Community Brag Posts
First build - kitchen trolley
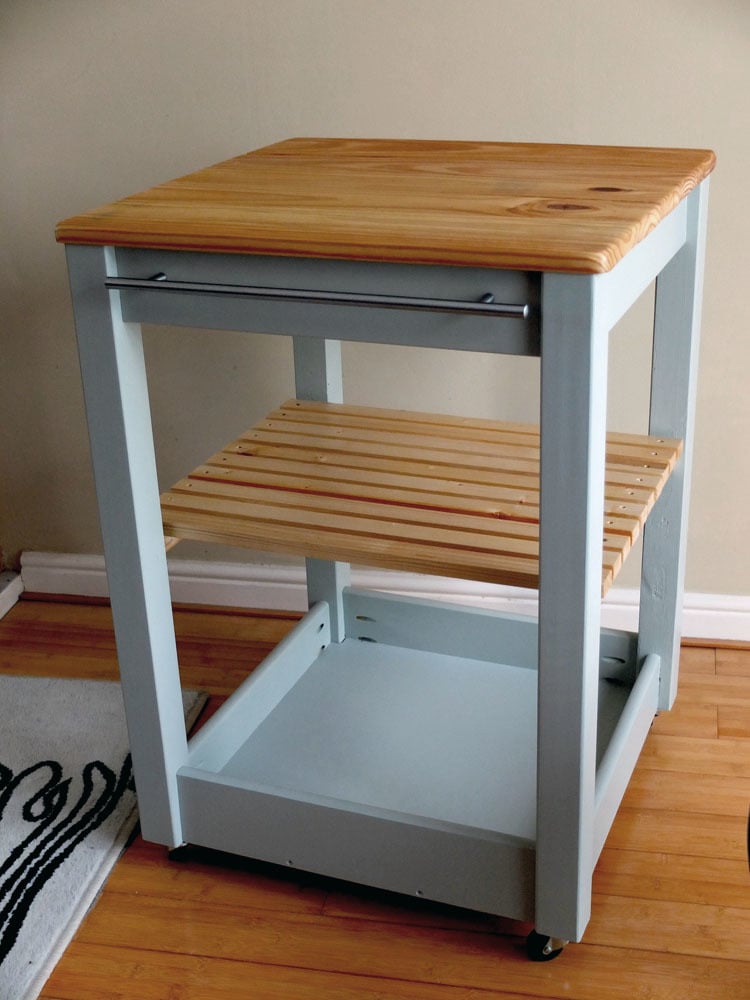
First build, mostly recycled from old bunk beds with much inspiration from this site!
Top is bed slats, rails and uprights are cut down bed parts. Base is mdf, shelf new pine boards. Pocket holes left uncovered as still amazed at construction with these things.
Took longer than it ought as slats were all round-edged so hand planed to make them more usable. Might take a weekend from new wood, including finish.
Painted by now-grown daughters to make a family project, everyone happy!
Estimated Cost
GBP 40 (USD 60) as wood was mostly reclaimed
Estimated Time Investment
Weekend Project (10-20 Hours)
Finish Used
Craig & Rose acrylic moonstone grey, (UK) Danish oil on bare wood.
Recommended Skill Level
Beginner
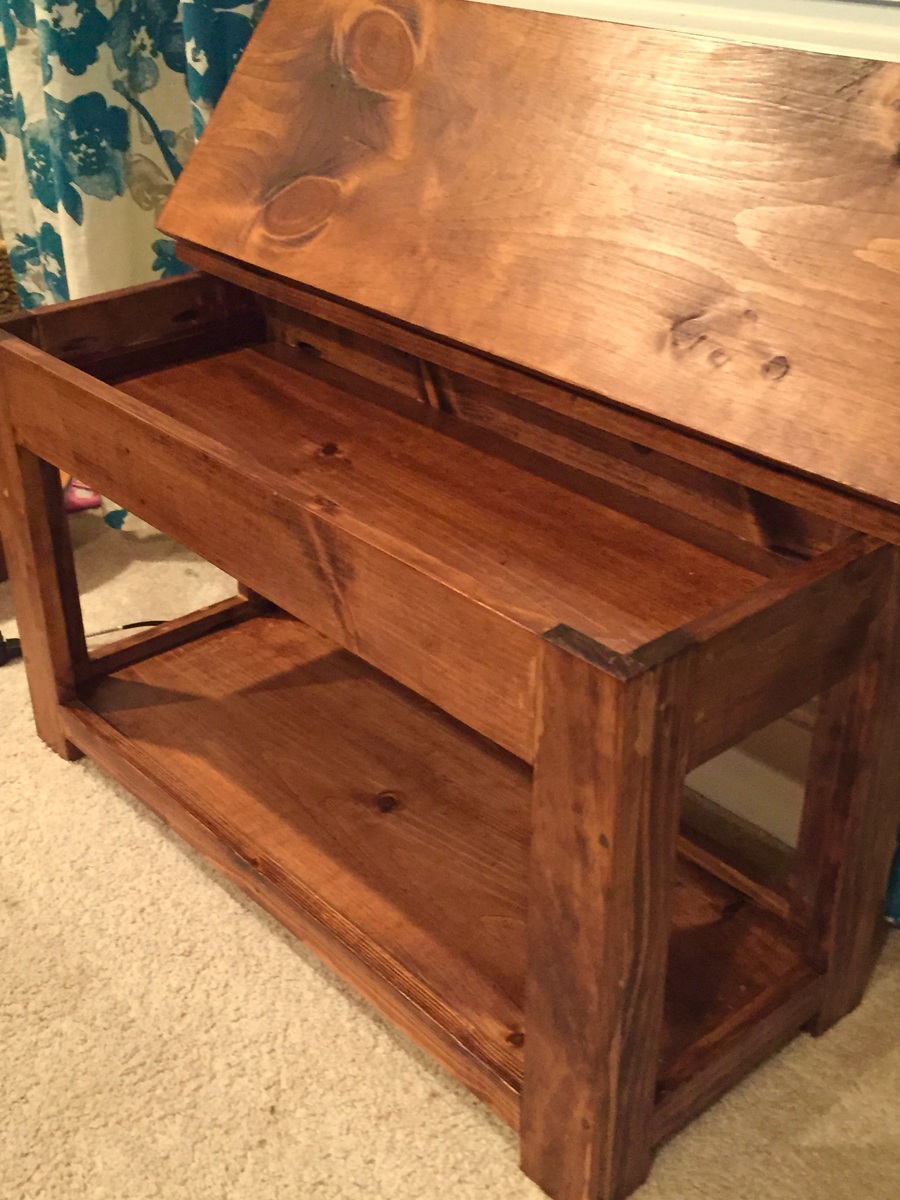
Flip top bench
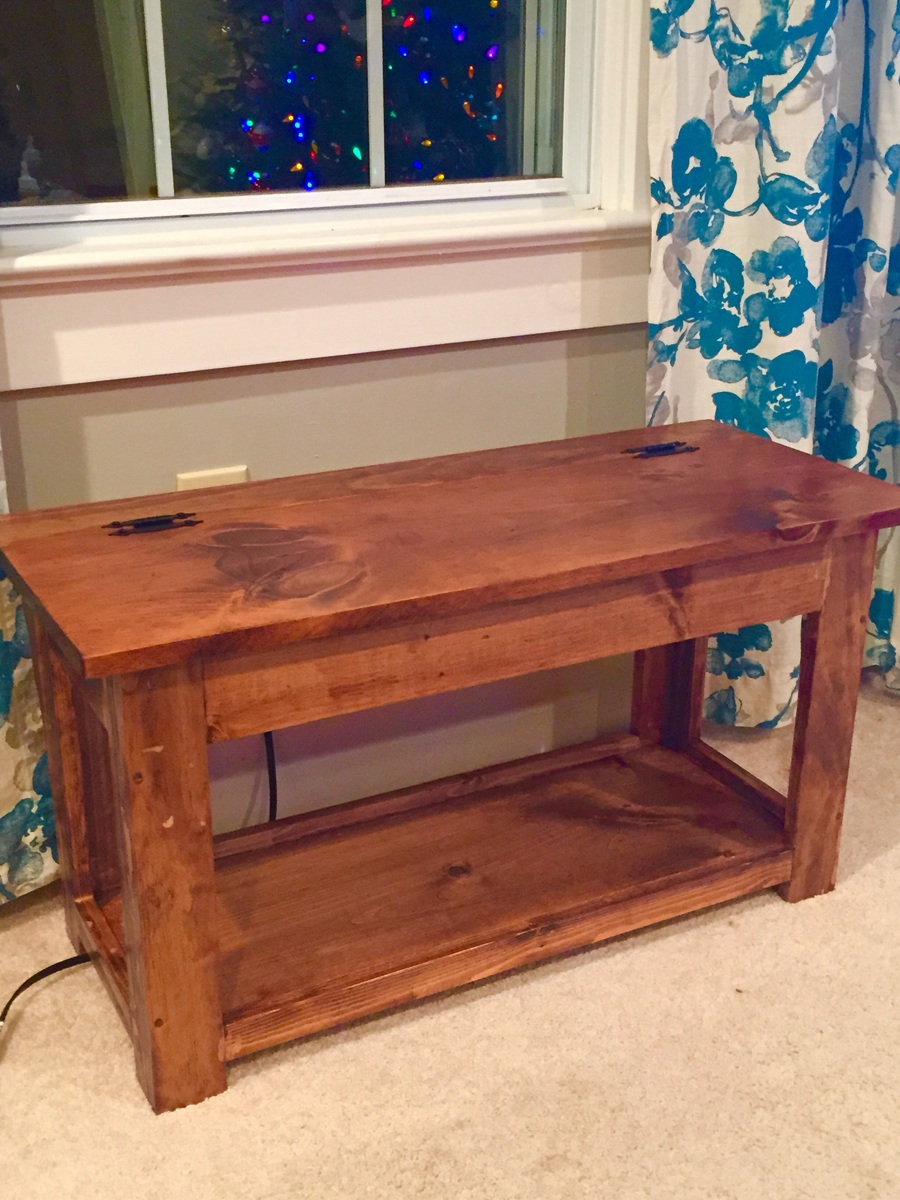
I made two of these as gifts. I modified the plans for a smaller bench length and width. They are 33in long on the top with a 1.5 overhang. I chose to place the 1x4 on top at the end as it was easier to stain and finish. Instead of wood glue since it was finished I used 3 pocket hole screws in the back, 2 corner braces with antique bronze finish on the ends under overhang and 2 on the inside of the storage area and gorilla glue.this made it very solid. It also made positioning it easy as I screwed the corner braces to the bottom side of the 1x4 face. I measured for a 1in overhang and 3/4 of an inch for the thickness of the back board. By doing so I could simply place the board on top of the bench and center it for 1.5 in overhang on ends then simply screw in the remaining screw hole in the inside of the storage compartment.
Built from Plan(s)
Estimated Cost
50bucks
Estimated Time Investment
Day Project (6-9 Hours)
Finish Used
Min wax honey oil stain and 3 coats of minwax semi gloss poly
Recommended Skill Level
Beginner
Our “Treehouse”
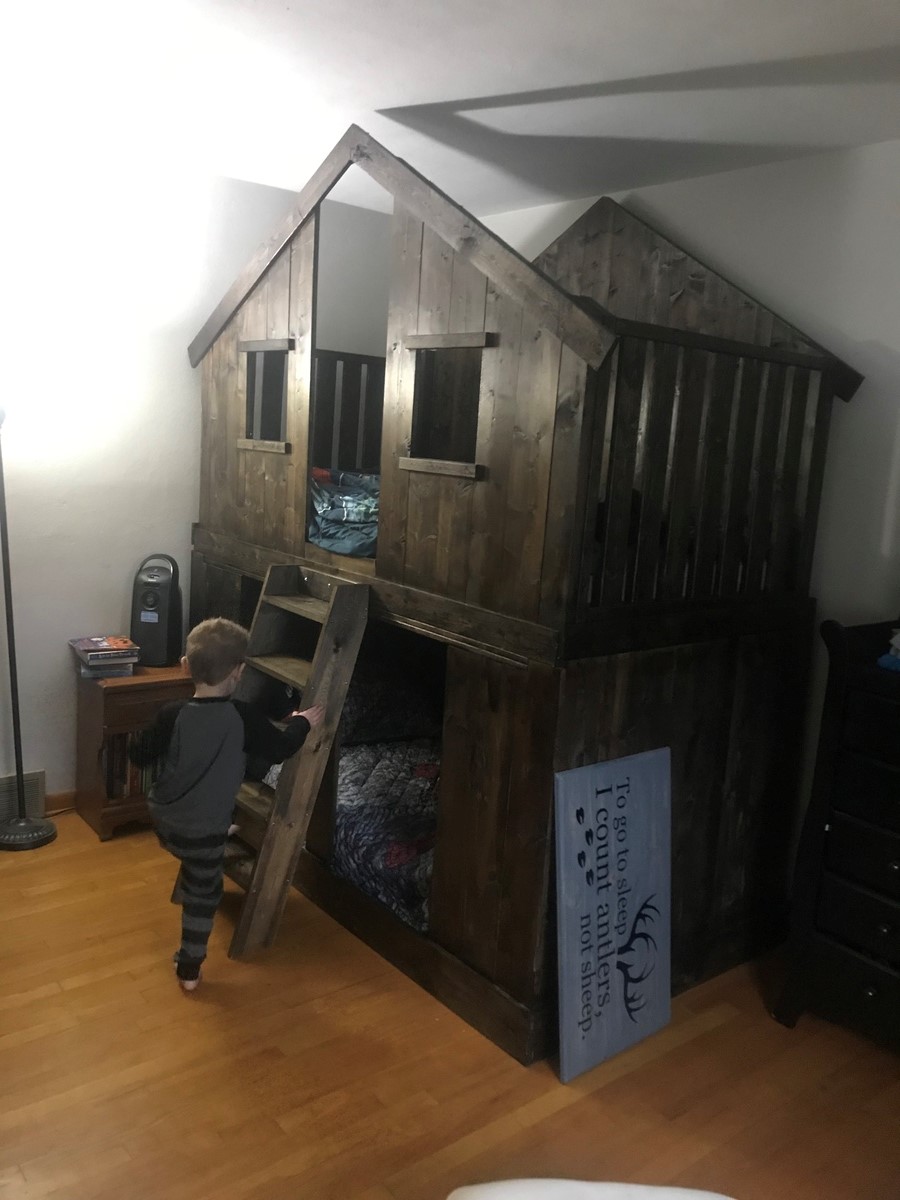
We started with the clubhouse bed but were concerned our three year old may be just a hair too young to sleep up top. We surrounded the bottom and placed some 2”x2” and plywood underneath to keep his mattress off the floor. Wrapped it up with fairy lights strung all around top of the inside. Turned out great!!
Built from Plan(s)
Estimated Cost
Too much lol
Estimated Time Investment
Week Long Project (20 Hours or More)
Finish Used
Dark walnut stain and polyerithane.
Recommended Skill Level
Beginner
Farmhouse Table

Hi Everyone,
I decided to make this table for my growing family. Total length is around 7ft, perfect for family dinners or entertaining

Built from Plan(s)
Estimated Time Investment
Weekend Project (10-20 Hours)
Finish Used
Extra tough matt coat
Recommended Skill Level
Intermediate
Comments
Wed, 10/02/2013 - 12:55
Farmhouse table
Hi all, this is my first build. It's loosely based on the farmhouse table plans without the breadboard ends but with dowelling down the joins to prevent warping
Shiplap Fireplace Built-ins - By Emily Greenhalgh Brown
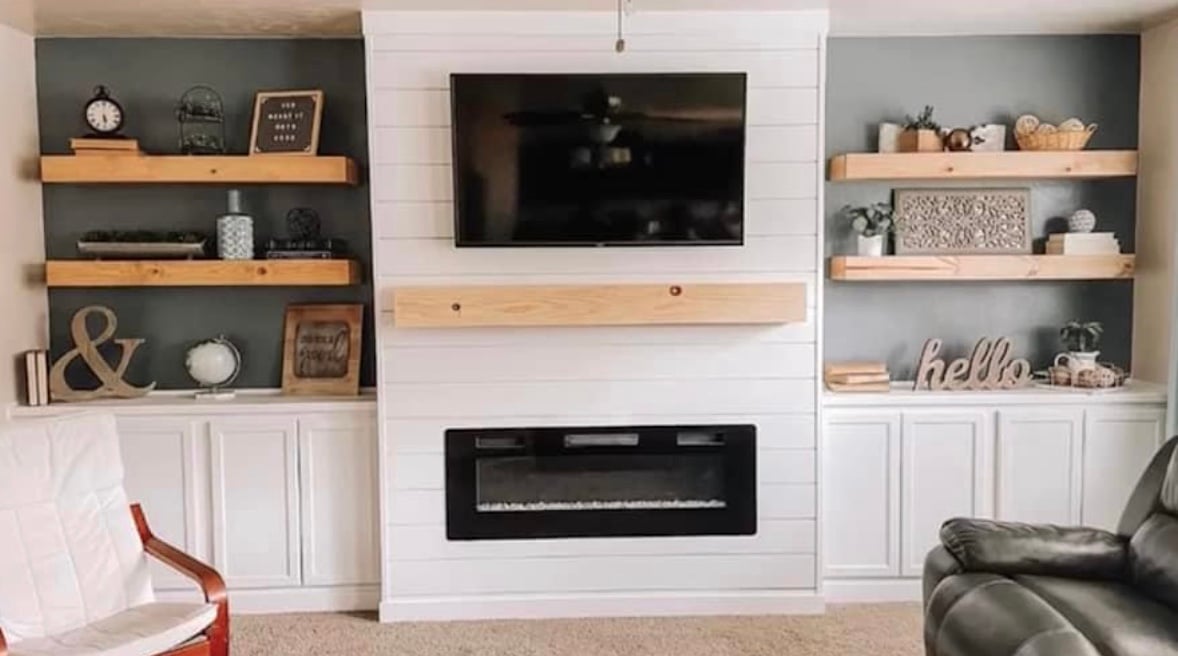
Stunning Fireplace Built in by Emily.
Built from Plan(s)
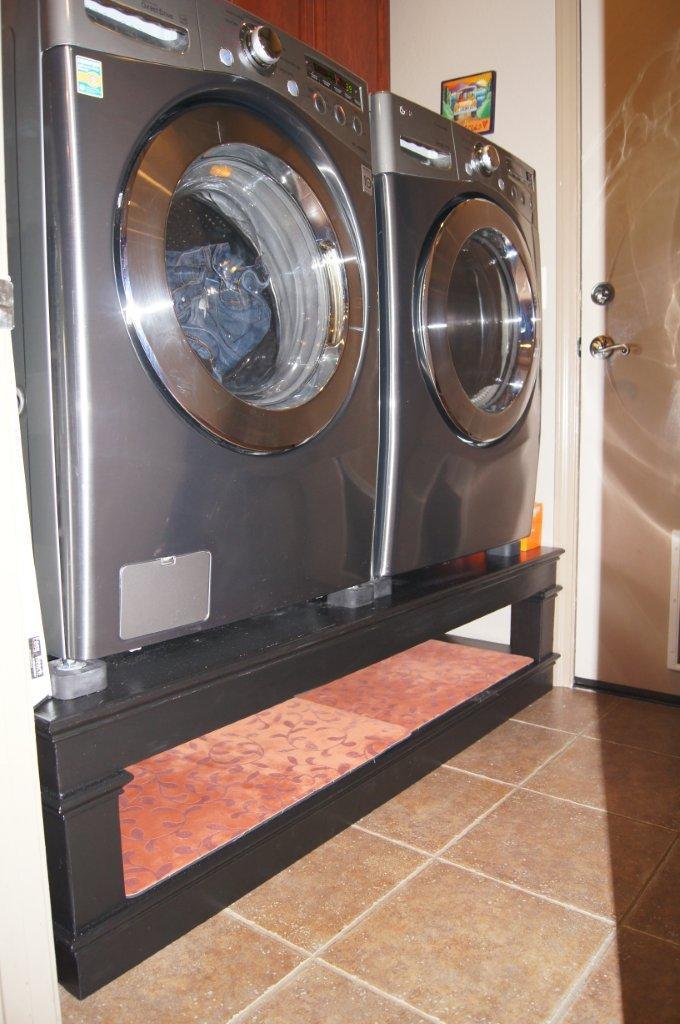
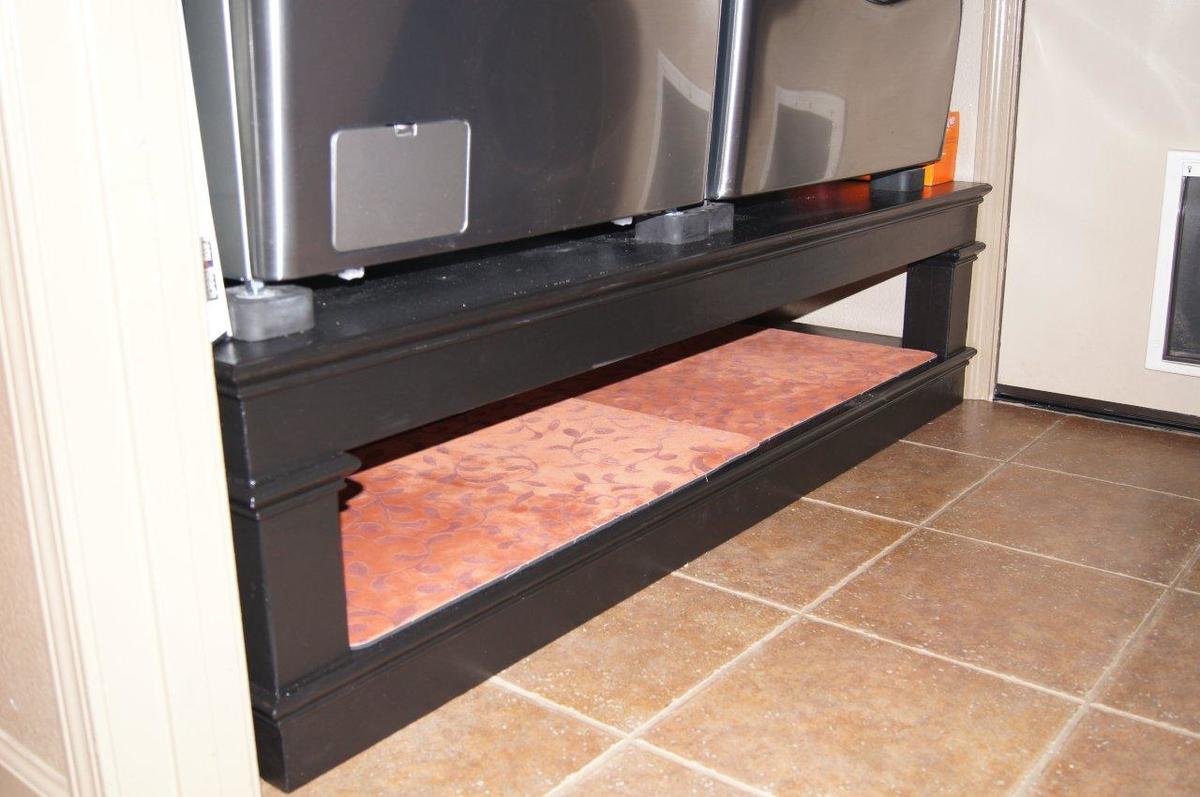
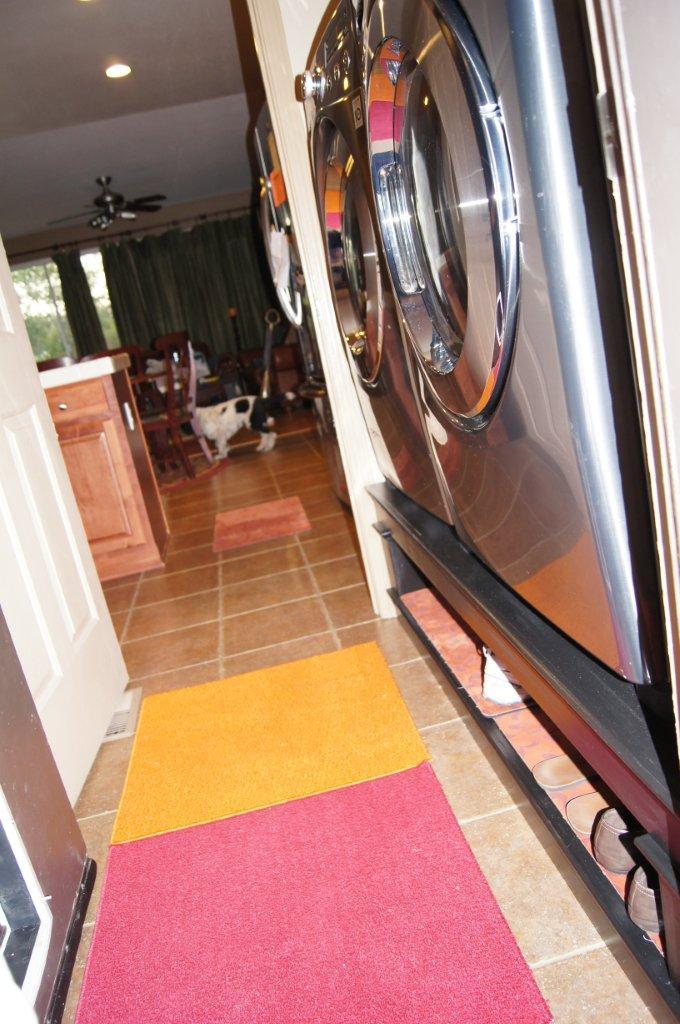
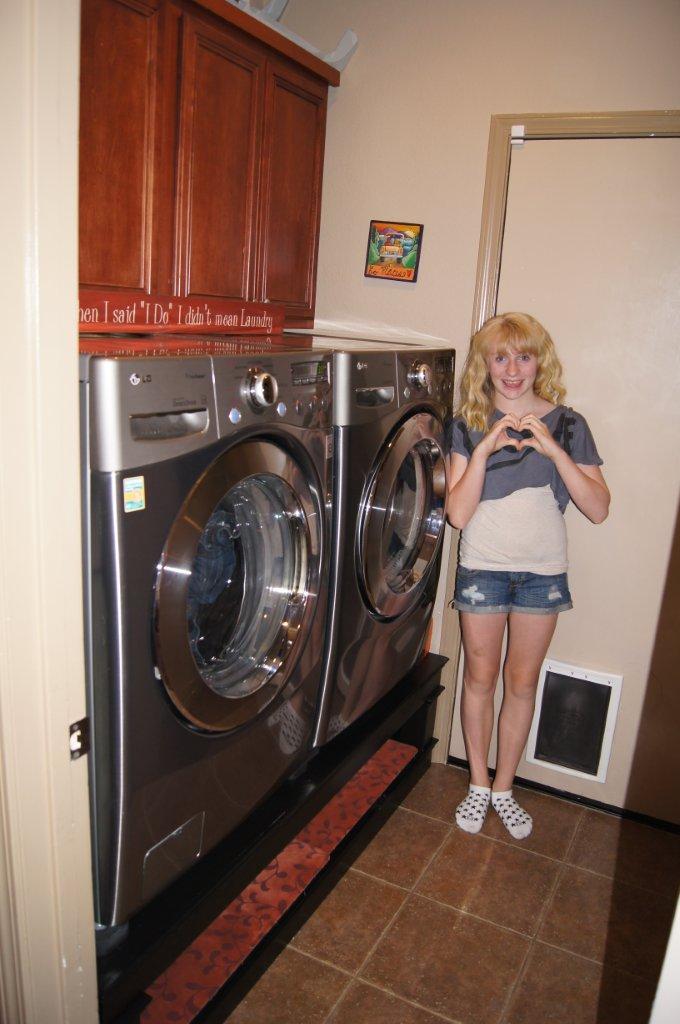
Helping me get organize
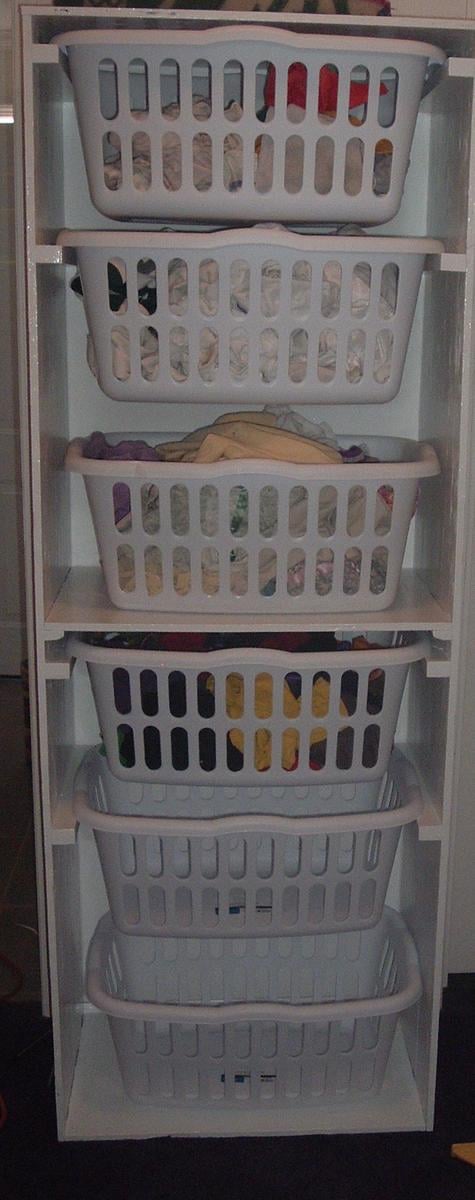
My laundry room is really small and laundry baskets were always in the way. I needed a way to organize it better. I thought it would be really cool to have a way have the baskets more accessable and take up as little space as possible. I started thinking up a plan when I decide to check and see what might be here and found the perfect project. My husband and I modified it just a little. Instead of building 2 smaller units and stacking them we decided to build it all in one unit. We added a shelf in the middle to help stablize it more. We also made wood side supports and only used them for the top 2 baskets in each section leaving the other two baskets to sit on the shelf and the bottom peice. We built it in just a few hours but because I used oil based paint to finish it, it too a while longer for it to dry.
Built from Plan(s)
Estimated Time Investment
Afternoon Project (3-6 Hours)
Finish Used
Oil based, high gloss white paint.
Recommended Skill Level
Beginner
Comments
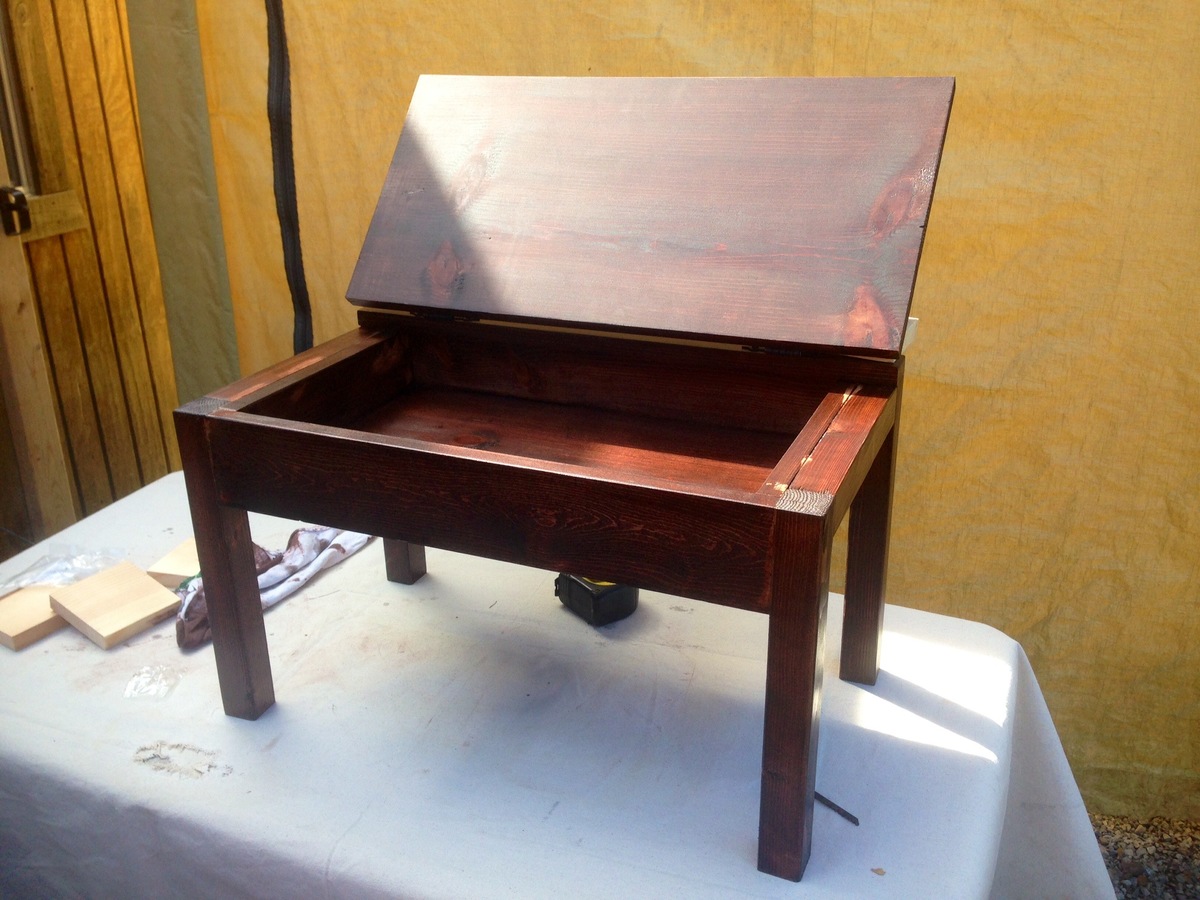
Lap Desk

Made 2 of these for my daughters. Then had a request for one from a teacher for a homebound student awaiting a liver transplant. I love that this site has given me the opportunity and means to help serve others. Thank you Ana!!!
Built from Plan(s)
Estimated Time Investment
An Hour or Two (0-2 Hours)
Recommended Skill Level
Starter Project
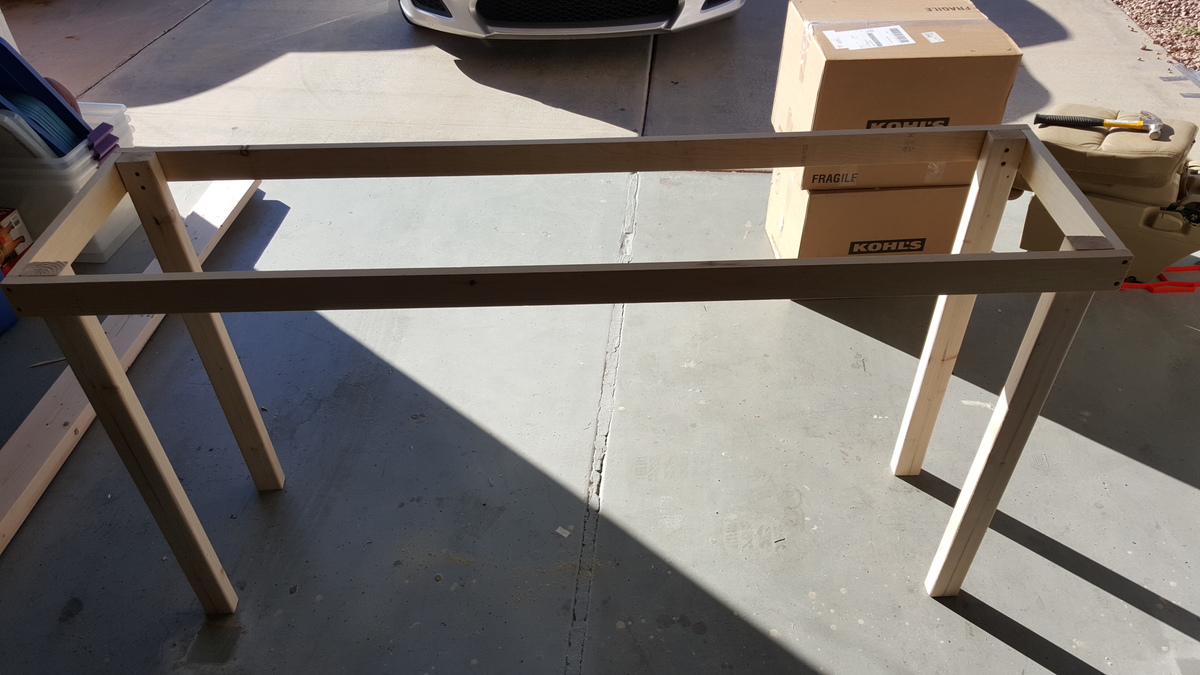
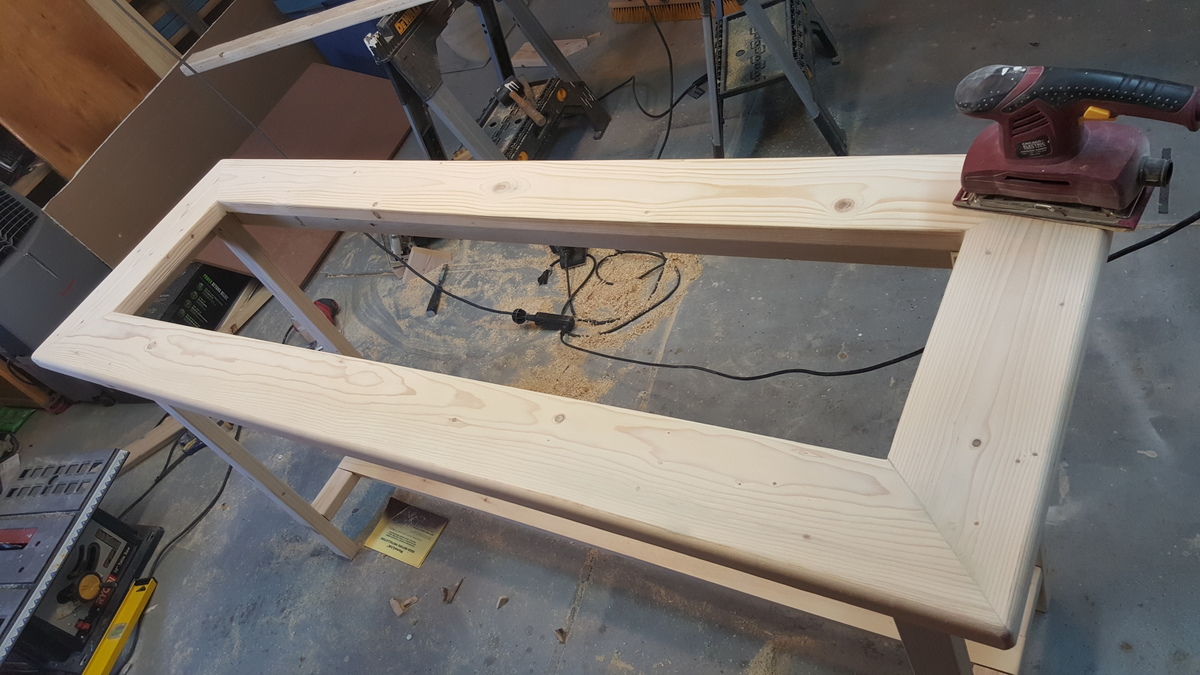
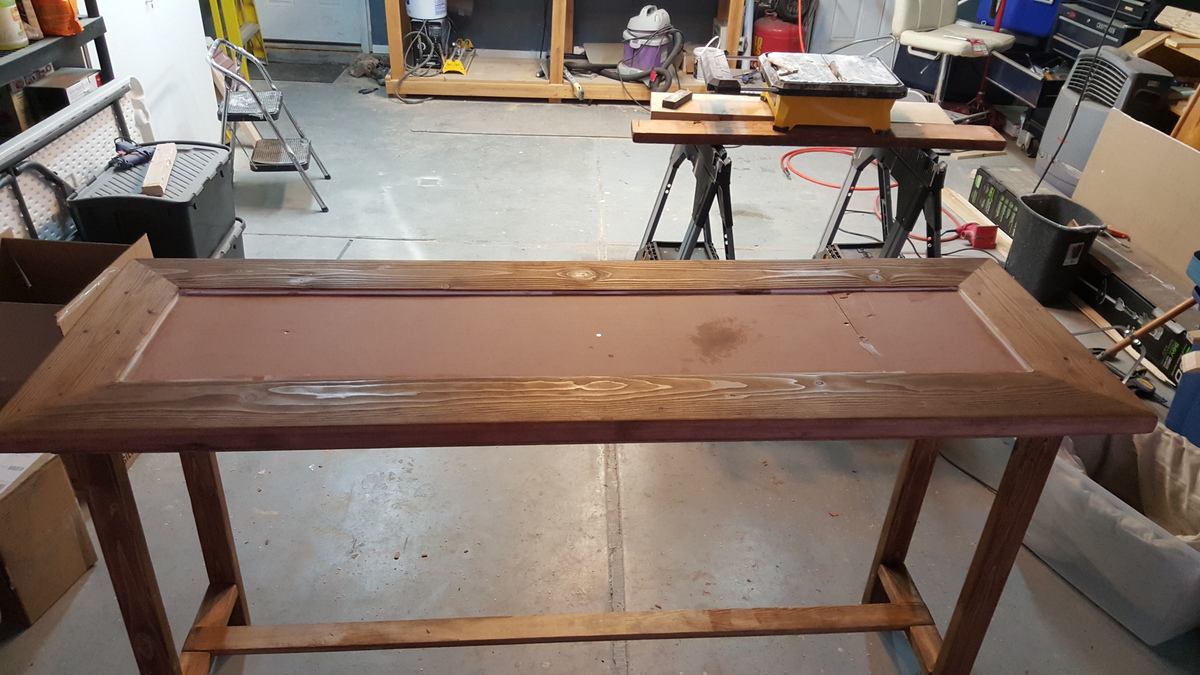
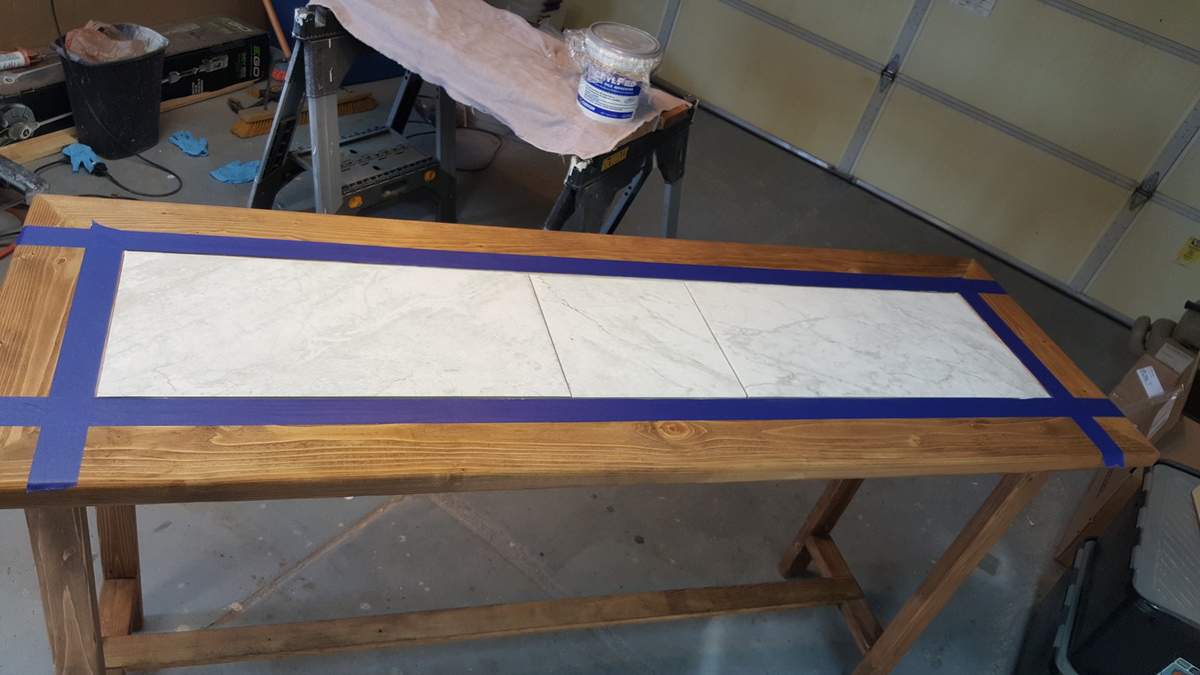
Farmhouse Buffet Table
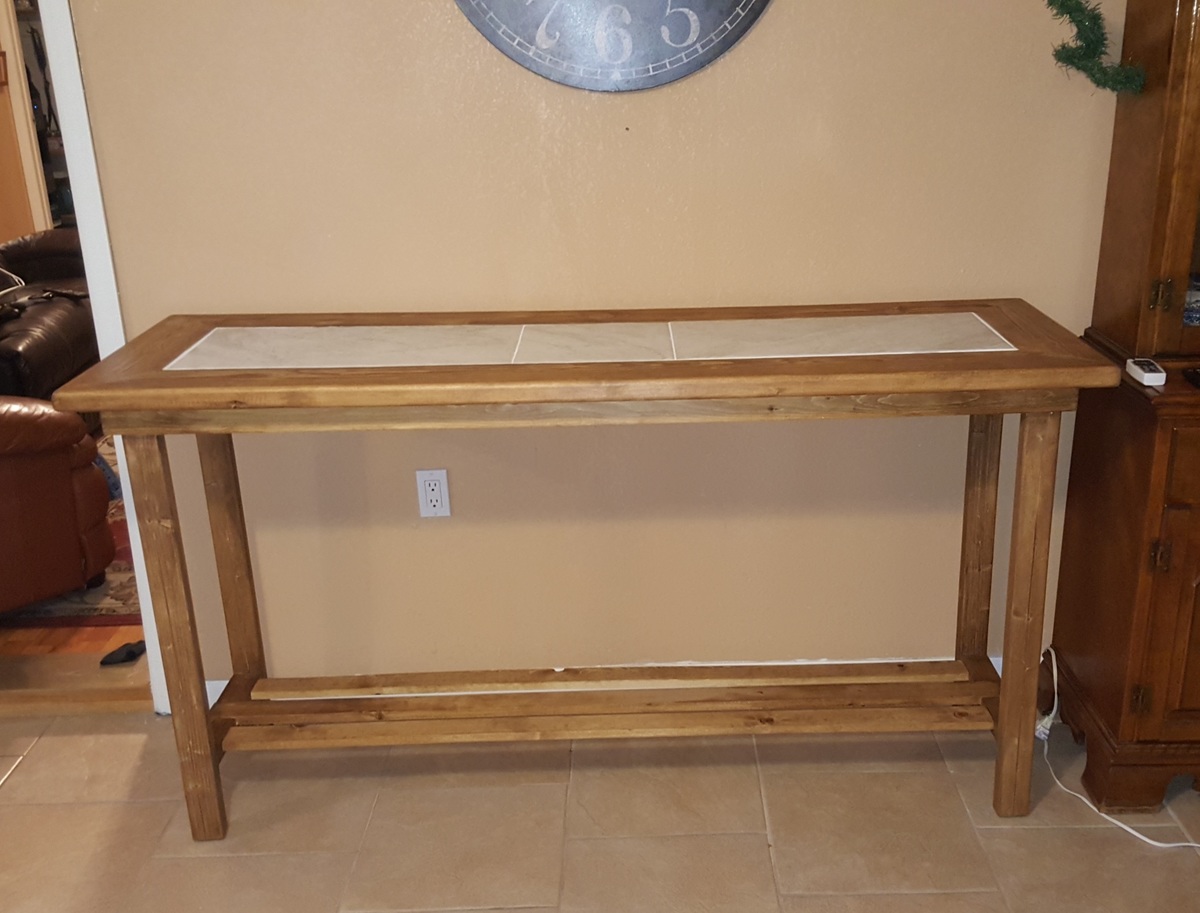
The goal of this project was to create a buffet / serving table to compliment the large farmhouse table I made a while back. We have been using a folding table for a buffet line at large family gatherings and that just didnt seem right when placed next to the giant 10' table. (info for the table: http://www.ana-white.com/2014/07/big-farmhouse-table)
The build is similar to the farmhouse table, but the materials are a bit smaller due to the size of the table. The legs are 2x3's and the table top itself is made of 2x6's outlining a 2' x 5' section of tile. All of the other materials (stretchers and apron) are made from 1x3s. The tile is set so it sits about 1/8" higher than the wood. This is to allow hot pans and plates to be placed directly on the tile without a trivet or other separator. The tile sets on a 3/4" piece of MDF supported by small 1x2 slats underneath.
All of the joinery is accomplished with glue and Kreg Jig / Screws.
Estimated Cost
$70 in lumber.
Cost doesnt include finish materials or screws as I had them onhand already, but would probably cost $20 or less.
Cost doesnt include finish materials or screws as I had them onhand already, but would probably cost $20 or less.
Estimated Time Investment
Day Project (6-9 Hours)
Finish Used
pre-conditioner (brushed), traditional american stain, 2 coats of tung oil finish and 1 coat of rub on poly (all applied by cloth).
Recommended Skill Level
Beginner
Dark Stain entertainment console

https://m.imgur.com/gallery/e9J96Q2 Good build, certainly had its challenges. Overall totally worth it to see how much my wife liked the end product.
Estimated Cost
$450-500
Estimated Time Investment
Weekend Project (10-20 Hours)
Finish Used
Minwax Jacobean
Recommended Skill Level
Intermediate
Farmhouse bed and nightstand

Queen size distressed farmhouse bed and nightstand with expanded metal inserts in door and headboard that we made rusty and then clear coated.

Built from Plan(s)
Comments
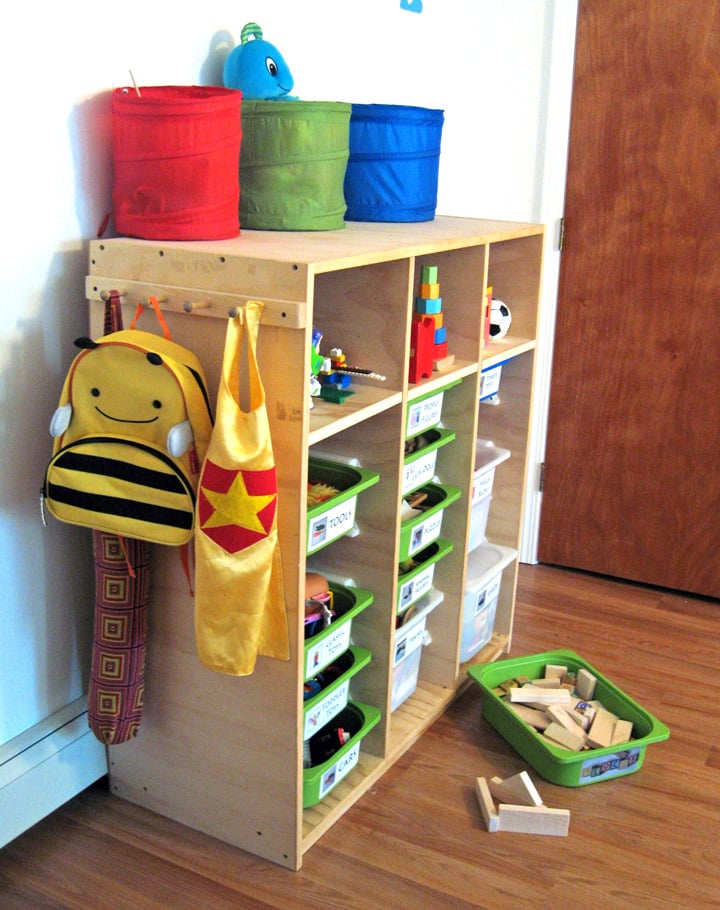
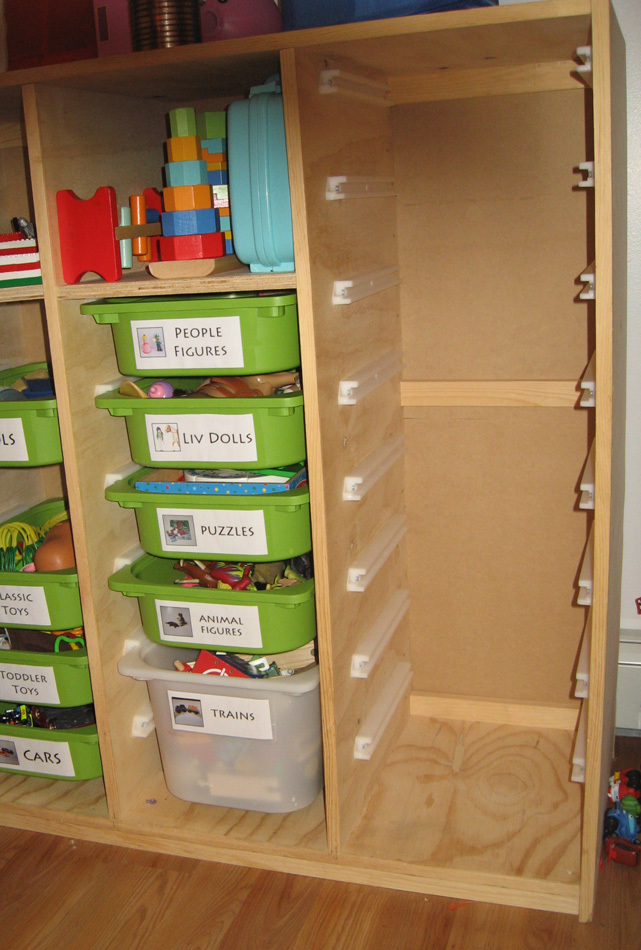
Trofast Toy Storage Solution
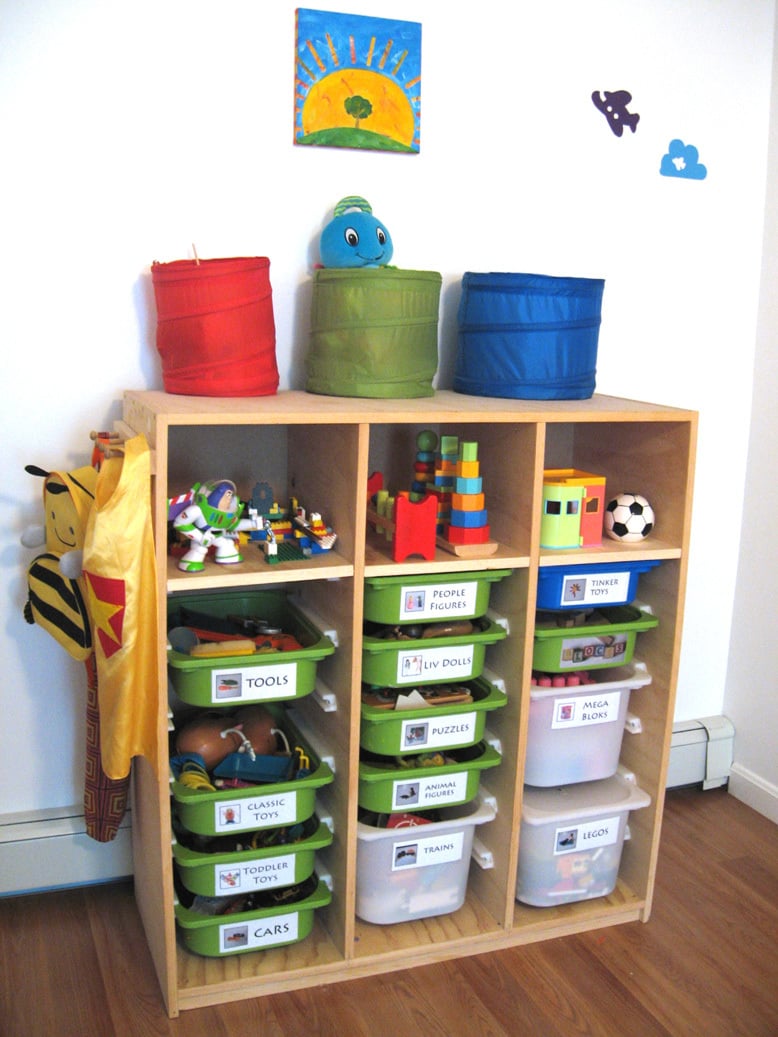
I had been asked a few times for these plans, but as someone else posted a similar one, I'll just stick to a blog post for now and describe my differences. I made this shelving unit January 2010, just after I found out of I was pregnant with my third child, and it's been a lifesaver since then. I desperately needed a toy storage solution (and purging), as shown in the 'eek' kids closet below. I didn't like the shape of triangular Ikea ones, as they spanned more floor space than I cared to give up. Plus, I wanted a place to put *almost* all of my kids toys, so I wanted it to be tall. I'm so glad we did, since we've moved twice (also, 'eek') since than, and it's made packing and unpacking the kids toys super (SUPER) easy. At first, I was afraid that the kids would go crazy and just tear down every bin at once, but it hasn't happened yet. Unlike the other plan that was posted, I used white sliders that ikea sold. I'm not sure if they still sell, as I don't see them online. It cost an additional $24 (they were $1/2), but seemed worth the extra money. I didn't have a router and wasn't particularly confident with our table saw skills. Plus the Ikea version had some really thin areas that made me nervous that it would break easily. I tried to keep it easy and just had to line up and screw the sliders in. Now that I'm a little more confident with a table saw, I'd give the router style a-go. I used two sheets of cabinet grade plywood, each costing about $30. I ripped down some pine boards to cover the front edges, which made the unit look loads nicer. However, I wish I would have used maple, instead of pine as they got dented almost immediately. Not a big deal though. The three shelves were sort of an afterthought, but turned out to be great for puzzles and other type toys. I didn't use backing or cross supports initially, but put some in after we moved. You can see them in the last picture below. The heater in our temporary house caused the slightly-bent sides to become very bent sides. That caused the drawers would spontaneously fall out, which was always quite the shock and disappointment. I put in some supports in the back, which I wish I did initially as it would have made manufacturing easier. Also, If I were to go back, I would put one cross support in the front-middle, as the boards are so tall, it needs something to help maintain the shape in the front. I've found that even in a perfect fitting slider, really heavy buckets would bend just enough to flex out of them to crash... so don't plan on filling one of the large buckets with matchbox cars and sticking it on the top. Regardless, we've learned our lessons, made it work better, and has been a huge success in our house for a while now.

Built from Plan(s)
Estimated Time Investment
Weekend Project (10-20 Hours)
Recommended Skill Level
Intermediate
Comments
In reply to Very nice by Supermom77 (not verified)
Tue, 10/04/2011 - 19:42
Haha, I guess a little.
Haha, I guess a little. Picking up when they aren't motivated is an ongoing battle. However, I did find having a specific place to put items with labels helped a lot, albeit with screaming. Actually the labels would probably be the best motivation of all of it.
The ideal is to have the kids only play with one bin at the time, but with more than one kid, that theory very quickly gets muddled... One child wants to play with one toy and one wants play with another, then "lego houses can't be broken down" and "polly pocket is using those blocks for the house" and so on. So it's more of a end-of-the-day(week/month/year haha) pick-up routine.
However, there seems to be a light at the end of the tunnel. My oldest (almost 6) seems to have caught on that the faster she picks up, the sooner she can move onto other activities besides playing (coloring, playdough, etc.), and is starting to pick up as soon as she's done without us even asking. I think getting an allowance has also helped with that.
That was way more than I thought I was going to comment, but I guess it goes to show you should never ask a Mom her opinion on something, unless your ready for a lecture :)

Thu, 10/13/2011 - 21:44
I love that your labels have
I love that your labels have pictures on them! I thought I should have done that way back when since my children are too young to read. Easy to find and easy to put away. Good job, Mom!
Halloween Yard Sign
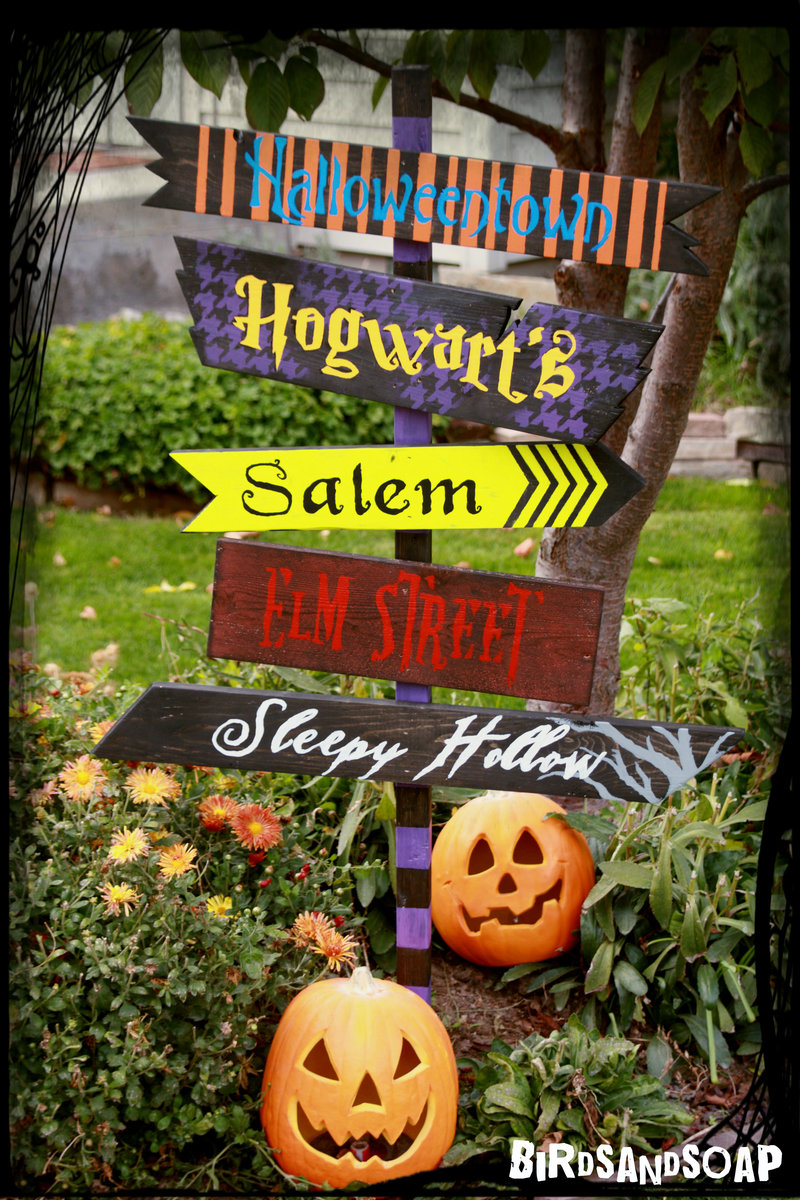
I made this yard sign just in time for Halloween. I FINALLY found a use for some of my scrap wood. This was a fun project, start to finish in one day. I used stain and paint to add bold color. Details are on my blog.
Estimated Cost
FREE
Estimated Time Investment
Day Project (6-9 Hours)
Finish Used
Minwax Gel Color stain in Onyx and Crimson
DecoArt Americana Multi-surface paints
DecoArt Americana Multi-surface paints
Recommended Skill Level
Starter Project
Christmas present doll bed for Reagan
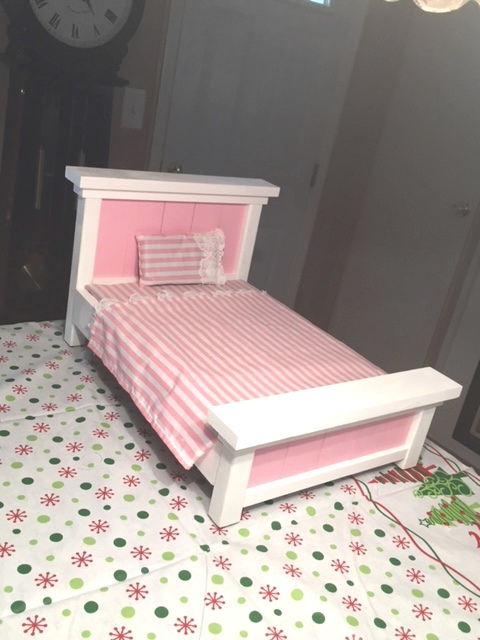
Made this for my granddaughter Reagan's American Girl doll. I made the bed and my wife made the sheets and blanket and pillow. Your plans were awesome!
Built from Plan(s)
Estimated Cost
18.00
Estimated Time Investment
Day Project (6-9 Hours)
Finish Used
Paint
Recommended Skill Level
Intermediate
Corner bookshelf
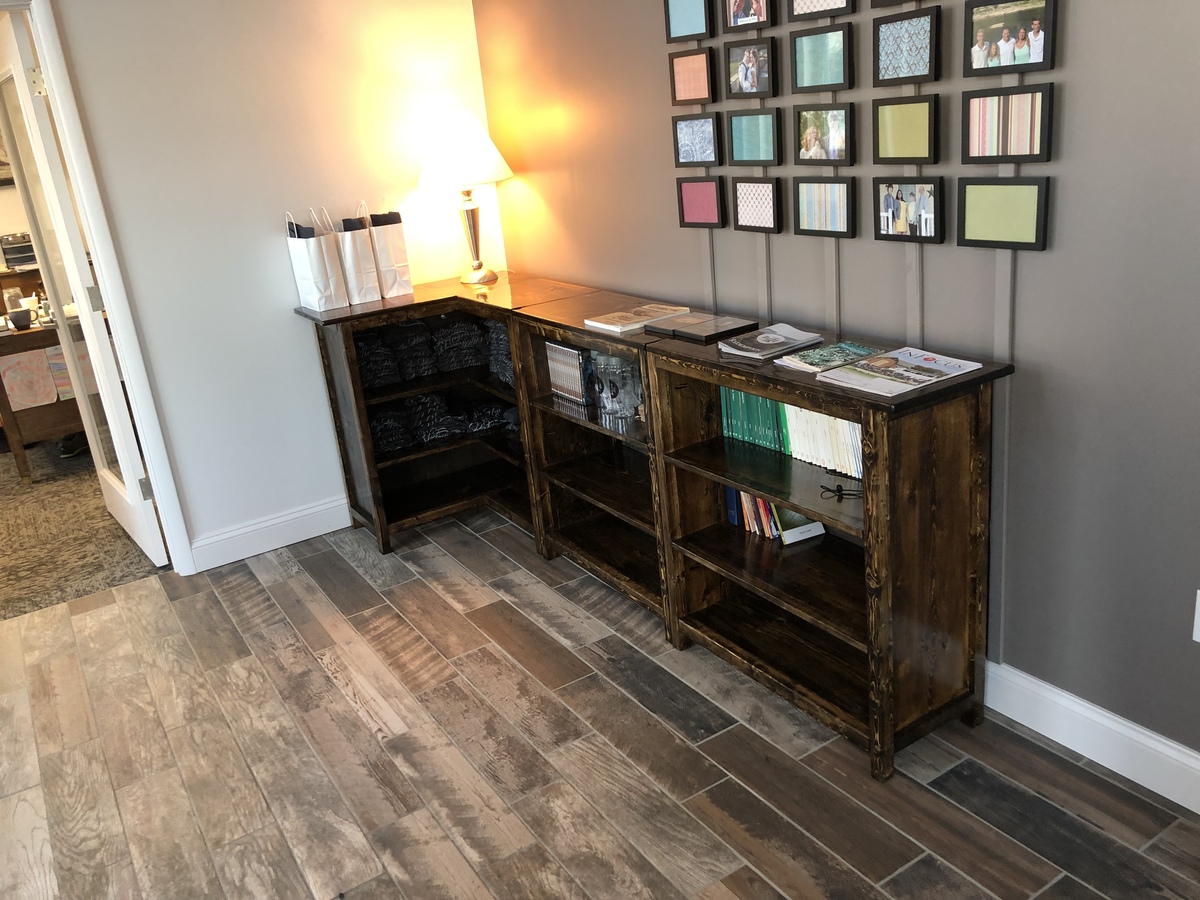
Made it taller and added a shelf
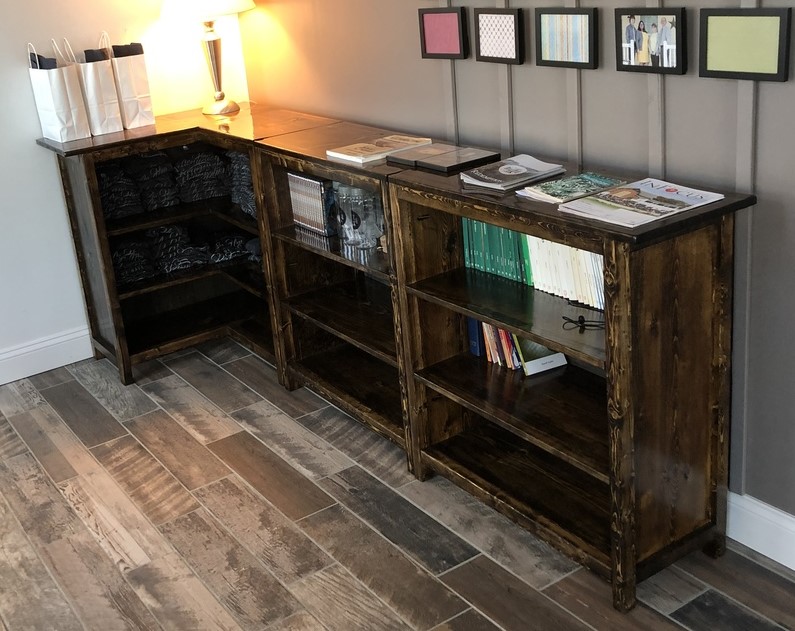
Built from Plan(s)
Estimated Cost
280
Estimated Time Investment
Week Long Project (20 Hours or More)
Finish Used
Minwax jackobean and polyurethane
Recommended Skill Level
Intermediate
Comments
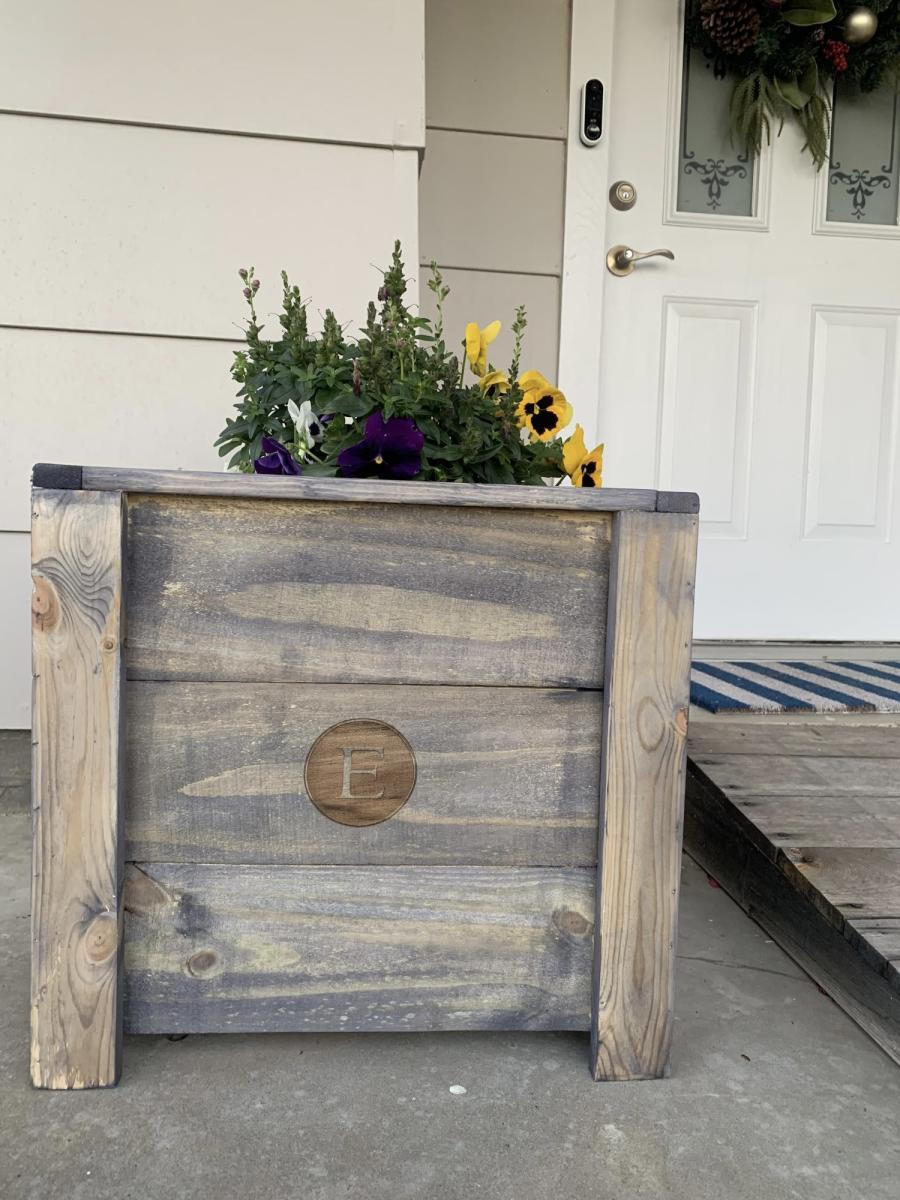
Easy planter boxes

Loved building these planter boxes!
I was able to use my laser to addd some personalization.
I also added small wedges at two levels in all four corners. This not only made it very sturdy but with a half lap “x” it creates two levels to pick from for different size pots
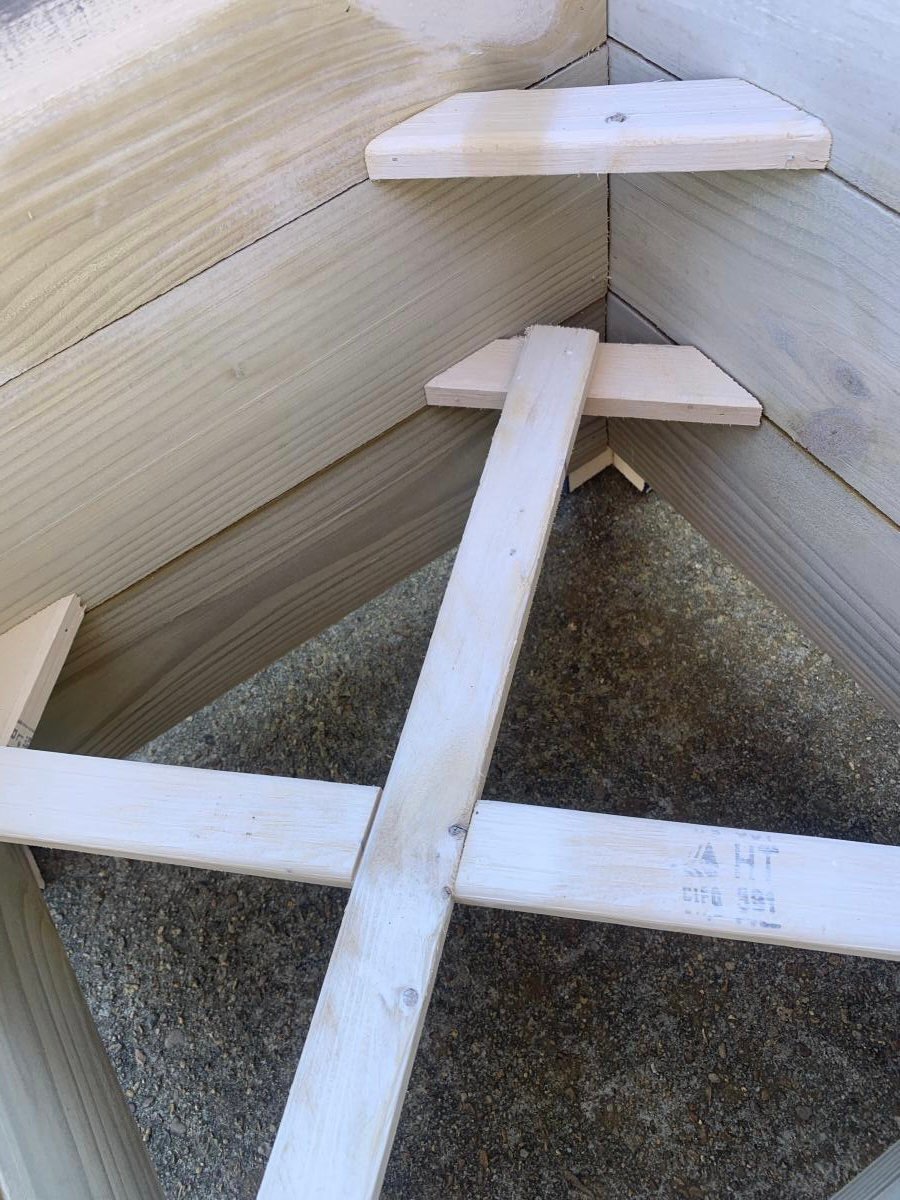
Built from Plan(s)
Comments
Double Double Loungers
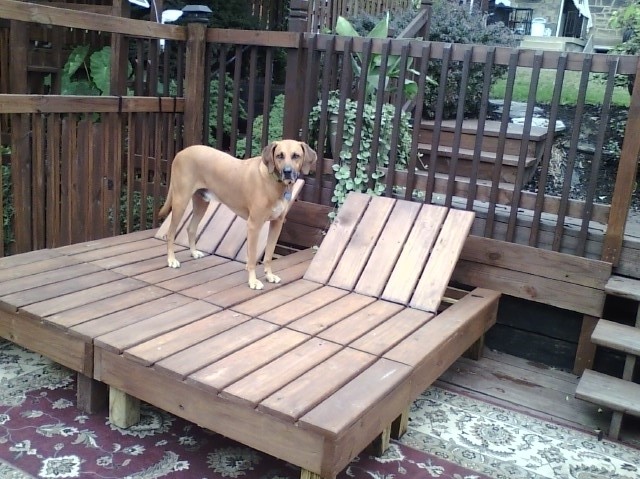
I had an idea in my head of what I wanted for deck seating/lounging in my mind but just couldn't seem to get to the "nitty gritty" of creating workable plans. Then, while googling through images of double loungers I stumbled onto Ana's site. Wow! I felt like a fish that had just found the water! With the detailed plans generously provided for a double lounger I was able to create my "vision" with just slight modifications. The loungers are actually two chairs and two ottomans that fit together or come apart depending on how much "togetherness" the situation calls for. And best of all - almost all the materials were left overs and cut pieces from another deck and fencing project. For cushions (not in this photo) I used two inexpensive "Hide A Mats" folding beds from Costco that I covered with waterproof duck fabric. I can't thank you enough, Ana, for taking the time to share your talent so freely. I'm truly grateful. As is Jake, the Redbone Coonhound, who insisted on being in the photo!
Built from Plan(s)
Estimated Cost
About $150 for hardware and cushions - lumber was scrap and leftovers from another project.
Estimated Time Investment
Weekend Project (10-20 Hours)
Finish Used
Olympic semi transparent deck stain.
Recommended Skill Level
Intermediate
Comments
Tue, 10/04/2011 - 22:46
Beautiful job! I really need
Beautiful job! I really need to create these for our backyard too, and Buck, our treeing walker coonhound :) lol. Jake is a cutie!
Tue, 10/04/2011 - 22:46
Beautiful job! I really need
Beautiful job! I really need to create these for our backyard too, and Buck, our treeing walker coonhound :) lol. Jake is a cutie!
Thu, 10/06/2011 - 06:18
I would have never thought to
I would have never thought to break it up into a chair and ottoman. Brillant! I love that idea!
Hailey Bed
We made this for our sons 5th Birthday. We adjusted the measurements for a twin/XL hoping it will last him until college!
Built from Plan(s)
Estimated Cost
$100
Estimated Time Investment
Weekend Project (10-20 Hours)
Recommended Skill Level
Beginner
tall panel king bed
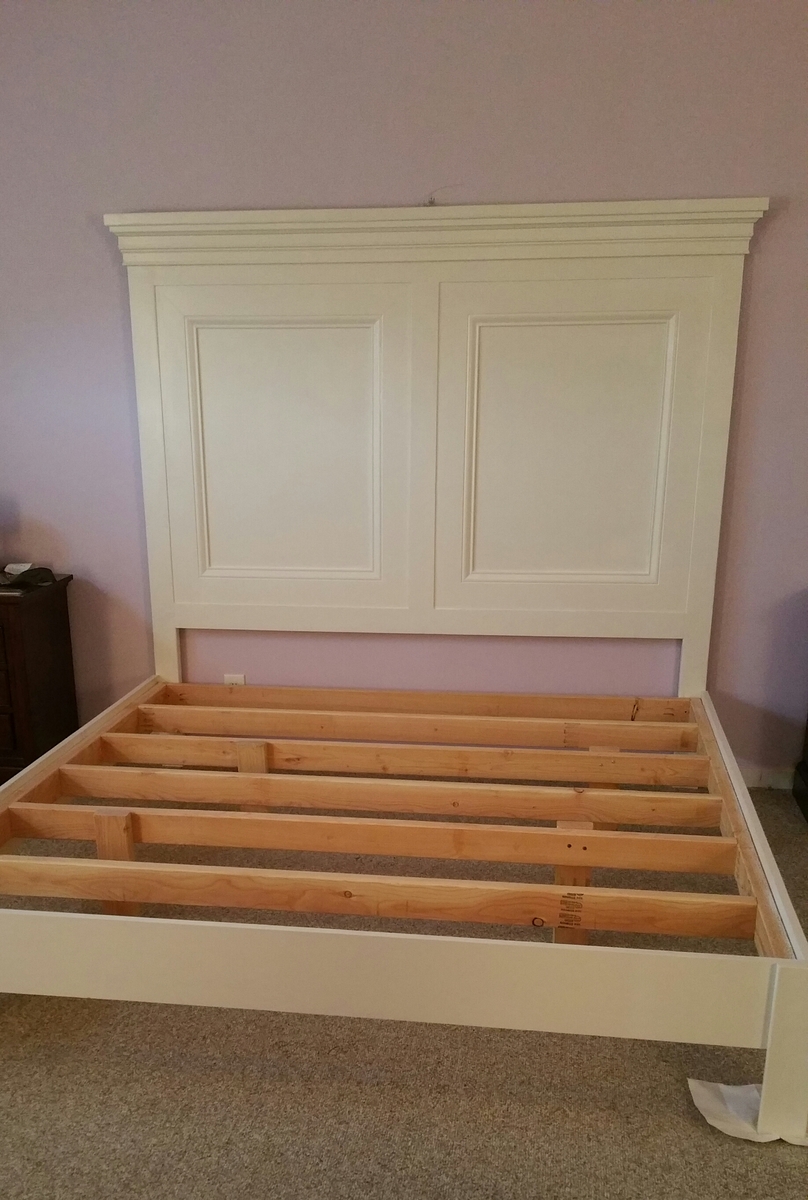
I had loved the king size panel headboard so I knew I wanted to build that, I also built the platform and remainder of the frame from the farmhouse king bed plan. It took me a while to get this built but was totally worth it.
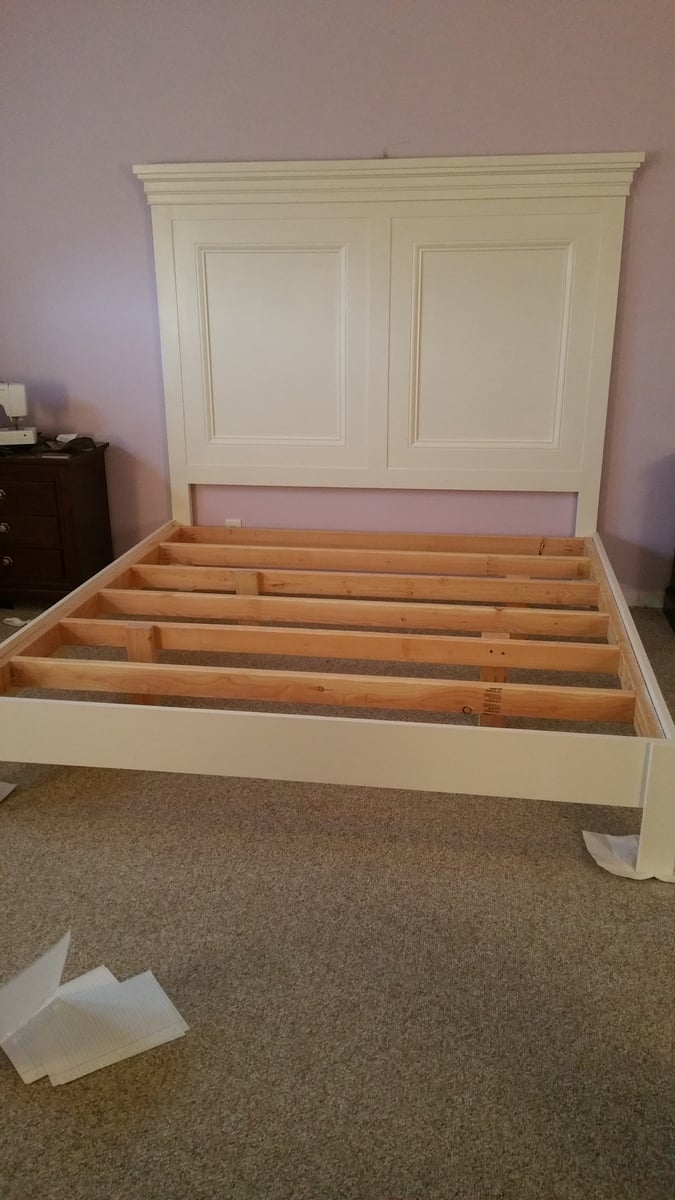
Built from Plan(s)
Estimated Cost
Total cost was about $200.
Estimated Time Investment
Weekend Project (10-20 Hours)
Finish Used
We painted white
Recommended Skill Level
Beginner
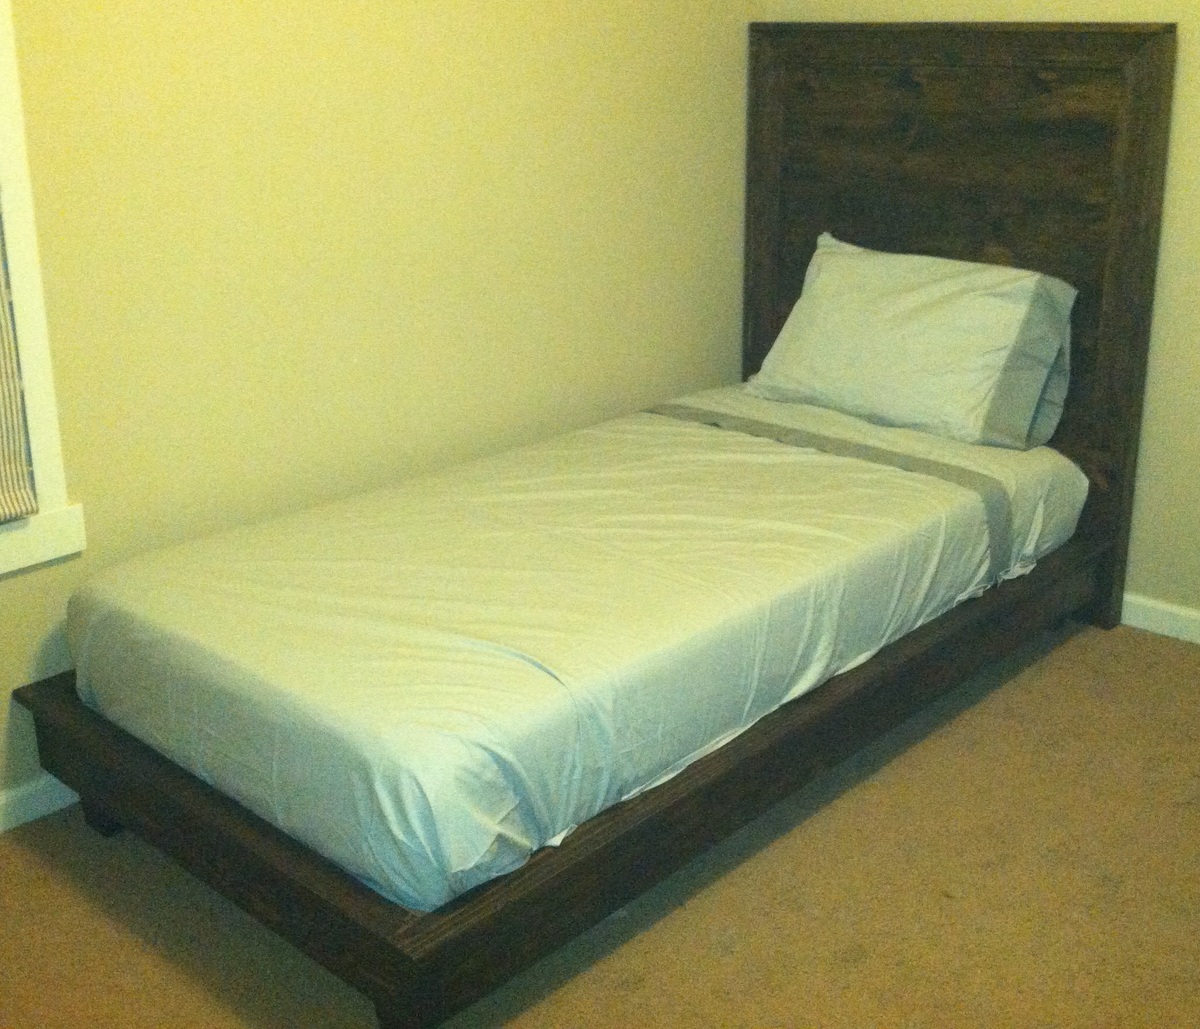
Loft Bed Over Perpendicular Twin
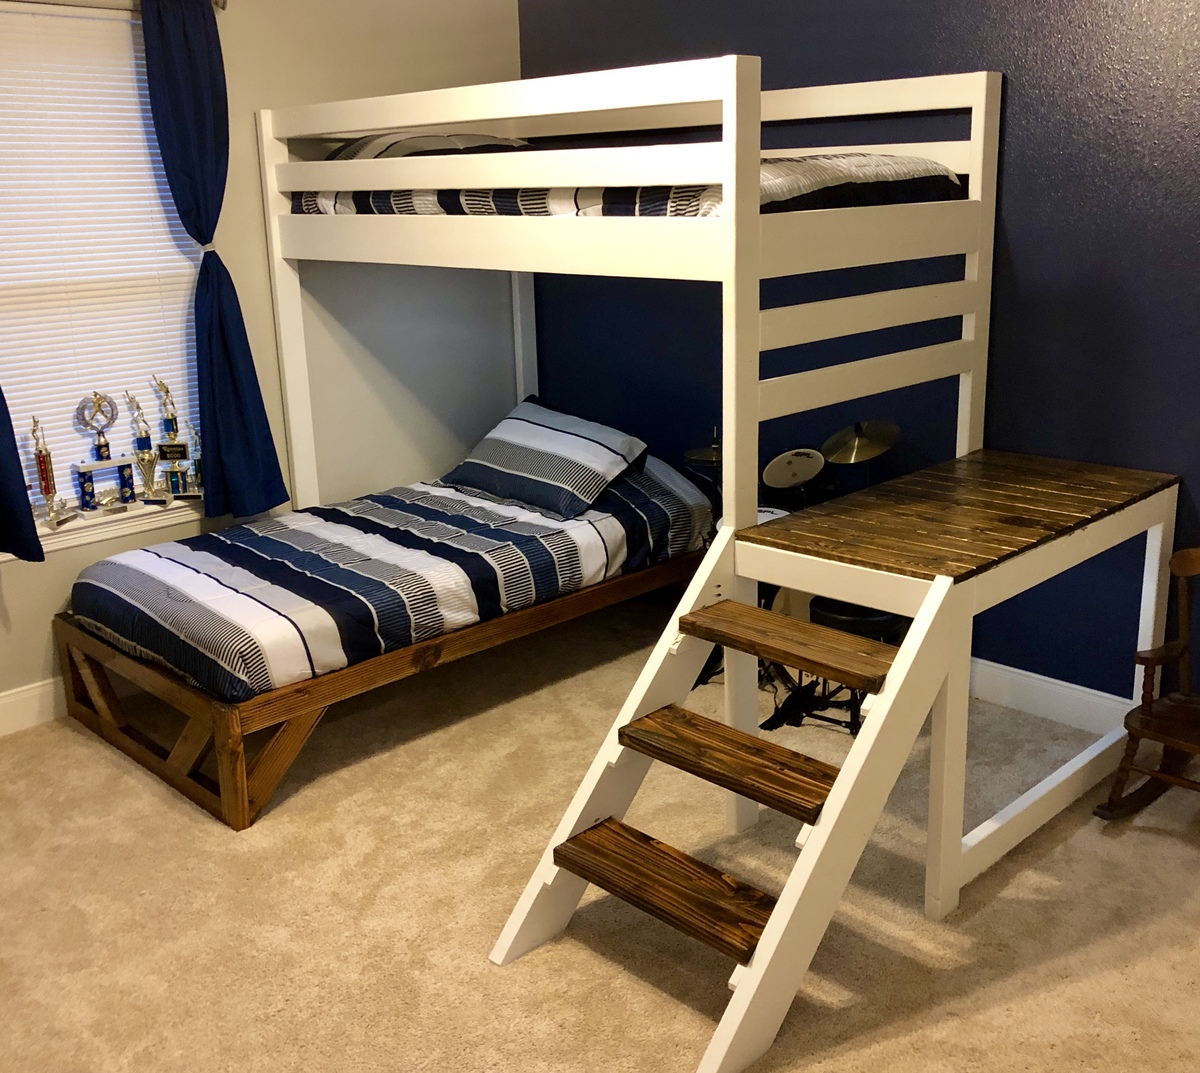
Loft bed over perpendicular twin base. Added puck led lighting for about $10.

Estimated Cost
$90 for lumber, already had paint and stain.
Estimated Time Investment
Week Long Project (20 Hours or More)
Finish Used
Artic White by Valspar
Jacobean by Varathane (stain)
Ace Polyurethane
Jacobean by Varathane (stain)
Ace Polyurethane
Recommended Skill Level
Beginner
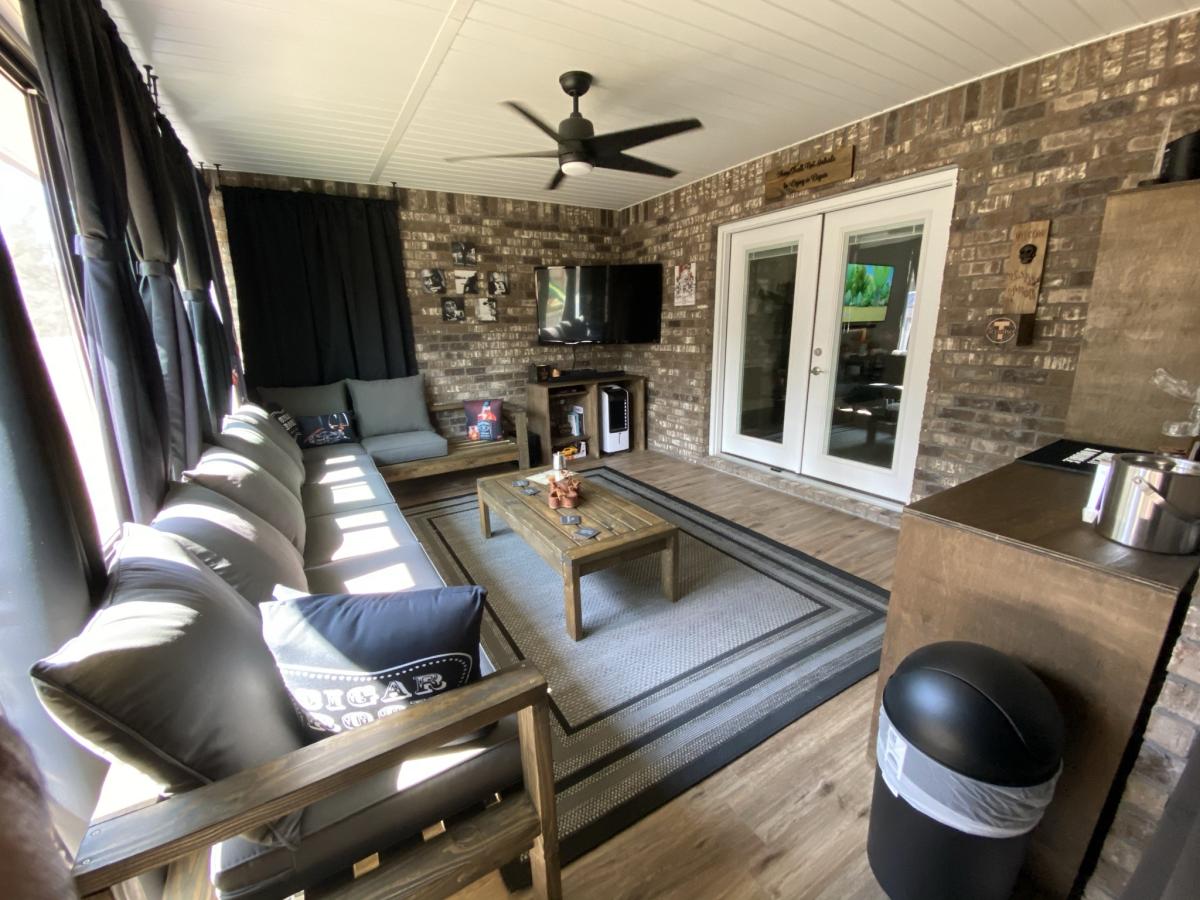
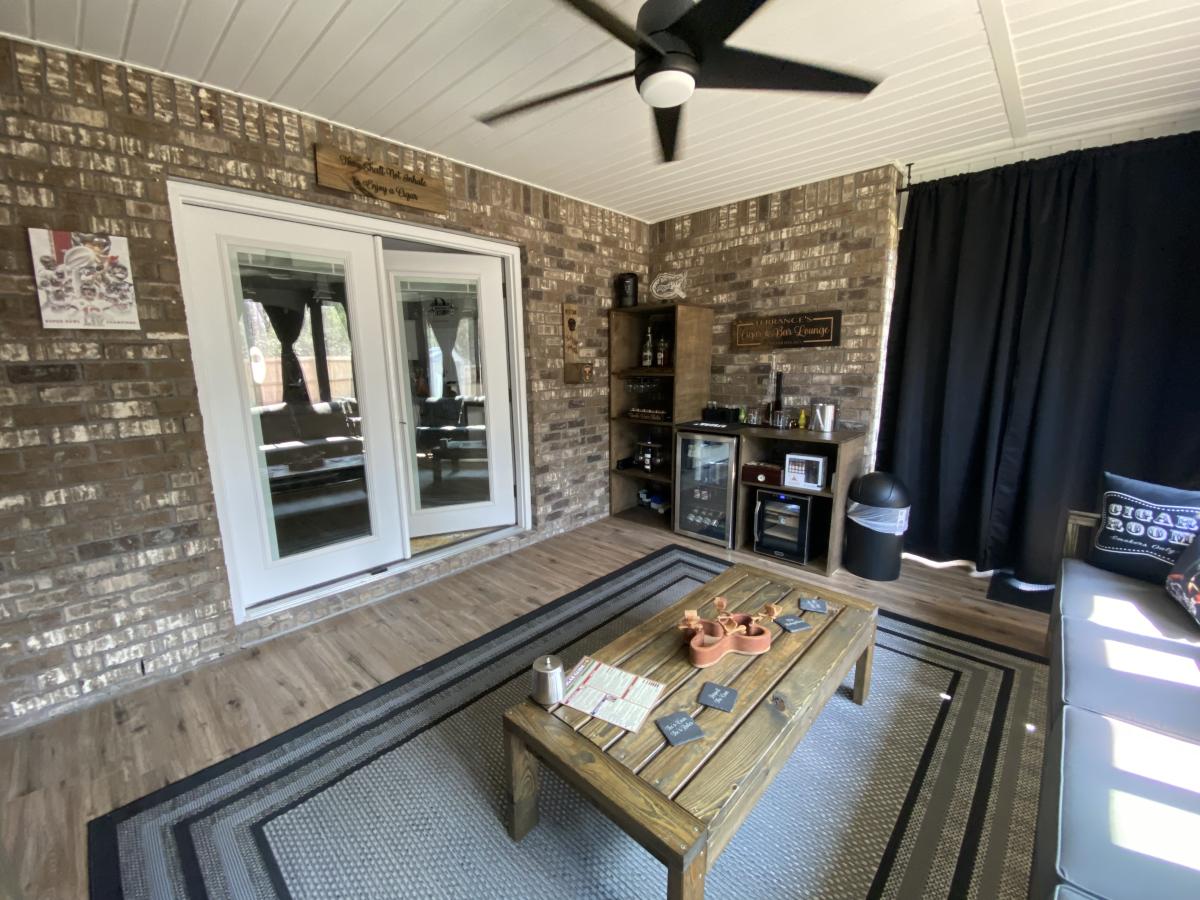
Man Cave by Dope Carvings
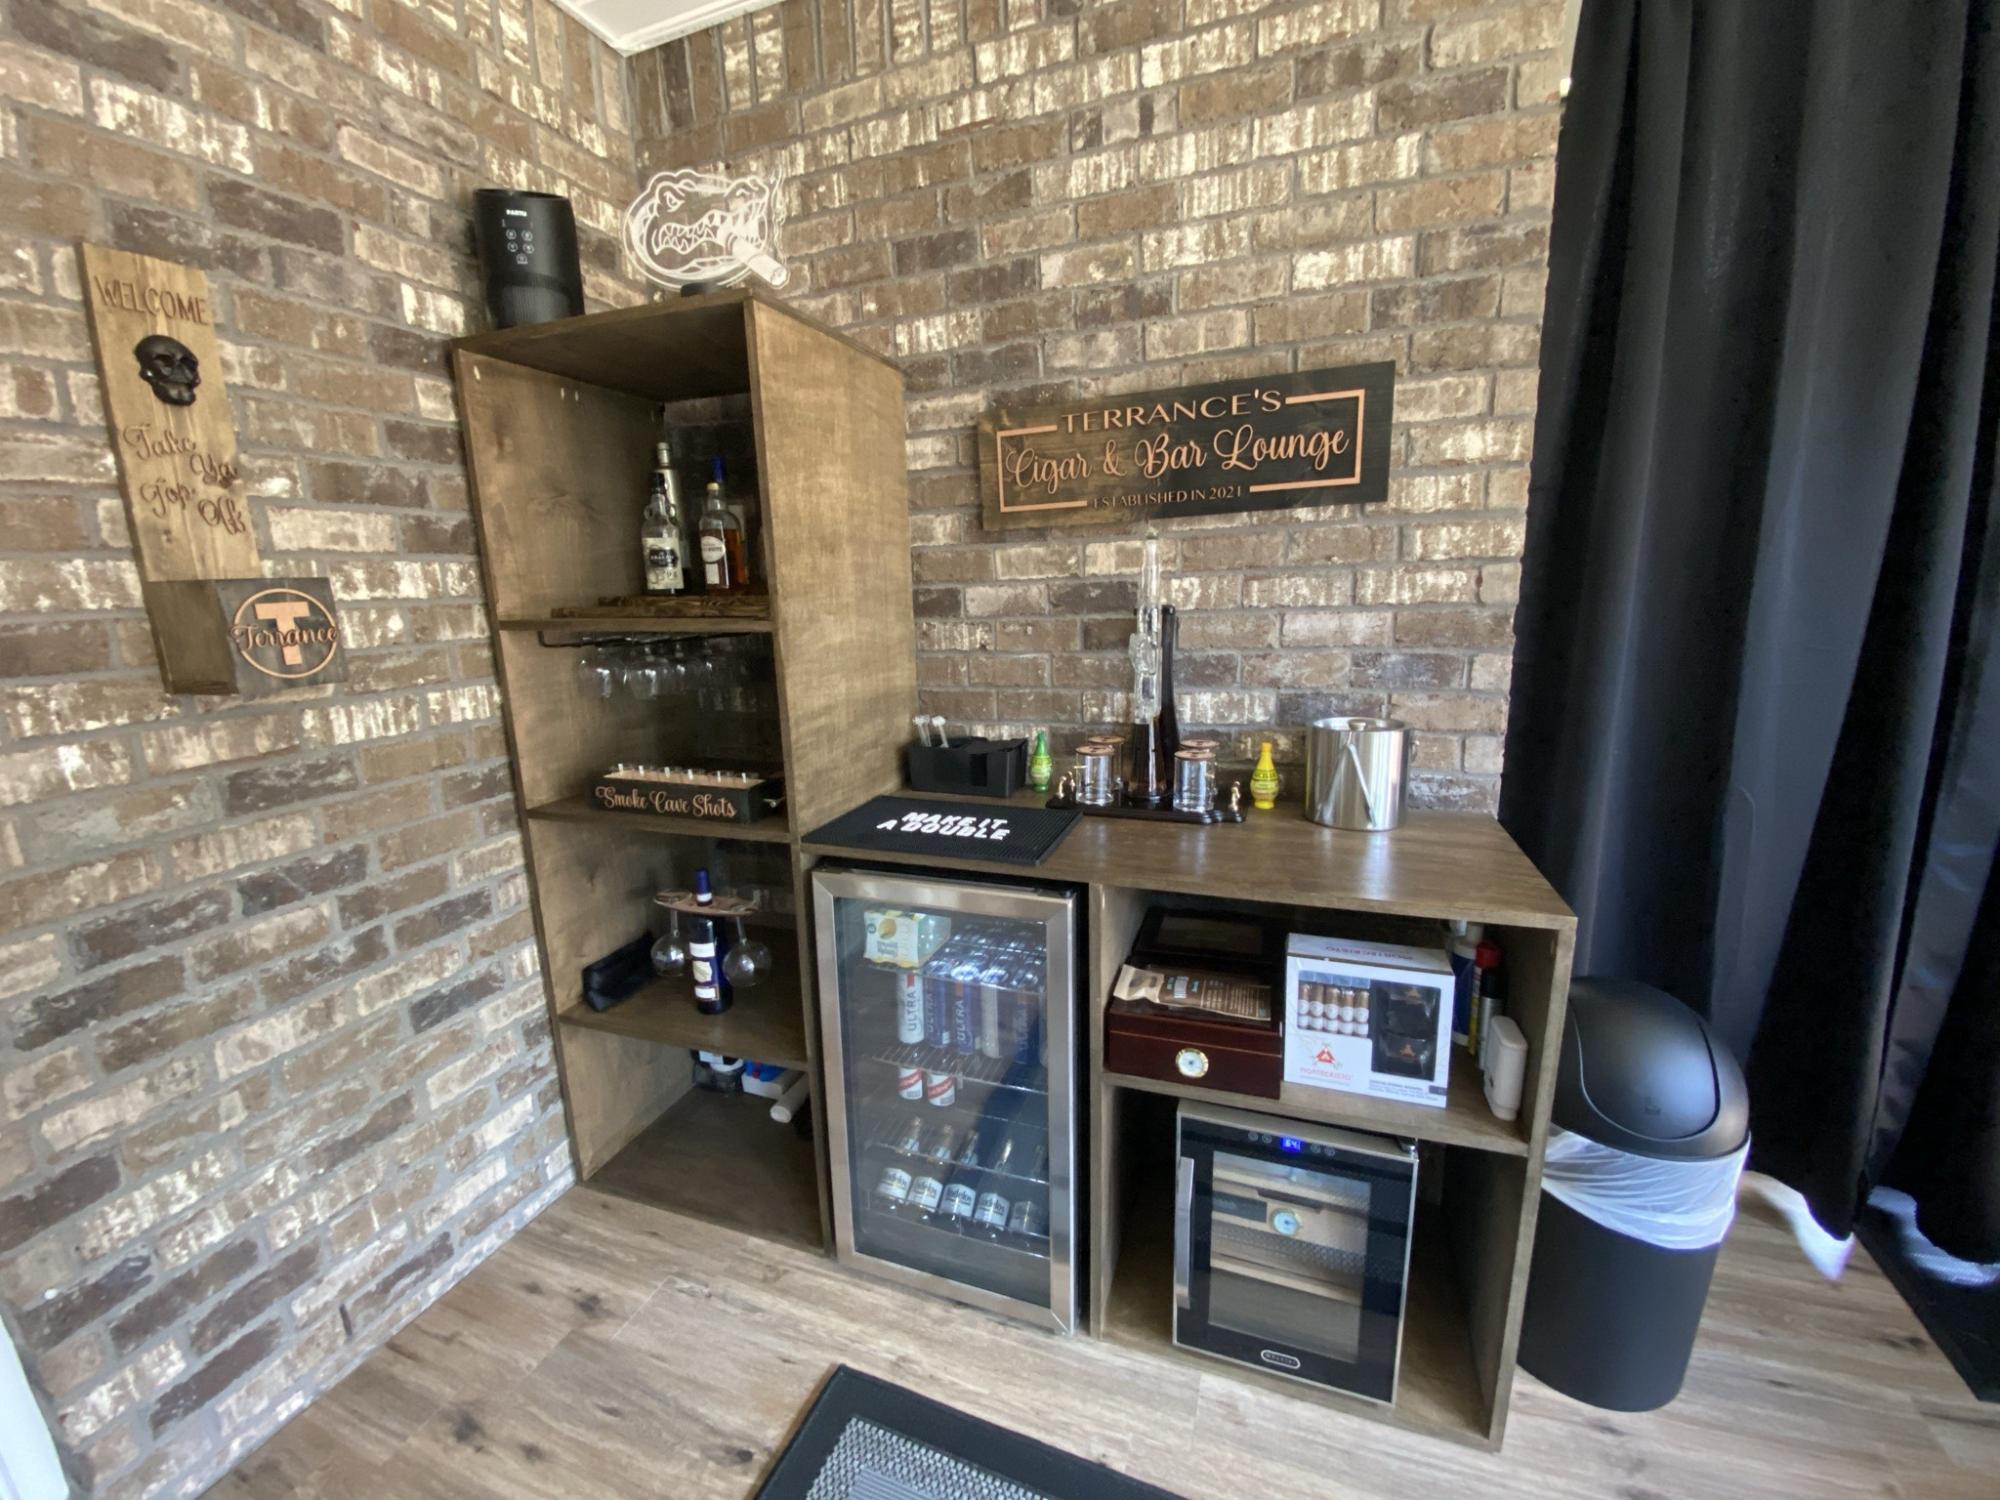
Resized the sectional to fit on our patio for my husband’s man cave! Also built the table and bar area using Ana White’s wood ordering system.
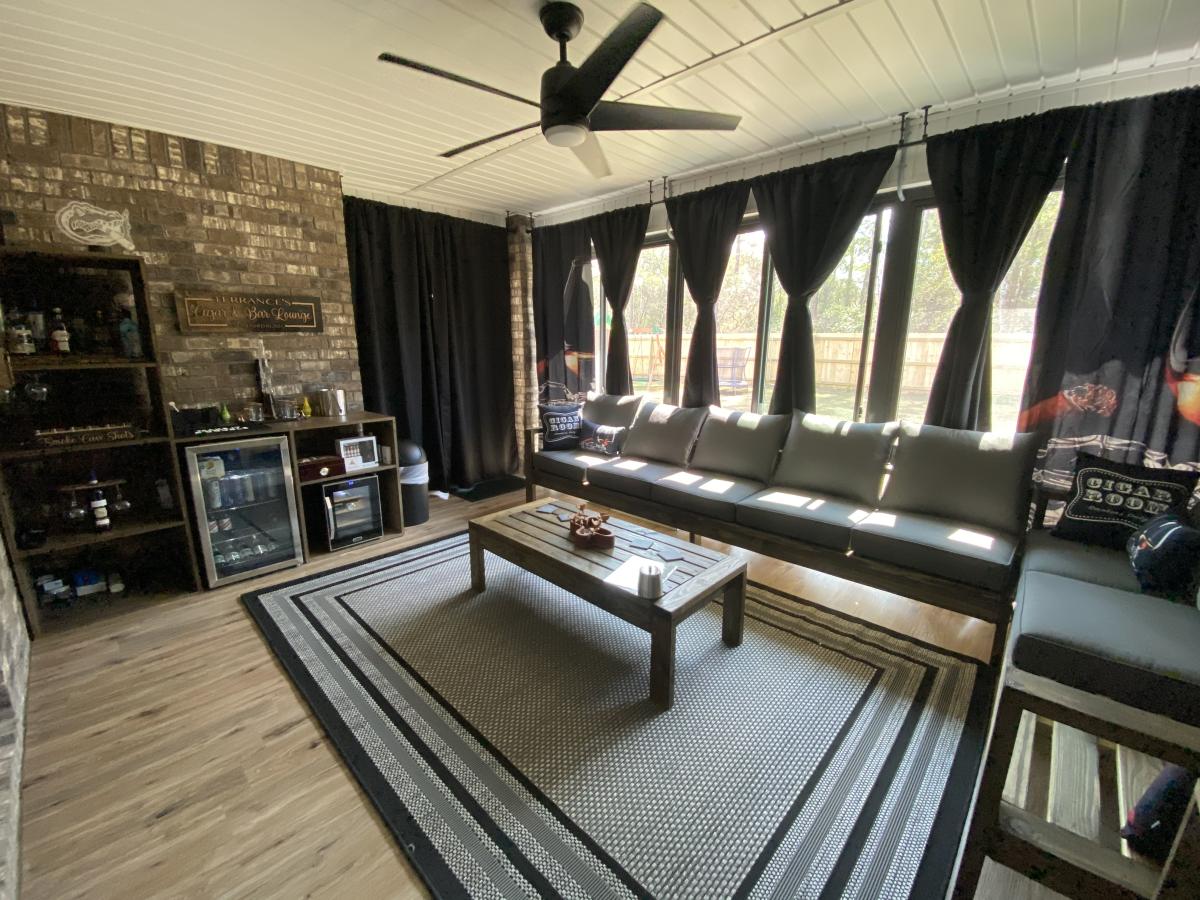
Built from Plan(s)