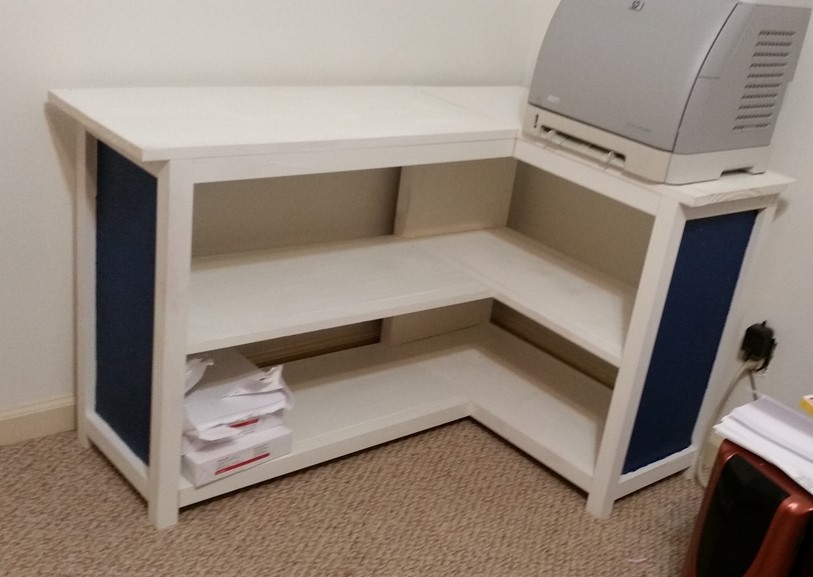
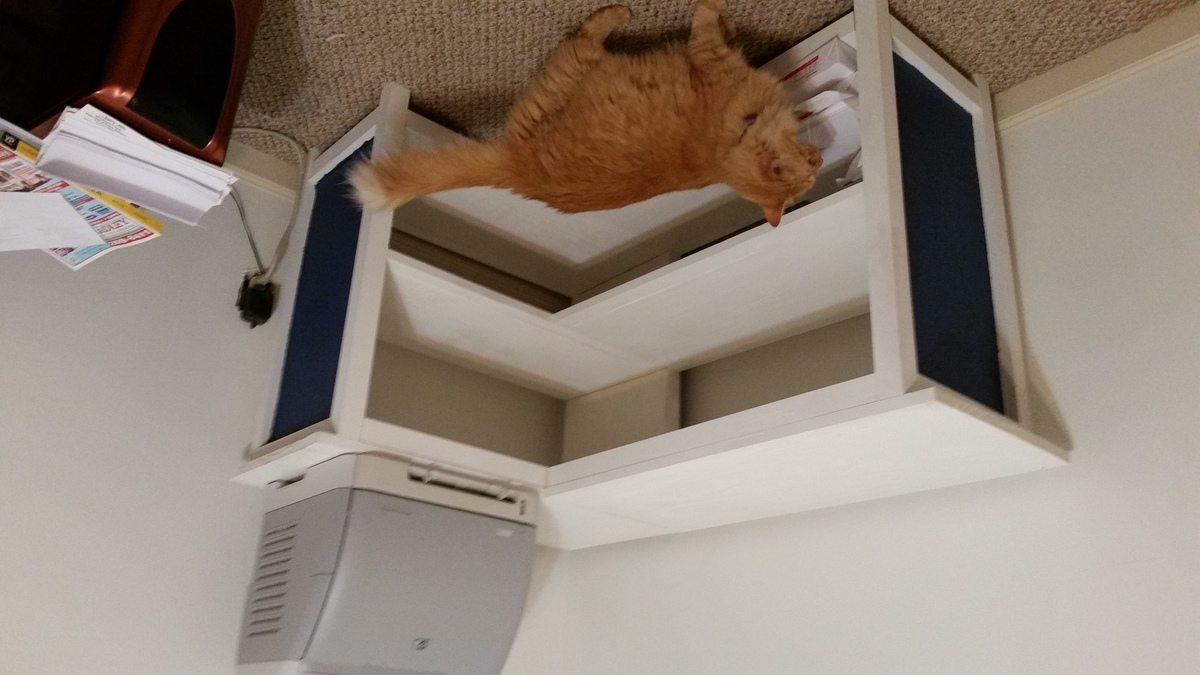
Community Brag Posts

Media console

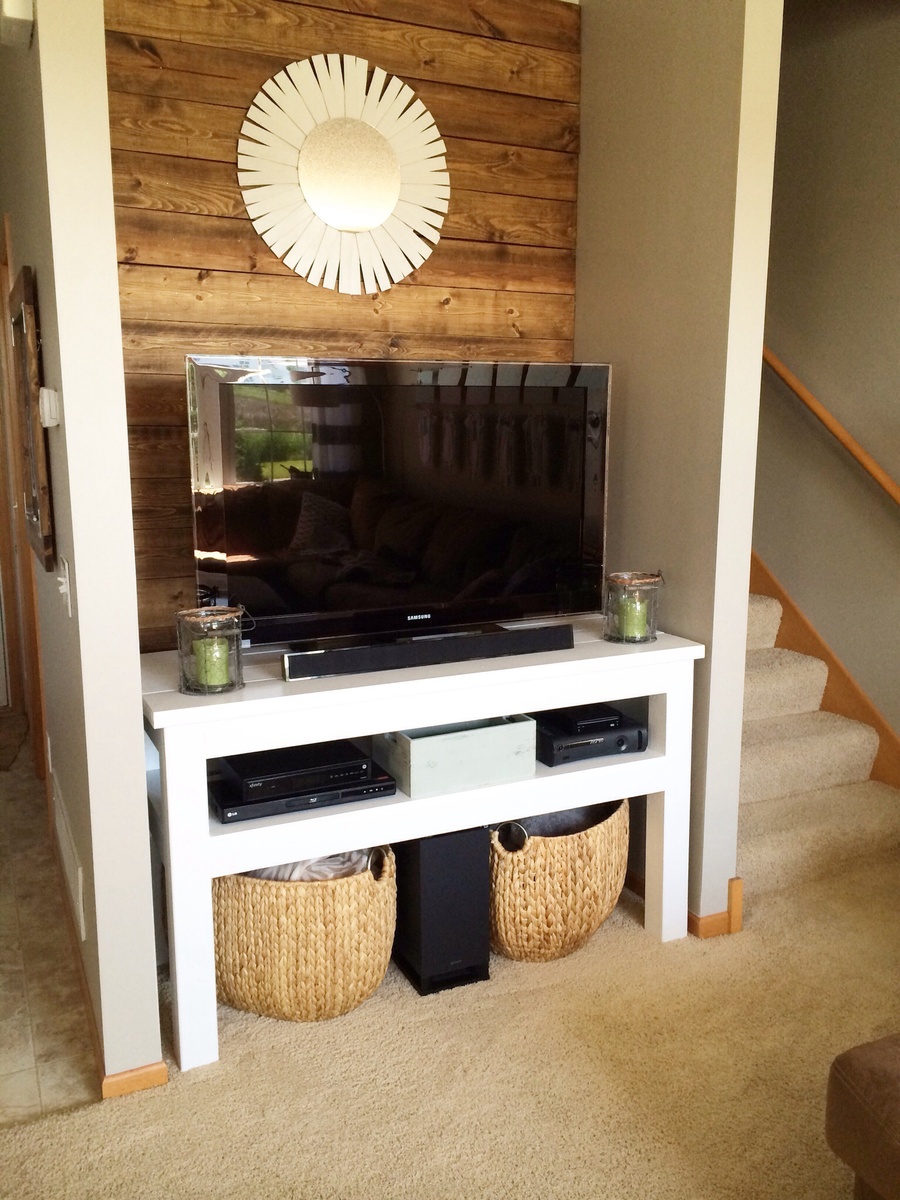
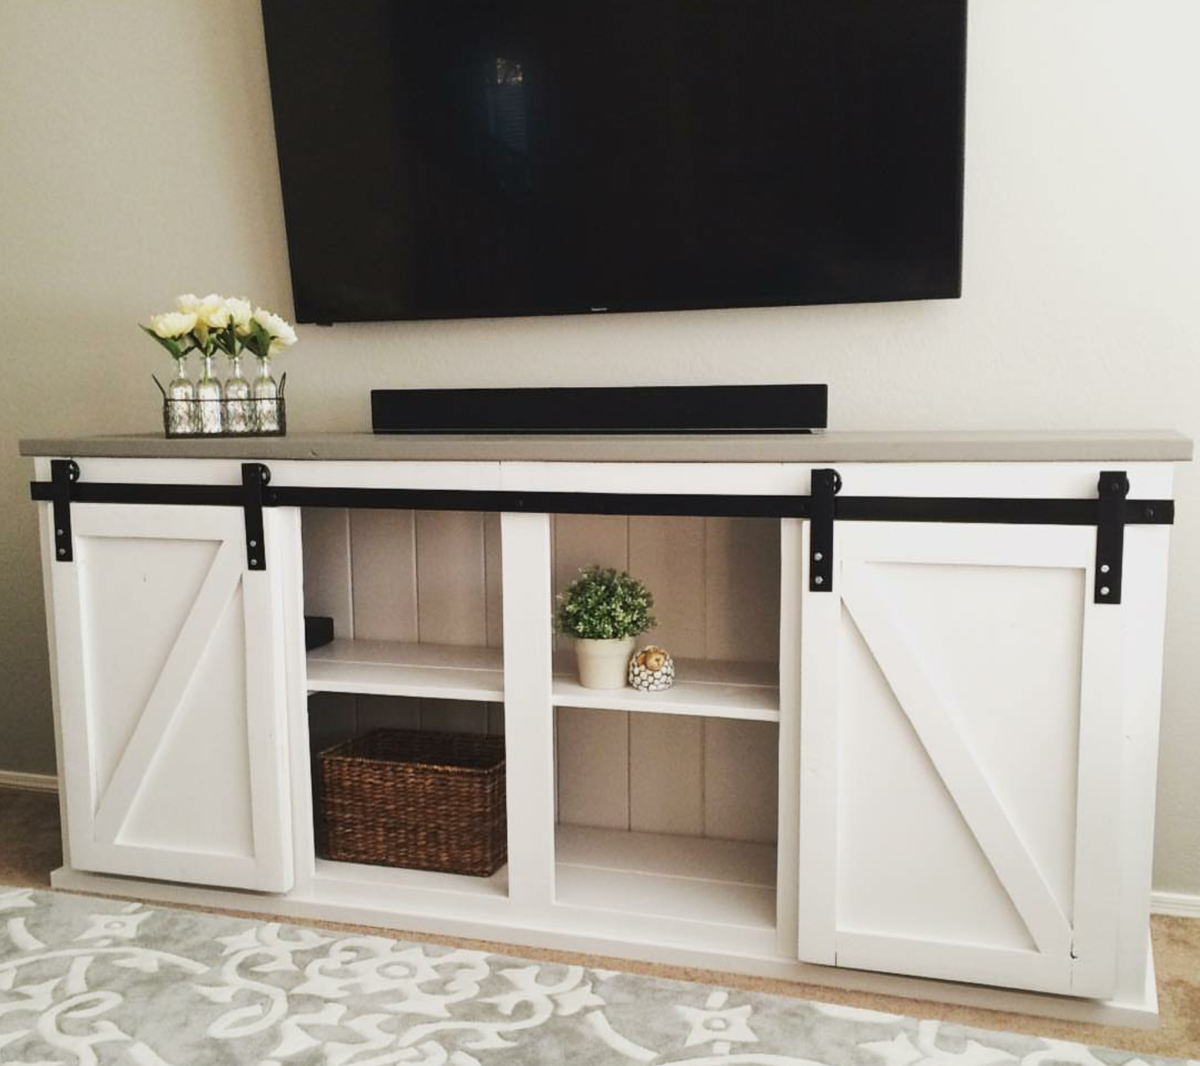
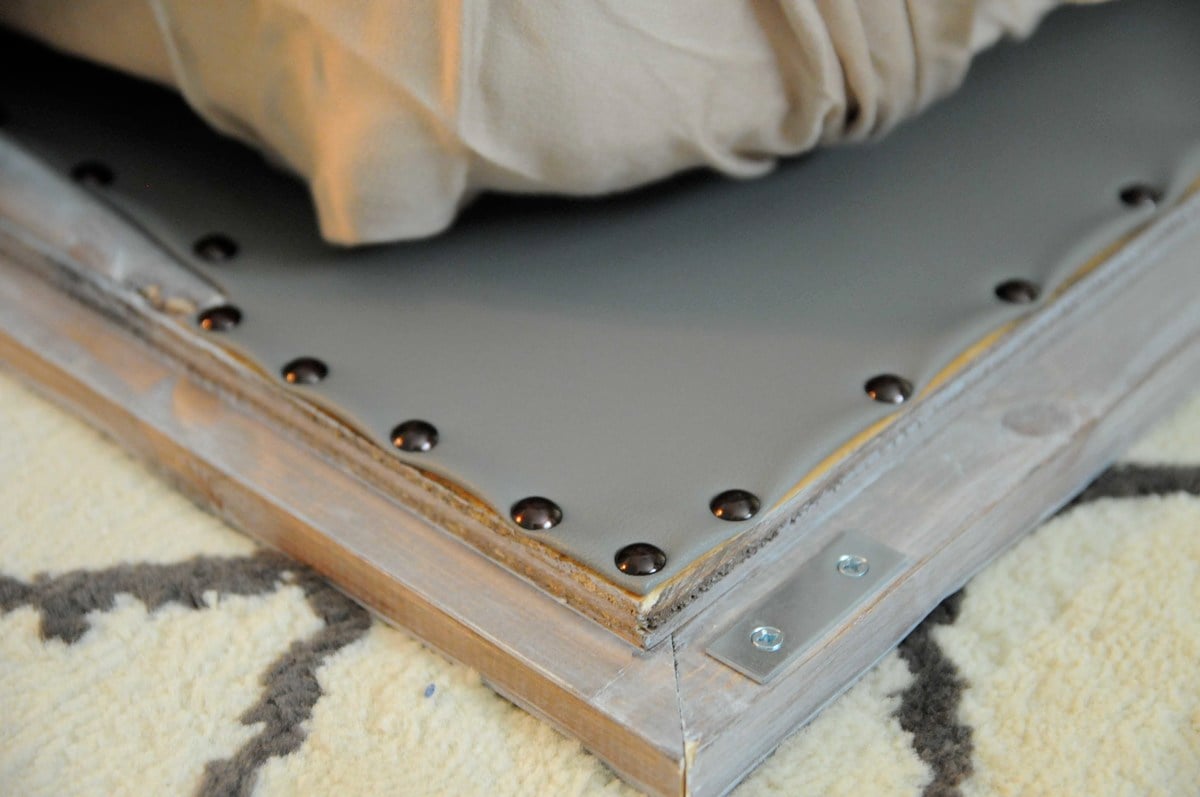
I needed something for my tv that would be high enough to accommodate our 18 inch sound bar sub so I modified the Taylor's Console plan to fit. Love the way it looks with my plank wall! Pretty happy with the first piece of furniture I built!

Built from Plan(s)
Estimated Time Investment
Afternoon Project (3-6 Hours)
Finish Used
White enamel paint from Sherwin Williams. Two coats primer, four coats of paint.
Recommended Skill Level
Beginner

Comments

Twin Storage Beds with Corner Hutch

Submitted by Anonymous (not verified) on Mon, 09/12/2016 - 05:47

We had to adjust the center hutch a bit to fit the beds into the room, but we are very very pleased with how this turned out.  Thanks for the plans!

Recommended Skill Level
Intermediate

Modern Adirondack Chair

Submitted by nk25 on Fri, 06/26/2020 - 18:46

I really enjoyed making this. Notes: The board with 20 degree cuts needs to be cut at a longer length if cutting at 90 degrees and trimming later. The back support is a little low if you’re over 5’10”.

Estimated Cost
$50
Estimated Time Investment
Weekend Project (10-20 Hours)
Finish Used
Deck stain. redwood color - Olympic brand
Recommended Skill Level
Intermediate

DIY Craft Table with Storage

Submitted by Anonymous (not verified) on Sat, 04/13/2024 - 12:39

Your plans were easy to follow. Made our DIY so much easier. Material sheet was perfect. Made a few small modifications and used a butcher block for the table. Finished product turned out great. Thank you again.

Lisa A.

Built from Plan(s)

Comments

Simple outdoor set

Submitted by boomer4676 on Fri, 08/24/2012 - 07:09

This outdoor set is a mix of the vintage bar stool plans and the simple table and bench set. I added a few things here and there.

Estimated Time Investment
Weekend Project (10-20 Hours)
Finish Used
Stained with dark walnut and white (leftover) paint
Recommended Skill Level
Beginner

Comments

Jake

Sun, 08/26/2012 - 17:38

I really like your table and bench. Even leaving off the massive 2x4s and using 1 x ? gives the table and bench a light look, but I will bet it is substantial. Keep up the good work.

Fancy X Farm House Table

Submitted by a_hall on Tue, 06/17/2014 - 12:19

Loving our new table - we ended up spending about $100 since we used for 4x4s than 2x4s. We also left out the 2 center pieces since we shorted the table to 6ft.

Estimated Time Investment
Week Long Project (20 Hours or More)
Recommended Skill Level
Intermediate

Corner Bookcase

Submitted by Anonymous (not verified) on Wed, 09/14/2016 - 16:58

I used the corner bookcase plan.  It was easy to follow.  I think it turned out well for my 2nd wood project. My sister had the idea of painting the panels blue to match the buildin bookcases in my libray room.  I have the backs of them painted navy blue.

Estimated Cost
$50
Estimated Time Investment
Day Project (6-9 Hours)
Finish Used
painted Sherwood williams White Panels Beur Navy Blue
Recommended Skill Level
Beginner

Barn Style Greenhouse

Followed your excellent plans, thank you.
Adapted to make smaller...approximately 10ft X 8ft.
It gave me a very enjoyable project to complete during 'lock-down ' and with Greenhouse.

Built from Plan(s)
Estimated Cost
£800
Estimated Time Investment
Week Long Project (20 Hours or More)
Finish Used
Treated all wood with preservative.
Steel panels (old roofing) were obtain from a kind neighbour for free and all external metal/wood was given several coats of 'Red Oxide' gloss Barn/agricultural paint.
Adaptions made by myself were :-

I put self adhesive 'Flashing' on the bottom wood of the vertical sides...to attempt to protect the wood in contact with the floor from getting over wet......time will tell if it works.

I made additional gussets to support the top piece of wood (attached to each end).

I had trouble with keeping the corrugated roof running parrallel....but the reason for this was that it was not manufactured with straight@right angle ends (when I held a level/straight edge along end - there was a quarter of an inch gap in the centre).
Recommended Skill Level
Intermediate

New Table for the Screen Porch

Submitted by margjack on Sun, 08/26/2012 - 14:03

I'm so excited about my farmhouse table! I used mostly scrap wood that I had lying around, and I adjusted the length of the table to fit my space (it is 62" long). I cut the table ends in a curve pattern just for a little more interest. I used the steel wool/vinegar solution to darken and age the top, with a paste wax finish on top to give it a more aged patina. I painted the base with the paint leftover from my outdoor sectional that I built from Ana's plans. The actual table didn't take long to put together, but it took me a month to get around to the finish.

Sorry for the photos - I used my cell phone camera and the light was bad!

Built from Plan(s)
Estimated Cost
$50 (Used mostly scrap wood - probably about $150 if I bought all the wood/supplies)
Estimated Time Investment
Day Project (6-9 Hours)
Finish Used
Top: vinegar/steel wool solution with paste wax finish
Base: Custom color exterior paint
Recommended Skill Level
Intermediate

Comments

spiceylg

Mon, 08/27/2012 - 13:45

I loved this style table before and now the mods to the end put it over the top! Love!

Rustic X Kitchen Island with 4x4 Legs

Submitted by Rich2727 on Fri, 06/20/2014 - 10:52

In order to make this island a little beafier I used 4x4 wood for the X as well as the the top and bottom braces. Top is made up of glued up 1x3 maple wood. It looked really good raw, but decided to stain it to give a more uniform look. I bought the rustic handles and the bottle opener on Amazon.com. I used lag bolts and washers for the finishing accents...similar to the pottery barn island. Painted them with Rustoleum oil bronzed paint and then dabbed it with a paper towel to give it a rougher finish to it and then sprayed the casters as well. This was a fun project and are getting a lot of use out of it. Thanks goes to Anna for the plans and inspiration for this island. Rich

Built from Plan(s)
Estimated Cost
$300
Estimated Time Investment
Week Long Project (20 Hours or More)
Recommended Skill Level
Intermediate

Comments

Mriddle

Fri, 06/20/2014 - 11:44

i keep debating if i should do this, you did a great job. i like the 4x4 sides.

Susan Hubbard

Sun, 06/22/2014 - 08:25

Rich, I love the changes you made with the 4x4's. You made a gorgeous piece of furniture! Can you share with me where/how you attached the drawer/shelf sides? I'd like to follow how you made this, but can't tell from the pictures. On the original they look inset from the 2x4's, but your space is taken up by 4x4's. Would you mind sharing??? Thanks!

Rich2727

Mon, 06/23/2014 - 16:36

So, I ripped the 4x4 cross pieces down by 1/2" so that the side panels would rest inside the rectangle and flush with the 4x4 frame and up against the X.

Did that make sense?

Susan Hubbard

Mon, 06/23/2014 - 18:28

That's what I thought, but I wanted to make sure. I'm going to make one similar to yours :)

Susan Hubbard

Mon, 06/23/2014 - 18:28

That's what I thought, but I wanted to make sure. I'm going to make one similar to yours :)

Tool Organizer

Submitted by Anonymous (not verified) on Thu, 07/02/2020 - 07:02

I’m very happy with my tool organizer. I also used the tool organizer idea for bracket to hang our bicycle rack. We love the way it all came out. Thank you so much for sharing!

We run a fence company. The best thing about this project is that it cost me $0!! I used 2X4 cutoffs that we were going to trash!

Built from Plan(s)

Tapered Wood Planter

Submitted by Anonymous (not verified) on Wed, 04/24/2024 - 10:53

Made this for our patio area very fun build, my wife loves it so of course she wants another one! Back to the wood stove.

Blair K

Built from Plan(s)

Vintage Step Stool

Submitted by Aisha on Tue, 08/28/2012 - 12:57

I made this vintage step stool awhile ago but forgot to post it to the Brag board. At first I made it then put a coat of a mix of beeswax and olive oil that I mixed up. But then it was being used in the bathroom by the kids and got filthy. So I sanded it down and put a coat of stain and poly on it. I love it much more now!

Very easy plan and great for a beginner project.

Built from Plan(s)
Estimated Time Investment
An Hour or Two (0-2 Hours)
Finish Used
One coat of Varathane's Red Mahagony and 3 coats of satin poly
Recommended Skill Level
Beginner

Comments

GuestCharles Odom (not verified)

Sat, 10/20/2012 - 03:43

You did a great job! I would like to try it myself. Measurements/Thanks

$40 Ping Pong table top game

With Father's Day rolling in, my sons and I needed a gift, stat! My husband thinks that Table Tennis is the quintessential father-son activity, so that was an obvious choice.
We needed something easy to make, easy to store, and budget friendly. With a 6, 4, and 2 year old helping out, I made a foldable mdf ping pong table that could easily be placed on our picnic table outside.
We had home depot cut the mdf in half, primed it, taped off some lines, spray painted it with chalkboard paint (bonus, you can keep score!), and screwed 4 small hinges to attach the 2 halves. We added a removable table tennis net, some paddles and balls, and have played nearly every day!

Estimated Cost
$40
Estimated Time Investment
Afternoon Project (3-6 Hours)
Finish Used
Chalkboard spray paint
Recommended Skill Level
Starter Project

Comments

Hall-End Photo Ledges

Submitted by SaraLodise on Fri, 09/23/2016 - 13:03

$10 Ledges made with 1x3s instead of 1x4s and fronted with cute trim pieces I found at Orange store. Finished with Behr Marque sample paint that didn't make the cut for the hallway walls (color: Gotham Gray).

Estimated Cost
Select Pine Lumber = $40
Pine Trim = $17
Behr Marque sample = $4
Total = $61
Estimated Time Investment
Afternoon Project (3-6 Hours)
Finish Used
Behr Marque - Matte - Gotham Gray
Recommended Skill Level
Beginner

Comments

Custom Toy Box

Submitted by Anonymous (not verified) on Sat, 04/27/2024 - 11:30

Your plan for this toy box was sooo easy to follow, but I added the feet. My grandson loved it. I have 2 other projects from your plans for him as well.

Charlene

Built from Plan(s)

5 board bench

Submitted by Jamie_A on Thu, 08/30/2012 - 06:34

My husband was talking about going to burn some old boards, and when I asked about them - they were from a 100 year old barn! After some coaxing, he brought home a huge pile, and filed up his side of the garage. I've been looking for something to do with them and I found your site! I'm so excited for all the projects to come. This was my first build (after a corner tv console that went horribly wrong, lol). I shortened the bench a bit to fit the small wall in our mudroom. This was a great plan, super easy and super quick.

Estimated Cost
free! used found barn boards
Estimated Time Investment
An Hour or Two (0-2 Hours)
Finish Used
I sanded the boards down with 80 grit, then 100. I used the vinegar and steel wool mix to age the cut edges, cleaned it off and applied 2 coats of spray poly, lightly sanding in between
Recommended Skill Level
Starter Project

Rustic Queen Sized Wall Bed

Submitted by ldo2626 on Wed, 06/25/2014 - 09:09

Expecting our second child, my wife and I decided to do away with our guest bedroom and combine it with our office. The only problem was our queen bed took up way too much space and it didn't get enough use to justify the sacrifice. We looked at the wall bed options available for purchase and decided they were way too blah and very expensive. I then found the "A MURPHY BED YOU CAN BUILD, AND AFFORD TO BUILD" post on Ana's website (thanks for the inspiration)! 

 Using cheap pine boards, plywood, door hinges, vinyl upholstery and stain I constructed the wall bed you see here. It really wasn't that difficult but facing it took the most time. To give the boards a more rustic look I used a utility knife to shave off the edges/corners and stained them with the Minwax American Walnut water based stain and the Minwax White Wash Pickling. When this started we thought we were going to have to settle for something unattractive and less than desirable. Seeing it in our office now, we love our new bed and actually think it makes the room look much better!  I didn't keep track of costs, but it couldn't have been more than $150.


Estimated Cost
I didn't keep track of costs, but it couldn't have been more than $150.
Estimated Time Investment
Weekend Project (10-20 Hours)
Finish Used
Minwax American Walnut water based stain and Minwax White Wash Pickling
Recommended Skill Level
Beginner

Comments

jwm816

Tue, 07/08/2014 - 08:08

Looks great! May I ask what the final outside dimensions were? Curious to see if this would work for me.

Thanks!

ldo2626

Wed, 08/06/2014 - 09:23

I would have to measure it when I get home... at work currently. Looking back, I think the best approach is to take the measurements from the plan, find the difference between standard mattress and queen mattress dimensions (check wikipedia for standard sizes), then add that difference back to the plan. I cut it real close on mine and could use a little more space. It would be nice to make it a bit deeper and with some head room to store comforters and pillows.

lopixy

Sun, 11/30/2014 - 18:10

I love this!  Could you give more details about how you did the facing?  Are the pine boards just nailed onto the plywood? 

chefrgk

Sun, 12/28/2014 - 12:59

I am dying to get started on this wall bed project. I keep getting this message when trying to open the Plans.

The page you are looking for is temporarily unavailable.
Please try again later.
can someone help me find them.

chefrgk

Sun, 12/28/2014 - 12:59

I am dying to get started on this wall bed project. I keep getting this message when trying to open the Plans.

The page you are looking for is temporarily unavailable.
Please try again later.
can someone help me find them.

nicolanala

Tue, 08/09/2016 - 15:24

Hi. I would love to try this. Looking to build in the next month before parents in law come over. Is there any working links to the plans??

josheli

Thu, 01/25/2018 - 13:06

click on the bed picture above and it will take you to the plans


Back