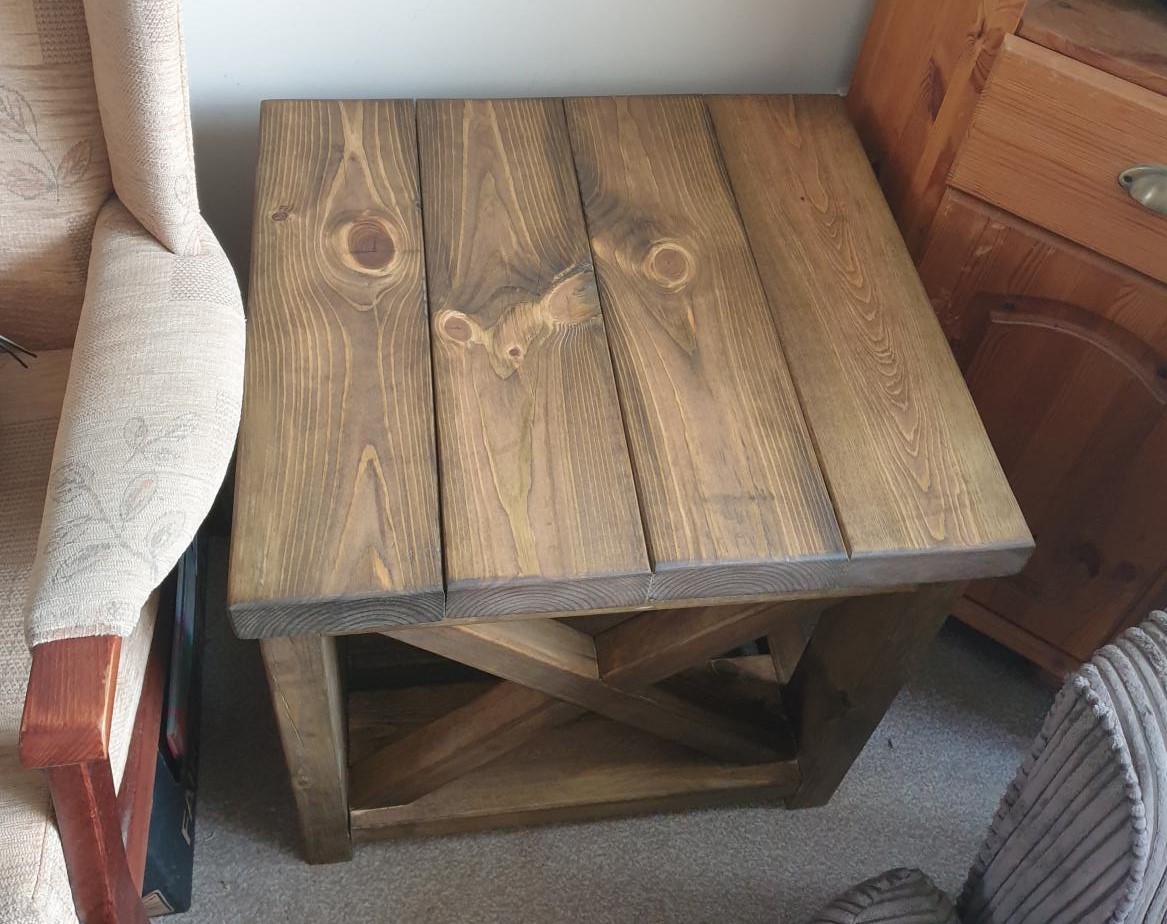
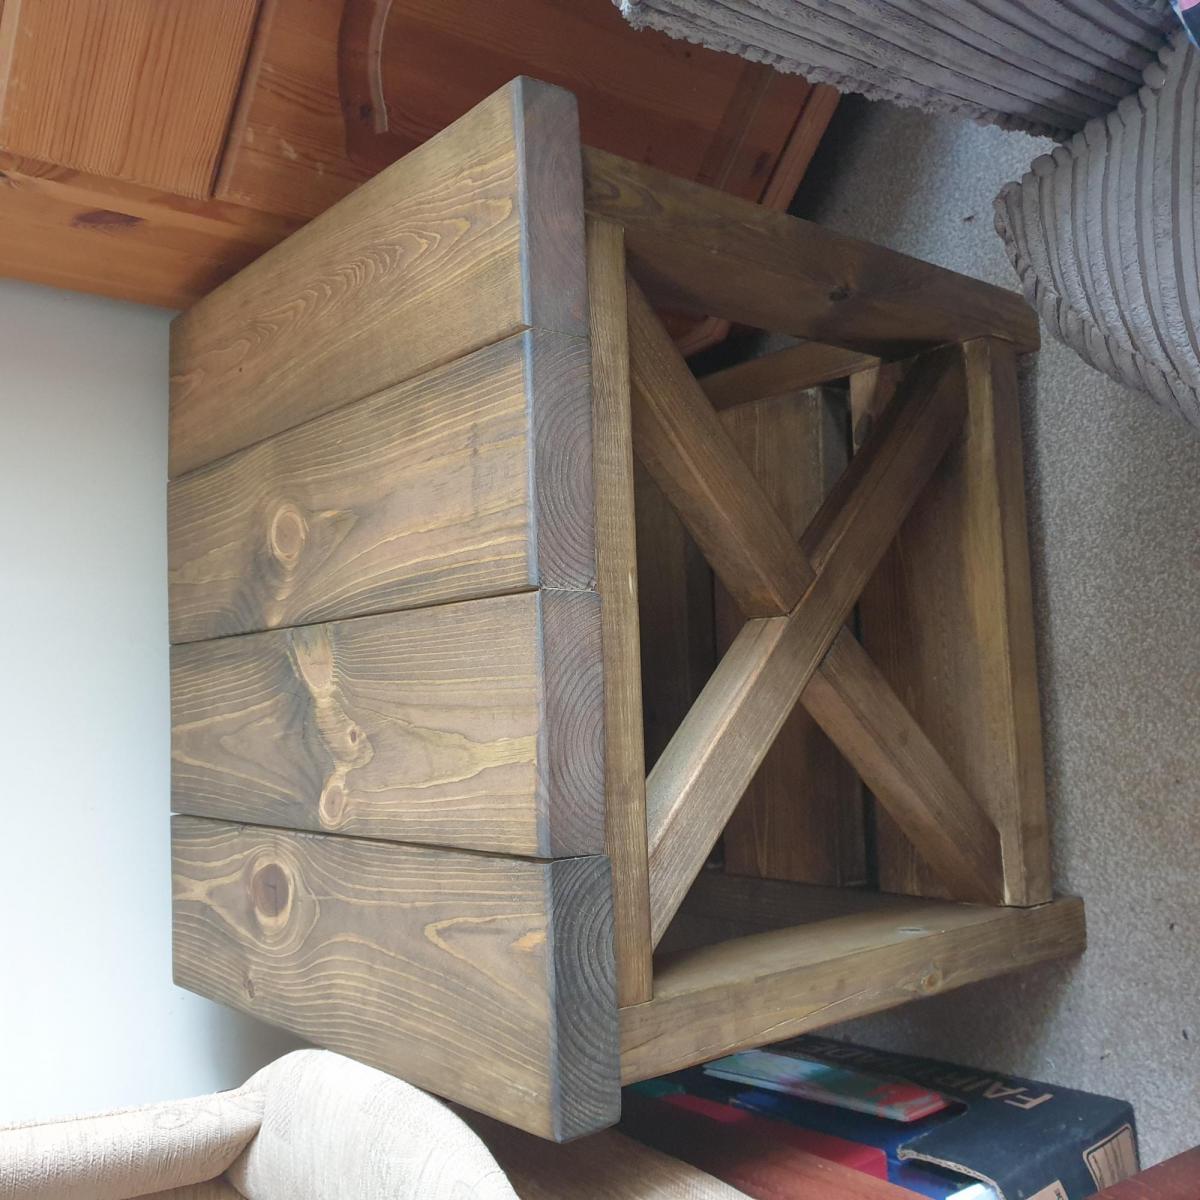
Community Brag Posts

5 board bench

Submitted by Jamie_A on Thu, 08/30/2012 - 06:34

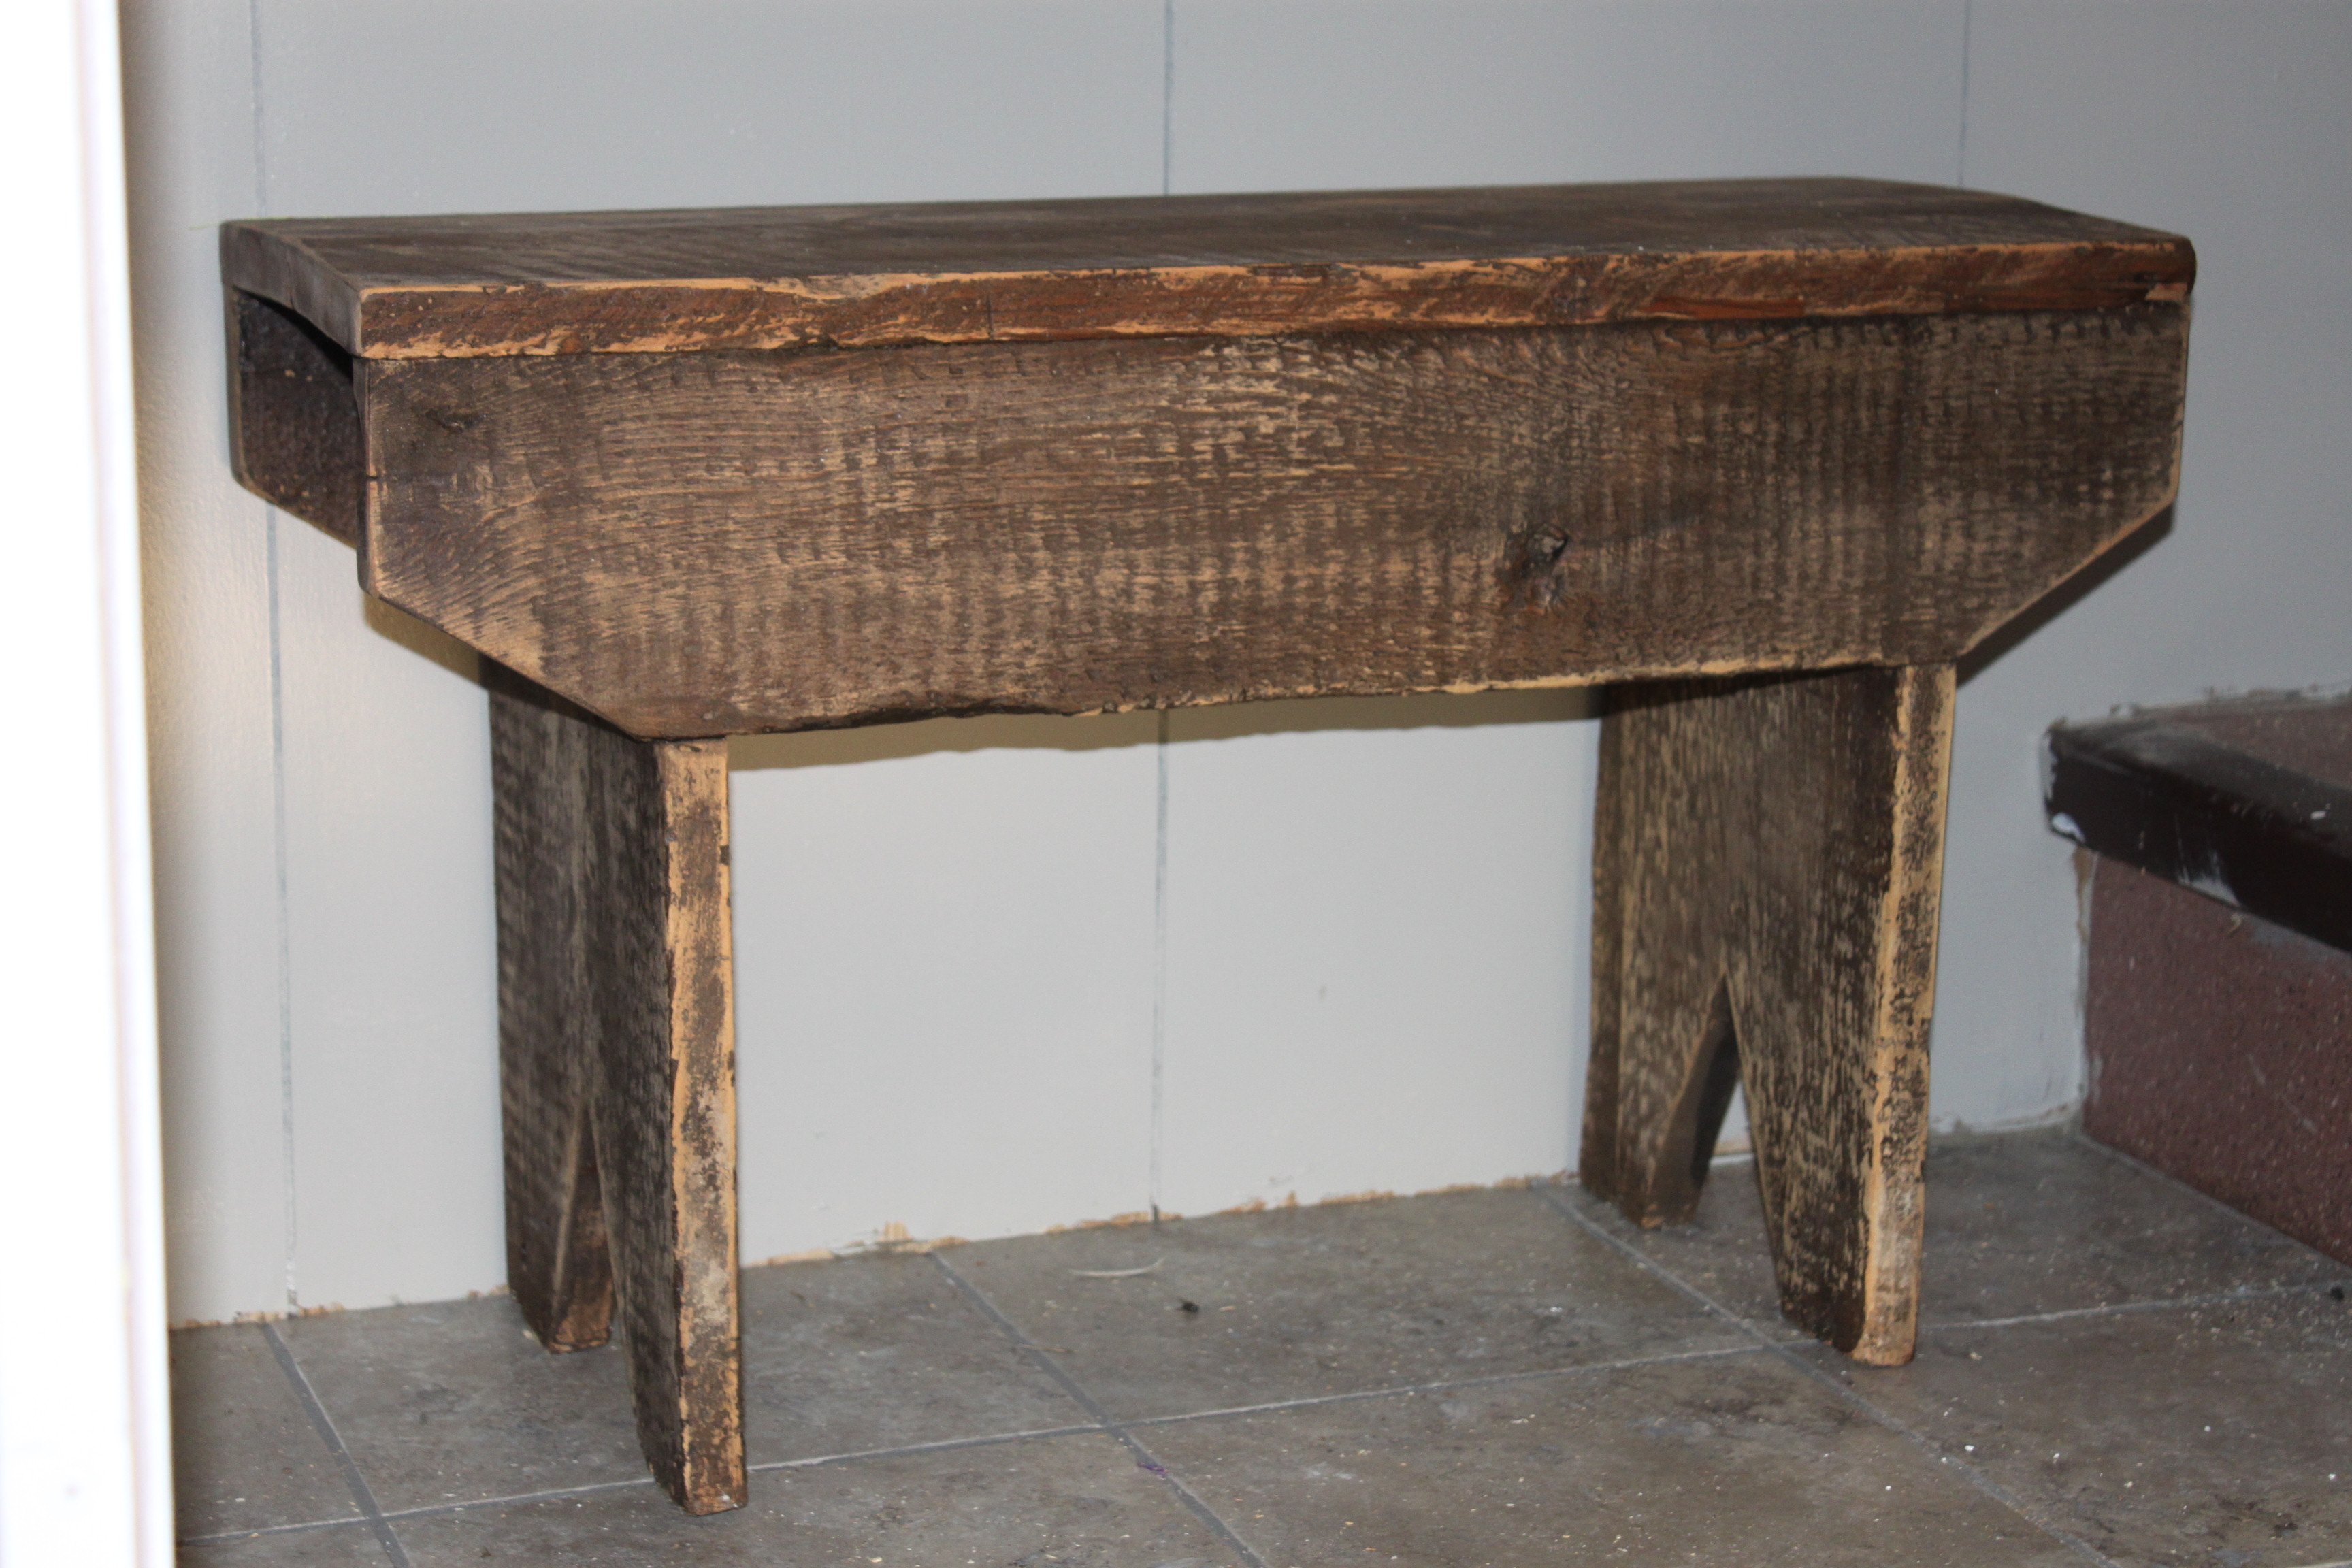
My husband was talking about going to burn some old boards, and when I asked about them - they were from a 100 year old barn! After some coaxing, he brought home a huge pile, and filed up his side of the garage. I've been looking for something to do with them and I found your site! I'm so excited for all the projects to come. This was my first build (after a corner tv console that went horribly wrong, lol). I shortened the bench a bit to fit the small wall in our mudroom. This was a great plan, super easy and super quick.

Estimated Cost
free! used found barn boards
Estimated Time Investment
An Hour or Two (0-2 Hours)
Finish Used
I sanded the boards down with 80 grit, then 100. I used the vinegar and steel wool mix to age the cut edges, cleaned it off and applied 2 coats of spray poly, lightly sanding in between
Recommended Skill Level
Starter Project

Rustic Queen Sized Wall Bed

Submitted by ldo2626 on Wed, 06/25/2014 - 09:09

Expecting our second child, my wife and I decided to do away with our guest bedroom and combine it with our office. The only problem was our queen bed took up way too much space and it didn't get enough use to justify the sacrifice. We looked at the wall bed options available for purchase and decided they were way too blah and very expensive. I then found the "A MURPHY BED YOU CAN BUILD, AND AFFORD TO BUILD" post on Ana's website (thanks for the inspiration)! 

 Using cheap pine boards, plywood, door hinges, vinyl upholstery and stain I constructed the wall bed you see here. It really wasn't that difficult but facing it took the most time. To give the boards a more rustic look I used a utility knife to shave off the edges/corners and stained them with the Minwax American Walnut water based stain and the Minwax White Wash Pickling. When this started we thought we were going to have to settle for something unattractive and less than desirable. Seeing it in our office now, we love our new bed and actually think it makes the room look much better!  I didn't keep track of costs, but it couldn't have been more than $150.


Estimated Cost
I didn't keep track of costs, but it couldn't have been more than $150.
Estimated Time Investment
Weekend Project (10-20 Hours)
Finish Used
Minwax American Walnut water based stain and Minwax White Wash Pickling
Recommended Skill Level
Beginner

Comments

jwm816

Tue, 07/08/2014 - 08:08

Looks great! May I ask what the final outside dimensions were? Curious to see if this would work for me.

Thanks!

ldo2626

Wed, 08/06/2014 - 09:23

I would have to measure it when I get home... at work currently. Looking back, I think the best approach is to take the measurements from the plan, find the difference between standard mattress and queen mattress dimensions (check wikipedia for standard sizes), then add that difference back to the plan. I cut it real close on mine and could use a little more space. It would be nice to make it a bit deeper and with some head room to store comforters and pillows.

lopixy

Sun, 11/30/2014 - 18:10

I love this!  Could you give more details about how you did the facing?  Are the pine boards just nailed onto the plywood? 

chefrgk

Sun, 12/28/2014 - 12:59

I am dying to get started on this wall bed project. I keep getting this message when trying to open the Plans.

The page you are looking for is temporarily unavailable.
Please try again later.
can someone help me find them.

chefrgk

Sun, 12/28/2014 - 12:59

I am dying to get started on this wall bed project. I keep getting this message when trying to open the Plans.

The page you are looking for is temporarily unavailable.
Please try again later.
can someone help me find them.

nicolanala

Tue, 08/09/2016 - 15:24

Hi. I would love to try this. Looking to build in the next month before parents in law come over. Is there any working links to the plans??

josheli

Thu, 01/25/2018 - 13:06

click on the bed picture above and it will take you to the plans


Animal Hooks & Knobs

Submitted by Anonymous (not verified) on Sun, 09/25/2016 - 22:05

Inspired by the Woodland animal hooks, we made a variety of different animal hooks/knobs in a fun 1 day project.

Estimated Cost
Wood $12 + scraps,
Acrylic Paints ~$7.50 + already owned paints (lots left over for another project),
Knobs $5
Estimated Time Investment
Day Project (6-9 Hours)
Finish Used
Acrylic paint
Recommended Skill Level
Starter Project

Modern Outdoor Sofa

Submitted by Anonymous (not verified) on Mon, 07/06/2020 - 08:44

We are building memories and patio furniture! We're total beginners and we built an outdoor sofa and coffee table! My husband and I have never built furniture before and really needed some patio furniture as we prepare to host our son and his sweetheart's wedding reception! We learned that it's a lot of work, but so worth it!

The plans we used are from Ana White's website (Ana, you've made a wanna-be carpenter out of me!) https://www.ana-white.com/woodworking-projects/outdoor-sofa-modern-comf…

Estimated Cost
Under $200
Estimated Time Investment
Weekend Project (10-20 Hours)
Finish Used
Minwax Helmsman Polyurethane
Lightly sanded between coats and applied 2 coats all over and 3 coats on arms
Recommended Skill Level
Beginner

playhouse loft bed

I started with the castle bed idea and it eventually evolved into this. It was very simple construction. I basically built 3 wall panels and screwed them together. I used 1x8 for the wall paneling. Then I attached 2x4 horizontally to the studs on the wall and the wall panels to support the plywood I put down to hold their mattresses. It's been a big hit. I added a doorbell and a mailbox, too.

Estimated Cost
$600
Estimated Time Investment
Week Long Project (20 Hours or More)
Finish Used
satin finish paint
Recommended Skill Level
Intermediate

Comments

abbpim

Sun, 09/16/2012 - 08:37

I've showed my kids every single bed plan and brag on here and yours is the only one they both agree on! So it looks like I'll be busy for a while!

adamdbrown

Sun, 07/12/2015 - 15:26

I am looking to build a modified version of your awesome bed/playhouse! I have 2 kids, and will essentially be making a duplex. Is there any chance you have schematics? Thank you!

King Sized Farmhouse Storage Bed with Storage Drawers

Submitted by mwindsor6 on Sat, 06/28/2014 - 22:04

This was the first project that I have ever attempted, and I do believe it came out very nice. The color is red oak, and it has 3 coats of lacquer on it. I adjusted the plan sizes to make it from a queen sized bed into a king size bed. It took a lot of hours to build it due to measuring and cutting and ensuring accurate cuts, fitment, and square. The bed is made out of primarily Oak hardwood, but the 4x4 posts are ceder because Home Depot did not have oak 4x4 posts. The regular lumber (2x4, 1x3, 2x6 ect.) is white wood.

Estimated Cost
$600
Estimated Time Investment
Week Long Project (20 Hours or More)
Finish Used
Miniwax Red Oak Stain, and Miniwax brush on lacquer.
Recommended Skill Level
Intermediate

Comments

athingvall

Sun, 12/28/2014 - 22:40

Love the bed. I am glad that you were able to make it work. Is there anything that you would change? Do you have enough support in the middle? Storage? I am trying to make the conversion from queen plan to king plan. Any thoughts would be great. Thank you.

mwindsor6

Mon, 01/19/2015 - 23:58

Thanks our for the comment, i would not change my ha of anything inn. the. Not thing I think I think i change and still might in the future is to make the drawers come out a littler further so the faces do not try to sit completely flush and come out about an 1/8 of an inch so the trim I have on it would sit a little more flush and not try to push against the bed.

As for support the is more than enough support in the middle. There is enough cross braces where there is only about 1/2" between them. Also for additional support I used 2 4x4 scap piece in the middle-ish of bottoms of each side on the bottoms. I set them about directly center of the sides of th center drawer. Also for the brackets I used thick house framing brackets with 1/2 bolts because I have been moving a lot over the years so it comes apart easier. If you would be more interested in that I can send additions all pictures.

Hope this helps you, the bed is extremely sturdy and we absolutely love it more than any bed we could have purchased from a store.

emily3982

Sat, 12/31/2016 - 07:56

Hi Great Job. I saw your previous comment. "Also for the brackets I used thick house framing brackets with 1/2 bolts because I have been moving a lot over the years so it comes apart easier. If you would be more interested in that I can send additions all pictures"  Where did you put the house framing brackets and 1/2 bolts?  We are in the process of building two twin beds with storage and the easy take down part is something I am mentally trying to wrap my head around.  If you have pictures of this as well that would be super helpful.  Thanks so much!  

Wall organizer

Submitted by Taa-daa on Thu, 09/29/2016 - 12:33

This organizer is perfect for an entry way! Hooks are at the hight of my toddler so he might learn one day to keep his coat of the floor. Few things are different from Ana's . I do not own a tool to make pocket holes so I had to improvise a bit and I used an old yoga mat instead of pin board. Thank you for this one!

Estimated Time Investment
Afternoon Project (3-6 Hours)
Finish Used
Mat white paint
Recommended Skill Level
Beginner

First project side table

Submitted by scott3196 on Tue, 07/07/2020 - 04:31

Lovely easy to follow plans even if i had to change all measurements into metric and wood just slightly different size. Really happy how it turned out

Built from Plan(s)
Estimated Cost
£45
Estimated Time Investment
Weekend Project (10-20 Hours)
Finish Used
Jacobean oak danish oil
Recommended Skill Level
Beginner

Cedar Outdoor Sofa

Submitted by Anonymous (not verified) on Mon, 05/06/2024 - 13:17

Two projects that I recently built for my wife and my daughter. My wife wanted a tea bar and a beach vibe, my daughter wanted an outdoor couch so it is made out of cedar. They both loved them.

Todd Springer

Console Table

Submitted by zen on Mon, 09/03/2012 - 14:45

Thanks Ana for the inspirations. This is my third project this summer. I used left over wood from my father's project.

Estimated Time Investment
Weekend Project (10-20 Hours)
Recommended Skill Level
Beginner

Easy Vintage Step Stool

Submitted by Veronica P on Mon, 06/30/2014 - 21:53

My one year old needed a step to reach a little higher in his and his brother's "Just My Size" John Deere themed closet so my boys and I set to work. We used Ana's "Easy Vintage Step stool" plan for inspiration but modified it to make use of the scrap wood from an old dresser. My three year old took every screw out of the old dresser all by himself and they both helped assemble the stool. They love it that much more having had a hand in the build. Thanks Ana for inspiring me to take on a hobby my boys and I can enjoy together!

Built from Plan(s)
Estimated Cost
Unknown as I was using scrap.
Estimated Time Investment
Afternoon Project (3-6 Hours)
Finish Used
Marigold yellow for the stool, black & white paint markers to paint the tractor and tracks and a couple coats of poly.
Recommended Skill Level
Starter Project

Comments

Farmhouse Table

Submitted by Anonymous (not verified) on Tue, 10/04/2016 - 17:11

This was a lot of work but so worth it. Thanks for the helpful information and plans!

Estimated Time Investment
Week Long Project (20 Hours or More)
Recommended Skill Level
Intermediate

Queen Size Fillman Storage Bed

Submitted by sandrabees on Wed, 09/05/2012 - 06:43

This was a BIG project for me. I learned a lot along the way. I modified the plans from the fillman storage bed (twin size to queen size). For the most part the main changes I made were in the Headboard and footboard. I added the width to make them queen size. The bases for the drawers I kept the same size for the most part. I have all of my dimensions and notes written down and will come back and add those.

I shortened the height of both the headboard and footboard by a couple of inches which enabled me to get them both built using 1 sheet of wood. I used a combination of birch hardwood and pine.

This was my first time building anything with drawers... 12 drawers was a bit daunting too! But with much sweat and love I worked thru this. This was built for my son and he loves it! I did add knobs to the drawers and need to update a picture!

Overall I spent about $200 on my wood. $100 on the drawer slides. and I got 25 wood knobs that I stained to match online for about $1 each.

My son loved the bed. I did not permenately attach all the bed supports instead did the top middle and end pieces. the others just lay in place and can be removed easily and large totes can be stored beneath.

My son was moved into the bonus room and as you can see the ceilings are low. This bed eliminated the need for a dresser and as a bonus no toys can get under it!

I have more pix on my blog.

I spent about 10 days from start to finish. a few of those days I worked a lot, in between I had to tend to 3 kids and life and rest my sore arms LOL

Estimated Cost
$350
Estimated Time Investment
Week Long Project (20 Hours or More)
Finish Used
Minwax "English Chestnut" plus 2 coats of poly finish
Recommended Skill Level
Beginner

Comments

Sarah W

Tue, 01/29/2013 - 07:24

This is EXACTLY what I've been looking for! You mentioned modified plans, have you posted those? If I've overlooked them, I apologize.

Cedar Patio Table

Submitted by rygy on Thu, 07/03/2014 - 18:19

I grabbed this idea from one of the brag posts linked off of Ana's easy dining table post. The entire table top is made from clear Western Red Cedar. The legs are made from 4x4 cedar fence posts (the clearest I could find). The table top is 5ftx5ft. All the joints were made using Kreg's pocket hole kit.I did change a couple of things from the original picture that was posted:

1. I notched out the 4x4 cedar legs to accept the main frame of the table top (which provides the best support possible) and also bolted though the leg and frame. Not to mention it gives it a more finished look than simply putting the legs inside the frame and bolting through.

2. I also made a custom bracket to support an umbrella so that I did not have to have bulky umbrella stand under the table (see attached pic)

I finished the table and bench with two coats of Teak Oil. I am not convinced this was the best choice, but it sure did look awesome the first month after it was complete. The colour of the cedar has faded a bit now that it has been out in the elements for two months. Any further suggestions on great finishes that hold up to the weather are appreciated.

Estimated Cost
$290.00
Estimated Time Investment
Weekend Project (10-20 Hours)
Finish Used
Teak Oil
Recommended Skill Level
Intermediate

Comments

mmeixner

Thu, 06/30/2016 - 20:50

I really love this table. Could you provide more details on construction, or post more photos of under the table? What is the table top's thickness? Looks like you used 13 boards 1x4 and the outside boards seem to be 1x8 but I'm not sure. Also, how did you attach the table top to the base ?

thank you, great work!

Michael

Sandbox with Benches

Submitted by boneill on Thu, 07/09/2020 - 04:39

Awesome sandbox !!

I’ve made a couple of these . One thing to save you money that I switched to on my second one is making the frame from 2x material vs 1x. Looks better too and is more sturdy .

Built from Plan(s)
Estimated Cost
$65
Estimated Time Investment
Afternoon Project (3-6 Hours)
Finish Used
Cedar deck stain/sealer
Recommended Skill Level
Beginner

Pallirondack Laundry Basket Dresser

I showed my wife the Laundry Dresser featured on Ana White's website and she asked if I could make one for her, but not quite so tall. I also turned the orientation to fit our laundry room space. I used primarily oak from recycled pallets to build the Laundry Basket Dresser. She wanted a work space on top, so folded laundry, empty baskets, etc. all have a temporary resting place depending on the day. From start to finish, it took me about 6 hours. She plans to stain the piece at some point, but its already in use, so I'm not 100% sure that will ever happen until we move or something. ;-) Great idea and laundry room organization!

Estimated Cost
Half a box of screws
Estimated Time Investment
Afternoon Project (3-6 Hours)
Recommended Skill Level
Intermediate

Comments

Kathy in Pittsburgh (not verified)

Mon, 09/10/2012 - 10:22

I love the open sides, plus it makes it much more feasible to build with scraps repurposed wood, which I love. Thanks for the inspriation

payne.kj

Mon, 04/08/2013 - 08:48

Hi, do you have any kind of plans for how you did this or atleast dimensions? I think this one fits more of what my wife needs, but I'm pretty new to making anything.

nicholas_ftm

Sun, 06/14/2015 - 20:16

Soooo I made this according to the measurements and no laundry basket I find fit. Kind of dissapointed in the fact that this cool thing I just built doesn't have any baskets that will fit it. Any advice on finding a basket that fits?

jkread

Fri, 07/10/2015 - 20:56

I think the idea is to build it to fit the baskets you have or buy some and build around them.

Back