Community Brag Posts

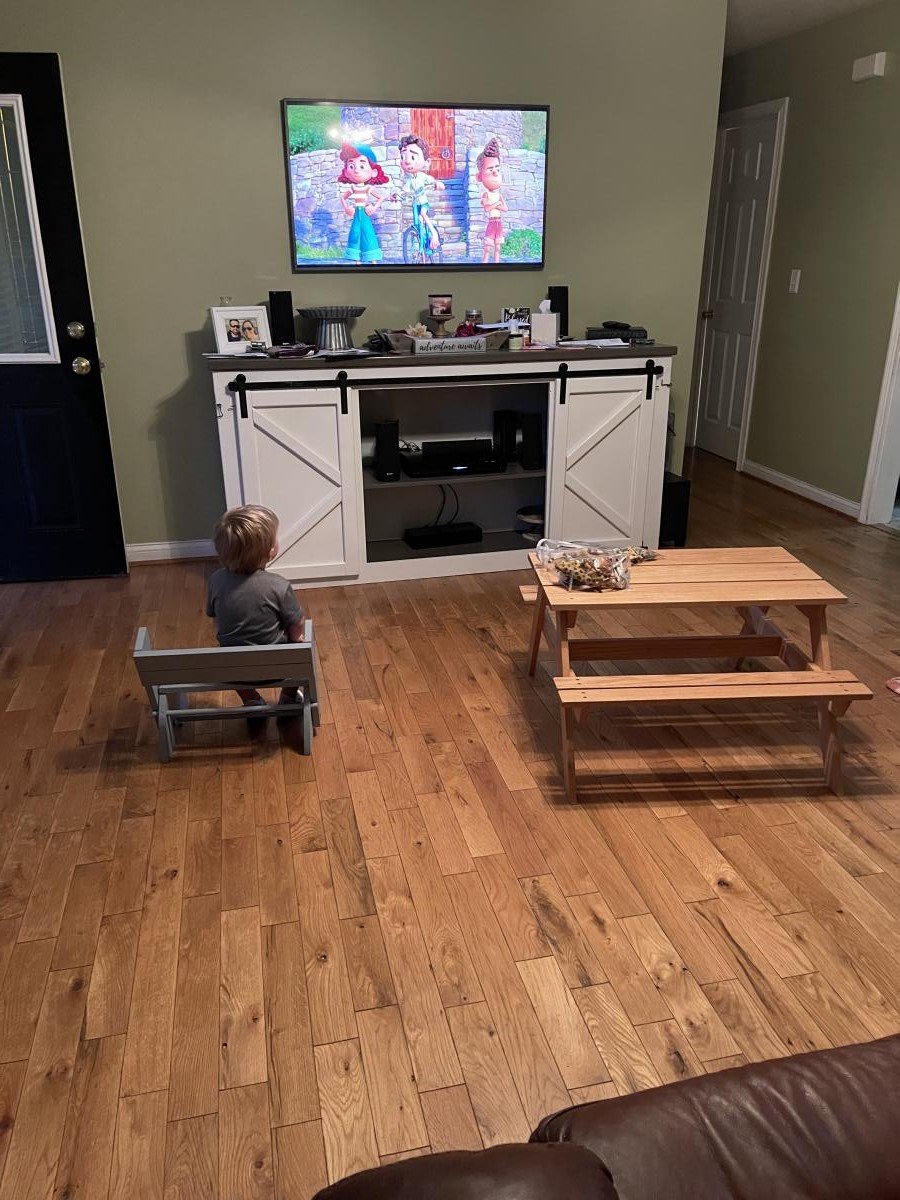
Little Kids Picnic Table
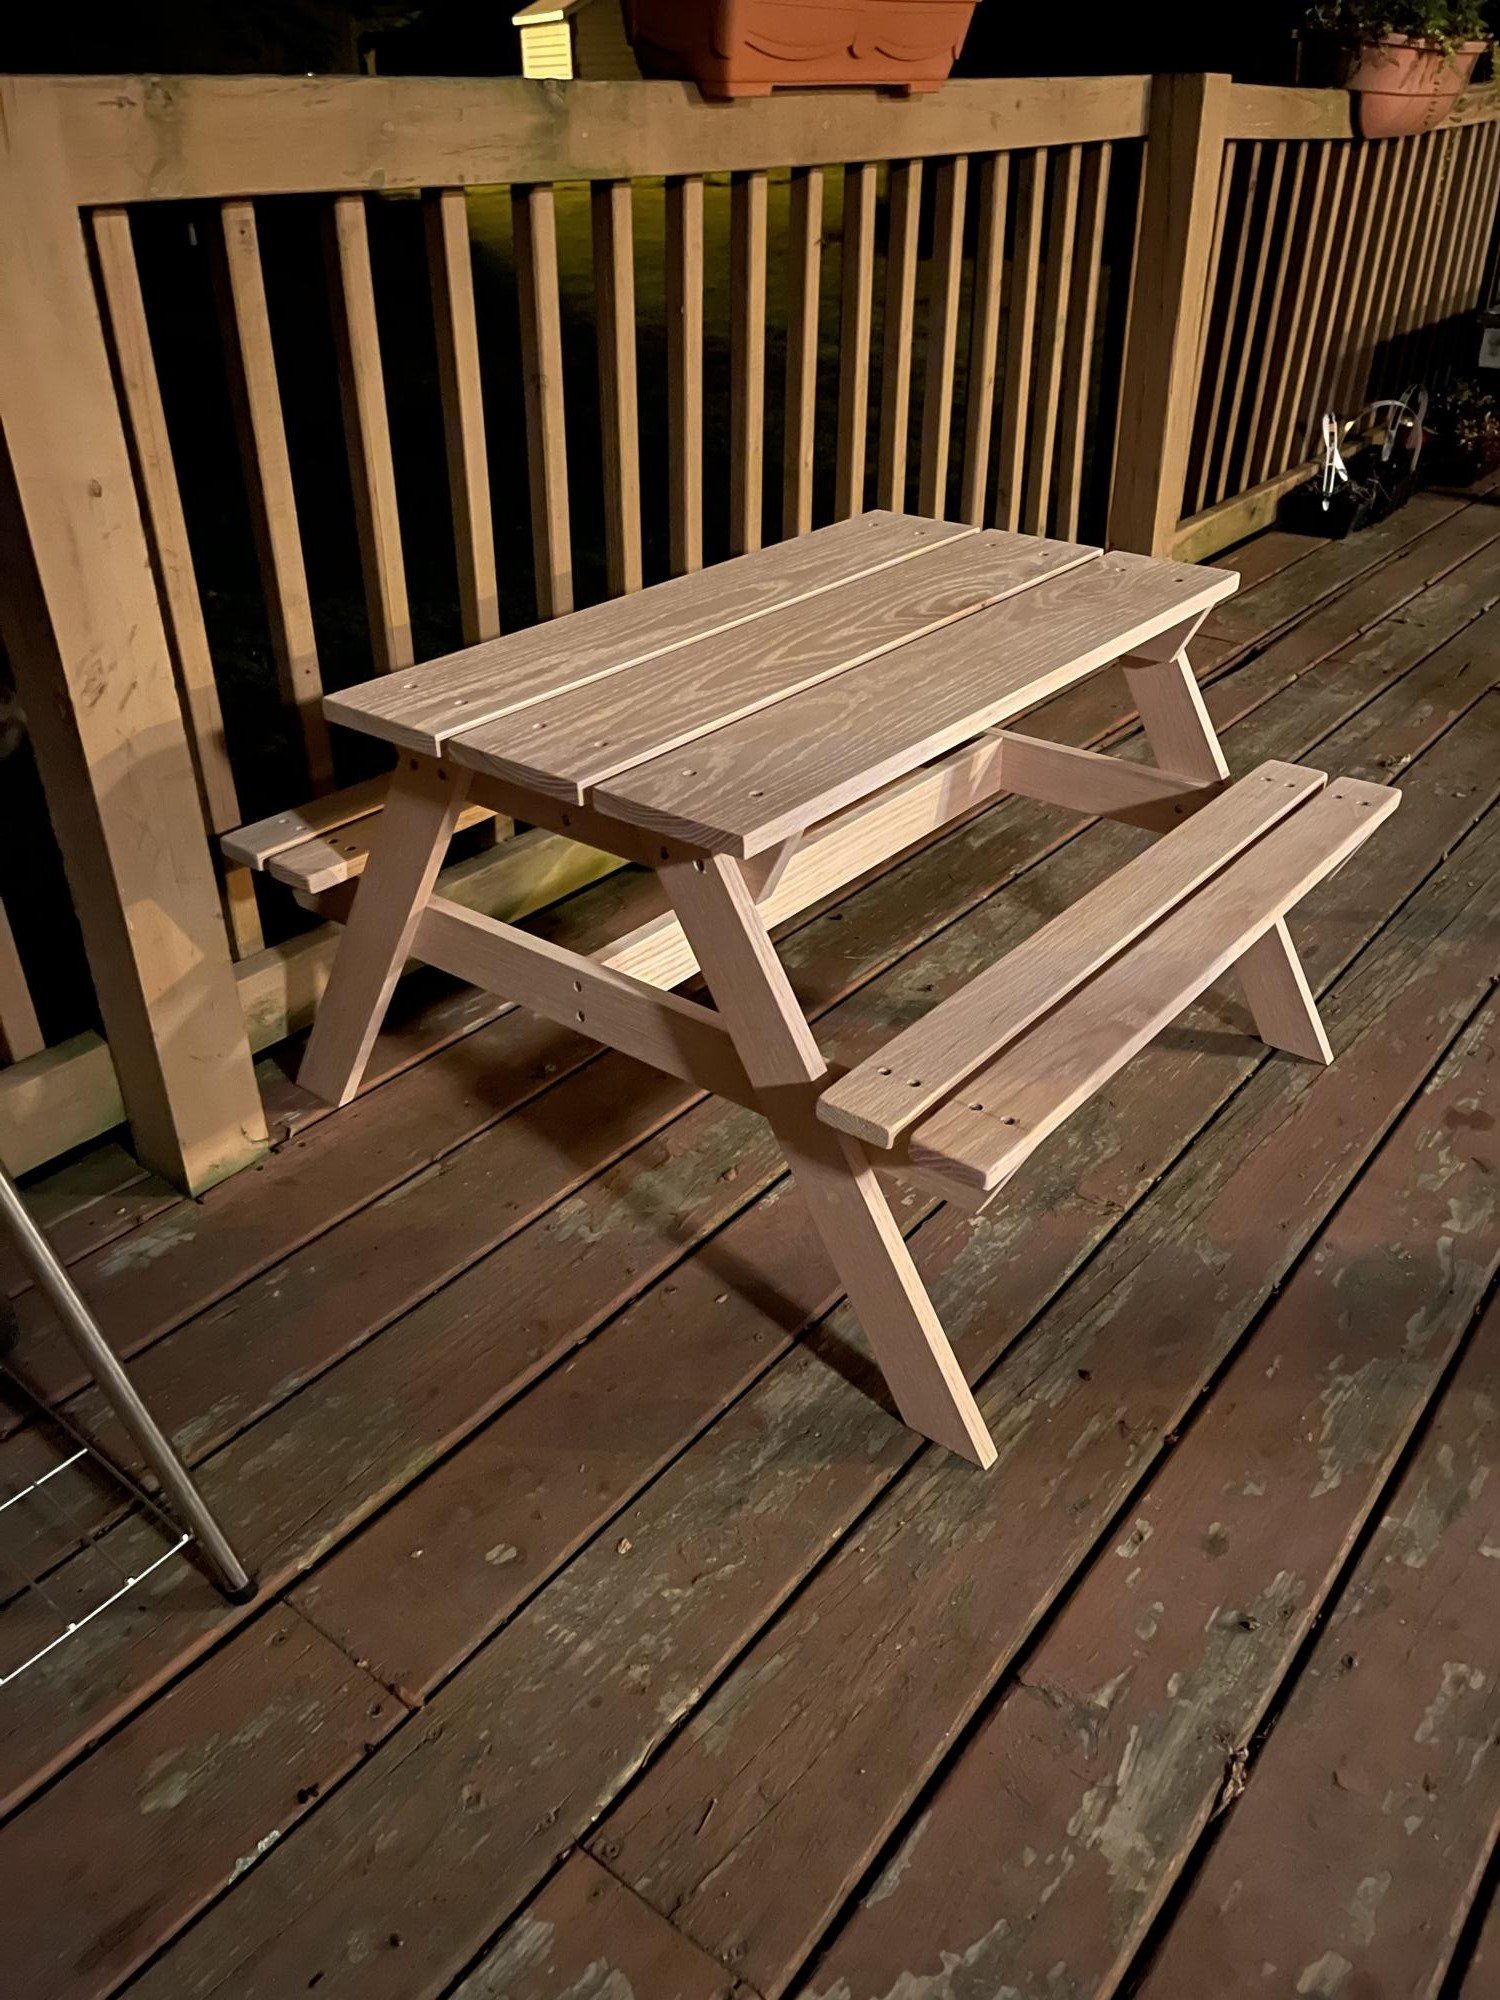
This little table was built for our grandson who loves it so much, it was taken inside. About 6 hours, and he took possession of it. Amazing piece!
Built from Plan(s)
Comments
Tue, 10/05/2021 - 07:02
SO ADORABLE!
I love this so much, such a great table and what an adorable grandson! Thank you for sharing~
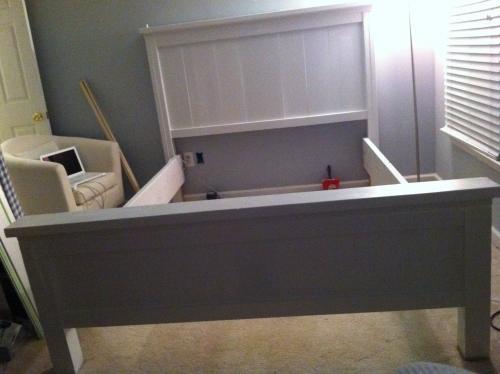
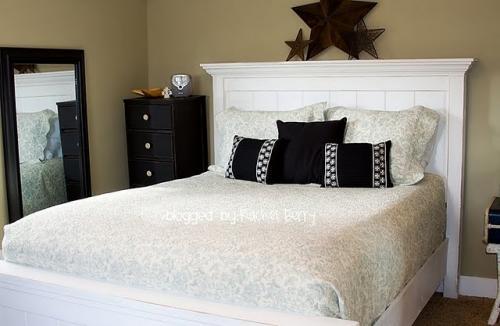
90% Reused/Reclaimed Wood Farmhouse Bed!
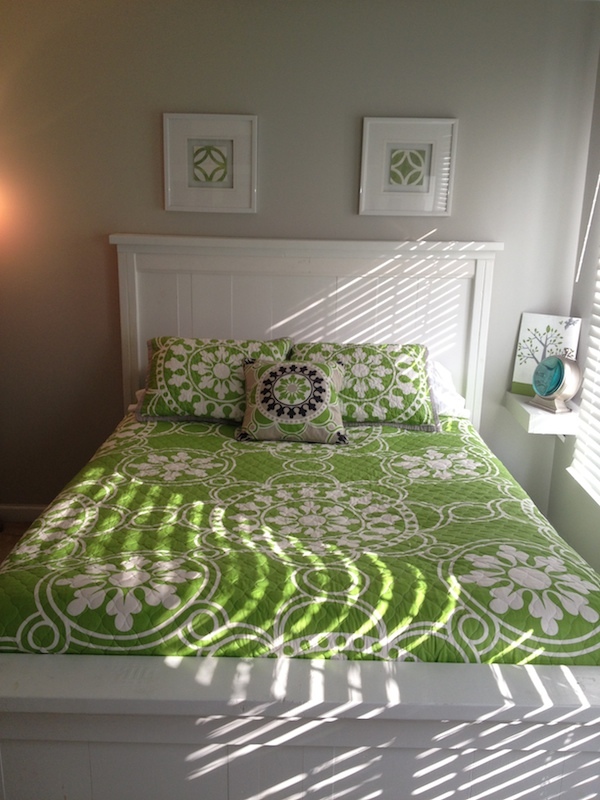
90% of this bed is built with scrap wood and re-used wood. I built this bed in 5 hours. (Not counting priming, painting, and filling).
The panels on the headboard and footboard instead of being all the same size are what I had leftover from other projects and lucked out with it balancing as the following:
HEADBOARD PANELS: from left to right --> 1x8, 1x3, 1x8, 1x8, 1x12, 1x8, 1x8, 1x3, 1x8.
FOOTBOARD PANELS: from left to right --> 1x8, 1x8, 1x12, 1x3, 1x4, 1x3, 1x12, 1x8, 1x8.
I only had to cut all of these boards to length, not width, and it all worked out PERFECT to make the panels.
Instead of the 4x4 posts, I used 2 2x4's that I had saved from when I ripped a closet and soffit out of our master bathroom. Those 2x4s are also used for the construction of the headboard and footboard, and the trim on top of both.
The only pieces of wood I had to buy were the 2x6 tops of head/footboard and the 2x10s for the side rails. T
The whole bed has dings and holes and dents and stuff all over it because of it being re-used/scrap wood, but I love the look of it. I painted it a gloss white to balance all of that. I found bedding that is green and white on one side and gray and white on the other side to match the color scheme of the room - and now it's done and I couldn't be more proud!!

Built from Plan(s)
Estimated Cost
$25
Estimated Time Investment
Afternoon Project (3-6 Hours)
Finish Used
kilz primer and white semi gloss paint
Recommended Skill Level
Intermediate
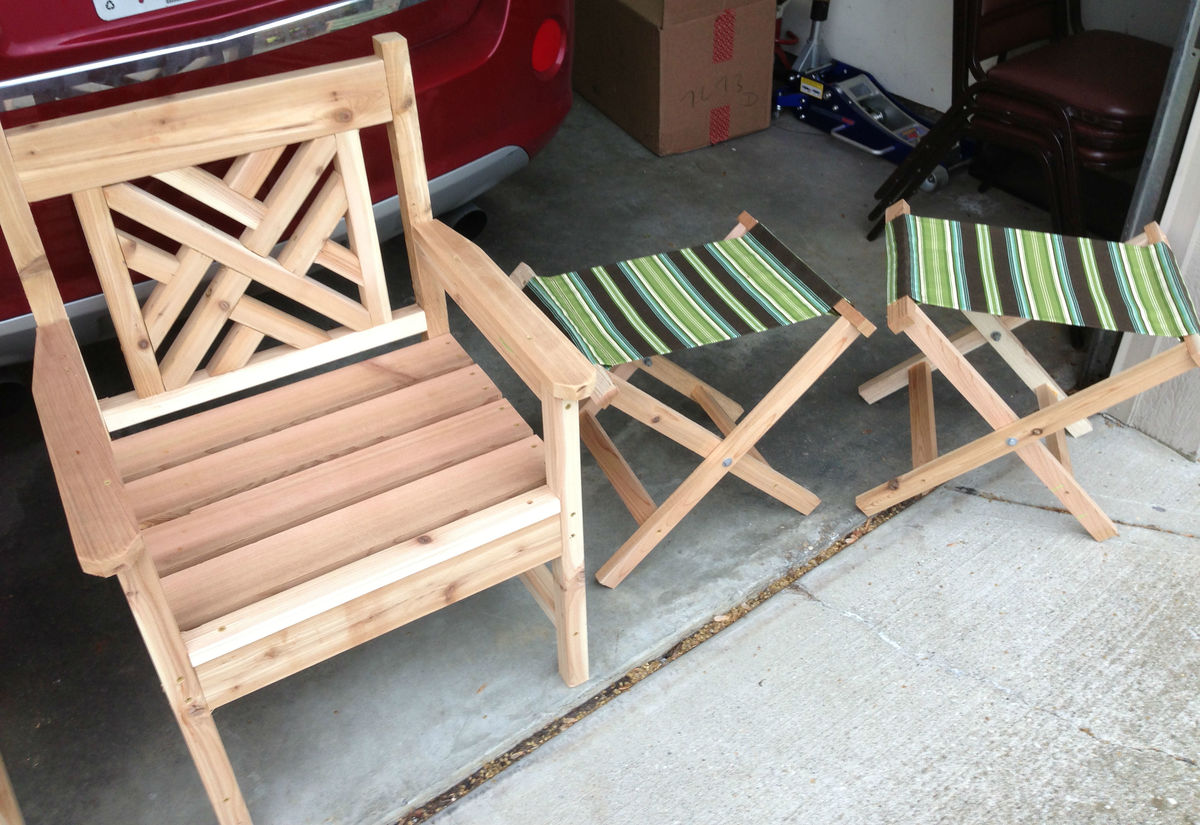
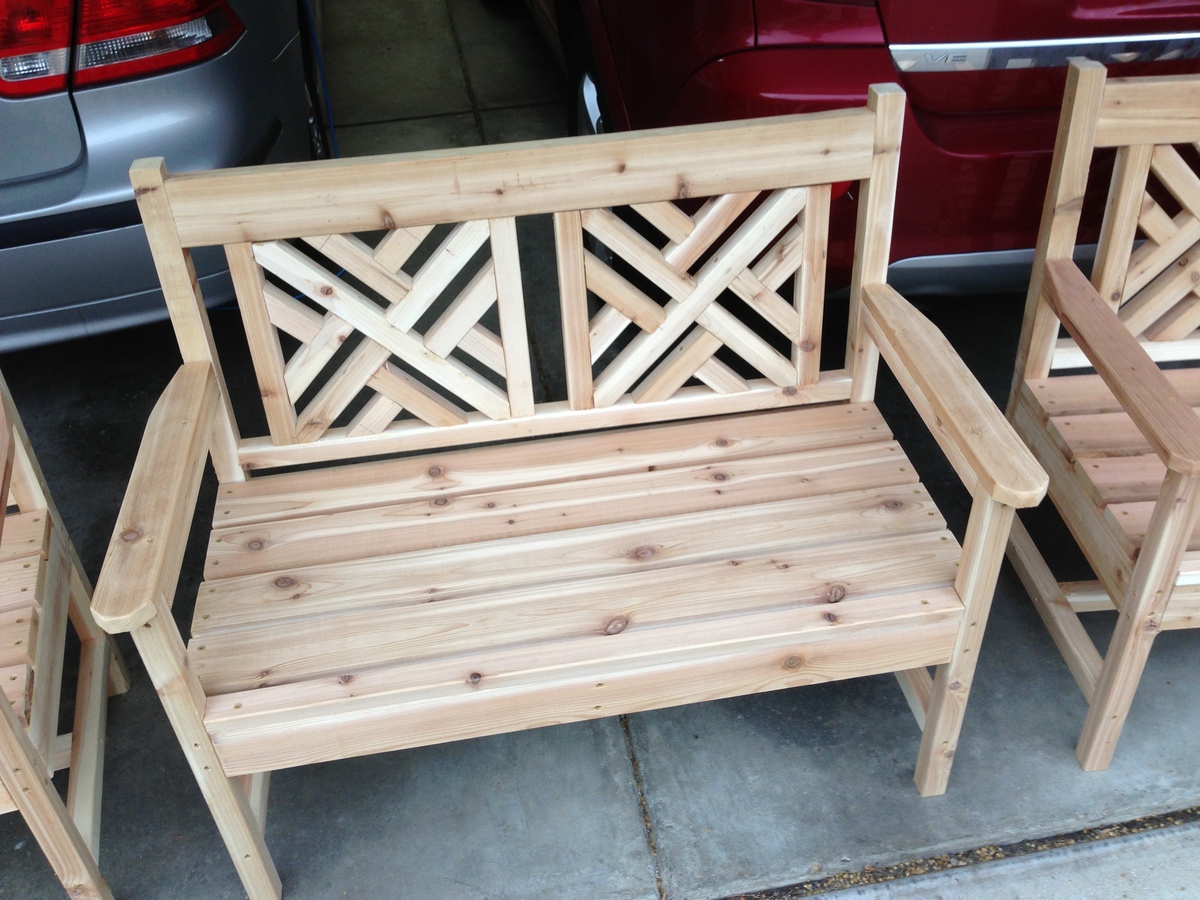
Patio Furniture
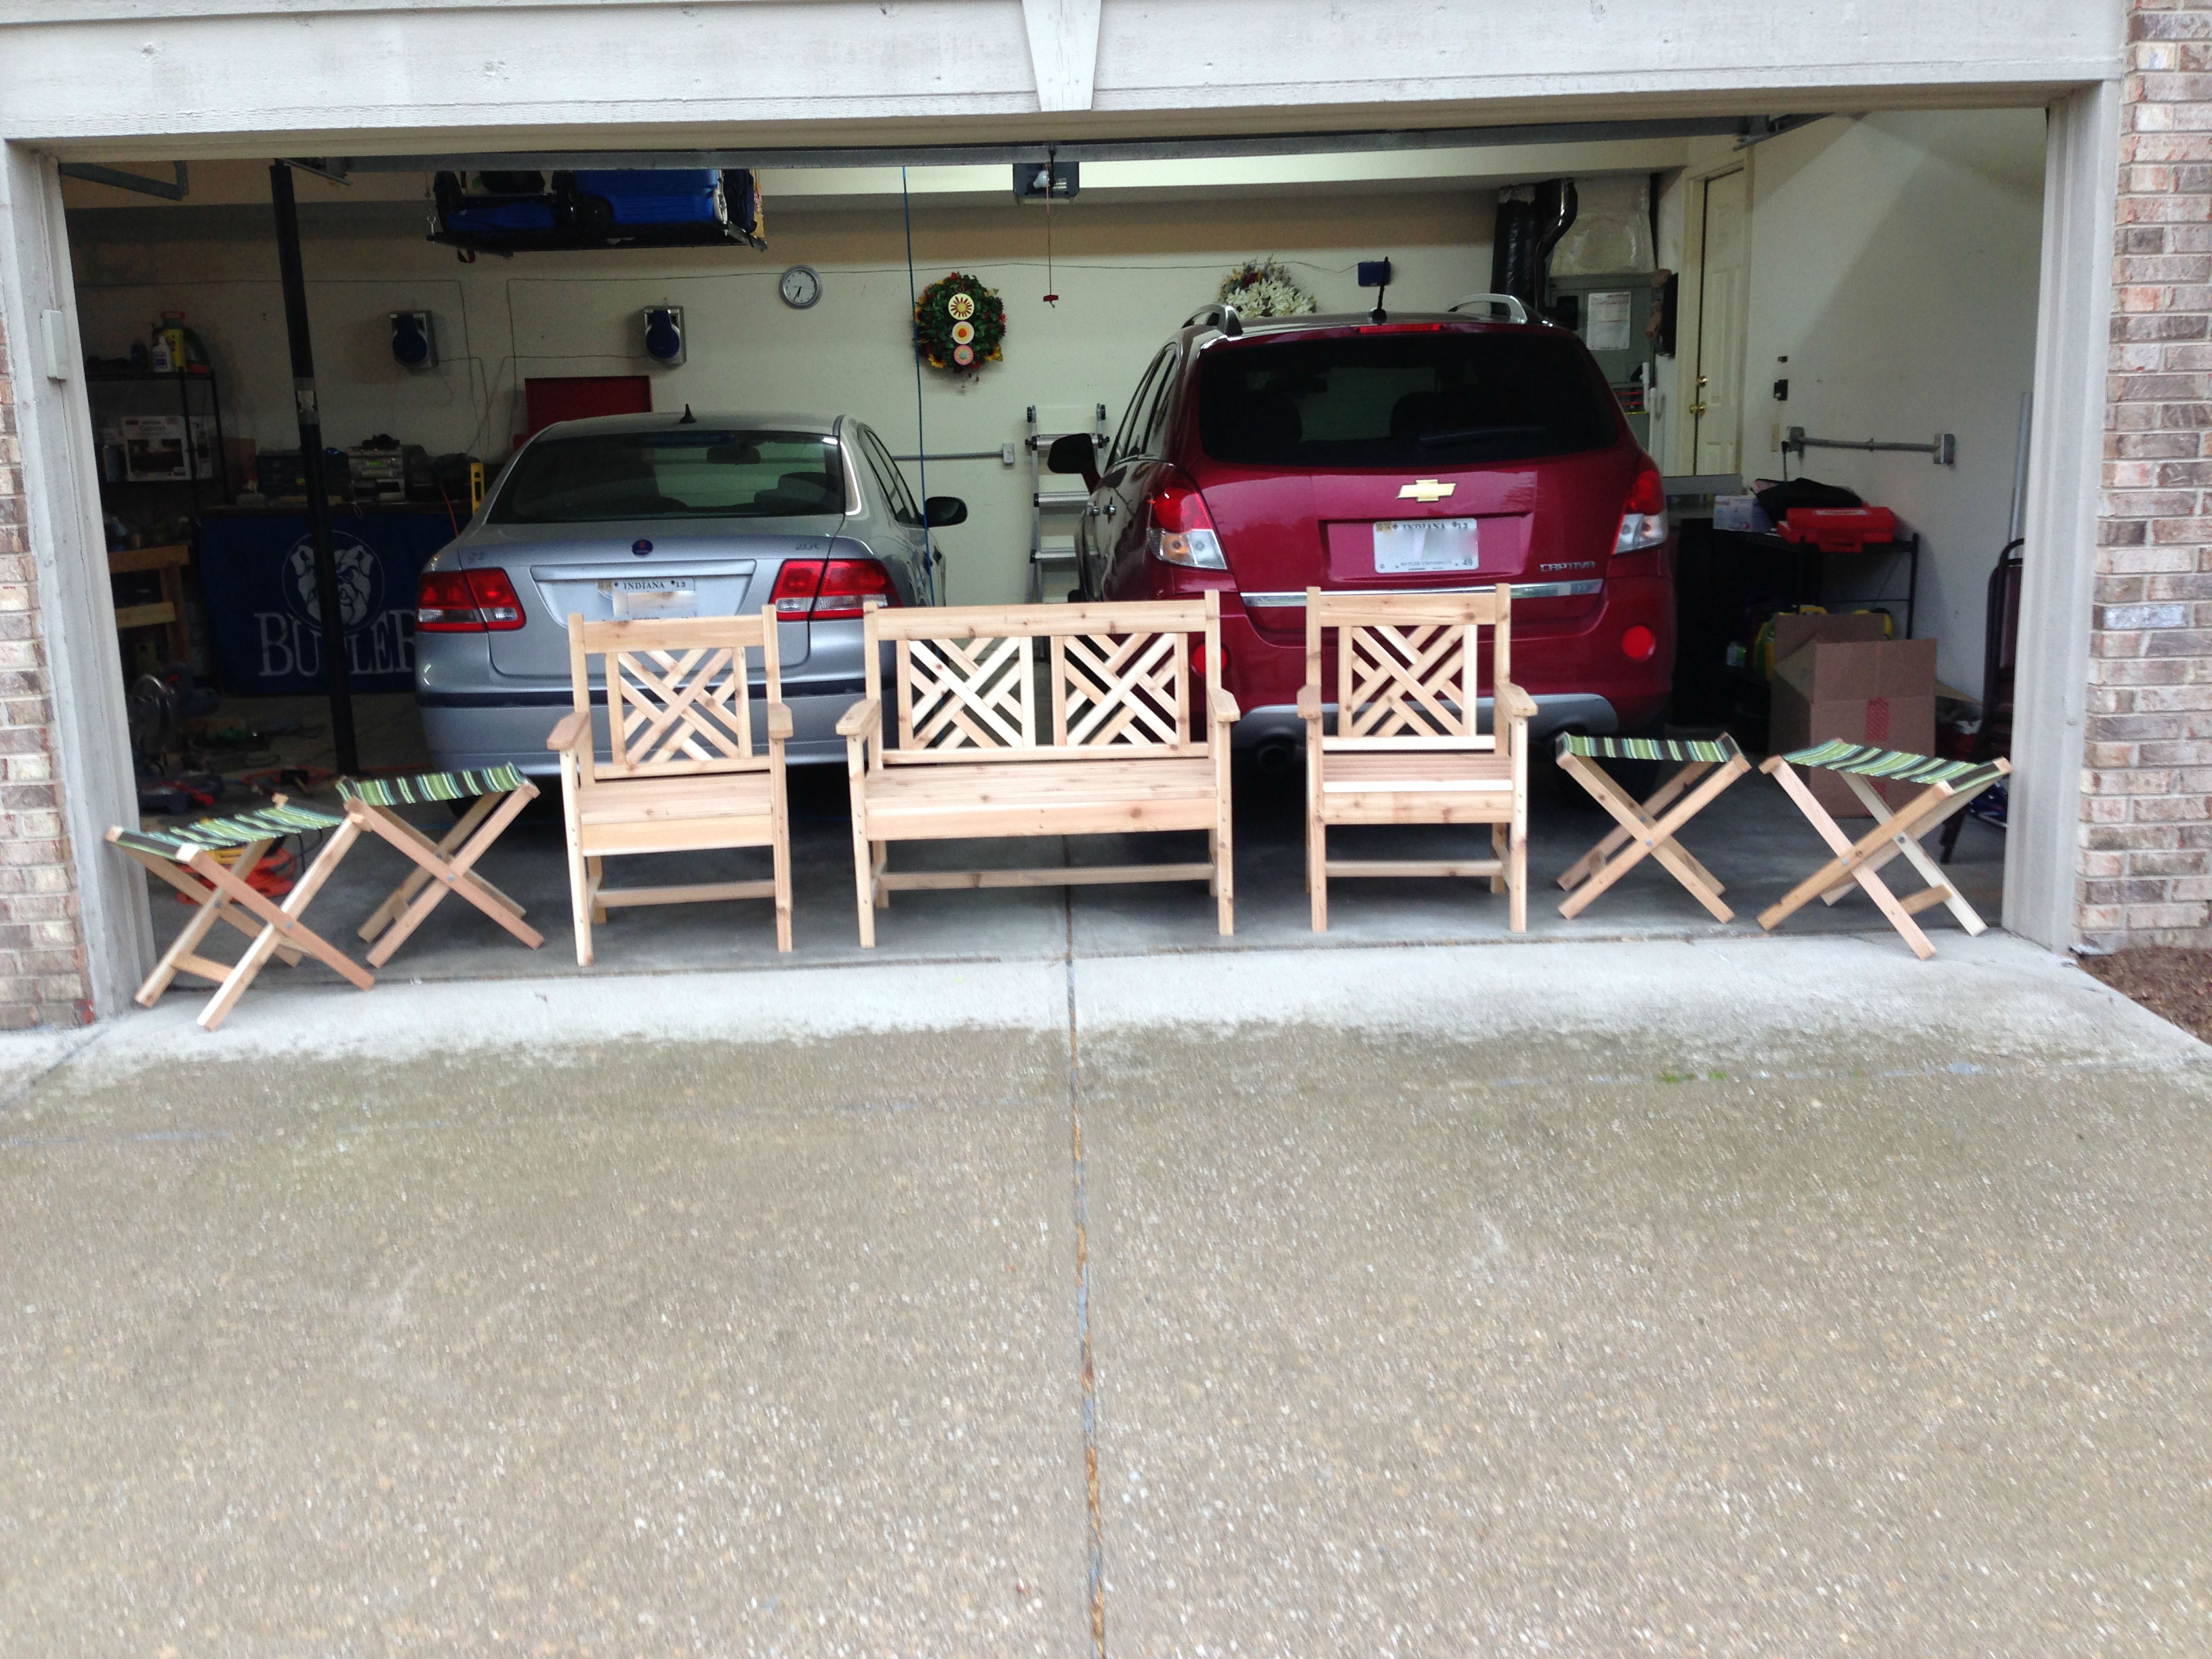
Memorial Day weekend project for my wife and I. These will go around our firepit out back, but it was raining so we just took pics in the garage where they were assembled. I built the woven back bench and used the plan (and SketchUp) to modify the plan for 2 chairs as well. I mirrored the weave on the bench and the 2 chairs for a bit of visual contrast.
I also used the plan for the folding camp chairs but simplified it a bit by removing the upper strechers and dowels and just making the fabric on there permanently. These will only be pulled out if we have more than 4 around the fire.
Built from Plan(s)
Estimated Cost
175
Estimated Time Investment
Weekend Project (10-20 Hours)
Finish Used
No finish, just the natural wood
Recommended Skill Level
Intermediate
Comments
Sun, 08/18/2013 - 18:04
Love the chairs!
I've been thinking of making the bench, but I really like the chairs as well. Your set looks fantastic!
Toy Shelf / Bins
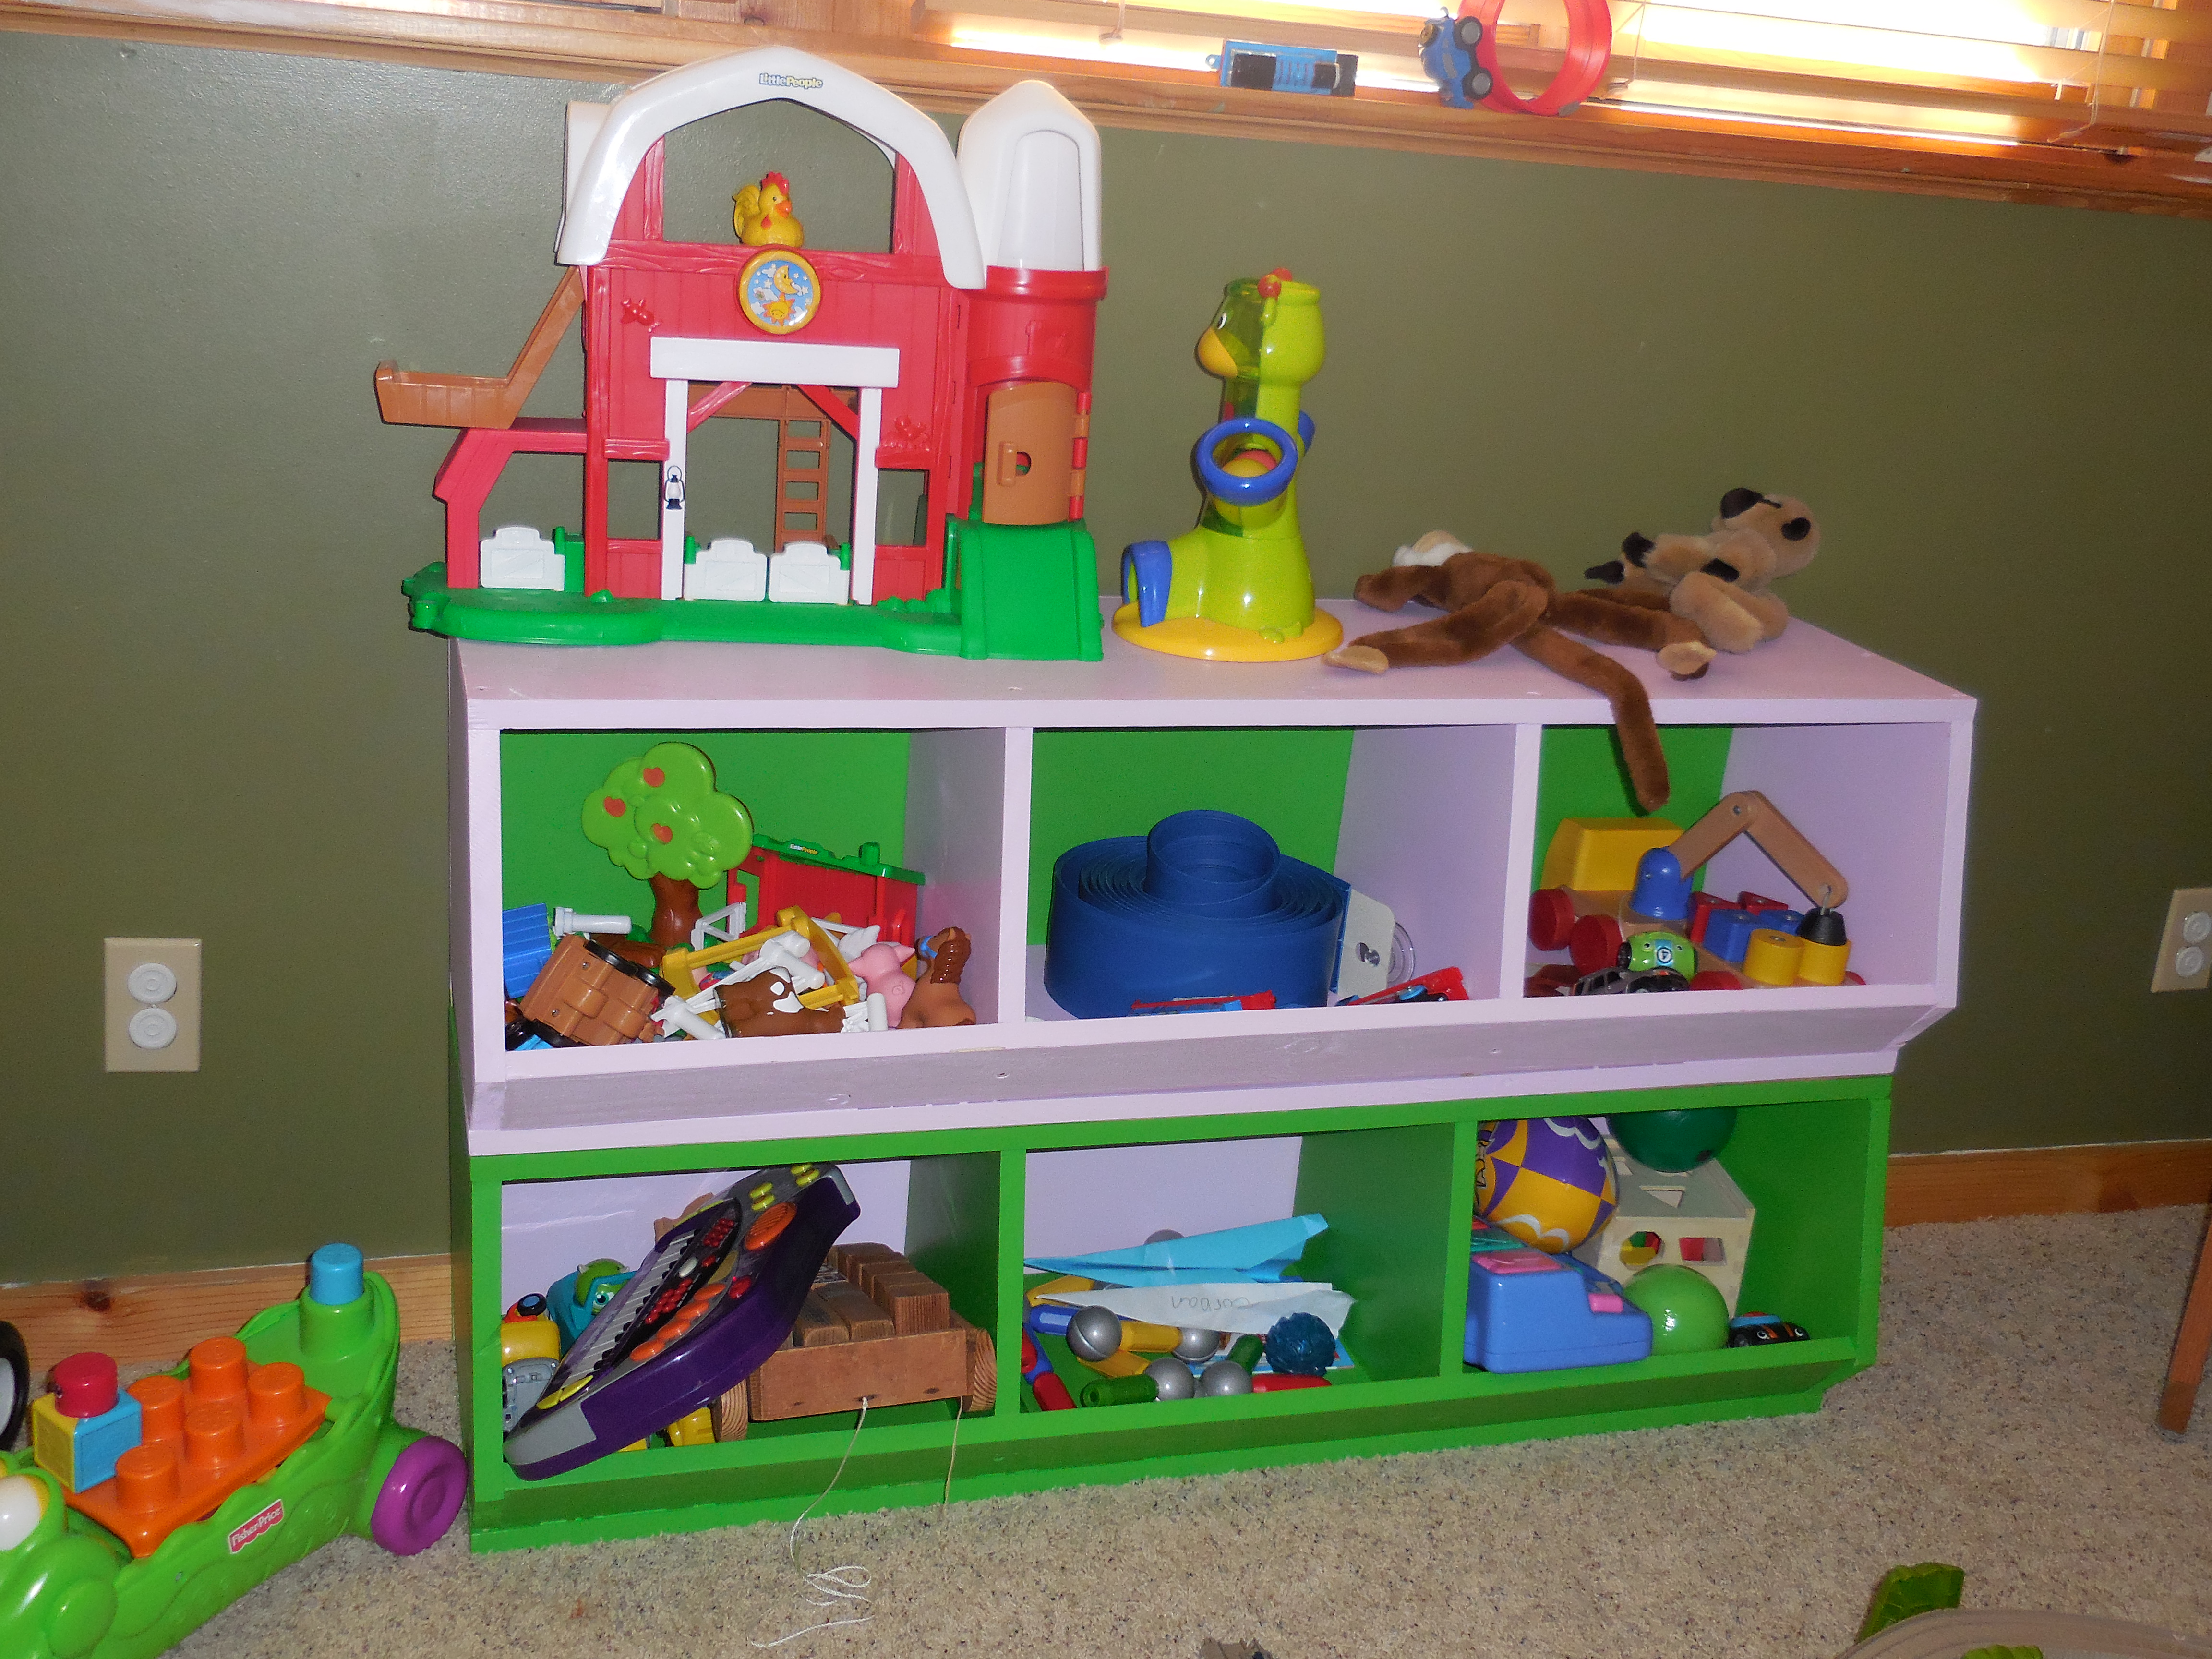
I am a beginner, so I took it slow. Working during nap time mainly (too dark / cold after bedtime!), this took me a couple weeks. I learned a lot and should have asked my husband for more help/advice; don't look too close! I loved Ana's stain color, and fully intended to copy it, but decided to let my boys have some input since it is for them and their toys. They picked out the colors (I limited my point and pick 1 1/2 year old to colors that wouldn't clash!) and my 4 year old helped me paint the color he picked out. It was a fun project and a good one to learn on.
Built from Plan(s)
Estimated Time Investment
Day Project (6-9 Hours)
Recommended Skill Level
Beginner
Rustic x bathroom furniture
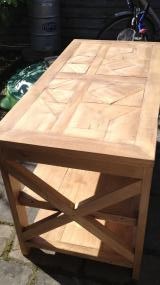
I started this project with your plans, but as you can see things did not go exactly as planned. The people I made this for wanted a mosaic countertop, so I invented this myself. I've never done this before. The whole thing had to be smaller than the plan suggested (calculate inches into centimeters is kind of hard to do), but it turned out quite good. Thanks for your plan, I will use more from this site!
I bought nice wood, so it's not a cheap project.
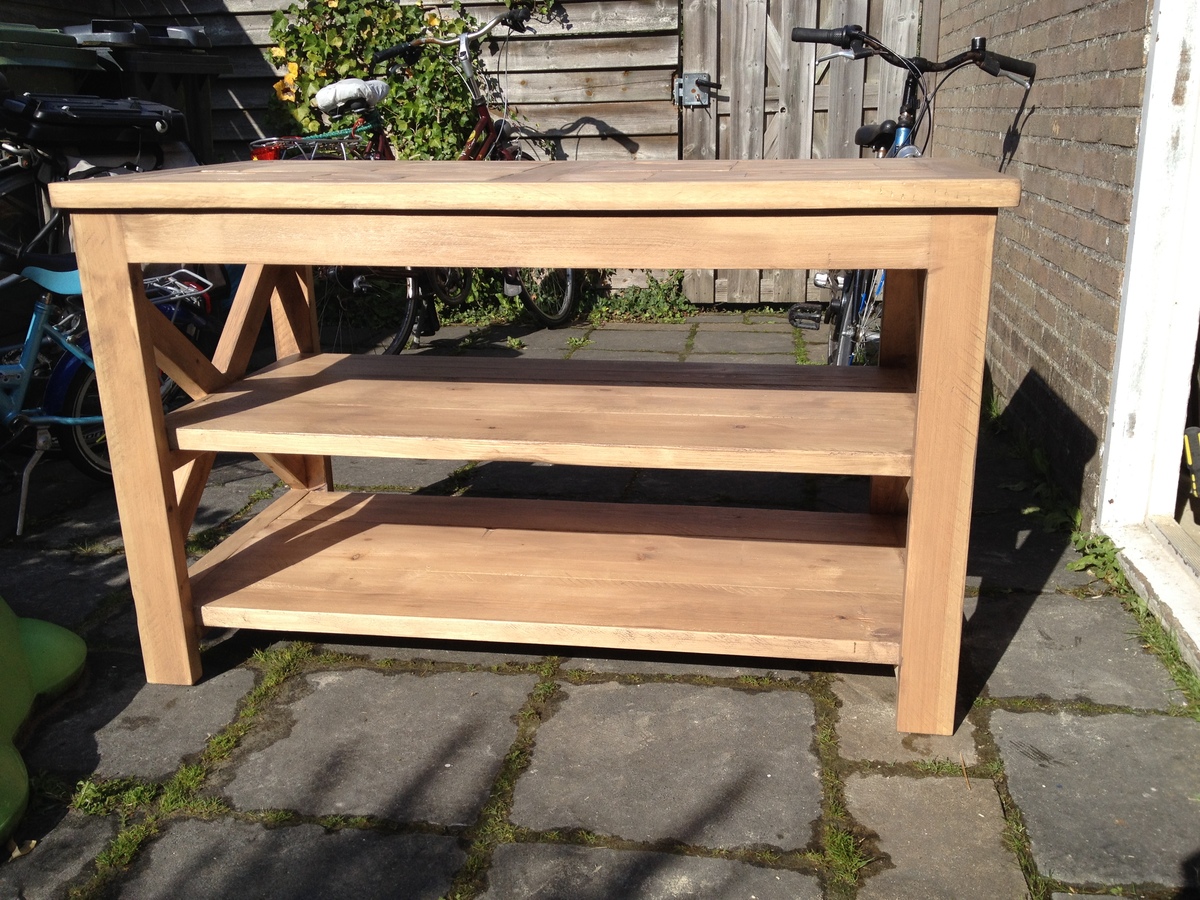
Estimated Cost
I think the costs of this furniture, everything included, is around $ 300.
Estimated Time Investment
Week Long Project (20 Hours or More)
Finish Used
I used a coloured varnish (treebark) and used a flooroil on top of that. I put it in oil twice
Recommended Skill Level
Intermediate
Rustic X Desk
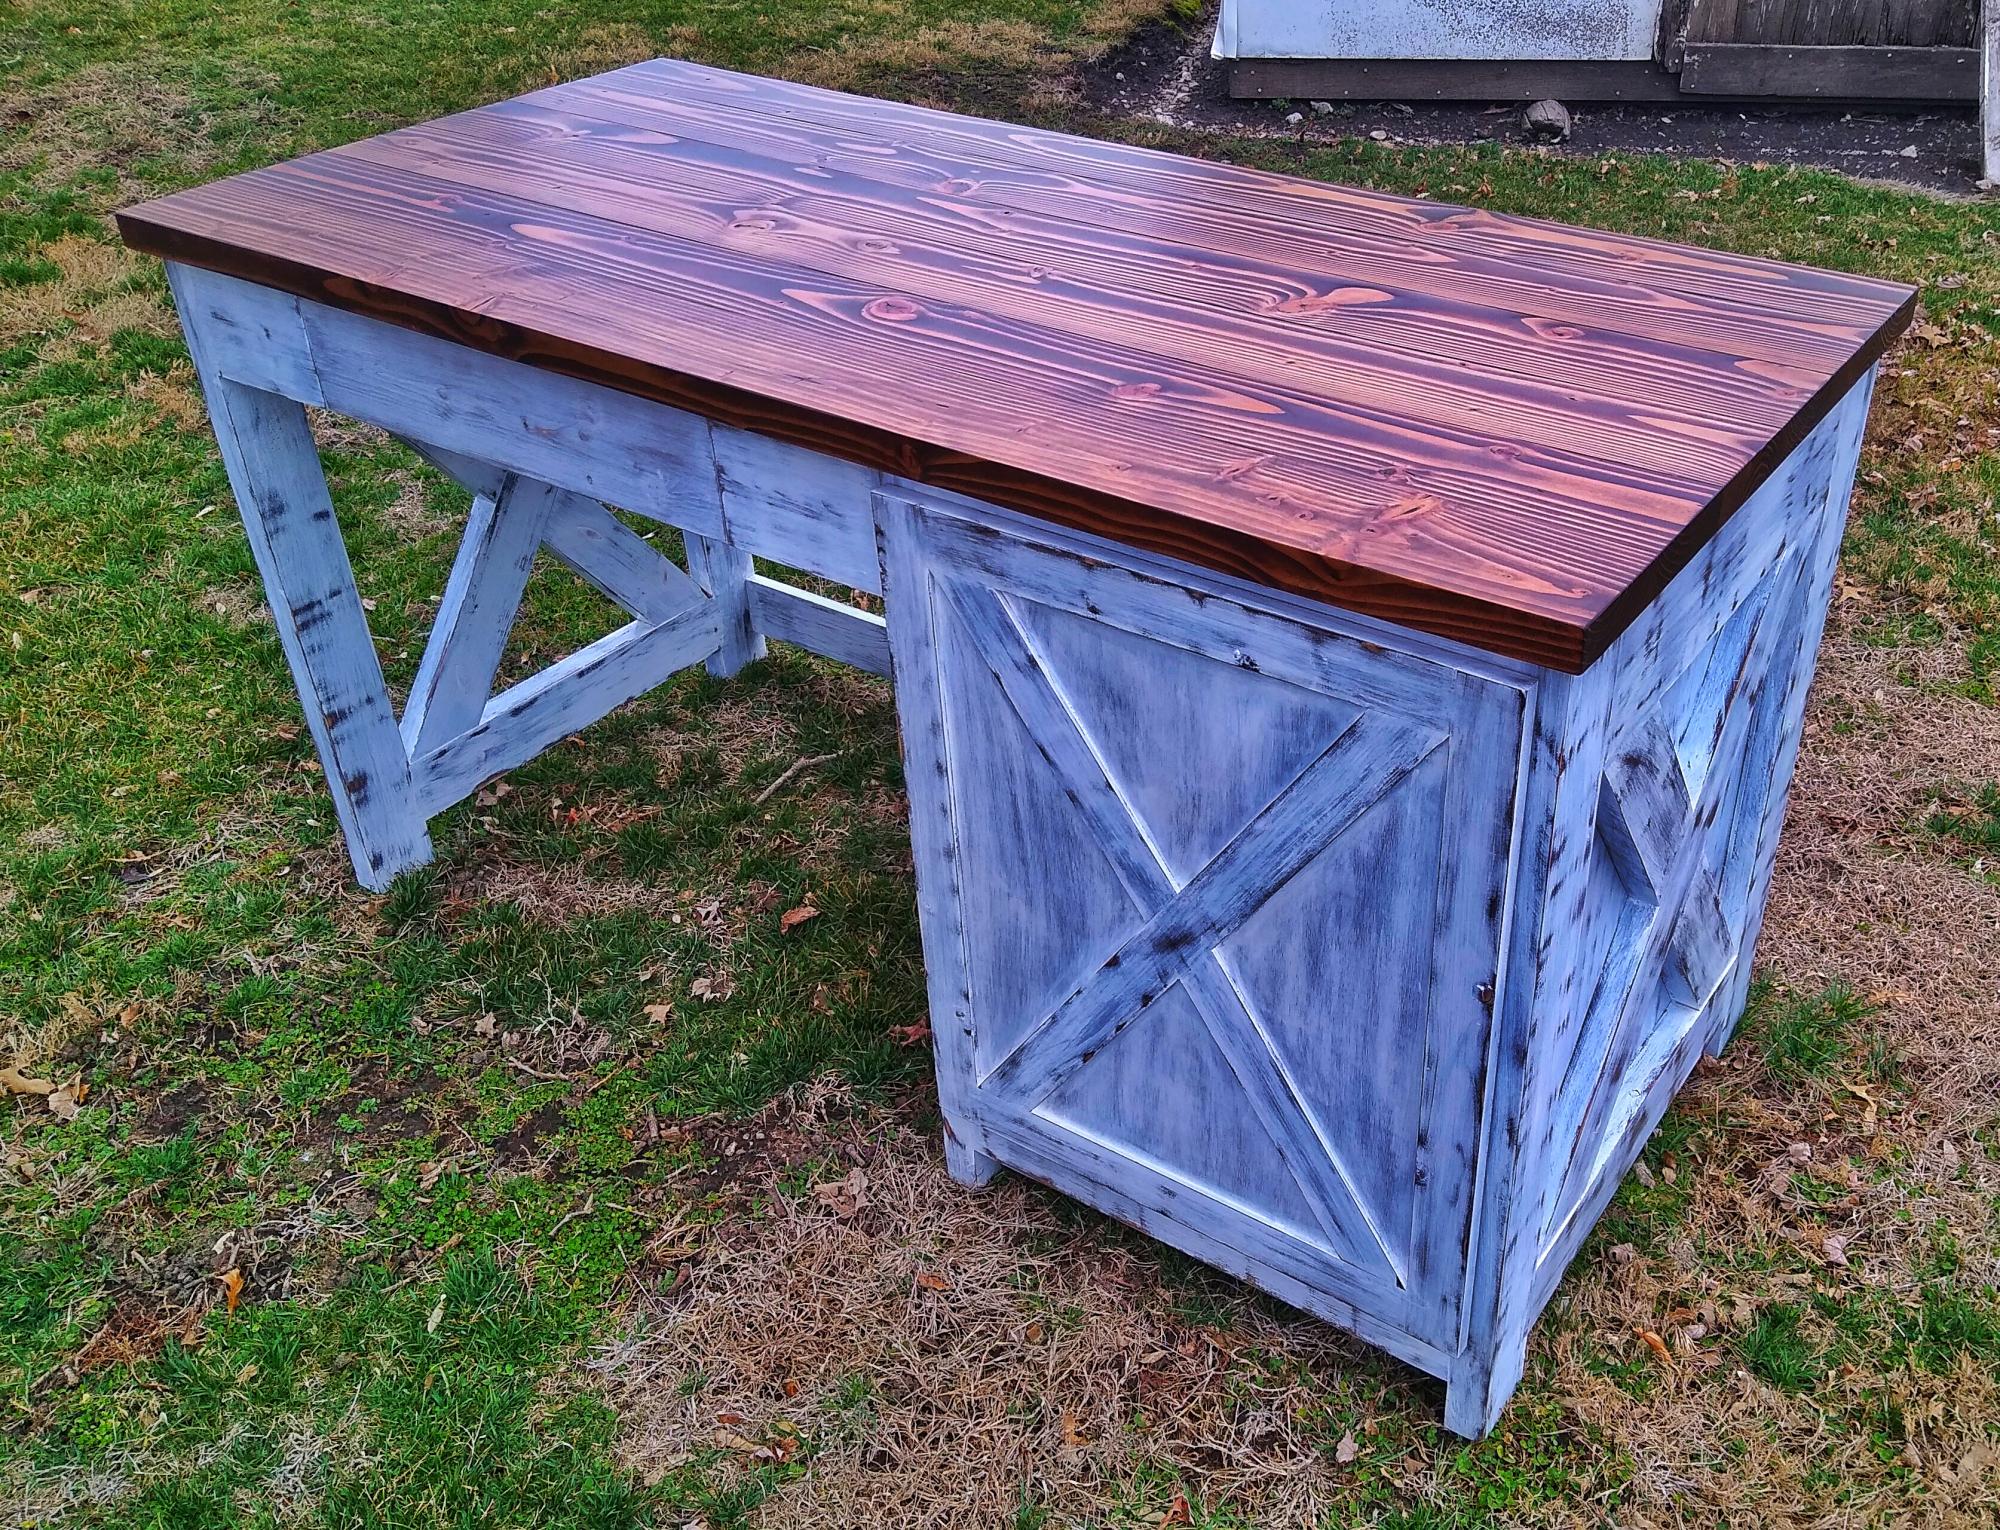
I was commissioned to build this Rustic X desk with a drawer and door incorporated into it. The finish is distressed white and a combination of Special Walnut and Espresso stain.
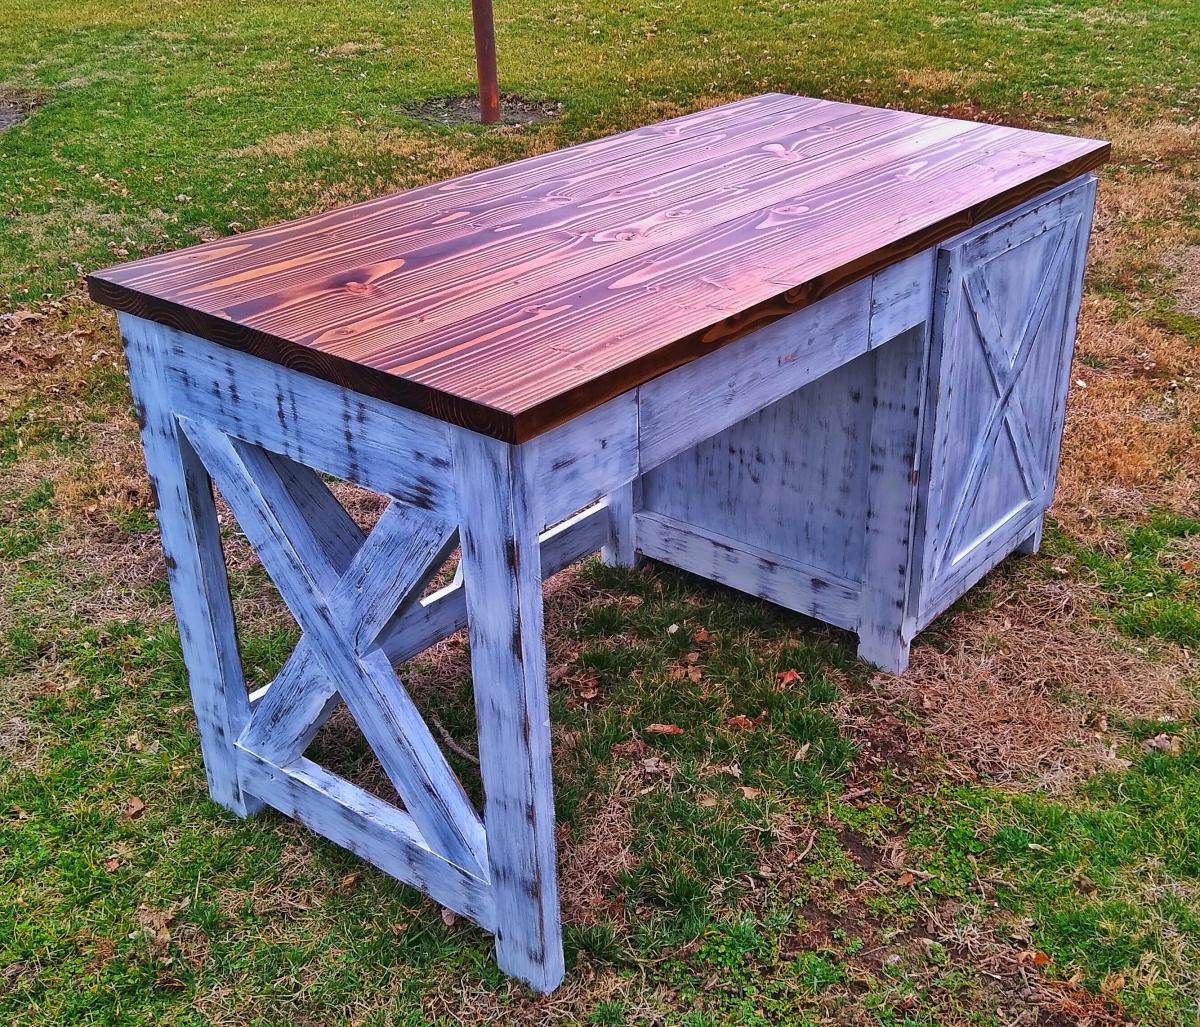
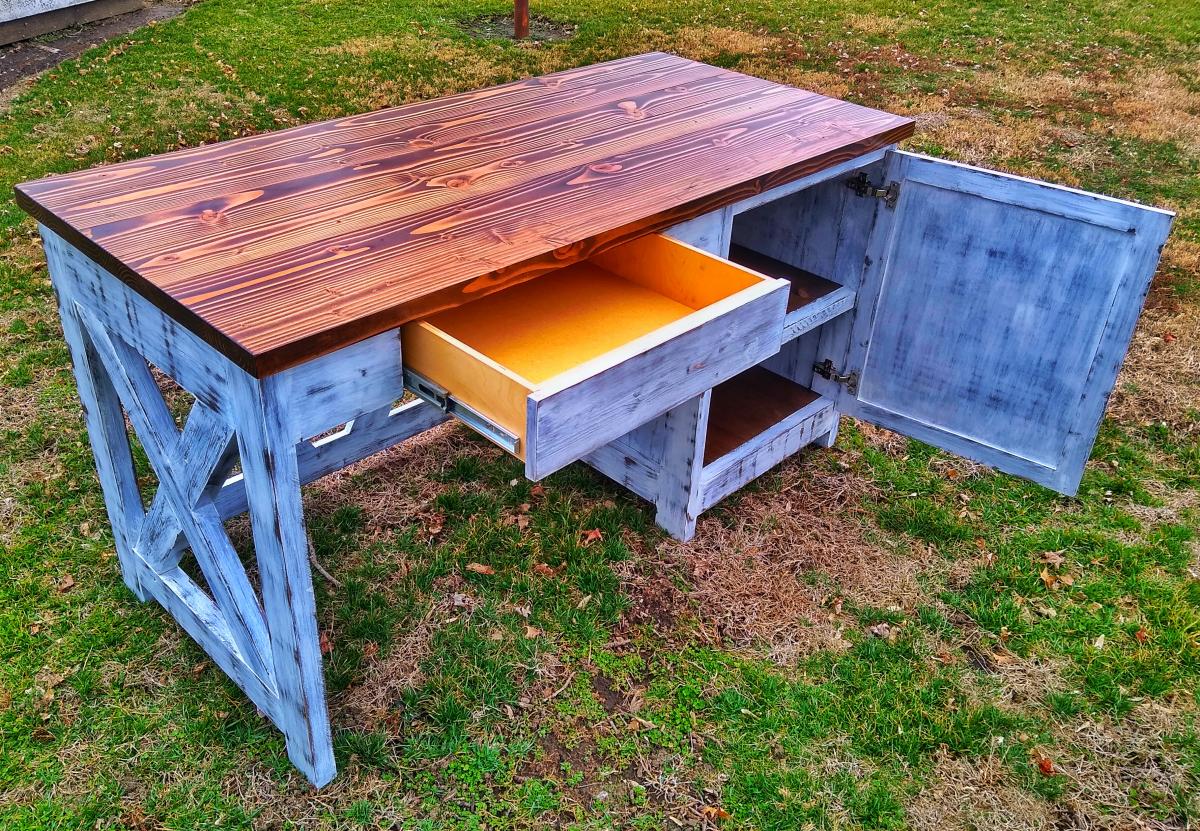
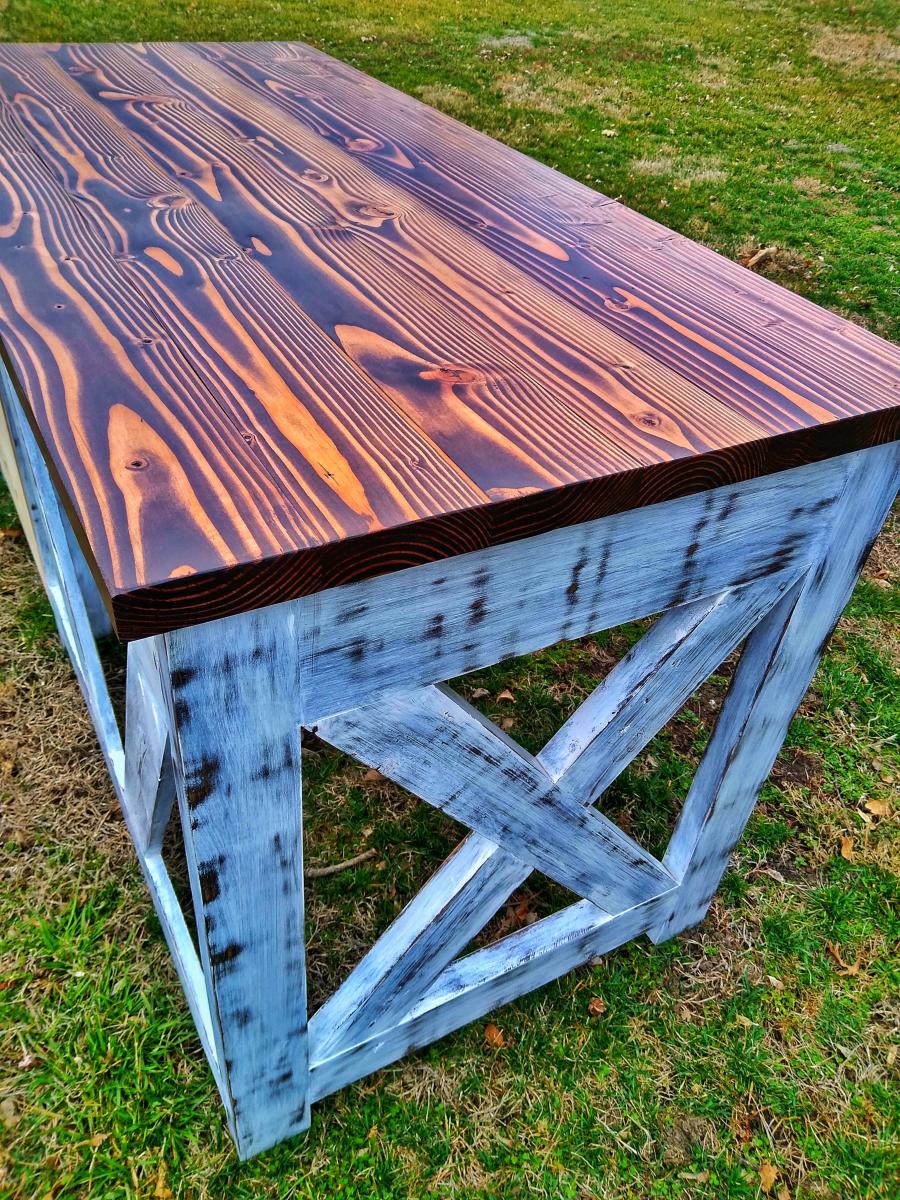
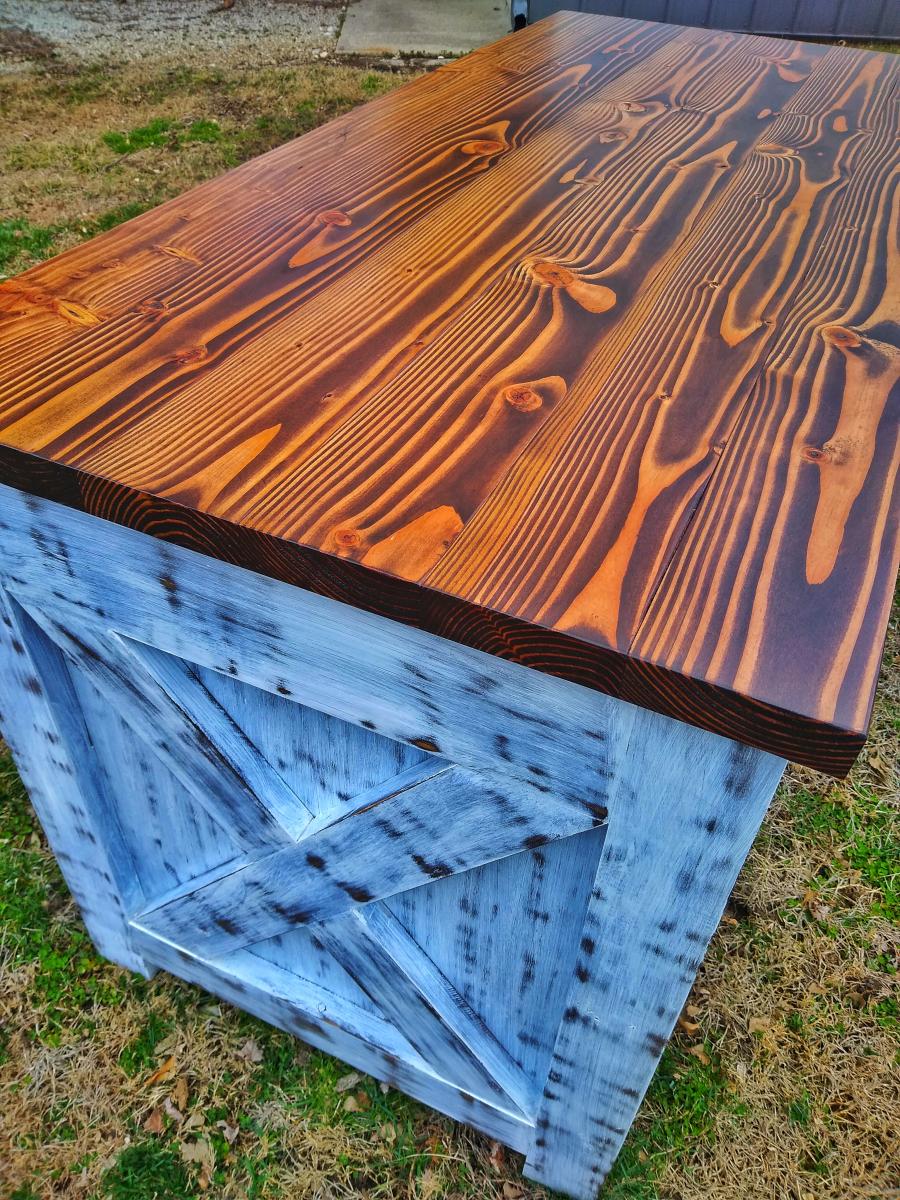
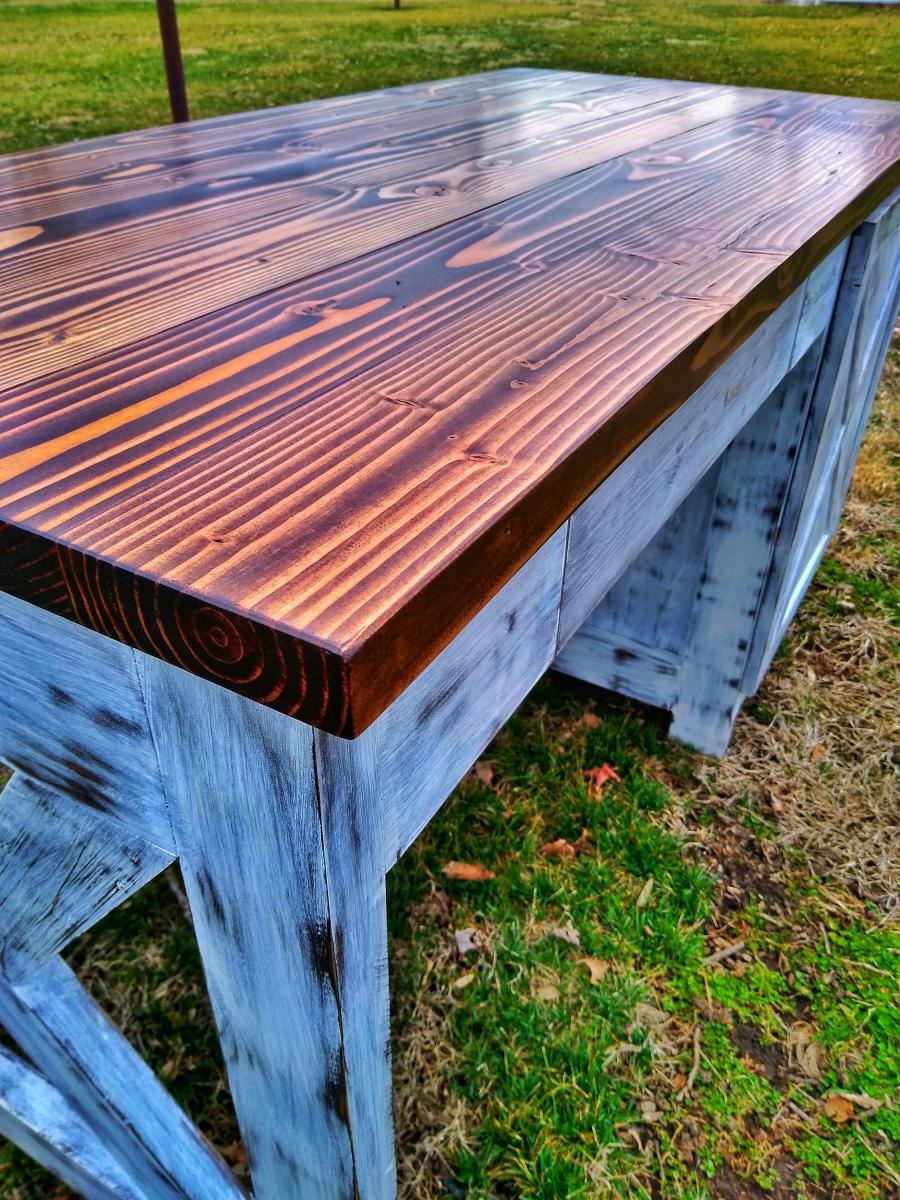
Built from Plan(s)
Comments
Wooden "Dishwasher"
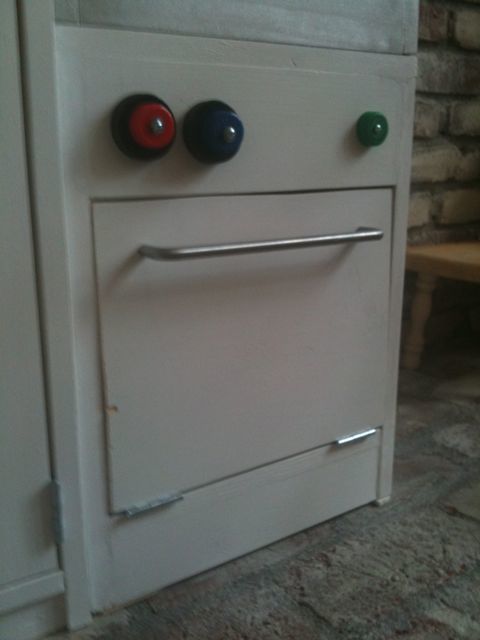
I used Ana's plan for Grace's Washing Machine and modified the interior panel to open downward instead of having a round door opening. My daughter LOVES this! VERY EASY build!
Estimated Cost
$0...I had scraps, handles, knobs and paint on-hand. May cost $25 otherwise?
Estimated Time Investment
An Hour or Two (0-2 Hours)
Finish Used
Paint
Recommended Skill Level
Beginner
Out door sectional

This is my first woodwork project, completed as a team, with my husband. Was good fun at times and frustrating at times! Our wood was thicker by a couple of millimetres out meaning the plans needed to be tweaked. Table was designed with the chair structure. We had cushions and covers made to measure (we live in SE Asia so cheaper than UK or US) about £200. Looking forward to building some deck chairs next!!
Estimated Time Investment
Week Long Project (20 Hours or More)
Recommended Skill Level
Beginner
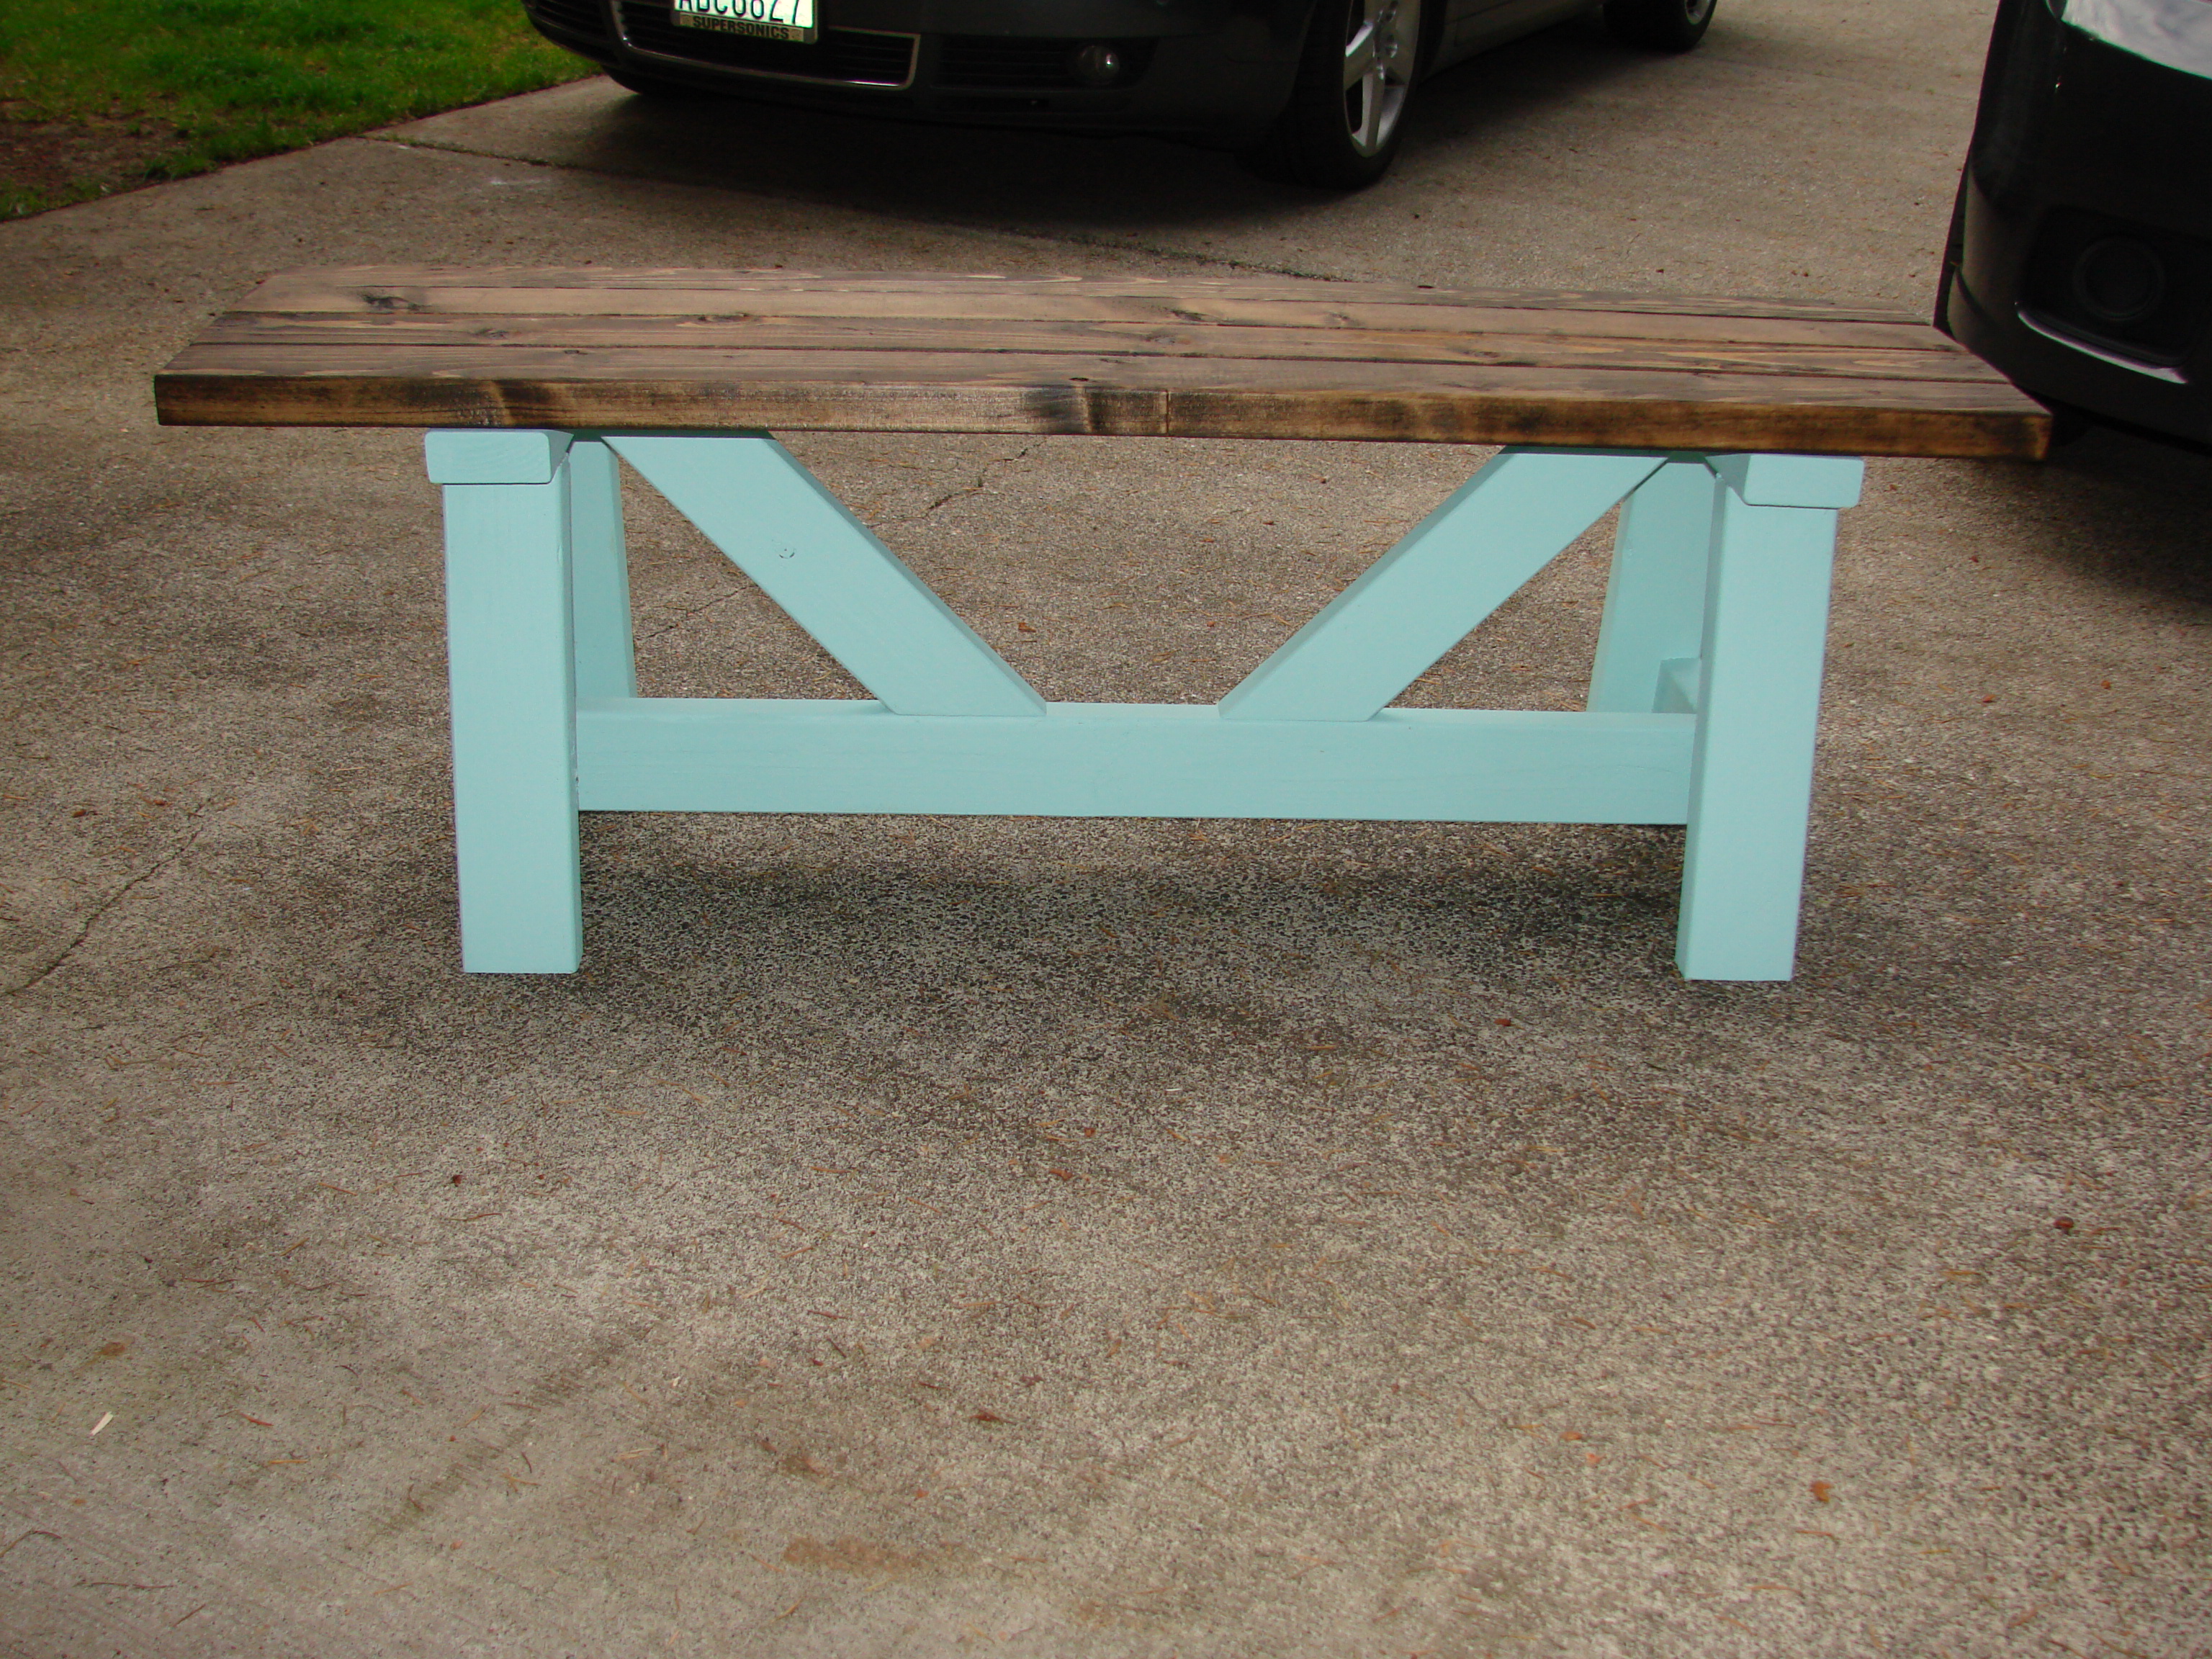
Providence Bench
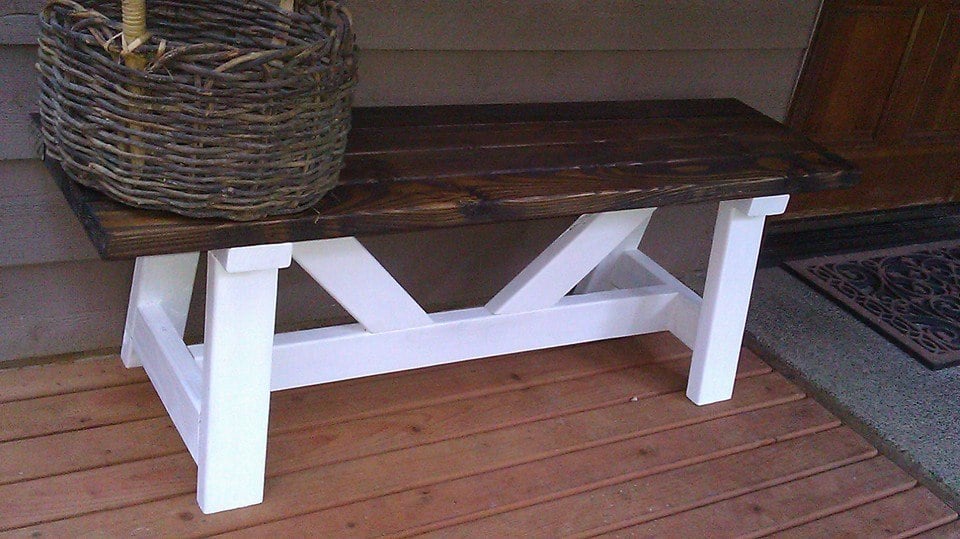
This bench is just perfect for the front porch. I have built several for friends and family. The plans are easy to follow. I wait until the end to cut the angled 45 pieces to be cut to fit exactly. Also filling the pocket holes on the legs and sanding prior to attaching the stretchers has saved me some frustration in finishing. I prefer the minwax jacobean finish with a minwax polycrylic in satin. I use any exterior flat with the same poly on top. I don't like the look of filling the pocket holes on the 45's so I try to place those on each end, countersinking my screws. Can be challenging to get screws in that way, but it looks better in the end. These are very sturdy and easy support 2-3 adults for seating.
Built from Plan(s)
Estimated Cost
$15
Estimated Time Investment
Afternoon Project (3-6 Hours)
Finish Used
Minwax prestain wood conditioner, Minwax stain in Jacobean with 2-3 coats of minwax satin polycrylic, using ultra fine sand papers in between coats. Base is white exterior paint with polycrylic on top.
Recommended Skill Level
Beginner
Comments
Octagon table
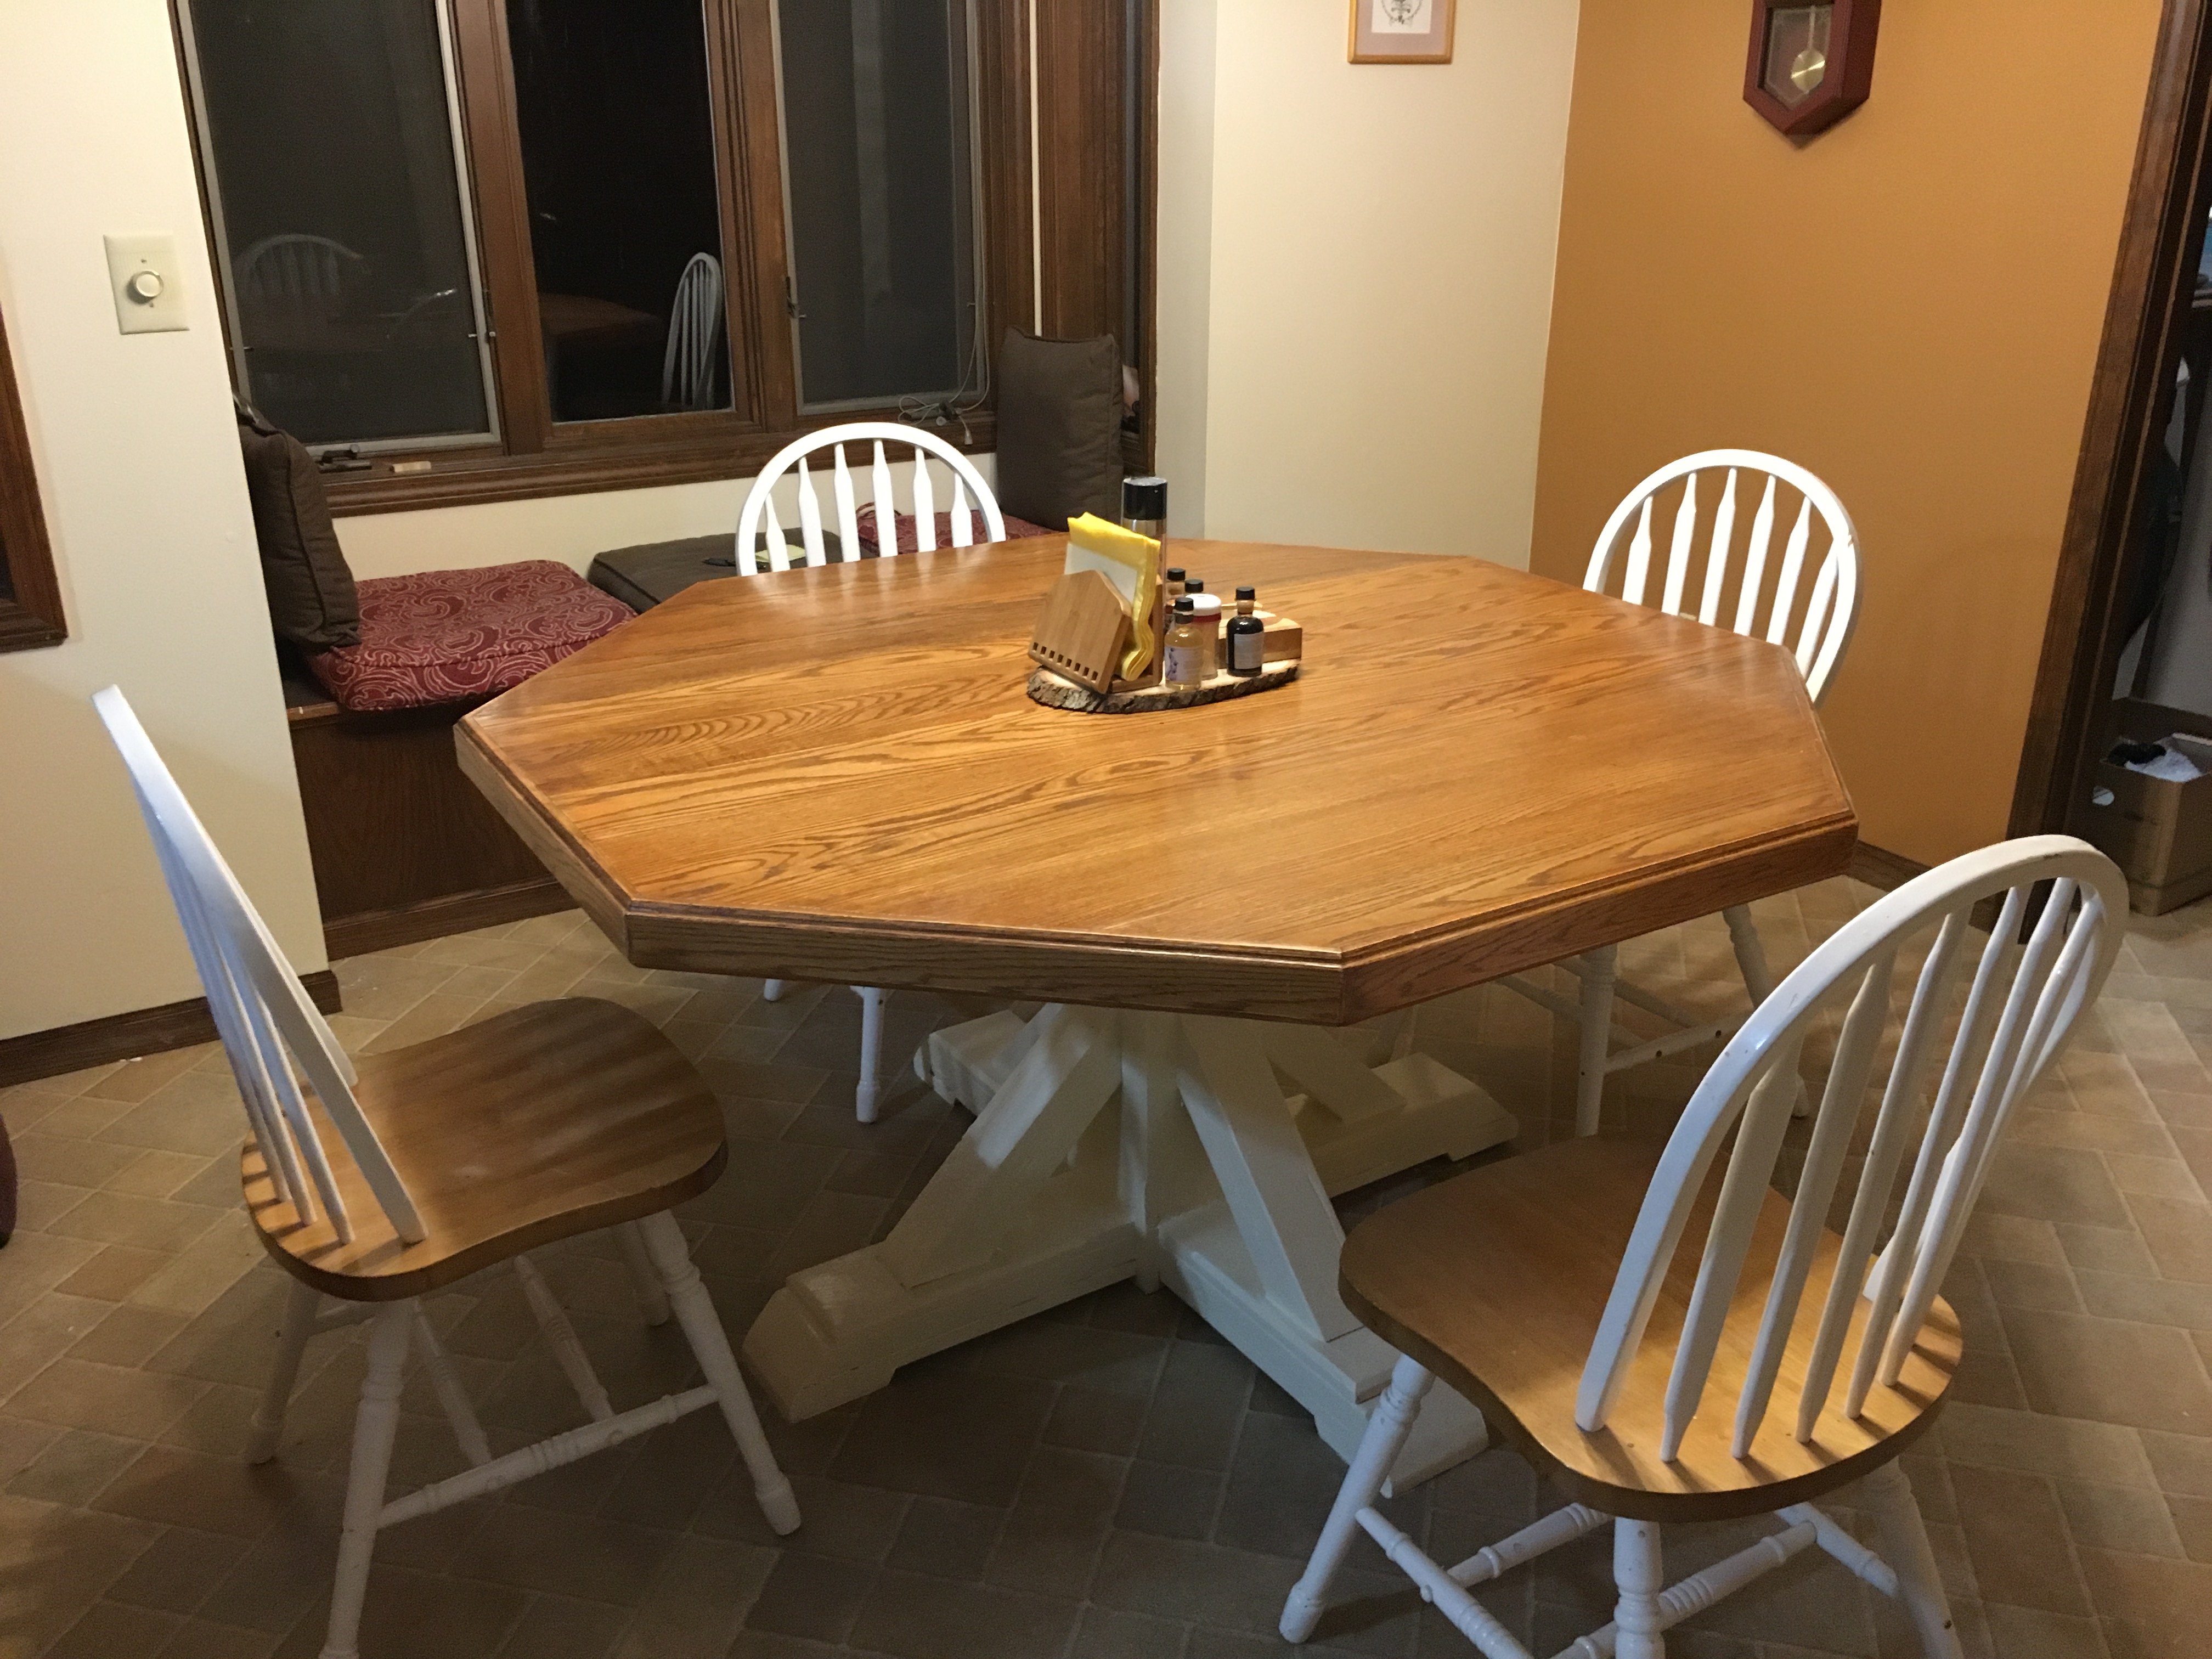
This was my very first woodworking project. It didn't end up perfect, but I learned a lot by making it, and it is still a quite nice dining table.
The minor modifications I made of the plan: I used 1x4-s as a frame for the table top, flush with the top. (The 2x2-s are next to it inside.) I made the lower supports out of 4x4-s (except that they didn't have 4x4-s at the store here so it's really 2 2x4-s put together). I have a few 2x4-s connecting the 2x8 and 2x6-'s in the base, to make it a bit more stable (not sure I really needed these but anyway), and I also ended up putting a few 2x4-s in the core of the base, again to make it a bit more robust. I routed the 1x4-s on the table frame, and also the table legs with a 45 degree bit (using a router is really fun! And really easy).
I used pine for the base and red oak for the table top -- mostly because I have oak cabinets in the kitchen. After sanding to 150 grit, I stained the oak first with Minwax Oriental Ginger (I would have used a dye if I had had one but this worked fine), and then two coats of GF antique oak. The Minwax gave a nice warm orange undertone while the GF highlighted the grain. It has 6 coats of GF high performance water based poly on it, sanded and wet sanded with very fine grit (up to 2000) so it's pretty smooth. It looks like many people use grain filler with oak, but I like the grain so I didn't. The base is painted white with whatever semigloss white paint I happened to have at hand.
Lessons learnt: 1) always, always measure twice, and always, always make sure that everything is square. 2) Don't build a table base from a board that's not absolutely straight. 3) Make sure to have enough screws and that the screws are of the right kind. 4) If you use a 45 degree router bit, you need to sand that 45 degree part much finer than the other parts of the table top, otherwise the grain will stick out and make it very rough. 5) Don't wet sand oak -- the poly dust white residue gets into the grain and it's impossible to remove.
Built from Plan(s)
Estimated Cost
About $400. Pine would have been cheaper.
Estimated Time Investment
Week Long Project (20 Hours or More)
Finish Used
See above. Two kinds of stains, both water based, and a lot of water based poly, sanded in between.
Recommended Skill Level
Beginner
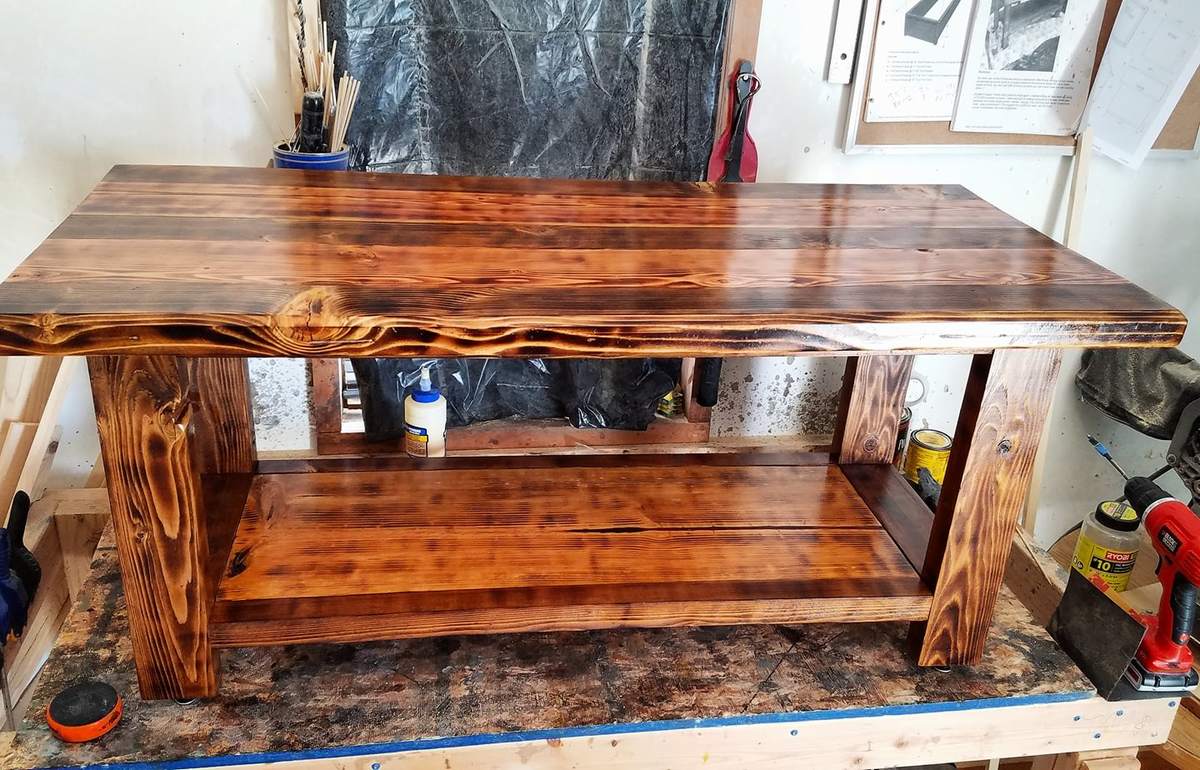
Rustic X Coffee Table
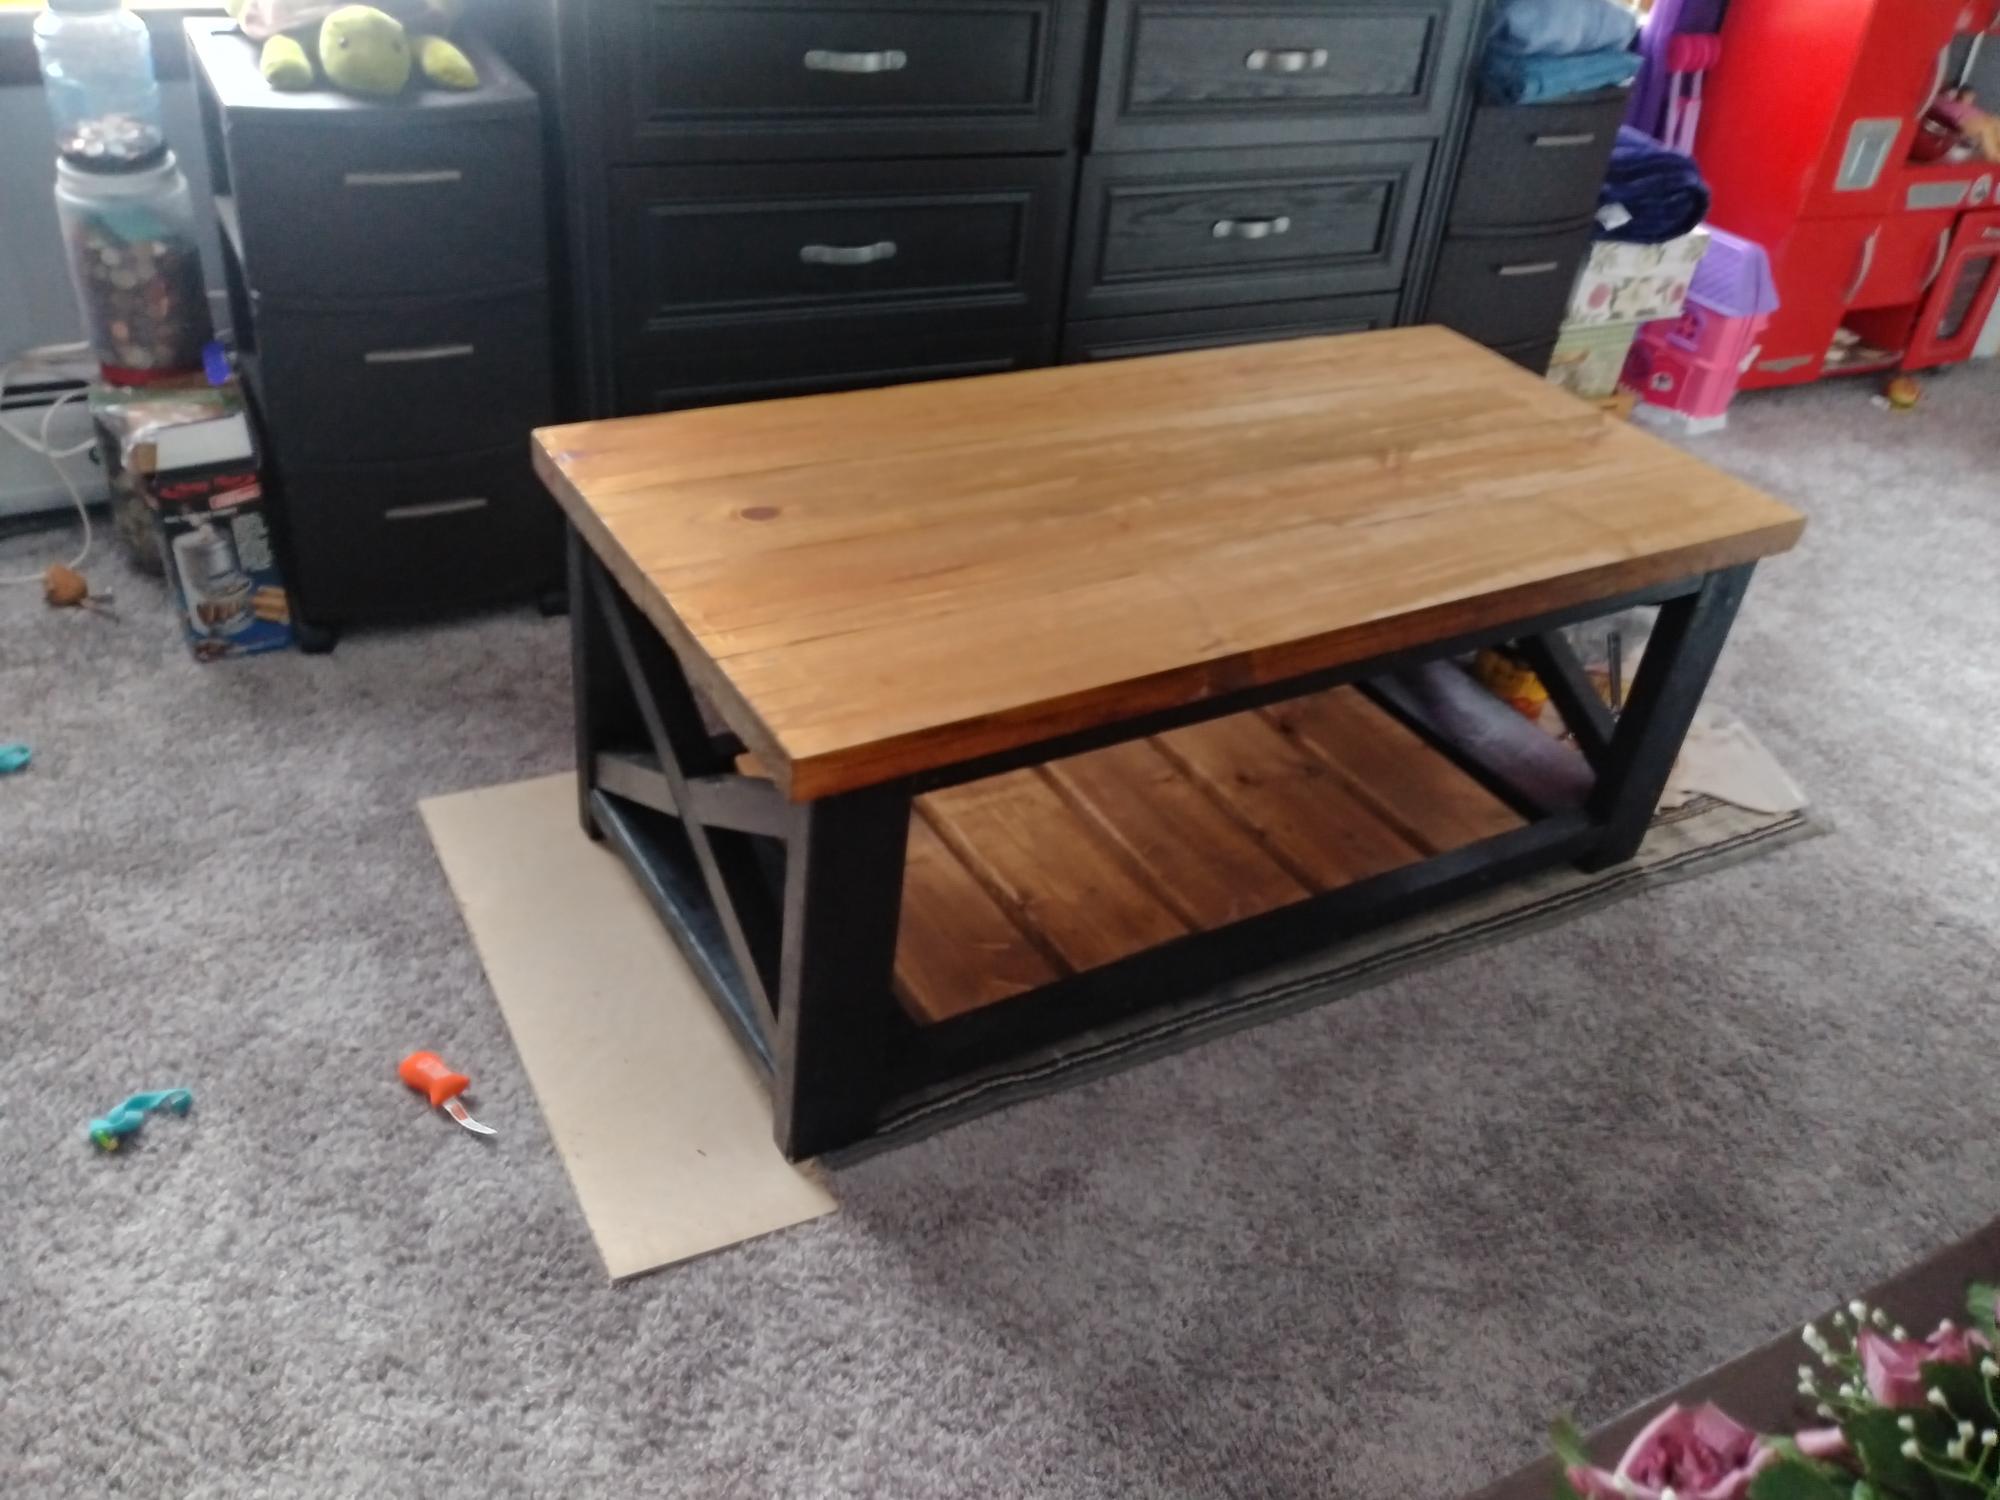
This was my third coffee table. After giving 2 as gifts, a friend paid me to make this one.
Built from Plan(s)
Comments
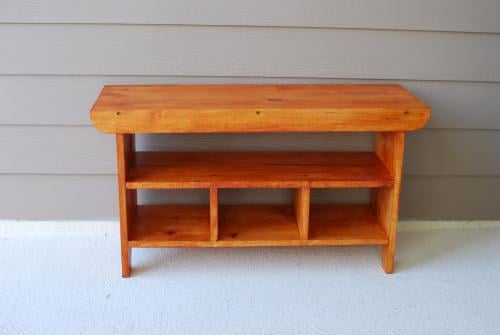
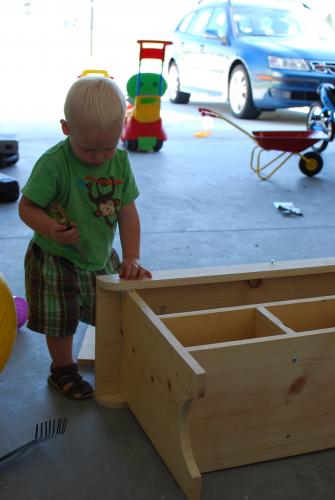
Kids Country Bench
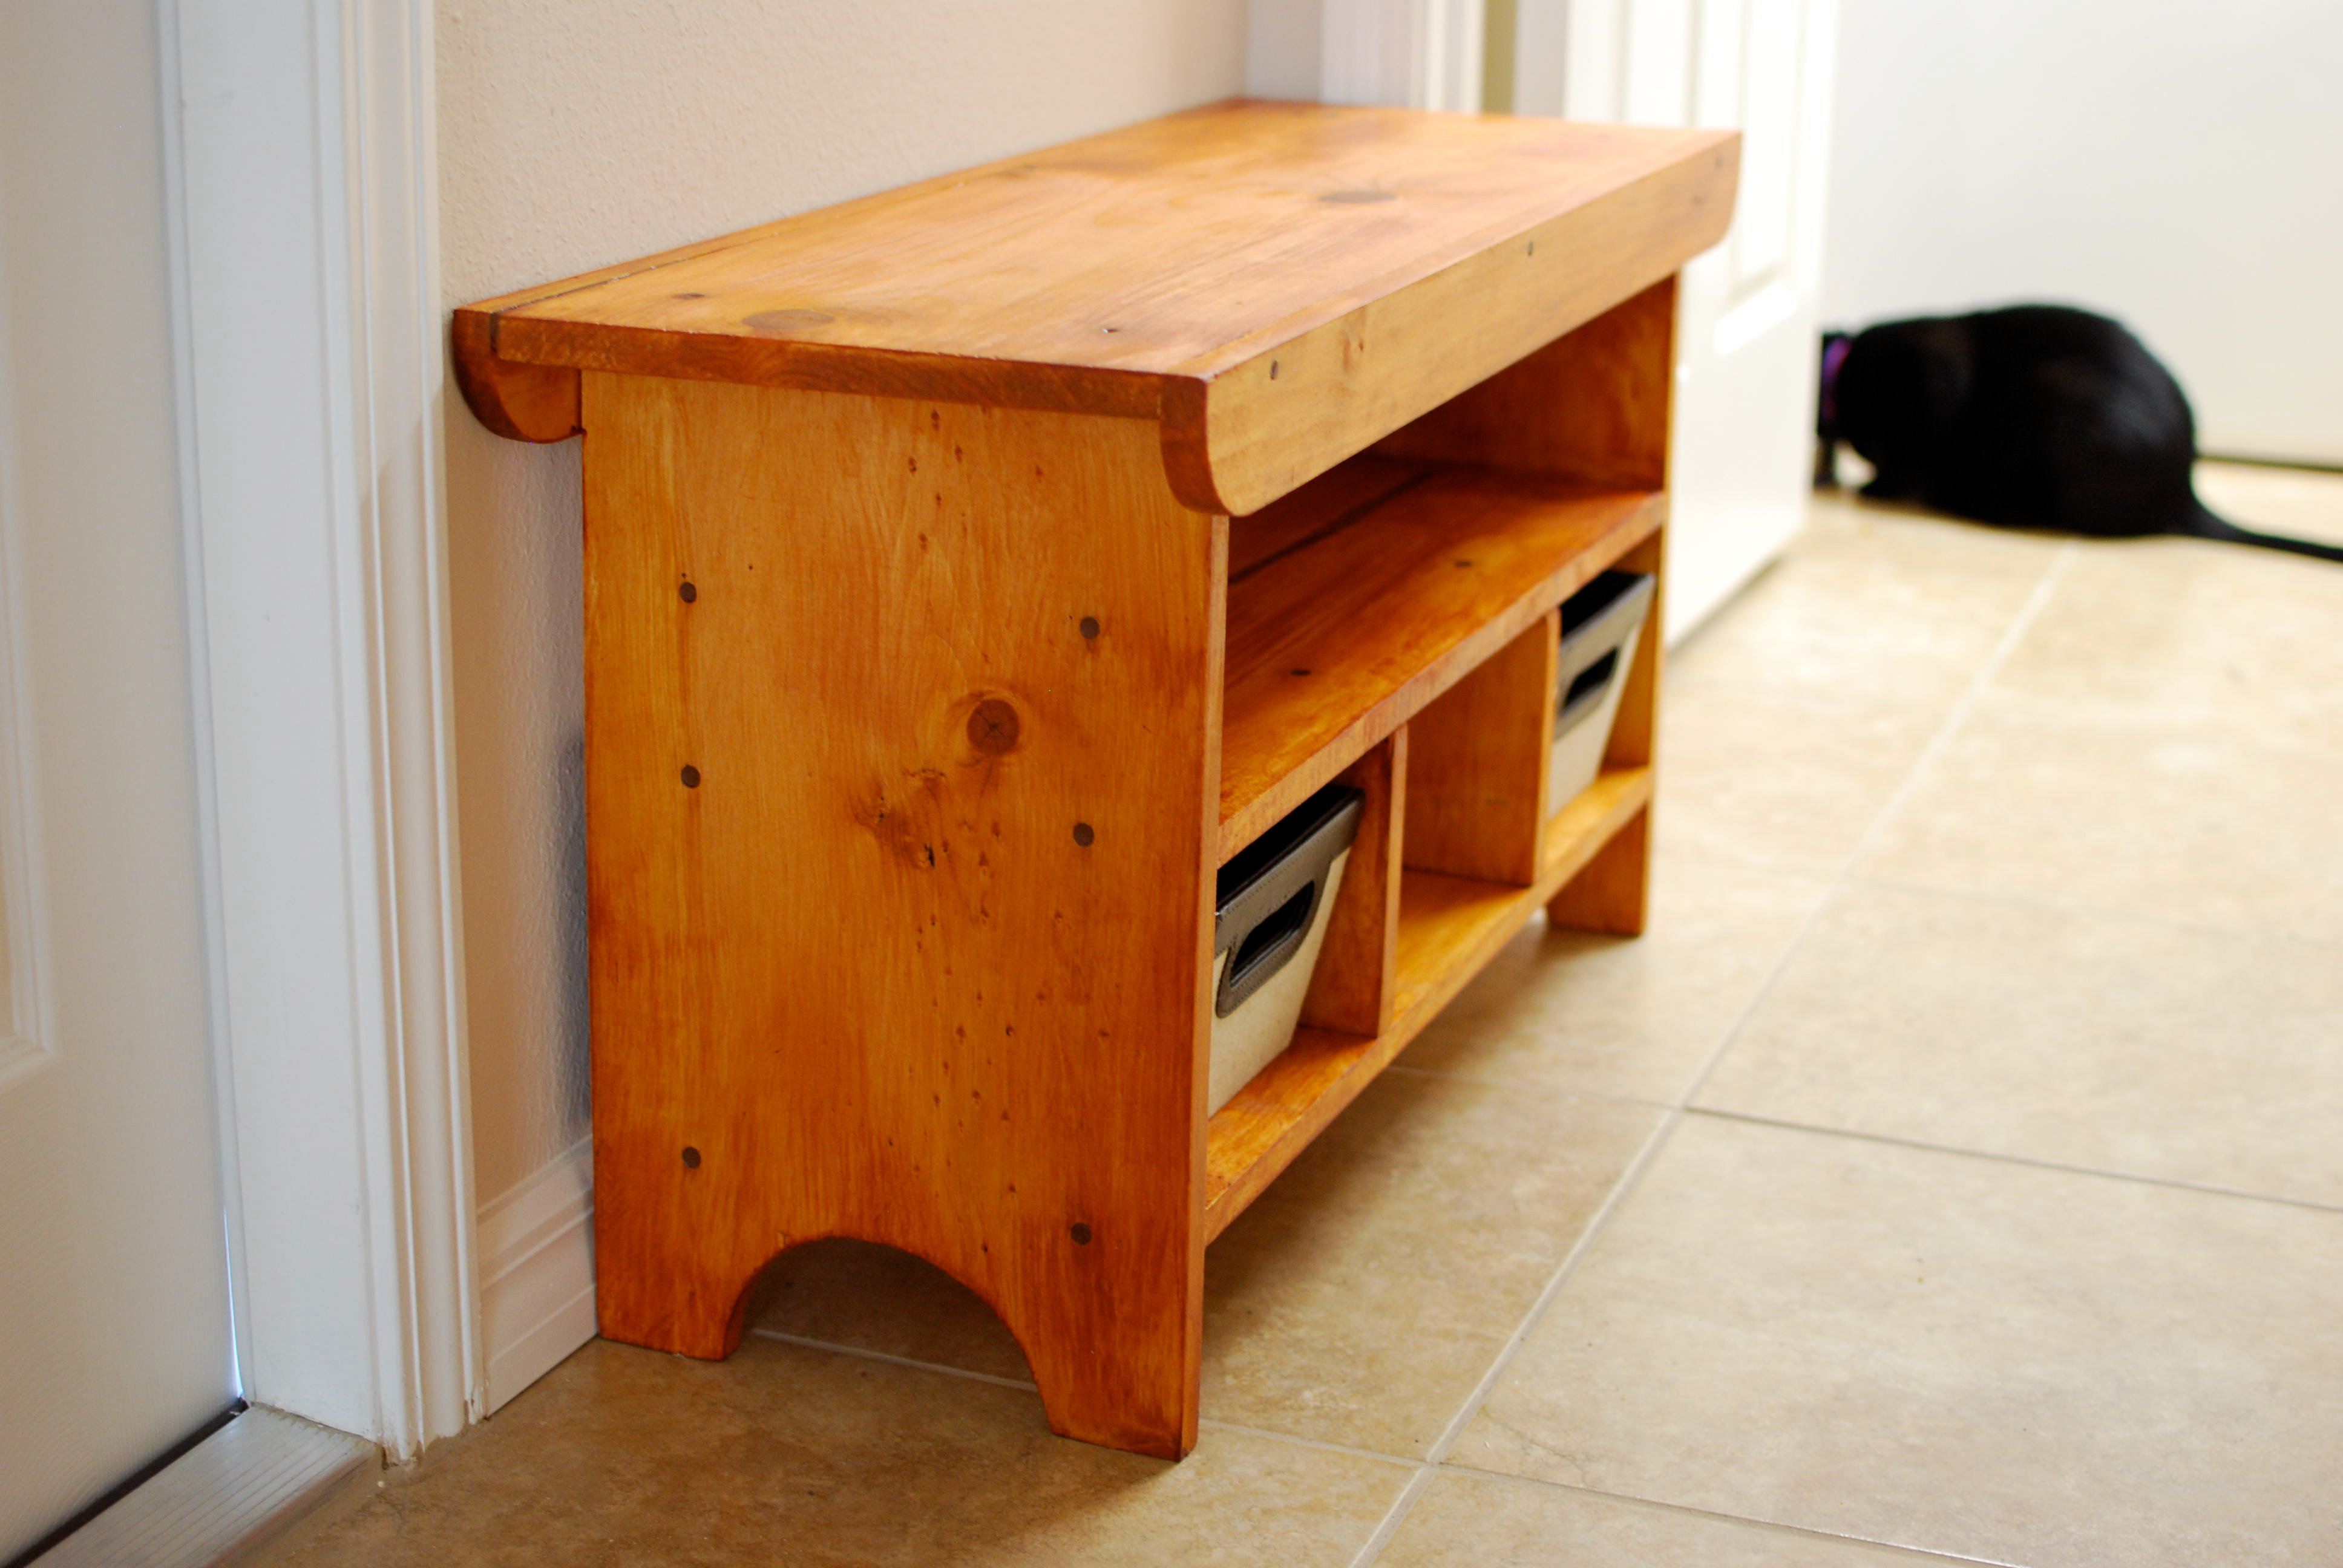
Hi! I made the Kid's Country Bench for my first ever woodworking project. Making this bench was the first time I've used a jigsaw (purchased for this project) and the first time drilling a pilot hole. My husband answered a couple of questions along the way, but I did all the work myself and am so proud. I did change some dimensions to accommodate pretty baskets I wanted to use. This is going to be very helpful for corralling two little boys' shoes in my entry.
Built from Plan(s)
Estimated Cost
$50
Estimated Time Investment
Day Project (6-9 Hours)
Finish Used
I really wanted to stain this and prime and paint later as a last resort, if needed. My concern was the wood putty. I didn't get the "stainable" stuff since I've only heard bad things about it. I got some that would supposedly blend pretty well. You can see that it's too dark for my stain, but I'm ok with that in the end. I think it' makes it look like reclaimed wood or something. You can also see on the end where I drilled two holes in the wrong spot (oops!) despite measuring twice, cutting once. (That doesn't help if you're measuring the wrong number!) :-)
Recommended Skill Level
Starter Project
Rustic Burned table
Used the plans for the Rustic X coffee table as a starting point. Left out the X's as they don't appeal to me. Took a butane torch and burned the base and tabletop before staining, and stained the table in alternating stains to give it a really unique appearance. Stains used were Rustoleum Summer Oak, and Minwax Early American, finished with Minwax Semigloss Poly.
Built from Plan(s)
Estimated Cost
$85
Estimated Time Investment
Weekend Project (10-20 Hours)
Finish Used
Rustoleum Summer Oak, Minwax Early American, Minwax Fastdry Poly
Recommended Skill Level
Intermediate
Bedside table
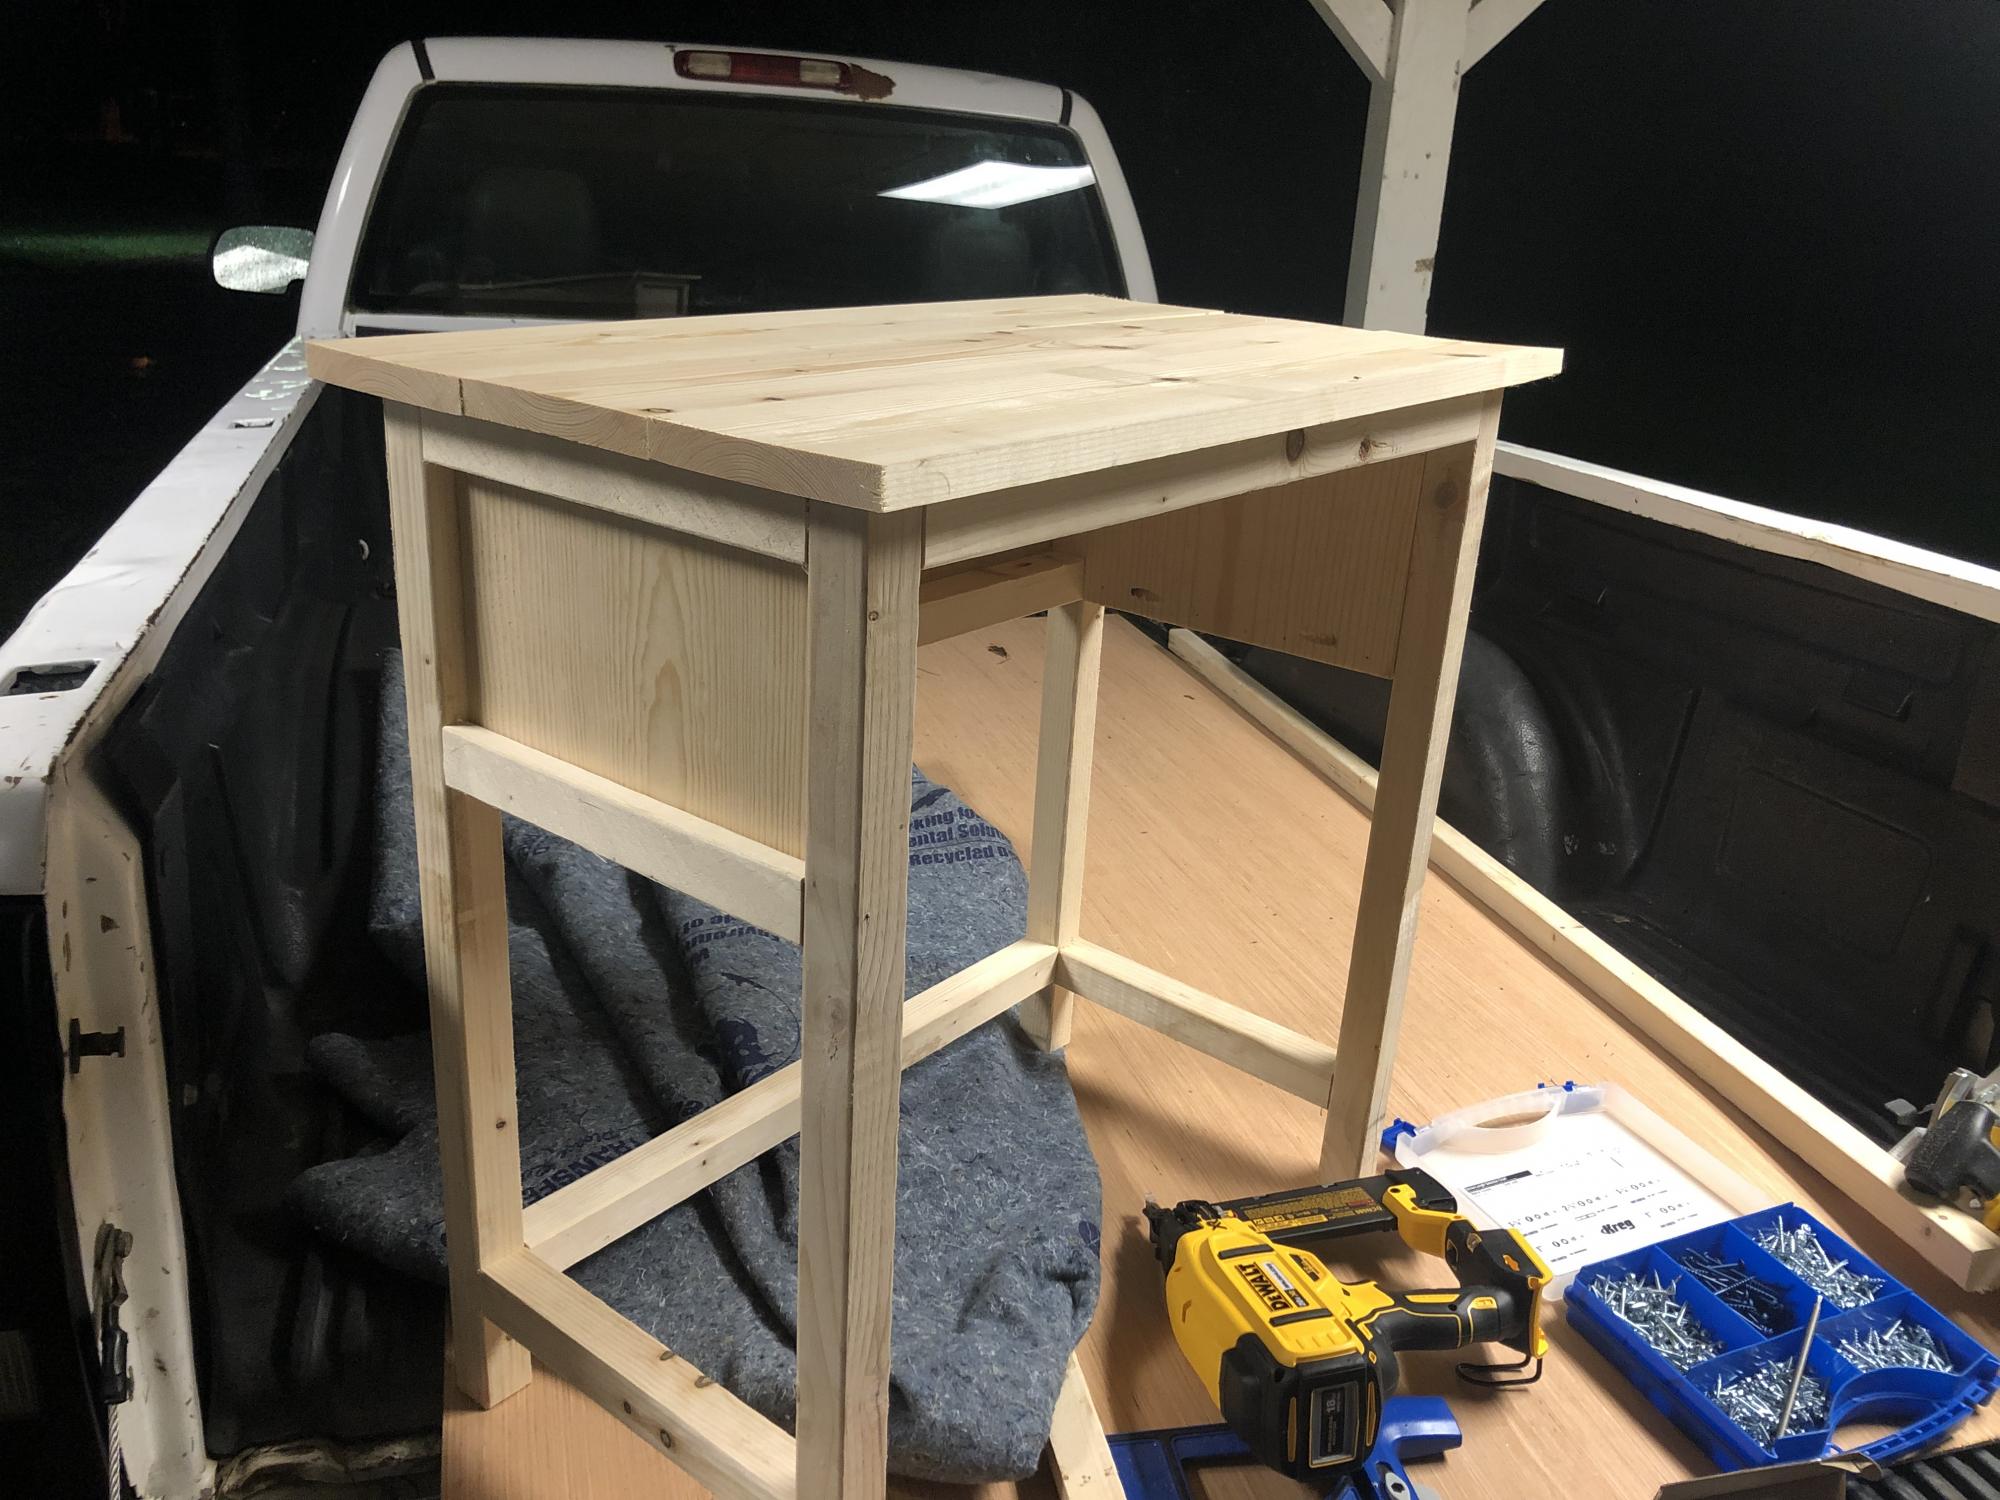
First time project.
My wife loves it and that’s all that matters!

Built from Plan(s)
First Build: Grace's Bookshelves
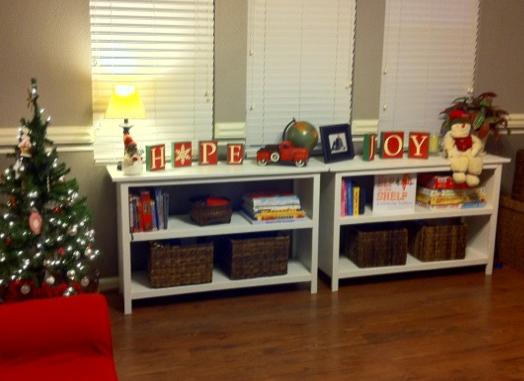
These bookshelves were a great first project, mainly becasue with the affordability, ease and great look......I was able to convince my husband I was not crazy for wanting to build furniture. After all I was a Construction Management major in college, wood shop was my favorite class in junior high and I spent countless summers in Mexico building homes.
Well he is now convinced! This was the perfect addition to our playroom for our two kids. As they have transitioned out of the preschool years we need to update the look. These bookcases are the perfect size for most basket and cubbies.
The one lesson I have since learned and would do if I build these again is to make sure the guy cutting my boards at HD cut them all the same width.
Built from Plan(s)
Estimated Cost
$60
Estimated Time Investment
Afternoon Project (3-6 Hours)
Finish Used
I learned a lot in finishing this. I used a Kilz spray primer and sanded it after the primer dried. Painted it with two coats of a Kelly Moore paint (color of the trim in our house) followed by two coats of Minwax Policrylic in Satin Finish.
Recommended Skill Level
Starter Project
Rustic X stlye coffee table

The construction of this project itself took me just over an hour. All my time was out into making it look very old, and staining it just right. I am very proud of how it turned out. Looks a lot better in person. This table is for sale.


Estimated Time Investment
Day Project (6-9 Hours)
Finish Used
English Chestnut stain with poly semi gloss finish
Recommended Skill Level
Intermediate
Comments
Rustic X Table
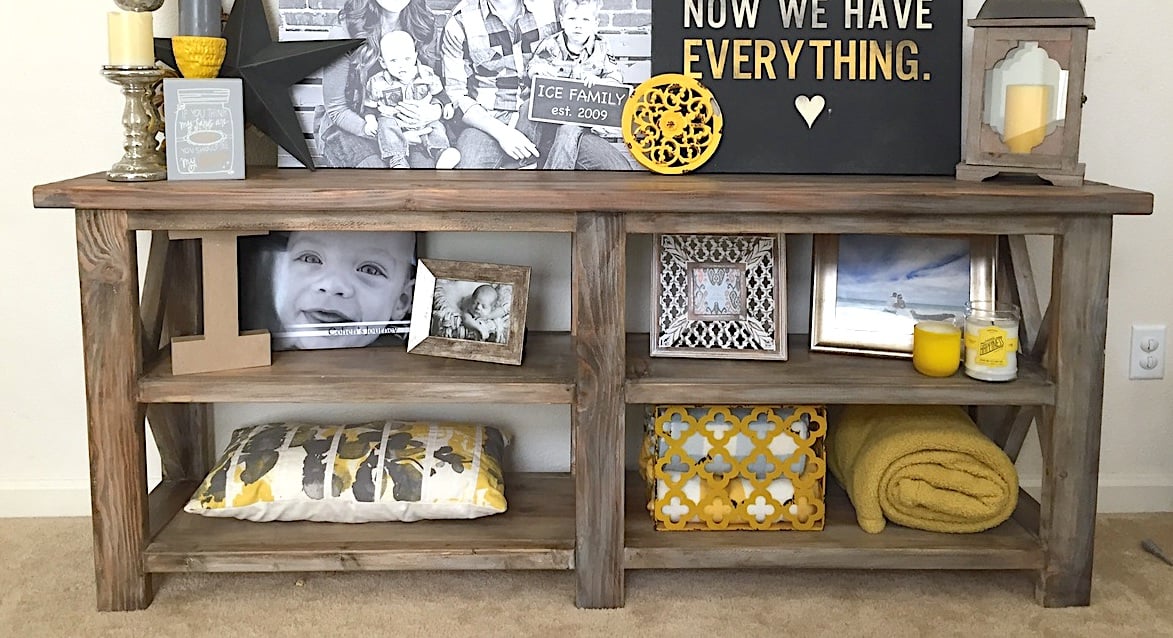
Enjoyed this project
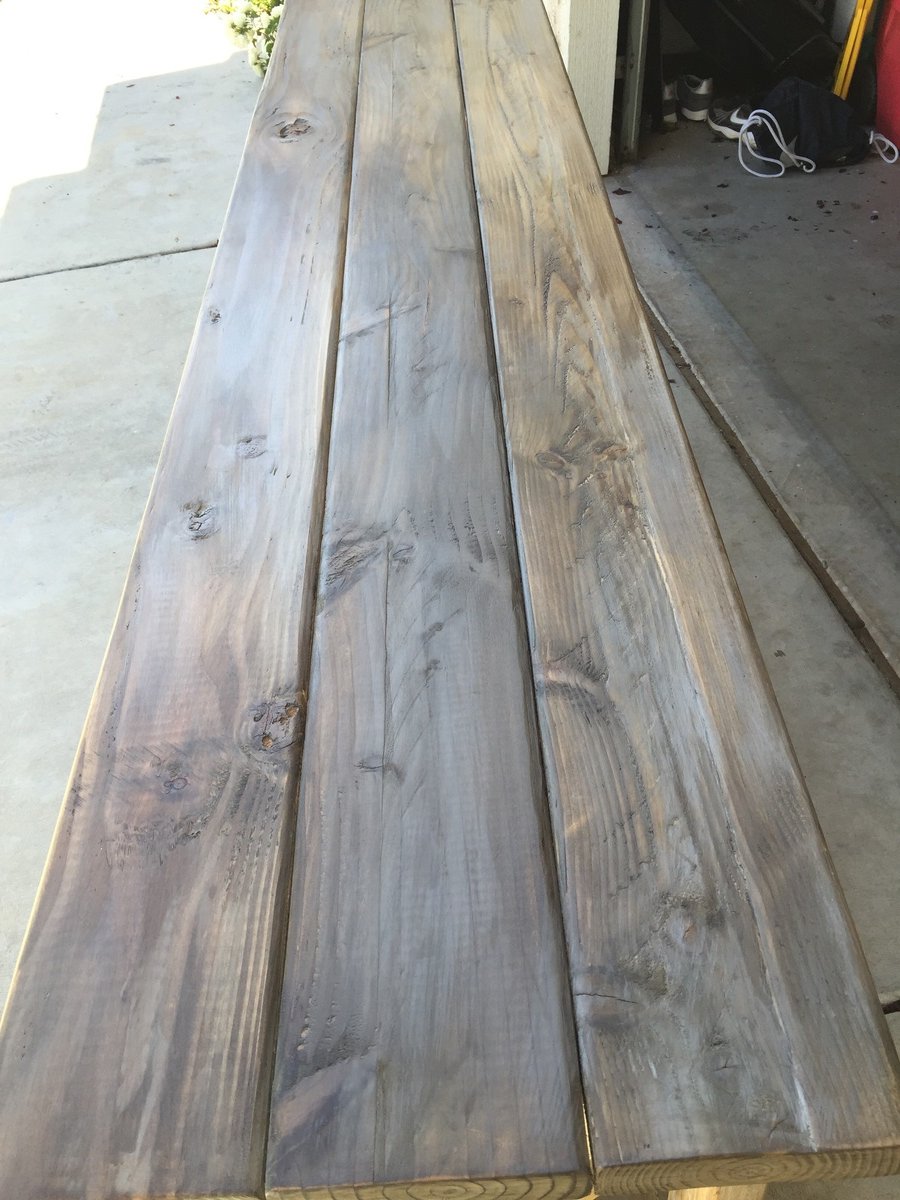
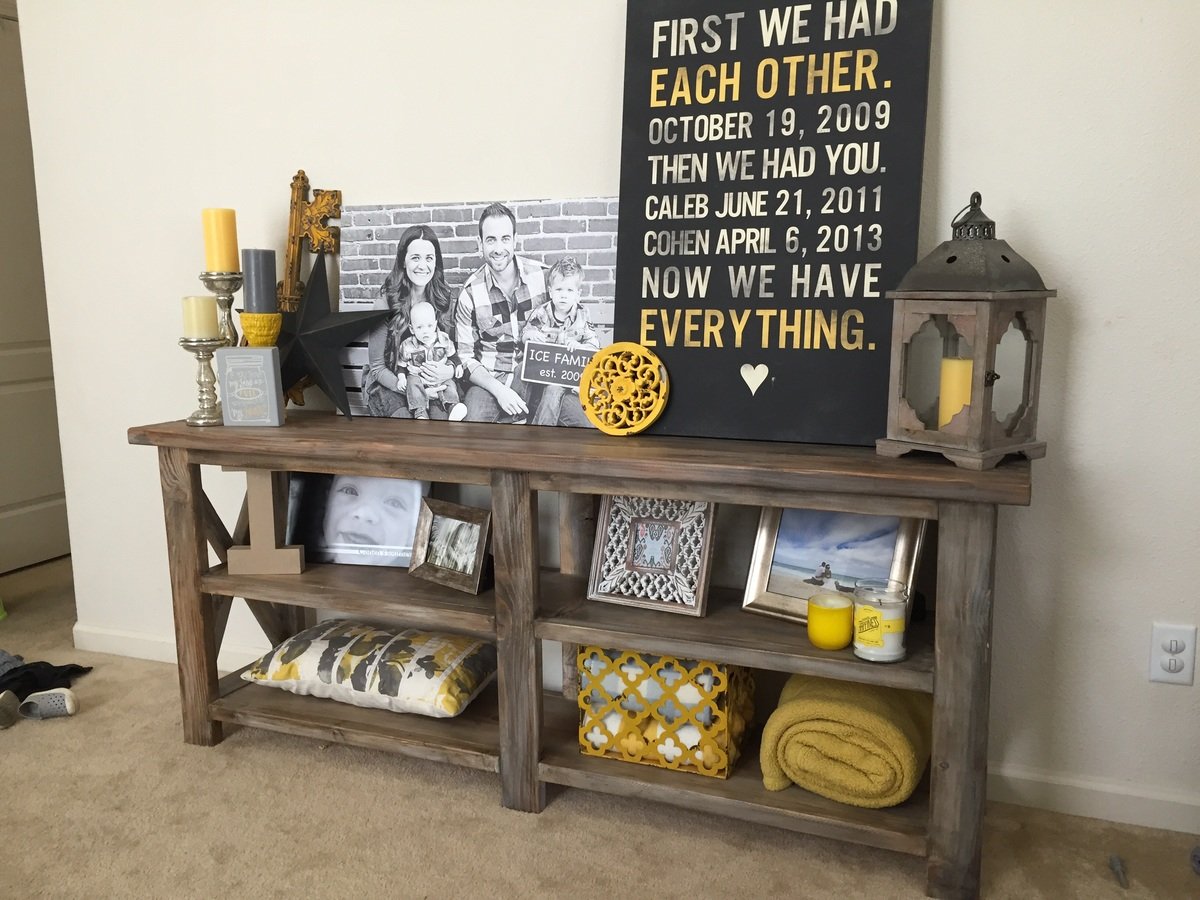
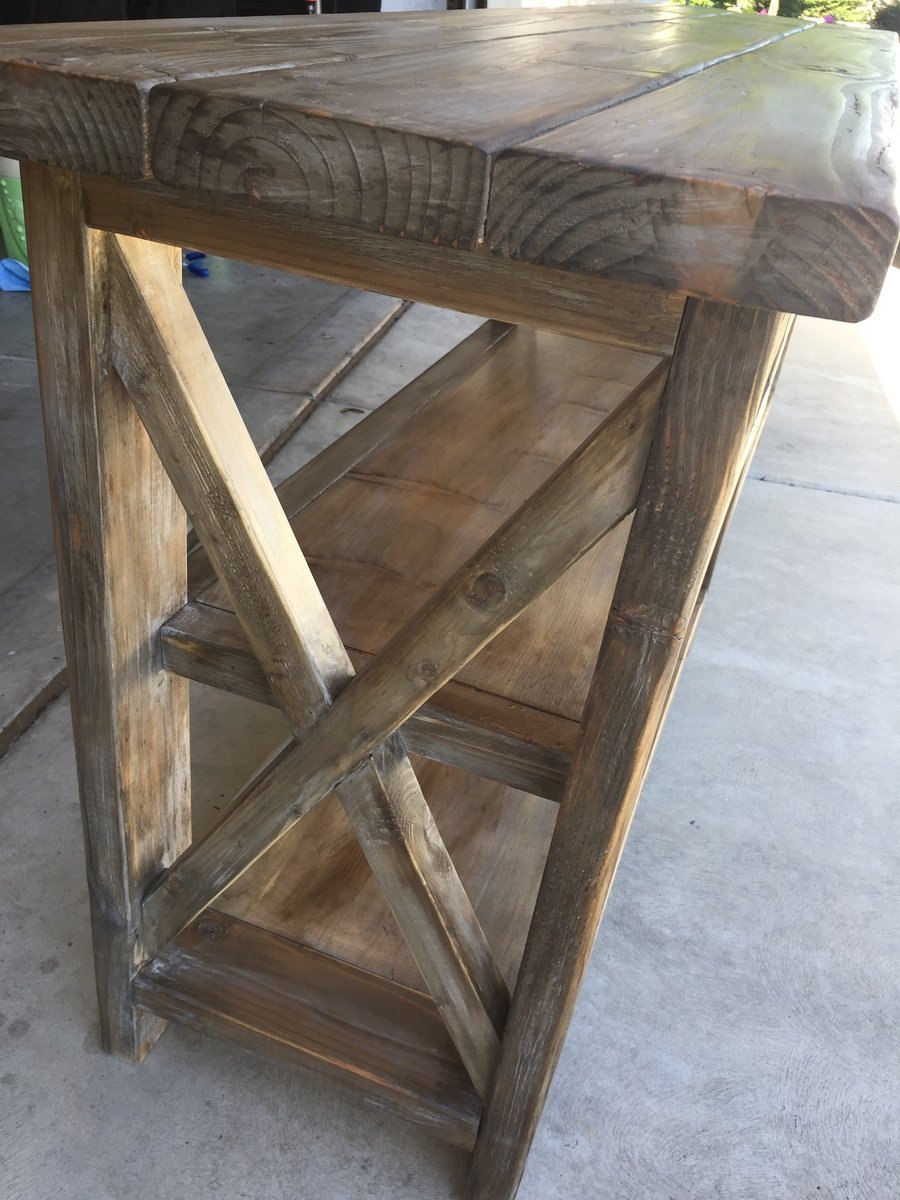
Built from Plan(s)
Estimated Time Investment
Day Project (6-9 Hours)
Finish Used
Tea, Steel Wool, White Wash, Dark Wax and Clear Wax
Recommended Skill Level
Beginner
Comments
Mon, 05/04/2015 - 10:16
Love this build and sign!
Thanks for sharing, great job on the decor and finish!
Seasonal And Holiday
Farmhouse Dining Bench

Hi there! This is Dani from The Project Lady!
I wanted to share my building plan and tutorial for these dining room benches! Total cost is about $20 for lumber per bench!
Head over to my website for step-by-step instructions and pictures!
Happy Building!

Estimated Cost
$20 for lumber
Estimated Time Investment
Afternoon Project (3-6 Hours)
Finish Used
General Finishes Brown Mahogany Gel Stain, Ceramathane Clear-Coat
Recommended Skill Level
Beginner
Monkey bar and play house
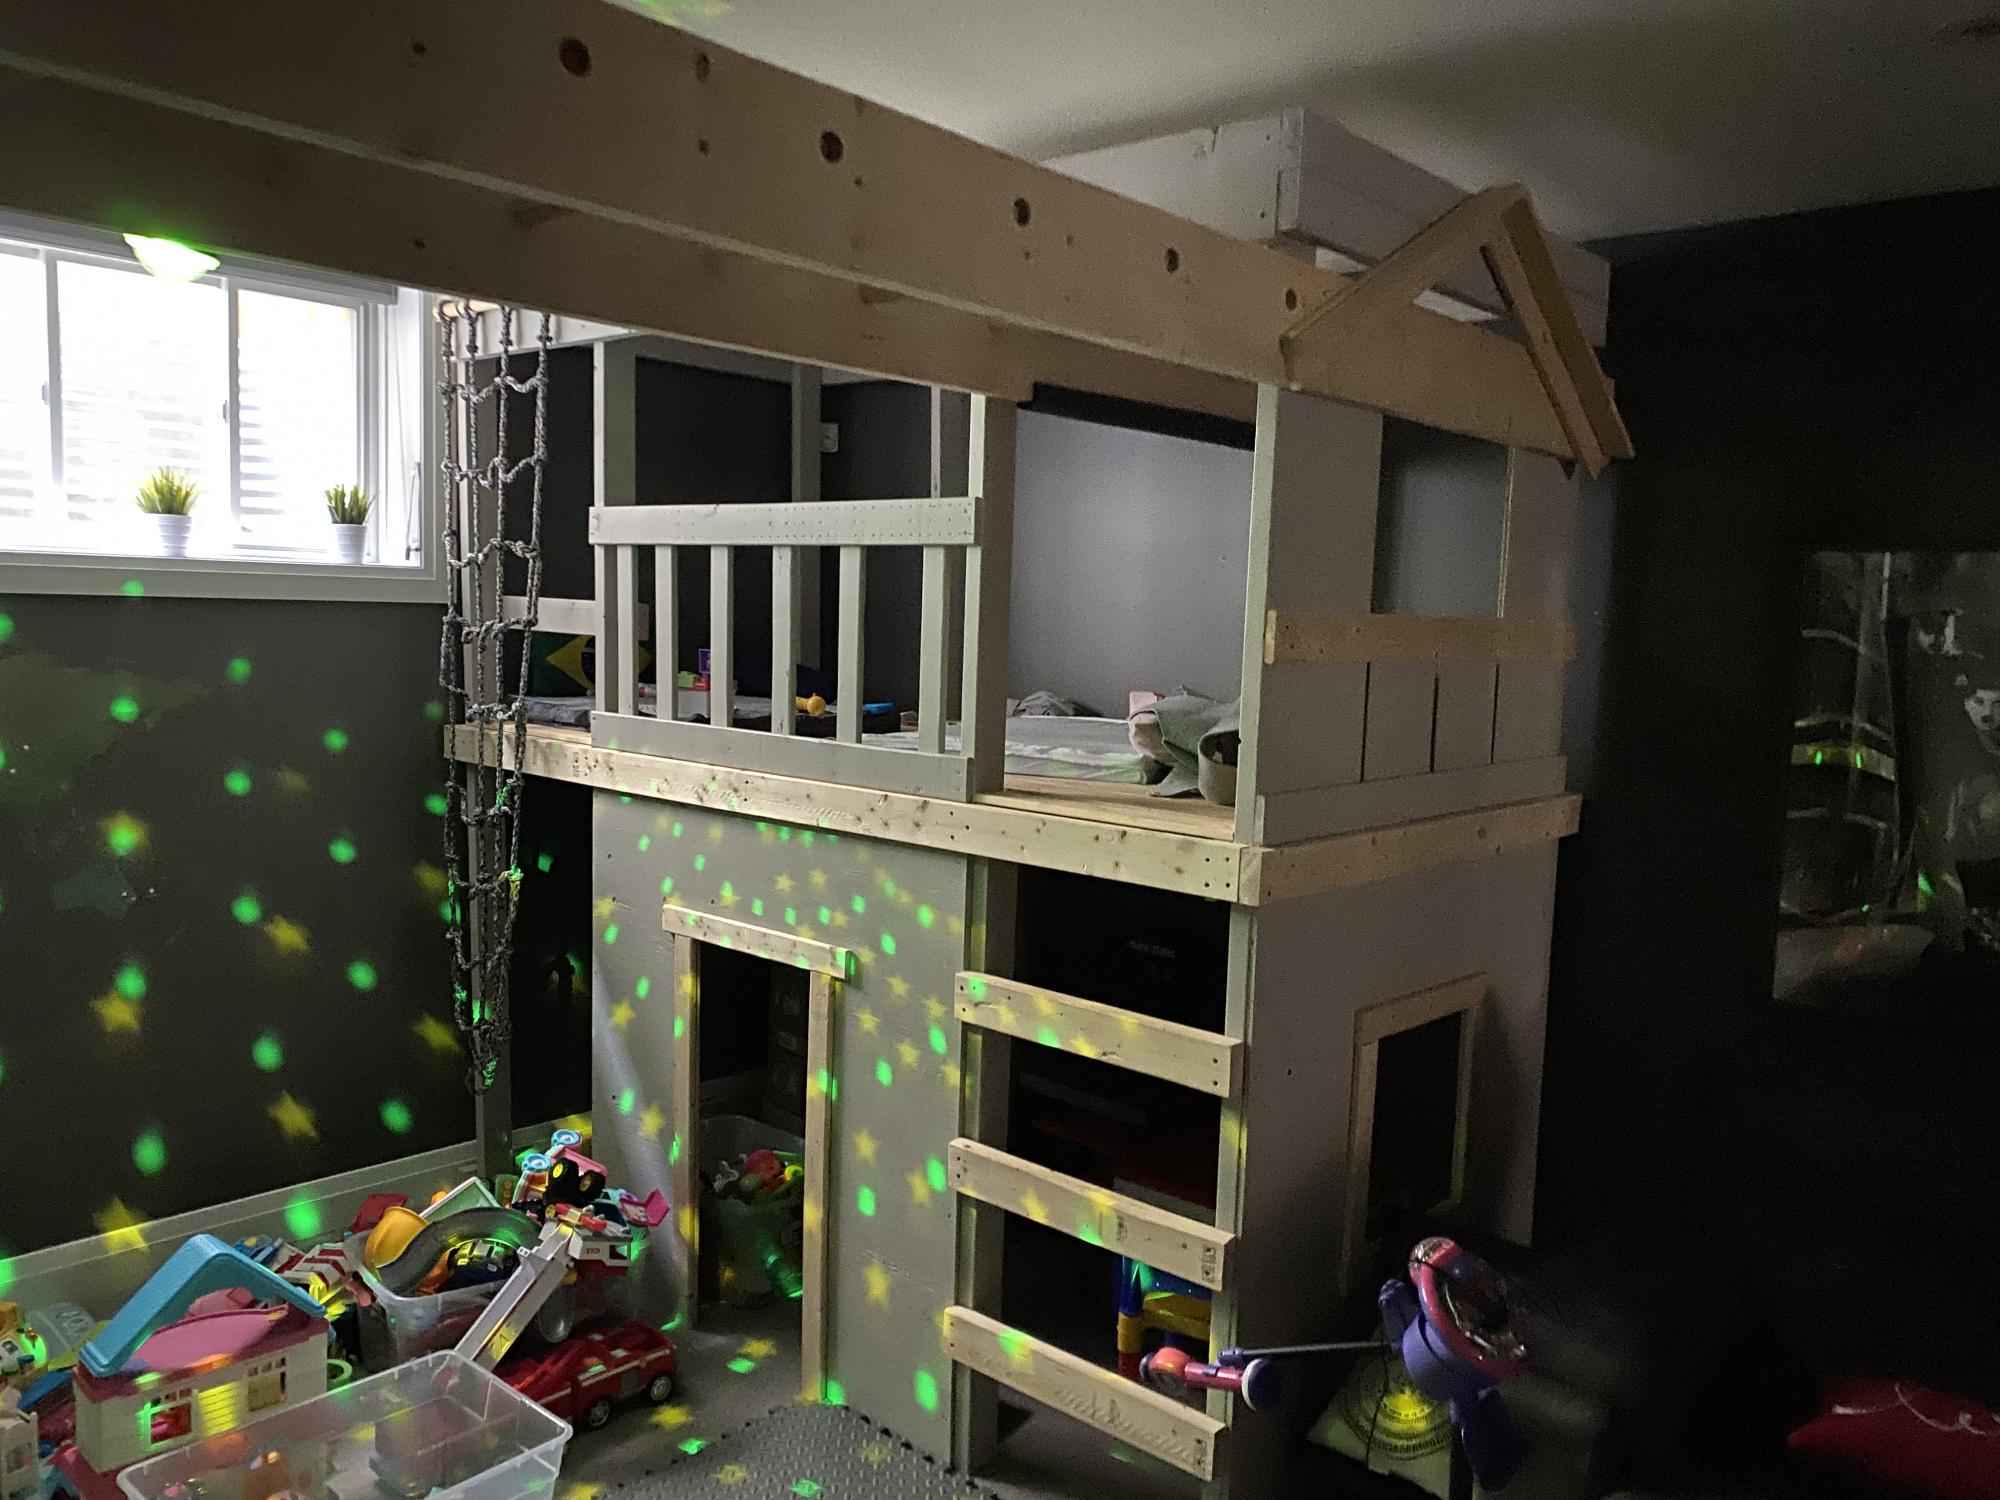
Inspired in one of your projects this was my first project with wood and turned out a go to place for the kids and guests to play all the time.
Thank you for the plan. Kids appreciate it too.
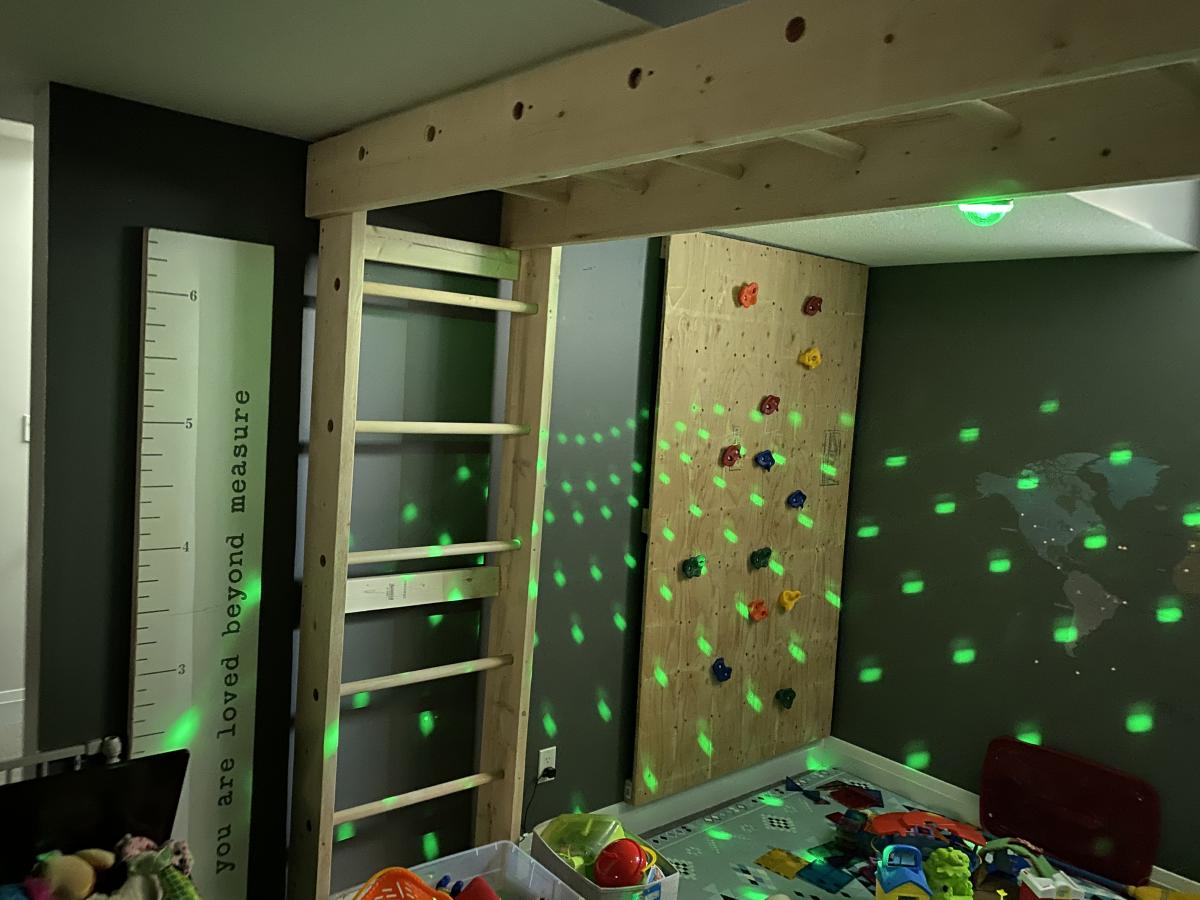
Built from Plan(s)
Comments
Farmhouse Bed With Stenciled Headboard
Loved Ana's Farmhouse Bed so we downsized it and made it into a twin size for our daughter. Took out the boards in the middle and painted a stenciled pattern instead.
Estimated Cost
$120
Estimated Time Investment
Weekend Project (10-20 Hours)
Finish Used
White paint
blue paint is Mythic Paint in Smooth Waves
blue paint is Mythic Paint in Smooth Waves
Recommended Skill Level
Intermediate