

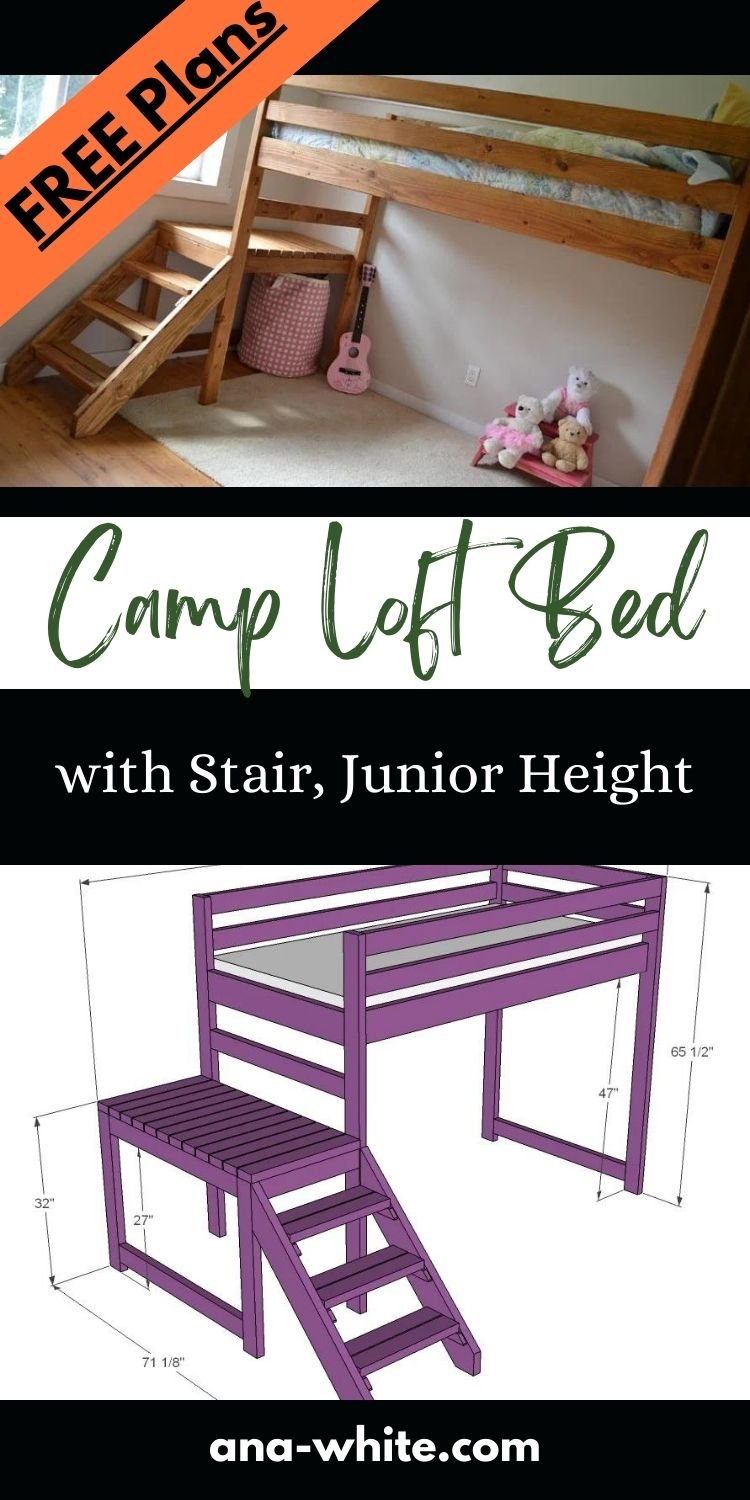
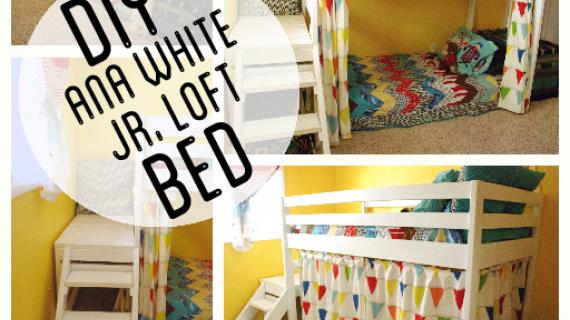
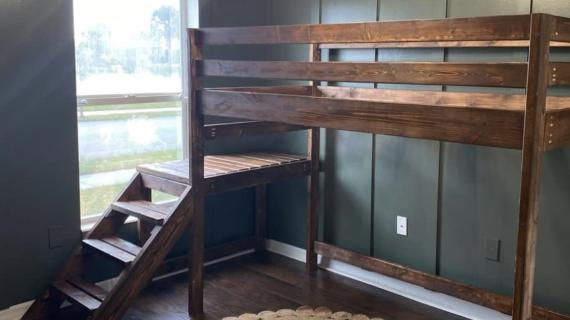
Build your own loft bed plans with stairs all from 2x4 and 2x6 lumber! This super sturdy and beautiful design features a platform for easy access, junior height loft bed plans free from Ana-White.com
This loft bed has been built and cherished the world over for almost a decade. Here's why-
- It's inexpensive to make - about $50-$100 in materials
- It's super sturdy and strong because of the 2x4 and 2x6 materials - the same materials we build houses out of
- It's an easy to build design that is fairly quick to tackle
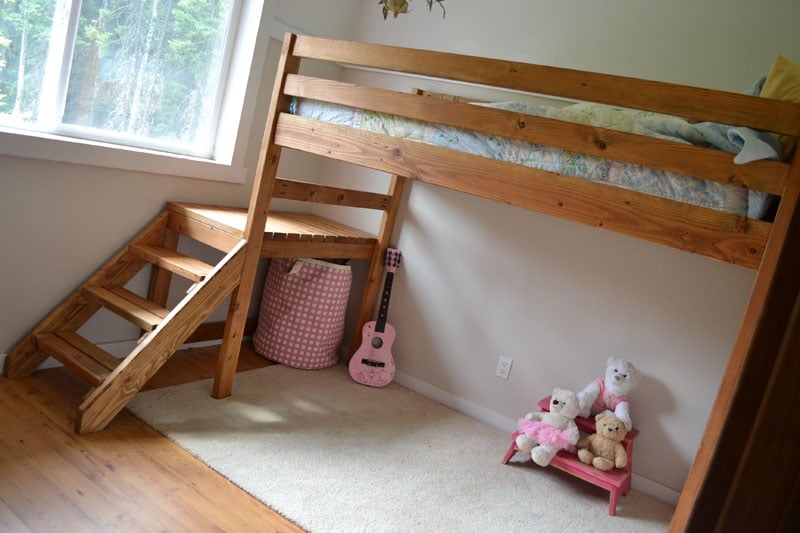
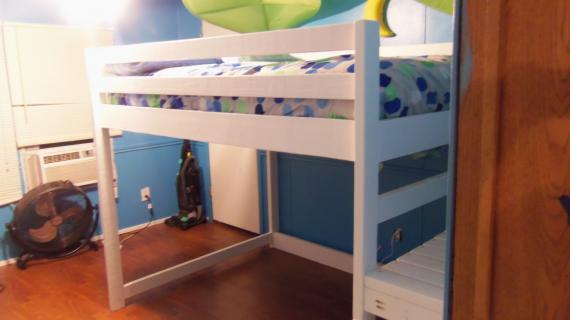
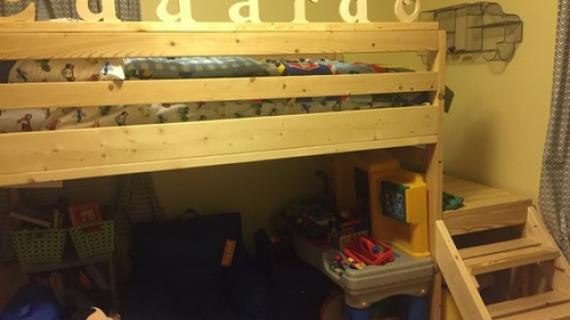
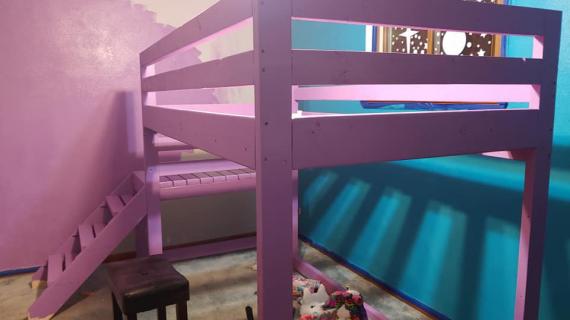
- The platform with stairs make it very easy to access the loft. The lower platform is at about the same height as a floor to mattress, so it's a very natural and easy process to go from the bed to the platform
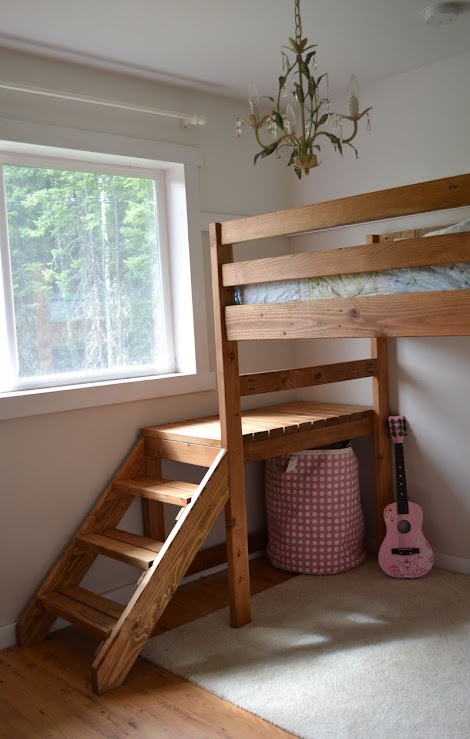
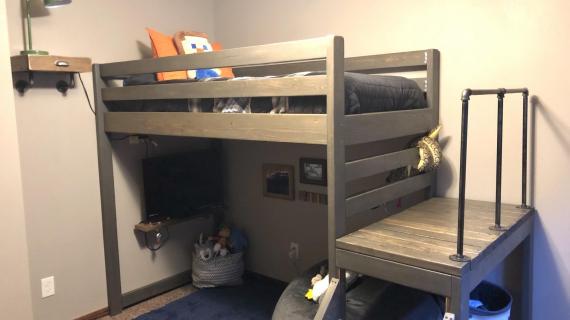
- This loft bed is a very beautiful piece that can go with just about any decor
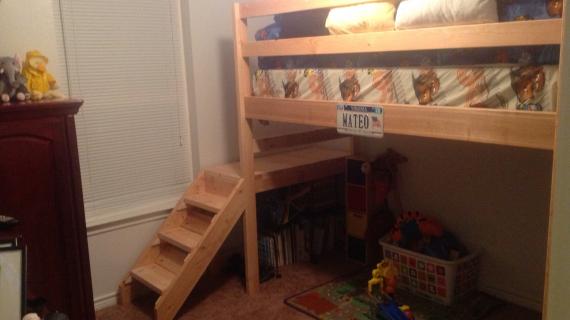
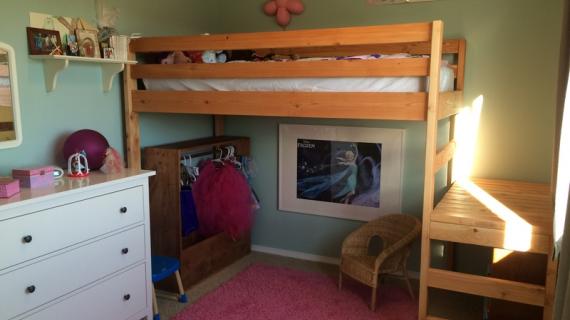
I built this loft bed for my then four year old daughter. At four years old, a loft bed seemed like a bad idea. But with the stairs, it's really not that different than a regular bed - just the access is at the bottom.
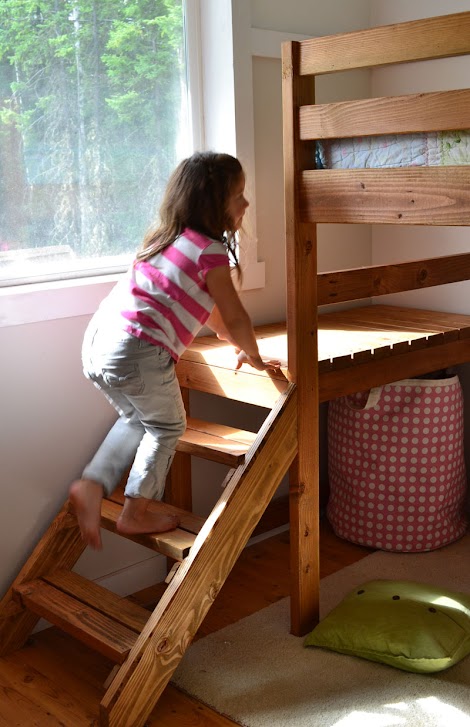
The stairs are so much easier to use than a ladder. And the platform is just right. Instead of having to crawl down a ladder, you simply swing your legs off the bed (just like a normal bed) and they rest on the platfrom. Then you stand up (with good headroom) and walk down the stairs.
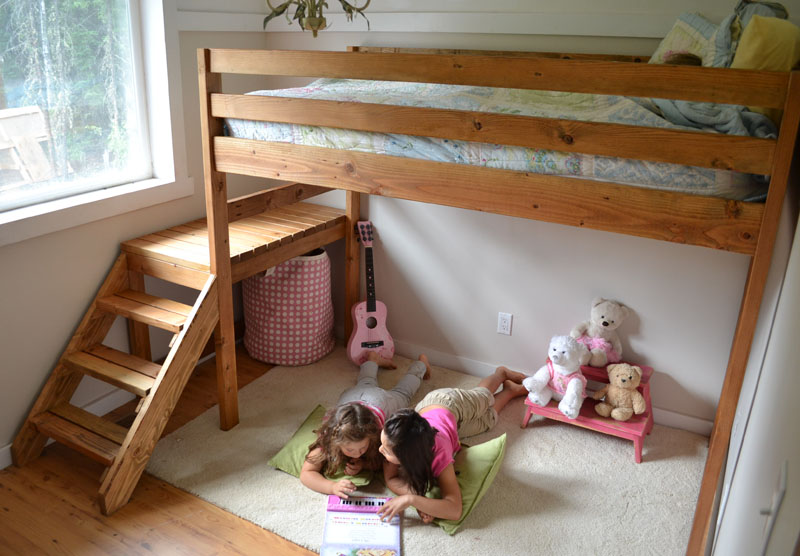
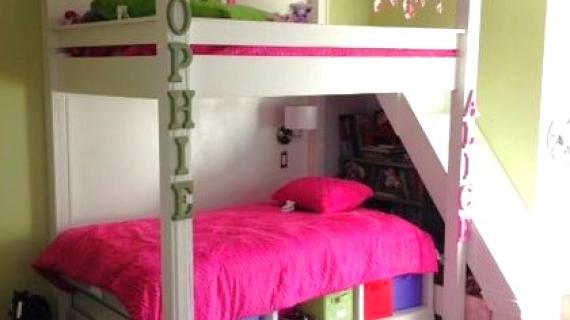
The goal was to create a loft bed that mom and dad could easily crawl into and snuggle and read bedtime stories - and easily sneak out when the child drifted off to sleep.

We designed this bed to fit inside a room just bigger than 8x8. Yes, 8x8. It gave the room so much more useable space!
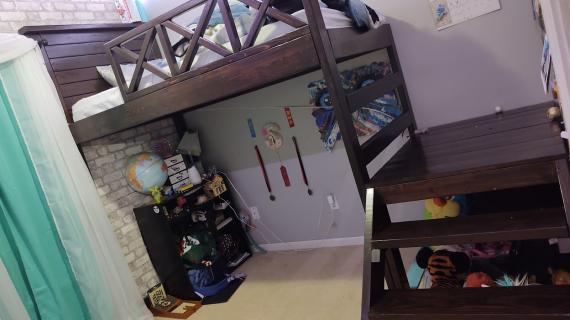
The window was previously the obstacle in the way of building stairs. But with the lower platform, we were able to not cover the window. Now it's entertainment for the kids as they use it as a stage, and look out the window from it.
Under the loft bed stair platform, no storage is lost. It's a great spot for a toybox or bin.

The best part about this bed is how easy and inexpensive it is to make. That's all 2x4s and 2x6s (I'll share my finishing technique with you later this week) bringing the total cost of lumber up to about $50!!!
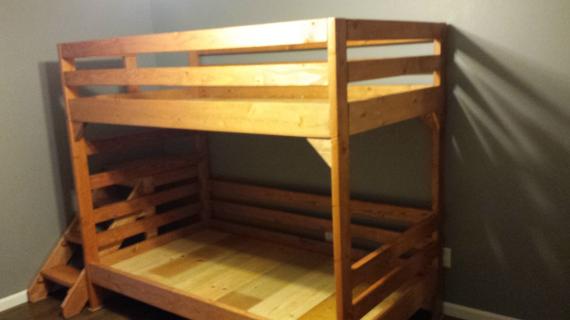
Convert to Bunk Bed with Stairs Option
We also love this bed with a second bed under it to create a bunk system. We have plans for a matching twin bed frame here.
NOTE: You may wish to increase the leg length by about 6" to give more headroom to the lower bunk - depending on how tall you make your lower bed height.
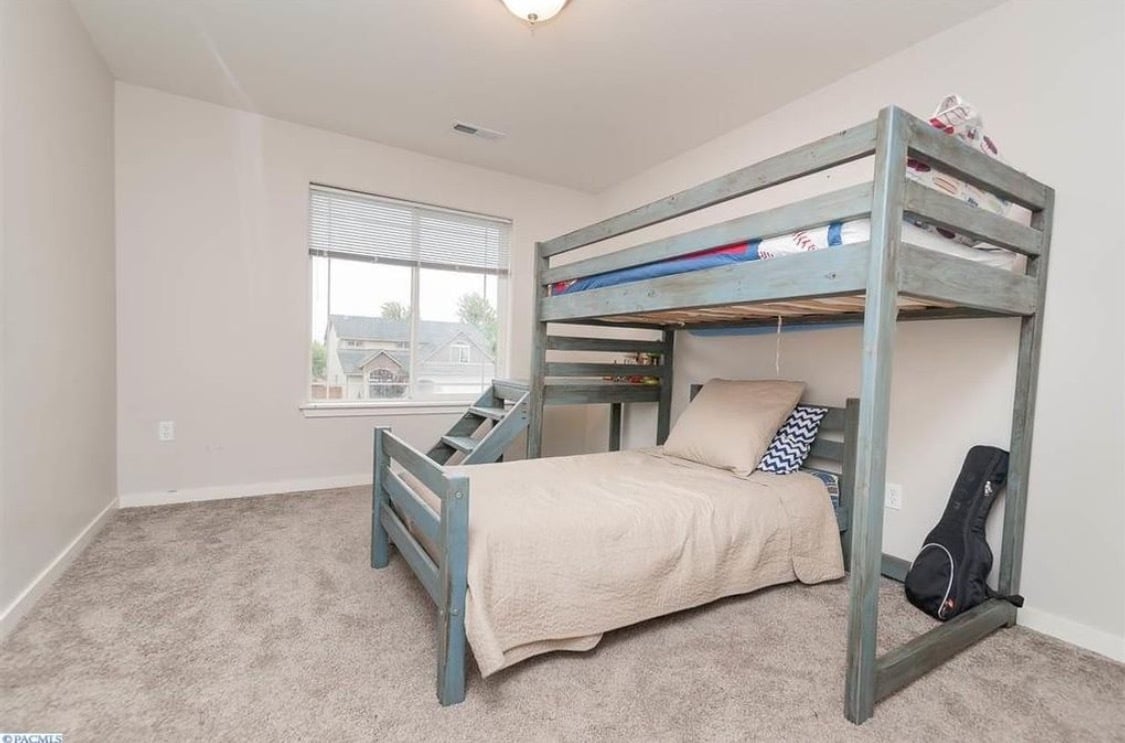
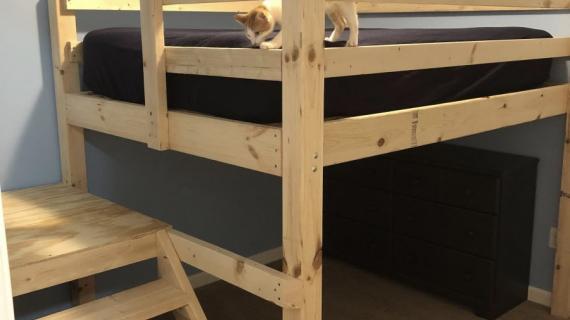
Photo SUBMITTED BY CAJSAWALLWORK
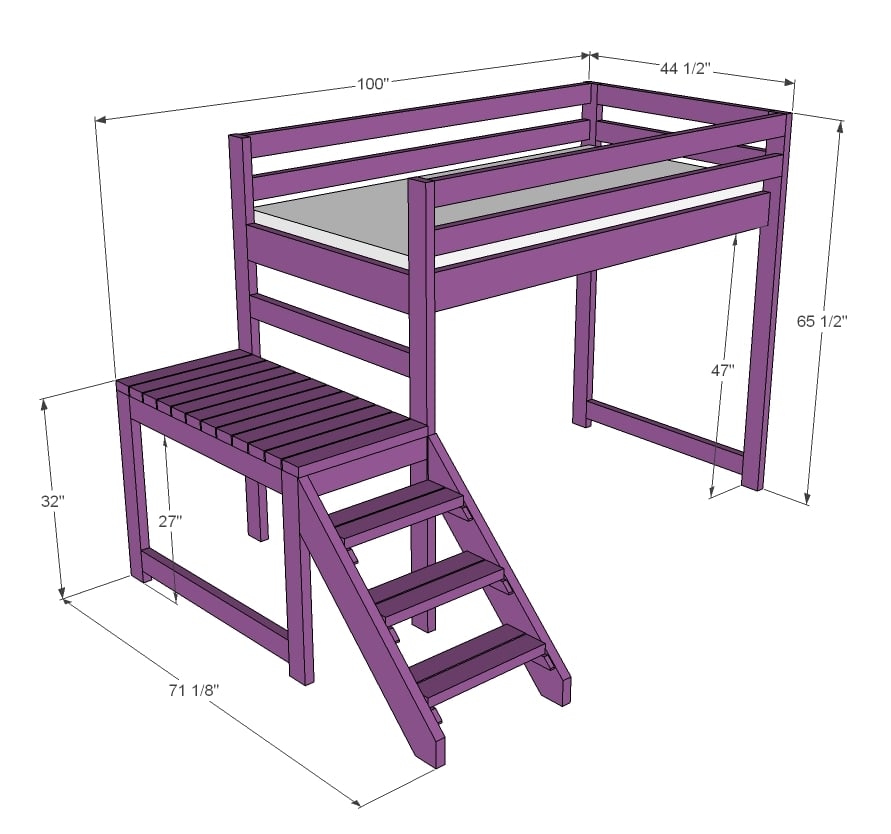
Loft Bed with Stairs Plans
Pin for Later!

Preparation
- 15 – 2x4 @ 8 feet long
- 4 – 2x6 @ 8 feet long
- 2 – 2x2 @ 8 feet long
- 1 – 1x2 @ 8 feet long
- 2 ½” pocket hole screws
- 4 – 2x4 @ 65 ½” - legs
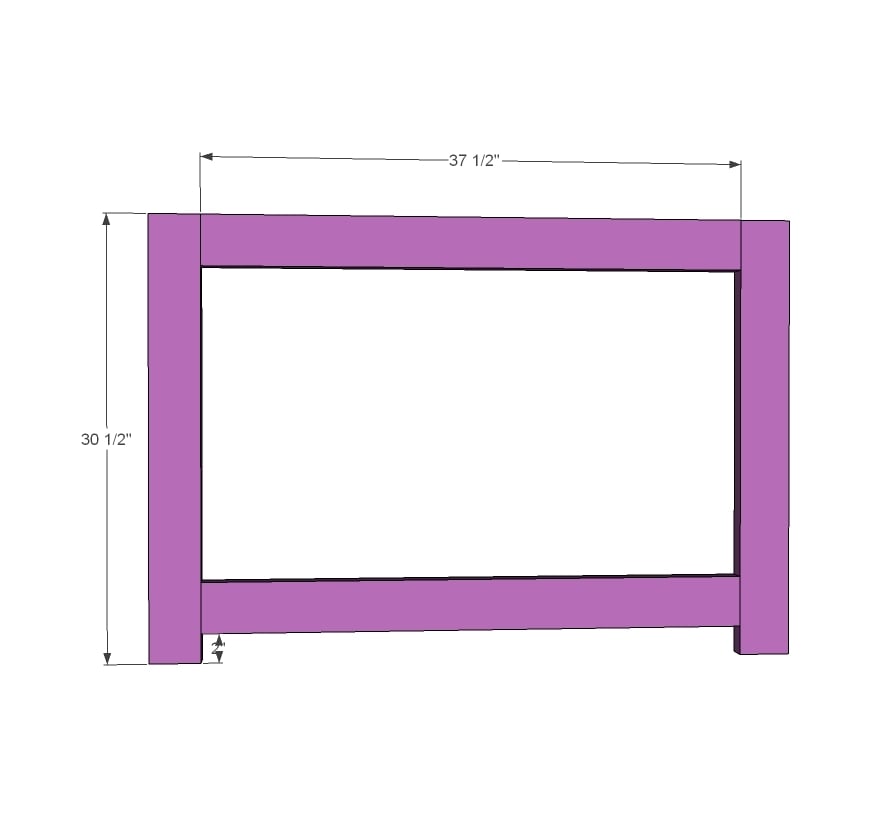
- 2 – 2x6 @ 37 ½” -bed siderails on ends
- 5 – 2x4 @ 37 ½” - guardrails on ends
- 5 – 2x4 @ 75” - guardrails and base support
- 2 – 2x6 @ 75” - bed siderails
- 2 – 2x2 @ 75” - cleats
- 2 – 2x4 @ 30 ½” - platform
- 2 – 2x4 @ 37 ½” - platform
- 1 – 2x4 @ 41 ½” - platform
- 2 – 2x4 @ 20 ½” - platform
- 12 – 2x4 @ 22” - decking
- 2 – 2x6 @ 43” (both ends cut 45 degrees off square, ends NOT parallel) – to be trimmed down in later steps
- 6 – 1x2 @ 7 ¾” (both ends cut at 45 degrees off square)
- 6 – 2x4 @ 20 ½” - stair treads
This bed requires a slat system (1x3s, 1x4s or 2x4s or similar) or a bunkie board mattress to complete


Please read through the entire plan and all comments before beginning this project. It is also advisable to review the Getting Started Section. Take all necessary precautions to build safely and smartly. Work on a clean level surface, free of imperfections or debris. Always use straight boards. Check for square after each step. Always predrill holes before attaching with screws. Use glue with finish nails for a stronger hold. Wipe excess glue off bare wood for stained projects, as dried glue will not take stain. Be safe, have fun, and ask for help if you need it. Good luck!
Instructions
Step 1
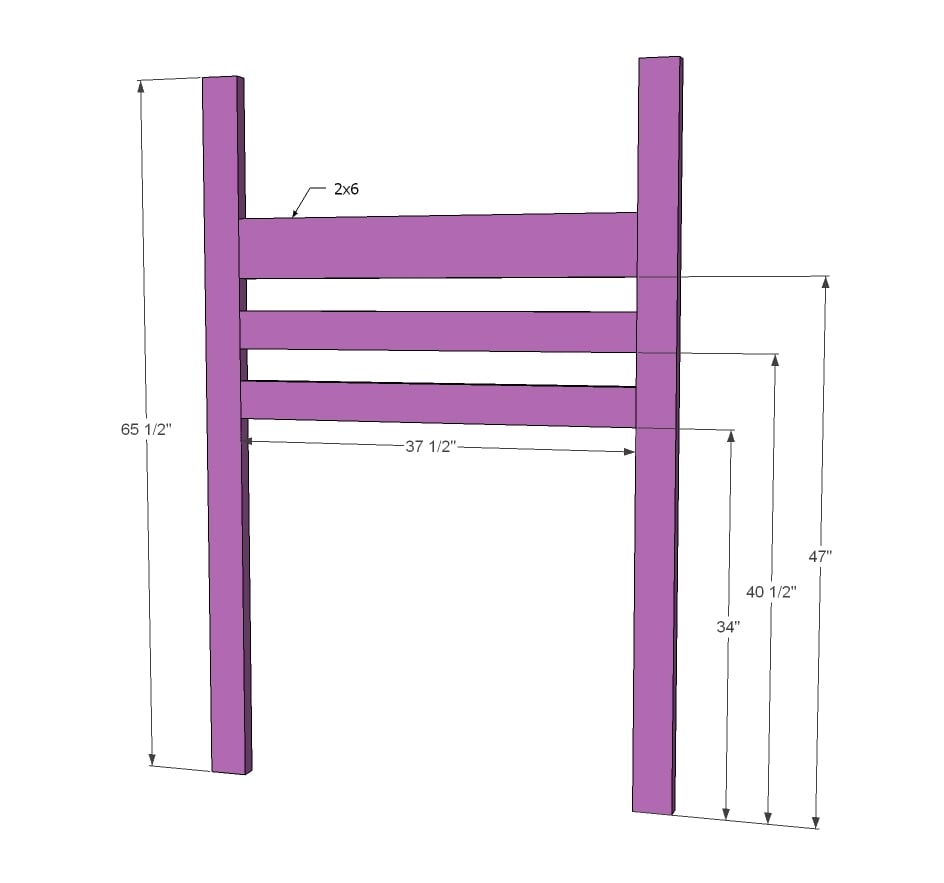
Build the ladder end as shown in diagram with 1 1/2" PHs and 2 1/2" PH screws. Use glue to fasten - these joints are permanent. If you are building this loft bed without the stair platform, add 2x4s all the way down to make a "ladder" for the kids to climb up.
Step 2
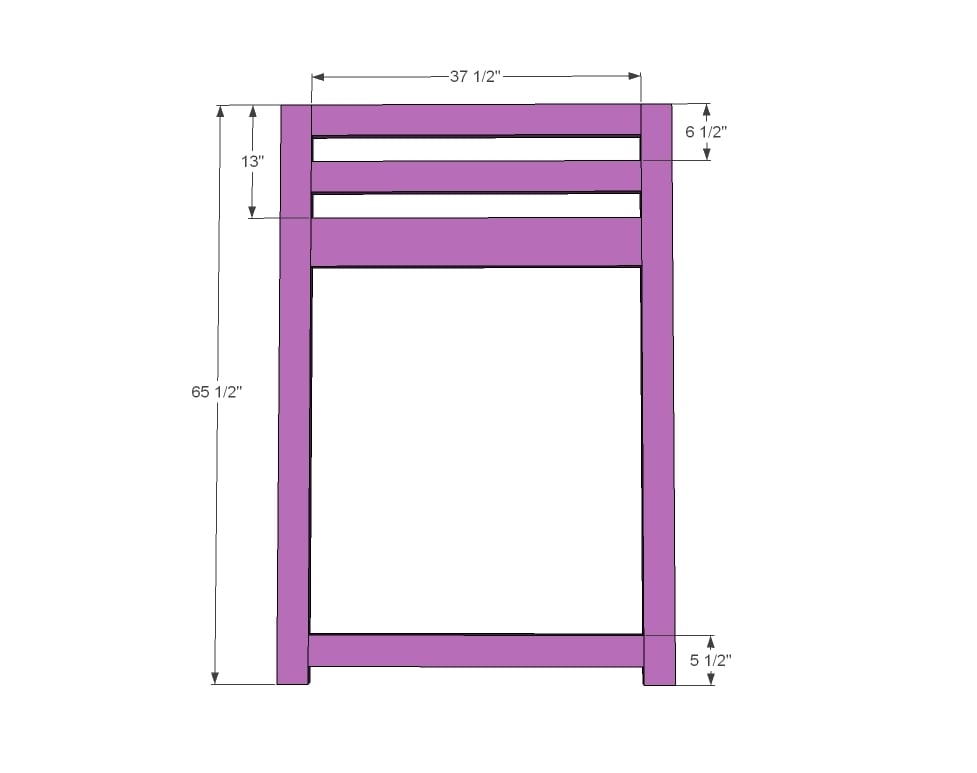
Build front end of loft bed same as ladder end.
Step 3
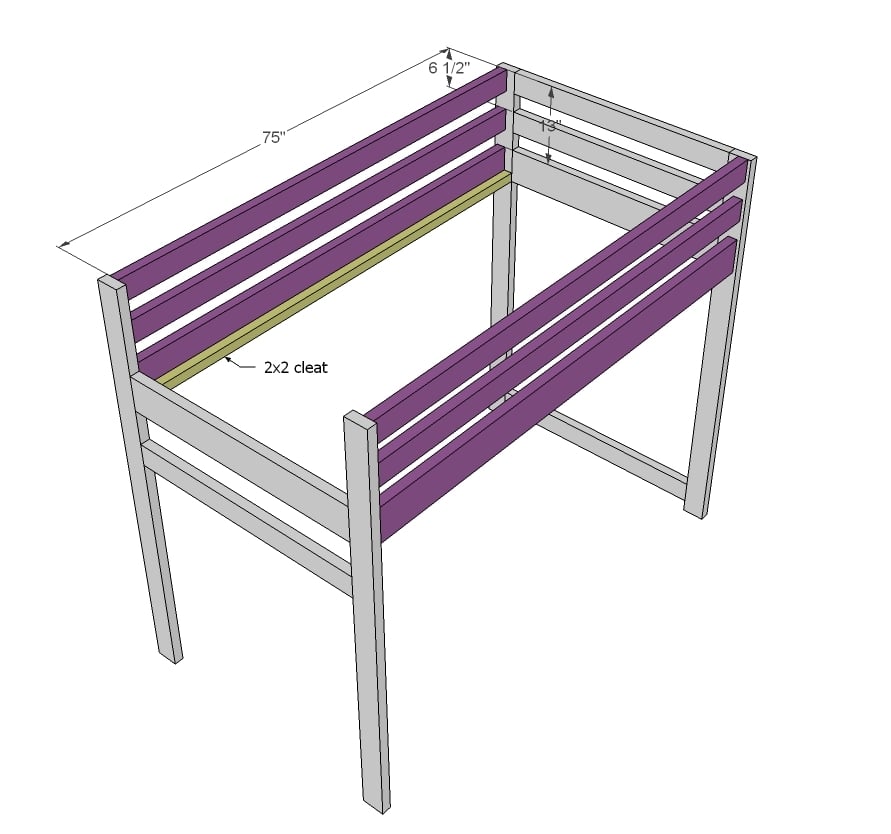
Now here's where we skip the glue. To make this loft bed easy to disassemble, I did not use glue here. The inside width for the mattress area should be 39", insetting the side rails 1 1/4" from outsides. I did this so your PH screws have lots of board to grab into. This bed has NOT been weight tested or guaranteed. If you feel you need extra support - add metal brackets under the 2x6s. An alternative method is to attach metal bed brackets directly to the ends if you have those. Notice the cleat is added in this step to. I used 2 1/2" screws and glue to attach, screws every 6-8" all the way down. This bed is designed to work with a bunkie board, but we just used 2x6s cut to length as the bed slats.
NOT SHOWN: Add the fifth 2x4 @ 75" at the back base of the bed to support the legs at the bottom.
Step 4
Now we'll start building the stair platform for the loft bed with stairs.
Step 5
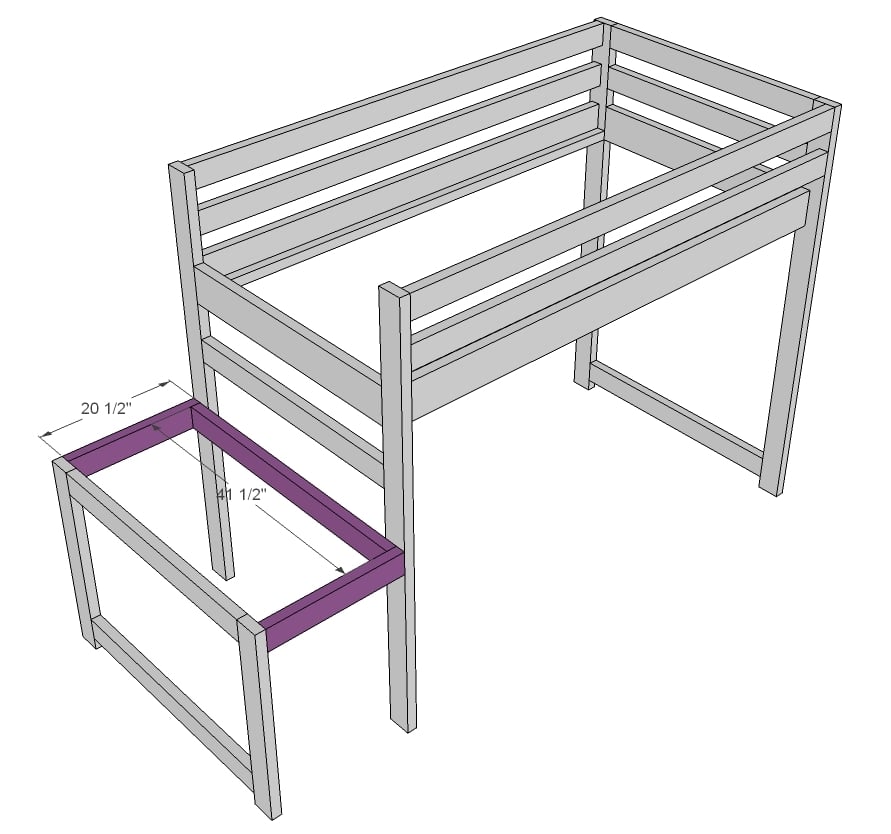
Attach stair framing to the loft bed legs.
Step 6
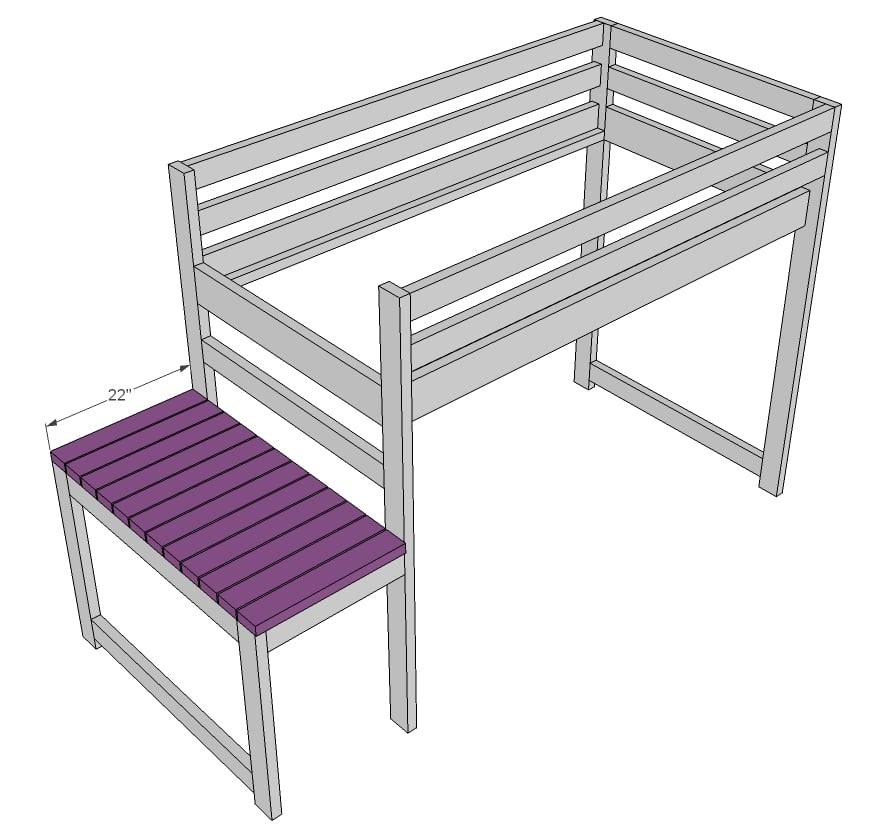
And then the decking is placed on top of the stair platform.
Step 7

The stairs are easy to build - just 45 degree angles! We went ahead and drilled 1 1/2" PHs along top edge of the stairs to connect the stairs to the bed later on.
Step 8
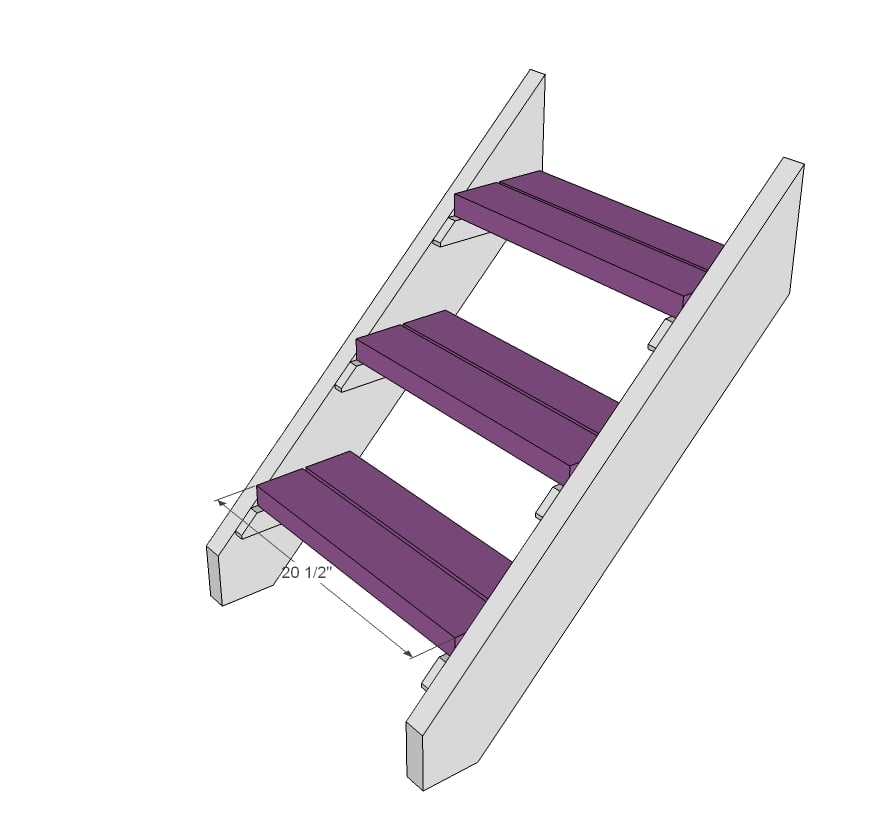
Then we added the stair treads. We also drilled 1 1/2" PHs along ends of the stair treads and attached with 2 1/2" PH screws just for extra strength. Everything gets glued.
Step 9
The bed was finished outside and then assembled in the room. TIP: We haven't found our bed needs it, but for extra support, you could add another 2x4 @ 75" (at $2 a 2x4, cheap insurance) to the base of the bed to further support the bottoms.
It is always recommended to apply a test coat on a hidden area or scrap piece to ensure color evenness and adhesion. Use primer or wood conditioner as needed.
Comments
Melinda Duffey (not verified)
Sun, 11/04/2012 - 14:20
Loft BED / Chestwick platform bed
I have a guest room that i want to fix up for my grand daughter but i did not want to give up my queen bed for company. After hours of sticker shock I found this site. Papaw is going to builed the loft for Emma and mom and Dad has the Queen bed under it for them and she will still have room to play. Thank you for the wonderful Plans and ideas that are so practial.
Britt (not verified)
Fri, 11/09/2012 - 06:26
mattress height
hi, thanks for the plans! i want to confirm that this fits a standard twin mattress? also that i'm reading the plans right and that there are 24" from the mattress support to the top of the top rail, as I'm trying to decide what height mattress to get for my toddler.
Aaron (not verified)
Sat, 11/17/2012 - 17:45
Fun time loved building it!!
I built this bed in 10 hours and to screw it together I used a pocket hole jig
Vlad (not verified)
Sun, 11/18/2012 - 19:14
Thank You
Just built this for my three-year-old son over the weekend. He helped me out. It was a great experience and it came out so cool. $80 worth of wood. The only problem we had was they don't sell the 2 1/2 inch screws in bulks so we had to buy 4 boxes of 25 screws at about $5-$6 a box. We took a couple of trips to Home Depot but so worth it. Now my son has all of his friends over.
Vlad (not verified)
Sun, 11/18/2012 - 19:15
Thank You
Just built this for my three-year-old son over the weekend. He helped me out. It was a great experience and it came out so cool. $80 worth of wood. The only problem we had was they don't sell the 2 1/2 inch screws in bulks so we had to buy 4 boxes of 25 screws at about $5-$6 a box. We took a couple of trips to Home Depot but so worth it. Now my son has all of his friends over.
Emeline (not verified)
Sun, 11/25/2012 - 11:00
Unité de mesure
Bonjour
Je suis française et j'ai découvert votre page web très symphatique. J'aimerai construire un lit mezzanine pour ma fille, le soucis c'est la traduction des longueurs.
Serait-il possible de les avoir en métre.
Merci.
Cordialement
Suzanne B (not verified)
Tue, 11/27/2012 - 23:35
Stair boards
I would like to make this bed. But want the deck part to be 36" high. How long would the stair boards (with 45 degree angle cuts) need to be? And at what heights would the stair cleats be? I think I will need 4 steps not 3 for it to work for my child.
Jimmy WM (not verified)
Mon, 12/03/2012 - 07:41
Lumber w/o steps
Has anyone built this without the steps (just 2x4s on the back for child to use like a ladder)? Just wondering how to adjust lumber supply list accordingly.
Katie B (not verified)
Wed, 12/05/2012 - 06:07
Has anyone ever taken apart
Has anyone ever taken apart and reassembled? Can it be done? Should it be done? Any precautions? or just don't bother?
In reply to Has anyone ever taken apart by Katie B (not verified)
Phanessa
Sun, 08/04/2013 - 06:43
In response to Katie B's question w/ Loft bed
I thought about that also. We are starting this project tomorrow for my daughters 8th birthday. That was about how old I was when I started re-arranging my room a couple times a year.
I have decided to make the stairs and platform its own complete fully standing unit. I can still connect the two for better stability, but should also be able to alter sides if needed. That is, if I've planed correctly! Lol.
Andy (not verified)
Fri, 12/07/2012 - 12:56
Bed Slats
Hi Anna,
My wife and I are fans of your site. We are currently in process making this loft bed and like the idea of using 2x6s as bed slats. But, we have a few questions we are hoping you could answer. Did you still use the 2x2 rails? Did you secure the 2x6 slats with PH screws? and lastly, how many slats did you use?
Thank you,
Andy
BMas99 (not verified)
Tue, 12/11/2012 - 16:17
Pocket Holes
Excuse my ignorance, as this is my 1st time doing pocket holes. What is meant by the 1 1/2 inch? Depth of hole? Distance between holes?
I'm excited about getting this built, because my kids are going to love it as a Christmas present. I'm making some adjustments by putting the stairs on the other side, and adding a slide and curtains.
BMas99 (not verified)
Thu, 12/13/2012 - 07:35
Never mind on the pocket
Never mind on the pocket holes. I have the 1 1/2 inch spacer block for the tool, so I should be good to go (once I do some practice holes).
Kayla McCormack (not verified)
Tue, 12/11/2012 - 20:04
I was curious to know if a
I was curious to know if a college student could use this same plan for building this bed?
Any thoughts?
Sara Baum (not verified)
Fri, 12/28/2012 - 14:23
Not Completely DIY-ers...
My husband and I are planning to make this bed (times two!) tomorrow and in my research for great storage options to go along with these plans, I realized that the IKEA TROFAST frame (the short one with room for three buckets across) will fit perfectly under the stair platform!! I know we could probably make a similar unit ourselves, but for $40, I think I'll go with the IKEA one!! : ) I just had to share my discovery in case anyone else was interested!!
Jessica B. (not verified)
Sat, 12/29/2012 - 15:10
Built it!!
My husband i just built this 2 days ago. Only took 8 hours drom start to finish. We spwnt roughly 200 because we made it taller so he could ise it through high school. Bed for life hopefully. We bought the kreg jog and screws within that $200. Great directions and plans. Thank you so much. This was our first project and we will be back for more!!
Jessica Ramos (not verified)
Wed, 01/02/2013 - 18:27
Hi Ana, my husband just built
Hi Ana, my husband just built this bed for our 4 year old and wanted to see what the weight limit would be for the bed??? Thanks :)
Maya (not verified)
Mon, 01/07/2013 - 19:36
just made two
I am so pleased with these beds. We took on the task of making 2 of them at the same time! My boys 4 and 6 are in love with their new beds. Since it was raining we turned our garage into a woodshop. We stained and built, brought them into their rooms and then put a coat of poly on them a few days later.
Thank you Ana for creating these plans.
Richard Kasten (not verified)
Sun, 01/13/2013 - 19:32
Kids Camp loft bed with stairs
In your instructions, you made a comment about "drilling 1 1/2" PHs along the top edge of the stairs". What are you referring to? I understand when you said to use 2 1/2 PH (Phillips Head?)screws. Are these the same thing?
On another note, I strengthened the joints on the foot and head end 2" X 6" boards by using 3/8" X 2" dowel pins on load bearing members. Same thing on the 2" X 6" side boards.
Amber V (not verified)
Mon, 01/14/2013 - 01:15
can the loft bed be turned in to a bunk bed?
i love this design and i think my 3 year old nease would love it as well but my nease and her mom(my sister) share a 8'x8' (give or take 6") room at are mothers house. as of not she has her full size bed at along the wall and a todler bed at the foot of her bed. with maby 2ft walk space inbetween the dresser and bed and about 8in to 1ft from the closet and todler bed.Well i guess what i need to know is there any way a full size bed could fit under the loft bed? maybe using your daybed design with the drawers but for a full size bed. that way it would open up more space on the floor and they can get to the closet better.
TGuza
Wed, 02/06/2013 - 21:08
I found these plans a few
I found these plans a few weeks ago and was able to talk my husband into helping me make them for our 2 youngest children. Having never used a Kreg Jig before we started without it, thinking we knew what we were doing. We put the first two boards together before heading out to purchase our new favorite woodworking tool.
Your plans made the beds so easy to put up. I had the boards all cut and sanded before we began which helped a lot. We started with our son's bed. I took us almost the whole day Saturday to put it together. On Sunday we put together our daughter's bed. Since we had just made one, everything went together so fast. I think we had it up in less than three hours.
The kids LOVE them and I've been searching your site for other things I "need." Thanks so much for posting your ideas!
christian456
Thu, 02/07/2013 - 02:20
The post is very nicely
The post is very nicely written and it contains many useful facts. I am happy to find your distinguished way of writing the post. Now you make it easy for me to understand and implement. Thanks for sharing with us.
http://www.go4articledirectory.com/article.php?id=2041
BCarter327
Fri, 02/15/2013 - 16:50
Wood
Hi there! We are getting ready to buy the lumber for the L shaped version of this bed and super duper excited! Only problem is I am not sure what type of lumber to buy to be sturdy and not tooo expensive... What have you all used on these beautiful beds?
beginner
Sat, 02/23/2013 - 11:16
pocket holes
Hi Anna, I am a totally beginner, and I really want to make this bed for my 6 year old daughter. I was going to buy the mini pocket kreg jig. Will that work for this project? Also, on other plans you show the pocket holes in the plans, and in this plan they are not there. I'm just a little clueless, and probably need someone to guide me through this. :-) I think I have read every comment, and really not sure if I should tackle this or not? Any advice?
Srenneb2
Mon, 04/08/2013 - 12:04
Camp Loft Bed with Stairs
We build this bed over the weekend for our 5-year old daughter. The plans were extremely easy to follow (when my husband read them). My daughter says it's "the bed she's always wanted!" Thanks for these, you made me look like a hero.
ashton12
Fri, 04/12/2013 - 05:59
Can I make a suggestion? I
Can I make a suggestion? I believe you’ve obtained something good here. But what should you added a pair links to a page that backs up what you’re saying? Or possibly you could give us one thing to look at, one thing that may connect what you’re saying to one thing tangible? Only a suggestion. Anyway, in my language, there isn’t much good source like this.
http://healthpharma.blogsome.com/
amandanmv
Sun, 04/14/2013 - 21:25
bed without the steps
I'm making this for my 11 year old daughter and I would like to omit the steps and just do the extra pieces on one side for her to climb up. How much of the wood can I take off my supply list?
MLWebster
Tue, 04/23/2013 - 19:43
Pocket Hole Screw placement?
First timer here. Very much a beginner. I have most all of my cuts done. Not real clear on exactly where to put my screws, or how to hold the wood together while drilling for that matter. I couldn't afford the name brand Kreg Jig (and they didn't have the $20 one) so I bought a cheaper competitor version that's supposed to do the same type of pocket hole screws.
So my question is, where do I drill from? In step one for example, Do I drill starting into the horizontal 2x4's into the vertical 2x4's from the side? Or from the top down? Or from the bottom up? Or from the vertical ones into the horizontal ones from the side? How many screws per intersect? Is there a beginners link/video somewhere I can check out?
Any help/direction would be much appreciated. Can't wait to get good at this and build other things.
lynn25lla
Thu, 04/25/2013 - 10:57
This was an excellent
This was an excellent article. It has some valuable content on this topic. Thank you for compiling it into an easy to read and well written post.
http://www.logbookloanstrust.co.uk/
DiyMom2Two
Fri, 05/10/2013 - 09:34
Ana please Help :)For a Queen size
Hello I'm hopefully going to be starting this project this weekend. As my son has a queen bed that takes up a lot of space in a small room. I think this would be perfect. As I am going to make him a fort under. My question is how would you change the plans to work for a queen? What size wood wood I need? The bed size is 60 by 80. This is my first project so any suggestions would be so helpful:). Also do I use a boxspring with it? And is the queen going to be to heavy? Thank you for your time
Craigwk
Fri, 05/17/2013 - 04:05
Timber
Really keen to make this for my son. Great plans that I amended to fit a UK small double mattress (4ft).
However you should all count yourselves lucky that the timber costs are so low in the US. I've priced this from a builder merchant with off the saw pine (construction grade c16) at £150. Redwood is >£200!
Al Lulu
Fri, 05/31/2013 - 15:34
Should I mount this to the wall
I'm about to start this project and I'm a bit concerned about the sturdiness of it.
I know, I know. I just worry.
Should I mount this to the studs on the wall or is it secure enough to handle a 6 year old and her jumping bean of a brother?
Thanks!
In reply to Should I mount this to the wall by Al Lulu
Lady Goats
Fri, 06/14/2013 - 17:52
Personal Preference
That's entirely up to you. After you build it, test it. If it doesn't seem sturdy enough for you, mount it to the wall! Something to consider: Your baseboards won't allow you to sit this flush to the wall, so you may have to screw a 1x into the side rail (on the back) so that you can screw it to the wall without tilting it or leaving a space between the bed and the wall.
Myang
Sat, 06/01/2013 - 18:30
Loft-Bed-Stair
I was just wondering what was used to support the bed of the loft bed besides the 2 X 2 cleat?
Myang
Sat, 06/01/2013 - 18:30
Loft-Bed-Stair
I was just wondering what was used to support the bed of the loft bed besides the 2 X 2 cleat?
In reply to Loft-Bed-Stair by Myang
Lady Goats
Fri, 06/14/2013 - 17:50
Bed Support
She mentioned in the plan that it's designed to be used with a bunkie board, but that they used 2x6s cut to length.
MoMo
Fri, 06/14/2013 - 08:00
Can I increase the height?
This is the best (simplest, most economic) plan we have come across and would like to build it in the full size dimension that Pammylaine shared but I was wondering if we could increase the height safely? My boys just keep getting taller and I wanted to know if I could make it tall enough for them to walk under... like 70" or so to the bottom of the mattress?
In reply to Can I increase the height? by MoMo
Lady Goats
Fri, 06/14/2013 - 17:46
To increase the height
I would imagine that making this taller wouldn't be a safety issue with a couple modifications. My suggestion would be to screw some 2x4s around the bottom into the legs on both sides and the back (leaving the front open) so that the legs don't splay. Don't put these directly at the bottom, but a few inches up (figure where you find it aesthetically pleasing). I would imagine that you could forego the spreaders on the side with the stairs, as long as the stairs are screwed in, but I would put it there anyway. Better safe than sorry!
Al Lulu
Thu, 06/20/2013 - 18:12
Stain color in photo?
Can someone tell me what the stain color that is in the pictures? Every time I refresh the page it offers a different stain and we LOVE the one in this picture.
CandiD
Mon, 07/08/2013 - 16:48
n/a
n/a
DiyMom2Two
Wed, 07/03/2013 - 12:18
Queen?
Hello can anyone help me as to how you could do this for a queen size?thank you
CandiD
Mon, 07/08/2013 - 16:46
I'm in the middle of building
I'm in the middle of building it as a full sized, I also modified the height so it was more of a standard loft bed height (my total height is 75" my area under the bed is 56 5/8"). I'm also splitting the platform into 2 sections since otherwise my daughter would have hit her head standing on it and I'm extending the platform massively. I'm adding a bunch of additional support, which I would suggest you do also if you plan to build it as a queen. I'm adding a 2x4 under the mattress supports, using purchased brackets for the long 2x6's and also adding a 2x4 running up and down under those for additional support (since those 2 long 2x6's are what holds up your mattress essentially). I'm also adding a 2x4 to the bottom between the two ends. As for changes to the plan for a queen, just measure your mattress and then adjust your length and width measurements for all your cuts. I hope to have mine done this week and will post more info and photos.
tigeress1026
Sat, 01/25/2014 - 07:37
I'm wanting to do this with a
I'm wanting to do this with a full size bed as well. I would love to know how yours turned out.
TishaM
Thu, 07/18/2013 - 10:52
Attaching Side Rails & Cleats (Step 3)
Can someone give me a little more guidance about attaching the 2x6 bed rails and cleats? As of now, I pre-drilled 3 pocket holes on each end of the 2X6 boards, thinking that I should use three screws here when I attach to the upright posts. I agree with not gluing these pieces, as I will need to dis-assemble the bed. HOWEVER, if I DO glue the cleats into place, I will be covering the lowest of my pocket holes, thus making it impossible to take those lowest screws back out (between the 2x6 and the head & foot-boards) . Did you all just attach the 2X6s with two screws into each head & footboard? Thanks much for any guidance!
GumbyHendrix
Mon, 07/22/2013 - 18:33
Suggestion...
Be careful screwing through pocket holes on ends of boards. They blow out easily. The Kreg screws I got at Lowes kind of had a washer head. I would recommend using PH screws with a trimmer head or what I ended up doing was grinding the "washer" portion off on the bench grinder.
PatH
Tue, 07/30/2013 - 18:49
Question about PH and 2x6
This is my first time using a kreg and pocket holes. When you're fastening the 2x6 board to the vertical posts/legs, how many pocket holes are you using? You CAN fit 4 holes/kreg fasteners in there, but I'm wondering if it is just enough to do a pair of holes/fasteners in the middle of the board?
As far as I can see, it doesn't say specifically in the plan.
Thanks!
In reply to Question about PH and 2x6 by PatH
awesometoast
Wed, 12/11/2013 - 20:41
I used 3 pocket holes in
I used 3 pocket holes in ours. Having finished it and sit/wiggle/jump tested it myself, I'm not sure I would trust only 2.
TheCholsons
Wed, 08/28/2013 - 18:07
queen bed
I want to raise up our queen guest bed so we can put a day bed with a beautiful frame underneath (we have very limited space in the house and this is our only guest room). I've been working all day on converting this plan... think I've just about got it... except now I'm thinking I may need to make the posts 4x4s instead of 2x4s for added strength... Any thoughts?? Also thinking of adding 2x4 'slats' accros to add support for the bigger mattress or maybe corner slats?? Not sure...
Any tips would be VERY helpful, this will be my first project... ever. Thanks!!!
Kittens_are_cute
Sun, 12/08/2013 - 13:53
Thank you!
Thank you so much for these plans! My grandparents and I are planning to make me this next summer... I can't wait!
mmusich
Thu, 12/26/2013 - 11:58
Queen bed
Does anyone think there is enough room to put a queen sized bed below coming straight out? I saw the earlier post about putting a twin below and a suggestion was make the legs a tad longer so there was more head clearance...any suggestion of how much longer? Looks like the length of the twin is 75" and the width of a queen would be 60" so it should work, just wondering if anyone has done this.