

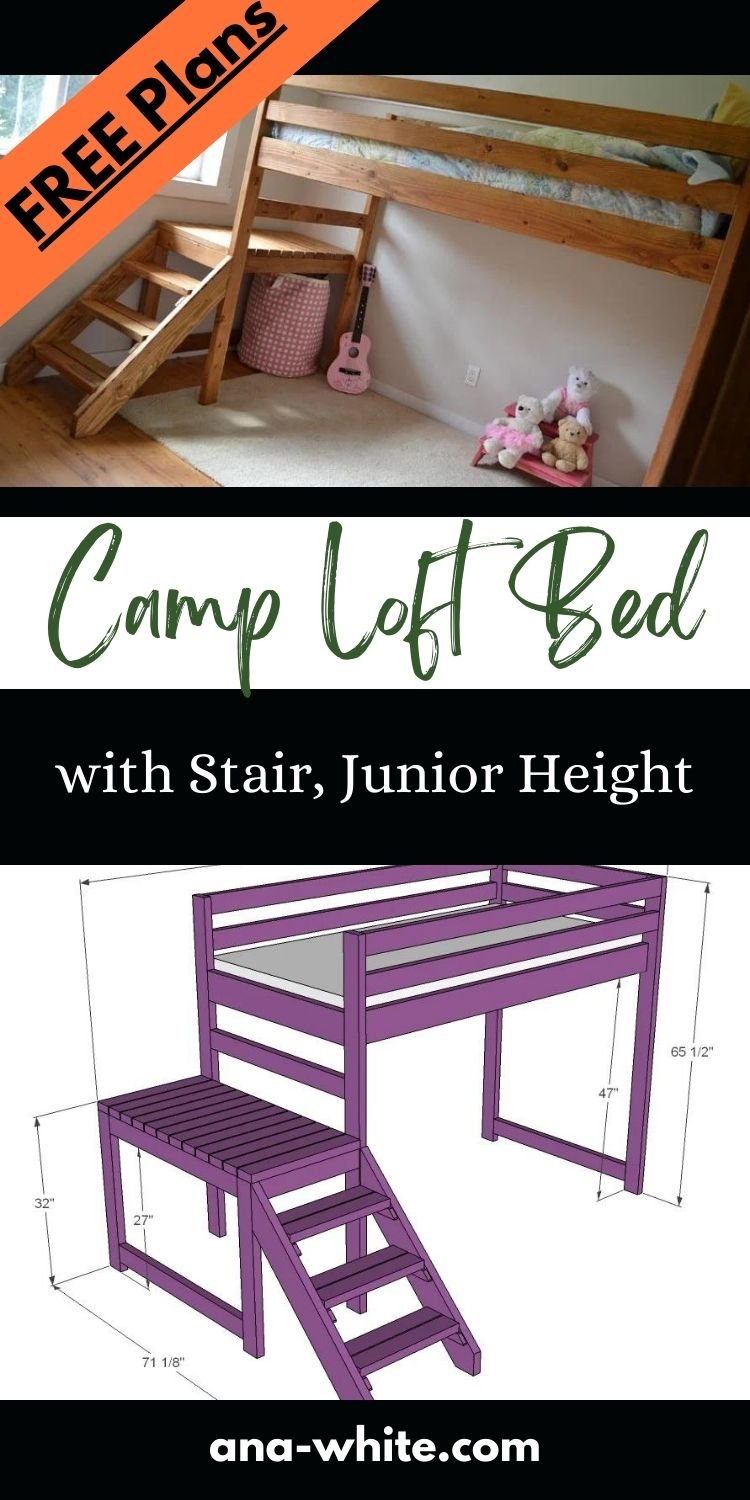
Build your own loft bed plans with stairs all from 2x4 and 2x6 lumber! This super sturdy and beautiful design features a platform for easy access, junior height loft bed plans free from Ana-White.com
This loft bed has been built and cherished the world over for almost a decade. Here's why-
- It's inexpensive to make - about $50-$100 in materials
- It's super sturdy and strong because of the 2x4 and 2x6 materials - the same materials we build houses out of
- It's an easy to build design that is fairly quick to tackle
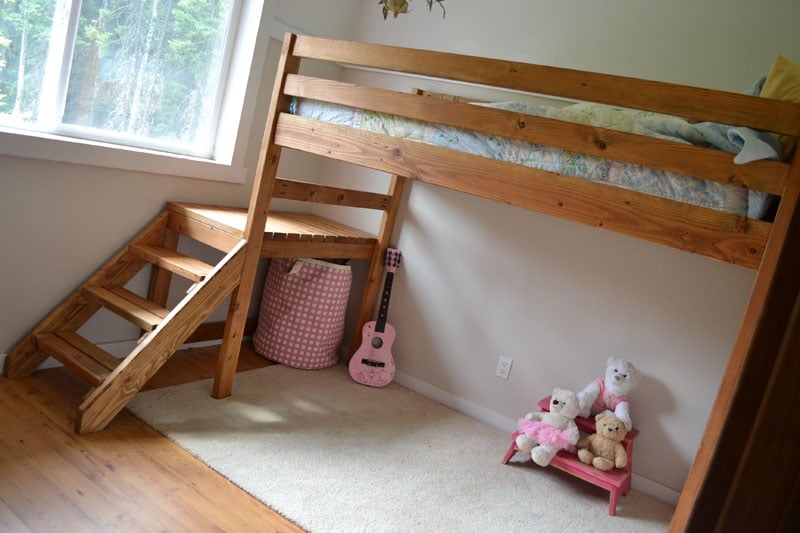
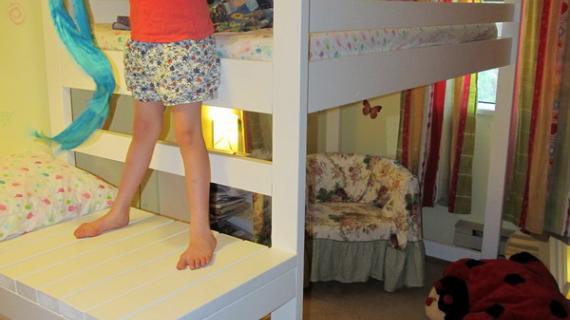
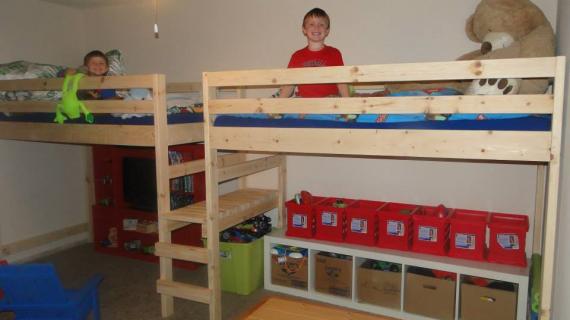
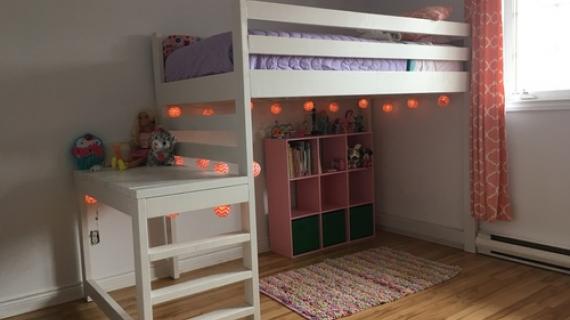
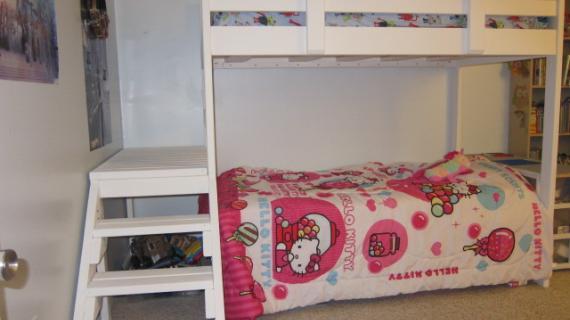
- The platform with stairs make it very easy to access the loft. The lower platform is at about the same height as a floor to mattress, so it's a very natural and easy process to go from the bed to the platform
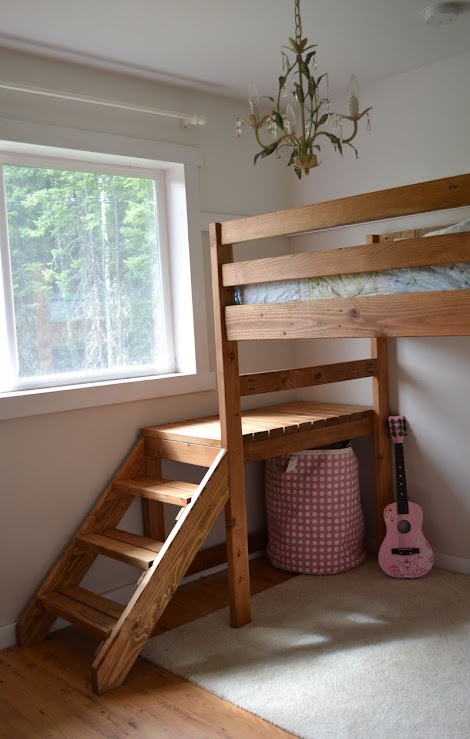
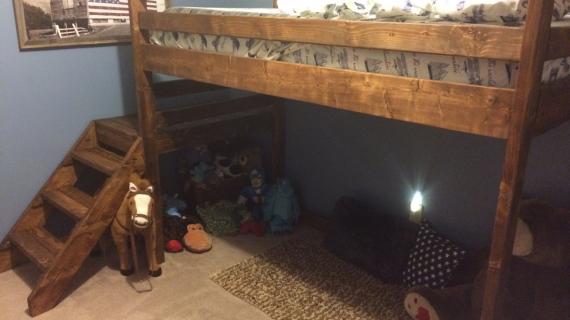
- This loft bed is a very beautiful piece that can go with just about any decor
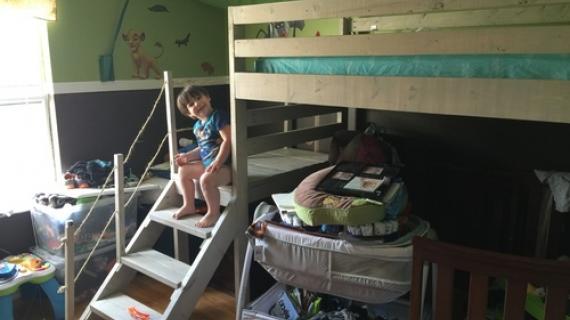
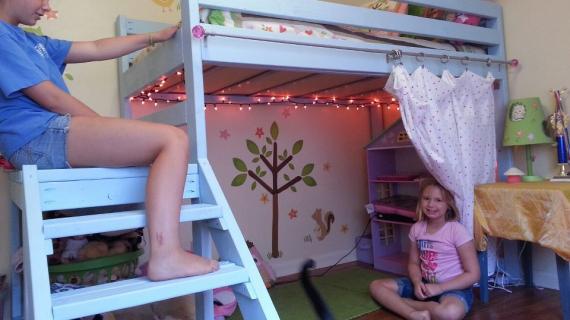
I built this loft bed for my then four year old daughter. At four years old, a loft bed seemed like a bad idea. But with the stairs, it's really not that different than a regular bed - just the access is at the bottom.
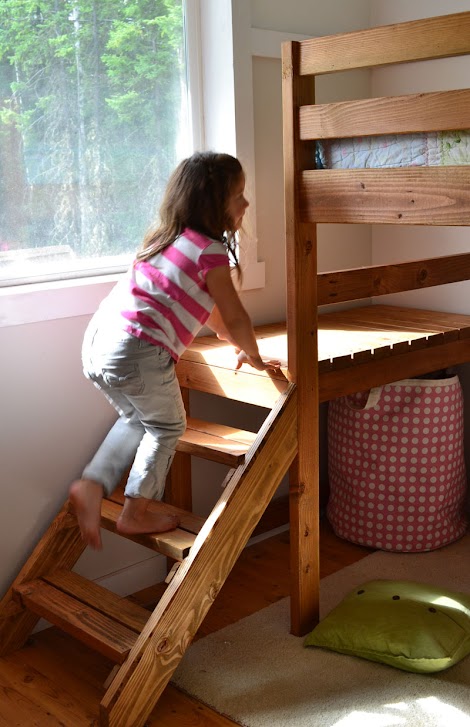
The stairs are so much easier to use than a ladder. And the platform is just right. Instead of having to crawl down a ladder, you simply swing your legs off the bed (just like a normal bed) and they rest on the platfrom. Then you stand up (with good headroom) and walk down the stairs.
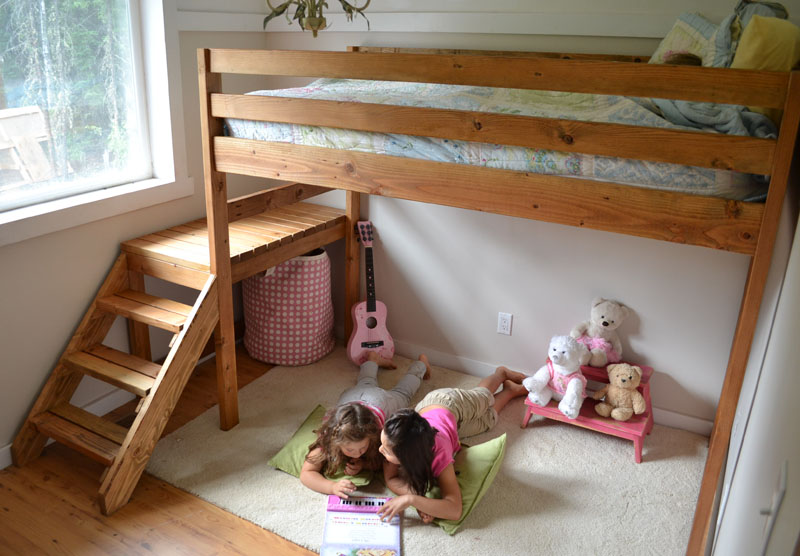
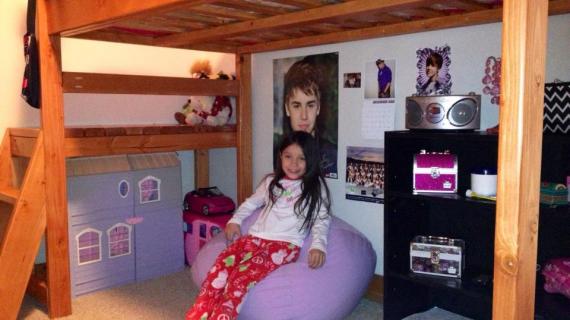
The goal was to create a loft bed that mom and dad could easily crawl into and snuggle and read bedtime stories - and easily sneak out when the child drifted off to sleep.

We designed this bed to fit inside a room just bigger than 8x8. Yes, 8x8. It gave the room so much more useable space!
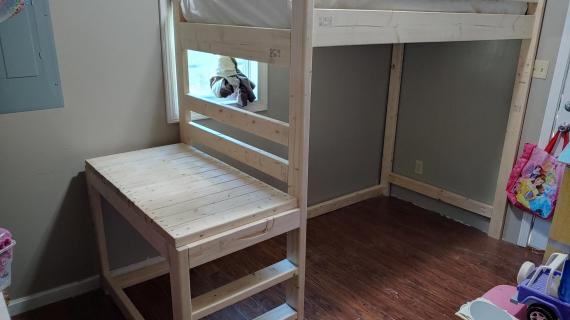
The window was previously the obstacle in the way of building stairs. But with the lower platform, we were able to not cover the window. Now it's entertainment for the kids as they use it as a stage, and look out the window from it.
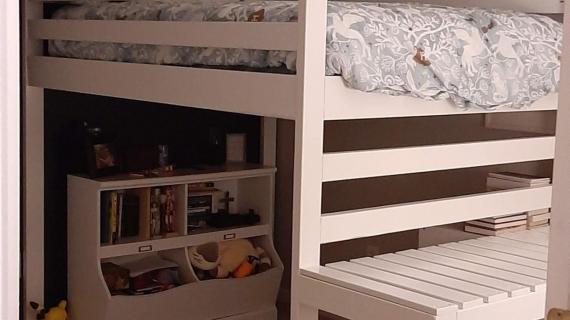
Under the loft bed stair platform, no storage is lost. It's a great spot for a toybox or bin.

The best part about this bed is how easy and inexpensive it is to make. That's all 2x4s and 2x6s (I'll share my finishing technique with you later this week) bringing the total cost of lumber up to about $50!!!
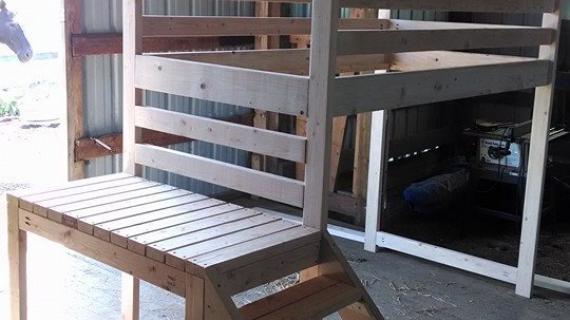
Convert to Bunk Bed with Stairs Option
We also love this bed with a second bed under it to create a bunk system. We have plans for a matching twin bed frame here.
NOTE: You may wish to increase the leg length by about 6" to give more headroom to the lower bunk - depending on how tall you make your lower bed height.
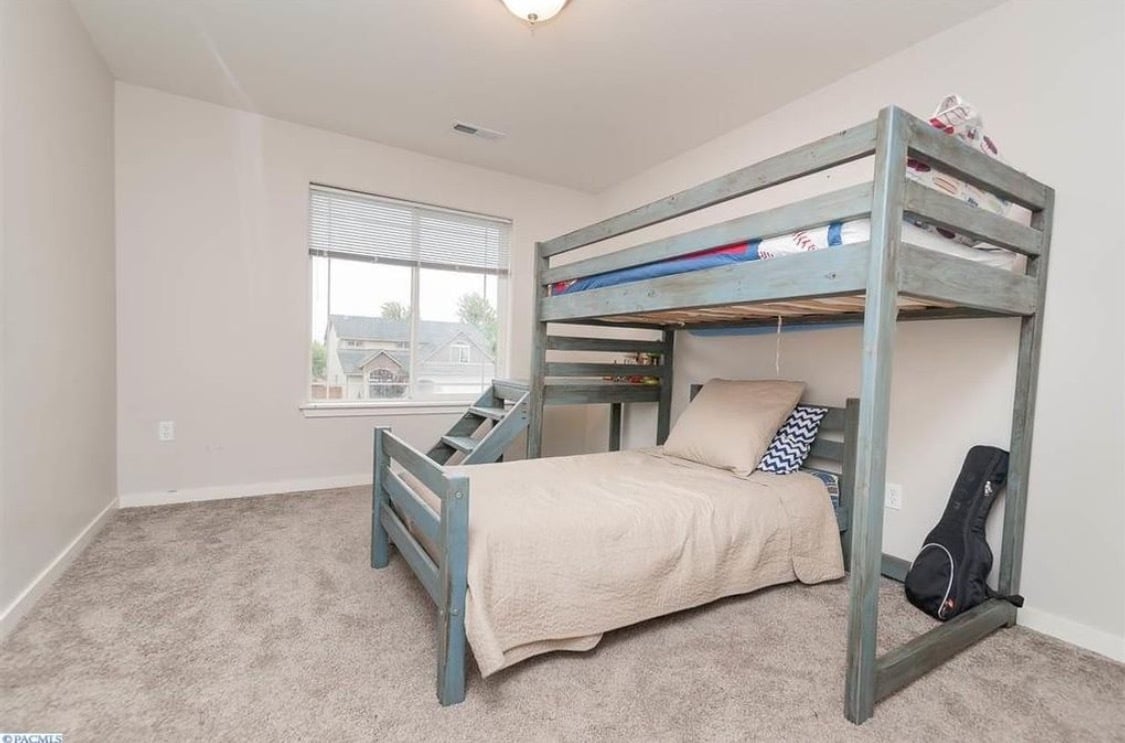
Photo SUBMITTED BY CAJSAWALLWORK
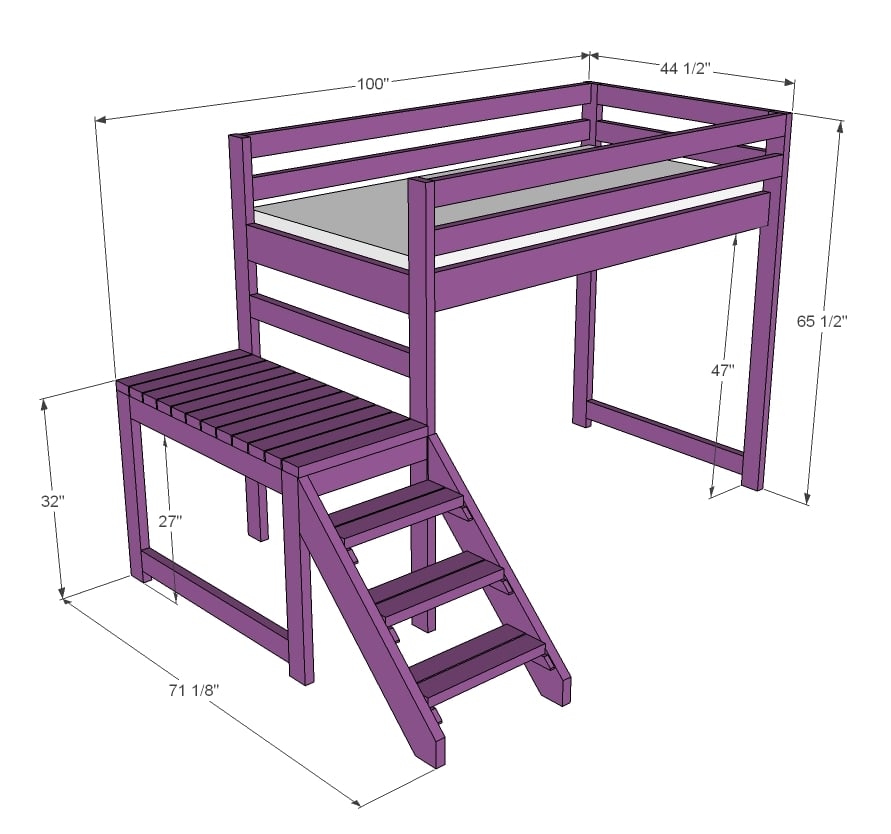
Loft Bed with Stairs Plans
Pin for Later!

Preparation
- 15 – 2x4 @ 8 feet long
- 4 – 2x6 @ 8 feet long
- 2 – 2x2 @ 8 feet long
- 1 – 1x2 @ 8 feet long
- 2 ½” pocket hole screws
- 4 – 2x4 @ 65 ½” - legs
- 2 – 2x6 @ 37 ½” -bed siderails on ends
- 5 – 2x4 @ 37 ½” - guardrails on ends
- 5 – 2x4 @ 75” - guardrails and base support
- 2 – 2x6 @ 75” - bed siderails
- 2 – 2x2 @ 75” - cleats
- 2 – 2x4 @ 30 ½” - platform
- 2 – 2x4 @ 37 ½” - platform
- 1 – 2x4 @ 41 ½” - platform
- 2 – 2x4 @ 20 ½” - platform
- 12 – 2x4 @ 22” - decking
- 2 – 2x6 @ 43” (both ends cut 45 degrees off square, ends NOT parallel) – to be trimmed down in later steps
- 6 – 1x2 @ 7 ¾” (both ends cut at 45 degrees off square)
- 6 – 2x4 @ 20 ½” - stair treads
This bed requires a slat system (1x3s, 1x4s or 2x4s or similar) or a bunkie board mattress to complete


Please read through the entire plan and all comments before beginning this project. It is also advisable to review the Getting Started Section. Take all necessary precautions to build safely and smartly. Work on a clean level surface, free of imperfections or debris. Always use straight boards. Check for square after each step. Always predrill holes before attaching with screws. Use glue with finish nails for a stronger hold. Wipe excess glue off bare wood for stained projects, as dried glue will not take stain. Be safe, have fun, and ask for help if you need it. Good luck!
Instructions
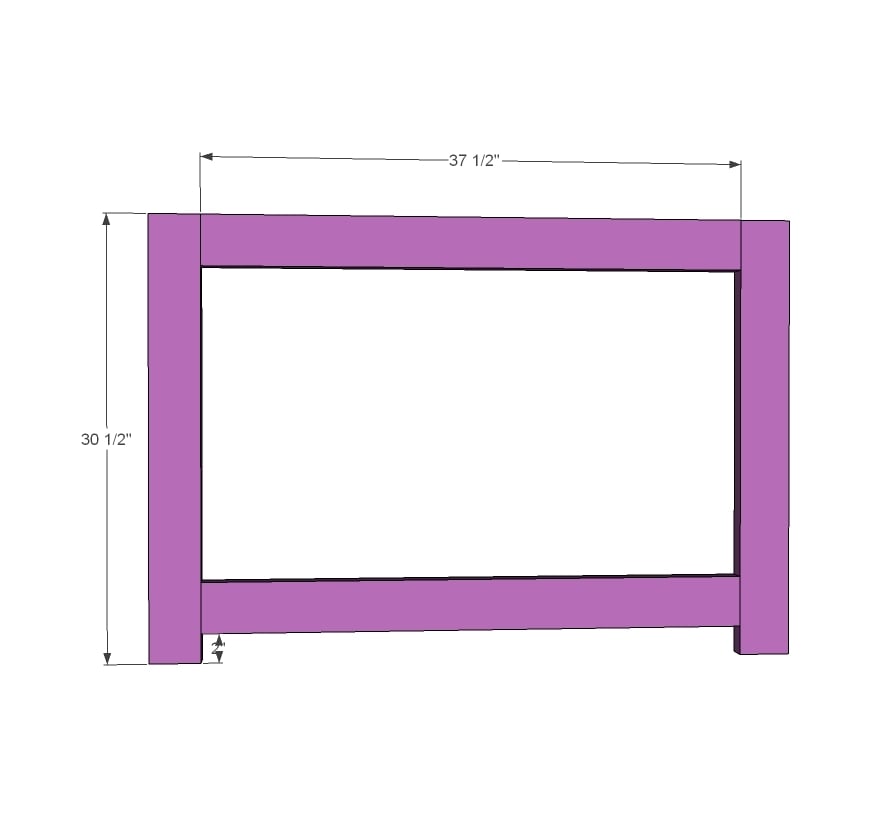
Step 1
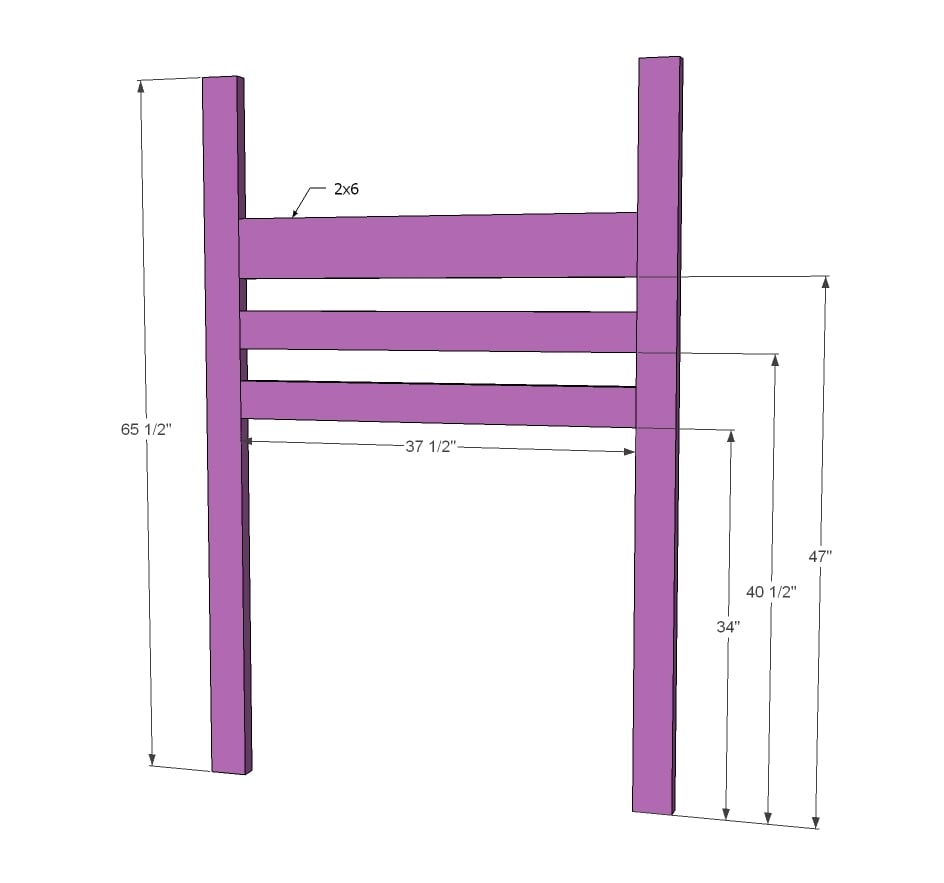
Build the ladder end as shown in diagram with 1 1/2" PHs and 2 1/2" PH screws. Use glue to fasten - these joints are permanent. If you are building this loft bed without the stair platform, add 2x4s all the way down to make a "ladder" for the kids to climb up.
Step 2
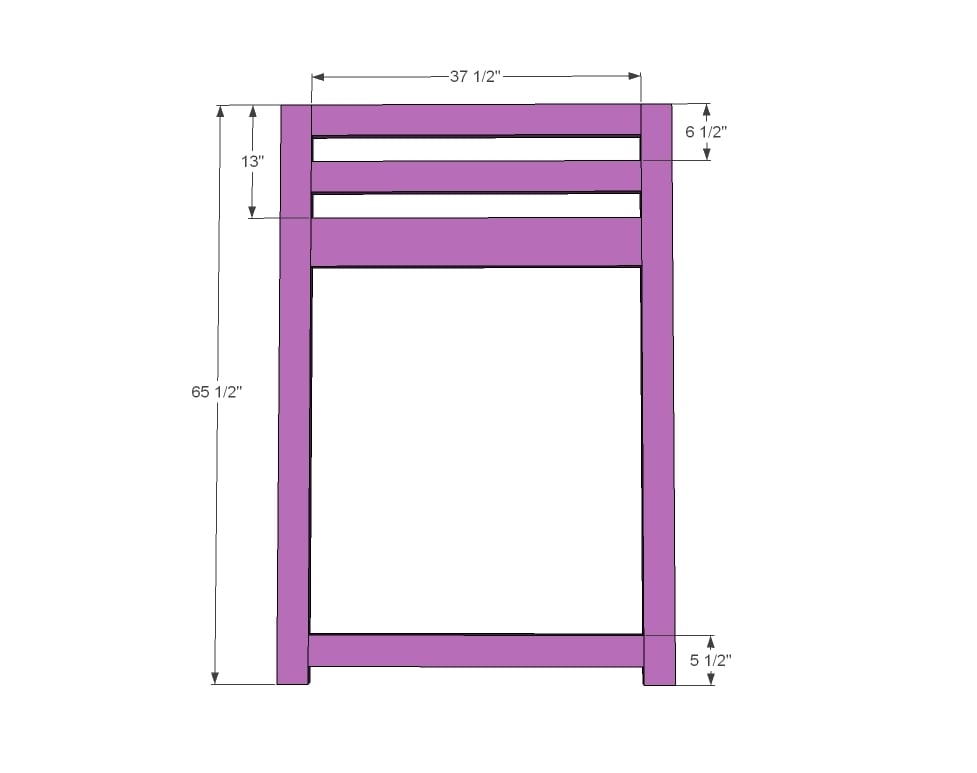
Build front end of loft bed same as ladder end.
Step 3
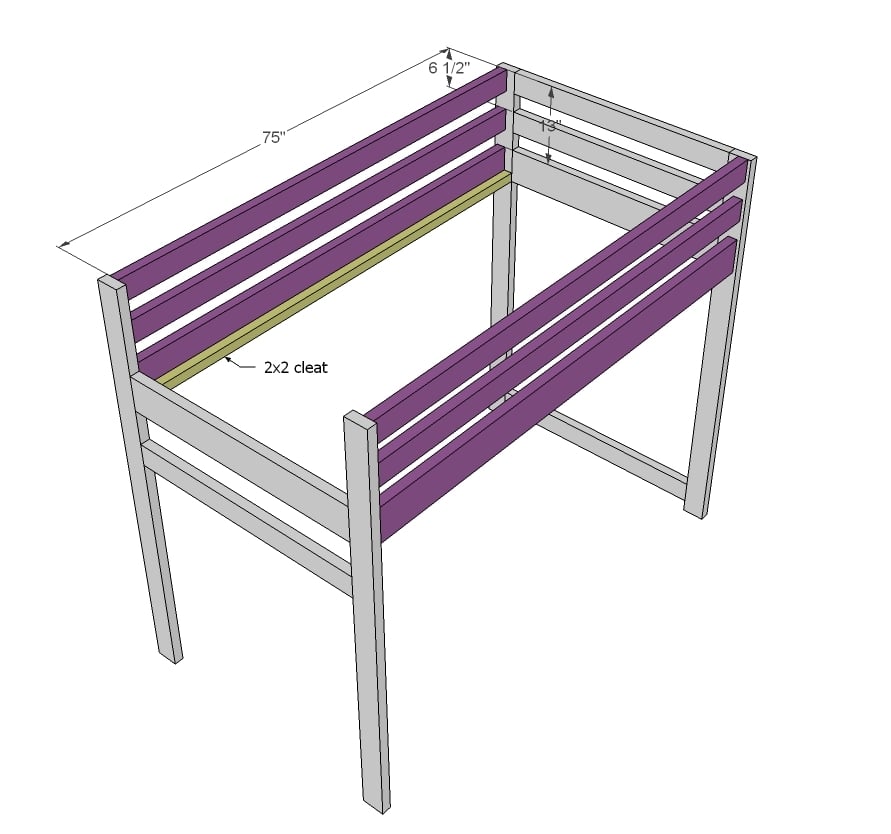
Now here's where we skip the glue. To make this loft bed easy to disassemble, I did not use glue here. The inside width for the mattress area should be 39", insetting the side rails 1 1/4" from outsides. I did this so your PH screws have lots of board to grab into. This bed has NOT been weight tested or guaranteed. If you feel you need extra support - add metal brackets under the 2x6s. An alternative method is to attach metal bed brackets directly to the ends if you have those. Notice the cleat is added in this step to. I used 2 1/2" screws and glue to attach, screws every 6-8" all the way down. This bed is designed to work with a bunkie board, but we just used 2x6s cut to length as the bed slats.
NOT SHOWN: Add the fifth 2x4 @ 75" at the back base of the bed to support the legs at the bottom.
Step 4
Now we'll start building the stair platform for the loft bed with stairs.
Step 5
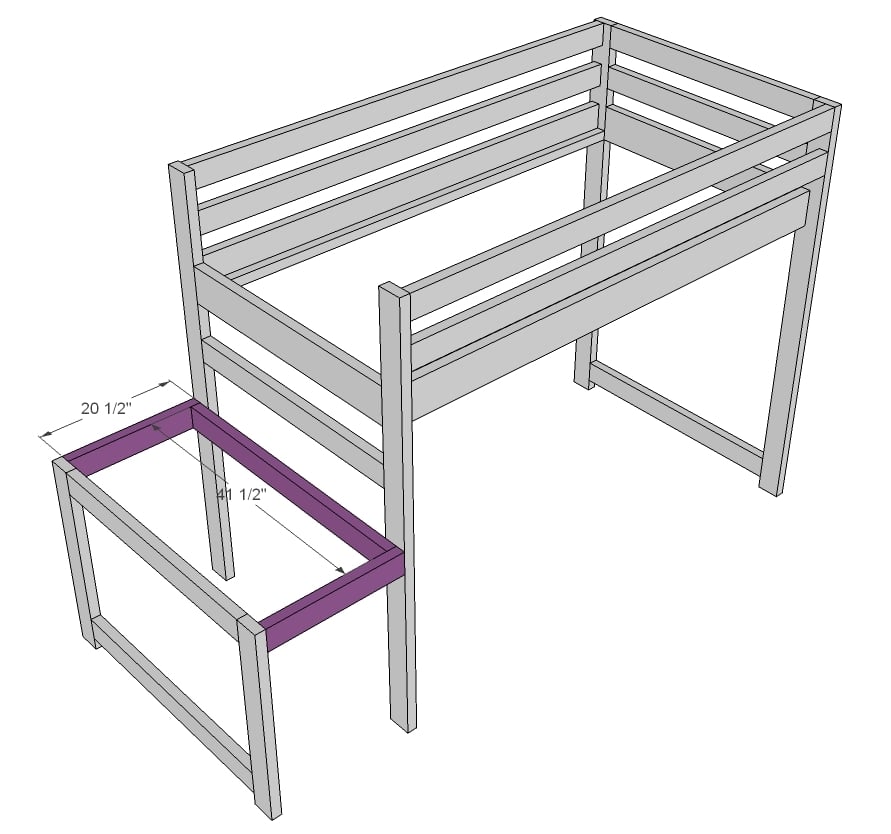
Attach stair framing to the loft bed legs.
Step 6
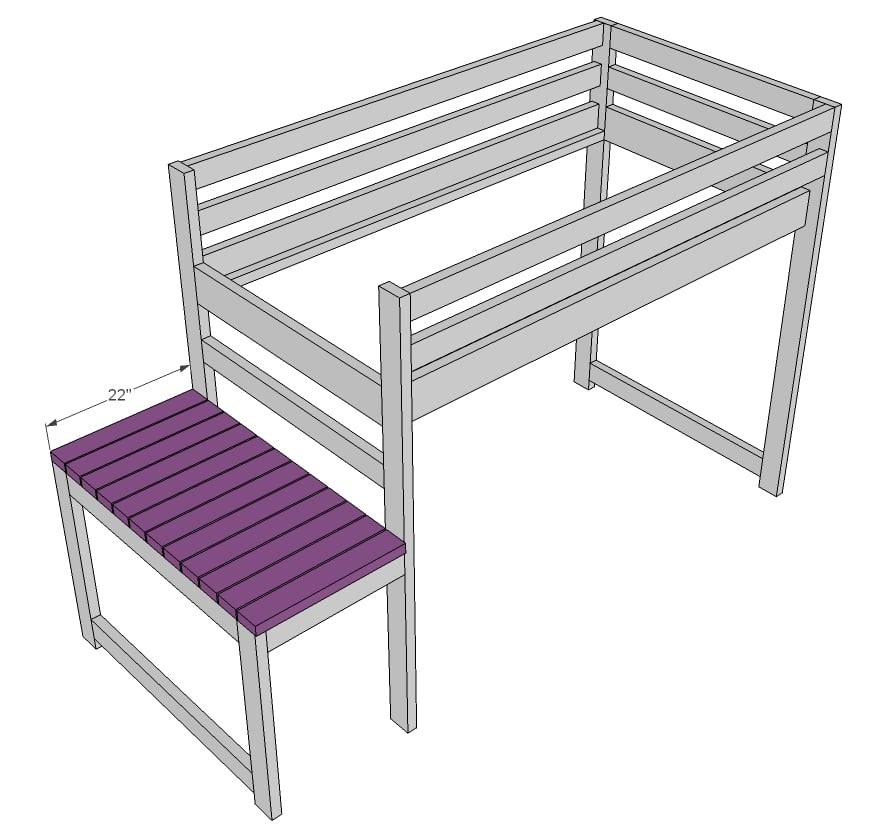
And then the decking is placed on top of the stair platform.
Step 7

The stairs are easy to build - just 45 degree angles! We went ahead and drilled 1 1/2" PHs along top edge of the stairs to connect the stairs to the bed later on.
Step 8
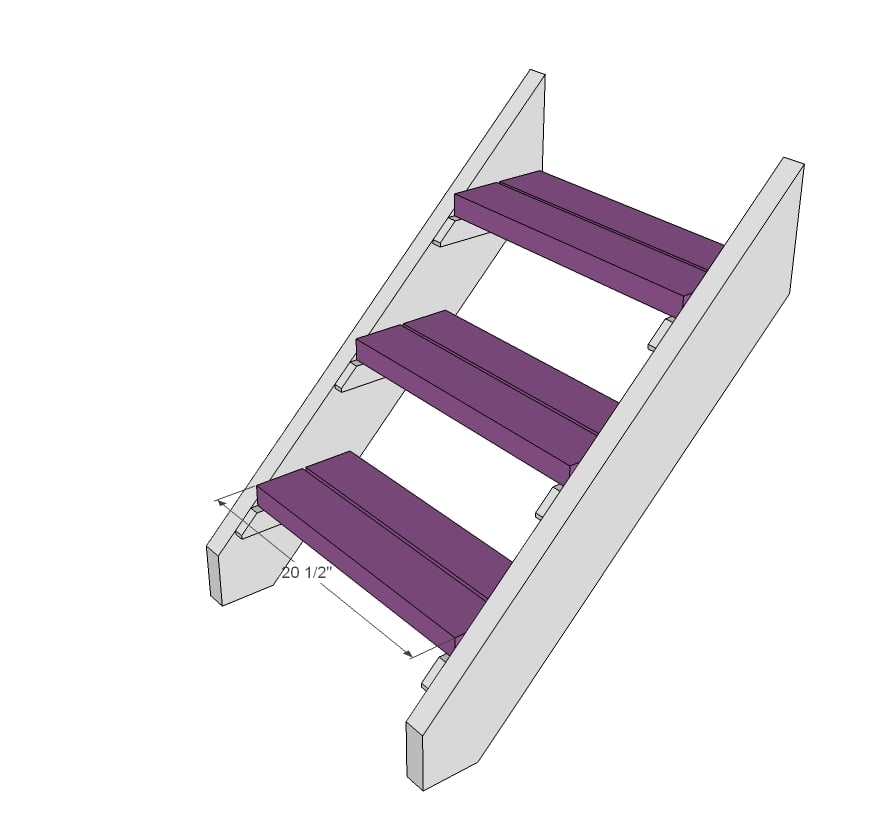
Then we added the stair treads. We also drilled 1 1/2" PHs along ends of the stair treads and attached with 2 1/2" PH screws just for extra strength. Everything gets glued.
Step 9
The bed was finished outside and then assembled in the room. TIP: We haven't found our bed needs it, but for extra support, you could add another 2x4 @ 75" (at $2 a 2x4, cheap insurance) to the base of the bed to further support the bottoms.
It is always recommended to apply a test coat on a hidden area or scrap piece to ensure color evenness and adhesion. Use primer or wood conditioner as needed.

Comments
tigeress1026
Sat, 01/25/2014 - 07:32
Full Size bed
I haven't read through all the comments as there are too many. Can this plan be made to accommodate a full size bed? My daughter has a full size bed and needs more room in her room and I love how safe this is as she tosses and turns all night and this has rails all the way around.
roccaburro
Sat, 03/01/2014 - 09:17
Building this ASAP
I love this bed! I have been looking for a loft bed for my daughter for a while and this is perfect. We are changing it a little bit because we want it for a double size bed not a single. And since we are renters and dont own a home yet we are using bedrail fasteners for the side rails so its easier to dismantle if we ever decide to move or buy a home. My daughter is 4 and she loves the idea of having tea parties under her bed LOL Im sure once the first one is done we will end up having to build a second one for our son.... LOL
roccaburro
Wed, 03/12/2014 - 15:01
Changed the plans
Already stripped a screw while putting together the "headboard" part so we opted to change the plans slightly to have metal joint connectors to hold the 75" long pieces of wood.... thought I should leave it as a comment so any other people that are renters and dont own the place they call home. We also made it so the steps are stand alone not connected to the bed so we can have switch the bed around to suit different rooms if ever needed :) Awesome bed for all the wood the kreg jig and a sander and the brackets and screws total cost of the bed it around $230 so worth it
overjinx
Sat, 09/13/2014 - 13:02
Yeah, I paid $260 with jig,
Yeah, I paid $260 with jig, stain, brush, etc..
overjinx
Sat, 09/13/2014 - 13:02
Yeah, I paid $260 with jig,
Yeah, I paid $260 with jig, stain, brush, etc..
overjinx
Sat, 09/13/2014 - 13:48
Yeah, I paid $260 with jig,
Yeah, I paid $260 with jig, stain, brush, etc..
A.Leatherdale
Sat, 03/15/2014 - 09:12
Does any one who has built
Does any one who has built this bed , have any wood Suggestions ? i will be undertaking this project this summer ( times 3 )
ladyj
Sat, 05/24/2014 - 16:45
Number of screws in 2x6
Hello there! I'm building this great bed for my kids and I'm super excited about it. Thanks for the awesome website....love all the plans. Just wondering how many PH screws I should use for the 2x6s. I would do 3 for sure but I could probably fit 4. Any ideas?
roehoe72
Mon, 05/26/2014 - 17:49
a few issues
Hello all. My g/f and i just finished building this loft bed for our 5 year old daughter. We absolutely love it. Very well designed. However i did find a few flaws i would like to share. If i am touching on something someone else has before i apologize. I read the plans twice and also read several pages of posts and found nothing. I should note that i am a journeyman Ironworker and am competent at reading blue prints. So here goes. In step one when your building the "footboard" the plans show that you install two 2x4s and a 2x6. Everywhere else on the drawings it shows one 2x4 and one 2x6. Like i said i read the plans twice but didnt catch this til i was installing the stair landings. Secondly, i had a hard time with the stairs. It would be nice to have a dimension from one end to the other, not from one end to another end that doesnt exist. I do plan to put another 2x4 under the mattress slats for added support and gussets under the 2x6. Like i mentioned before, this is an awesome bed. We cant keep our daughter away from it. Again, this is just constructive criticism. I want to thank you Ana for having such a wonderful page. Cant wait to build something else from your page.
DIYmommyof4
Tue, 06/03/2014 - 15:22
Help!!
Hi!! I have nearly completed building this bed. I altered the plans to make it 74 1/2 inches tall. I added another horizontal support in the back. We are expecting our fourth child and we needed the extra height so that we can put a crib under the loft. My husband is concerned that the screws won't be strong enough. And considering there will be a newborn underneath, a little overkill won't hurt anything. My question is: how can I beef this up after already drilling in the pocket holes? I was thinking about adding a bolts in between the pocket hole screws on the 2 x 6 with the cleats. Would this be the only connection that would really need the extra bolts? And since the bolts won't go all the way through the wood, would a lag bolt be what I need to use? I looked on other websites where carriage bolts are suggested, but they can't really be used with these plans. I have never used bolts before, just wood screws so I am a little lost. Also, if I decided to use cross bracing, how would I go about doing that? Thank you so much!!!!
Go Blue Dave
Thu, 08/07/2014 - 05:57
Jig Question
I can't wait to make this for my son! My question is, which Kreg Jig do you recommend? I'm not a big project guy and this will actually be the first thing I build!! Thank you!!
DIYmommyof4
Thu, 08/07/2014 - 06:30
Answer to Kreg Jig question
Hi! I actually bought every Kreg jig they make, LOL I started with the cheapest one and did not like it at all. I exchanged it for the one that was more expensive and it did not like it, exchanged it. I ended up getting the most expensive one. I think it was hundred dollars and worth every penny. And just a heads up: I made this bed for my youngest daughter. I did a lot of research and the Kreg jig website actually says that it does not recommend using pocket hole screws to build a loft bed or bunkbed. I did use it to put the bed together as called for in the plans. But I went back and added bolts to all joints for extra support. I also had to add a cross support along the back because I added height to it and it had some sway issues. If I were to do it all over again, I would have used a plan that only calls for lag bolts. But it's a wonderful concept and I love all of Ana's plans! Also, you will need a special drill bit for the pocket hole screws and I don't believe the Kreg jig Kit actually came with one.
As long as you don't add to the height, the pocket hole screws may be enough. It has obviously worked for several people following this plan. But if you are going to have a couple of kids playing on the bed and bouncing around, I would urge you to use the extra bolts.
tandre
Sun, 08/10/2014 - 11:29
4x4's as posts?
Anyone use 4x4's for the posts instead of 2x4's?
tandre
Sun, 08/10/2014 - 11:29
4x4's as posts?
Anyone use 4x4's for the posts instead of 2x4's?
5foot4brunette
Mon, 08/11/2014 - 11:44
9" deep TWIN mattress
Holy cow WE LOVE THIS PLAN!
What are thoughts about using a TWIN foam mattress with these dimensions: 74 x 38 x 9 inches .
I've been drinking too much coffee today, so I might have glossed over specific dimensions on this project. Tends to happen when I get jacked up on caffeine. Don't worry, I wont build "under the influence". LOL
Thanks in advance for your feed back.
Fuzzbutt26
Wed, 09/03/2014 - 07:43
Re loft
Moved into parents home to care for my father the only spare room was 7 x 7ft I built a loft bed [which I loved] with a sofa under then became disabled & unable to access the bed so slept on the floor [we had a front ladder which I could not climb] Now thanks to finding your plan I'm building the platform to access the bed I just have room at the end I may need to make it a fraction narrower but I can work that out thanks so much I never thought of this before
overjinx
Sat, 09/13/2014 - 12:58
short of lumber
Anyone else ended up short? I was missing one 2x4 to complete the cut list, thankfully I had one sitting in my garage. Maybe I messed up somewhere, but I only have 4 little pieces left around 8 - 10 inches and 1 around 17 inches.
overjinx
Sat, 09/13/2014 - 13:49
And it seems like I am going
And it seems like I am going to be one 2x6 over
catveee
Tue, 09/16/2014 - 05:46
Top of stair deck attachment hardware?
What do you use to attach the wood to the stair base for the deck? I only see Pocket Hole screws listed so do I use those somehow or just regular deck screws/something else on top? Thanks!
Lilly'smom
Thu, 10/16/2014 - 16:11
Type of lumber
I am getting ready to purchase the lumber to build this bed. Most of the kiln dried framing grade 2x4's and 2x6's I've looked at are extremely rough, splintered and full of knots. Even if I really pick through them, it looks like sanding will take a while. The photos of the finished beds all look good, but is it really possible to make a piece of finished furniture look and feel nice when starting with such rough wood?
whittlevin
Fri, 10/17/2014 - 09:33
Investing in a planer will go
Investing in a planer will go a long way into making smoothing out rough spots, and eliminating warped or bowed boards. It cuts the time sanding will take in half, and you don't have to invest $25 in sandpaper. If you work with wood a lot building furniture its a must have. Just a little hint, if you don't want to pay retail price, go to auctionzip and keep an eye out for them. I bought mine practically new at an estate sale for $45 (porter cable). Just an idea.
MarkLenz
Thu, 10/23/2014 - 12:53
Full-Size, Revised Cut List
Just built this for a full-size mattress for a grandson. I used the shopping list from an earlier post for a full-size, but ended up with two left-over 8 ft. 2x4's. Our mattress measured 53" x 73", so I made some adjustments to the cut list and ended up with the following. Sorted by length (for efficient cutting and so all same-length parts would, in fact, be the same length) and showing which pieces are used in which steps):
Step
Qty
Material
Length
1
2
3
4
5
6
7
6
1x2
7 3/4"
6
8
2x4
20 1/2"
2
6
16
2x4
22"
16
2
2x4
30 1/2"
2
2
2x6
43"
2
7
2x4
53"
2
3
2
2
2x6
53"
1
1
1
2x4
57"
1
4
2x4
65 1/2"
2
2
4
2x4
75"
4
2
2x6
75"
2
2
2x2
75"
2
Jflake
Fri, 02/06/2015 - 21:52
Finishing advice?
Hi, this was one if the first projects like this I've done. I used Doug Fir, and after lots of prep planing, etc... The bed looks great. I'm unsure how to fill the screw holes, though, and keep the bed looking good. I'd like to use polycrylic without stain as the natural wood looks so nice. Any advice on what to do with the screw holes besides putting the same colored filler in each hole, which will stand out and look ugly? Thanks!
gfishbuilds
Tue, 02/24/2015 - 11:10
paint and wood
What type of wood do you recommend? What type of paint do you recommend?
Ana White Admin
Tue, 02/24/2015 - 12:54
Types of wood and paint
Pine is fine to use for this project, and your paint of choice.
AKenny11
Mon, 03/16/2015 - 20:59
2" vs. 2 1/2" Ph screws
I've read a few comments where the 2 1/2" screws were a tad to long. Is there anyone that can tell me exactly where they used to 2" screws and the 2 1/2" ones? Or would it still be safe to just go with 2" screws for the whole project?
mmmcquillen
Mon, 05/04/2015 - 14:33
Stain
Hi there! I have a tiny room so I am adjusting the plan - but one of my biggest problems is finding stain that I love. We built a coffee table (also from here!) last fall and my husband and I still disagree about what stain to use. I love the way yours turned out — i have found staining pine to be difficult to make it look so smooth. Can you share what stain you used and how you treated it? Thanks so much!
Angie51778
Fri, 06/05/2015 - 10:04
Drawers?
Has anyone ever tried to put drawers under the deck? How about modifying the stairs for lift top storage?
In reply to Drawers? by Angie51778
JoanneS
Fri, 06/05/2015 - 11:19
Lift Top Storage stairs
Hi Angie,
I saw this post where lift top stairs were done for the loft bed. It looks like a great idea:
http://ana-white.com/2013/05/plans/storage-stairs-bunk-or-loft-bed
Sweetingegirl
Sun, 06/28/2015 - 12:52
Junior Loft Camp bed
So my hubby and I cut all the pieces, but now we can't put it together. We have the jig, but when we did the practice pocket holes it's just not strong enough even with glue... what are we doing wrong? Do we need 2 sets of holes on both sides??
In reply to Junior Loft Camp bed by Sweetingegirl
Ana White
Wed, 07/01/2015 - 07:32
Assembly
One side only for the pocket holes. It sounds like you need to double check your settings on the kreg jig and collar and be sure that you have the right size screws.
Richblue2
Sat, 07/04/2015 - 20:18
Support and supplies
First, my concern was that by looking at the plans this was not going to be sturdy at all, but once I started assembling, I started giggling at how wrong I was. I sat myself right on top with no hesitation once completed.
Two notes for the heavy planners like myself.
You will need one 1 lb box ea of the 2.5" and 1.5" screws. Basically, 4 screws per cut piece.
And when I put mine together, the 12 planks that make the platform at the top of the stairs doesn't completely cover the platform. I just used 2 pieces of scrap 2x2 from the cleats and it filled perfectly.
Made 2 at once, and it paid off when my kids got back from Nana's and...surprise! Big daddy win. :-)
KaylaSantiago14
Sun, 08/23/2015 - 13:40
Adjustments
Would it be possible to add a few inches to the height as well as making it full size? I am at beginner level for sure so I need all the instructions/directions I can get! Haha. My son is 4.5 and we've got a baby on the way and we'd really love to do something special and fun that he could grow with. Please help! :)
lithiummoon
Mon, 10/12/2015 - 08:05
Do you perhapd know a way to
Do you perhapd know a way to be able to convert these plans or have them somewhere that can be made to fit a full size bed by any chance?
Thank you
Ana White Admin
Mon, 10/12/2015 - 11:29
Full size
We are unable to commit to plan requests at this time. I would suggest looking at brag post for added tips, tricks and measurement mods. Here is one to start with http://ana-white.com/2013/06/loft-bed Be sure to read through all of the comments for added information! Hope this helps!
Eleanor Martel
Wed, 10/21/2015 - 23:27
LOVE!, But no gap!!
We love this bed! Thank you so much! the only thing we had a problem with was there are no written instructions stating you have to gap the 2x4s on the deck part....we were halfway done screwing them in when i noticed it. What we did was put 11 2x4s and 1 2x6 and it was perfect. Again thank you so much.
Ryna
Wed, 10/28/2015 - 16:03
Wood selection
I am super new to this and was wondering what types of wood choices everyone was making. My local lumber store has lots of Fir, but I'm not convinced it is the choice wood for this project.
Spediturtle
Thu, 12/03/2015 - 14:53
Type of wood?
What type of wood is best used for this bed?
Ana White Admin
Fri, 12/04/2015 - 10:15
wood
Pine or Douglas Fir
cortesfamily
Fri, 01/29/2016 - 21:58
tools
hello!!!
this would be our very first family project!! its both frightening and exciting! But before we begin do we need the circular saw and kreg jig??? we have a saw just not the circular one.
In reply to tools by cortesfamily
Lady Goats
Sat, 01/30/2016 - 14:50
How Exciting!
How Exciting!
I hope you have fun building this. That's key ;-) What kind of saw do you have? If you have another way to cut the wood, you do not need a circular saw. Ana has a drop-down list of tools to choose from, so she chooses many options so that people can use what they have on-hand. Hope this helps!
In reply to tools by cortesfamily
Ana White
Sat, 01/30/2016 - 16:30
Yes, this plan calls for
Yes, this plan calls for pocket holes, you will need a kreg jig. Do you
have a handsaw? A circular saw and chop saw would work great! Hope this
helps! Also, please take a look at this video
https://www.youtube.com/watch?v=2na6Qvxc5Mo and the "Getting Started" link
at the top of the website! Happy Building!
cortesfamily
Tue, 02/02/2016 - 20:21
saw type!
we have a jig saw, looks like well be getting a kreg jig! and we will take a look at the video thank you
Luciana-
Sat, 02/06/2016 - 22:29
Screws
Nice bead and plans but I am very new to making things. Do you happen to have any more detail plans on where you are placing the screws and what size screws and where you are using them on your plans ?
aschopp
Mon, 02/29/2016 - 09:42
Who did you finish the wood?
Could you let us know ho wyou finished the wood for this project? I am hoping to build it this week!
mariad444
Tue, 03/15/2016 - 21:54
Mattress size
Please please please...Does anyone know the maximum mattress thickness?? I have read everything I can find and am not able to find the answer anywhere?? Help
glamazonjayne
Thu, 03/17/2016 - 15:43
need help with attaching the steps to th platform
My husband built this bed for our daughtr, but had a difficult time understanding the instructions, aas they are quite vgue. He could not igure out how to attach the stais to the platform. Please send u DETAILED instructions on how to attach the stairs to the platform.
Mgossage
Sun, 03/20/2016 - 17:10
Modify to a full sized mattress
LOVE LOVE LOVE this!! Just one question...How would you modify this to fit a full sized mattress?
Thanks in advance!!!