

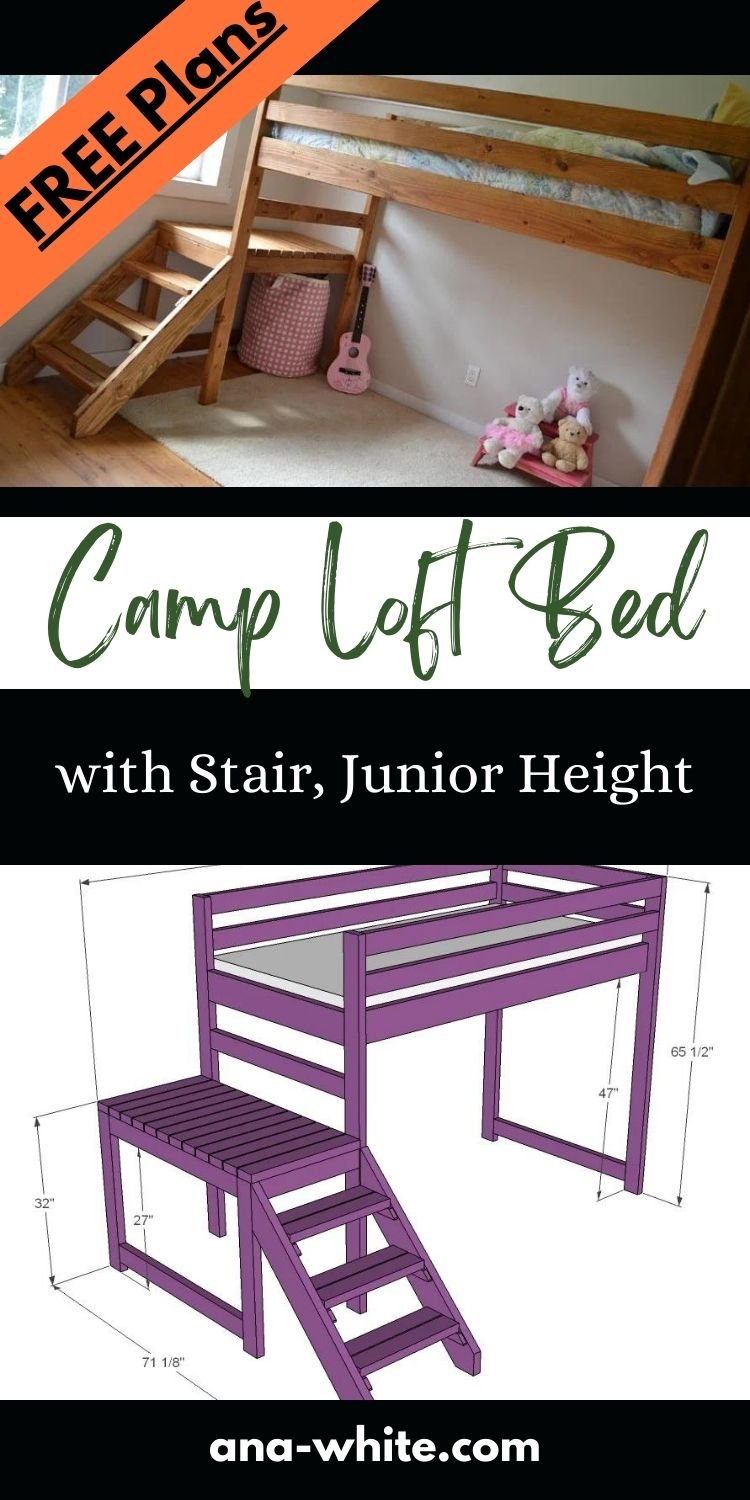
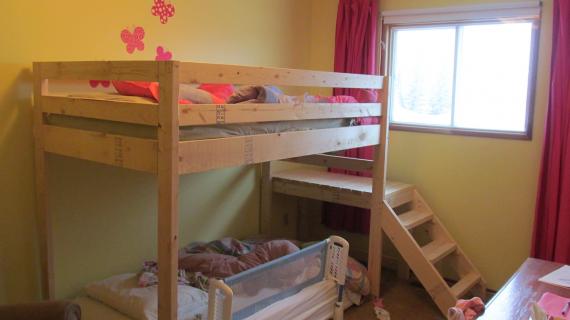
Build your own loft bed plans with stairs all from 2x4 and 2x6 lumber! This super sturdy and beautiful design features a platform for easy access, junior height loft bed plans free from Ana-White.com
This loft bed has been built and cherished the world over for almost a decade. Here's why-
- It's inexpensive to make - about $50-$100 in materials
- It's super sturdy and strong because of the 2x4 and 2x6 materials - the same materials we build houses out of
- It's an easy to build design that is fairly quick to tackle
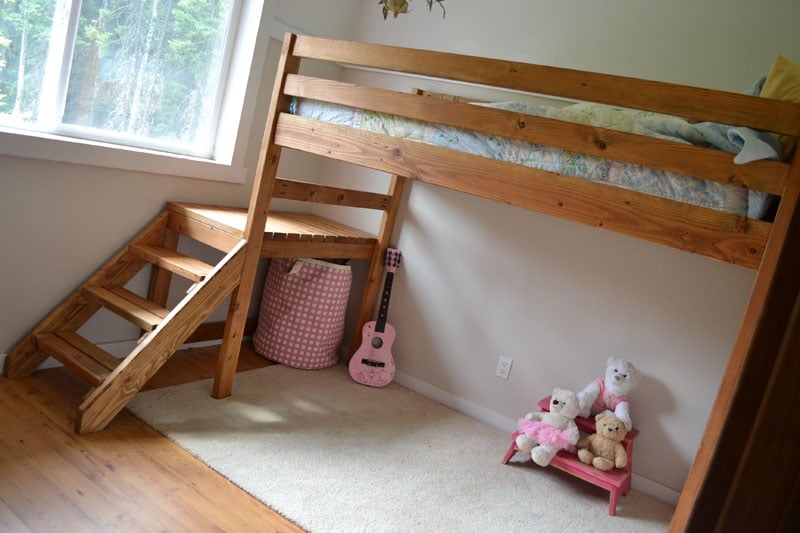
- The platform with stairs make it very easy to access the loft. The lower platform is at about the same height as a floor to mattress, so it's a very natural and easy process to go from the bed to the platform
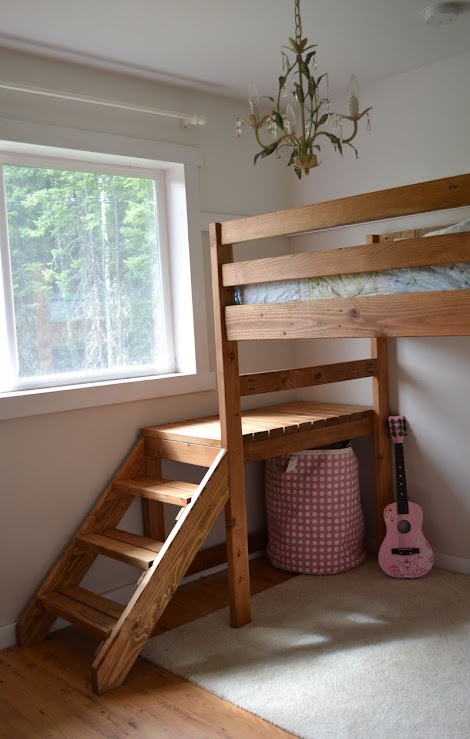
- This loft bed is a very beautiful piece that can go with just about any decor
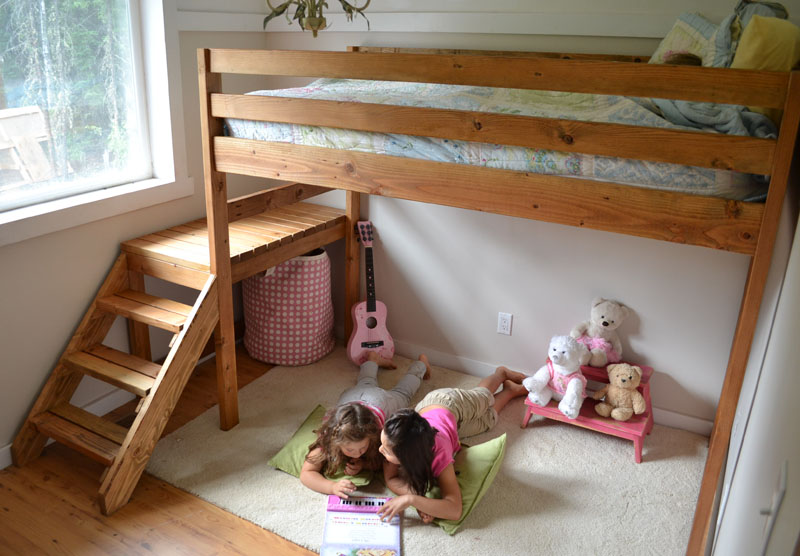
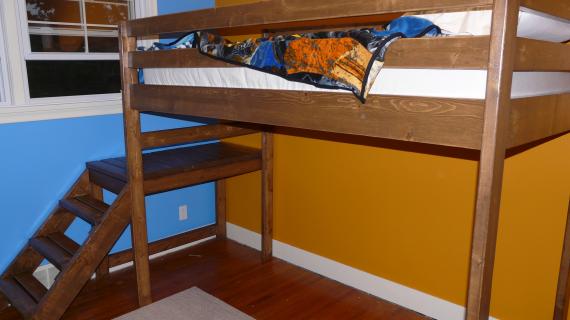
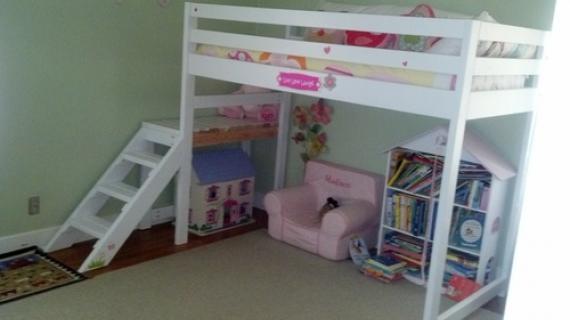
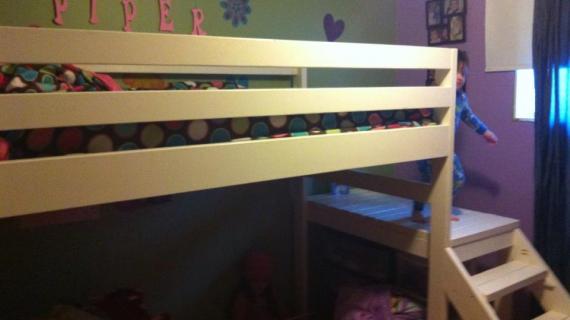
I built this loft bed for my then four year old daughter. At four years old, a loft bed seemed like a bad idea. But with the stairs, it's really not that different than a regular bed - just the access is at the bottom.
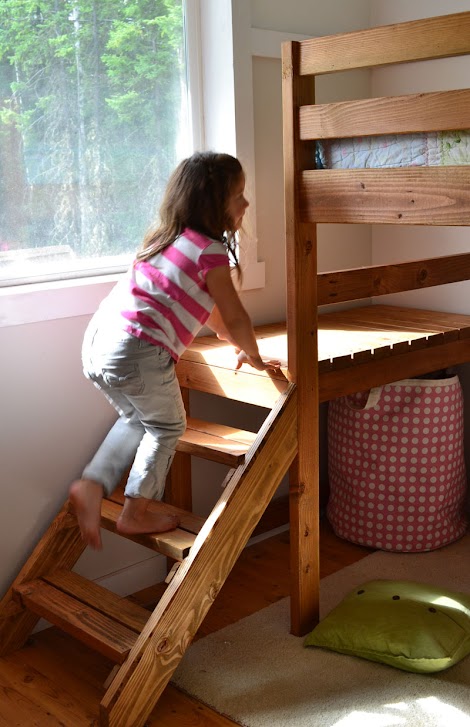
The stairs are so much easier to use than a ladder. And the platform is just right. Instead of having to crawl down a ladder, you simply swing your legs off the bed (just like a normal bed) and they rest on the platfrom. Then you stand up (with good headroom) and walk down the stairs.
The goal was to create a loft bed that mom and dad could easily crawl into and snuggle and read bedtime stories - and easily sneak out when the child drifted off to sleep.

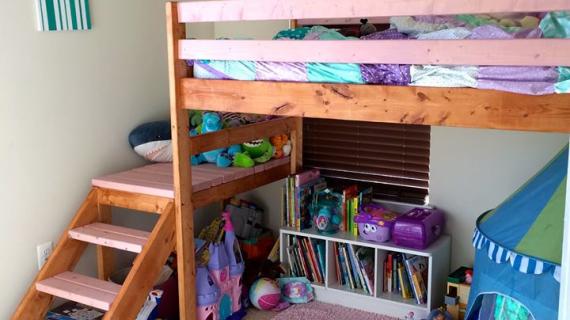
We designed this bed to fit inside a room just bigger than 8x8. Yes, 8x8. It gave the room so much more useable space!
The window was previously the obstacle in the way of building stairs. But with the lower platform, we were able to not cover the window. Now it's entertainment for the kids as they use it as a stage, and look out the window from it.
Under the loft bed stair platform, no storage is lost. It's a great spot for a toybox or bin.

The best part about this bed is how easy and inexpensive it is to make. That's all 2x4s and 2x6s (I'll share my finishing technique with you later this week) bringing the total cost of lumber up to about $50!!!
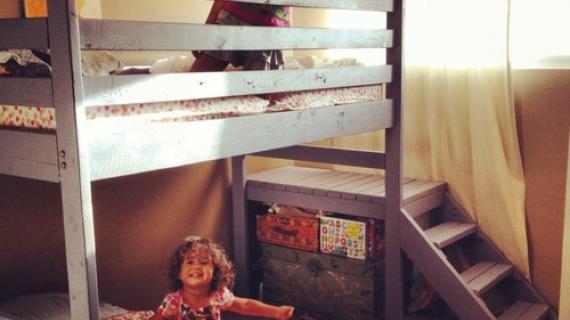
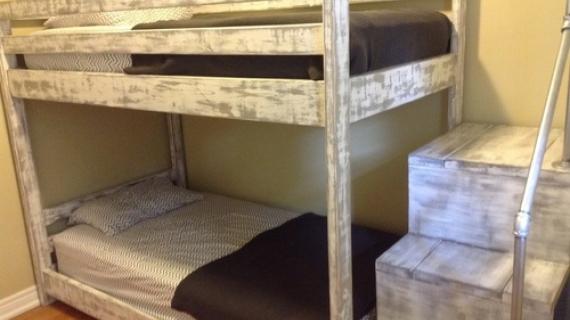
Convert to Bunk Bed with Stairs Option
We also love this bed with a second bed under it to create a bunk system. We have plans for a matching twin bed frame here.
NOTE: You may wish to increase the leg length by about 6" to give more headroom to the lower bunk - depending on how tall you make your lower bed height.
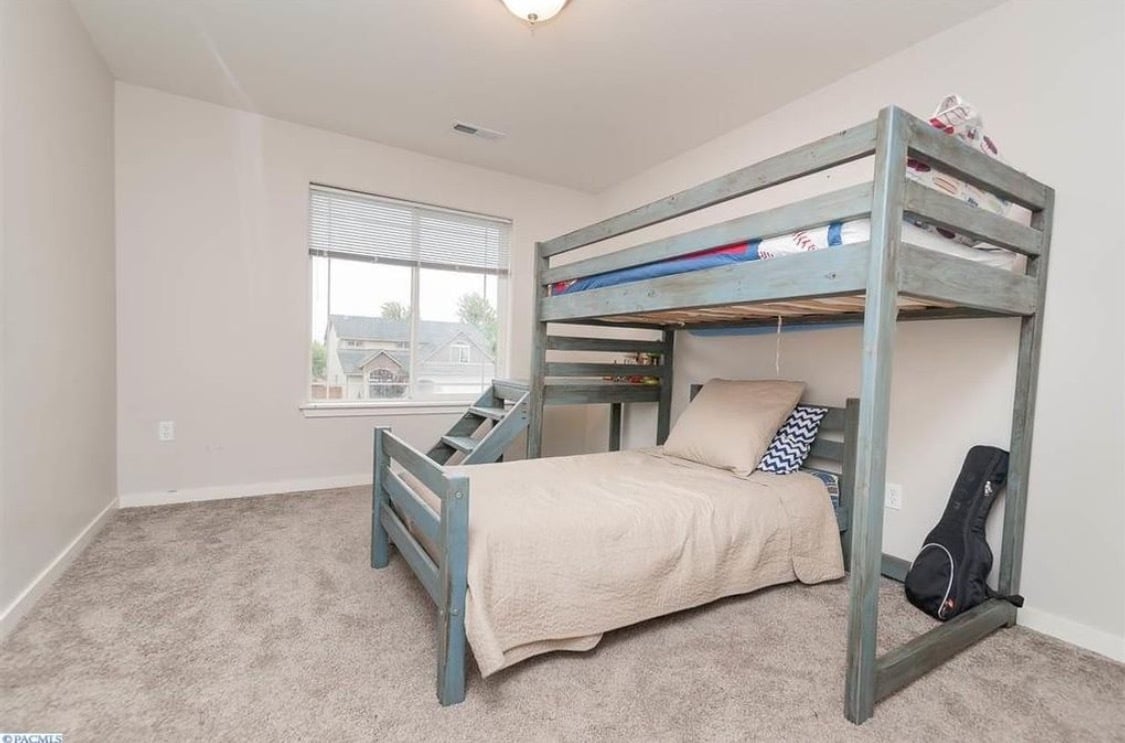
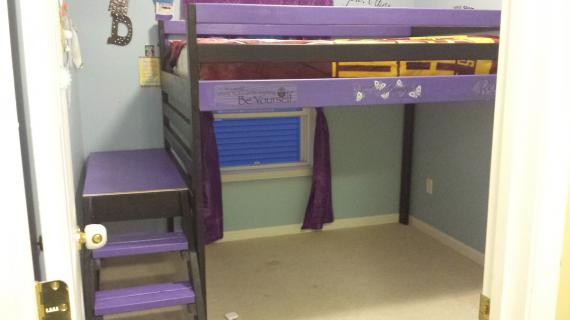
Photo SUBMITTED BY CAJSAWALLWORK
Loft Bed with Stairs Plans
Pin for Later!

Preparation
- 15 – 2x4 @ 8 feet long
- 4 – 2x6 @ 8 feet long
- 2 – 2x2 @ 8 feet long
- 1 – 1x2 @ 8 feet long
- 2 ½” pocket hole screws
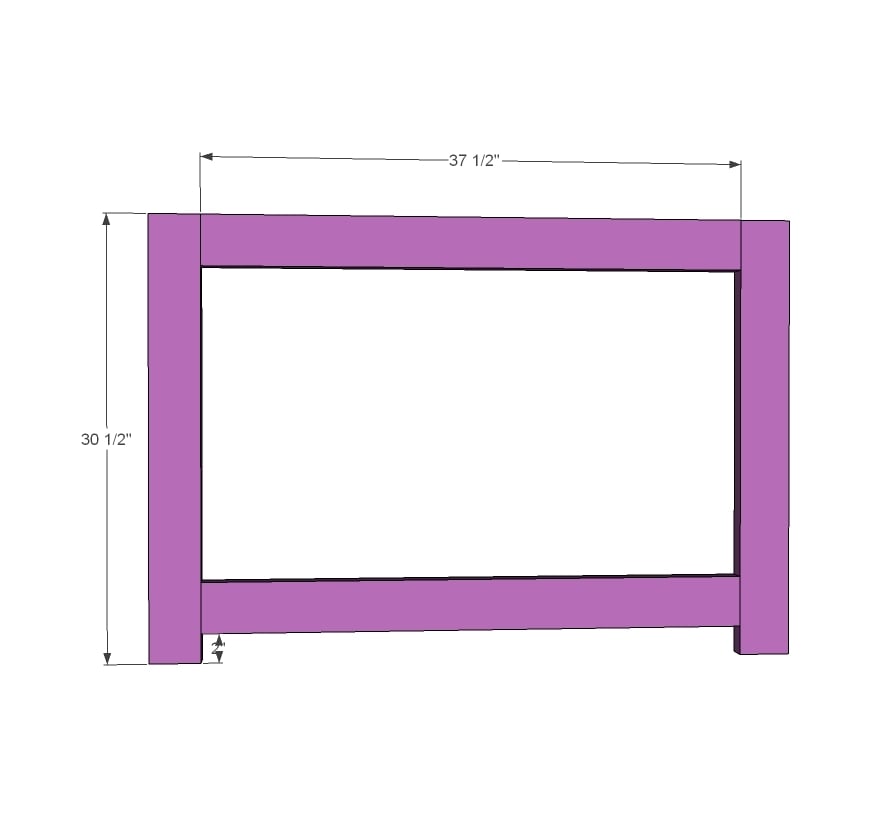
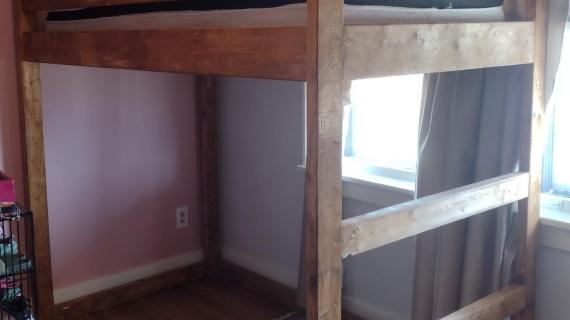
- 4 – 2x4 @ 65 ½” - legs
- 2 – 2x6 @ 37 ½” -bed siderails on ends
- 5 – 2x4 @ 37 ½” - guardrails on ends
- 5 – 2x4 @ 75” - guardrails and base support
- 2 – 2x6 @ 75” - bed siderails
- 2 – 2x2 @ 75” - cleats
- 2 – 2x4 @ 30 ½” - platform
- 2 – 2x4 @ 37 ½” - platform
- 1 – 2x4 @ 41 ½” - platform
- 2 – 2x4 @ 20 ½” - platform
- 12 – 2x4 @ 22” - decking
- 2 – 2x6 @ 43” (both ends cut 45 degrees off square, ends NOT parallel) – to be trimmed down in later steps
- 6 – 1x2 @ 7 ¾” (both ends cut at 45 degrees off square)
- 6 – 2x4 @ 20 ½” - stair treads
This bed requires a slat system (1x3s, 1x4s or 2x4s or similar) or a bunkie board mattress to complete


Please read through the entire plan and all comments before beginning this project. It is also advisable to review the Getting Started Section. Take all necessary precautions to build safely and smartly. Work on a clean level surface, free of imperfections or debris. Always use straight boards. Check for square after each step. Always predrill holes before attaching with screws. Use glue with finish nails for a stronger hold. Wipe excess glue off bare wood for stained projects, as dried glue will not take stain. Be safe, have fun, and ask for help if you need it. Good luck!
Instructions
Step 1
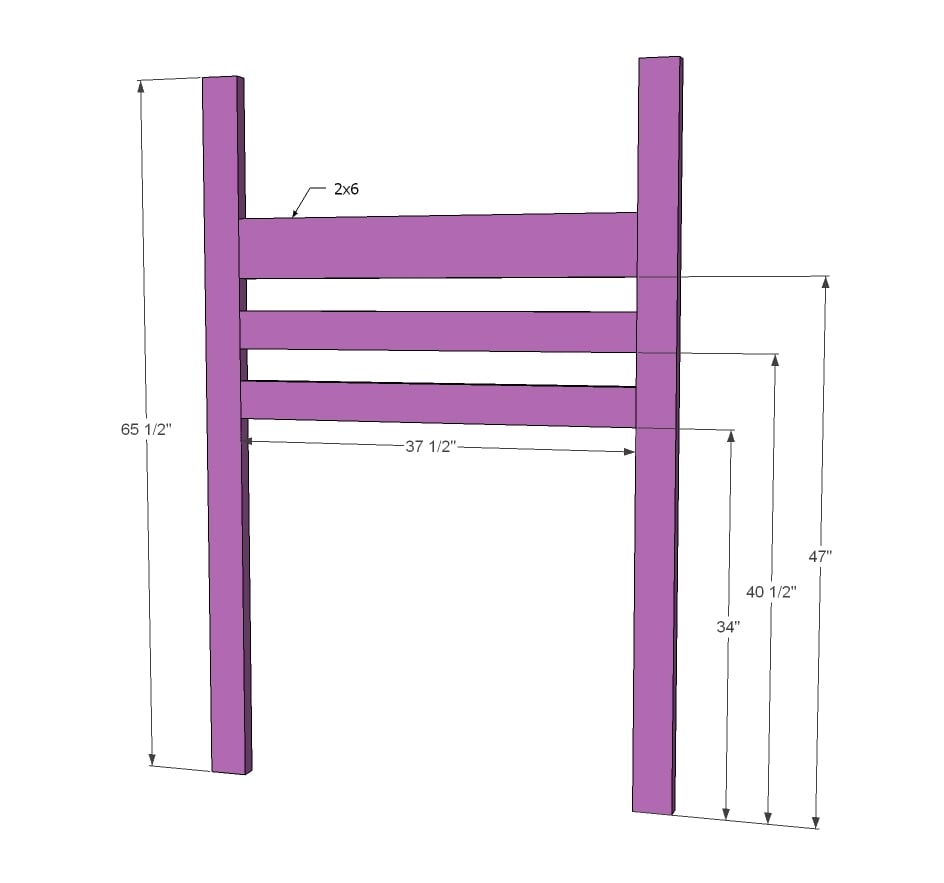
Build the ladder end as shown in diagram with 1 1/2" PHs and 2 1/2" PH screws. Use glue to fasten - these joints are permanent. If you are building this loft bed without the stair platform, add 2x4s all the way down to make a "ladder" for the kids to climb up.
Step 2
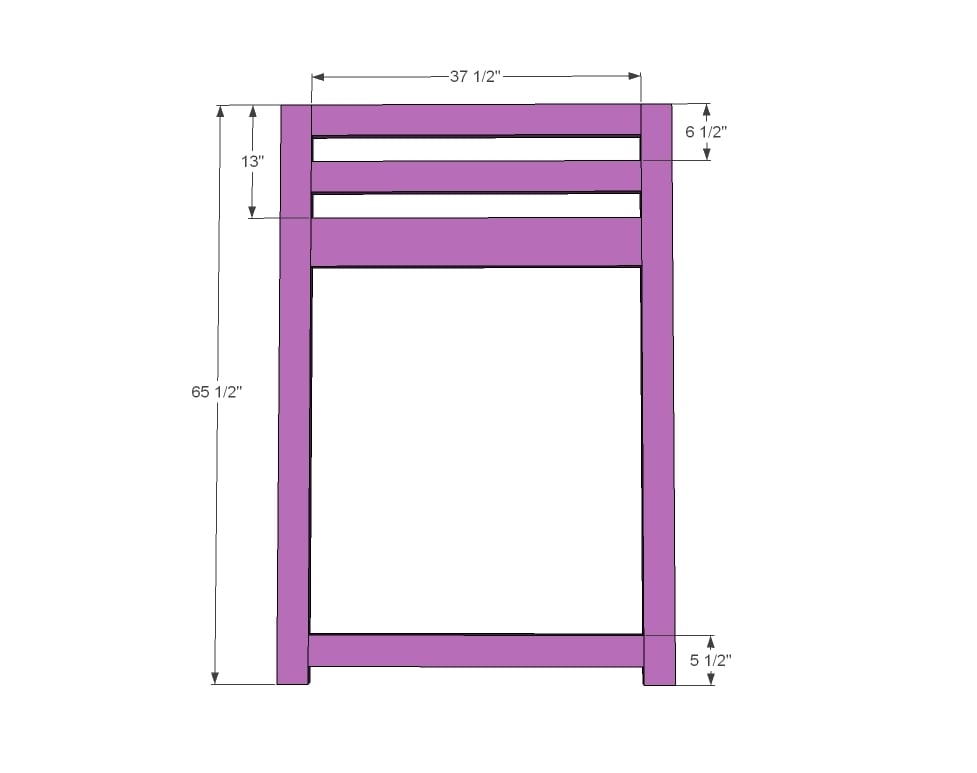
Build front end of loft bed same as ladder end.
Step 3
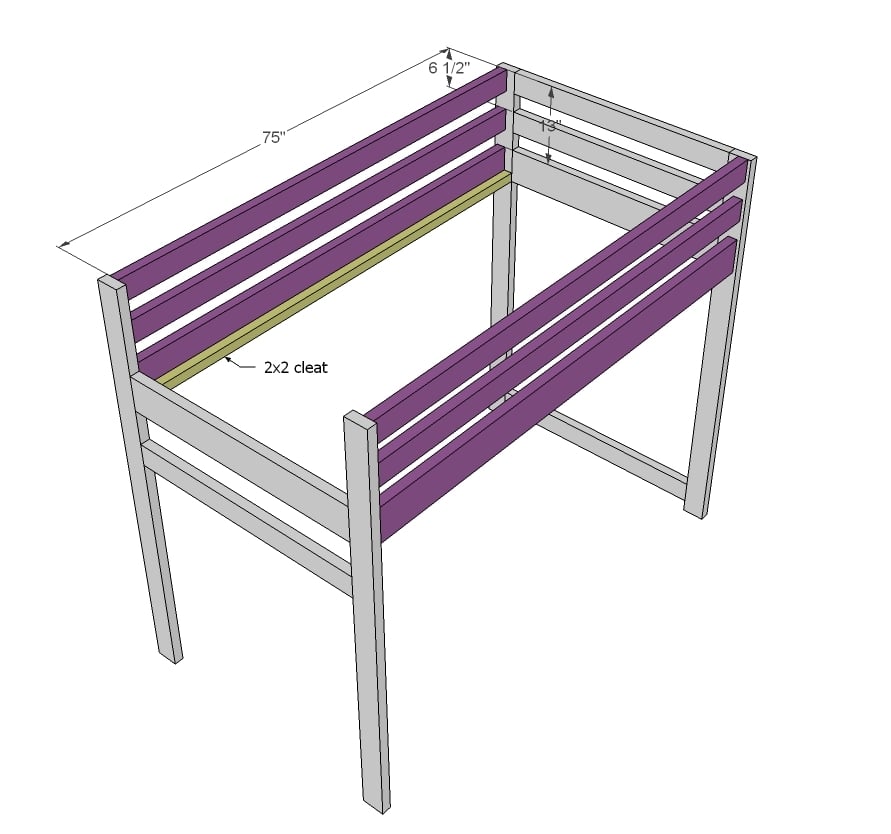
Now here's where we skip the glue. To make this loft bed easy to disassemble, I did not use glue here. The inside width for the mattress area should be 39", insetting the side rails 1 1/4" from outsides. I did this so your PH screws have lots of board to grab into. This bed has NOT been weight tested or guaranteed. If you feel you need extra support - add metal brackets under the 2x6s. An alternative method is to attach metal bed brackets directly to the ends if you have those. Notice the cleat is added in this step to. I used 2 1/2" screws and glue to attach, screws every 6-8" all the way down. This bed is designed to work with a bunkie board, but we just used 2x6s cut to length as the bed slats.
NOT SHOWN: Add the fifth 2x4 @ 75" at the back base of the bed to support the legs at the bottom.
Step 4
Now we'll start building the stair platform for the loft bed with stairs.
Step 5
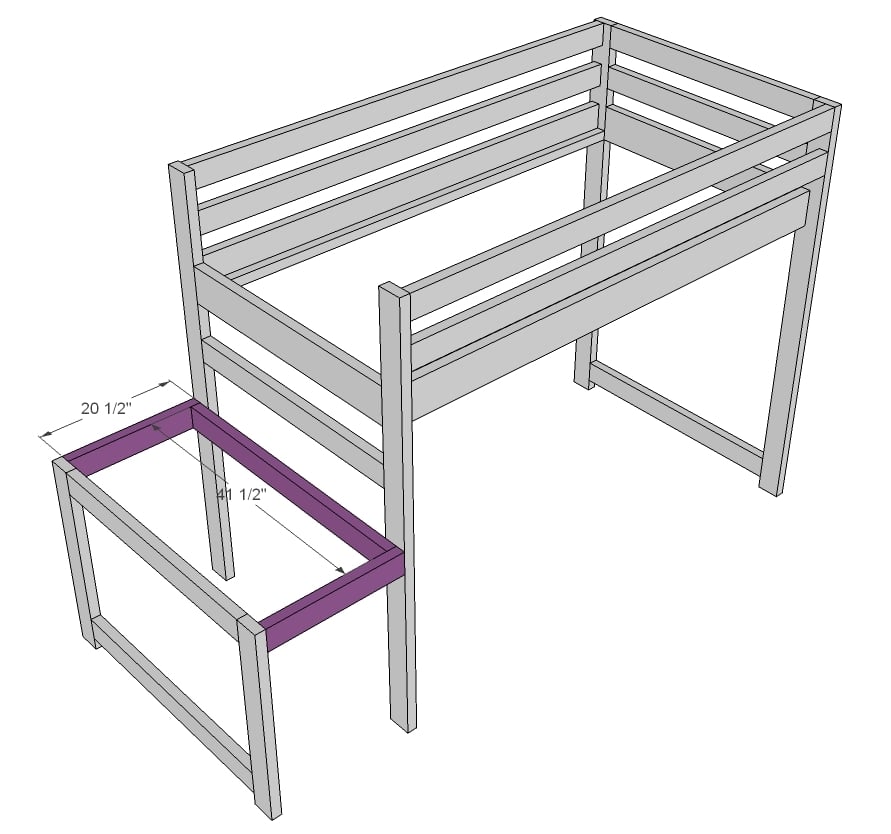
Attach stair framing to the loft bed legs.
Step 6
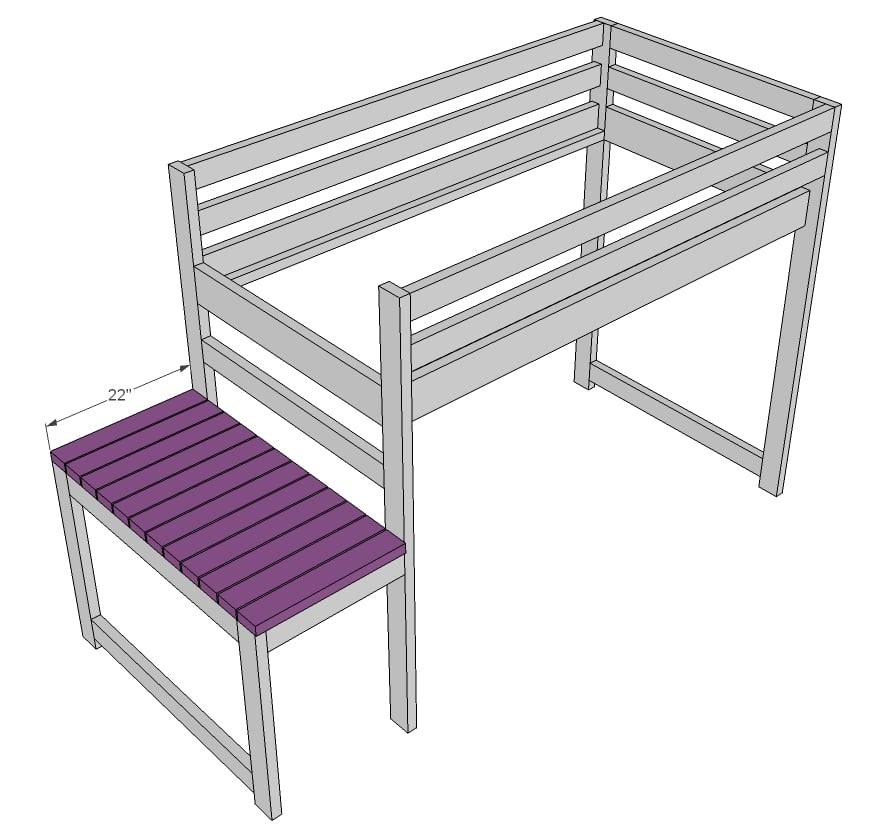
And then the decking is placed on top of the stair platform.
Step 7

The stairs are easy to build - just 45 degree angles! We went ahead and drilled 1 1/2" PHs along top edge of the stairs to connect the stairs to the bed later on.
Step 8
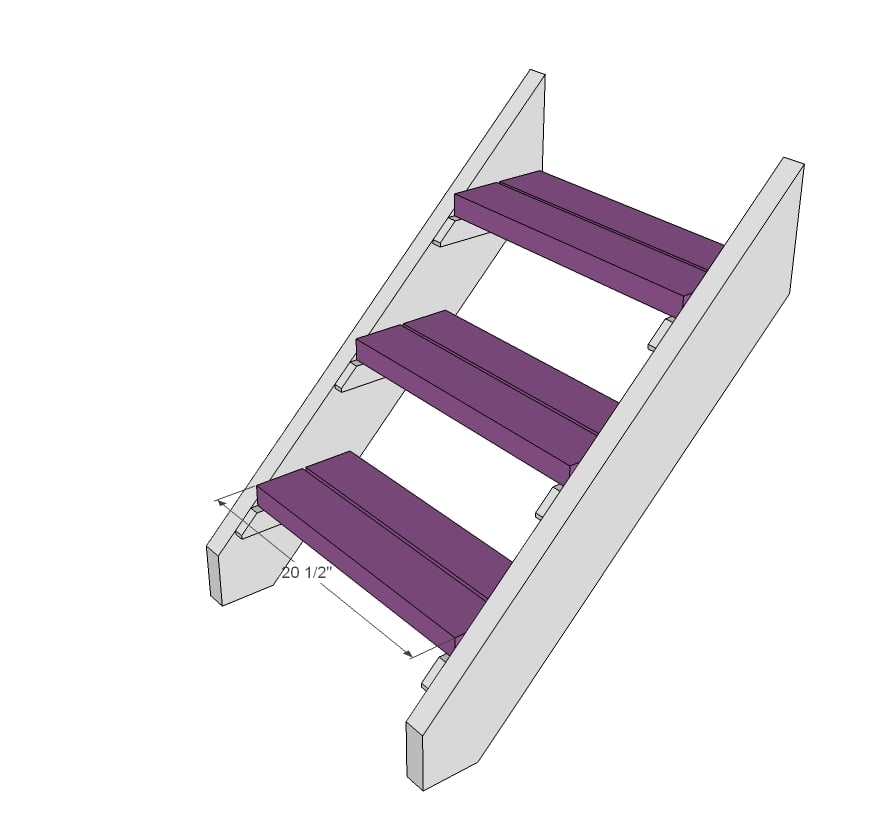
Then we added the stair treads. We also drilled 1 1/2" PHs along ends of the stair treads and attached with 2 1/2" PH screws just for extra strength. Everything gets glued.
Step 9
The bed was finished outside and then assembled in the room. TIP: We haven't found our bed needs it, but for extra support, you could add another 2x4 @ 75" (at $2 a 2x4, cheap insurance) to the base of the bed to further support the bottoms.
It is always recommended to apply a test coat on a hidden area or scrap piece to ensure color evenness and adhesion. Use primer or wood conditioner as needed.


Comments
Ntrisdale
Thu, 04/07/2016 - 09:15
Full size bed plan?
Hi Ana, do you have a modified version of this plan for a full size bed?
debduhadway
Tue, 04/12/2016 - 14:10
dimensions for a full size bed
What would the dimensions be for this loft bed for a full size mattress?
Thanks,
debbie
ArleneP
Wed, 05/25/2016 - 17:35
Loft for a big kid...AKA an adult
I was wondering if this plan could be sized up for a Full XL mattress?
Admetz84
Wed, 06/15/2016 - 10:25
I love this plan. Just curious
Hello all. I am curious if the plans could be adjusted to make this work for a toddler bed matress size? My 7 yr loves her twin size and my 3 yr old wants her toddler bed like big sister. The husband and I aren't ready to buy another twin bed lol. If anyone could help with adjusting the measurements we would be grateful.
spursfreak21
Sat, 07/09/2016 - 10:51
Type of Screws
Is it possible to build this without a Kreg Jig? I really don't want to have to purchase one. Could you just use regular wood screws? Would they have to be longer than the length given in the plans? Has anyone done this without a Kreg Jig?
sanrico
Mon, 08/08/2016 - 14:29
Yes, you could, but it wouldn
Yes, you could, but it wouldn't be as attractive (in my opinion). I did this project yesterday, and at the beginning of the day, I wondered the same thing. Since it is all right angles, you could build this without the Kreg Jig. You could just drive long screws in from the opposite sides.
I strongly suggest buying the Kreg Jig. I got mine for $40 at Lowe's yesterday (it's the R3 version), and I'm really glad to have it. It works really well and makes the joints look so much more professional. No exposed screws!
ahndreak
Thu, 08/11/2016 - 17:30
The camp loft bed with stairs
Where are finishing screws used in the plans? And I am not understanding where the pocket holes screws go in the top of the steps? And the 12 boards for the plat form are those pocket hole screwed in as well? And the section that you don't glue to be able to disassemble, do you just leave the pocket hole screws open then?
I apologize for all the questions but this is the biggest project I will be doing so far and want to make sure I do it correctly so my child doesn't get hurt
ahndreak
Wed, 08/17/2016 - 07:40
Camp loft bed with stairs
How do you attach the 2x2 cleats? I've done well with all the rest but can't figure how you attach the cleats?
mkscalf
Tue, 10/04/2016 - 14:52
Is this plan missing details?
We started this project and already in step 1 notice that the instruction photo includes 2 2x4s but the actual product only has one. Is this what you meant with the update for better safety? Also the materials list only says 2.5 inch pocket hole screws but then the instructions say "1.5 inch and 2.5 inch" but doesn't say which ones go where... Our 2.5 inch came out the other side, so we are going with 1.5 inch and can't find anywhere where it would be useful to use the 2.5 inch. That makes me nervous since an extra inch of screw legth could mean a bed falling apart!!!! HELP!
GaryG
Tue, 10/04/2016 - 19:02
Legs?
Just curious, for the legs, do they need bracing at the bottom? Will it wobble? Thanks!
Smilee1079
Fri, 12/30/2016 - 15:37
Ok for a 4 year old?
Is the height of this bed okay for a 4 year old? Some other junior bunks seem so low and I don't want to need a new bed again in a couple of years because he won't be able to fit under it comfortably to play. Thanks!
ehadden
Thu, 01/05/2017 - 15:58
Made This Bed (With Modifications)
Ana,
Thanks for this plan. I built this for my 5-year old who is getting a 3 1/2-month old roommate! He loves it, as do the other two kids (11 and 9). I modified the plan to add 10" at the head for some storage shelves with an AC/USB outlet integrated for light, clock, and device charging. I also added 17" at the foot for shelving to hold books, legos, etc.). The bedroom had 127" of wall space, so I chose to integrate other pieces to fill the wall. Thanks for the plan!
EH
sandriazul
Fri, 02/10/2017 - 07:11
Height ok for 9 year old?
Hi! I love the bed and want to make one for each of my girls, but I was wondering if the height is ok for a 9 year old who is 54 inches tall? Will she be able to hang out in the lower area comfortably, or would you make hers a little taller? Thanks!
Gaylene
Sun, 04/09/2017 - 17:10
Strong Enough for Teenagers?
Hello! I love this loft bed. Can you tell me if the construction is strong enough to hold teenagers and/or adults? Do you have a recommendation for the kind of wood to use?
mmmcquillen
Mon, 07/31/2017 - 22:50
Stain color?
Love this! We have made a few items on here before and are looking to make 2 of these for our daughters. But I always second guess my stain choices! Can you tell me what stain you used and if you did wood conditioning or varnish? Thanks so much! I have told so many people about this incredible site!
Danivinnola
Tue, 09/05/2017 - 08:18
Queen Size
Do you think I could make this queen size? What additional support would I need?
Natelarson57
Fri, 12/22/2017 - 05:24
Help attaching 2x2 cleat!
I’m a novice first of all and I’m trying to figure how attach the 75 in 2x2 cleat that holds the slats/mattress. It didn’t say pocket holes, it just said 2 1/2in screws. Is it just normal screws? And do you put the screws in from the bottom up or the from side into the 2x6? Any guidance would be much appreciated. This seems like an important piece.
tachpro92
Fri, 12/22/2017 - 07:21
No pocket holes
Natelarson57, my understanding is that the cleat is just screwed from the inside into the 2x6. Just regular 2 1/2in wood screws should be fine (and glue as stated). The 2x2 and 2x6 together are 3 inches thick so the screw will not penetrate to the outside. I wouldn't recess the screw at all. It won't visible and recessing it will put it closer to penetrating the 2x6. Hope this helps.
Natelarson57
Fri, 12/22/2017 - 09:41
Thanks!
Thanks tachpro92!! Thats just what I needed, I'm starting the build today! Just came back with the wood.
Natelarson57
Sun, 12/24/2017 - 11:03
Help with the stairs
I starting to build the stairs and the instructions say to do pocket holes. This maybe a dumb question but is it two pocket holes on both TOP right and left edges of each 2x4? thanks
lisssakathryn
Fri, 12/29/2017 - 12:02
Junior Heights?
Hi! I've been doing a lot of research lately about loft beds, trying to find the right one for my 3.5yo daughter. We already bought the mattress (Tuft & Needle - Christmas sale), but are still in the market for a bed. I had actually googled loft beds which brought me to pintrest, which brought me to this one! I LOVE it!!! First of all, all the beds I am seeing are either flimsy looking or $1000+, it never occured to me to look for DIY beds.
My only thought is that I have found that most junior loft beds have a height much lower than this bed does. I think I would want to cut about 1' off the height of the bed. Would this be doable without completely ruining the bed? I am only 5'1", so I definitely need a bed short enough to be able to put a sleeping kid into without much trouble if the situation calls for it. Or would the steps and platform be strong enough to hold me while lugging her up there?
Cmslate
Sat, 01/06/2018 - 06:05
Has anyone made this in a highrmer height?
I love this bed and have already bought materials. Has anyone made in for a taller child and increased the height and if so can you share changes to basic plan? Thank you
sorrellt
Tue, 01/09/2018 - 09:35
Kreg Jig Set
Which Kreg Jig Set do you recommend using for this project?
suthrnmom
Sun, 01/21/2018 - 09:20
no stairs and xl twin bed?
is there a plan for this for no stairs and to have an xl twin bed? i would like to use the side as a ladder instead of the stairs. i need to know what supplies i would need and what demensions to cut. thanks so much!
hannahcossey
Mon, 01/22/2018 - 09:25
what kind of wood should i
what kind of wood should i use and also what kind of gray stain?
jbd307
Sat, 02/03/2018 - 15:37
Full size
Love this design! Do you have the plan available for a full sized bed?
kknowles15
Mon, 06/24/2019 - 06:15
I see that this comment is…
I see that this comment is over a year old, but I was also wondering this question. I think I'll modify the plans to accommodate. My son is 3 and still likes it when I snuggle with him and the full size will give that extra room. I can't wait to build this!
Amanda_flores98
Mon, 02/05/2018 - 10:37
Love the design. Have a few questions
I would really love to build this for my self just to make some more space in my room. I just have a few questions hopfully you can help me out with. Do you know what the measurements would be if it was for a full size bed instead of a twin? And how would that change some of the sizes of the materials needed? Although I wouldn’t mind having a twin, a full is just a little roomier :) Also is this easy to deconstruct afterwards? Like for example if I were to build this plan and assemble it in my room could it easily be taken apart and set up in another home? Sorry for all the questions! It’s okay if you can’t answer all of them but thank you so much in advance!!
itsjustmeuc
Tue, 01/29/2019 - 22:39
Queen mattress?
Would this bed still work increased in size for a queen mattress? We have a queen mattress so want to use this.
My boy currently sleeps with us so is used to a big bed plus I’d rather not buy a new mattress if I don’t need to.
ksturgeon
Sat, 06/15/2019 - 08:27
PH screws
What are PH screws? Phillips Head? Pocket Hole? Precipitation Hardened? Thanks.
kknowles15
Mon, 06/24/2019 - 06:13
Pocket Hole
Pocket Hole
thenabeana
Fri, 06/28/2019 - 17:20
Step 1
Hi, I cut all my wood and am only on the first step but i don't understand where my first set of screws go.. Can someone please help!
bspills21
Sat, 06/29/2019 - 13:51
SEND HELP LOL!!!!
this is probably an extremely stupid question but in the shopping list can someone send me a link to the type of screw i dont know if we need 2- 1/2" ph screws or 2 and 1/2" ph screw? help!
the contractor…
Fri, 07/19/2019 - 10:39
Weight limit?
Hi! Have any adults try out the finished loft and did it hold your weight? Has anyone made changes to the plan to hold an adult? If so, what were the changes?
DaveBishop48
Tue, 08/06/2019 - 14:16
Ana, have you posted your…
Ana, have you posted your finishing technique for this bed as you had promised? If so, where might I find this information? Thanks.
jshirl1992
Sat, 08/10/2019 - 09:36
Instead of screws could i…
Instead of screws could i use threaded nut inserts with bolts? We move alot and i wonder if that would be easier for disassembly and reassembly?
cosmama
Thu, 09/26/2019 - 18:55
Do you have specs for a full…
Do you have specs for a full size?
cosmama
Thu, 10/03/2019 - 22:20
Do you have a cut guide for…
Do you have a cut guide for a full size?
In reply to Do you have a cut guide for… by cosmama
Ana White
Fri, 10/04/2019 - 17:40
We don't at the moment, I'm…
We don't at the moment, I'm sorry.
I will work on updating this plan and adding a full size cut list.
In the meantime, you can simply add 15 inches to all the width wise cuts (since the full size mattress is normally 15" wider than the twin). The lengths should be both 75" so no modifications would be necessary there.
Mojo9
Wed, 10/16/2019 - 15:40
Play loft with lower bed?
Could this be used as a indoor play loft?? A lot about the plan is similar to the out door play loft. If we used 2x4s and deck board or plywood for the floor in the upper loft??
Placing a 2x4 or 2x6 along the bottom to frame in for a twin and support the structure?
Thoughts?
Sahra
Wed, 10/23/2019 - 08:37
Mattress size for this project
Hello. I'm curious are the interior dimensions of this bed large enough to accommodate a general twin mattress size of 75"x39"?
Paulajfrick
Fri, 11/01/2019 - 21:55
I made this
I made this with altercations,but have no idea how to share them
Tsun428
Thu, 01/23/2020 - 22:14
Could I use the top as a…
Could I use the top as a play area for my 2.5 year old with her toddler bed (crib) mattress underneath until she gets a tad older? Or do you have other simple plans that you could recommend that would be more suitable?
Charlotte_Smith
Tue, 02/04/2020 - 16:30
Height and Weight
I was recently looking for a loft bed because my new bedroom is very, very small and I need a lot more space when suddenly, I came across this plan and my dream bed appeared! I love this so much and its so much cheaper than actually buying it. The only questions I have are what the weight limit for this bed is and if there is any way that I can make into a queen-sized bed. Did anyone make this bed for a teen or tween that could share some info about the weight and height they made it into? Thanks!
jakehintz1
Mon, 03/02/2020 - 07:52
I just finished this bed for…
I just finished this bed for my 4 year old son and i made a few changes and it worked out great. Instead of the 2x2 cleat, i cut 2x4s at 39 inches and placed them every 9 5/8 across the 75 inch span and i also cut a half inch sheet of mdf to 39x75 and put on top of the previously mentioned 2x4s. This bed held me no problem before adding the 1/2 inch sheet of mdf and Im 300+ lbs. To make this a queen size you will just need to adjust the length and width to fit the mattress. I would suggest maybe using 4x4s for the legs or adding more support front to back and side to side...
timdale21
Sun, 02/16/2020 - 05:58
How to attach the decking
Am I missing how the decking is attached? Are they using pocket screws and if so how and where? I missed that when reading through and have started the build. Please help!
jakehintz1
Mon, 03/02/2020 - 07:57
I thought the same thing so…
I thought the same thing so i put pocket holes in all my platform pieces because i did all the holes before moving everything in to assemble in my sons room. When i got to that part i realized that they can not be attached that way. I just drilled 4 holes in each board, 2 on each side and used 2.5 inch construction screws, and countersunk them. just make sure to place the screws within the outer 1.5 inch on each side so when you screw them down you drive into the 2x4s that make the platform. I did .75 inches from the outside so i would be directly in the middle of the 2x4s below just so i didnt have to worry about splitting.
rjkevin
Mon, 03/02/2020 - 08:28
Full size
Can this plan be modified for full size mattress?
jakehintz1
Tue, 03/03/2020 - 04:58
Yes that would be pretty…
Yes that would be pretty easy, the length is the same so all those pieces would be the same. A full is 54 inches wide and a twin is 38, so you would just need to extend those lengths out to support the 54inches.
Dave840
Sun, 04/05/2020 - 08:18
I'm pretty new to project…
I'm pretty new to project like this. I see your bedrails look like they T with the corner posts. Is there any special clamping you used to do that? In my limited experience, even with pre-drilling holes boards push away. Thanks for the insight.