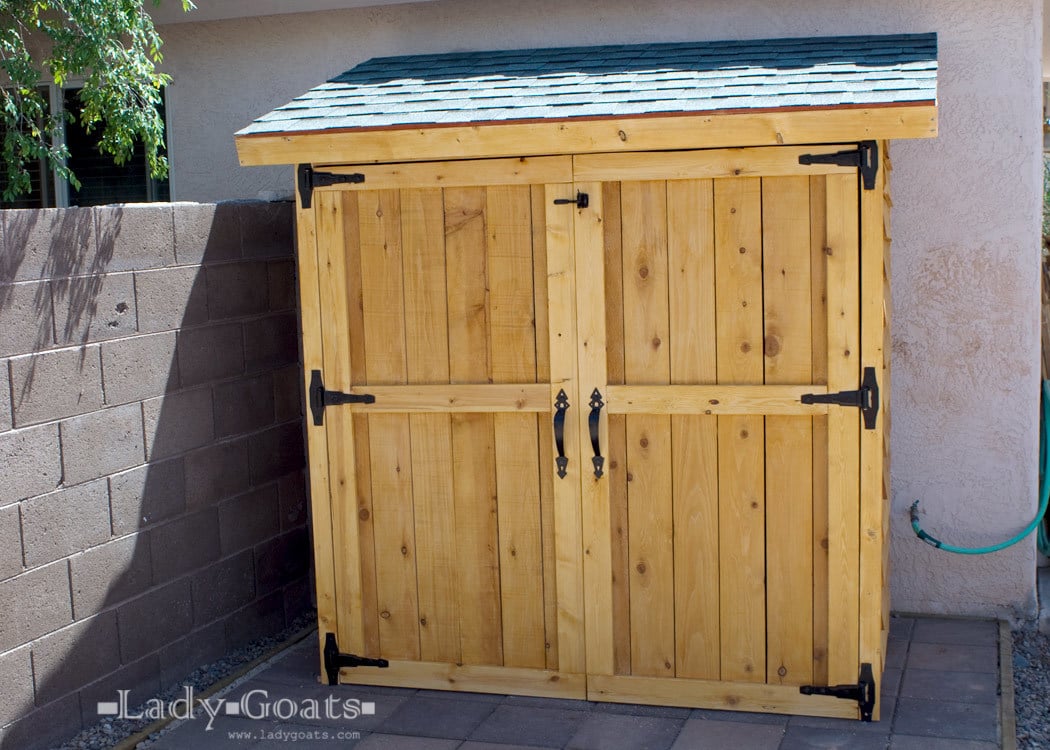


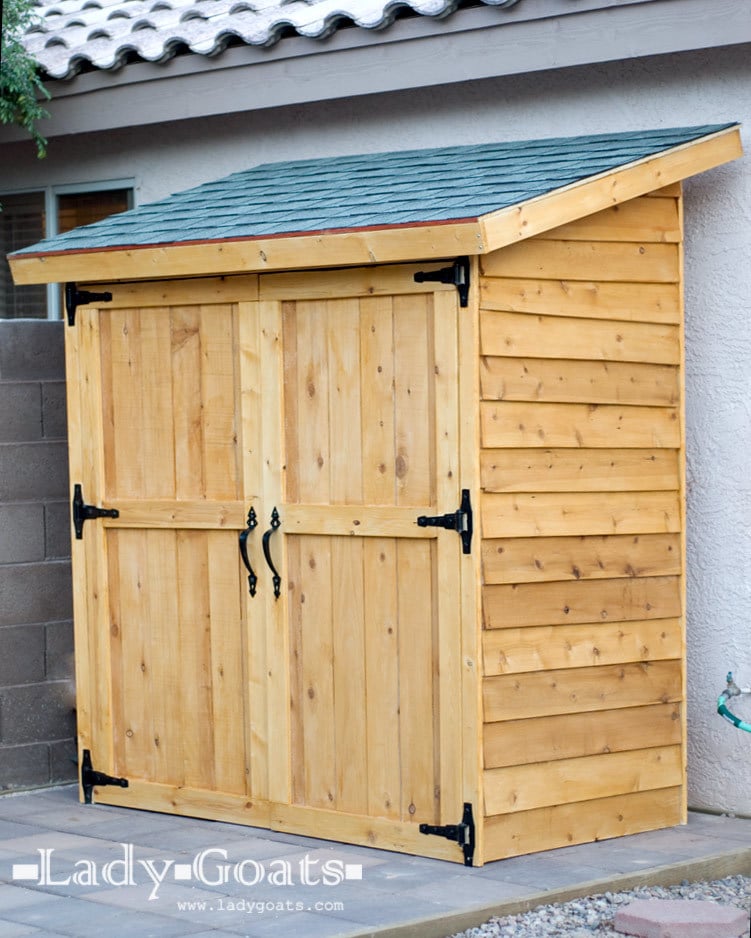
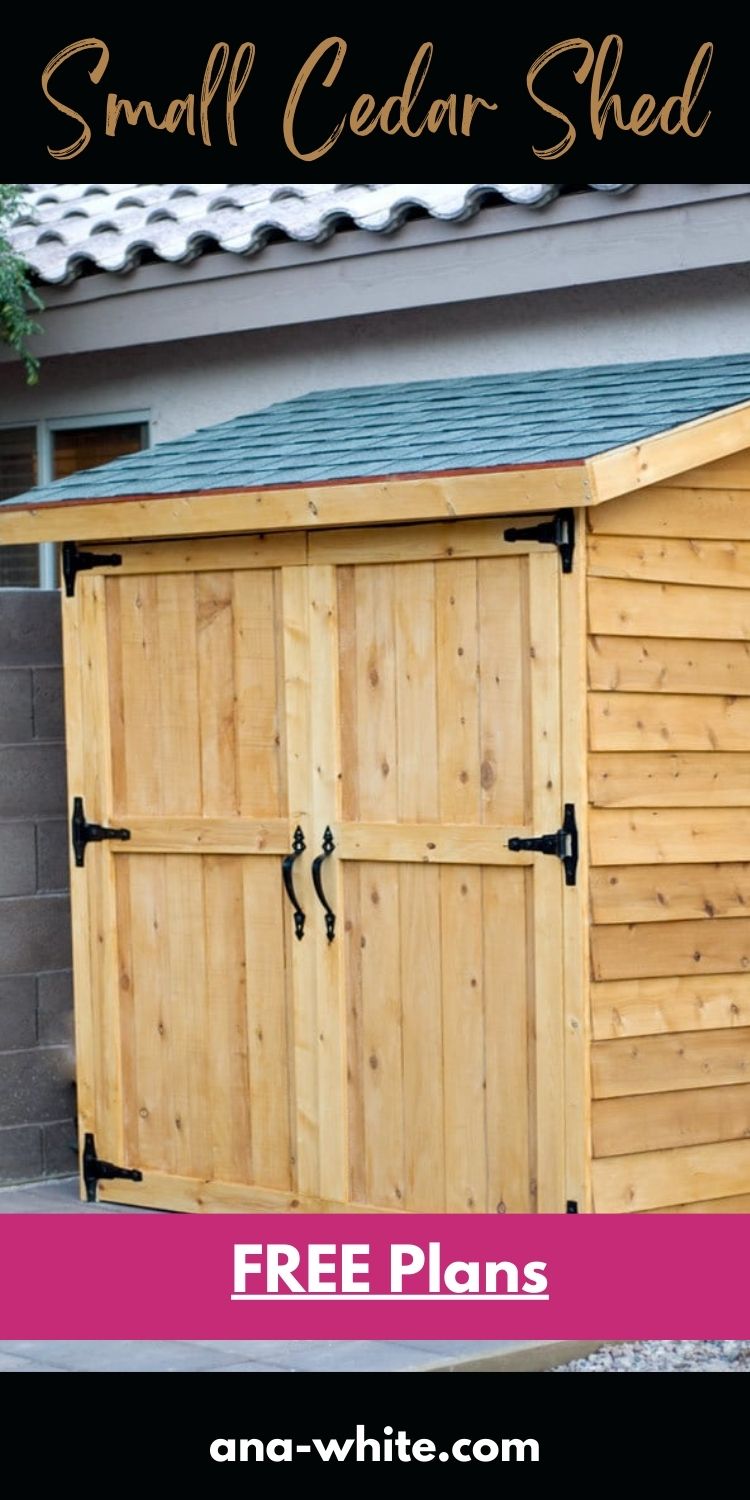
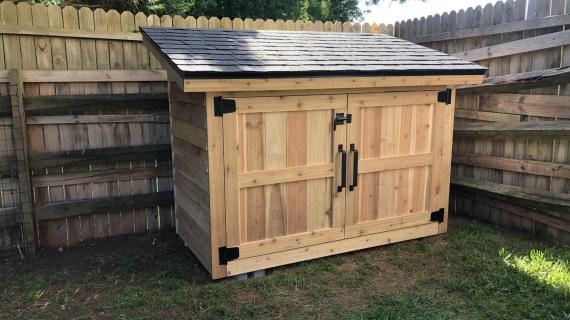
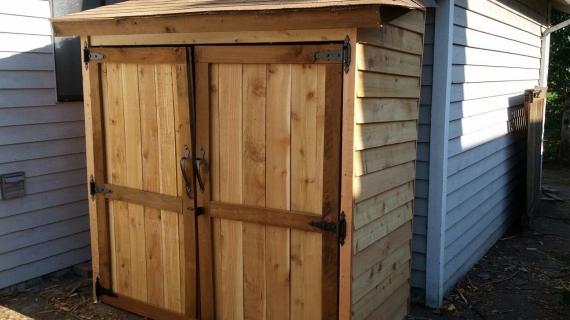
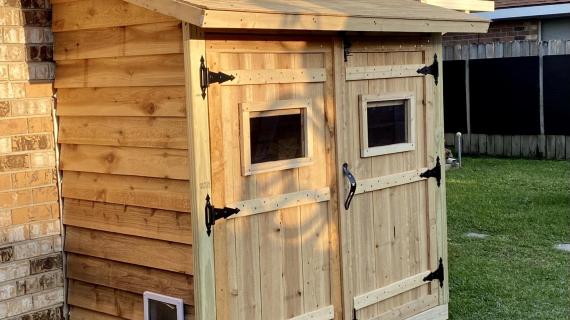
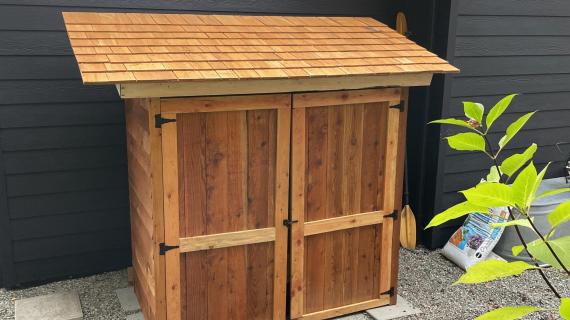
Build your own cedar shed to store lawn mowers, tools, trash cans, or just extra things. We love that it's like an outdoor closet.
This cedar shed plan uses fence pickets - so it's much less expensive. The simple design can be built by most anyone. Step by step plans with diagrams and shopping and cut list from Ana-White.com


When I first started building projects, I didn't care if I worked in the gravel driveway on a cold day. I didn't care if I had a little spot behind the boat, on the floor in the garage to work. I was so crazy about building, I found a way around anything to work on a project.
But over the years, slowly, tool by tool, I've been working up to a dedicated work space. And boy is it nice.
It's kind of like having a sewing table. Or a potting bench for gardening. Or even a dedicated spot to make coffee in your kitchen. When you do something on a regular basis, it sure makes life easier to have a dedicated work station for it!
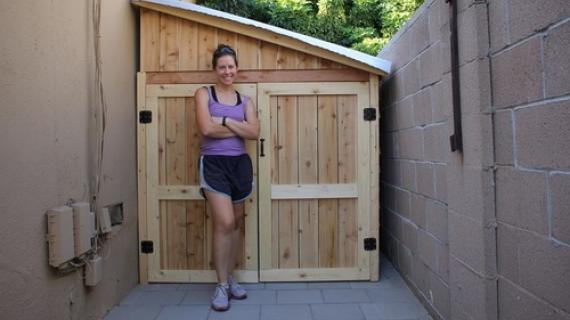
So when my friend Gina from Lady Goats wrote me saying, Help, Ana, I'm building in the rocks and dirt! I had to work with her to come up with a solution.
I hope this solution we came up with works for many of you too!
How much does this cedar shed cost to build?
Gina sent me a link to a cedar shed with a retail price of $1600. Okay, that's more than the tools inside!
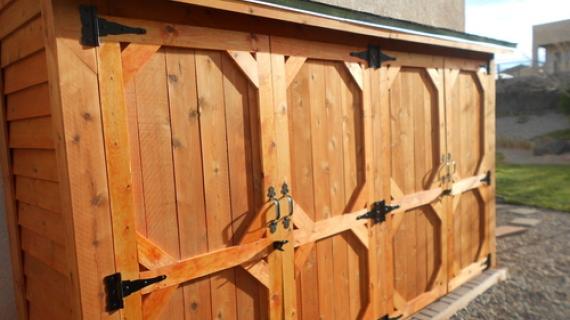
She wanted to use cedar, and I thought, what cheaper solution than cedar fence pickets for siding? At a couple of bucks each, Gina was able to make this shed for $255! And it's cedar!
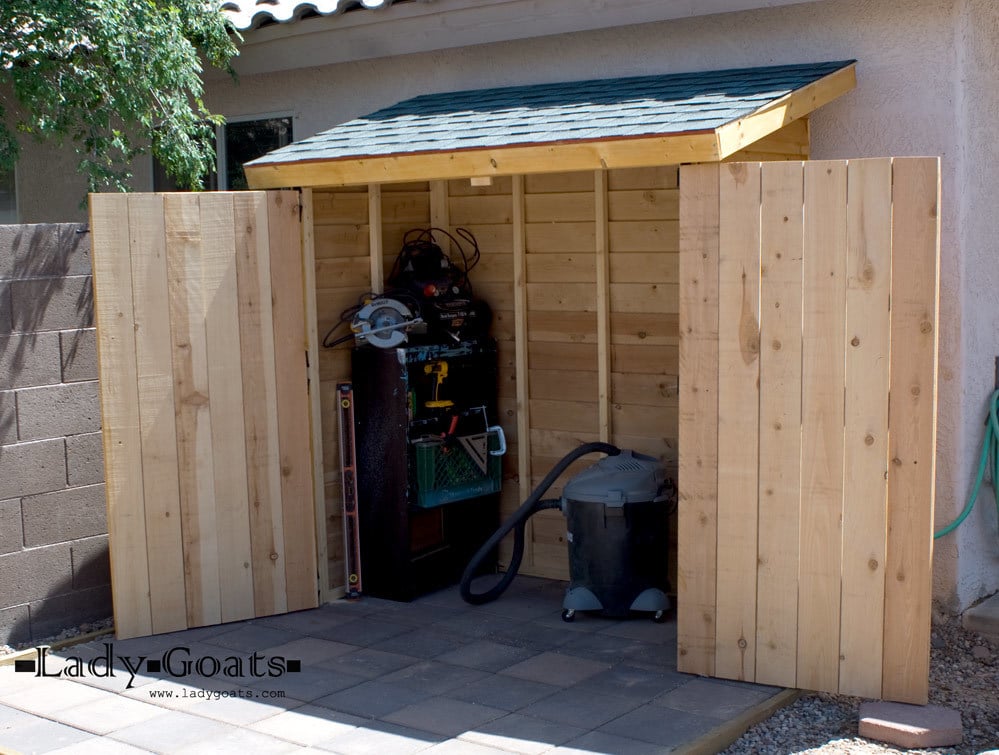
Gina is going to add a few fun things to the inside - like a miter saw cabinet and some door shelves, so stay tuned as we turn this shed into a workshop!
And here's a few notes from Gina:
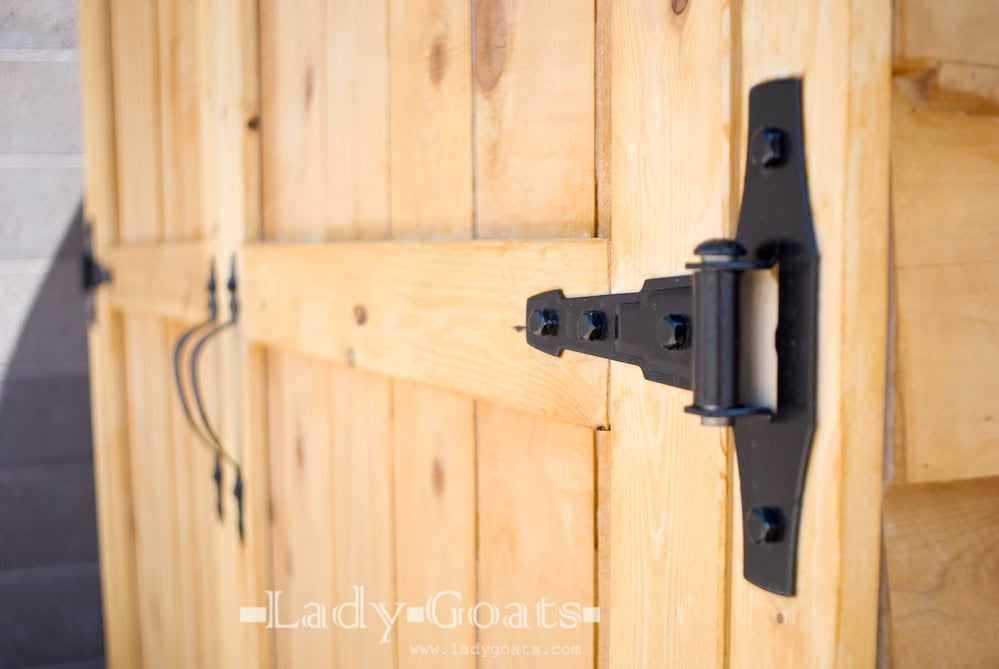
- I found it saved about $15-$20 to use this set of hinges & latch, instead of buying them individually. You'll end up with two extra latches, but I'm sure they'll come in handy elsewhere!
- Every minute I spent on this was timed, and the entire build took almost 8 1/2 hours (including roofing, excluding finishing). So this could definitely be a weekend project! - All of the components, unassembled, take up about 12" of space! Maybe this info will come in handy for some of you! I would have definitely pre-built everything and assembled it after I got my HOA's approval if I'd have known!
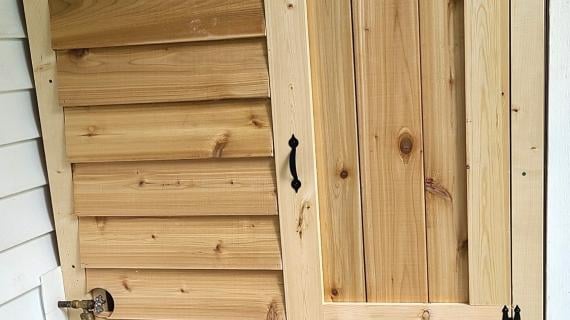
- This was my first roofing project, and this product made it SO EASY. They have videos on their website that explain everything. - The paneled doors were kind of tough to get tight. Use a pipe clamp! If you don't have one, nail one corner of an end board and squeeze the boards together while someone else nails all of 'em.
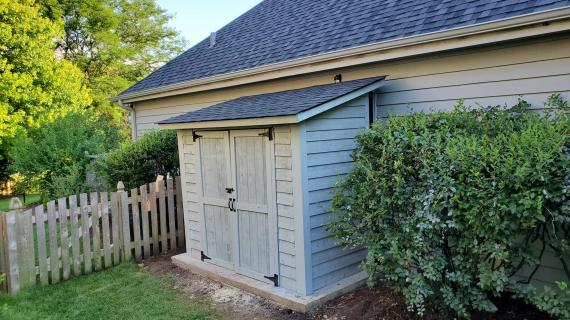
- The roof allows you to put the shed about 8" away from a structure (meaning there's an 8" gap between the shed and other structure). If you want to lessen that gap, you'll have to resize the roof.
For lots more photos and tips, please check out Gina's blog post here.
Cedar Storage Shed Plans
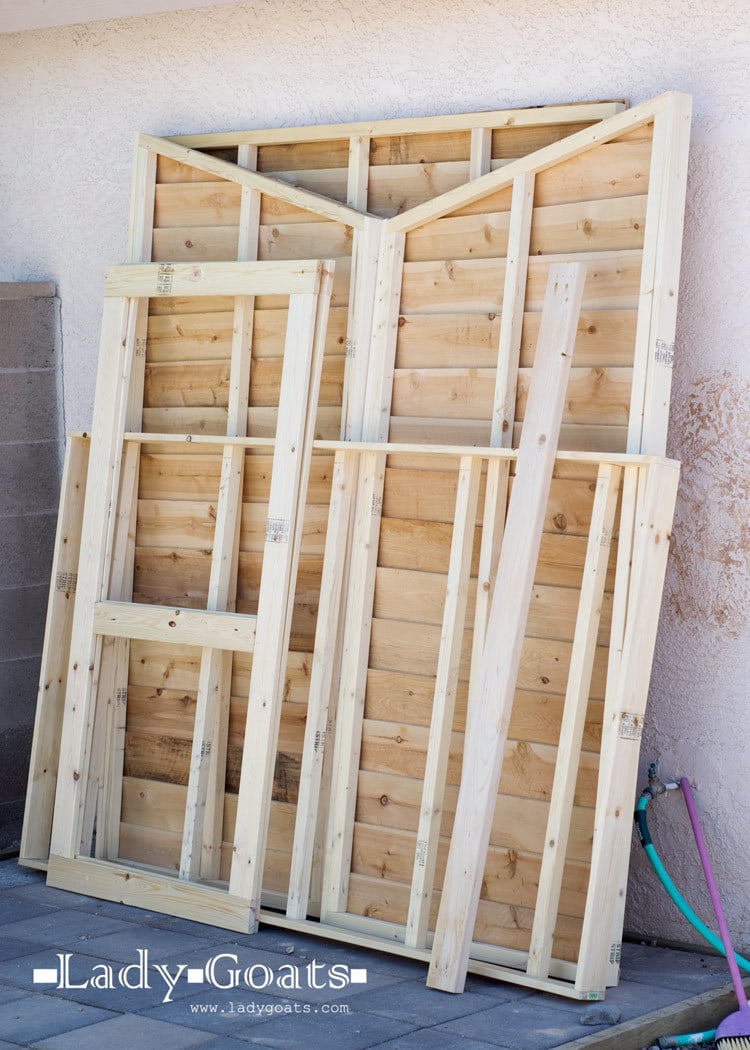
This shed plan can be built in panels first and then assembled on site -
The free step-by-step plans follow. Thanks for using our plans.
Pin For Later!

Preparation
- 18 – 2x2 @ 8 feet long
- 44 – 5 1/2" wide cedar fence pickets
- 1 – 2x4 @ 8 feet or stud length
- 4 – 1x3 @ 8 feet long
- 8 – 1x4 @ 8 feet long
- 1 – 4x8 sheet of plywood for attaching roofing shingles (check what your shingles manufacturer recommends)
- 30 square feet of roofing shingles
- Roofing nails or glue
- Heavy duty gate hinges, Handles, Lock or Catch
BACK WALL
- 2 – 2x2 @ 66 1/2"
- 5 – 2x2 @ 77”
- 16 – 5 1/2" wide x 1/2" thick fence pickets @ 66 1/2" long
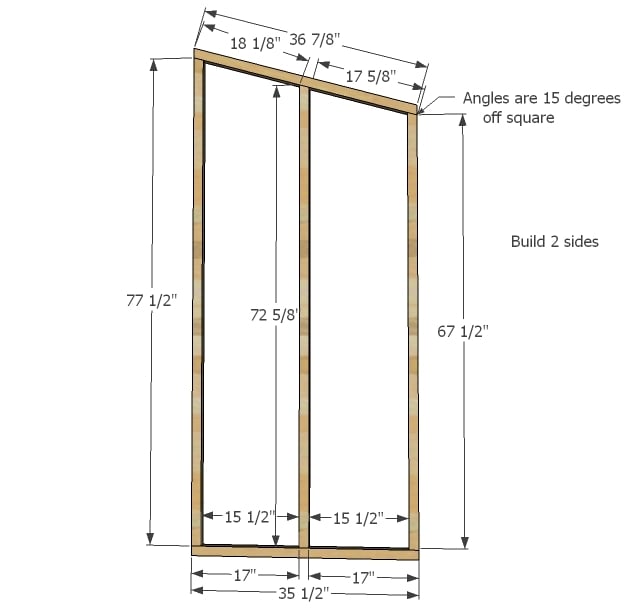
SIDE WALLS
- 2 – 2x2 @ 35 1/2"
- 2 – 2x2 @ 77 1/2" (longest point, top end cut at 15 degrees off square)
- 2 – 2x2 @ 72 5/8" (longest point, top end cut at 15 degrees off square)
- 2 – 2x2 @ 67 1/2" (shortest point, top end cut at 15 degrees off square)
- 2 – 2x2 @ 36 7/8” (long point to short point, both ends cut at 15 degrees off square, parallel to each other)
- 32 – 5 1/2" wide x 1/2" thick fence pickets @ 35 1/2" long
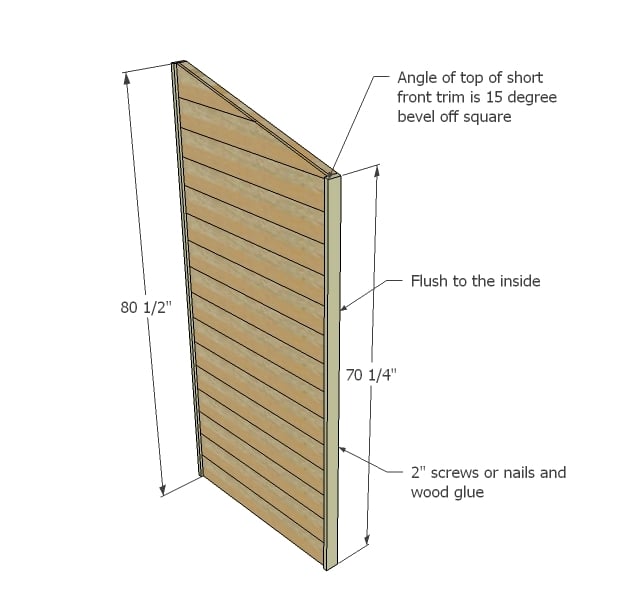
- 2 – 1x3 @ 80 1/2"
- 2 – 1x3 @ 70 1/4" (short point measurement, top edge beveled at 15 degrees off square)
FRONT HEADER
- 1 – 2x4 @ 66 1/2"
ROOF
- 2 – 1x4 @ 83”
- 2 – 1x4 @ 46 1/2"
- 5 – 2x2 @ 46 1/2"
- 1 – roofing plywood @ 83” x 48”
DOORS*
- 4 – 1x4 @ 60”
- 4 – 1x4 @ 33”
- 2 – 1x4 @ 26”
- 12 – 5 1/2" wide x 1/2” thick fence pickets @ 67”
*You may wish to build doors slightly shorter to enable easier opening and closing - recommended to build doors to fit finished opening.


Please read through the entire plan and all comments before beginning this project. It is also advisable to review the Getting Started Section. Take all necessary precautions to build safely and smartly. Work on a clean level surface, free of imperfections or debris. Always use straight boards. Check for square after each step. Always predrill holes before attaching with screws. Use glue with finish nails for a stronger hold. Wipe excess glue off bare wood for stained projects, as dried glue will not take stain. Be safe, have fun, and ask for help if you need it. Good luck!
Instructions
Step 1
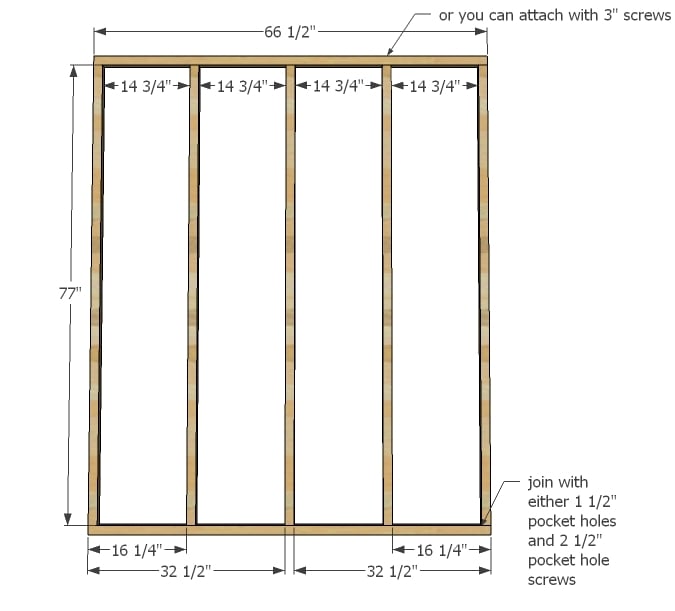
Frame you your back walls. You can use the Kreg Jig or 2 1/2" screws here.
Step 2
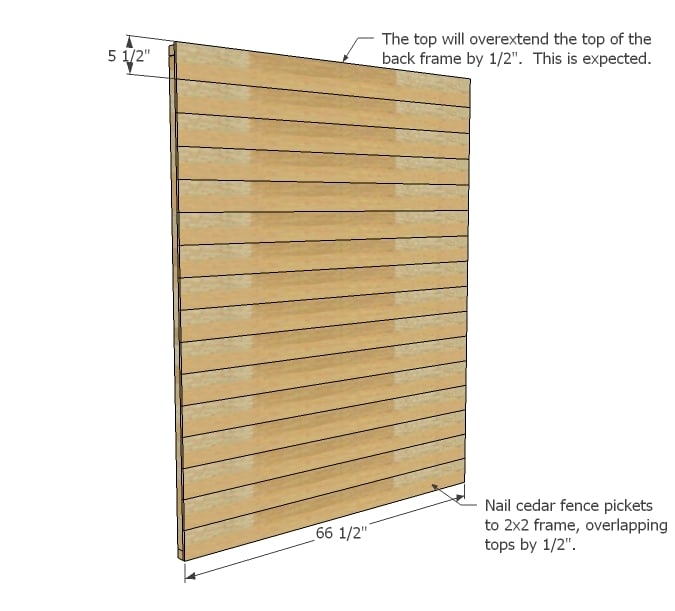
Starting at the bottom and working upward, attach the cedar fence pickets, overlapping 1/2" as you go up. Screw or nail and glue on.
Step 3
Frame side walls as shown in diagram as you did the back wall. You will need two side walls.
Step 4
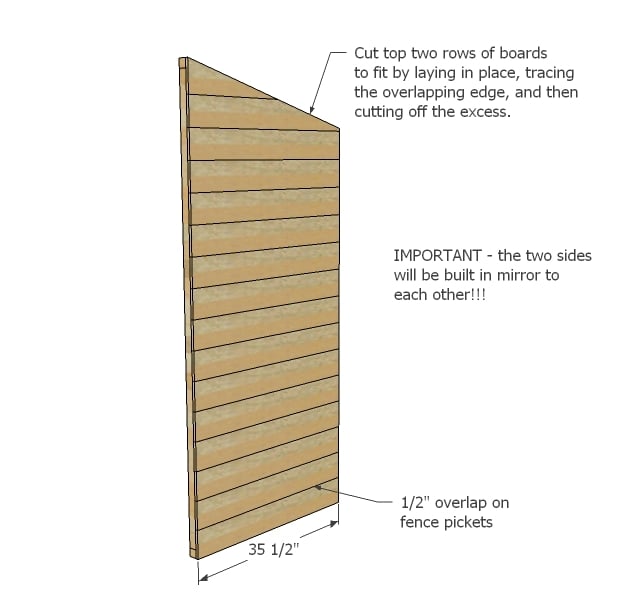
And add the cedar siding to back wall as shown in diagram. Do not forget that the sides need to be done in mirror!
Step 5
Build the side walls and attach cedar fence pickets to the side wall.
Step 6
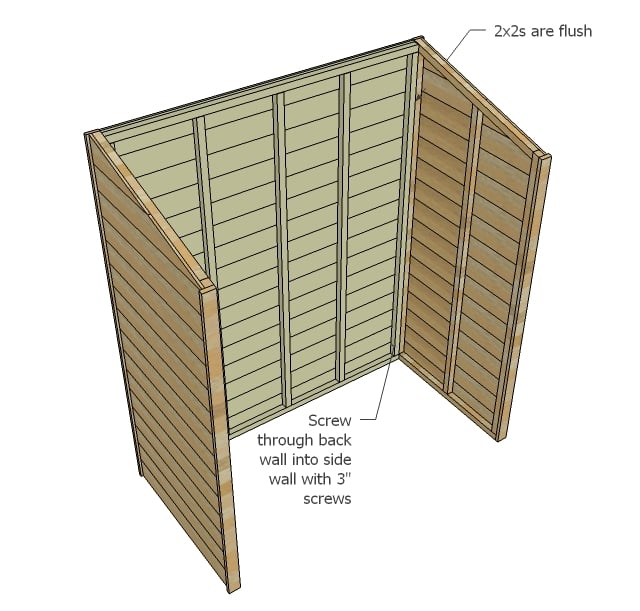
Once your side walls are complete, you can attach back walls. Use 2 1/2" screws or brackets for easy disassembly.
Step 7

Add header to front of shed. Take a minute here to make sure your project is square. The door area especially needs to be square.
Step 8

Frame up roof as shown above.
Step 9
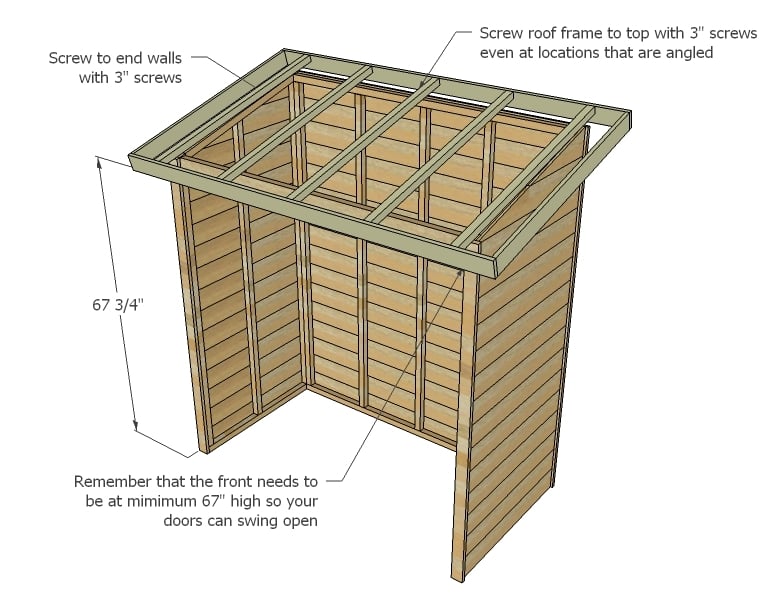
And attach roof to top of storage shed.
Step 10

Add plywood and roofing to top of shed.
Step 11
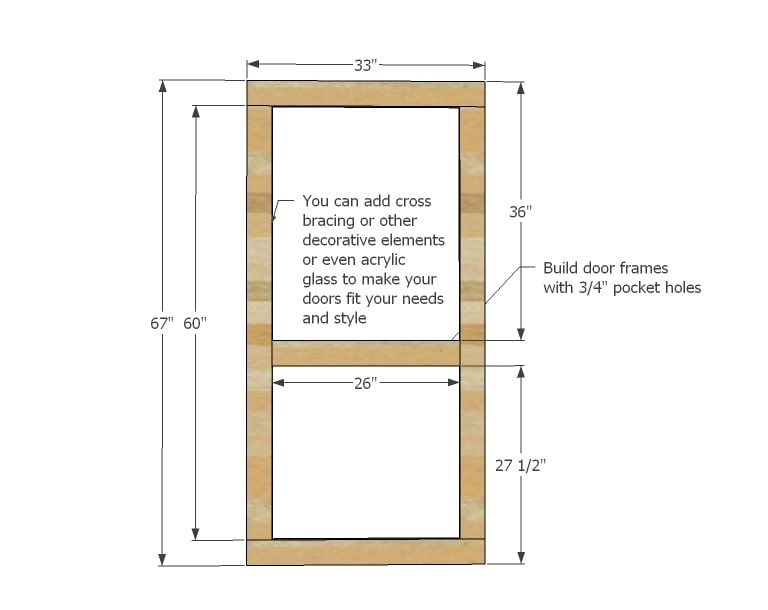
Frame doors up with pocket holes. Build doors to fit your openings. I like to leave 1/8" gaps.
Step 12
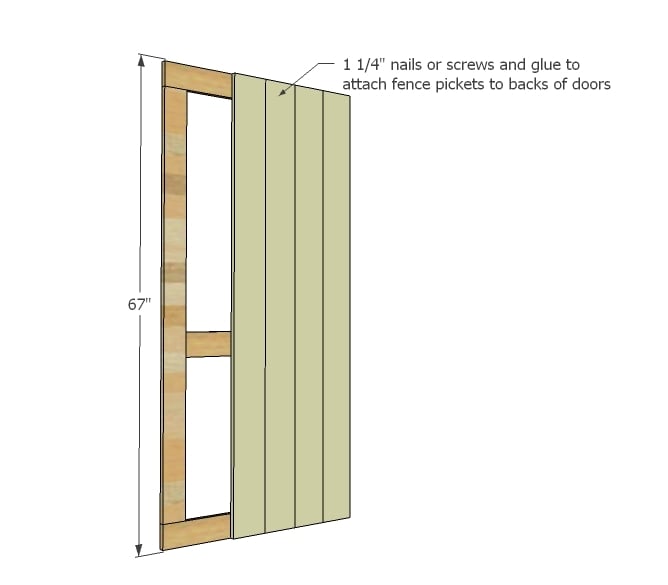
Attach cedar fence pickets to back of doors.
Step 13
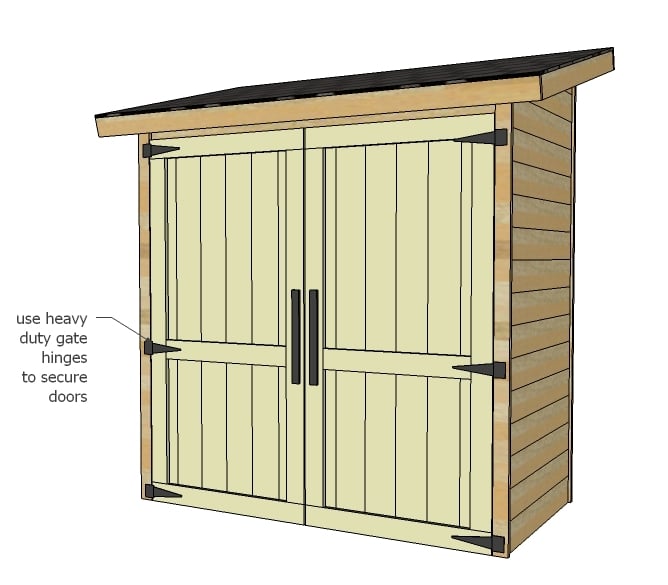
And then install doors to shed.
Step 14

I love how Gina added the stop block to keep doors closed. Isn't this shed beautiful!
Step 15

Don't forget the pretty hardware!
It is always recommended to apply a test coat on a hidden area or scrap piece to ensure color evenness and adhesion. Use primer or wood conditioner as needed.
Comments
Ryan (not verified)
Mon, 04/02/2012 - 00:43
Very nice.
Very nice.
Foleygirls
Mon, 04/02/2012 - 06:25
Love It!
I love this shed! Unfortunately for me I don't have a space around my house to put this...do you have any plans coming for a larger shed I could build for my yard??? :-)
emmarosemc
Mon, 04/02/2012 - 08:01
I would advise to put some
I would advise to put some kind of liner underneath the shingles, especially if youve got powertools stored in the shed. Doesnt need to be tar necessarily but at least some thick plastic. Also handnail the shingles - much less risk of have nailpops/holes and thus leaks.
In reply to I would advise to put some by emmarosemc
Lady Goats
Mon, 04/02/2012 - 11:30
Great input!
I had some looong conversations with the people in the roofing departments in both Lowe's and Home Depot (made sure to talk to a lot of people, because it's hard to get accurate advice from one person that may or may not have done a roof!), and they all mentioned that the type of shingles I used, with the OSB, in my climate wouldn't require the use of another underlayment. So everyone'll definitely benefit from looking into how roofs in your area are done!
Guest - Jessica (not verified)
Mon, 04/02/2012 - 08:35
I've been praying you'd post
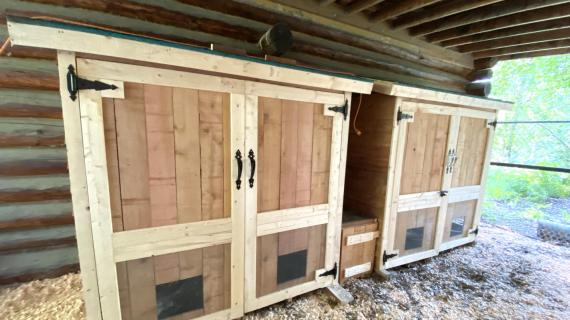
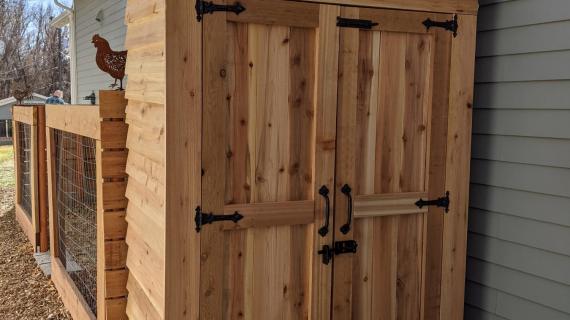
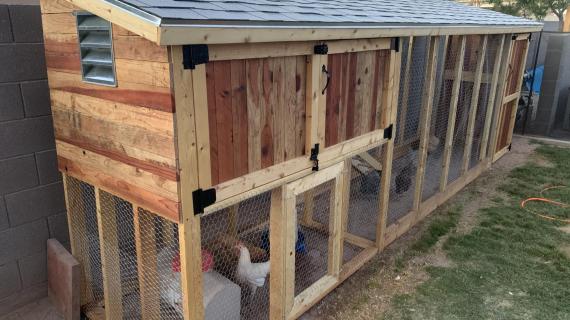
I've been praying you'd post some kind of plans like this...my evil genius idea to renovate them??? CHICKEN COOP! Thanks Ana!
Ana White
Mon, 04/02/2012 - 08:39
Jessica, what a great idea!
Jessica, what a great idea! You could just add a little chicken door out the back and a run and have a coop! With the large double doors, cleaning inside would be a piece of cake!
I am working on some chicken coop plans, but it could be a bit to build and test and post. Thank you so much for being patient with me!
James Reeves (not verified)
Tue, 04/03/2012 - 22:35
I don't have chickens, but have 5 cats need summer run
Anna, don't have chickens as of now but l have 5 cats, my daughter renting front half of our duplex has 6 cats.
Last fall bought 2 - 10 x 10 x 6 ft high dog kennel's for my 18 yr old sheperd to run free in no chain.
Just wondering if you have any plans for our cats who needs exercise and my de clawed cat who catn't run loose. A runner put in maybe a few ramps, hollow tubes an area safe for them to run get sunlight have fun in the nice weather.
Just not sure what type of wire or mesh to put around 4 sides won't get claws caught in. If you have any diagrams plans etc please email them to me thanks
jim
redtrek
Sun, 04/11/2021 - 14:15
Chicken Coop Version
I have used these plans as the basis for plans to build a chicken coop that will be 18' x 4' x 6'. I am planning to build a modified shed to match. I'm hoping to have it finished in the next 2-3 weeks. I don't see an option to post photos, though.
Legomamaof4
Mon, 04/02/2012 - 08:45
Wonderful JOB!
What a Wonderful Building! What an affordable storage option that will last a long time. Great Job and Thank you for the POST! Maybe this will be a summer project. ;')
Jennyw9wkids (not verified)
Mon, 04/02/2012 - 08:50
I have been looking for some3thing like this!
I have been looking for something like this to build and put on my back deck for a potting shed. I am always doing stuff in the yard and i always have to either go up front to the garage or way in the back to the shed for my yard tools. Since most of my flower beds and potted plants are on or around my deck this would be perfect to keep all my little yard tools in and handy. THANK YOU!
Guest (not verified)
Mon, 04/02/2012 - 09:22
Just in time!!!! It's a perfect project!
Seriously. You always seem to time things perfectly for your readers' needs! Was hoping that you'd one day post more outdoor projects such as this shed. I love it! Maybe we'll be seeing outdoor kitchen islands, a outdoor washing station (especially for gardeners' veggies, convertible outdoor swing (bed/swing), different type of sheds in the near future?....a girl can only wish! THANK THANK YOU for everything that you do! You are one amazing person, Ana!!!
Guest (not verified)
Mon, 04/02/2012 - 09:24
Just in time!!!! It's a perfect project!
Seriously. You always seem to time things perfectly for your readers' needs! Was hoping that you'd one day post more outdoor projects such as this shed. I love it! Maybe we'll be seeing outdoor kitchen islands, a outdoor washing station (especially for gardeners' veggies, convertible outdoor swing (bed/swing), different type of sheds in the near future?....a girl can only wish! THANK THANK YOU for everything that you do! You are one amazing person, Ana!!!
Sally (not verified)
Mon, 04/02/2012 - 10:20
making a little cheaper yet...
If you think you have no intentions of moving...screw a header board to the outside wall of building at top and bottom. Then fix 2 x 4 on the sides, vertically. Now you can attach your side and roof, and save the money by not making a finished back!
Cindy from Indiana (not verified)
Mon, 04/02/2012 - 11:51
Oh my golly! This is perfect!
It's like you read my mind, Ana and Gina!
I was just standing outside my house yesterday afternoon trying to brainstorm some attractive but inexpensive storage. I cannot believe you posted this at exactly the right time!
Thank you - it looks great!
Guest (not verified)
Mon, 04/02/2012 - 13:33
What to put it on?
I don't have a patio and I'm guessing this probably shouldn't go directly on the grass. Do you know what I need to do to prep the ground it will sit on?
Ana White
Mon, 04/02/2012 - 14:20
The easiest way to do a floor
The easiest way to do a floor would be concrete pier blocks, a wood framed floor probably could get away with 2x4 joists depending on your load requirements. Foundation types vary greatly by region and soil type, so ask locally for advice. I am working on a chicken coop that will have a floor and is very similar to this design in the next bit. Thank you everyone for the comments and feedback and pins! Much appreciated!
Robohead
Mon, 04/02/2012 - 14:34
Perfect Shed
I've been looking for plans for a shed like this. And the timing couldn't be better. This is getting bumped to spot number 2 on my to-do list. This website has been so incredibly useful to me. I'm so glad I found it.
redhead_61
Mon, 04/02/2012 - 16:04
awesome
It turned out SO great. I love the look of natural woods outside. It really has helped warm up my little enclosure of cinderblock walls! This will be such an awesome spot. I LOVE the price savings as well.
debandtom25
Mon, 04/02/2012 - 17:20
Are you kidding?!?
I was just searching Google for some ideas for an outside trash/recycling shed, and I thought, "Why don't I check Ana's site?" I don't recall you having a shed, but I thought I would give it a try. Well, how do you do!!! The first item that pops in my face is the shed! Thank you Lady Goats! I'm off to print out the directions and then see how I can modify specifically for my needs. Will post pics when I'm done. :)
Guest (not verified)
Thu, 04/05/2012 - 14:17
Exactly what I needed too!
Its perfect, all the basics of putting it together, now, just need to slightly modify it to fit under my window and my garbage bins.
Thanks Ana!!
Hinsonc
Tue, 04/03/2012 - 09:09
Shed floor
So you have any information on how you did the paver floor?
Kerry L. Andrus (not verified)
Tue, 04/03/2012 - 23:47
Chicken's on my mind
I went looking at this shed wondering if it would be big enough for my home flock like many other readers! I've sadly discovered that the majority of the plans online are for smaller coops. I do hope the coop you are putting together is a bit larger Ana! I can't wait to see it!
mamma_joy
Sat, 04/14/2012 - 11:47
Did you find my tablet?
I have a tablet of drawings of things we have thought of building with measurements and all (b/c I don't get Sketch Up, yet). This looks almost exactly like one that I was dreaming about but had yet to finalize. I have some fence panels waiting to be repurposed......I wonder if I'll get a garage this year or if I'll end up still needing to make this! Nicely done!
Misty K (not verified)
Thu, 05/10/2012 - 20:59
Pool Shed!
I am saving this project build for next summer....pool should be going in/up by then and this would make a PERFECT pool shed to keep all that stuff from cluttering up the garage and in reach!
~Misty K
taylorgdaddy
Sat, 05/19/2012 - 05:32
pdf version
Ana, I would like to download the pdf version of this and the link seemed not to work. Any ideas? Thanks
Robohead
Sat, 05/19/2012 - 09:55
Well, I'm not Ana, but
You can save it as a PDF from the print function.
1. At the bottom of the plan, click on "Printer-Friendly Version"
2. New window will load the plan. Now right click and choose "Print" from the menu.
3. You should see your printer model listed. Click it and a drop down menu appears.
4. Select "Save as PDF".
5. Print away.
Deborah (not verified)
Tue, 06/05/2012 - 02:36
cedar shed plan
Gina,
Thank you so much for this plan. I've drawn a plan for my potting shed which is very similar but, needed help with how to attach the roof.
Bob Delanki (not verified)
Sat, 06/16/2012 - 23:38
Expanding the width?
I don't have a place to keep lumber, so I'd like to have a shed very much like this except wide enough to keep some 8' lumber and full sheets of plywood between projects. Any thoughts on how the design would need to be beefed up if it's being made about 50% wider? Thanks!
MomOf3
Wed, 07/18/2012 - 08:04
I'm trying to figure out a
I'm trying to figure out a similar problem. I believe to make it wider, you would use 8' treated pine pickets. I don't believe the cedar comes in 8' length. After cutting off the dog-ear, you will be 3" or so short, but you should be able to stack them on an angle.
Kaya (not verified)
Sat, 07/07/2012 - 19:41
Cedar pickets
I can't find the cedar pickets at lowes or home depot? Any ideas? Where did you buy yours?
In reply to Cedar pickets by Kaya (not verified)
Lady Goats
Mon, 07/09/2012 - 11:10
Cedar Pickets
Hi Kaya! I bought these from Lowe's.
Hope this helps!
Jeannette (not verified)
Sun, 07/08/2012 - 20:00
Cedar Pickets
Kaya - you took the question right out of my mouth lol. Need to know where to find them too. Would like to start building next weekend.
Jeannette (not verified)
Sun, 07/08/2012 - 20:05
Cedar Pickets
Kaya - you took the question right out of my mouth lol. Need to know where to find them too. Would like to start building next weekend.
In reply to Cedar Pickets by Jeannette (not verified)
Lady Goats
Mon, 07/09/2012 - 11:11
Cedar pickets
Hi Jeannette! I bought these from Lowe's.
xoxo
Jeannette (not verified)
Sat, 07/14/2012 - 08:31
Cedar pickets
I am in Canada (Toronto) and can't find cedar pickets anywhere (not even in pressure treated). They actually look at me like a moron when I ask. What else can I use?
Help!
MomOf3
Wed, 07/18/2012 - 08:38
Expanding Depth
Ana or Lady Goats, I'm hoping you can help me. I want to expand the depth of the shed. I'm thinking I can use 8' pine treated pickets (I'd love to use cedar but can't find them that long). Any thoughts of what this would do to the roof? If I keep the front and back height the same, or would that make the slope too low to drain properly? If I raise the slope I would need longer 2x4s, right?
mamalecia11
Tue, 05/14/2013 - 14:01
Finishing
When you said 8 hours excluding finishing, how are you finishing it? I am terrible at knowing what to do when I am finished building a project.
In reply to Finishing by mamalecia11
Lady Goats
Tue, 05/21/2013 - 13:36
Finishing
Hi mamalecia11! I used a large, cheap brush to brush on an exterior stain (cabot stain - I don't remember the color!). You could paint or stain it, but make sure you use exterior grade paints/stains. Good luck!
In reply to Finishing by Lady Goats
mamalecia11
Tue, 05/21/2013 - 18:51
Thank you so much!!
I am almost finished with the shed and I am loving it!! So is my husband-hahaha!!
Paul Steele
Tue, 05/21/2013 - 09:16
Small Cedar storage shed
I really like this project and a friend has asked me to build one for her. Do you have any more actual pictures of the building process? The drawings are nice, but having some actual pictures would be very helpful too. Thanks. Really like finding your website and all the projects and ideas.
Paul
In reply to Small Cedar storage shed by Paul Steele
Lady Goats
Tue, 05/21/2013 - 13:42
Building Process
Hi Paul!
I do not have any more pictures of the building process, but you could look through the brag posts to see if anyone else has posted any? If there's anything in particular that you need help with, I'd be more than willing to help..!
how to build a shed
Tue, 04/15/2014 - 20:05
how to build a shed
https://www.youtube.com/watch?v=c7jo3_vvyAQ
Kara L
Tue, 04/29/2014 - 02:17
Splitting pickets
I am trying to nail the pickets to the sides, and am having trouble with the pickets splitting on me. Where exactly should the nails be? I was trying to get them close to the top so that they would be hidden by the next picket. Is this correct?
Thanks so much for any help!
sbivens
Wed, 05/28/2014 - 21:21
make it bigger!
I'm wanting to do something similar to MomOf3, which is make it deeper. How will that work out with the roof? Math is hard.
sbivens
Wed, 05/28/2014 - 21:24
Can we make it deeper?
I'm wanting to do something similar to Mom of 3, which is make it deeper. How will that work out with the roof? Math is hard.
sbivens
Wed, 05/28/2014 - 21:26
Sorry for the double post
Commenting is also hard.
TaylorMade1205
Tue, 06/17/2014 - 08:34
Alternative Pickets
Hi Ana and/or LadyGoats,
What would be the alternative to cedar picket fencing at 1/2", I can't find that anywhere. I live in Florida and neither the Orange or Blue store carry 1/2 thick fencing. I clicked on the link LadyGoats supplied and they no longer sell it. I want to build this shed to store my stuff since I've become addicted to both your sites. Thanks for providing an outlet for my creative side.
rrmorris
Tue, 11/04/2014 - 14:35
I want this plan
Looks like just wht I have been looking for.
walt555
Wed, 02/11/2015 - 08:01
roof angle, height for deeper shed
could someone tell me how to change the height and/or roof angle so i could push the depth to 4ft
shopgirl
Sun, 05/03/2015 - 19:58
How to make it bigger?
Hi,
I think I've got too much stuff. Is there an easy way of doubling the size of this shed?
Thanks!