Community Brag Posts

Jack's Play Kitchen

Submitted by AmyW on Tue, 03/13/2012 - 14:17

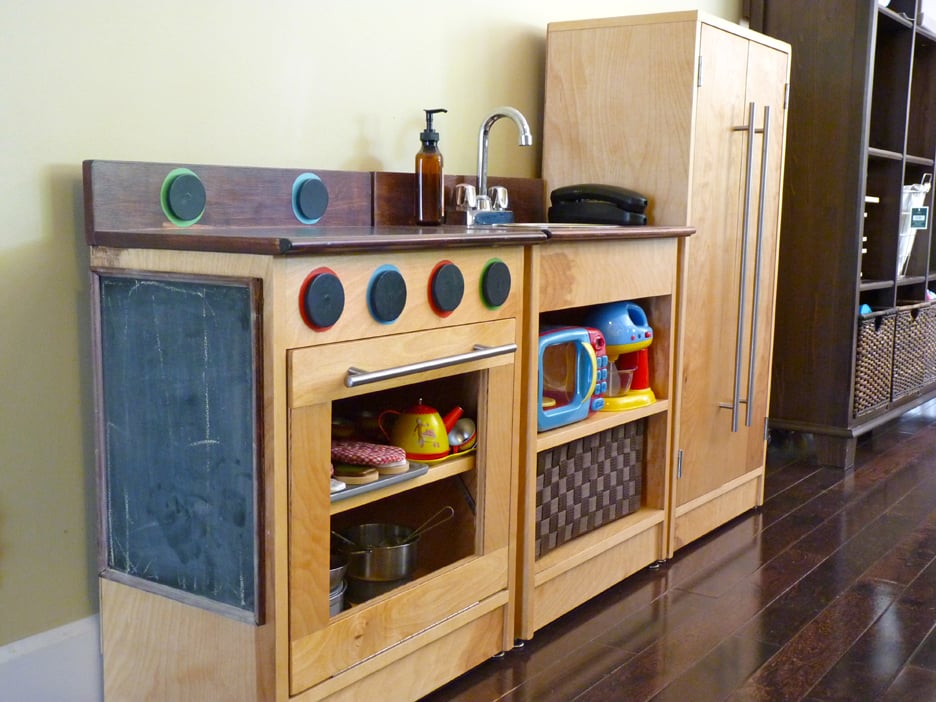
My husband and I built this kitchen for my son's 2nd birthday and it continues to be a huge hit. We scaled the dimensions up a bit so he can use it longer, and used 3/4" birch plywood with veneer on the ends. The oven knobs spin on dowels, the stove burners are just painted on and we added moulding to the edge of the countertops to give it a nice rounded edge. We used a cheap bar faucet from ebay, hardware from IKEA, and a stainless steel bowl with a rim for the sink. I highly recommend using a flap stay on the stove door to keep it from slamming open, and magnetic catches on the oven and fridge doors. We also used anti-tip furniture straps because these suckers are heavy.

Estimated Time Investment
Weekend Project (10-20 Hours)
Finish Used
clear stain on bases,
red mahogany stain on countertops,
many many coats of poly (this thing will survive the apocalypse)
Recommended Skill Level
Beginner

Comments

TIffonie

Sun, 07/08/2012 - 18:16

I've been planning on building these for my son soon. Your color choices are fantastic! How much bigger did you make them?

AmyW

Sun, 07/08/2012 - 22:00

Thanks Tiffonie!
We added three inches to the width and height. It was a bit large for him at two years old. Now that he is 3.5 it still gets played with every day, and the size works well. Good luck- your son will love it!

Little Cottage Loft Bed Animal House

Submitted by davisnc on Mon, 01/06/2014 - 11:17

I spent time over my winter break from work to build this for my nine year-old. She absolutely loves it. It is much sturdier than the basic wooden loft I had in college. Now my 6YO wants one! I bought a Kreg Jig, which was a great investment to build something like this. I used a circular saw but next time around would borrow or purchase a miter/table saw for the large number of cuts required. I spent $475 in lumber, screws, nails, paint, etc which was more than I had planned, but we are happy with the result! It took me about 40 hours to build this in my basement. Great project for daddy/daughter time while school was out; she made the majority of the measurements for me! There were very slight issues with the plans but overall it was not too difficult.

Built from Plan(s)
Estimated Cost
475
Estimated Time Investment
Week Long Project (20 Hours or More)
Finish Used
Olympic One paint with primer
Recommended Skill Level
Intermediate

Wooden patio Cooler by DIY Pete

This was my very first project I did. Very proud of how this turned out. Now my sister has one and I am building another one with Mickey Mouse on it for my other sister. I build it in a day with lots of breaks due to 4 teenagers.

Built from Plan(s)
Estimated Time Investment
Day Project (6-9 Hours)
Recommended Skill Level
Beginner

DIY Outdoor Sofa, Chairs and Coffee Table

Submitted by Anonymous (not verified) on Thu, 07/27/2023 - 13:22

I decided to build my patio furniture and built a couch, with cushions, coffee table, 2 Adirondack adult chairs and one child’s Adirondack chair. It was so much fun to plan and build all of the furniture and so enjoy going out there on cool days! Thanks to Ana White for all of the plans! This is my 20th Ana White project! On to my next project! Plans were outdoor modern sofa, modern Adirondack chair, kids Adirondack chair, 2x4 outdoor coffee table.

JoAnne

Seasonal And Holiday

Tryde Console Table

Submitted by metsfan94 on Sat, 03/17/2012 - 14:18

Untreated 4x4s are so hard to find around me so I used 2x4s for the legs. To get the legs truly square, I used my table saw to rip about a 1/4" off from each side of 2x4s (making the legs 3" by 3"). This also helped the legs appear to be one solid piece. After sanding with palm sander I applied Dark Walnut Minwax Stain. After the first coat set, I applied more stain to random places on the table to give it a somewhat "worn" look I guess. I finished with two generous coats of Minwax Semi-gloss poly. I like the way it came out. I also built the tryde coffee table, and after doing so I realized that the 2x6 breadboards had a slight angle to them. To fix this on the console table I attached the breadboards more inward toward the center of the table. The level look is just more appealing to me, but it's no biggie. Now I'm working on finish two tryde end tables, and soon I'll be starting a tv stand. Love the plans and the site in general! Thanks!

Built from Plan(s)
Estimated Cost
About $25-30
Estimated Time Investment
Afternoon Project (3-6 Hours)
Finish Used
Stain: Minwax Dark Walnut
Clear Coat: Minwax Semi-gloss Poly
Recommended Skill Level
Beginner

Playhouse Loft bed... Full size

Submitted by J.Gutz on Wed, 01/08/2014 - 08:37

Using the original plans, I modified them to fit a full size mattress.

Estimated Cost
$175 + mattress
Estimated Time Investment
Weekend Project (10-20 Hours)
Finish Used
Quite Lilac and White Paint
Recommended Skill Level
Intermediate

Comments

PRB1963

Mon, 08/10/2015 - 09:04

Could I get the plans for a twin bed please. My granddaughter will love this. Recntly got custody and want her room looking great!! Thanks, Paula

Farmhouse Bed

My wife is an avid quilter and I've just begun woodworking, so when we needed a bed for our spare bedroom, we combined my love of woodworking with her love of quilts to come up with this bed, modified from your plans.  We couldn't be happier with the way that it turned out!

Built from Plan(s)
Estimated Cost
$150
Estimated Time Investment
Week Long Project (20 Hours or More)
Finish Used
Provincial Stain covered by polyurethane (3 coats).
Recommended Skill Level
Intermediate

Modified Rustic X

Submitted by Anonymous (not verified) on Sat, 11/23/2019 - 19:26

Pondering how to finish it. I did modify the ends using 2 uprights rather than the X. It was a fun weekend project. Thank you for you inspiration!

Built from Plan(s)
Estimated Cost
$50
Estimated Time Investment
Day Project (6-9 Hours)
Finish Used
Will probably paint it white.

DIY Brew Station

Submitted by Anonymous (not verified) on Sun, 07/30/2023 - 14:38

I used your workbench plan to build my Brew Bench. I changed the measurements to fit my space and used a butcher block for the countertop. Very sturdy and pretty easy project. Took one day to build.

Scott R

Comments

Perfect Teenage Desk!

Submitted by tracysmith on Mon, 03/19/2012 - 17:55

I built this desk for my 15 year old daughter. We needed to size it so that a neat yard sale find seat could fit under it. I also added supports for the legs at the bottom. It just didn't feel sturdy enough for me. Large, single drawer was painted on the inside to match the color of her walls, pulling the whole look together! Lots of fun to build!

Built from Plan(s)
Estimated Cost
FREE
Estimated Time Investment
Afternoon Project (3-6 Hours)
Finish Used
I used Glidden Cappuccino White for the main body of the desk and in the drawer, I used Glidden Spanish Olive. Both are in a satin finish.
Recommended Skill Level
Starter Project

Comments

kristen

Tue, 03/20/2012 - 16:48

Love your daughter's desk! And I also love that it was FREE. The Hubs always wants me to throw out the scraps and I just can't, especially after seeing projects like yours :)

In reply to by kristen

tracysmith

Tue, 03/20/2012 - 22:05

Thank you Kristen!!! I love dipping into the ole scrap bins... of course, I have three of them..LOL I also use the stuff that I can't make into a project out in the Ghetto Fire Pit so we enjoy it any way we can!!! Someday I'll have to take a pic and post it on Ana's site somewhere.. I doubt anyone will want one but it works for us!

shelbyannec21

Mon, 12/21/2015 - 15:08

I love how you changed the design alittle on this, I am trying to build something very similar to what you did for my vanity/dressing table! I noticed on yours the front aprons are not noticable how did you do that? I want your exact design, and my dimensions are 29" w X 16" d. Thank you in advance!

Rustic X Table

I hated my old flimsy coffee table and I decided that I needed another one. After searching online for tables that I could build, my wife and I came across this one. Its large, sturdy and has the underneath shelf for additional storage. Plus the styling was cool too.

Built from Plan(s)
Estimated Cost
About 80 dollars.
Estimated Time Investment
Weekend Project (10-20 Hours)
Finish Used
To finish this table the first thing I did was coat the table with Minwax Pre-Stain Wood Conditioner. I did a double coat of that before I used Varathane Stain+Poly in Cabernet. I chose the semi-gloss. It took several coats before I got the color that I was happy with.
Recommended Skill Level
Intermediate

Media Console

Submitted by Anonymous (not verified) on Thu, 03/31/2016 - 18:57

I built this console from the Grandy Sliding Door Console. I modified the plan slightly and lowered it to about 30 inches high, and have since hung the TV on the wall. I made the sliding door hardware at a local metal fabrication shop, and used patio door wheels for the hardware. It is stained with Rustoleum Dark Walnut stain wiped on with a cloth to ensure a non-uniform stain for a distressed look. I used the Kreg jig for most of the connections, and added support of the mid shelf in the back of the piece.

Built from Plan(s)
Estimated Cost
$500
Estimated Time Investment
Weekend Project (10-20 Hours)
Finish Used
Rustolium Dark Walnut with satin wipe on poly.
Recommended Skill Level
Intermediate

Farmhouse Bed - Canadian King

Submitted by rbernier09 on Thu, 11/28/2019 - 06:39

Followed Ana’s plans to the inch and I had no issues at all everything fit like a glove. I used knotty pine for all facing boards except for the 2x4 sandwiched second from the top on both head and footboard (used spruce). I used spruce for anything that would be hidden. Glue and #10 fasteners. Instead of screwing the side rail cleats to the foot/headboard post I used 3.5 inch bolts and washers.

A Canadian King is when your dog owns your bed and allows you to sleep in it.

Estimated Cost
$500
Estimated Time Investment
Weekend Project (10-20 Hours)
Finish Used
Circa 1850 Bleach.
Minwax white wash pickling stain.
Old Masters Wiping Stain - Dark Walnut.
Varathane Diamond water based clear coat - Satin.
Recommended Skill Level
Intermediate

Planked Wood Sideboard

Submitted by Anonymous (not verified) on Fri, 08/04/2023 - 11:23

I used a modified version of the Planked Wood Sideboard to fit the space I had. With the exception of the frame, it’s made of walnut. I love the way it turned out. Thanks Ana!!

Adam Benns

Built from Plan(s)

Flat back book racks

Submitted by Spolitte on Wed, 03/21/2012 - 20:39

These came together nicely but I definitely advocate the right tool for cutting the curves on the sides. Also, the next time we make them, and we most likely will, I will make the roomy version. The wider size will give us a little more room for a few extra books. All in all the girls are very please with them. I like that they are just above their bed to make night time reading easy and fun. Couldn't have done it without you Ana. Thanks.

Estimated Cost
10ish dollars minus paint
Estimated Time Investment
Day Project (6-9 Hours)
Finish Used
We painted all the surfaces a No Voc semi gloss for easy cleaning. When it came time to add the girls names I found that a bright semi gloss with layers of corresponding glitter paint added the vivid contrast and bling that all little girls love.
Recommended Skill Level
Starter Project

Simplest Armoire

Submitted by carongirls on Sat, 01/11/2014 - 16:20

We needed something to put clothes in. A dresser wouldn't of been big enough, so I decided on the armoire. I shortened the height so I'd only had to buy 2 1x12's. Everything else is the same. The 1x12's were so warped I had a heck of time with the doors.
I'm not digging the distressing. I tried the Vaseline thing. Never again it was a mess. I'll just stick to sanding it down from now on.

Built from Plan(s)
Estimated Cost
$100
Estimated Time Investment
Day Project (6-9 Hours)
Recommended Skill Level
Beginner

Son's new bed.

Submitted by Anonymous (not verified) on Sun, 04/03/2016 - 07:26

This bed came out beautiful! Thank you for the plans. 

Estimated Cost
$300.00
Estimated Time Investment
Week Long Project (20 Hours or More)
Finish Used
Provincial, Dark Walnut, Golden Oak
Recommended Skill Level
Intermediate

Rustic X End Table

Submitted by Anonymous (not verified) on Sat, 12/07/2019 - 12:47

This is a simple super fun build, you can easily make several in one day and there are so many options on finish. I

Built from Plan(s)
Estimated Time Investment
Afternoon Project (3-6 Hours)
Finish Used
White Chalk Paint and Minwax Dark Walnut stain
Recommended Skill Level
Beginner

Narrow Console table

Submitted by lazyLiz on Sun, 03/25/2012 - 11:27

I wanted a hallway side table, using Ana White's Simple, Cheap and Easy console table directions (as usual with most of my built) and revising the measurement and adding some thing in here and there I was able to build me this! Thanks to my new jigsaw my husband bought me :) Measures 55" long, 34" height and 14-1/2" depth.

Estimated Cost
$ 45.00
Estimated Time Investment
Afternoon Project (3-6 Hours)
Finish Used
dark mahogany and poly
Recommended Skill Level
Beginner

Comments

vacookie

Thu, 04/12/2012 - 13:17

I am looking at making this soon and really like what you did with the sides. Any tips should I decide to go a similar route on mine? I haven't done that type of work before with my jigsaw and am not sure can pull it off but it looks so good!

daisy (not verified)

Tue, 07/24/2012 - 11:11

could you pretty please share how you did the sides and everything on this table...I love this exact table (the one you built) and it would be PERFECT in our family room under the t.v. Pretty, pretty please :)

Back