
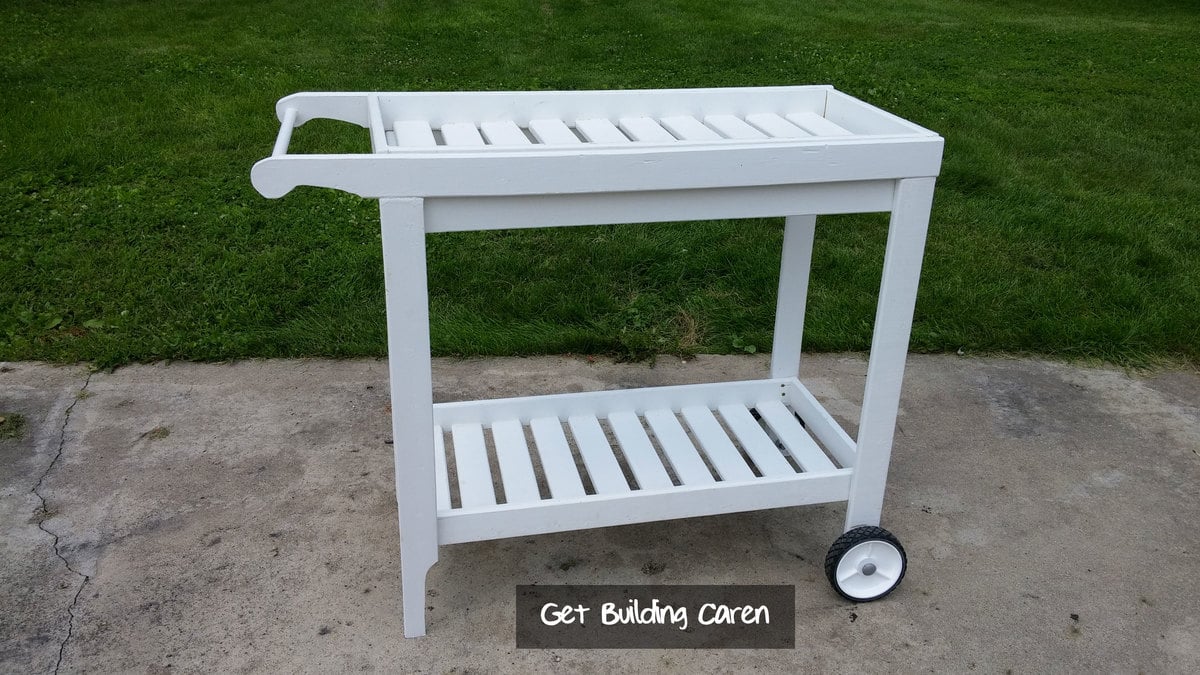

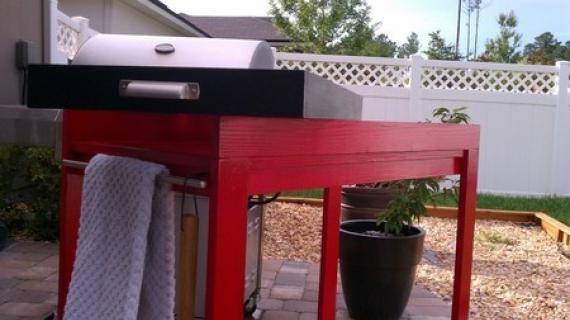
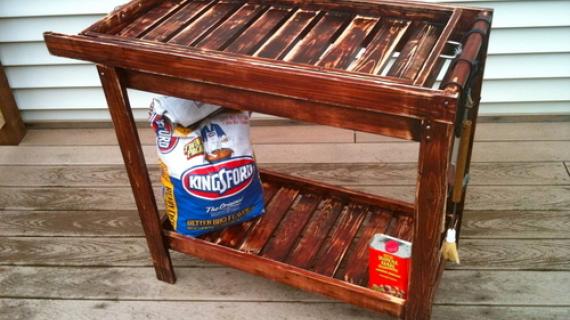
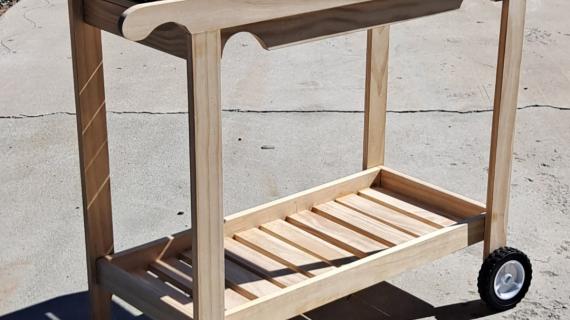
Free plans to build your own wood rolling bar cart - Featuring a top tray that is fully removable, and bottom shelf with slatted design for easy water drainage, curved handles for easy moving, and two large wooden front wheels, moving your party outdoors - or indoors come unplanned weather changes, is as easy as it is stylish.
The plans are very detailed with step by step diagrams, shopping and cut list, and reader submitted photos from Ana-White.com
Preparation
- 9 - 1x3 @ 8 feet long
- 4 - 1/2" diameter bolts,
- 2 1/2" long with bolts
- 6 - 1/2" washers to fit bolts
- 2 - handles
- 2 - 6" diameter wood rounds
- 2 - 1x3 @ 41 1/2" (Side Aprons)
- 4 - 1x3 @ 32" (Legs)
- 2 - 1x3 @ 16" (End Aprons)
- 2 - 1x3 @ 32" (Optional Side Supports)
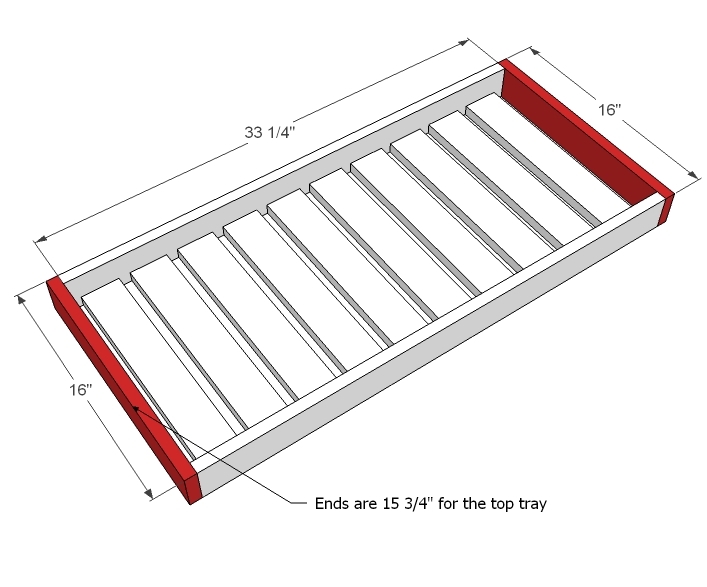
Trays
- 4 - 1x3 @ 33 1/4" (Sides)
- 10 - 1x3 @ 14 1/2" (Bottom Slats)
- 10 - 1x3 @ 14 1/4" (Top Slats)
- 2 - 1x3 @ 16" (Bottom Ends)
- 2 - 1x3 @ 15 3/4" (Top Ends)


Please read through the entire plan and all comments before beginning this project. It is also advisable to review the Getting Started Section. Take all necessary precautions to build safely and smartly. Work on a clean level surface, free of imperfections or debris. Always use straight boards. Check for square after each step. Always predrill holes before attaching with screws. Use glue with finish nails for a stronger hold. Wipe excess glue off bare wood for stained projects, as dried glue will not take stain. Be safe, have fun, and ask for help if you need it. Good luck!
Instructions
Step 1
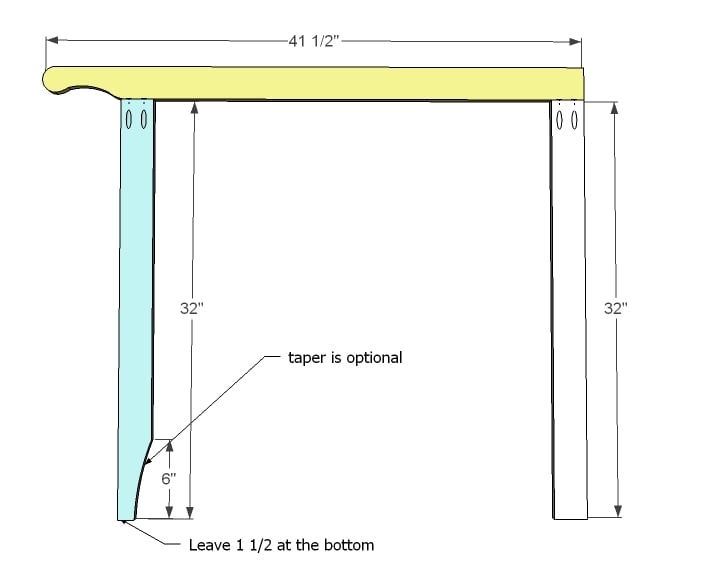
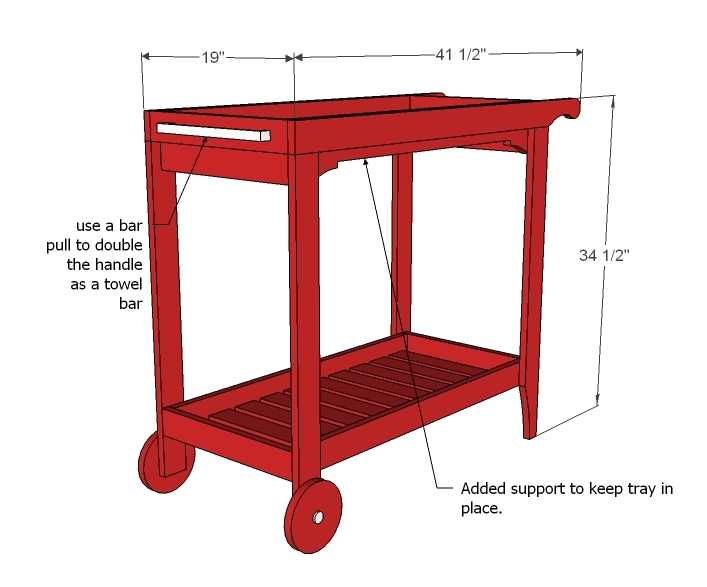
Build the sides. Start by drawing a handle pattern on the side aprons. The handle at most can be 6" long, as the handle overhangs the back leg 6". Clamp both side aprons together and sand until the two match perfectly.
You can also taper the back leg with a jigsaw as shown above (I didn't, but would be cute).
Then attach the legs to the side apron, using 1 1/4" pocket hole screws and drilling holes with the Kreg Jig, set for 3/4" stock. Again, the handle overhangs the back leg by 6". Use glue and adjust for the square.
Step 2

Once your two sides are complete, attach the end aprons as shown in the diagram. Use glue, adjust for square.
Step 3
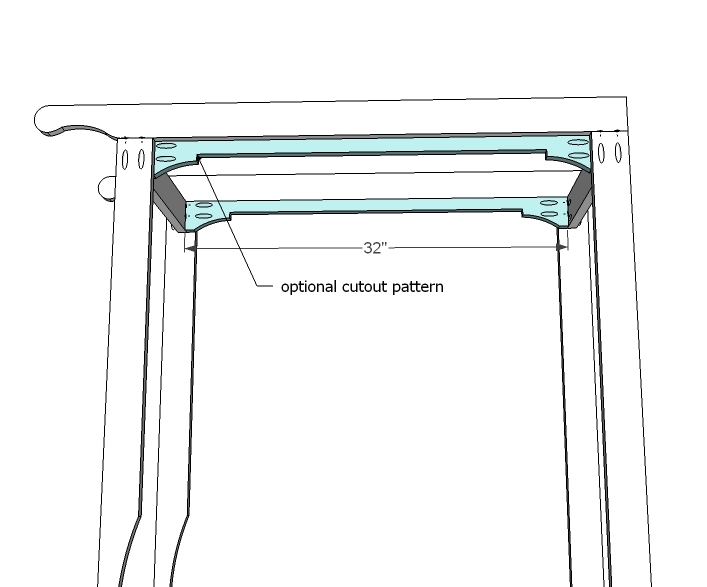
After I built my bar cart, I thought that a little extra support and also, a rail for possibly using smaller trays (or even a drop in ice bucket) would be good. So this step really is optional, but recommended. Add the side aprons supports as shown above.
Step 4

Now the trays. You can build the trays with pocket holes, but it's really overkill. I used 2" finish nails and wood glue, two nails per slat, with slats spaced 3/4" apart.
The top tray needs to be 1/4" narrower than the bottom so you can easily remove it without scratching the finish. This is noted above and shown in the cut list.
Step 5
Step 6
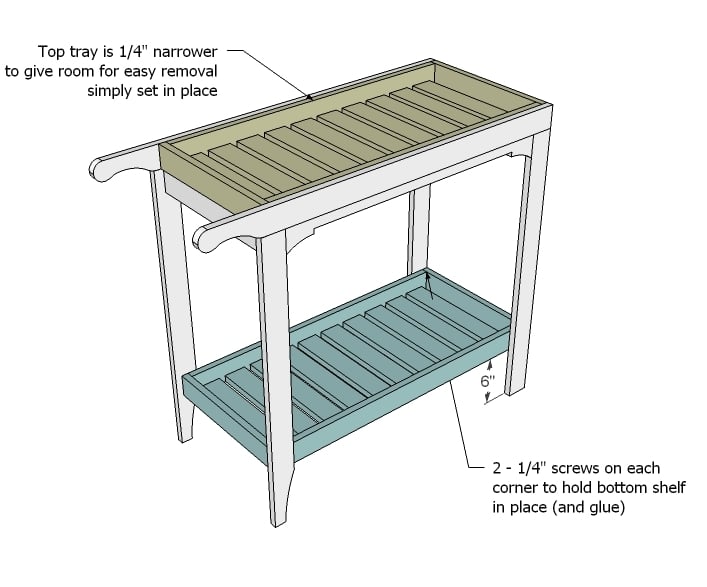
Now add the trays to the frame. The top is as easy as just resting in place. For the bottom, measure up 6" and screw in place. I used 1 1/4" screws and glue from the insides, two per leg, and it's plenty strong to hold my preschooler.
Step 7
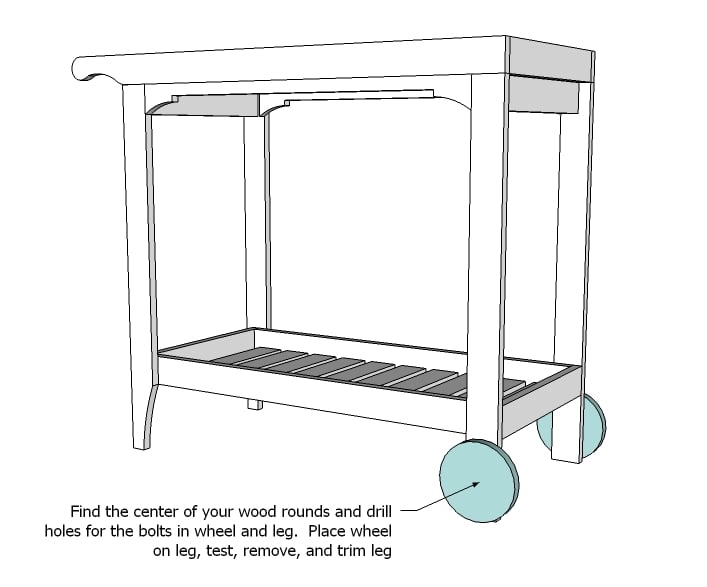
Drill holes in the center of your wood rounds with a 1/2" drill bit. Mark the hole placement on the leg, and drill holes in the legs. Test the wheels with bolts, and when satisified, remove the wheels and trim legs (see next step).
When you put your wheels on permanently, you will want to use three washers - one on the bolts side, one on the nut side, and one between the wheel and the leg to protect your finish. Bolt side out, nuts on the inside.
Step 8

And a diagram for how the finished leg should look.
It is always recommended to apply a test coat on a hidden area or scrap piece to ensure color evenness and adhesion. Use primer or wood conditioner as needed.


Comments
karahart
Wed, 05/11/2011 - 10:28
Love it!
Such a smart plan Ana!! I can't wait for the baby to get here so that I can get back out and start building again! Thanks for another awesome plan (and thanks for the feature too!)
In reply to Love it! by karahart
Ana White
Wed, 05/11/2011 - 13:07
Congrats!
Congrats, I'm so happy for you, and thank you! Can't wait to meet the little builder :)
In reply to Congrats! by Ana White
karahart
Thu, 05/12/2011 - 14:28
Thanks!!
Haha, she so is going to be a little builder too!! We've already got plans for lego's and fisher price hammers! Thanks for the Congrats, so sweet!!
babysteps
Wed, 05/11/2011 - 10:42
Gorgeous!
I love it, even if it makes my 'want-to-do list' even longer!
ddietz12
Wed, 05/11/2011 - 10:53
I love it. Was going to build
I love it. Was going to build the outdoor bar table for my brother so he has something to but his food on while he is bbqing but this is so much better for that situation. Especially since the tray is removal. Perfect. Good job as usual Ana and thanks for sharing
claydowling
Wed, 05/11/2011 - 10:56
Wooden wheels a classic
If you don't want to argue with making wheels, Harbor Freight and Menards both have good selections of wheels that would be appropriate for this cart.
The wooden wheels are slick though, if you can pull them off.
ACraftyCauldron
Wed, 05/11/2011 - 11:50
I was hoping...
I was hoping when I saw this on FB yesterday that plans would be coming. I LOVE IT!!! I loved the whole idea of it anyway, but the removable tray really put me over the top. FABULOUS!!!
dananryan
Wed, 05/11/2011 - 12:24
Thank you!
I can't wait for better weather to start on this project. It's perfect!
Rachael Jean (not verified)
Wed, 05/11/2011 - 12:38
Anyone have any hints for
Anyone have any hints for building this if you don't have a Kreg jig?? I'm fine with visible screws...
In reply to Anyone have any hints for by Rachael Jean (not verified)
Ana White
Wed, 05/11/2011 - 13:03
Can be done!
For sure, it can bed done! There are really two ways. The old fashioned way (that still works probably better than anything) is to use wood dowels. Really the only joints that require a pocket hole joint are the side aprons to leg joints.
The other option is to raise the supports to cover the leg to side apron joints. See diagram below.
In reply to Anyone have any hints for by Rachael Jean (not verified)
claydowling
Wed, 05/11/2011 - 13:08
More advanced joinery
Most of this cart could be built using half-lap joinery with a good exterior grade glue (Titebond III comes to mind). Mortise and tenon joinery should take care of the rest.
Those are moderately advanced topics though, and you'd either need expensive power equipment and a fair bit of training, or a couple of chisels, a decent hand saw, and some practice.
You could also look at knock-down hardware. Although to be fair, for what you're going to pay, you could buy a kreg jig.
Ana's suggestion is probably more sensible though. My only reservation was that dowels crossing the end grain don't give as much strength as you might like, but worth it to find out.
Rachael Jean (not verified)
Wed, 05/11/2011 - 13:17
Thanks! Dowels and "advanced
Thanks! Dowels and "advanced joinery" are both WAY beyond my current skill level... :) I was thinking the part about the top of the tray would be the only part that would be a bit of a sticky wicket to do w/o the kreg, so thanks for the diagram Ana! :) This will go on my To Build list... :)
claydowling
Wed, 05/11/2011 - 13:32
Dowels
Dowels aren't really that complicated. You would need to pick up a doweling jig and brad point bits though. Decent doweling jigs are inexpensive and very versatile. You could practice with a bit of scrap and in the space of an afternoon you'd be building good solid joints with your new doweling jig.
There's no shame in the doweling jig, either. Lots of pros use it for building furniture because it just works. I have a set of drawers held together with dowels, and there's no risk they're going to come apart anytime soon.
This video shows how easy they are to use: http://www.youtube.com/watch?v=ht0Q5MmwWsM
martinezds
Fri, 07/24/2015 - 10:09
Like the removable tray.
Like the removable tray.
ERob11
Mon, 08/03/2015 - 11:34
Wood
What kind of wood do you use?
In reply to Wood by ERob11
Ana White
Wed, 08/05/2015 - 10:30
pine or douglas fir would be
pine or douglas fir would be fine