


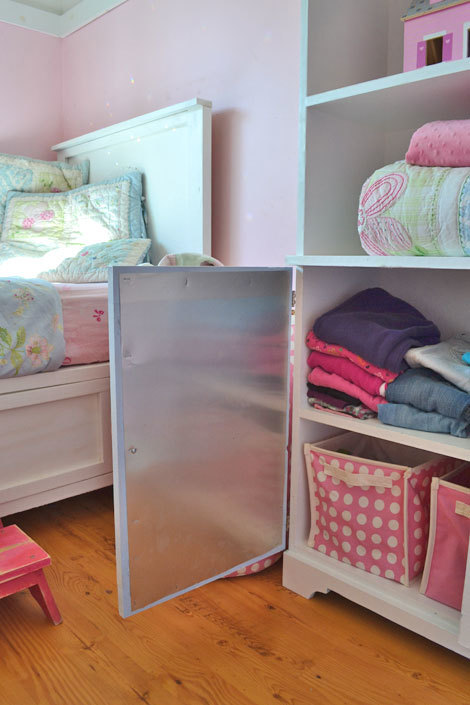
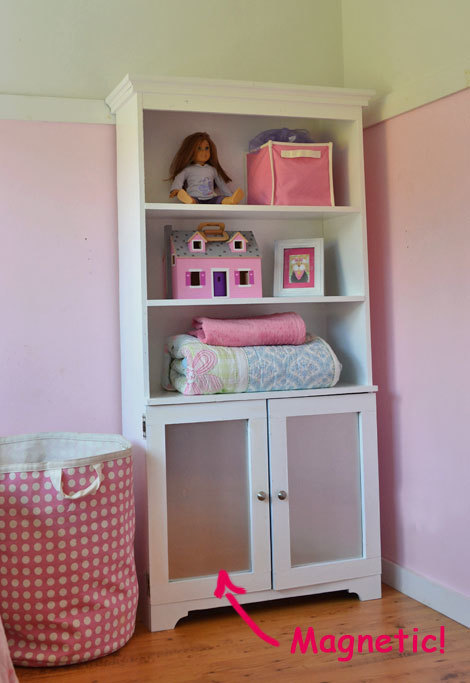
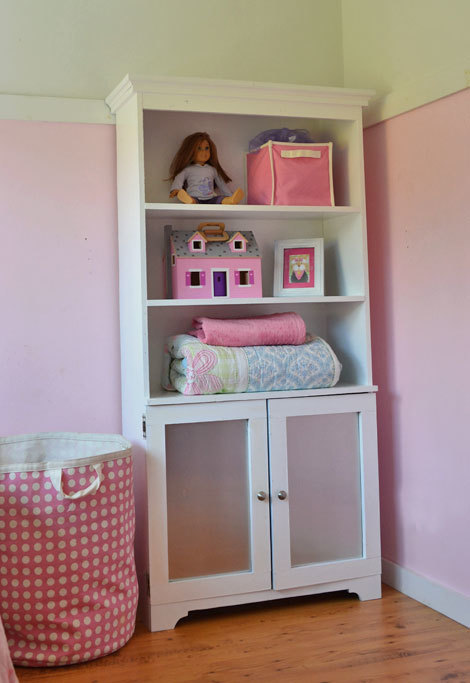
Build this armoire with open storage and concealed storage behind magnetic metal doors. Industrial chic with just a touch of metal, this cute kids room DIY project contains free step by step furniture plans to build!
Necessity truly is the mother of invention.


Preparation
5 - 1x12 @ 6 feet long
1 - 1x4 @ 6 feet long
2 - 1x2 @ 8 feet long
2 - 1x3 @ 8 feet long
20" wide tin flashing roll, 4 feet long
2 sets of hinges
2 knobs
Optional 3/4" x 3/4" cove moulding
1 sheet 1/4" plywood
2 - 1x12 @ 71 1/4"
1 - 1x12 @ 36"
5 - 1x12 @ 34 1/2"
1 - 1x4 @ 36"
1 - 1x4 @ 34 1/2"
1 - 1x2 @ 36"
1 - 1x2 @ 37 1/2"
1 - 1x2 @ 39"
4 - 1x2 @ 11 1/4" (Width of 1x12)
4 - 1x3 @ 20 1/2"
4 - 1x3 @ 17 7/8"
1 - 1/4" plywood @ 72" x 36"
If you can't find 1x12s that are straight or would like to build a wider width armoire (deeper storage) then replace the 1x12s with plywood cut into strips to your desired widths. Recommended widths to use up your plywood are 11 3/4" and 15 3/4" or 23 3/4". Choose PureBond Formaldehyde Free Plywood for a formaldehyde free alternative.


Please read through the entire plan and all comments before beginning this project. It is also advisable to review the Getting Started Section. Take all necessary precautions to build safely and smartly. Work on a clean level surface, free of imperfections or debris. Always use straight boards. Check for square after each step. Always predrill holes before attaching with screws. Use glue with finish nails for a stronger hold. Wipe excess glue off bare wood for stained projects, as dried glue will not take stain. Be safe, have fun, and ask for help if you need it. Good luck!
Instructions
Step 1
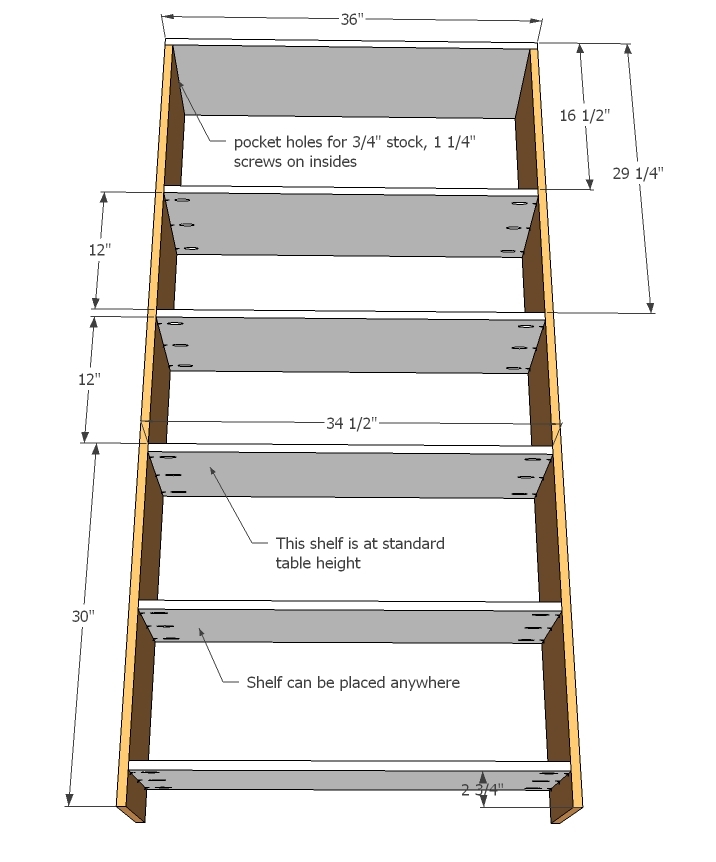
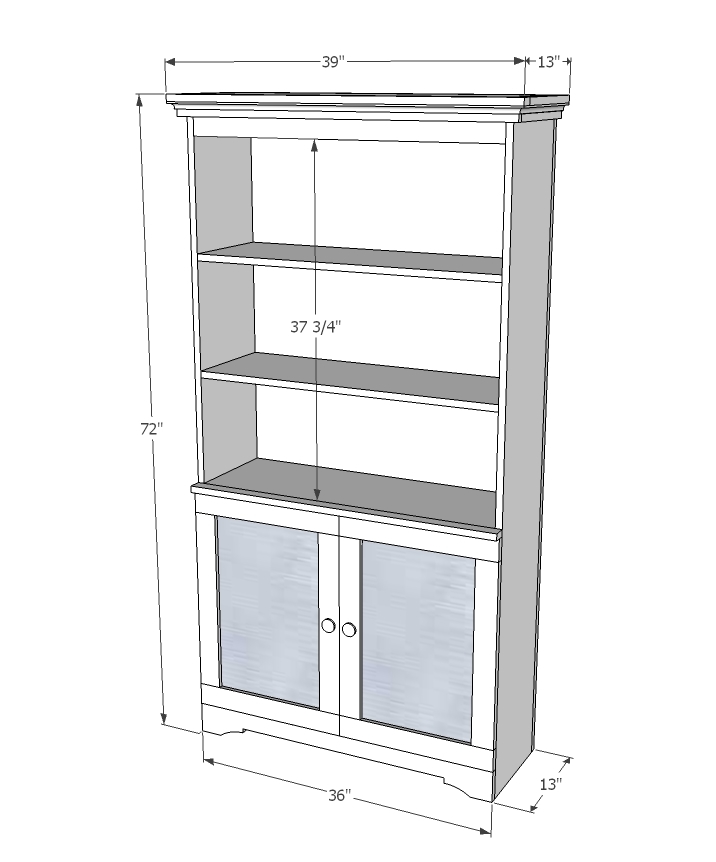
Build the cabinet box as shown above, using either 3/4" Kreg Jig holes and pocket hole screws or 2" screws and glue, countersinking screws. Adjust the box for square by taking a diagonal measurement from opposite corners, ensuring measurements match. Bottom, middle and top shelves must be fixed, remaining shelves can be adjustable or fixed at different heights. You can also use 1x10s for the non-fixed shelves for a different look or inset doors.
Step 2
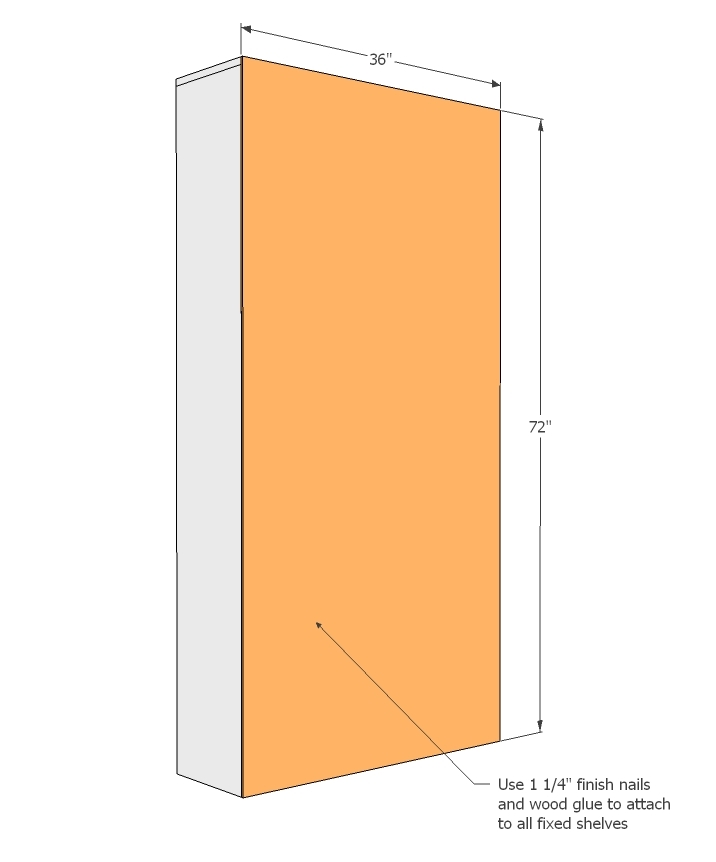
Attach the back as shown above, using finish nails and wood glue.
Step 3

Now the header, nail in place from all sides as shown above.
Step 4
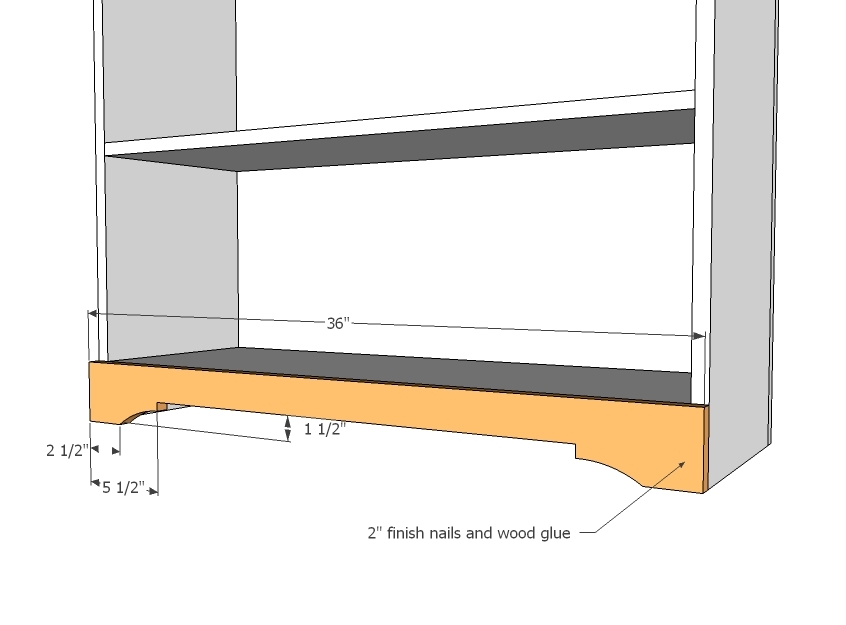
The footer is attached on top with 2" finish nails and wood glue. If you wish, you can use a jigsaw to cut out a decorative pattern.
Step 5
Step 6
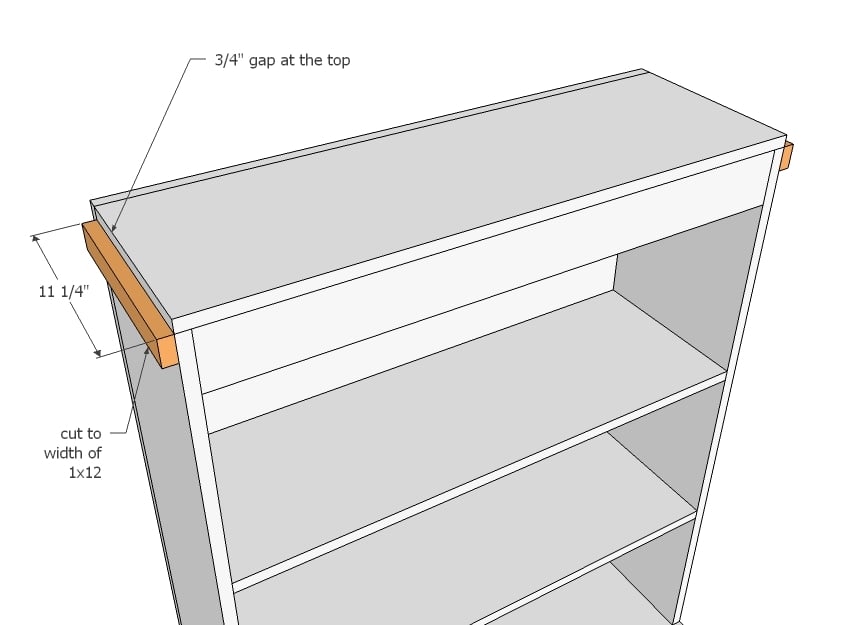
Use 1 1/4" finish nails and glue. I like to hold the top 1x2 in place to guide me as I attach these.
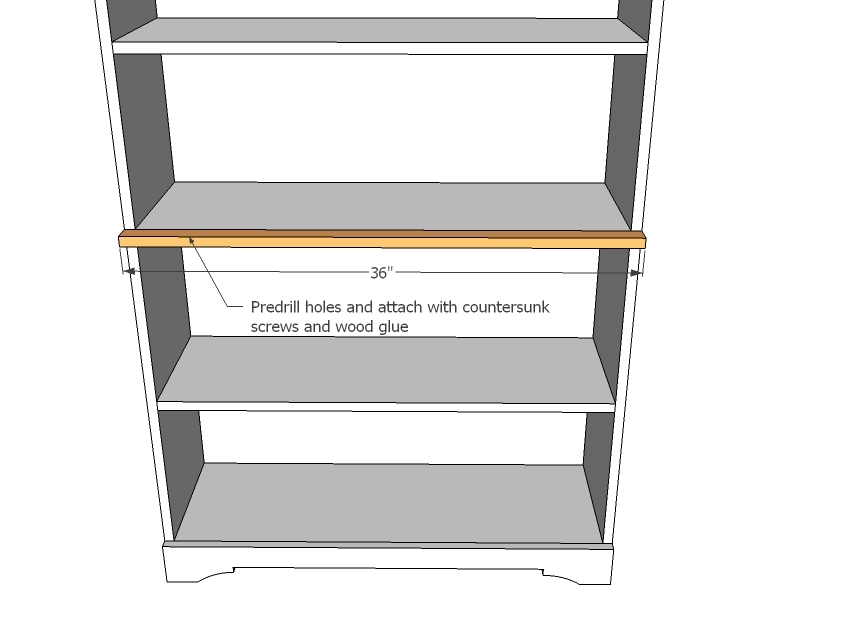
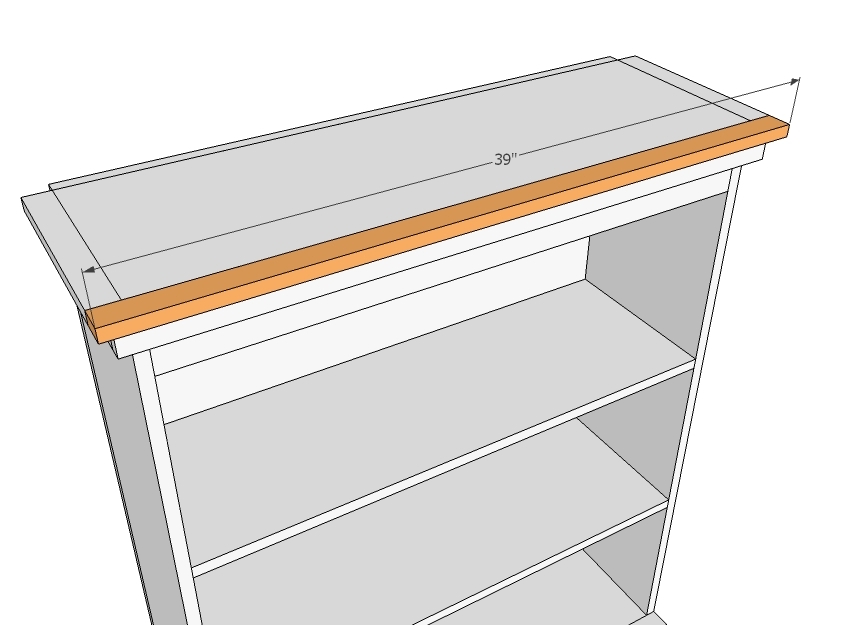
Step 7

Now the front - use 1 1/4" finish nails again.
Step 8

Now for the top, use 2" finish nails and wood glue.
Step 9
Here too.
Step 10

I wanted to soften my crown, so used 3/4" x 3/4" cove mouding, mitered around the top as shown above.
Step 11
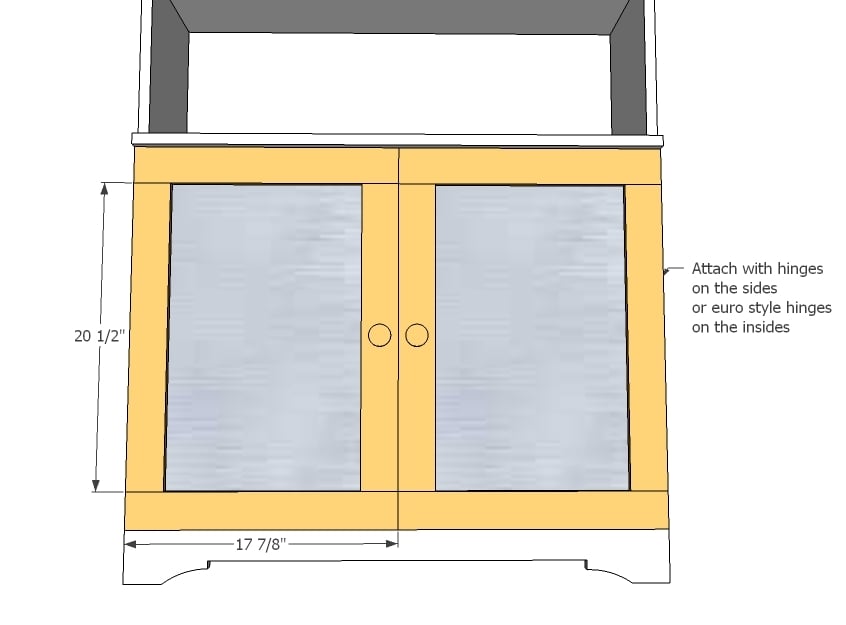
I built door frames as shown above using the Kreg Jig, with pocket holes set for 3/4" stock, 1 1/4" screws. Then I finished the empty frame and painted. Finally, I stapled the tin flashing to the back with 3/4" staples. I also filed sharp points from the tin flashing and covered the edges with clear tape.
It is always recommended to apply a test coat on a hidden area or scrap piece to ensure color evenness and adhesion. Use primer or wood conditioner as needed.
Comments
hoffer5353
Tue, 08/23/2011 - 04:10
amazing
You do such amazing work, when do you find all that time? It seems as though you have a new project to share almost every day.
Do you have a place on your web page where we can have a photo tour of your house? I bet it is fabulous
How much of the furniture in your house is made by you or purchased?
Thanks for all the great ideas and plans!
In reply to amazing by hoffer5353
Ana White
Tue, 08/23/2011 - 09:01
Hi there, we do plan to
Hi there, we do plan to photograph the entire house at some point - being that the house itself is DIY :) but haven't had the time just yet. Thank you for reading!
MegShannon (not verified)
Tue, 08/23/2011 - 05:25
TOUR!
What a great idea. I vote photo or even better VIDEO TOUR!
Come on Ana, you are only building a duplex, creating furniture from scratch, taking care of a family, raising a kid and running your own online business/website-- I think you have plenty of time to do a tour!:)
In reply to TOUR! by MegShannon (not verified)
Ana White
Tue, 08/23/2011 - 09:05
LOL! This week my sister came
LOL! This week my sister came and stayed with us, and really helped TONS so I could get more done. Maybe she'll just move in, so then we can get the video tour done! Thanks Meg!
Guest (not verified)
Tue, 08/23/2011 - 05:39
I WANT :D
I think this might be my next project before building wall to wall shelving system in my kids playroom. My son needs something in his room for clothes and toys in a little cubby hole that nothing fits into. And this would be PERFECT! Need to make my dimensions a bit different but still.
ACraftyCauldron
Tue, 08/23/2011 - 05:53
How in the World???
Ana, how in the world do you always know the exact pieces I am needing in my house!?!? This is PERFECT for a little troublesome spot where I was needing some more storage. THANK YOU SO MUCH!!!
In reply to How in the World??? by ACraftyCauldron
Ana White
Tue, 08/23/2011 - 09:02
Thank YOU for reading and
Thank YOU for reading and liking this piece - man it holds a ton of stuff! We've got all of Grace's clothes in it - she's been wanting a "play area" in her closet. We'll see :)
Crystal Fisher
Tue, 08/23/2011 - 09:26
Excited!
This is exactly what I was trying to design in google sketchup...and a garbage/compost holder for our driveway...I never thought of tin! That is an excellent idea! and if you put a piece of glass in or clear coat it you can make it a white board, or maybe chalkboard paint!!!!!! Ohhhh the ideas. Thank you so much Ana, you make my day every time I come on here. It's like a breath of sunshiny hope :)
darlasowders
Tue, 08/23/2011 - 09:31
Flashing
This looks perfect for a spot or two (or three or four) in my home too!
Might be a good idea to cover the (sharp) edge of that flashing with something though. Even just covering it with duct tape before tacking it on should do it, but if you cut it closer to the measurement of the inside of the opening, it could be covered with some narrow trim.
In reply to Flashing by darlasowders
Ana White
Tue, 08/23/2011 - 11:17
Totally agree on the edges -
Totally agree on the edges - we simply covered all the edges with clear packing tape, on both sides before stapling on. Another thought - you may be able to get away with 14" wide roll of flashing instead of 20" - then you are only making one cut, and can place the cut at the bottom.
claydowling
Tue, 08/23/2011 - 13:09
Filing the edges
You can get rid of the sharp edge by passing a mill or bastard file over it at an angle to relieve the sharp corner. Even under tape, that's a good idea.
kindlekat
Wed, 08/24/2011 - 14:36
Just what I wanted
Looking forward to one day building this, I see great plans for it in my dining room as a wine bar/alcohol storage. I'll just add some of those wine-glass holder thingys to under one of those shelves, and perfection! Thanks Ana! This great piece could go in anyone's house for so many things!
Craftycraftswoman
Mon, 08/29/2011 - 07:02
Beautiful!
This is exactly the inspiration that I was looking for to flank a window seat I want to build in our dining room (for us piano room)! Any ideas on how to add a faux glass panel instead of metal and still have the doors close somehow?
In reply to Beautiful! by Craftycraftswoman
Linda B
Wed, 08/31/2011 - 12:17
0
0
Linda B
Wed, 08/31/2011 - 12:10
Glass door modification
Modifying for glass inserts is an easy fix. Just build another door frame using a 2 1/4" width stile and rail. The length of stiles should be 19 3/4", and the rails 17 1/8". (I hope my math is correct!) Center the frame on the inside of the outer door frame 1/2" from the outside edge, and glue and screw together. This leaves you with a 1/4" "rabbit" on the inside of the frame for you to drop in your glass insert, and 1/2" for the door to close. Use glass "clips" to attach the glass to the door frame. An example of such is found at
http://woodworker.com/fullpres.asp?PARTNUM=158-567&LARGEVIEW=ON
I hope this works out for you. Happy building! :-)
Craftycraftswoman
Fri, 09/23/2011 - 06:56
THanks
Thanks Linda B for the help!
Guest keri (not verified)
Thu, 10/13/2011 - 17:57
American girl armoire
Is there a way to make any of these armoires smaller for my princess' doll clothes ?