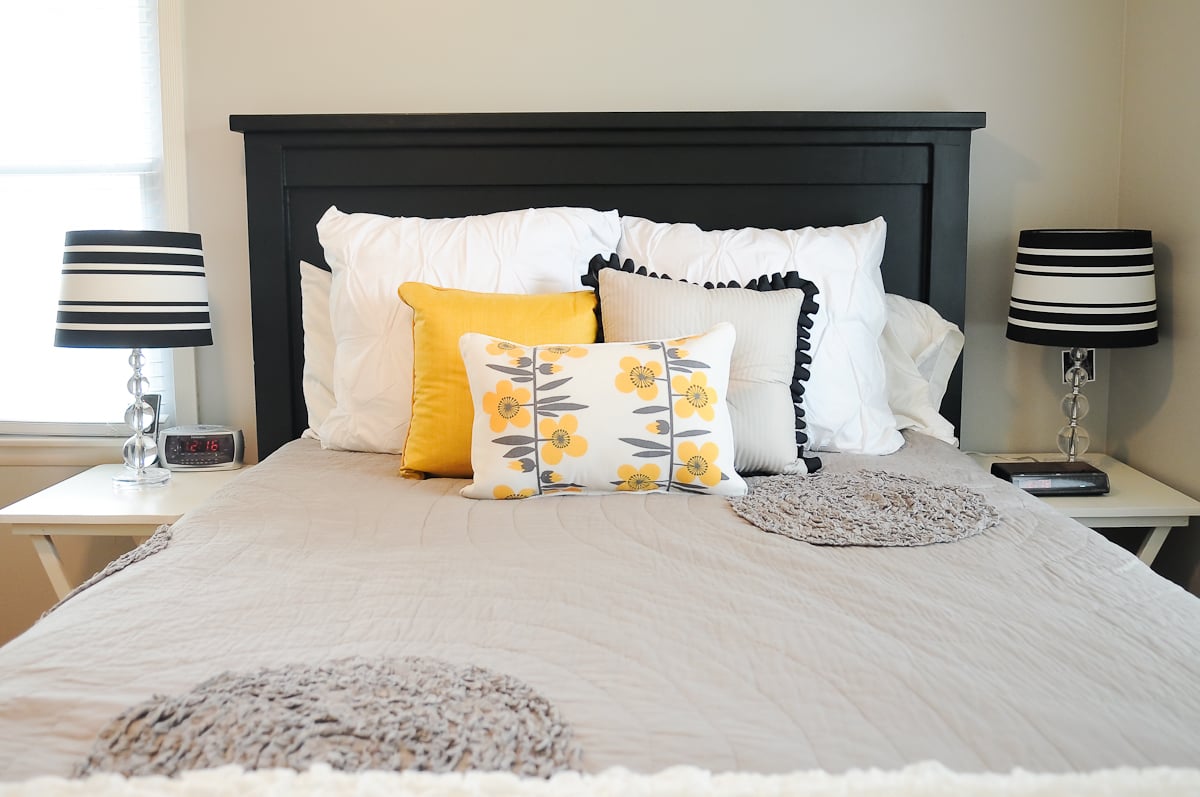
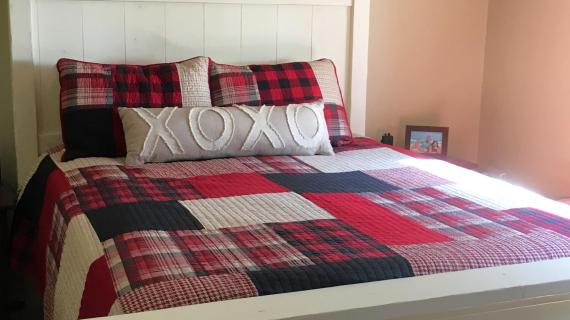
This beautiful farmhouse bed can be made for just a fraction of the cost to buy - all from standard, off the shelf lumber! You won't need a pocket hole jig or any special tools to build.
This bed has been built thousands of times and is a reader favorite. You can also find the twin version, king version, and all our farmhouse bed plans here.
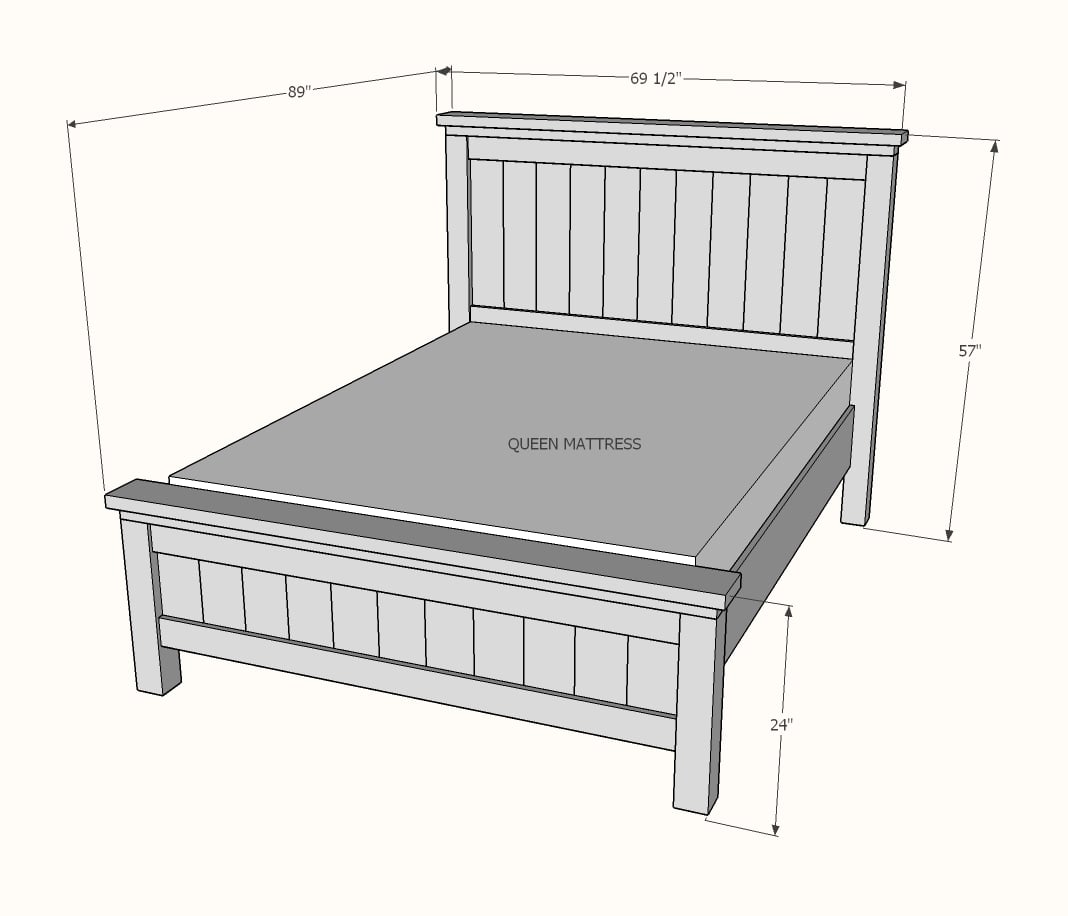
Preparation
- 12 - 2x4 8 feet long
- 2 - 2x6 8 feet long
- 2 - 1x10 8 feet long
- 2 - 4x4 8 feet long
- 1 - 2x2 8 feet long
- 6 - 1x6 8 feet long
- 4 - 1x4 8 feet long
- 100 - 1-1/4" long brad nails
- 75 - 2-1/2" long self tapping wood screws (#8 star bit recommended)
HEADBOARD CUT LIST
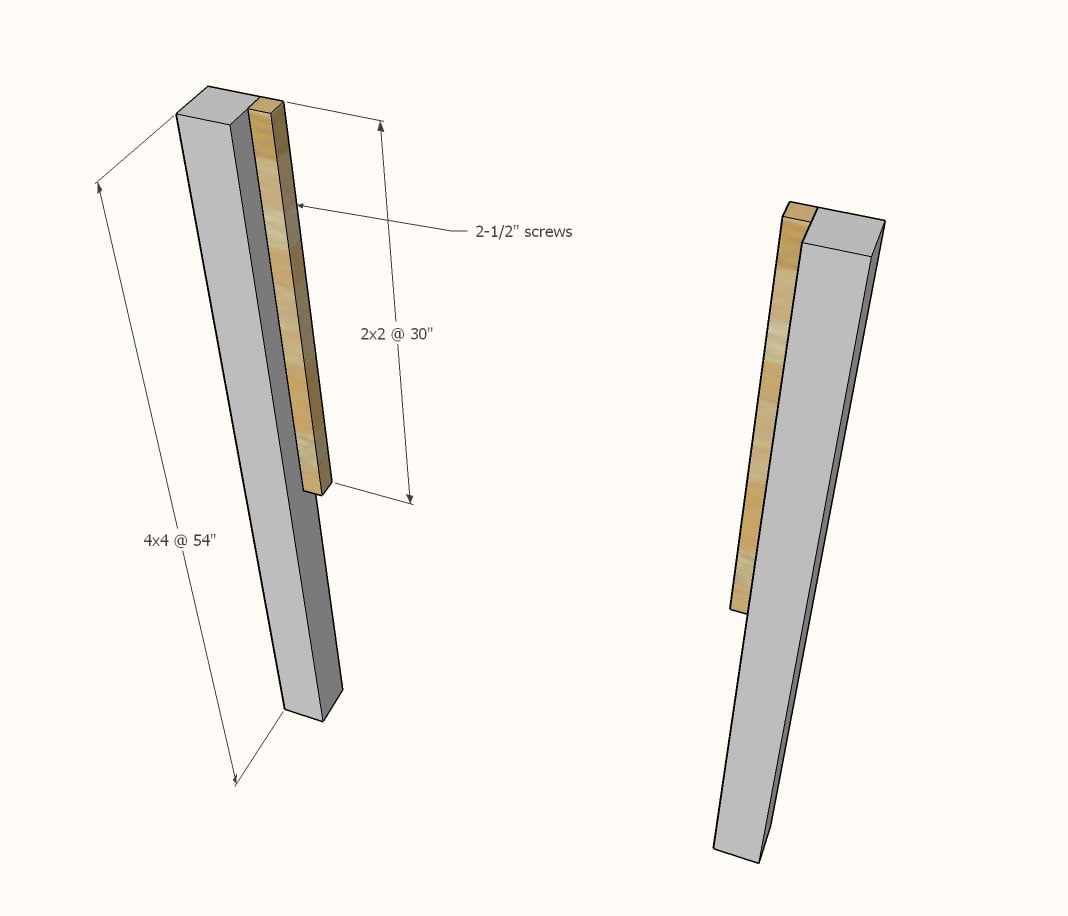
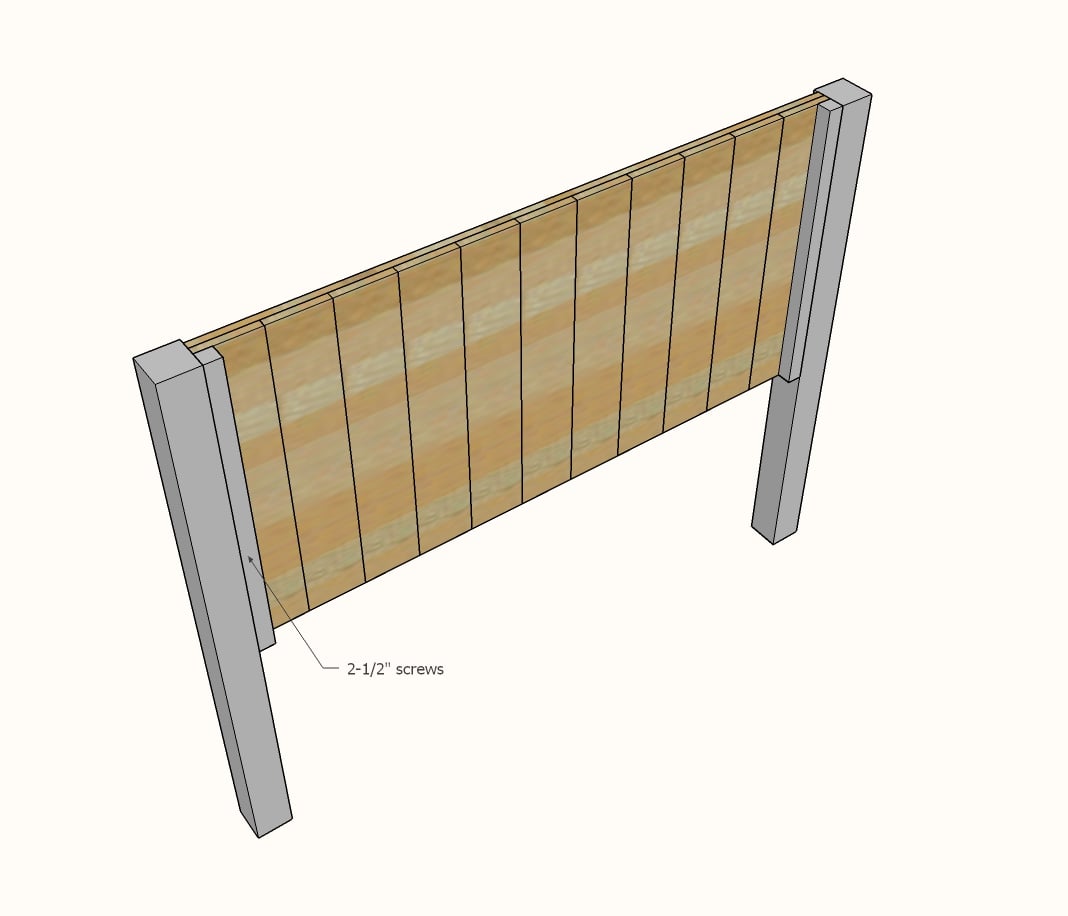
- 2 - 4x4 @ 54"
- 2 - 2x2 @ 30"
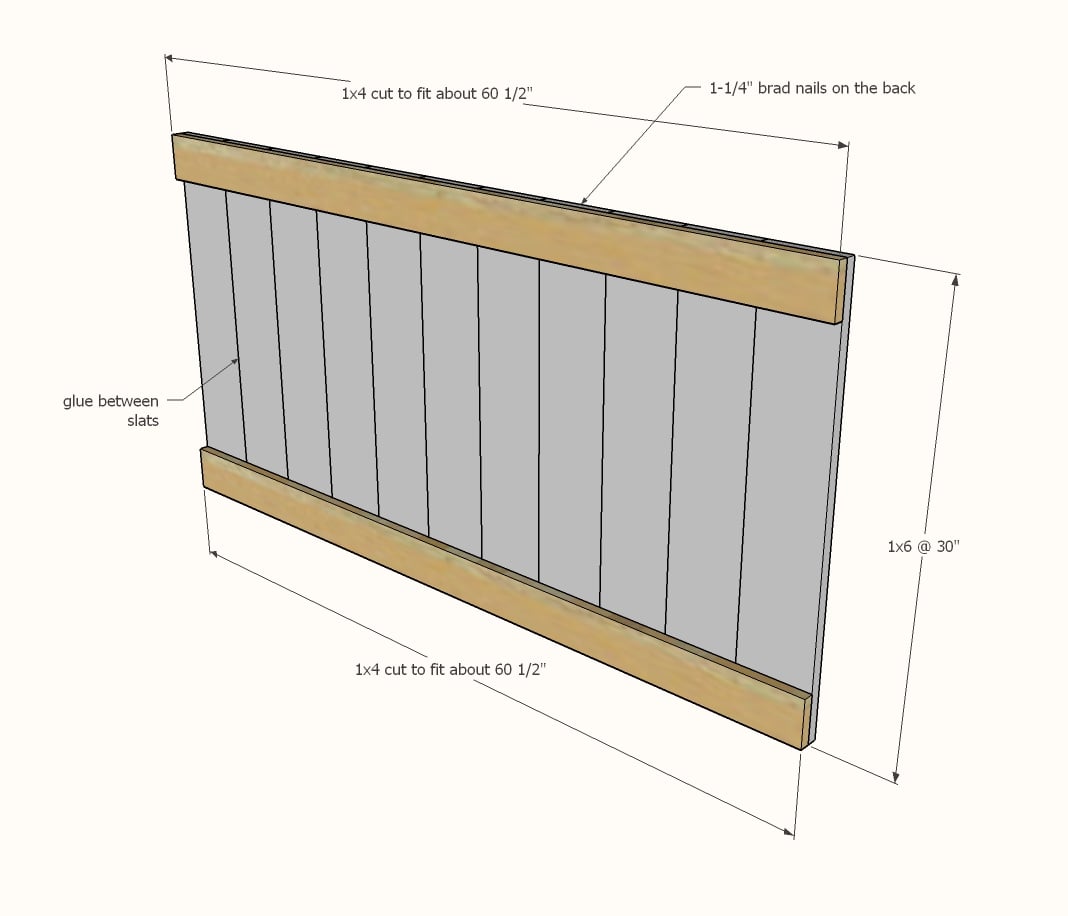
- 11 - 1x6 @ 30"
- 2 - 1x4 @ about 60-1/2" - measure and cut to fit
- 1 - 2x4@ 67-1/2" - measure and cut to fit
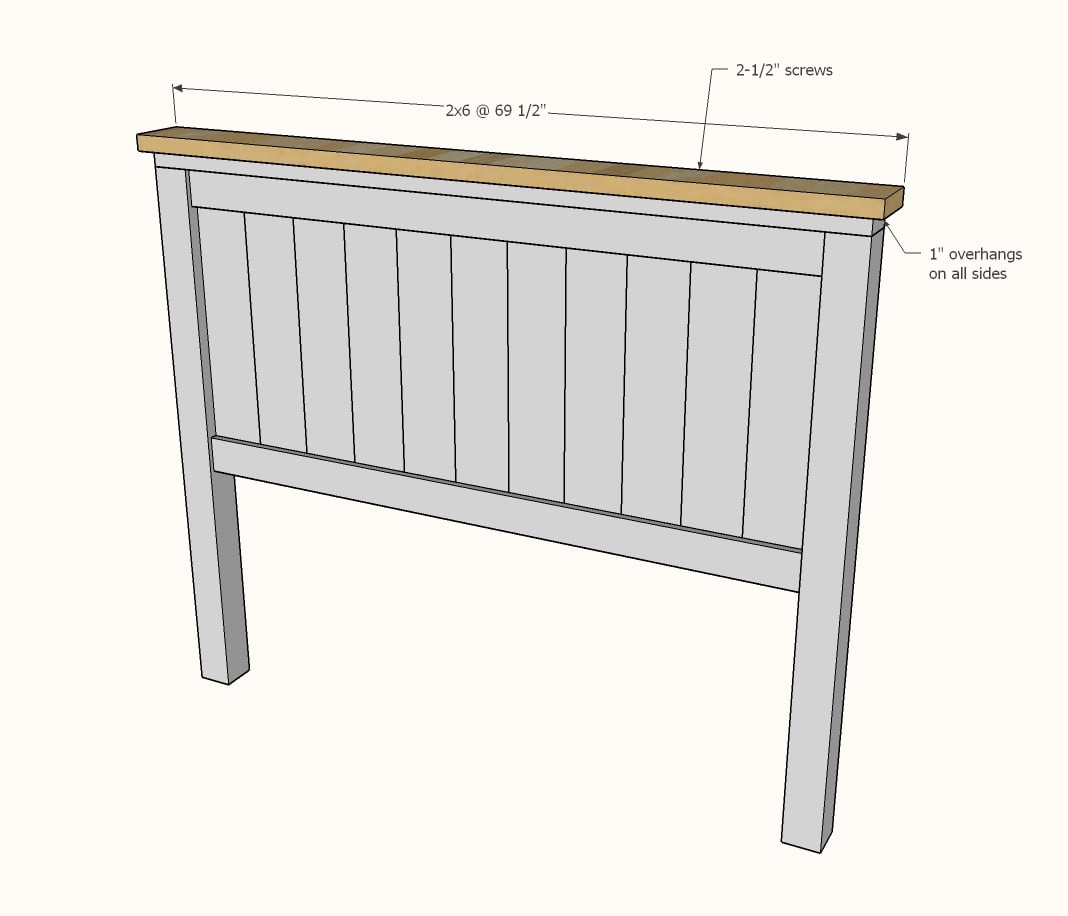
- 1 - 2x6 @ 69-1/2" - measure and cut to fit
FOOTBOARD CUT LIST
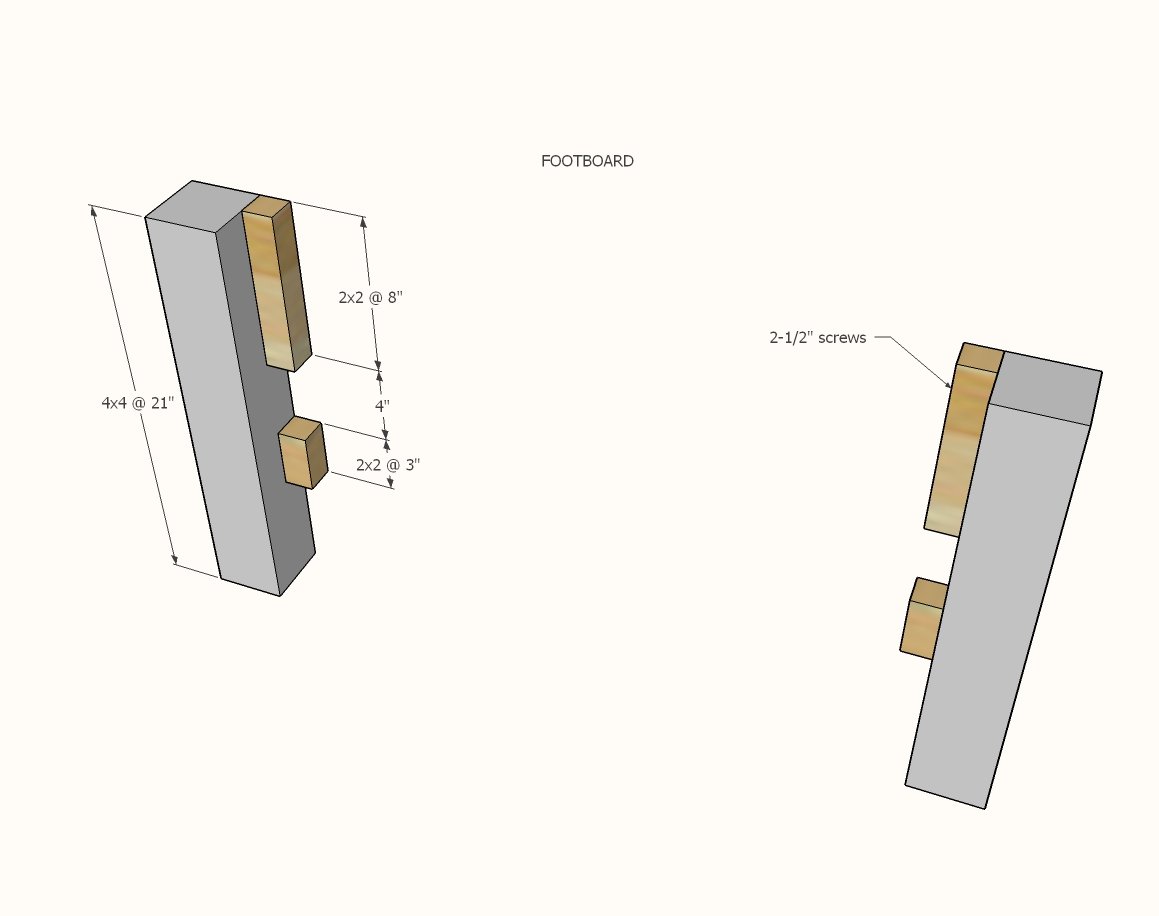
- 2 - 4x4 @ 21"
- 2 - 2x2 @ 8"
- 2 - 2x2 @ 3"
- 11 - 1x6 @ 15"
- 2 - 1x4 @ about 60-1/2" - measure and cut to fit
- 1 - 2x4@ 67-1/2" - measure and cut to fit
- 1 - 2x6 @ 69-1/2" - measure and cut to fit
MATTRESS SUPPORT FRAME/SIDERAILS
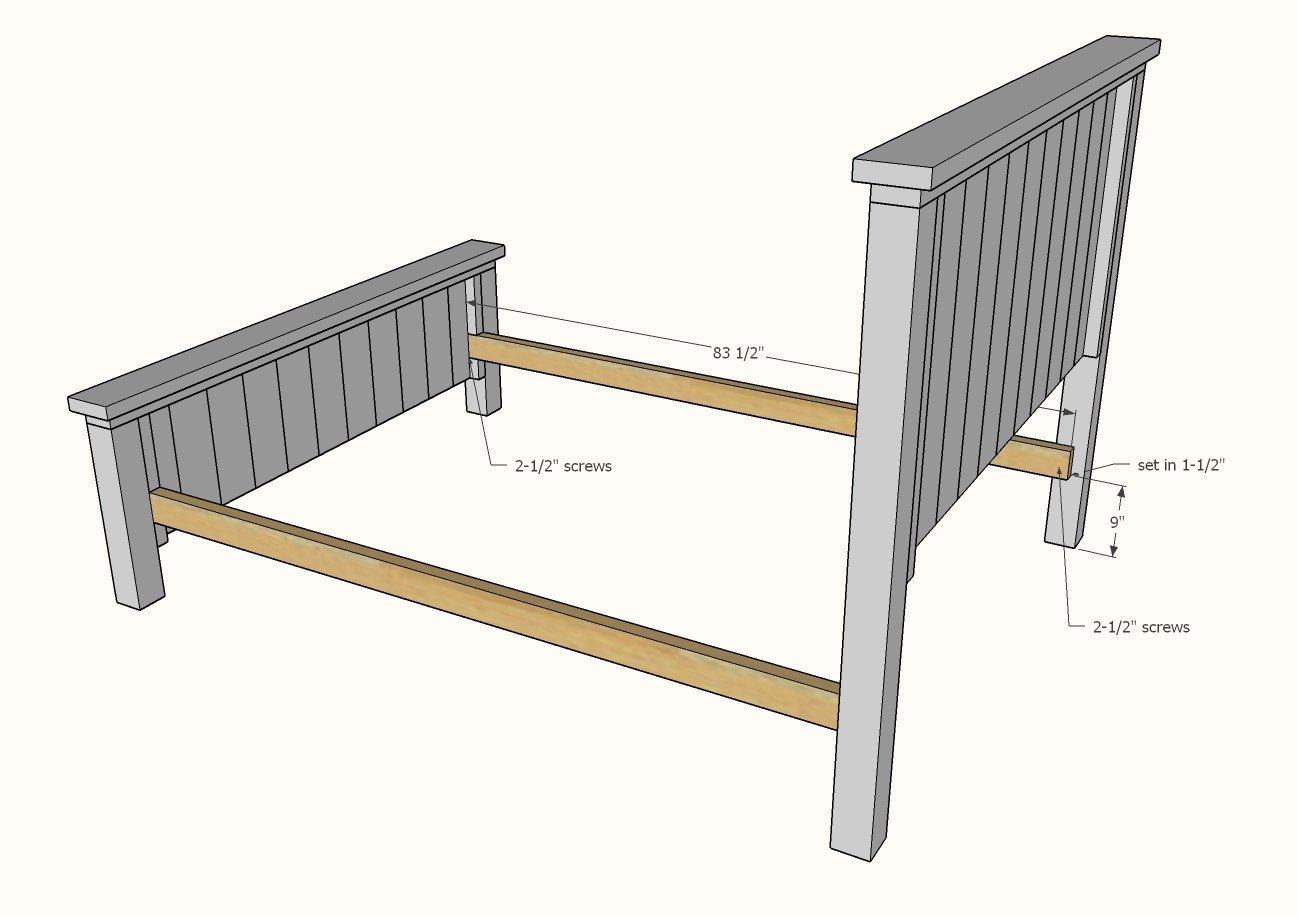
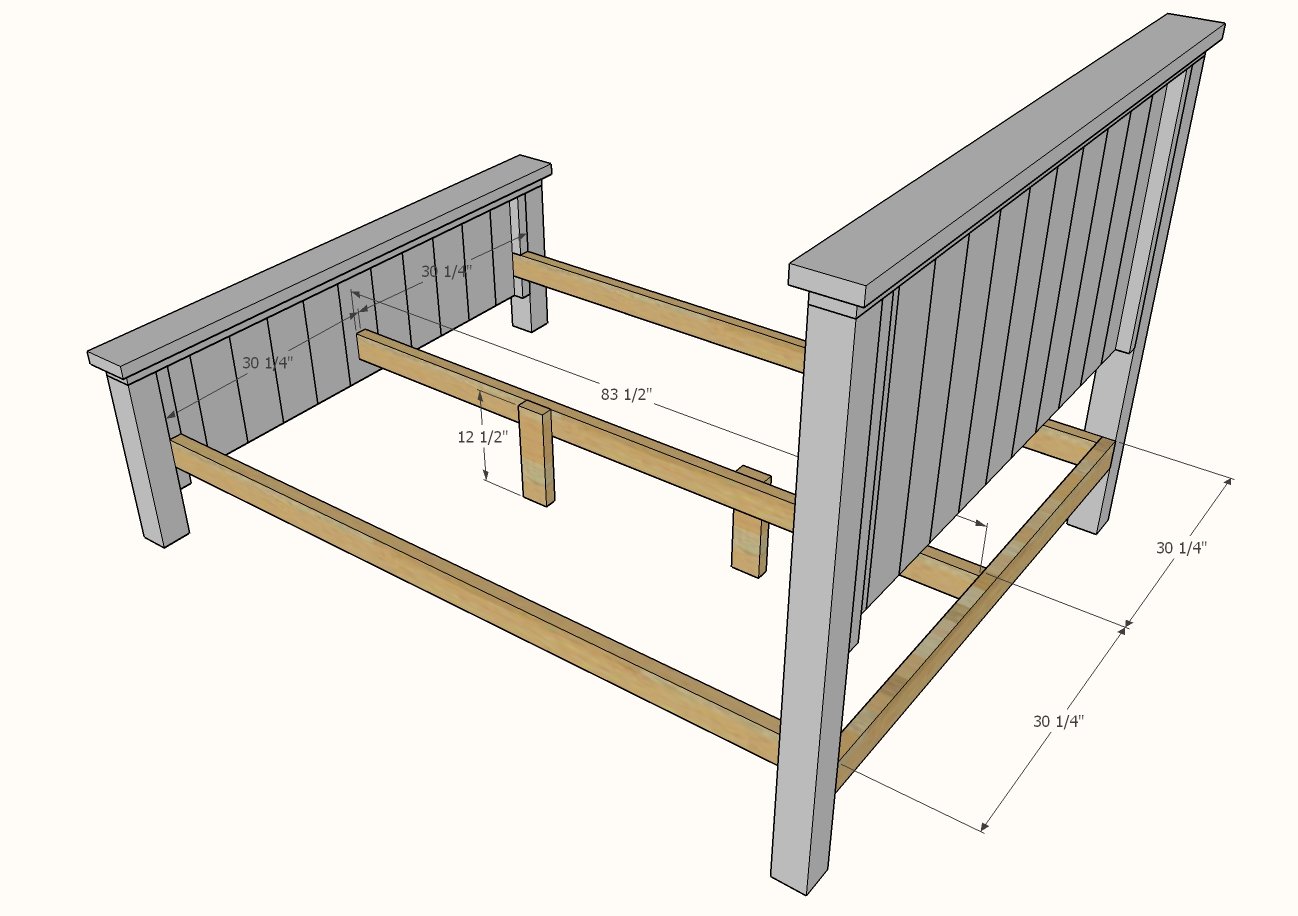
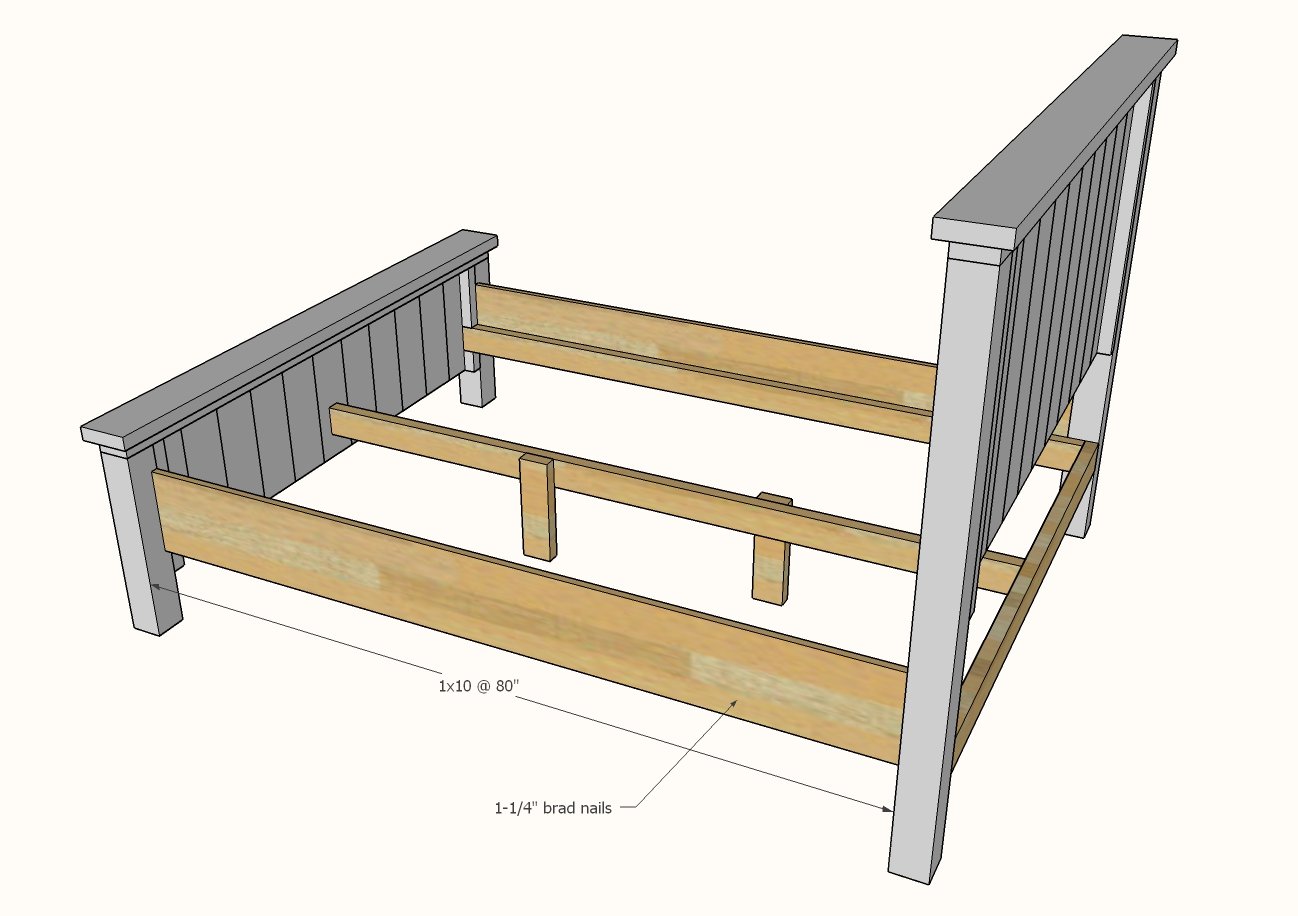
- 3 - 2x4 @ 83-1/2"
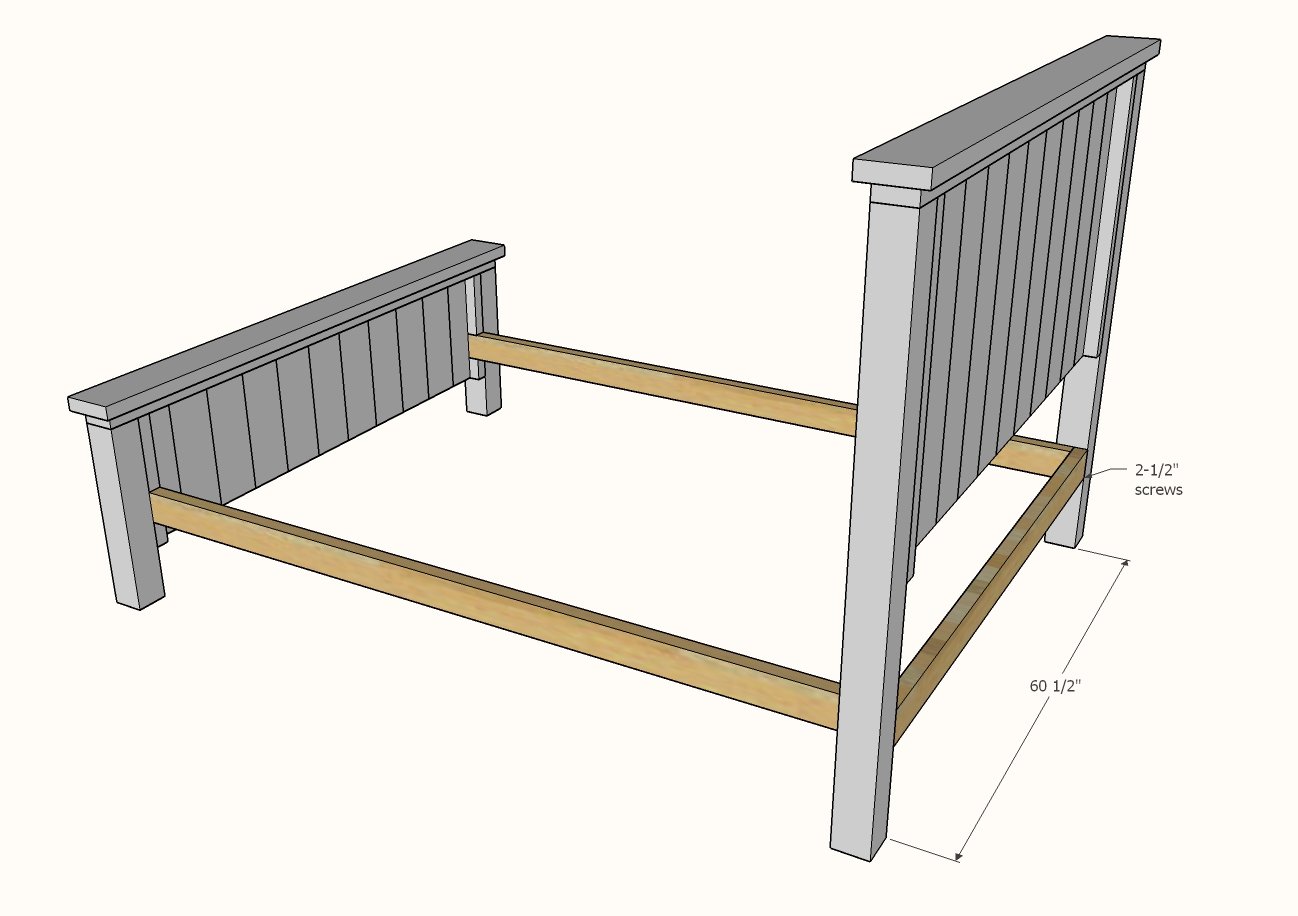
- 1 - 2x4 @ 60-1/2"
- 2 - 2x4 @ 12-1/2"
- 2 - 1x10 @ 80"
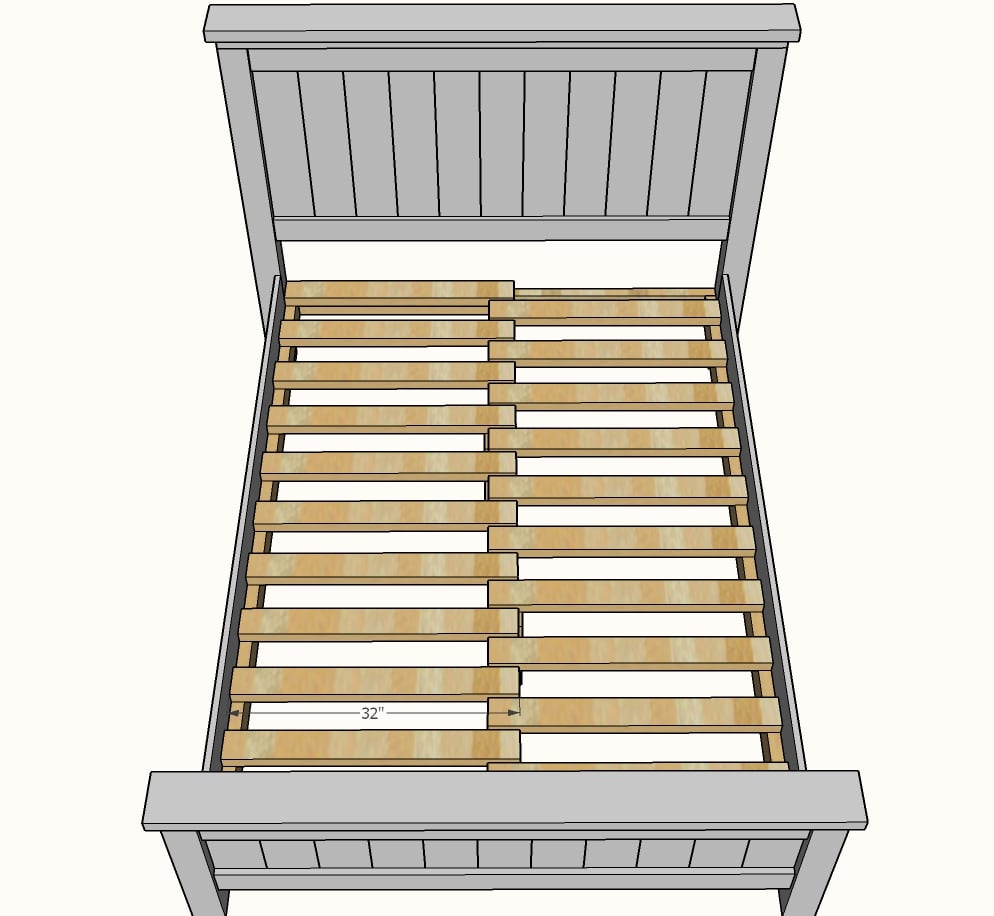
- 20 - 2x4 @ 32" - can be as short as 30" if you need to burn up scraps
Cut all boards except as noted to measure and cut. We recommend using a compound miter saw for the straightest cuts, but you can also use a circular saw and a carpenter's square - just make sure your cut ends are nice and straight.
Instructions
Step 1
Step 2
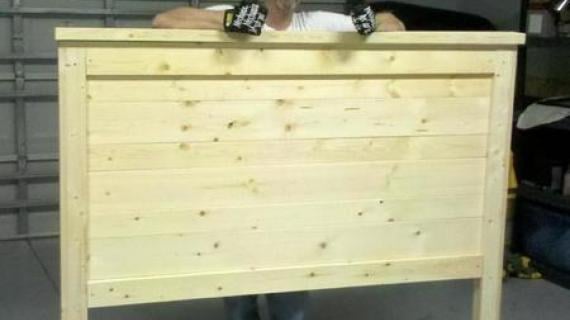
Layout the 30" 1x6 boards flat, side by side. Measure the overall width of all the 1x6 boards. Cut two 1x4s to this measurement.
Nail the 1x6 boards with glue to the 1x4s. Apply glue between the 1x6 boards as you go.
Make sure the panel is built square by measuring opposite diagonals (outside top corner of 1x4 to outside bottom corner of opposite 1x4) and adjusting so the opposite diagonals match.








Comments
Queensize Farm… (not verified)
Thu, 12/02/2010 - 20:07
[...] Now we can make one of
[...] Now we can make one of our own at a fraction of the cost! This bed was made for $129.00 Visit Ana White’s site for the complete information. The Farmhouse bed pattern is here Read more from Bedroom Furniture [...]
Queensize Farm… (not verified)
Sat, 12/04/2010 - 19:32
[...] Now we can make one of
[...] Now we can make one of our own at a fraction of the cost! This bed was made for $129.00 Visit Ana White’s site for the complete information. The Farmhouse bed pattern is here Read more from Bedroom Furniture [...]
Bedroom Inspir… (not verified)
Fri, 12/10/2010 - 05:34
[...] I always feel like
[...] I always feel like queen comforters are too small for queen beds. This summer I want to build this farmhouse bed from Ana White, with a few alterations. And I’ll probably repaint our room because I want to [...]
Kent (not verified)
Sun, 12/19/2010 - 05:40
I had the same issue. I
I had the same issue. I finished building the headboard last night, and the middle panel piece doesn't look that bad actually.
Shannon King (not verified)
Tue, 12/21/2010 - 15:39
We are almost done with
We are almost done with ours..including the box spring. We did some changes like attatching the side rails to the front of the 4x4 posts, because it wasn't big enough for our box spring the way the plans listed. We then lowered the inside frame to the very botton of the side rails. We did some modifications on bolts, and strength too. We drilled out 1.5 in holes and filled them with dowel to screw the bolts into because it didn't seem strong enough for the box spring and the wood is really heavy. We are almost done and I am a little sad that we had to make so many changes to make it strong enough and to fit our mattress set. I am also really disappointed that the foot board is so low. But at this point there is not much we could do without taking the whole footboard apart. I would make the 4x4's for the footboard alot taller if I was doing it again, it looks really low with the box spring, not what I wanted at all. I'll post a picture in a few weeks when it's all done.
Guest (not verified)
Sun, 10/30/2011 - 15:42
has anyone submitted proper
has anyone submitted proper instructions on the dimensions of a king size 80x76 with a box spring that is two pieces?
Sara (not verified)
Wed, 12/29/2010 - 08:58
we found 4x4 untreated white
we found 4x4 untreated white wood at a menards for about $10 each.
Sara (not verified)
Wed, 12/29/2010 - 09:01
We also had the same issue
We also had the same issue with the panel. We had to add 2 small panels on either side to make it look right.
Craig (not verified)
Tue, 01/04/2011 - 06:50
I think I am going to build
I think I am going to build this bed. We just upgraded to a Queen foam sans box spring and this will work out great. Good feedback from those who have found minor flaws on the plans.
Thanks Ana for the great DIY plans.
I continue to update and post some final pics.
Craig (not verified)
Tue, 01/04/2011 - 09:47
Ana, Question. If we
Ana,
Question. If we foresee the need to disassemble the bed every so often what would you recommend for attaching the support joists to the side rails?
Here is what I was thinking for the head/foot boards and side rails.
Use bed rail fasteners for the side rails to head board and foot board and using a surface mounted keyhole bed rail bracket for the support joists.
I am going to make this frame for a foam mattress. I was thinking of recessing the support rails about an inch to lock the bed into the frame so it wouldn't slide off. Do you think I should put plywood down on top of the support rails?
I live in a small island town in Alaska so I'm not sure what the local hardware store carries yet but I found some good products on www.rockler.com.
Thanks Ana.
Living with th… (not verified)
Wed, 01/05/2011 - 08:52
[...] an earlier post? Well,
[...] an earlier post? Well, it’s been turned into a bed!! I found plans online at this awesome website. This woman Ana White make simple plans for all kinds of furniture. This particular bed is [...]
luv2cook (not verified)
Thu, 01/06/2011 - 03:25
I don't own and I have a deck
I don't own and I have a deck that I could work on to put this bed together and to stain it. BUT, I don't have anything to cut with. Do you know if Home Depot or Lowe's would cut it for me, if I showed them the cut list? Does anyone know? I REALLY need a new bed frame and this looks just like the one I want. I heard Lowe's would cut it for me but is this a rumor? Does anyone know? Thanks!!
Living with th… (not verified)
Thu, 01/06/2011 - 09:07
[...] of the new bed Added
[...] of the new bed Added Jan 6, 2011, Under: Family For a while now I have had my eye on this farmhouse bed. It was perfect, beautiful, everything I wanted in a bed. The only problem was that I had to [...]
savvylili (not verified)
Sun, 01/16/2011 - 12:01
I love this bed! My husband
I love this bed! My husband and I were going to buy this one at World Market for our 2nd bedroom/guest bedroom: http://www.worldmarket.com/product/index.jsp?productId=3909405 but after finding this Queen Farm House bed, we are looking forward to building it!
Also, I love the little red night table, any idea if there are plans for that here or where I might find something similar??
Thanks! And thank you for building this website, you are SO talented!
Liliana
Heather M (not verified)
Sun, 01/16/2011 - 19:18
Here is the bed I made in a
Here is the bed I made in a twin! I will post another picture tomorrow after we get the mattress and the bedding on it. Thank you for the tutorial and it's the first thing I made with wood!
http://www.facebook.com/photo.php?fbid=10150127592180477&set=a.46409964…
Scott (not verified)
Sat, 01/22/2011 - 21:42
I was just at Lowes today and
I was just at Lowes today and they will make your cuts for $0.25 per cut. The store near me said they can't cut the 4x4 though...
Craig T. (not verified)
Mon, 01/24/2011 - 05:29
I could not find non pressure
I could not find non pressure treated 4x4 posts either without spending A LOT on Fir or Cedar. I decided just to use the PT, and wait a couple months before painting them. Are other folks finding non PT 4x4s?
Kent (not verified)
Mon, 01/24/2011 - 10:39
Yes, both lumber stores I
Yes, both lumber stores I went to carried non-PT posts. I would suggest paying the big bucks for the cedar. It will pay off in the long run by not having to see the pressure treatment scars every time you pass your bed! Just my thoughts on your predicament...good luck.
Popular Woodwo… (not verified)
Tue, 01/25/2011 - 03:19
[...] most of us are drawn
[...] most of us are drawn into woodworking, she wanted furniture for her home. It all began with a Farmhouse Bed. White's projects are completely spelled out for you. She has a materials list and an estimated [...]
jennygrace (not verified)
Sun, 01/30/2011 - 20:13
Stumbled upon this website -
Stumbled upon this website - LOVE it!!!
Leah (not verified)
Mon, 01/31/2011 - 03:29
Could this bed be easily
Could this bed be easily changed to look simmilar to PB's Hudson by replacing the panels with a high quality 1 inch plywood and some quarter round trim? Has anyone tried it? I'm dying to get the hudson bed but my budget would never allow it, and when I saw these plans I had hope... here is the PB bed I was talking about: http://www.potterybarn.com/products/hudson-bed-dresser-set/?pkey=cbed-d…
Liliana (not verified)
Mon, 01/31/2011 - 17:54
this bed is beautiful, now I
this bed is beautiful, now I don't know which style I want!
~ L.
Teresa (not verified)
Tue, 02/08/2011 - 16:36
What exactly is the "antique
What exactly is the "antique wash" used on this bed? Is it watered down latex paint or a completely different product?
Thanks!
A Change In Th… (not verified)
Thu, 02/17/2011 - 04:32
[...] had in mind. And I’ve
[...] had in mind. And I’ve been convinced that this style of bed is the way I wanted to go. I love Ana White’s farmhouse bed and Katie from Bower Power sealed the deal (or so I thought) when she built her [...]
Haley Folmer (not verified)
Wed, 03/23/2011 - 21:25
Lag screws? Yes, please!
Some of you have been asking about the illusive 4.5" screws. I also went to HD and Lowes and found that they don't exist, so I went to my local hardware store and asked them what to do. They handed me some 4.5" lag screws (with hex heads) and told me that they would be easier, and I had no idea what they meant by that until I actually assembled my bed.
Sarah M. (not verified)
Mon, 03/28/2011 - 22:19
Farmhouse Bed in a Twin XL
Hi Ana,
I just love, love, love, your site! Thank you for all you do on here, it's so helpful to me and it saves me so much money!
I was wondering if you had plans to do this bed in a Twin XL. I have 2 boys that are really tall and they are in desperate need of new beds! We were going to purchase these Pottery Barn Beds (http://www.pbteen.com/products/guys-beadboard-basic-bed-and-trundle/?li…), but I actually like your bed better! I showed my husband (who can build... with instructions :) and he thinks we might be able to do this. We would love to give it a try, but are unsure what the dimensions would be for the size we would like. Like I said, we would love to have Twin XL beds with a box spring. Would you be able to send me the materials, cut list, and instructions for this size?
Thank You So Very Much,
Sarah M.
Bekah
Tue, 03/29/2011 - 22:09
What to do when moving?
I would really like to make this bed but we'll be moving fairly soon - how can I make this so it can come apart to move and get in and out of houses, and still be sturdy and look nice?
In reply to What to do when moving? by Bekah
claydowling
Mon, 04/11/2011 - 07:32
A bit more advanced
Rockler sells bed brackets that let you securely and non-permanently attach the rails to the head and foot board. By far the easiest route.
The second, more traditional route is to cute a mortise through the legs and build the rails long enough that they go all the way through, and leave a little bit of room to wedge them with a key mortise on the other side.
A little bit of google-fu (and the fact that I grew up around woodworkers, so knew the terminology) found this for a good example of what I mean: http://books.google.com/books?id=0vkDAAAAMBAJ&pg=PA49&lpg=PA49&dq=throu…
It's something I wouldn't be afraid to tackle, but probably shouldn't be your first build.
Also, don't be intimidated by looking at that magazine and think that you need to be a middle-aged man with a beard to do "serious" woodworking. My mom was a woodworker for years, and has never been either bearded or a middle aged man.
Harold (not verified)
Mon, 04/11/2011 - 02:04
Farmhouse Queen Plans FLAWED!! Read this first
The plans involving the 4x4 posts / queen sized farmhouse bed are ill thought out.
The problem being, if you build the head/foot boards to the specs, the 4x4s are 60" apart. The exact size of the 60" queen mattress/box spring. However, when you affix the 2x10 side rails, to the inside of the 4x4 posts, suddenly you lose 1.5" on each side (width of the 2x10s) and hence neither the box spring or mattress will fit.
So unless you want to just plop a large piece of ugly plywood down ontop of the whole thing, you have to find a way to chisel/route out slots in the 4x4s in the head board, and do god only knows what to make the foot board end work.
So if you want to make a queen sized farmhouse, i strongly suggest just scaling down the dimensions of the king that Ana designed so well, or if you must use the 4x4s, make your headboard/footboard 3" wider. (measure your 2x10s to be sure they are indeed 1.5" thick, if they are not, then double their thickness and add that to the head/foot boards)
I discovered this only after making the entire head board and foot boards. Needless to say, i'm extremely angry that after spending $200 on wood/supplies and hours of work.
LoCrawford (not verified)
Sun, 06/24/2012 - 04:12
Easy fix
(1) If you're just using a mattress (no box spring), the slats that hold up the mattress should be afixed so the tops are at the same height as the side rails. The mattress isn't bound by the side rails and can just sit atop the whole base.
(2) If you plan to incorporate your box spring, attach 2x4s to the inside of the 4x4 posts. The 2x4s will hold up the box spring and the 2x10s (length stated in cut list) can be nailed to the outside of the 2x4s and will serve a decorative function only.
Both of the above methods are stated by Ana herself, one in her plans, the other in a comment listed before yours. Your problem sounds like a reading error instead of a design error to me. Hope this helps.
natalie&morgan (not verified)
Mon, 05/02/2011 - 18:48
BIG problem..
hi ! we're making this bed for our daughter, in the full size version, and cannot find 4 1/2" screws ANYWHERE ! all our lumber and all the other supplies are bought already, we even bought an air compressor and a realllly expensive nail gun for this project.. dont know what to do now that we cant find nails that size.. please help !
natalie&morgan (not verified)
Mon, 05/02/2011 - 19:09
oh.. and i dont have a ace or
oh.. and i dont have a ace or true value.. im in grande prairie alberta canada..
aria_dia
Wed, 05/11/2011 - 02:36
are the plans fixed or still broken?
has the plans for the bed been fixed about the discrepancy on the 1x8's not fitting and the mattress not fitting correctly or are they still incorrect?
Also to chime in with the crowd... could I just screw in my metal frame or would that ruin the bed or show through?
mindymom79
Wed, 05/11/2011 - 06:29
The headboard and footboard are fine.
Just make the frame (joists) a little wider and the rails a little shorter, so you can attach to the front of the 4x4's, instead of the inner sides. It's just as easy. or if you haven't started, go ahead and extend the headboard. I admit I made the king, not the queen, but I found some great brackets from Rokler, that I'm going to attach to the front, not the sides, so it's easy to collapse to move.
Guest (not verified)
Tue, 05/24/2011 - 18:58
Beautiful!
Ana -
I've been rummaging through my old barn and have discovered a treasury of old wood! I was wondering, for the sideboards, can I use 1x10s or does it need to be a 2x10?
Thanks,
Ashley
Ralph S (not verified)
Sat, 05/28/2011 - 19:33
Sideboards
1*10s might be a bit thin if actually using to support the mattress\boxspring but if just decorative I don't see why they would not work.
R
Ralph S (not verified)
Sat, 05/28/2011 - 19:31
Great Project!
I have just started this project in Queen size. Being an apartment dweller with lots of restrictions on what we can do, I went over to a friends to do the cutting of the lumber. While visiting both the Orange Box and Blue Box building supply stores I was a bit surprised to find that 8" boards measured in at 7 1/4". So I have to go back and pick up some 1/4 inch filler. I am thinking Dowels or something similar to give a bit of a beaded look between the boards. Just need to get the Side Boards and Hangers before I have everything to complete it. Keep up the great site!
Mark (not verified)
Mon, 06/20/2011 - 20:19
Pressure treat 4x4's
Hey everyone, I'm in the process of building this bed, cost me just $300.00 (I live in Canada so prices on lumber may differ substantially). I just wanted to mention to all who are considering building this bed that YOU DO NOT USE PRESSURE TREATED 4X4 as the chemicals used in pressure treating can be very harmful and nasty (even if you get a sliver you can get a bad infection). They use arsnic and other harmful substances so I just thought I would put that out there. You can get untreated 4x4's...just ask for them at your lumber store!
Tim and Amy
Wed, 08/03/2011 - 06:39
Stained pine finishing
Hi Ana,
We LOVE your blog. We just started building, and I've even got my mother hooked with plans of things to build! We started making the farmhouse queen this weekend and are staining it a dark walnut colour using minwax. It looks great, but there is no sheen at all and I'd like a more 'finished' look. I'm hesitant to use polyurethane due to the toxins, and am considerin watco teak oil. What is your experience with finishing stained pine products? Are there any alternatives that you can recommend that would be less toxic but still seal and give a bit of a shine?
Thanks,
Amy
yogashell
Tue, 09/27/2011 - 12:03
Less toxic sealant
Hi Amy,
We have used AFM Safecoat sealant on other wood projects and also plan to use it on the bed. It leaves a slightly shiny surface and seems to protect well although we just recently tried it. I would recommend giving that a try, they have a good reputation for being low toxicity and environmentally responsible.
shelli
1ofeach (not verified)
Sat, 08/13/2011 - 06:58
King size?
I know I'm missing it. Surely, the instructions to adapt this for king size (and king size WITH box springs) is here, and I'm just missing it. So, will someone hold my hand and show me where those are? Please?
Love your site!
Myn Nowell (not verified)
Thu, 08/25/2011 - 09:16
Kins Size Bed Plans
Hi Ana!!! I stumbled upon this bed and LOVE it!!!! My son is taking furniture making this year in school and has agreed to make this bed for me!!!! I am SO excited! Can you please tell me if you have the plans in King Size? If you could email them to me that would be AWESOME! I love all your work!
Thanks!
Myn
sara (not verified)
Fri, 09/02/2011 - 11:02
black look
I heard about your site from my sister and I love it. I am going to build a queen and was wondering what would you recommend for wood and what do I need to use for the black look cause I was looking at something someone else posted and she said it did not turn out so I am a little worried.
Sara
yogashell
Tue, 09/27/2011 - 11:51
We built 2
We are almost done with our second farmhouse queen - one for us and one for the guest bedroom. This was my first woodworking project ever, and my husband's first big project. I plan to make a brag post when we get them stained. I just wanted to echo others' suggestions about reading all the comments and ideally, all of the plans for the various sizes before diving in.
We did come up with a great solution for making the bed easier to take apart for moving. We used Rockler Heavy Duty Wrought Steel Bed Fasteners to attach the frame to the headboard. However, this added a few hours to the construction time of the first bed (including brainstorming) and we expect it to add about 2-3 hours to the construction of the second bed, now that we've done it before. We had to borrow a router and learn to use that, and it takes a lot of precise measurements. However it seems very sturdy, we've been sleeping on ours for about a month without concern, and it comes apart relatively easily.
Thank you, Ana, for the great plans! We love how these have come out and are already starting on our next project!
webjunkie3437
Mon, 11/21/2011 - 00:46
Thank you for your plans
We were looking around for a set of headboard/footboards, but I think I'm going to be building this one in the King size since we're upgrading. Thanks so much for your site!
Jason
Guest (not verified)
Tue, 11/22/2011 - 17:36
Queen Farmhouse bed
I just finished making the queen bed and I had to say Im impressed! Very sturdy! I did run into a problem with the length of the 1x8 making the headboard, and them not being long enough or in the case wide enough. I quickly solved the problem by using pencils to create a gap between the boards on the headboard to make up that space. Turned out pretty good! There is one that is off but you can only tell if you built the bed. No one will notice! Hope this helps!
Guest (not verified)
Wed, 11/30/2011 - 08:24
Newbies
I don't know how else to contact the wonderful Ana, so I will simply comment here.
I think this is a wonderful site. The plans are simply to follow and give newbies like me the confidence to try new things. Do you have a section, or you could create a section that explains/ shows how to do some of the basics or explains the terms. Things like counter sink and butt (terms I do not know) are the only things keeping me from making any of these amazing projects . . . . :D
In reply to Newbies by Guest (not verified)
spiceylg
Wed, 11/30/2011 - 10:07
Info
Hello. She responds more readily on Facebook under her page called Knock-Off Wood which this website used to be called. On this site, go under Community for answers to a bunch of your questions. There are also some articles listed under "Also of Interest" in the left column. Jump right in. I hesitated for quite some time and then once I started, was sorry I waited so long! Happy building!
Guest (not verified)
Sun, 12/18/2011 - 21:28
Farmhouse Bed
Ana,
Thank You So Very Very Much for these plans!! I printed them out and asked for this to be my Christmas present. Hubby had already made the bedside table for my birthday..
My bed is now finished and I'm just waiting for Christmas!! The bed is absolutely beautiful and I want to thank you for making my Christmas extra Special this year! Love your site!! Hubby also made your wrapping station for me :)
You are a very Special Lady :) Thanks for sharing :)
Jason Steele (not verified)
Wed, 12/21/2011 - 09:27
Frame help
Ana,
I am done with my Headboard and the footer for my king bed that you have here. However, do you have any plans for how to make the frame for the box springs and mattress? I see them for the queen but not for the king. I don't wanna just "wing it" and try to come up with something. any help would RULE! LOVE the site and can't wait to build more stuff.