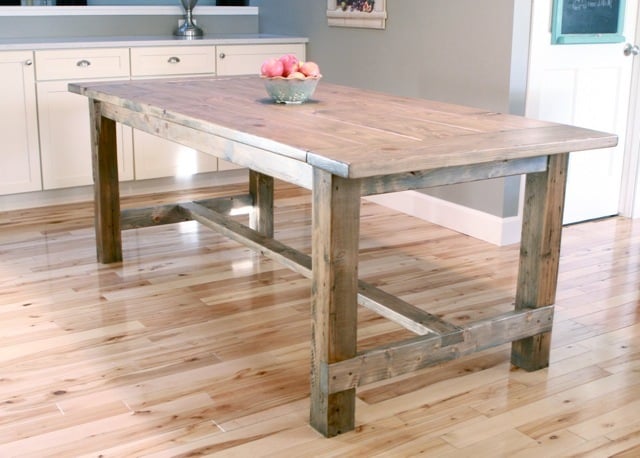


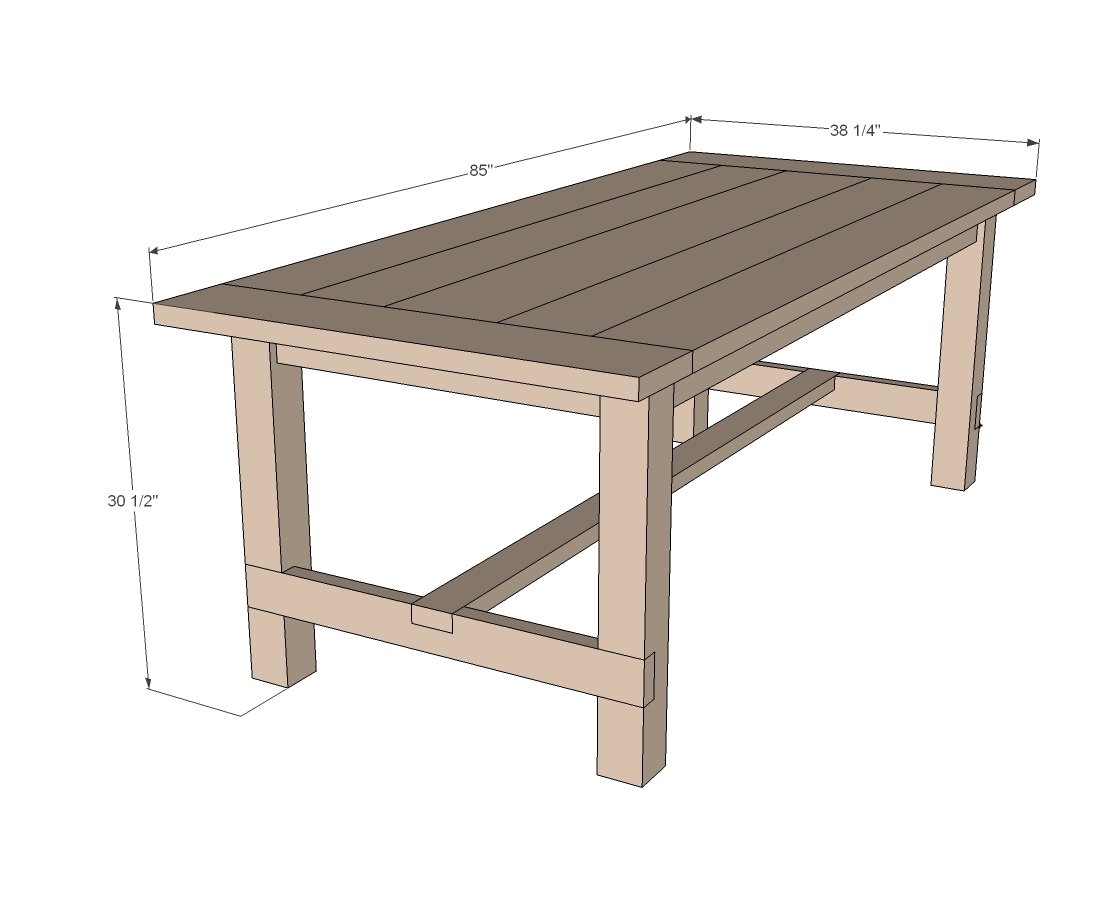
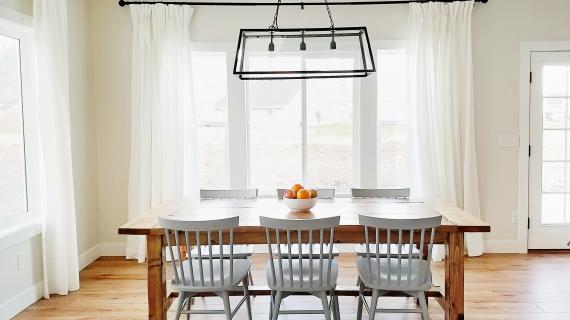
Free plans to build a Farmhouse Table. This table has been built tens of thousands of times and is loved the world over for it's basic material composition, simple clean lines, easy to build steps, and sturdy, functional size. Our step by step plans with diagrams make it easy.
This plan uses pocket holes and is the updated plan. We also have this plan available to build without pocket holes.
Farmhouse tables can cost thousands of dollars.
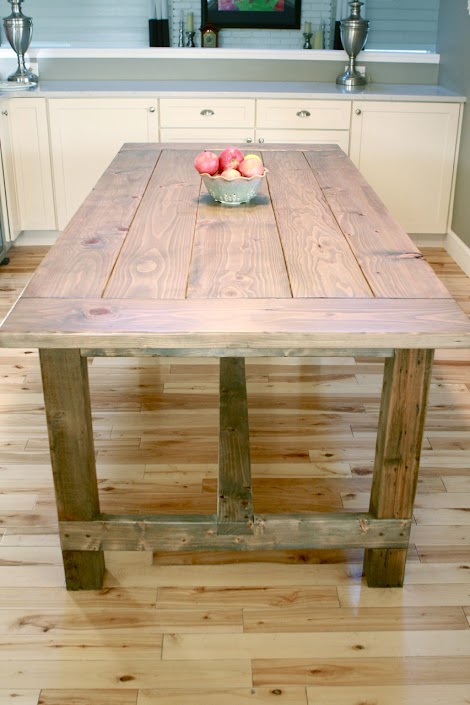
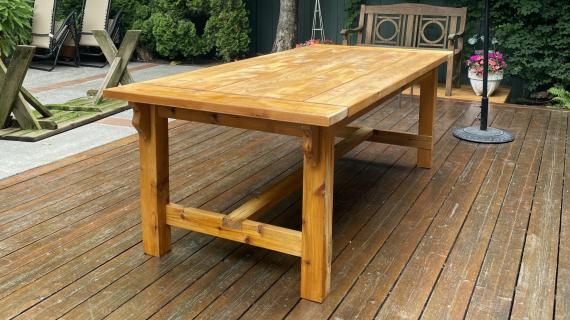
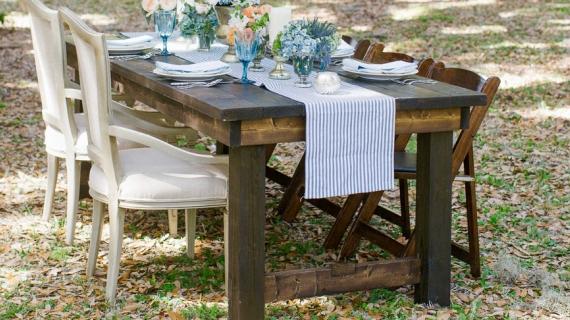
The good news is you can build your own for between $100-$200, and it will be sturdy, repairable, and have a rustic wood top to beautify every meal.
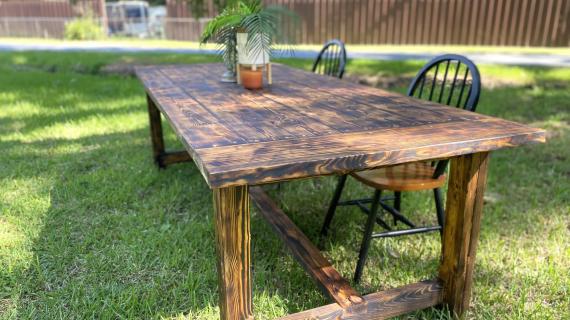
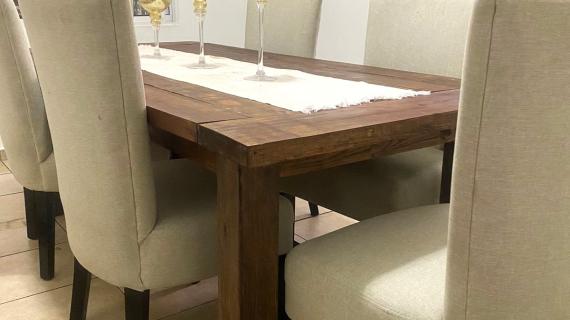
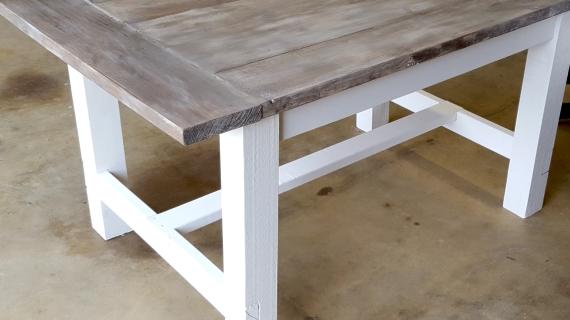
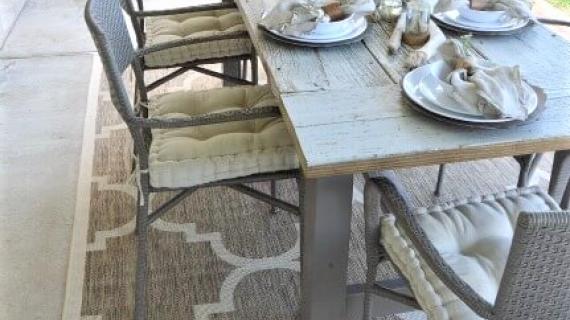
A DIY Farmhouse Table has a rustic wood top that beautifies every meal.
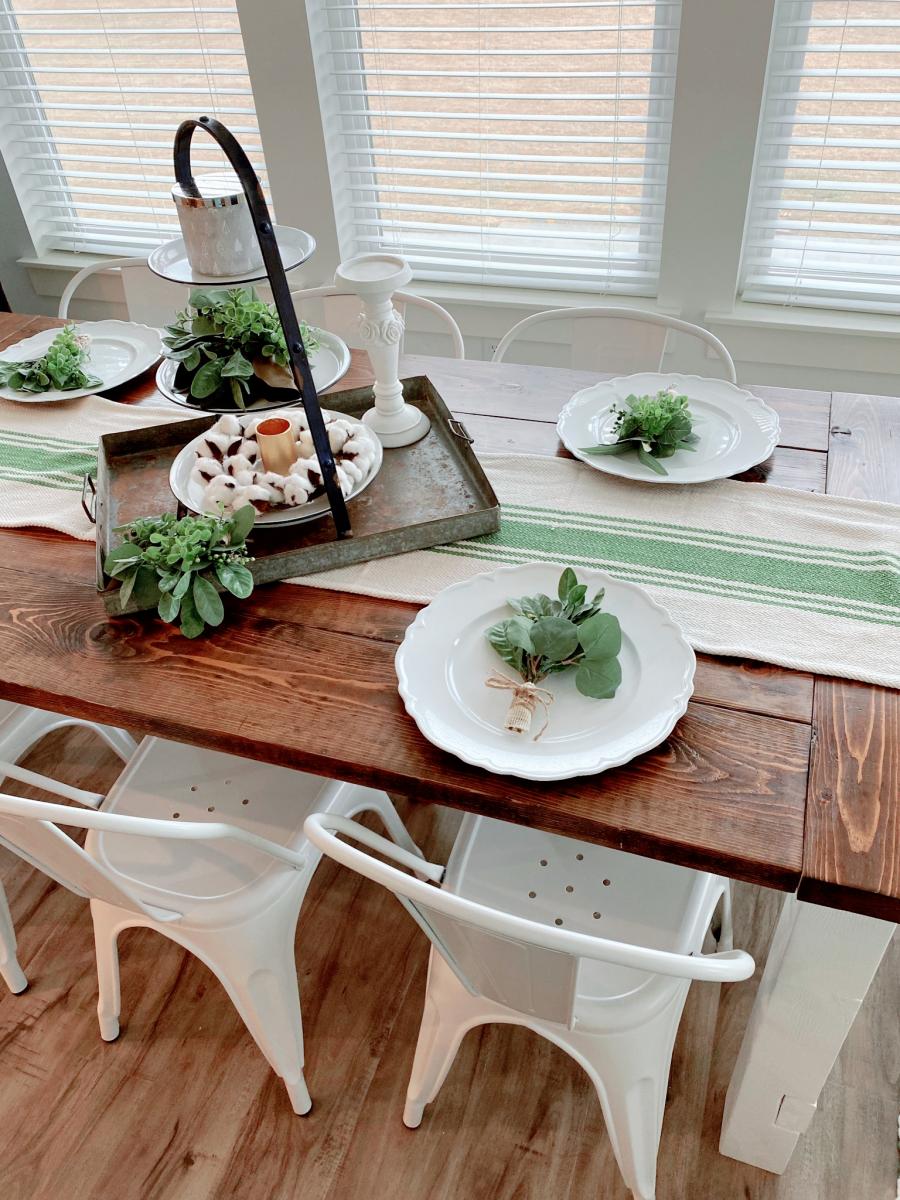
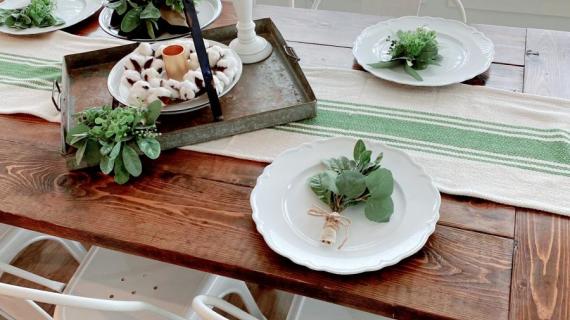
Paint or stain, or both, to make your farmhouse table beautiful and unique.

A DIY Farmhouse Table will cost about $100-$200

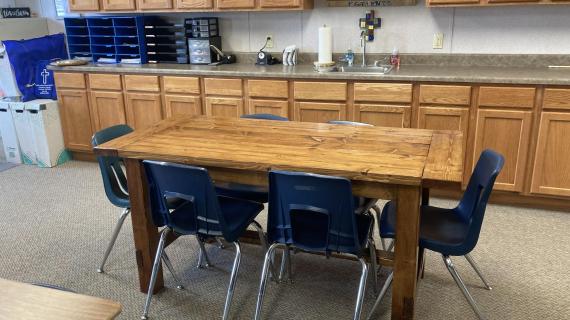
Built by Hillary at The Friendly Home, we upgraded the farmhouse table for pocket hole joinery (no visible fasteners) and easier construction.

Hillary made this table with pocket holes instead of adding the 2x2 supports as done in the original plan, saving a ton of cuts and holes to be drilled, which saves time and money.
Also, by using pocket holes, we hide most all of the screw holes, so a beautiful stained finish like Hillary's is very easy to do.
The easy to do pocket hole plan follows if you want to build this table.
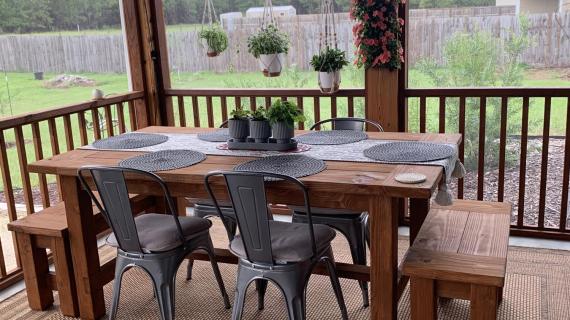
And as always, Hillary delivers a beautiful finish, and you can get all the details on how Hillary finished her table here. I love the stain color and will have to try it as well!
PS - Don't have a pocket hole jig? Here's the original Farmhouse Table Plans.
PSS - Have trouble finding 4x4s? Check out this beginner friendly 2 Tool/$50 Farmhouse Table plans
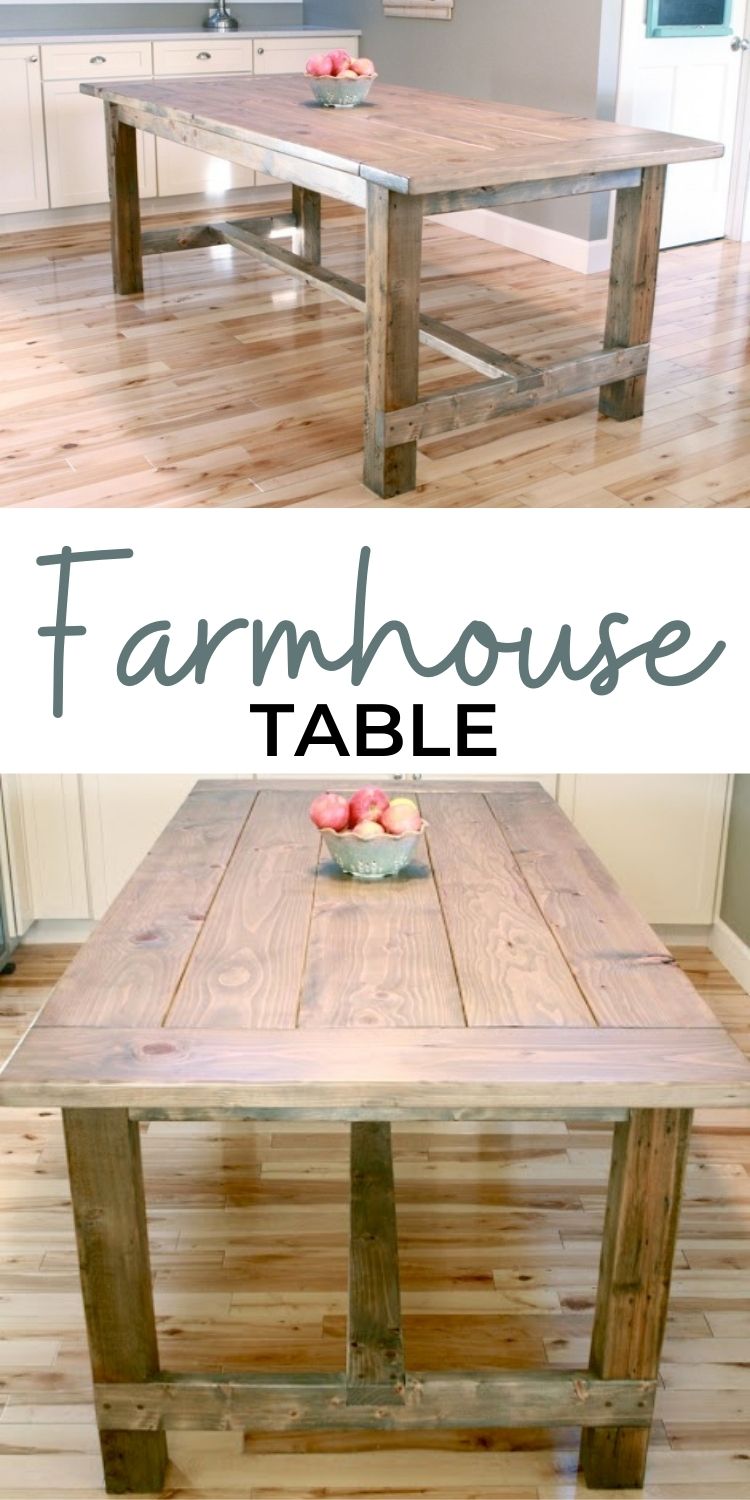
Pin For Later!
Preparation
- 4 - 2x4 @ 8 feet long
- 1 - 4x4 @ 10 feet long
- 4 - 2x8 @ 6 feet long
- 1 - 2x8 @ 8 feet long (breadboard ends)
- 1 - 2x10 @ 6 feet long
- 4 - 4x4 posts @ 29" (legs)
- 2 - 2x4 @ 67" (long aprons)
- 2 - 2x4 @ 27" (short aprons)
- 1 - 2x4 @ 74" (stretcher)
- 2 - 2x4 @ 34" (stretcher supports)
- 4 - 2x8 @ 70.5" (table top planks)
- 1 - 2x10@ 70-1/2" (center table top plank -- I had to use one 2x10 to get the right overall width)
- 2 - 2x8 ~38" (breadboard ends -- measure your joined tabletop before cutting these)


Please read through the entire plan and all comments before beginning this project. It is also advisable to review the Getting Started Section. Take all necessary precautions to build safely and smartly. Work on a clean level surface, free of imperfections or debris. Always use straight boards. Check for square after each step. Always predrill holes before attaching with screws. Use glue with finish nails for a stronger hold. Wipe excess glue off bare wood for stained projects, as dried glue will not take stain. Be safe, have fun, and ask for help if you need it. Good luck!
Instructions
Step 1

First, cut and notch out the 4x4s. If you can get your home improvement store to make square cuts, ask them to cut your 4x4s. Otherwise, you'll need a 12" (maybe a 10" will work too) miter saw or set your circular saw to the deepest possible cut. Cut one side, flip the 4x4 and finish the cut on the bottom side. Sand until cut is smooth. You'll probably add cork or felt pads under the legs later on to level table up and protect your floor.
Then notch out the stretcher joint as shown in diagram. Definitely practice first on a scrap if you can. This is easier to do than it looks - just be sure to get the top and bottom cut right, and it will all work out!
Step 2

Notch out the stretcher support board first, then attach to the 4x4s. Remember the screws will show here, so drill in pattern. Use 3" screws to attach.
Do both ends.
Step 3
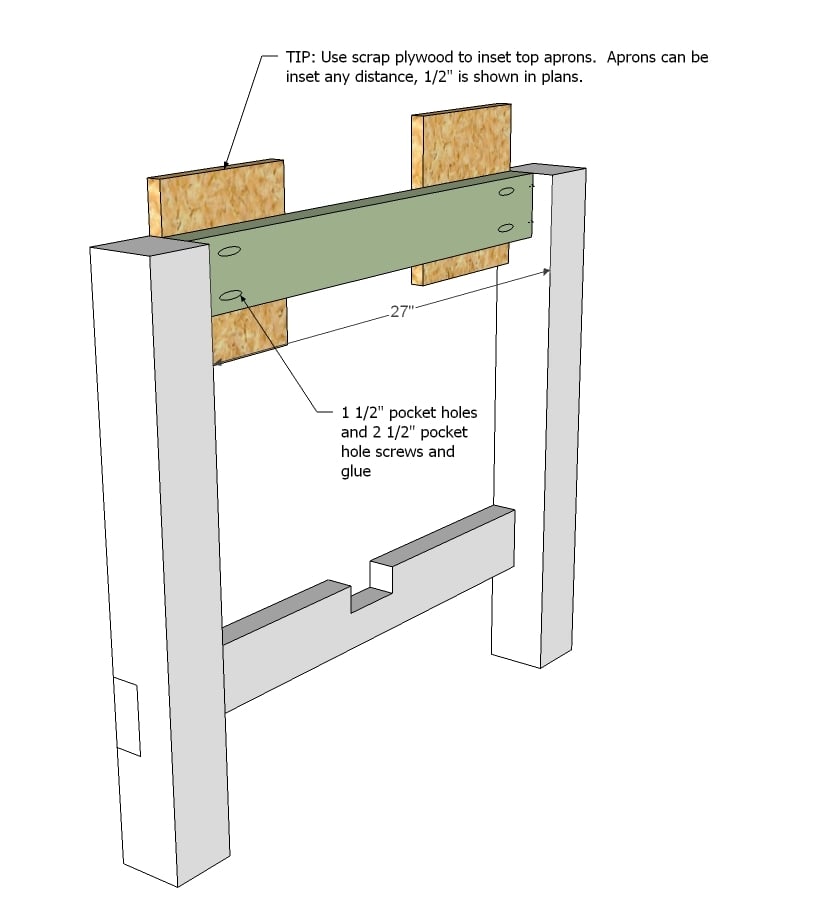
Then add your top aprons with 1 1/2" pocket holes and 2 1/2" pocket hole screws.
NOT SHOWN: Drill 1 1/2" pocket holes on the insides of your aprons facing upward for later attaching the the tabletop too. Drill three holes per end apron.
Step 4
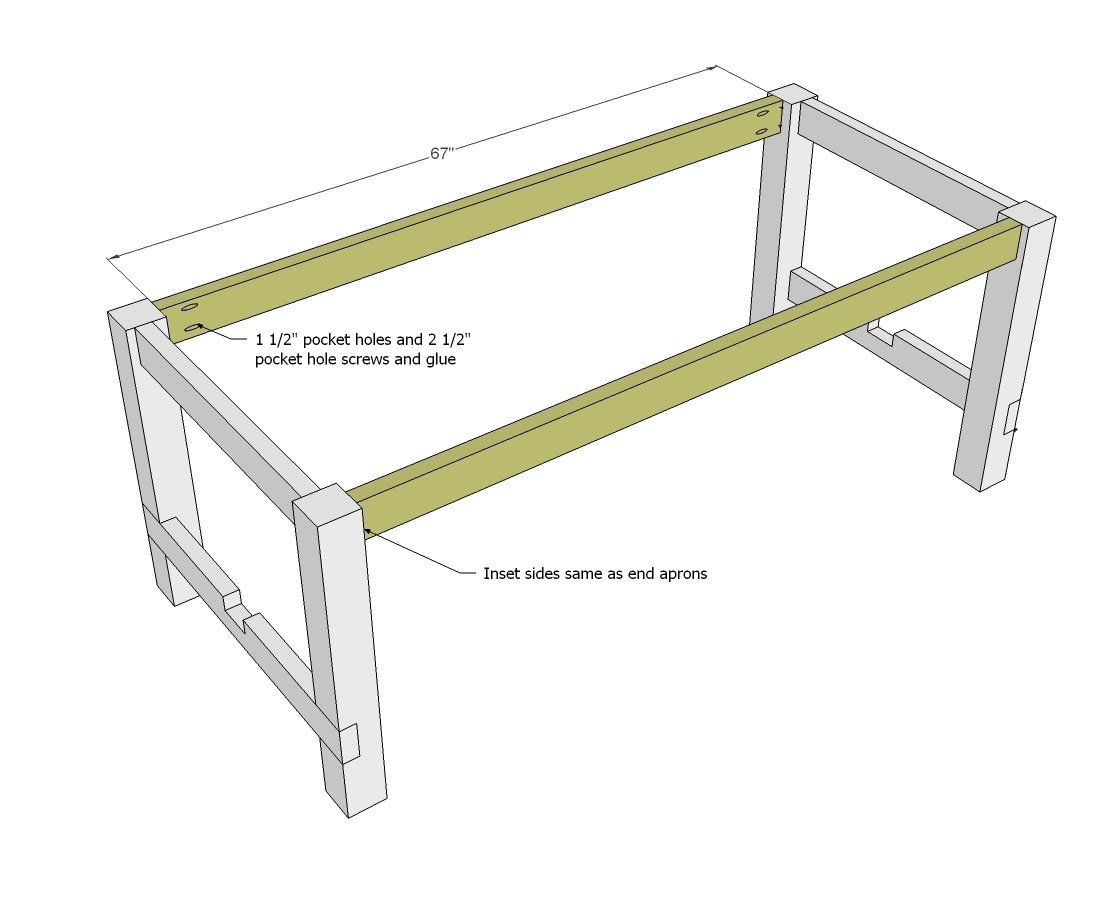
Now attach the two ends together to create your table frame.
NOT SHOWN: Drill 1 1/2" pocket holes on the insides of your aprons facing upward for later attaching the the tabletop too. Drill five holes per side apron.
Step 5

Attach base stretcher with pocket holes underneath.
Step 6
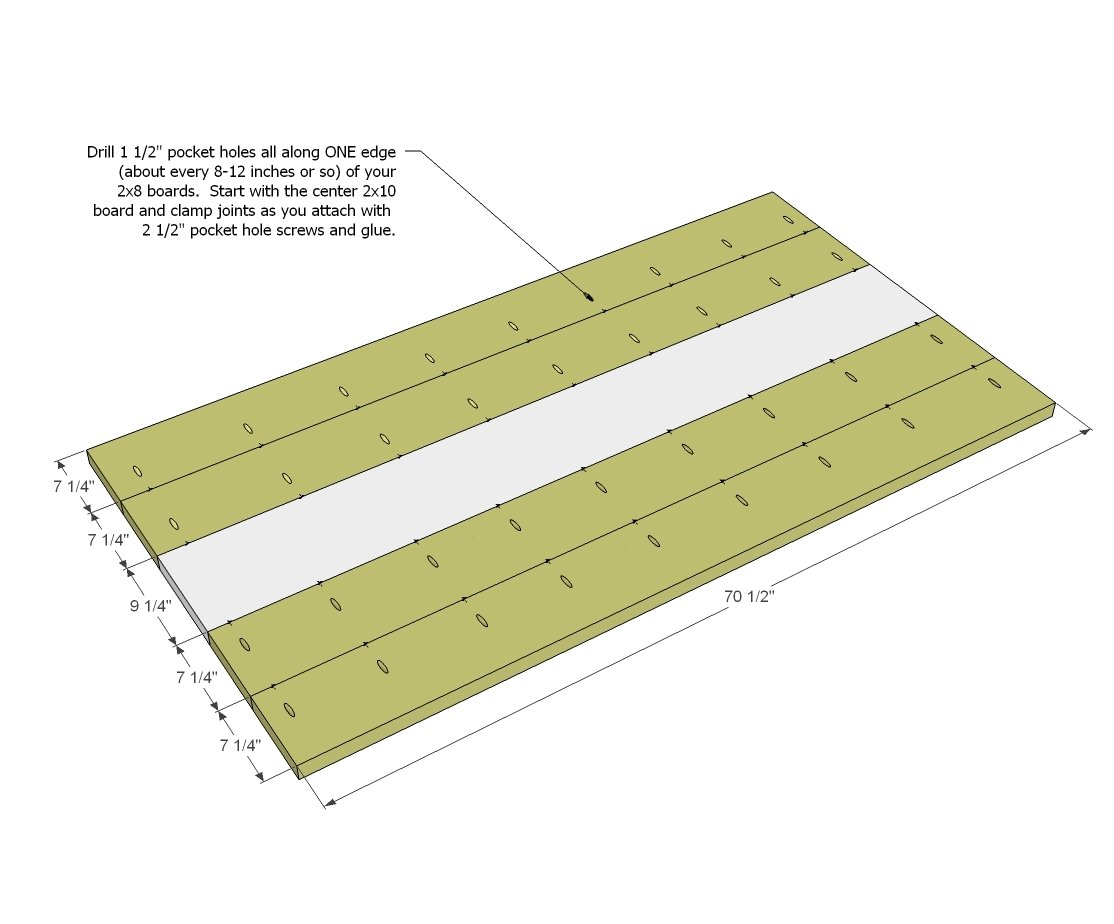
Now start building your tabletop.
Step 7
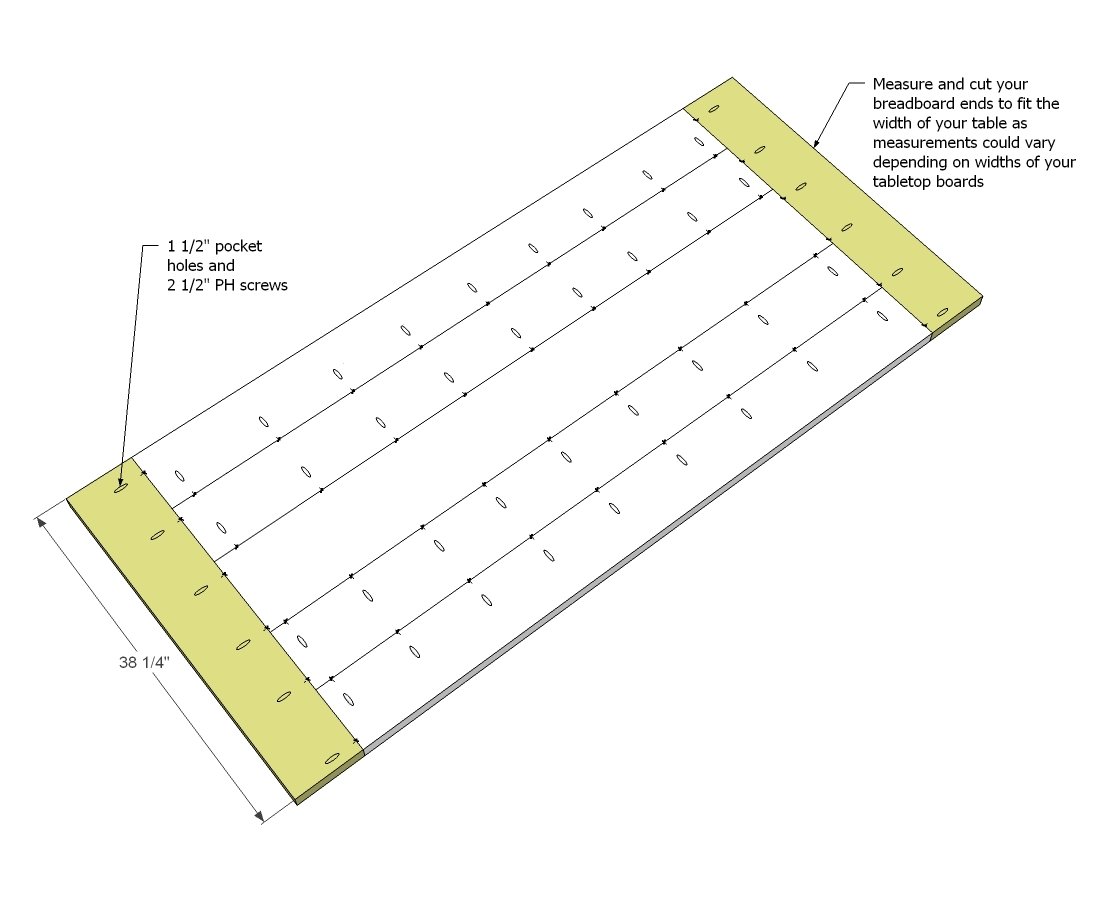
Measure and cut your breadboard ends to fit and attach to tabletop.
Step 8
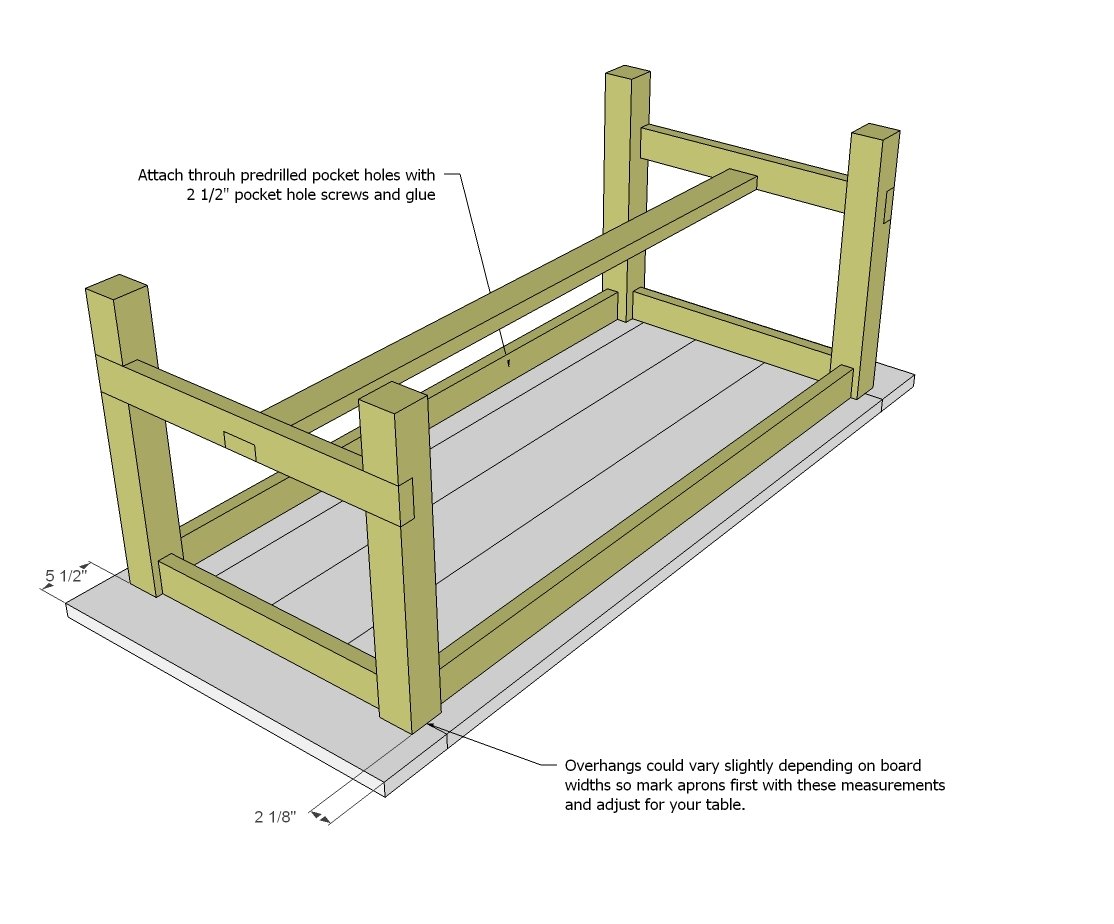
Then attach the base to the tabletop through predrilled 1 1/2" pocket holes with 2 1/2" pocket hole screws.
It is always recommended to apply a test coat on a hidden area or scrap piece to ensure color evenness and adhesion. Use primer or wood conditioner as needed.


Comments
birdsandsoap
Mon, 11/12/2012 - 10:49
I like this a lot!
this table turned out beautiful and the finish is great.
hawkingbrandy
Tue, 05/21/2019 - 23:15
Me too!
Me too!
Sarah @ ROR (not verified)
Mon, 11/12/2012 - 12:31
love this one!
So gorgeous and clean! I just started reading your site a month ago and keep coming back for more. I featured you on my blog today as a huge source of inspiration for me. (rain-on-roses.blogspot.com) Congrats on the book, I'm so happy for you!
MattVD (not verified)
Mon, 11/19/2012 - 11:09
Great update!!!
I decided to make a farmhouse table using your plans 2 weeks back, but decided to adjust the plans for pocket holes. After I had already started, you posted this update!! Happy to see that I pretty much made the adjustments you did and now my table looks great! Thanks for putting these plans out there!
In reply to Great update!!! by MattVD (not verified)
stevenleerson
Wed, 05/27/2015 - 17:27
You can construct your own
You can construct your own farmhouse table made of planks of solid reclaimed pine, this farmhouse table expands to seat up to 8 people. Bearing the knots and imperfections from its previous life, every piece is subtly distinct.
But you can modify this plan to your desired measurements & appearance:
- 60"w x 38"d x 31"h. (Comfortably seats up to 6; up to 8 when expanded to 80"w.)
- Expands to 80"w with drop-in leaf.
- Solid reclaimed pine in a weathered finish.
- A .5 cm gap in the apron between the extension and the table allows the solid wood to naturally expand and contract.
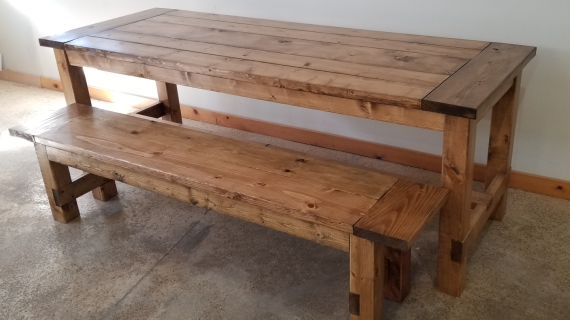
To match your newly-built farmhouse table with bench, here's another plan: http://ana-white.com/2011/01/plans/farmhouse-bench
HikingStick
Mon, 04/20/2020 - 05:26
Leaf?
How do you make it work a drop-in leaf?
Chris G (not verified)
Mon, 11/26/2012 - 08:13
Wood for the Table
Hi Ana! So I am in NJ, and I am having the hardest time finding any 2 x lumber other than Doug Fir Framing Wood. I read that most folks are using Dried Southern Pine, but they only have 1x of that here.
Can I glue the 1x's together face to face, or should I use the Framing Lumber? Any help would be really appreciated!
Thanks,
Chris
In reply to Wood for the Table by Chris G (not verified)
maryal
Thu, 02/16/2017 - 10:15
No, don't glue them together!
Just use 2X framing wood. I'm pretty sure that's what everyone else is using here.
Sandy Tull (not verified)
Wed, 11/28/2012 - 11:38
extentions
In a previous design there were extentions for the table to add I believe 15 more inches per end. I cannot find that plan, can you help?
Thanks,
Sandy
Sandy Tull (not verified)
Wed, 11/28/2012 - 11:38
extentions
In a previous design there were extentions for the table to add I believe 15 more inches per end. I cannot find that plan, can you help?
Thanks,
Sandy
Vince (not verified)
Fri, 11/30/2012 - 14:18
End Seats
Has anyone built this and run into a problem with seats at the end, not pushing in enough to actually eat at the table? I'm using this plan to build my own table to seat 10 in a couple of weeks and was curious if someone had any ideas on how to solve that problem? Thanks, love the plan!
KevinK (not verified)
Sun, 12/02/2012 - 08:30
Vince, I'm just finishing
Vince, I'm just finishing this table and found the plans at another site (artofmanliness.com). Those plans also include removable leaves on both end that would eliminate the chair problem on the ends.
KevinK (not verified)
Sun, 12/02/2012 - 08:33
Vince, I'm just finishing
Vince, I'm just finishing this table and actually found identical plans on another website (posted over a year ago by the way...artofmanliness). Anyway, those plans also include removable end leaves that would take care of the concerns with end seats.
nice joy (not verified)
Thu, 12/06/2012 - 00:57
finishing
Hi
the stain on the table is not evenly distributed, may be treating wood with a pre stain solution will help. The table looks great any way
Hillary (not verified)
Wed, 01/02/2013 - 22:14
I actually did use wood
I actually did use wood conditioner before staining the top, but not on the stretcher and aprons and you can definitely see the difference! I ran out of wood conditioner and was in a hurry. But, with the aprons and stretcher, it's not so noticeable since they're down low. And the top looks great in person.
Jonna O (not verified)
Sat, 12/08/2012 - 16:55
Pushing the seat under
Hi, I am in nearly finished with my farmhouse table, and was worried the end pieces wouldn't accomadate a chair well. So, I flipped the the cross beam streacher with the notch to the inside, and shortened the cross beam support. I then switched out the 8" bread board pieces for 10". Doing these two things bought me about 3.5 inches. Doesn't sound like much, but it makes a difference. Good luck!
Vince (not verified)
Wed, 12/12/2012 - 11:39
Good idea! I'll have to try
Good idea! I'll have to try that. Building this weekend, we'll see how it goes. Thanks!!
jenn.batman
Fri, 09/23/2016 - 10:25
I was wondering the same
I was wondering the same thing about seating at the ends. Does that H-shaped piece on the bottom offer any structural support that it couldn't do without?? I think the post legs visually would be fine by me. Off to continue reading all the pages of the comments and see if anyone already addressed that lol.
Chrisw (not verified)
Mon, 12/17/2012 - 16:40
Finish
My question is about the small gaps between the wood planks on the table. When something gets spilled will it fall through the planks, or with the screws being tight enough and the seal on it, it is sealed tight? I'm just worried about milk or something spilling in there and not being able to get cleaned up...
Matt F (not verified)
Tue, 01/01/2013 - 16:46
You have two options. Trim
You have two options. Trim the edges of the boards to eliminate the milled round-over form the sawmill. You will have to adjust the width of the table to accommodate this extra step. Second, and this is what I did, glue and screw the boards together. When you finish with Poly, the finish will seal the grooves. Wife and I built and finished ours in 3 days! Looks great.
Nicholas Paul Nelson
Sun, 01/06/2013 - 11:12
bench
does anyone know if there are plans for a matching bench to go with this table?
Hillary @ The … (not verified)
Mon, 01/14/2013 - 09:32
farmhouse bench
Not sure if the dimensions are right for this table, but here are the bench plans: http://ana-white.com/2011/01/plans/farmhouse-bench
bingo (not verified)
Mon, 01/07/2013 - 08:26
I am working on the table top
I am working on the table top and I have attached all the pieces together but the 2 x 10 has a slight bend. It makes the table have a twist to it in the middle. The bend in the middle makes all the boards uneven. Is there anyway to fix this?
Ive swapped out a couple of other 2 x 10's and they still have a slight bend in them
bingo (not verified)
Mon, 01/07/2013 - 08:36
I am working on the table top
I am working on the table top and I have attached all the pieces together but the 2 x 10 has a slight bend. It makes the table have a twist to it in the middle. The bend in the middle makes all the boards uneven. Is there anyway to fix this?
Ive swapped out a couple of other 2 x 10's and they still have a slight bend in them
Hillary @ The … (not verified)
Mon, 01/14/2013 - 09:35
If you have a friend with a
If you have a friend with a planer, you might be able to fix the twisted board by planing down the high part. It's really hard to find good 2x8s and 2x10s -- sometimes I have to dig through the whole pile of them at Lowe's, but getting the straightest possible wood to start with is your best bed.
camilton
Sat, 01/12/2013 - 07:14
Types of Wood
Hi, I'm new to this site and to the world of DIY. This table is going to be my first project as my current one is falling apart.
What is going to be the best type of wood to use to make this table? something that will good for a table and will take a stain pretty well?
Thanks! Love this site!
Hillary @ The … (not verified)
Mon, 01/14/2013 - 09:40
The plans for this table are
The plans for this table are for framing lumber, which doesn't really come in a variety of species. Usually you get fir or pine, both of which work equally well for this. You're best bet is to find the driest wood you can, no matter the species. If it feels cool/moist when you lay your hand on it, skip it. If it is really heavy, skip it. Go to a different store and see if you can find something drier. You can get other species in 2x lumber at a "real" woodworking store (not Lowe's or HD) but you'll pay probably $7/board foot for the wood (or more), versus under a dollar a foot for framing lumber. Framing lumber takes stain fine, just sand it well and be generous with the wood conditioner. And test on scraps first to get the color you want -- you can always return cans of stain you decide aren't right.
Hillary @ The … (not verified)
Mon, 01/14/2013 - 09:30
modified Farmhouse table -- scaled to 6'
I've posted a modified cut list and shopping list for scaling this down to 6' and giving more overhang on the breadboard ends. Hopefully this will be helpful to someone! http://thefriendlyhome.blogspot.com/2013/01/6-farmhouse-table.html
Aleesha (not verified)
Tue, 01/22/2013 - 22:25
Okay...I may have screwed my tabletop up...
So I'm relatively new to woodworking. I've done lots of small projects with my dad growing up and with my husband in the last few years- but nothing big like a table. I thought I could handle it though, if everyone else could. WRONG. At least I THINK wrong. SO I have my tabletop all assembled using pocket-holes- except for the breadboard ends. I didn't want to attach them till I had the rest right. I used the plan with the 10 inch board in the center and 2 8 inch boards on each side. I placed a pocket hole every 10 inches and the boards have no gaps between them- but they wiggle. I was expecting to be able to pick up the whole table top- and I can, but I can move the boards with just a little bit of pressure. I'm not sure if its because the boards weren't perfectly straight but they looked pretty darn perfect...other than the fact that they are rounded anyway- is that what's causing it to have a little give? When I attach it to the apron with that give go away? Or maybe when I attach the breadboard ends? Does anyone even know what I am talking about? I just feel like it should't be wiggly. Can you tell me what I might have done wrong? I have screwed all the pocket holes in as tightly as I can. I thought about adding more screws, or just adding a support across the middle or something- but what I really want to know is what did I do wrong?
warrenlee
Mon, 12/01/2014 - 19:07
table top has some give
You might want to use glue on the boards prior to screwing them together. Once you have them glued and screwed, let them set for a little before handling them so the glue has some time to bond. You can get glue that is quick setting.
dak1ne
Thu, 01/31/2013 - 12:59
Great !
Many thanks for the plans i tried to make this one but with wood from shipment pallets. You can see the result here :)
http://palettesunivers.canalblog.com/archives/2013/01/25/26243650.html
Many thanks again, i will soon do another model you created, still with wooden pallets.
Take care. Dak1ne
KeriDorgan
Thu, 02/07/2013 - 08:34
How can I make this with leaves?
I need to extend this to be longer for the holidays... For the holidays we have at least 12 adults so I need to make leaves to accommodate.... Already thinking of making the table longer for everyday. Please help as I am going to start this project next weekend since it is a 3 day weekend for me :) Thank you!
thehaileys
Sun, 05/12/2013 - 15:47
Putting the table outdoors?
Hi! Has anyone put a table like this outdoors? How has it held up?
I noticed on other plans people mentioned using cedar (which we didn't see). We are able to put the top of the table together and wish we had researched more!
We plan to use an outdoor plan and water-based seal. Anything else we can do to help it wear less?
Thanks!
Kate
sofamily02
Wed, 05/15/2013 - 10:16
Breadboard Ends Loose?
The tabletop went together smooth, but when I went to attach the breadboard ends, they don't seem to fit as snug as the boards side by side. Did anyone else have issues with loose breadboard ends? I purchased metal plate fasteners that I'm going to attach on the underside of the table where the breadboard ends connect to the table top.
julie_rushton
Tue, 06/18/2013 - 13:12
Without stretchers?
Has anyone made this table without the stretchers? Would it be secure enough? I love the look of the Tryde Coffee table as a dining room table and I'm thinking this plan would be easier to modify than the coffee table plan... thoughts?
Thanks!
Buckethead
Sun, 06/30/2013 - 09:32
Expansion issues anyone?
I am curious if anyone has experienced problems due to differential expansion between the breadboard ends and the main body of the table?
Wood expands and contracts due to changes in humidity. The effect is greater across the grain than along the grain so the main body of the table will expand and contract more than the ends. This type of the table is probably the most common example of what differential expansion is and how to deal with it. If not properly dealt with, this expansion can cause the wood to split or deform.
Most fine woodworking versions of this type of table make the ends wider than the main table, and attach the ends in a loos fashion, such as as pegs in elongated holes, so that they can can move.
kasimpkins
Tue, 07/30/2013 - 21:24
To small!!
I have always dreamed of having a farmhouse table like this! When I found these plans I was SO excited. Then I realized....it won't fit. My teeny tiny dining area is about a foot longer than the size of the table. So, I was wondering is there a way this can be made to extend? Maybe a 4x4 foot square table with 1 foot extensions on the end or a leaf or something?! When I have company I turn the table the other direction and it run into my living room (its all one long space). I like the length for company but on a regular basis it just doesn't fit. Any suggestions?
Tomstar
Thu, 08/01/2013 - 07:10
Woodworking projects
More often, woodworking projects are expensive in nature, so you must plan your budget beforehand, and consult an experienced contractor that can understand and fulfill your requirements within your pocket size.
njuarez33
Thu, 11/14/2013 - 13:30
Great post I just built my
Great post I just built my table using 100% reclaimed wood from my barn
shankel
Tue, 11/26/2013 - 11:47
removable legs/ tabletop
Is there a way to make the legs or tabletop (and stretcher?) removable to make it easier to move? Bolts? Brackets? I have yet to build this table but want to make sure it can move to my next place of residence with me. Any insight is appreciated!
TeamCraven
Thu, 01/23/2014 - 08:24
Removable
Reply to shankel: (if you haven't built this table yet...) We're in the process of building this table right now. We're making the table top and also the frame removable. We bought some metal threaded inserts in the hardware section of the hardware store, and the hex bolts that will fit into them. (so that we can screw and unscrew the pieces apart as many times as we need without stripping out any wood) We're going to end up having 4 separate pieces of table that will be able to go together. Piece 1: Table top with long aprons attached. Piece 2: 2 legs with short stretcher and short apron attached. Piece 3: (opposite) 2 legs with short stretcher and short apron attached. Piece 4: Long stretcher. We're attaching 2 short 2x4 boards that will be screwed directly under the tabletop, but fit snugly just inside where our short aprons will sit, so then our metal threaded insert will be in the 2x4, and we can put our hex bolts from the short apron straight into the 2x4 to attach. Also, then we'll have the metal threaded inserts in the short bottom stretchers, so then we can screw/bolt the long stretcher bar into it on each end, but it'll still be removable. Does that make sense? We just finished assembling the table top last night, and haven't started on the frame yet, so this is our plan... in theory... but we'll see how it actually works once we get that far! :) Good luck!
apowers313
Mon, 12/16/2013 - 20:49
Great project
This was my first Ana White project and I'm very happy with the results. Very solid design and easy to execute. Hillary's suggestion to use the polyurethane really paid off -- our 3 year old has gotten glue and marker on the table so far, and both wiped off without a trace.
TeamCraven
Wed, 01/22/2014 - 21:33
Seams
I was wondering if anyone has used epoxy or something else to fill in the seams of their table top? I don't want to deal with crumbs and nastiness getting stuck in the grooves all the time. I read somewhere in the comments that someone used some type of silicone to fill in the seams, after staining but before poly, but now I can't find the comment. Could you sand an epoxy down if you overfill? Would that scrape up your stained board and cause unever color? I just don't know what to do, and wondered if anyone had tried anything. Thanks!
gawa11
Thu, 06/05/2014 - 12:16
softwood or hardwood?
hi there, i see most people made their table with pine, but will using a softwood in a table not be very easily damaged? would a hardwood not be alot better to stand up to wear and tear, how have peoples tables lasted throughout everyday use?
hoosierary
Tue, 08/05/2014 - 11:42
softwood or hardwood?
I guess it all depends upon the preference of the end user. Some people like the soft wood and the ding's and dents that make it more rustic. Others like the sturdiness of hardwood that can absorb more impacts without leaving blemishes.
Rjcross
Tue, 09/23/2014 - 13:51
Anna!!
I am building this table and saw on the husky farmhouse table, that you built for your sister, you put silicone in the gaps...
I have kids and I am worried about the gaps/dips.... would you recommend filling them on this table with silicone?
If so... how? What kind? and if not... have any tricks up your sleeve?
Rjcross
Fri, 09/26/2014 - 17:52
anyone?
anyone?
In reply to Anna!! by Rjcross
Stephen Peters
Sat, 09/27/2014 - 17:24
Instead of silicone I would
Instead of silicone I would use a caulk called "Lexol" it is clear like water and will not yellow like silicone. I would only use it in the gaps between the boards to keep liquids from "running" through. Don't over tool it. One wipe with your finger is all you get.
Either use it sparingly deep between the boards so it doesn't "oouse" out.....or after one coat of finish...let dry...then continue your finish coats. Hope that helps
Come to think of it "Dap 230" has a clear caulk that is very elastic that would be easer to use. It is water clean up. Not quite as clear but if you finish over it ... it won't be noticeable.
The problem with silicone is that it yellows quite badly over time and it will cause "fish eyes" in your finish. That would be a horable mess to clean up. :( Have fun with your project! This looks like a perfect table for boys.
deltaechobravo
Tue, 11/25/2014 - 14:07
So...be honest
I just built this table, albeit shorter (took 12in from each of the length pieces) and with the stretcher supports on the inside instead of the outside (inspired by Hillary's 6' plans).
What I didn't do was use glue. This is my first project of any scale, and I guess I was so focused on the cuts and measurements that it slipped my mind. The question then, is how doomed is my table? Having spent the better part of two days on it I find myself rather attached, but I can see where a bond approximately the same strength as wood itself might be a crucial component. Nothing is ever easy.
Thanks,
DeltaEchoBravo
Leslie.glatt75
Sun, 12/07/2014 - 23:24
Frustrated
Hubby has been working in this table since early November (weekend project). Well he is all ready to scrap the whole thing cause of warping. He literally put the table top together and the boards were fine now it's warping. It was really hard to find 2x8s and the one 2x10 that wasn't warped. any suggestions? Ps. It's still in the early stages. No stain yet.