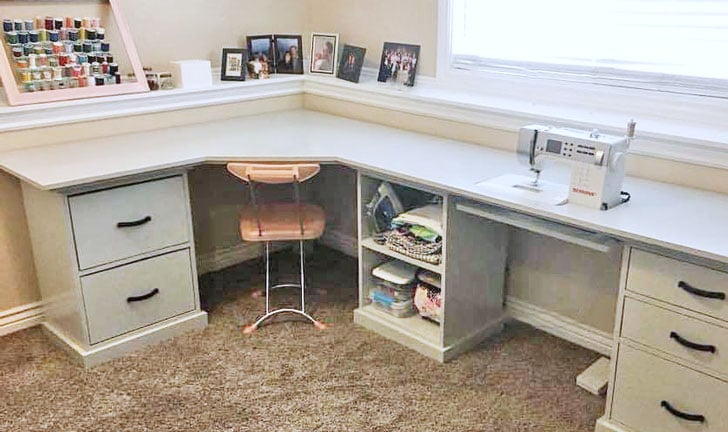


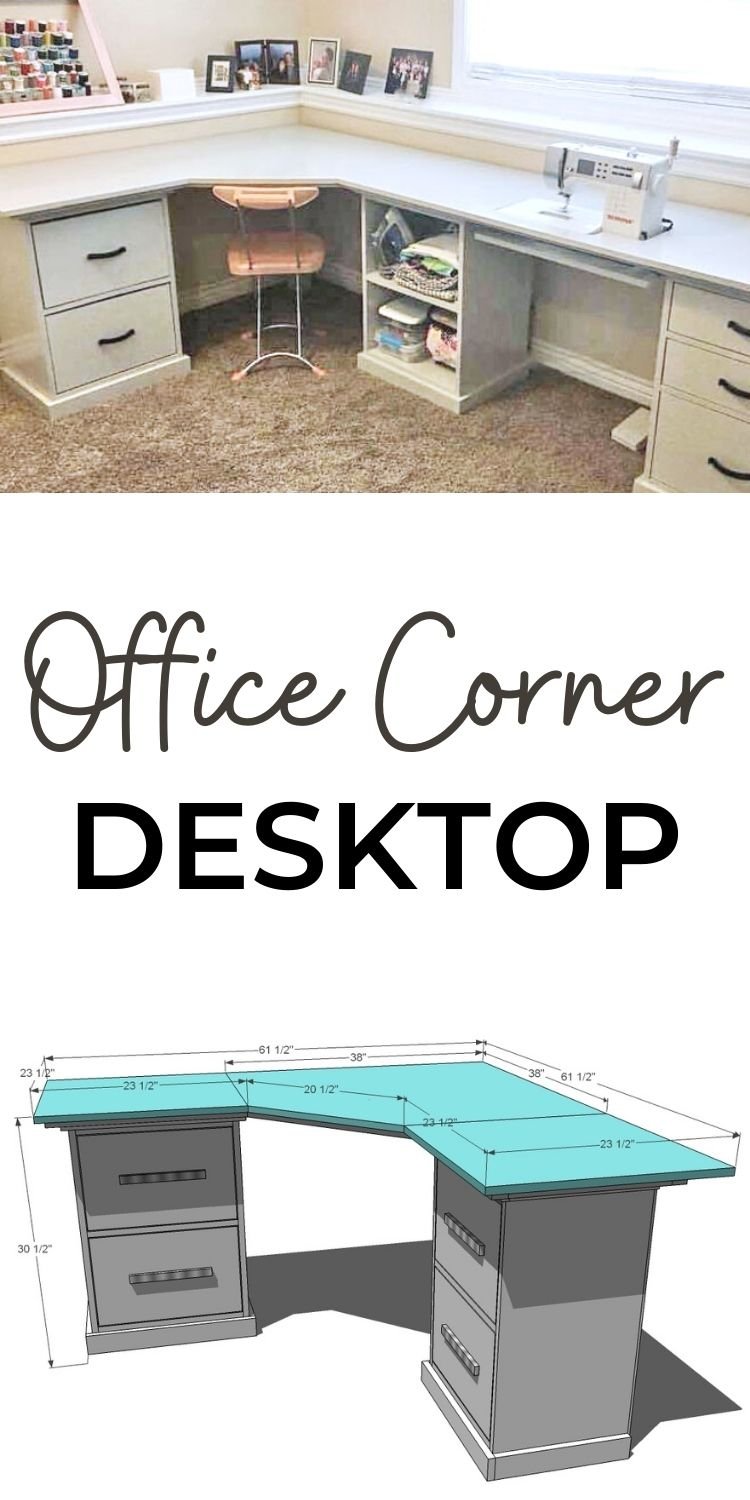
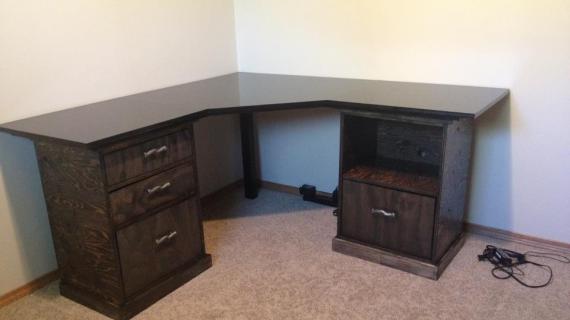
Corners in offices can be great ways to expand your space - whether you use the corner for a computer or a workspace.
With this easy plan, you can build your own corner desktop. Build bases to suit your storage needs to create the perfect corner desk system!
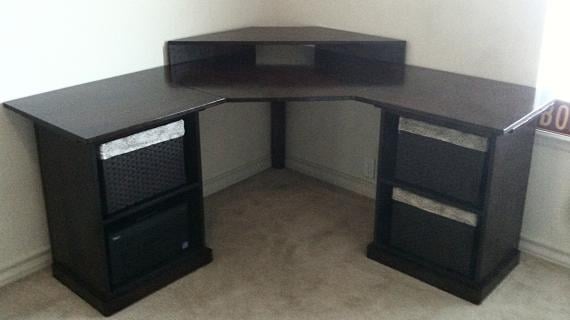
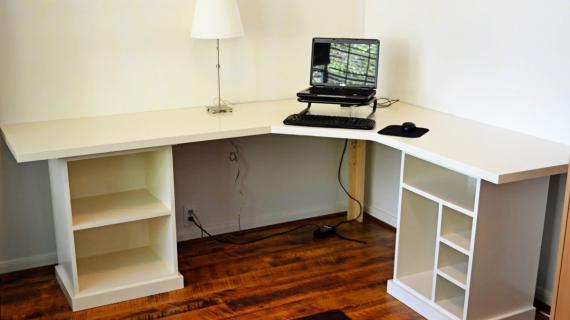
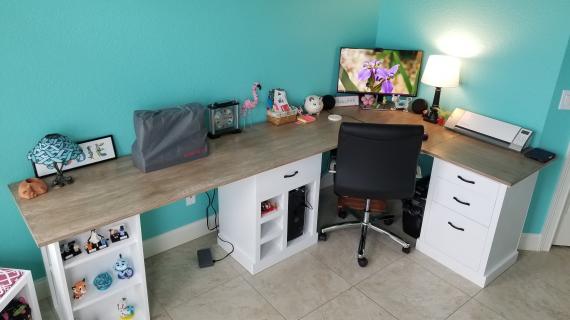
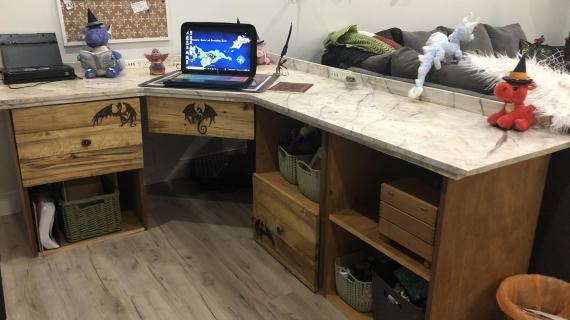
Shown with open shelf base and open bases with drawers. See all plans in the Modular Office Collection to customize your corner desk top with the perfect bases.
Preparation
- 1 – Sheet of 3/4″ MDF or hardwood plywood
- Edge Banding if you are using hardwood plywood
- 4 – 1×2 Boards
- 1 – 1×3 Board
- 3″ screws for attaching the back leg OR corner brackets and screws to attach the back leg with hardware
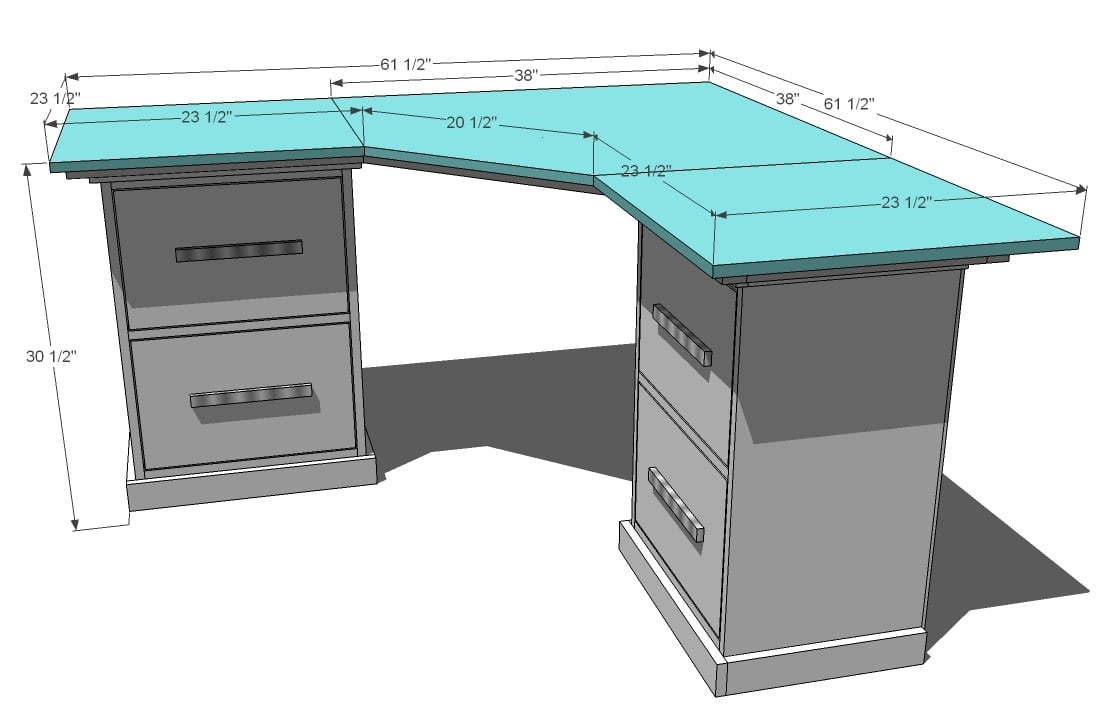
Cut List for Tabletop Pieces
- 1 – 3/4″ MDF or Hardwood Plywood cut in a 38″ x 38″ square (you will cut off one corner in step 1)
- 2 – 1×24 boards @ 24 1/4″ (you can cut the pieces out of your scraps from the corner, dimensions 23 1/2″ x 24 1/4″)
Cut List for Trim Under Tabletop
- 1 – 1×2 @ 58 1/4″ (trim in red)
- 2 – 1×2 @ 56 3/4″ (trim in green)
- 4 – 1×2 @ 16 1/2″ (trim in blue)
- 1 – 1×2 @ 38 3/4″ (trim in yellow)
- 1 – 1×2 @ 22″ (trim in pink, cut to measurement, mitering ends 45 degrees)
Cut List for Leg
- 3 – 1×3 @ 29 3/4″ (leg pieces)


Work on a clean level surface and use proper safety precautions and equipment. Review the plans before beginning, having a clear understanding of how the plan will be put together. Predrill and countersink your screws, using glue. Check for square after each board is fastened.
Instructions
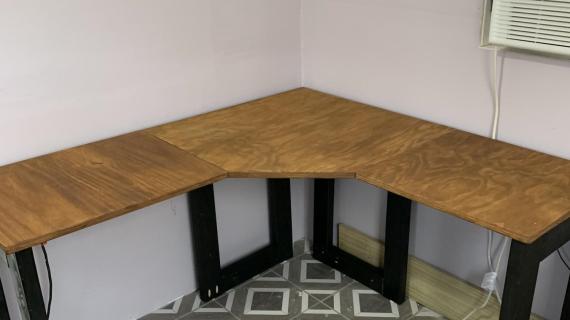
Step 1
Measuring the tops. Measure the tops of your bases and make sure they will fit in a 15 1/2″ x 21″ opening. If they will not, adjust the trim lengths to fit in step 3.
Step 2

Tabletop Pieces. Cut out your tabletop pieces as shown above. For the corner, blue, cut a 38″ x 38″ square. Then mark on 2 sides 23 1/2″ from the back. Draw a 45 degree angle between the two points and cut off the corner.
Step 3

Trim Pieces. On the underside of the tabletop, fasten the trim pieces using the 1 1/4″ screws and glue.
Start with the red board, fastening it 3″ from the back edge and 1″ from the front side edge as shown above.
Then fasten the green boards, leaving a 16 1/2″ gap between the two green boards. Next, fasten the white boards. Where the white boards span the tabletop joint, make sure you fasten to both the corner and side tabletop pieces.
Then fasten the yellow trim piece in place. Finally, measure and cut the pink piece, mitering ends in 45 degrees. Use glue and let the glue dry with the piece laying flat.
Step 4
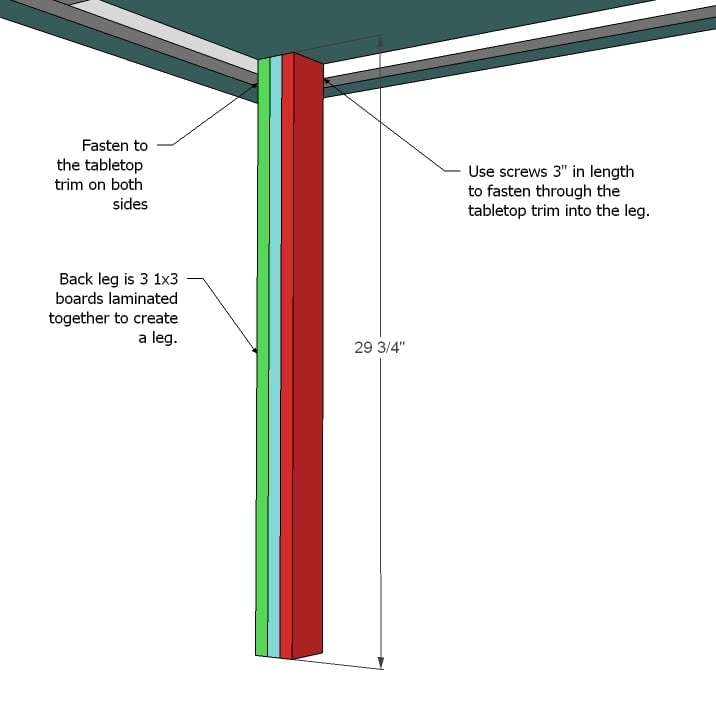
Leg. Build the leg by fastening 2 of the 1×3 boards together with glue, 1 1/4″ screws, and clamps. Let dry and fasten the remaining 1×3, again with glue and clamps and screws. Let dry. You can attach the leg to the tabletop by screwing through the top, screwing through the trim, or using corner brackets.


Comments
Alana Jo (not verified)
Wed, 03/03/2010 - 08:48
I really need this! Thanks
I really need this! Thanks
Tara M (not verified)
Wed, 03/03/2010 - 09:01
Thank you.Thank you.Thank
Thank you.Thank you.Thank you.
Viola (not verified)
Wed, 03/03/2010 - 09:18
Thank you so much Ana!!! Now
Thank you so much Ana!!! Now to get my husband to help me build.
Serena (not verified)
Wed, 03/03/2010 - 09:46
Love it! After I get our
Love it! After I get our bedroom set finished (and maybe the rest of the schoolroom pieces) I'm planning to make this for my craft room. Thanks so much!
TracyD (not verified)
Wed, 03/03/2010 - 10:29
SWEET!! Thank you!!
SWEET!! Thank you!!
Heather (not verified)
Wed, 03/03/2010 - 11:39
Hey Ana, after seeing your
Hey Ana, after seeing your corner desk it got me thinking. We are in need of new kitchen cabinets. How cost efficient would it be to make your own cabinets? Money is tight,I was just wondering if we could build our own?
Erin Zacharda (not verified)
Wed, 03/03/2010 - 12:44
OH MY GOSH!!!! I have been
OH MY GOSH!!!! I have been wanting that desk FOREVER! Now I can have it!! YOU ROCK, ANA!!
Erin
Jennifer (not verified)
Wed, 03/03/2010 - 17:12
Yay!!!!!
Yay!!!!!
Amanda (not verified)
Sat, 03/06/2010 - 12:26
I am so excited! We're
I am so excited! We're planning on attacking our library/office next year and with these plans (and a few of your other plans too!) we'll be able to build everything we want and save thousands. Thanks so much!
Lisa B (not verified)
Wed, 03/10/2010 - 12:59
Hello Ana!I can't tell you
Hello Ana!
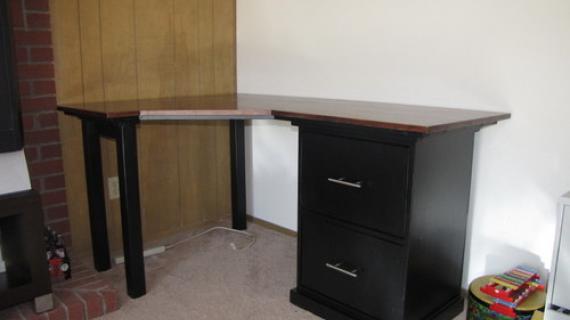
I can't tell you how much I appreciate what you are doing here! I am so excited because we just came back from the store to buy the supplies for this desktop system. My husband is building this along with some other items on your site for my craftroom. He is going to make it into a huge "U" shape so I can have my different crafting stations. And the best part of it......it only cost us $23 because we used our points from our credit cards!!! And that was even with the tools that he needed.
I also wanted to share with you a very high compliment. My husband is a very handy and can do anything from electrical, plumbing, carpentry etc. I have been telling him for months about your site and he kept on blowing it off. Well after I told him about the big corporate company coming down on you he was outraged. I then printed out the plans for the items I wanted (here;s the compliment) and as he was reading them over he said outloud "WOW this girl is good!" Now my hubby NEVER EVER says that about anyone an won't even take advice from anyone.
Gotta go start our project. But I just had to stop on by and let you know how excited I am that I am getting my craftroom done in the way I have always wanted it. If it weren't for your site I wouldn't be able to have it because I just don't have thousands laying around!!
Big Hugs from Carlisle, PA!!! I can't wait to share the pictures with you when it's done!!
Danny Mittleamn (not verified)
Sat, 03/13/2010 - 07:48
Exactly what I have been
Exactly what I have been looking to build for my wife!
One comment: I need to put an under desk keyboard drawer into the table. So in step three it is important for me to have onsite my drawer assembly and confirm how it is going to attach underneath. If it doesn't fit the diagonal framing beam, this is the time to adjust design so it will fit.
Kenneth (not verified)
Sun, 03/28/2010 - 11:32
I built one very similar desk
I built one very similar desk many years ago, the only difference was that I added a very inexpensive pull out keyboard drawer for it...would be a nice addition to yours.
Adam | Toronto… (not verified)
Sun, 03/28/2010 - 11:35
Very nice build. I love
Very nice build. I love finding projects that give you very nice results that cost much lower than the originals. I've been looking to create a desk that'll fit into my office without having to spend an arm and a leg to do it.
I'm going to follow these plans and then report back on my finished creation.
paul (not verified)
Sun, 03/28/2010 - 13:03
I built something like this a
I built something like this a while back for my sister. Instead of painting or varnishing the top I used self adhesive vinyl floor tiles. They come in one foot squares and are stocked, in all sorts of patterns, at most Home centers Lowe, Home depot etc. Most of the time they sell for about 1.00 to 1.50 each. They go on fast, look great, are impervious to spills, and will, I think, last indefinitely on a desk top.
Kemi (not verified)
Sun, 03/28/2010 - 14:32
I found your blog via
I found your blog via Lifehacker, this desk is they perfect project I've been looking for!
JuiceyBananas (not verified)
Mon, 03/29/2010 - 02:38
The space between the
The space between the cabinets that hold up the desk doesn't look like much. Can the dimensions be expanded to increase more room and still allow someone to lean on the middle safely I wonder?
Richard (not verified)
Tue, 03/30/2010 - 06:21
Wow, This is a trash design.
Wow, This is a trash design. Please anyone one reading this don't build this desk. It lacks stability and the MDF will not hold up very long. Real carpenters all around the world are upset at you for posting this on the internet, please remove it. Some people might take you seriously. Thank you for your time.
Anonymous (not verified)
Tue, 03/30/2010 - 06:55
All you need is an old door
All you need is an old door (fill the knob hole or use for computer cords, etc.) and two metal filing cabinets. So simple, even a caveman could do it. Have a nice day!! KISS
Caitlin (not verified)
Wed, 07/21/2010 - 06:05
Working on this right now,
Working on this right now, sorry if this might upset "real" carpenters, Richard. I'll make sure not to jump on it, and pray that the paperwork sitting on it does not manage to break the fragile MDF.
jigganancy (not verified)
Wed, 10/27/2010 - 11:03
I'm building this right now.
I'm building this right now.
What type of wood and finish did Nancy use?
DeAndrea (not verified)
Sat, 11/13/2010 - 16:45
Are their any other reader
Are their any other reader photos out there? What do you folks do for the ends of the plywood? Just add trim? If so, what kind? Also, anyone who's built this, is the corner space sufficient for someone to move around in comfortably? Looks like the dimensions are the same as pb, but, the hubby is a little worried about it being large enough.
orangesugar (not verified)
Mon, 01/03/2011 - 06:31
DeAndrea I recently measured
DeAndrea I recently measured the Pottery Barn Desk and the corner piece is actually 40"x40". Not that much of a difference though.
Karen (not verified)
Mon, 01/10/2011 - 15:40
I've been wanting a smaller
I've been wanting a smaller corner desk unit for our den. Thanks for these ideas, pictures, and plans! blessings on your day!
rob (not verified)
Sat, 02/05/2011 - 17:57
this is cool! wifes office is
this is cool! wifes office is closing so she's working from home and needs a desk.
with a little modifying the size this will be perfect. im going to use her file cabinets for the base and instead of useing the 3 pieces together for the center leg cutting 2 six in pieces into a corner then installing it at corner.
thank you for the main idea
wforeman
Sun, 06/26/2011 - 05:25
Easy to Build and Has Been in Daily Use for 6 Months!
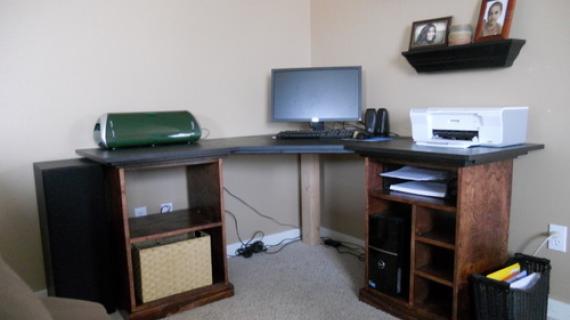
This was my first "Ana White" building project and I was hooked on this site from this project on! I started a new job in January which required me to work from home, so I needed to create a home office fast. I had space in a corner of my basement, so I found this corner desk plan.
I built it in a weekend (using the 'open base units' as my cabinets), painted it using some "overstock" paint from my local home improvement store, and have been using it daily ever since.
A couple of things I learned from this project:
- Take the time to put several coats of paint AND polyurethane on the desk. I did this and the finish has held up beautifully!
- I strongly recommend the use of a pocket-hole jig to assemble the base units. I use the Kreg jig
- Invest in clamps!! I've found that clamping everything before you attach it keeps corners square, tables level and your project looking professional.
I highly recommend this project!
Wayne
http://www.SimpleWoodworkProjects.com/blog
Supermom77 (not verified)
Mon, 09/05/2011 - 21:31
HERS & his
Any suggestions for turning this into a large two sided unit for hers and his use? Should I just build two? or do I need to do more? He's a real moose so it has to be strong.
wforeman
Tue, 09/06/2011 - 04:42
Hers & His idea
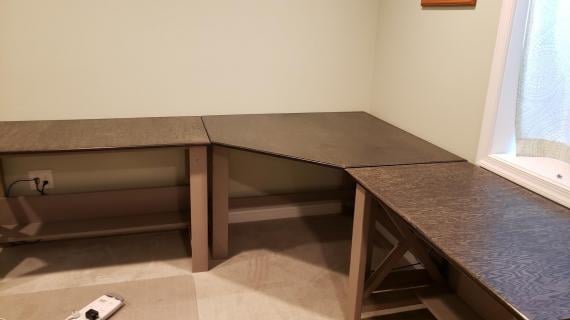
This design is really flexible, so you could certainly extend it for use for two people. Just remember that it's a "corner" design so to extend it for two people, you'll just want to extend one of the sides.
Here's a photo of how another reader did just that... extended the corner design to accommodate another person.
http://ana-white.com/2011/08/family-computer-station
I used 1/2" plywood for my corner desk and it is very strong. If you stick to the plans above, you won't have any issues with breaking the desk.
Have fun with the design, that's part of the fun!
Wayne
http://www.SimpleWoodworkProjects.com/blog
sherie
Mon, 01/16/2012 - 10:50
Corner Desk Hutch
Are there plans anywhere for either the corner or straight hutch (about 8" tall) that sit atop the desks in the similar line at PB? Thanks!
Guest (not verified)
Mon, 01/23/2012 - 20:33
paint finish??
i think i would like to paint my desk instead of stain... could someone please suggest a base and sheen? I will be painting the desk white for sure but i want it to be highly durable. I have read that High gloss latex is durable but I dont really like the look of high gloss. I prefer semigloss. I'd also like to stay away from oil-based paints and polyurethane finishes, too smelly for someone who suffers from frequent migraines :-P
Sadie (not verified)
Mon, 01/23/2012 - 20:36
also, just to add, i am using
also, just to add, i am using the corner desk top plan, extending one side by a few inches. one base is the file cabinet plan and the other side is the book case plan. I am really excited about this project :)
EB (not verified)
Tue, 06/26/2012 - 06:33
Corner desk plans?
HI there! I know this is an older plan on your site - I cant seem to download the PDF version of the plan? Can you take a look and maybe send it to me? This corner plan is just what Ive been looking for to DIY myself a desk!
Thanks ana!
laniehoe
Fri, 07/06/2012 - 22:09
Craft storage help
Not only do I like this desk but I LOVE Whatever that is holding the inks and punches on the wall above. I have been going insane trying to find a way to put mine on the wall where they would be easily reached. Please tell me that is one of your designs and how do I make it.
Sara (not verified)
Tue, 07/17/2012 - 07:39
Corner desk bases
Hi Ana - Love love love this. I am wondering if you can direct me to a specific link that shows the plans for these particular bases shown in this pic (ones with big section on top, big on left and 3 little on right)? Thank you!
Jay (not verified)
Mon, 08/20/2012 - 22:20
Dear Ana, Thank you so
Dear Ana,
Thank you so much for this website. I'm a police officer by profession, but I've always loved woodworking and carpentry. I've recently taken carpentry up as a hobby to pass time through a work related injury and have plans to build several of your designs . I can't thank you enough for the inspiration and the groundwork which will allow me to put my downtime to good use and stretching my money, while providing quality furniture that I will enjoy for years to come.
Greg (not verified)
Mon, 01/07/2013 - 19:36
Corner desk
I would like to build the exact same corner desk as in the picture. Do you have the cut list and plans for the base units with the open shelves? Thanks.
Francis (not verified)
Sat, 01/19/2013 - 17:44
Hi, I'm considering starting
Hi, I'm considering starting this project. I'm wondering whether the seams between the three different desktop pieces are visible. I'm assuming so based on other DIY projects I've done with similar aspects. Has anyone had luck hiding them? Perhaps by filling the whole length of the seam with wood filler?
kongk
Tue, 05/21/2013 - 06:54
I recently found many useful
I recently found many useful information in your website especially this blog page. Among the lots of comments on your articles. Thanks for sharing.
Driving Lessons Dublin
Kast
Fri, 10/04/2013 - 06:09
New to this...
Just read over your plans. I love your work by the way. Just curious, I see a Kreg jib is on the supply list. I don't see in the plan instructions when I would use this. I'm thinking when I attach the leg to the table if I insert the 3" screws through the trim? I also want to be clear that I need to make bases first to make sure they fit underneath within the trim areas.
Thank you
kasselt001
Wed, 02/05/2014 - 05:45
drawers
Hi Ana,
I only see the directions for the table top. I love the pottery barn inspired drawers. Do you have instructions to build these as well?
kennethrh2
Sat, 02/15/2014 - 21:36
Awesome!
You rock and your website is awesome!!! I enjoy woodworking projects and your website has some awesome projects on it!
Thanks Anna!!!
mombuilder
Wed, 04/29/2015 - 01:31
Attaching desk top pieces
I am just wondering how you secure your table top pieces together--can you use a kreg jig and screw them together? Or do you just glue them and rely on the trim pieces to hold them together? I can't wait to build this system for my husbands new office!
Sixchaulks@hot…
Mon, 12/18/2017 - 05:07
Bigger
How could I make the depth of this top wider. Going from 231/2 to 30 in. My question is what size does the centre need to be if the sides are now 30 x 30.
Thanks Rod
mcjessyfamily@…
Mon, 07/26/2021 - 09:14
Looking for plans for the sewing machine to the right of the cor
Hello, Where can I find plans for the rights side of the table? The portion with the sewing machine cutout.