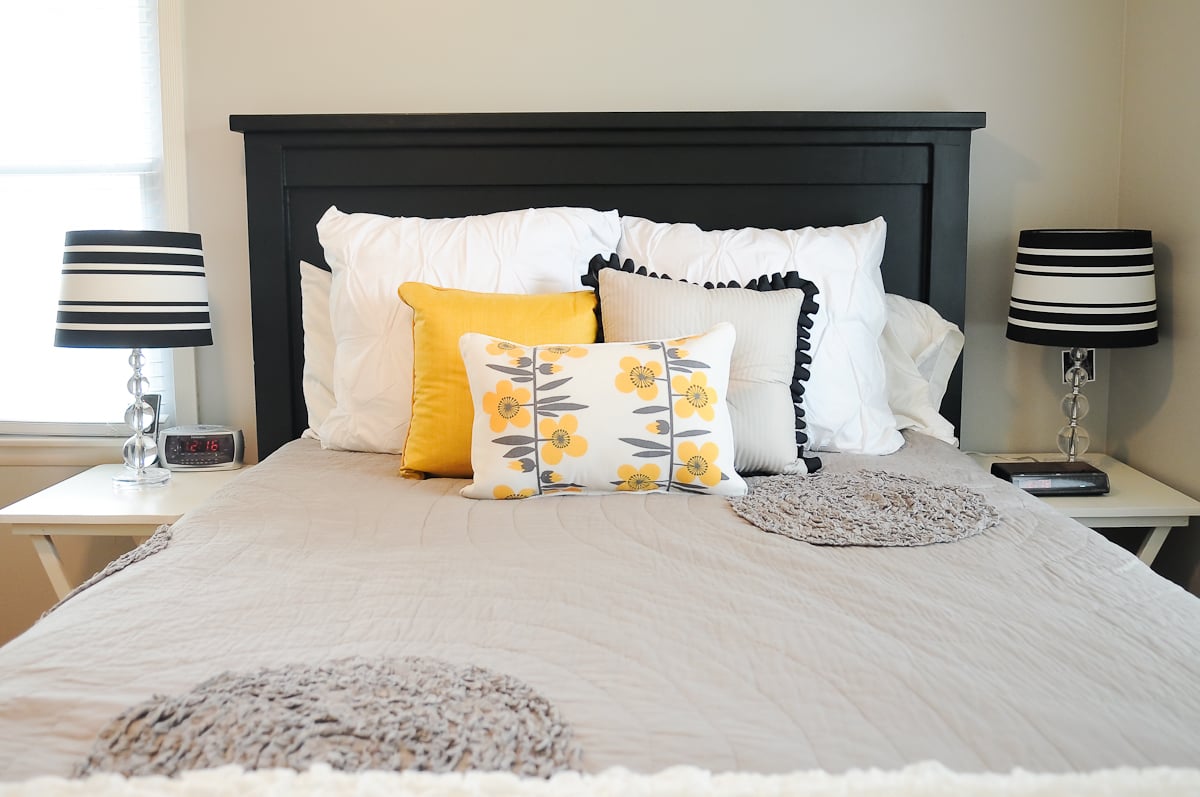
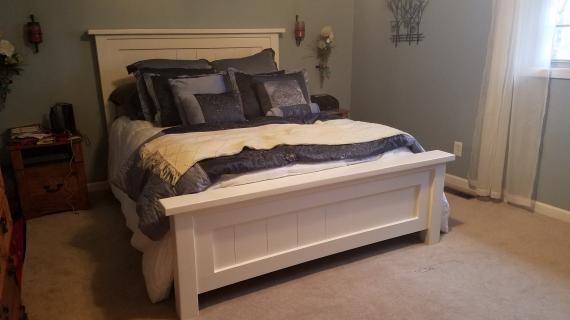
This beautiful farmhouse bed can be made for just a fraction of the cost to buy - all from standard, off the shelf lumber! You won't need a pocket hole jig or any special tools to build.
This bed has been built thousands of times and is a reader favorite. You can also find the twin version, king version, and all our farmhouse bed plans here.
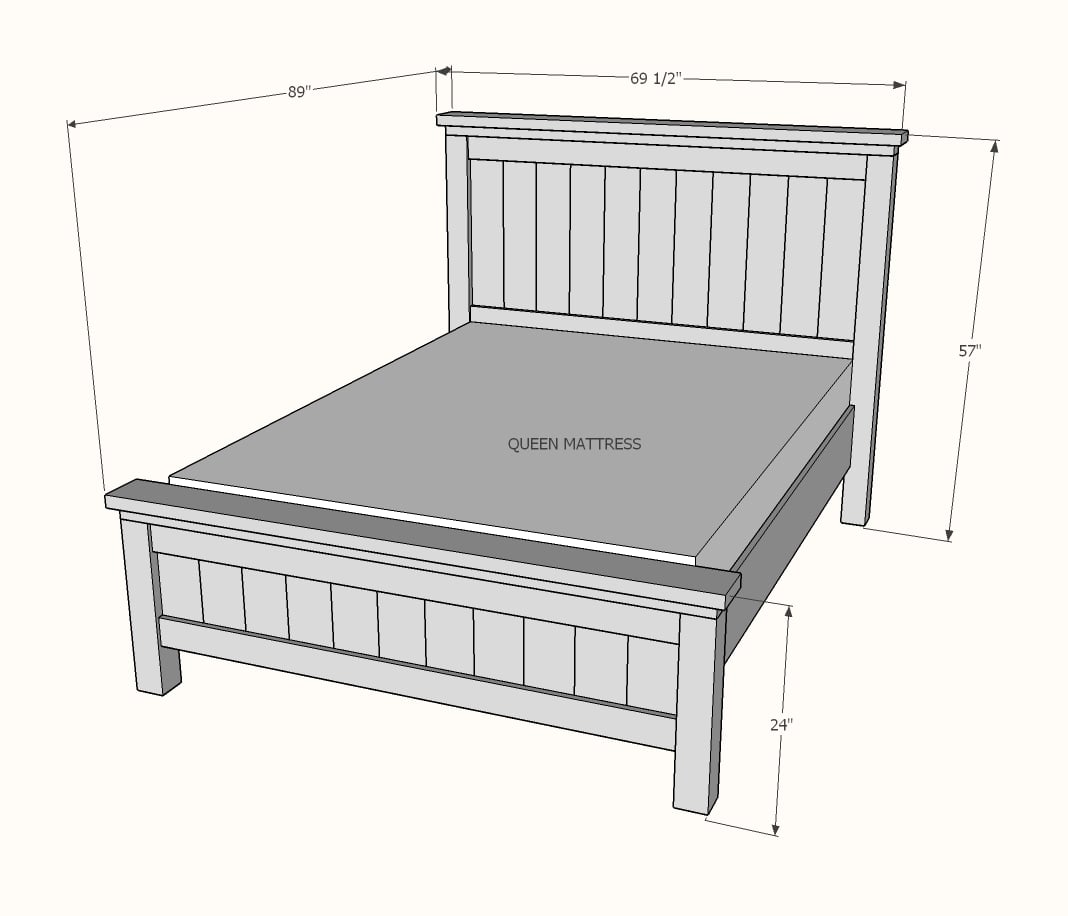
Preparation
- 12 - 2x4 8 feet long
- 2 - 2x6 8 feet long
- 2 - 1x10 8 feet long
- 2 - 4x4 8 feet long
- 1 - 2x2 8 feet long
- 6 - 1x6 8 feet long
- 4 - 1x4 8 feet long
- 100 - 1-1/4" long brad nails
- 75 - 2-1/2" long self tapping wood screws (#8 star bit recommended)
HEADBOARD CUT LIST
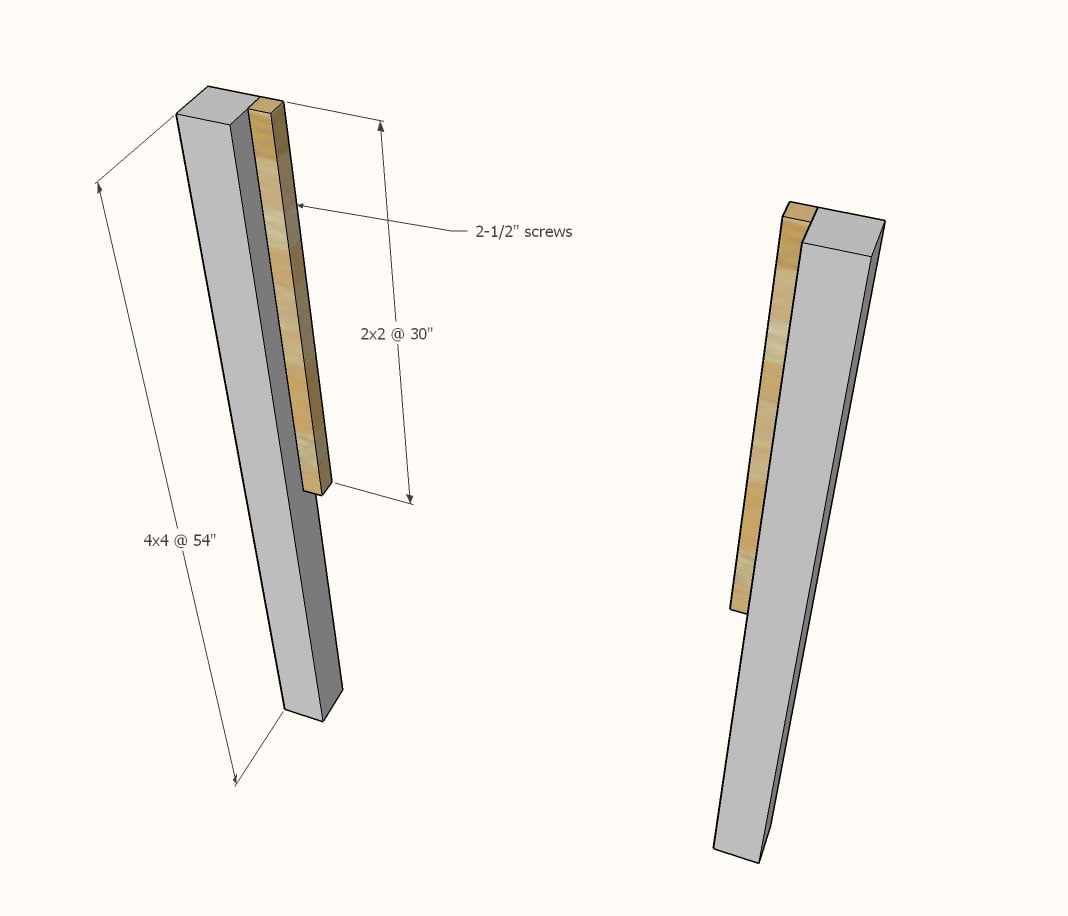
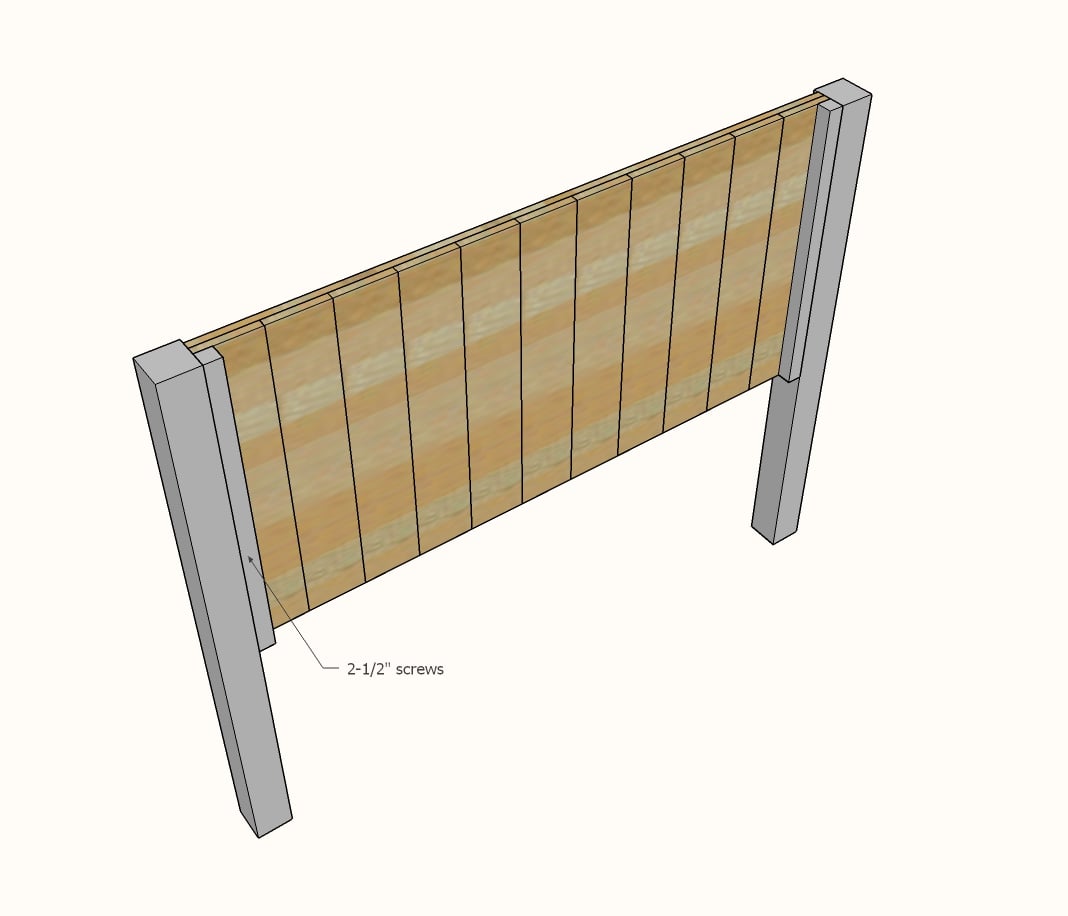
- 2 - 4x4 @ 54"
- 2 - 2x2 @ 30"
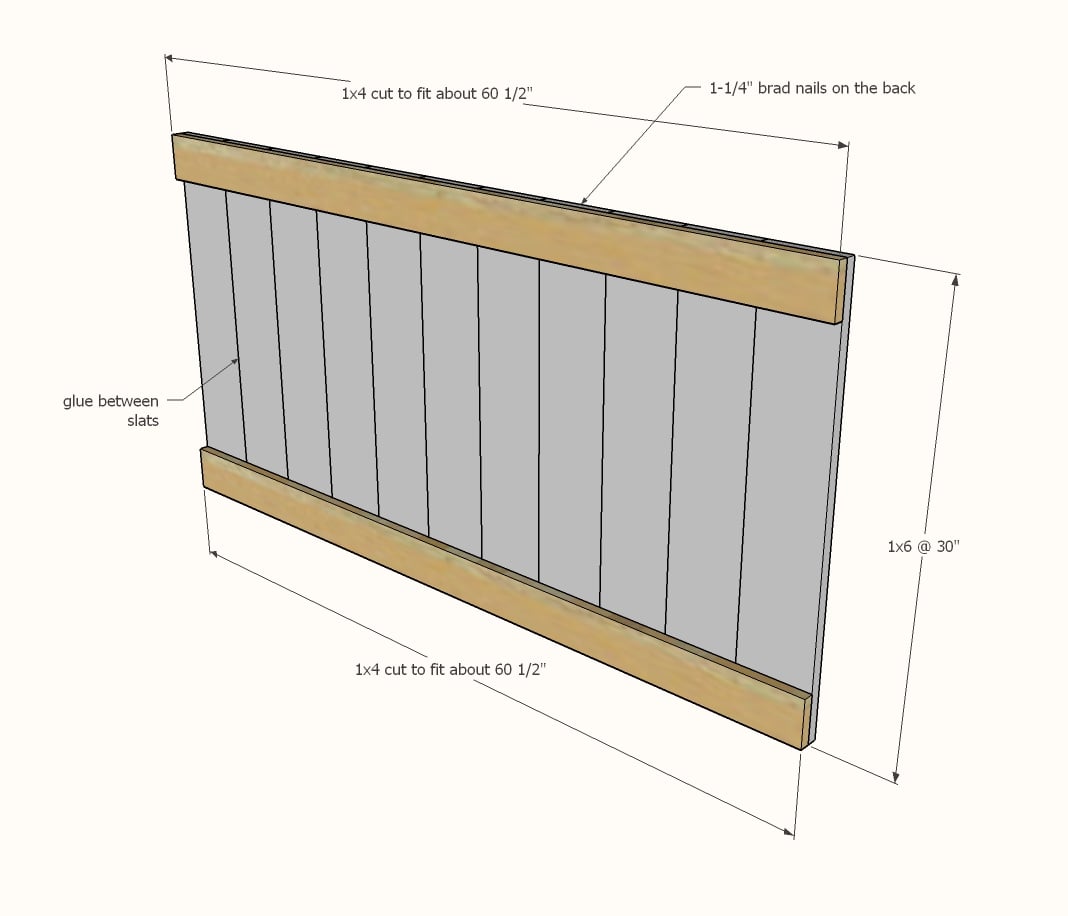
- 11 - 1x6 @ 30"
- 2 - 1x4 @ about 60-1/2" - measure and cut to fit
- 1 - 2x4@ 67-1/2" - measure and cut to fit
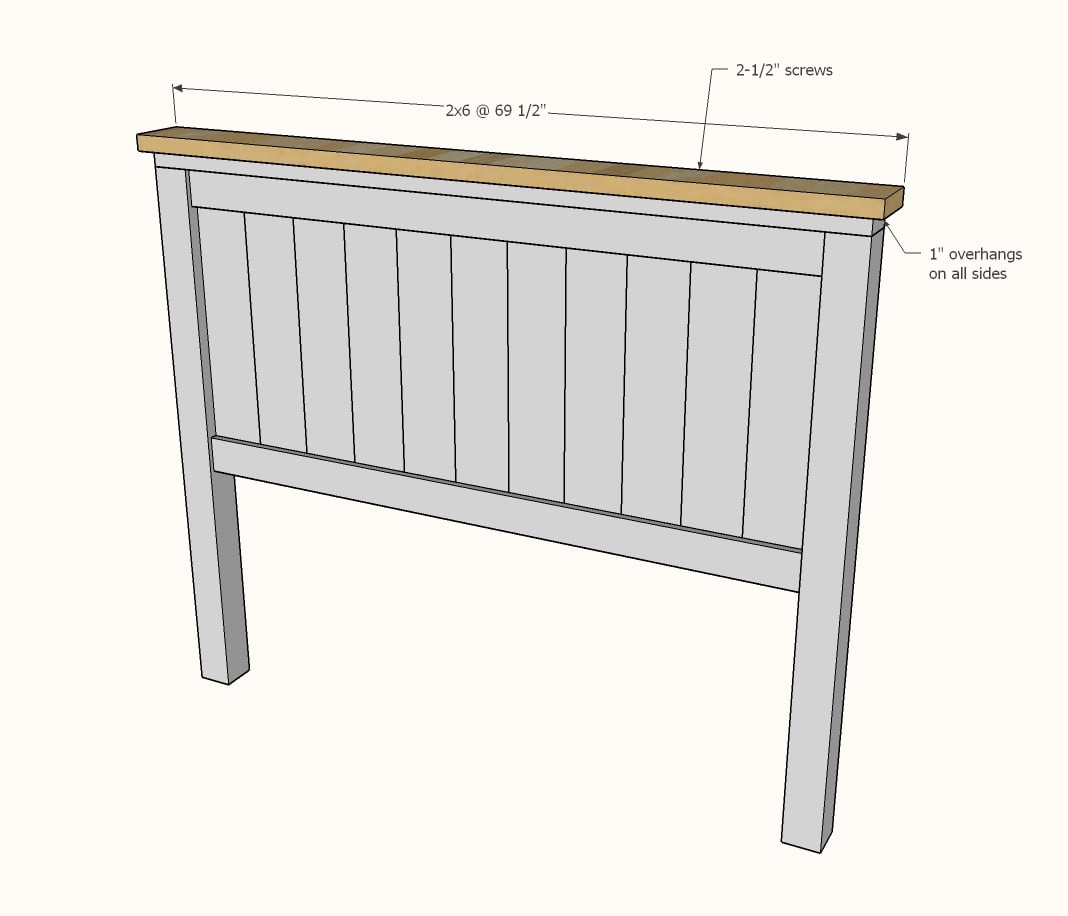
- 1 - 2x6 @ 69-1/2" - measure and cut to fit
FOOTBOARD CUT LIST
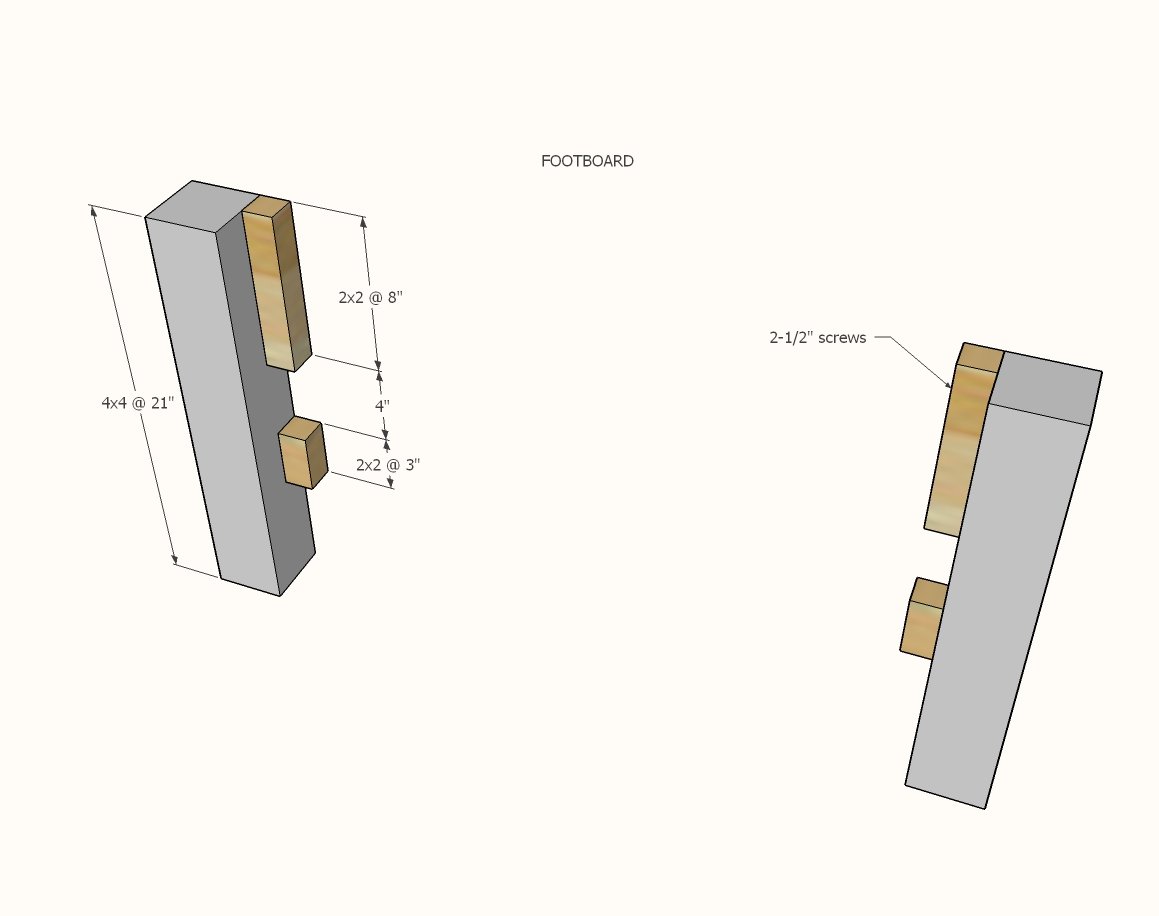
- 2 - 4x4 @ 21"
- 2 - 2x2 @ 8"
- 2 - 2x2 @ 3"
- 11 - 1x6 @ 15"
- 2 - 1x4 @ about 60-1/2" - measure and cut to fit
- 1 - 2x4@ 67-1/2" - measure and cut to fit
- 1 - 2x6 @ 69-1/2" - measure and cut to fit
MATTRESS SUPPORT FRAME/SIDERAILS
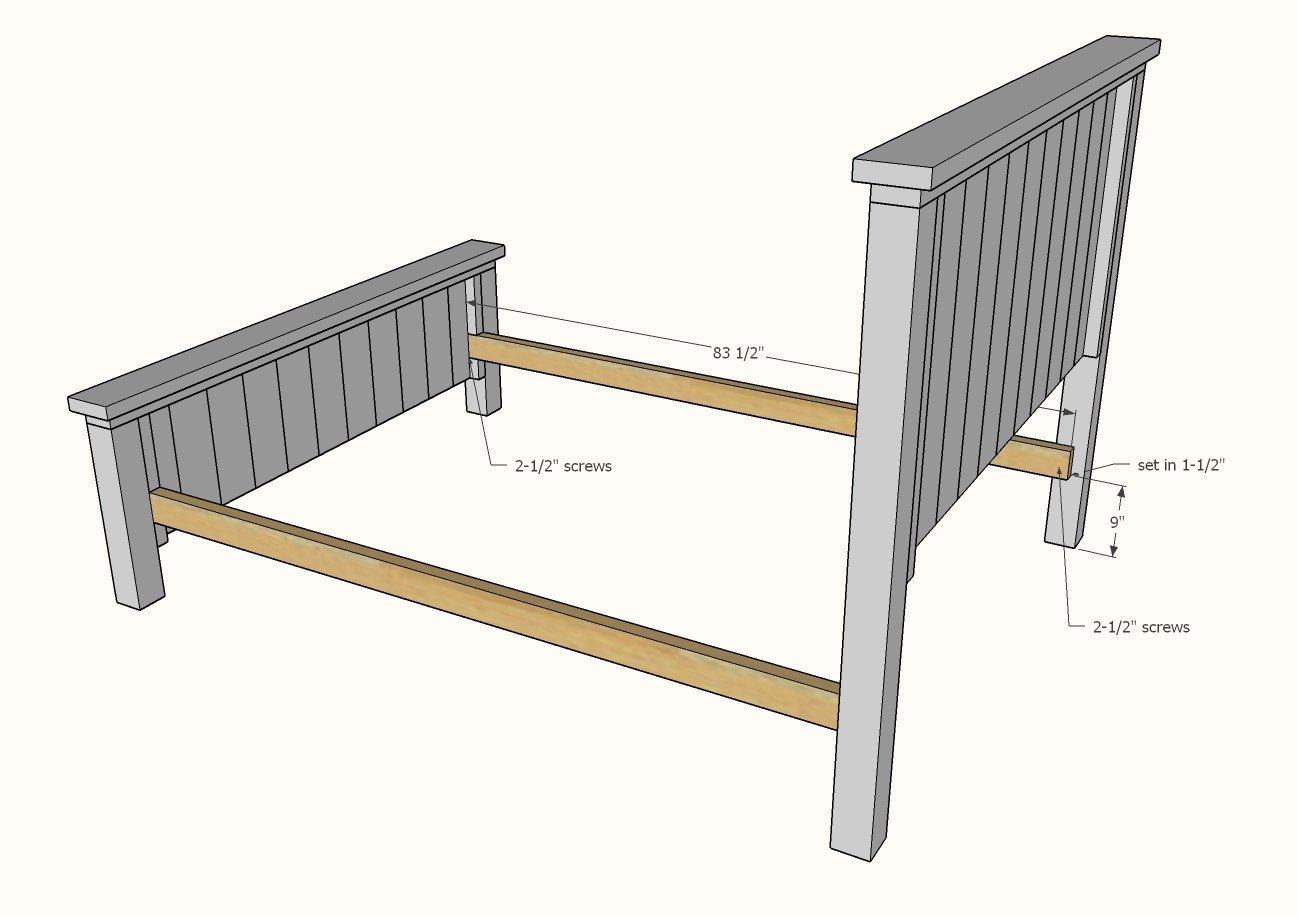
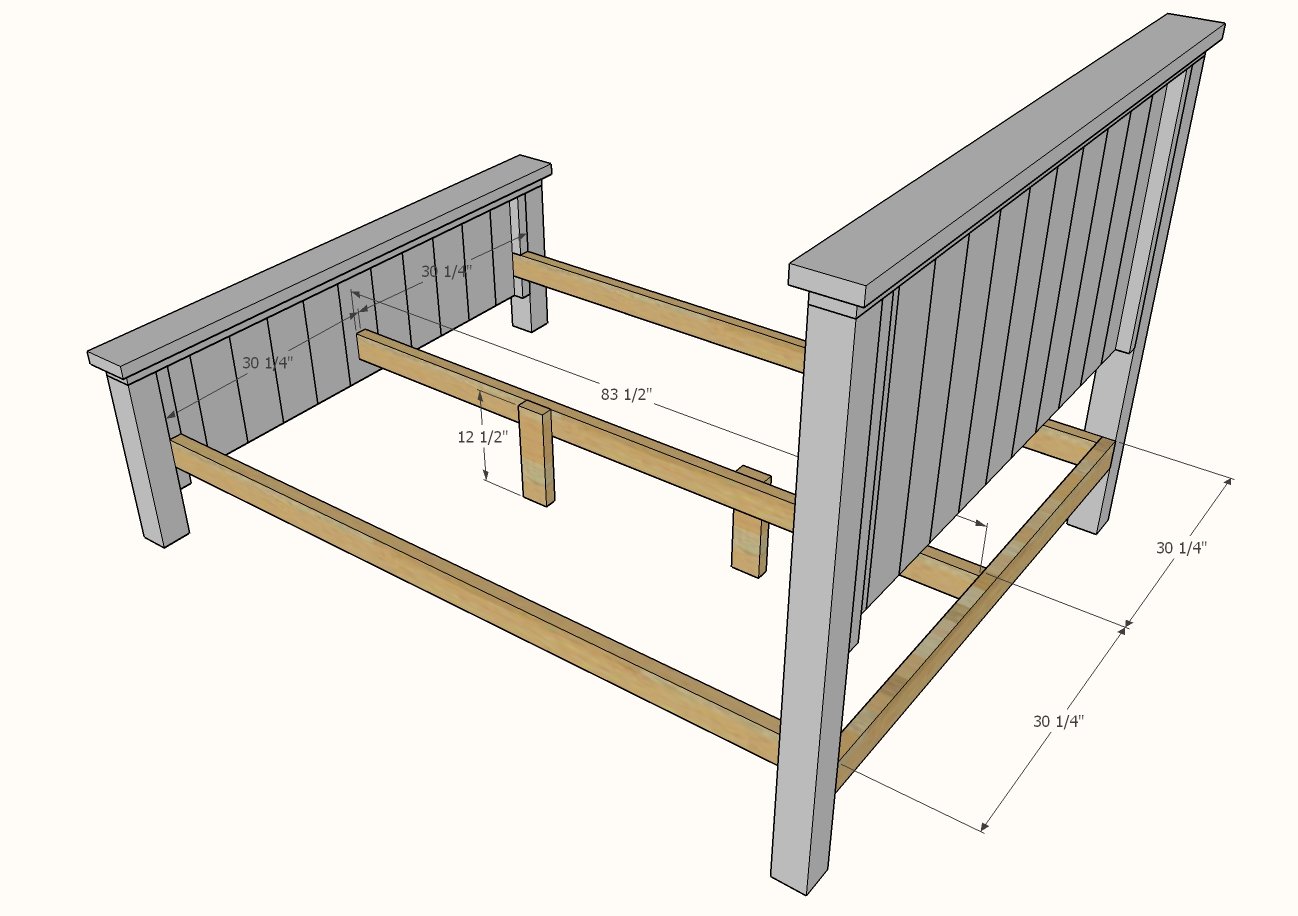
- 3 - 2x4 @ 83-1/2"
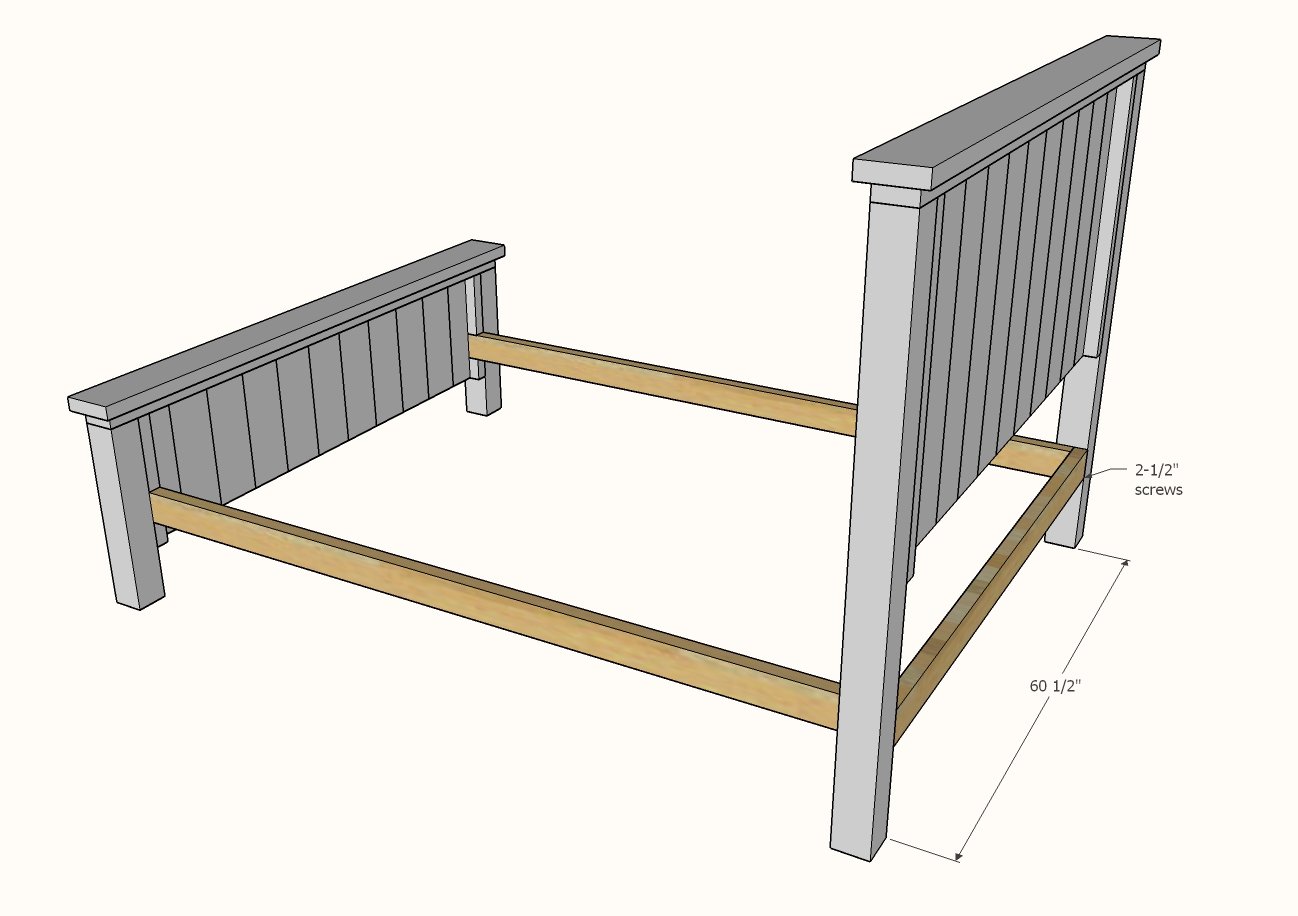
- 1 - 2x4 @ 60-1/2"
- 2 - 2x4 @ 12-1/2"
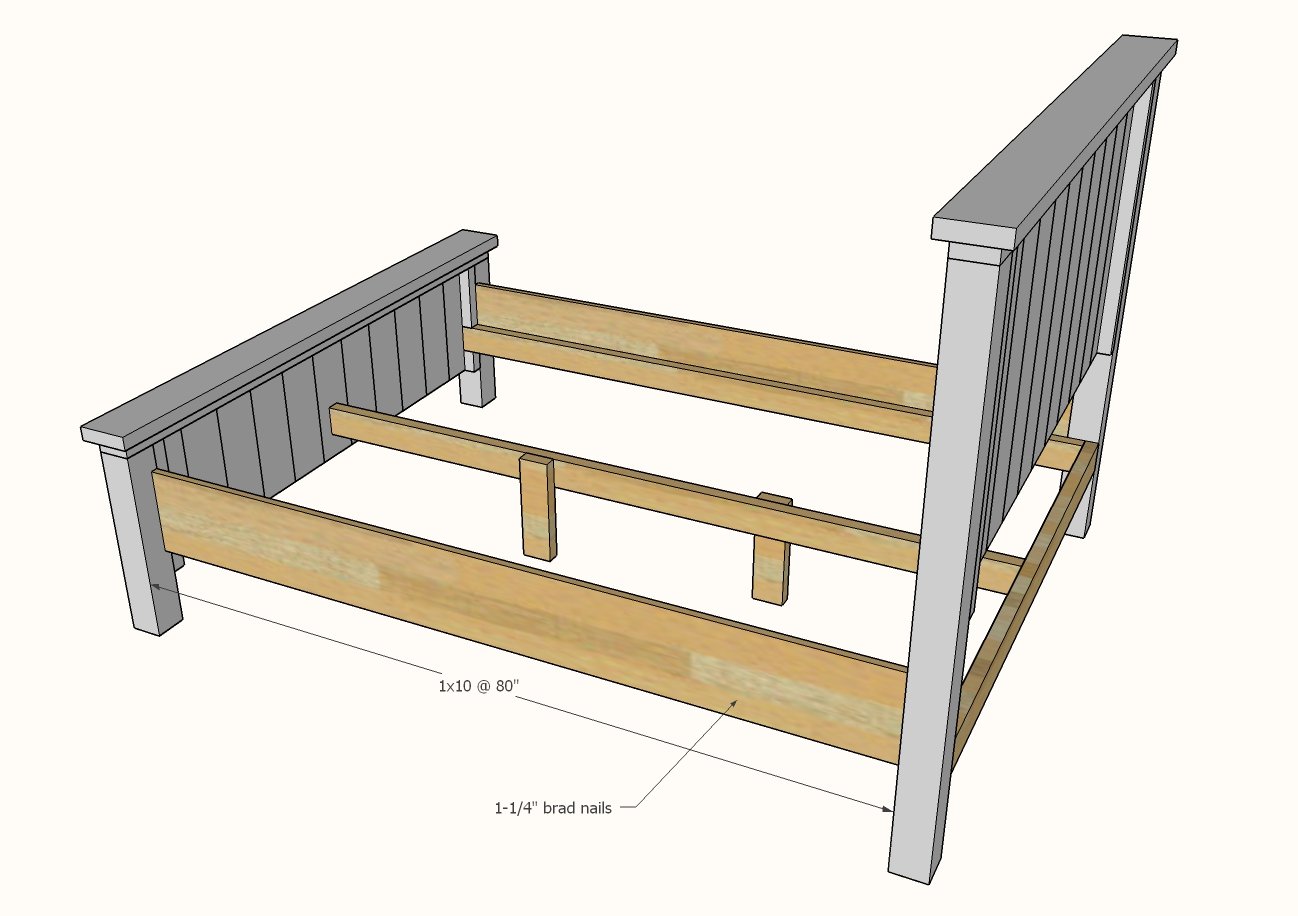
- 2 - 1x10 @ 80"
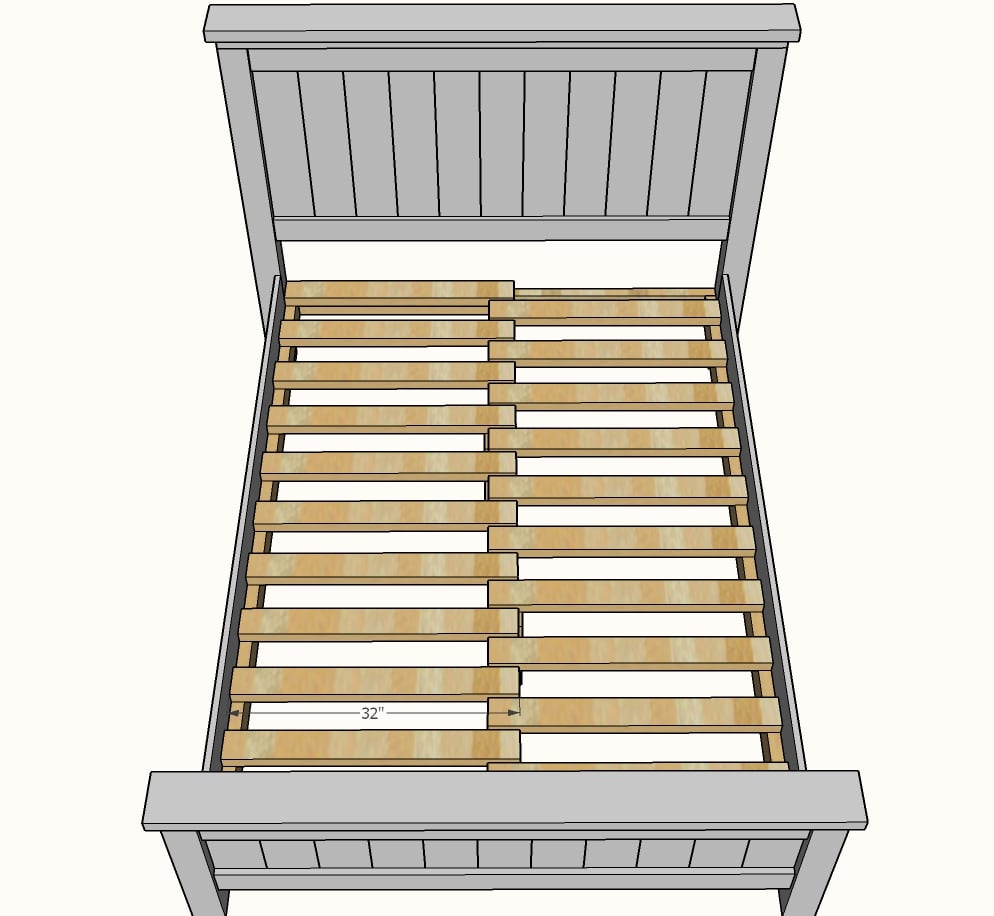
- 20 - 2x4 @ 32" - can be as short as 30" if you need to burn up scraps
Cut all boards except as noted to measure and cut. We recommend using a compound miter saw for the straightest cuts, but you can also use a circular saw and a carpenter's square - just make sure your cut ends are nice and straight.
Instructions
Step 1
Step 2
Layout the 30" 1x6 boards flat, side by side. Measure the overall width of all the 1x6 boards. Cut two 1x4s to this measurement.
Nail the 1x6 boards with glue to the 1x4s. Apply glue between the 1x6 boards as you go.
Make sure the panel is built square by measuring opposite diagonals (outside top corner of 1x4 to outside bottom corner of opposite 1x4) and adjusting so the opposite diagonals match.








Comments
Anonymous (not verified)
Mon, 02/01/2010 - 21:12
what kind of chisel did you
what kind of chisel did you use on between the boards?
Ana White (not verified)
Tue, 02/02/2010 - 09:04
No chisel - I actually used a
No chisel - I actually used a flat bladed screwdriver and scraped the paint between all the boards in the panel to add some depth.
Leslie (not verified)
Wed, 02/03/2010 - 07:20
Sorry I am a bit confused how
Sorry I am a bit confused how to make the box spring work with this bed. It I do 2 X 6 joists my box spring is going to sit about 4 inches above the side rails. Can I use 2 x 4's instead or will that make the bed not strong enough? Also, my box spring is 60 inches wide and the joists are only 57. From side to side of my 4x4s there is 60 inches. I really should have premeasured the box spring, but this is my first project and do not really know what i am doing. I have already built the headboard. Any ideas how to fix this without starting completely over. I would like to hide as much of my box spring as possible since I wont be able to use the dust ruffle anymore.
Thanks for all your plans, I am loving this, hopefully I will start to figure out what I am doing though!
Leslie (sorry I saw afterwords you want them on the blog, not email)
Sabrina (not verified)
Sat, 02/13/2010 - 16:36
Also wondering about the 4
Also wondering about the 4 1/2 inch screw. Do you mean lag screws?
Lauren (not verified)
Mon, 02/15/2010 - 03:15
Hi Ana!I just have a
Hi Ana!
I just have a question...
I'm going to start the bed today and it's my first project(so excited!)
I was wondering when you use the brad gun and glue to attach parts of the headboard together, do you have to clamp it? I'm a beginner and am not sure when/if clamping is needed...
Thank you!!
Sabrina (not verified)
Mon, 02/15/2010 - 08:01
Lauren, my husband is almost
Lauren, my husband is almost finished with our bed, and he didn't clamp anything while he glued/nailed. He said the only thing he thinks you would need to clamp is if you didn't find 4x4's and used 2 2x4s, you'd probably need to clamp those. But we had no problem finding the 4x4's at our home depot.
Anonymous (not verified)
Fri, 02/19/2010 - 10:40
WOW! Thank you SO MUCH for
WOW! Thank you SO MUCH for posting this WONDERFUL plan. I tried to make my own plans on Google Sketch-Up and gave up in frustration, but I am SO THANKFUL to have something to build for my wife on a limited budget that looks so phenomenal! Thank you, thank you!
Karianne (not verified)
Fri, 02/26/2010 - 08:10
I am thinking of building
I am thinking of building just the headboard for this bed. Can I bolt the headboard onto our metal bed frame? How would that best work?
sunflowerlin (not verified)
Fri, 02/26/2010 - 20:39
OH MY GOODNESS! I LOVE this
OH MY GOODNESS! I LOVE this bed :D Can you please inform me when you get the plans/dimensions for the king size version because I would love to take a crack at it!
Loving all of your blog, one day when we have a little income, I am going to build a lot of furniture pieces and you will definitely be a HUGE resource!
Thanks!
sun_flower_lin (at) hotmail (dot) com
lorchick @ ON{… (not verified)
Sun, 02/28/2010 - 16:49
Hi Ana, I've been following
Hi Ana, I've been following your blog for a few months and you're just so inspiring to me! My next giftie from my husband is going to be a compound mitre saw. He's absolutely delighted that I want a tool that he wants too ;)
For now, though, I just fired an email off to my dad, who has all the woodworking tools one could want, and asked him if he can help me build this farmhouse bed for my hubby for his birthday (in may). I couldn't pick a countersink bit out of a lineup a few weeks ago, but hopefully by May I'll be tossing around carpentry terms like a pro ;) Thanks for your inspiration! (I've also linked to your blog from my sidebar for a while now, too!)
Jen (not verified)
Wed, 03/03/2010 - 10:35
Hi Ana, thanks again for
Hi Ana, thanks again for sharing your plans! We went to our Lowe's and purchased our lumber, only a sales associate told us they do not make 4 and a half in screws:(
Was it a lag bolt or a different kind of screw? We can't wait to build this but just don't know which screw to get for that part of the list. If anyone else knows will you email us? [email protected]
THANKS a million!! love your work!
Melissa (not verified)
Thu, 03/04/2010 - 10:05
Hi Ana, love your blog!
Hi Ana, love your blog! Forgive me if someone already asked this but would this attach to a simple metal frame, or would I have to adjust the plans? We already have one and in the interest of time and energy I would just as soon attach our metal frame to the head and footboards.
Thanks!
-Melissa
Christopher (not verified)
Sun, 03/07/2010 - 14:01
For everyone who has asked
For everyone who has asked about 4 1/2 inch screws, forget Lowe's or Home Depot. Go to Ace or True Value, walked in this morning and in 2 mins i was walking out the door with my nails at .25 a piece.
Jennifer Wilcox (not verified)
Mon, 03/08/2010 - 04:57
Does anyone know what the
Does anyone know what the plans for the Farmhouse bed are for using a boxspring and mattress? I can't seem to find this anywhere and the plans appear to not use a box spring which I do not want to get rid of.
Jen (not verified)
Sat, 03/13/2010 - 15:21
Just an update on our bed, we
Just an update on our bed, we find that the center panels when using the measurements given you will come up with a missing gap that is 1 and 7/8ths inch, we cut a piece that small to fit, also, we couldn't find any 4x4 posts that were not treated, so our only option was to get expensive douglas fir which cost 78 bucks for all 4 posts. Total in lumber the actual cost was 151 in the white wood pine at lowes (the cheapest they had) and the 78 bucks added to that. After materials and paint / stain it will prob. come in right under 300 bucks, which still has saved us a TON:) We are so happy with how it is coming out, minus the short measurements that were easy to fix. Just wish we would have seen another posters comment about 1 x 10 boards instead of the 1 x 8's because we would have had a more uniform center panel with out adding in that small peice where the gap was hehe:) I can't wait to stain it when all is said and done. Still have not found a 4 and a half in. screw, even ace hardware told us they only have lagbolts or nails in that size, so we did a 4 in. screw which worked just as well:)
I think we are doing the toddler bed next:) Thanks agian for your plans!
Kristin (not verified)
Wed, 03/24/2010 - 10:38
Hi Ana! I love all of your
Hi Ana! I love all of your plans! I am planning on surprising my husband and building him a farm bed for his 30th birthday. Just wondering how you put the headboard and footboard together if you do have a box spring. Sorry, maybe a dumb question, but I am really new to this:) Thanks for all of your great plans!
Anonymous (not verified)
Thu, 03/25/2010 - 06:13
I'm planning on building this
I'm planning on building this bed for my wife, I'm wondering though about the optional frame you built. I do have a box spring can you either illustrate or explain the difference in building this if I am using a box spring? Thanks!
Anonymous (not verified)
Sun, 04/04/2010 - 04:53
I started building this bed
I started building this bed yesterday and I have finished the panels. Thanks very much for putting the plans together. Just a suggestion, perhaps let people know about nominal dimensions of lumber so that they know that a 1x8 is actually 3/4 x 7 and 1/4 to 7 and 1/2 depending on where you buy and in what country. I was fortunate to find one local lumber yard dumping off 1 x 12's (6 foot lengths) for $4.50 per board. All in good shape with no twisting or checks. These work out to 11 and 1/4 inches each. In order to creat a 60 inch panel, I used 4 pieces of the 1x12 and 5 pieces of 1x4 (I had to cut the 1x4's down to three inches each). I hope to post a photo but what the final panels look like is alternating 1x3 inch boards with 1x 11 and 1/4 boards and I really like the pattern. It truly looks "farmhouse" in the sense that someone in the country might just utilize whatever boards they have laying around... Cheers!
The Klauers (not verified)
Sat, 04/10/2010 - 09:18
My husband and I are building
My husband and I are building the bed right now. I am actually sitting in the garage..ha! Just cut out 1x8 for the headboard. They came out too short. Ana, please let everyone know they should look for 7 1/2" wide boards. Ours are 7 1/4" so it's too short. To compensate for the difference of 2 1/8" we are inserting a piece in the middle. Hopefully comes out alright! Thanks for the plans Ana. You rock!
drax0r (not verified)
Sun, 04/18/2010 - 07:08
I'm building this with and
I'm building this with and for my wife for Mother's Day.
We got the lumber yesterday and did all of our cuts.
Just to demonstrate the fruits of all of her cuts, I laid out the pieces for the foot board. That's when I discovered the discrepancy.
My 1x8 are 7 3/16" wide. That comes out to 1 5/8 short of 60".
I thought about just cutting out a sliver to try to hide in the end, but then I stumbled on the idea of alternating panel sizes.
5 * 7.1875" + 4 * 6" = 59.94"
So where X = 7.1875" and Y = ~6.07" my panels will look like:
X|Y|X|Y|X|Y|X|Y|X
When it comes together in reality, I expect I'll have just a touch of overhang which I'll just sand down to square it up with the 1x4x60's.
I'm new to woodworking, but the engineer inside of me says lumber is an excellent use case for the metric system.
And if we won't go metric, let's at least bring back parity between "dimensional" nomenclature and nominal measurement. Innit?
* 6.07 effectively equivalent to 6 1/16
pixtonkids (not verified)
Fri, 04/23/2010 - 07:32
I am really having fits over
I am really having fits over trying to adjust this plan to be a daybed for my son's extra long twin. Could you please help me out with the measurements for the length of the boards between the 4 x 4's if I need the cleats to support a mattress that is 78"x38"??
I would really appreciate any help you could give me on this. I already made the upholstered beds for my two other sons and they look fab!
Virginie (not verified)
Mon, 04/26/2010 - 22:51
I have a quick question for
I have a quick question for you! I am ALMOST done, but I'm not sure how to fasten the very top piece of the head/foot boards.
I was not able to find 4 1/2 " screws, but I did find 5" ones. So would I just drill the 5" screws into the top piece, above the 4x4 posts but not in the middle/panel area? Perhaps use the smaller screws in the middle on top of the panel?
Thanks again Ana for all the inspiration you give!
Ana White (not verified)
Tue, 04/27/2010 - 05:48
Virginie, that would work!
Virginie, that would work! Or you could just use 3" screws - just make sure the top is on there good.
Meaghan Milliorn (not verified)
Mon, 05/10/2010 - 05:12
Yes, PLEASE update these
Yes, PLEASE update these plans to let people know the 1x8 is too short, and to use 1x10 instead for the planks. Our headboard came up too short also. We had to find some random piece of wood to make up for the gap. It worked, but I hate that it is a skinny piece and does not match the lovely wide 1x8 planks.
Sally (not verified)
Thu, 05/20/2010 - 09:17
Ana, can you explain how the
Ana, can you explain how the bed frame attaches behind the footboard?
Also, do you think this could covert easily with the loft plans?
I am trying to squeeze 3 grandkids in the same room!
Thanks Sally
Ana White (not verified)
Thu, 05/20/2010 - 10:43
Sally, the easiest way is to
Sally, the easiest way is to simply screw through the last "stud" in the bed frame directly into the footboard. You will want to use 2" screws. It's super easy. And yes, you could simply extend the 4x4 posts to create a loft bed (but we do have a few loft bed plans online too!). If you are interested in building this, I highly recommend research ALL of the Farmhouse beds, because I purposely designed plans slightly different to give you options when building. Good luck with your project!
Sally (not verified)
Fri, 05/21/2010 - 03:37
Thanks Ana, I am making it
Thanks Ana, I am making it either tonight or tomorrow. I just bought the lumber for $221. I bought grade A Eastern Pine.
I am slight altering one detail...I bought 6" hanging joists, (.84 cents each) - like you would use for a deck - for the bed frame, rather than run screws from the outside. 2 reasons...I think fastening the joist to the side rails will make it super easy to assemble once painted and all parts are in the room and also a little easier to disassemble if I ever have to move it!
I am planning on taking pictures along the way...I'll keep you all posted on how it goes.
Ana thanks again for such easy to follow plans!
Kerrin (not verified)
Mon, 05/24/2010 - 07:19
Question regarding 4 1/2"
Question regarding 4 1/2" SCREWS--
I picked up all the lumber for the bed. Now I just need to know what I need for screws. Are they lag bolts? Any help is appreciated.
I saw this question a few times but didn't see an answer. Sorry if I missed it somewhere.
Thanks so much Ana!
Maggie (not verified)
Fri, 06/18/2010 - 12:13
Kerrin- Someone further up
Kerrin- Someone further up suggested stopping by an actual hardware store (ACE, etc.) for the screws.
Christi Pobst (not verified)
Wed, 06/23/2010 - 11:40
Hi! Thanks so much for the
Hi! Thanks so much for the plans! I love this bed and hopefully will be making one soon!
My husband and I went to Lowes to check out the wood and see if it was possible for us to do. When we went to the first thing on the list was the
(4) 1” x 8” x 8’ Pine Board $24 (For Panels) At Lowes they were around $20 for one of the boards.
So my question is, where did you get your wood?
Thank You! e-mail me or repost here.
ladyplz(at)gmail(dot)com
Ana White (not verified)
Tue, 06/29/2010 - 12:30
Christi, check the
Christi, check the "whitewood" boards section. It's pine that hasn't been sanded and has knots in it for that rustic character. Should be half the cost or less.
Kat (not verified)
Thu, 07/15/2010 - 08:15
Anna we need you!! Building
Anna we need you!! Building the full Farmhouse bed and have the headboard, footboard and slats cut but having trouble figuring out the boxspring issue! I am so worried about supporting that mattress and boxspring. Just screw cleats into the bottom inside of the siderail and lay boards across? Is it that easy?
Ana White (not verified)
Thu, 07/15/2010 - 08:17
Kat, if you have a boxspring,
Kat, if you have a boxspring, it's even easier - you can skip the slats. Without a box spring, you will need to lay slats according to your mattress recommendation for spacing. The cleats are very strong and with glue and screws, actually become integrated with those siderails. Good luck with your project! Ana
Matt (not verified)
Mon, 07/19/2010 - 17:21
Ana, do you have the cut and
Ana, do you have the cut and board list to make this a king size bed? I couldn't find them. thanks!
mrbeanfan (not verified)
Thu, 07/29/2010 - 17:42
Ana,Awesome plans. I am very
Ana,
Awesome plans. I am very excited to build one of these. I too want to build for a king sized bed. In the plans, it mentions checking other beds for options with frame/box springs. My set will have a 5.5 inch high box spring. What modifications can/should i make to these plans--I wouldn't mind utilizing the side rail/cleat system under the box springs as it should be pretty solid. It's nice to know that making solid wood furniture with just basic tools really is not out of reach for most people!
Thank you again
mrbeanfan (not verified)
Fri, 07/30/2010 - 16:57
To those who had questions
To those who had questions about the king dimensions: What worked for me was using 10 pieces of the 1x8 (mine was actually 7.25 inches!!) and 1x4 on each end...it came out to 79 7/8 inches...almost 80..i just modified the 1x4s to the exact same length.
My bed will fit right around my metal king bed frame. The bed is 76 wide, the frame is 76.25 with a widening at the end that goes to 77.5. I'll have about an inch to spare around the sides, the front and back don't matter because the frame is actually shorter than the bed...
Panels made today--waiting on 4x4 posts (which my lumber yard DOES normally carry-but were out today)..and I had to rob 1 1x4 to make the width come out. Therefore, i must wait..but it looks awesome so far!!!
mrbeanfan (not verified)
Fri, 07/30/2010 - 17:00
I would also recommend "dry
I would also recommend "dry fitting" the cut pieces to make the panels to make SURE you are getting the width (or close to it!) that you want...once you see it's the right dimension, then go ahead and glue it up and nail it together.
I also used torx screws on the BACK side of the headboard panel to ensure stability..2 inchers will do nicely, plunging into all 3 layers of wood..
new_mamma (not verified)
Fri, 09/10/2010 - 11:40
I love this bed! You are such
I love this bed! You are such an inspiration.
I would love to make this bed with hardwood panels (not MDF) instead of boards. I just don't know how or what size panels to use. I saw that some of your reader photos had panels instead of vertical boards and I wondered if they could tell us their dimensions and cut list!
Thanks,
Katie
IPlayOutsideTheBox (not verified)
Tue, 09/14/2010 - 01:40
If you seek long enough...you
If you seek long enough...you will find!!! YAHOOO....this is the bed that has been in my mind for several years now!! Thanks so much for sharing this! I will be making a king size one!!
Inspiration Fr… (not verified)
Fri, 09/17/2010 - 10:46
[...] Yes, she MADE this. For
[...] Yes, she MADE this. For around $150, in fact. And doesn’t it look amazing? If that doesn’t inspire you to get DIYing… nothing will! [...]
leannpurdy (not verified)
Wed, 09/22/2010 - 15:44
Ana, have you thought of
Ana, have you thought of possibly using something like this http://www.homeplacemall.com/servlet/Detail?no=336 to connect the headboard and foot board to the rails? This would seemingly make the bed easier to take apart if it would need to be moved.
Any thoughts?
swimbecky (not verified)
Fri, 10/01/2010 - 18:02
I'm so excited to have found
I'm so excited to have found your site! I have just sent my hubby 3 of your tables that I'm choosing between, and a headboard plan... but now I found this whole bed and I want to build it, too! I can't wait to get started on your projects!
Is there somewhere on this site that has the plans for this bed in a King? Thanks so much, Ana!
Bedroom comple… (not verified)
Fri, 11/05/2010 - 12:07
[...] we still need to work
[...] we still need to work at building the drawers. I also absolutely fell in love with Ana’s Farmhouse bed, so of course I had Ryan build the headboard for our new bed (the footboard is yet to come). [...]
Ariel (not verified)
Mon, 11/08/2010 - 11:11
I need them also!!!!!
I need them also!!!!!
Jill (not verified)
Thu, 11/18/2010 - 12:30
Help! I am trying to make a
Help! I am trying to make a full size bed. I will use a box spring. How do I do this? Seems like 2x4 or 2.6 is overkill. Anyone done the bed and use a boxspring and can help me with the boards and cuts?
Thanks so much!
Ana White (not verified)
Mon, 11/22/2010 - 10:31
For those of you curious how
For those of you curious how to use a box spring with this plan


Guest (not verified)
Sun, 08/07/2011 - 22:46
Do I need to make the 4 by 4 posts taller?
So I want to use our box spring with this plan and I re did the plan in google sketch up just to make sure I understood everything before I actually started buying and cutting wood... and I just wanted to see what you thought about my idea... I measured our entire mattress set... (box springs and mattress) and it is 20 inches tall. So I measured from the top of the pink piece (where the box spring sits) of wood in the image above (in my plan in goolge sketch up... that is with the green piece 10 inches off the floor) and it seems like I would basically loose the headboard behind my mattress and box springs... I hope that all makes sense... should I just make the posts taller to compensate for the box spring being at the level where the mattress usually would sit in these plans? like make my posts 9 inches taller because that is how tall my box spring is? Would that look funny? and Would I also have to make the foot board 9 inches bigger all around so it didn't look silly? Please email me back I am trying to figure this out!
fairyprincess83
Thu, 04/23/2015 - 20:53
links aren't working
Links aren't working. I have a split box spring with my queen. Not sure how to modify this to use them.
Colin (not verified)
Mon, 11/22/2010 - 16:39
Ha! I was just thinking
Ha! I was just thinking today... now how I'm going to work this with a box spring... THANKS ANA, perfect timing!
PS - for those of you looking for the 4 1/2" screws, HD has 4 3/4" which work great. They are near the decking screws and come in packs of 8, need 3 packs for maximum support.
Jessica Harris (not verified)
Fri, 11/26/2010 - 13:49
;
;