Community Brag Posts

Triple Printer Console
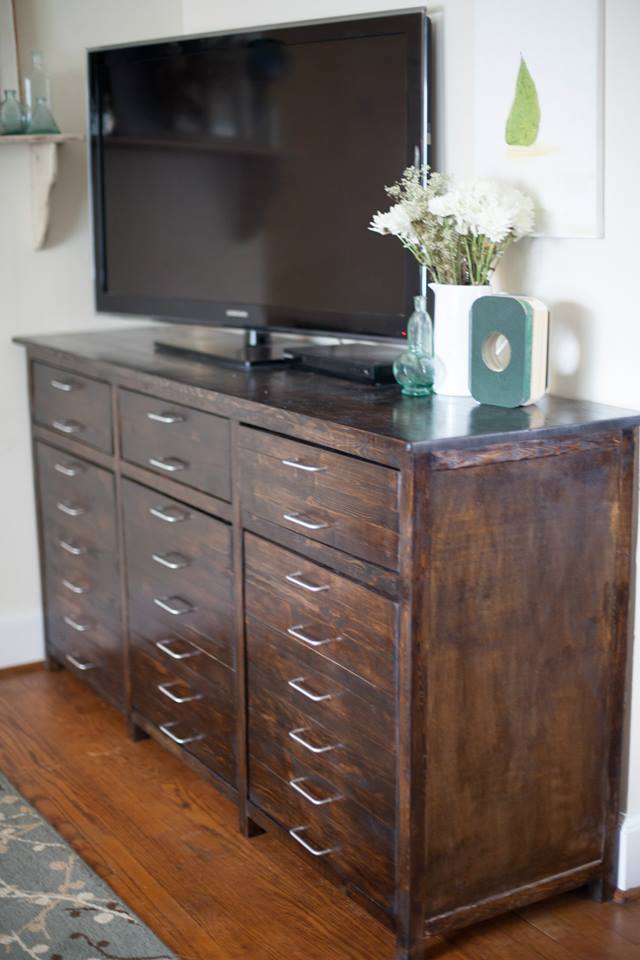
We made this and a dresser just like it. We wanted matching furniture.
Estimated Cost
$350
Estimated Time Investment
Week Long Project (20 Hours or More)
Finish Used
Danish Oil
Recommended Skill Level
Intermediate
Comments

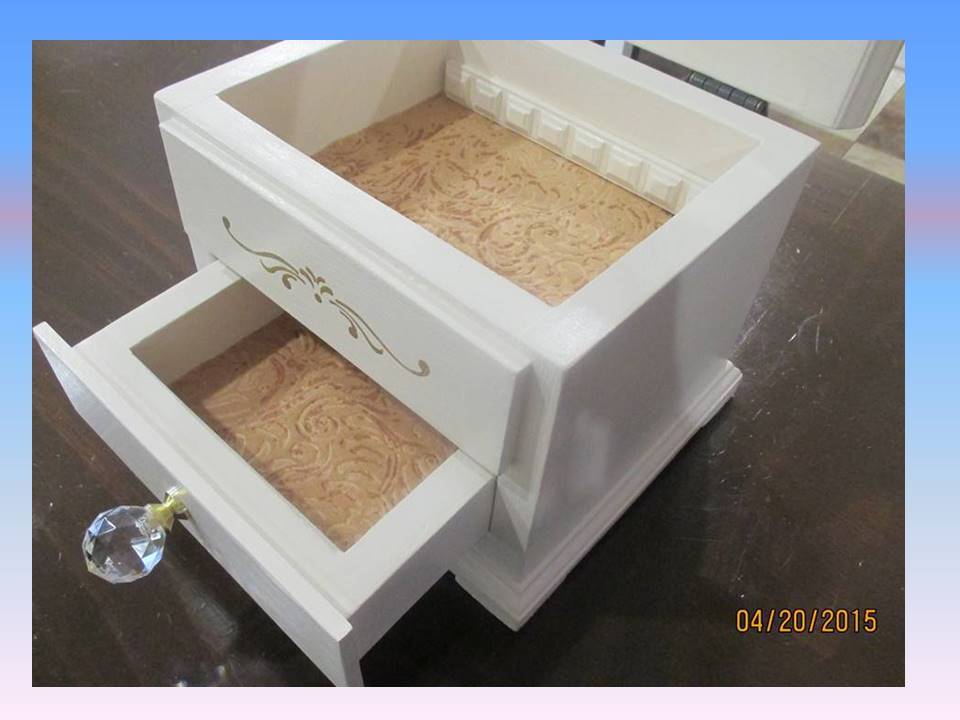
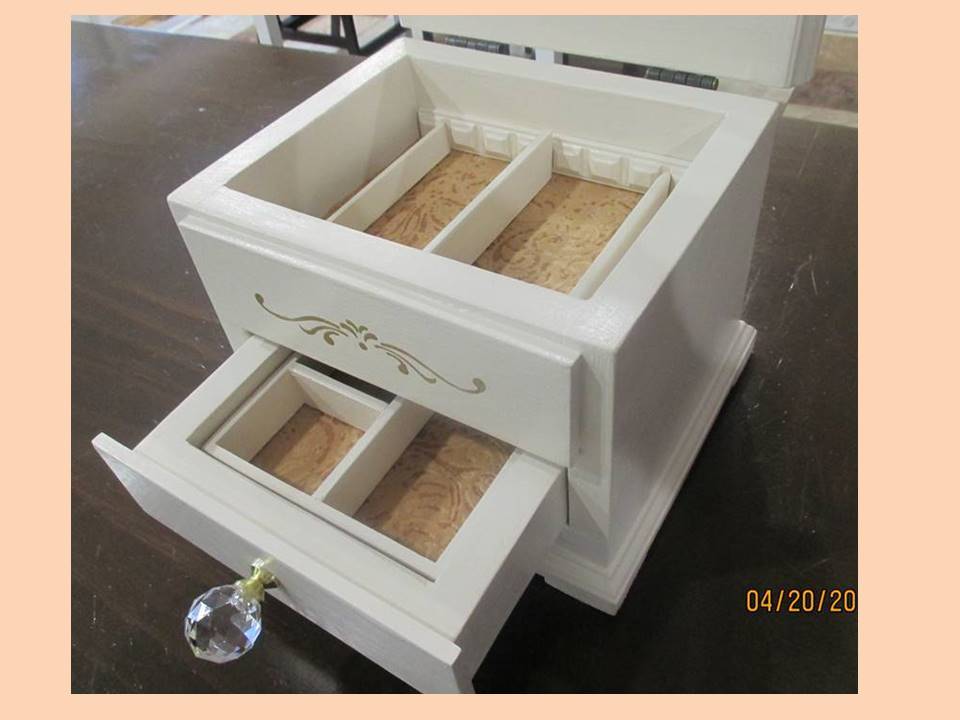
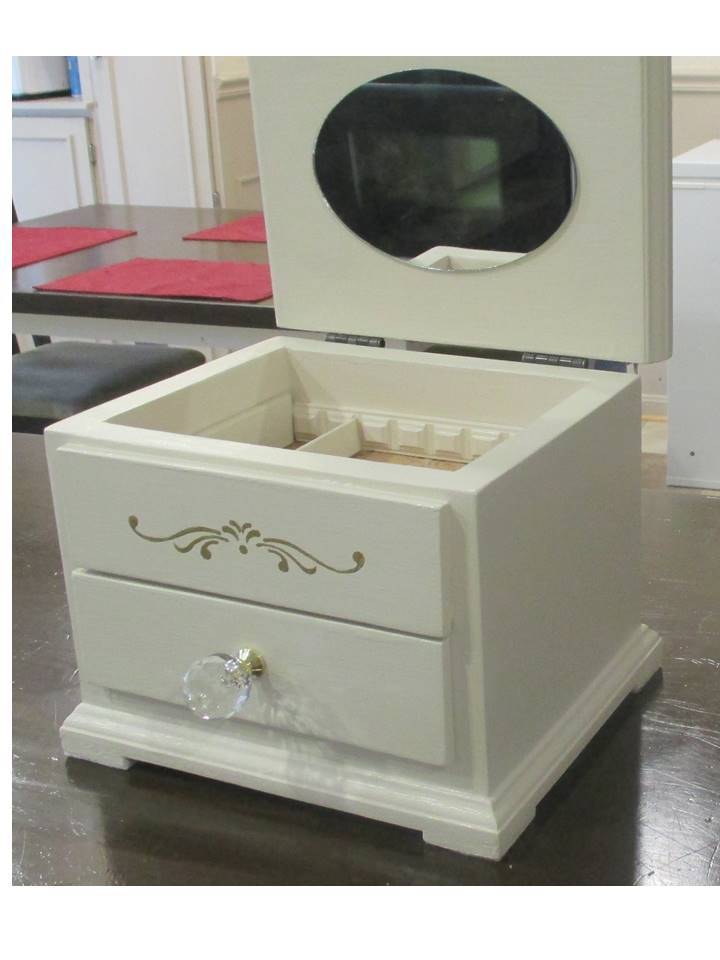
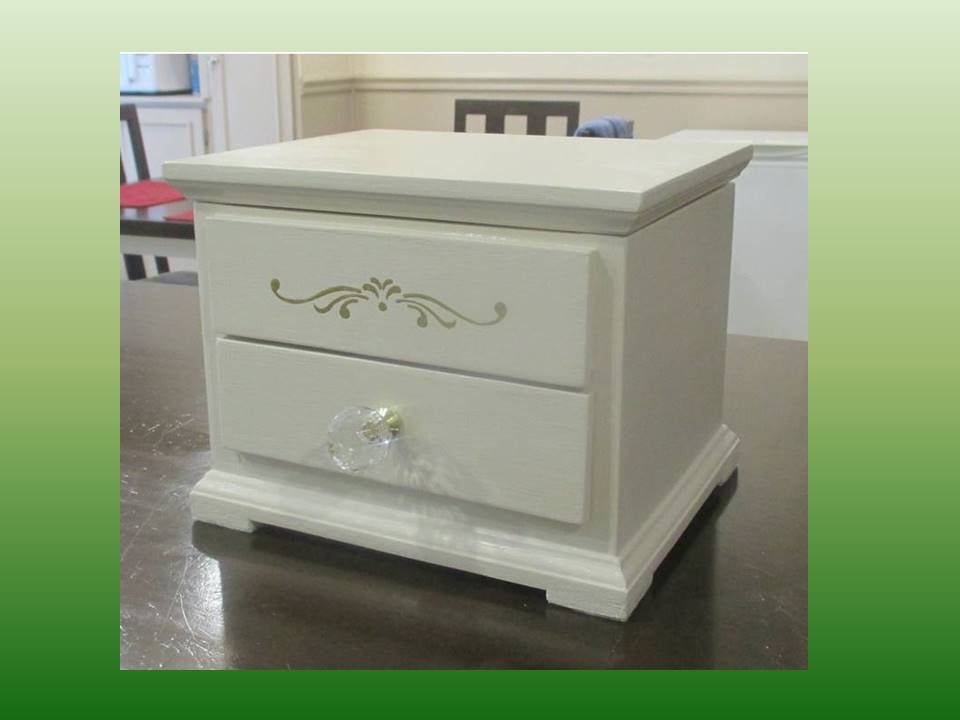
Jewelry Box Retirement Gift

This jewelry box is a gift for a friend at work who is retiring. It is a variation of the Easy Jewelry Box, with the following modifications:
Hinged lift-up top with mirror
Overlay drawer fronts from ¼” craft wood (Gold stencil on top false drawer front, and drawer boxes are 1/8” shorter than the shelf from front to back, to ensure the fronts sit flat against the box front and drawer back doesn't touch the box back at all)
The bottom is 2 pieces thick, to allow space for the drawer overhang and attaching the bottom moulding.
Solid wood back (instead of plywood)
Top and bottom edged with mini stop moulding to make the overhangs, and added feet made from lattice
Removable drawer divider tray and 2 heights of removable dividers for the top, made from dentil, lattice and screen bead mouldings
I really took my time on this build to get everything just right with the build and the finish. Probably spent about 6 hours spread out over the last few weekends.
Built from Plan(s)
Estimated Cost
Cost: 1x8 and 1x2 Lumber and finishes were already on hand (left over from other projects) and I spent about $25 for the mirror, hardware, felt, mouldings, and craft board.
Estimated Time Investment
Day Project (6-9 Hours)
Finish Used
3 coats Clark & Kensington semi-gloss paint + primer in Crushed Peanut, sanded between coats. Stencil: 1 coat Americana Gloss enamel metallic in glorious gold. Soft wax on the shelf and drawer bottom.
Recommended Skill Level
Beginner
Comments

Wed, 04/22/2015 - 18:29
Thank you!
Hi Linda, thank you for the nice comment! This was a fun build, and I'm very glad to say the gift was a big hit! :)
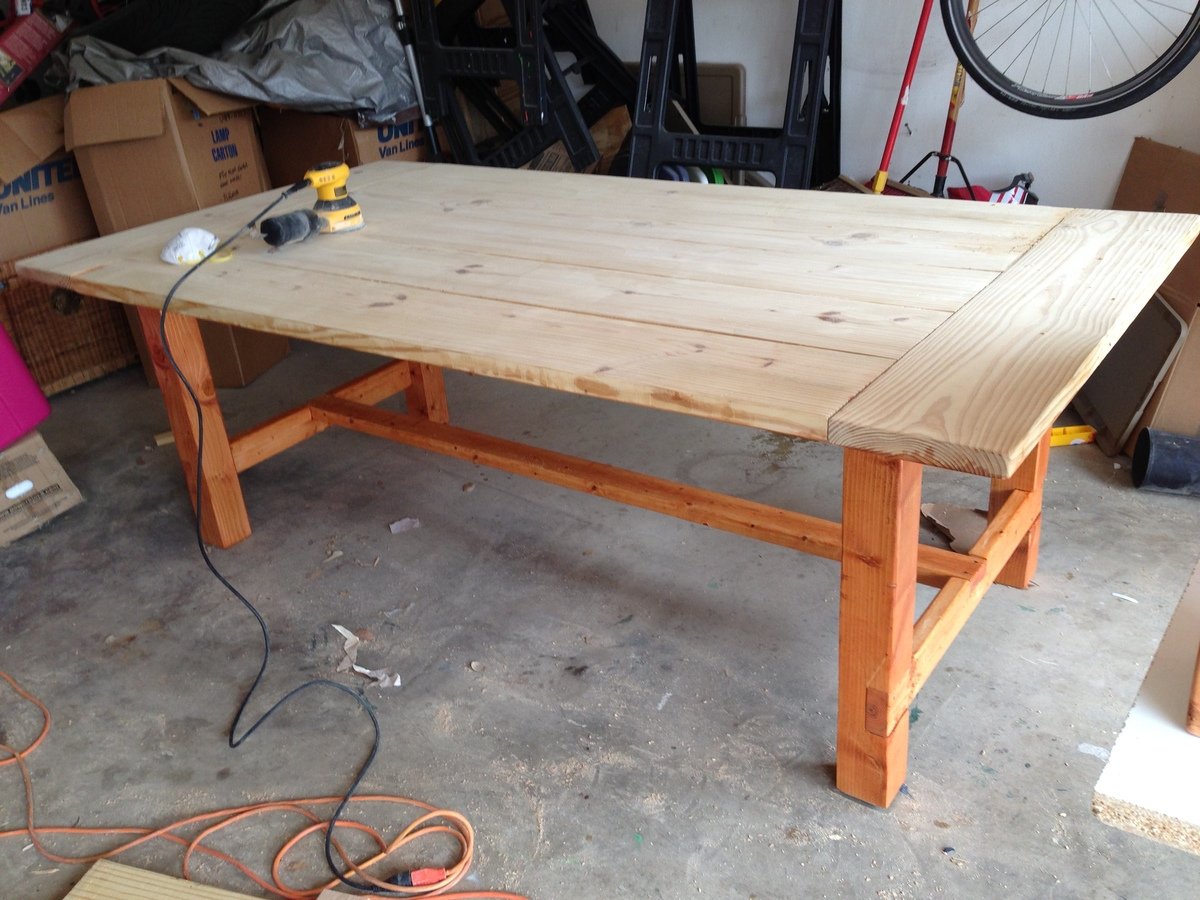
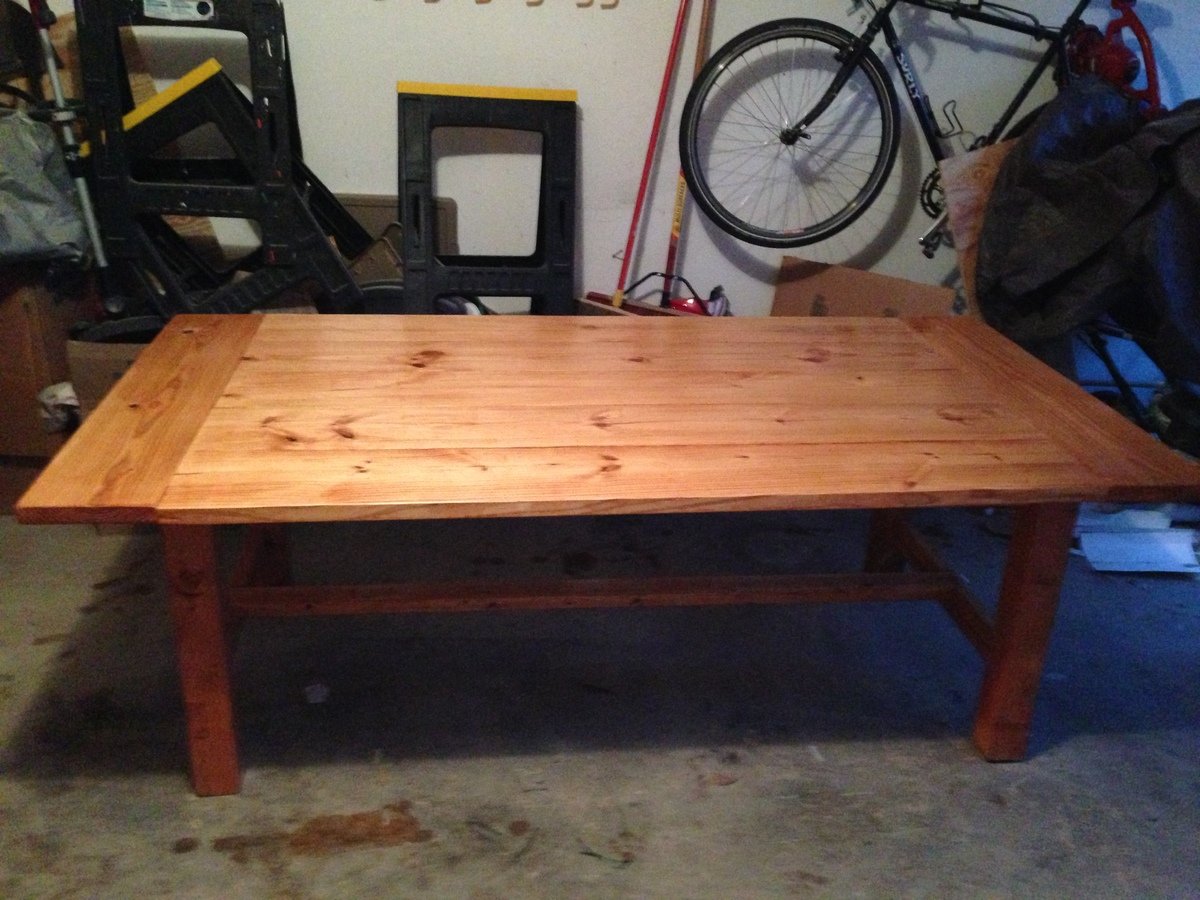
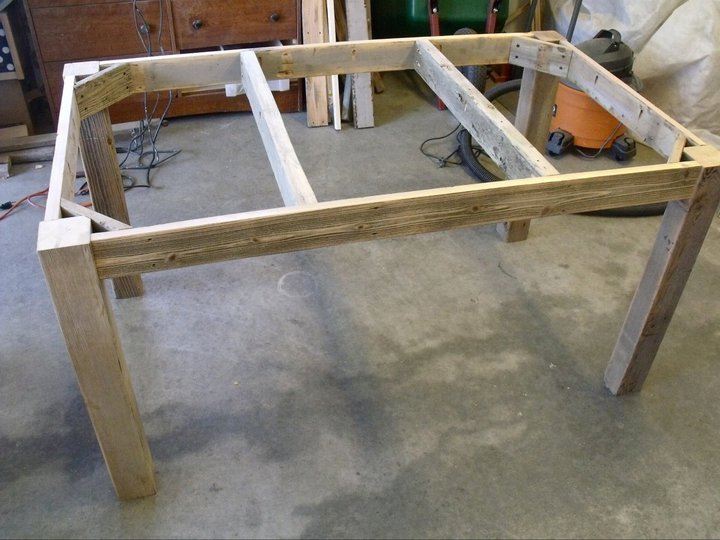
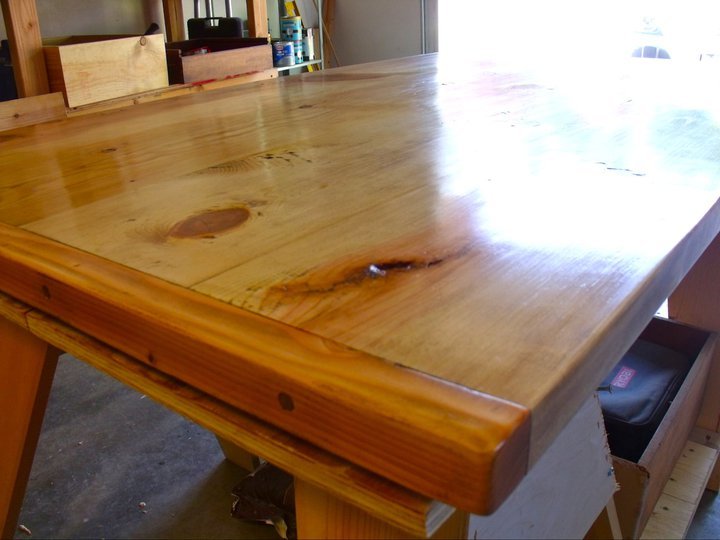
Rustic X Farmhouse Table
We were able to finish this table after work one afternoon and stain it the next day. (we have a 16 month old also, so you can do it! :) ) I wanted a similar style I had found at World Market that retailed for $700 we were able to complete this entire table for $100 including all hardware and stain. LOVE it so much and get SO many compliments on it. Thanks so much!
Shelby
The Dandy Lion
Estimated Time Investment
Day Project (6-9 Hours)
Finish Used
A satin poly with espresso stain in one
Recommended Skill Level
Intermediate
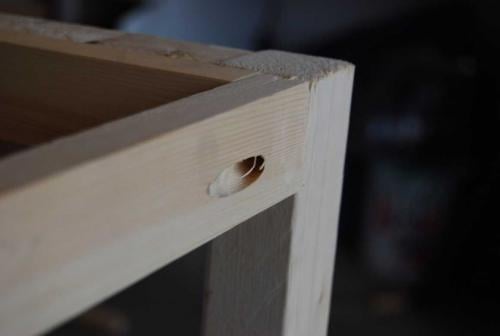
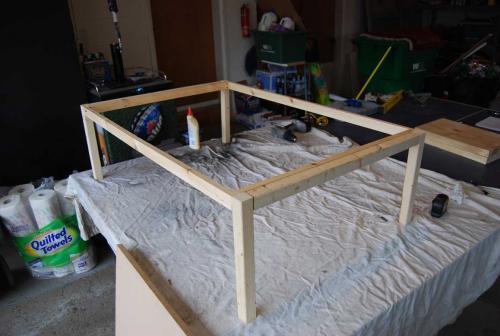
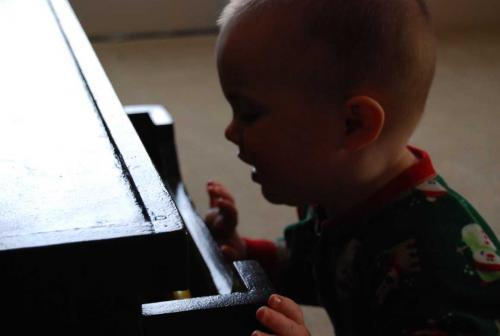
Low Activity Table
With three little kids we needed some place to put the loads of toys that we have. The first time I saw this - I knew I had to build it!
This project was quite the task. For me building is a breeze - it's the painting that is the process!!!
I started working on this on Sunday last week - it was built in about 3-4 hours. Painting took forever, and three colors!
Love for you to check out my blog post with all the details, even my painting flub up.
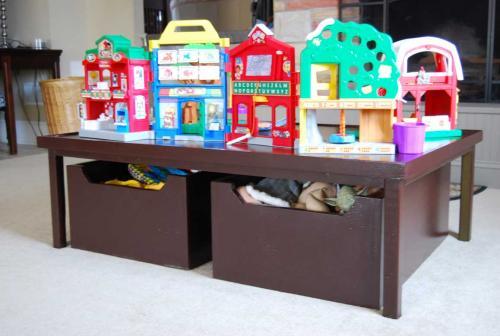
Built from Plan(s)
Estimated Cost
$108...$70 in wood, $30 in Wheels, $8 in paint.
Estimated Time Investment
Afternoon Project (3-6 Hours)
Finish Used
Sanded...primed...sanded...random painting experience...ended with Rustolium Kola - Semi-gloss.
Recommended Skill Level
Intermediate
Bookshelf Hidden Doors Over Closet

Hidden door bookshelves hide a furnace closet. Built by Kraig Faulkner
Built from Plan(s)
Recommended Skill Level
Advanced
Comments
Thu, 01/23/2020 - 07:05
Great idea! Do the…
Great idea! Do the bookshelves swing freely when weighed down with books? What type of hinges did you use?
Thu, 09/17/2020 - 08:01
Looks Awesome + Safety Note
I'm currently working on a basement renovation project. I'm probably going to incorporate a feature like this for my mechanicals, too.
One important safety note for anyone who wants to do this: It's recommended that your furnace be a minimum of 30" away from any combustible materials. That includes walls and partitions. The image of this project displayed is right next to the furnace, which is not a good idea.
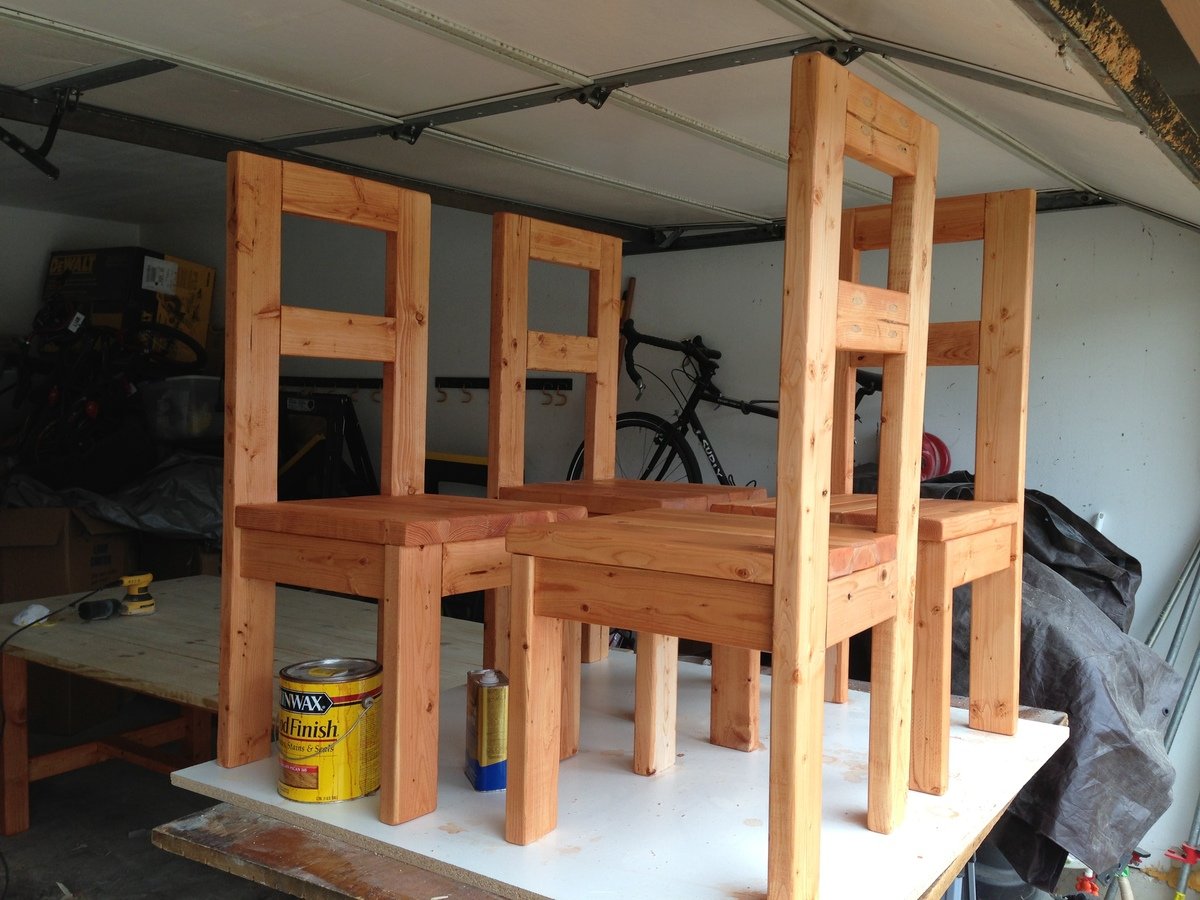
Modern Farmhouse Dining Room table with 2x4 chairs
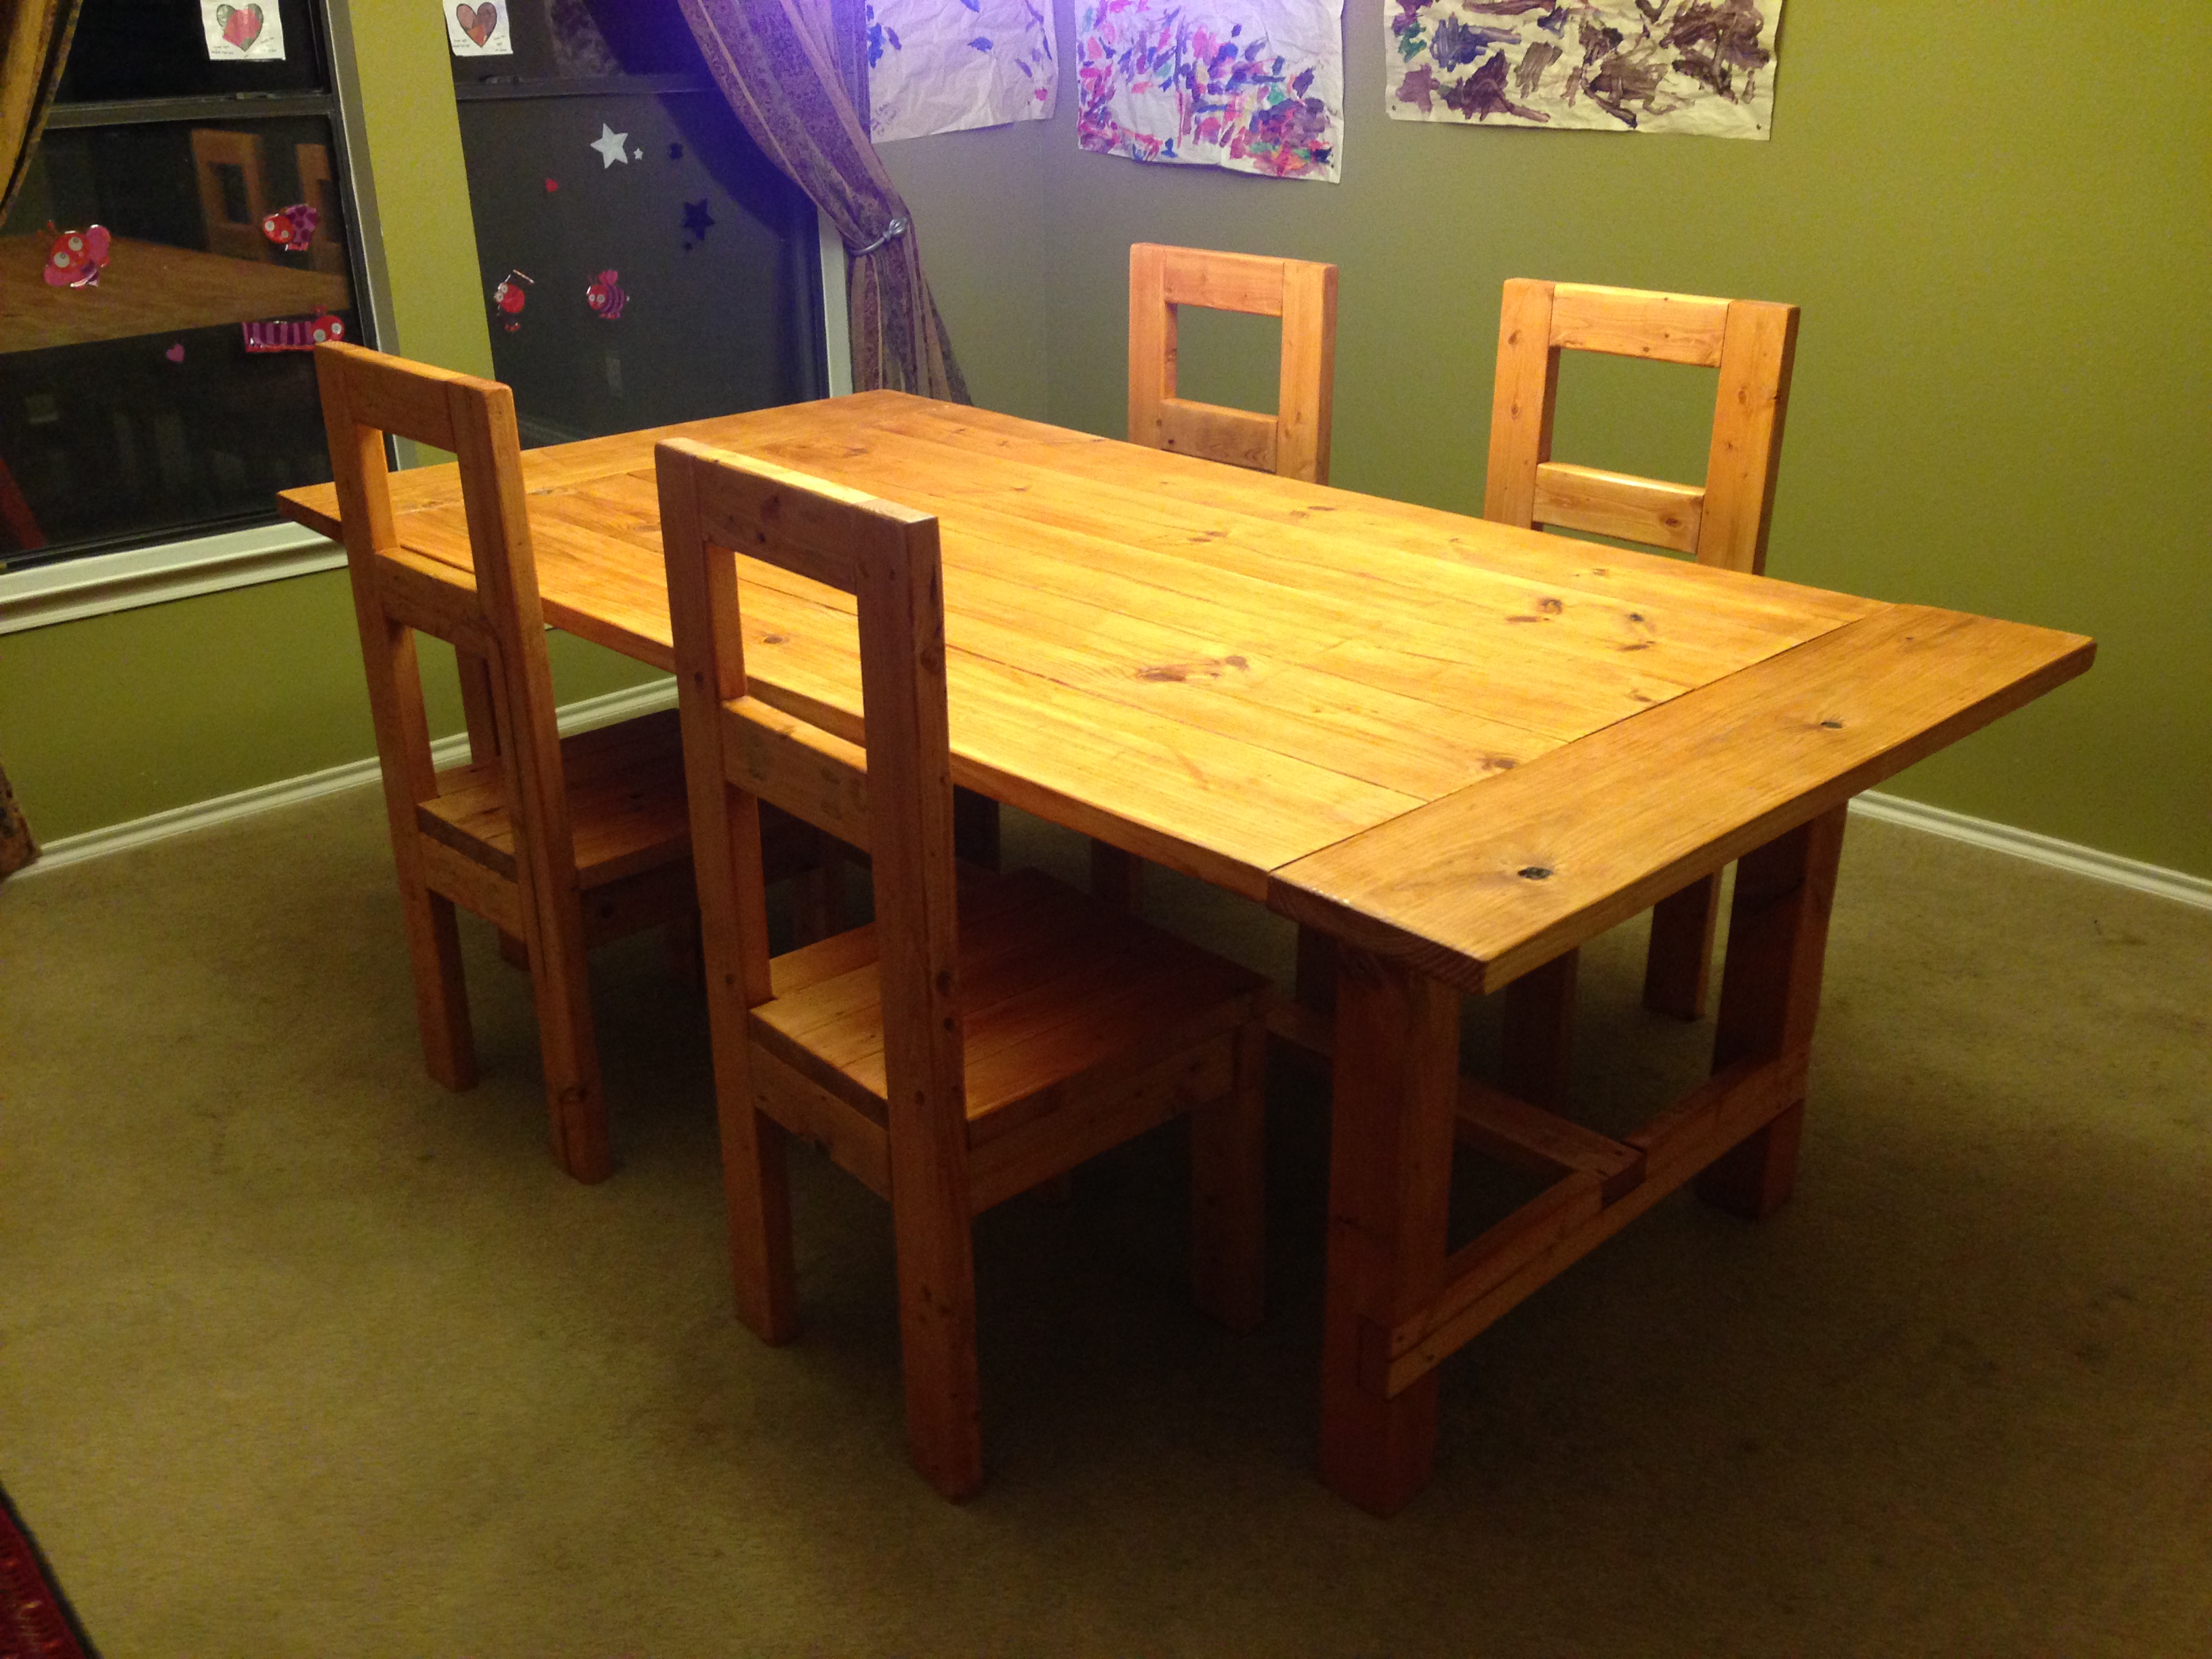
Modern Farmhouse Dining Room Table (with pocket hole) and 2x4 chairs with plans reposted from morelikehome.net.
Surfed the site for the right plans and dove right in. Thank you for the inspiration all!
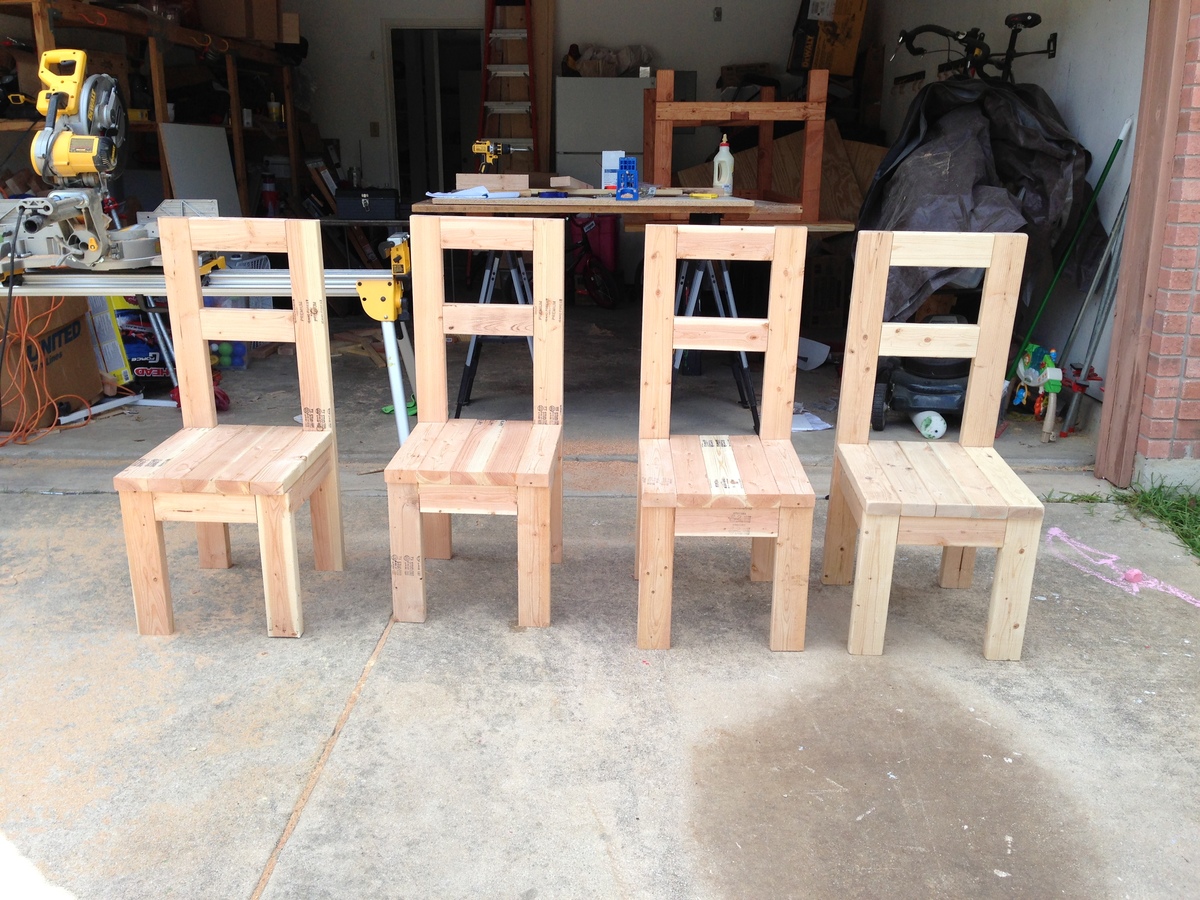
Estimated Cost
$200
Estimated Time Investment
Week Long Project (20 Hours or More)
Finish Used
Minwax Golden Pecan and Poly coat.
Recommended Skill Level
Beginner
Comments
Mon, 09/10/2018 - 11:05
I don't see the plans to make it.
I have clicked on the link the plans are not there.
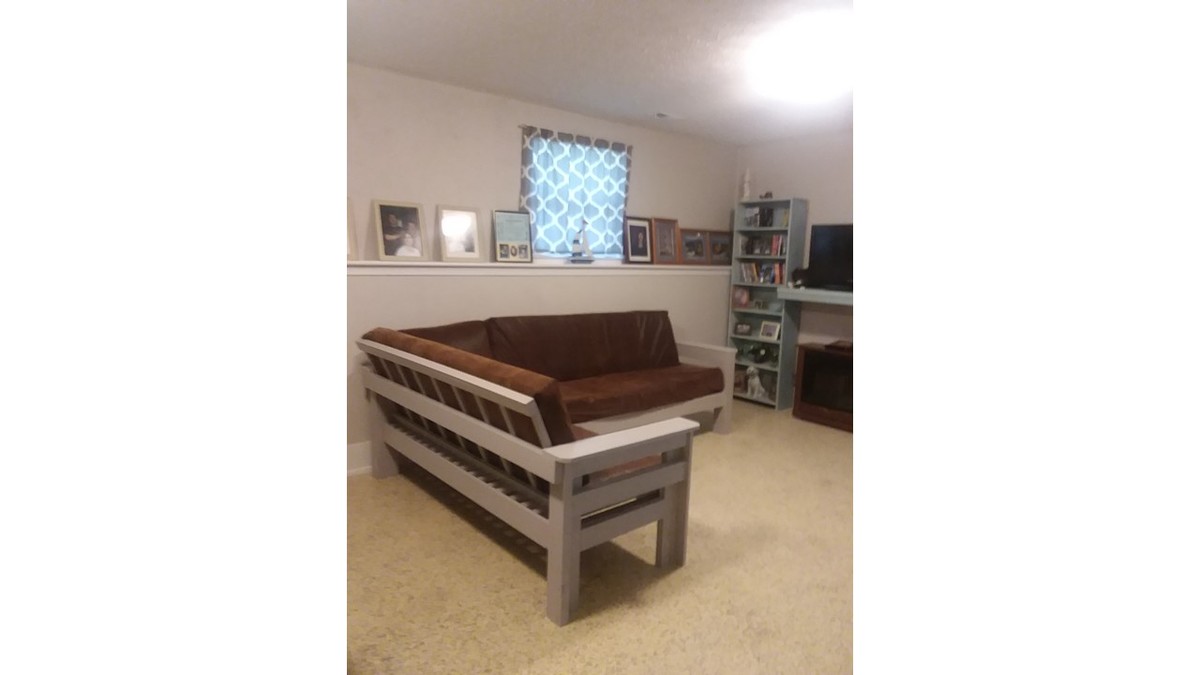
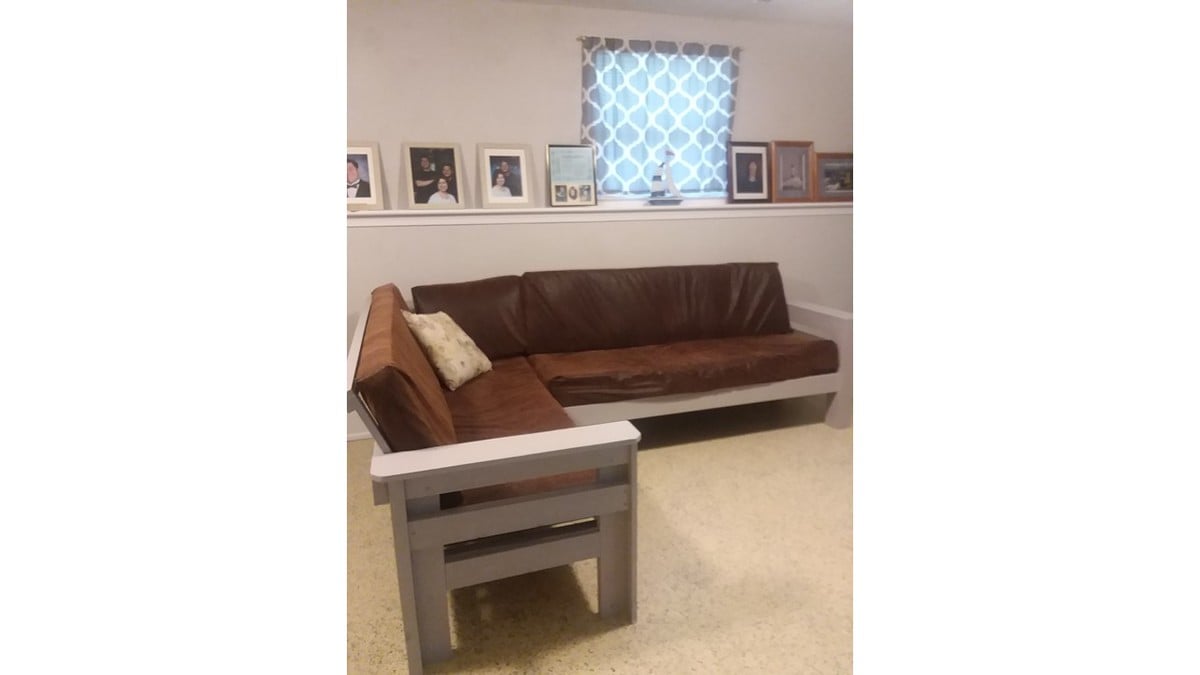
Accidental Sectional

This project evolved from us purchasing the wrong foam to go under 4 area rugs. After it didn’t work for the first rug, we had 3 more rolls of the stuff that we couldn’t take back to the store (we had waited too long to do a return). I originally had intended to buy an inexpensive sectional sofa for the downstairs family room, but with all this foam staring at me, I decided to put it to use and make sofa cushions. There was enough foam to do a whole sectional!
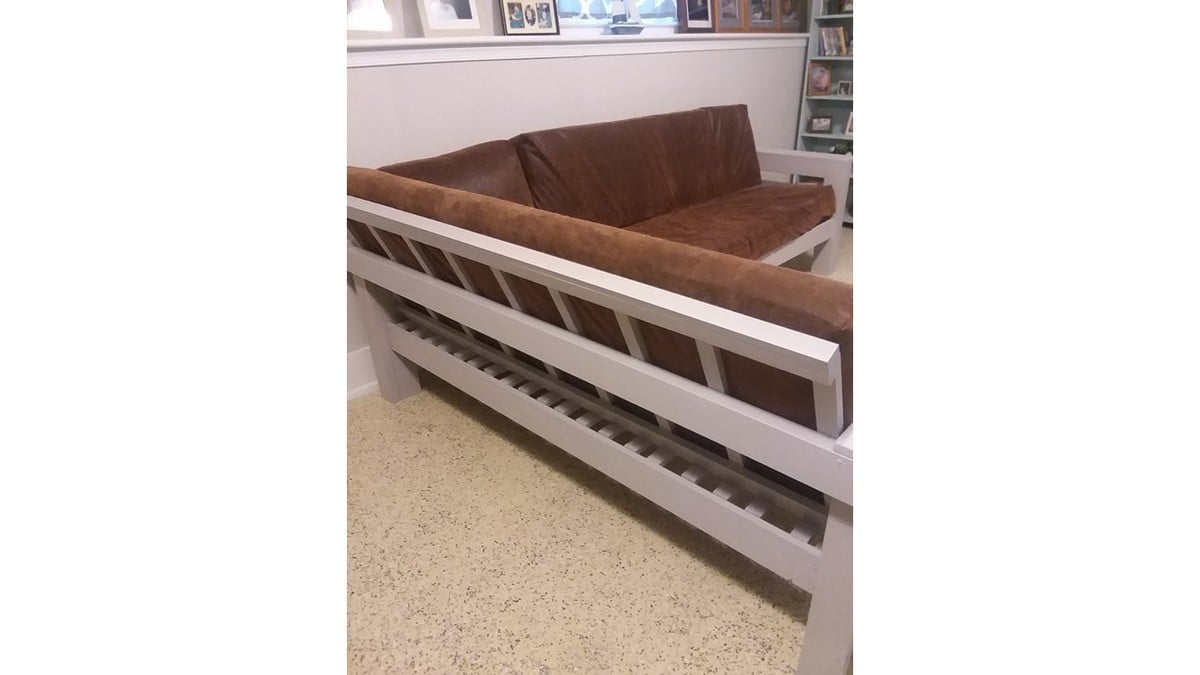
The sofa frame is based on Ana’s Outdoor 2x4 Sectional sofa. I adjusted the size, because the fabric I wanted to use was 54” wide, and that would fit nicely around a 22” deep x 4” thick cushion. Each cushion is 11 layers of the foam (seat cushions: 67 x 22 x 4, backs: 67 x 18 x 4). That length for the cushions fit exactly into the 8 yards of fabric available on the bolt. The next week I ended up going back for some more fabric for the corner cushion and an ottoman that's in work.
I had the frame assembled and was ready to add the final upper back pieces, when Hubby suggested we give it a slanted back. That required a little re-engineering and a couple of extra boards on the back and armless end. Instead of using 2x4s the full length for the seat, I had used some 1x2 furring strips reclaimed from another project. Also used some of those for the upright pieces for the backs. Added some 1x6 to top the arms and ½ x 3 ½” craft boards to the front to hide the cut 2x4 ends.
The cushions are covered in a polyester faux tooled suede (fabric from Hobby Lobby). The cushion covers are slightly loose on purpose, to give the nice worn squishy look that a real soft leather sofa cushion would have.
It’s surprisingly comfy and we love the look!

Built from Plan(s)
Estimated Time Investment
Weekend Project (10-20 Hours)
Finish Used
The finish is 2 coats of Clark & Kensington Satin enamel in Winter Storm.
Recommended Skill Level
Beginner
Comments

Tue, 06/05/2018 - 14:47
DIY Sectional
You are so resourceful! Love how this turned out! Thanks so much for sharing such detailed instructions, much appreciated!
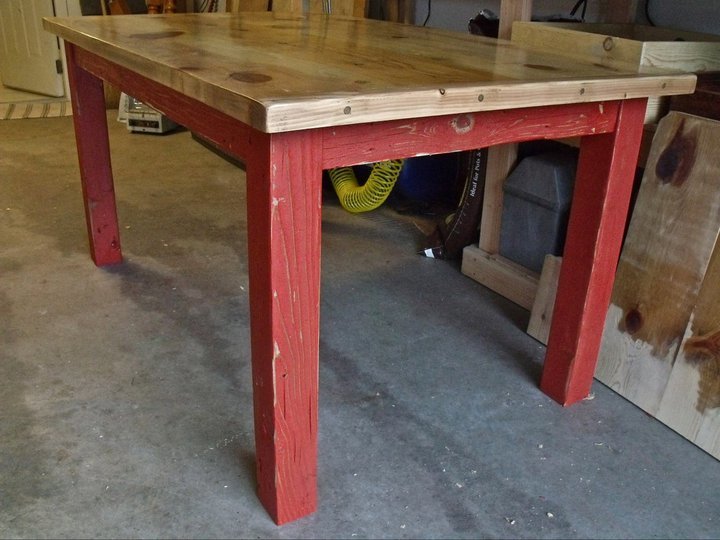
Free Farmhouse Table
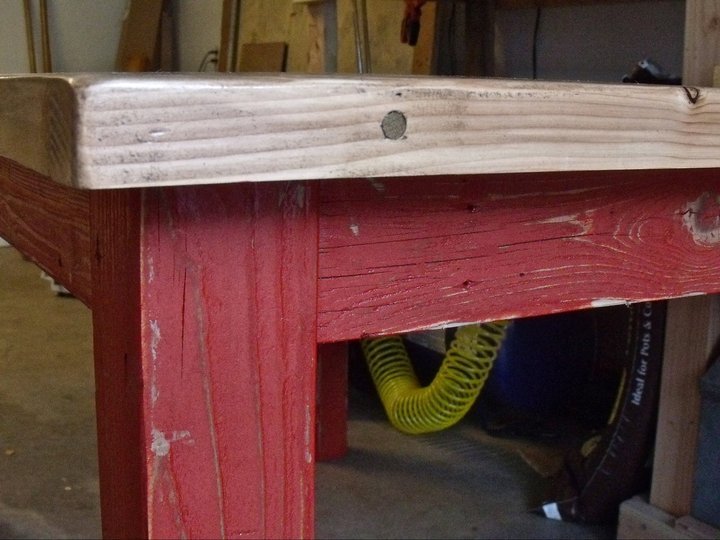
I got all the wood from the dump. The best way to get a good glue up for the table top is joint the sides flat, and then hand plane the top for a smooth surface. Gorgeous table for nothing.
Estimated Cost
$0.00
Estimated Time Investment
Week Long Project (20 Hours or More)
Finish Used
Non wax Shellac, Walnut Stain, Semi-Gloss Poly, Red Spray Paint
Recommended Skill Level
Advanced
Comments
Mon, 10/07/2013 - 08:55
How did you manage that?
What did you do when you went to the dump to get the wood? I like the idea.
Hexagon address planter
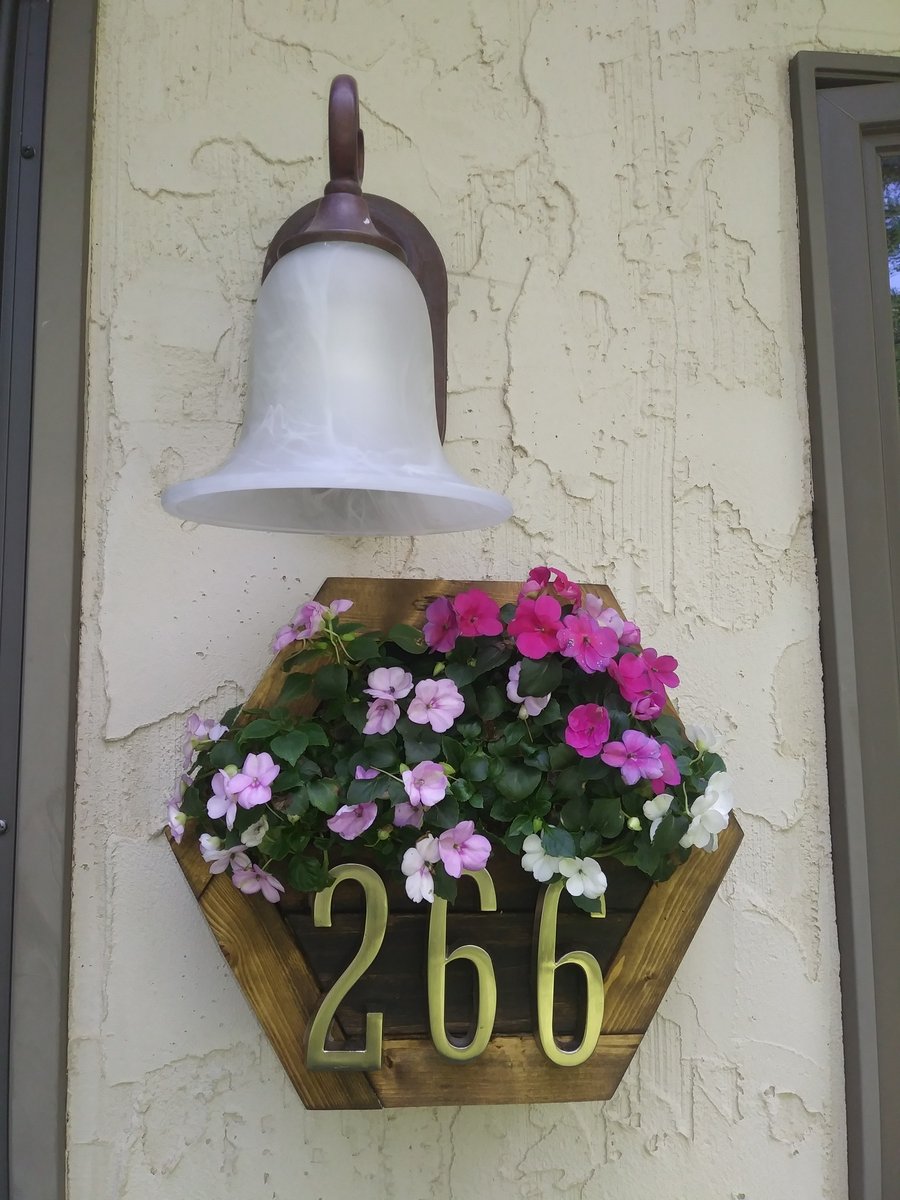
Not much to say, just a quick project to use up some scrap lumber. Better to use it than burn it.
Estimated Cost
$15 for the numbers, wood was all scrap 2x2 and 1x2
Estimated Time Investment
An Hour or Two (0-2 Hours)
Finish Used
Minwax English Chestnut and Thompsons Outdoor Sealer
Recommended Skill Level
Starter Project
Wooden garden tools storage shed
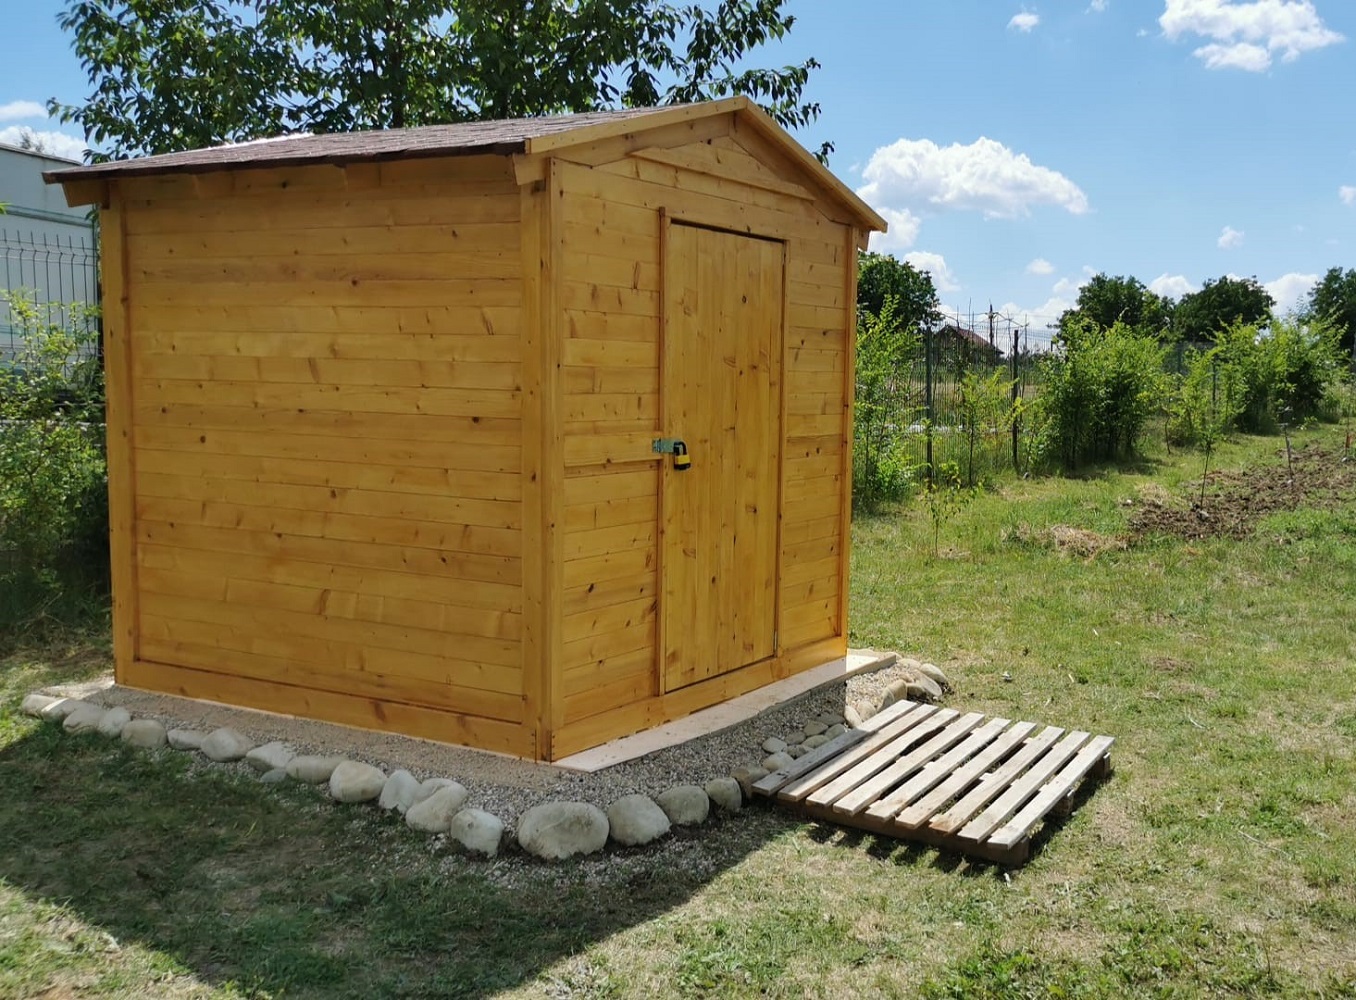
Our last project was building a tiny garden tools storage shed. We used only 1 x 4 boards. We don't have any plans, but you can watch the entire building process on our YouTube channel. We are very proud of the way the project turned out.
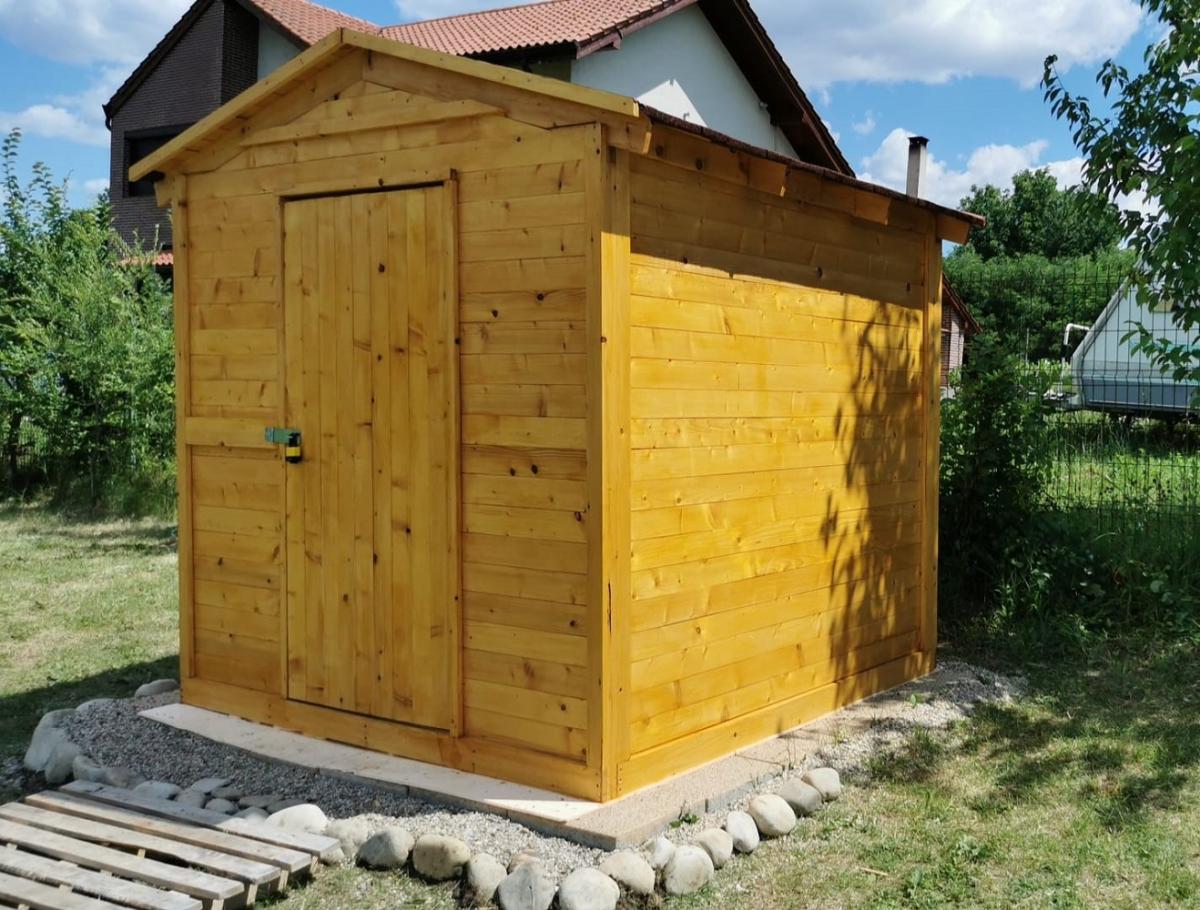
Built from Plan(s)
Comments
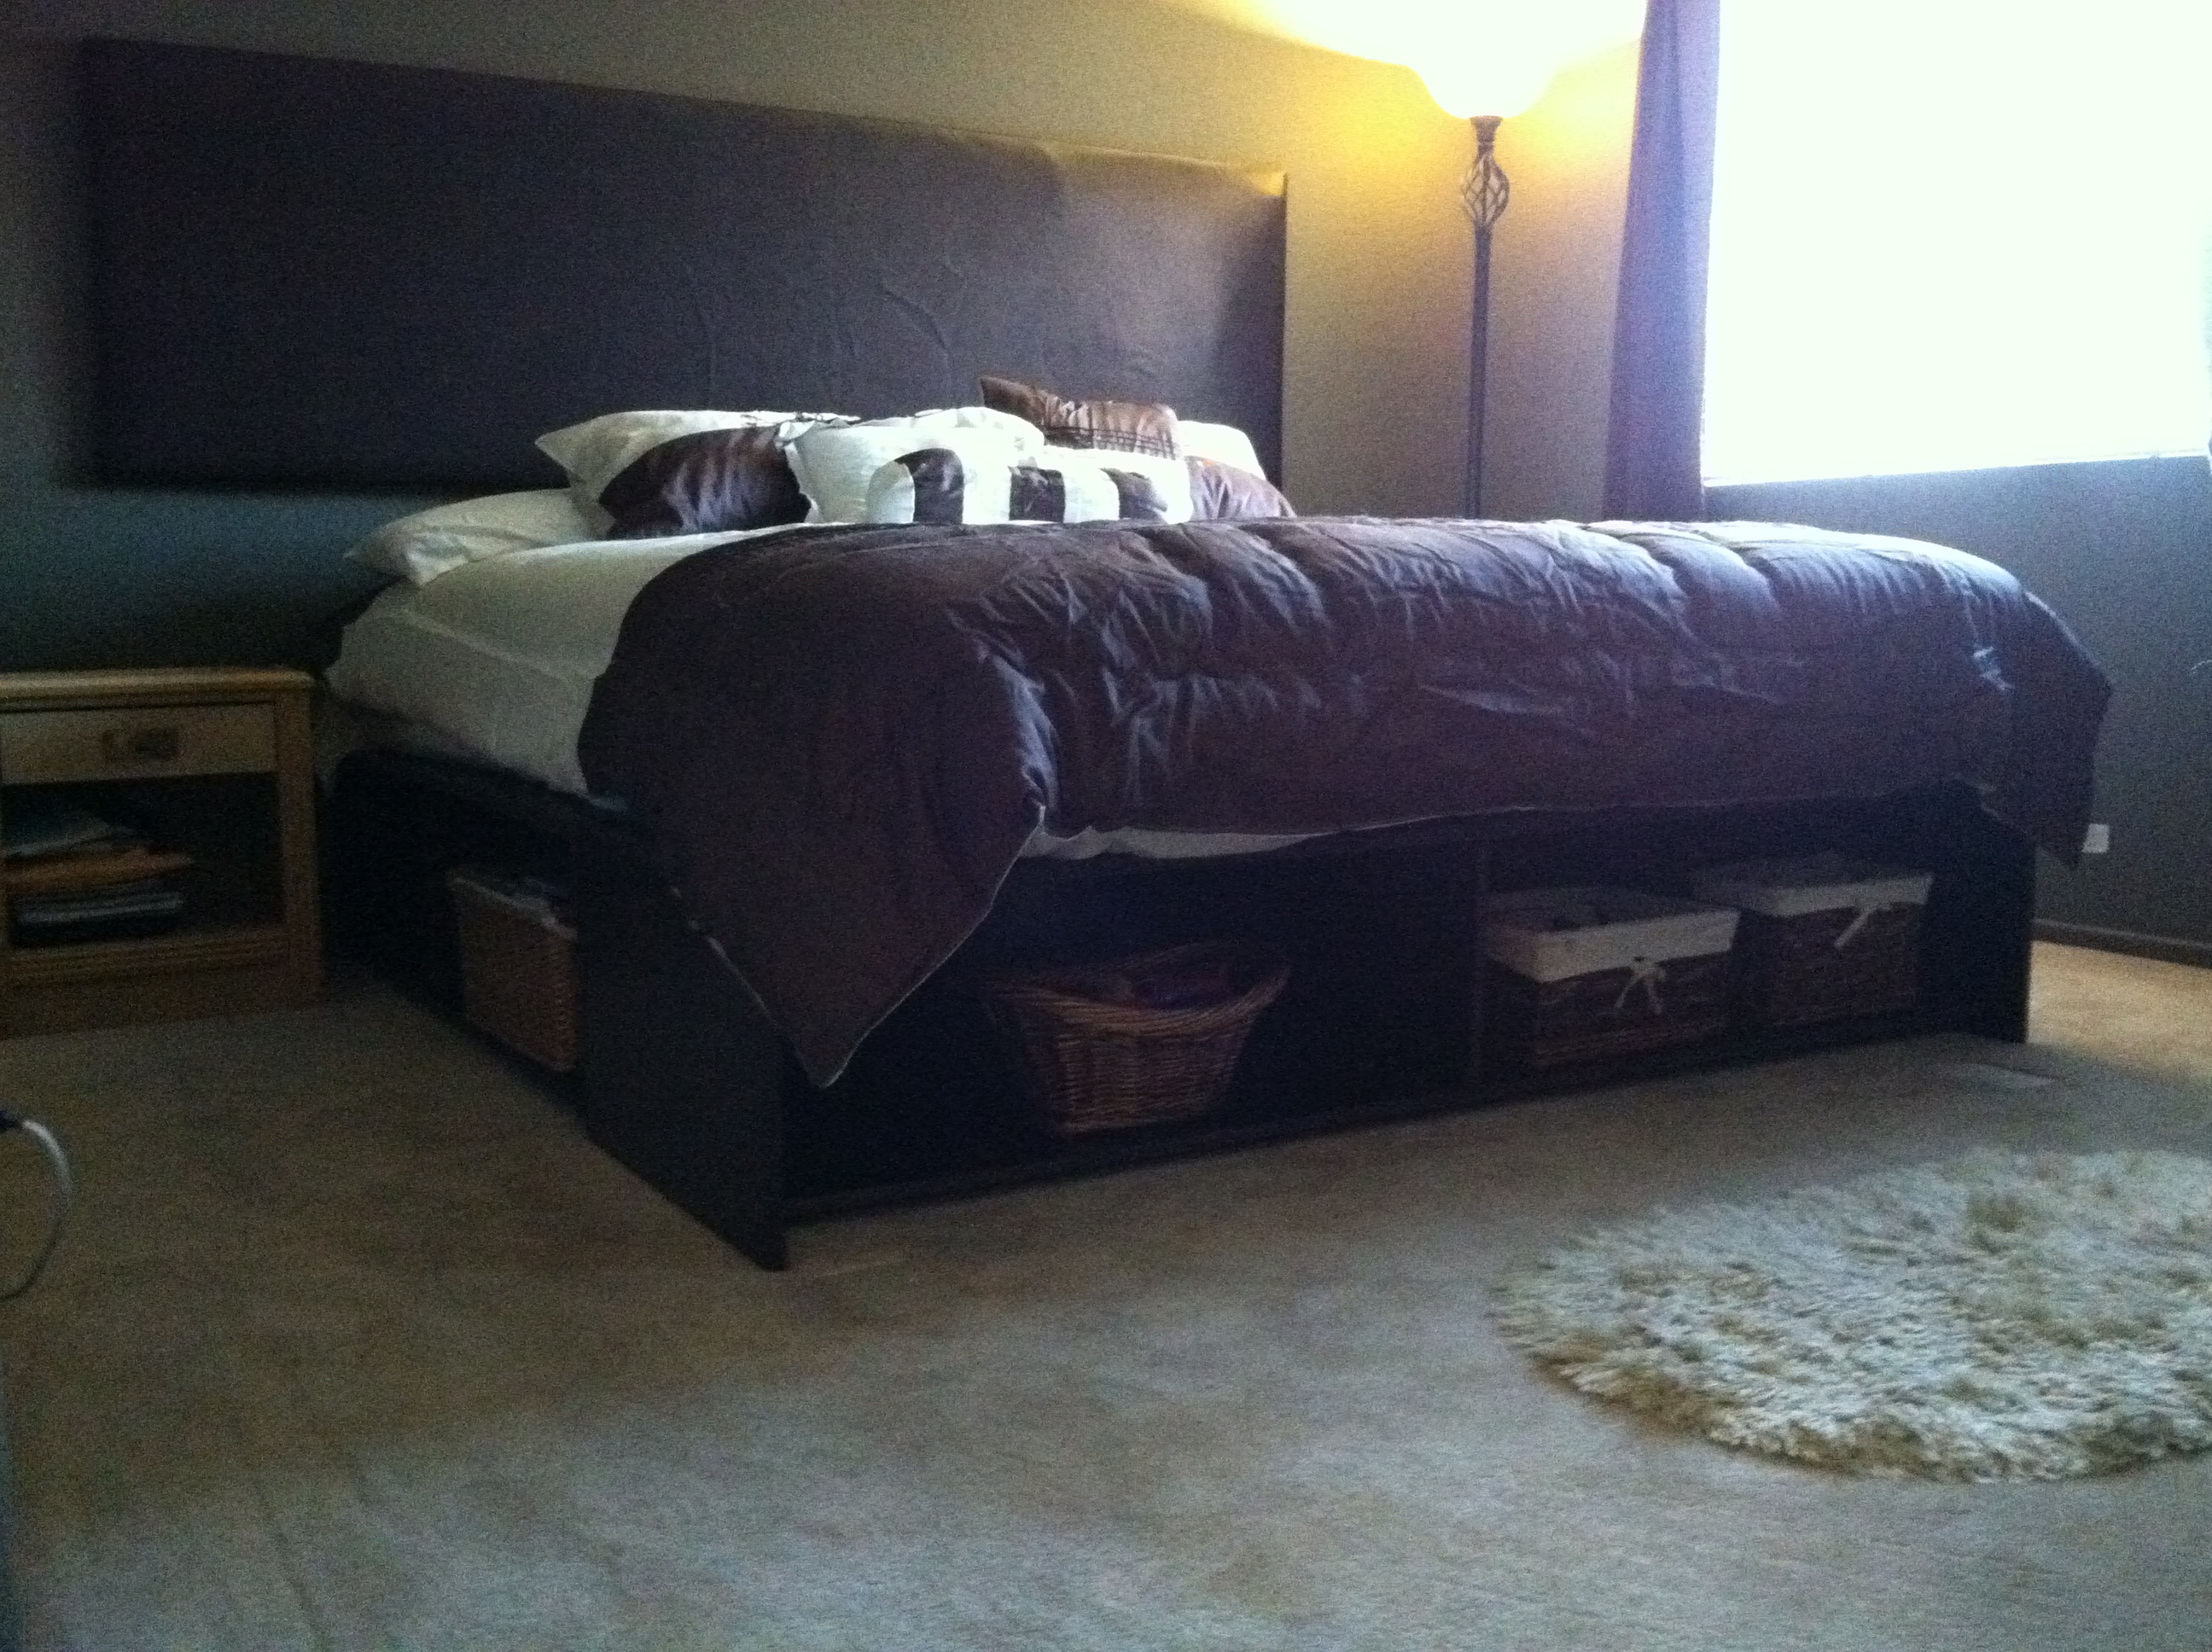
Toddler version of the platform bed
We reworked the plans for the pottery barn inspired bed into a toddler sized version. Arms were added near the head to prevent our child falling out in the first year. They ended up being something of a hazard in those early days, as our child kept hitting her head. If we were to recreate it, we would make the arms go up higher or without the finished top. The bed also was not lifted off the ground in as great of a proportion to the original.
The pine is left untreated and unfinished. The only glue used was homemade milk glue.
Built from Plan(s)
Estimated Cost
<$100
Estimated Time Investment
Weekend Project (10-20 Hours)
Finish Used
None
Recommended Skill Level
Intermediate
Comments
Adirondak Chair and Stools
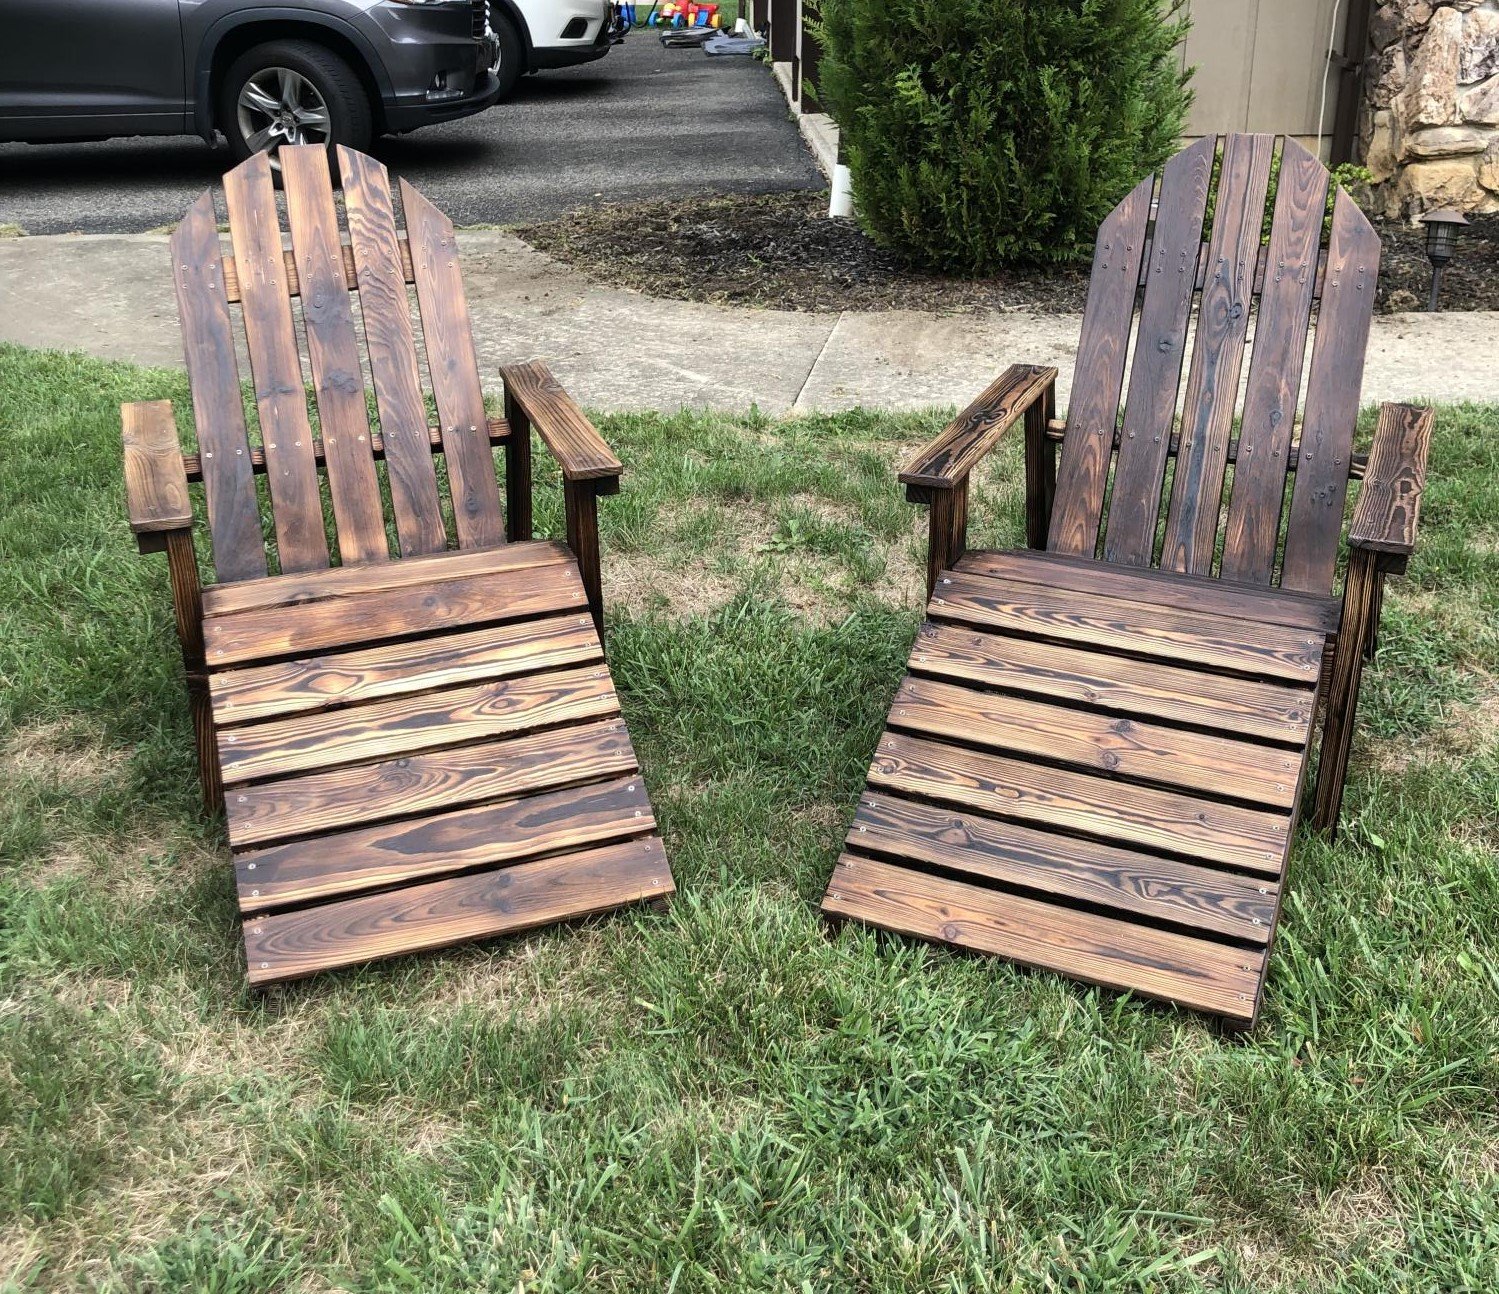
Plans were super easy to follow. I finished the chairs by using the Shou Sugi Ban technique. I burned the chairs and stools completely, than wire brushed them. I repeated the process a second time. I finished by adding a coat of poly which I believe gave the chairs a little more depth. They are so comfortable and plans were perfect. Thank you Ana!
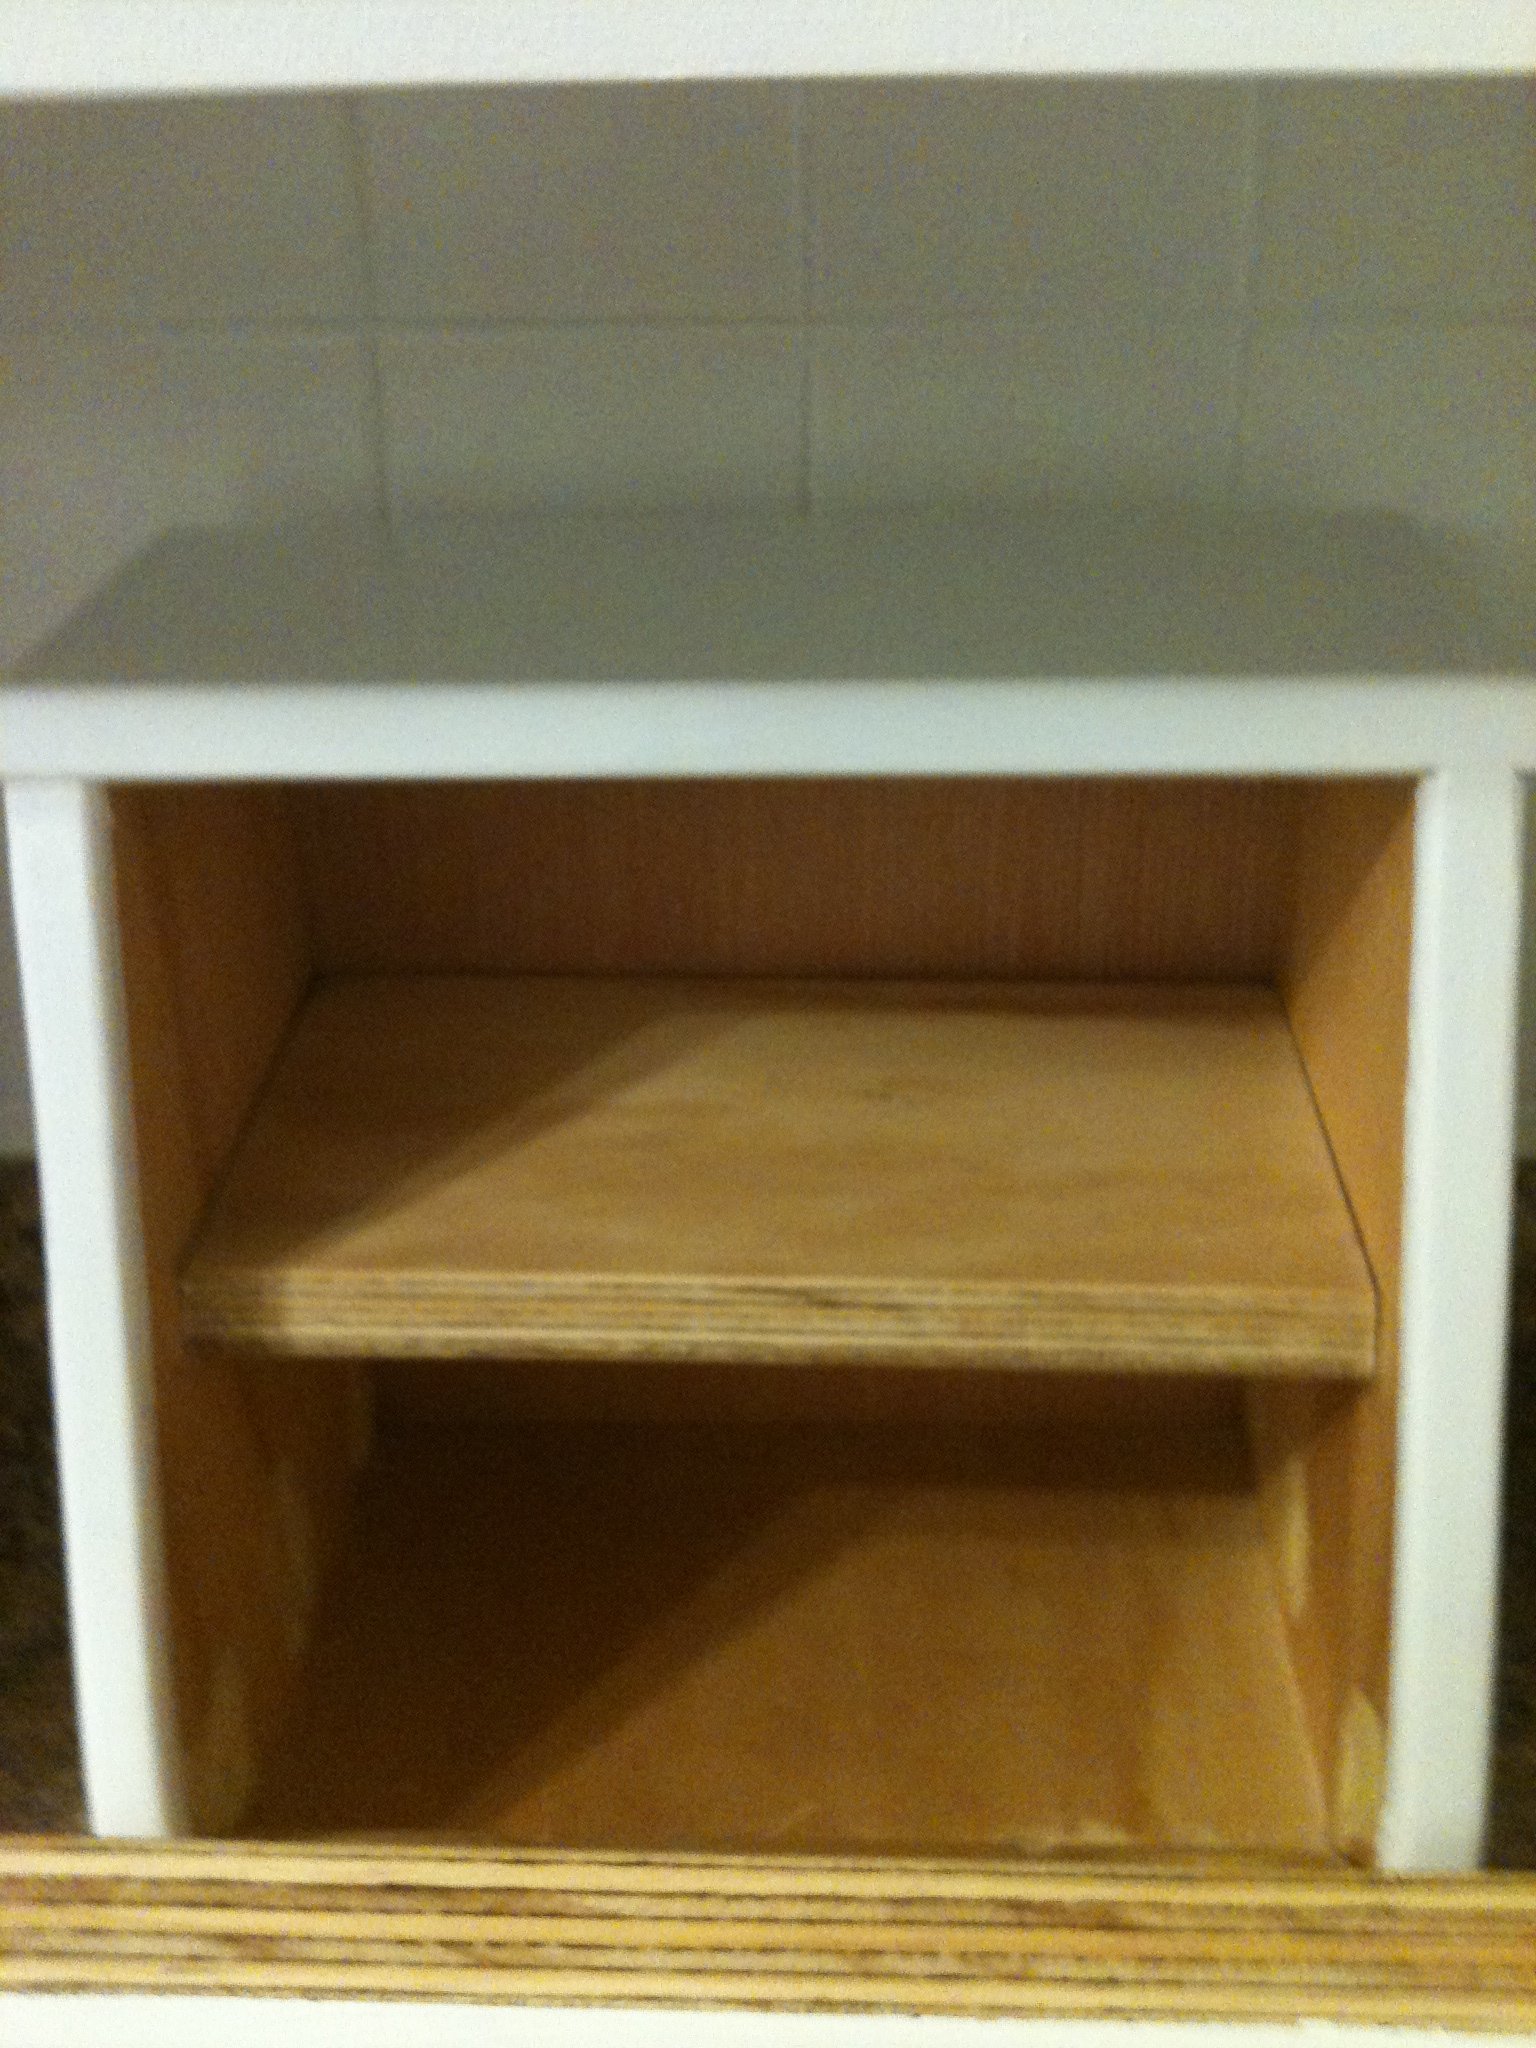
Bread Box
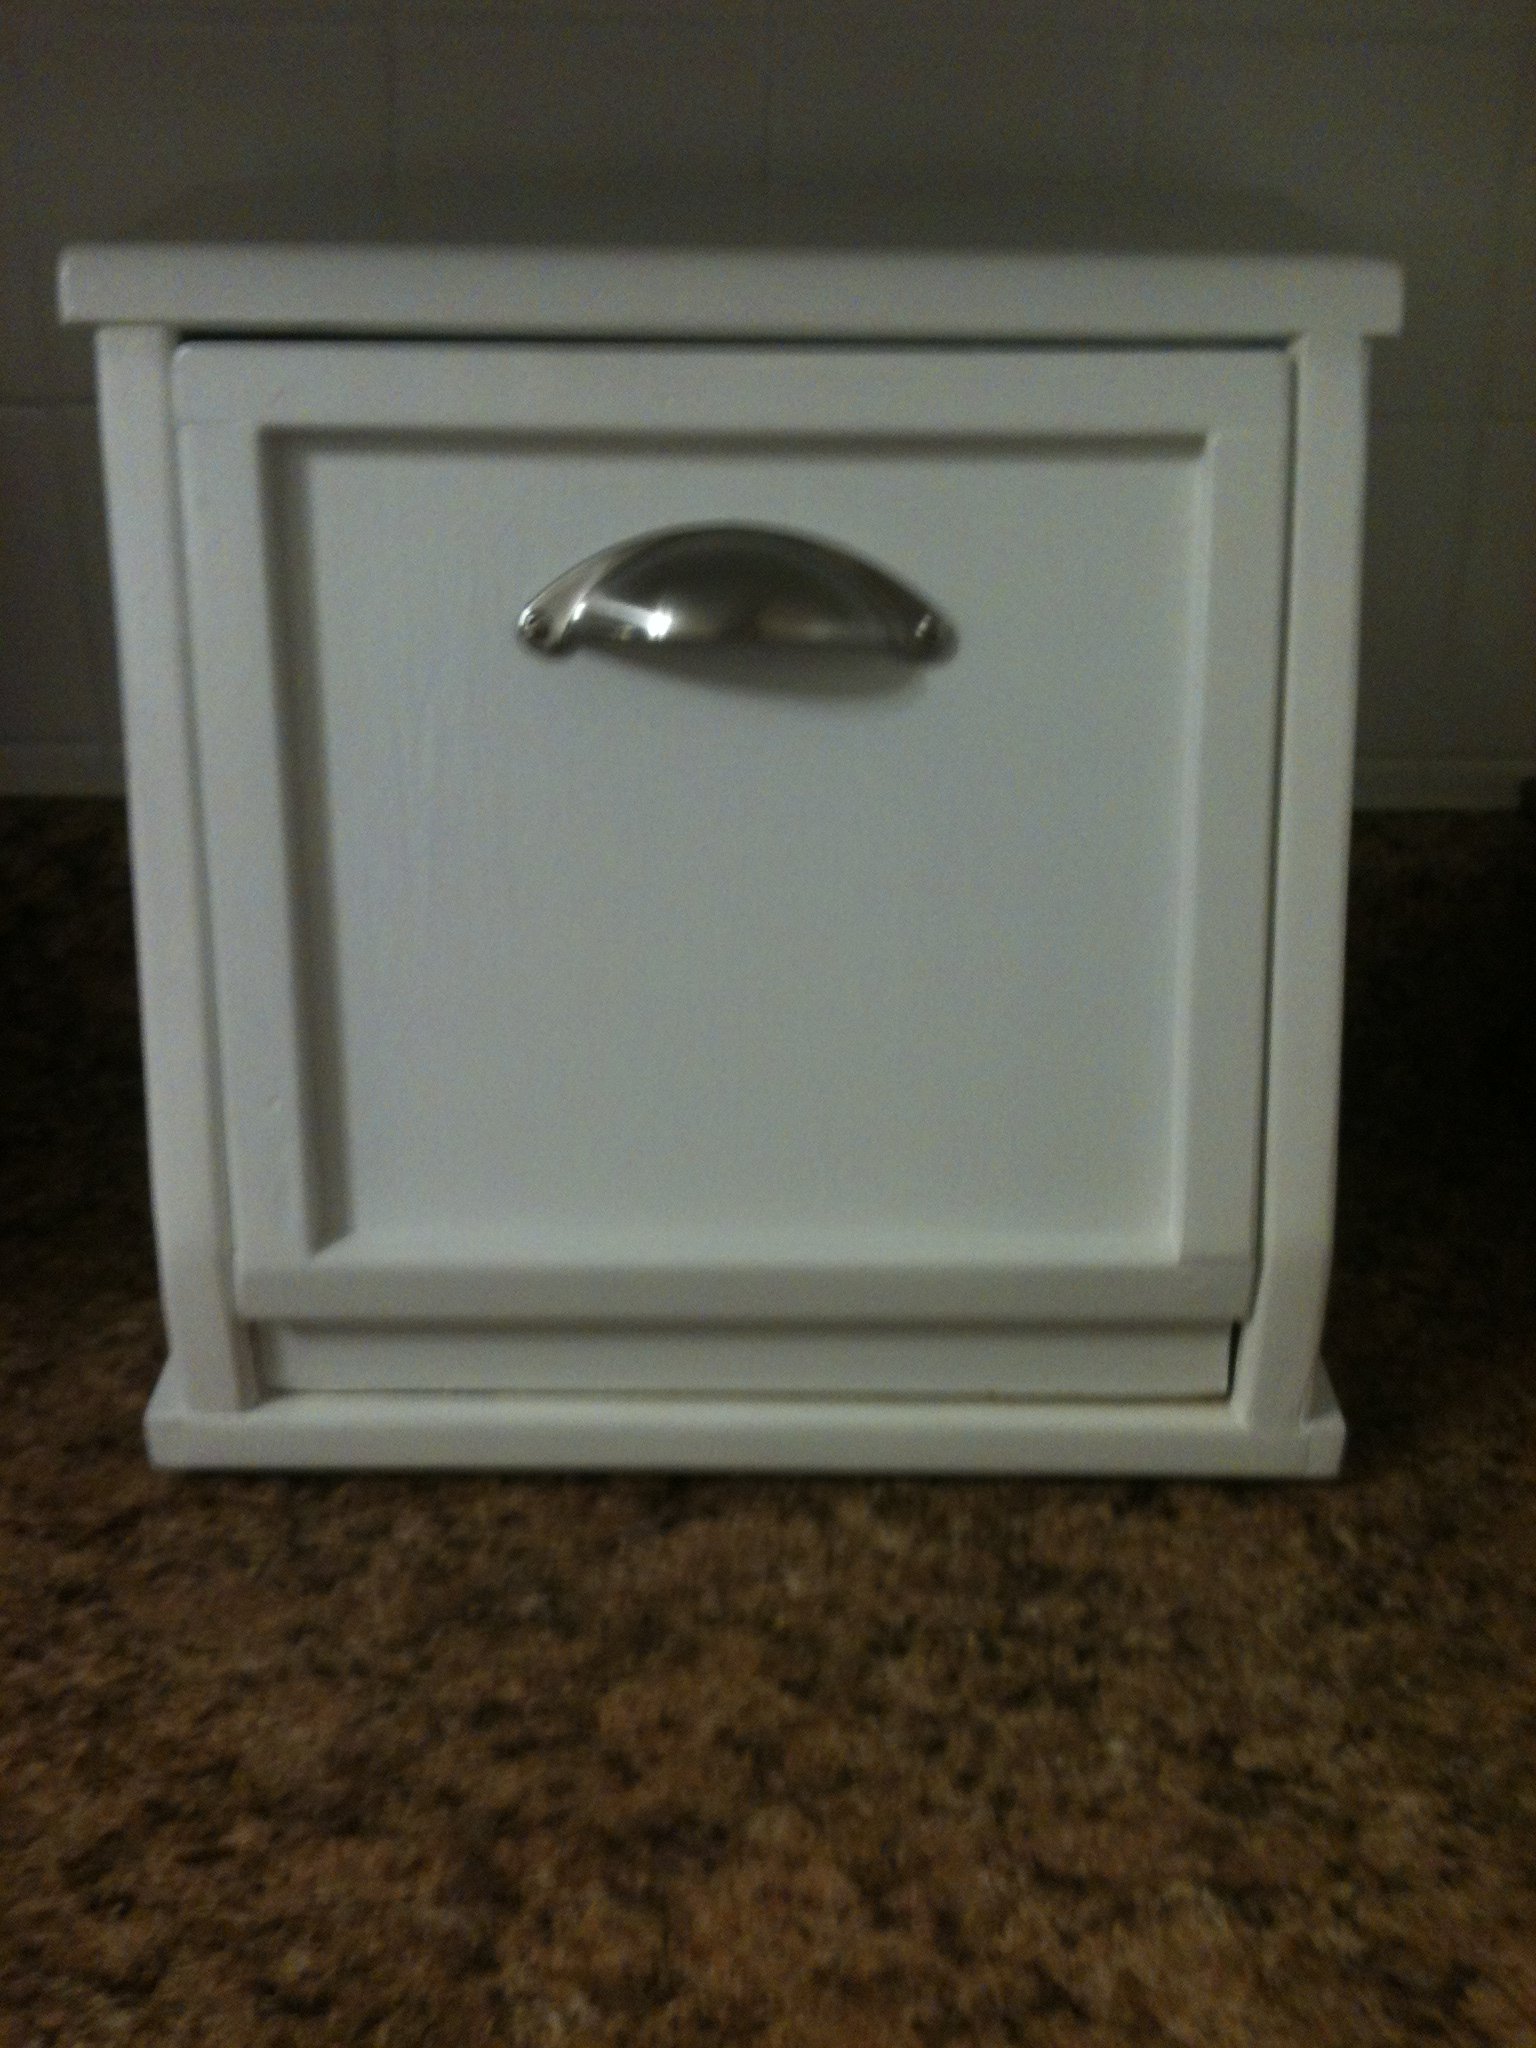
I started baking my own bread a few months ago, and storage was an issue. My husband decided to build me an old fashioned bread box and set out designing one on his own to fit in our small galley kitchen. I love it. It is a double decker, so I can fit two loaves in it just fine. The inside is coated with a food-grade sealer.

Estimated Cost
$20: $16 for the food-grade sealer and $4 for the handle, scrap wood used from other projects.
Estimated Time Investment
Afternoon Project (3-6 Hours)
Finish Used
White spray paint, food-grade sealer inside.
Recommended Skill Level
Beginner
Comments

Sun, 12/04/2011 - 02:32
Resourceful
That is a great idea indeed and I love how it has a shelf inside.
Wed, 12/07/2011 - 03:49
Love this!
This is an awesome idea, can't wait to make one for my kitchen. Beautiful job! Thanks for sharing this!
Sat, 06/30/2012 - 07:05
Just what I'm looking for!
Just what I'm looking for! Do you have a pattern or measurements on this project? Thanks!
Tue, 08/20/2013 - 10:40
measurements
Please, let me know if there are plans/measurements somewhere. Love this!!
Standing Outdoor Planter
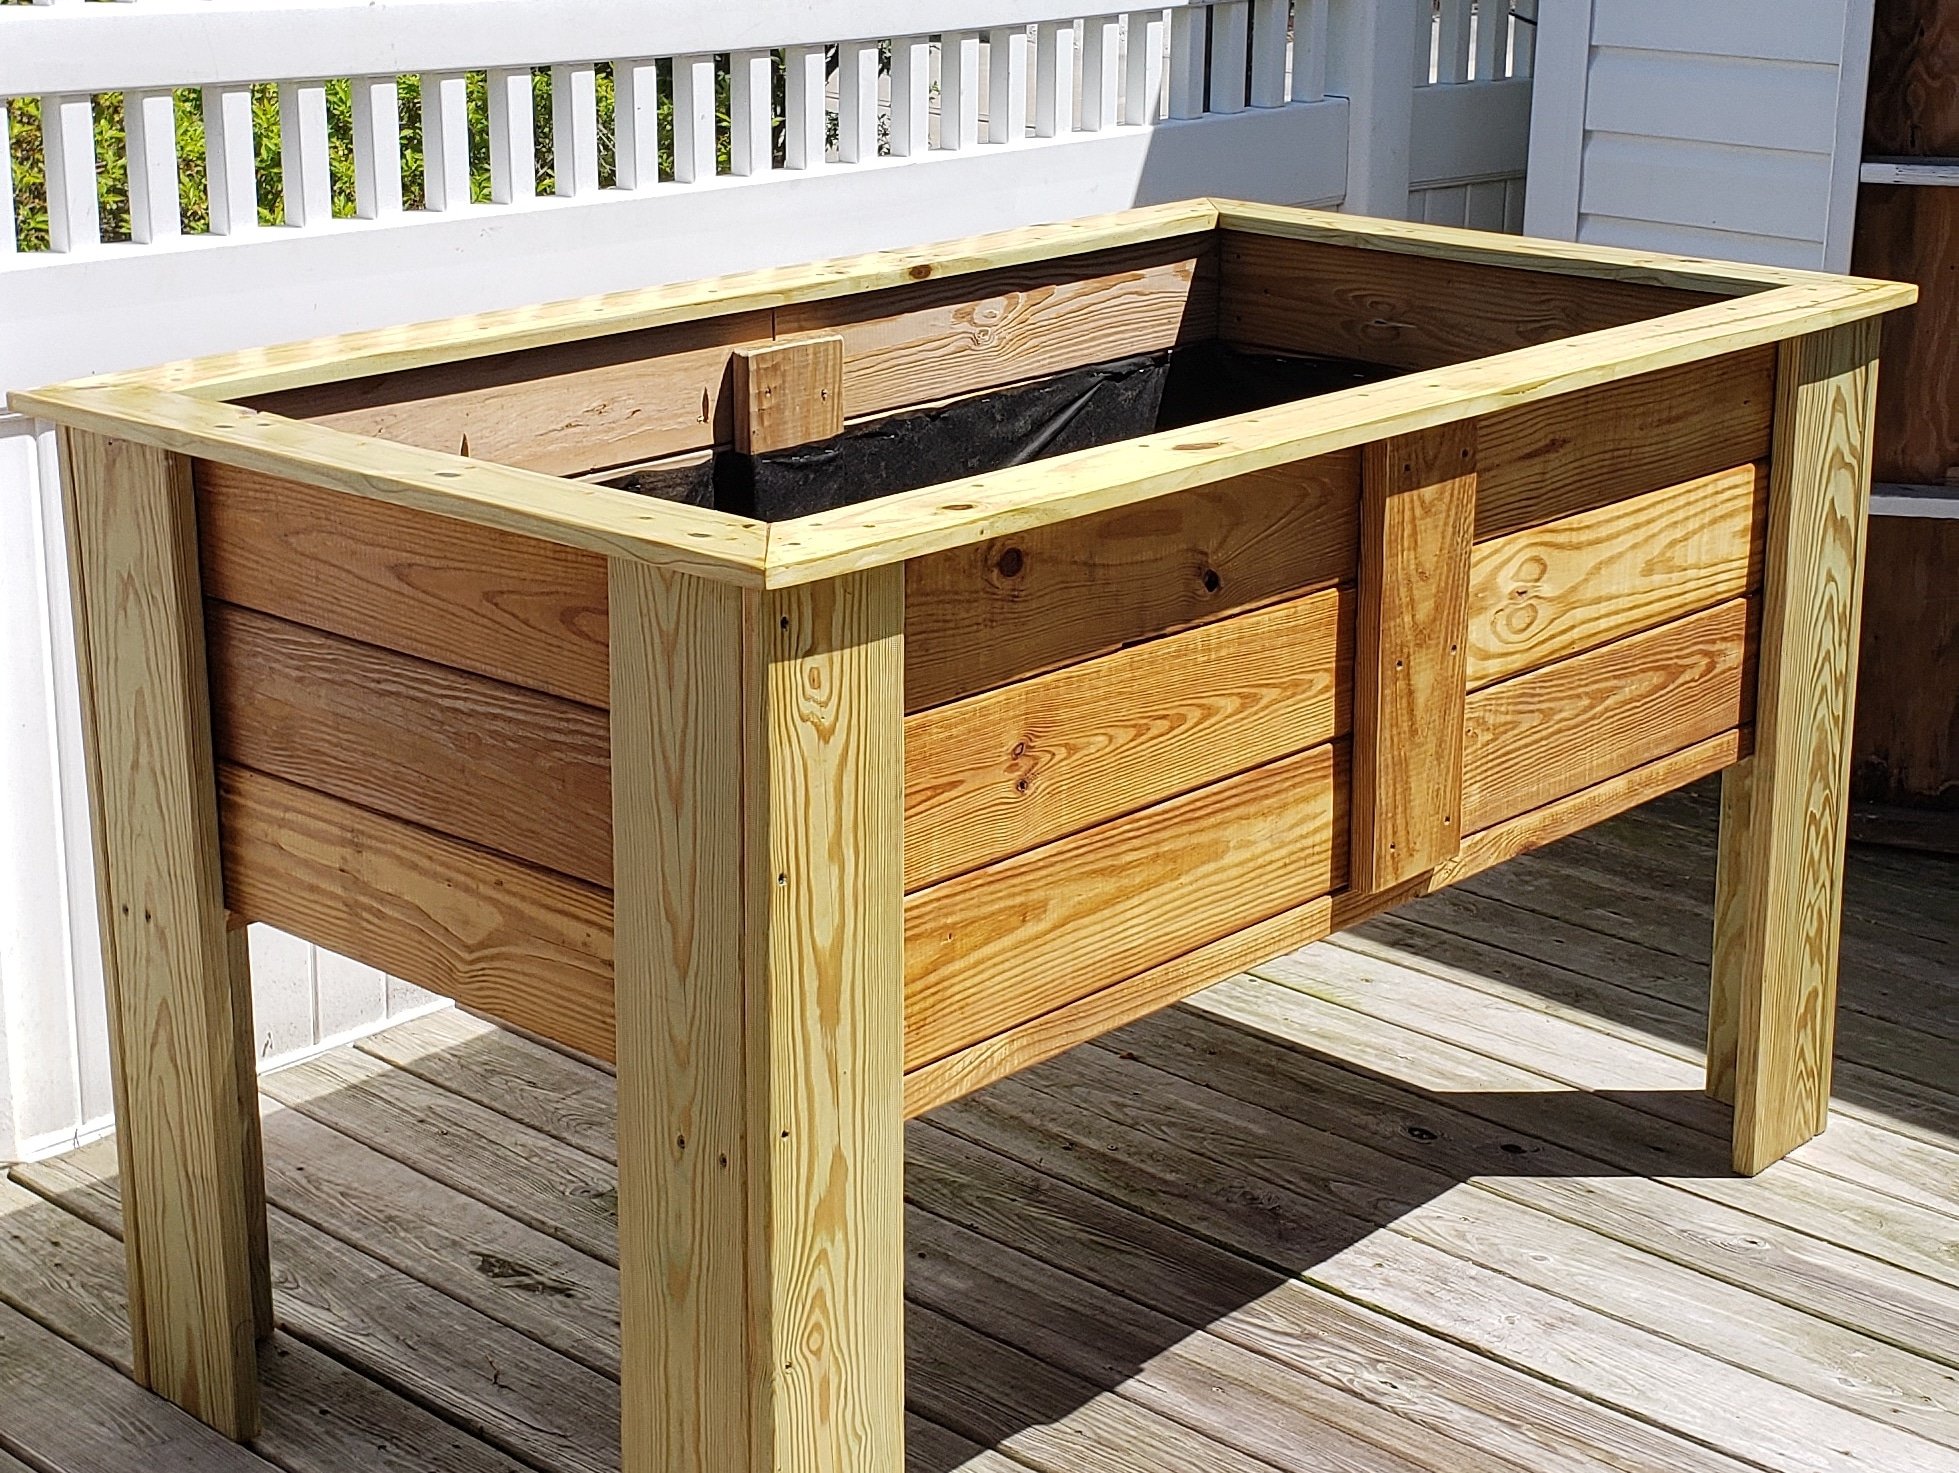
A friend of mine has issues with her knees but loves gardening so I built this to allow her to continue gardening. She loved it.
I didnt follow any particular set of plans I watched several you tube videos and combined different ideas from the videos to develop my own plan.
Built from Plan(s)
Comments
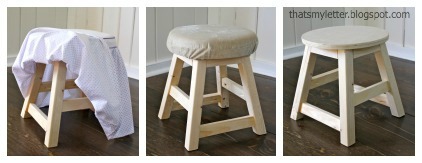
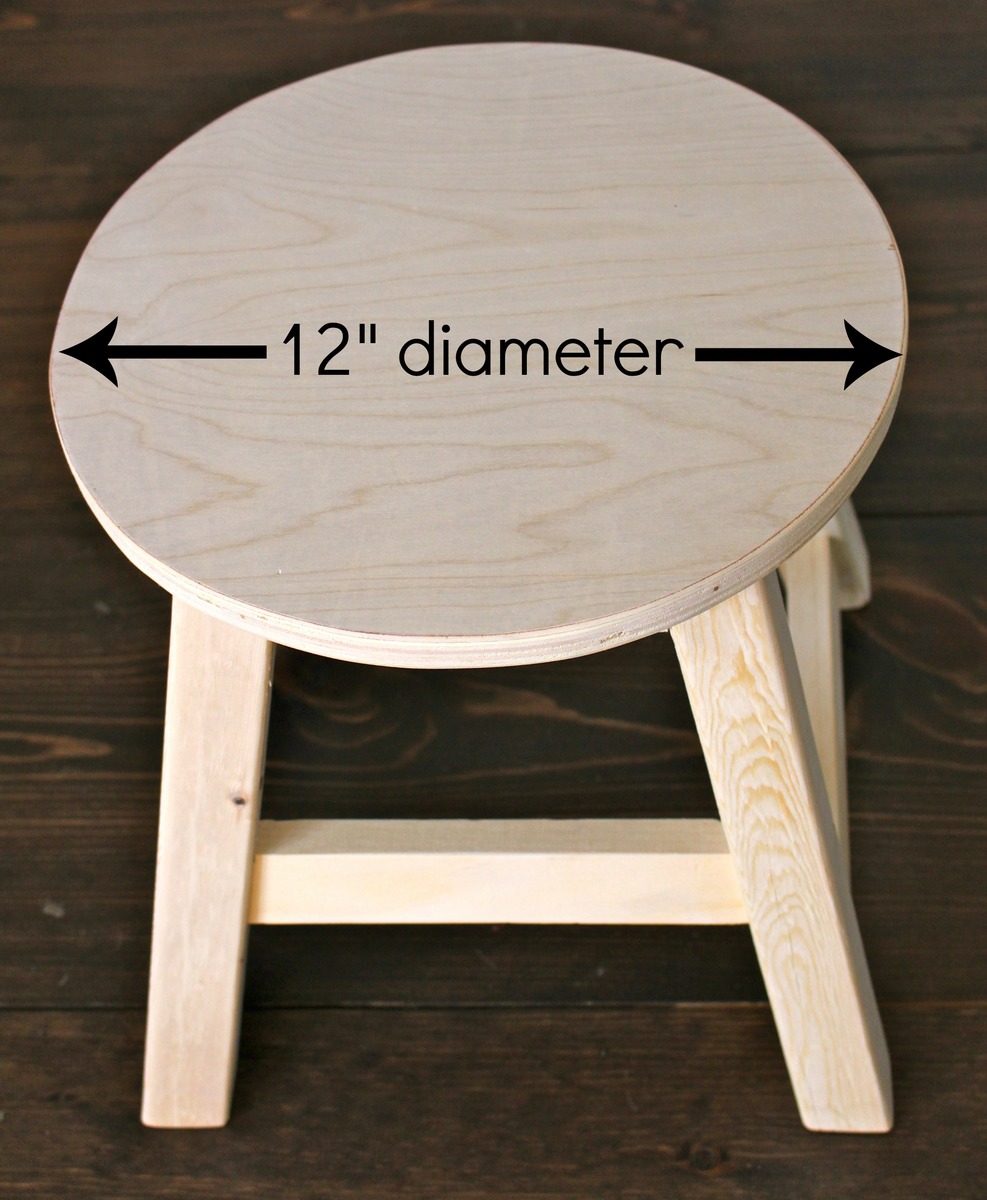
kids vanity stool & slipcover
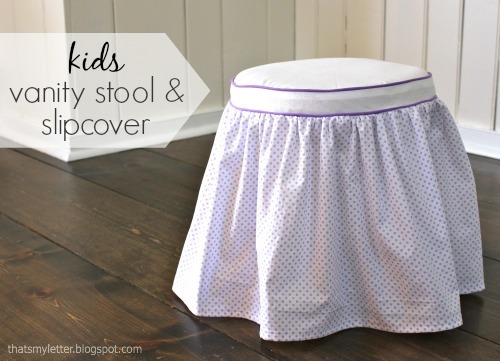
I used all scraps to construct the stool modifying the leg height to 12 1/2" and the seat to a 12" diameter to fit properly at the kids vanity. See the complete details on the slipcover in my blog post link.

Built from Plan(s)
Estimated Cost
$10
Estimated Time Investment
An Hour or Two (0-2 Hours)
Finish Used
no finish
fabric slipcover
fabric slipcover
Recommended Skill Level
Beginner
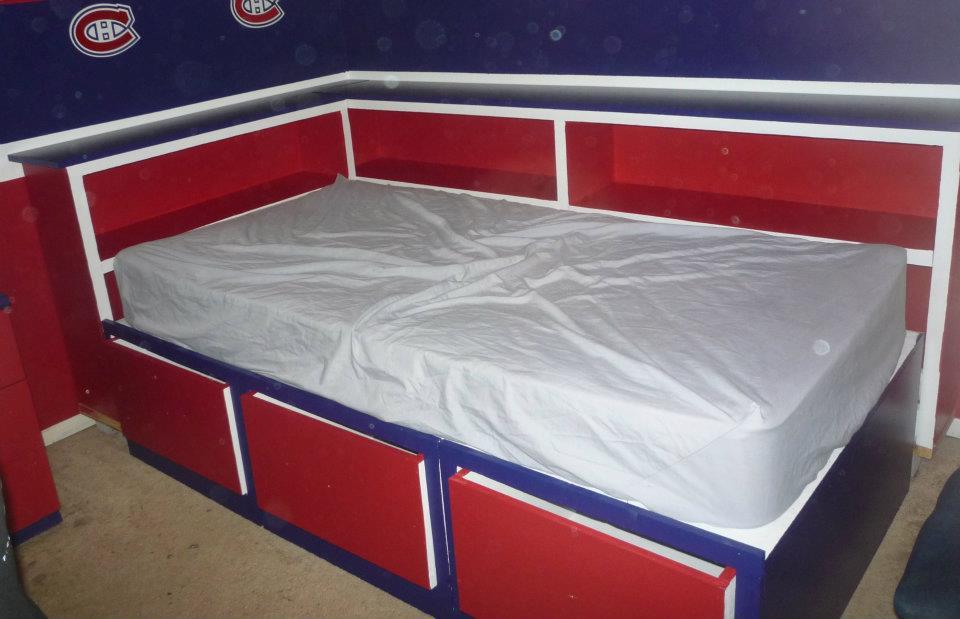
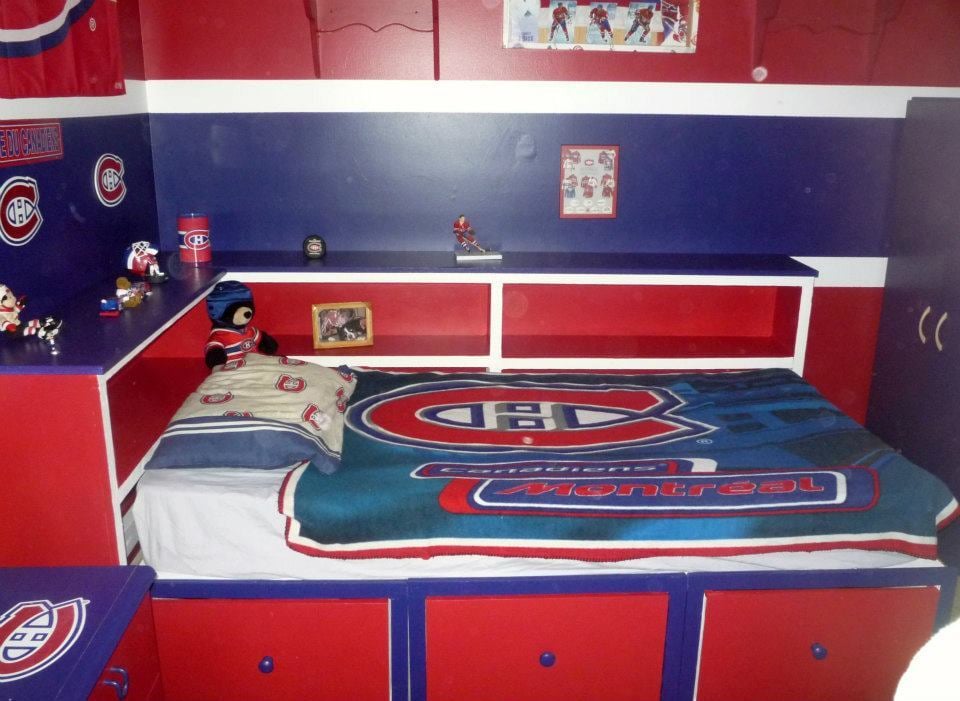
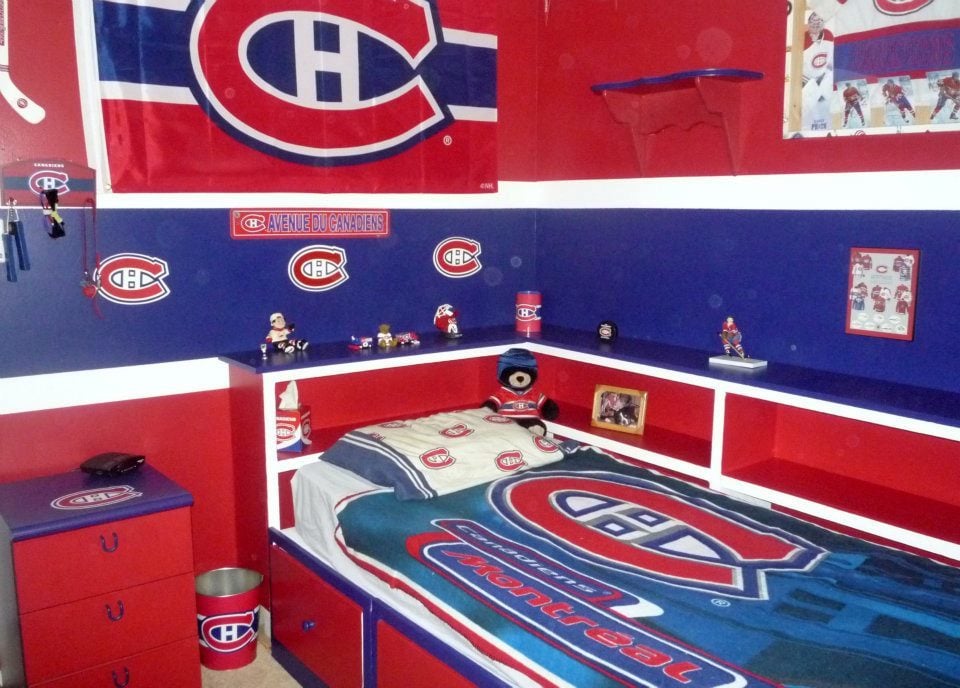
Nathan's Montreal Canadians bed

Our nephew Nathan really wanted a captain's bed like his friend. We built him one even better for Christmas this year. I couldn't find one plan with everything we wanted to I used the plans for the Storage Daybed for the base, and used the plans for the Cozy Corner twin bed collection wide bookcase unit. We combined both the headboard and sideboard into one unit (by extending the top to the short end) giving him an L shaped headboard for all his hockey stuff :) The only thing we messed up on was the height of the bookcase. He wanted it higher so it's on blocks for now to raise it. My sister did all the final painting to match his room and it looks AWESOME!!!
Steve had everything cut at work and we put it together in one 12 hour day! Nathan LOVES his new bed. Thank you Ana!
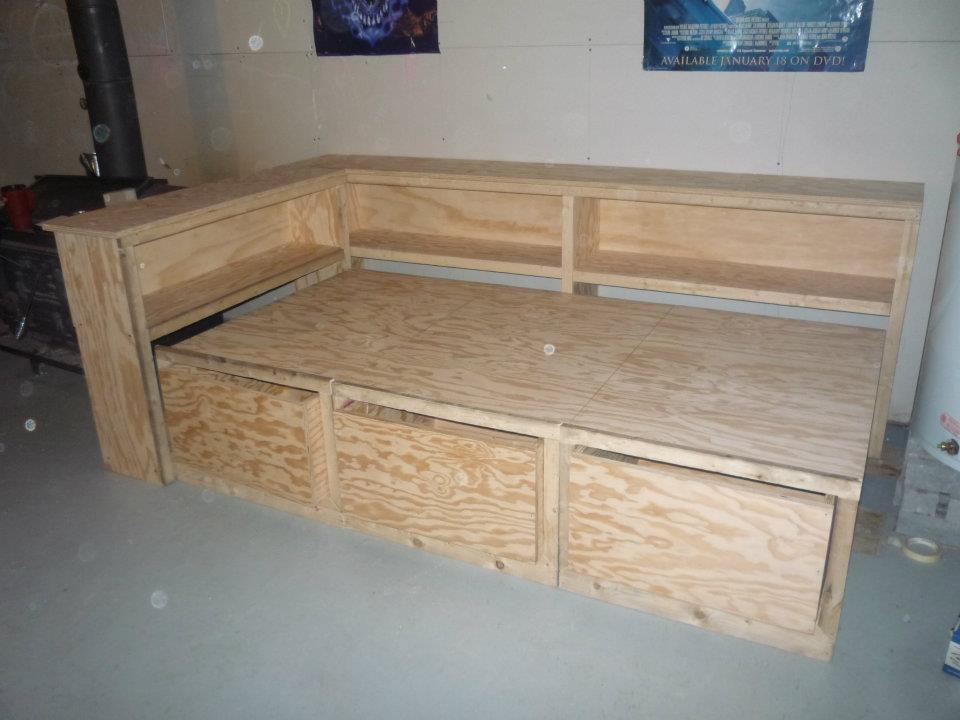
Built from Plan(s)
Estimated Cost
about $125
Estimated Time Investment
Weekend Project (10-20 Hours)
Finish Used
Nathan is a HUGE Montreal Canadian's fan. He applied 2 coats of wood primer, then his mom, my sister did the finishing paint with the official Montreal Canadians colours to match his room. A couple of little touch ups to be done but it looks great.
Recommended Skill Level
Beginner
Comments

Fri, 01/06/2012 - 16:52
Very cool, Great work
That is one nice, cool looking bed. Interesting colors, is it his school colors? I've never thought of painting plywood, you've given me some ideas.
Fri, 01/06/2012 - 21:24
The colors are the official
The colors are the official Montreal Canadiens hockey team's colors, My son is a HUGE fan! Nathan LOVES his bed. and it is very solid.
Fri, 01/06/2012 - 20:29
Ummm... The bookcases were
Ummm... The bookcases were too short because you didn't take the mattress height into account. Looks really good though.
Solid maple IKEA inspired bookcase
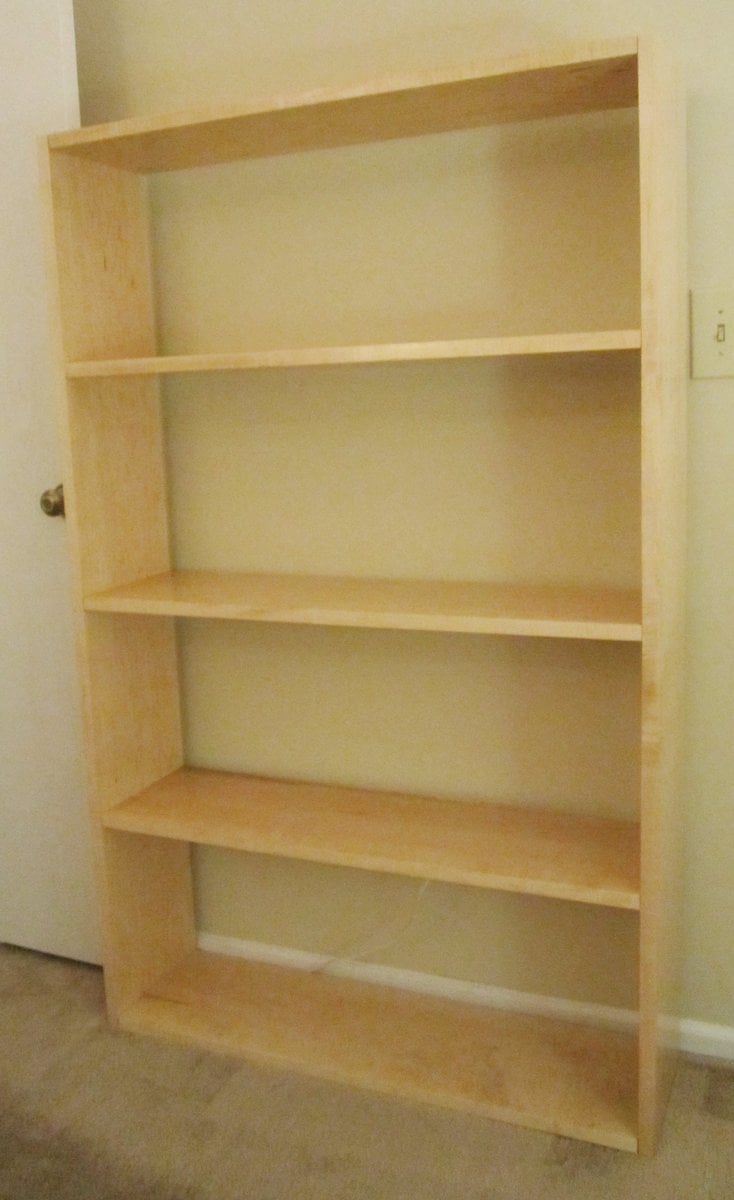
I made this bookcase out of solid hard maple lumber. The project was more expensive because I chose to use this wood. It also took more time because I had to do a lot of sanding in order to finish it with shellac and paste wax, but I think it was worth it. I altered the plans and made the bookcase 5' tall instead of 6' as it would have been a little large for the room I put it in otherwise. I used a kreg jig to create pocket holes on the undersides of the shelves so that I did not have to drill and make holes on the sides of the bookcase. I also used L and T brackets on the back to hold the whole thing together.
Built from Plan(s)
Estimated Cost
$115
Estimated Time Investment
Week Long Project (20 Hours or More)
Finish Used
Shellac and paste wax. The key was to sand extensively before finishing, as the lumber I bought was very rough. I sanded to 400 grit which may have been excessive, but it did create a nice finish. In between coats of shellac I also sanded. I finished it all up by adding a coat of paste wax. I liked this finish as it was much more natural and less hazardous than many other finishes.
Recommended Skill Level
Beginner
Comments

Tue, 01/24/2012 - 10:12
Lovely
I really like this. I made a similar set a while back out of pine, because I needed a lot of book storage in a hurry, but nothing near this nice.
How is the side to side stability? I found a need to put bracing along the back, which also served to keep my books from falling off when the cats push up against them.
Tue, 01/24/2012 - 10:46
Thank you!
The side to side stability is pretty good. It'll rock a little bit, but it's really quite sturdy. The L and T brackets in the back helped significantly with the stability.
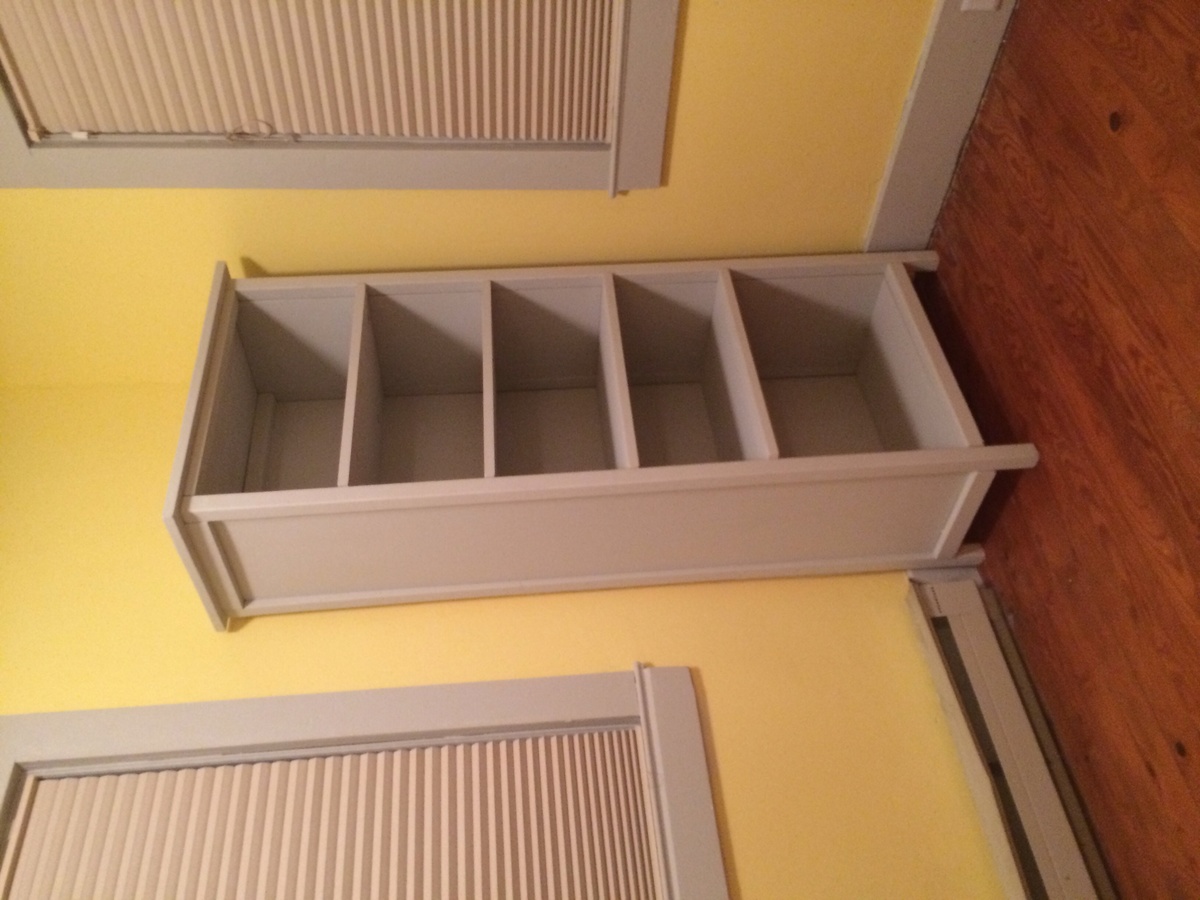
Bookshelf for our nursey based on your terrific Channing plan
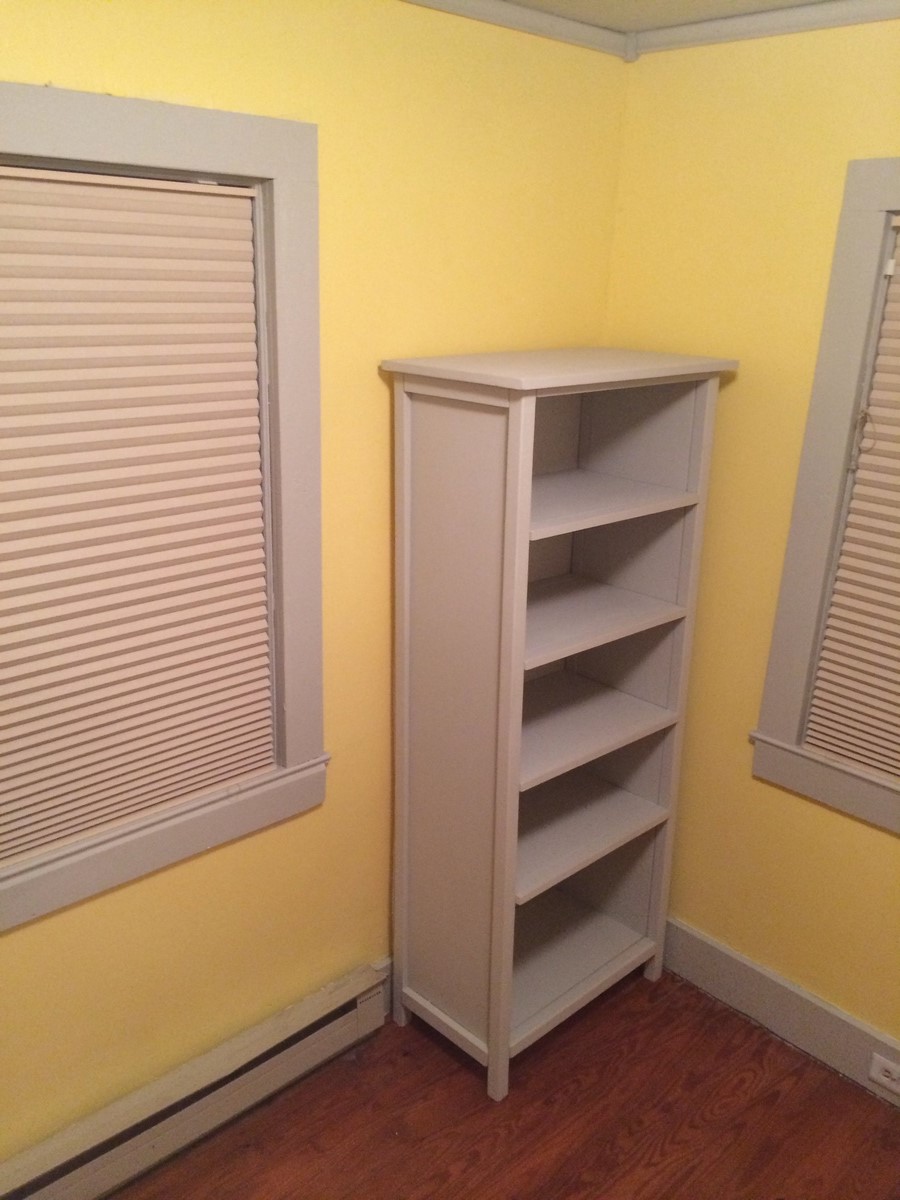
Great, simple bookshelf for our nursery
Built from Plan(s)
Estimated Cost
$150 for wood, $150 for paint and tools I needed
Estimated Time Investment
Weekend Project (10-20 Hours)
Finish Used
Flat wall paint -- the same we used for the trim in the room.
Recommended Skill Level
Beginner
Comments
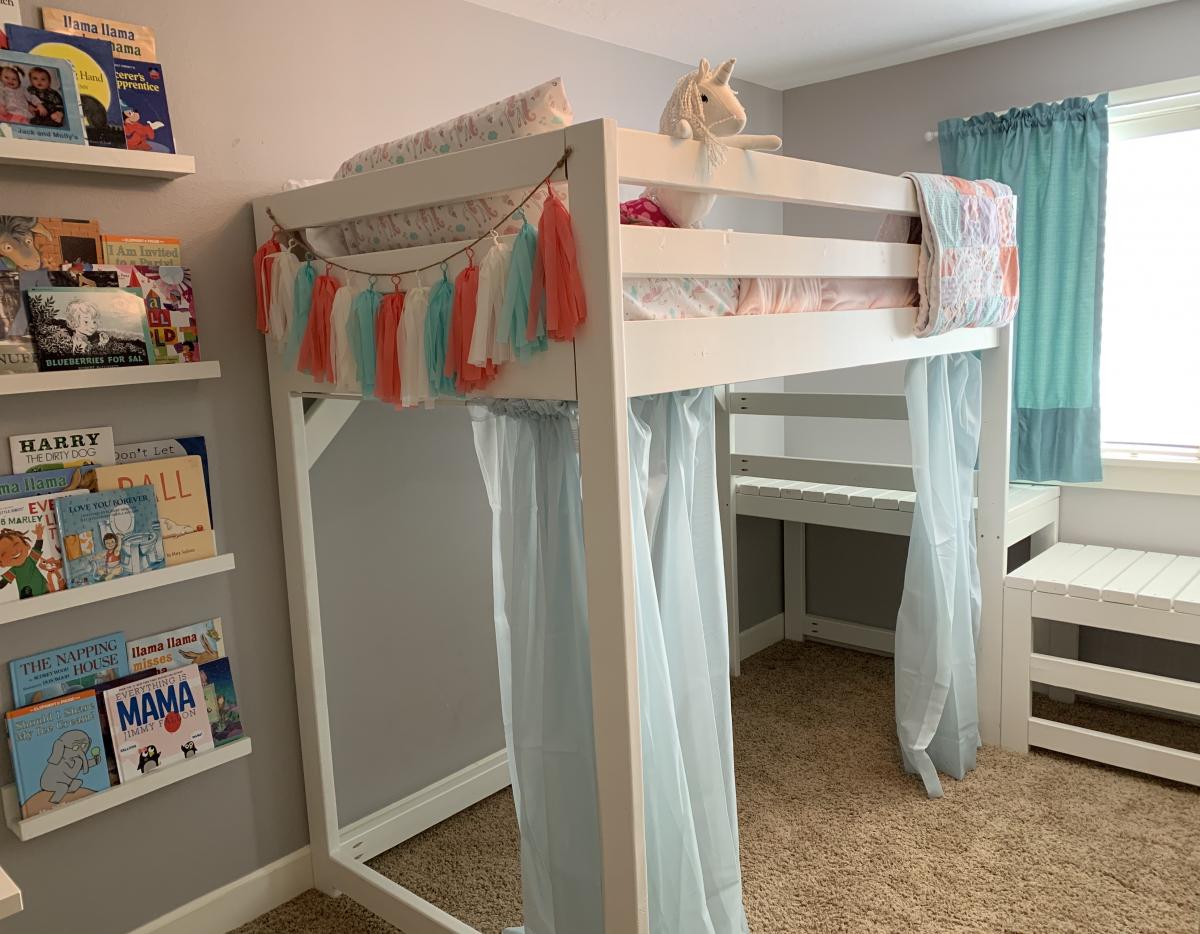
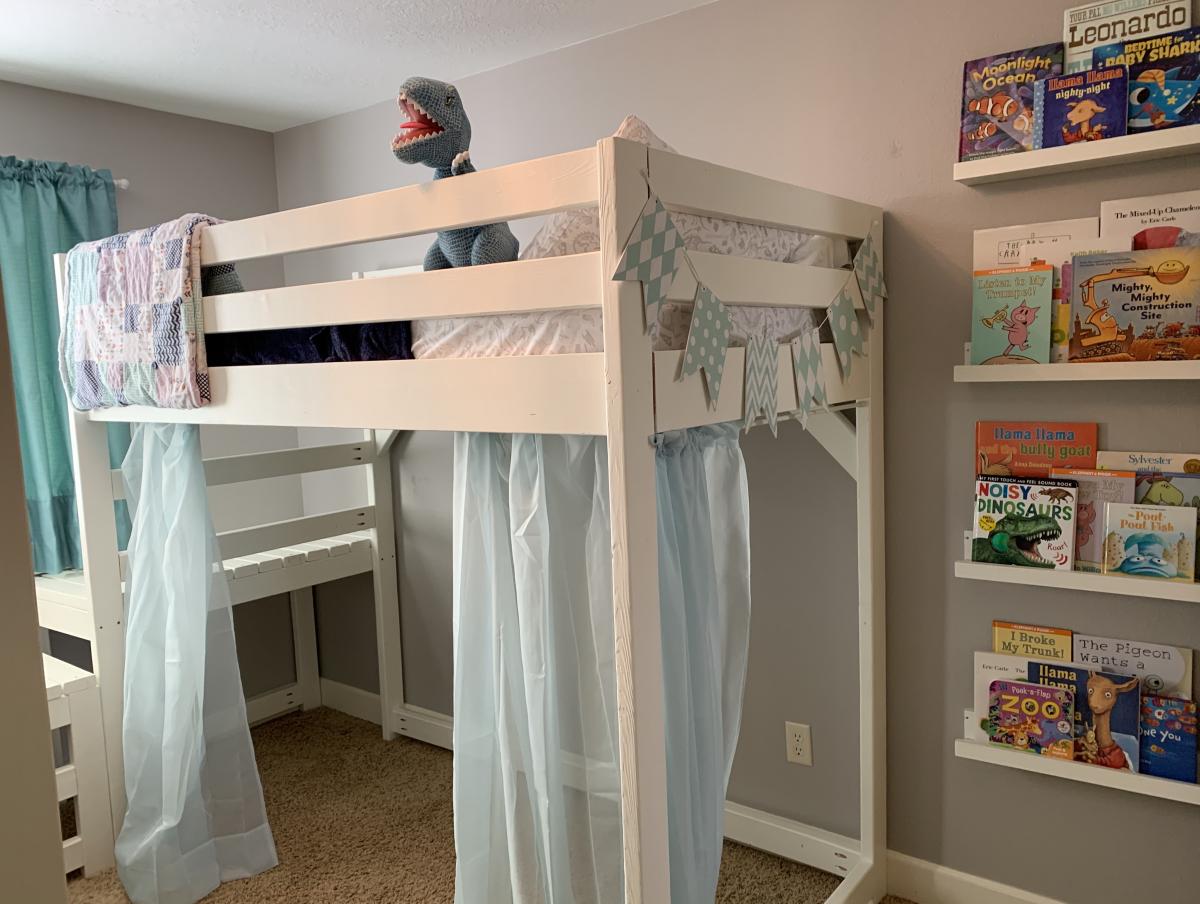
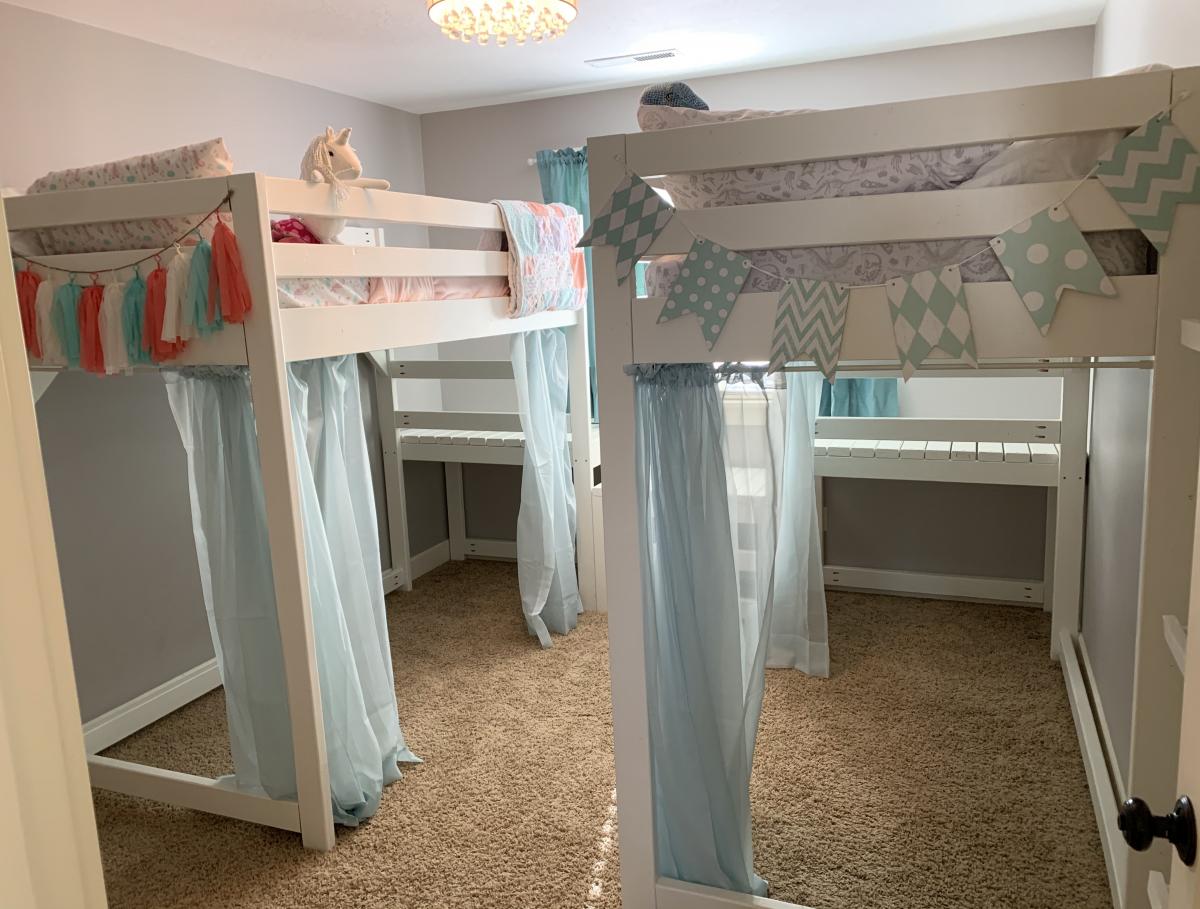
Twin Loft Beds for Twins
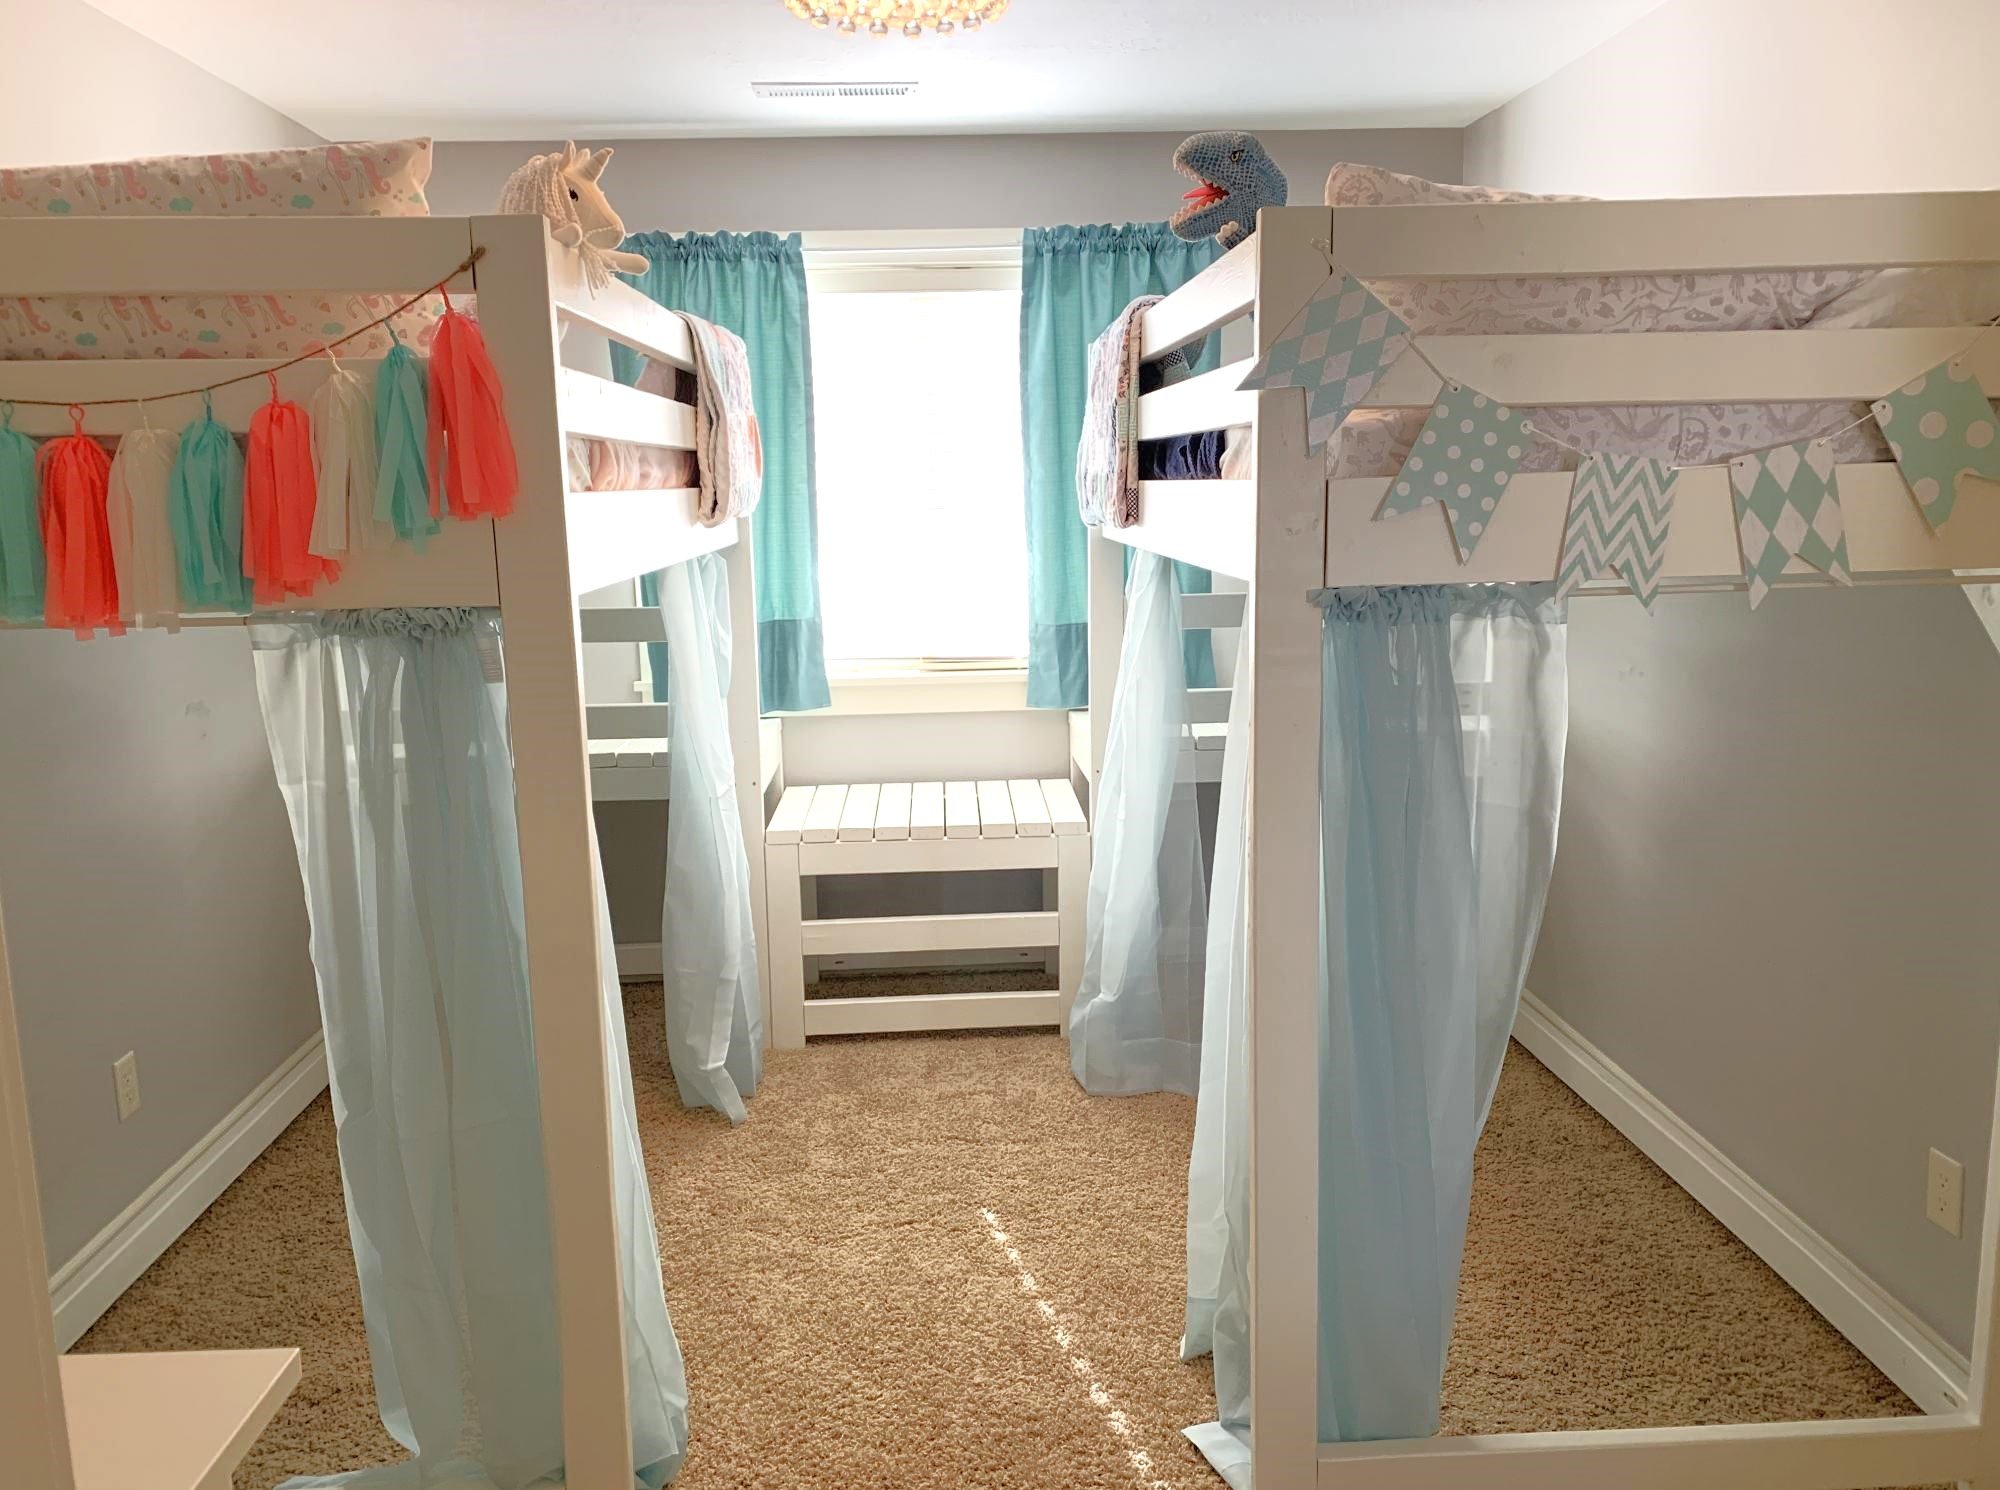
My twins just turned four and were still sleeping in their toddler beds, so it was time for an upgrade. They still want to share a room so we knew we needed to maximize space and open up some room for them to play. We chose the Camp Loft Bed but raised the height to 72" (with 53" of headspace) so we might be able to add a desk underneath when they get older.
Essentially, we made two loft beds with the platforms but omitted the stairs. Then we built a slightly lower platform to put between the two beds, which acts as a step down. Then instead of making stairs that jut out into the room, we added two 2x4s as ladder rungs to the lower platform. This also acts as a tunnel for the twins to crawl under to go between each other's play spaces. This also makes it so the beds can be easily separated if we ever need to put them in separate rooms.
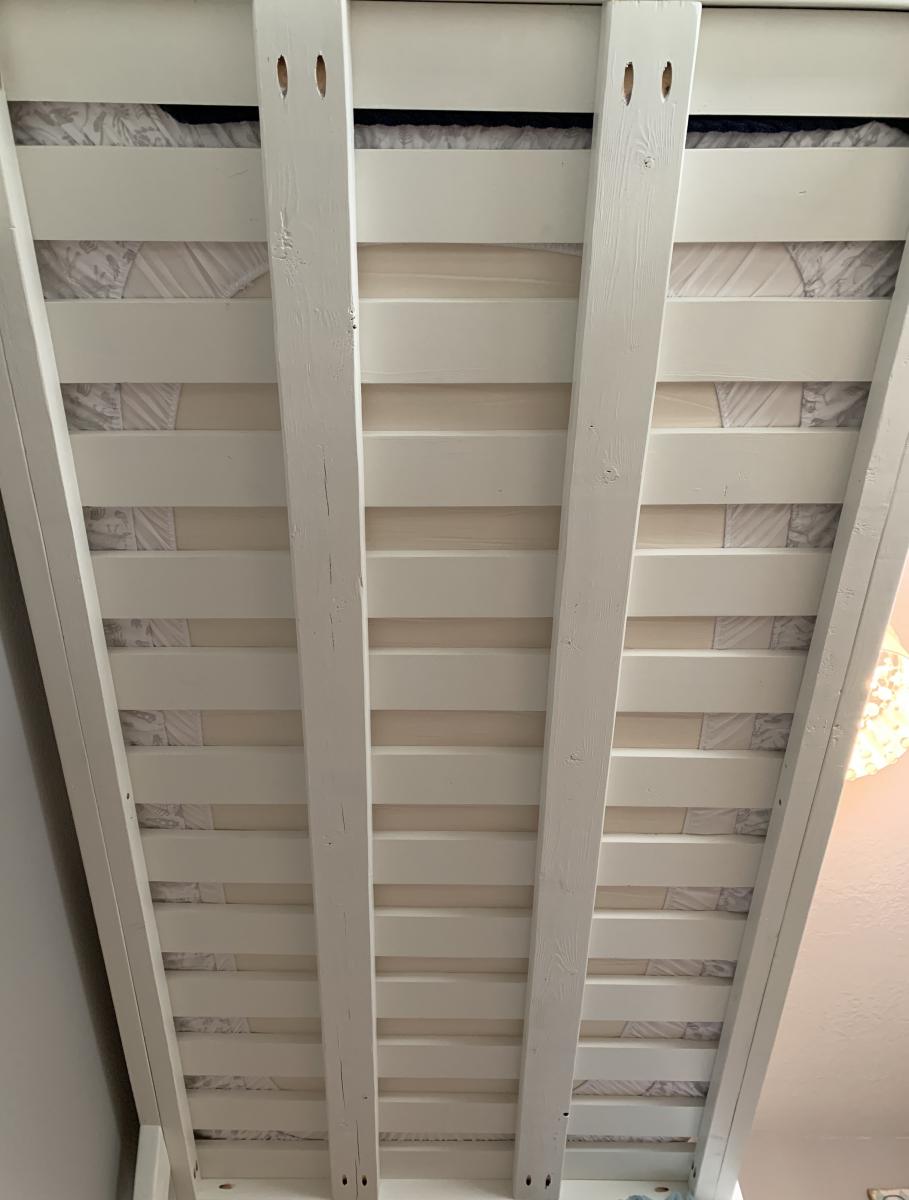
When it was complete we noticed one of the beds was a little wobbly, so we added diagonal braces in the corners and another 2x4 across the length of the bottom to help stabilize it. We also chose to use 1x4 pieces of pine as the slats for the mattress to lay across, but they didn't feel like they would support our weight if we wanted to read to them in bed. So we added two more 2x4s underneath the slats the entire length of the bed, which has added a ton of support.
We stopped keeping track of exactly how much it cost, but it was close to $400 for both beds combined. And it took most of my husband's free time for two weeks, but most of that was painting two coats of paint on every piece before assembling. First he cut all the pieces to size, drilled the holes with a Kreg Jig, and then painted. To make the painting more efficient, he put a bunch of screws into boards so he could paint all the exposed sides of the lumber, flip, and leave them to dry. Then we assembled the beds in their room.
The twins love their new beds, and we love how much more space they have to play in their room! We were worried the room would feel too crowded but with the openness of the plan and the space that was opened up underneath, we think it turned out great! Now we can move in a bunch of their toys and reclaim some of our house! Thanks for the great plans!
Built from Plan(s)
Estimated Cost
$400
Estimated Time Investment
Week Long Project (20 Hours or More)
Finish Used
Two coats of white paint/primer
Recommended Skill Level
Beginner