Community Brag Posts

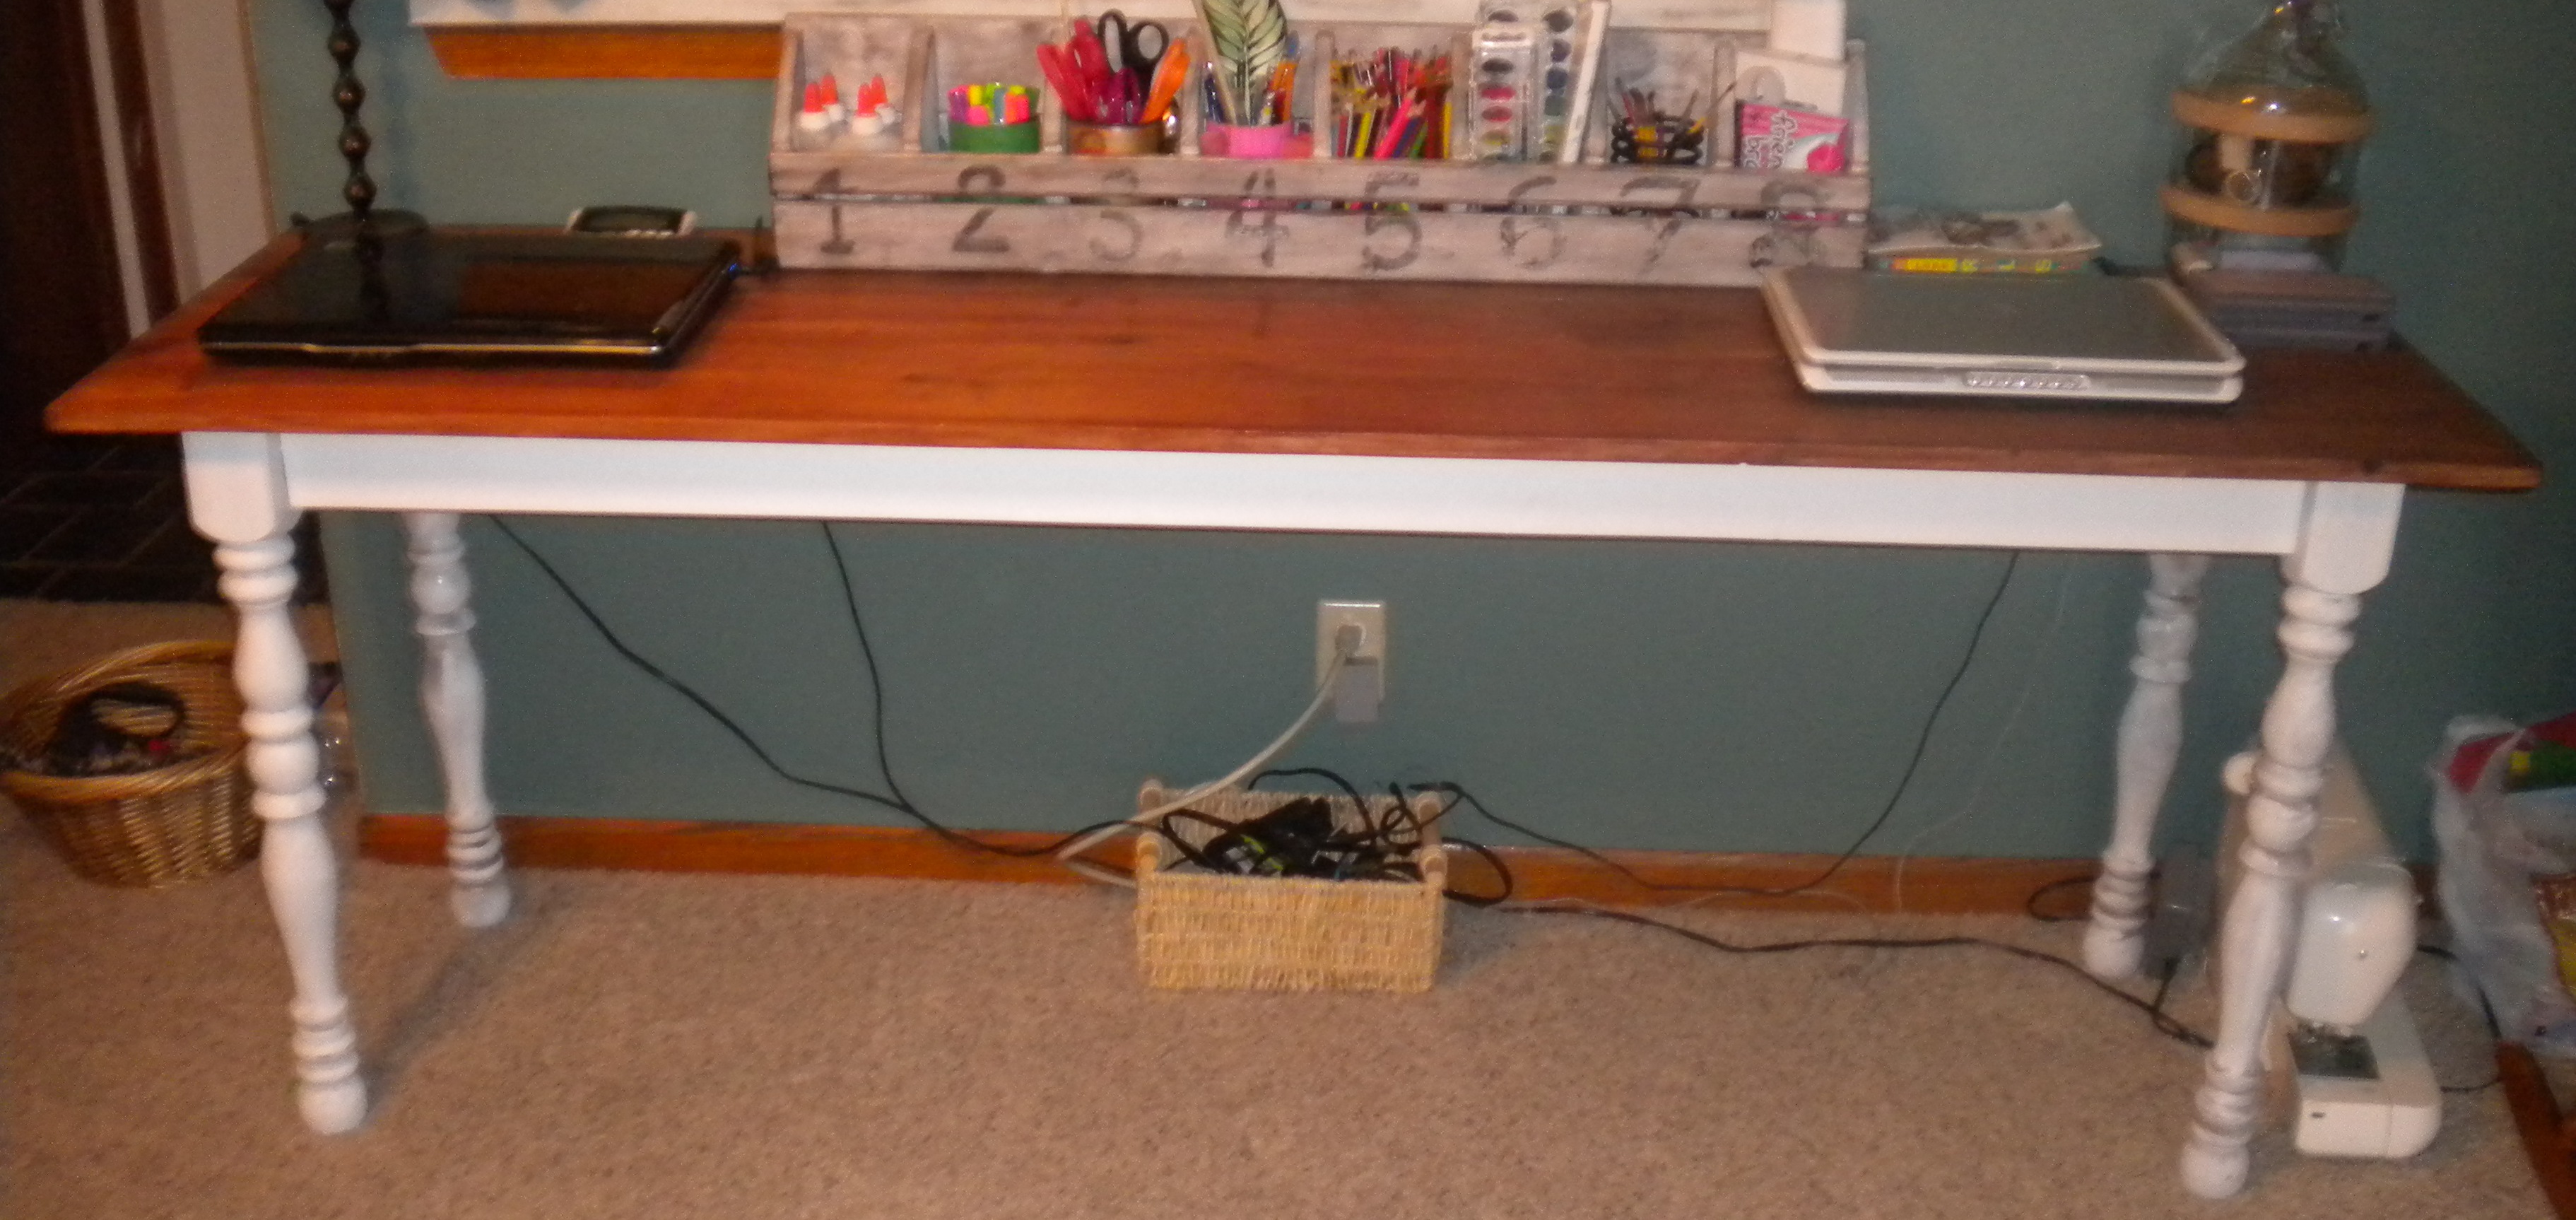
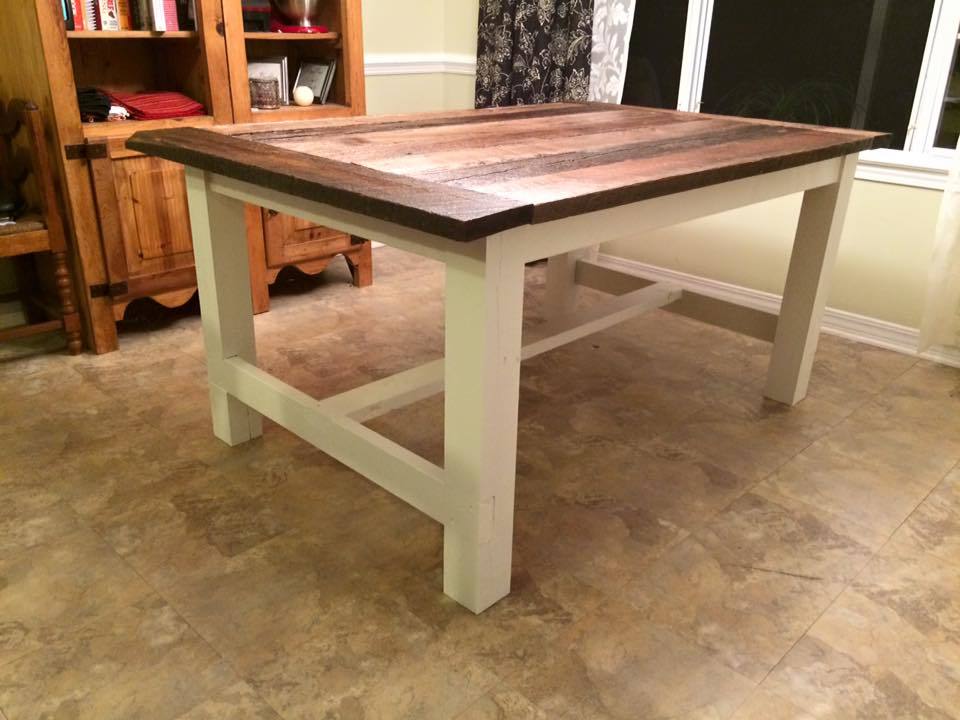
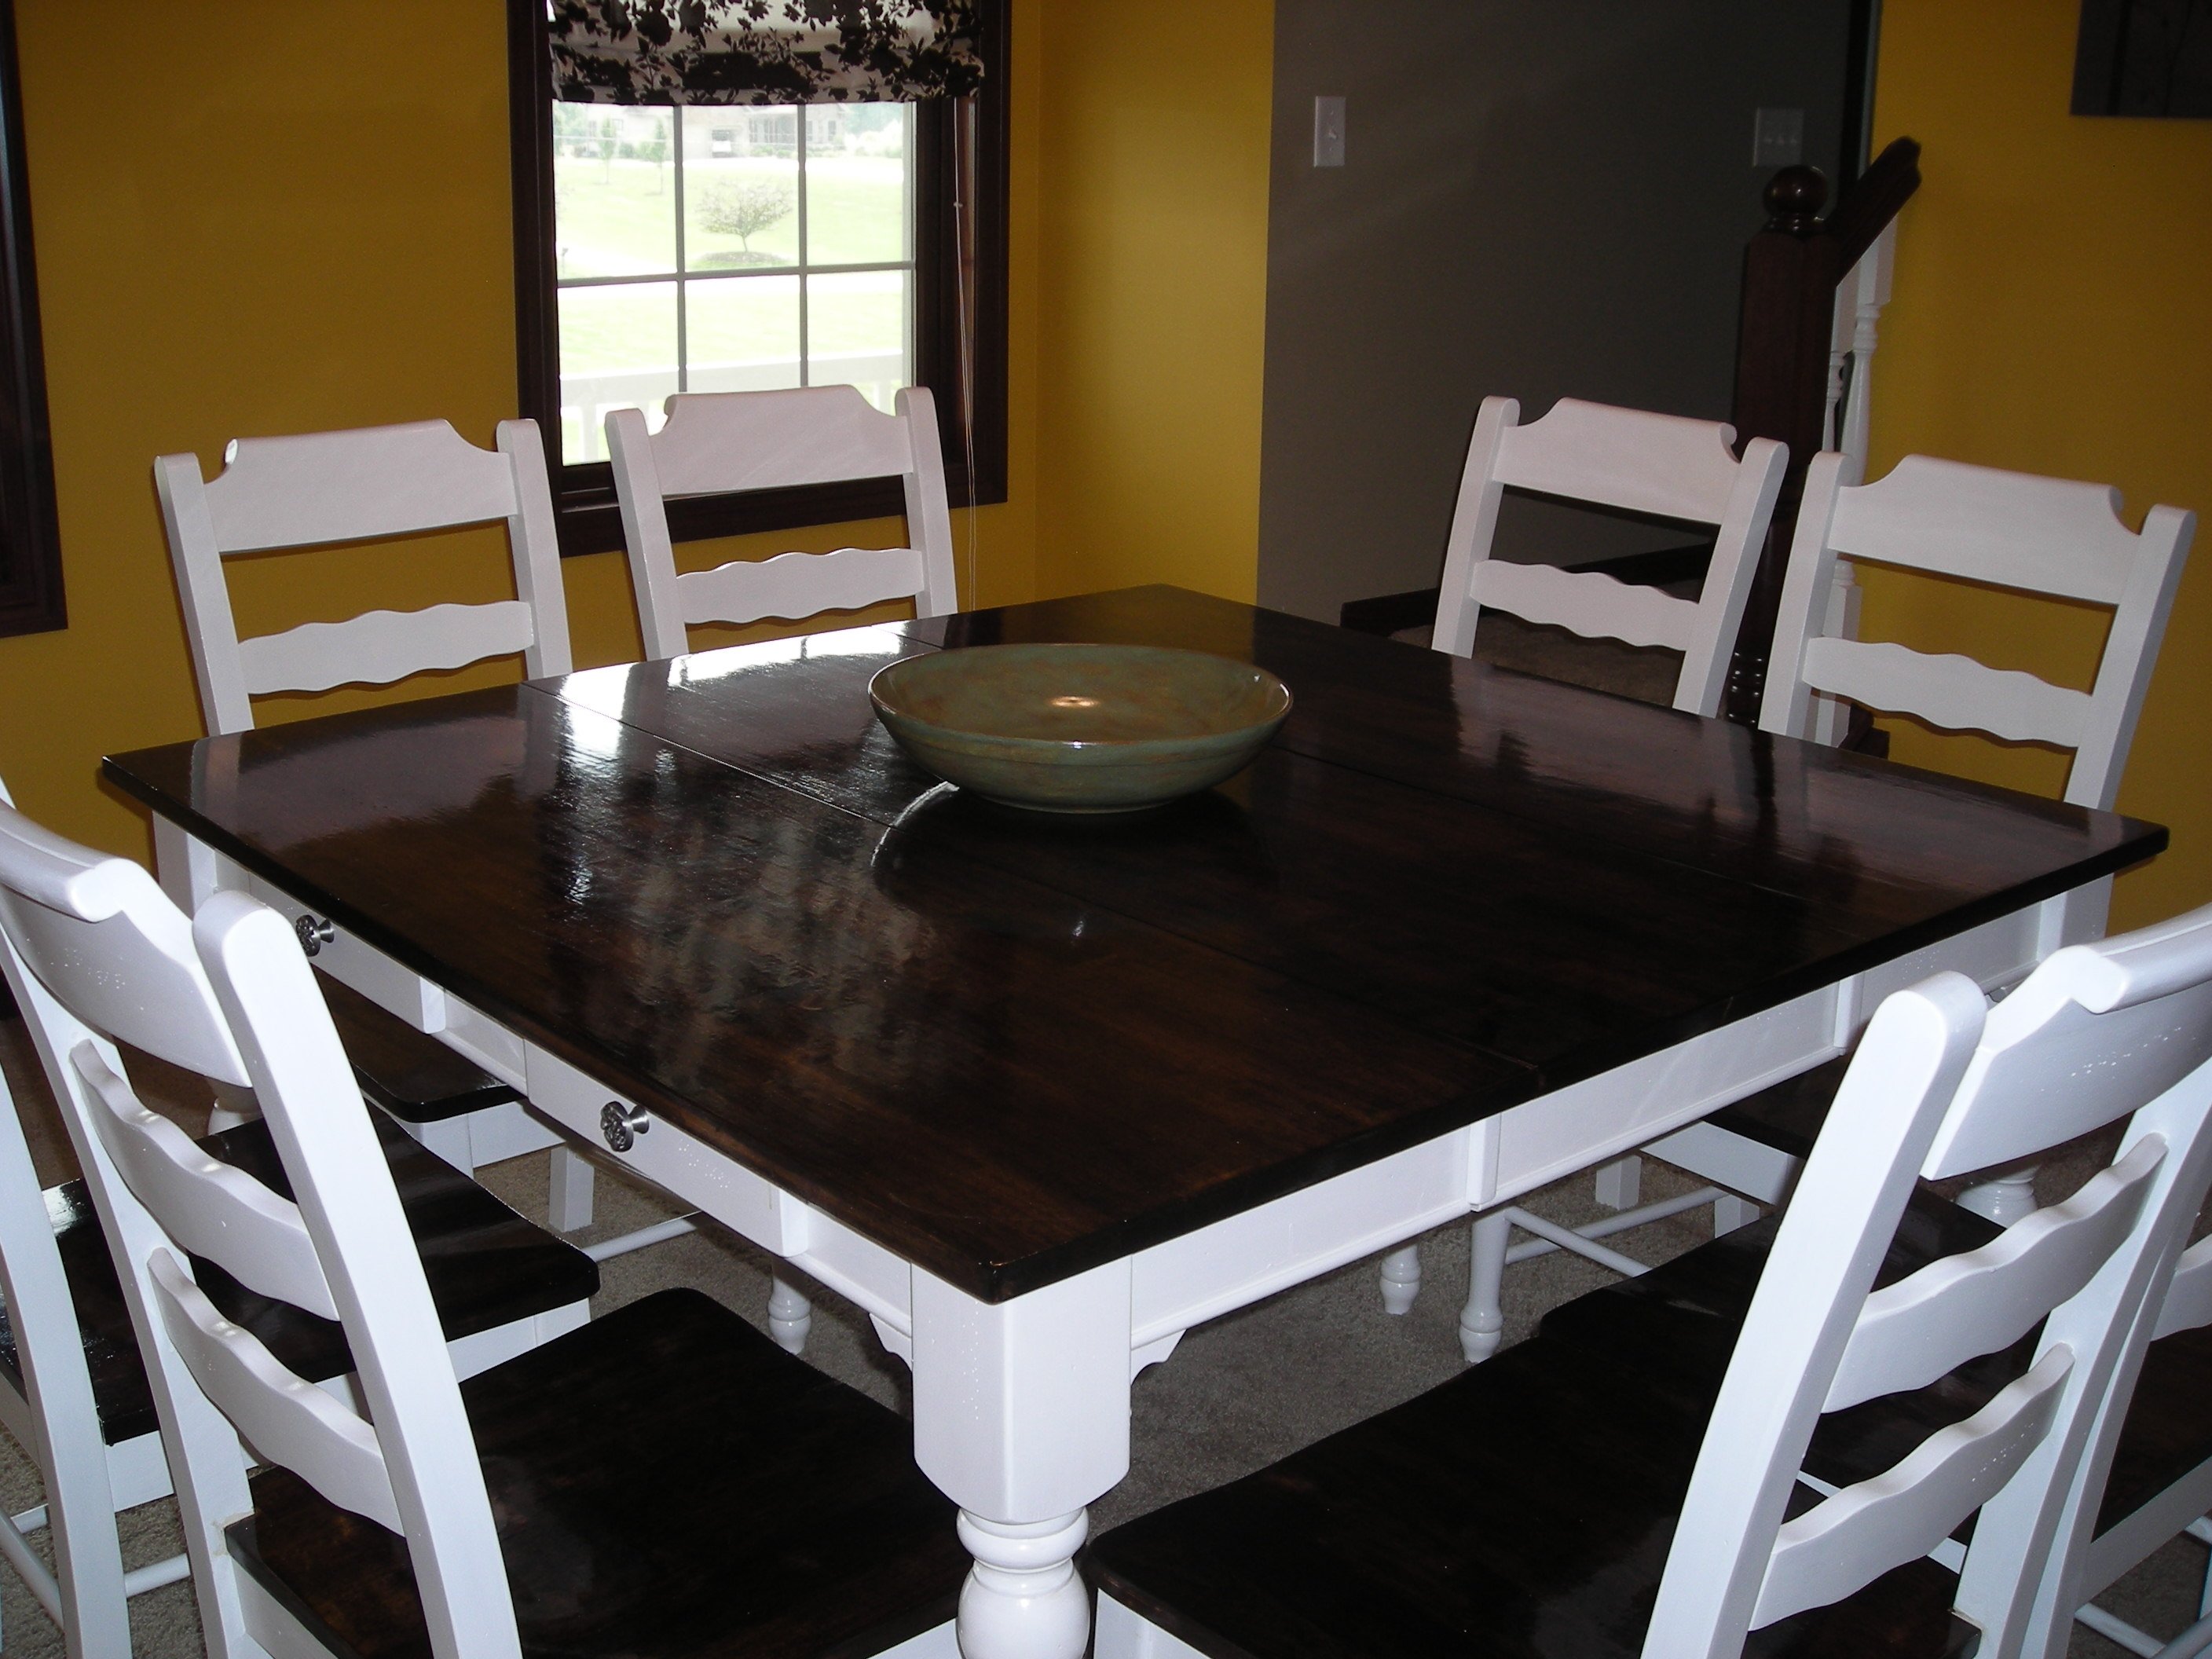
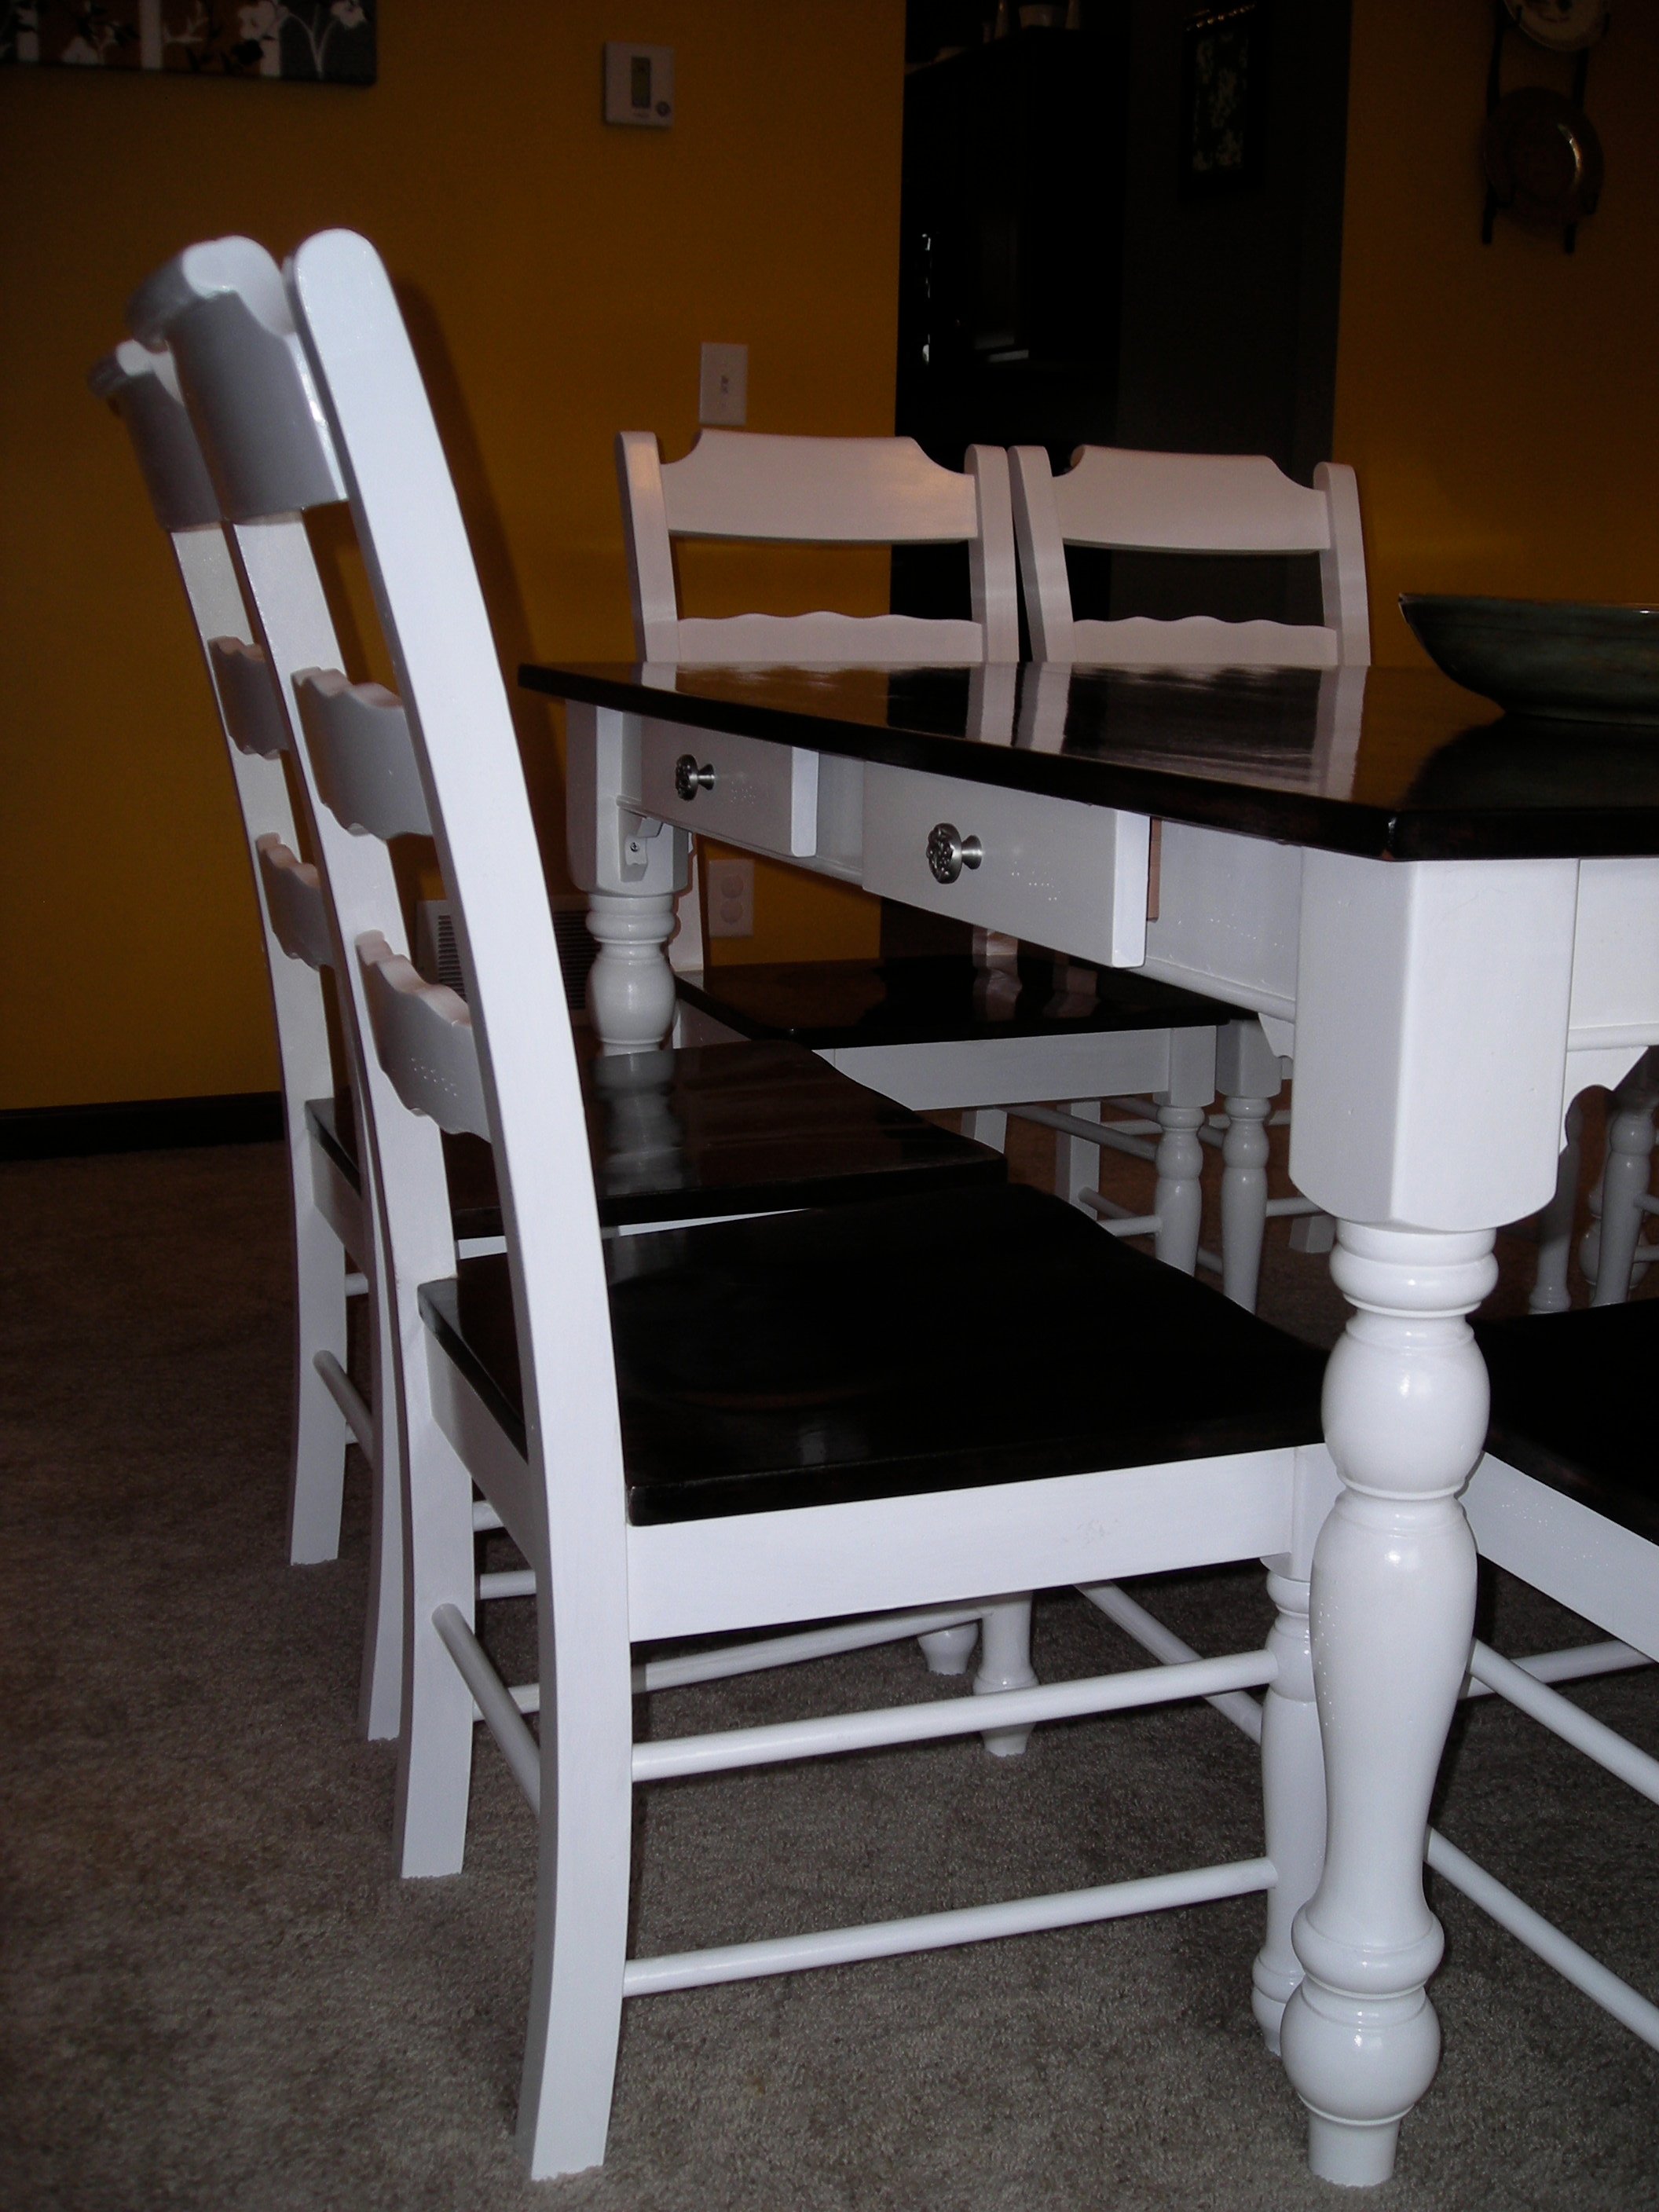
My Farmhouse/homework table
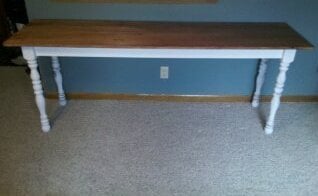
I saw the plans for the narrow farmhouse table and had.to.have.it! I showed my husband and he liked it but wanted turned legs. This was the compromise. I'm so happy with how it turned out!
Built from Plan(s)
Estimated Cost
$28.00
Finish Used
I used a minwax stain with poly on the top and white on the legs
Recommended Skill Level
Beginner
The Perfect Patio Table
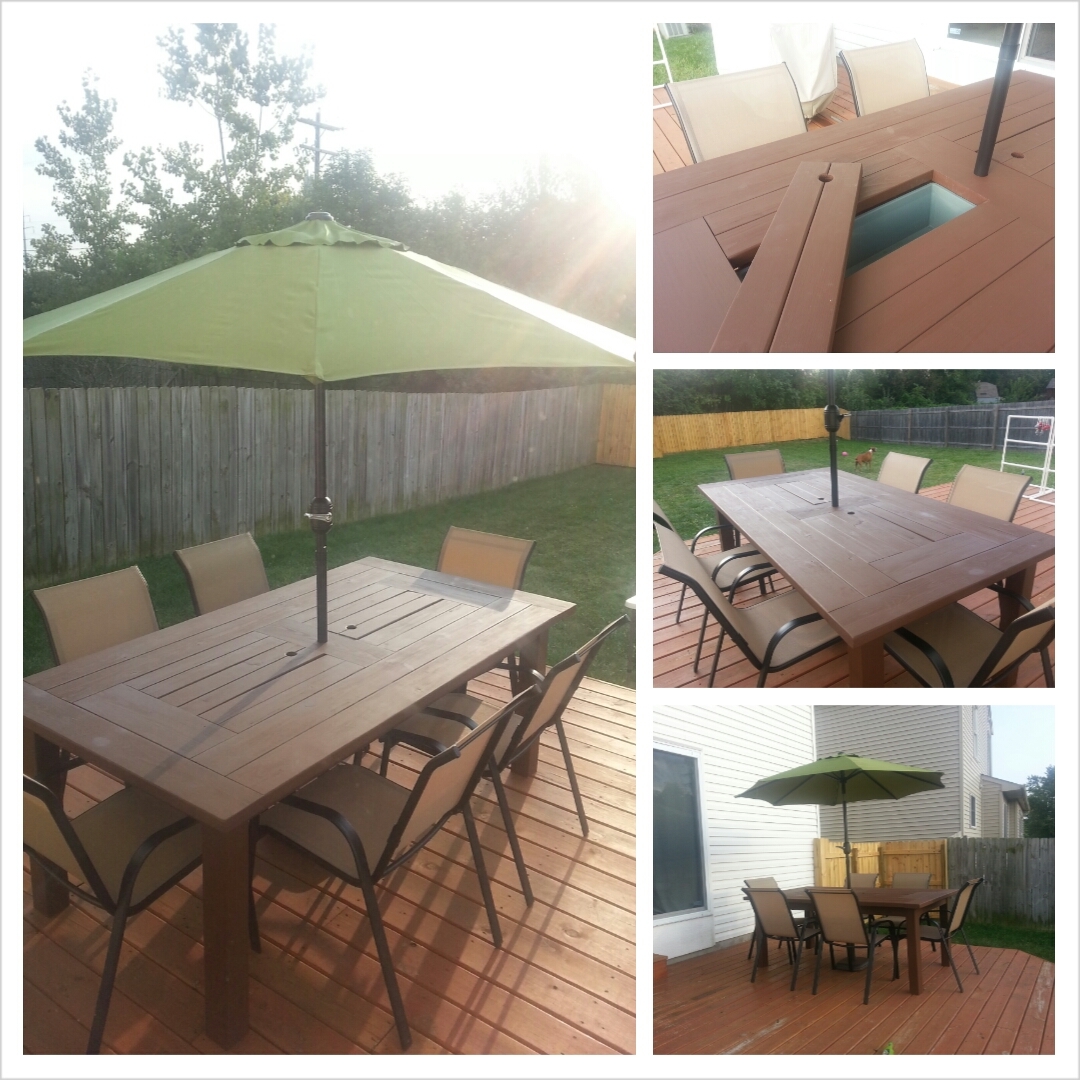
From the plans, we added 2x6's to each end of the table to make the table a better size for 6 people, and also used 4x4's as legs rather than the 2x4's suggested. It makes the table much more sturdy and even looks best in my opinion.
Estimated Time Investment
Week Long Project (20 Hours or More)
Finish Used
Olympic Maximum Stain+Sealant in One (Base 2) in Russet
Recommended Skill Level
Intermediate
Comments

Ana's Pockethole Farmhouse Table
My cousin and I fell in love with the farmhouse table so, when we discovered some old barn wood at my dad's house, we knew we had to build that table using the barnwood for the top. I love each and every imperfection in the barn wood. This was a fun project and I look forward to building another of Ana's plans.
Estimated Time Investment
Day Project (6-9 Hours)
Finish Used
Polyacrylic on the top and primer/paint on the base.
Recommended Skill Level
Beginner
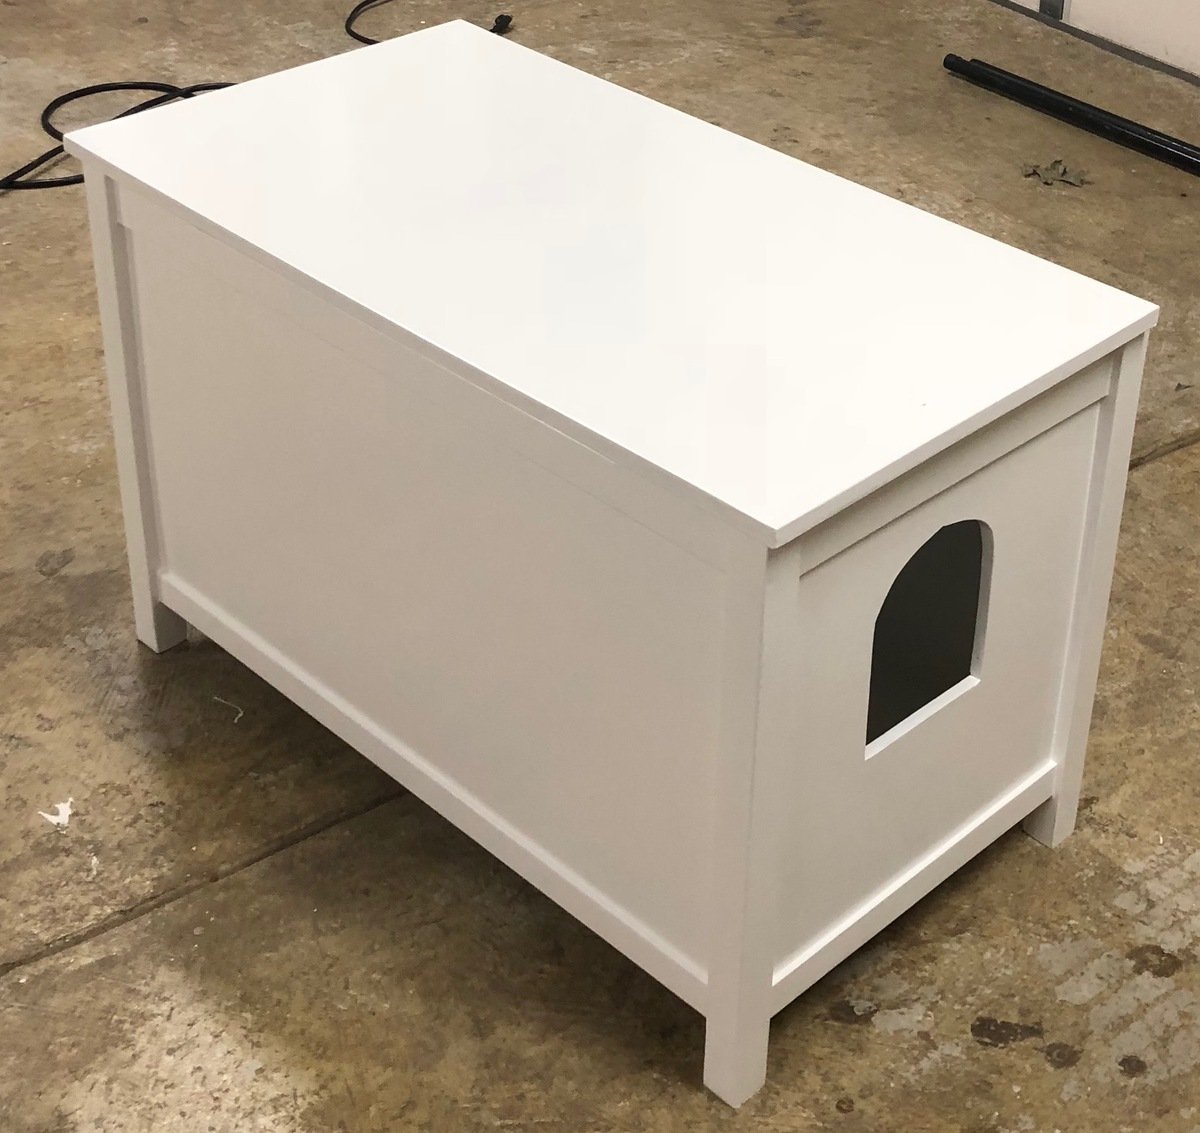
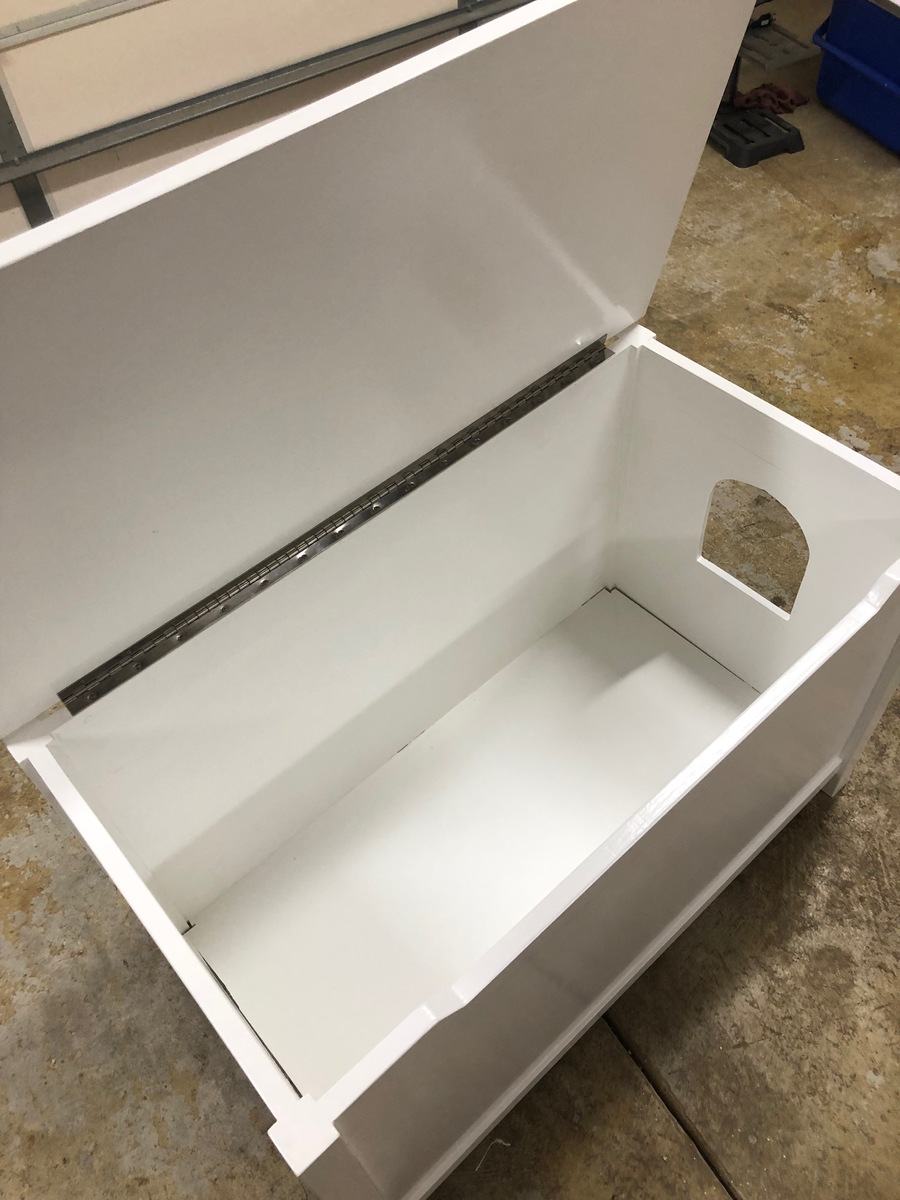
Litter Box Furniture
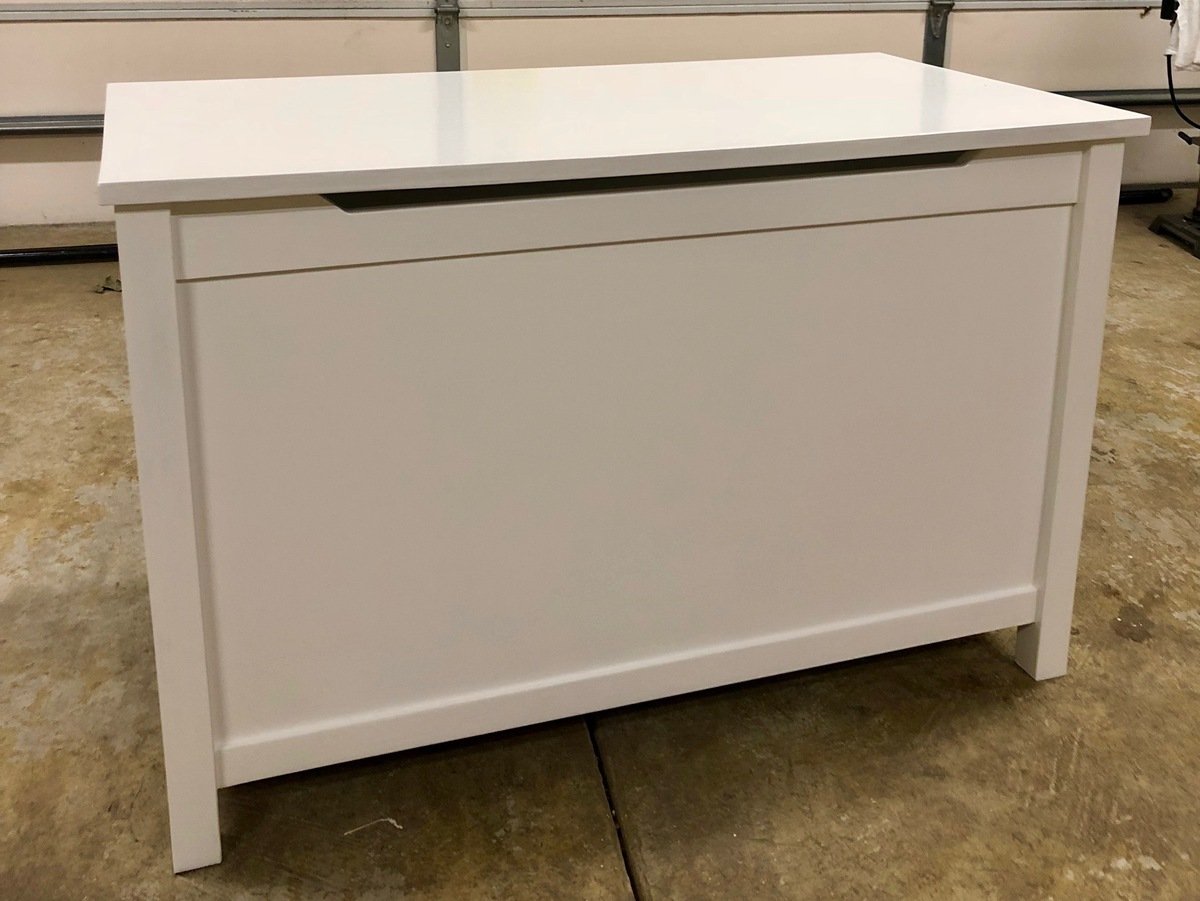
Took the Simple Modern Toy Box Plan and converted it to a litter box cover/storage unit.
Built from Plan(s)
Estimated Time Investment
Weekend Project (10-20 Hours)
Finish Used
Valspar Oil Based Paint
Recommended Skill Level
Beginner
Outdoor Daybed
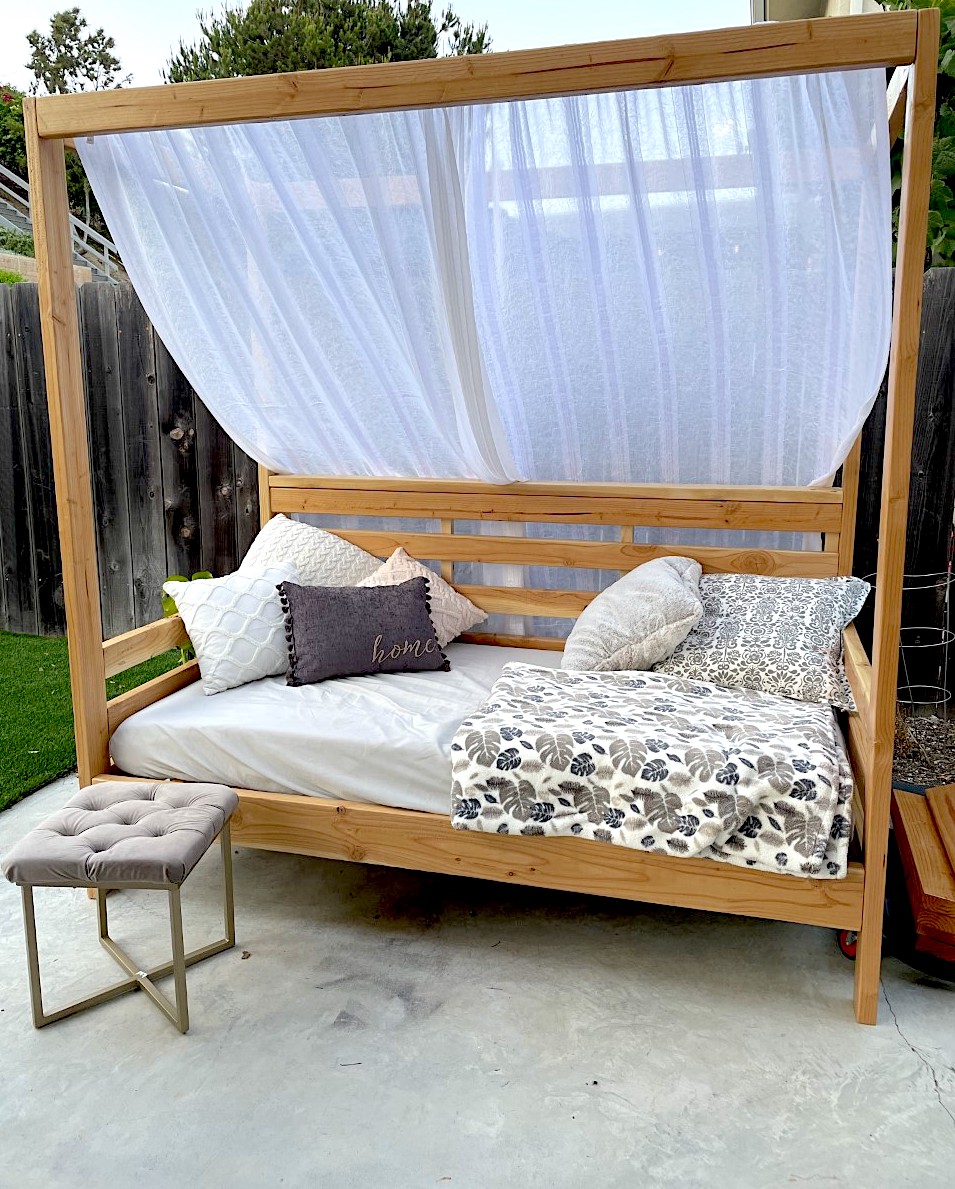
What a great project!! My private outdoor space is amazing. Thanks Ana!!
Built from Plan(s)
Comments
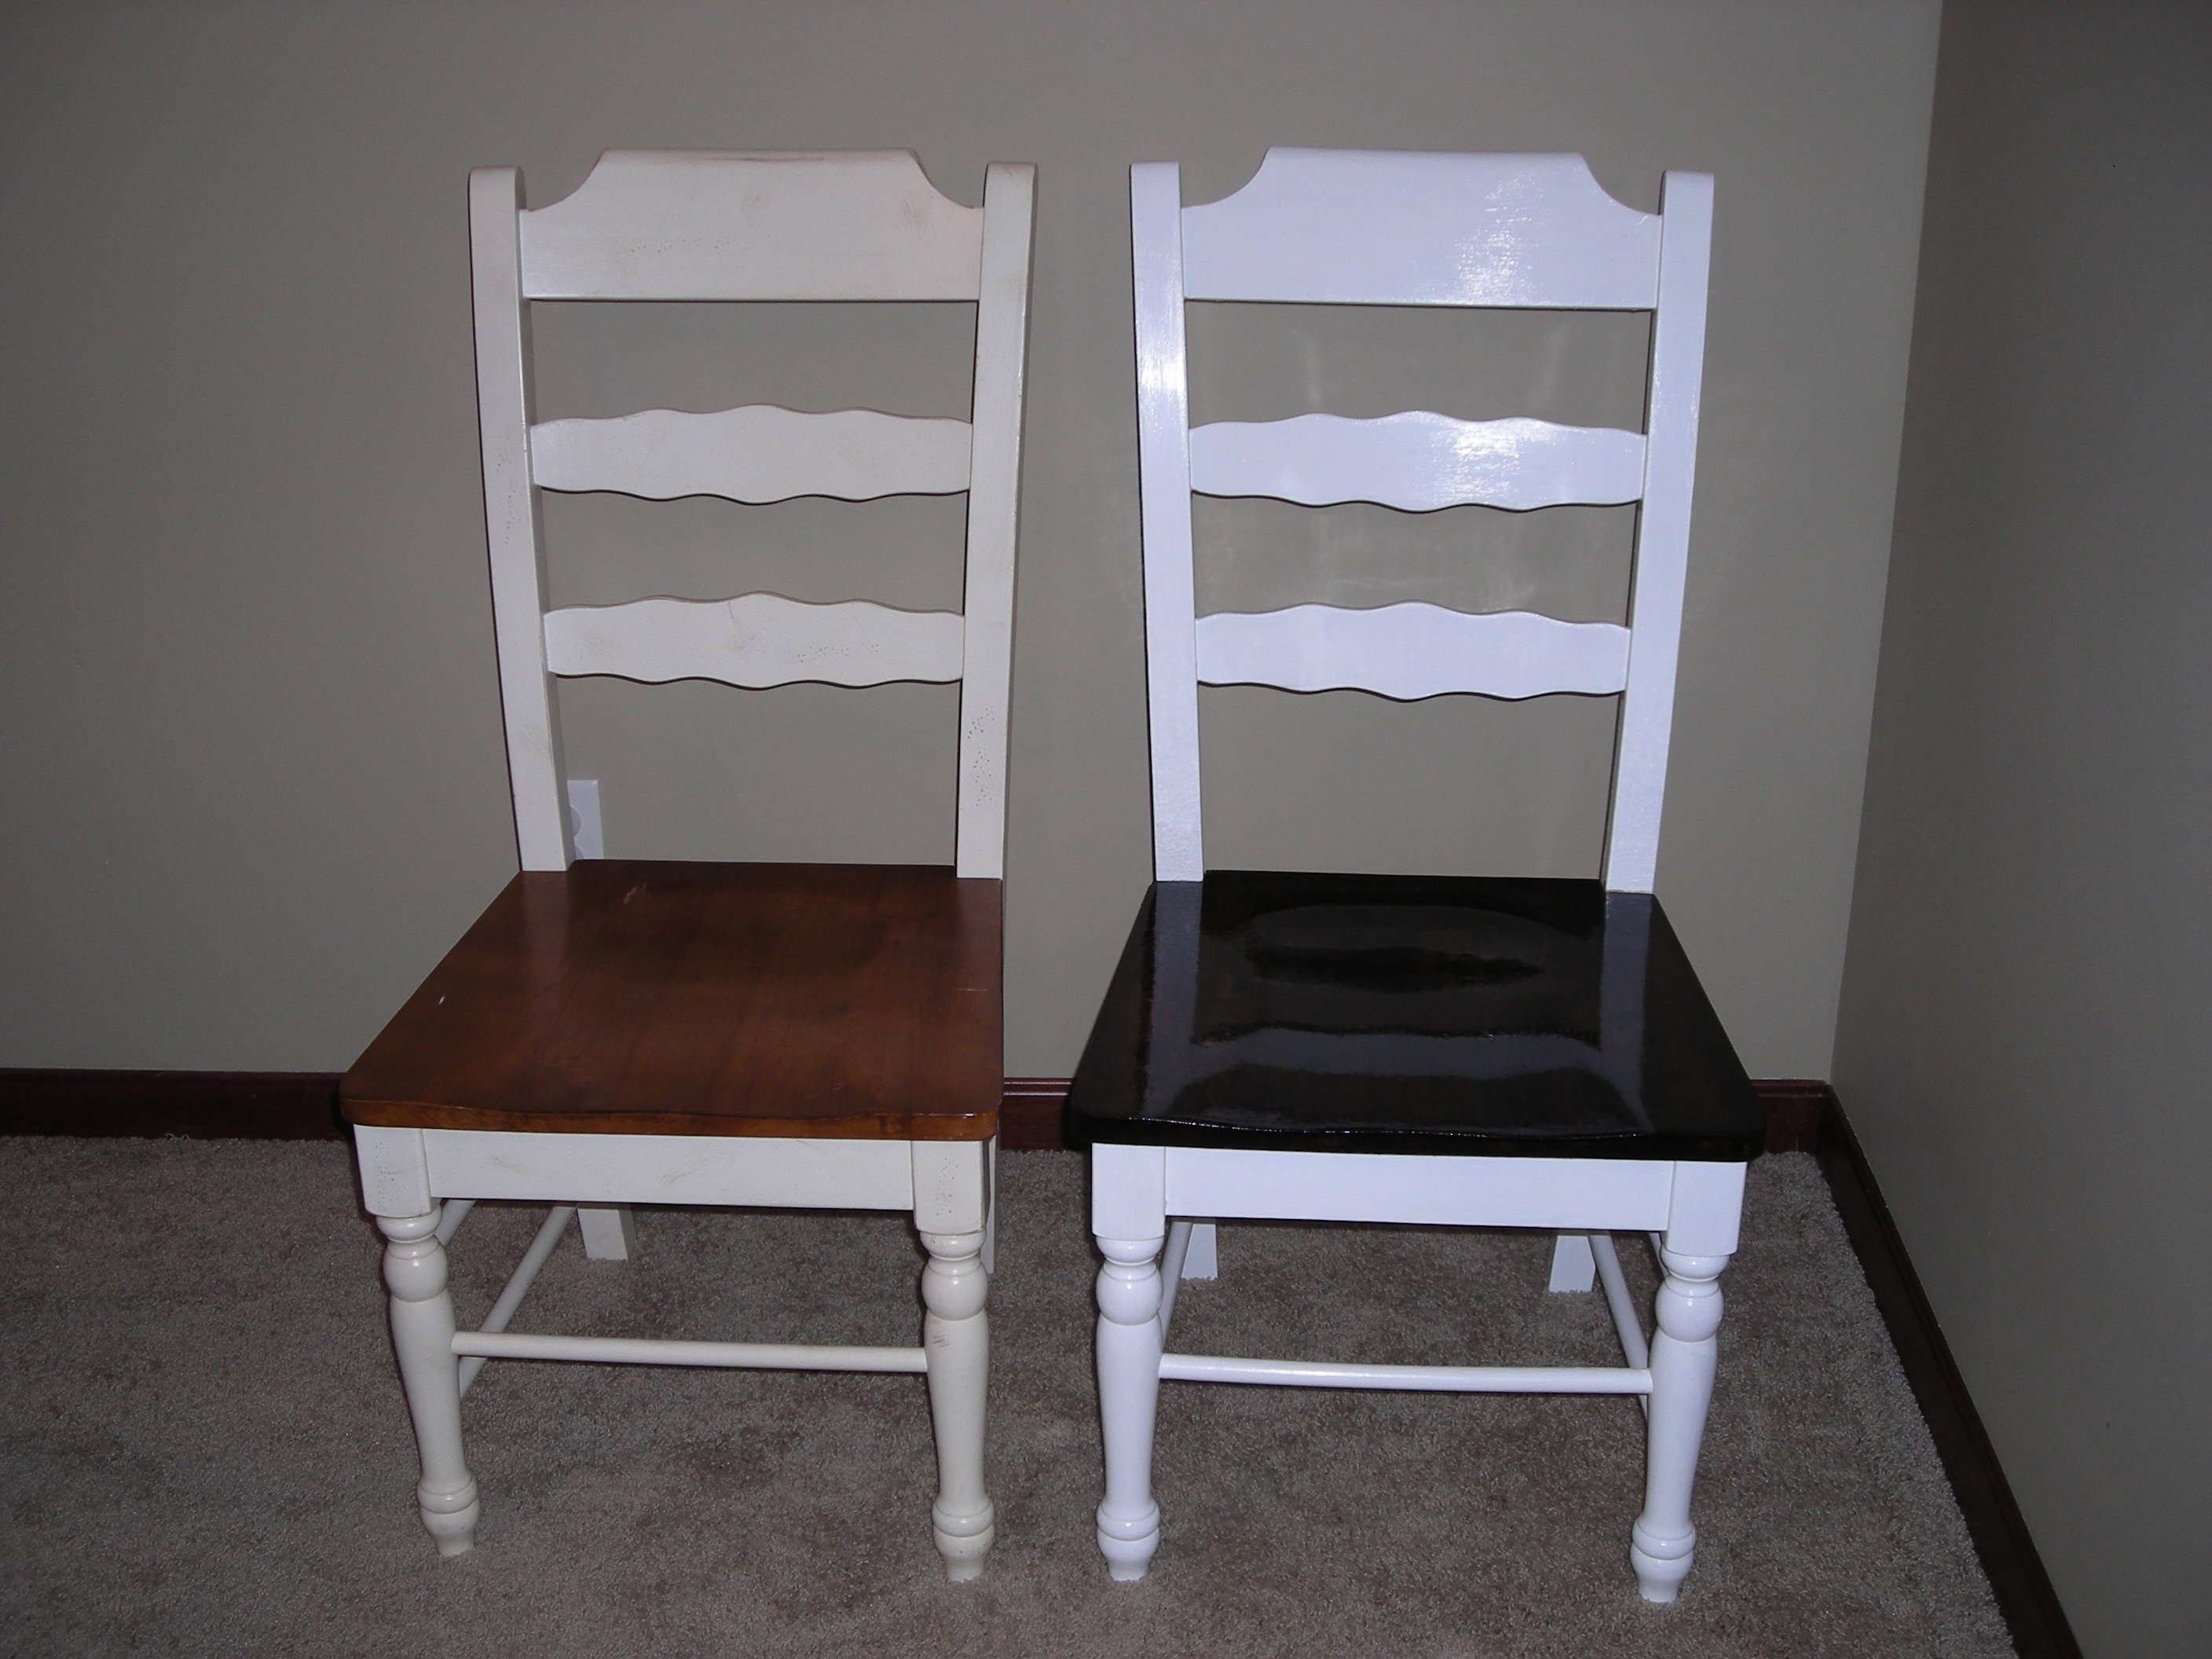
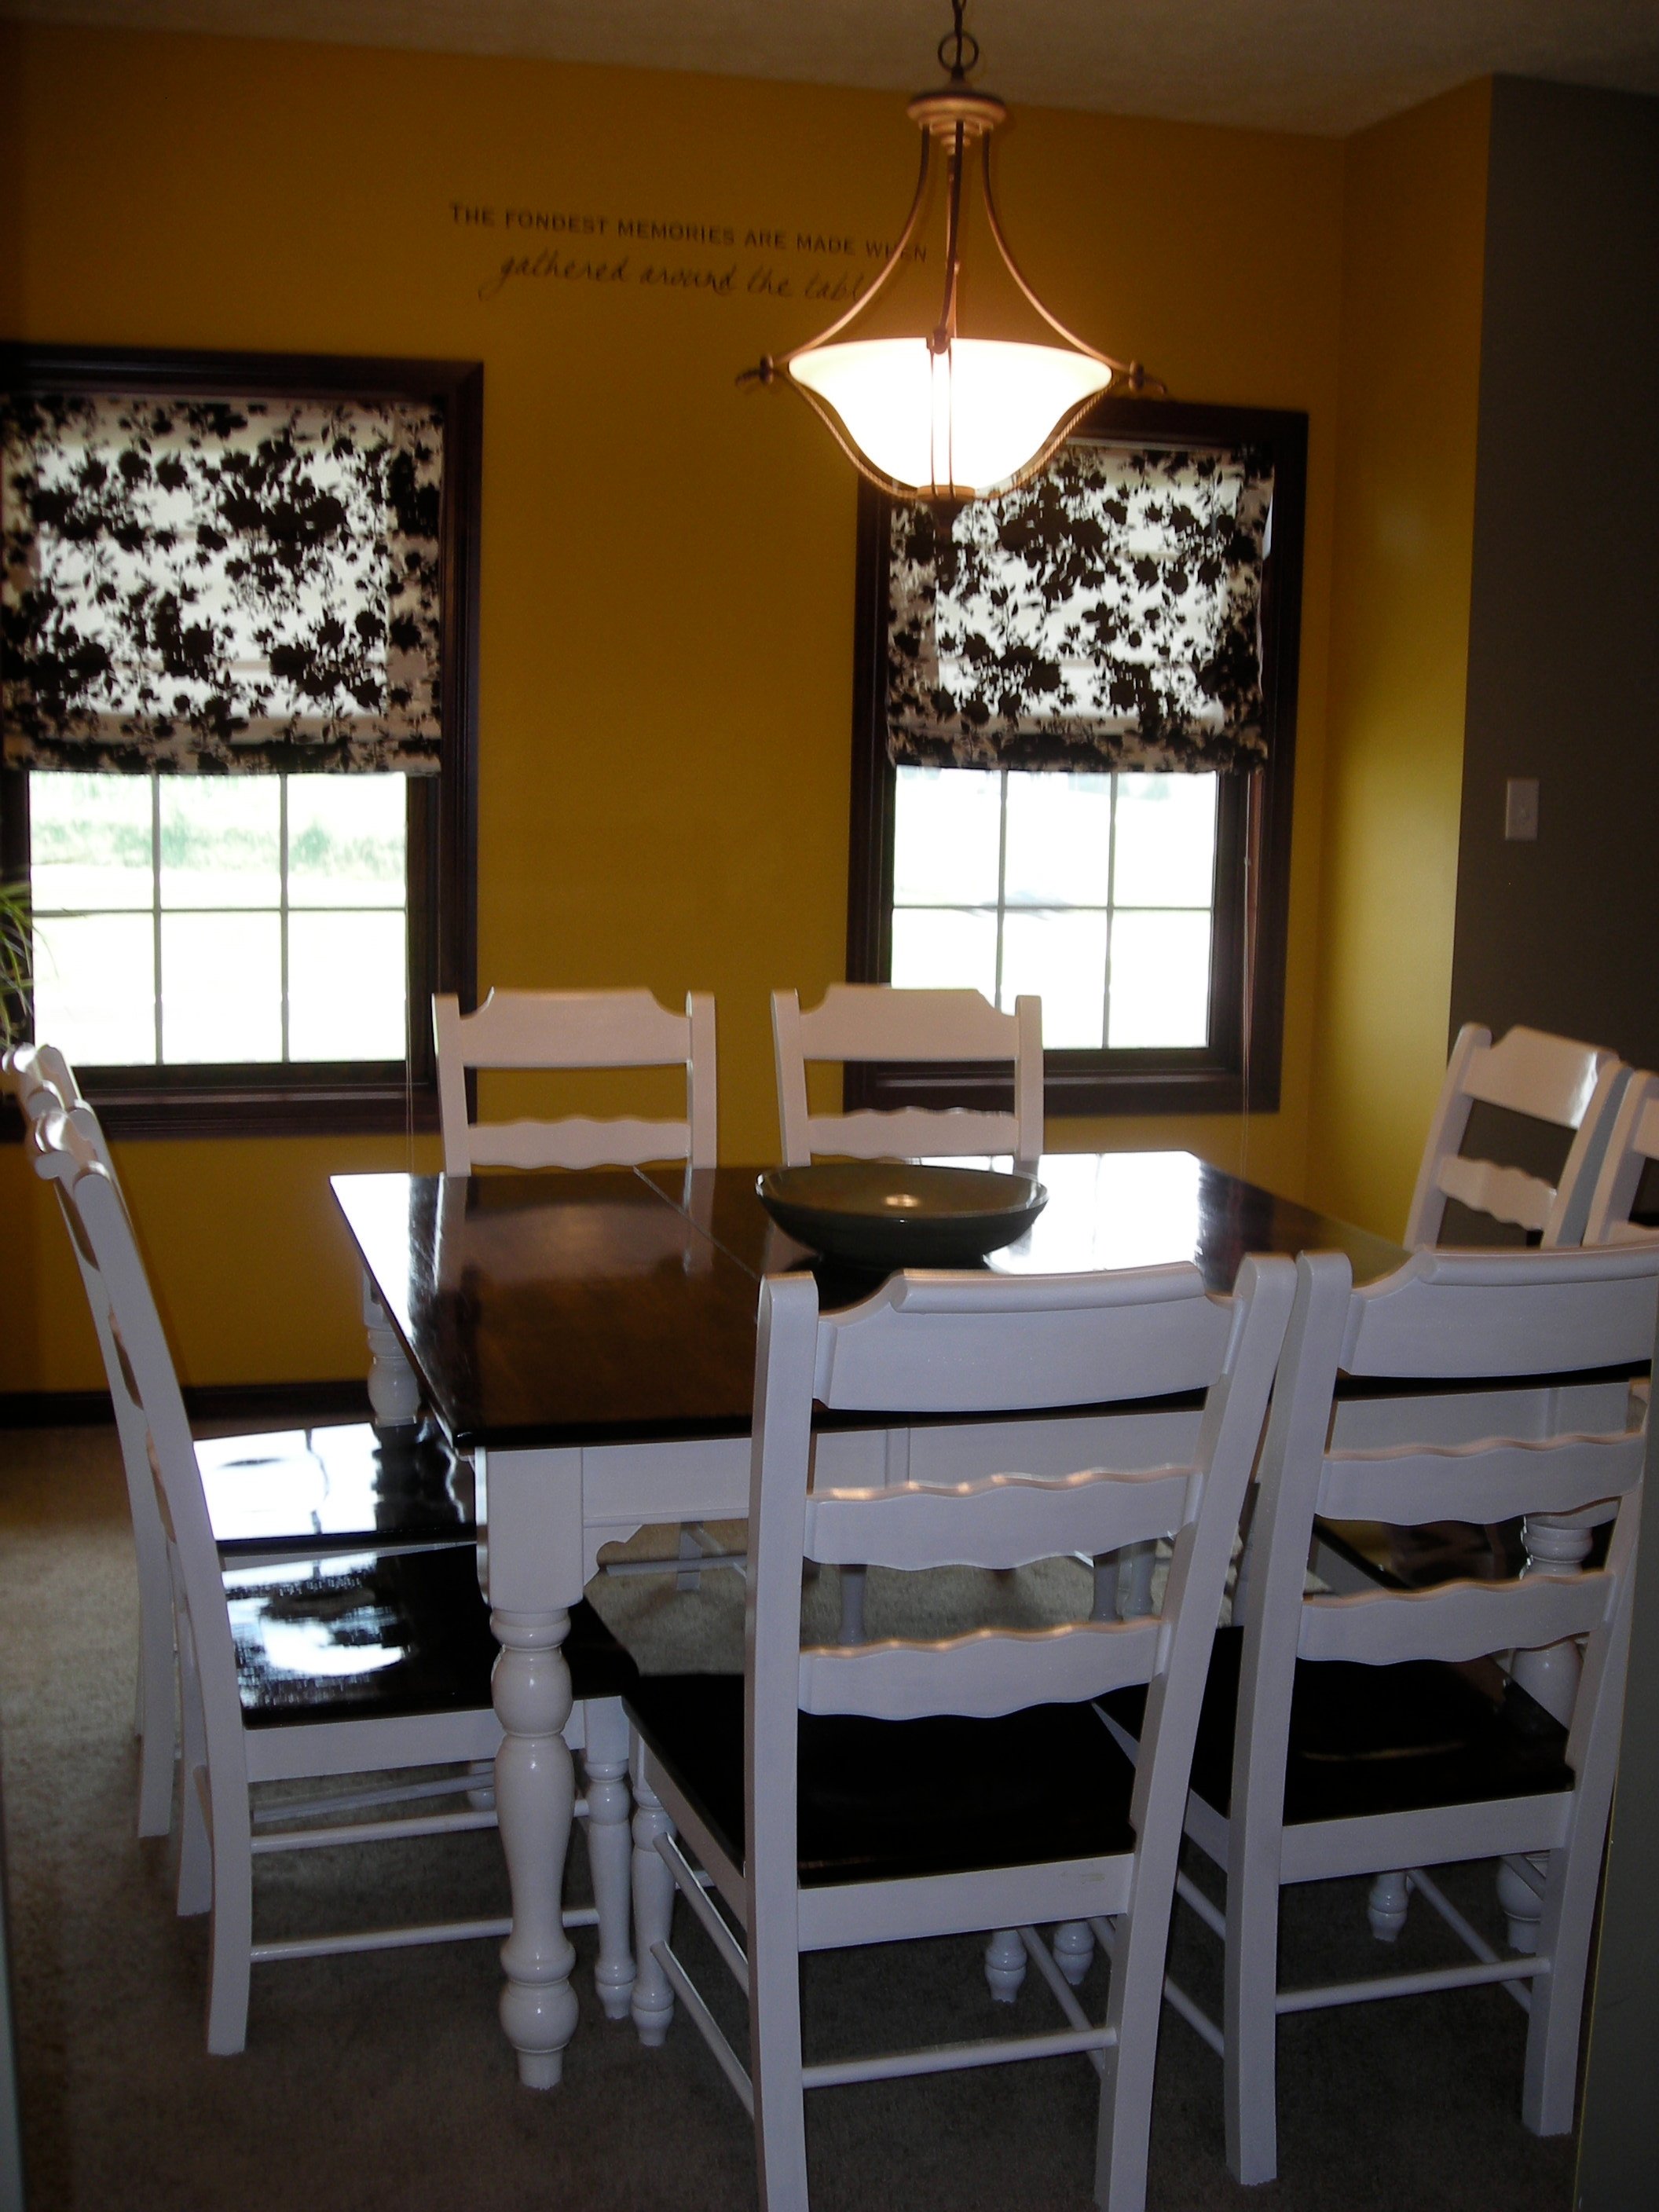
Refinished Dining Room Set
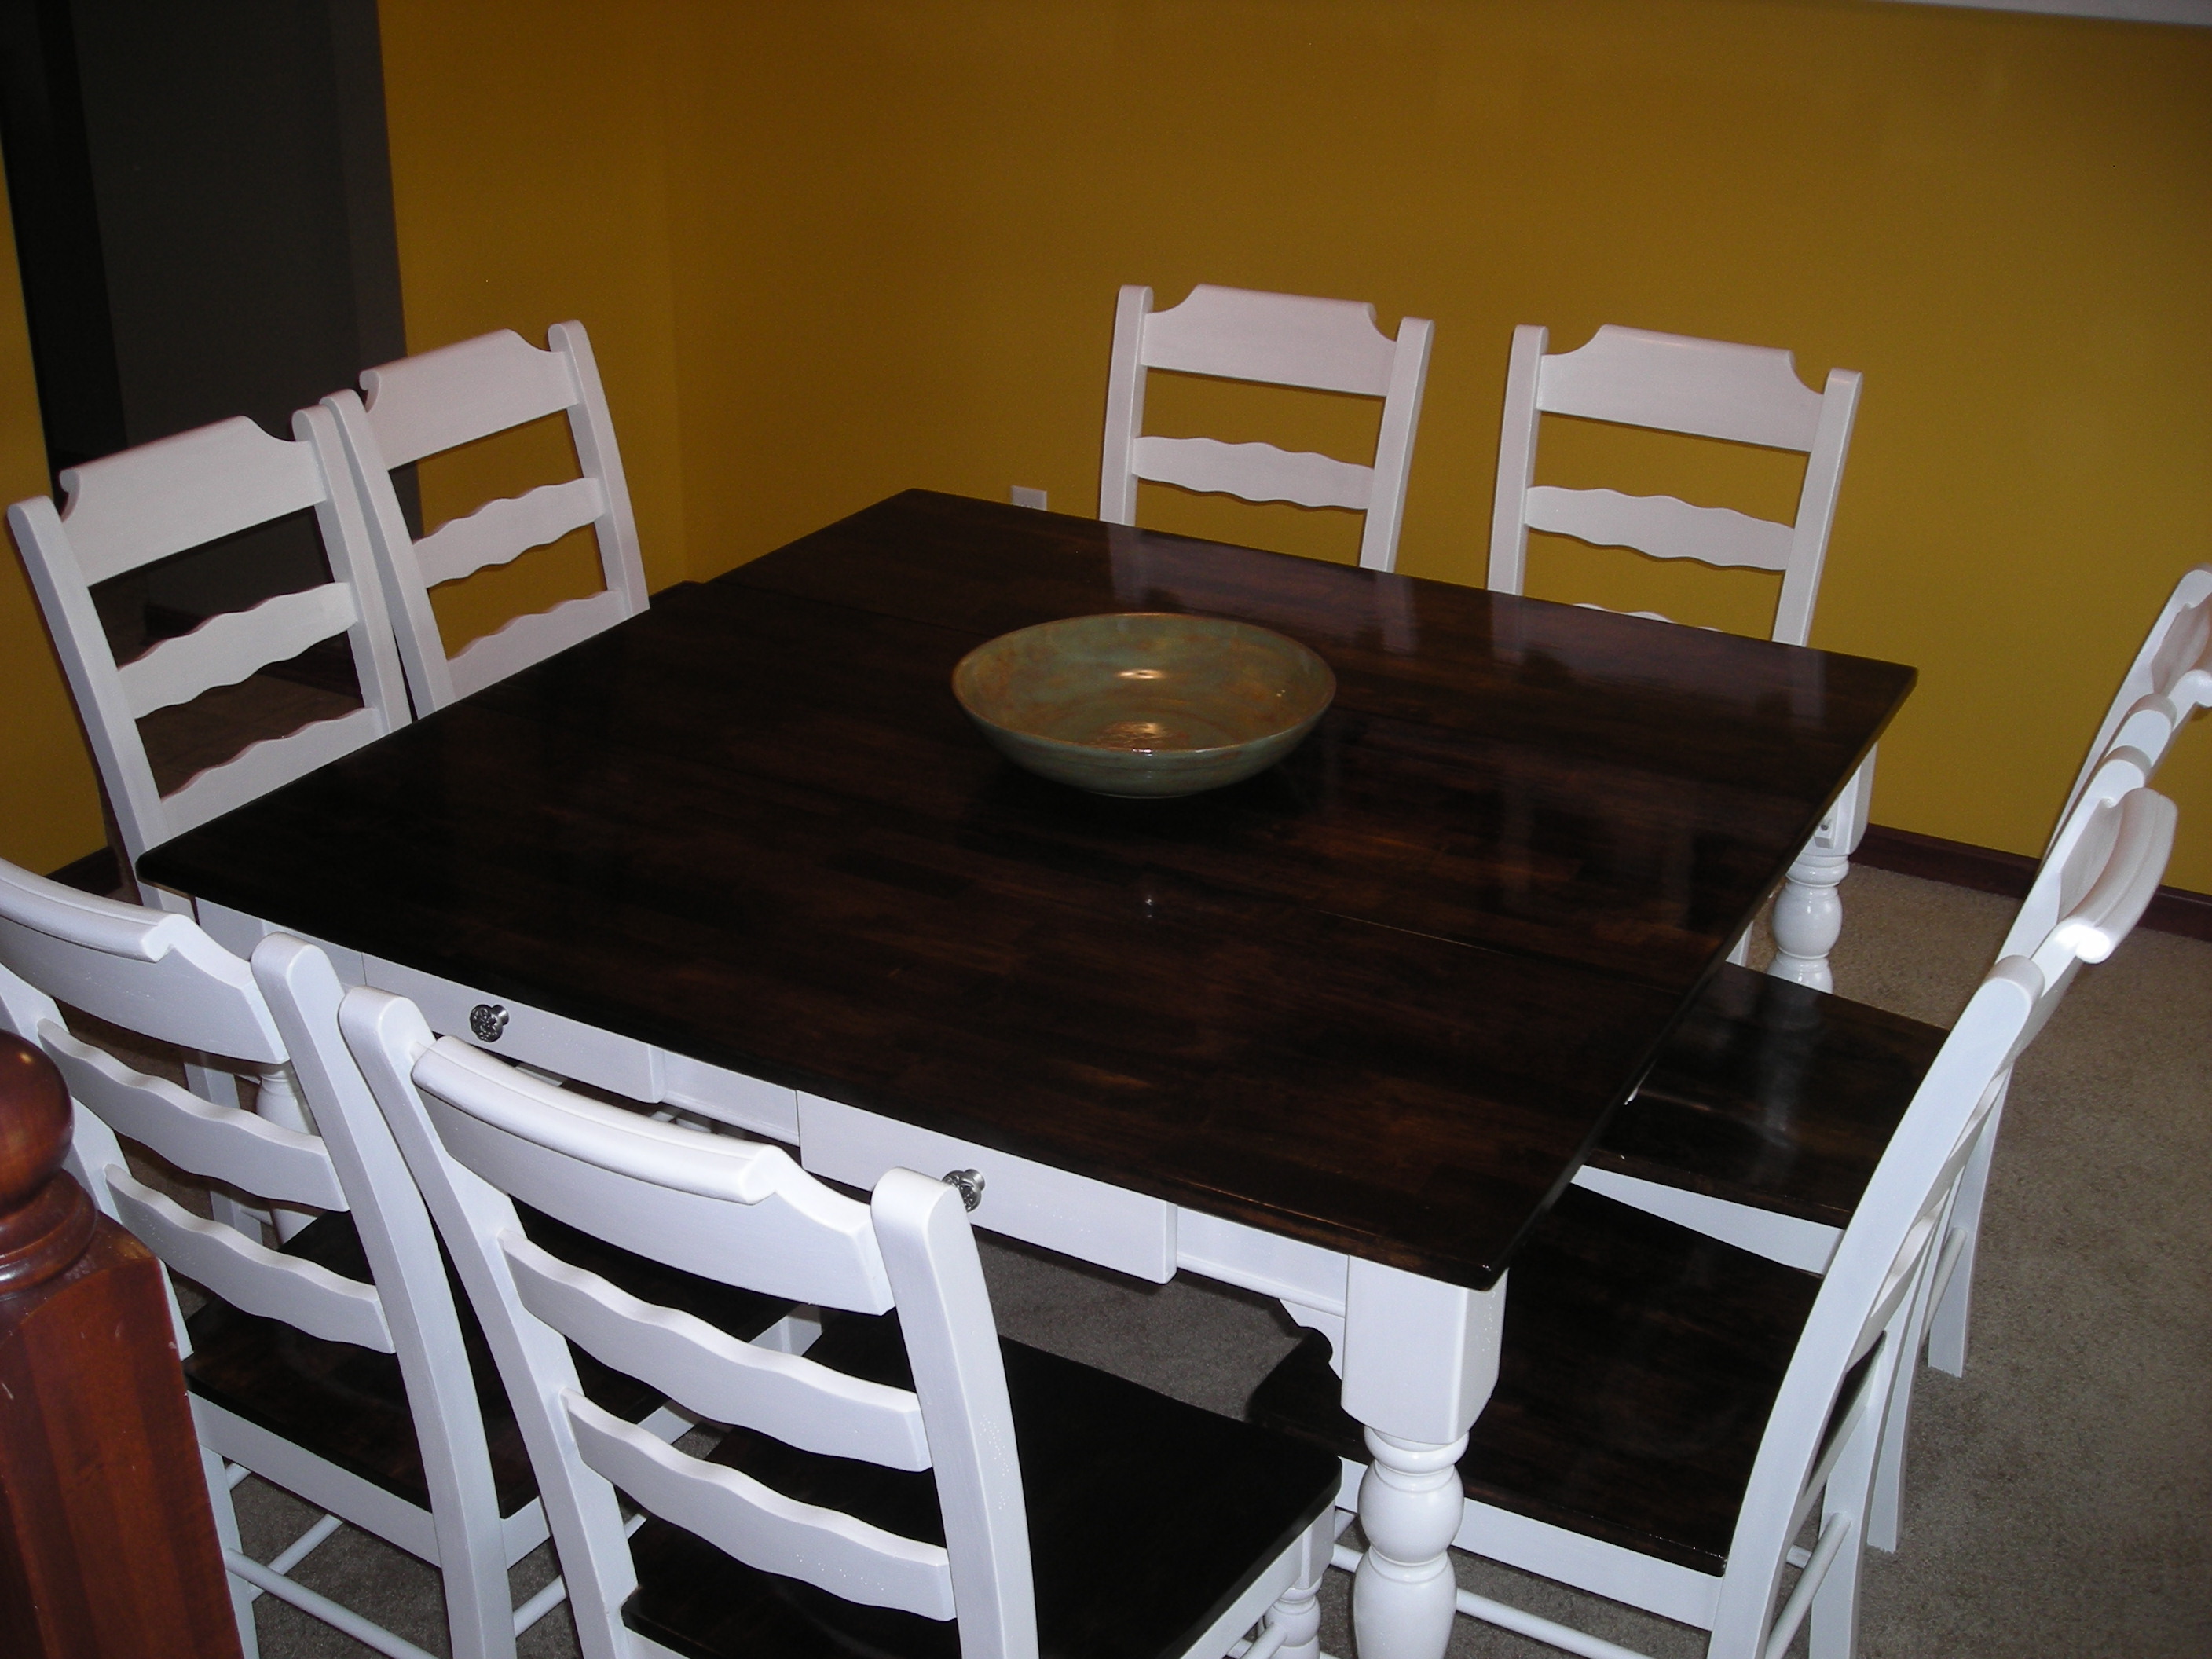
I know this website is more about building furniture, but I spent the last year refinishing this dining room set in my spare time (between working full time and going to school part time). I bought it at a garage sale for $100, and with a lot of love, time, and energy, it is finally ready for family dinners!
Estimated Cost
$150
Estimated Time Investment
Week Long Project (20 Hours or More)
Finish Used
I used white primer, white glossy Behr paint, Minwax Dark Walnut Stain, and Minwax Glossy Polyurethane.
Recommended Skill Level
Beginner
Comments

Sun, 09/09/2012 - 22:30
Refinished Dining Room Set
Very good job. I myself love finding old pieces and giving them new life.
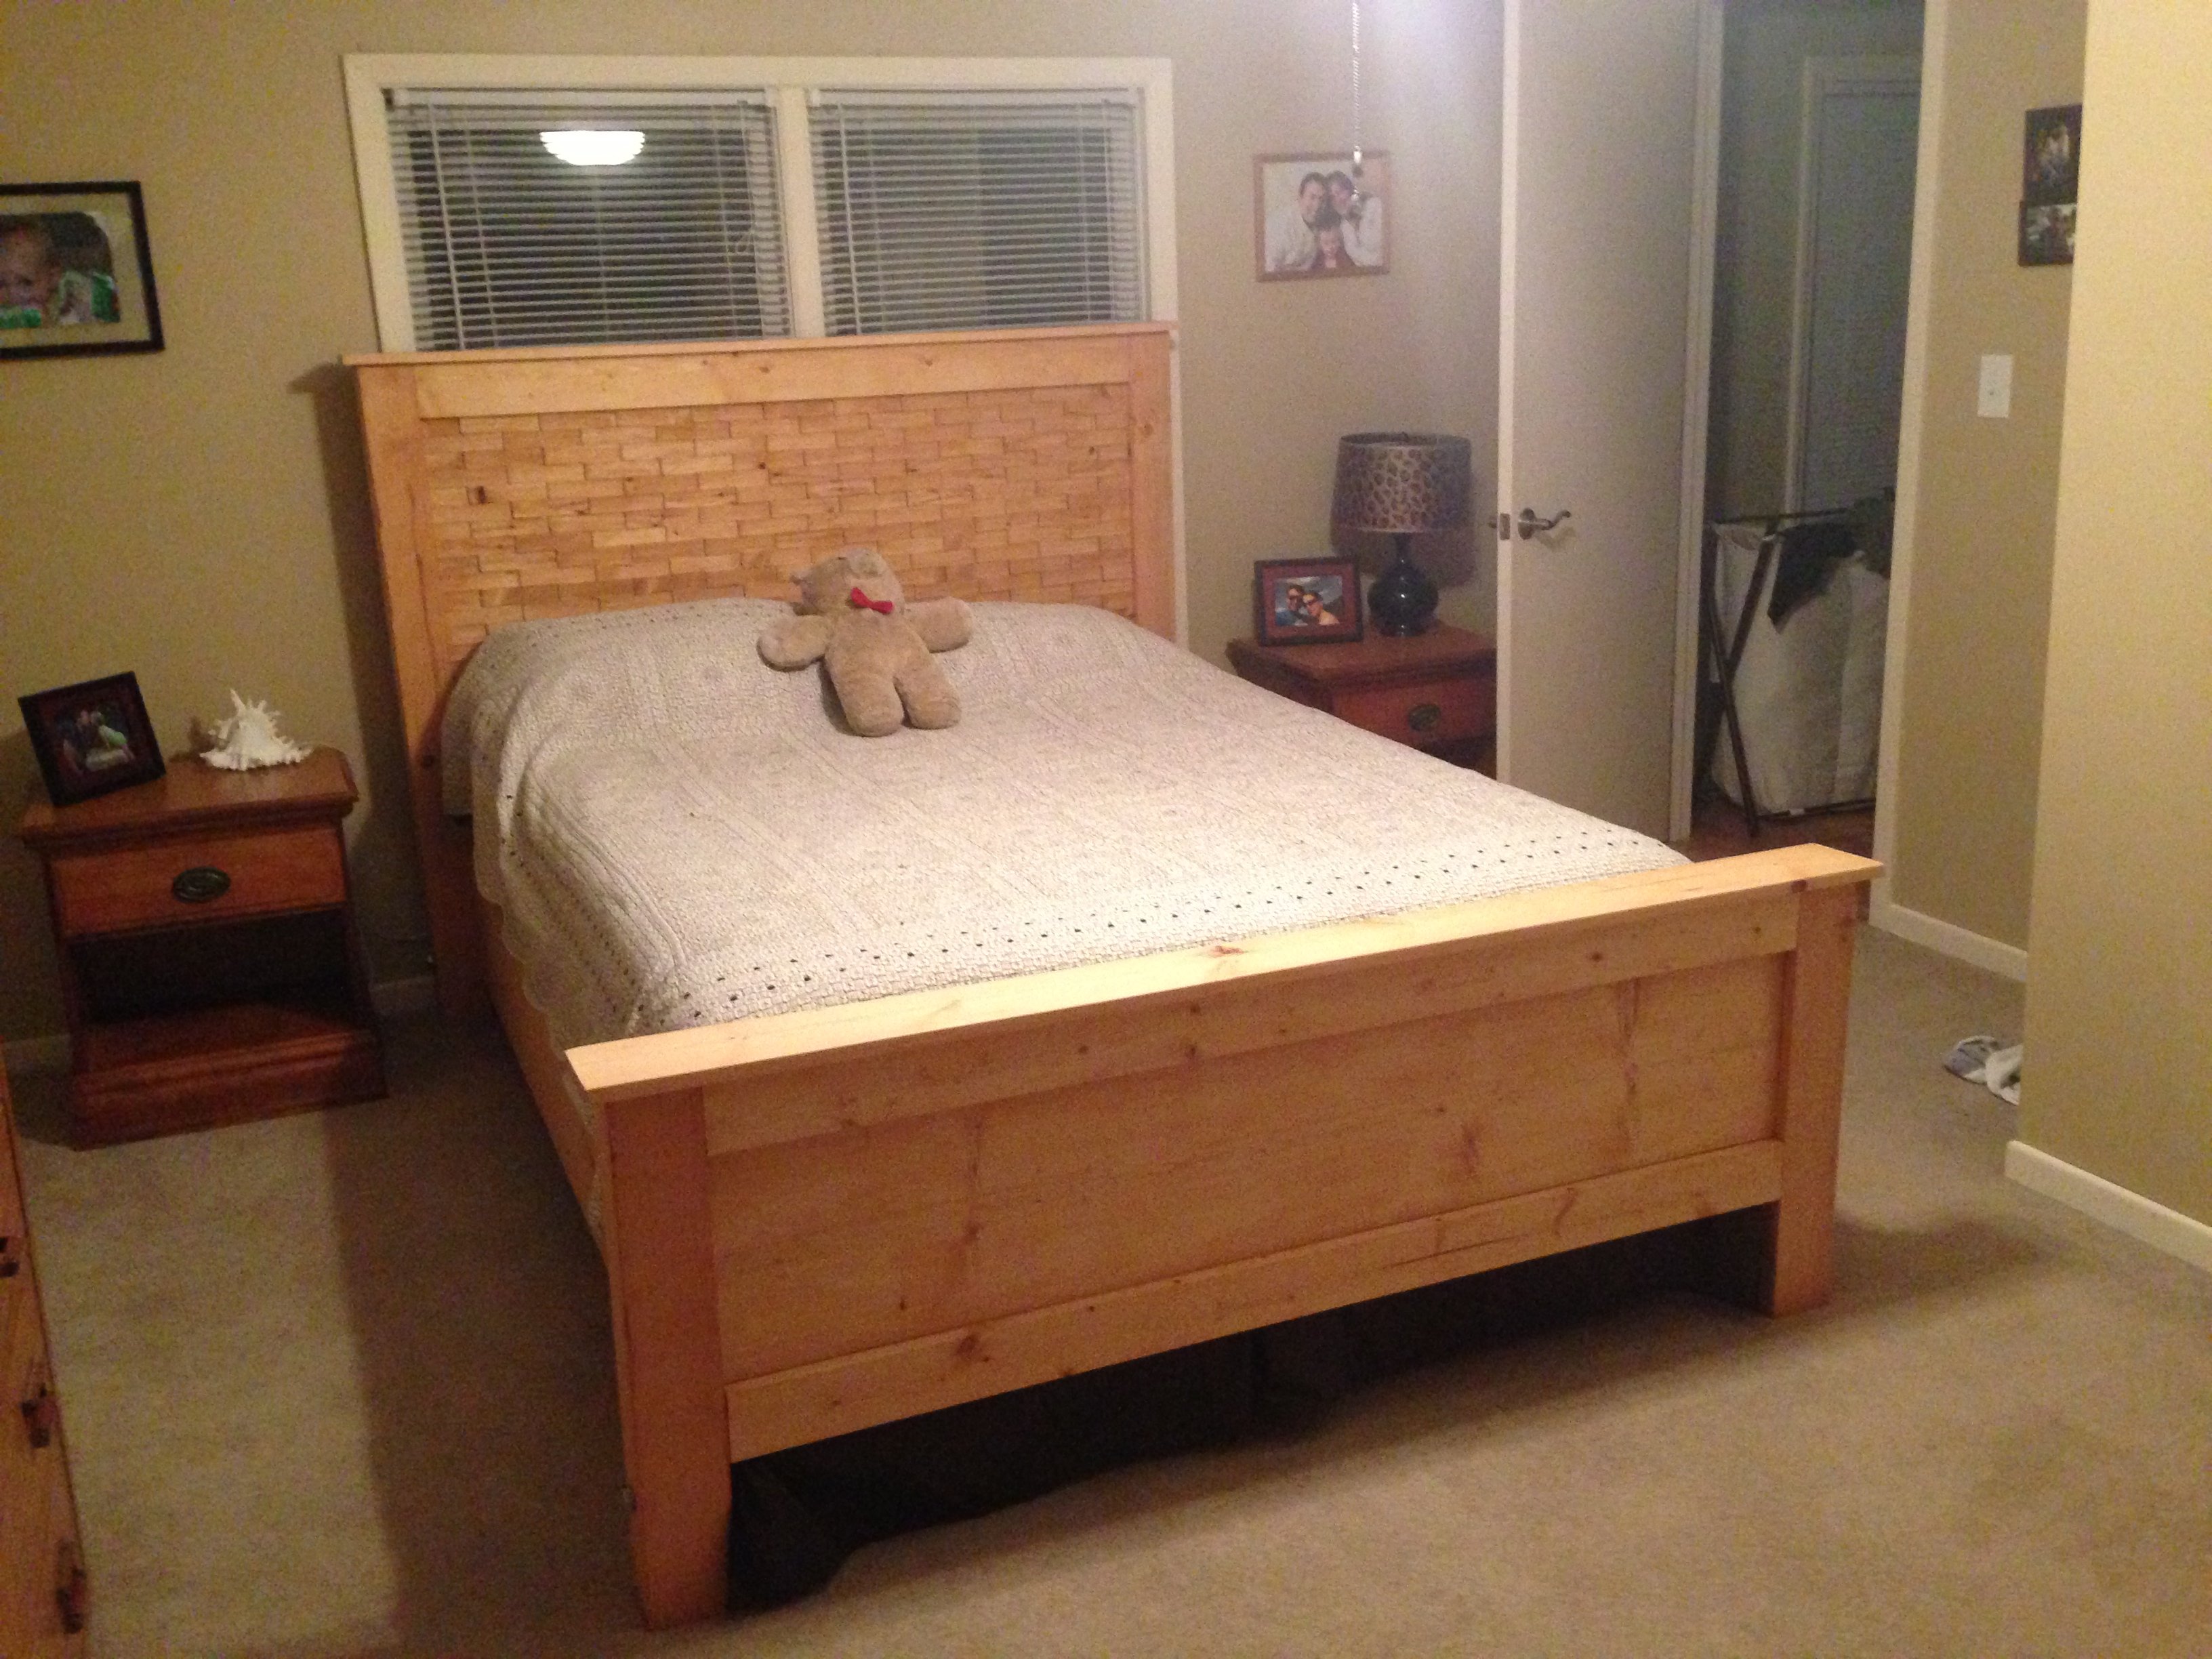
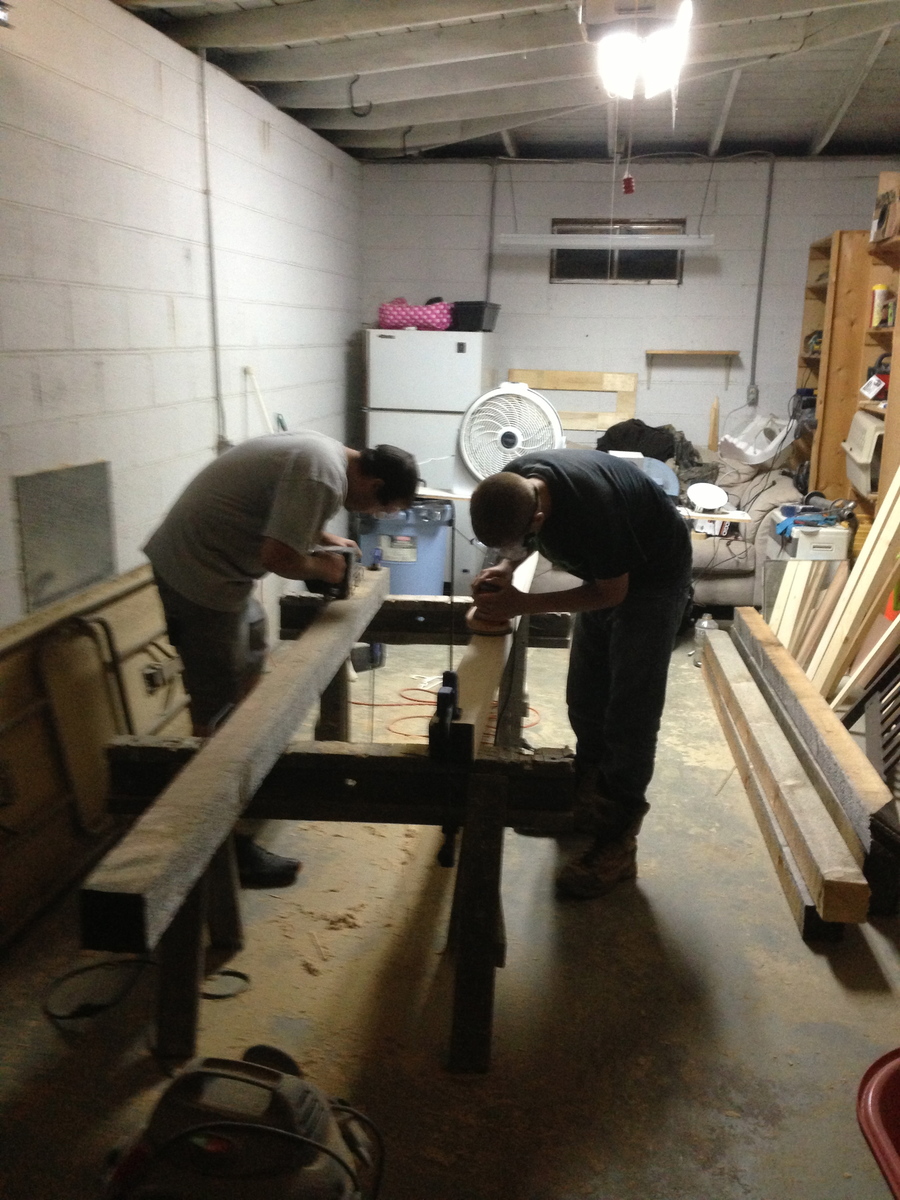
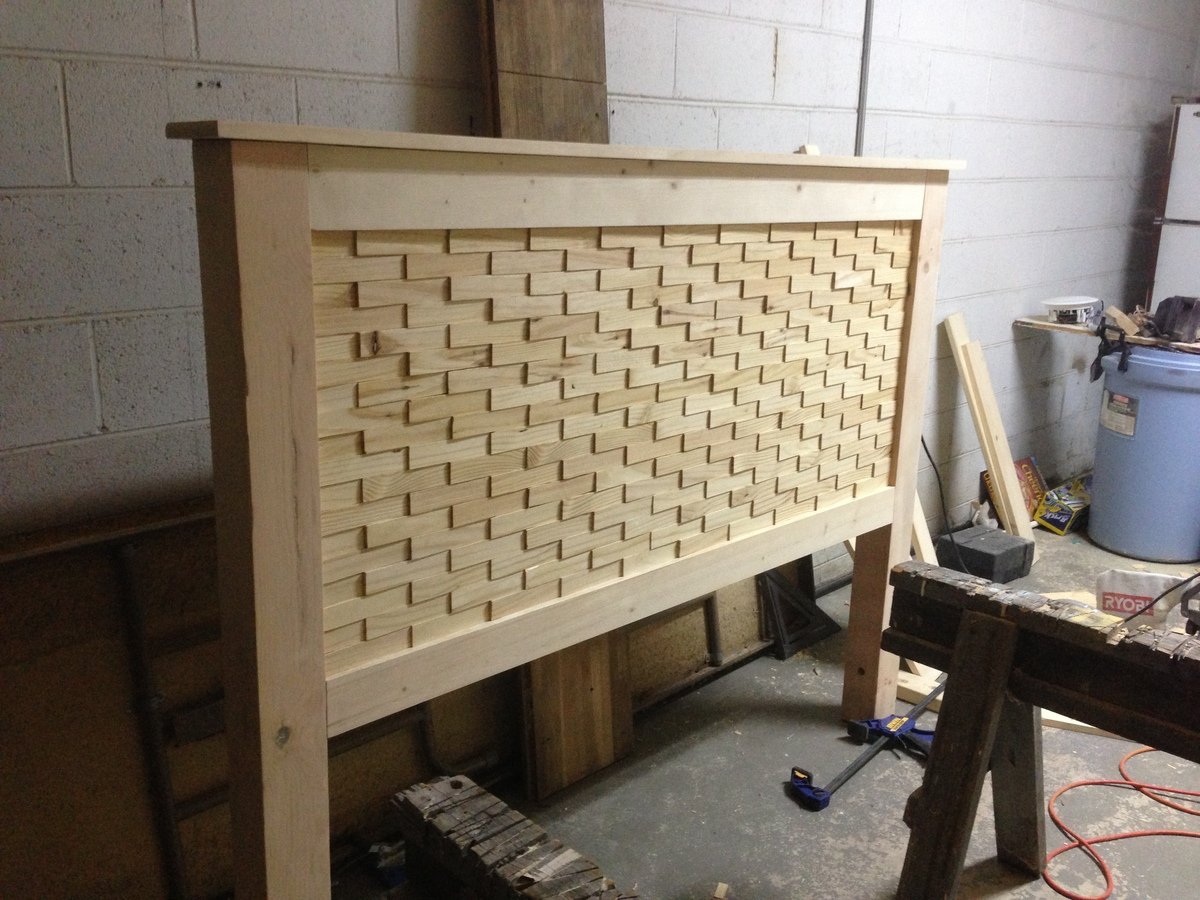
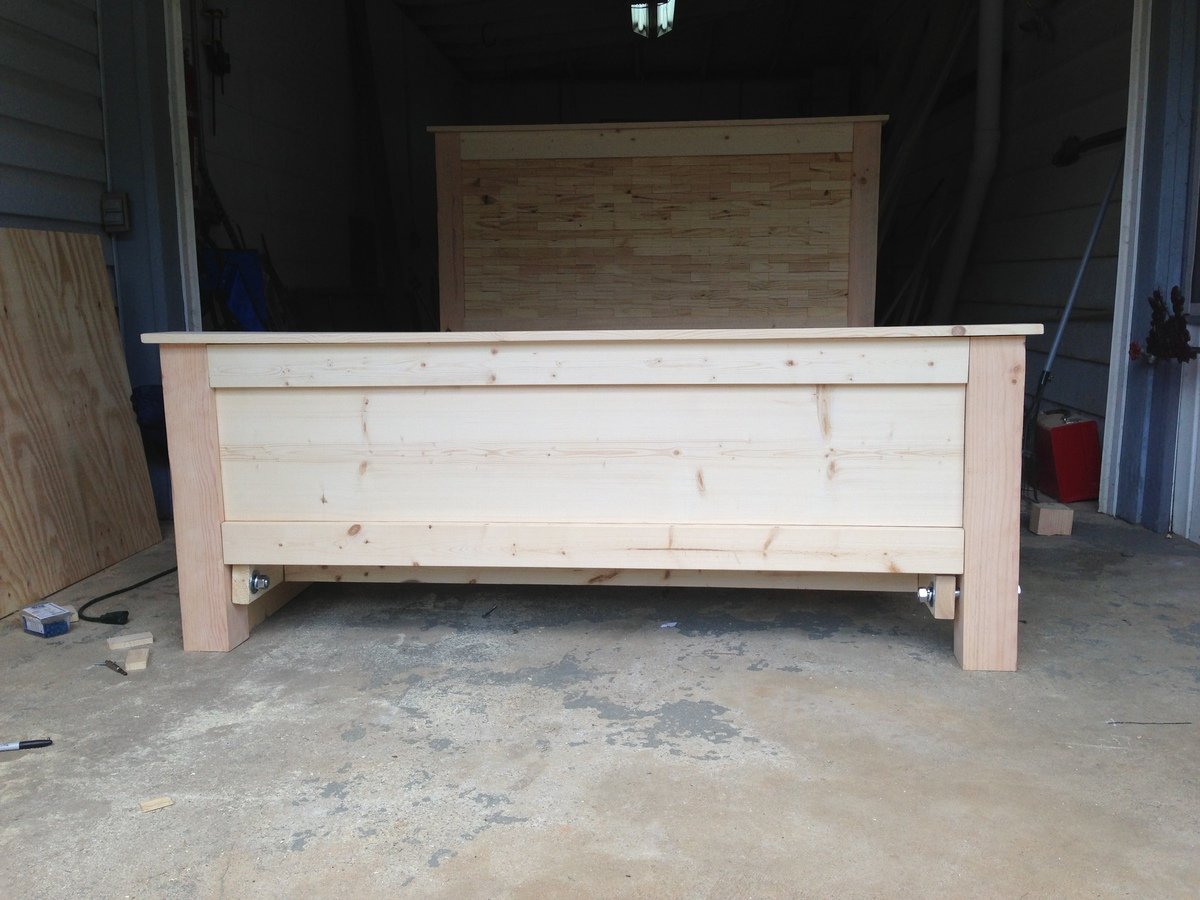
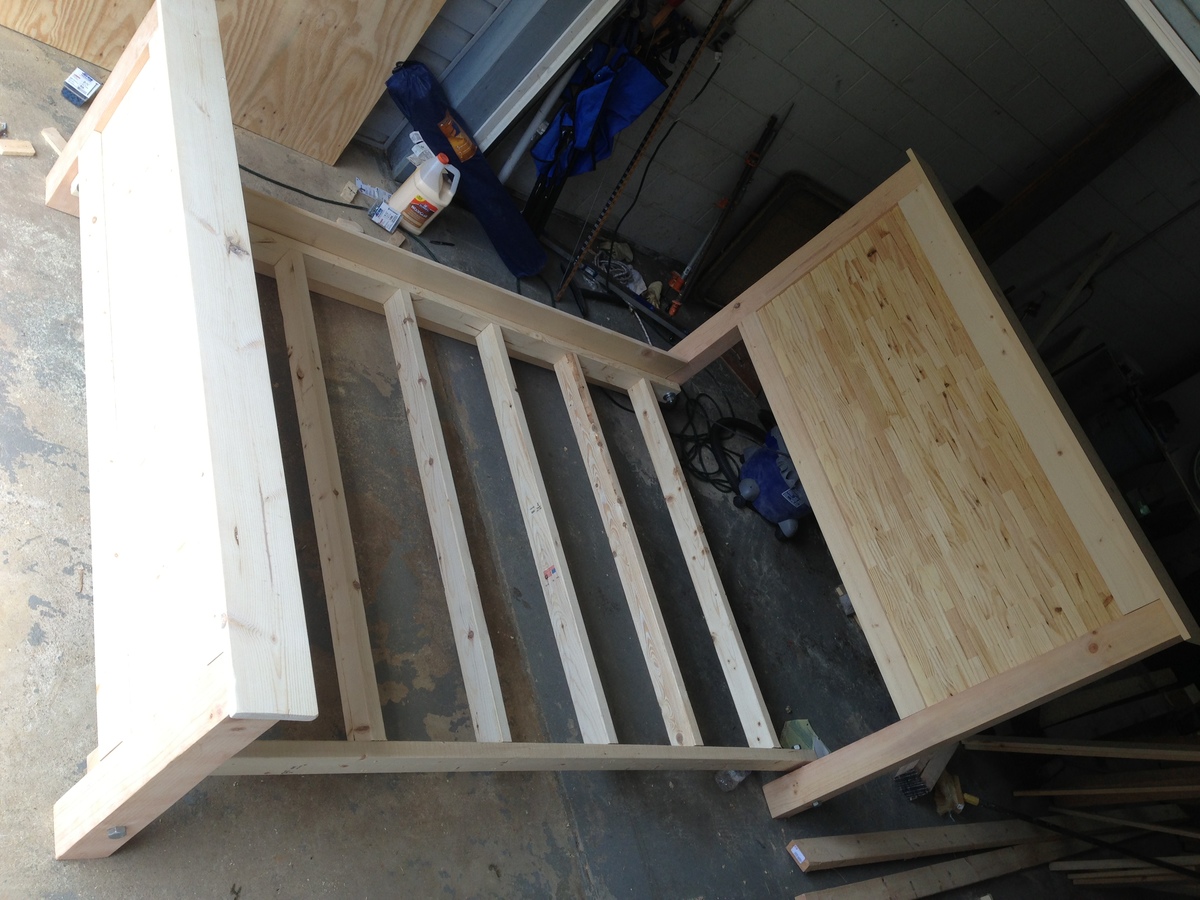
DIY Wood Shim bed plans - Queen
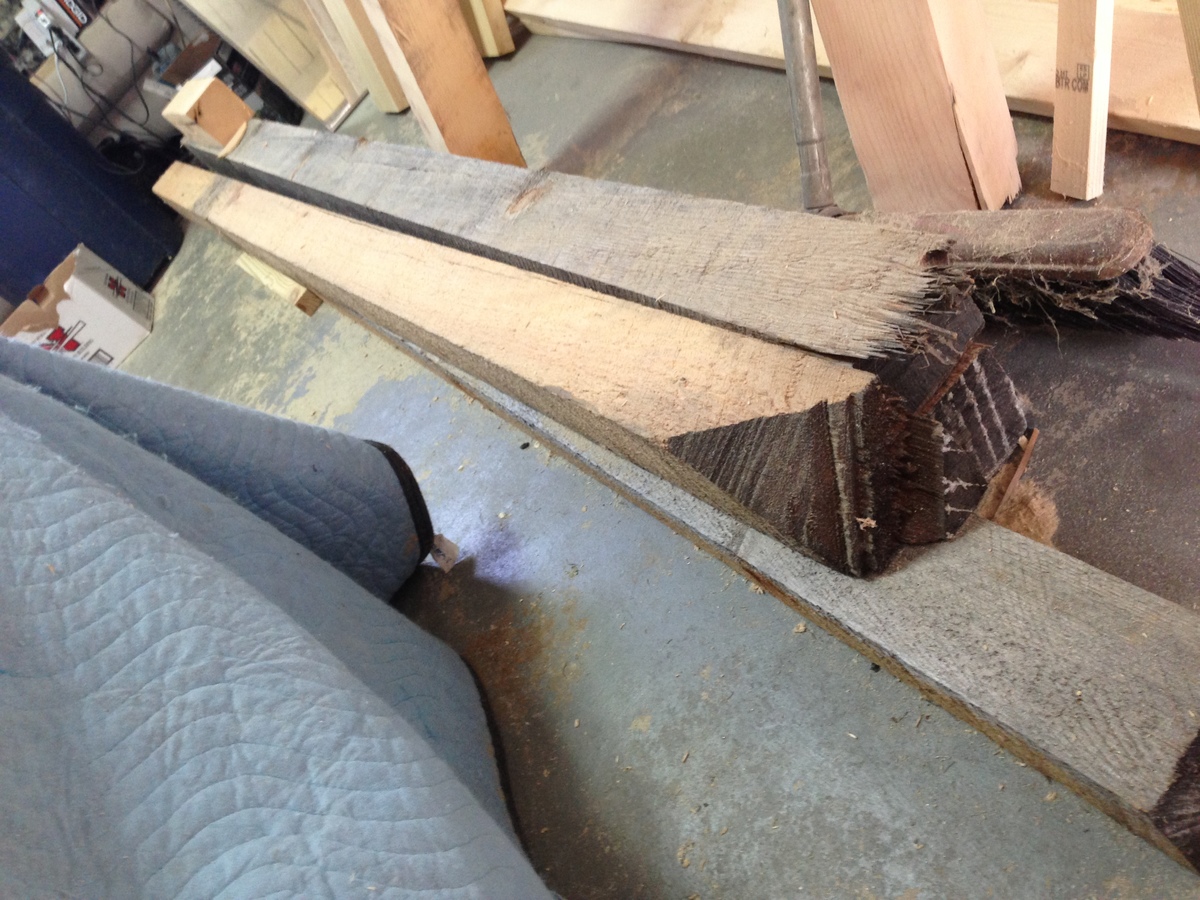
This Project was my second build. I had a few issues finding the materials required to even build it. Everything was found easily except the 4x4s. Everything here in my part of NC is either already pressure treated or cedar. Since everything else is Pine that really didn't float my boat. Plus for 1 4x4x8 of cedar cost $29 and for a color i didn't even want it wasn't even considerable. After calling around to a few places and no success i finally though of calling a lumber mill.
The Lumber mill had what i wanted for really cheap 4x4x8 for $5 but they were in rough condition. I had to do a lot of sanding to get them into workable condition. oh and by the way these are really 4x4s none of that 3.5in stuff here and man are they heavy.
Once i Started building my girlfriend decided she wanted the footboard to be higher and she didn't want to see any plywood for 1 we were going with a light finish and didn't think it would look to good. Instead of the footboard being at 20in high we raised it to 26. This allowed me to use some existing wood i already had to fill in the holes of exposed plywood. I used a 1x12 and 4 1x4s, i really only required 2 1x4 but to continue with the raised look of the footboard i used 4.
As far as the headboard goes i had to change that up a little bit as well. Im not sure if it was just because of the queen size or the fact that the lumber place i used to buy the 1x3s only had round edges so i opted to go with the 1x4s. Well because of that when i got to the last row of shims it was less than 1/2 the size. So resolve this issue again i used a existing 1x6 and replaced the top 1x4 with it. i made a line on the 1x6 which was taller then the headboard and cut it off with my circle saw so its now like a 1x5. Also on a side note when it came to the shims i cut them all 6in long due to the fact the center of the head board was 60in. it gave me an easy 10 shims per row. i used wood glue to hold them in place.
When it came to hooking the headboard and footboard to the bed frame i used 3/4s in-7in Lag bolts. this allows for easy on and off plus theres no way im breaking through them.
I loved this build but man those shim took forever. Sanding the 4x4s took me about 2 days. This job took me about 1 week to complete it working on it a few hours a night. But it was well worth it. I loved the way it turned out. its bigger than i though it would be but its workable.
Built from Plan(s)
Estimated Cost
200
Estimated Time Investment
Week Long Project (20 Hours or More)
Finish Used
I used Summer Oak as my finish of Choice. We didnt want anything to dark but had to have a fair amount of color in it.
To apply the finish we used a Cotton Rag and just rubbed it on. The finish for the shim part took me about an hour, well at least it felt like an hour and it gave my hands a definite workout.
To apply the finish we used a Cotton Rag and just rubbed it on. The finish for the shim part took me about an hour, well at least it felt like an hour and it gave my hands a definite workout.
Recommended Skill Level
Beginner
Comments
Sun, 01/05/2014 - 18:13
You've really done a
You've really done a beautiful job! And I don't even like light-stained wood typically. Beautiful shim work.
Toddler version of the platform bed
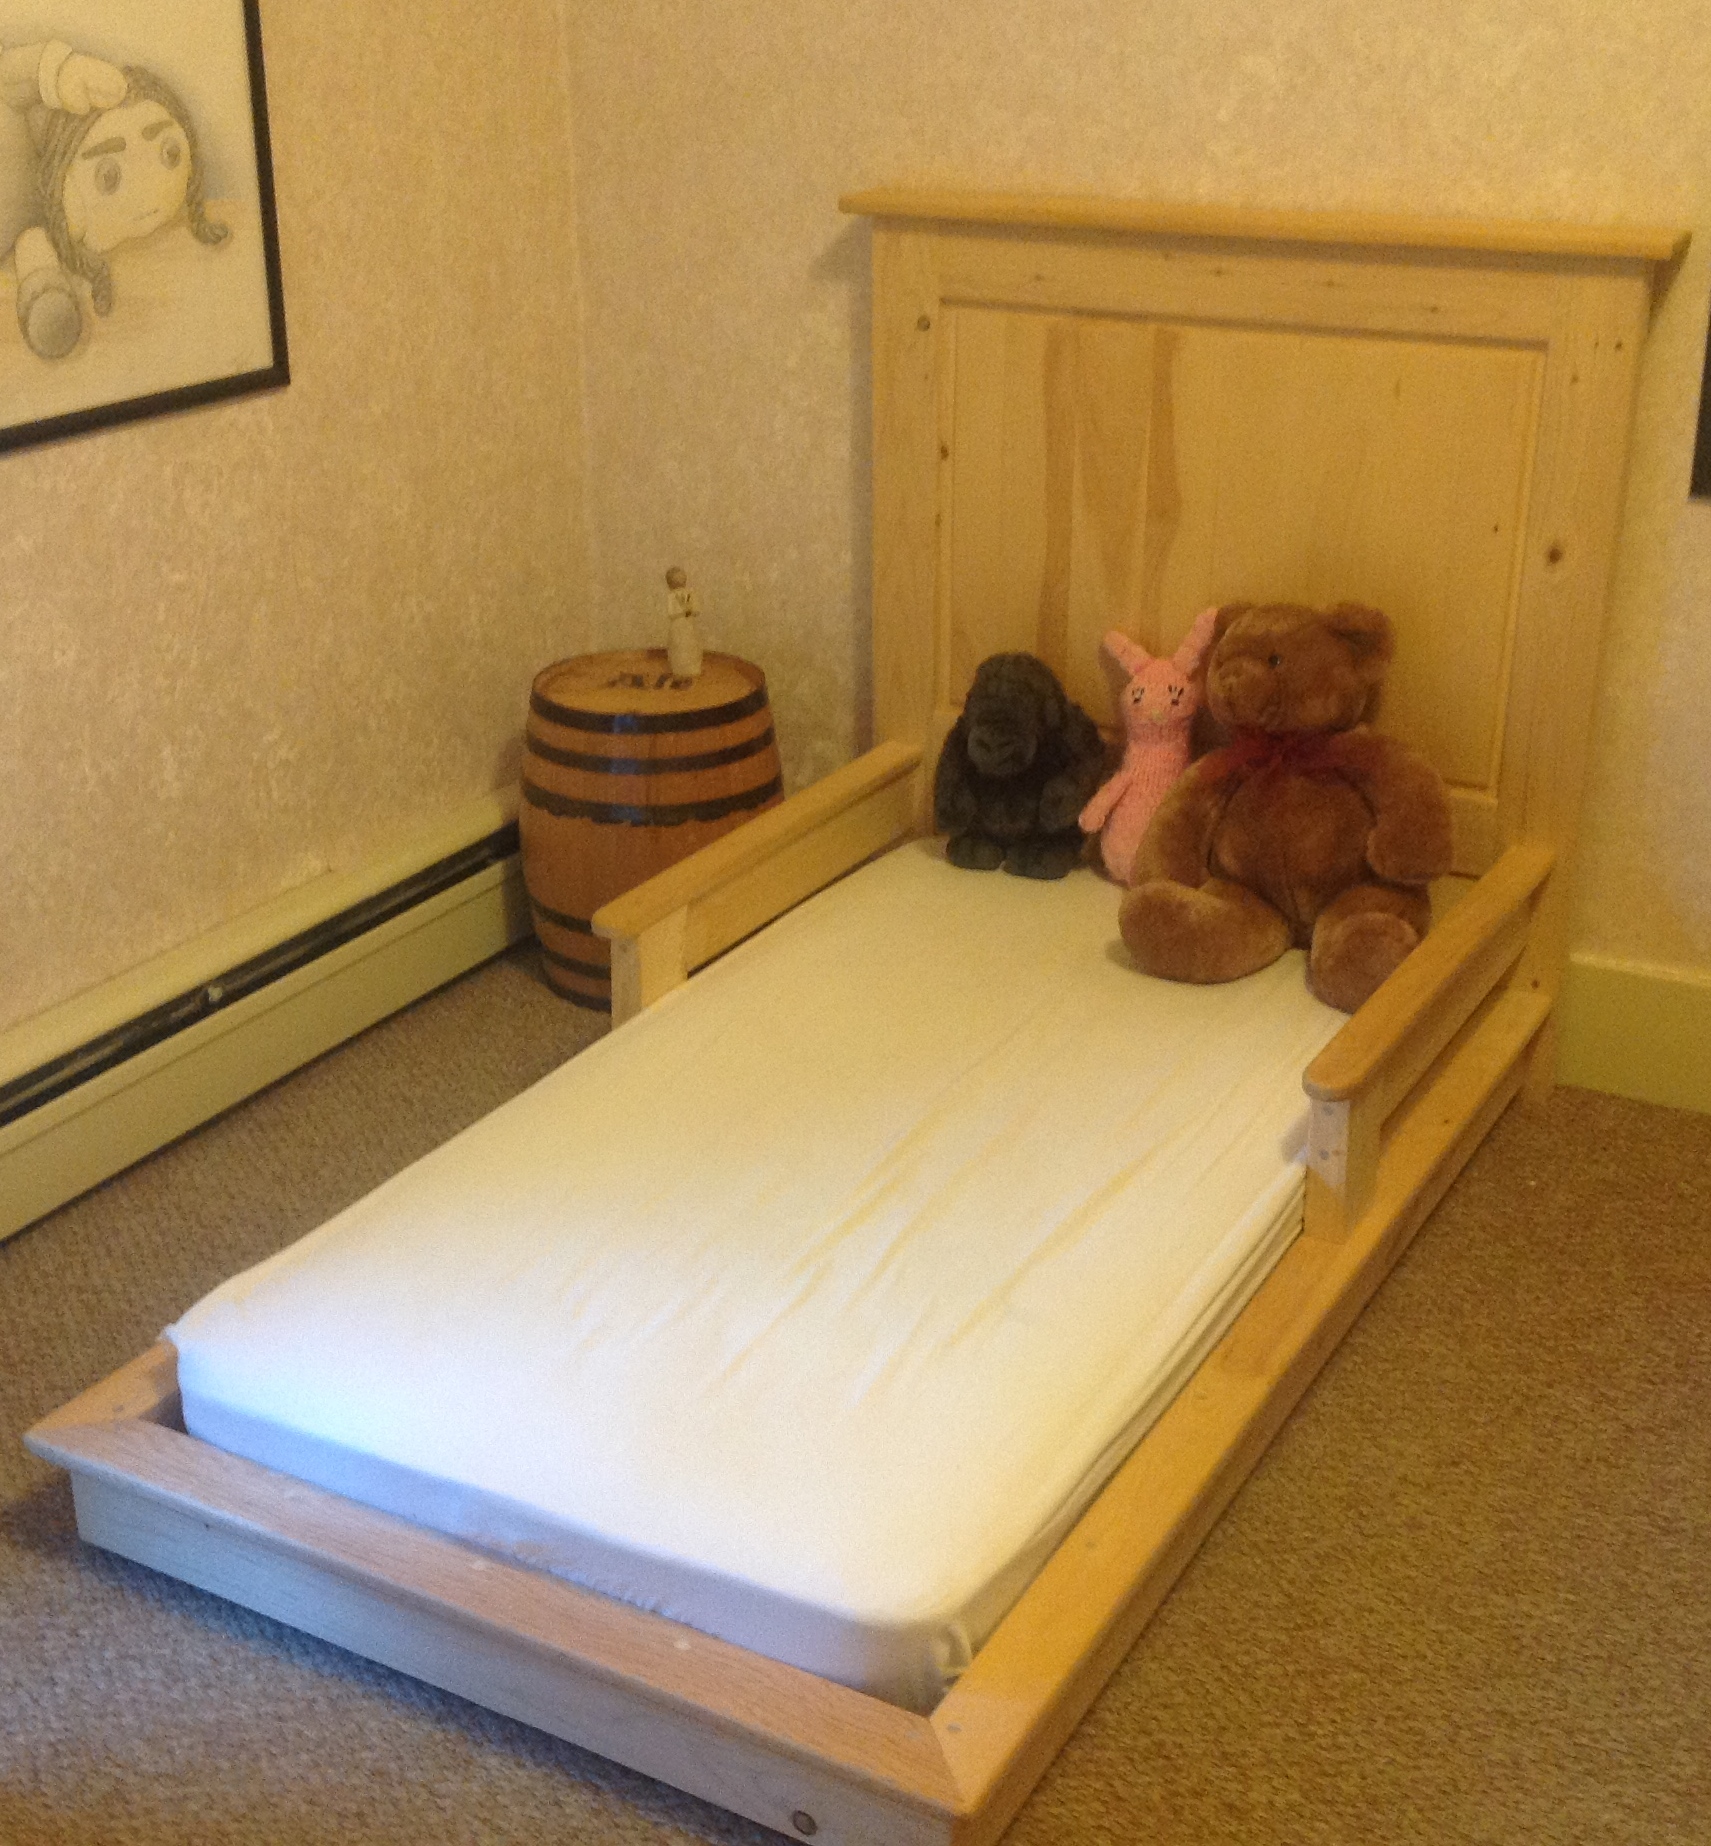
We reworked the plans for the pottery barn inspired bed into a toddler sized version. Arms were added near the head to prevent our child falling out in the first year. They ended up being something of a hazard in those early days, as our child kept hitting her head. If we were to recreate it, we would make the arms go up higher or without the finished top. The bed also was not lifted off the ground in as great of a proportion to the original.
The pine is left untreated and unfinished. The only glue used was homemade milk glue.
Built from Plan(s)
Estimated Cost
<$100
Estimated Time Investment
Weekend Project (10-20 Hours)
Finish Used
None
Recommended Skill Level
Intermediate
Comments
Dresser
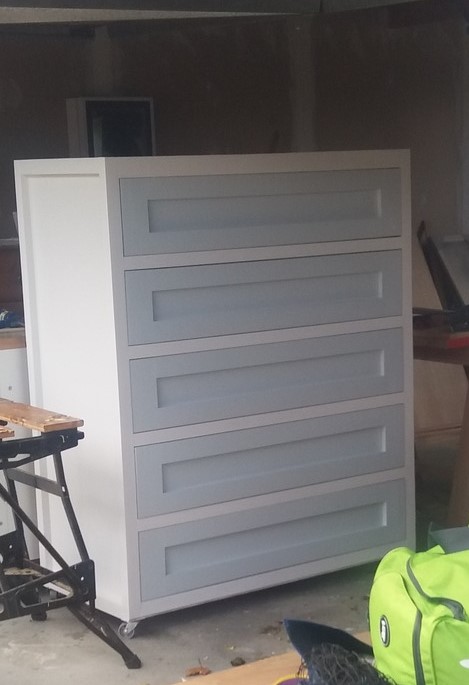
Adapted plans to suit me
Your and your husband's videos are easy to
follow and well explained for the beginner thanks.
Definite confidence building to Finish
Thanks
Estimated Time Investment
Week Long Project (20 Hours or More)
Recommended Skill Level
Intermediate
Modified Brookstone Desk
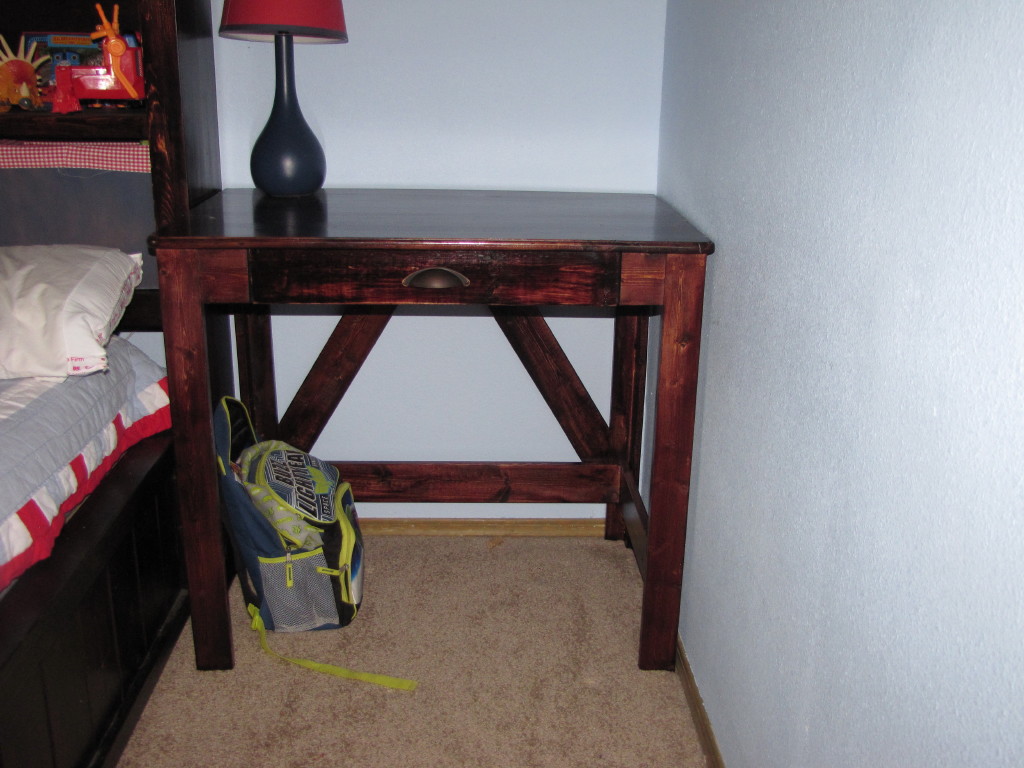
I had to change the plan to better fit my son's room. I changed the depth to 22 and the width to 34 to fit in the corner. Big lesson learned don't use the worst wood possible where the drawer slides go, yikes the rigging I had to do was awful. Atleast no one can see it is all under the desk. :)
Built from Plan(s)
Estimated Time Investment
Weekend Project (10-20 Hours)
Finish Used
Minwax Red Mahogony and Minwax Wipeon Satin finish poly.
Recommended Skill Level
Beginner
Table top chalkboard easel
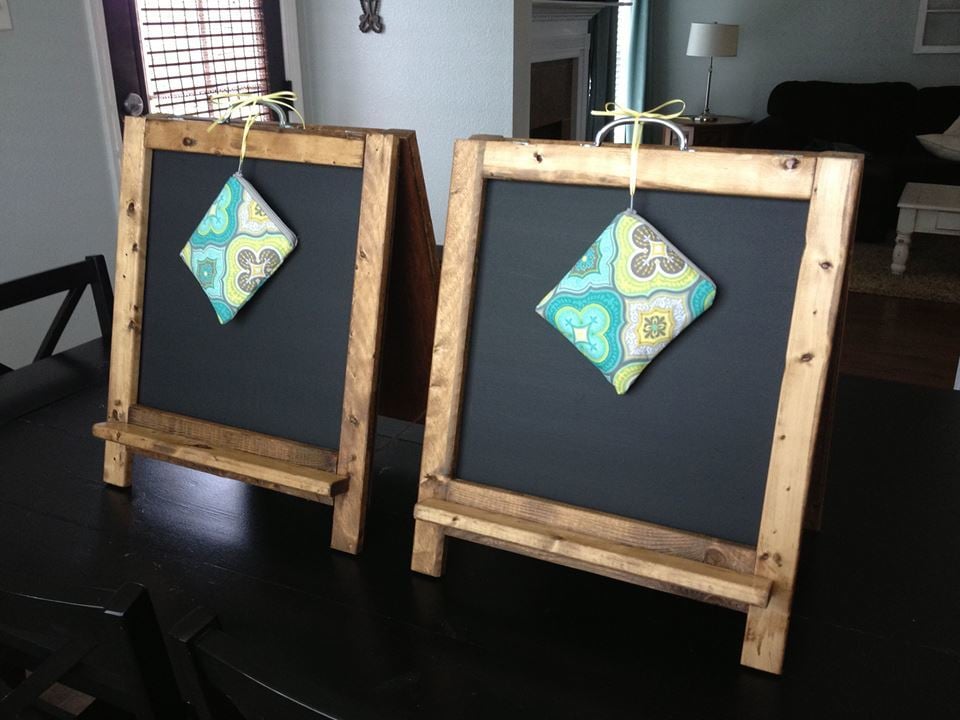
I saw these here on Ana Whites site and fell in love and wanted to make one for my 3 year old. Well at the time (we now no longer have it) we had a huge chalkboard wall upstairs for my 4 boys and therefor the hubs told me there was no need to build these....but I have a friend who has twin girls and I new that was the perfect opportunity to build these cute things as their birthday presents! So that is what I did. I also made a zipper pouch to hold the chalk. The girls love them :)
Built from Plan(s)
Estimated Time Investment
An Hour or Two (0-2 Hours)
Finish Used
chalkboard paint, Minwax Early American stain
Recommended Skill Level
Starter Project
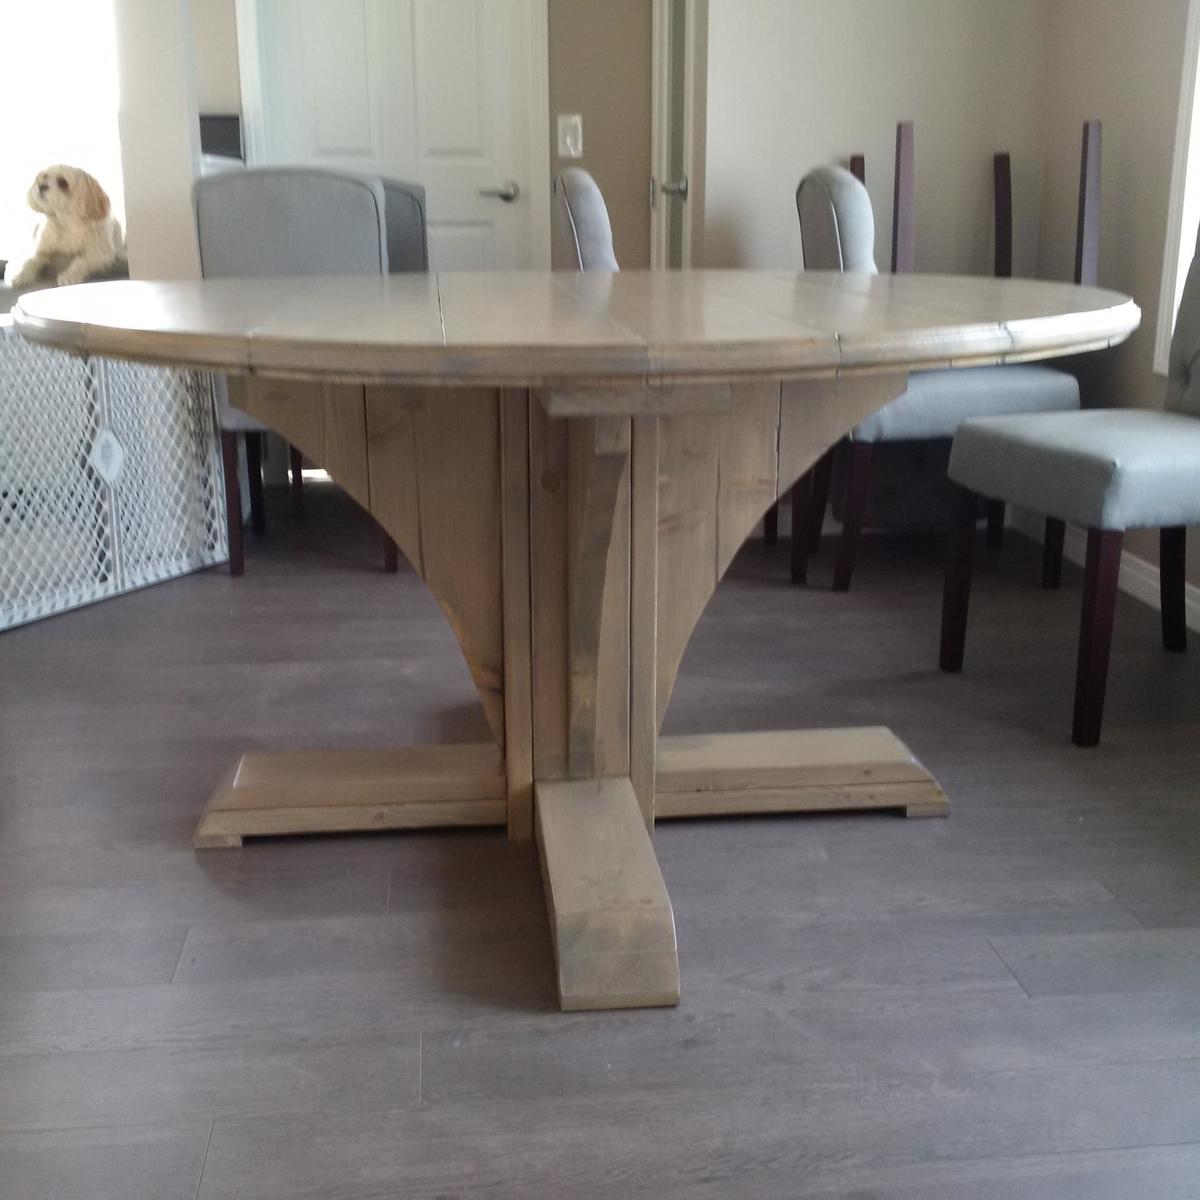
Round Farmhouse Style Table
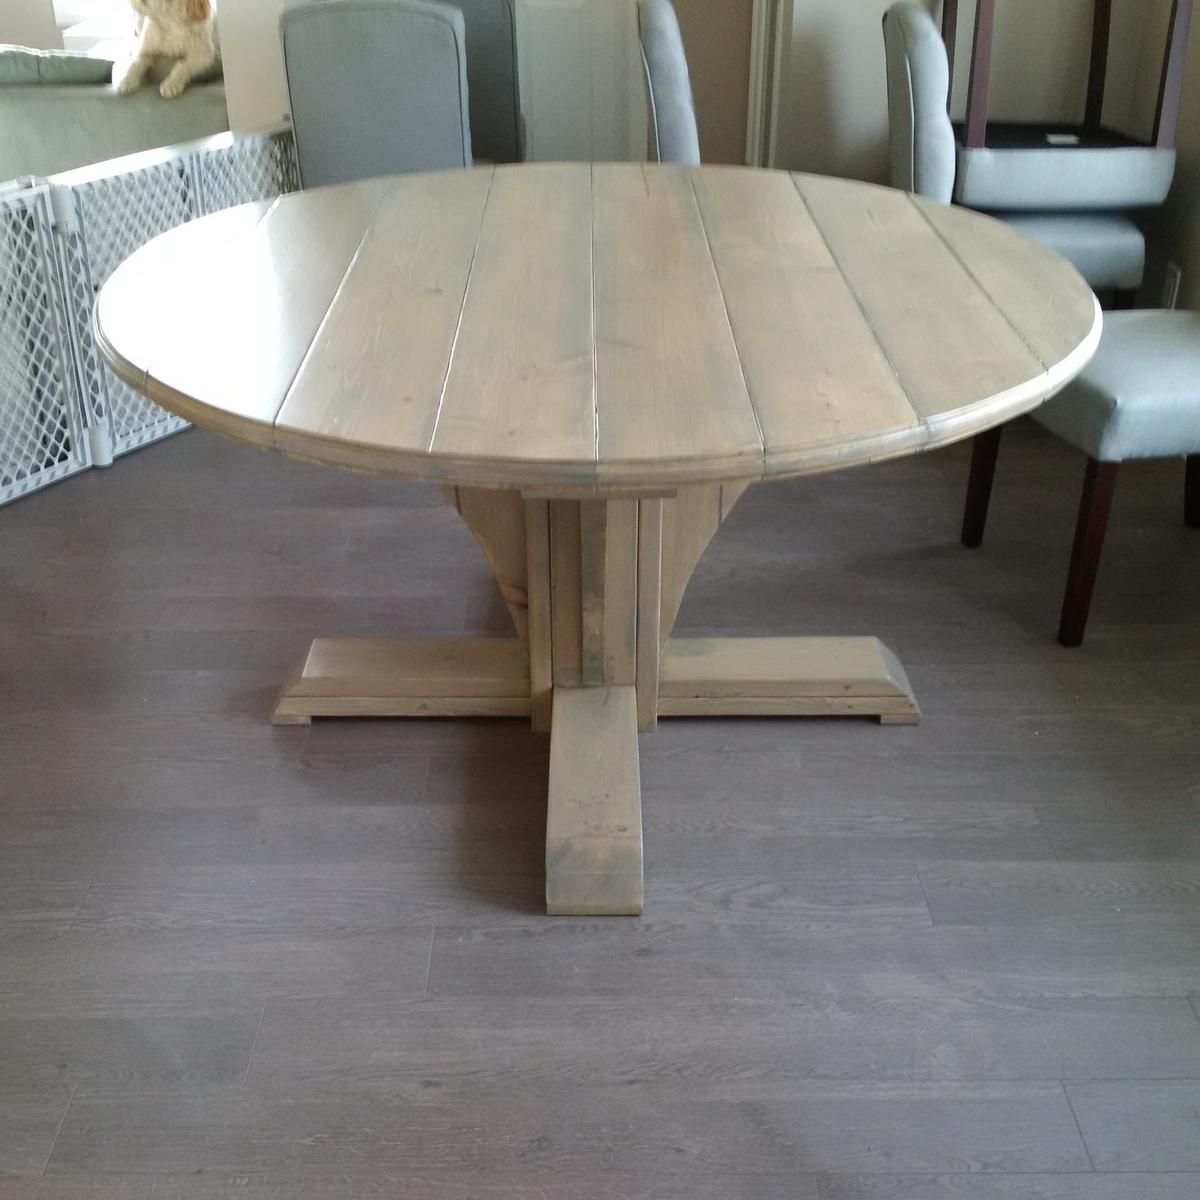
I started this project with the intention of building the octagon table. The person I was building it for changed their mind and asked for round instead. With the table top now being round I did not think that the supports underneath the table fit with the design so I used the leftover scraps from cutting the round top to make the altered supports you see in my photos. Turned out pretty good I think and the recipient is in love with the design. Thanks for the original plans Ana and good luck to everyone else building this table!
Built from Plan(s)
Estimated Cost
$80.00
Estimated Time Investment
Weekend Project (10-20 Hours)
Finish Used
I used a Cabot stain. I believe the color was river rock. One coat of stain and then three coats of Minwax Poly Urethane to seal it up and protect the table top.
Recommended Skill Level
Intermediate
play kitchen

I made this for my 5 year old daughter for Christmas. I really like how beautiful and sturdy this play kitchen is. I added 4 inches to the height so it would be the right size for my daughter. I also made all the sections equal in width. This made it simpler for cutting the shelves. The faucet is made from various pvc pipes and spray painted with Rustoleum silver. All the knobs are able to be turned, and the faucet can swivel. For the oven shelf, I used a cooling rack. Thank you so much for this wonderful plan!


Built from Plan(s)
Estimated Cost
I didn't keep track, but I would guess at least $200. The paint was a big cost, but I have a lot left over.
Estimated Time Investment
Week Long Project (20 Hours or More)
Finish Used
Behr Ultra - Ceylon Cream, Shimmering Pool, and Radiant Rose
Recommended Skill Level
Intermediate
Comments

Wed, 12/26/2018 - 13:59
I love this! We shared on
I love this! We shared on Instagram, thank you so much for sharing with us!
Mon, 12/31/2018 - 16:04
Thank you!
Thank you! I LOVE your website and all of your plans! I've learned so much from you and you've given me the confidence to take on any diy project!
Tue, 01/01/2019 - 12:43
Thank you!
Thank you! I LOVE your website and all of your plans! You have given me the knowledge and confidence to tackle any diy project!
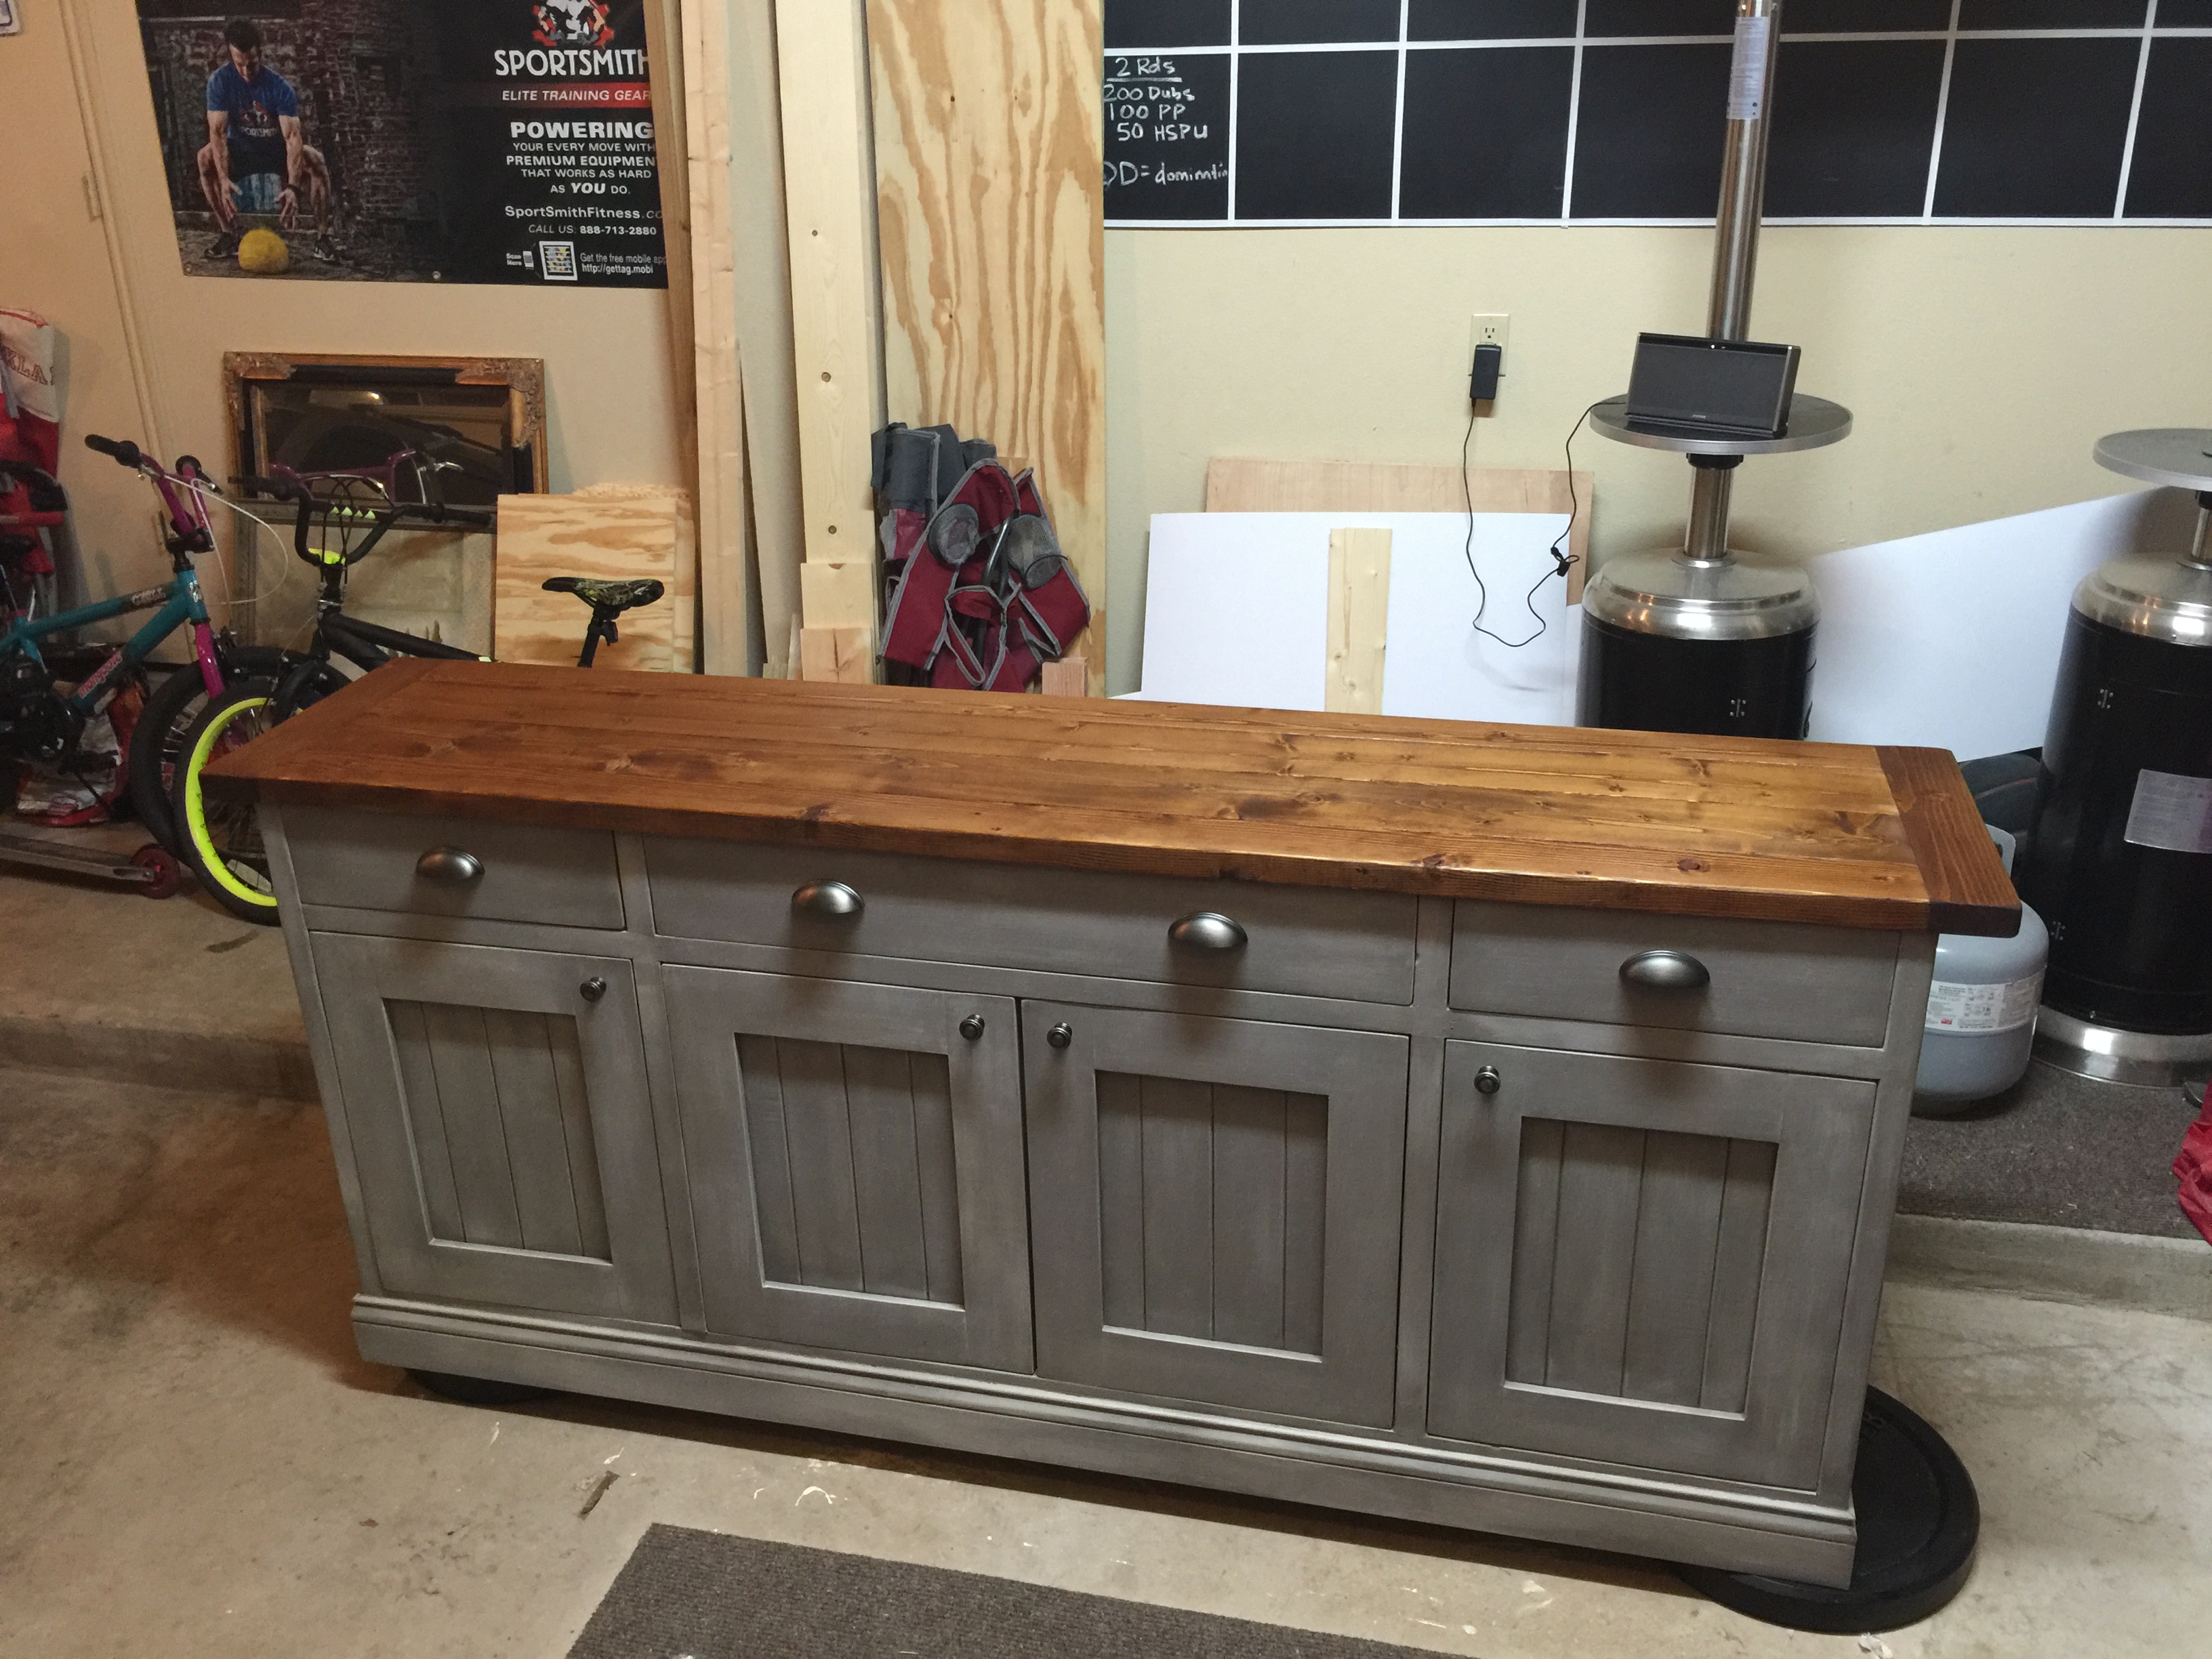
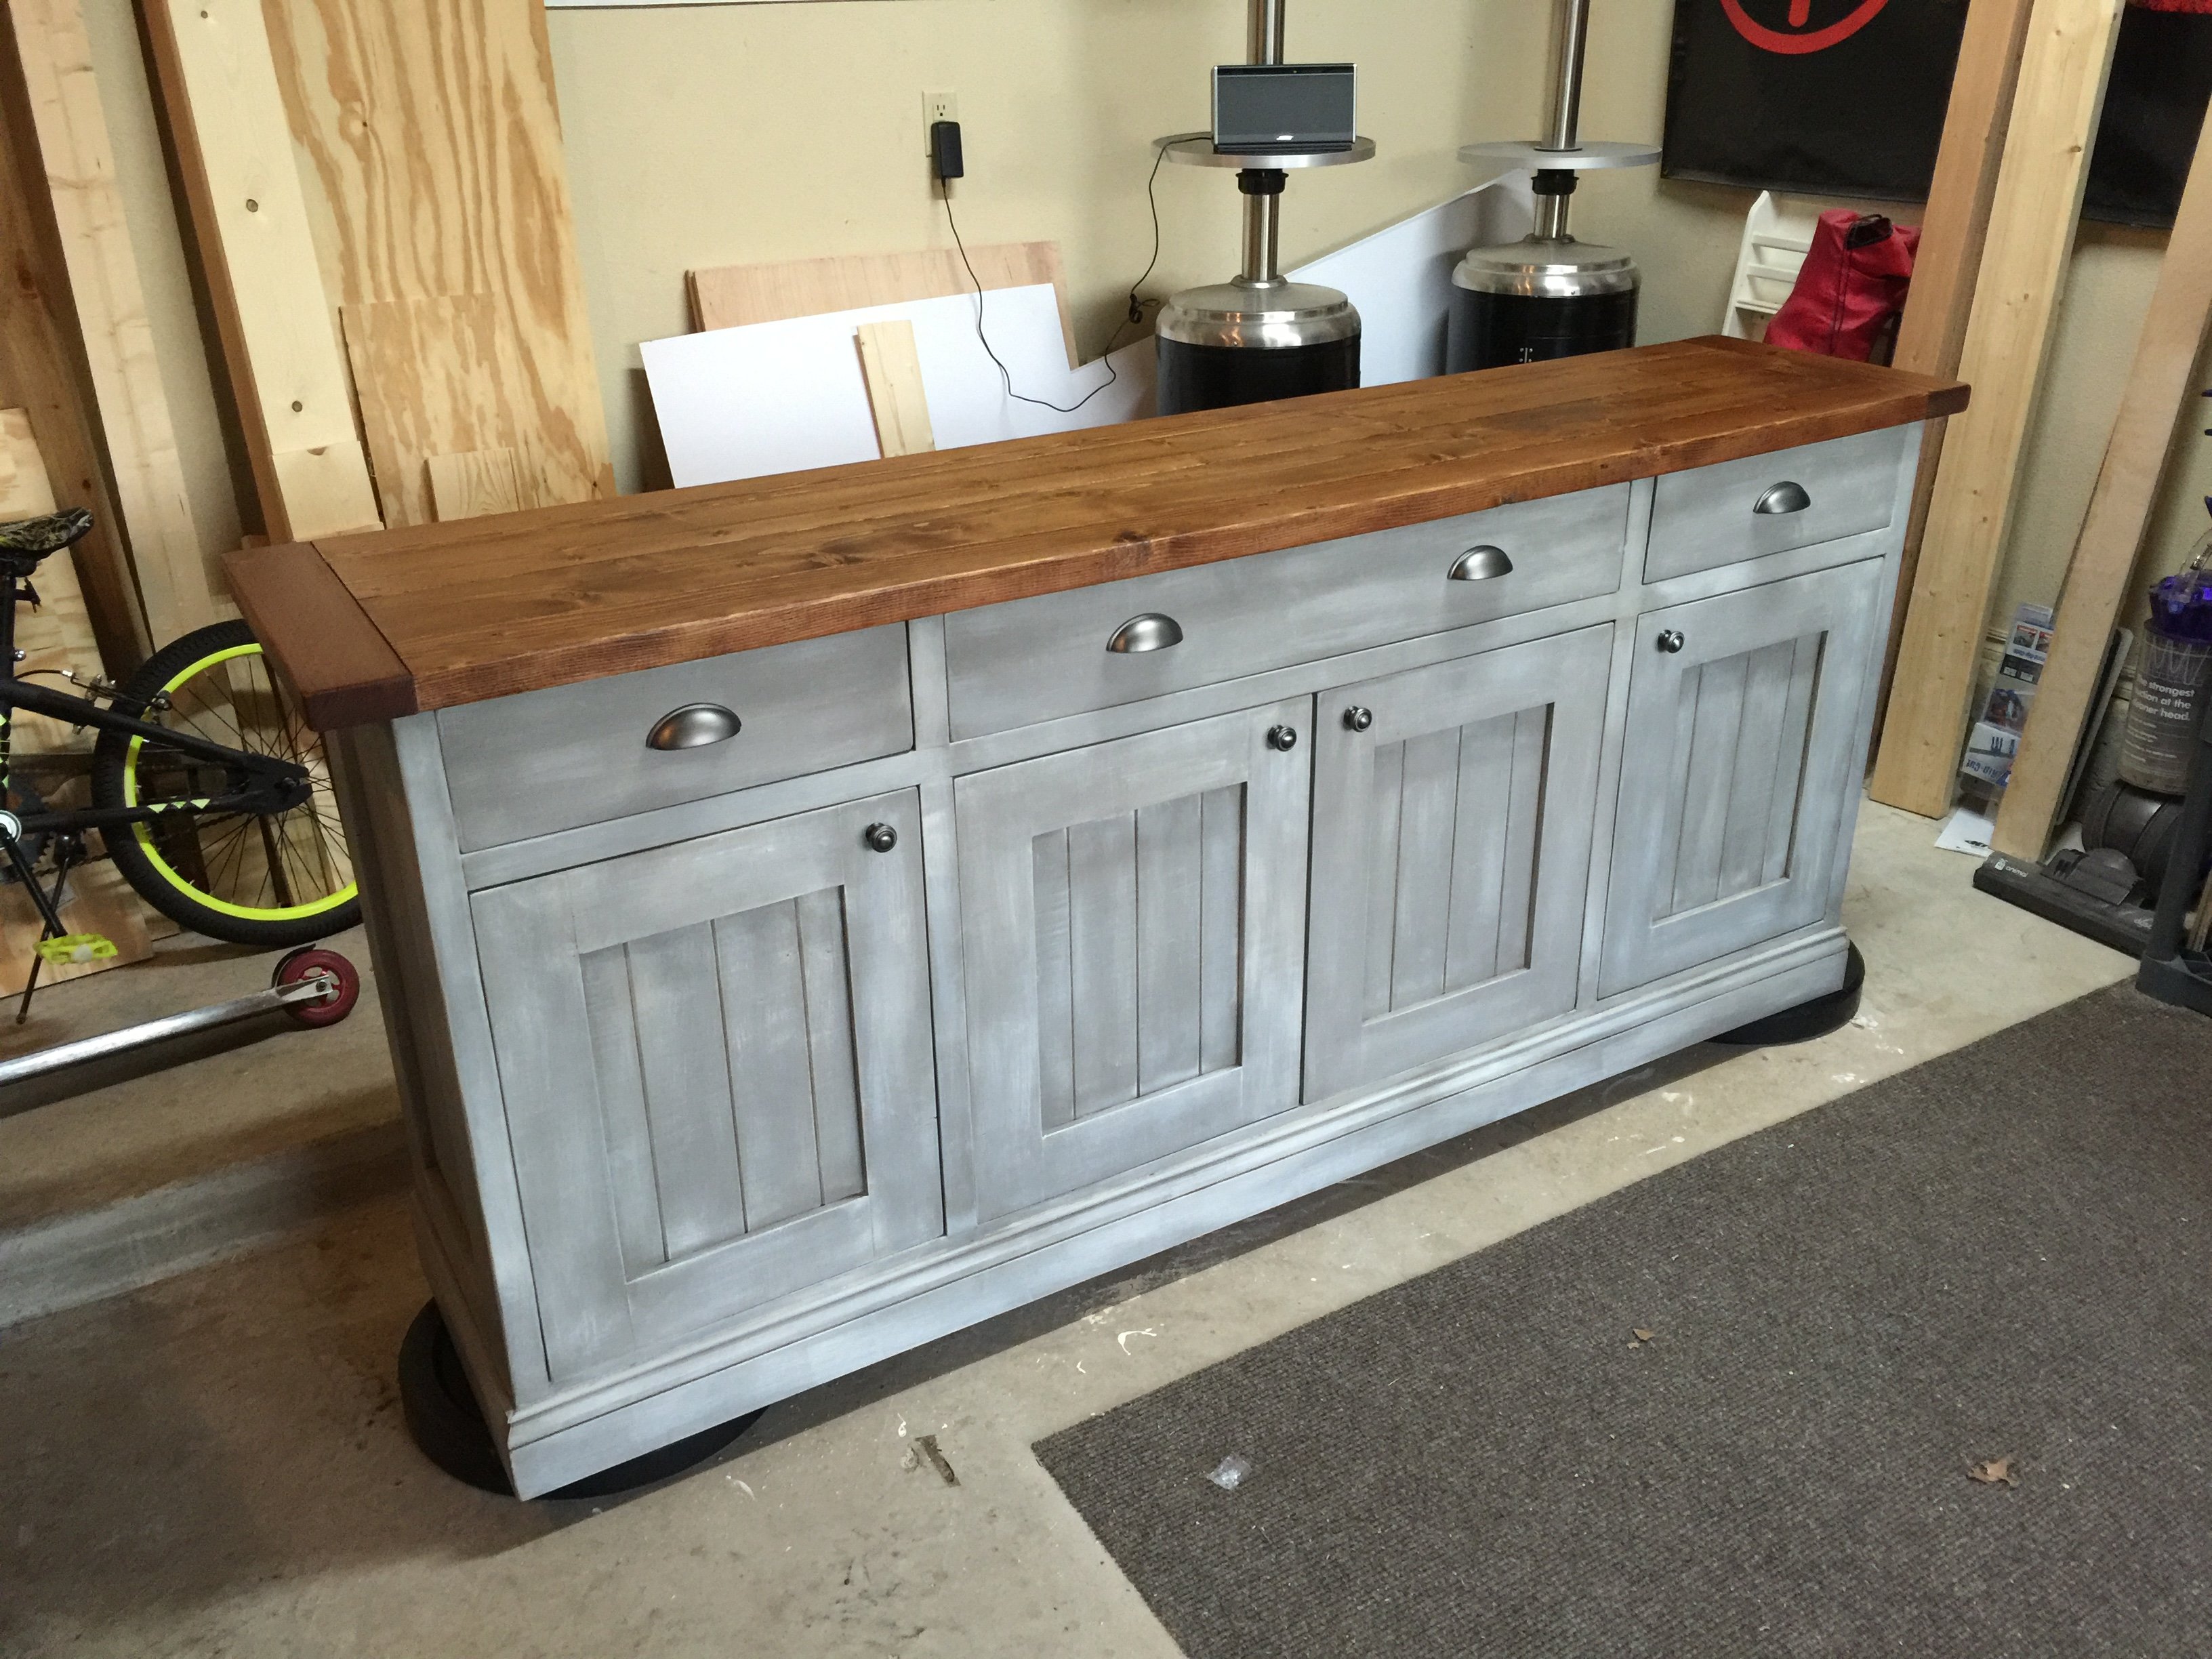
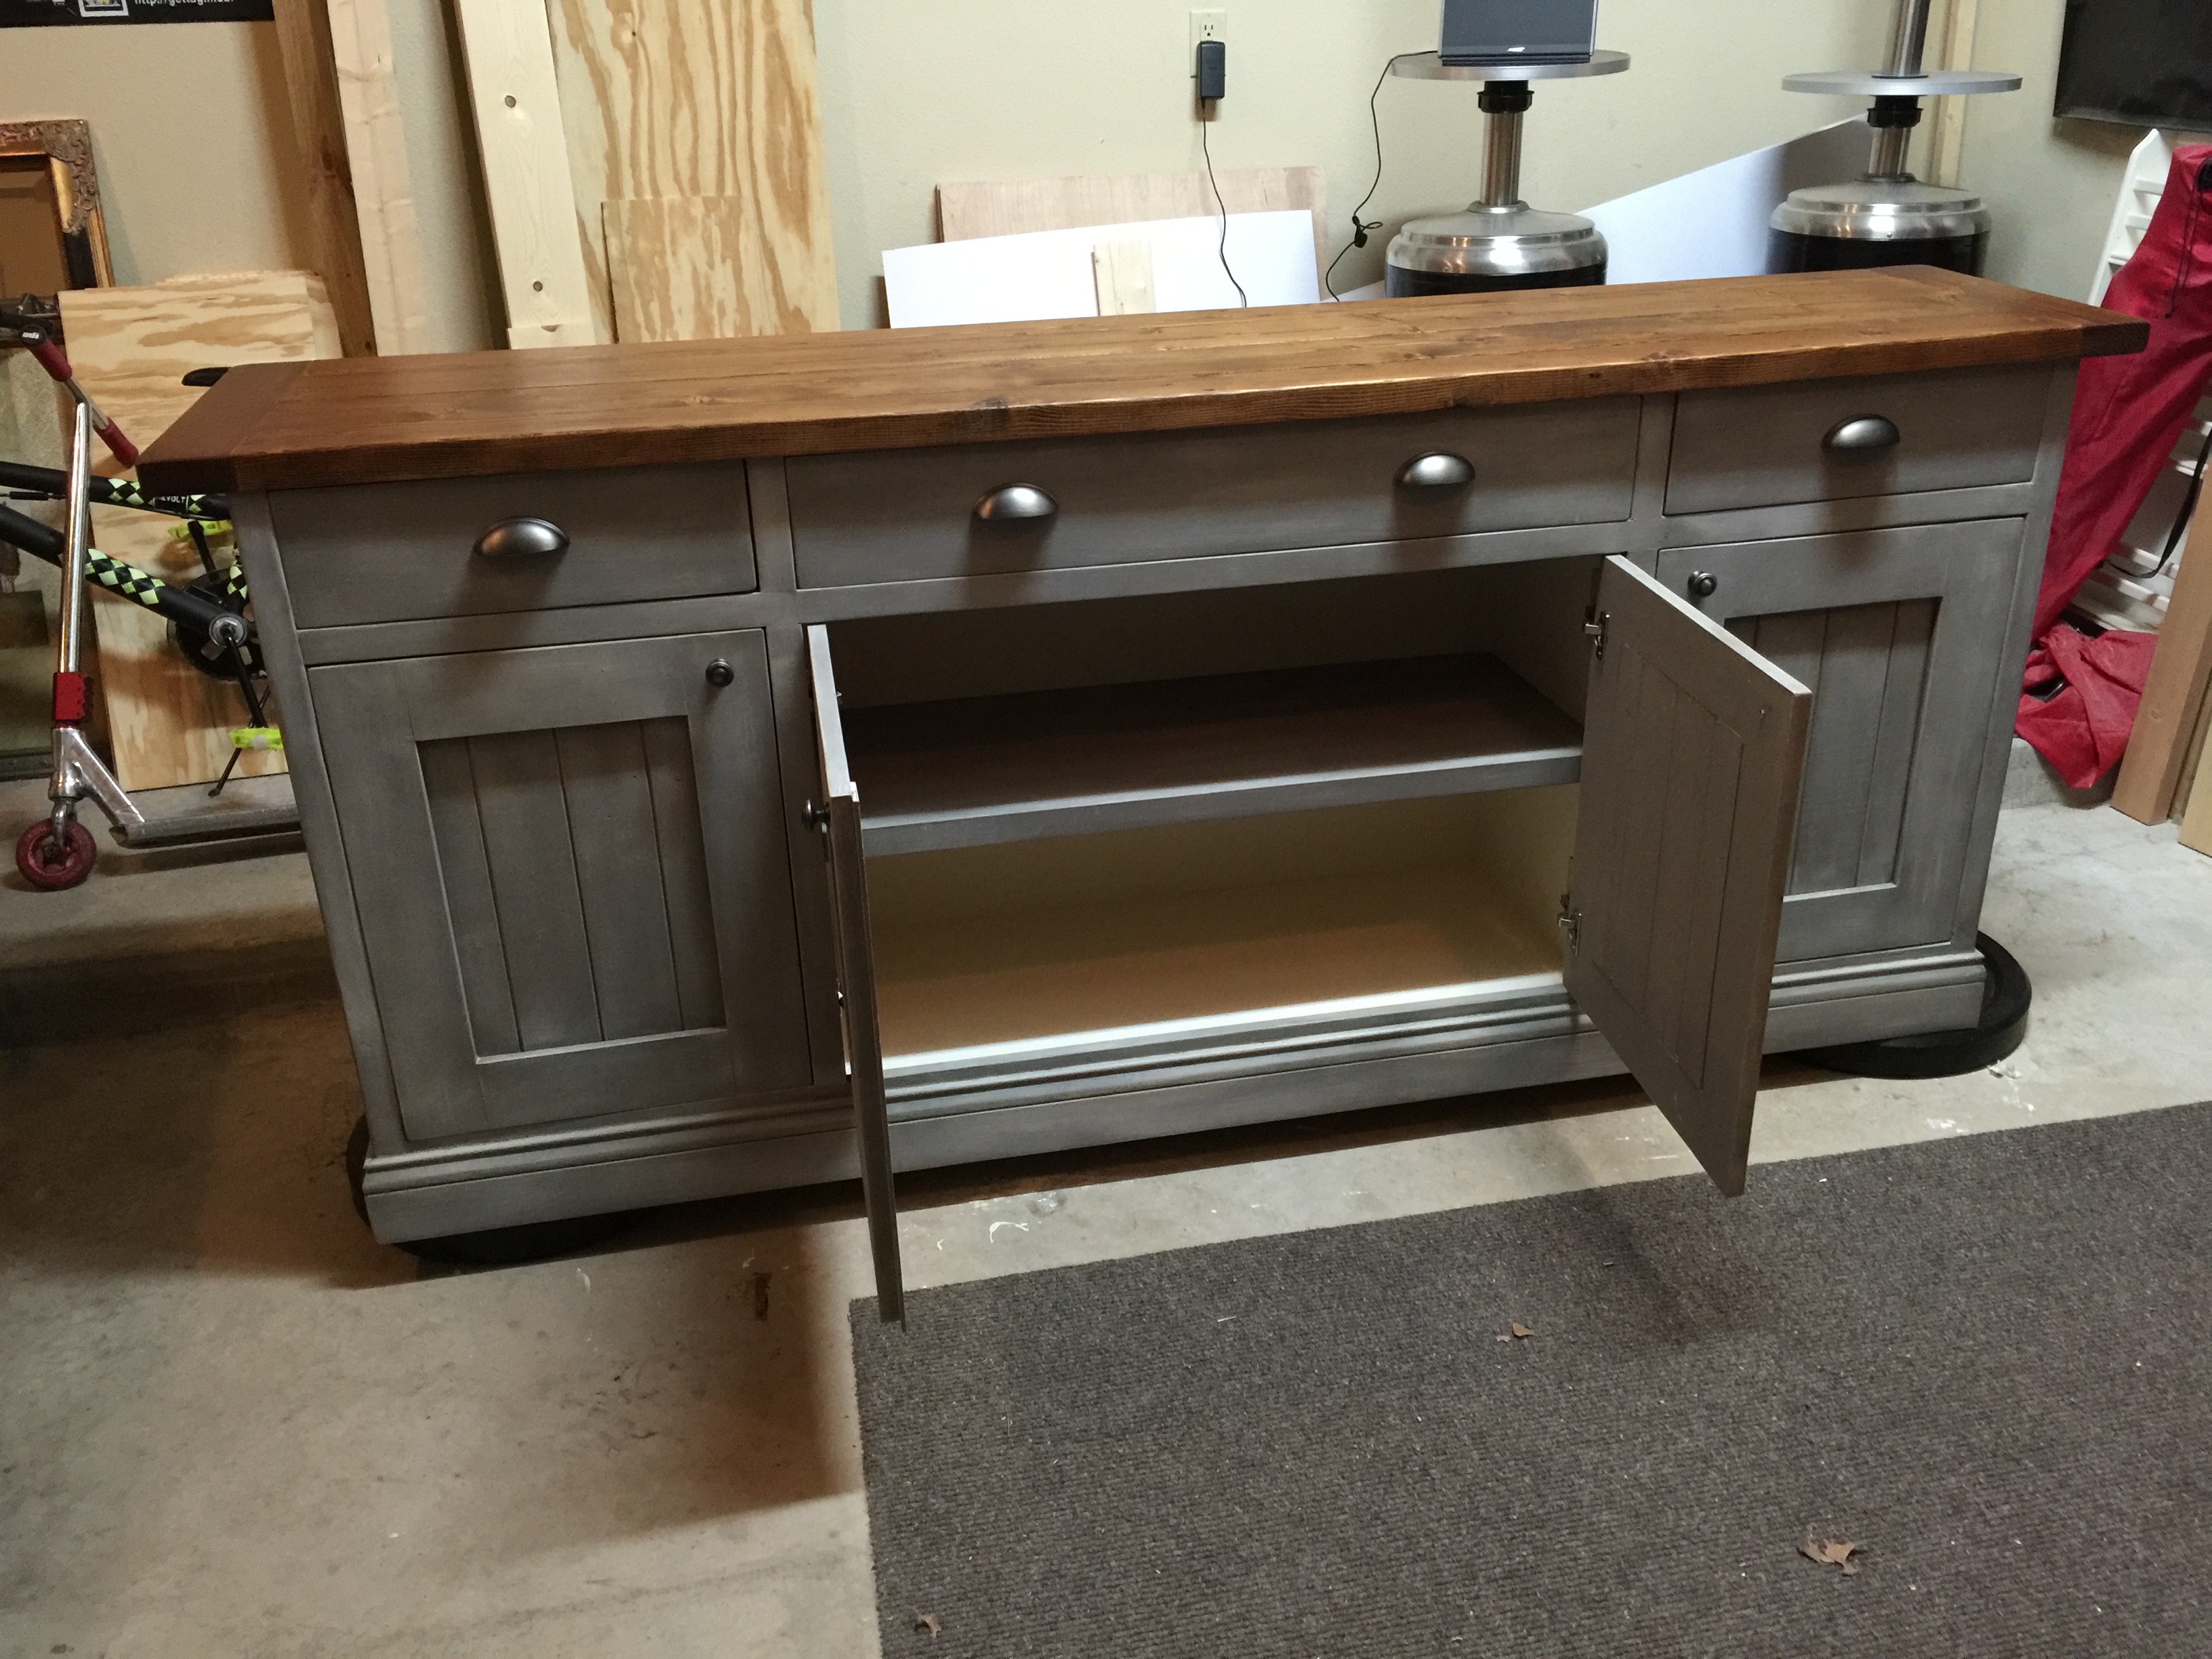
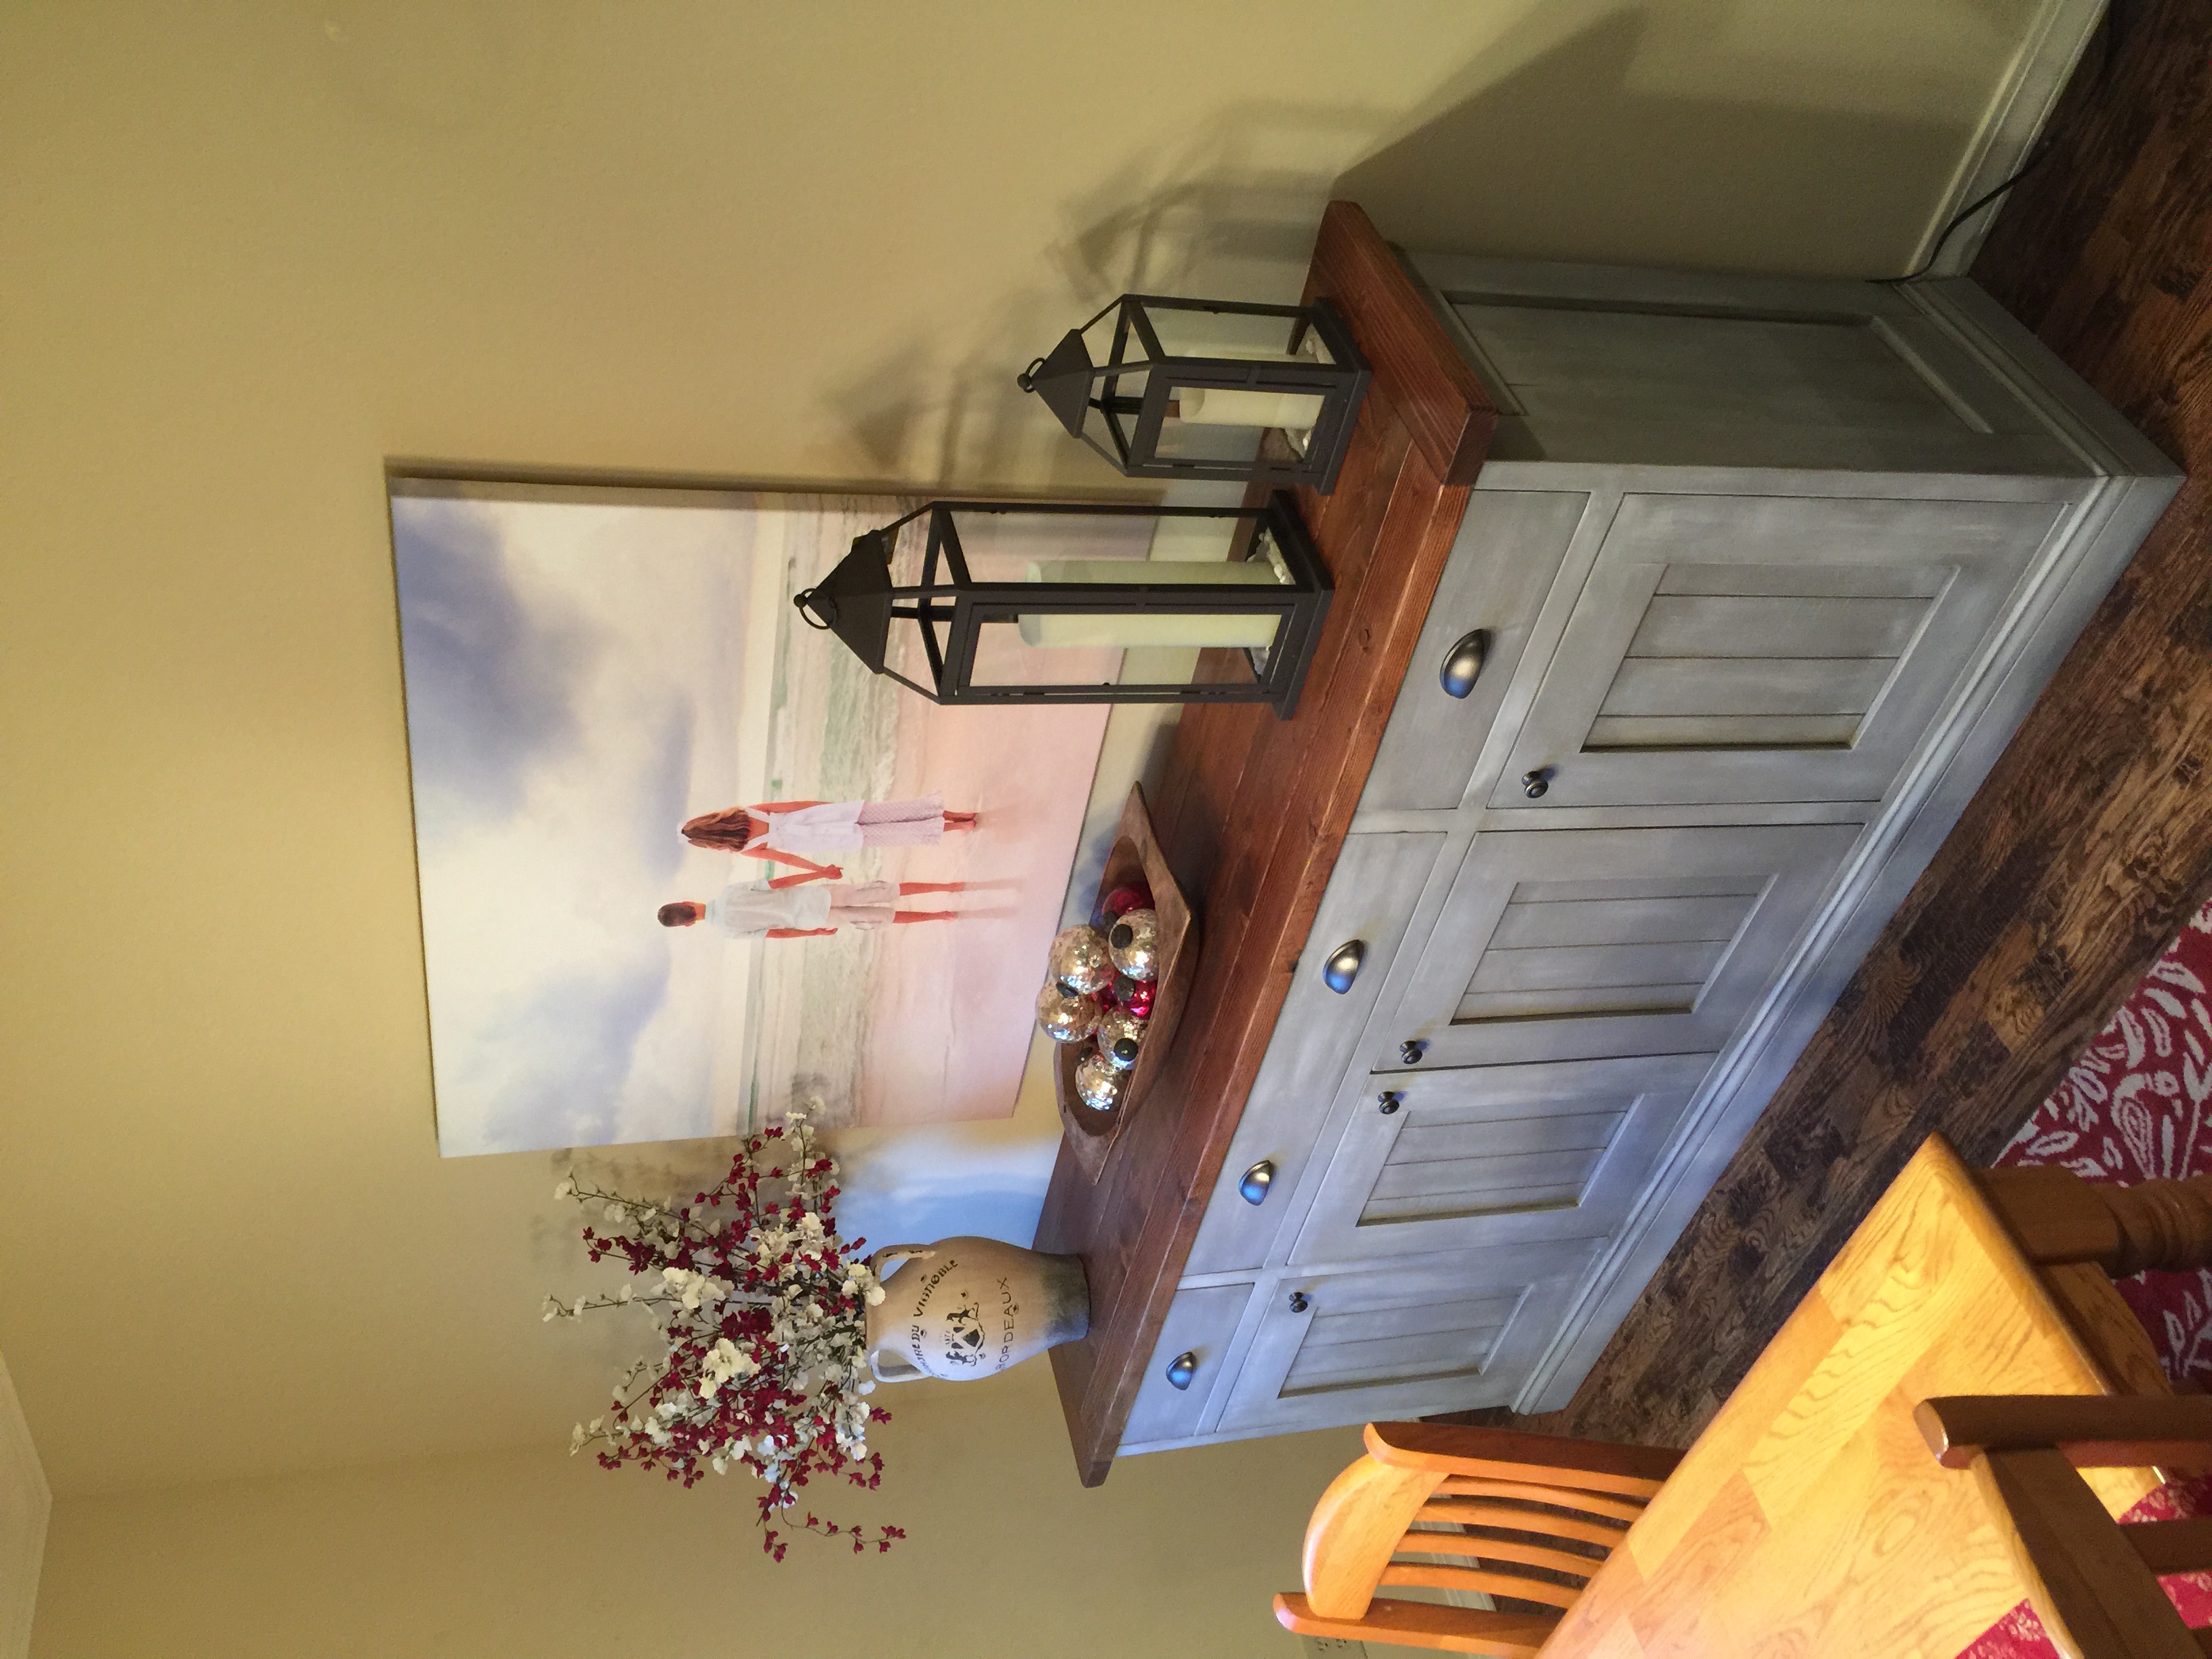
Farmhouse Console Table
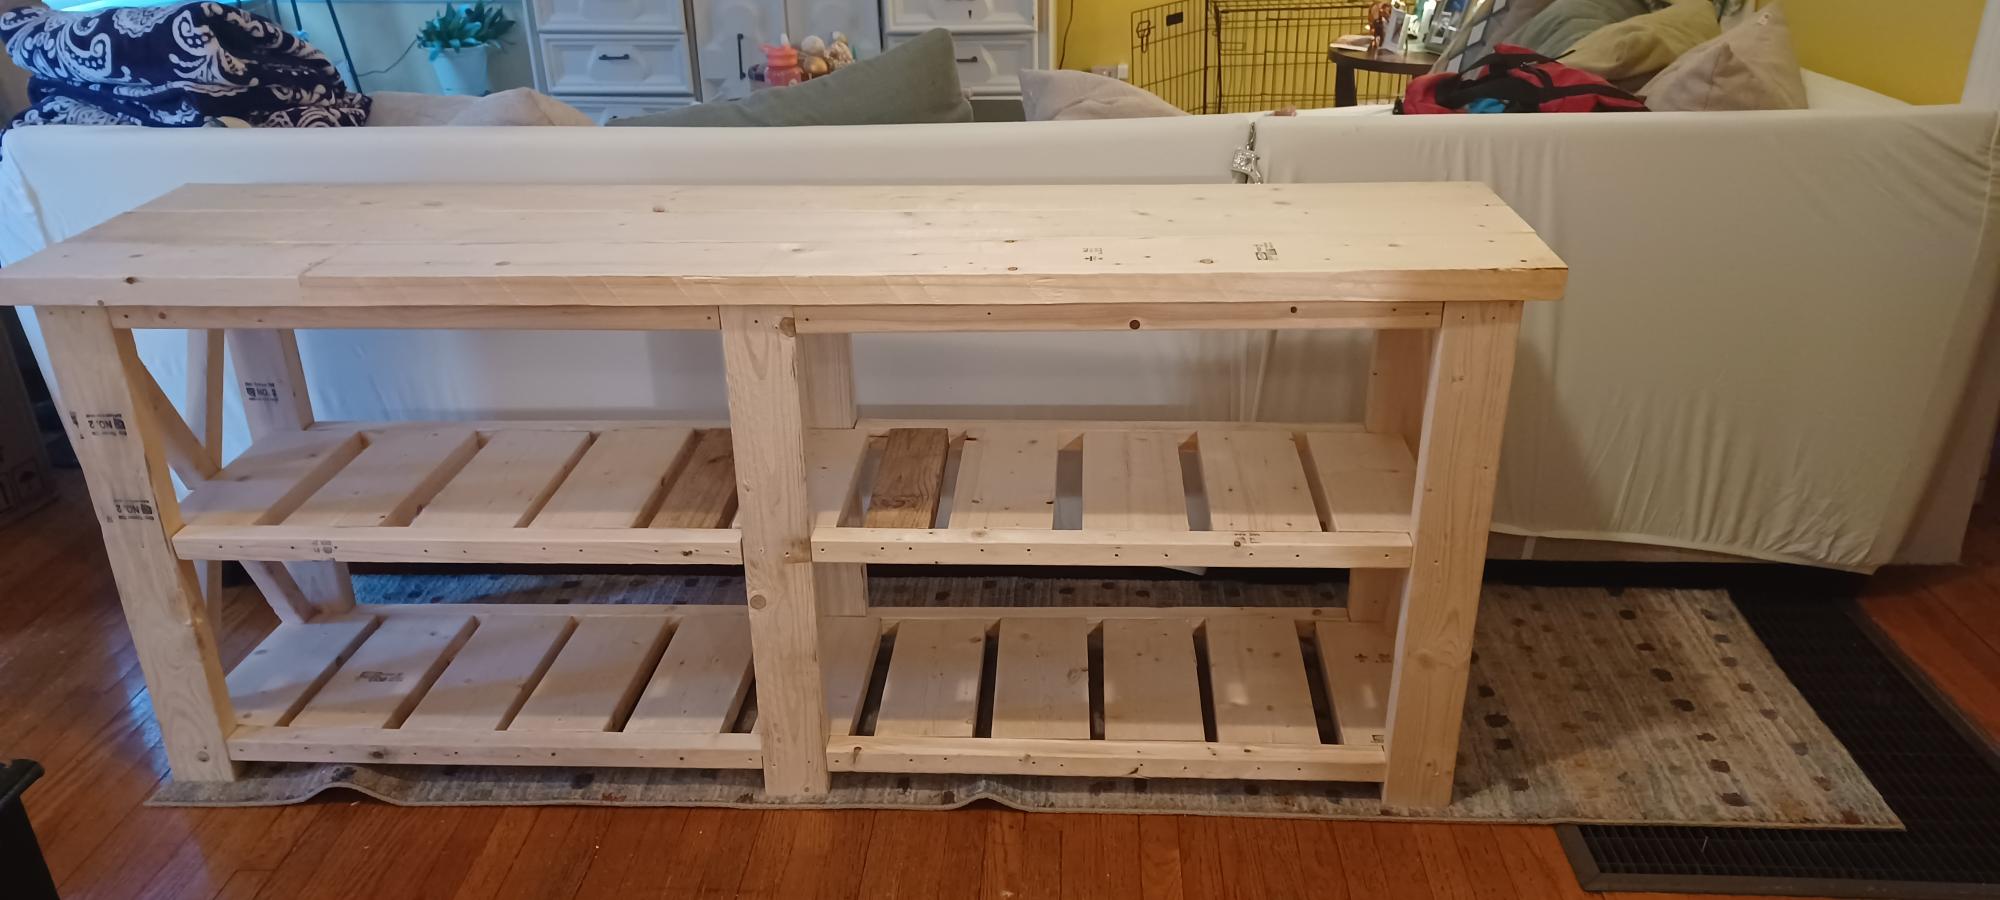
Just finished this last night! My very first piece of furniture! I'm so proud of myself! Thank you so much for these plans!!
Built from Plan(s)
Comments
Ipex Bookcase
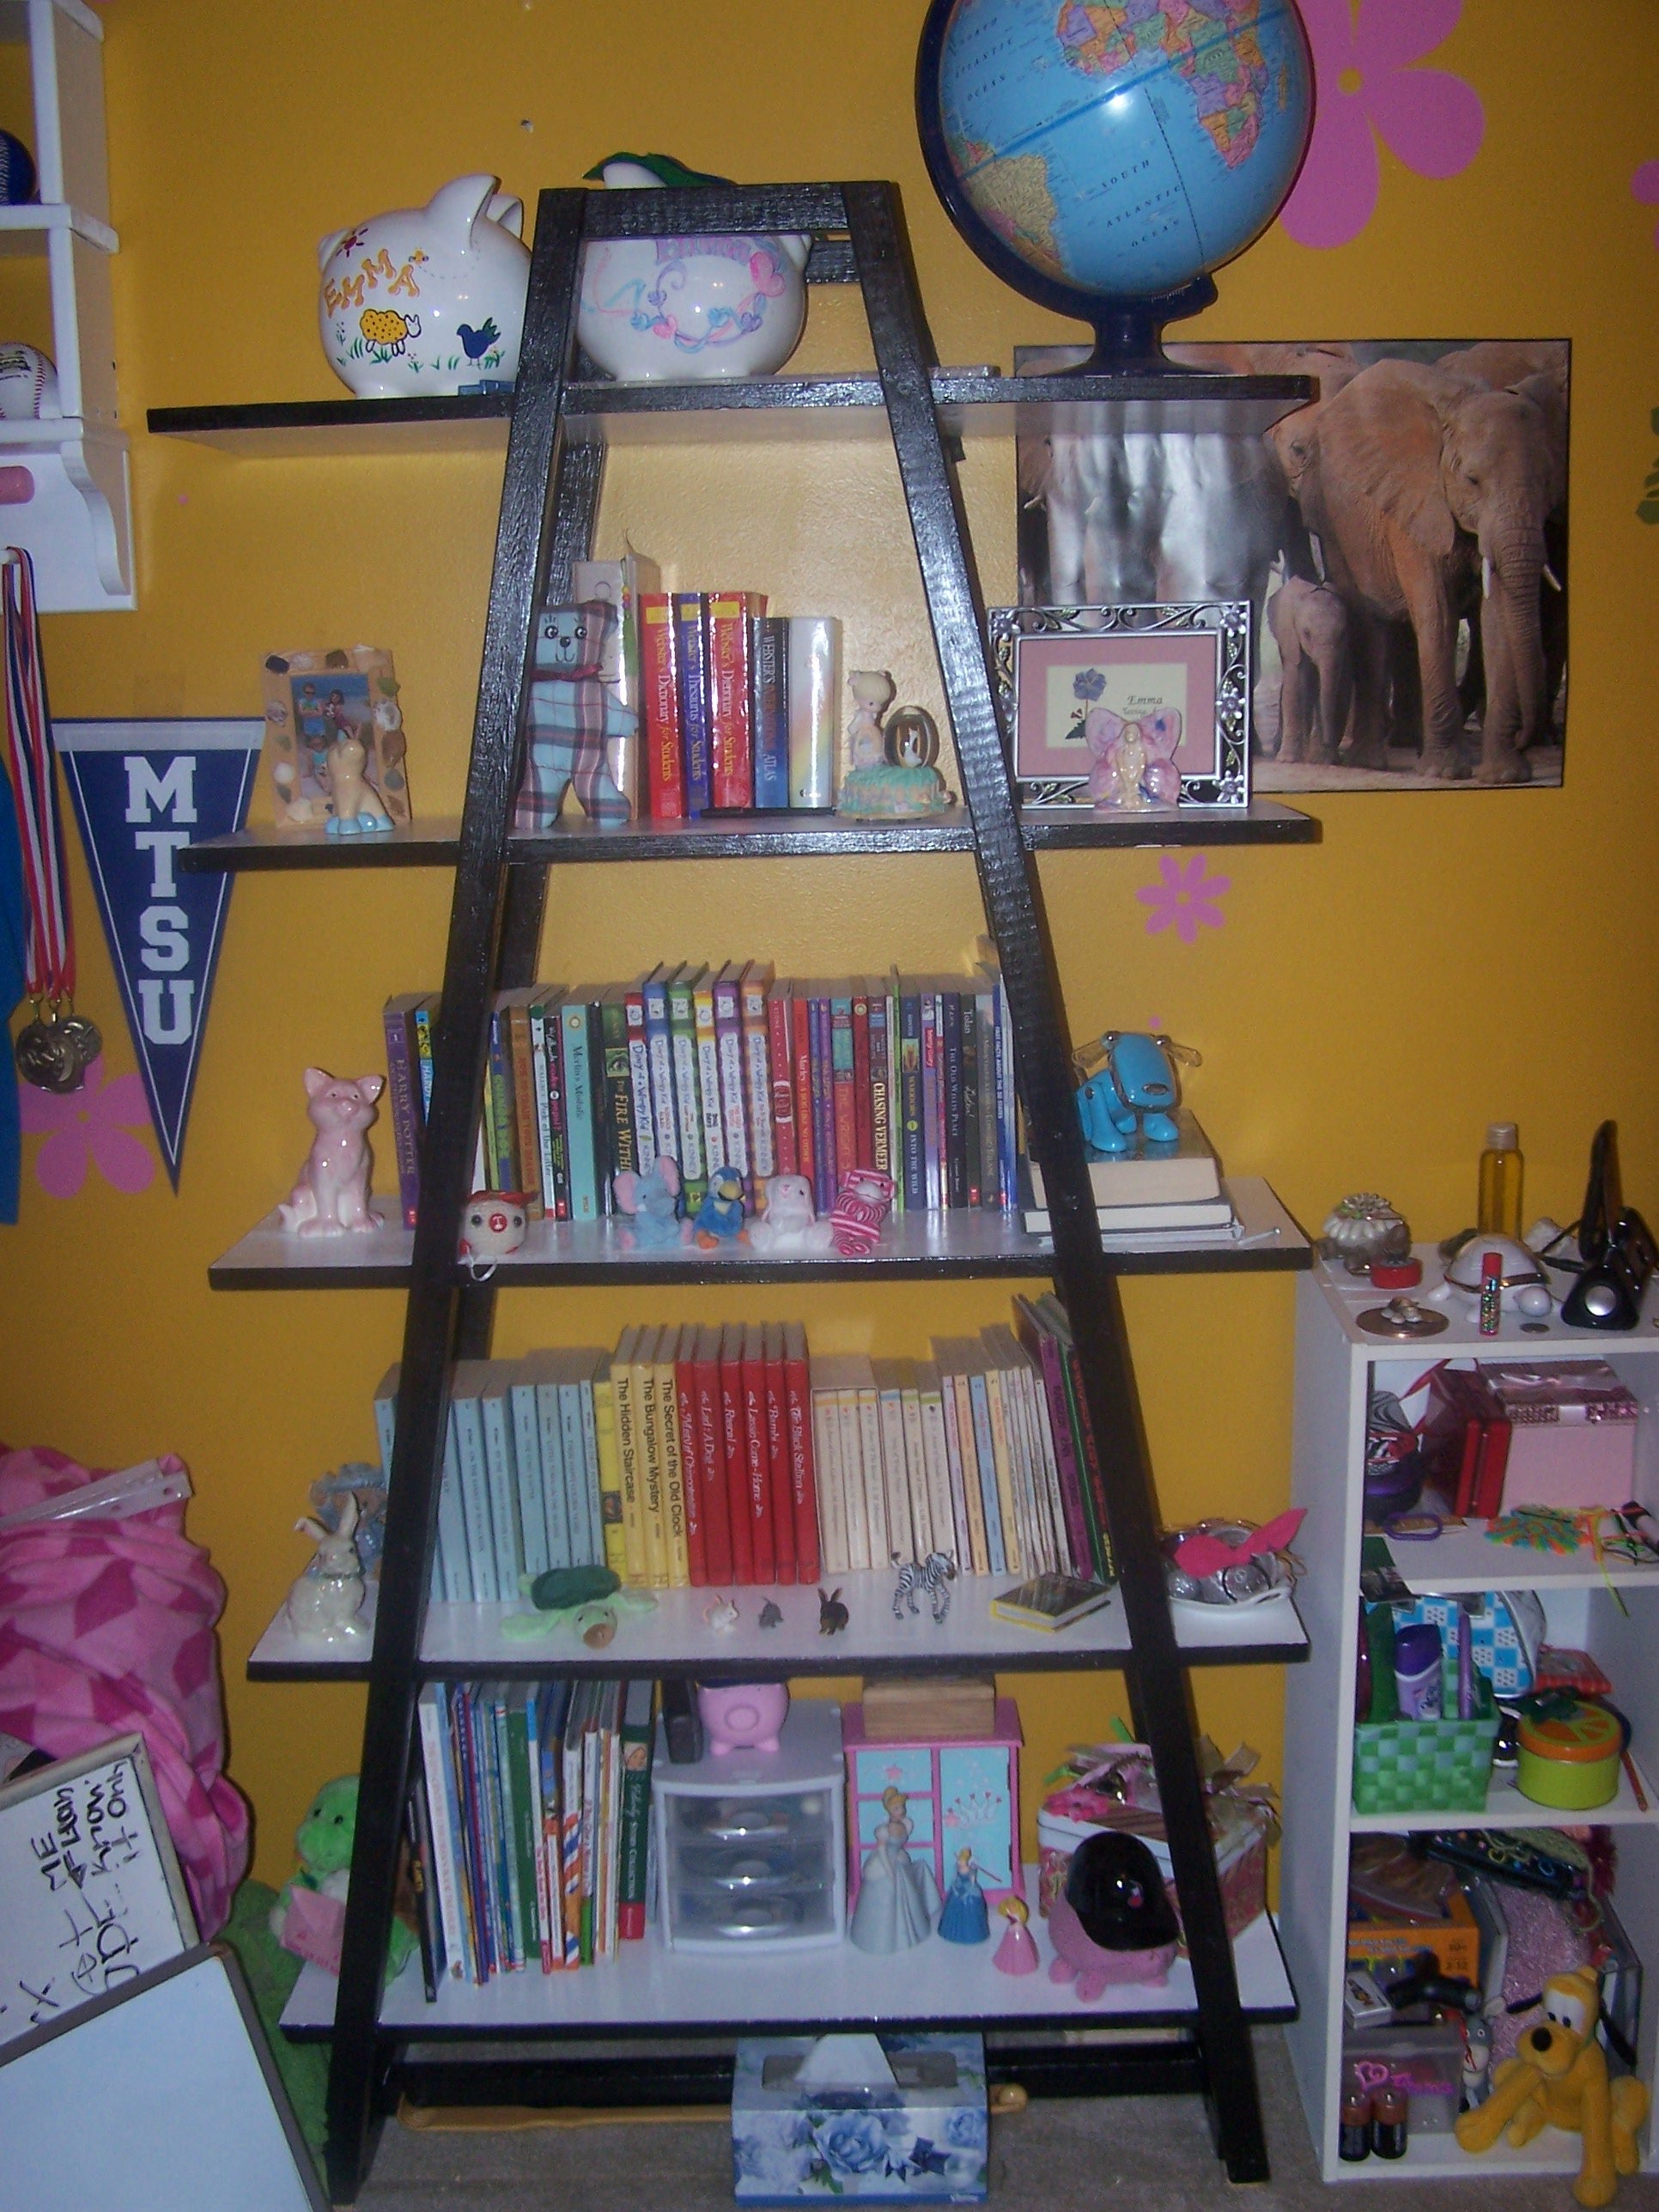
This is the Ipex bookcase (plans on this site). My husband built it for our almost 11 year old's room. He modified it to be 36 inches wide rather than 48. Painting scheme done by me - she is into black and white/zebra.
We are pleased!!
Built from Plan(s)
Estimated Cost
$50
Estimated Time Investment
Day Project (6-9 Hours)
Finish Used
Painted with white and black enamel
Recommended Skill Level
Intermediate
Planked Wood Sideboard
I used Ana's plans and Hillary's suggestions to build this extra large buffet. It took probably 25-30 hours if you consider the extra trips to Home Depot and Lowe's because I didn't yet have the proper tools. I used Annie Sloan's French Linen as my base coat, Old White as my dry brush coat, Annie Sloan Clear Wax throughout and Dark Wax in the crevices. This was my first big league build, so I had to recruit a skilled neighbor for assistance with the drawers and doors. My two recommendations would be to ensure the piece is square at every step, and to cut the wood as you go. Don't make all the cuts at once because there will be adjustments.
Built from Plan(s)
Estimated Cost
450-500
Estimated Time Investment
Week Long Project (20 Hours or More)
Finish Used
Annie Sloan French Linen dry brushed with Old White
Recommended Skill Level
Intermediate
Comments

Fri, 10/30/2015 - 20:14
this is awesome! I love the
this is awesome! I love the colors. Especially the color for the top. What stain is that?
Thu, 11/05/2015 - 12:12
Thanks for your comment! I
Thanks for your comment! I used Minwax Early American and a matte poly finish. My intention was to paint the top, but someone convinced me to stain it to see how it would look. I liked the stained version better.
Wed, 11/04/2015 - 09:06
Beautiful work.
I'm building this a we speak....got the sides finished this weekend. Question: Did you router the exposed front, top and side edges?
Thu, 11/05/2015 - 12:10
I think you mean along the
I think you mean along the bottom? If so, I basically purchased some baseboard moulding at Lowe's. I didn't care that it was primed because my plan was to paint it.
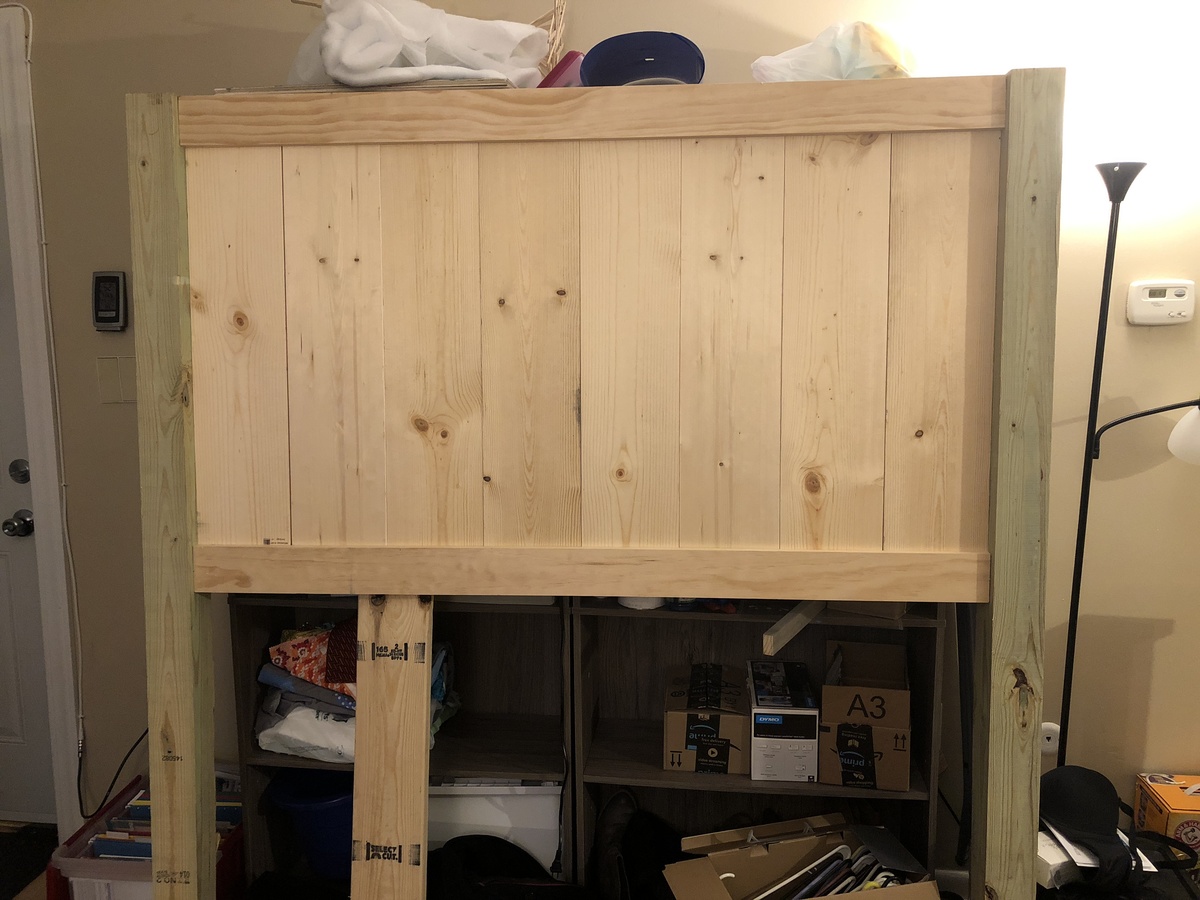
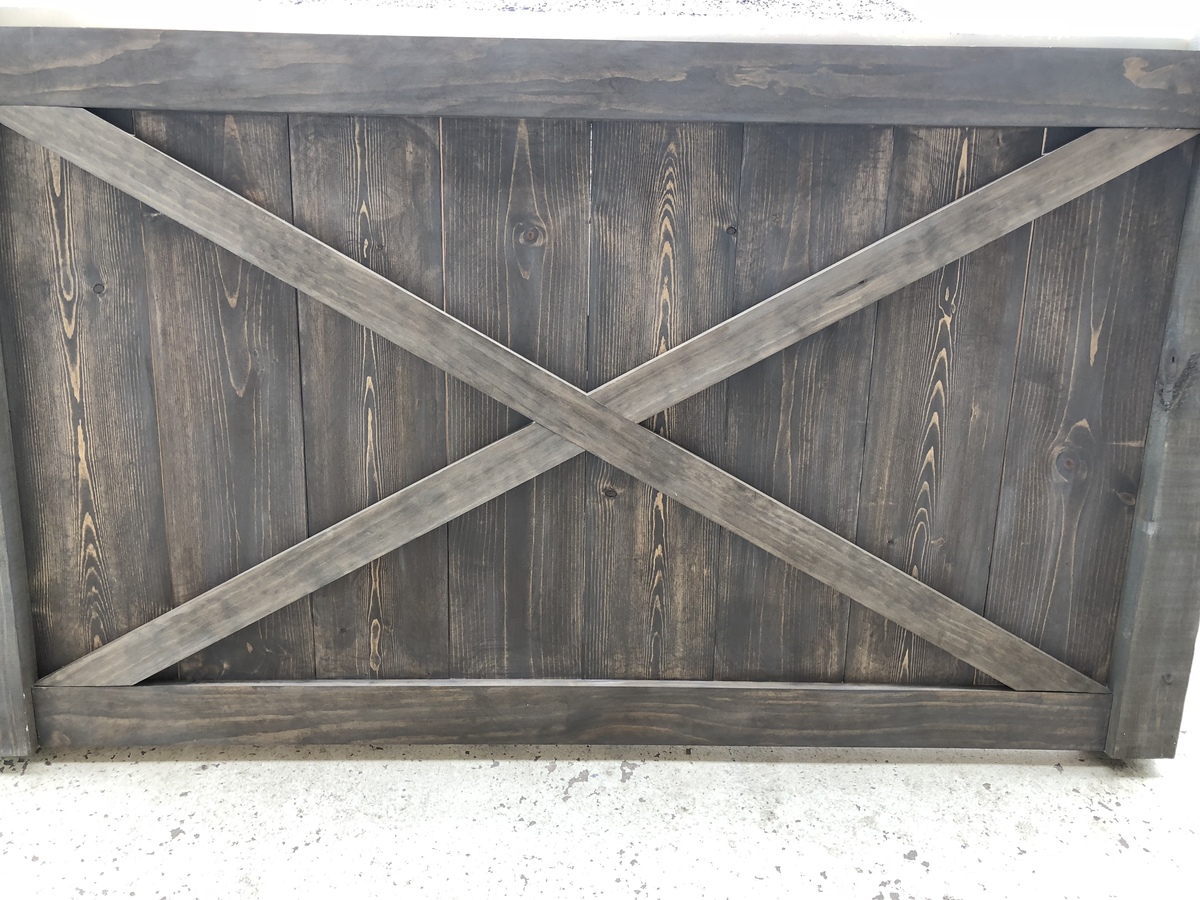
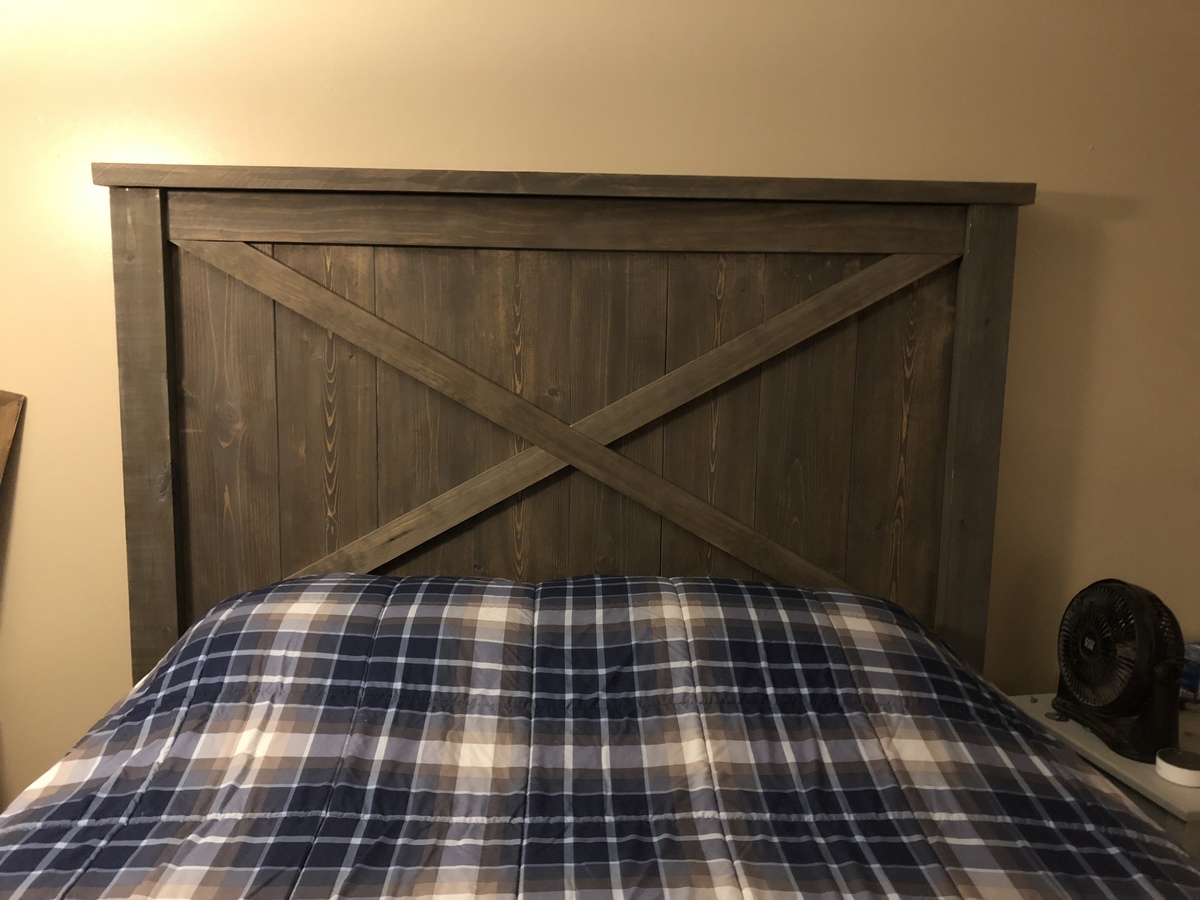
Farmhouse bed queen headboard
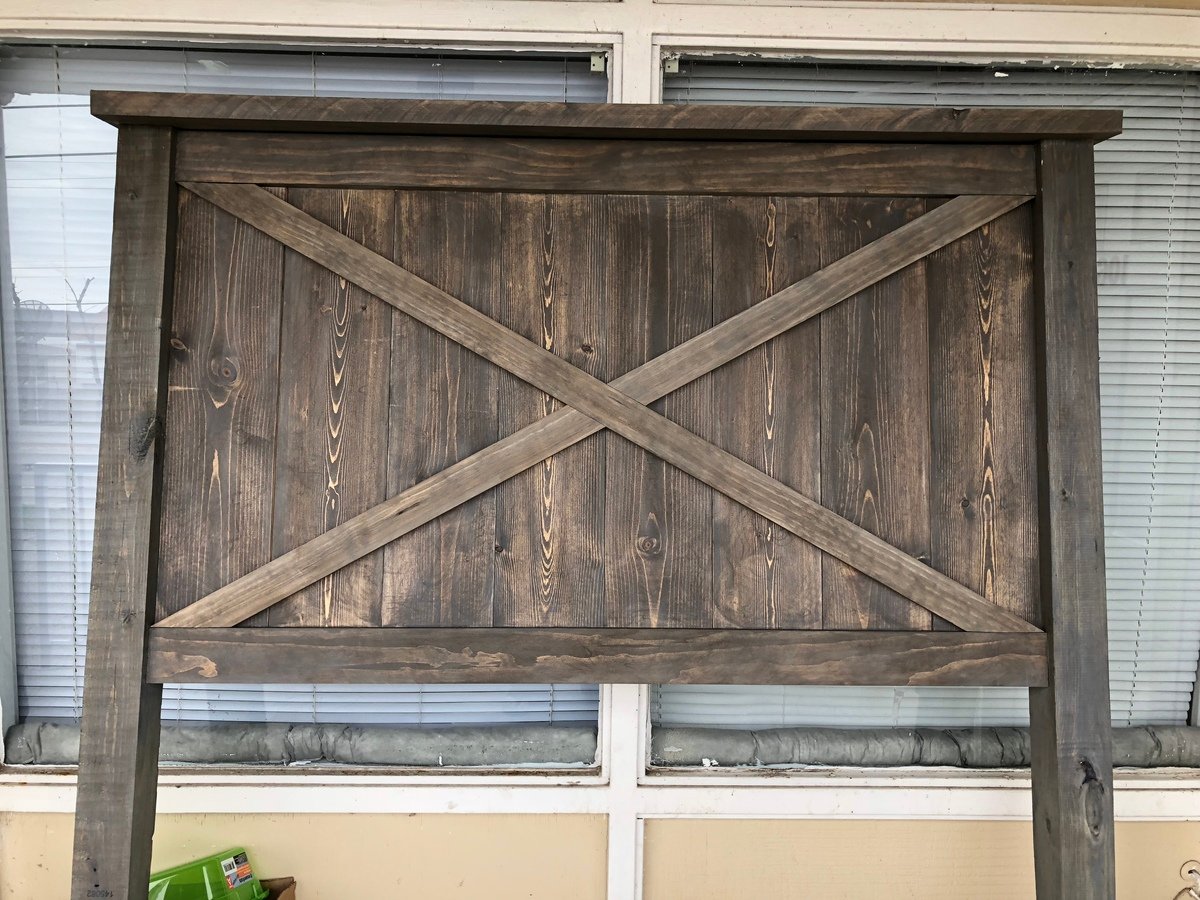
I used Ana’s plans to make my queen sized headboard. I used 1x8’s for the verticals and changed the framing a bit to only have one piece of wood on top. I also left out the 2 extra board on the back to save some cost. I glued and nail gunned each vertical piece to the top and bottom 1x4. I attached the assembled center to the 2 posts with pocket screws and small L corner brackets for stability. I also adjusted the height of my project to come to approximately 64 inches tall and the bottom of the inner picture portion, where the mattress reaches the headboard, to just hit the top of that 1x4 so we never have missing objects that have fallen behind the bed. I did use the green pressure treated lumber for the 4x4’s and they stained just fine. I also added a farmhouse style X through the center. I ripped my top 2x6 on both sides to be approximately 5 inches wide, so the rounded edge of the worn lumber is now square. I stained this in minwax dark walnut then went over with a second color coat of minwax classic grey. My apartment isn’t big enough for the sides and foot board but someday if we move, I’ll be able to complete the entire bed set.

Built from Plan(s)
Estimated Cost
$60 in lumber high estimate
Estimated Time Investment
Day Project (6-9 Hours)
Finish Used
1st coat minwax dark walnut. 2nd coat minwax classic grey.
Recommended Skill Level
Beginner
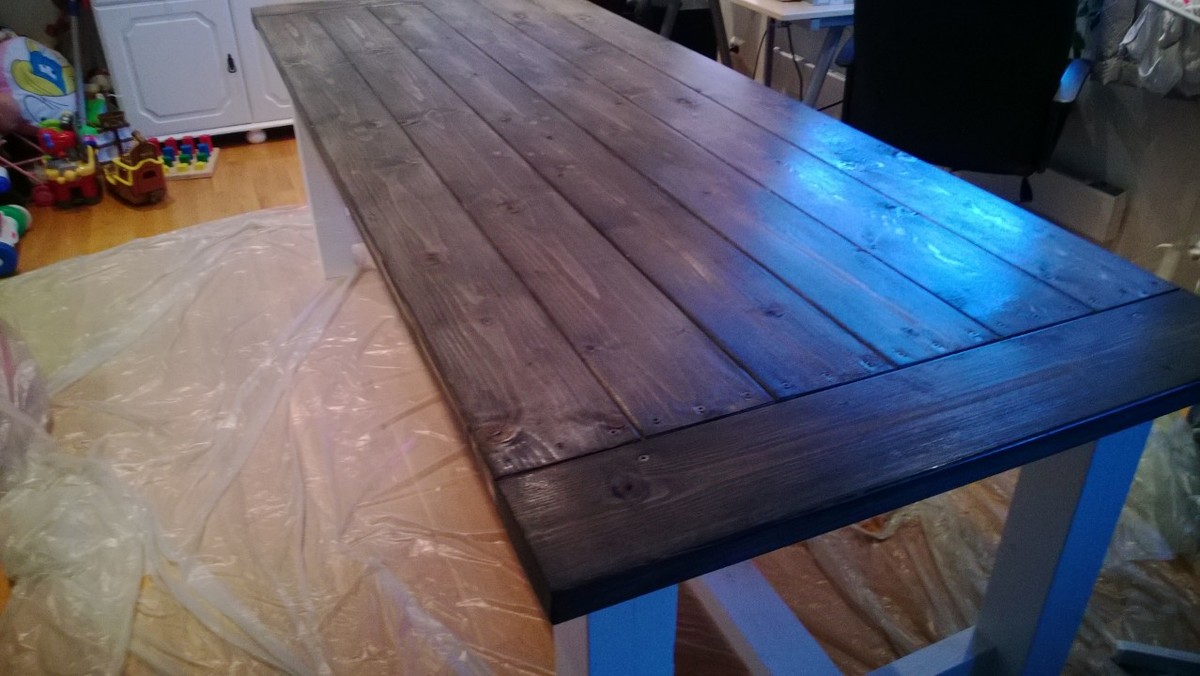
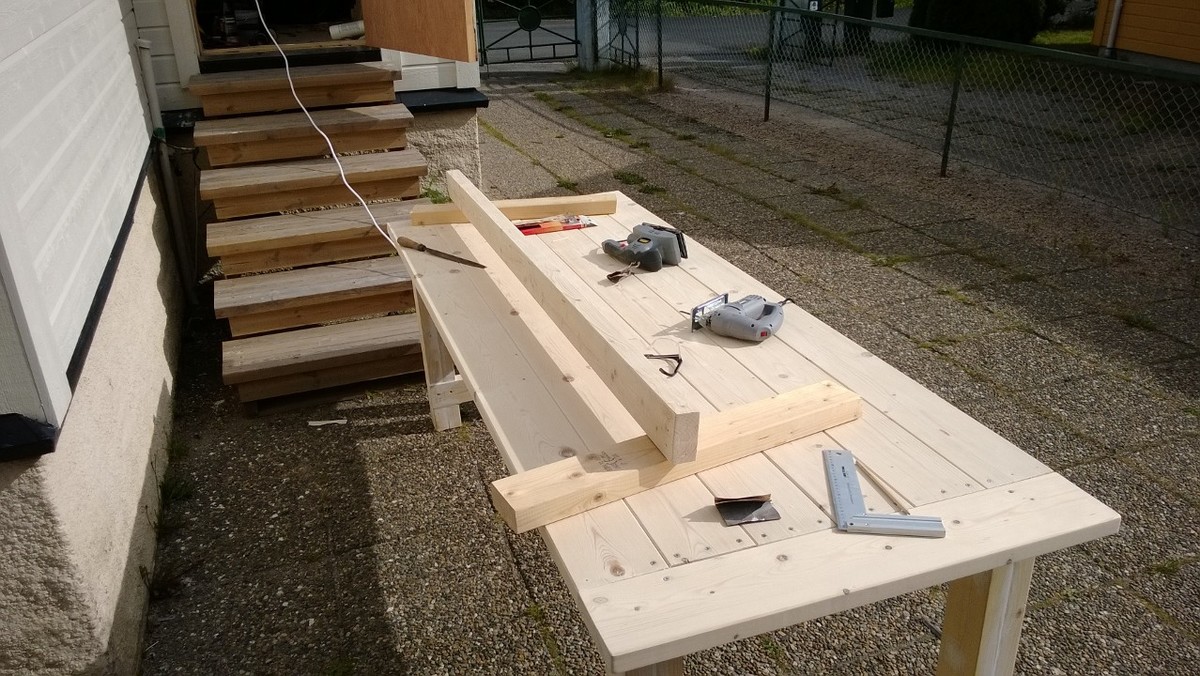
Farmhouse table
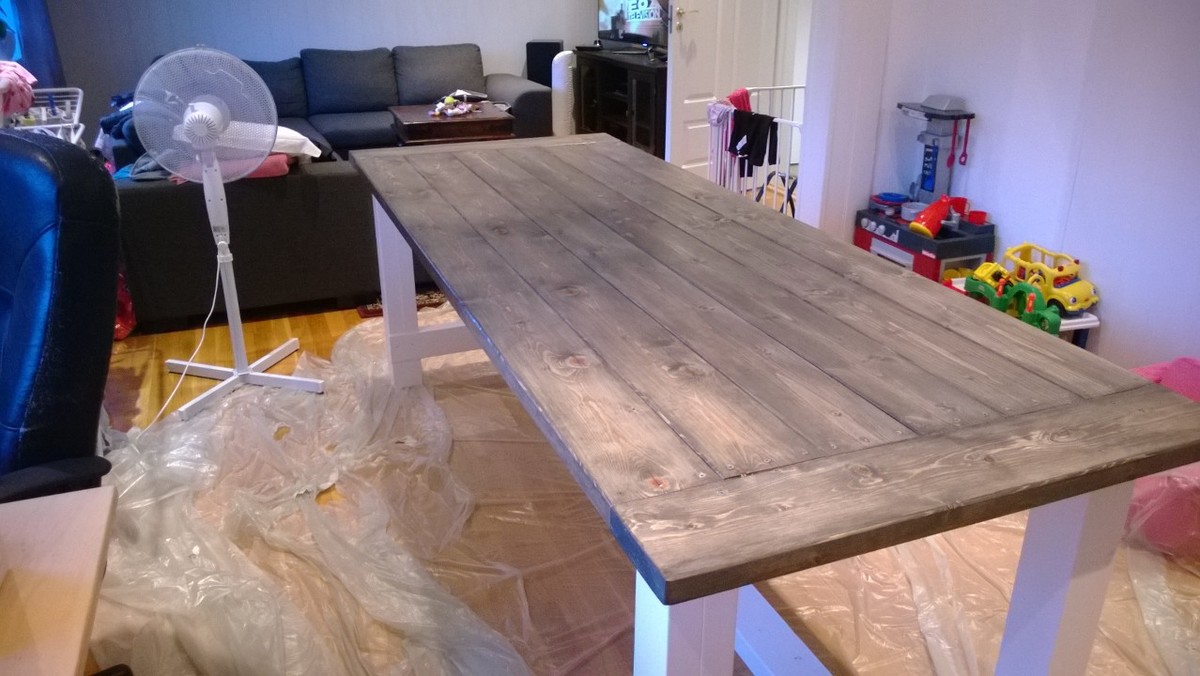
Norwegian version.
Wood sizes in millimeters:
Can be bought from Byggmax, Monter or Coop Obs bygg for example.
36x48mm
48x98mm
48x148mm
Lessons learned: Dont buy cheap tools and make sure the wood is straight.
Built from Plan(s)
Estimated Time Investment
Week Long Project (20 Hours or More)
Finish Used
Custom mixed stain (beis fra Fargerike) and bee wax
Recommended Skill Level
Intermediate
Camp Loft Bed with Stair Junior Height

My husband built this bed for our 4 year old son and let me say its just perfect! His room is on the smaller side and this made a huge difference for him to have more play room. When my son seen it his eyes filled up with tears he was so excited! My husband built this bed on a Sunday afternoon. He torched the wood along the grain, and then over a period of a week added clear (he used 3 coats as the wood just soaked it up pretty good ). Highly reccomend this project!


Built from Plan(s)
Estimated Cost
around $150
Estimated Time Investment
Day Project (6-9 Hours)
Finish Used
My husband torched the wood along the grain and then 3 coats of clear
Recommended Skill Level
Beginner
Fireplace mantel
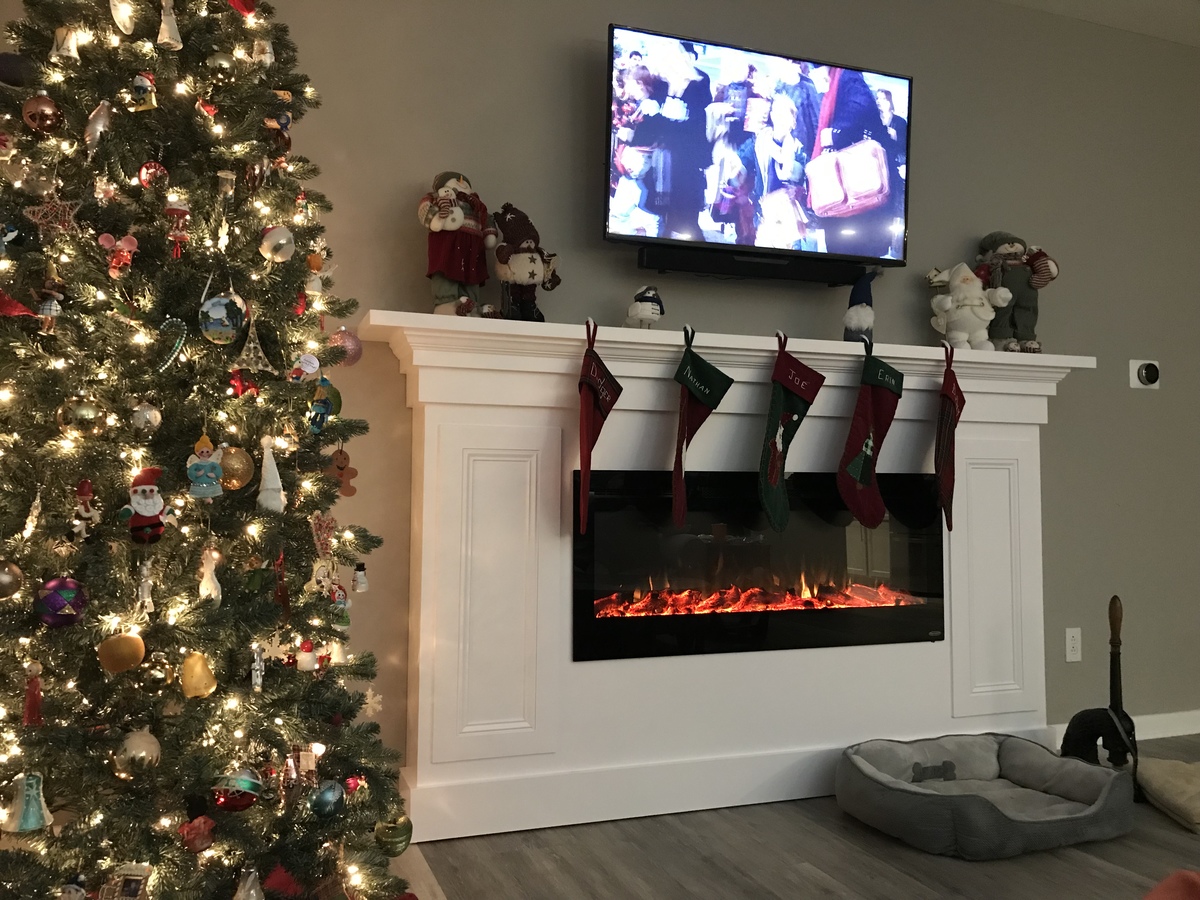
I took inspiration from Ana’s faux mantel to build a home for this linear electric fireplace. I got it done just in time to hang Christmas stockings.
Estimated Time Investment
Weekend Project (10-20 Hours)
Finish Used
Behr Alkyd semigloss enamel in white
Recommended Skill Level
Beginner
Seasonal And Holiday
Comments
Ana White Admin
Sat, 07/30/2022 - 13:37
WOW Beautiful and that view!!!
Thank you for sharing, these look amazing!