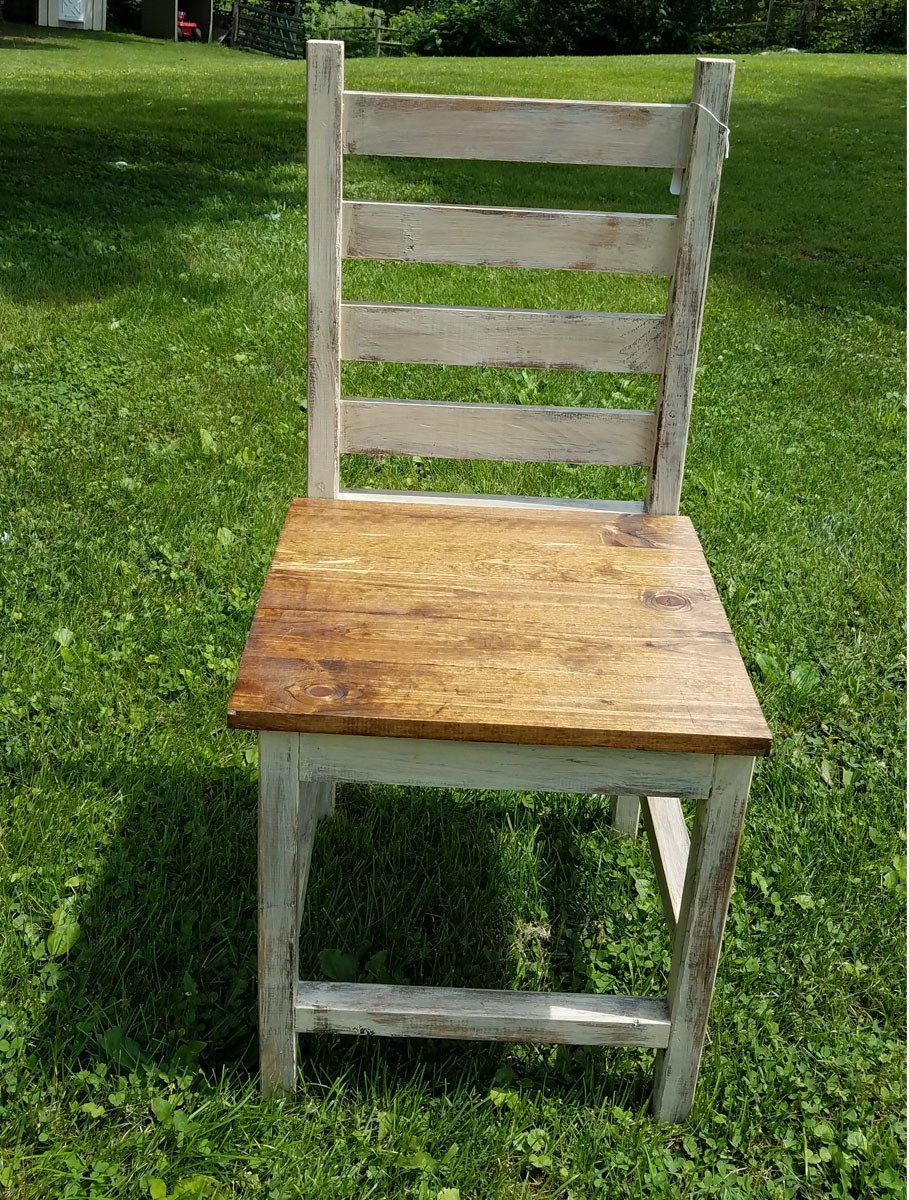
Community Brag Posts

Family Back Deck COVID19 Project Facelift

Submitted by Anonymous (not verified) on Tue, 06/02/2020 - 11:53

Thank-you so much Ana White! We took on our back deck as a family COVID19 “homeschool” two weekend project! Why just build a sectional sofa when you can build a sectional sofa, coffee table, farmhouse table with two benches, two Adirondack chairs and a side table that the 11 year old designed and built himself! Mission accomplished, he’s a builder for life.

Our deck was brutally neglected and the boys had had some exposure to power tools and small builds. We decided that the best way to remedy the situation was to set up a family build all at once so that the tools are out and then put back away after the build is complete!

The plans were easy to follow and incredible! Thanks again so very much!

Estimated Time Investment
Week Long Project (20 Hours or More)
Finish Used
Stained the sofas, chairs, coffee and end table with outdoor solid stain. Used the same solid stain on the bottom of the farmhouse table benches, and outdoor oil based spar varnish on the farmhouse table and bench tops. Finished the look by refinishing the deck with Behr Penetrating Oil finish in Chocolate and cushions from Lowes for the sofa. Adirondack chair cushions were sewn by myself with Sunderland fabric leftover from front porch, cushion inserts from IKEA.
Recommended Skill Level
Beginner

Outdoor Wood Island

Submitted by Putterer1 on Mon, 02/26/2024 - 10:43

Hello - I am new to your projects post. I really like the projects that you post. I had been looking to make a "grill storage/prep" cart and came across your plans for the Rustic X Kitchen Island with drawers. I also saw a picture of another table and decided to merge the two. Attached are pictures of the finished project. I modified some of the dimensions to accommodate what I was trying to achieve. I used a half-lap on the X's on the sides. I also used center drawer slides so they would not be seen on my version. I would be happy to provide additional pictures, dimensions or project tips. Thanks for posting your projects. Keep 'em coming. I don't have a blog, Insta.

Tom Riley

Built from Plan(s)
Seasonal And Holiday

Florida Cypress Truss Beam Farmhouse Table

Submitted by Abesurfman on Thu, 05/22/2014 - 19:37

Here's my take on the Truss Beam Farmhouse Table using native Florida Cypress which was cut to size from raw logs at a local cypress mill. Thanks so much for the inspiration and plans. My wife loves it and it looks great in our first home.
I finished it with Odies Oil and a combination of Odies Oil and Odies Butter for the table top to preserve the natural beauty of the wood while protecting it from food and liquids.
I probably spent $600 in all but I got a killer deal on the wood which should have cost around $800-$900. I would guess that if I were to try to buy a table like this one out of the same wood, it would have easily cost over $3,000.

Built from Plan(s)
Estimated Cost
$600
Estimated Time Investment
Week Long Project (20 Hours or More)
Finish Used
Odies Oil & Odies Wood Butter. Both are rub on applications.
Recommended Skill Level
Intermediate

Comments

spiceylg

Fri, 05/23/2014 - 11:07

This table is on my must have build list. This is a beautiful build and that wood is gorgeous!!!

Jake'n'Leelo

Mon, 11/10/2014 - 08:16

Hi! Your table looks amazing! Did you modify the size? If yes, what tabletop size did you end up going with? I am going to have to modify mine to fit my dining space but am concerned about how it will affect the truss beams.

In reply to by Jake'n'Leelo

Abesurfman

Wed, 01/07/2015 - 08:05

I modified both the tabletop and the base.
The final length of the top was about 69" (+ or - an inch or two). In the pics you'll notice the breadboard ends are half the original size. These pieces were pecky cypress and one of them was very pecky which would have made it difficult to join.
As for the base, because of how sturdy the table top joints are (pocket screws and wood glue) and the smaller breadboard ends, I decided it wouldn't matter if the table legs were directly bellow the breadboard end joints. I also preferred extra legroom clearance (tall people problems) so I made that the priority and adjusted the base for the desired legroom. Not sure the exact measurement but it looks like it was about 15" on each side. After almost a year of everyday use it seems that I was right, supper sturdy and going strong.

jefsocmw

Thu, 08/06/2015 - 10:19

Your table looks awesome. I am preparing to make this also and during my research I have found comments over the concern with attaching the breadboard ends. Instead of pocket holes, the true woodworking suggestions are to use mortise and tenon joints with gaps to allow for expansion and contraction a described here, http://goo.gl/Or5HJM. What method did you use and how is it holding up? My goal is to build a table that will last and that looks professionally made our as close to it as I can get. 

Keepsake doll crib and highchair

Submitted by Anonymous (not verified) on Mon, 08/22/2016 - 12:54

We were trying to figure out what to give our granddaughter for Christmas when the great grandparents arrived with our 2 kids old maple crib from the 80's. After much debate(well, not really, apparently the crib now breaks every law in the book!)  we decided to repurpose it into keepsakes. Enter Ana White!  We settled on a doll crib and doll highchair.  After many design changes trying to best utilize the old wood we came up with these. As you can see they were a hit and luckily very sturdy!  There are now 2 doll cribs, 2 high chairs and 4 granddaughters, each family has a set as a keepsake.  There are a few scraps left just in case a grandson happens along! Should be enough for a logging truck!

Estimated Cost
$30
Estimated Time Investment
Weekend Project (10-20 Hours)
Finish Used
Original finish plus Danish oil and clearcoat on cut ends
Recommended Skill Level
Intermediate

Picnic table

Got the plans on here had a little trouble with the angles on the seat but overall looks good and was easy to follow the plans

Built from Plan(s)
Estimated Cost
Free wood just time invested and $10


in screws
Estimated Time Investment
Afternoon Project (3-6 Hours)
Finish Used
None yet
Recommended Skill Level
Advanced

Wood Window Treatment

Submitted by Anonymous (not verified) on Sat, 03/02/2024 - 11:24

My has been wanting me to make some window treatments to replace aging Roman curtains on our bay windows. It was a challenge never made these before and she is well pleased with the results. The center window is 62 inches wide while the two side windows are 32 inches wide each. Each window treatment is 14 high.

Raymond Spears

workbench

Submitted by vic b on Mon, 07/30/2012 - 13:43

kids workbench

Estimated Cost
$60
Estimated Time Investment
Afternoon Project (3-6 Hours)
Finish Used
clear finsih
Recommended Skill Level
Beginner

OutDoor dining table

My wife and I were looking for a larger table for our deck and after searching and seeing that everything out there was 300 dollars and up for something decent I decided I would try building something. This table was perfect for our needs and looked easy enough for me to put together. The most time consuming part was staining all of the boards as I went but it was totally worth it in the end. I also deviated from using screws and used my nail gun along with some glue to put the top frame together and the slats on but I did use some 2inch deckmate screws to attach the legs. One problem I did run into was I was about half a board short on the slats which wasn't a big deal just ripped one on the table saw, not sure if I miss measured or what but either way. We love our table and will entertain around it for years to come.

Built from Plan(s)
Estimated Cost
Around 80 Dollars
Estimated Time Investment
Day Project (6-9 Hours)
Finish Used
I used a Behr deck stain that was solid the color is called Russett and I did with a 3inch brush.
Recommended Skill Level
Beginner

Pine Farmhouse Table

Submitted by jaykruger on Fri, 08/26/2016 - 07:45

Simple pine farmhouse table, top is 2x6 Pine cut down to 5" wide strips top was joined with pocket screws and glue

Base is 4x4 pine joined with lag bolts

Longest part of the buld was sanding the top smooth, special care was needed in measurig the notches to fix the X-Brace legs


Tools: Drill, Table Saw, Circular Saw, 1/2 socket drive

Estimated Cost
$150 all in for wood, bolts, screws and stain
Estimated Time Investment
Weekend Project (10-20 Hours)
Finish Used
minwax espresso and poly clear
Recommended Skill Level
Beginner

Outdoor furniture

Submitted by td_tx on Sun, 06/07/2020 - 11:33

I used rough cedar to build the patio set. I pre-sanded all pieces to smooth them out and sanded again at the end to limit any remaining splinters. I could not find cedar 2x2, so I ripped all 2x2 from 2x6 using the table saw. The furniture is covered by our porch and we decided to leave it unfinished to let it weather naturally. The plans were modified slightly to accommodate IKEA outdoor cushions. I had some remaining wood, so I built a basic coffee table using some black iron hairpin legs from Amazon.

Estimated Cost
$600 with cushions
Estimated Time Investment
Weekend Project (10-20 Hours)
Finish Used
Left unfinished to let the cedar weather
Recommended Skill Level
Beginner
Seasonal And Holiday

Bed for Small Room

Submitted by Anonymous (not verified) on Wed, 03/06/2024 - 12:17

In my new house we have a small room that can fit a full but also have a tall family, so when I found out that there is a Full XL, I went on the hunt for bed frames and not many choices, so I turned to Ana's site and found/used the essential bed frame for all sizes plan and adjusted it for a FullXL. Our house theme is black and white so we painted it with Ink Black by Behr. Whole frame built for $50 as I already had the paint. My wife loves the frame.

New Bed for my 3 year old!

Submitted by red98dawg on Thu, 08/02/2012 - 13:49

I had been on a search for a while for new furniture for my son’s new big boy bed room but couldn’t justify the money for new furniture and couldn’t find anything remotely nice on craigslist. I ran across this plan on Ana’s site and just had to have it so it became my first large furniture project.
It was fun to build and very rewarding when my son told me he loved his new bed!

I did have some issues with using the kreg jig on the platform so I did use wood screws on the outside frame. I had better success with the kreg jig on the headboard, guess I just needed practice.

There were a few things I did to make it easier to move the bed if needed:
I did not attach the slats but I did lay them on a non skid grip (like you put under rugs on wood floors).
I attached the headboard to the platform using carriage bolts so it could be taken apart easily.

The plans were really easy to follow.

Estimated Cost
$170
Estimated Time Investment
Weekend Project (10-20 Hours)
Finish Used
Minwax - Jacobean, 1 coat
Minwax - Fast-Drying Polyurethane, 2 coats
Recommended Skill Level
Beginner

Guest Bathroom

I. LOVE. MY. BATHROOM.

This started with an EPIC FAIL. "Yes Dad I think I hit a pipe with a nail!!!"

Fast forward through plumbing & drywall fixes and life. I added the Board & Batten, made a mirror frame and installed a new mirror. I finally love my guest bathroom.

Estimated Time Investment
Weekend Project (10-20 Hours)
Finish Used
Painted Board & Batten with "Wedding Bells" from Lowes and stained mirror frame with Rustoleum in Carrington.
Recommended Skill Level
Intermediate

Cubby Desk

Submitted by Anonymous (not verified) on Mon, 08/29/2016 - 07:56

I modified the plans so the top was 2 ft x 4 ft, more suitable for a college student like myself. I also used a full sheet of 3/4 MDF and used that for the top as well as all of the 3/4 plywood pieces. MDF was much cheaper but next time I would spend the extra money on plywood because the MDF cracked a bunch and was not as easy to work with. Thanks for the plans!

Estimated Cost
$100
Estimated Time Investment
Weekend Project (10-20 Hours)
Finish Used
Shellac based primer and latex white paint
Recommended Skill Level
Intermediate

Adirondack Chairs

Submitted by Anonymous (not verified) on Fri, 06/12/2020 - 18:21

Plans were excellent! Thank you. For my own personal preference I used 1x5 for the arm rests to make them a bit wider for your drink, and rounded the corners. Can’t wait to use them!

Estimated Time Investment
Afternoon Project (3-6 Hours)
Finish Used
used a blue outdoor paint to finish them. Two coats.
Recommended Skill Level
Intermediate

Pallet Nightstand

I used pallet wood to create a completely different look for this project. The frame and some of the trim pieces stayed the same, but there were a few edits made to support the pallet top, sides, and shelf. In addition, the drawer design changed a little bit to allow a false front instead of the inset one from the original plan.

More info in the link below!

Estimated Cost
$20
Estimated Time Investment
Day Project (6-9 Hours)
Finish Used
Minwax Natural
Recommended Skill Level
Beginner

Farmhouse Potting Bench

This was my first woodworking project and I absolutely love it !!

Built from Plan(s)
Estimated Cost
50
Estimated Time Investment
Weekend Project (10-20 Hours)
Recommended Skill Level
Intermediate

Comments

Solid Maple Desk

Submitted by ccbuilder on Sun, 08/12/2012 - 14:29

This is a solid maple desk with two drawers finished with shellac and paste wax. I altered the plan by giving the desk and overhang, as well as changing the way the legs were built.

Built from Plan(s)
Estimated Cost
$250
Estimated Time Investment
Week Long Project (20 Hours or More)
Finish Used
Shellac and paste wax. I sanded until the surface was incredibly smooth and then used a high quality brush to apply the shellac.
Recommended Skill Level
Intermediate
Back