Community Brag Posts
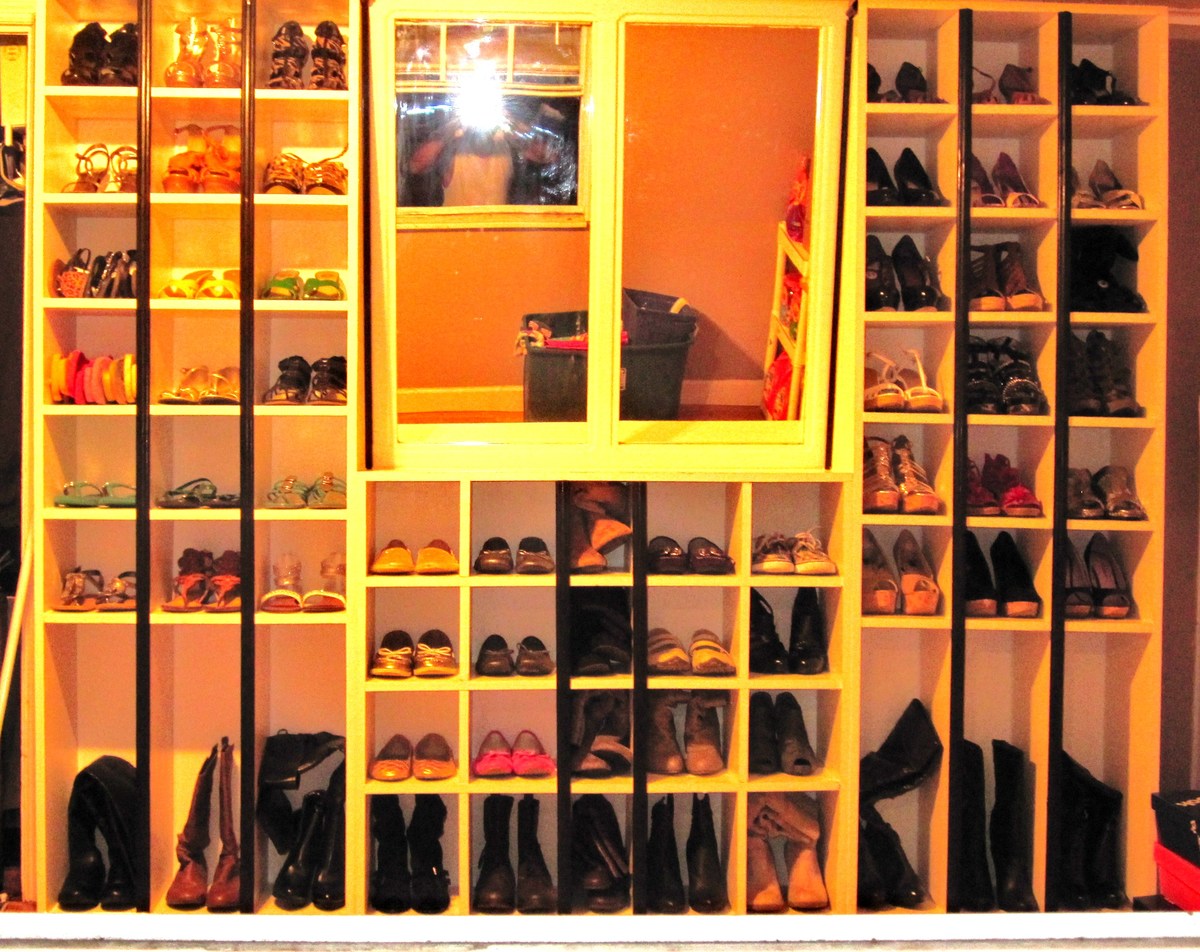
Ultimate Shoe Cabinet
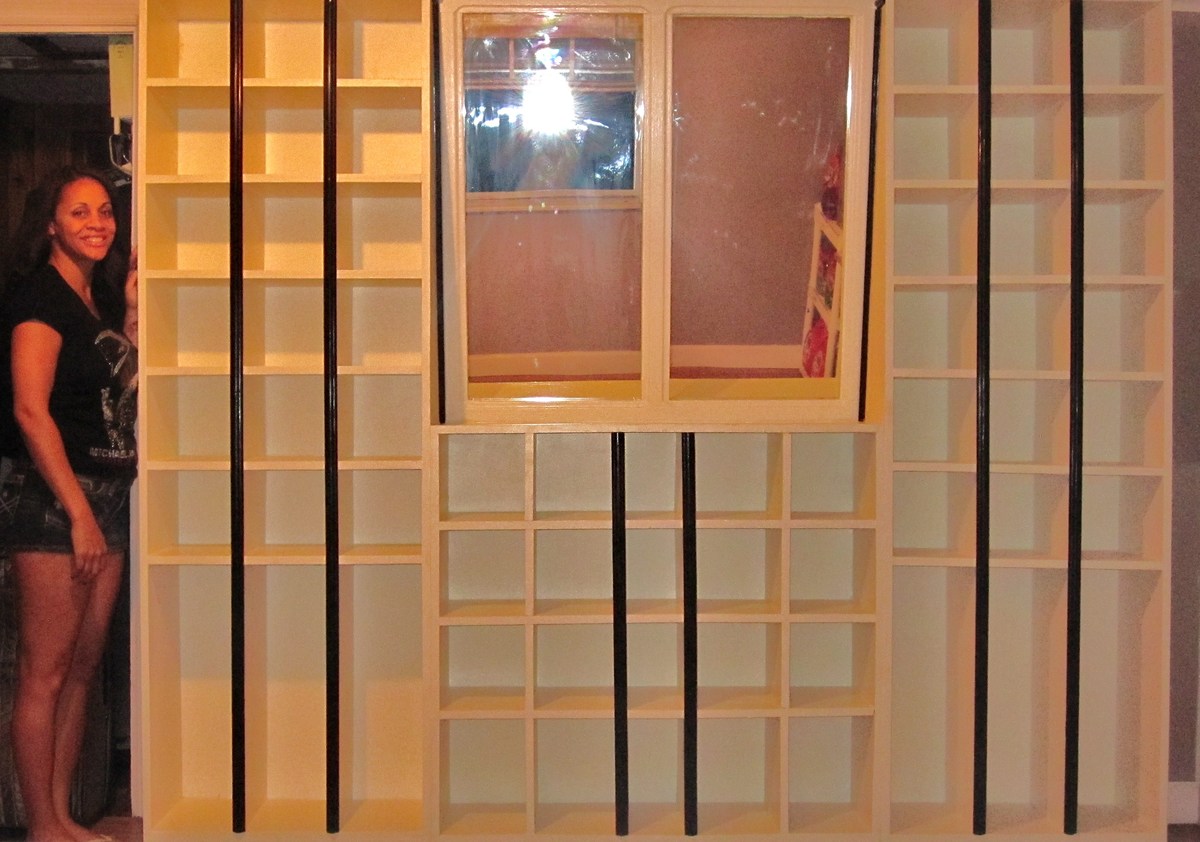
This was our very first project made from the plan Shoe Shrine Shelves submitted by Anna White with a few variations. The middle, short cabinet was made from left over pieces using the same dimensions as the taller shelves. The width was determined using the mirror dimensions. The mirror was my husbands genius idea! It was an old mirror just sitting around in our garage, he sanded it down, primed with Kilz and painted Antique White to match. He also suggested the trim stripes on the front (painted Pure Black for contrast) to give the cabinet some unique character! This piece can really be designed many different ways to suit your specific needs. I LOVE it and can't wait for our next project! Thanks so very much Anna!!!
Estimated Cost
$450-500
Estimated Time Investment
Weekend Project (10-20 Hours)
Finish Used
Antique White (overall)
Pure Black (accent pieces)
Pure Black (accent pieces)
Recommended Skill Level
Intermediate
Comments
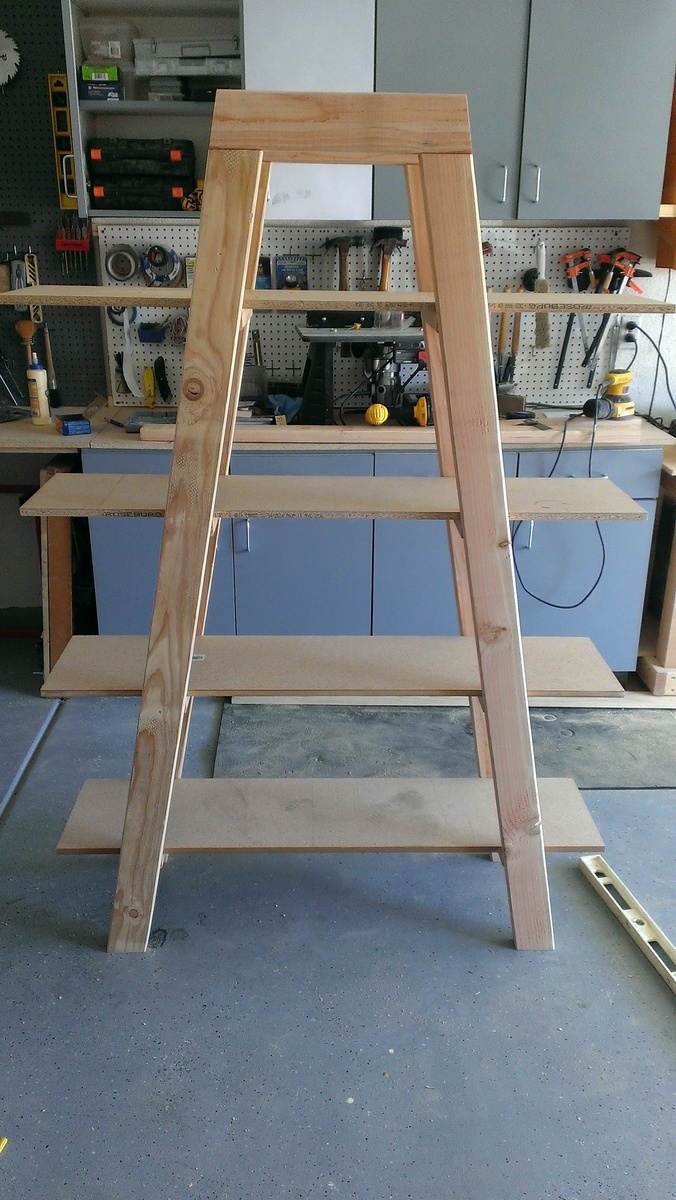
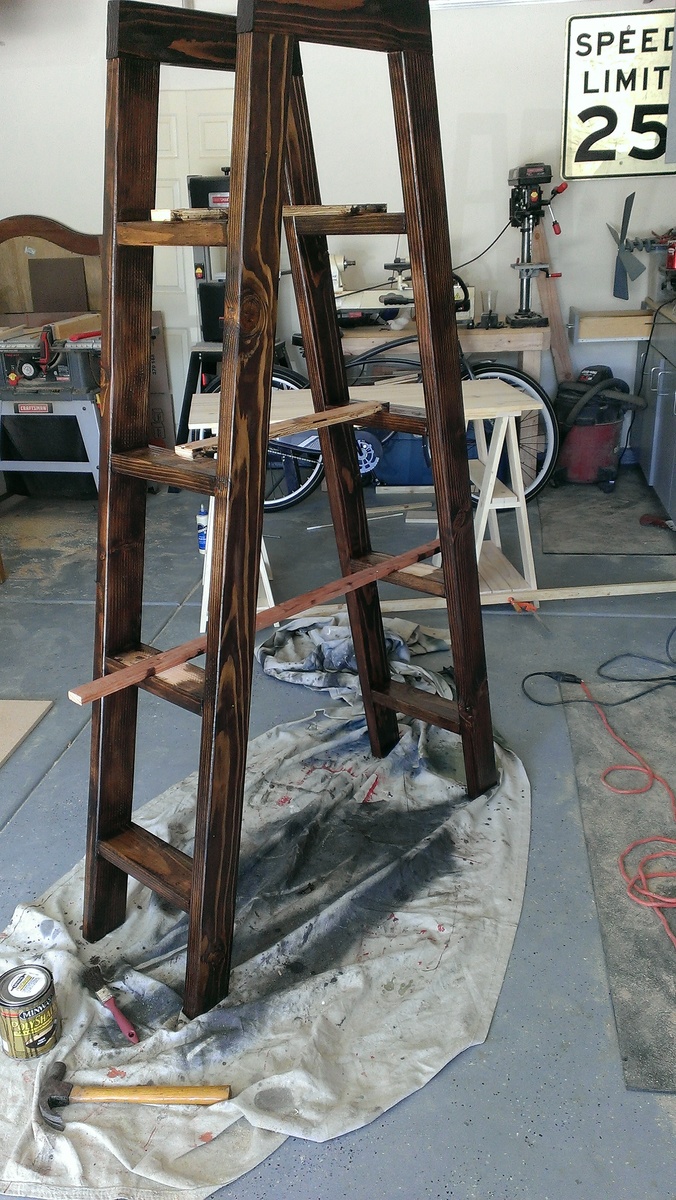
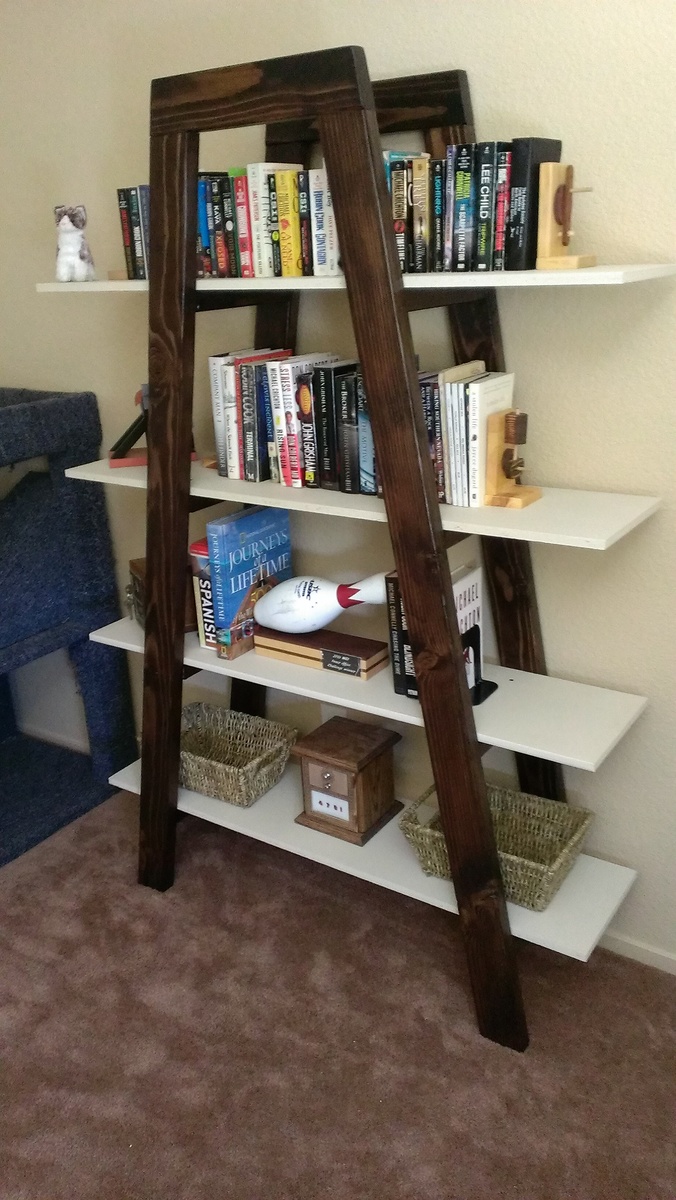
truss shelf/bookcase

This was a pretty simple project as long as you make accurate cuts. Making accurately angled cut allows for tight joint also love the pocket screws. I did add a top brace for stability, seemed a little unstable without them. I pocket screwed them on from the backside, so they can't be seen from front. Than went with a two tone paint/stain.
Built from Plan(s)
Estimated Time Investment
Weekend Project (10-20 Hours)
Recommended Skill Level
Beginner
Modern Deck Chair Go Seahawks
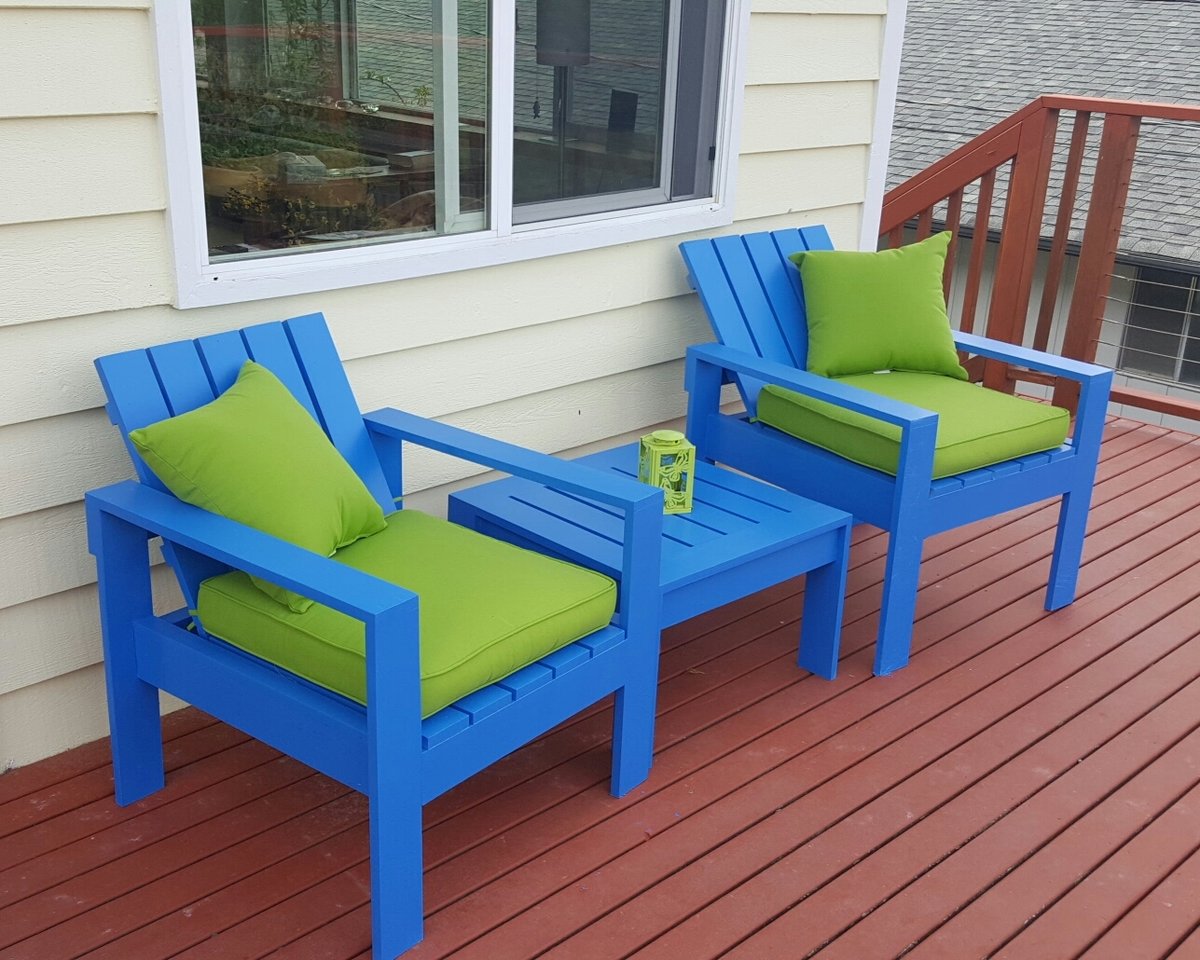
Great instructions and a great finished project
Built from Plan(s)
Estimated Time Investment
Weekend Project (10-20 Hours)
Finish Used
paint
Recommended Skill Level
Beginner
Entry Way Bench
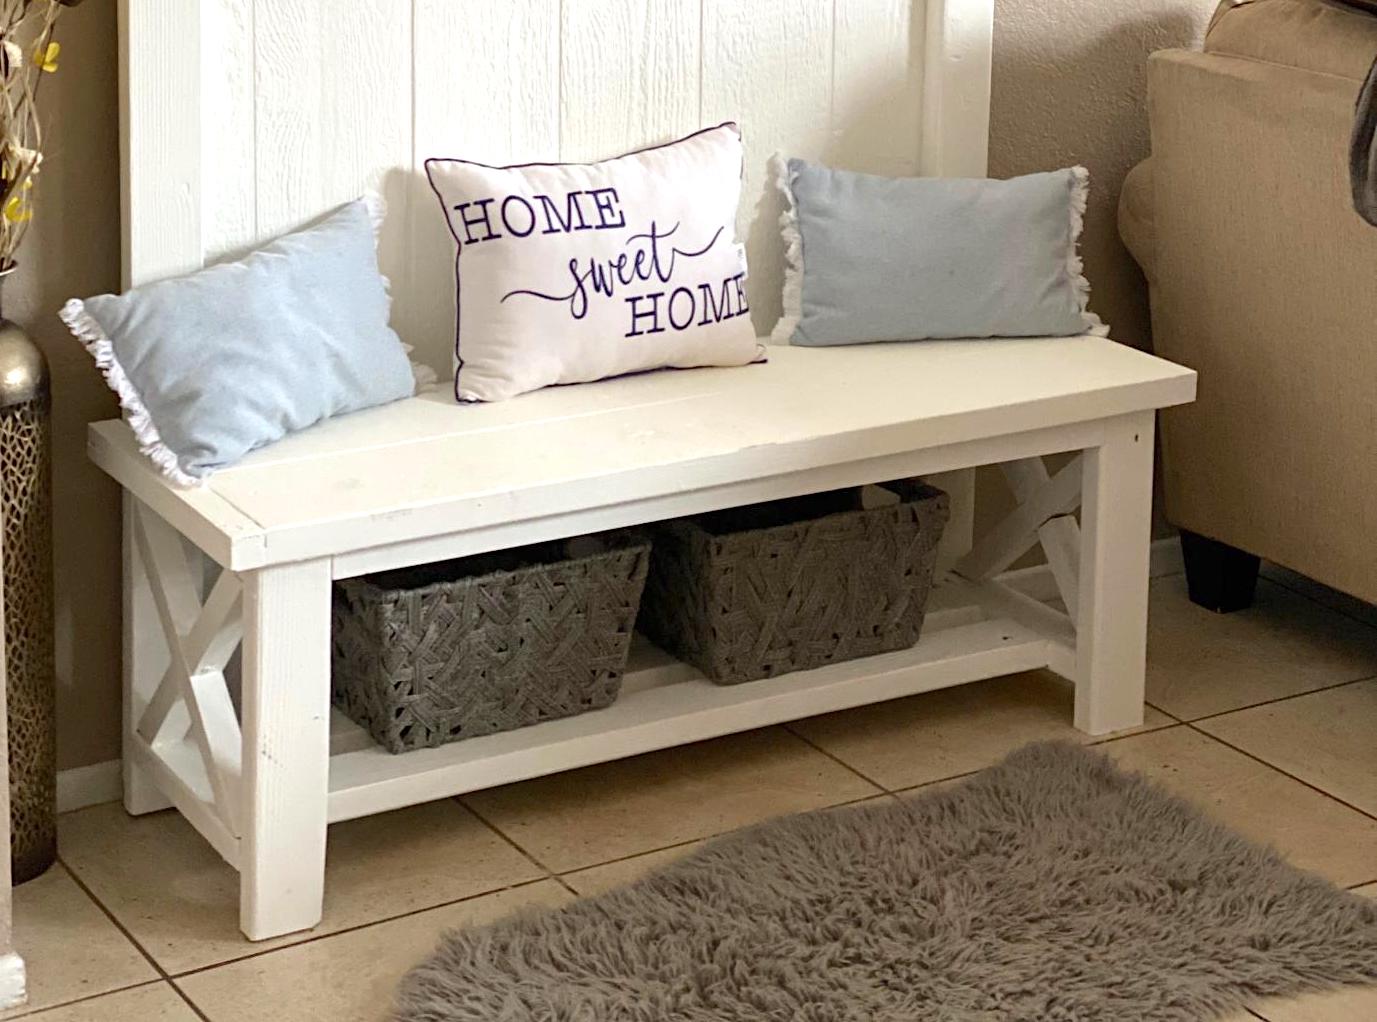
Built this plan and it came out amazing. I used a sheet of siding for the back to really bring out some grains!
Built from Plan(s)
Estimated Cost
100
Estimated Time Investment
Day Project (6-9 Hours)
Finish Used
Matte white bher paint
Recommended Skill Level
Intermediate
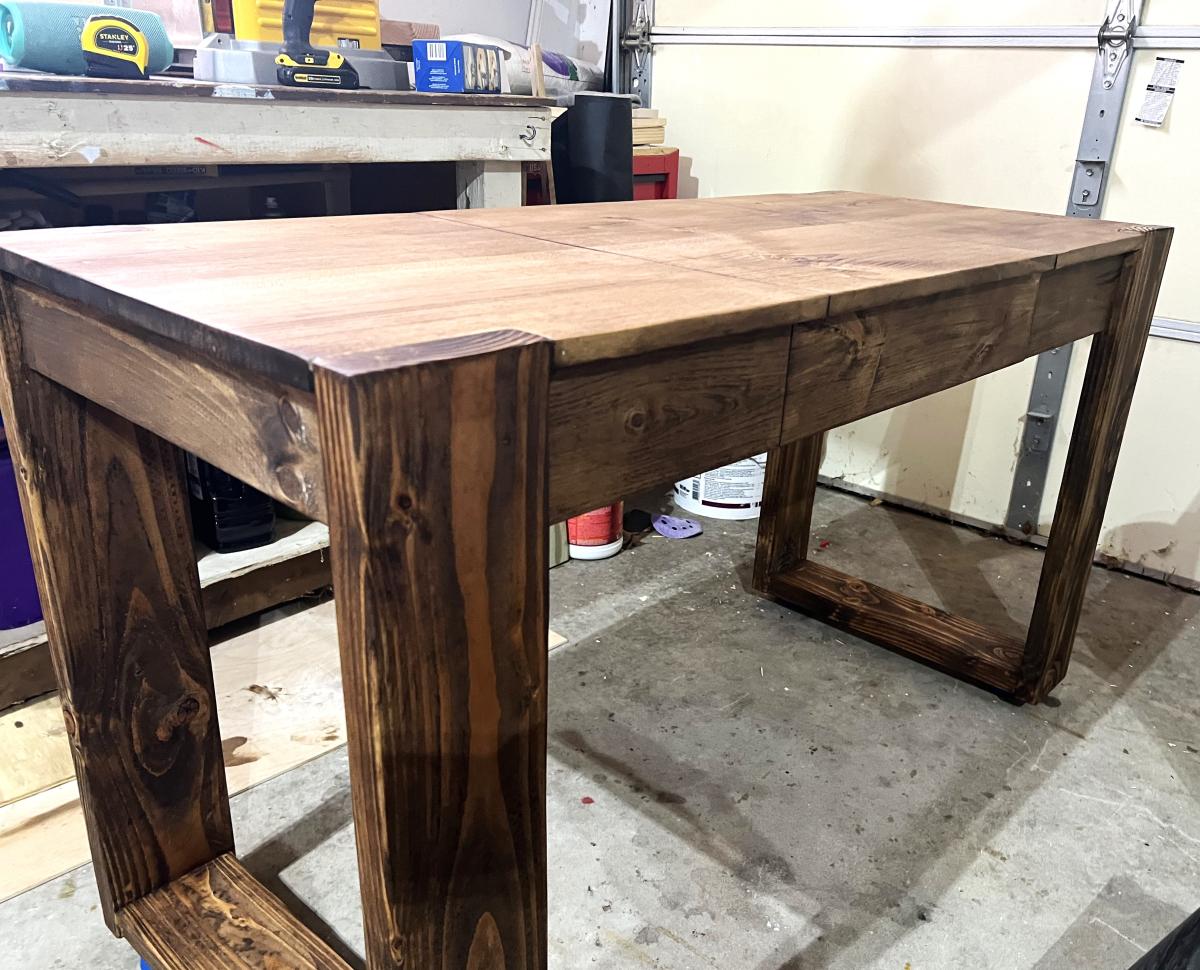
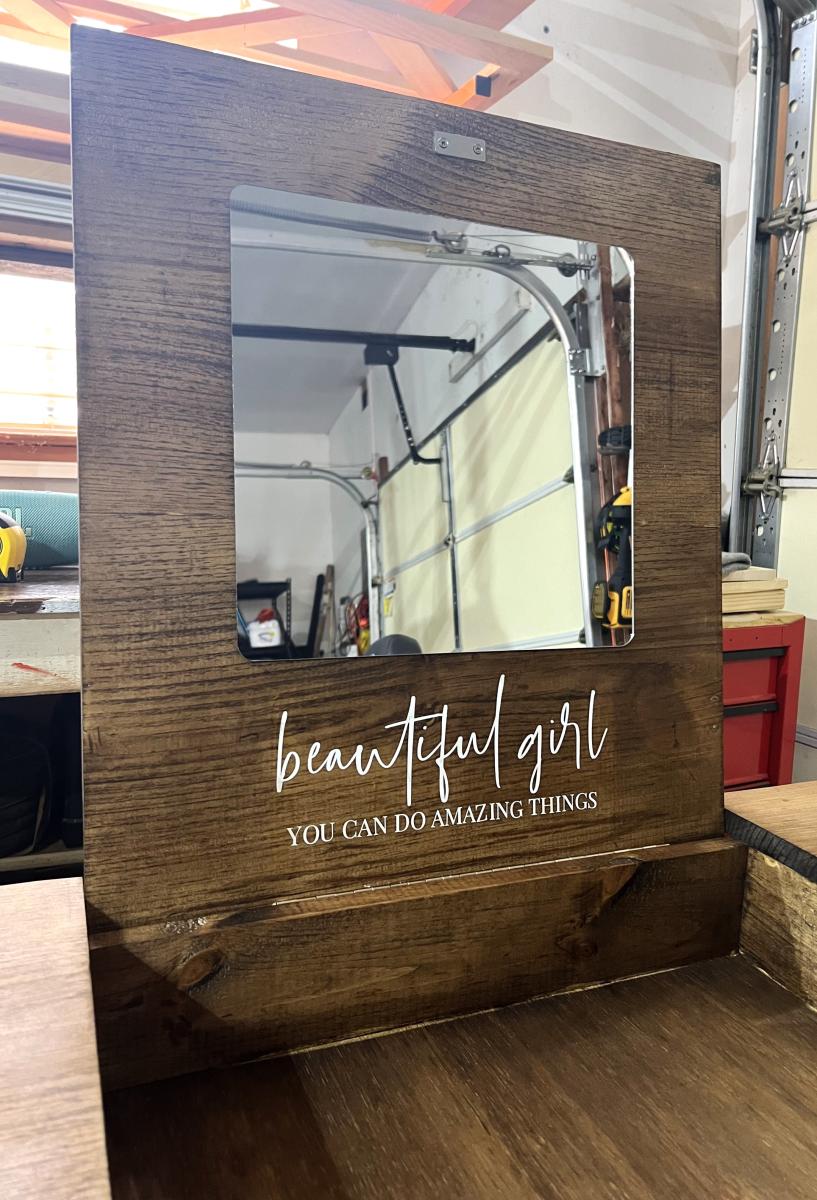
Chunky Leg Storage Vanity
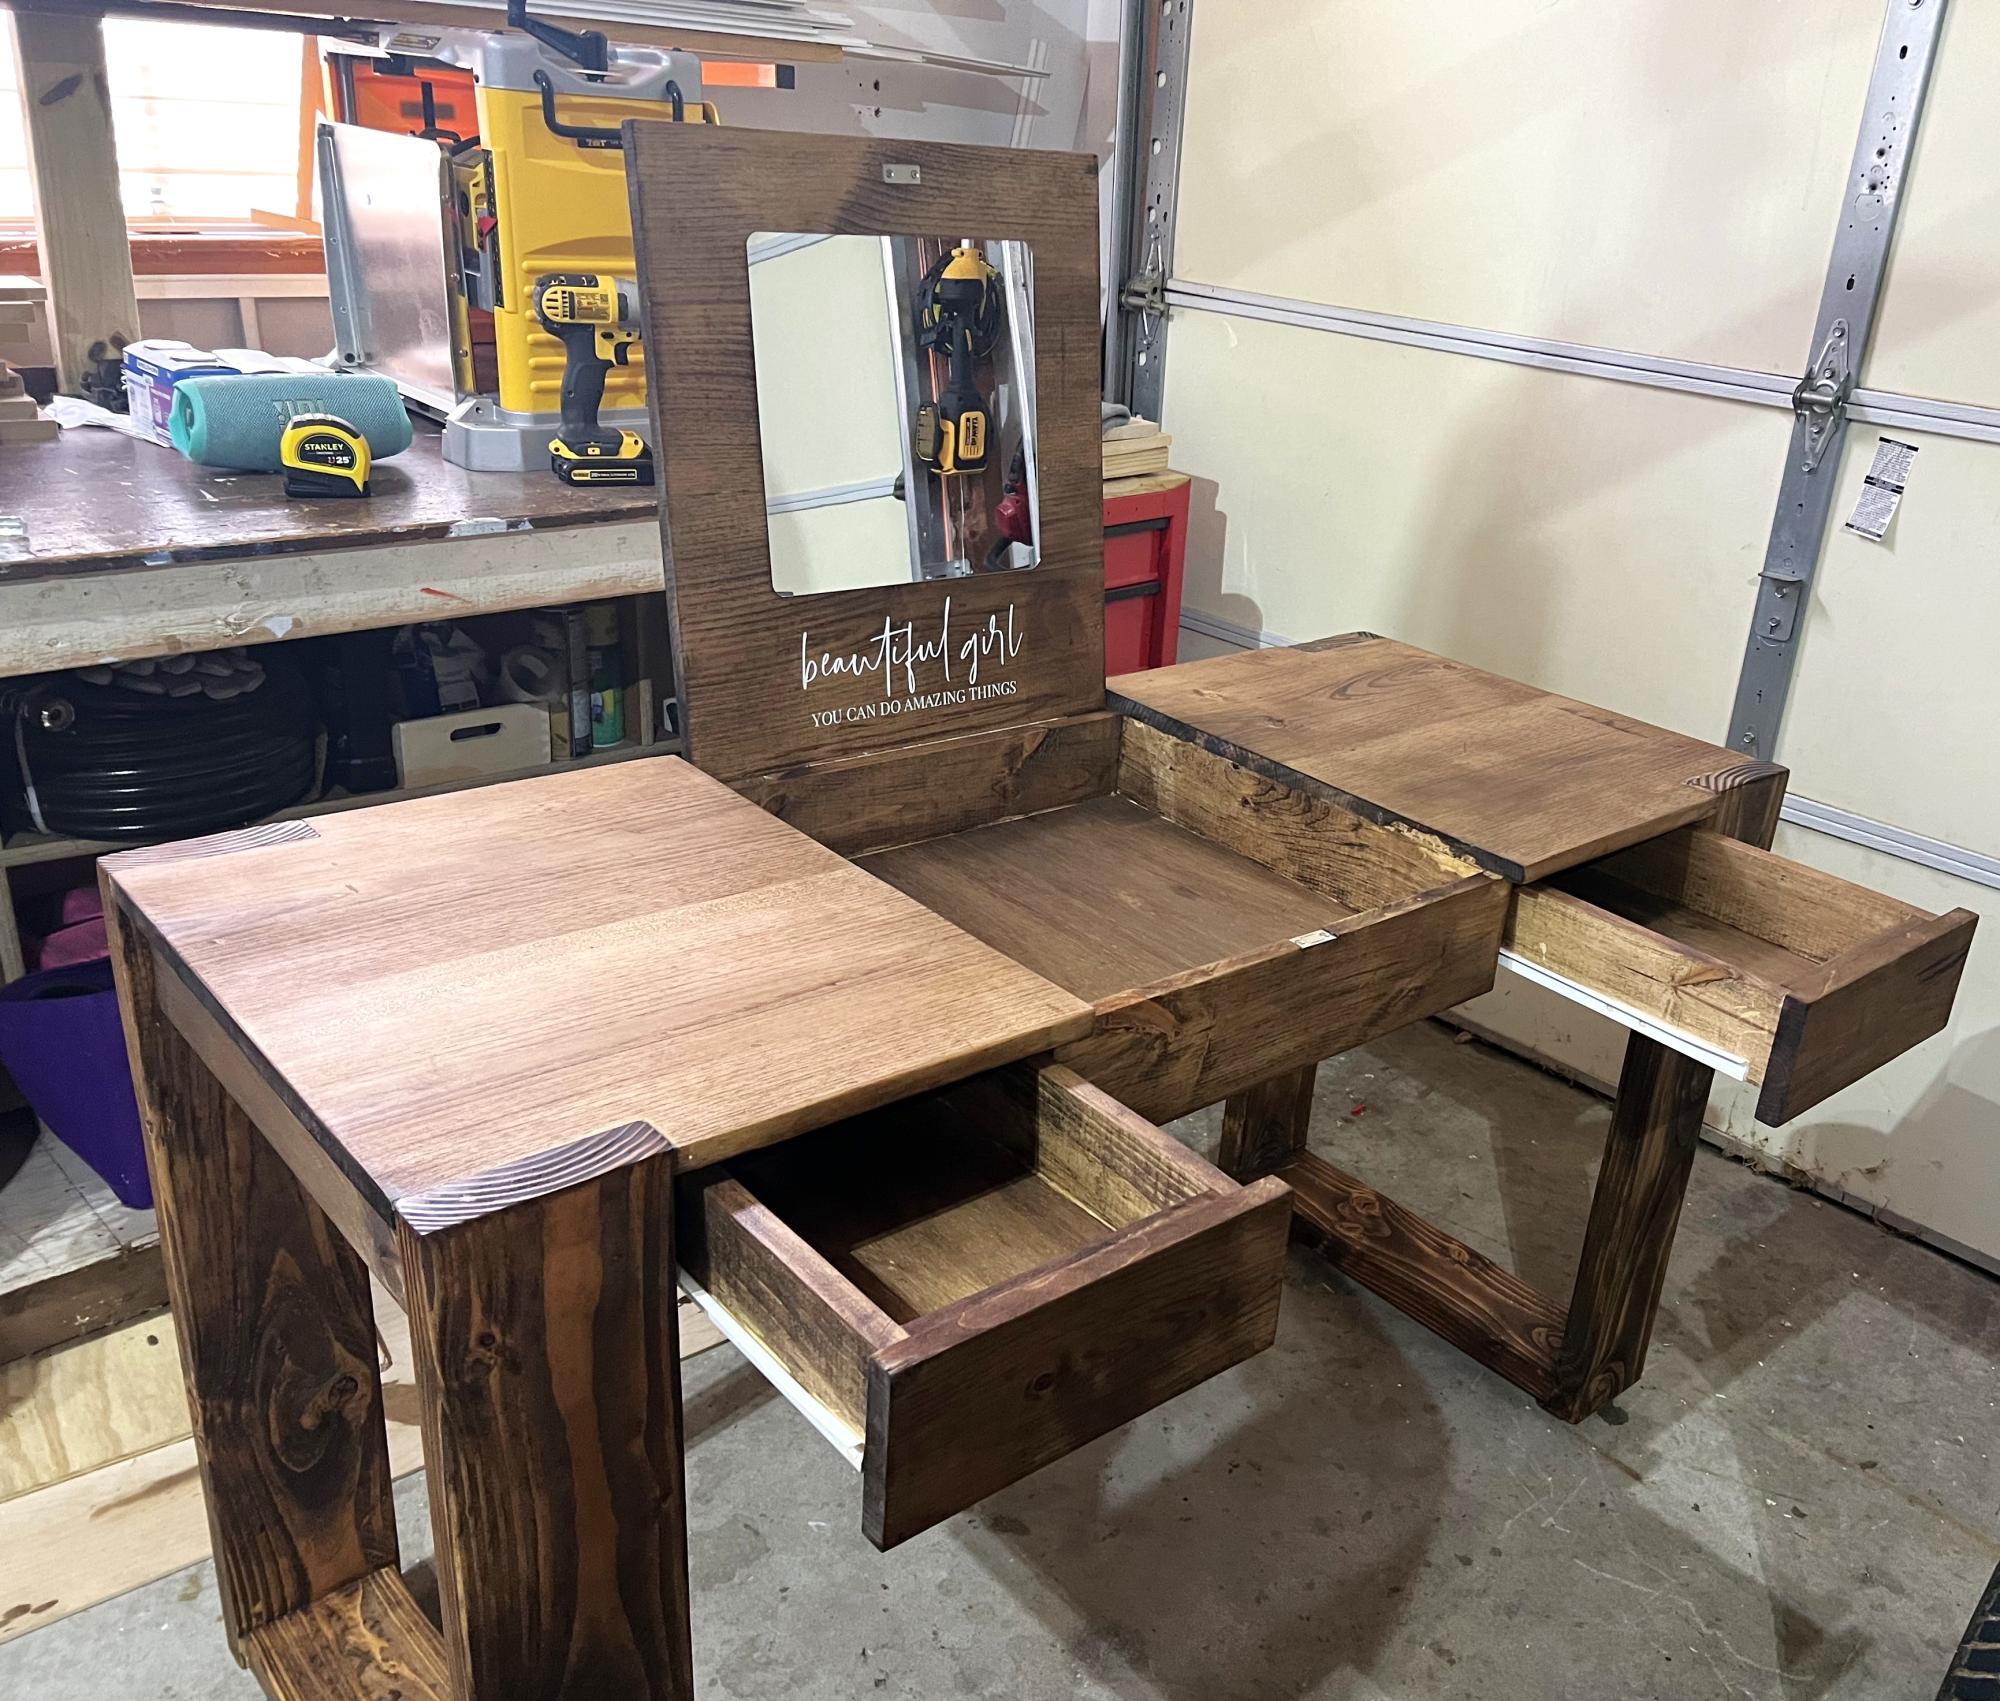
Hi! I love Ana White's plans! I used the chunky leg desk plan and added drawers and a flip-up vanity top! :) https://www.instagram.com/bow_and_timber/
Built from Plan(s)
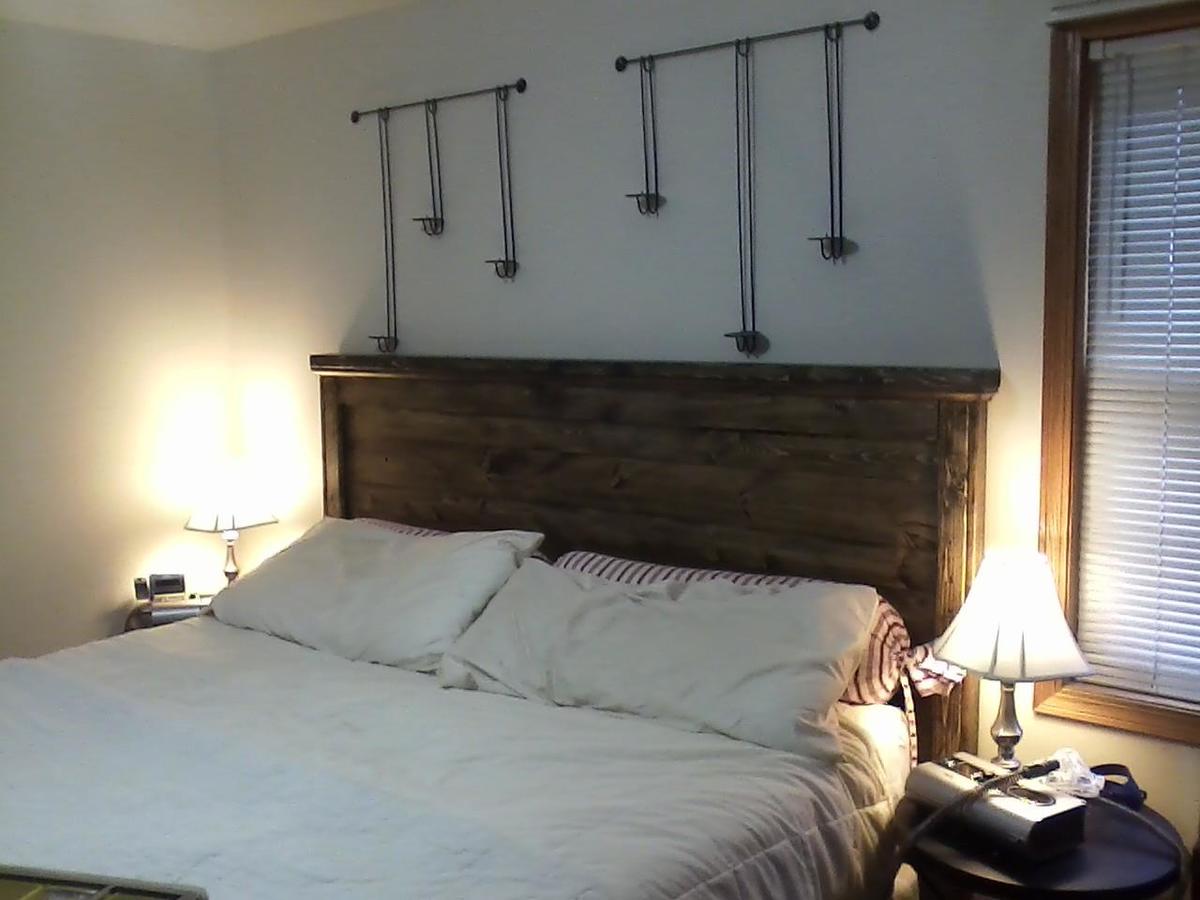
Rustic Head Board
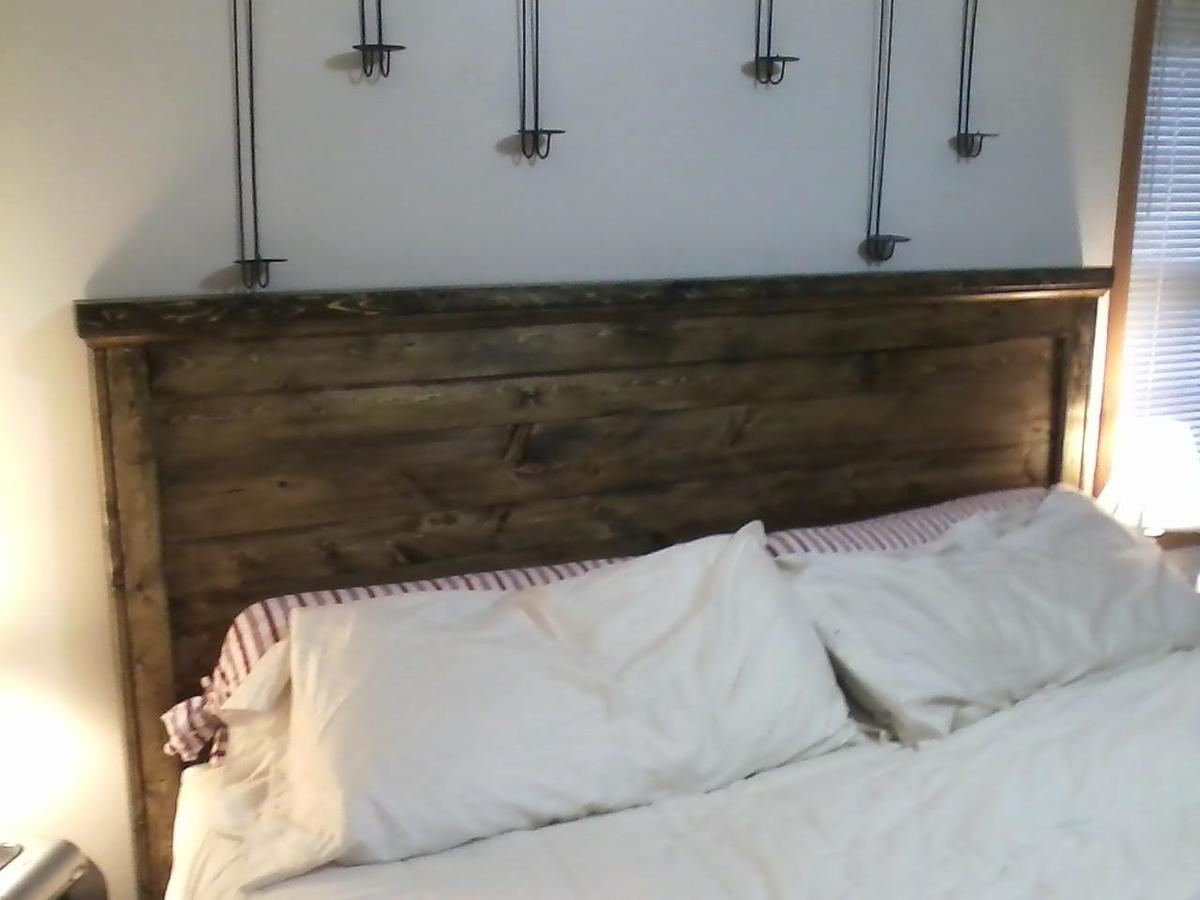
My wife wanted to get a new rustic style head board in the Pottery Barn style. Thanks to your site and plans I saved around $800. My wife even made a comparison picture with my head board and two from Pottery Barn. This was my fist major project and ever since I built this, people just come to me with ideas of things to build. Now she wants a matching foot board. I love your site and it's the first place I look anytime I have a project in mind.

Built from Plan(s)
Estimated Cost
$80 - $100
Estimated Time Investment
Weekend Project (10-20 Hours)
Finish Used
Antique walnut stain with a semi gloss polyurethane.
Recommended Skill Level
Beginner
Comments
Sun, 07/01/2012 - 06:37
Fantastic!
Looks great! The comparison picture is fantastic. I made this headboard last summer and we love it too.
Fri, 02/22/2013 - 13:57
how many coats of stain did you put on it?
How many coats of stain did you put on it and did you stain it after it was all put together? Love your headboard it is awesome!!!
Inspired by the Homemaker
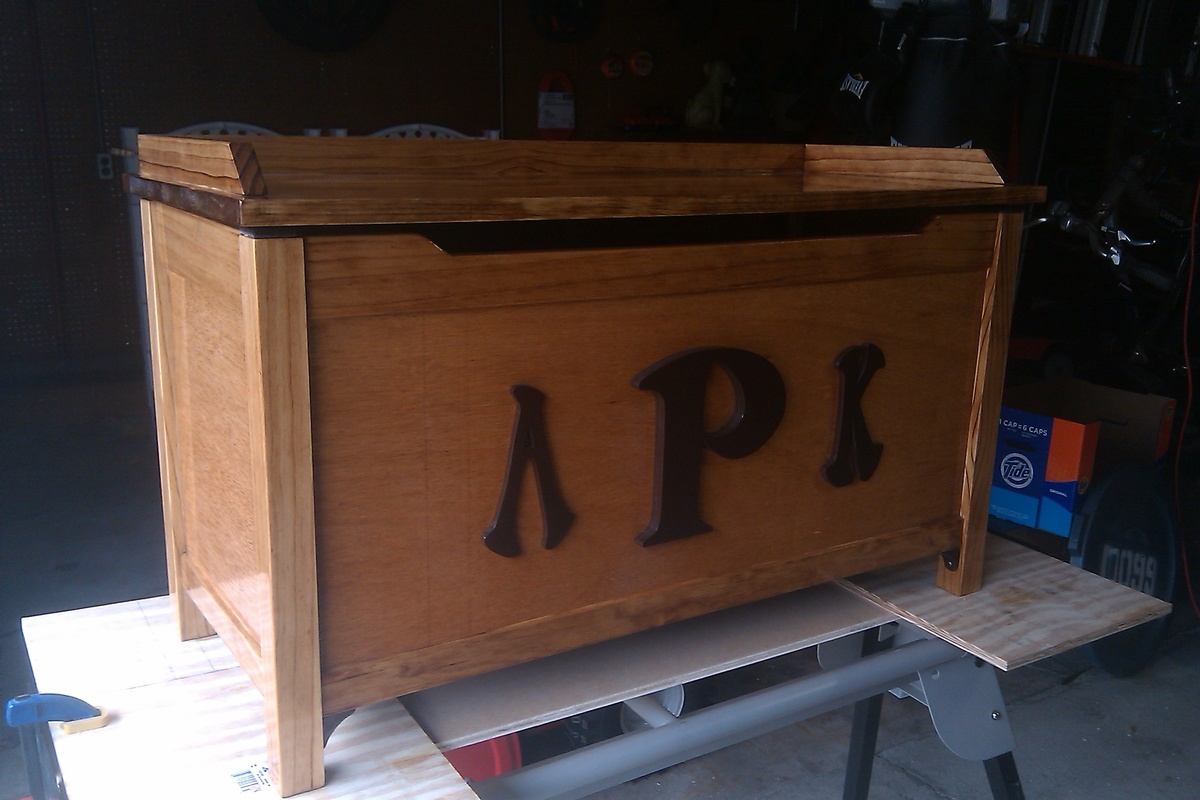
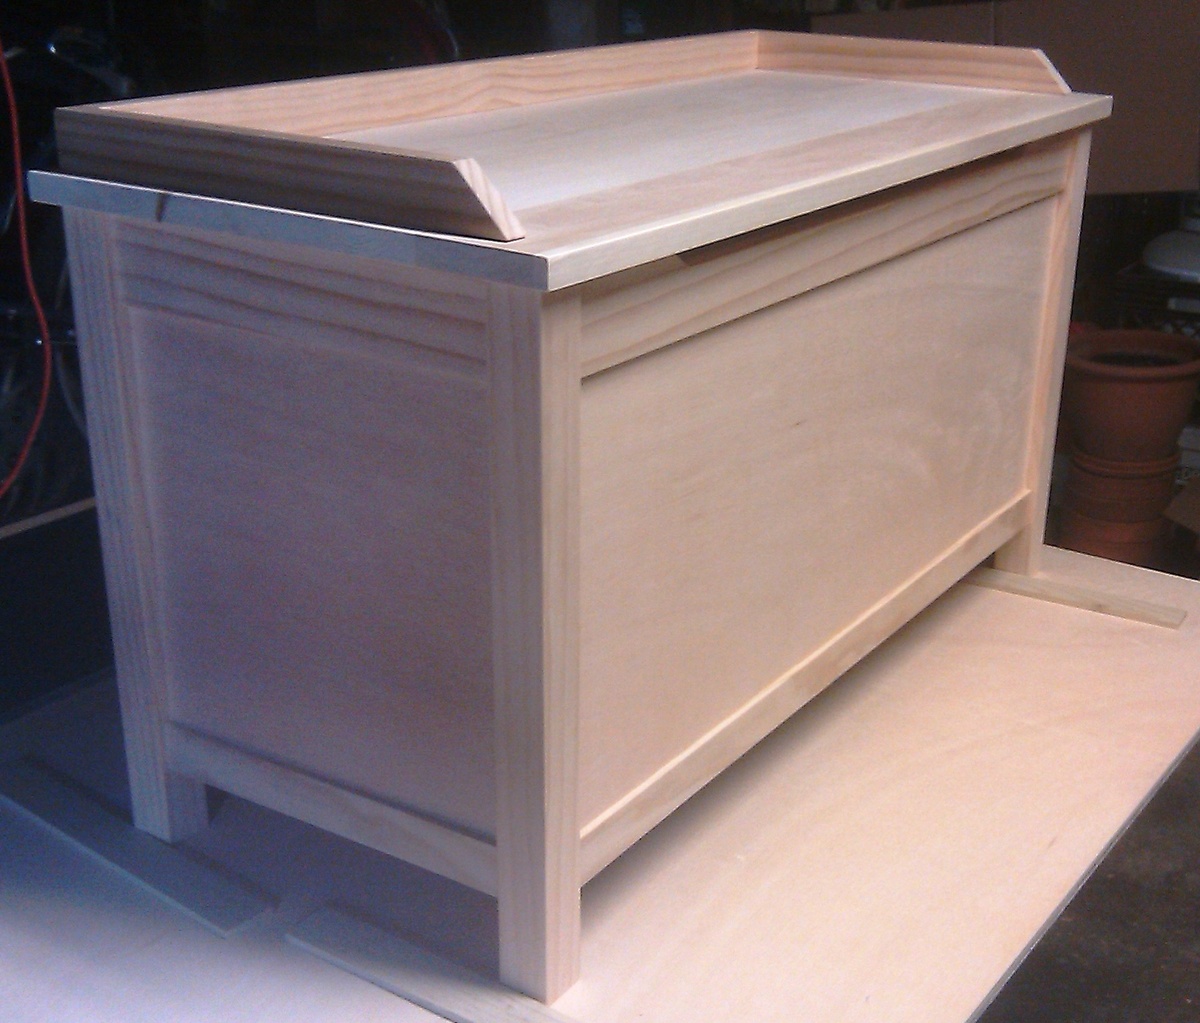
I was inspired to try woodworking after seeing plans for this toybox. After that, my imagination is running wild with projects. I've added a few other pics of projects that I've finished. Thanks, Ana. Just wanted you to know that you continue to inspire!
Built from Plan(s)
Estimated Time Investment
Week Long Project (20 Hours or More)
Finish Used
MinWax Golden Stain, 4 coats of water-based Poly.
Recommended Skill Level
Beginner
Comments
Thu, 06/12/2014 - 08:13
Staining the top
Looks great. What type of wood did you use for the top? Project panel per the plan? I am getting ready to build this toy box and would like to stain mine, but have concerns about staining project panel.
Diagonal Wall Corner Cabinet
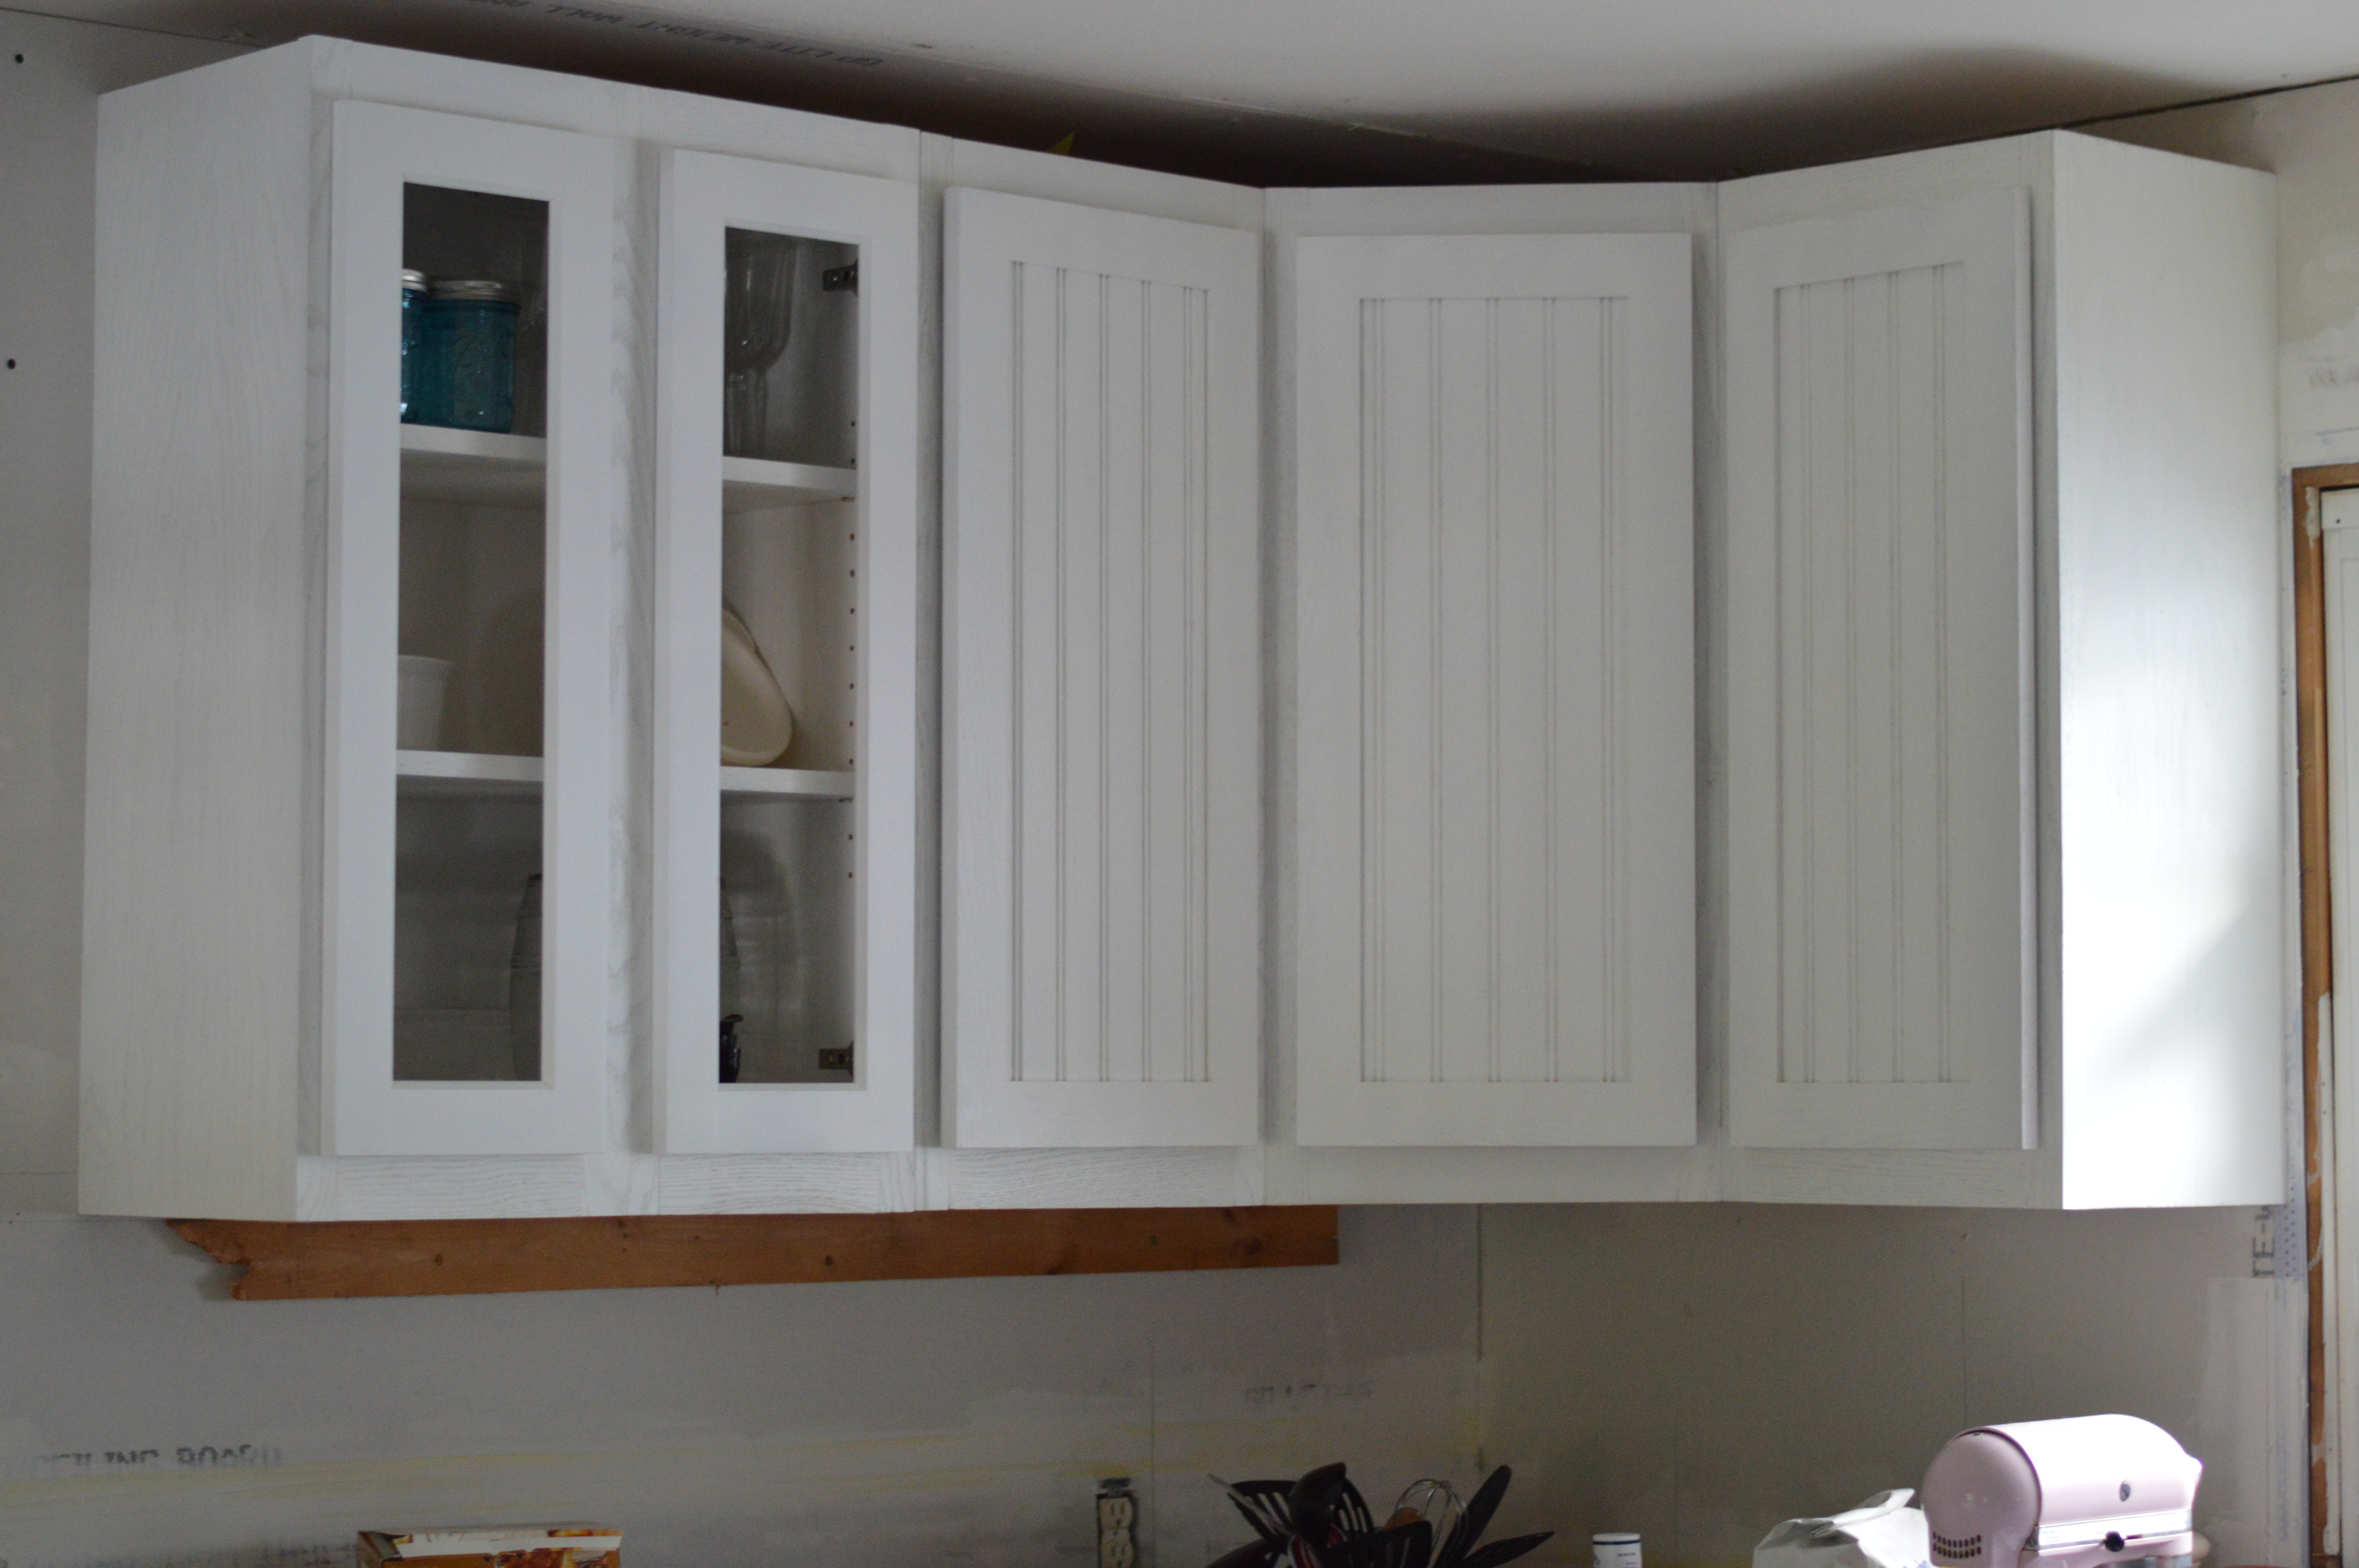
I made this cabinet first, actually two of them, that way I would know the exact depth to build my other wall cabinets. The depth without the face frame came to 11 3/4". I built it exact to the plans, Thank you Ana! I did modify the height to 36" and the rails of my face frames are 2 1/2" to accomodate the trim at the top and lighting at the bottom. I have never built cabinets before and never made a pocket hole before either! But I couldn't invest the $15,000 that Lowe's quoted me, this house is too old. So I found a really nice set from craigslist and went from there. I built all my wall cabinets to a custom height of 36". The doors came from FastCabinetDoors and they are great quality doors. The door I chose was "Camden" in oak frames and panels. I used Rustoleum Cabinet Transformations in Pure White for the finish. I hope to be finished in 5 weeks.
Built from Plan(s)
Estimated Cost
$75 for lumber
Estimated Time Investment
Weekend Project (10-20 Hours)
Finish Used
Rustoleum Cabinet Transformations "Pure White". When I ran out, I switched to Rustoleum Varathane Water based polyurethane in Satin as the clear top coat. Its an awesome product. Magic eraser will take anything off of it! And it is the only polyurethane I have found that doesn't discolor white paint.
Recommended Skill Level
Intermediate
Mother's Day Gift

My son and I made this quick for a gift. Thanks so much for the excellent plans. A couple modifications to use supplies on hand. Turned out great! Remember to fasten seat down before putting on arms.
Finish Used
White exterior paint and stained & varnished seat and back design. Used 1 x's intead of of 2 x 6's for seat.
Comments
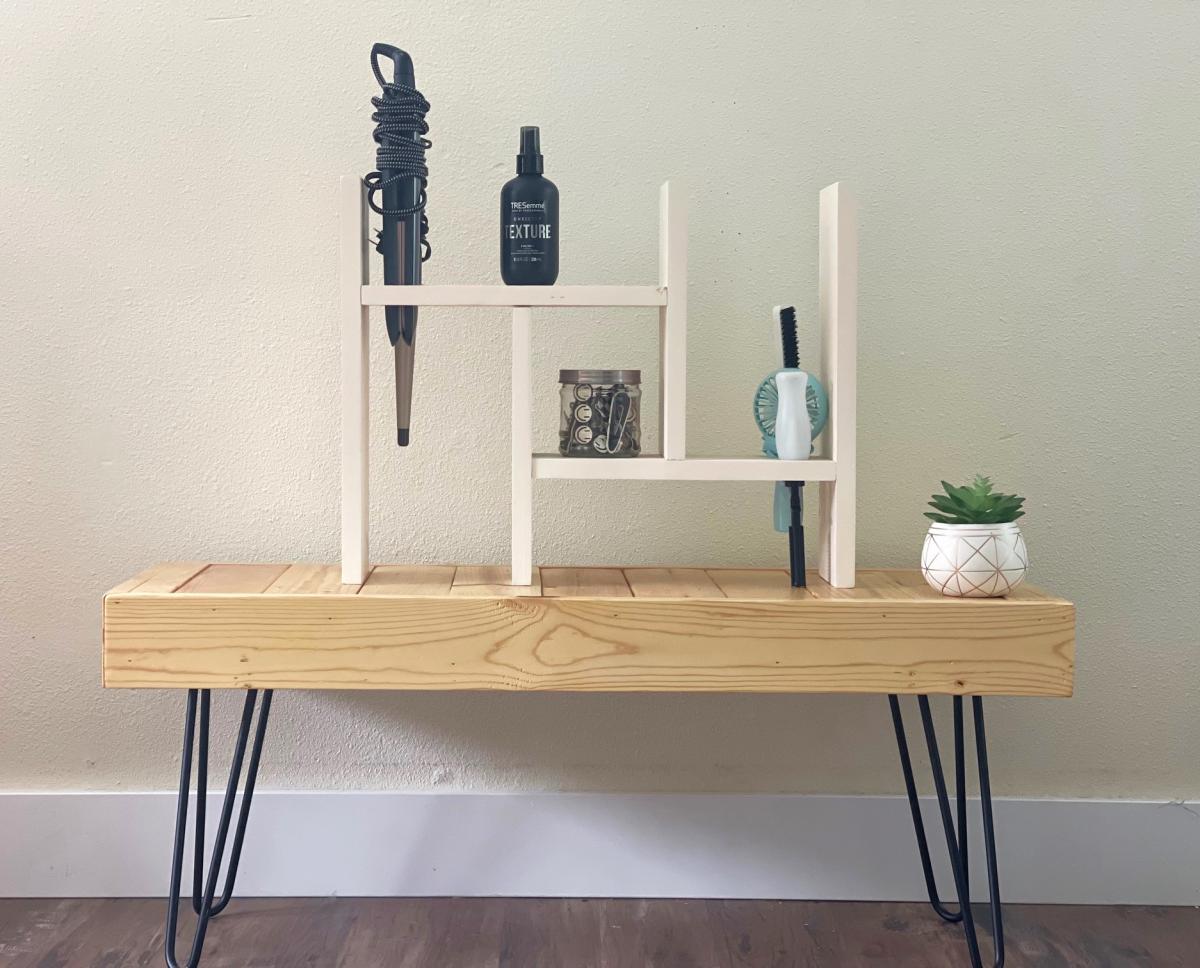
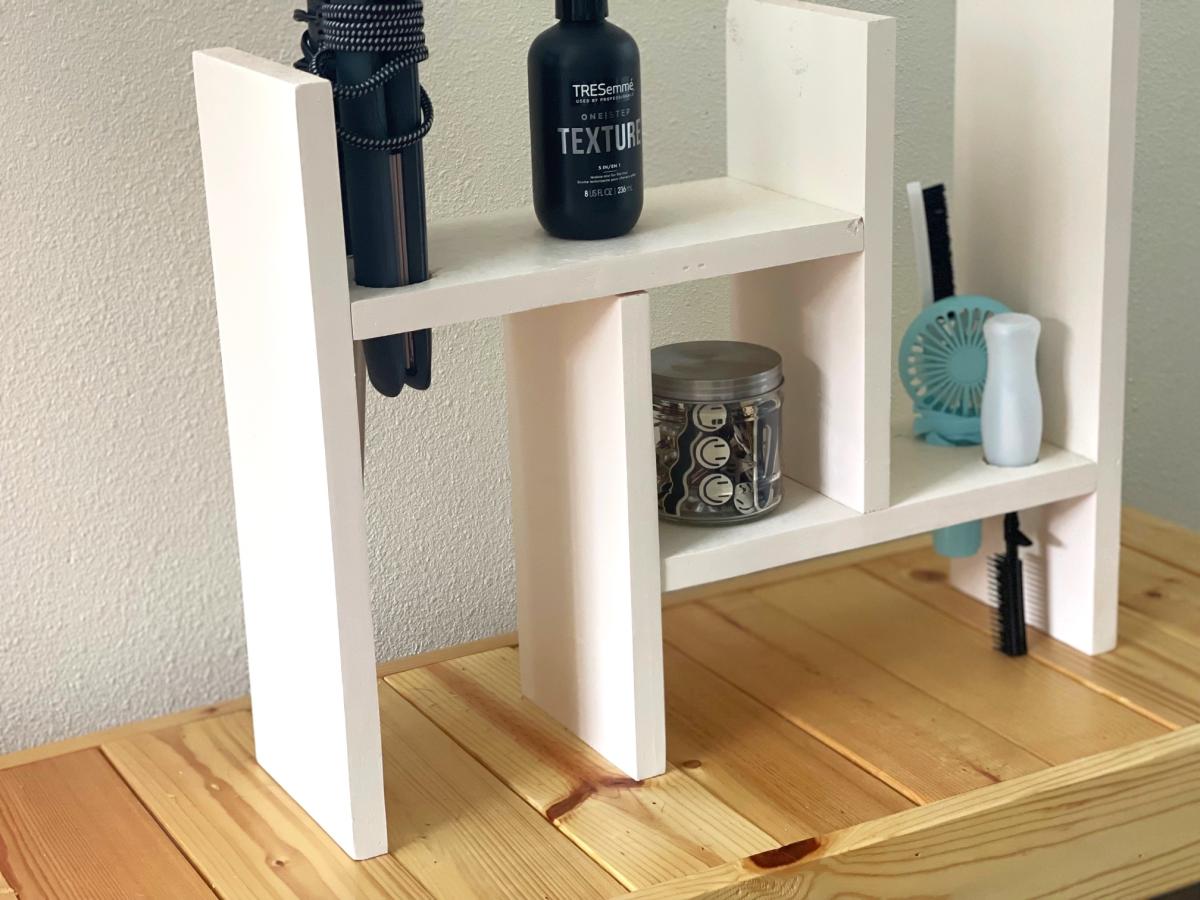
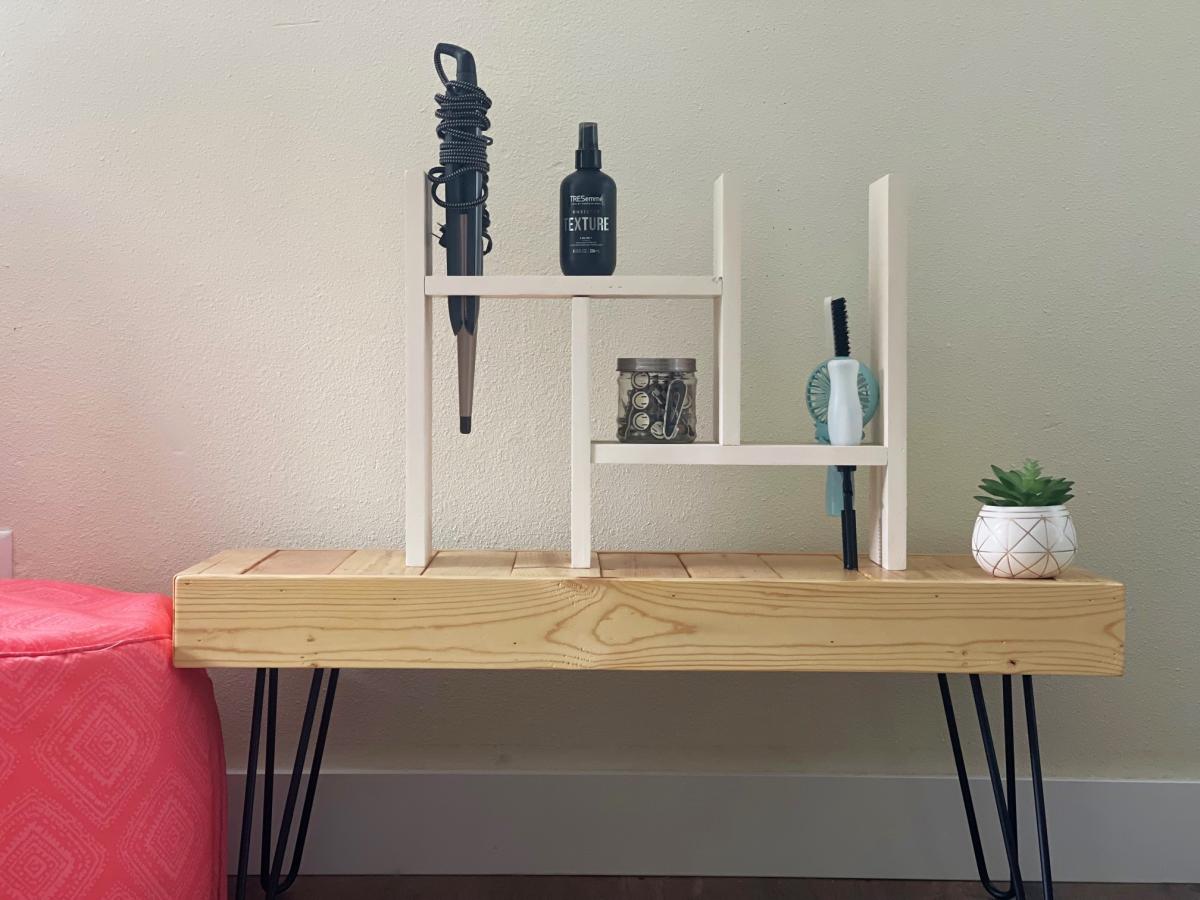
Adjustable Hair Tool and Accessory Shelf

My daughter has all of the hair tools and accesories and needed an organized place to put it, this worked great!
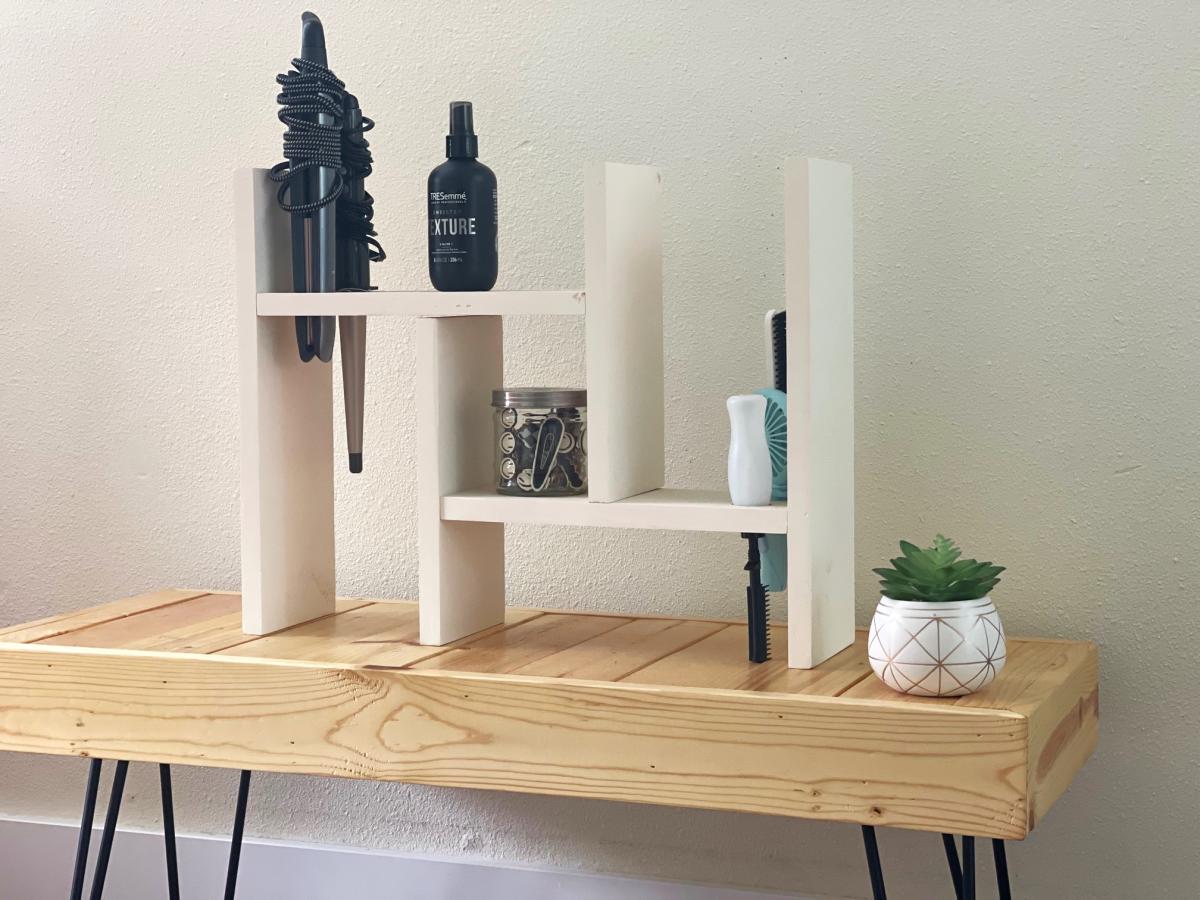
Built from Plan(s)
Seasonal And Holiday
A-Frame Chicken Coop (with modifications)
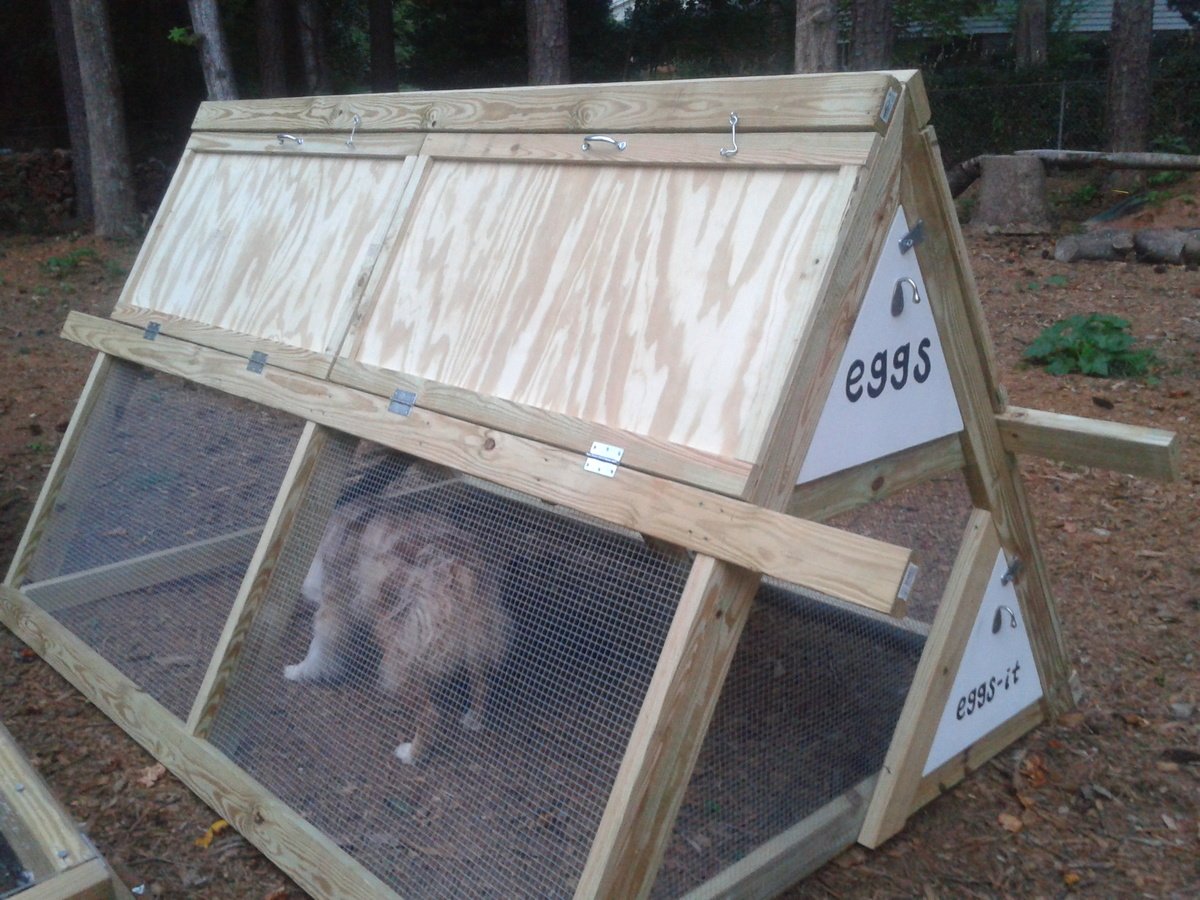
We followed the plans for the A-frame chicken coop very closely, and then modified it a bit at the end.
1. Trim was added to two doors on each side, as suggested. They are secured with latches at the top, more to keep them from falling open than to keep critters from getting in. We used 2x4x10's instead of 2x4x8's on the middle horizontal rail, giving us foot-long handles on each side. My husband and I are able to move the coop about 15 feet at a time, which is pretty good considering it is STURDY!
2. We used 1/2" galvanized hardware cloth instead of chicken wire, as suggested by one commenter (and lots of others in blogland).
3. I cut 1/4" plywood to fit the loft space and coated it with vinyl stick-on tile. This should make it easier to clean. We didn't screw down the plywood, so if we have to, we can remove it to hose it off/scrub it.
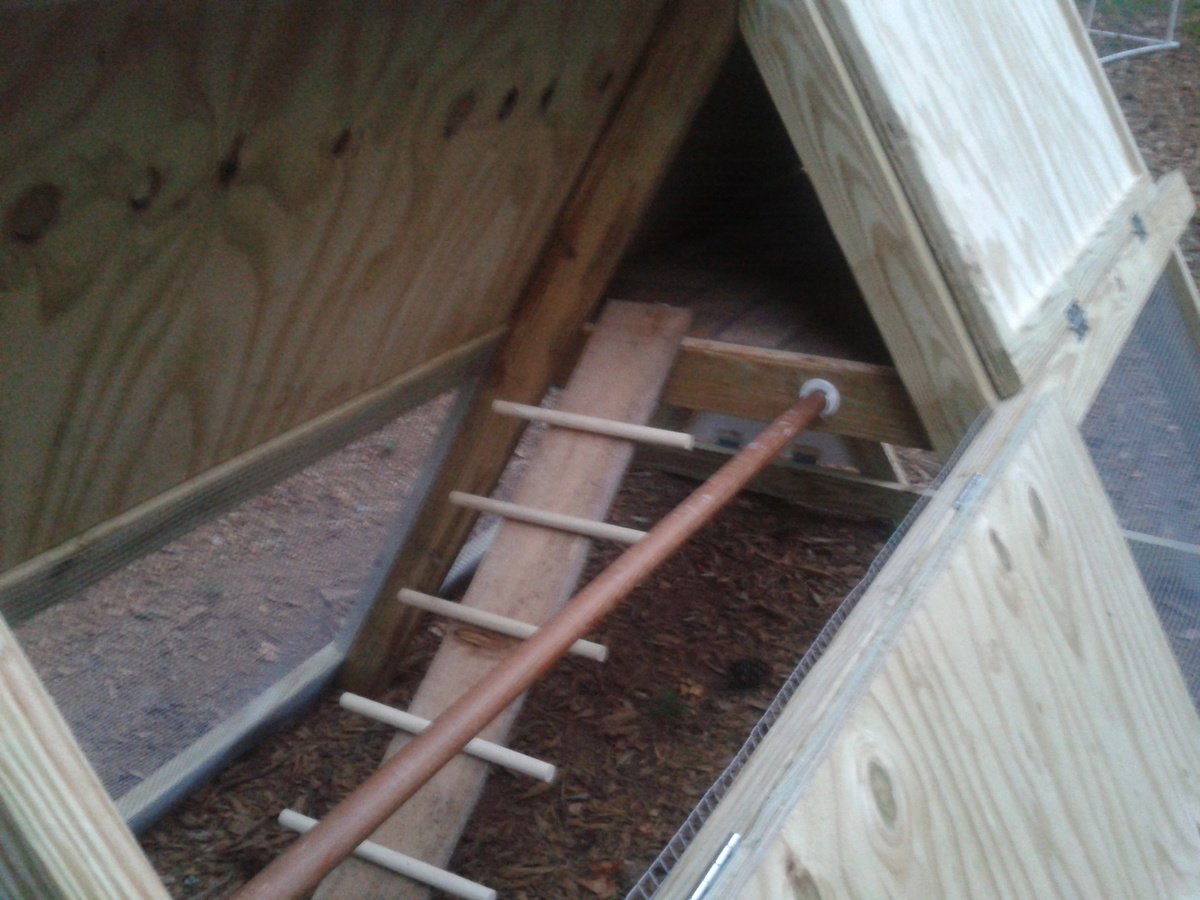
4. I cut a triangle of plywood to make an egg door at the end of the roost. It hinges at the bottom (with a 2x4 ripped into a 1x4 to cover the hardware cloth and provide a mounting spot for hinges) and latches at the top. I plan to use cotter pins or something to secure the latch. There is also a piece of untreated 1x4 held in place with tabs at the egg door to prevent bedding from falling out once it's converted to the nesting box (I'm planning to get pullets, not ready to lay yet, so they won't even have a tempting nest box)
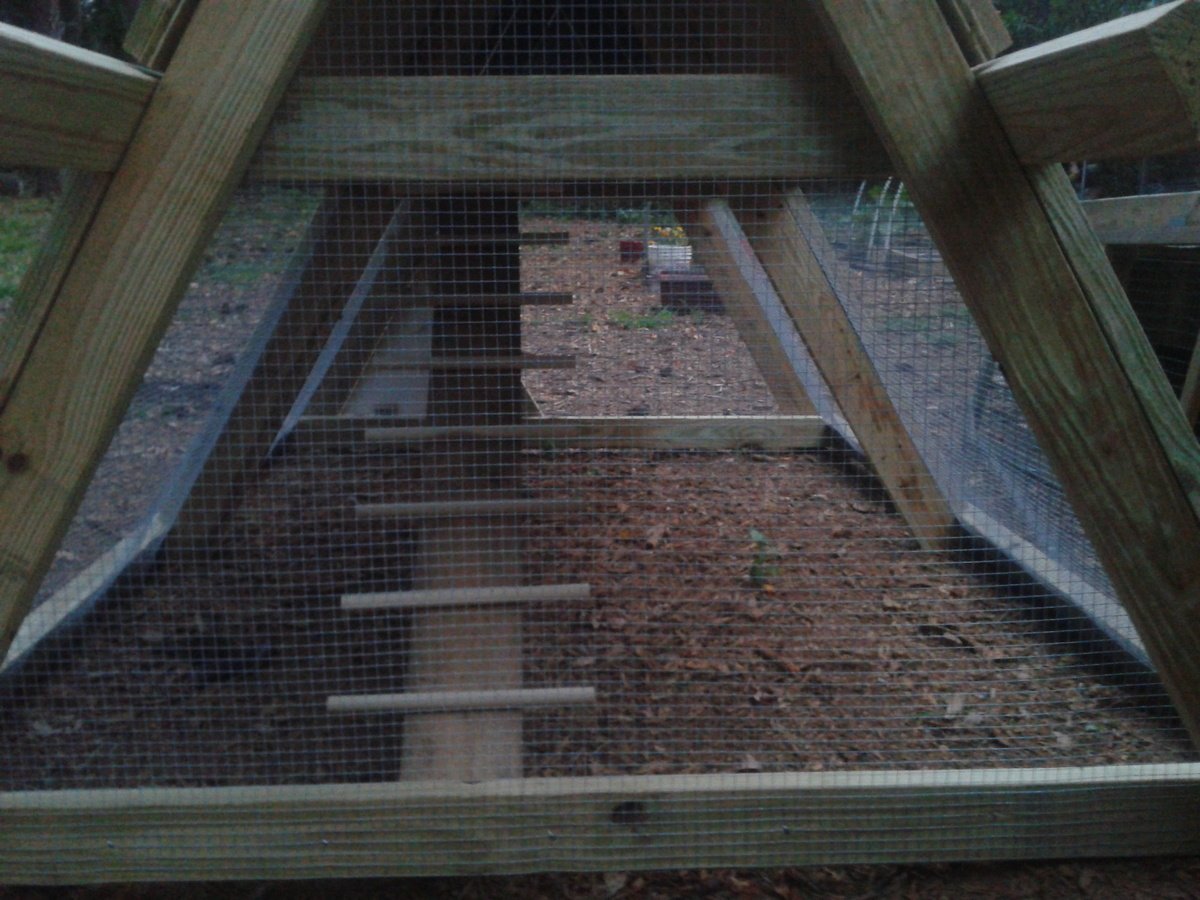
5. There was no bottom door in the plans (to allow free-ranging), so I cut a piece of 2x4 to make a triangle against the bottom (same size as the egg door). It folds out (just like the egg door) and will allow the chickens easy access to the yard. We do have hawks in our neighborhood so free time will always be supervised. We also have a dog (who I coaxed into the coop for the main picture, haha!) who will need supervising. She's been around chickens before but you never know what will make her turn on them!
6. There was also no roost in the plans (although if you look at Ana's coop, there is a 2x4 across the middle of the side walls). I had a leftover closet rod, so I mounted that in the covered section parallel to the ladder. The ladder was shifted to the side. For the ladder, I just used a piece of cedar fencing and cut 2 48" dowels into 4 pieces each, and secured those with screws from the underside. I hope my chickens will be able to get up the ladder!
7. I also made a tube feeder from PVC and a dog bowl, and am working on a nipple waterer. Will update post when those are finished!
Now I just have to get some hens! I've been searching craigslist and can't wait!
Built from Plan(s)
Estimated Cost
200
Estimated Time Investment
Day Project (6-9 Hours)
Finish Used
Unfinished except for plywood floor (vinyl stick-on tile) and plywood doors (white exterior acrylic paint)
Recommended Skill Level
Intermediate
Comments
Thu, 09/20/2012 - 19:31
Great Modifications!
I really like the addition of the roosting bar and how you made the ladder. Your little chickens will be so happy! Good luck!
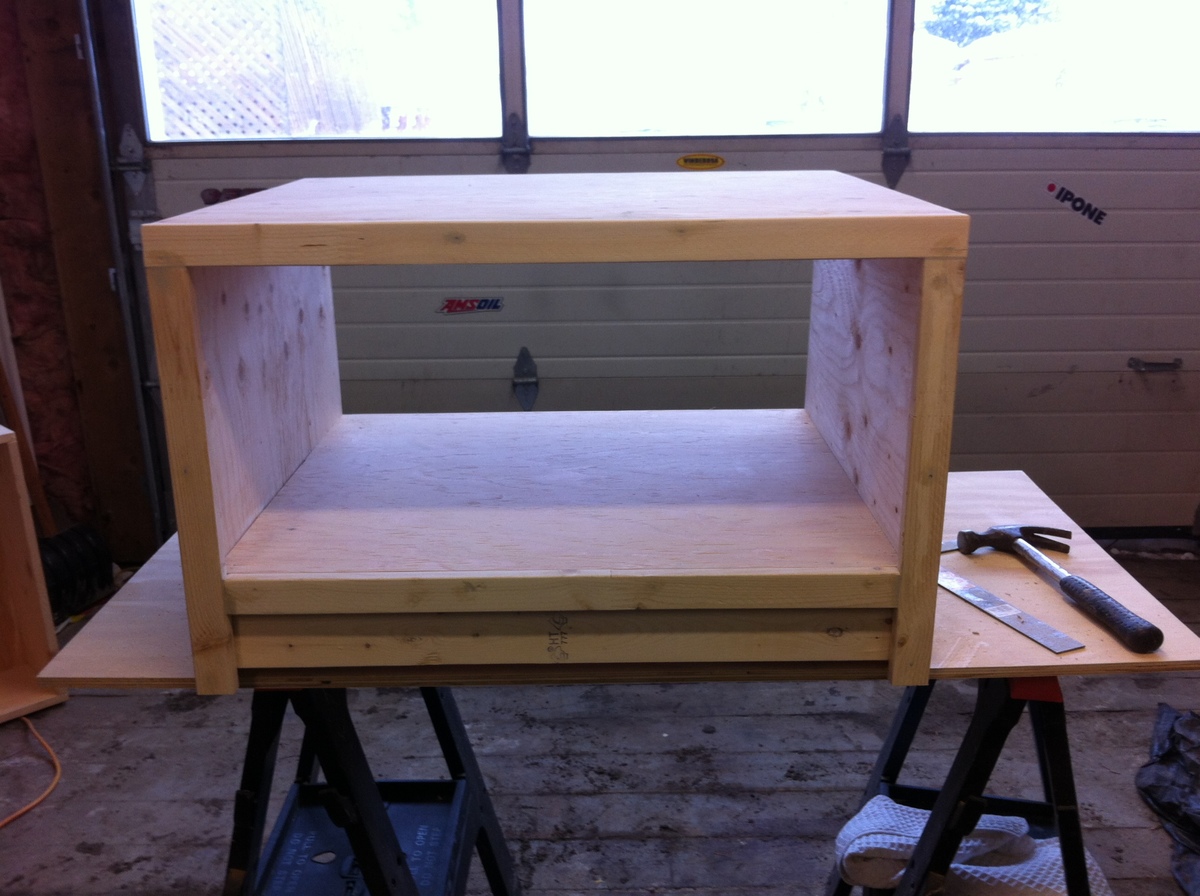
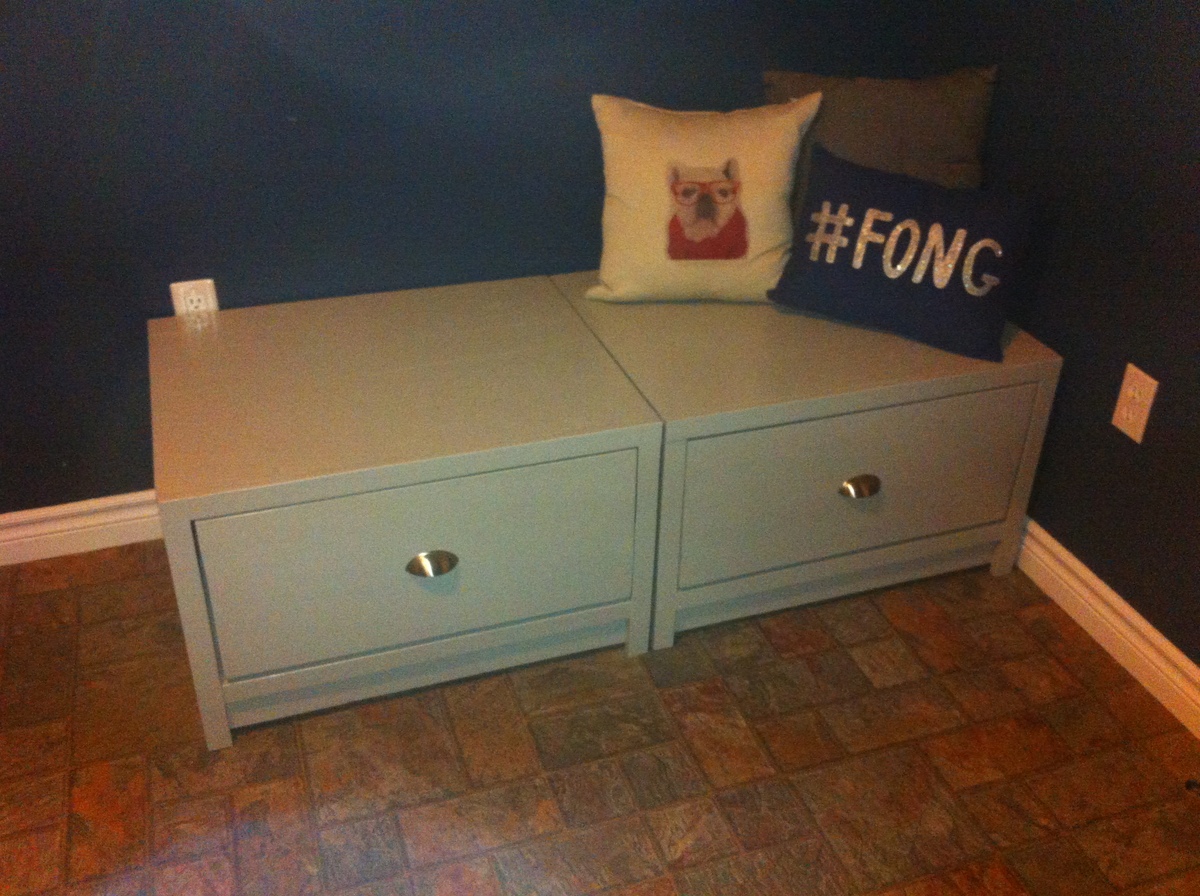
Awesome entryway bench!
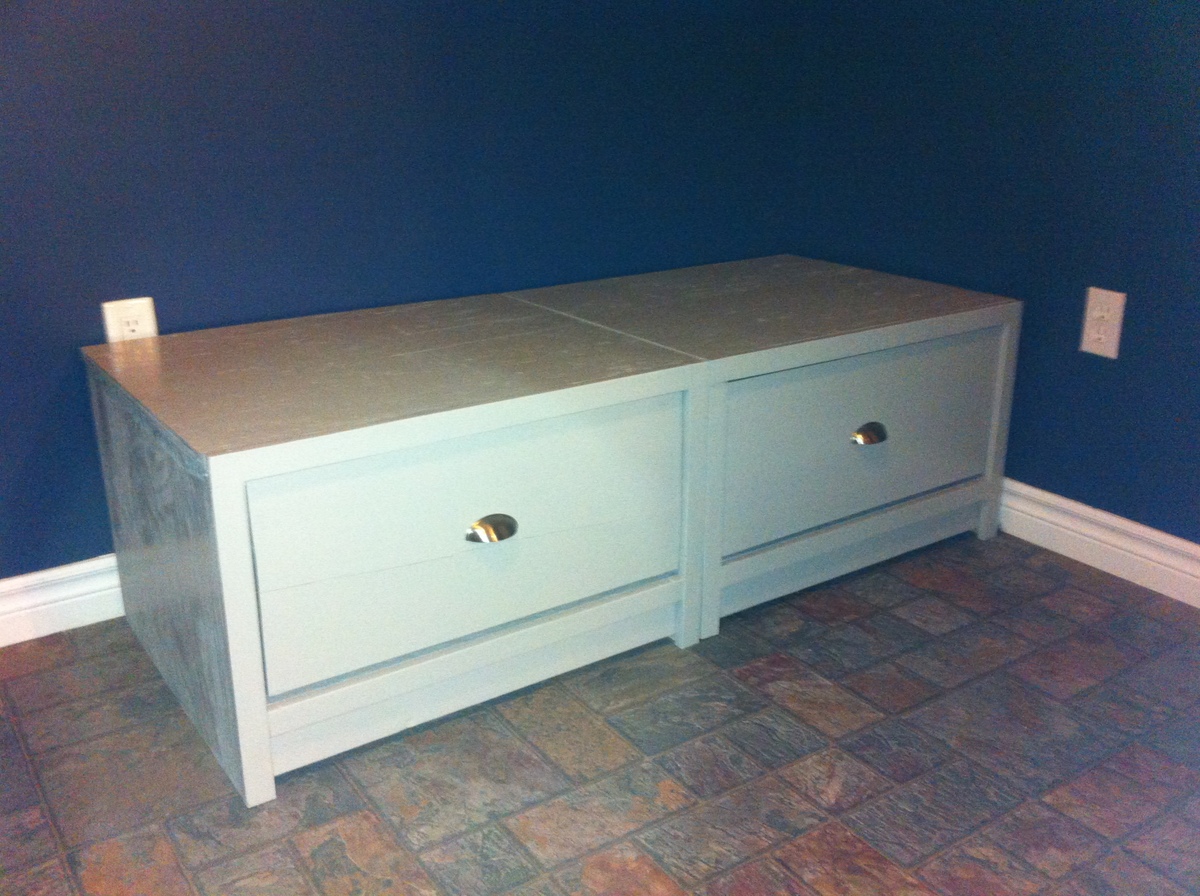
My second project ever (was feeling brave taking on drawers)!!
I made 2 drawers from the plan and intend on building an upright attachment.
The bench is VERY sturdy and the drawer space is incredible. I managed to fit almost all my sporting gear in one and my board games in the other.
Built from Plan(s)
Estimated Cost
60$
Estimated Time Investment
Weekend Project (10-20 Hours)
Finish Used
Benjamin Moore High Gloss Wood Finish
Recommended Skill Level
Intermediate
Fancy X kitchen table
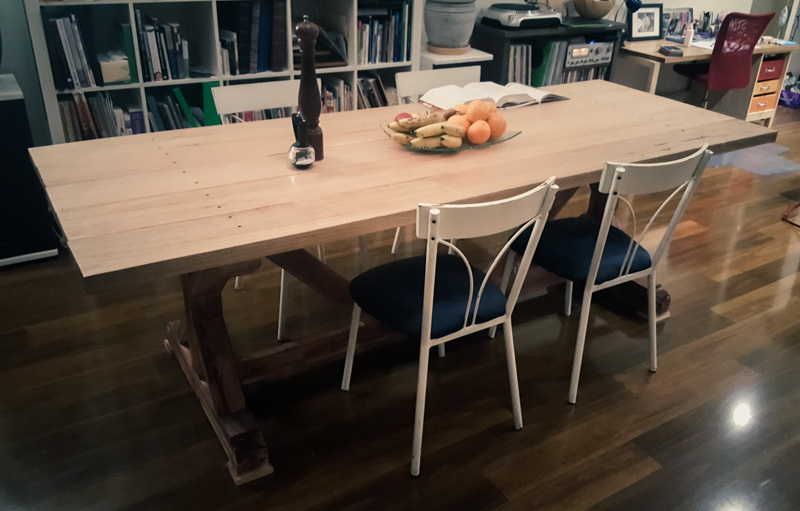
We wanted to make a rustic solid kitchen table and the Fancy X was the perfect fit. Originally we were attracted to the beautiful pictures of Jackies framhouse table but at the last minute deceided to switch to the Fancy X plans to make it a little different. We were also attracted to the design because a local shop has one like it for sale but at $1800 thought it a bit steep. The project came to $300 because we chose hardwood for the table top, with pine it would have been abot $200. We are very happy with the results. Thank you Ana!
Built from Plan(s)
Estimated Cost
$300
Estimated Time Investment
Weekend Project (10-20 Hours)
Finish Used
Scandinavian oli, and Jarrah stain on the frame
Recommended Skill Level
Intermediate
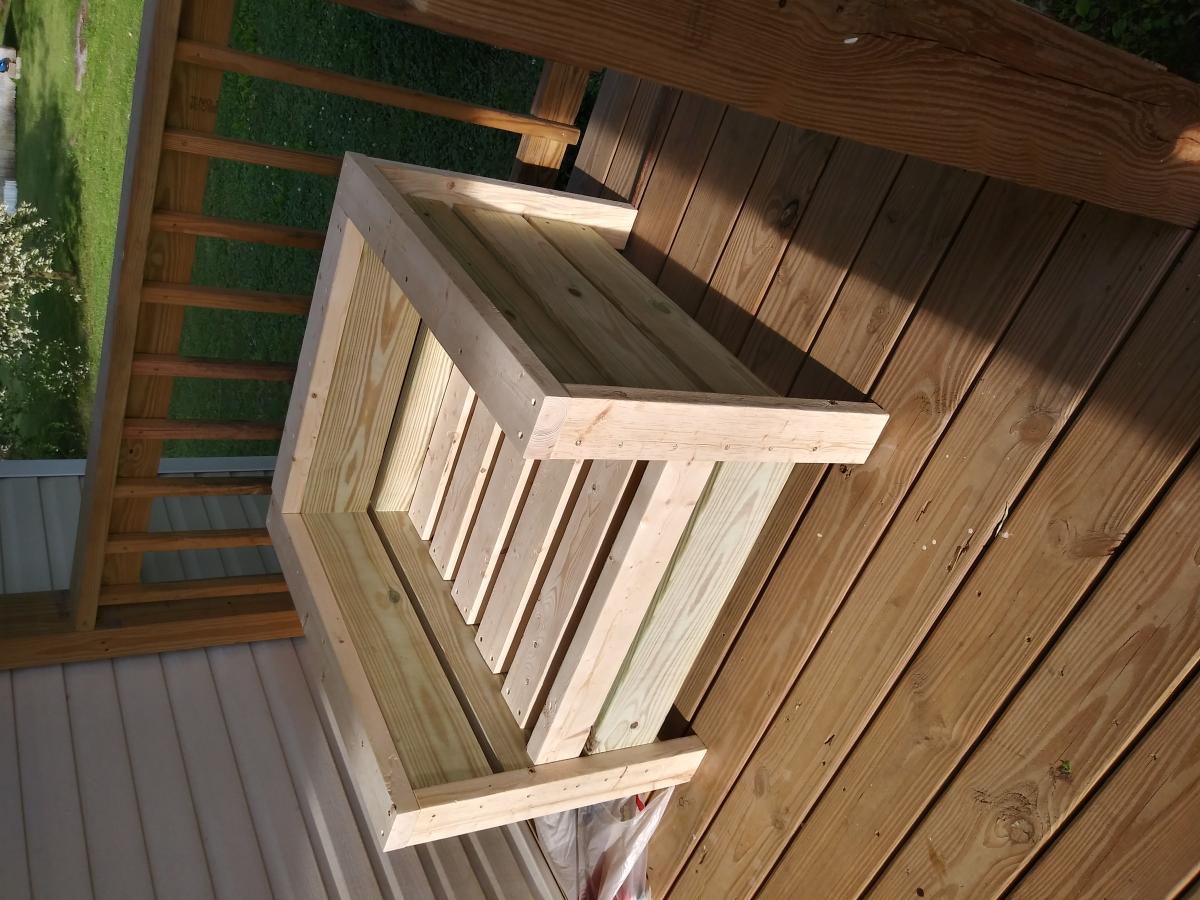
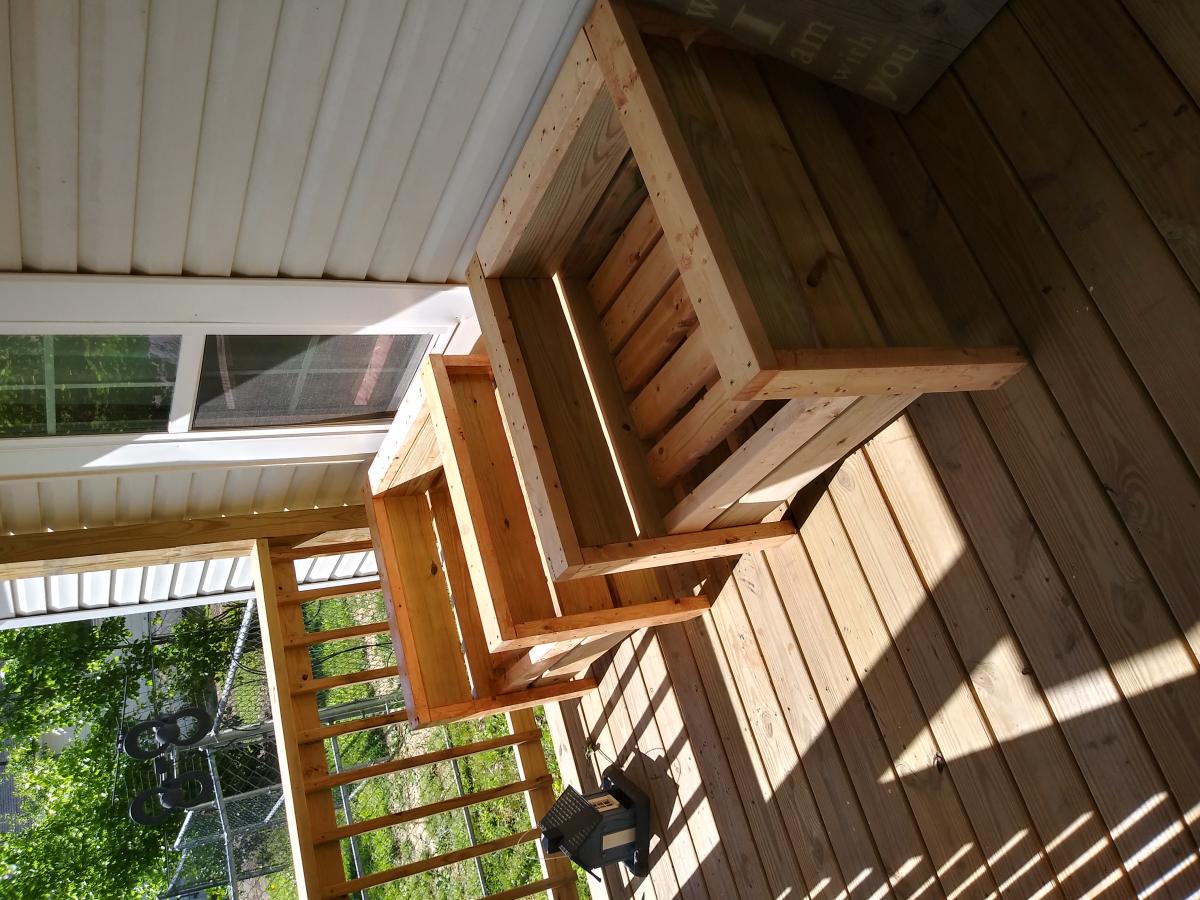
Great Porch Chairs

I enjoyed making these outdoor chairs! I had to make two for when company is allowed to come by again. The plans were simple to follow, and making the cushions was a bit more of a challenge. I ended up having to use a mattress topper cut into 25"x25" squares. I found some great seat covers on Wayfair.
Built from Plan(s)
Estimated Cost
300.00
Estimated Time Investment
Day Project (6-9 Hours)
Finish Used
Minwax Polyshades, Pecan satin
Recommended Skill Level
Intermediate
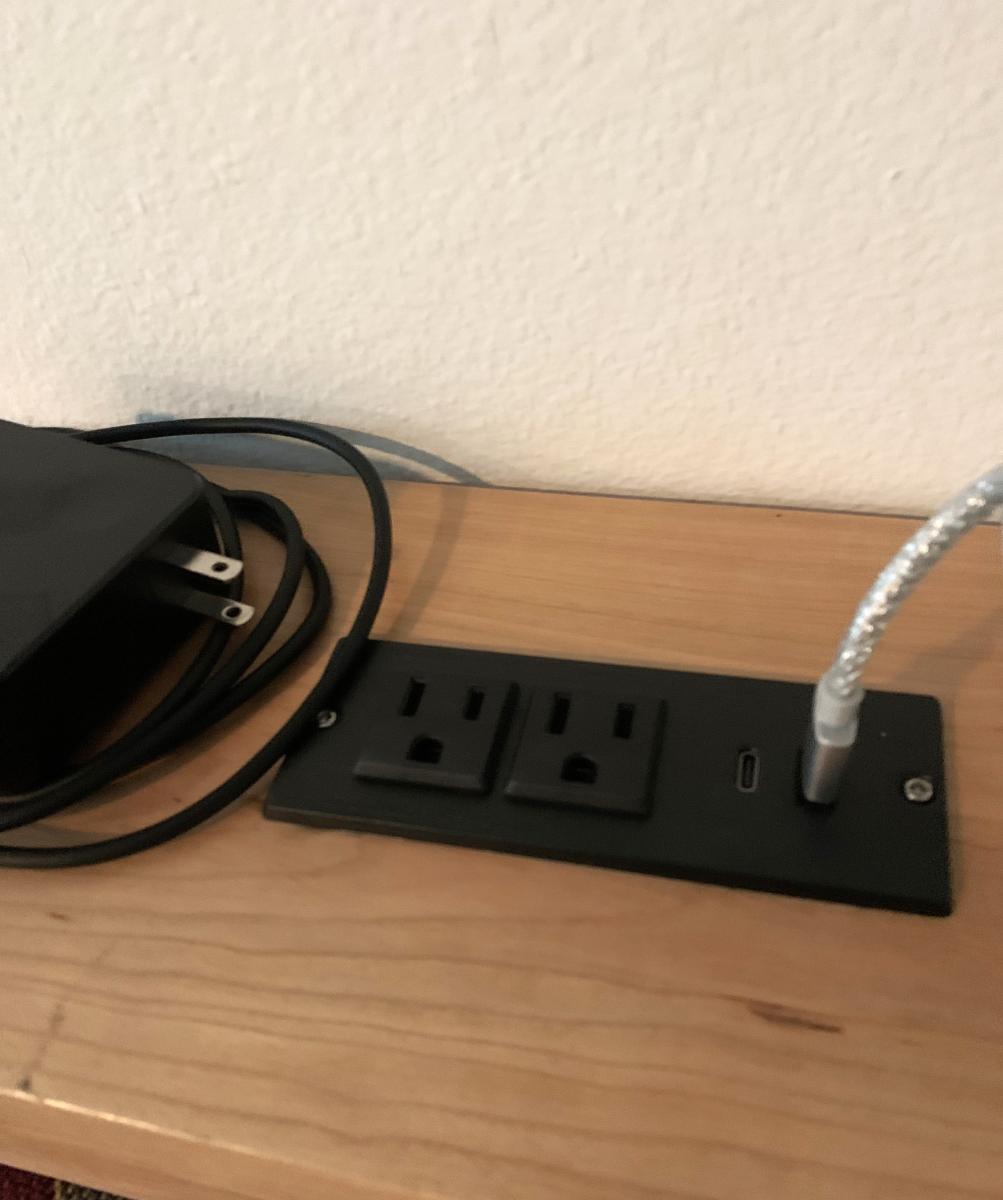
Sofa Charging Table
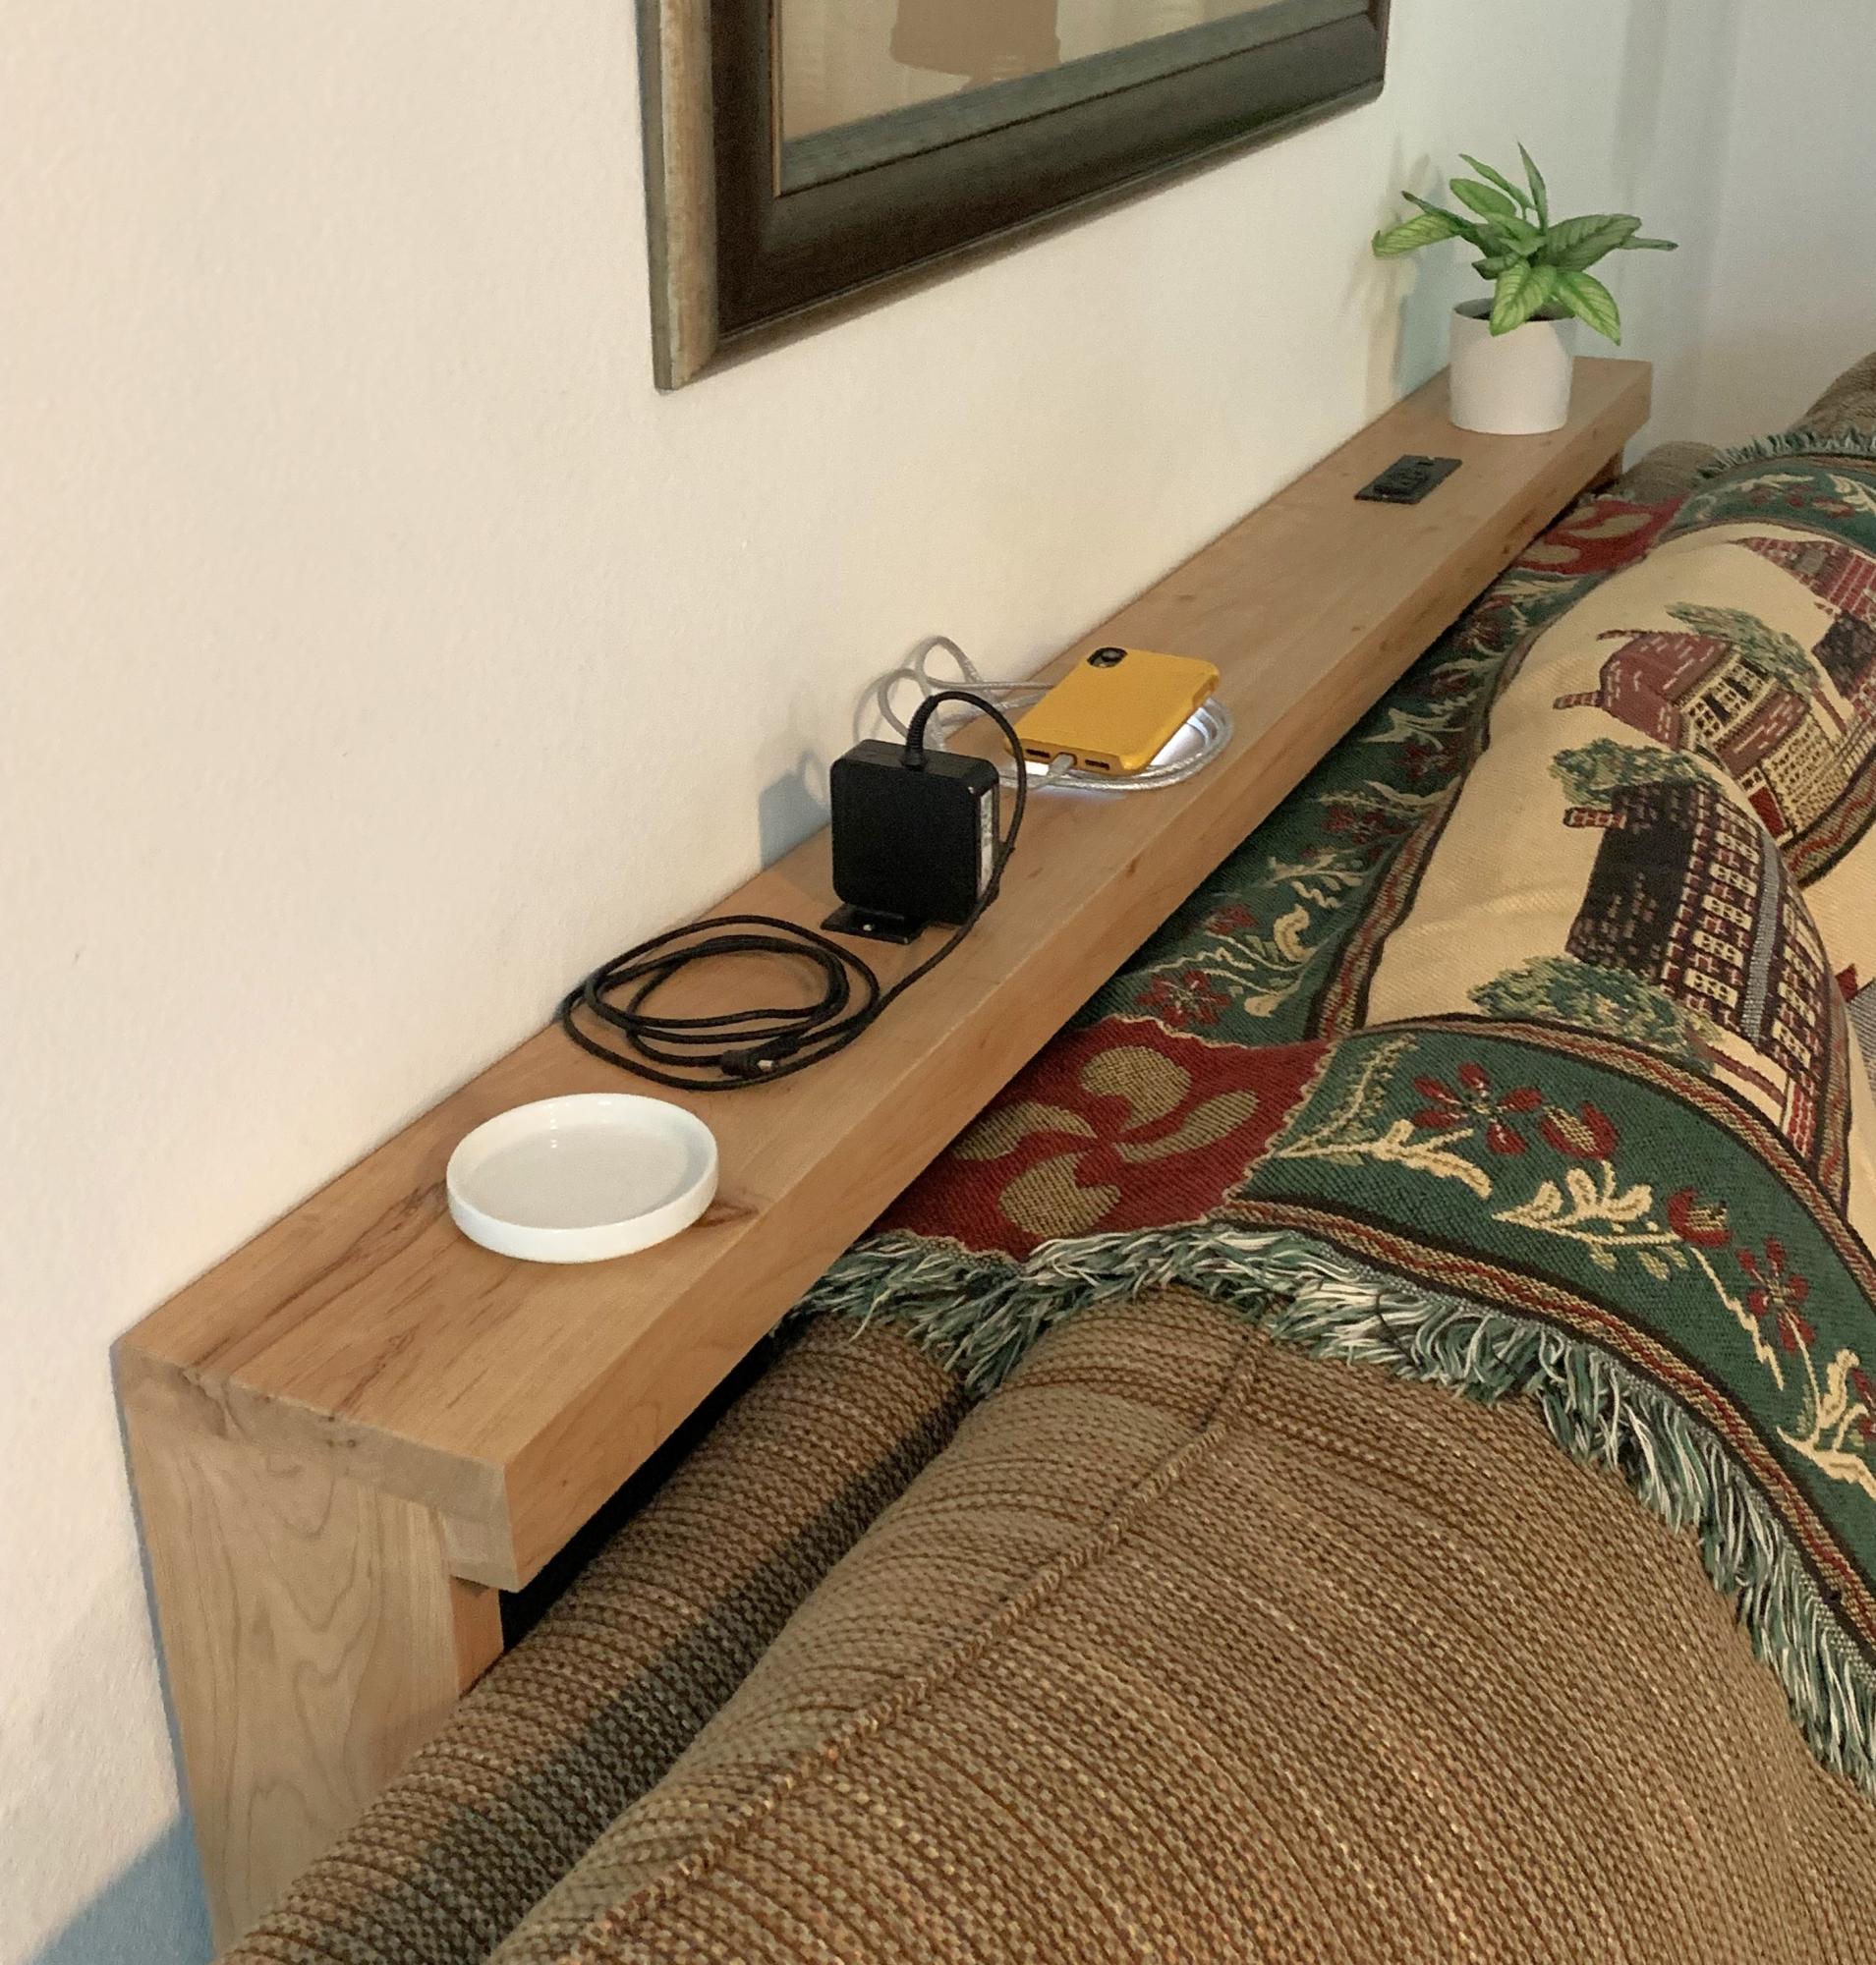
We wanted a shallow table behind our sofa where we could charge our phones and laptops while relaxing in the evening. I used three 1” X 6” pieces of cherry, connected with pocket holes, and put a small gusset in the corners. With a couple of power strips inserted in the top and plenty of polyurethane, that was it!
His Hands
woodworking bench
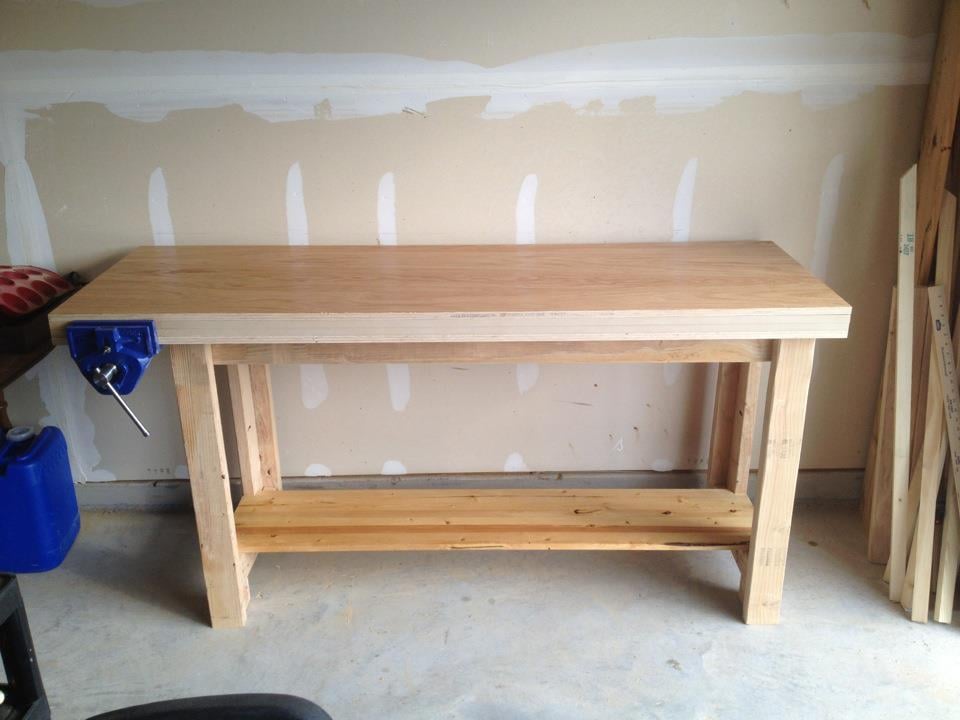
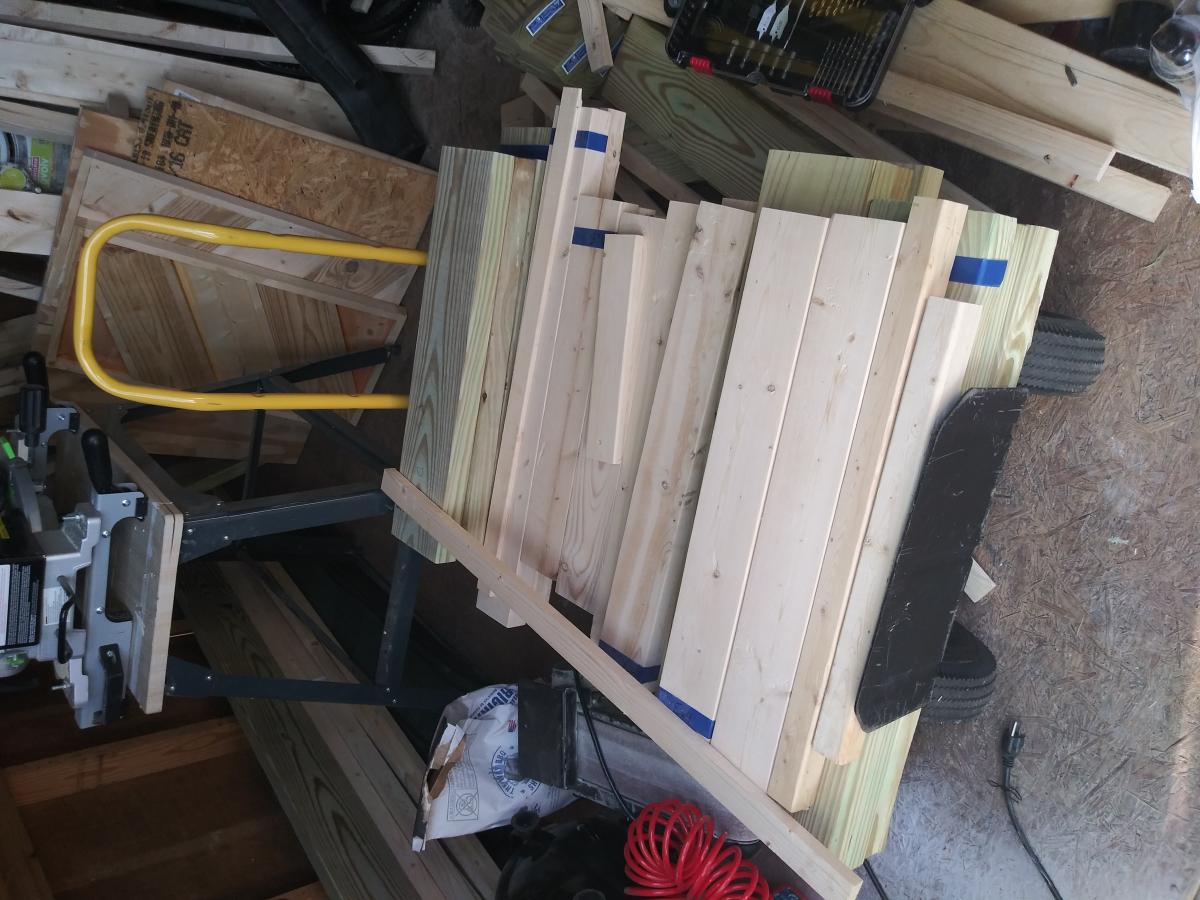
Used the sturdy work bench plans for the base. The base is 60" x 20". The top is 6'x2'. I wanted 2" overhang all around to accomodate clamping. I used 3/4" oak plywood for the benchtop. It's stacked as follows, oak plywood, 3/4" mdf x 2, oak plywood for a massive 3" thick top. I used pocket holes to join the legs and on a few of the other joints including to attach the top. The benchtop layers are screwed together with 2.5" wood screws with countersinks for the heads. I would have put a full shelf in but that's the piece of wood I had so I used it. I bought the 7" undermount woodworkers vise online for around $70. It's mounted with 2.5" lag screws and washers. I did not use exact 2x4's for the base, I used the standard 2x4's (which are actually 1.5" by 3.5"). The bench is pretty sturdy as is but with the massive top/vise and not using standard 2x4's it is not as solid as I would like. It's fine for now but eventually I going to install some threaded rods through the legs length and width to pull it together rock solid. I put some tung oil on the top and later i'll put some wax paste over that. I'm going to seal the edges with shellac or maybe just leave as is. Eventually put some bench dog holes in the top for my vise. I did this all with a cordless drill/bits, kreg jig, circular saw with homemade fence, rulers, squares, random orbit sander etc. Took about two weeks time, working mostly on weekends. The bench alone is around $130, all bought from a "big box" store. Be ready to spend more $$ on tools if you don't have them. This is my 2nd project.
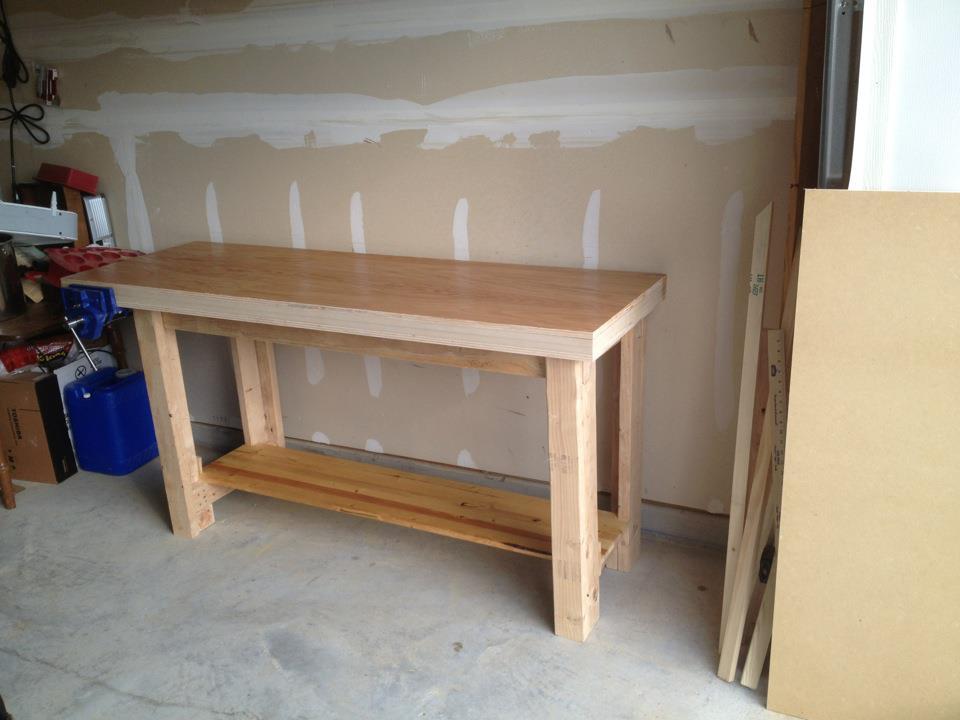
Built from Plan(s)
Estimated Time Investment
Week Long Project (20 Hours or More)
Finish Used
tung oil
Recommended Skill Level
Starter Project
modified garden farmhouse table

I put an ad in a local classifieds for free wood. Got some heavy oak beams I had local carpenter saw to make the leg posts. The top boards are construction scaffolding boards. All will be sanded and stained some more, top boards sanded and varnished, bottom boards and posts stained and some holes filled w epoxy and it is good to go.
This was a really fun project. We stood on top of the boards to make them bend down when screwing them in from the top as well as bottom, as the middle board is cracked and bent. I love the table as it is now but it will look even better when the boards are even more worn and grey from the elements. Thank you Ana White!!!!!!!! we can't wait for a book of yours' to come out for a European audience, as we Europeans have a hell of a hard time to convert the measurements! This means we improvise a lot. The tables in your book help, but the local wood we buy in many different countries and stores.. have different measurements!!!!
Built from Plan(s)
Estimated Time Investment
Weekend Project (10-20 Hours)
Finish Used
We don't have minwax here so it is a French company called Liberon I think
Recommended Skill Level
Intermediate
Comments
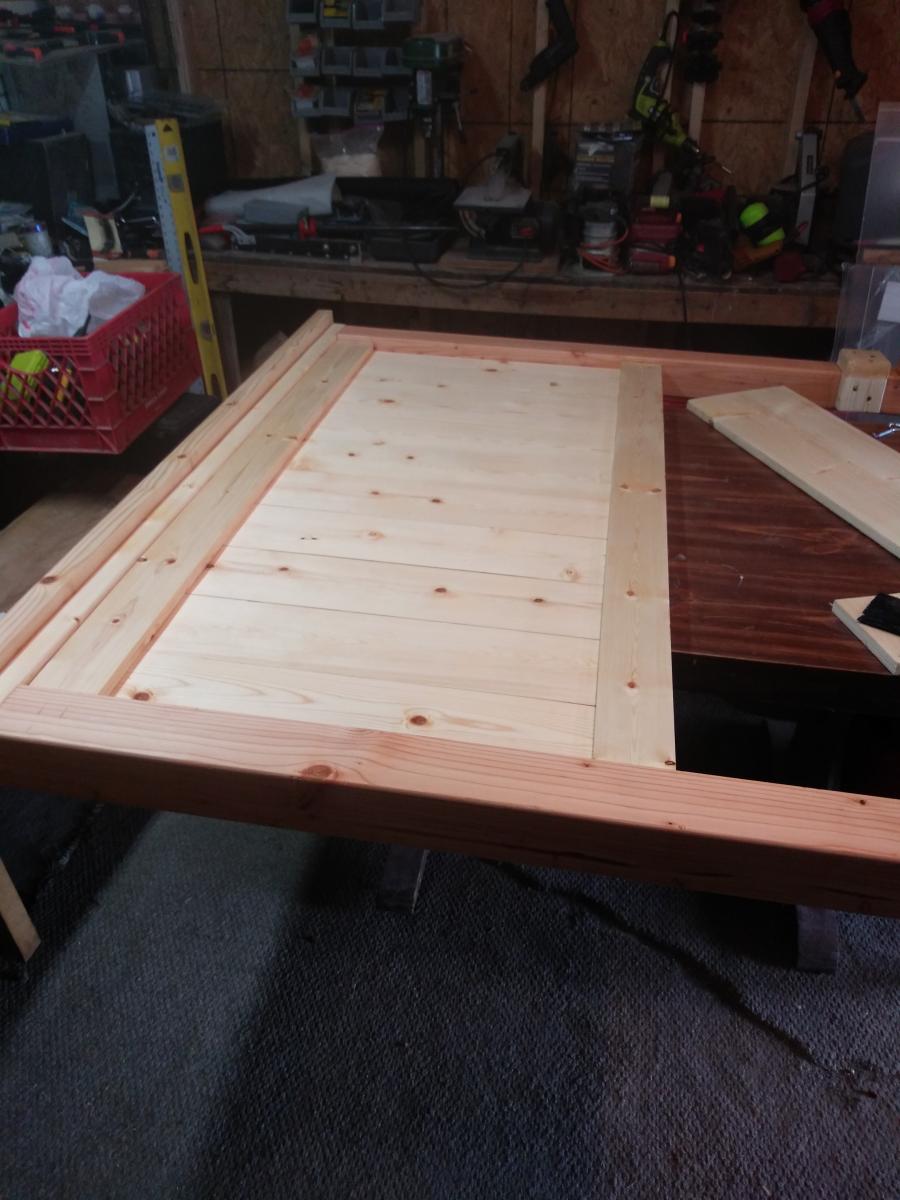
Farmhouse Dining Room Table and Bench

This was my first ever DIY project as I wouldnt consider myself a handy man, but I had alot of fun making this table and bench. I modified the design as I wasn't confident in making the necessary cuts for the X but I added a long support underneath the table top so that the top wouldn't sag (hopefully!). Since completing the table, I've grown more comfortable with my carpentry "skills" and all I want to do on the weekends is build things! I'm sure I'm driving my wife insane!
It took me a lot longer as I had a couple weekends where I could only work on the table and bench for an hour or two but you can definitely do it in a weekend.
Thanks Ana!
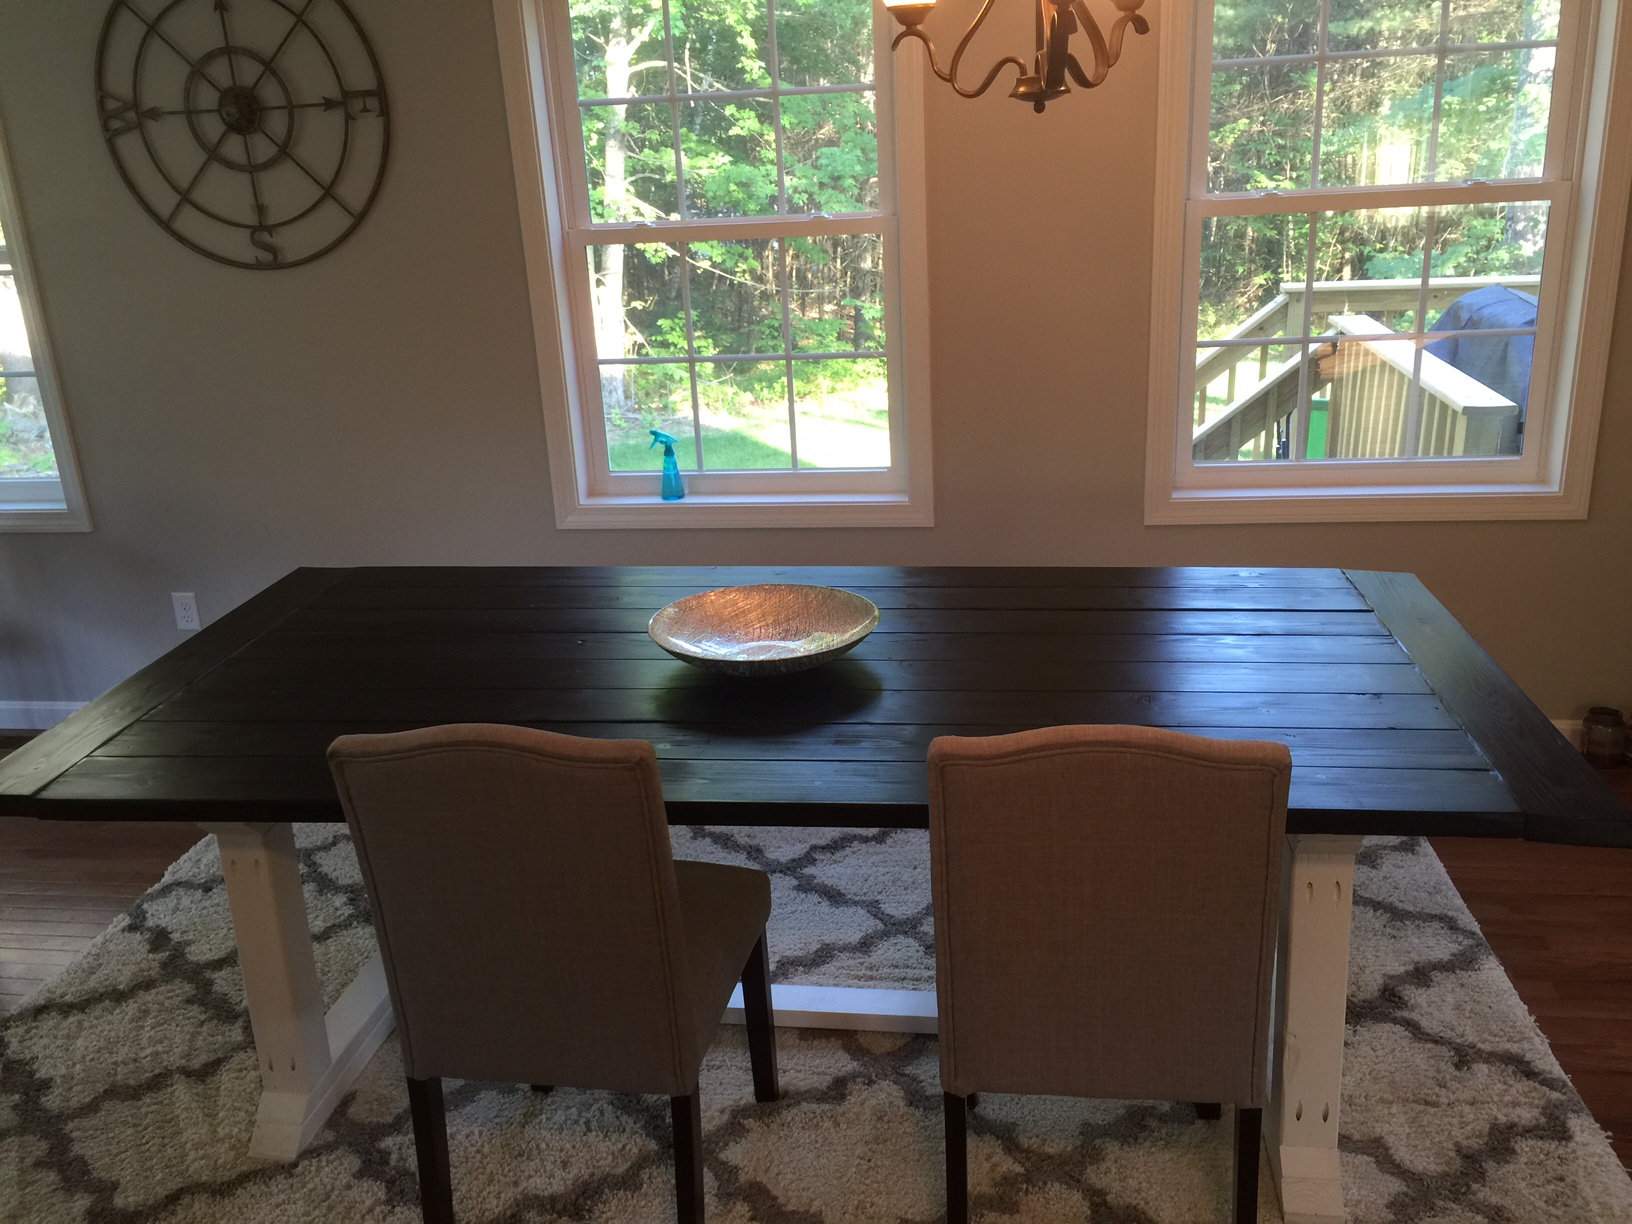
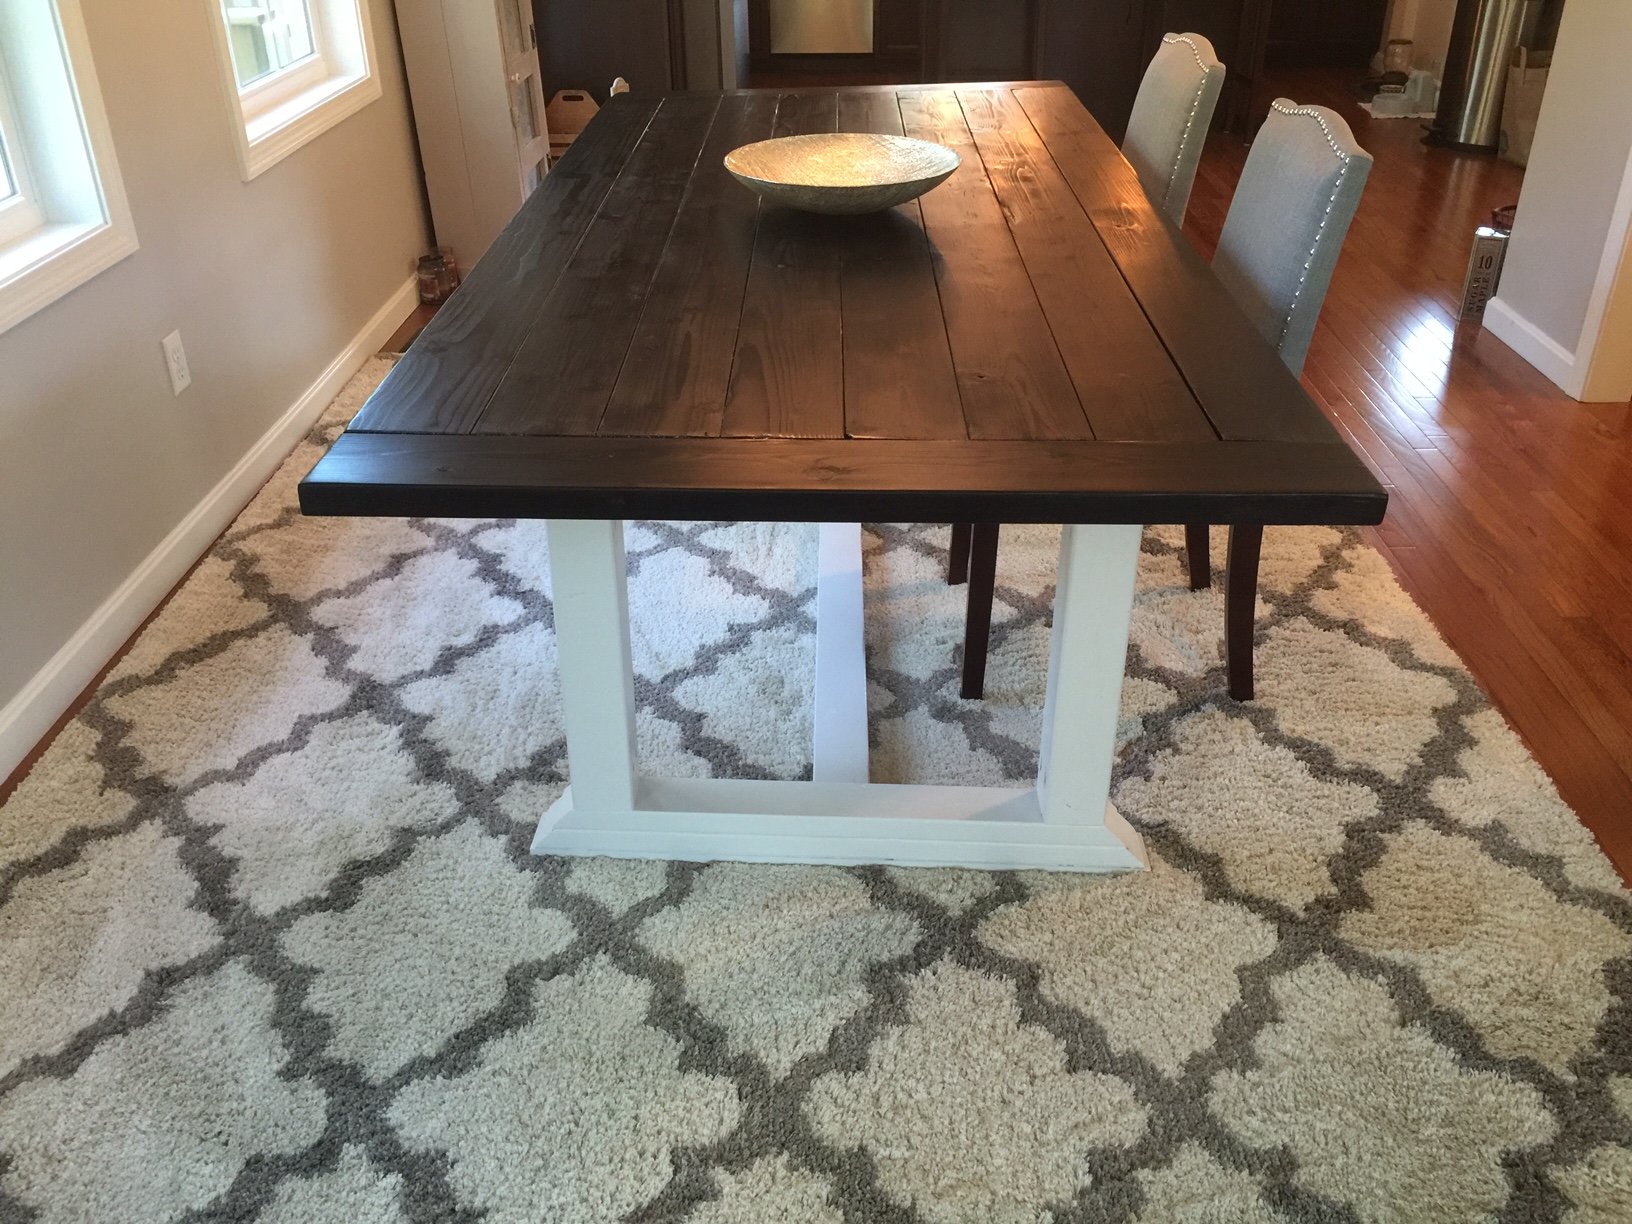
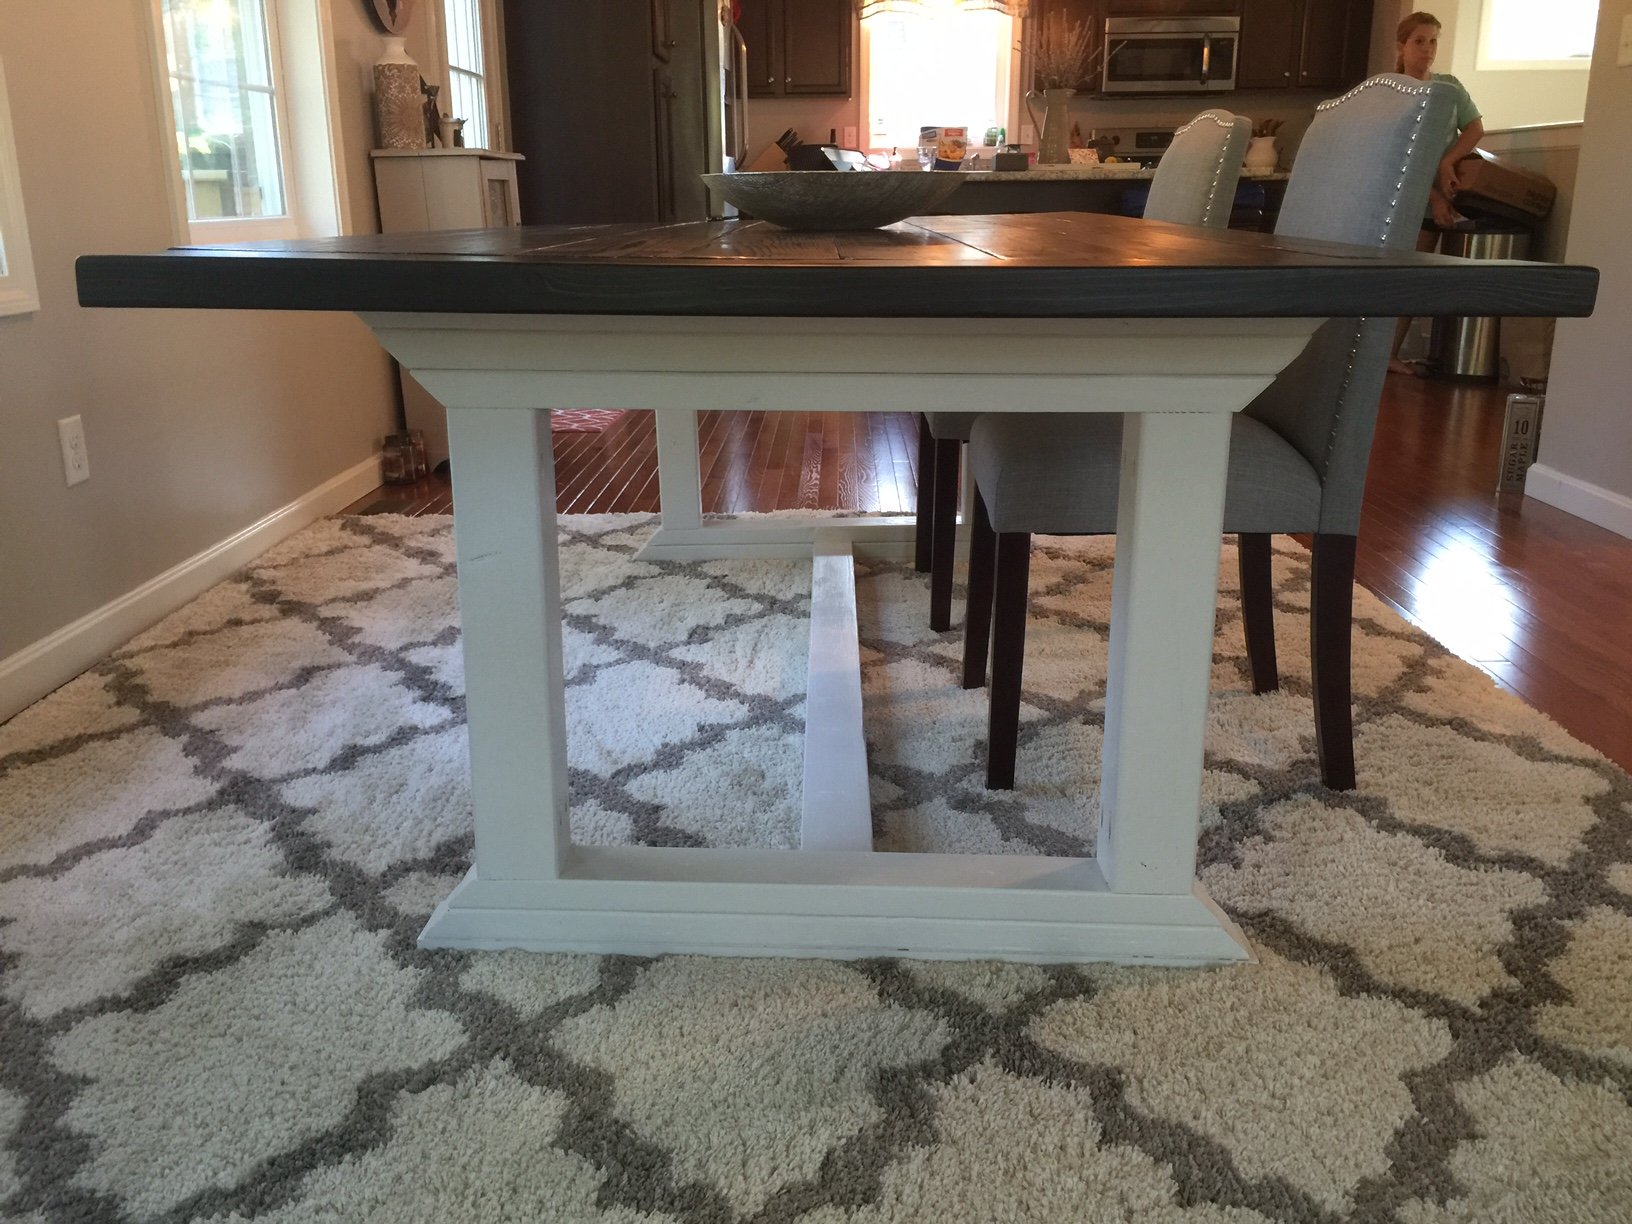
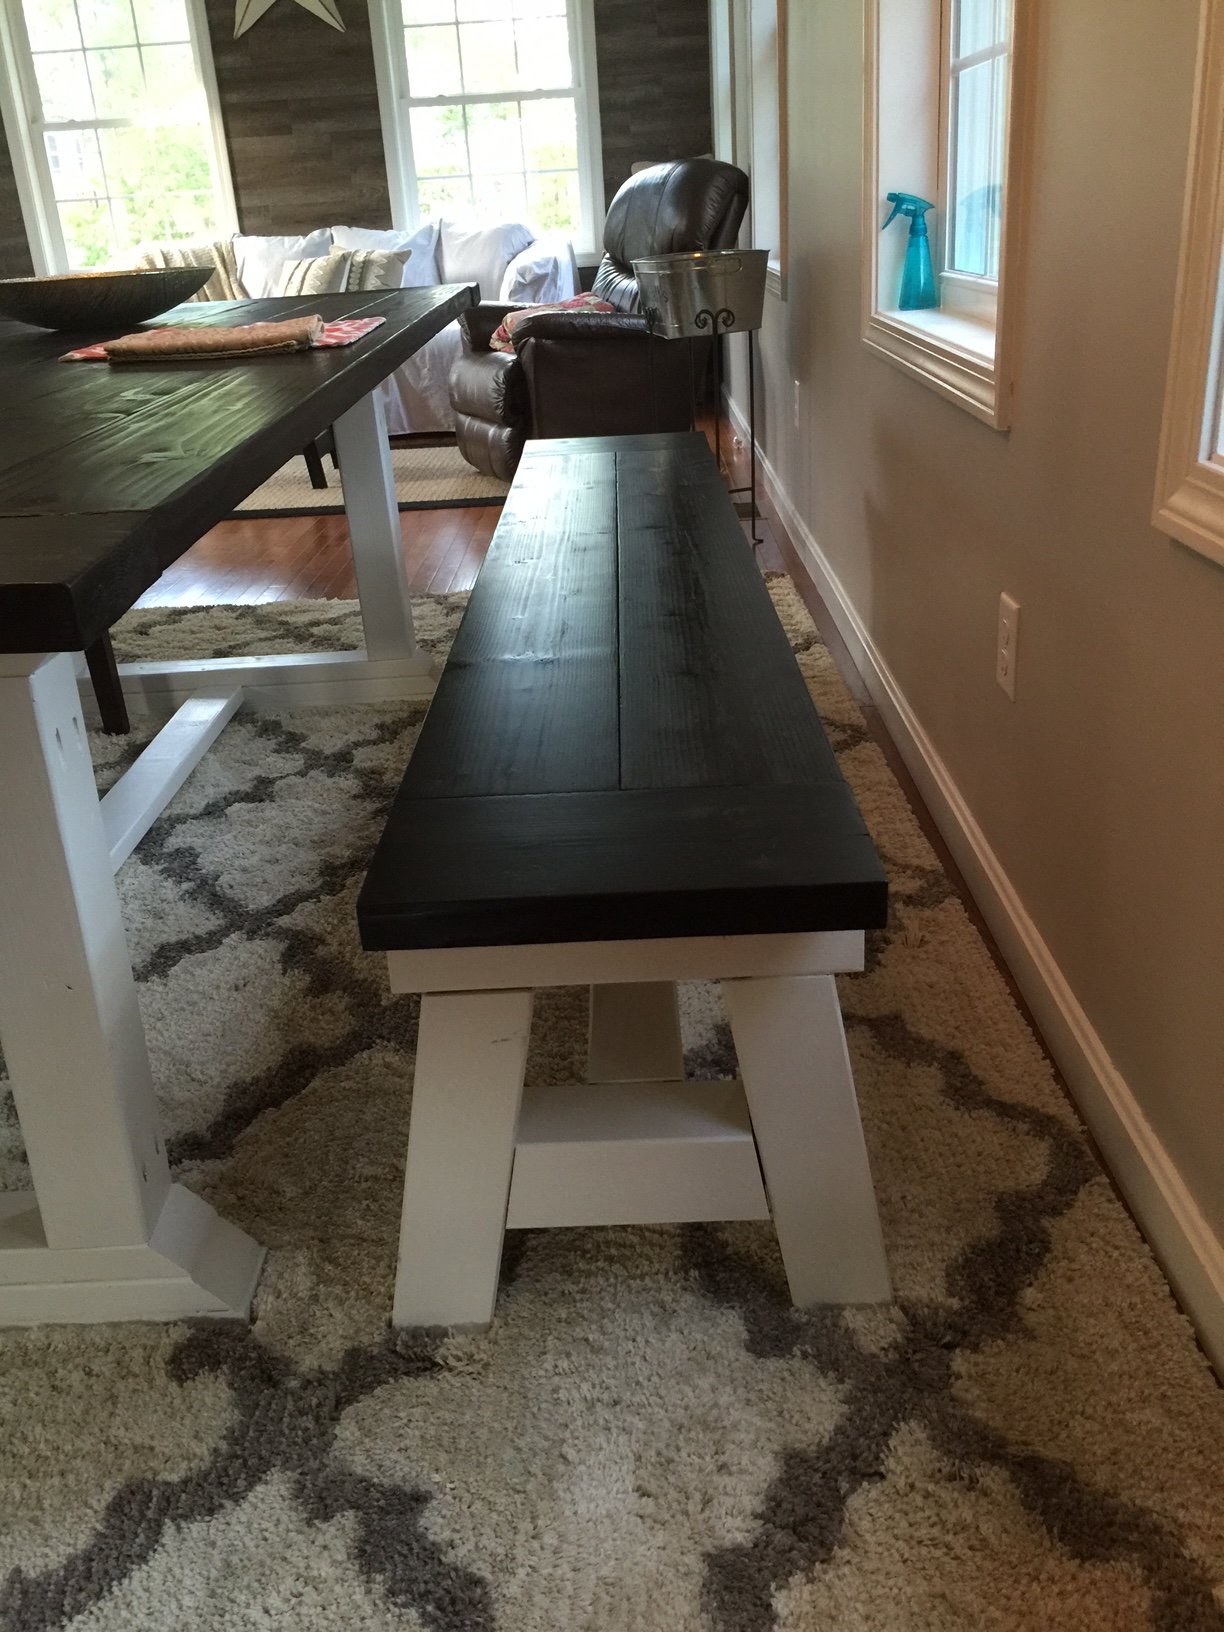
Built from Plan(s)
Estimated Time Investment
Week Long Project (20 Hours or More)
Finish Used
Miniwax Expresso Polyshades
Recommended Skill Level
Intermediate
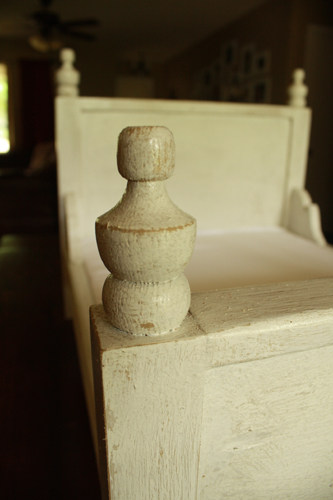
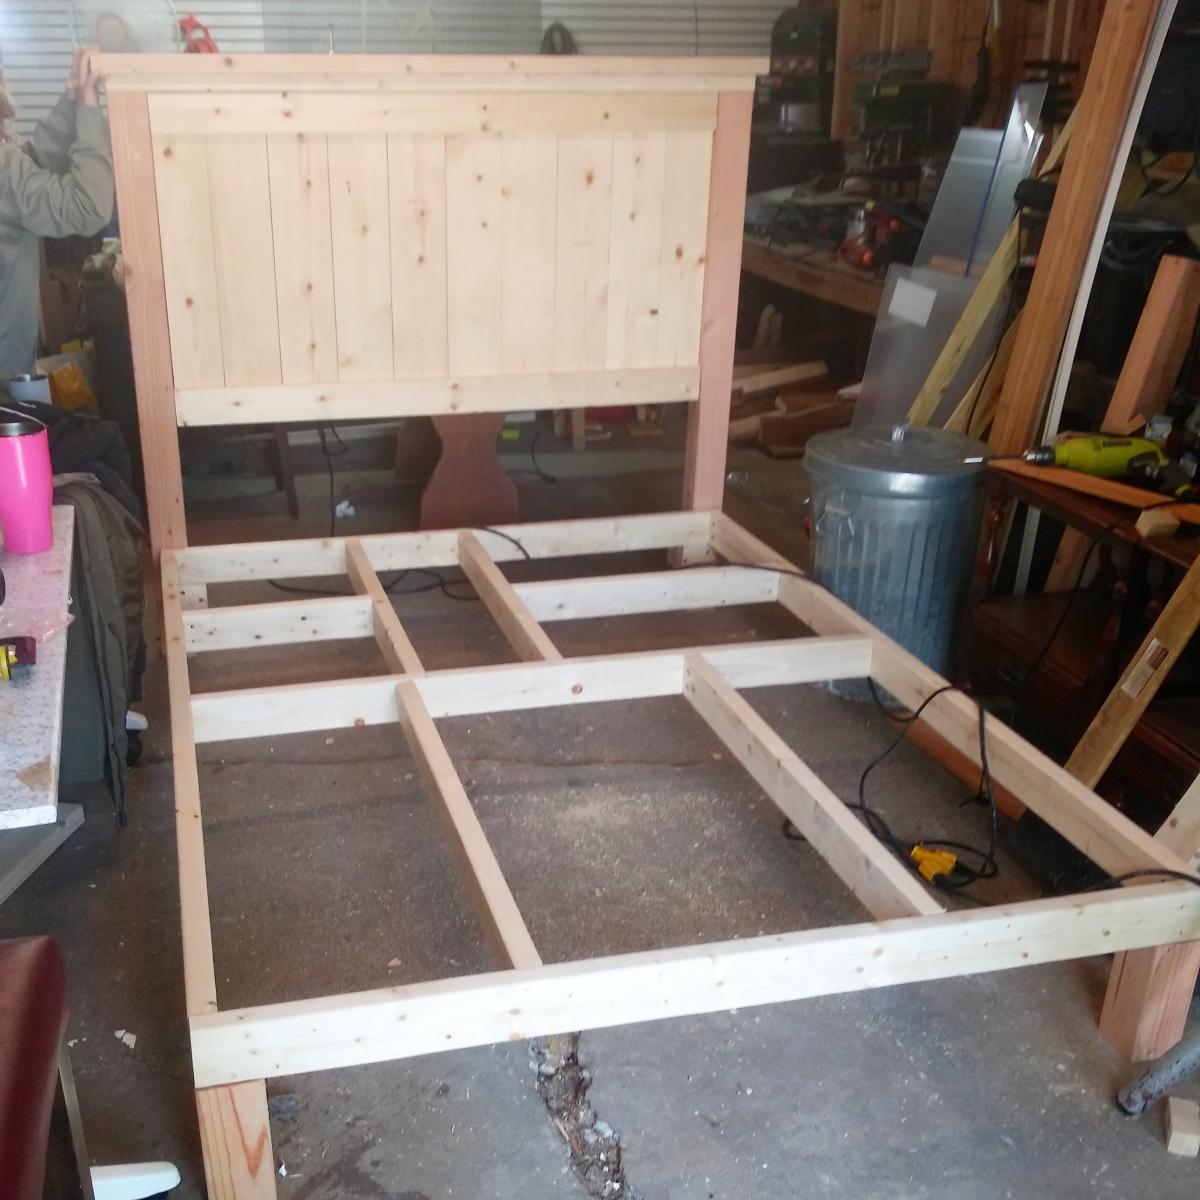
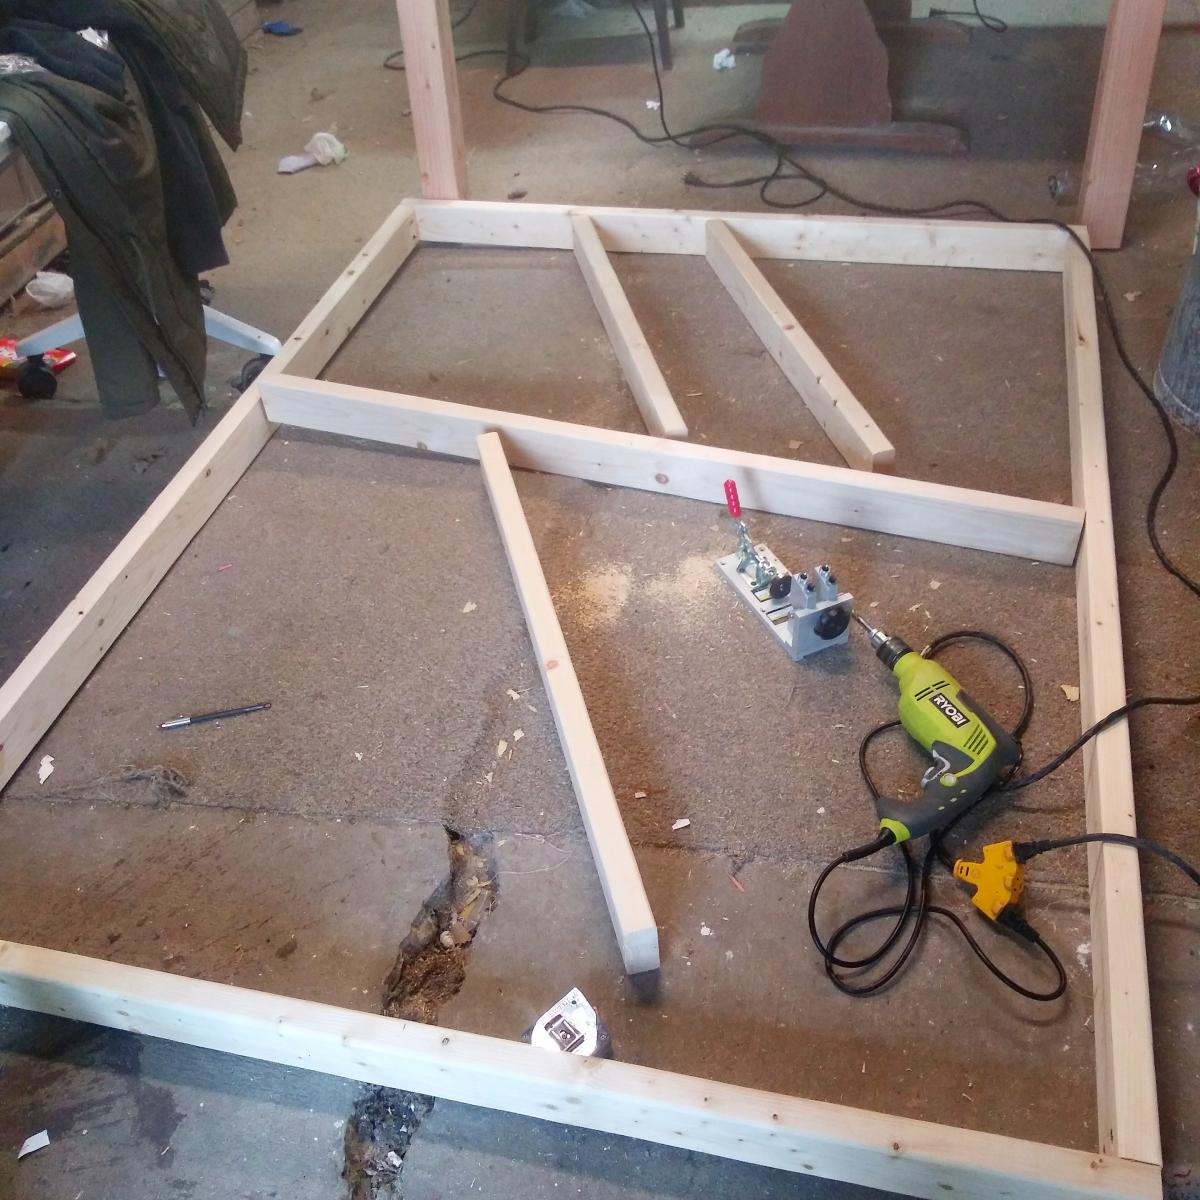
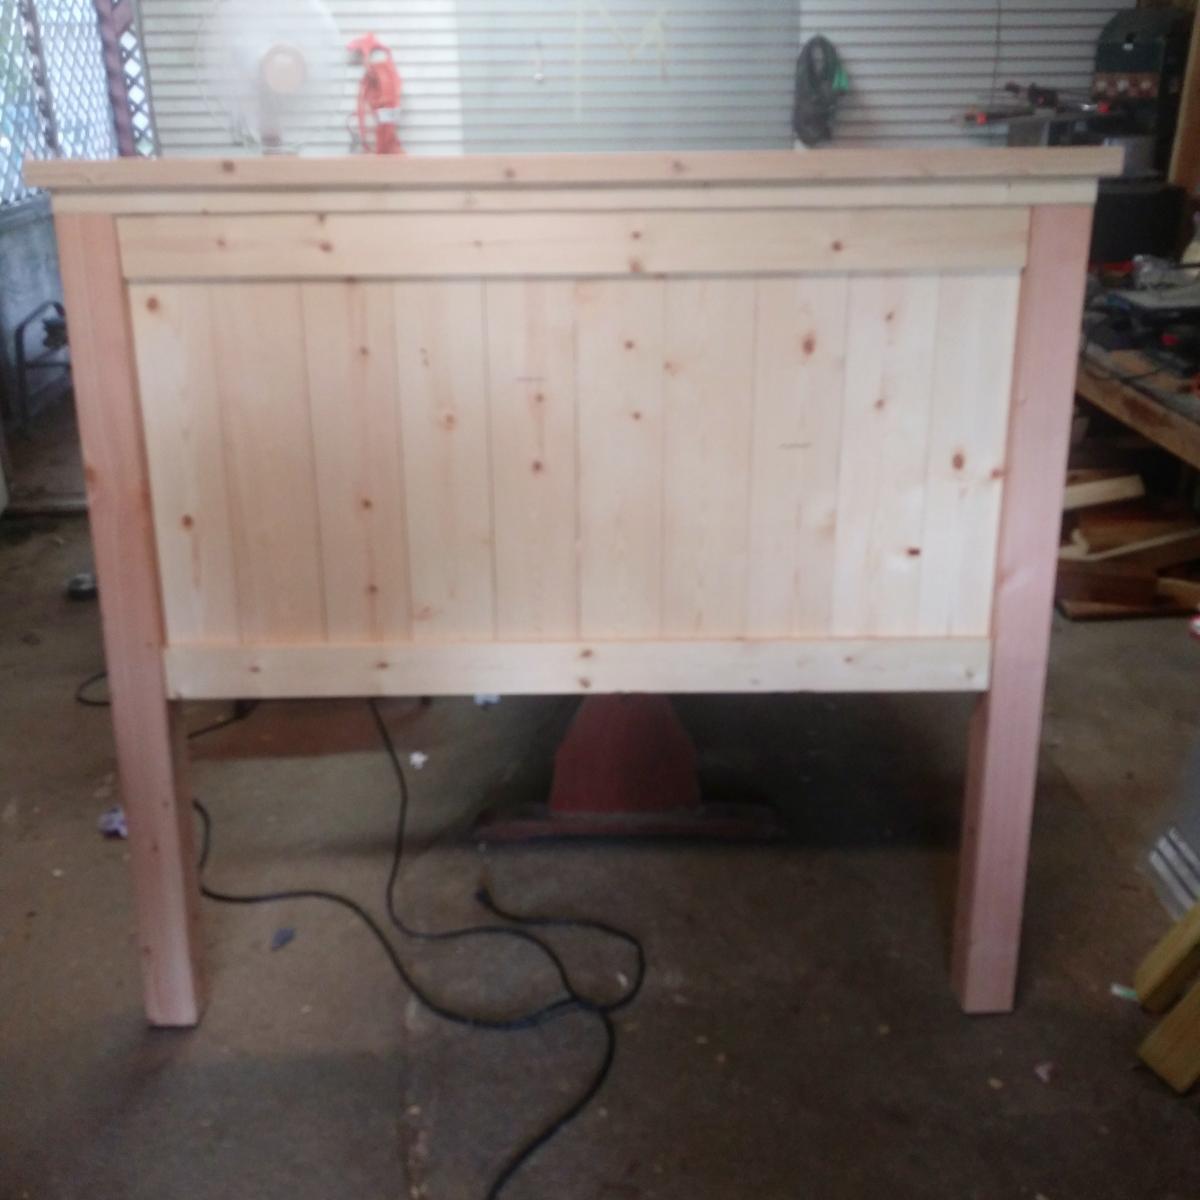
Farmhouse Queen Pine Bed

This bed is a modified version of the farmhouse queen. Instead of a footboard I allowed the side boards to continue around the foot of the bed. The frame was built to give support and also house the motor and other moving parts needed to lift and lower the head. In the linked text is a video of the bed with the head lifting and lowering on the mechanical base.

Built from Plan(s)
Estimated Cost
$200'ish
Estimated Time Investment
Day Project (6-9 Hours)
Finish Used
Minwax Polyurethane on the pine boards and black spray paint on letter and rope trim.
Recommended Skill Level
Intermediate
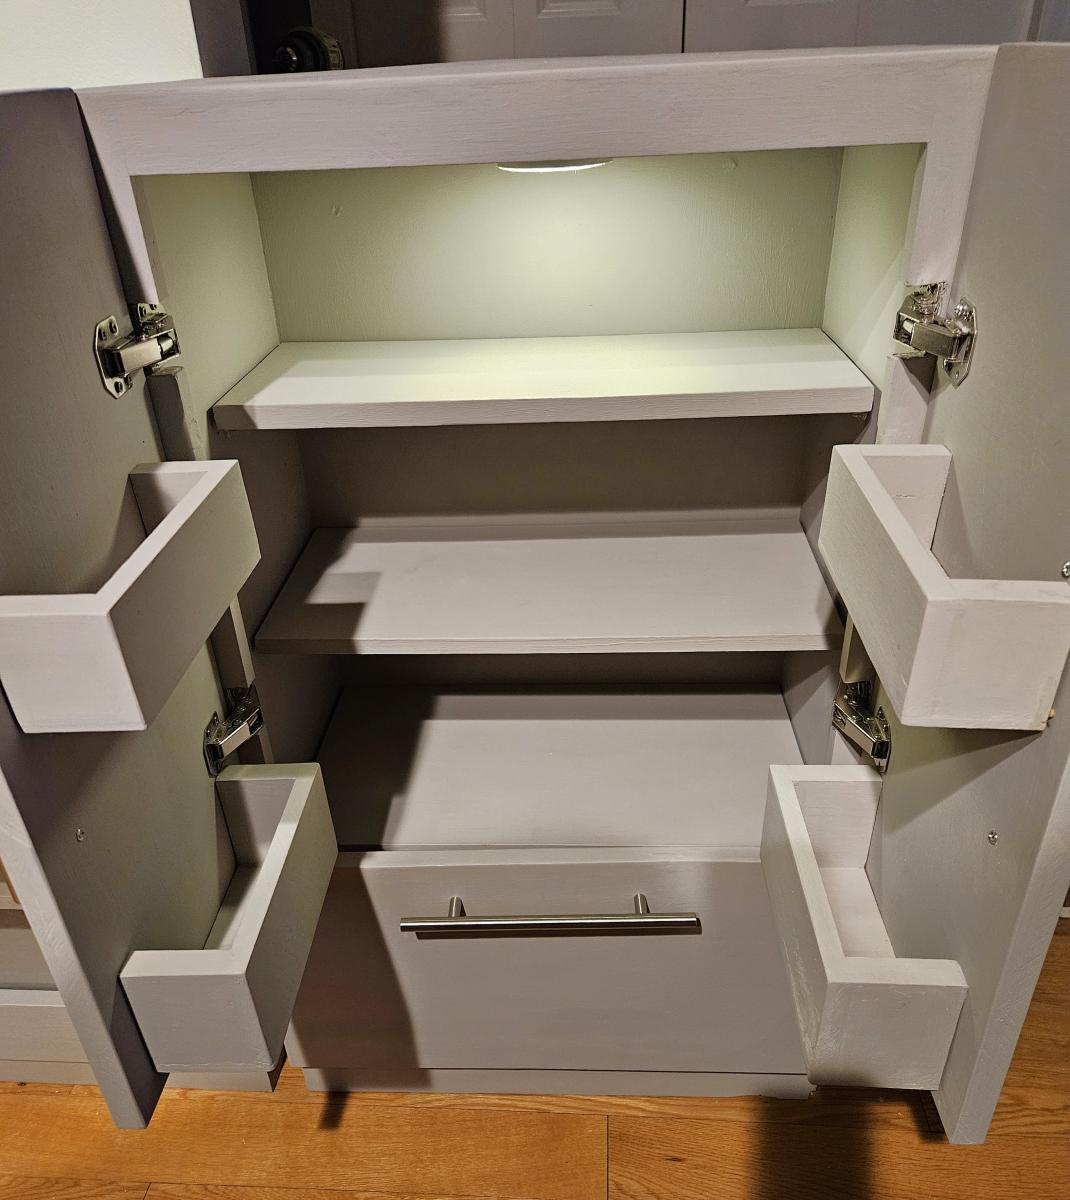
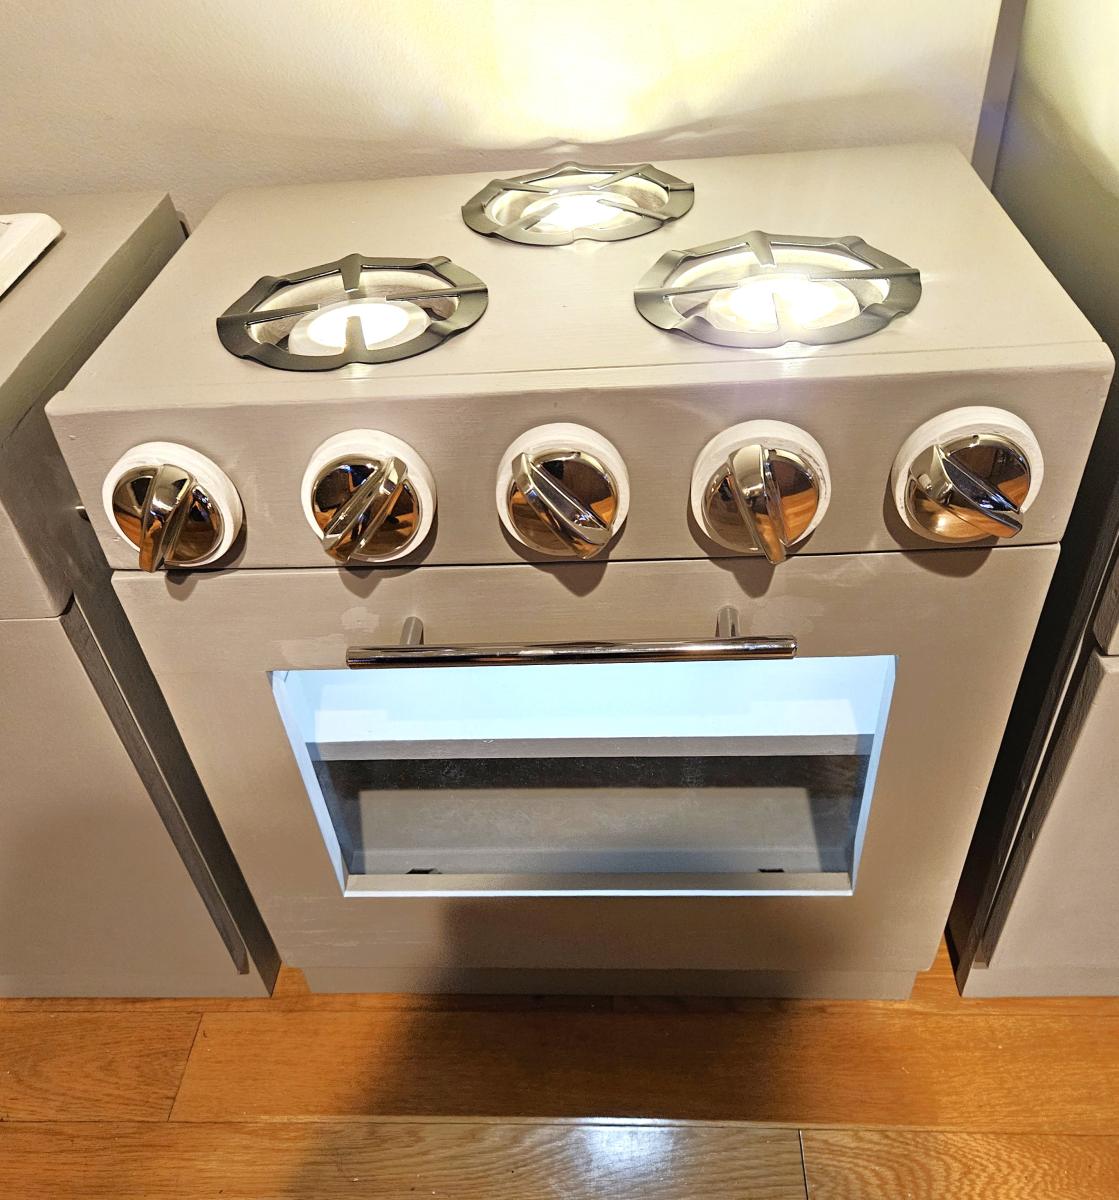
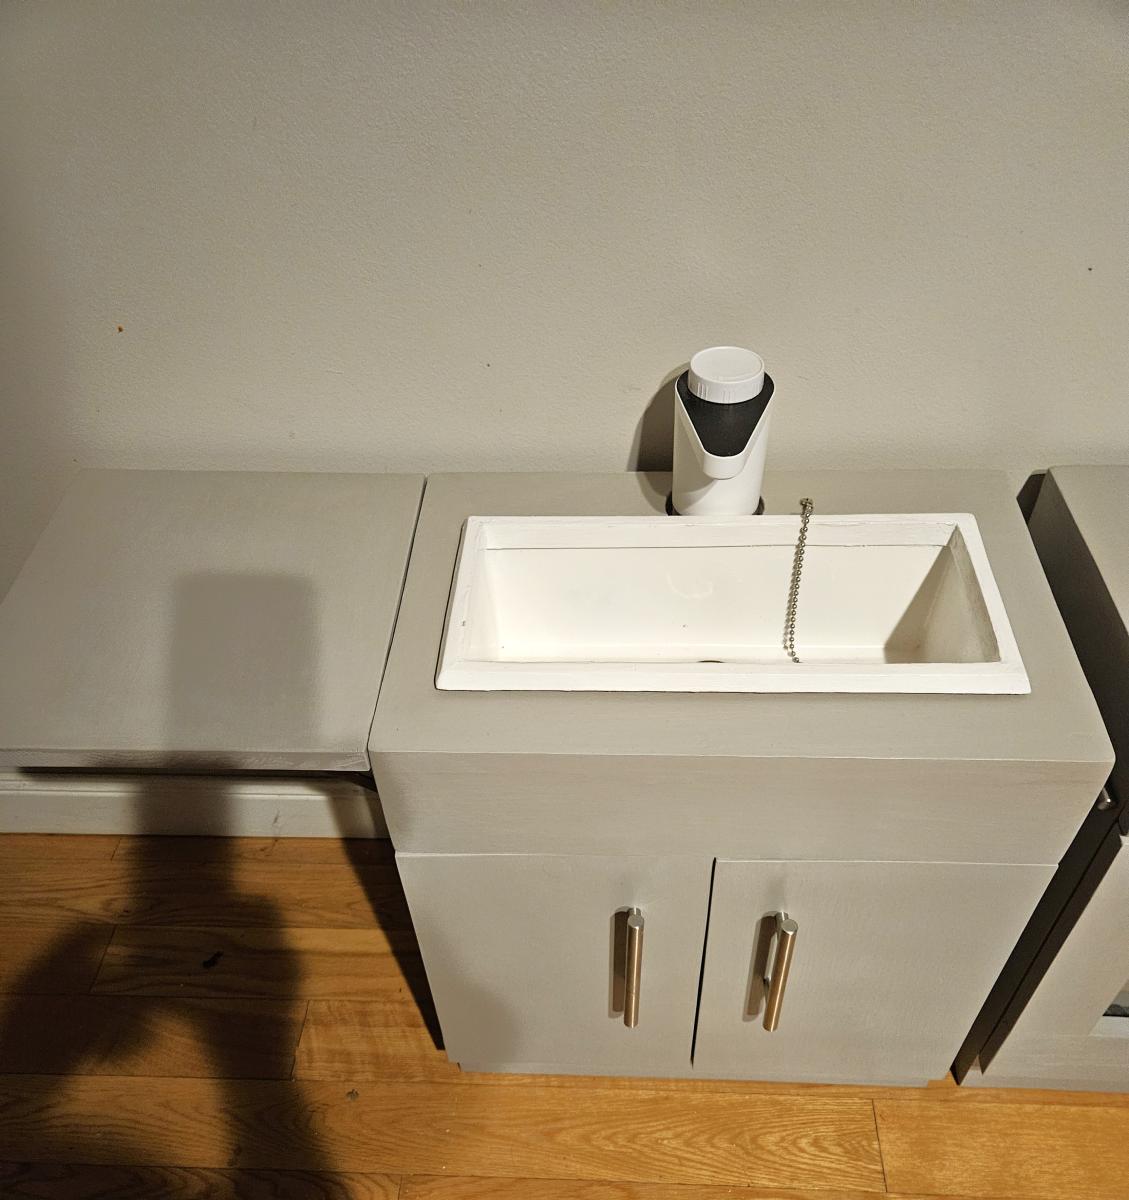
Deluxe Kids Play Kitchen
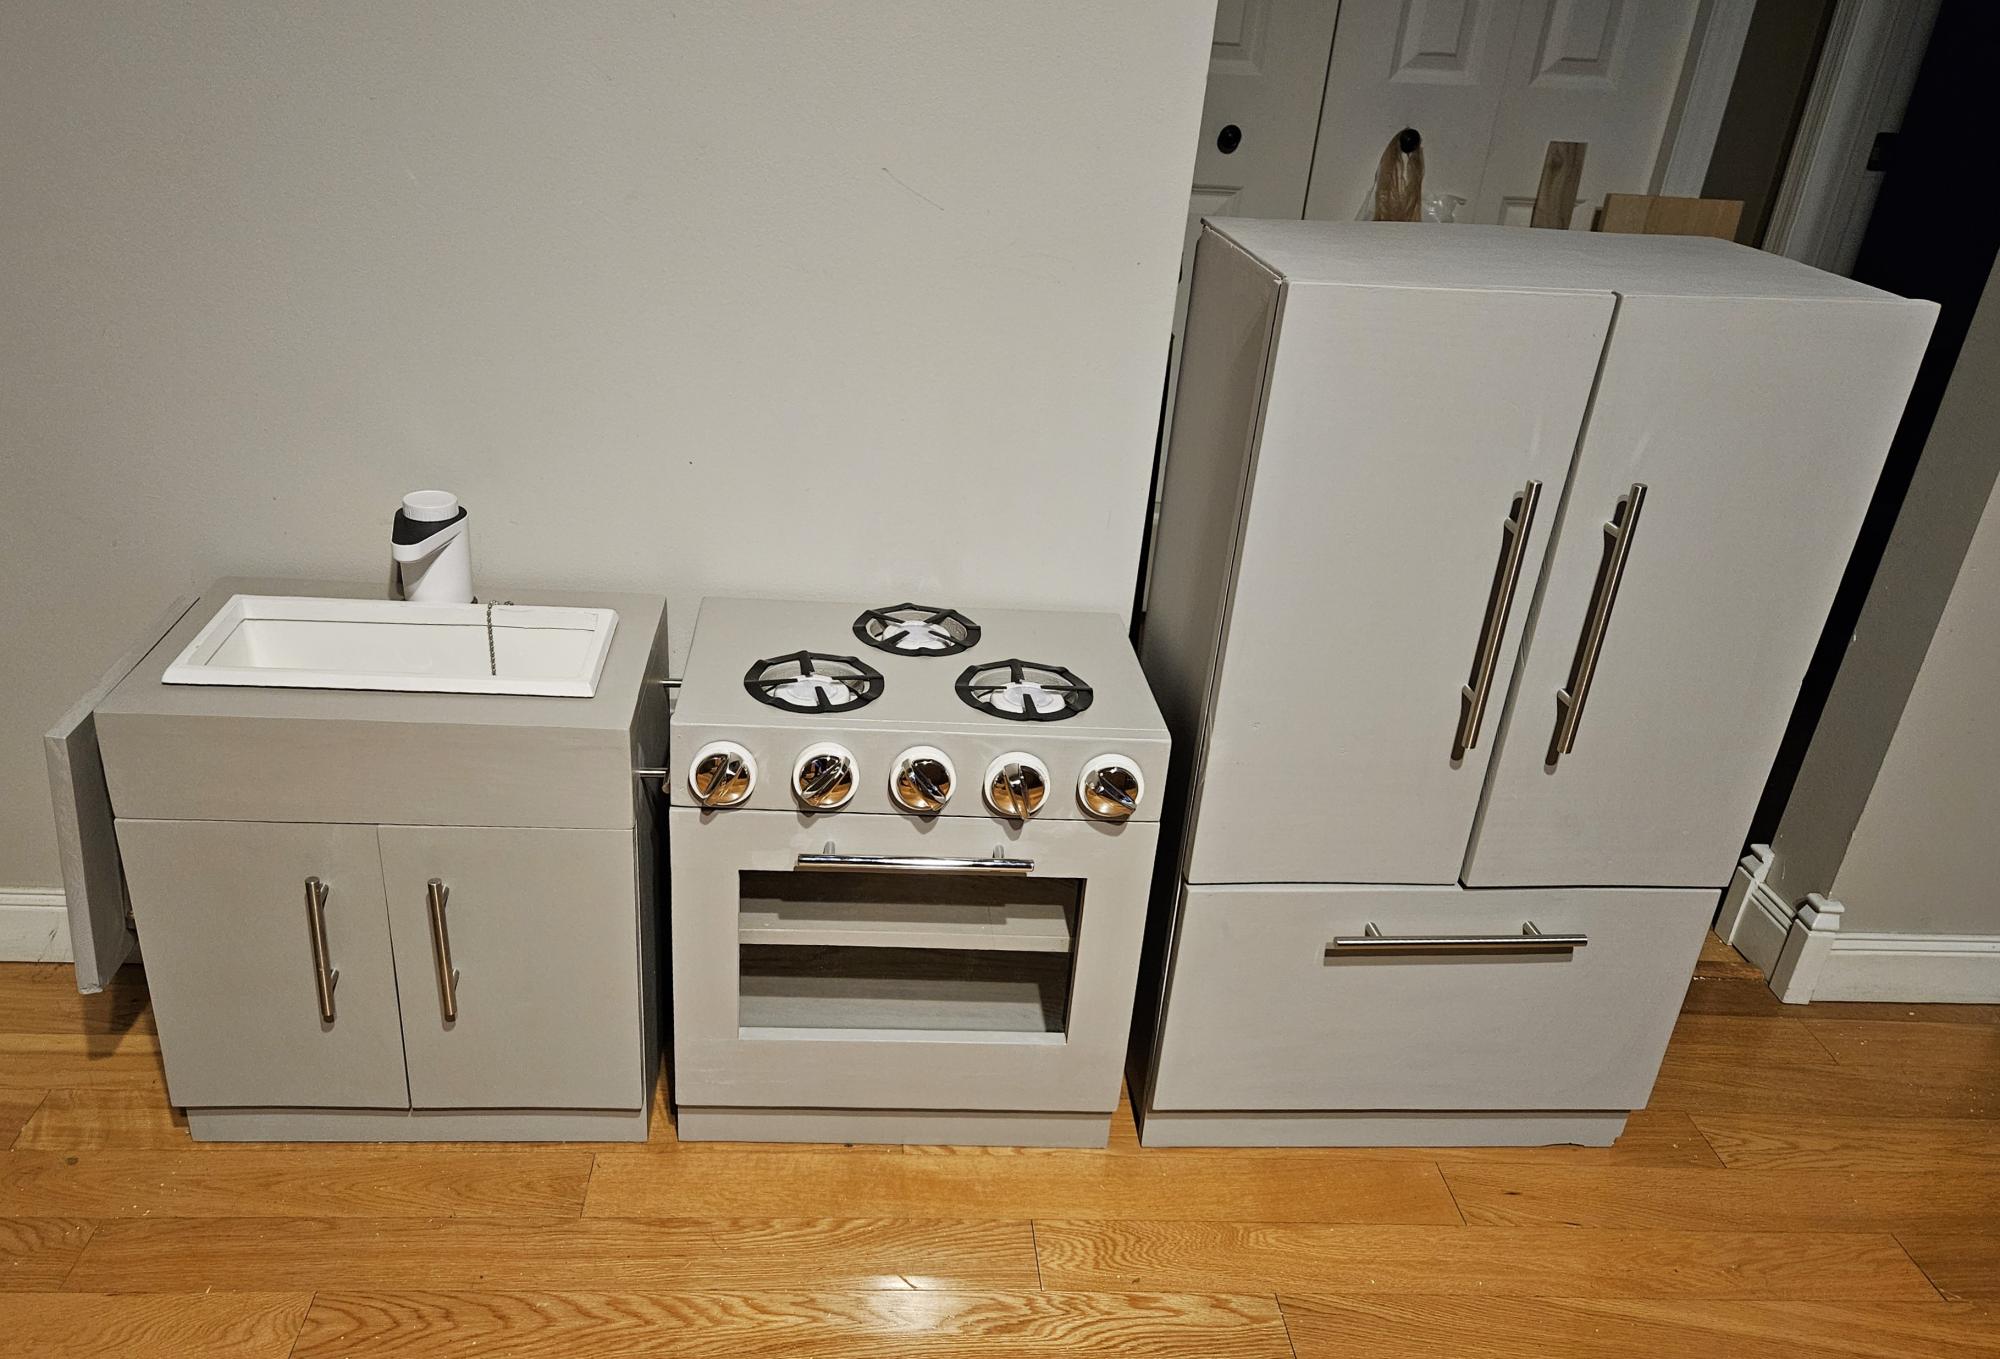
Christmas kitchen for my granddaughter using Ana's kids kitchen plans.
Raelyn's Gramma