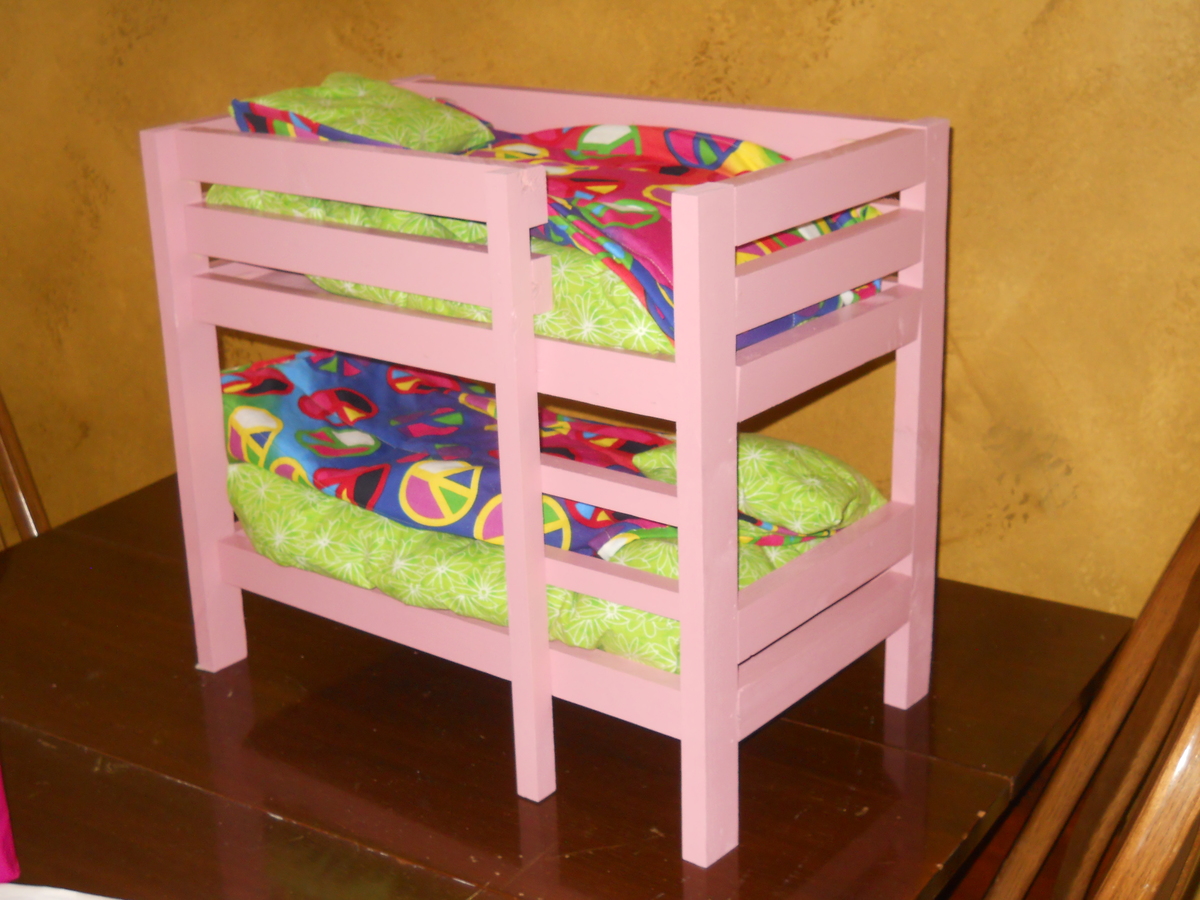
Community Brag Posts

Doll Bunk Bed

Submitted by LARMO on Sat, 01/25/2014 - 19:45

I made this for my grand-daughter for her birthday following the plan from the plan catalog using my Keg Jig and scraps from previous projects. My wife followed a link from then plan to make the pad and quilt. I spray painted it with a semi-gloss pink - her favorite color

Estimated Cost
$50
Estimated Time Investment
Afternoon Project (3-6 Hours)
Finish Used
Krylon Semi-gloss Spray Paint Pink
Recommended Skill Level
Intermediate

Rolling Shelf

Submitted by imsomark on Tue, 04/19/2016 - 06:31

Thank for this plan, I needed something in the corner of my living room and this ended up being perfect. I followed the steps for the frame of the bookshelf as the plan outlined but made a few other changes:

1. I put the EMT pipe a bit lower than Ana's plan, more like how the RH shelf looked. I drilled a hole 5 inches from the top of each shelf, and about 3/4 of an inch from the back (5 inches up, 3/4 over)
2. I used flat iron spray paint for the EMT pipe and caps
3. I used caps instead of having the pipe ends sticking out
4. I used 4'' rigid caster wheels, found on etsy for $15 each
5. I used weathered oak stain
6. I couldn't find the right size corner brackets so I bought a 1.5'' wide steel flat bar from Lowes and made them myself. I cut the bar at 6'', put it in a vise and hammered it in the middle to be at 45 degrees, and drilled holes for the screws.

Built from Plan(s)
Estimated Cost
Wood - $50
EMT Pipe - $4
Pipe caps - $10
Casters - $80 (including $20 shipping)
Stain - $7
Spray paint - $7
Steel flat bar - $5
Screws - $5

Total - $168
Estimated Time Investment
Weekend Project (10-20 Hours)
Finish Used
Weathered Oak
Recommended Skill Level
Intermediate

Brandy Scrap Wood Storage Bed with Drawers - KING

Even with having severe disability's with my hands and a lot of help from my wonderful husband, this plan was perfect for me. I did add a head board with selves and extended the length of the sides to allow for a bench seat. I am so proud of this beautiful bed, Rebel and Zeus love it too.  Thank you, Ana White.

Estimated Cost
$135
Estimated Time Investment
Week Long Project (20 Hours or More)
Recommended Skill Level
Intermediate

Essential Adirondack Chair - Brad's Mod

Submitted by Anonymous (not verified) on Fri, 09/08/2023 - 13:09

I modified the design to better suit my senior body.
I added 3 inches to the seat height by using 2x6s, made it 1 inch wider, and added clunky drink holders.
I also used cedar fence boards for the seats and backs because I like the look.
I went with Barn Red Stain and Thompson's Water Seal for the finish.
Thank you for this design. They are quite comfortable.
The cost was less than $40 each.

My Bed

Submitted by AlHoward on Sat, 04/14/2012 - 10:08

I just followed Ana's plan!

Estimated Cost
$175
Estimated Time Investment
Weekend Project (10-20 Hours)
Finish Used
One coat semi gloss interior paint and sanded.
Recommended Skill Level
Beginner

Comments

Combo of Farmhouse Bed with Farmhouse Storage Bed

Submitted by jeniroosen on Mon, 01/27/2014 - 21:39

I meshed the Farmhouse Bed with the Farmhouse Storage Bed with Storage Drawers and this is the final product. Let me know if you have any questions. I learned along the way.

A few things I modified -

I knocked off the corners of the 1x8's used in the footboard and headboard as I wasn't a fan with how they butted up straight. I liked the rounded edges of the routered boards instead.

I cove routered the tops of 2x6's and loved how they turned out

When I handed my cutlist to the kid at the big orange store, he pulled OSB instead of plywood for the storage cabinets. I realized it halfway through the cutting as I was shopping for other things and didn't have the heart to tell him halfway through the job. I had to edge band (first time) the edges and the OSB soaked up a lot of primer.

Estimated Cost
$400
Estimated Time Investment
Week Long Project (20 Hours or More)
Finish Used
Glidden Antique White
Recommended Skill Level
Beginner

Comments

Jim's Corner Cupboard

Submitted by jimmyray7 on Fri, 04/22/2016 - 13:05

This was my first large build, and it went fairly well. A few little issues here and there, but I'm the only one who will notice most of them.

Built from Plan(s)
Finish Used
White Latex paint finished with Minwax Polycrylic (spray paint can - not recommended. Next time I'll brush or wipe on the poly).
Recommended Skill Level
Beginner

Camp Loft Bed

Submitted by msjo62 on Tue, 01/14/2020 - 12:31

Created for my grandson.  He woke up Christmas morning so excited!  He loved it!

Thank you for the plans!

Distressed Farmhouse Bench

Submitted by sandrabees on Tue, 04/17/2012 - 06:09

Built this for extra seating in my dining room. I followed Ana's plans to the T.... I used a skill saw and chisel to notch the wood...

Estimated Cost
$20
Estimated Time Investment
An Hour or Two (0-2 Hours)
Finish Used
Black onyx and 2 coats of poly with distressing
Recommended Skill Level
Starter Project

Comments

sarah family (not verified)

Wed, 11/07/2012 - 12:17

Hi! Just curious about two things. Did you use 1 x 4's for the inside apron or 2 x 4's? Also, have had any problems with kids tipping the bench over?

Toddler bed

Submitted by Anonymous (not verified) on Wed, 04/27/2016 - 09:47

this is my favourite piece of furniture that I have built so far and my daughter loves it! Turned out great and the plan was so easy to follow. I wouldn't suggest glueing and kreg jigging. We did that on our coffee table and when the wood shrunk it tore in between the boards and looked terrible. I used flanged plugs at the ends so that I can pop them out and take the bed apart easily but have no exposed screw holes and then filled the kreg holes with the kreg plugs and they stained up great!

Built from Plan(s)
Estimated Cost
$50
Estimated Time Investment
Day Project (6-9 Hours)
Finish Used
wagon wheel deck stain and 1 coat of indoor varnish
Recommended Skill Level
Intermediate

Comments

Low Loft Bed

Submitted by enweldon on Sun, 01/19/2020 - 19:09

Made several modifications to this plan.  Wanted the bed to be easy to change sheet, reduced overall height to 48in.  The mattress is fairly thick so I increased the rail height to 18in by adding another row on the side rail.  The ladder can be located on either end.  My munchkin now has a new bed and with some curtains, a new hideout.

Built from Plan(s)
Estimated Cost
$200 lumber, $50 hardwear, stain,
Estimated Time Investment
Week Long Project (20 Hours or More)
Finish Used
Red Oak Stain with a Satin Poly coat.

DIY Modern Stair Railing

Submitted by Anonymous (not verified) on Mon, 09/18/2023 - 08:57

During a home renovation we found out part of our stair rail would need to be replaced and the quote from the contractor floored us. We were searching for an economical way to DIY the stairs and come across your idea. I immediately loved it and we worked to figure out how we could put it together with our limited construction knowledge. The end result exceeded my expectations. I totally love it!

Raised Cedar Beds

THANK YOU Ana's your plans are a life saver and pocket book saver as well. You make your plans so easy to follow and use. For my project I used the cedar fence pickets and redwood 2" x 2" stakes that where on sale at the orange box store for "6 pack bundle" for only $.50 each. All I can say is SCORE! ;') Since we live in Arizona I treated all the lumber with a outdoor weather proofing wood finish (Cedar Color), lined all the interior beds (only the Wood Sides) with 4 mil plastic to keep the cedar from absorbing all the water and wired mesh on the bottom of the garden prior to adding dirt. This keeps my local rabbits/other creatures from eating my roots from the bottom up. And I have my dog from the top side. We are already a 100 degrees here and we needed to get our seedlings in a garden asap. Thanks Again for the Plans, Ana! I will be making more of these garden boxes to come.

Estimated Cost
$15
Estimated Time Investment
An Hour or Two (0-2 Hours)
Finish Used
Behr Premium Transparent Weather Proofing Wood Finish (Cedar Color)
Recommended Skill Level
Starter Project

Comments

Mariel

Thu, 08/08/2013 - 09:39

Love this! We are new to Phoenix - originally from the Midwest - and I really would like to add some raised beds to our backyard. I appreciate your comments on how you adapted these for the desert! May I ask what side of your house they are on? I'm thinking to put mine on the east side so they get morning sun, but not the scorching afternoon rays. Thanks for your AZ advice!

Seasonal And Holiday

Kylee's first build

Submitted by momtokx2 on Sun, 02/02/2014 - 14:31

My 7 year daughter and I built the Fiona's Doll Adirondack Chair together for her friend's birthday. This was Kylee's first build. She decided instead of finishing the chair, she would give her friend paints and let her do it herself. The chair went was easy to build thanks to such great plans. It took between 2-3 hours. Although I think without her help it would of been a bit quicker. I could not be happier or prouder of a project.

Built from Plan(s)
Estimated Time Investment
An Hour or Two (0-2 Hours)
Finish Used
Unfinished, allowing the new owner to finish it
Recommended Skill Level
Beginner

Cedar Top Modification

Submitted by Anonymous (not verified) on Sun, 05/01/2016 - 16:45

We needed a compost bin to replace the pile forming in a corner of the yard. We referred to it as "The Buffet" to reflect how much our new puppy enjoyed digging through the scraps. 


I I substituted cedar fencing to top the bin instead of the plastic sheeting. I just liked the way it looked and it was more cost effective. The most difficult part of the project really is wrangling the chicken wire. It's sharp!

Estimated Cost
I spent about $75 on materials for the project. I spent about another $75 on things like screws, a new staple gun, some waterproofing stain, etc all of which I have left overs and can use again.

I used treated lumber and a waterproofing deck stain. This is not for an edibles garden. I'm just using the soil to fill in low spots around the yard. If I was building it for a veggie garden I would have used all cedar wood with no stain or a natural shellac.
Estimated Time Investment
Day Project (6-9 Hours)
Finish Used
Thompson waterproofing deck stain. Brushed on.
Recommended Skill Level
Intermediate

Headboard with Fold Down Tray Tables

Submitted by t856463 on Sat, 01/25/2020 - 21:05

Wow, my 2nd piece of furniture I attempted.  A lot of wood filler was involved.  My shelves seemed too big, so I just did one, then my back board accidentally got used in “open shop” so I used some left over pegboard.  I had fun but spent a lot of time fixing “oops, that doesn’t seem right”. Peg

Estimated Cost
$40
Estimated Time Investment
Week Long Project (20 Hours or More)
Finish Used
Paint and stain

A First Planter Project

Submitted by Anonymous (not verified) on Mon, 09/18/2023 - 15:44

Cedar Planters, my first planter. Thanks Ana!

Caleb

Built from Plan(s)

Comments

Built three - Four Dollar Stackable Children’s Chairs

Submitted by jrokusek on Mon, 04/23/2012 - 08:39

Great plans for a simple kids chair! I generally followed Ana's plans, but used a hardwood - Elm - that I cut on my sawmill. It looks generally like oak. It is heavier than pine, but should be more durable too. I'm 200+ pounds and have jumped on the chair with no issues.

I also used pneumatic brad nailer and glue for the back and seat slats. I highly recommend glue for this project! I am an avid woodworker with a garage full of tools, so honestly this took me less than an hour from start to finish. However, this was one of the most satisfying projects I've built in a long time!

Estimated Time Investment
An Hour or Two (0-2 Hours)
Finish Used
I eventually finished this with a custom stain I had leftover from another project and water-based polyurethane. Minwax Golden Pecan is similar, perhaps just a bit lighter than what I used.
Recommended Skill Level
Starter Project

Little Girl Dress Up Caddy

This project took about a week of commitment because of the multiple coats of paint. Otherwise, it was a very quick build, built in one day, but quite tedious sanding. I wish I could have sanded before I built it because the corners were very difficult to get around on the inside. I drew the crown on very thin Plywood that I had laying around from a night table I built and cut it out with a jigsaw.

Estimated Cost
Under $100 with stencils, paint, light, stick on mirror ($10 from Amazon) and jewels for the crown
Estimated Time Investment
Week Long Project (20 Hours or More)
Finish Used
Valspar Pantone Cabaret, Disney Shimmering Glitter Specialty Finish on the crown, and satin polycrylic
Recommended Skill Level
Starter Project