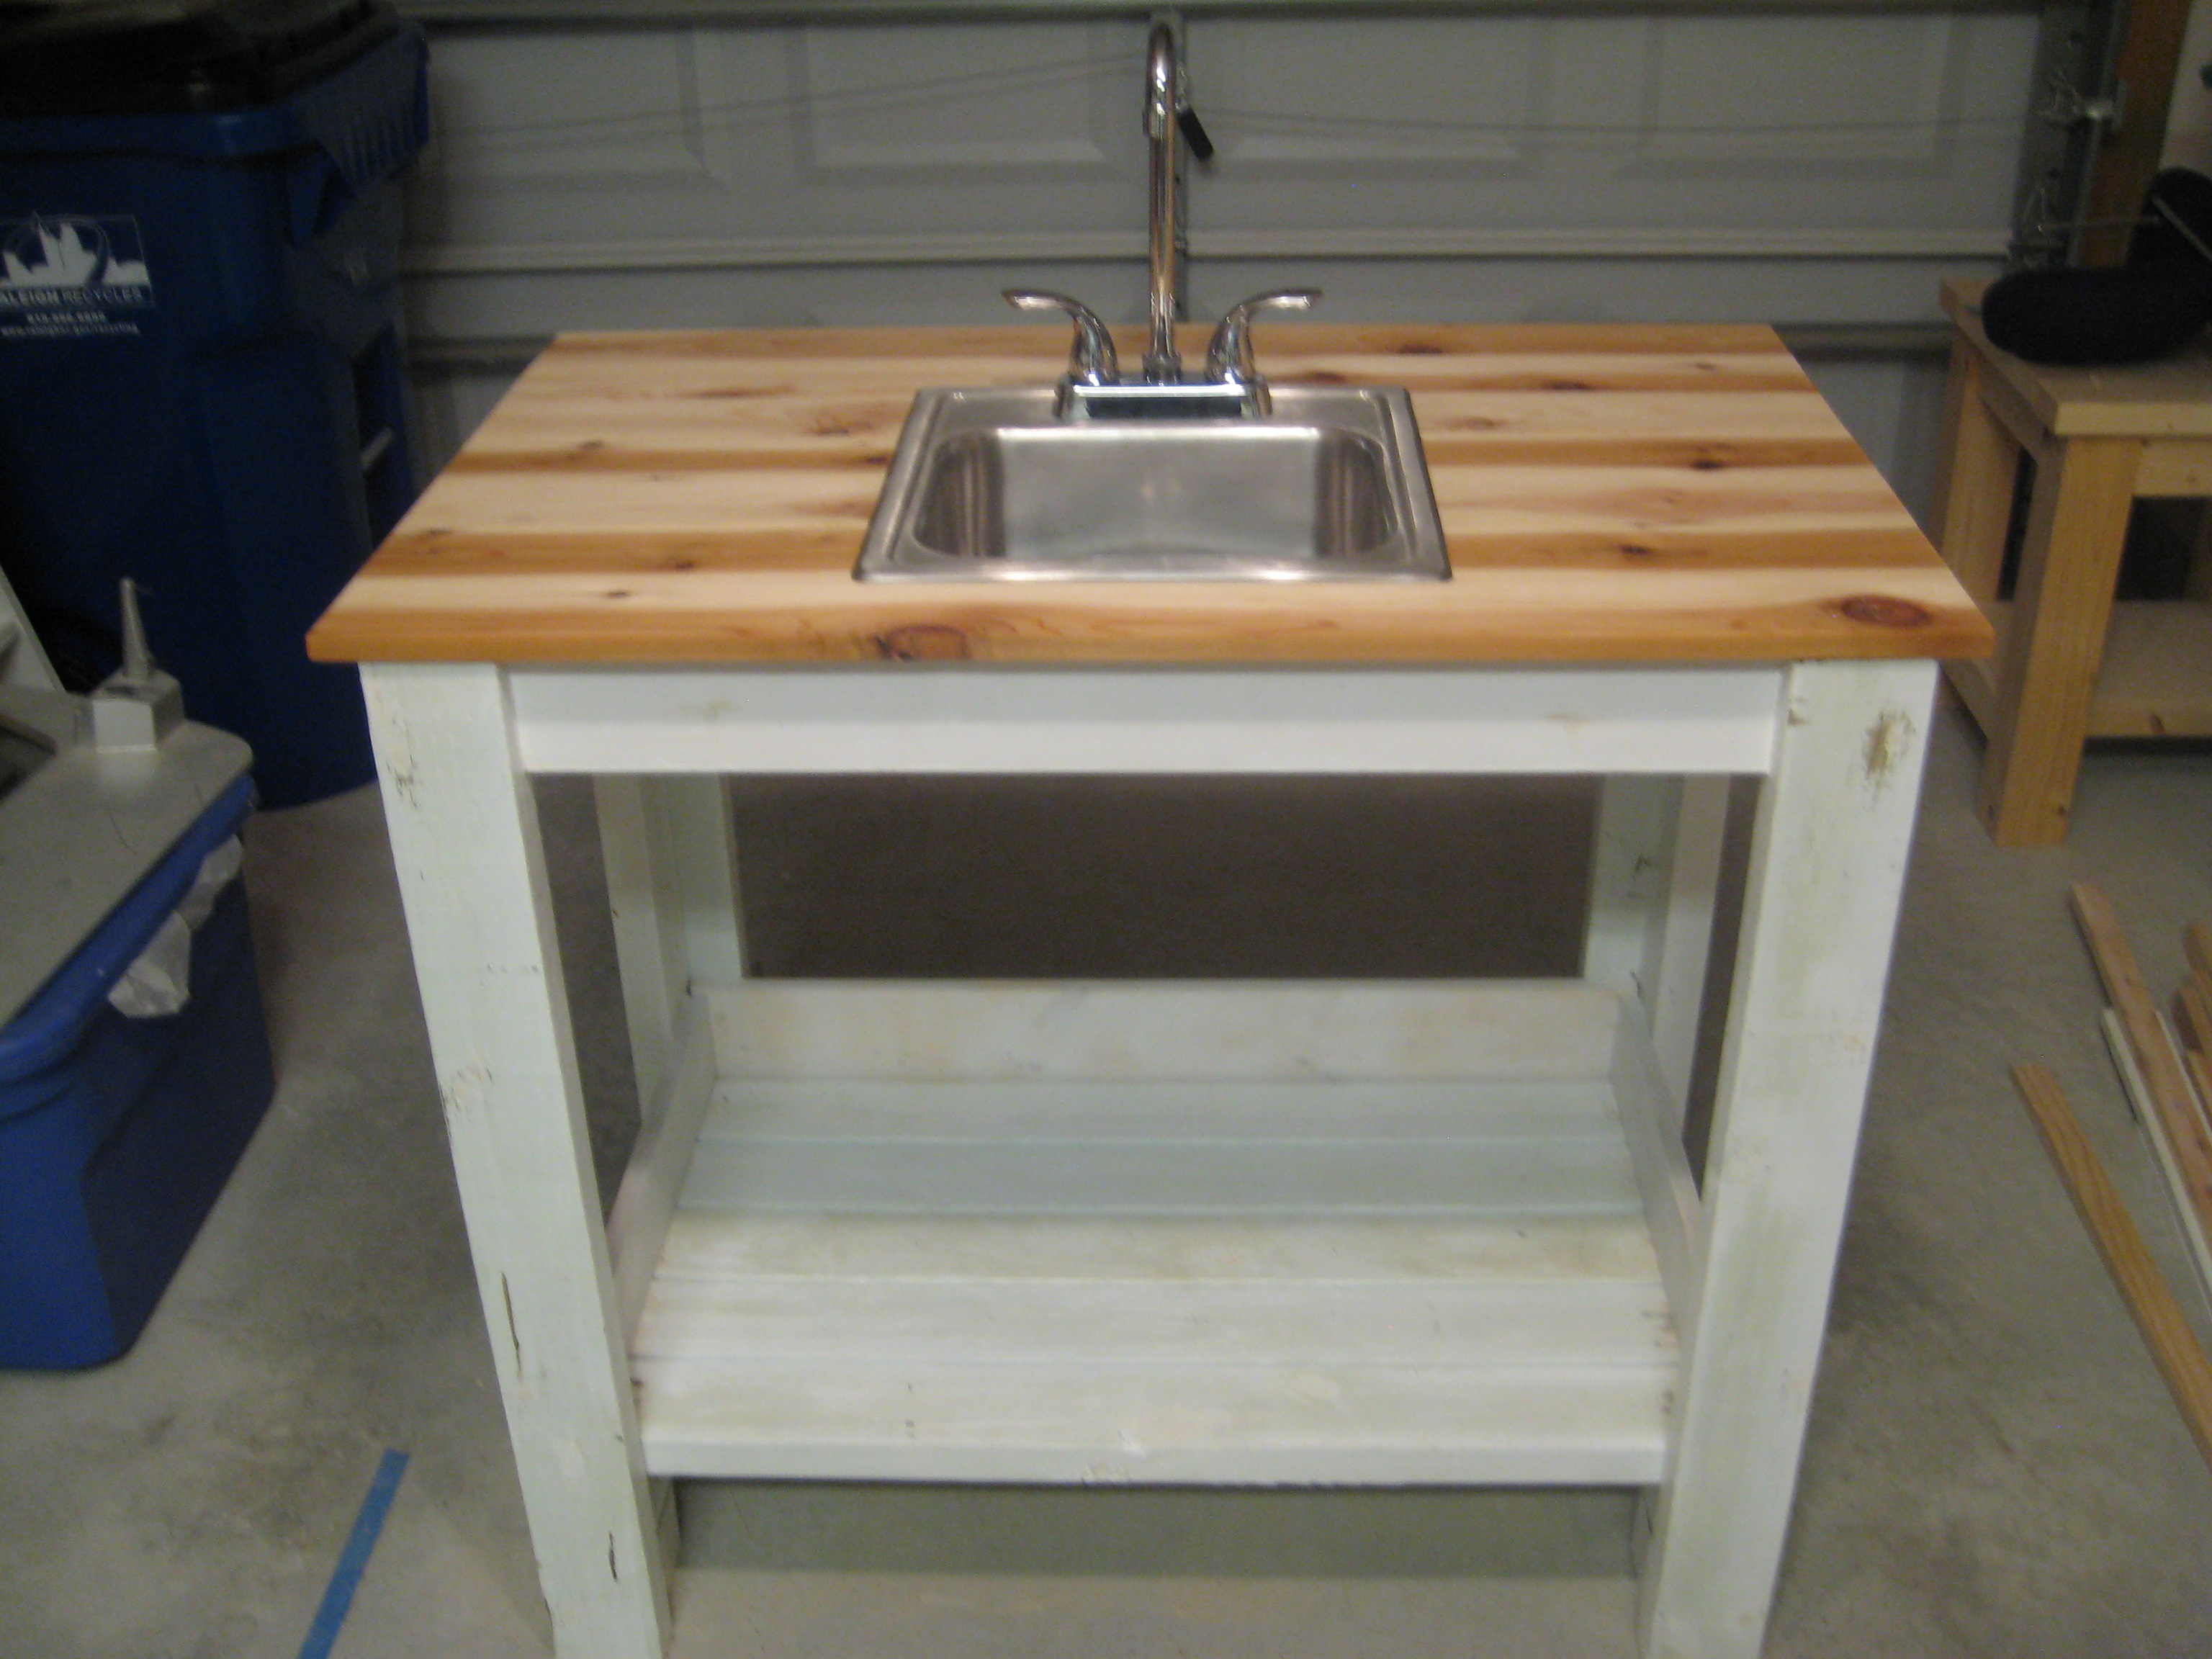
Community Brag Posts

play kitchen

Submitted by DIYMomof4 on Tue, 12/25/2018 - 10:05

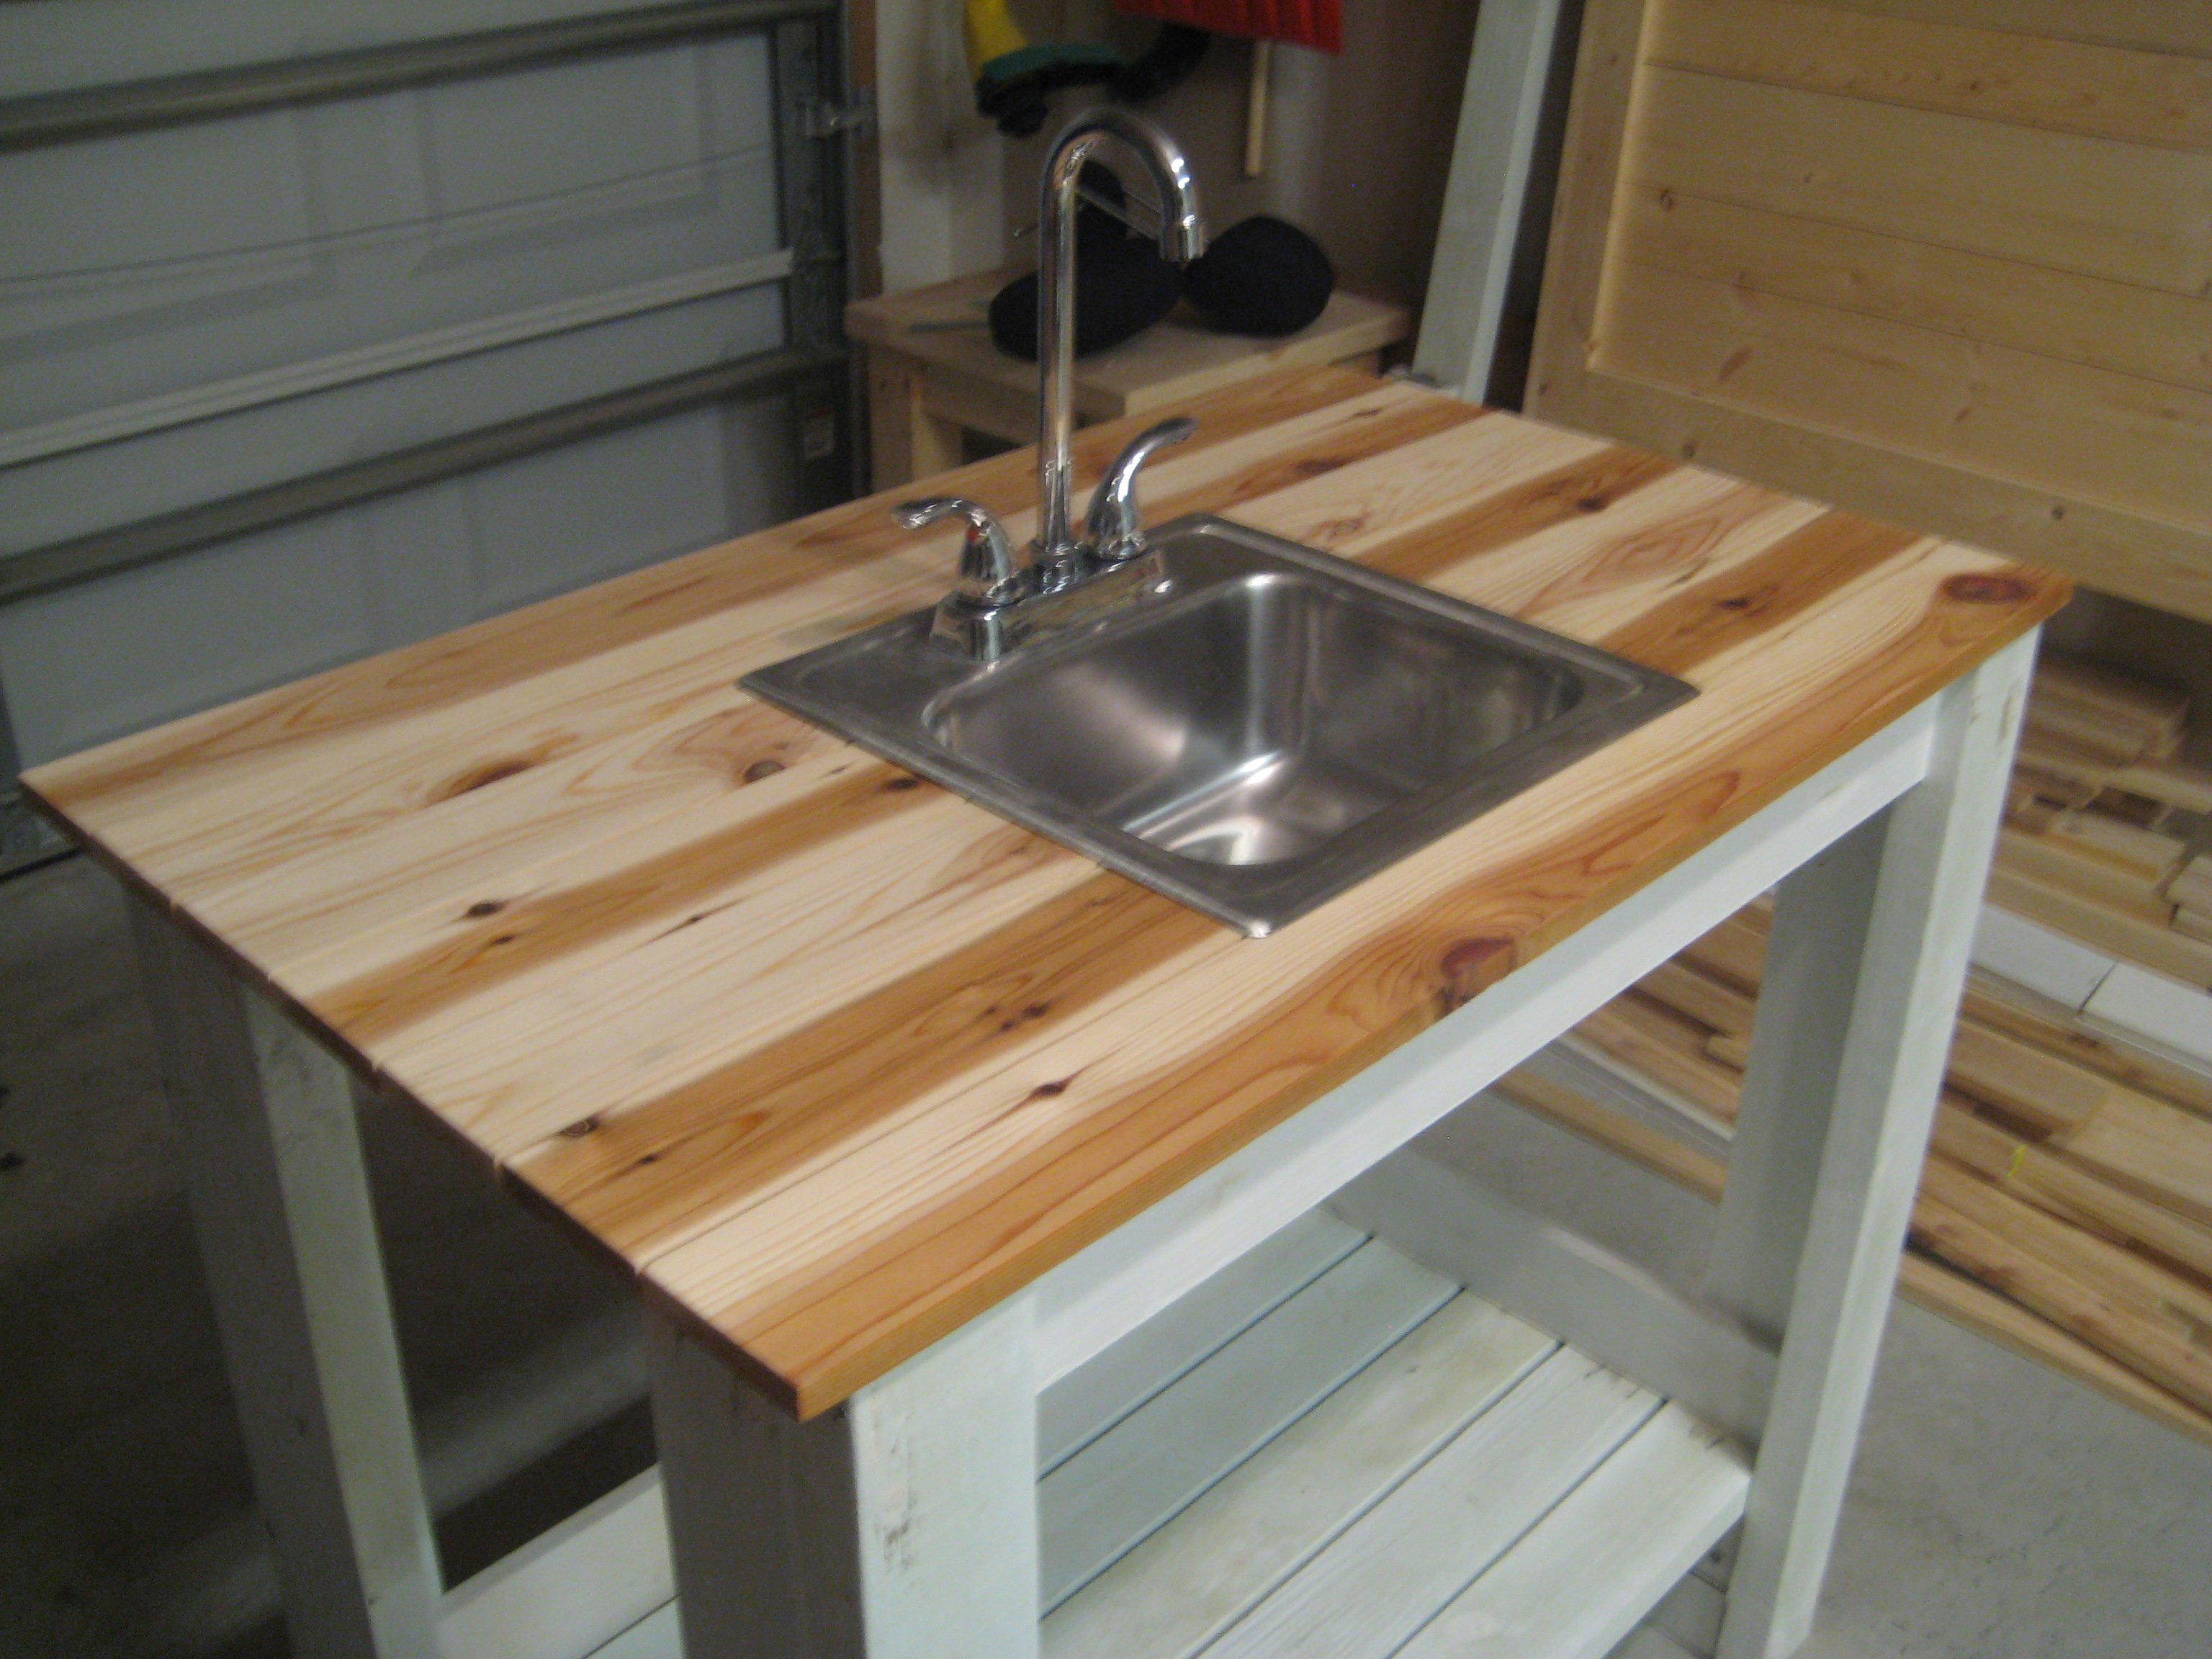
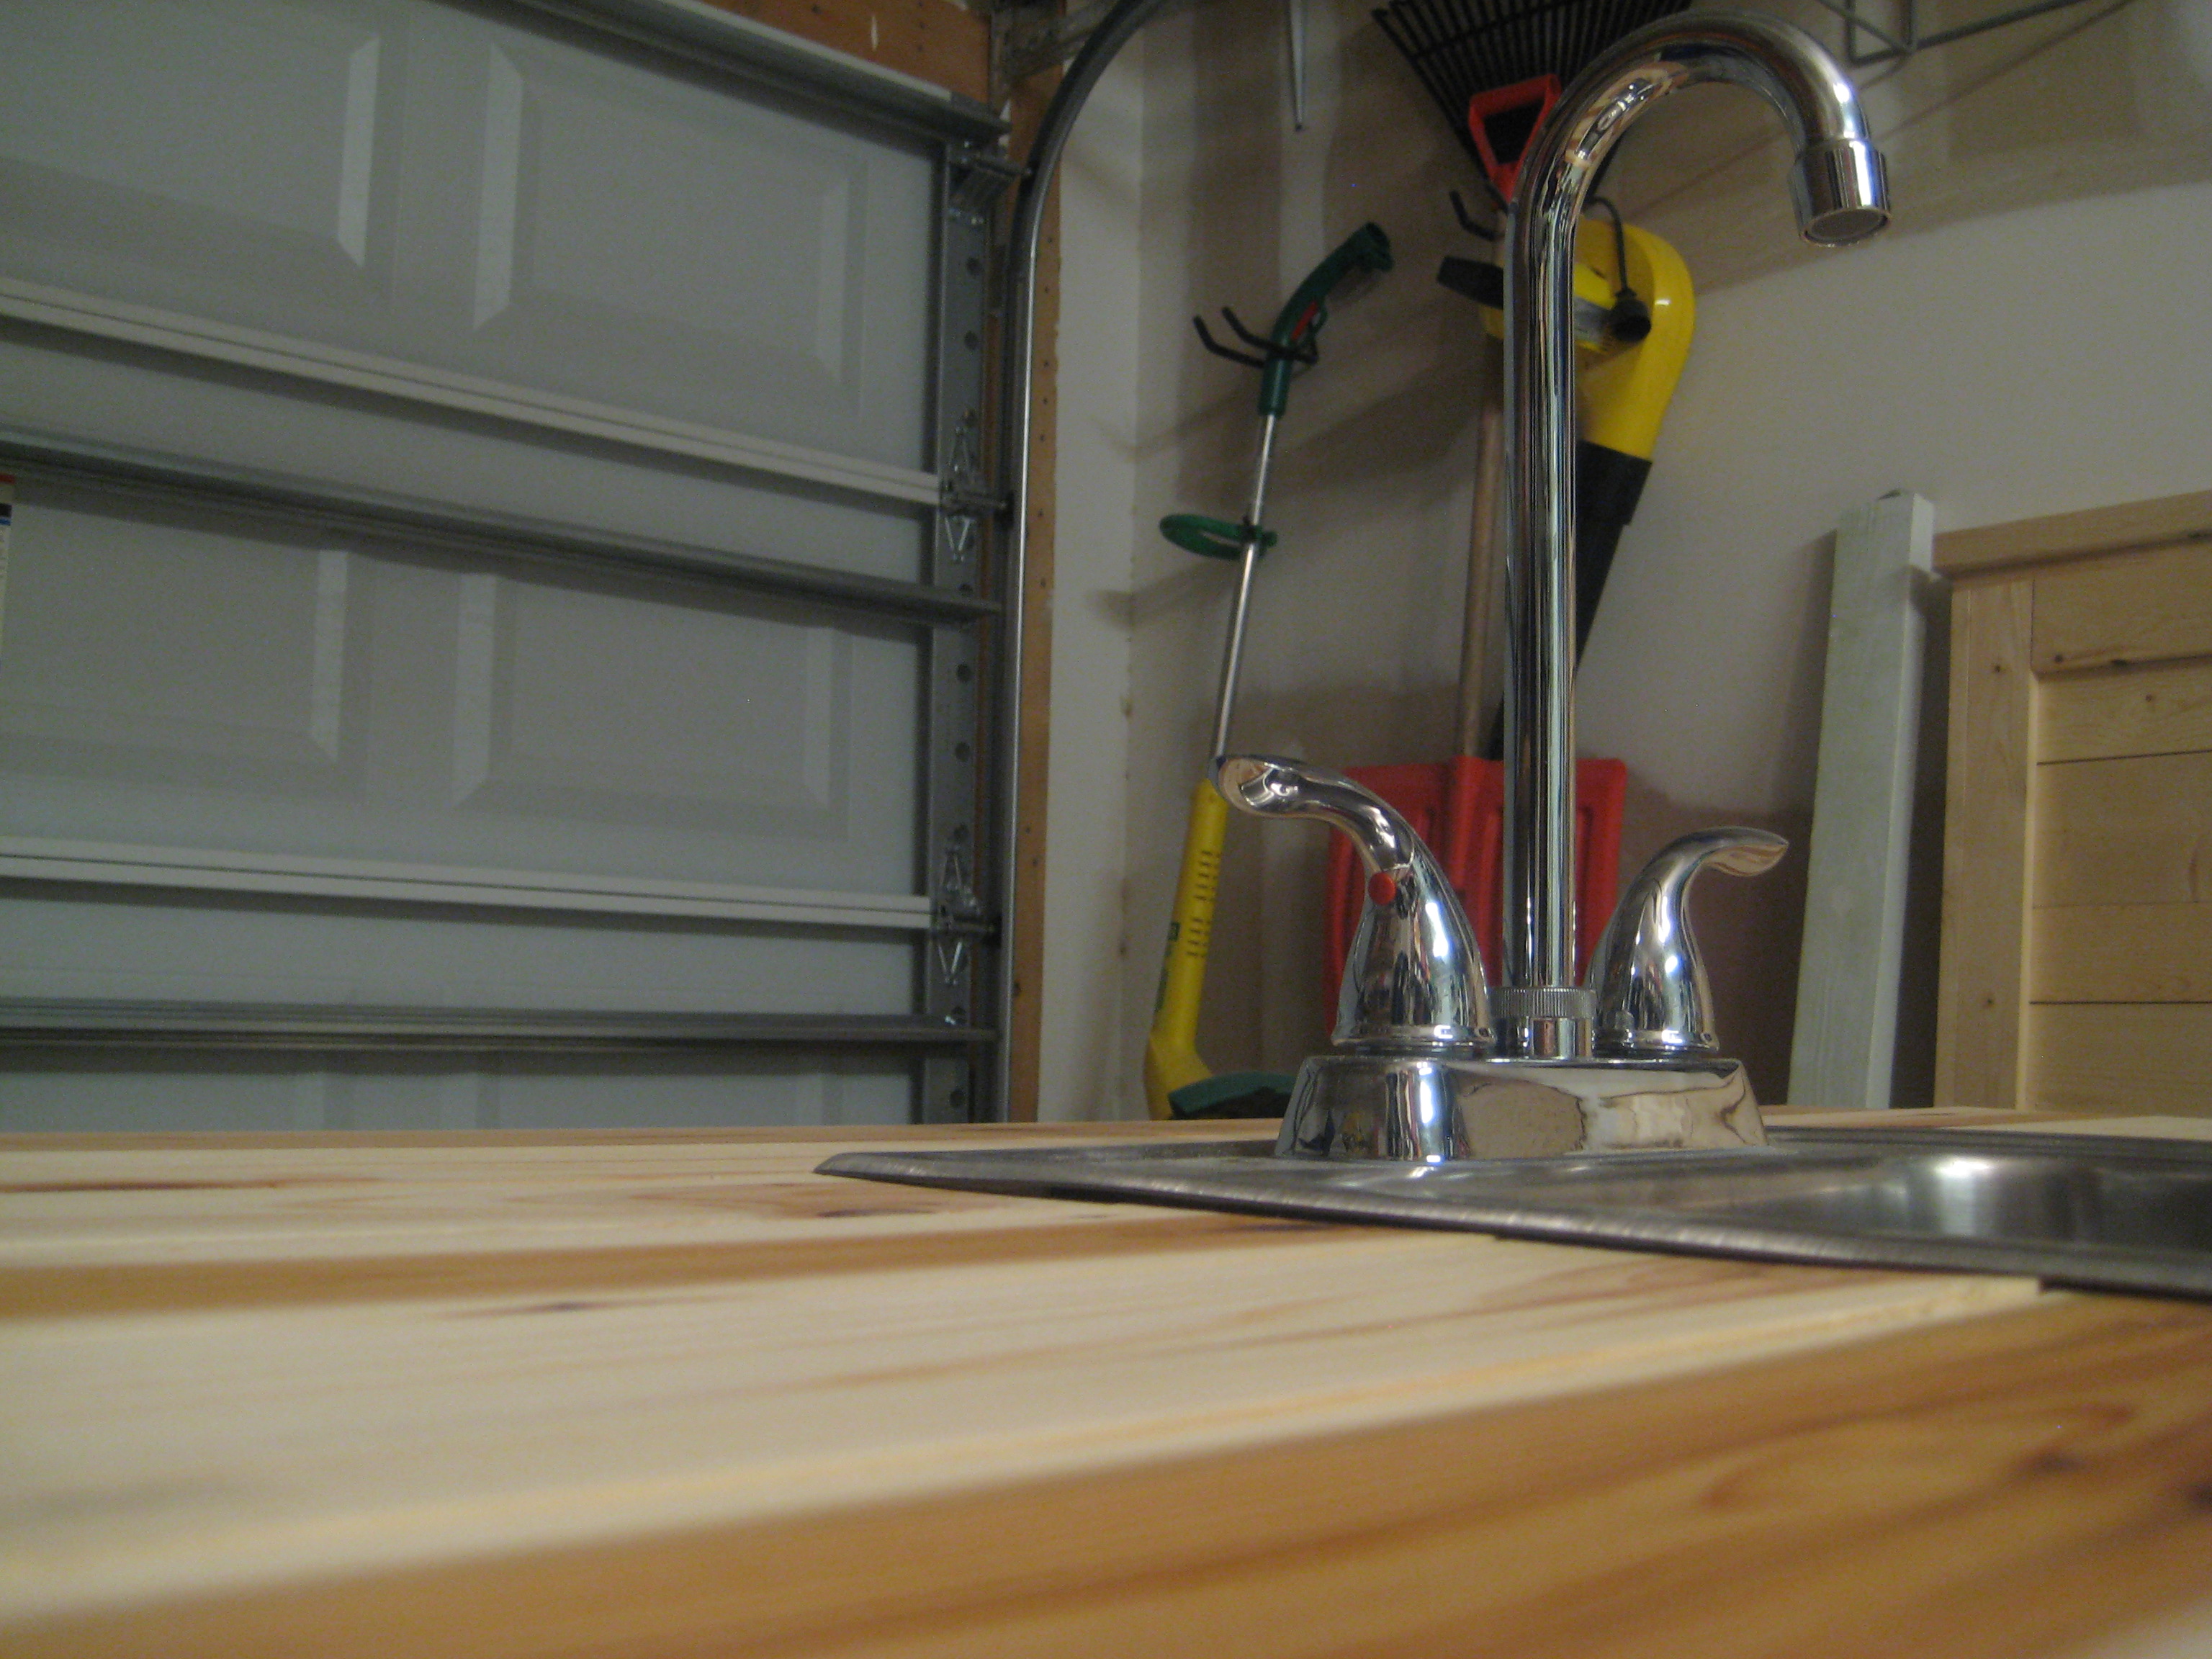
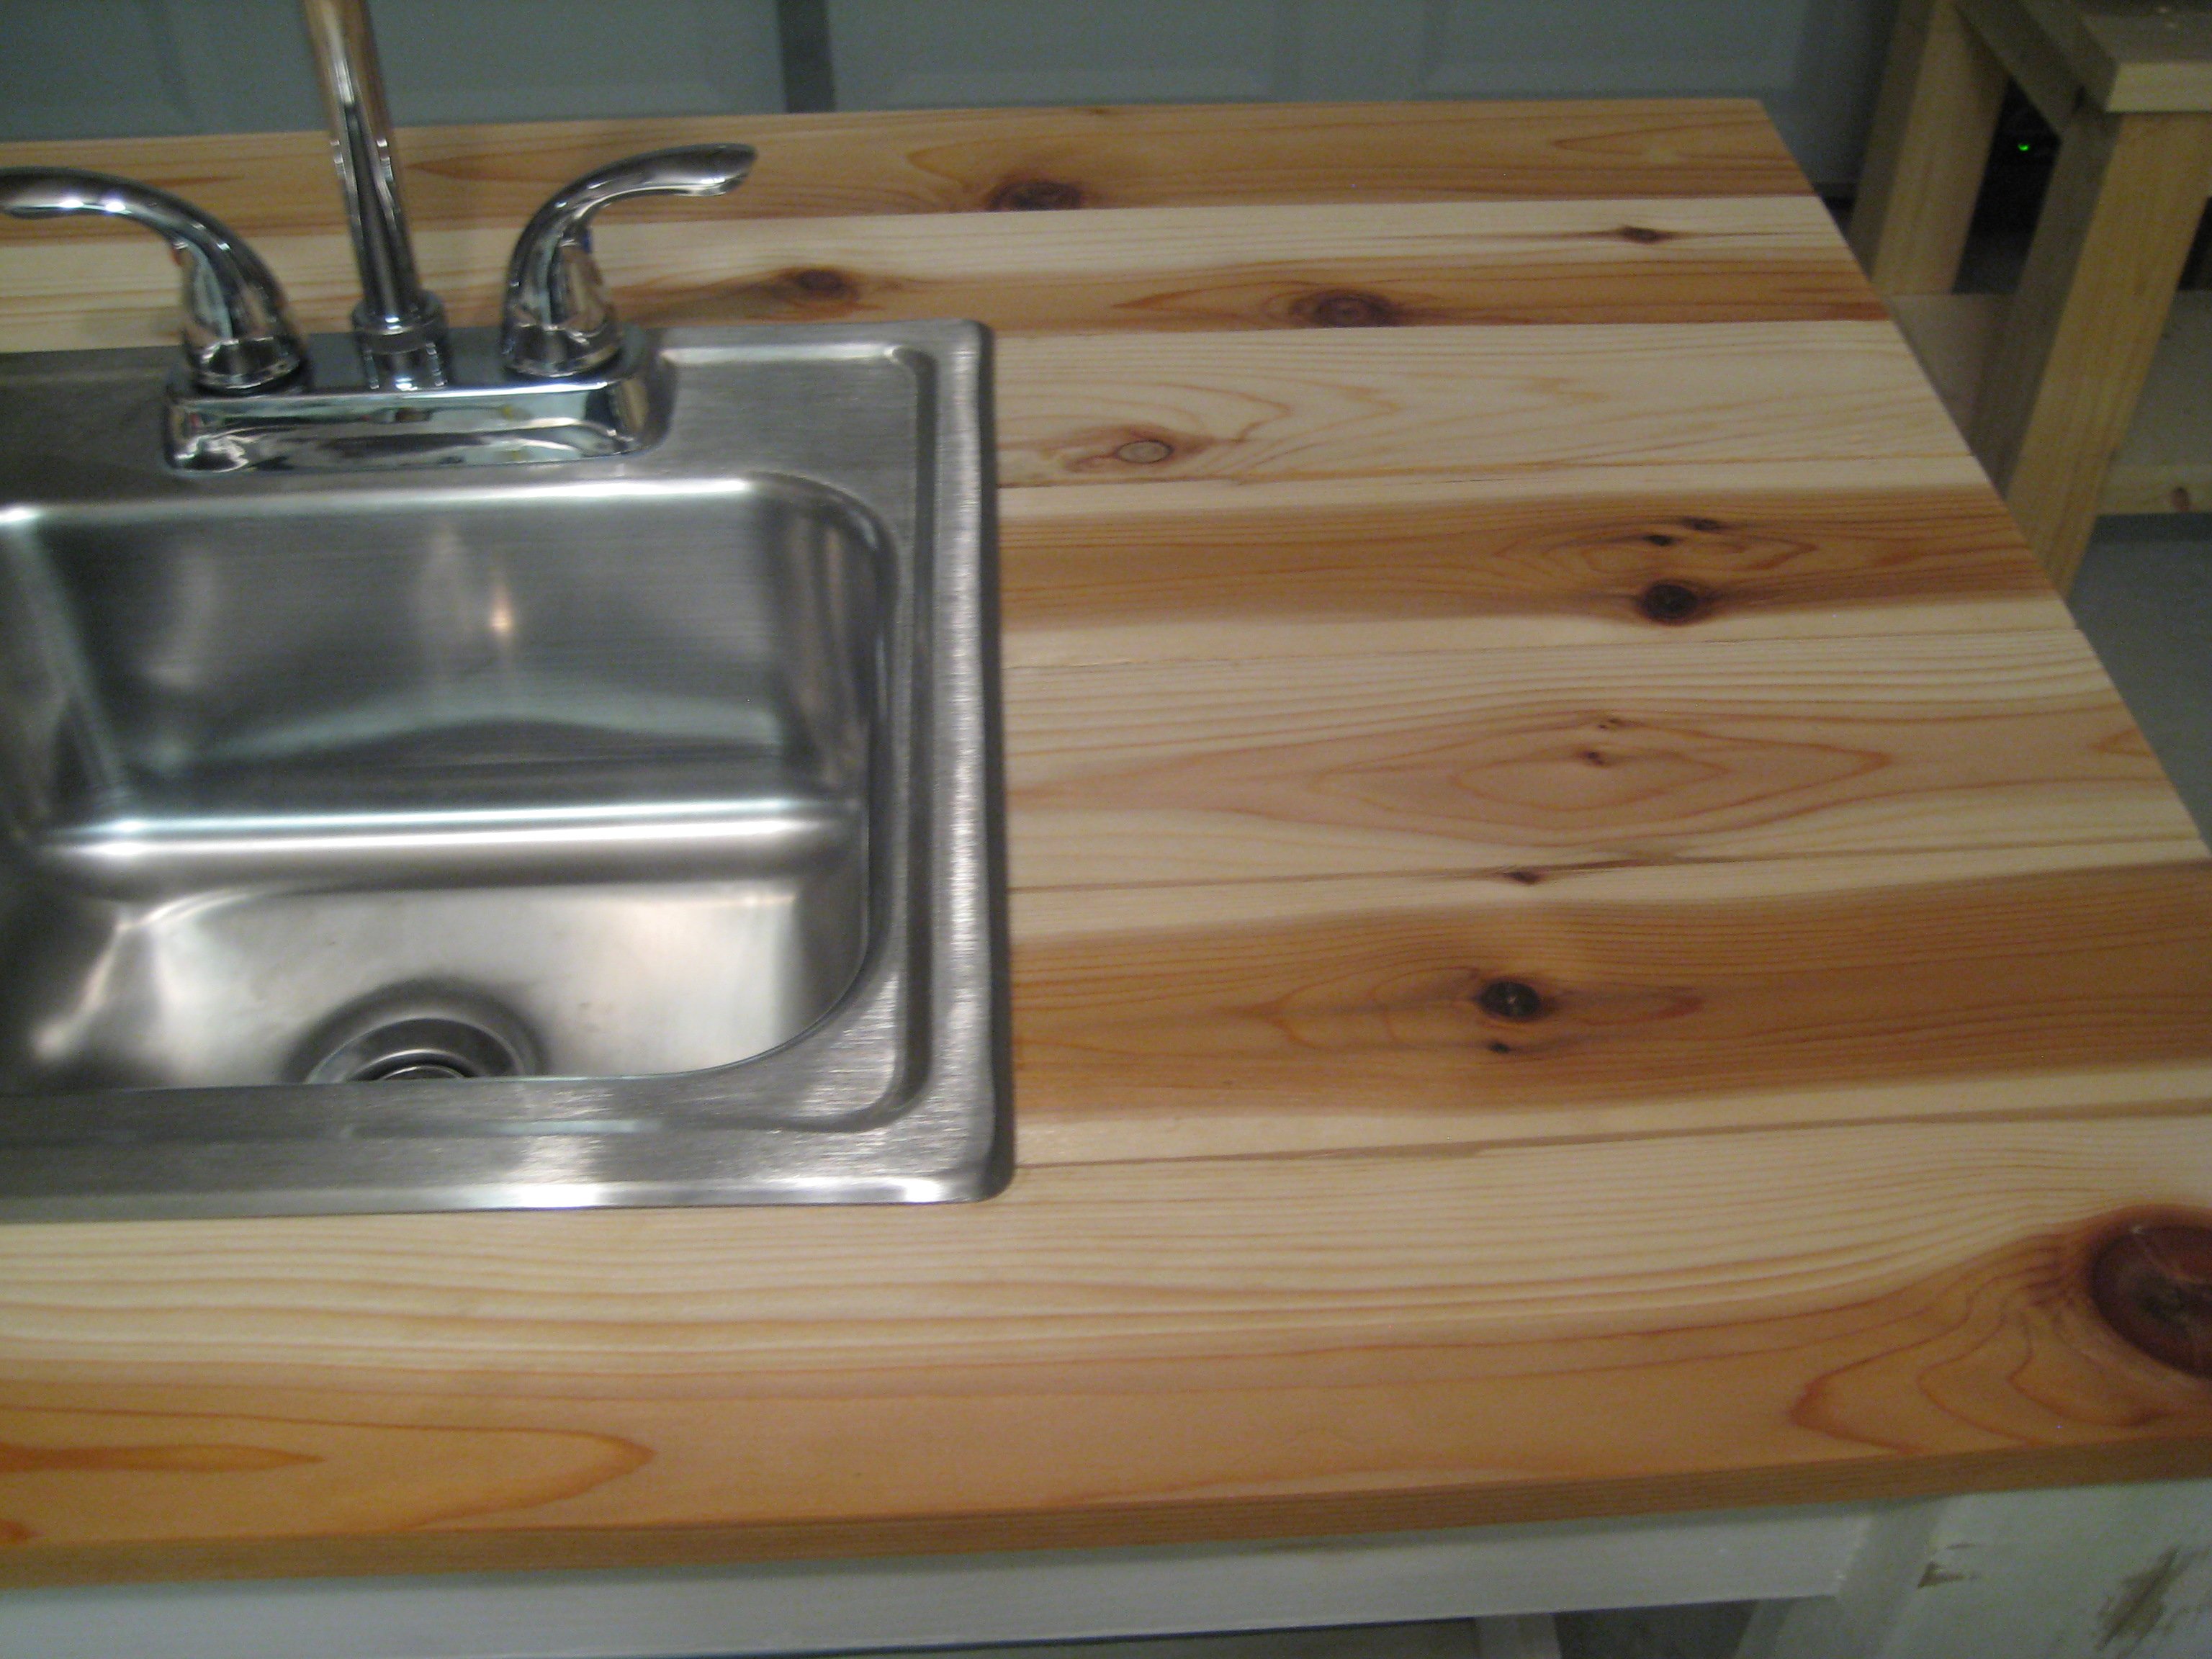
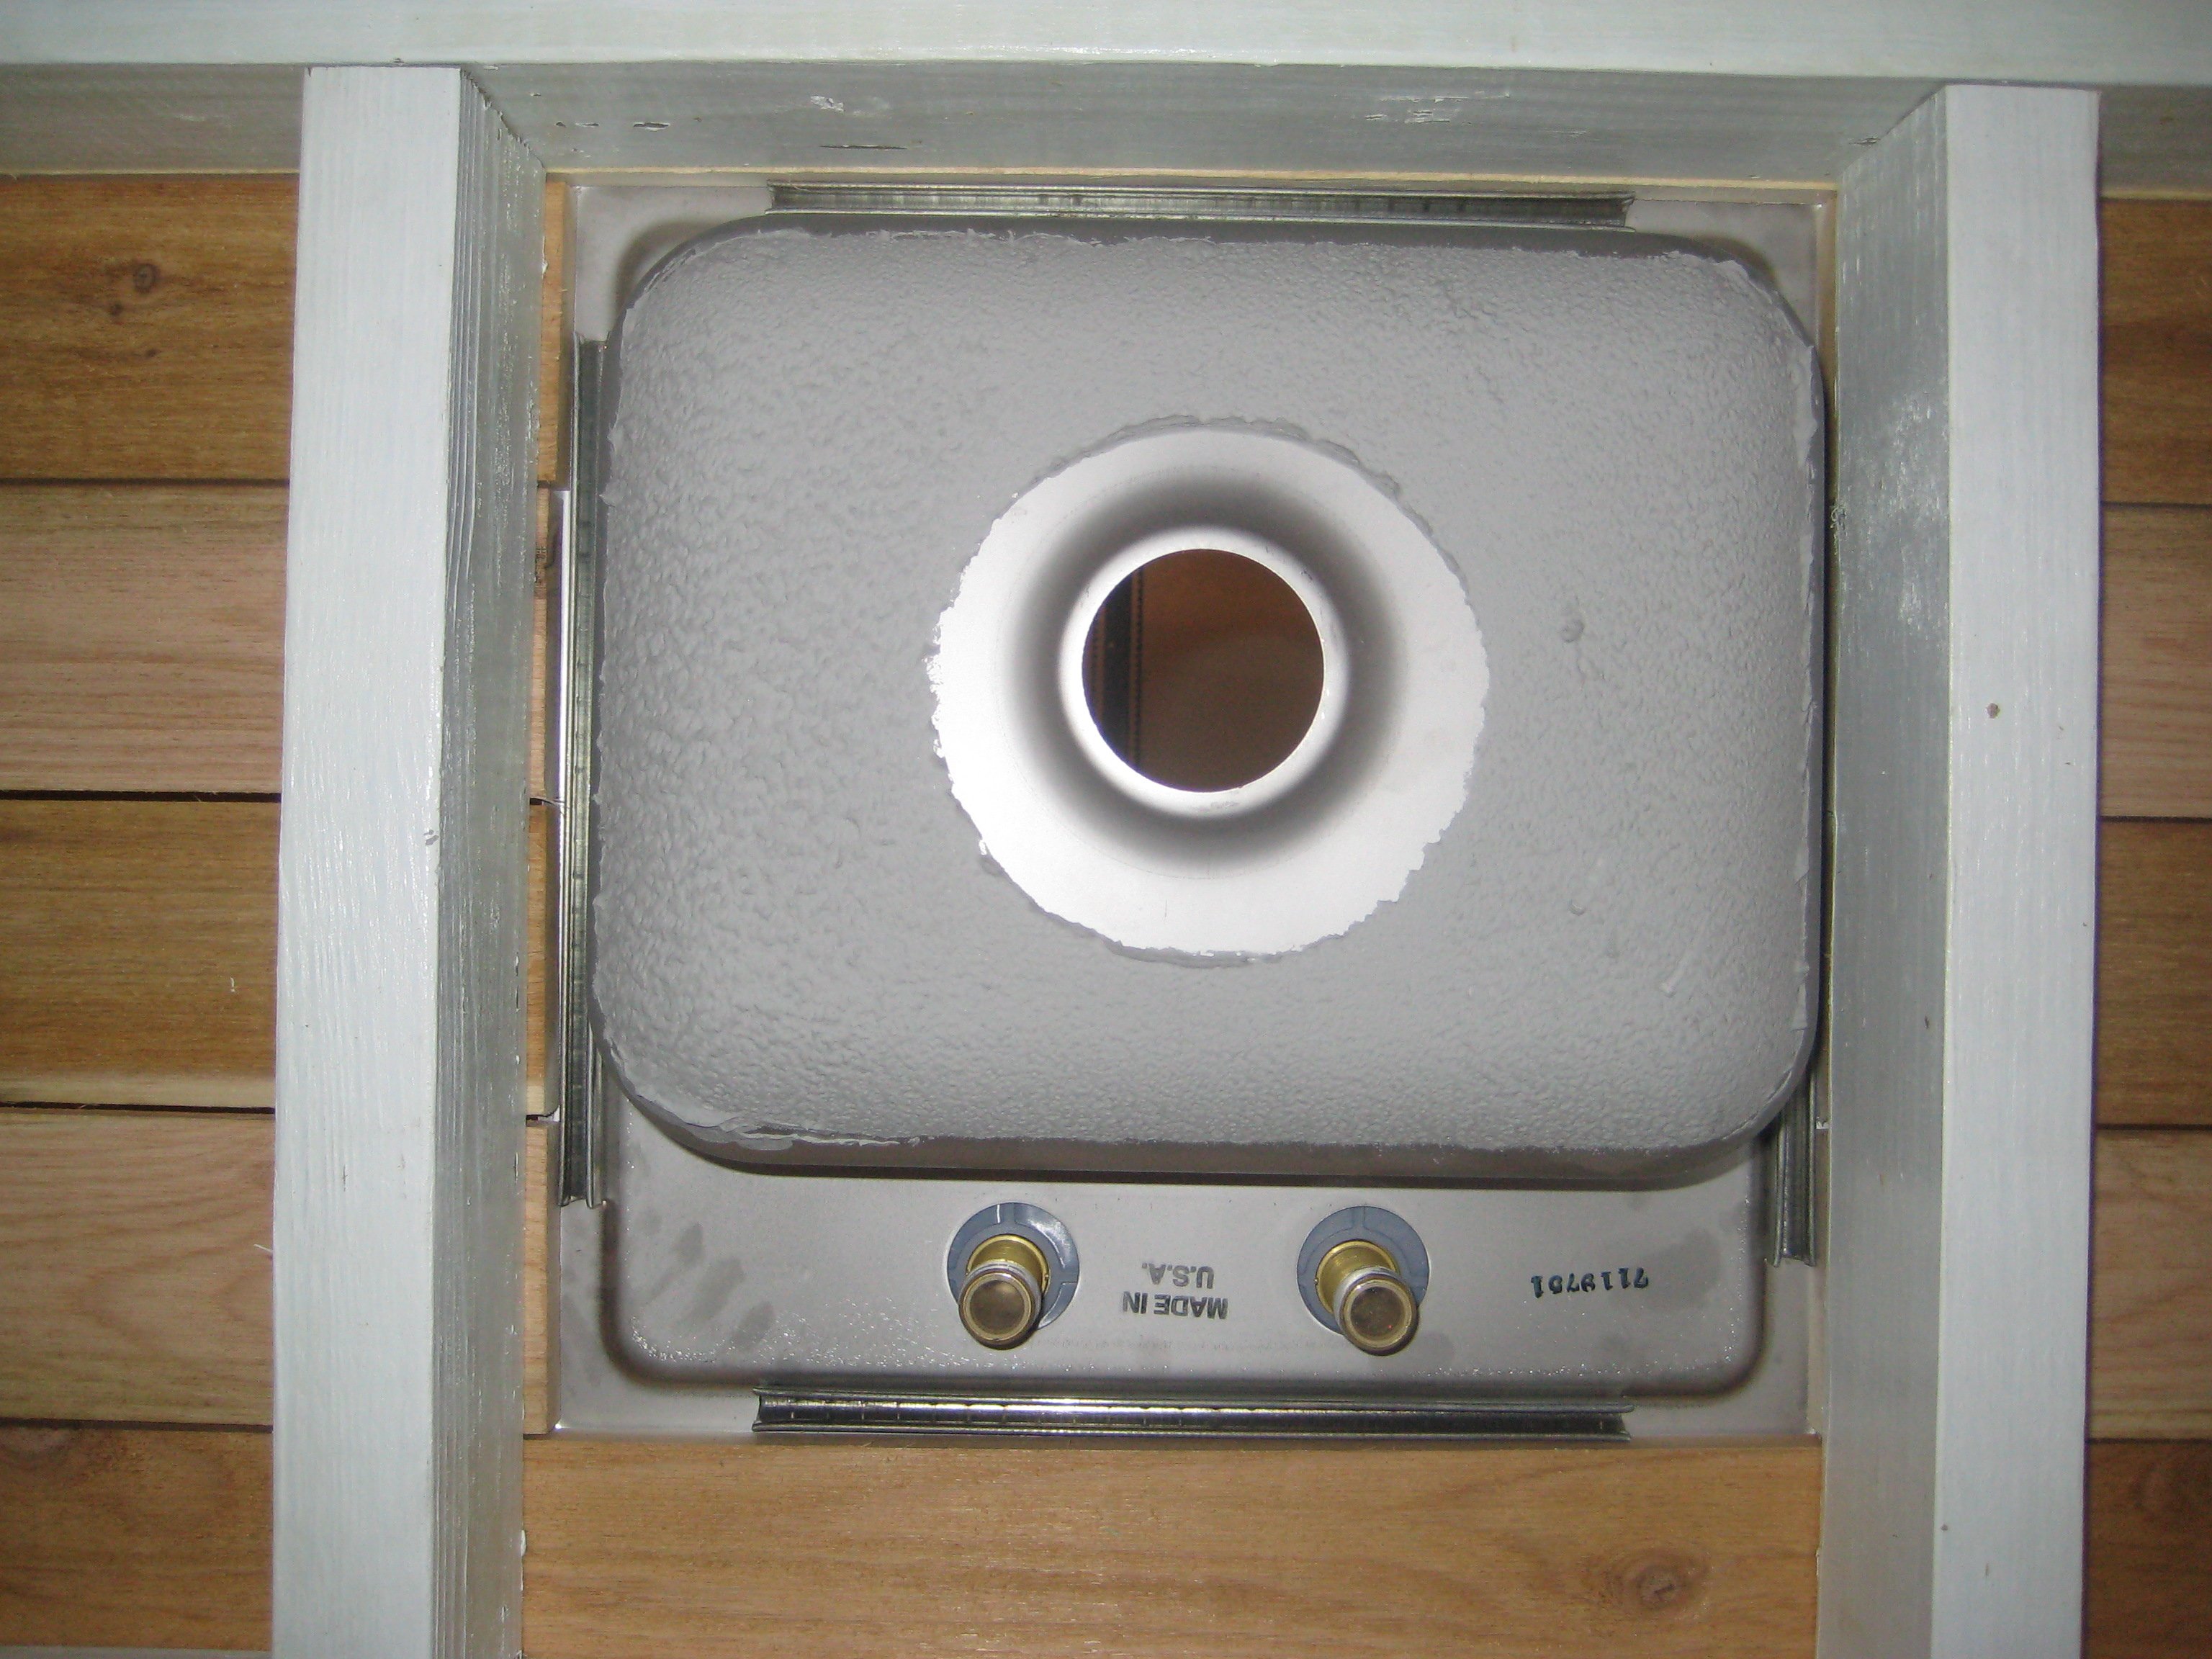
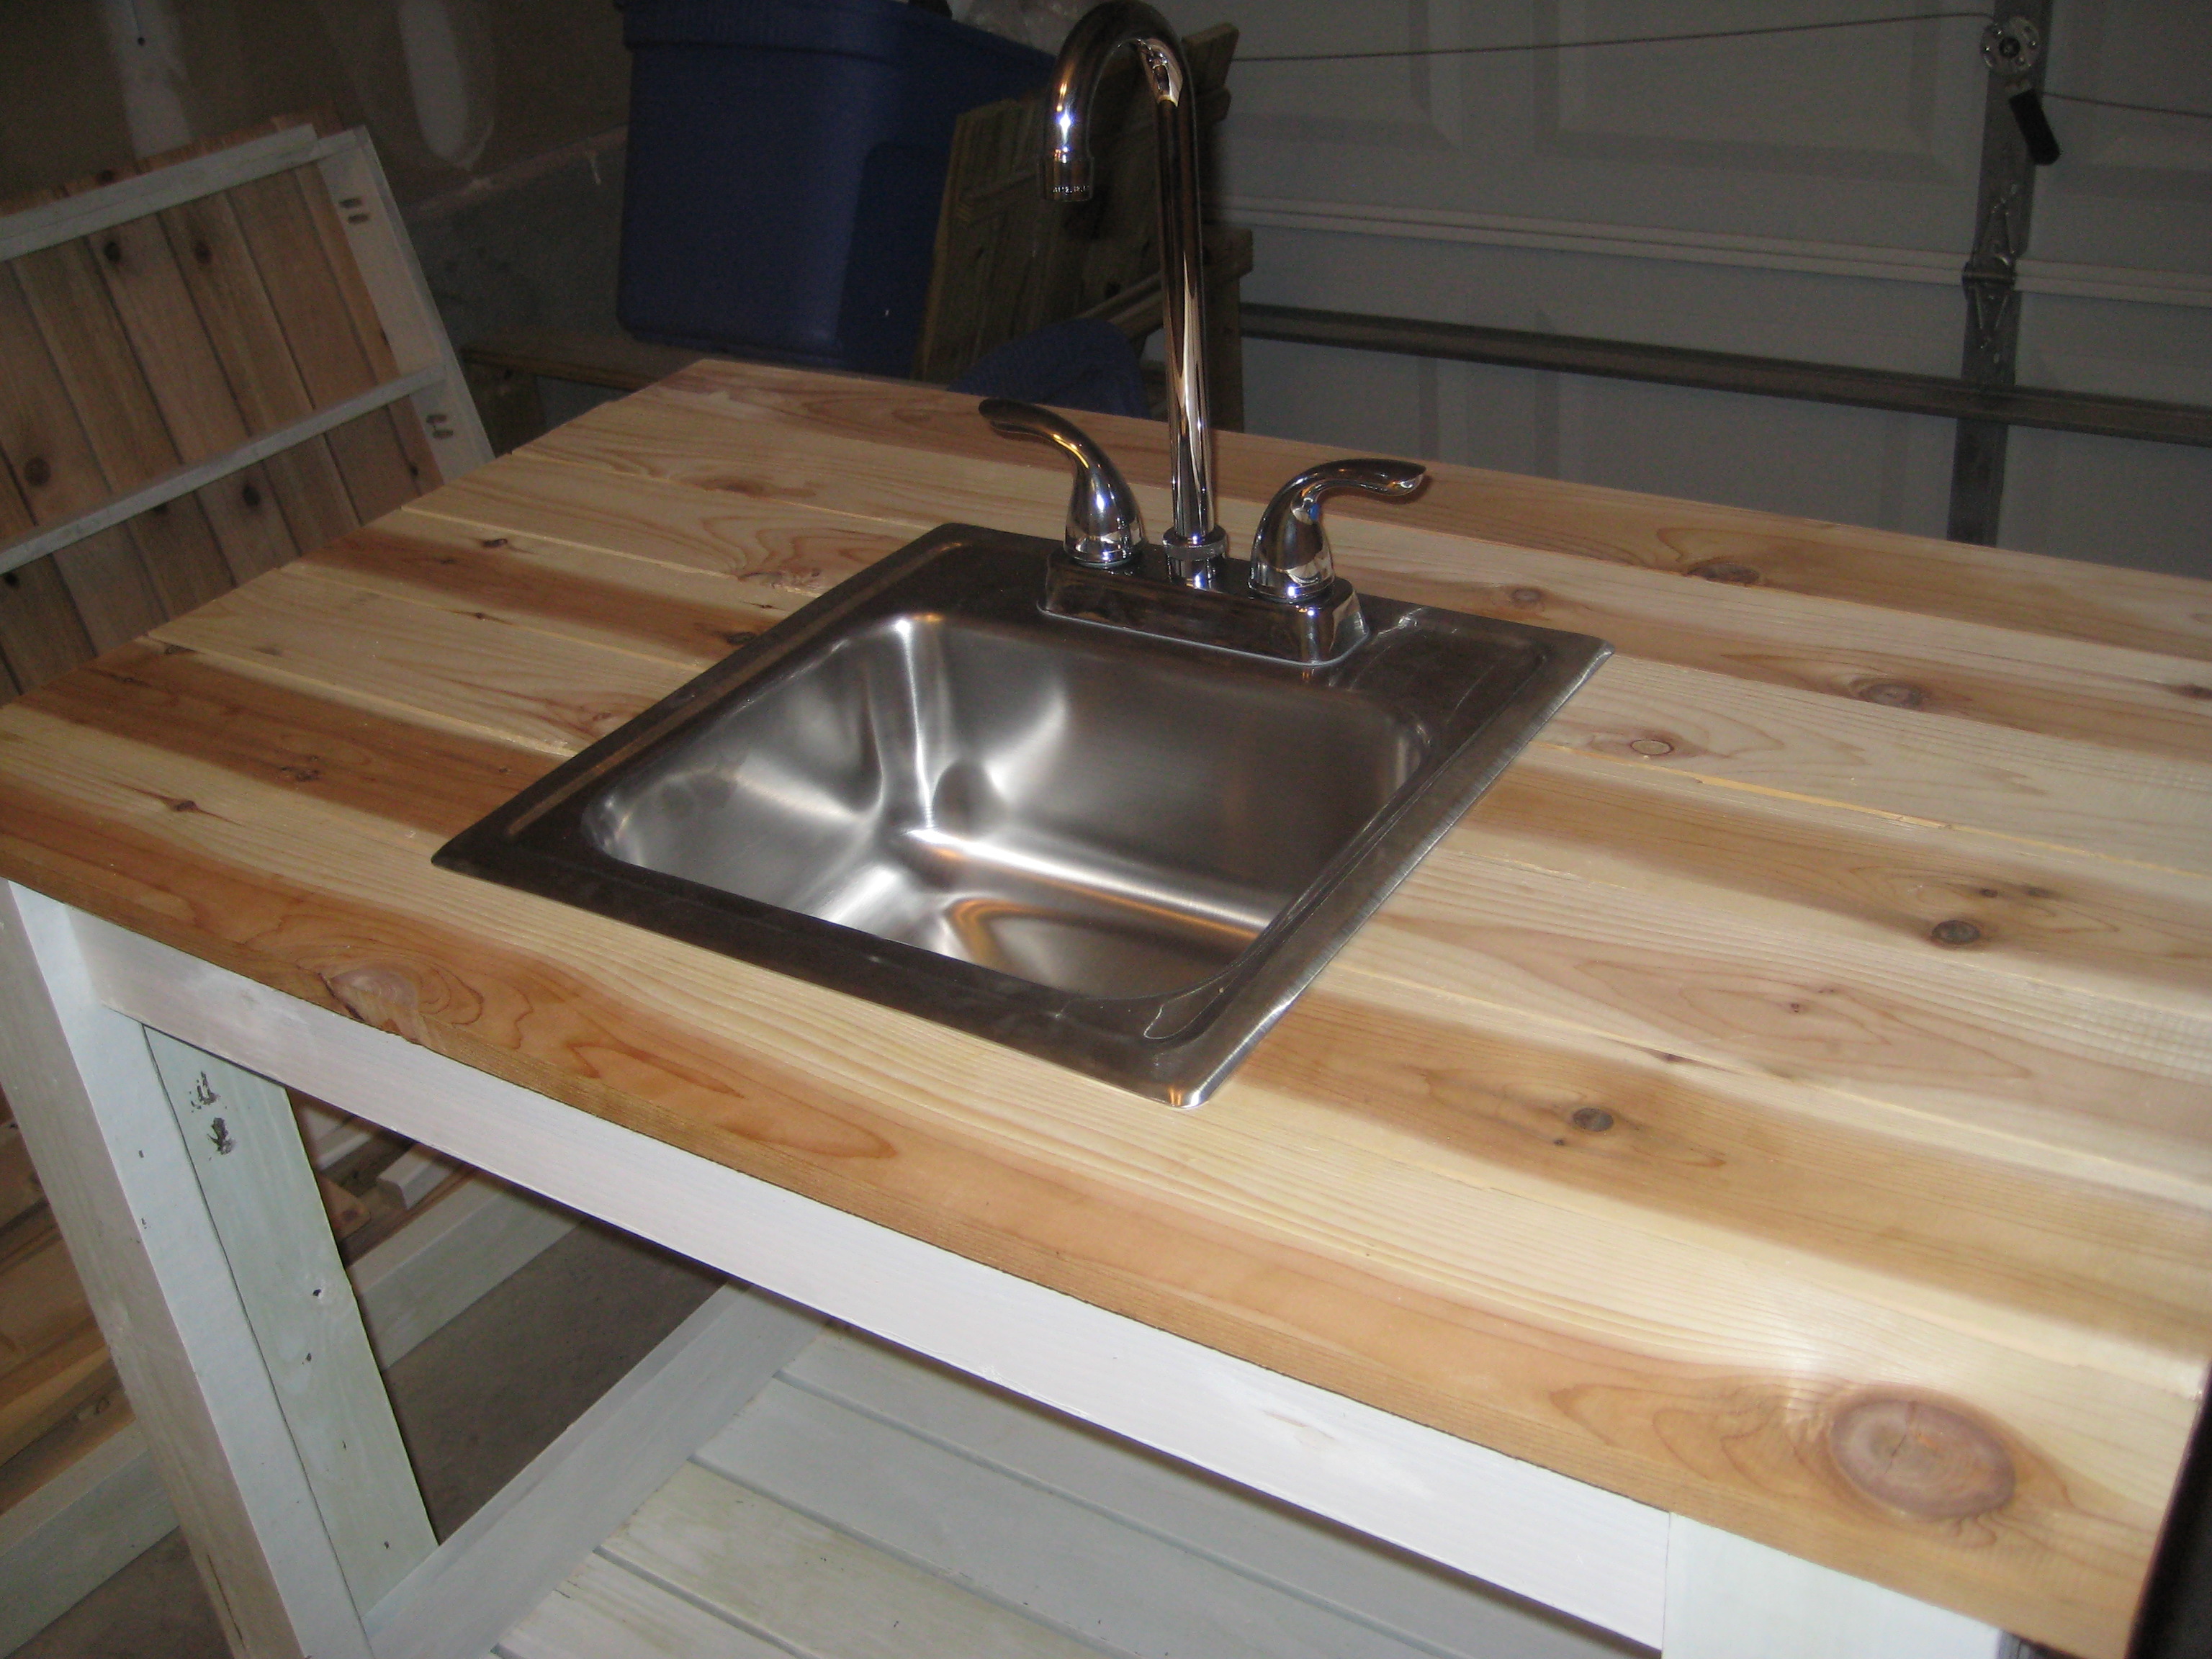
I made this for my 5 year old daughter for Christmas.  I really like how beautiful and sturdy this play kitchen is.  I added 4 inches to the height so it would be the right size for my daughter.  I also made all the sections equal in width.  This made it simpler for cutting the shelves.  The faucet is made from various pvc pipes and spray painted with Rustoleum silver.  All the knobs are able to be turned, and the faucet can swivel.  For the oven shelf, I used a cooling rack.  Thank you so much for this wonderful plan!

Built from Plan(s)
Estimated Cost
I didn't keep track, but I would guess at least $200. The paint was a big cost, but I have a lot left over.
Estimated Time Investment
Week Long Project (20 Hours or More)
Finish Used
Behr Ultra - Ceylon Cream, Shimmering Pool, and Radiant Rose
Recommended Skill Level
Intermediate

Comments

DIYMomof4

Mon, 12/31/2018 - 16:04

Thank you!  I LOVE your website and all of your plans!  I've learned so much from you and you've given me the confidence to take on any diy project!  

DIYMomof4

Tue, 01/01/2019 - 12:43

Thank you!  I LOVE your website and all of your plans!  You have given me the knowledge and confidence to tackle any diy project!

Farmhouse Console Table

Submitted by Anonymous (not verified) on Wed, 08/31/2022 - 16:20

Just finished this last night! My very first piece of furniture! I'm so proud of myself! Thank you so much for these plans!!

Built from Plan(s)

Comments

Another Doll Farmhouse Bed

Submitted by n8ur9irl on Fri, 08/12/2011 - 06:16

I made this for my Granddaughters 6th Birthday. My husband and I just finished a tree house for the Grand kids and we had lots of scraps left! Very easy to make and the only thing that took time was waiting for the paint to dry.

Estimated Cost
9.00 for the bedding, 0.00 for the bed ( I had wood scraps from a treehouse we made)
Estimated Time Investment
Afternoon Project (3-6 Hours)
Finish Used
White enamel, for durability.
Recommended Skill Level
Beginner

Comments

Oxidized Wood Silverware Caddy

This was the very first thing I've tackled. It's something I've always wanted to do, but haven't taken the time. A new house that we've moved into has a barn beam mantle above the fireplace (which we love!), so we wanted to incorporate wood that would compliment it. We used knotty pine and tried out the oxidized wood treatment to get the desired color and sealed it with a spray Varathane. Because of that treatment, it took an extra day for all of the drying time from start to finish. I also plan to stencil on the side "Give Thanks", but haven't found a good spot to get a stencil yet.

I am such a fan of these great designs and styles, I will be making many more things. Next on my list, the Oxidized wood X pattern side tables and coffee table! Thank you, Ana!

Built from Plan(s)
Estimated Cost
$15, but have wood and other things left over
Estimated Time Investment
Afternoon Project (3-6 Hours)
Finish Used
Oxidized wood using The Friendly Home's how-to-step-by-step instructions, then sealed with a spray varathane
Recommended Skill Level
Starter Project

Farmhouse bed queen headboard

Submitted by Anonymous (not verified) on Fri, 12/28/2018 - 09:32

I used Ana’s plans to make my queen sized headboard. I used 1x8’s for the verticals and changed the framing a bit to only have one piece of wood on top. I also left out the 2 extra board on the back to save some cost. I glued and nail gunned each vertical piece to the top and bottom 1x4. I attached the assembled center to the 2 posts with pocket screws and small L corner brackets for stability. I also adjusted the height of my project to come to approximately 64 inches tall and the bottom of the inner picture portion, where the mattress reaches the headboard, to just hit the top of that 1x4 so we never have missing objects that have fallen behind the bed. I did use the green pressure treated lumber for the 4x4’s and they stained just fine. I also added a farmhouse style X through the center. I ripped my top 2x6 on both sides to be approximately 5 inches wide, so the rounded edge of the worn lumber is now square. I stained this in minwax dark walnut then went over with a second color coat of minwax classic grey. My apartment isn’t big enough for the sides and foot board but someday if we move, I’ll be able to complete the entire bed set.

Built from Plan(s)
Estimated Cost
$60 in lumber high estimate
Estimated Time Investment
Day Project (6-9 Hours)
Finish Used
1st coat minwax dark walnut. 2nd coat minwax classic grey.
Recommended Skill Level
Beginner

My Simple Outdoor Sink

Submitted by kmatt55 on Sun, 08/14/2011 - 16:46

I finally completed the last piece to my customized simple two-toned outdoor collection...an outdoor kitchen sink!!! It still needs a couple of touch ups... but more on that later. This is by far my favorite and easiest project to date. We plan on using this as a grill caddie/garden station. This will eventually go onto a 24x12 deck up against our kitchen window (The indoor and outdoor sink will be against each others backs). I decided to go with the Sturdy Workbench plans for the base mainly because of the weight. We wanted something that's going to be difficult to move since it will be hooked up to outdoor plumbing. I used treated 2x4's for the base, cedar 1x4's for the top. I bought the bar sink for about $70. I also used a Kreg Jig to screw in the cedar slats from underneath so the screws won't be visible from the top. FYI - Wait a couple of weeks before you paint soaking wet treated wood. The green chemical from the 2x4 is starting to leak through my white paint. I'll have to go and prime/paint it again when it finally dries. Other than that, it came out 10 times better than I could ever imagine.

Built from Plan(s)
Estimated Cost
$120 ($70 for sink and hardware)
Estimated Time Investment
Weekend Project (10-20 Hours)
Finish Used
Thompson's Water Sealer, semi-gloss exterior white paint.
Recommended Skill Level
Beginner

Comments

Vegasboiz

Sun, 09/29/2013 - 08:16

I love the sink table a lot. I have been looking for one for a long time. Can you tell me what is the length, width, and height for this table. Thank you very much. Jimmy

Another Benchright Farmhouse Dining Table

Submitted by Thewaggy on Sat, 09/07/2013 - 16:41

I know, I know, yet another Farmhouse Benchright Dining Table! For this one, I wanted 4x4 legs, angled turnbuckles and removable legs since I know I have to move a lot. The legs are made removable with carriage bolts and with the legs fastened this way, the whole project has a more simplified frame. The finish is dark walnut to try and blend vintage/weathered design with a modern finished project. I added dark gray slate to the tabletop, carved in via router, for a little more design and as a built in trivet if so desired.

Estimated Cost
200.00
Estimated Time Investment
Weekend Project (10-20 Hours)
Finish Used
Minwax Dark Walnut with Satin Finish
Recommended Skill Level
Beginner

Farmhouse Queen Headboard

Submitted by danicarby on Mon, 11/09/2015 - 07:19

I built this for my mom's guest room.  She watched my kids and I worked in the garage.. couldn't have been a better vacation! :)


I used 6" (finished size 5") tongue and groove boards for the panel, shorter posts and screwed main structure pieces together using 5-1/2" lag bolts and plugging with 3/4" dowel pieces.  I added woodedn blocks at the bottom of posts for attaching metal bed frame.


My dad didn't have any pipe clamps so I ended up using a wratcheting strap!  HA!  Use what you can and save money! :)

Built from Plan(s)
Estimated Cost
I just made the headboard and that cost about $60 in wood, $40 for finishing products & $10 in hardware.
Estimated Time Investment
Weekend Project (10-20 Hours)
Finish Used
General Finishes Seal-A-Cell, General Finishes Antique Walnut Get Stain, Minwax Polycrylic (Clear Satin)
Recommended Skill Level
Beginner

Fireplace mantel

Submitted by Anonymous (not verified) on Mon, 12/31/2018 - 12:44

I took inspiration from Ana’s faux mantel to build a home for this linear electric fireplace. I got it done just in time to hang Christmas stockings.

Estimated Time Investment
Weekend Project (10-20 Hours)
Finish Used
Behr Alkyd semigloss enamel in white
Recommended Skill Level
Beginner
Seasonal And Holiday

Hockey Equipment Stand

Submitted by Anonymous (not verified) on Sun, 09/18/2022 - 12:52

Ana, Thank you for the idea and plans. I made the stand a little taller and the base a little bigger to accommodate future growth of my Grandson. He loves it by the way.

Thanks again!

Built from Plan(s)

Comments

Farmhouse Bed

I built this bed as a modified farmhouse bed. I chose to have a solid wood headboard instead of having a slotted look as it fit better in the decor of our home. I purchased a bed rail kit from Rockler so that I could remove the rails without removing any screws. (http://www.rockler.com/product.cfm?page=5783) It was a relatively easy project considering my skill set was very low when starting! http://www.lifewithfingerprints.com/2010/09/labor-of-love.html

Built from Plan(s)
Estimated Cost
$110
Estimated Time Investment
Weekend Project (10-20 Hours)
Finish Used
I used a satin black paint finish with a polyacrylic coating.
Recommended Skill Level
Beginner

Comments

Utility Table

I had empty spot in my kitchen and I wasn't able to find any nice looking utility table, so I figured to do it myself. I was looking for plan but didn't seem to find what I was looking for (If you find plans for the similar one, let me know!), so I end up using my left over 2x6 and 2x4's to make counter top and 1x4 for legs as for shelves. I made "grill" for the shelves from 1x2's. My kitchen has white cabinets so legs I painted white and counter top and shelves I stained same color than my counter top I made for my kitchen. I measured space between window and door and made it fit there, height is same as my kitchen cabinets.
I need to stain shelves one more time to get them nice, but i had no room to let them lay around the house so I had to put them together.

http://ourleaningtree.wordpress.com/diy/utility-table/

Estimated Cost
Less than 20$
Estimated Time Investment
Weekend Project (10-20 Hours)
Finish Used
Wite paint and dark walnut stain
Recommended Skill Level
Starter Project

Owens nightstand for Ben

Submitted by Mommy2BMR on Sat, 11/14/2015 - 20:46

This is my first furniture build! I am thrilled with the way it turned out, and now I am totally addicted. It's going into my son's room.

Built from Plan(s)
Estimated Time Investment
Weekend Project (10-20 Hours)
Recommended Skill Level
Intermediate

Comments

Sliding door bar

Submitted by Anonymous (not verified) on Wed, 01/02/2019 - 13:30

I used the plans from the website and added a few extra features that we really wanted .we made the tracks for the sliding doors ourselves and got all the hardware for really cheap. Also, added leds on upper/lower shelving to give to a really cool look at night. All in all, we didn't spend more than $350-$400 on this awesome piece. 

Estimated Cost
$200-$300 and about $350-$400 with some added features
Estimated Time Investment
Weekend Project (10-20 Hours)
Finish Used
Clear stain for top and white paint for everything else
Recommended Skill Level
Beginner

Comments

Small Chicken Coop with Planter, Hurricane Edition

Submitted by Anonymous (not verified) on Thu, 09/29/2022 - 15:55

Englewood, FL, Irma. This coop built to plan using pressure treated plywood. 40’ pine tree on it, still useable. Not sure there’s any real damage!

Comments

Doll Adirondack Chair

Submitted by spiceylg on Sun, 08/21/2011 - 12:52

When I first saw this I thought it was adorable and had to build it even though I don't have any children! I use lengthier guestimated times to include sanding, painting and drying times.

Built from Plan(s)
Estimated Cost
$5-6 plus paint
Estimated Time Investment
Day Project (6-9 Hours)
Finish Used
It's been a while since I completed this project. I used spray primer and spray paint.
Recommended Skill Level
Beginner

Teaching Easel in the Classroom

I built this easel for my wife who teaches 2nd grade using the plan on this site. I used a jigsaw to make all the cuts which is why some of them are not perfect. All holes were countersunk and covered with wood filler as I have not yet purchased a Kreg Jig. One sample jar of paint was just enough to cover the whole project with 2 coats. Home Depot sells the whiteboard in 2' x 4' pieces for about $10 in my area. The toughest part was getting the holes to line up just right for the bolts that fix the four main pieces together. Some of them I had to use a little bit of force to make fit. The plan was easy to follow and worked well. I added a curtain rod to the top to hang a paper pad from which I bought for about $5. The big whiteboard behind the easel was hung over the existing chalkboard using industrial strength velcro strips. I bought the whiteboard material from Home Depot for $13 for a 4' x 8' sheet (it is actually called a "hardboard panel board". It works very well with dry erase markers and was an easy, cheap way to install a whiteboard over the current chalkboard.

Built from Plan(s)
Estimated Cost
$40
Estimated Time Investment
Day Project (6-9 Hours)
Finish Used
Behr purple paint sample
Recommended Skill Level
Beginner

Farmhouse Table with Reclaimed Lumber Top

We found this beautifully chippy lumber on the side of the road and snagged it knowing it would make a perfect table top someday.  When I decided to build a table for our back patio makeover, I knew exactly what I had to make the top out of.  

This was my very first build and the pocket hole plans made it so much easier than I thought it would be!  I built the top first then modified the cut list dimensions based on the top.  I also flipped the ends around so the braces would show on the inside instead of the outside.  

I seriously can't get enough of the top, it's so pretty and I don't have to worry about it at all since it's already wonderfully rustic.  The table fits six chairs perfectly.  We are looking forward to having many evenings around this table with family and friends!

Estimated Cost
$100
Estimated Time Investment
Weekend Project (10-20 Hours)
Finish Used
On the base, I applied two coats of Sherwin-Williams' SuperDeck solid stain in "Caribou" then sealed it with Minwax Spar Urethane clear satin with a sprayer.

For the top, I sealed the underside with Thompson's Water Seal clear waterproofer, and have plans to seal the top with Miss Mustard Seed's Tough Coat Sealer (http://missmustardseed.com/2015/09/cleaning-sealing-chipping-antique-pieces/)
Recommended Skill Level
Beginner

Comments

Sliding Door Console

Submitted by Anonymous (not verified) on Sun, 01/06/2019 - 07:16

My husband built this as my Christmas gift. It couldn’t have turned out any better. We shortened it to 75 inches and added a butcher block top to match the floating shelves and island in my kitchen. The plans were very easy to follow. We did have to spend quite a bit of time planning out the barn door track, but it was worth it.

Built from Plan(s)
Estimated Cost
$600
Estimated Time Investment
Week Long Project (20 Hours or More)
Recommended Skill Level
Intermediate

Comments