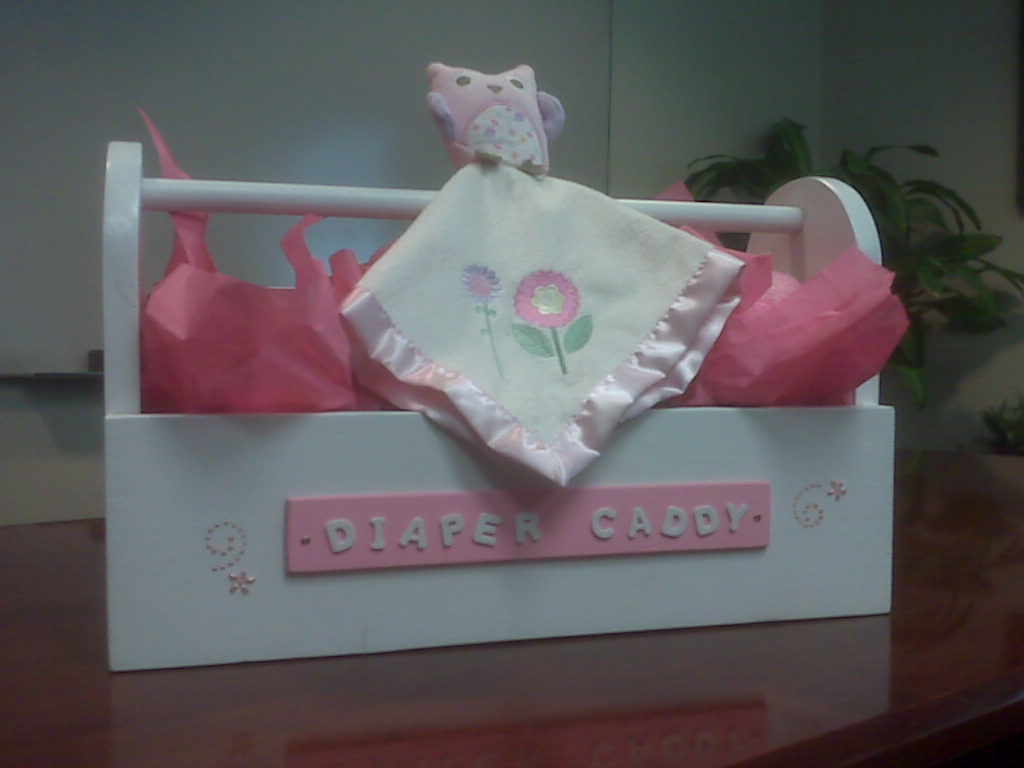
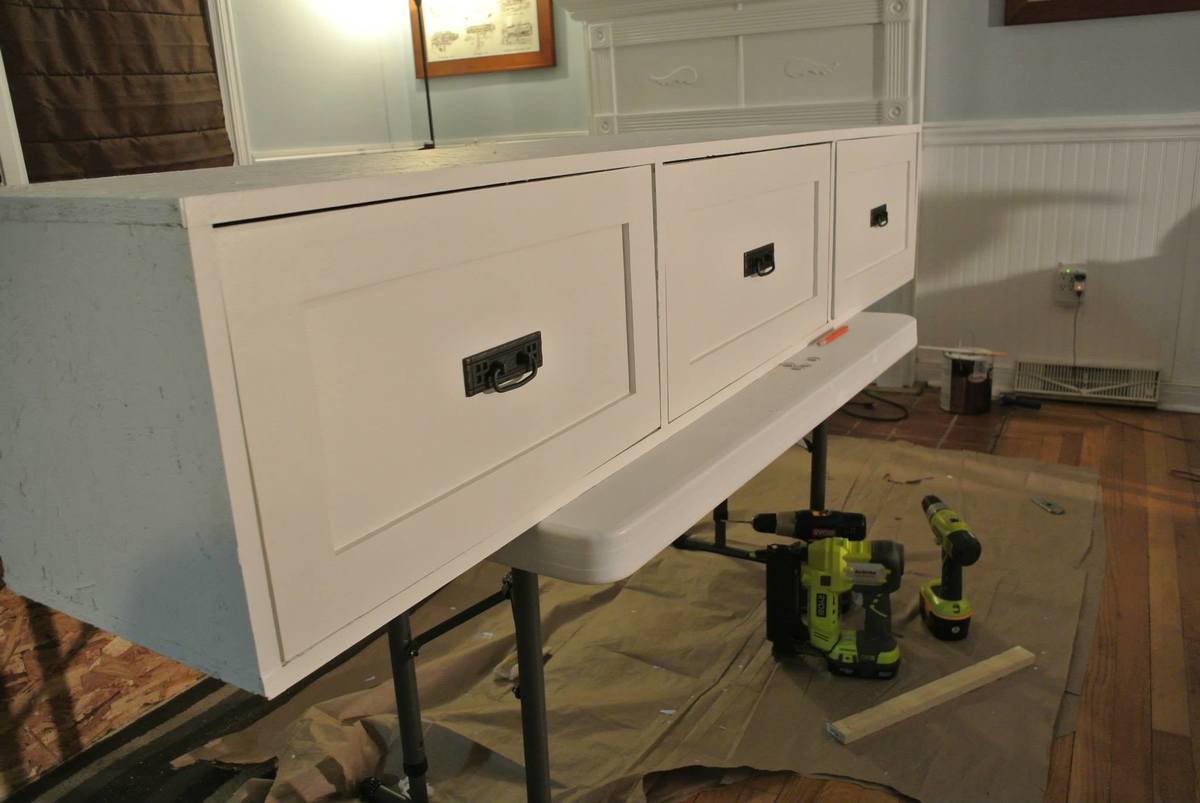
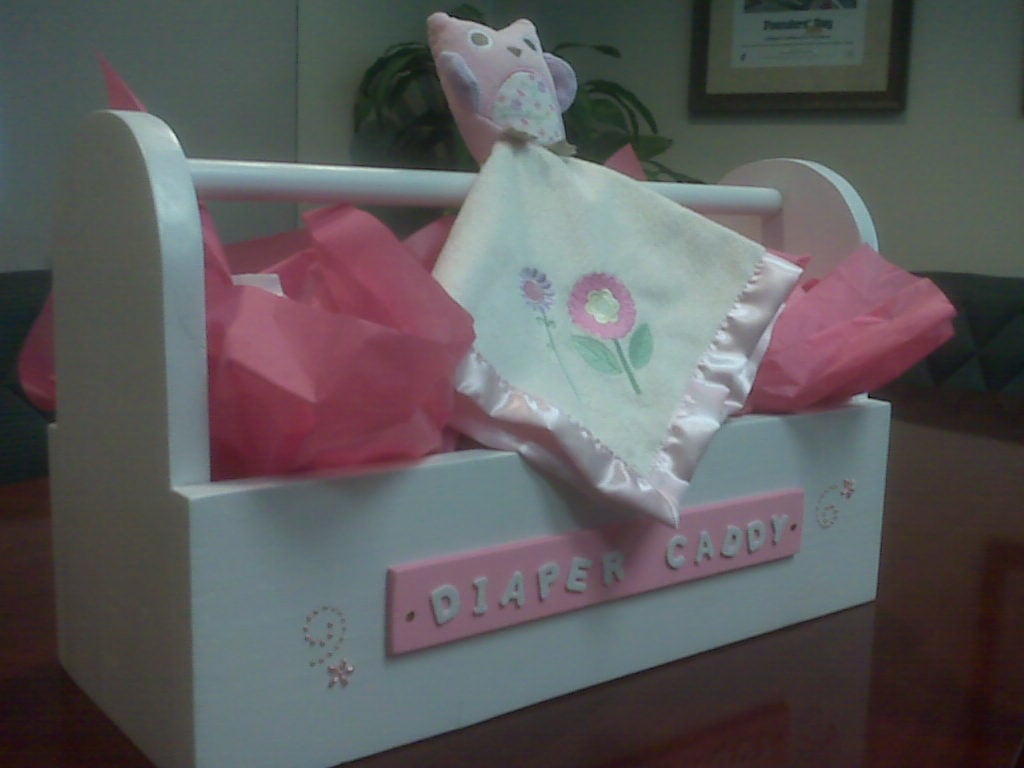
Christmas tree shelves
![](/sites/default/files/IMG_21791_1.jpg)
I built 7 of these for christmas gifts this year. 4 of them from cheap pine, and 3 from reclaimed barn wood. Everyone was very pleased with their presents.
![](/sites/default/files/20201221_135114_1.jpg)
![](/sites/default/files/20201213_120131_1.jpg)
I built 7 of these for christmas gifts this year. 4 of them from cheap pine, and 3 from reclaimed barn wood. Everyone was very pleased with their presents.
I am completely obsessed with this jewelry cabinet - Thank you so much for posting this plan! This was my third woodworking project since discovering Ana White, and it was very easy to make and the plan was super easy to follow.
Fri, 02/07/2014 - 10:52
I love it! Where did you find the hardware for it? I have been looking for something pretty that is also narrow enough and haven't had much luck.
We recently moved from a 530 sq ft rental house to a 1700 sq ft rental house. The one kitchen table that we had in the little place was needed in our library/craft/homeschool room so I needed something knew for the kitchen. My 8 year old daughter helped a lot (she loves using the Kreig Jig).
I love how this (my second wood working project ever!) came out.
Thanks for making it so easy to create beautiful and custom furniture for me and my family!
Fri, 12/05/2014 - 17:31
This is my first brag post. Any tips on why the photo is sideways and there are weird links in odd spots?
Thanks!
Tina
Fri, 12/05/2014 - 19:59
When my photos posted sideways, I used microsoft paint to rotate and saved as a new photo. This seemed to solve the issue.
I made these nightstands with reclaimed siding and fir flooring, and scrap wood from a remodel they will ultimately furnish. I found the matching knobs for $1 each at a building materials salvage yard.
This is a sliding barn door I built for some friends. It's constructed from standard pine boards and premade tongue and groove beadboard planks.
I Scaled down this Buffet and Hutch from the Shanty 2 Chic gal. Had to make it fit to our dining room. Wife loves it
So glad these plans were posted so that I could build my own outdoor sectional. I built two armless and two corner/end pieces. I used cedar with American Walnut stain and clear/satin spar urethane. I purchased the cushions online. They only had 24x24"; so for the back cushions, I used a seam ripper to open the cushion, cut the foam and extra fabric, and re-sew.
Easy build and flexible to modify size
Since I've been working at home, I needed a desk with space for both my work station and for my personal use. This plan was quite easy to adapt into a two-position desk. On the left side I substituted a keyboard tray for the drawer. I also made mine 2" deeper than the original plans, since that fit my needs better.
Sun, 01/03/2021 - 10:14
This looks amazing, I really like the added keyboard slide out!
A mini version of the original folding chalkboard easel. A smaller chalkboard space at 13" x 13" this size is perfect for tabletop use and easy carrying for kids.
here is my version
Mon, 12/15/2014 - 12:22
Wow this is really great! I love the wall color too! Nice work!
Wife found a post where someone did a riff on farmhouse X table where instead of supports at the floor and top of the base, there was one support in the middle of the X. The riff made the table taller than the original (which I didn’t realize till we had the x bench put up against the ‘riff’ table - about 3 inches too low which I’ll fix this weekend. It only works ok for my 6’7” brother law lol.
Other alterations i made - turned the X support into through tenons (my first - future ones will be cooler) and decorative cross 2x2 under the table top similar to the way they are on the bench.
Turns out, looks pretty cool with taller bar chairs!
Fri, 01/08/2021 - 10:21
It's absolutely beautiful, love the height with the taller chairs!
Just finished the legs on my first project tonight. Instead of using the Krejig I found a really nice pocket hole jig that had some amazing reviews at my local Harbor Freight. Turned out really nicely if I do say so myself. I intend on finishing tomorrow as far as building goes. Will probably sand and stain a dark espresso in the next week or two.
This was a fun project that my Dad and I had the opportunity to work on together. We were able to locate an old barn that and recently been blown over (farmer gladly told us to take whatever we wanted). We salvaged the wood, hit it with a little sand paper that provided the true rustic farm house look. With some modifications and a biscuit joiner we were able to fit this together. All in all I think I spent a total of $6 on the lag blots for the legs.
Made in 2014 from the playhouse bed plans with the storage stairs as well.
I took some ideas from an Ana White wine rack I saw and made this Pantry for our kitchen. Pretty happy with how it turned out.
I made a couple of decorations from my scrap wood. On the snowflake, I had some extra parts of 1x2s laying around so sized this down to 20" and used those. The tree is just a bunch of different types of wood I had left over. This was really fun to do.
It took me a little over a day as I had to paint and wait for it to dry before I could assemble.
Thank you for the ideas and plans.
Tue, 12/16/2014 - 19:16
This is beautiful! It's so gratifying to use up scrap and turn it into something like this. :)
In reply to Thanks Pauline by CSaintD
Tue, 12/16/2014 - 20:38
I have a RYOBI giveaway on my blog, you should submit this photo.
So, after having built the rustic console and rustic end table, I was staring at the blank space in my room and the stack of books and decided that I could fix two problems with just a slight adjustment of the console plans. Basically the structure is exactly the same for the top, "legs" and shelves, but then instead of running 2" x 2" trim, I did 1" x 2" and 2" x 4" at the base (mostly to keep the dust bunnies as bay). The other significant difference is the ends, which I paneled and trimmed out rather than doing the open "X". And then ran tongue and groove paneling along the back to finish it out.
As with my other rustic builds, I left off the metal trim (again, for now at least) and distressed the top and face with a rotary wire brush. The texture on the top of this one turned out really wonderful. I hate to even put anything on top to hide all that grain. Price was a little more too, mainly for the extra 1" x 12" x 6' and the pack of tongue and groove panel boards.
My 1st coffee table and I'm in love with how this came out. Really proud of myself for this one!
Mon, 01/18/2021 - 11:09
Gorgeous, thank you for sharing your first coffee table, it turned out amazing!
Santa's elves made this one just in the knick of time! Ana makes it impossible to not spoil this child :) I wish I had one of these when I was a kid, we used to play "store" all the time
Looking for rustic outdoor table ideas, I came across Ana's website and the Providence Table and benches. When I saw it, I knew this was what we were after. After some more browsing I came across the 4x4 truss beam table and decided to rather go with the chunkier table. Although I’ve done a few woodwork projects, this was the most ambitious to date, especially considering that I only have a few hand held tools.
We live in beautiful Cape Town, South Africa - we work in metric, so all dimensions needed to be converted. Also, our locally available wood sizes are different to timber sizing in the States, i.e. we don't have 4x4 (100mm x 100mm) or 2x4 (50mm x 100mm) available, so it was a bit of a challenge to decide what to go for. In the end I decided to use 75mm x 50mm rough cut treated construction pine. It was cheaper, and I could end up with a REALLY Chunky table if I glued 4 pieces together! In order to do this, I need to amend the plans as if it was made from 6x4 beams.
So I started the process of cutting the 75mm x 50mm timber to rough sizes, gluing the pieces together, sanding the joints, filling the gaps with glue/ sawdust mixture and re- sanding for each member of the table! I took my time with this and did a bit each day after work. It was interesting watching YouTube vids on this build - the guy starts with perfect 4x4 timber pieces, cut them and assemble. For me just to get to the starting point took quite some effort, but I knew I would be very happy with the more chunky look.
Other challenges I did not fully appreciate when deciding on the REALLY Chunky size, was the cutting of these thick pieces of timber using hand held tools and how to join them!! You don’t get very long small drill bits for pilot holes, so ended up using self-drilling screws. Unfortunately the longest length I could find was 120mm (8.66inch) - so I had to counter sink them really deep into the timber - this was quite tricky!
Other things I did were to lower the original design table height as recommended by other builders on this site so I made the table height 750mm (29.5inch). It worked out very well for small children as well for adults (I'm 6ft2). Table length I made 2.4m (approx 8ft). For the table top I used 220mm x 50mm (8.66 x 2 inch) timber, once again due to the restrictions of locally available sizes. I also change the spacing between the legs in order to fit the benches under the table (1600mm opening to fit the 1550mm benches).
For the benches, I once again had to decide what timber sizing to use. I wasn't keen to go through the process of forming 6x4's for each bench member for 2 benches and also felt that it would look just too chunky for the short bench legs. So the design ended up being a hybrid between the providence bench- and the chunkier 4x4 bench design, using 2 pieces of 75mm x 50mm to create 100mm x 75mm (4 x 3.5inch) legs.
Other changes made to the bench design was to make the bench height 450mm (17.7inch), amend the overhangs of the seat, and change the overall length to be able to slide the bench in under the table.
The altered height of the table and benches really worked out well and we sit very comfortably at that table.
We used chalk paint for the finish, but as you can see, we're still deciding on colour choices and final look of the top.