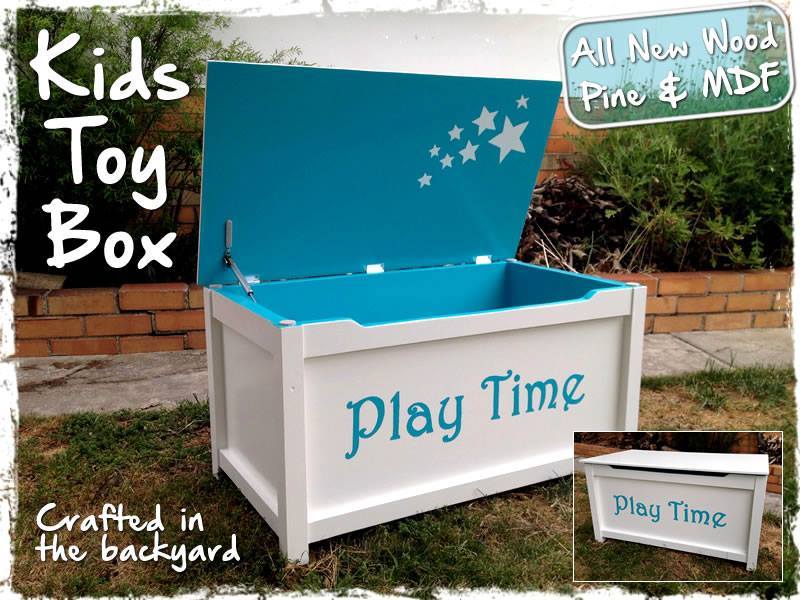
Community Brag Posts

Kids Adirondack chairs

Submitted by Anonymous (not verified) on Tue, 10/05/2021 - 04:46

This was my first time building a chair. The plans were so easy to follow. The kids size fits an average child up to about age 5 or 6. If I were to build again I would add a bit of height to the backs so they could fit them even longer. My granddaughters aged 3 & 5 just loved them.

Built from Plan(s)

Barn Pallet Beam Ledge

I always have leftover pallet wood lying around. So I decided to whip of a beam ledge as a gift. I ended up wrapping it before I even got a final photo but it was finished in a dark gel stain. I think the next time I make one I will apply a simple Tung oil finish so all the wonderful character can remain.

Built from Plan(s)
Estimated Cost
FREE!
Estimated Time Investment
An Hour or Two (0-2 Hours)
Finish Used
Moderate Sanding
Recommended Skill Level
Beginner

Farm Harvest Table - OLD!

I did a shortened version of the Farm Table, I only had room for a six foot table. I wanted to give it an old-looking feel, so I beat it up a bit and stained it with an ebony stain, then a jacobean. I plan to paint the legs black.

Estimated Time Investment
Weekend Project (10-20 Hours)
Finish Used
Ebony and Jacobean
Recommended Skill Level
Beginner

Kids Country Bench

Submitted by iwn2000 on Wed, 04/22/2015 - 12:34

We wanted a bench for our daughter for our front porch, both for sitting and for storage of her rain boots, outdoor toys, etc. I'm definitely a beginner woodworker so I wanted something easy I could tackle in a couple of days with only basic tools, so I chose the Kids' Country Bench project. I liked the version posted here by a user named Jenny Anne, who modified the bench to make three cubbies rather than two on the bottom shelf, so I did the same thing.

It was easy, and the bench turned out great! I used no power tools except for a cordless drill to do the 40+ pilot holes & woodscrews. I don't own a jigsaw and I want to learn hand tools anyway, so I used a coping saw (a kind of miniature hacksaw) to do the curved cuts on the trim & the legs, and used heavy-grit sandpaper to smooth out the wobbles (there were a lot of wobbles).

For the rest of the cuts I used a Japanese-style pull saw (a cheap one from Ace Hardware). Cutting all the boards to length with a handsaw was probably the hardest part, and I had a tough time truing the edges. Next time I would probably use a miter box and miter saw to get perfect 90-degree angles, but I got better as I went along, and was able to finish the edges pretty well with a wood file and sandpaper.

I wanted to stain it a deep red color, but my better half insisted on a clear stain, so I used clear Polycrylic, four coats on the top & outsides, and three coats on the inner & undersides.

The bench feels pretty sturdy and is definitely strong enough to take my 3-year-old's weight. The trim on the front and back acts as a brace, so it's got some structural integrity. I don't know that I would trust it to hold an adult's full weight for very long -- I probably won't be dancing on it or using it as a stepstool or anything, but for a kid's bench it's solid and level.

The whole build probably took me four sessions in my "workshop" (i.e. my basement), at probably 2-3 hours per session. With woodworking it's definitely true that you learn by doing -- I gained confidence as I went along and am excited to try some more advanced projects!


Built from Plan(s)
Estimated Cost
About $150 total, but that included some tools I needed for my workshop. It would have been much cheaper for just the lumber and glue.
Estimated Time Investment
Weekend Project (10-20 Hours)
Finish Used
Clear Polycrylic, applied with synthetic-bristle brushes (brushes can be cleaned with soap and water between uses). Four coats on outer faces, three coats on inner and under sides. Two hours' drying time between coats, 24 hours' drying time after final coat before use.
Recommended Skill Level
Starter Project

My small truss coffee/project table

Submitted by sr320 on Sat, 09/02/2017 - 13:15

Shrink size and make double truss small coffee/project table. Select Minwax NATURAL BEIGE water base stain and got very warm, peachy color.

Built from Plan(s)
Estimated Cost
90$
Estimated Time Investment
Weekend Project (10-20 Hours)
Finish Used
minwax water based stain and poly
Recommended Skill Level
Beginner

Benchwright Console Table

Submitted by Anonymous (not verified) on Tue, 10/05/2021 - 09:39

I built the console table and liked it so much I decided to modify the plan to make a whole set. I made two side tables , and a coffee table. This is also the first time I installed drawer hardware. I was a bit intimidated but after watching a “how to” video from Anna it was pretty easy. I’m working on finishing the coffee table now. The stain is weathered oak. They’re finished with gloss lacquer.

Built from Plan(s)

Comments

Play Pie Hutch

I used Ana's plan to make this pie hutch...in about 45 minutes (except for painting)!! It was lots of fun and my daughter helped paint it afterward. She still plays with this almost every day!

Estimated Cost
>$40
Estimated Time Investment
Afternoon Project (3-6 Hours)
Finish Used
Paint
Recommended Skill Level
Beginner

Cottage loft bed

Submitted by Krae on Wed, 05/29/2013 - 10:59

My husband and I made this for our daughter's 6th birthday. She loves it! It took us about a week to complete it. We were able to reclaim the room we had her toys in, since this gave her more room to play in her bedroom. We used wood shims for the shingles, and we made the windows a little narrower than the plans.

Built from Plan(s)
Estimated Time Investment
Week Long Project (20 Hours or More)
Recommended Skill Level
Intermediate

Comments

Trash recycling bin

Submitted by Lwente on Sat, 09/09/2017 - 05:51

I used Ana's tilt out trash bin plans to help me build this fabulous center for use in my kitchen. I love the way it turned out!

Estimated Time Investment
Week Long Project (20 Hours or More)
Finish Used
For use in my kitchen. One side will be for trash, the other recycling
Recommended Skill Level
Intermediate

Comments

lindsayalbrecht

Sat, 04/18/2020 - 19:04

Can i get the dimensions from you? I’m wanting to create the exact same thing with two bins and drawers.

Planter boxes made in Australia

Submitted by Anonymous (not verified) on Wed, 10/06/2021 - 00:41

Greeting from from Queensland, Australia.

I decided to make a couple of wooden planter boxes for our garden at home, after watching Ana's video on the “Easy Build DIY Planter Box” made from cedar and painted white. I downloaded the plans, and then converted the measurements to metric. I did make a couple of alterations from what was shown in the video. Whilst I do not have a workshop at home, I attend a local "Men's Shed" where there is a large range of woodworking machinery available to use. Firstly, I used rough sawn treated pine 150mm x 25mm boards, which I dressed and cut down to size. The dressed timber looked great once I stained the boxes. Secondly, I have made the boxes without legs, so that they sit directly in the garden, and are filled with potting mix soil.

After making the first 2 planter boxes, my wife asked if I could make another couple. After that we decided another 3 planter boxes in a different part of the garden might be nice, so I made these the same. Then I made a longer planter box of the same style for vegetables and herbs.

Thanks so much, Ana, for the great plans and video, as well as the inspiration. Mind you, my planter boxes took a lot longer to build than the time you indicated in your video, but that is fine.

Cheers Noel

Comments

Seasonal And Holiday

vintage step stool

Submitted by rhonit on Mon, 03/14/2011 - 05:17

This is my first ever build. Now I have cut wood all my adult life, trim wood and straight cuts for husband. As to actually build something all on my own, this is a first. I started small, and have other things in mind to build up too (excuse the pun). I did have my husband drill the holes with his Kreg Gig. It might look like old barn wood but that was a happy mistake. First I used oak stain, then black stain, white paint, red and turqouise paint. And sanded like crazy, again, Happy Mistake!!

Estimated Cost
$20
Estimated Time Investment
An Hour or Two (0-2 Hours)
Finish Used
stain & paint
oak stain, black stain, left over paint: white paint, acrylic paint, barn red & turquoise
sand like crazy and ta-duh, looks like old barn wood. Looks like One Hot Mess, prior to sanding.
Recommended Skill Level
Starter Project

First project Kids Beds

Submitted by elfranzen on Thu, 05/30/2013 - 17:44

First project I have done since high school. I built and my wife painted.

Estimated Cost
$80 a piece
Estimated Time Investment
Weekend Project (10-20 Hours)
Recommended Skill Level
Beginner

Farmhouse Table & Bench

We wanted a farmhouse dining table but didn't want to be confined by 4 corner legs or supports at the end of the table so I combined the farmhouse top from this site with another farmhouse table base that I found at shanty2chic through a link on this site.  We couldn't be happier with how it turned out!  I didn't follow any of the plans exactly but adjusted them so we had a table that fit well in our dining room, still fit several guests and was a good eating height.  The bench was also modified from the plans I found at shanty 2 chic.

Built from Plan(s)
Estimated Cost
$240 for table and bench
Estimated Time Investment
Week Long Project (20 Hours or More)
Finish Used
Minwax Special Walnut with Minwax Satin polyurethane
Recommended Skill Level
Beginner

Comments

robinm88

Wed, 04/29/2015 - 11:35

Do you have the plans for the base of the table and the bench? I found the tabletop plans, but have gone to the shanty2chic website and can't find anything for the base, etc.

kenneth.ring

Wed, 04/29/2015 - 12:28

Here is a link to the plans I used for the table base: http://www.shanty-2-chic.com/2014/05/restoration-hardware-inspired-dini…

And for the bench: http://www.shanty-2-chic.com/2014/06/diy-benches-for-my-dining-table.ht…

I made some modifications to the table length/width to fit our dining room space better which is just a matter of preference. I then changed the length of the bench to fit our table. Other than those small changes which didn't effect the integrity of the plans, these are what I went by.

robinm88

Wed, 04/29/2015 - 13:34

Thank you so much! This is exactly what we've been looking for. I love that the legs/base are completely under the table so not to interrupt or block causing wasted space.

Kids Storage Bookshelf

Submitted by Malka on Wed, 09/13/2017 - 00:29

Project was super easy to build, and fits a TON of books and toys. Perfect for our nursery. Stained in Minwax Classic Grey with a satin poly finish.

Built from Plan(s)
Estimated Cost
$100 +/-
Estimated Time Investment
Weekend Project (10-20 Hours)
Finish Used
Minwax Satin Polyurethane
Recommended Skill Level
Beginner

Clara's Table with Oak tabletop

Submitted by rhilborn on Wed, 03/16/2011 - 11:23

This was our first project to build. It was a great experience and a fun project to do as a family. We chose to make the tabletop out of red oak so that it could take a beating but the base is pine utility boards just as suggested in the plans. My husband has woodworking skills from school days and I have a fair amount of finishing skills. We had some pitfalls getting familiar with the Kreg jig but now that we are our second project was a breeze! We already made 1 of 2 modified bitty benches to go with the table.

Built from Plan(s)
Estimated Cost
$50
Estimated Time Investment
Day Project (6-9 Hours)
Finish Used
Minwax Dark Walnut, Minwax Wipe On Polyurethane-Gloss; Behr Home Premium (Leftover housepaint), Minwax Wipe On Polyurethane. I have used 2 in 1 stain and polyurethanes before for finishing and I've also used spray on polurethanes, the wipe on stain and polyurethanes were my favorite combinations thus far! I did countless coats of stain on the tabletop with 120 grit sanding and/or 00 steel wool in between. There are also quite a few coats of poly on the tabletop since it's a work surface. The base has 2 coats of paint brushed on with a brush and then knocked down with a foam mini roller. I sanded with 120 grit sandpaper in between coats and then roughed it up a bit after the paint was ready before applying poly. I only felt it needed one coat of poly on the base.
Recommended Skill Level
Starter Project

So happy with my console table!!

Ever since I saw the beautiful rustic X console table, I knew I had to have one in my house. And I finally built one all by myself!! Thanks to Anna and Hilary. I am so very happy with my console table.

Built from Plan(s)
Estimated Cost
$100
Estimated Time Investment
Weekend Project (10-20 Hours)
Finish Used
mixture of dark walnut and weathered oak
Recommended Skill Level
Beginner

garden potting stand

I made this for the April Cent-Sational Salvage Challenge where you had to incorporate a kitchen utensil that you purchased at Habitat ReStore into your project and spend no more than $15!  I used a kitchen sink- it's the only kitchen utensil my ReStore had!  I used 2" x 4" for the entire project and left the sink unattached so that it can double as a kids water table later.  For the finish, I used a light blue latex paint, gave it a sanding to expose the wood, then wiped with Dark Walnut stain.  This gave it the old barn wood look.  This little stand allows us to pot our plants somewhere other than the dining room table, push the dirt into the sink and down the hole into a bucket.  No mess!  Plus, it's pretty cute and I made it for a total of $5!  $5 for the sink at Habitat ReStore and the 2" x 4"s I saved from a construction site dumpster.  Win, win.


Estimated Cost
$5
Estimated Time Investment
Afternoon Project (3-6 Hours)
Finish Used
Latex paint, sanding, stain-wash for antiquing.
Recommended Skill Level
Starter Project

Comments

Corner Cupboard

My husband built this for me. The doors were a bit frustrating for us as beginners. I really thought he was going to end my life over those doors really. I am very happy with the end result but it did sit inside of the house for over a month without doors. LOL I love this cabinet so much though. It's my favorite piece so far.

Built from Plan(s)
Estimated Time Investment
Week Long Project (20 Hours or More)
Finish Used
General Finish Java Gel Stain
Dove White Valspar Paint
Recommended Skill Level
Intermediate

Clara's Table

Submitted by Anonymous (not verified) on Fri, 10/08/2021 - 08:57

I've built four of these tables over the years for grandkids. One has already outgrown the table height so I rebuilt the frame and added longer legs. I modified it and use mortise and tenon joints, which has held up great.

Built from Plan(s)

Comments

Ana White Admin

Fri, 10/08/2021 - 10:36

Love that you were able to do a whole new table with longer legs to fit the grandkids as they grow! Thanks for sharing~