Community Brag Posts

Entry Mirror (from The Handbuilt Home)

Submitted by Linda7 on Tue, 10/01/2013 - 14:48

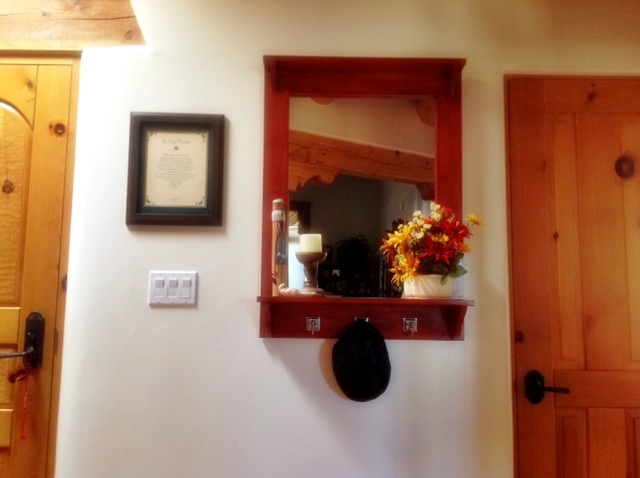
My sister and brother-in-law recently moved to Albuquerque and purchased a home with a wonderful view of the Sandia Mountains. I built them the mirror from The Handbuilt Home (p. 36), and they hung it in the entry hall. The reflection in the mirror is a gorgeous view of the mountain range out of their large living room windows. Because this was not a rustic build, I used better pine boards, sanded very smooth.
Thank you to ANA for the great plan (and book!). Also a great big hug to JOANNE and TRACY for responding so quickly to my query regarding attaching the mirror to the frame. I ended up having the mirror company attach the mirror with silicone because I was afraid mirror clips would mar the smooth, shiny surface of the wall. We also covered the back of the mirror with craft paper, contact cemented to the frame to protect the mirror silvering.
This was a fun build, and my sister and b-in-law are very pleased with it.

Built from Plan(s)
Estimated Cost
Around $75.00
Estimated Time Investment
Weekend Project (10-20 Hours)
Finish Used
Minwax Express Color "Crimson", two coats, followed by four thin coats of gloss poly, sanding between coats with fine grit.
Recommended Skill Level
Beginner

Comments

JoanneS

Tue, 10/01/2013 - 18:11

Linda, your mirror looks fabulous! The finish is just gorgeous, and I love the hardware you used. Beautiful build! :)

Linda7

Tue, 10/01/2013 - 18:20

Thanks for the nice complement, Joanne. I really do appreciate your help!

4' tall reading lamp

Submitted by Anonymous (not verified) on Mon, 12/21/2015 - 12:09

I made this 4' tall reading lamp by modifying the adjustable height bolt bar stool plans. I had to modify most of the measurements on the fly but I think it turned out well! It's a bit too cold here to stain it, so I'll do that (and tuck the cord away nicely) in the springtime. Love this site! So many great ideas and plans to be found. I recommend it to friends all of the time!

Estimated Cost
$30
Estimated Time Investment
Afternoon Project (3-6 Hours)
Recommended Skill Level
Intermediate

Christmas gifts

Submitted by Anonymous (not verified) on Sat, 02/16/2019 - 16:59

I made 6 for my nephews & niece for Christmas. Great project!

Estimated Time Investment
Week Long Project (20 Hours or More)
Recommended Skill Level
Beginner

Farmhouse Table for our busy family of 8!

Submitted by baybones on Fri, 09/30/2011 - 13:23

This was our first ever building project. We our so happy with the results. Read more about it at http://www.sidetrackedsarah.com/2011/09/build-your-own-dining-room-tabl…

Estimated Cost
$80
Estimated Time Investment
Day Project (6-9 Hours)
Recommended Skill Level
Starter Project

Comments

kat (not verified)

Sun, 10/02/2011 - 05:21

Wow guys, what a great job! And only 1 day, thats amazing. This is on our to do list as well but lots of other "important" kiddy things to do first :) Was there anything when building you would have done differently? Any tips you may have :)

Sarah R (not verified)

Sun, 10/02/2011 - 19:57

Well, we did it in more than one day.....but an hour or two here or there. Our biggest tip is to watch Ana's tutorial on how to notch the legs. That was really helpful! Just be sure to check for square before you attach everything!

Painted X Shelf

Submitted by scokenour on Thu, 10/03/2013 - 15:26

I slightly modified the X Shelf plans, using 2x2's (actually ripped my own from 2x6's since the only ones I could find were in horrible shape). The X's were a little trickier than I anticipated, but well worth it! I really like the look using 2x2's vs. the chunkier 2x4's.

Built from Plan(s)
Estimated Cost
$60
Estimated Time Investment
Weekend Project (10-20 Hours)
Finish Used
Stained using a vinegar/steel wool (my favorite!), then painted a quick coat of antique white milk paint, sand; then a quick coat of gray wash (1/2 Pewter Grey 1/2 water); then sealed with finishing wax.
Recommended Skill Level
Intermediate

Comments

Lady Goats

Fri, 10/04/2013 - 08:57

I'd actually considered going down to 2x3s instead of 2x4s, but the 2x2s look great! Awesome Job!

scokenour

Fri, 10/04/2013 - 09:19

Thanks! My inspiration piece actually came from a piece that one of the dealers (I work in a high-end antique & interior store) and I was THRILLED to see your plans which made it so much easier! Can't wait to start my next project!

Above Toilet Cabinet

Submitted by Smokeydog on Thu, 12/24/2015 - 12:58

I built this above toilet cabinet for my son and his wife for Christmas. They moved into a new house and wanted this additional storage space.  Turned out pretty good!

Built from Plan(s)
Estimated Cost
$135.00
Estimated Time Investment
Weekend Project (10-20 Hours)
Finish Used
BEHR Satin Paint with primer
Recommended Skill Level
Intermediate

Modern Farmhouse Bed

Submitted by Strong1233 on Sat, 02/23/2019 - 06:20

Made legs 16 inches to bring to height suitable for the mattress I had.  My first project ever using Kreg K5.  

Built from Plan(s)
Estimated Cost
$180
Estimated Time Investment
Weekend Project (10-20 Hours)
Finish Used
Minwax Wood Finish Penetrating Stain - Classic Gray 271
Recommended Skill Level
Beginner

Farmhouse mini end tables 20” top

Submitted by Anonymous (not verified) on Sun, 01/15/2023 - 19:20

I built the farmhouse bed and needed side tables. These worked out great. Very easy to manipulate sizes to make larger

Comments

Stylish Comfort

Submitted by hoffer5353 on Tue, 10/04/2011 - 09:55

I love to sew and create new things so I decided I would make a leather upholstered ottoman. Leather is extremely easy to work with!
I started by sewing together leather rectangles that I purchased from an online auction.
When that was complete I determined the size of the box, foam thickness and the overall height I would like for it to be, I created/designed as I went.
Other than the upholstering items (buttons, needles, foam, batting, leather) everything else was scraps that I had and was able to reuse to create my ottoman. I added a shelf below for storage and am glad that I did it is a great place to put magazines.
It ended up taking much more time that I planned because I didn't follow a definite plan. Now that I have completed one I am sure that the others will take much less time. I am so happy about how it turned out!
I gifted it to a friend for a housewarming and she loves it! It even matched her area rug; apparently it was meant to be!

Built from Plan(s)
Estimated Cost
$100.00
Estimated Time Investment
Weekend Project (10-20 Hours)
Finish Used
Minwax-Red Oak, Minwax-Polyurethane-Semi Gloss, Deft-Semi Gloss Spray
Recommended Skill Level
Advanced

Comments

Study/ Work Bench

Submitted by Alisa on Sun, 10/06/2013 - 22:34

This is my first woodworking project and when I saw the plans, I knew it would be perfect for an indoor study and work bench for my hubby. Not having any power tools except for a drill and two sanders, I went to Home Depot and they were obliging and patient enough to cut my lumber for me (I loved making the bench so tools will be next on my list). The plans were easy to understand and since Maths is not my strong point, I was happy to have something so easy and methodical to work with. I loved the extra shelf on the top and the larger one on the bottom.

I made 2 modifications:

The height of the front legs are 33” instead of 36” because I wanted it at wrist height for my husband on the current stool he has in his room. I kept the back legs at 48”. I forgot to account for the 3” difference when I was assembling the lower shelf, so I ended up taking a hacksaw to the base of the 4 legs after assembly to account for this and this explains why the bottom shelf is so low to the ground. But it works!

Hubby wanted something attached to the back of the bench to protect the wall behind from spills. He also wanted a smooth shelf surface where nothing could get stuck in small spaces. The shelves also needed to be able to take weight and being a newbie, I didn’t want to mess with the measurements too much. After assembling the bench (including the back supports), I purchased a large 3/8” sheet of plywood and had it cut into 4 pieces – two for the back spaces and two for the shelves and then used screws and glue to attach those to the piece. The one thing I should’ve done was purchased 1 ¼” screws for attaching the plywood to the shelves, because I overlooked it and they went straight through to the underside of the shelves and had to have someone cut the screw ends off, which was no small feat.

But overall, I was very pleased with the way it turned out, especially for a first-time project.

Built from Plan(s)
Estimated Cost
$85
Estimated Time Investment
Week Long Project (20 Hours or More)
Finish Used
For the finish, I used 2 coats of Minwax Wood Stain in Dark Walnut. It was darker than I’d expected and even though I’d used wood conditioner and sanded it beforehand, the plywood took on a zebra-like appearance after I wiped the first coat off with a rag. So I decided to make it more uniform and painted the second coat on, concentrating on the lighter areas and letting it dry without wiping it off (not a good idea because I had to wait a week to ensure it evaporated prior to applying the topcoat). I then applied 3 coats of the water-based Polycrylic protective coat, according to the directions on packaging.
Recommended Skill Level
Beginner

King Storage bed

Submitted by Anonymous (not verified) on Sun, 12/27/2015 - 18:50

Variation using your King Bed Storage plans. Made from pine plywood and solid pine for the trim. Drawers made from aspen with pine fronts and 1/4 inch pine plywood. Took about 60 hours in my garage. Two large drawers (with bottom sliders) and 4 jewellery trays on the end piece. 2 smaller drawers (Custom fit without sliders) plus an open bin space on each side piece. Contrasting teak wood jewellery trays pop out with magnetic push catches. All joinery is with hand cut dovetails. Total of 144 dovetails.

Estimated Cost
$300
Estimated Time Investment
Week Long Project (20 Hours or More)
Finish Used
Pecan stain with 3 coats of polyurithane
Recommended Skill Level
Intermediate

Comments

Laundry room copy

Submitted by rpagan24 on Fri, 01/27/2023 - 02:27

Version of your laundry room make-over !

Comments

Tryde Side Table

Submitted by Joni on Sun, 10/09/2011 - 10:46

This was my first project, so I picked one of the easier table plans. Once I learned how to work the miter saw, Kreg Jig & drill, it was pretty easy!

Built from Plan(s)
Estimated Cost
$10, not including paint or 4x4
Estimated Time Investment
Weekend Project (10-20 Hours)
Finish Used
Primer, and 2 coats of Valspar Semi-Gloss Paint (Roasted Sepia & Jekyll Sans Souci Green)
Recommended Skill Level
Beginner

Comments

Pull-out step stool

I needed a step-stool in my kitchen to reach in my top cabinets. I'm rather short so I was constantly dragging a chair from my dining table over to find things. I did a google search for a step stool and looked at images. As soon as I saw the picture I knew I had to build it, the retailer selling the original one I saw has a starting price of $270 and goes all the way up to $680! It took me 2 weeks off and on and several times of putting together and taking apart to get Ito the size specifications on the retail website.

Estimated Cost
Around $50
Estimated Time Investment
Weekend Project (10-20 Hours)
Finish Used
Stain and satin finish poly
Recommended Skill Level
Beginner

Comments

Bunnie1978

Wed, 10/09/2013 - 04:13

That's a cool idea... mix between nesting tables and stools! Great job!

Mrswhetstone

Sun, 05/31/2015 - 18:27

I just used the picture i found online as reference and built it through trial and error. Unfortunately I don't know how to create plans either.I can tell you the legs are 2x3's cut at a 5° angle and the tops are 2x6's. I ordered the drawer slides from amazon for approximately $12 a piece.

robear529

Fri, 08/21/2015 - 06:34

Hi, I've been looking for the original image that you used as your model in an attempt to find dimensions to start with, but haven't been able to find it. Could you perhaps remember what brand it was or what site you found it on? If you still have the stool, could you maybe tell me the width of your top step and I could maybe go from there? 

Thanks for the picture. This is a brillant idea and exactly what I'd like to create for my kitchen. I'm hoping to be able to use it as a counter height seat as well when I'm working in the kitchen.

Rustic X TV Console

Submitted by Rol8701 on Tue, 12/29/2015 - 12:41

Loved this plan, decided to use it for our living room TV console. Planning to add handles to the crates during a weekend when we have some free time. Very impressed with our final product :)

Built from Plan(s)
Estimated Cost
$85 for wood, stain, sandpaper and wood glue. $70 for the crates and grey paint. Not sure how much the wife spent on dressing up the top of the console.
Estimated Time Investment
Afternoon Project (3-6 Hours)
Finish Used
1st layer of stain we used weathered oak by Minwax
2nd layer special walnut by Minwax
3rd layer weathered oak
4th layer special walnut

wiped off access stain with a rag, 320 grit sandpaper was used between stains.
Recommended Skill Level
Intermediate

Comments

Modern outdoor 2x4 chair with modification

Submitted by Anonymous (not verified) on Fri, 03/08/2019 - 13:31

This chair was made off Ana white'smodern outdoor chair with modification to add back support. Without the back support the back pillow would keep falling off.  The cushion are 25x25 but very thick for comfort.

Estimated Time Investment
Afternoon Project (3-6 Hours)
Recommended Skill Level
Beginner

Comments

Brittsiana

Sun, 08/16/2020 - 10:03

Does anyone know what degree angle this is for the back support?
I would like to add it to my newly finished chairs I made over the weekend. The pillow keeps falling down.

outdoor table inspired by the outdoor sectional

Submitted by vic b on Tue, 10/11/2011 - 23:56

constructed in a similar way to the outdoor sectional, using 1x4's. We used 4 1x4's laminated together for each leg.

Recommended Skill Level
Intermediate

Comments

Cindy from Indiana (not verified)

Wed, 10/12/2011 - 10:02

That table looks GREAT! And your pup is gorgeous, too!

sgilly02 (not verified)

Fri, 10/14/2011 - 21:41

What kind of wood did you use? I tried something similar but ended up splitting the wood and had to change the design of the table. This is just what I had originally planned but was unable to produce. It's just beautiful.

vic b

Sat, 10/15/2011 - 13:55

We used 1x4 Australian Tallowood (Hardwood) decking timber. All the screw holes were pre drilled and countersunk. Bolts at the top and bottom of the legs to hold them together.

Modern Craft Table

Submitted by Lee Anne on Thu, 10/10/2013 - 17:38

Peggy and I modified this table to be larger, put it together with the help of our Kreg Jig and painted it, with Kaitlyn's help, chocolate on the sides with white interiors and blue on the top. We look forward to making lots of art and being crafty at this table. And making lots of other projects to complete our craft room.

Built from Plan(s)
Recommended Skill Level
Beginner

Comments