Community Brag Posts
Triple cubby inspired
I started with the triple cubby design, resized it to fit my space, added doors, and built three of them. They run the length of the wall in the area where my pool table is, and provide both storage and seating. In the process I used a multitude of Kreg items - the rip cut, the pocket hole jig, the hinge jig, the cabinet knob jig, and the corner clamps. As this was my "starter" project, I made some mistakes, learned a lot of lessons, and can't wait for my next project!
Built from Plan(s)
Estimated Cost
Plywood - $210 (three sheets, very high quality plywood); mouldings - $26; hinges - $80 ; knobs - $23. This was my "starter" project so I also invested in a lot of tools.
Estimated Time Investment
Week Long Project (20 Hours or More)
Finish Used
White latex paint
Recommended Skill Level
Beginner
Mirror

I was so excited to build this mirror using Ana White’s plans. I built it a few years ago and it’s still hanging in my entryway!
Built from Plan(s)
Comments
A $15 One-Day Pirate Table
This was my second wood project. I loved working on it. The measurements and instructions were great. It is definitely for toddlers which works well for us. I used stain we had from/for other projects. Thanks.
Built from Plan(s)
Estimated Cost
App. $15
Estimated Time Investment
Afternoon Project (3-6 Hours)
Finish Used
Stain
Recommended Skill Level
Beginner
Comments
Sat, 06/11/2011 - 10:28
That is so cool!
I love it.. it turned out great! Good job! That looks so fun for the kids!

Sat, 06/11/2011 - 13:32
i am in LOVE
I have been eyeing this for a while...but I ended up doing the preschool bench. SO CUTE!!!!
Sun, 06/12/2011 - 10:40
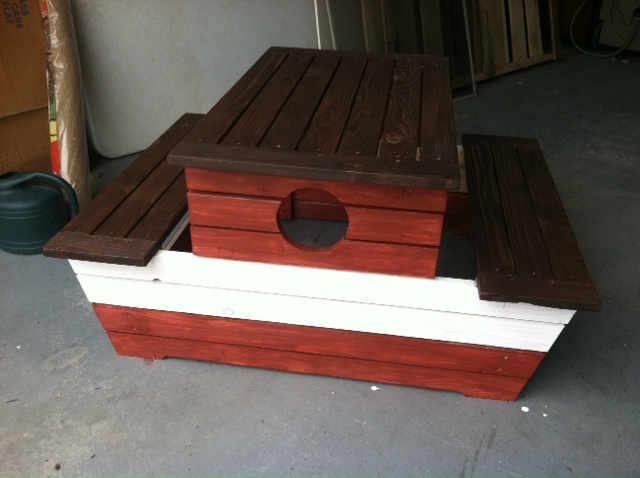
Picnic Table
Marisol, I was choosing between the two as well... but since I have boys the choice was a bit easier :-)
Sat, 06/14/2014 - 12:12
Dumb question
Are the seats and table top supposed to be 1x2 instead of 1x3? I am confused bc the sides would be too short.
Reclaimed TV stand

I needed a new TV stand, why buy when you can make. I am about halfway done and this is what i have so far. This has been built with all reclaimed wood. I took wood from a table, a hutch and a cabinet to make this. so much fun.
Stay tuned for the finish product!!


Estimated Time Investment
Weekend Project (10-20 Hours)
Recommended Skill Level
Intermediate
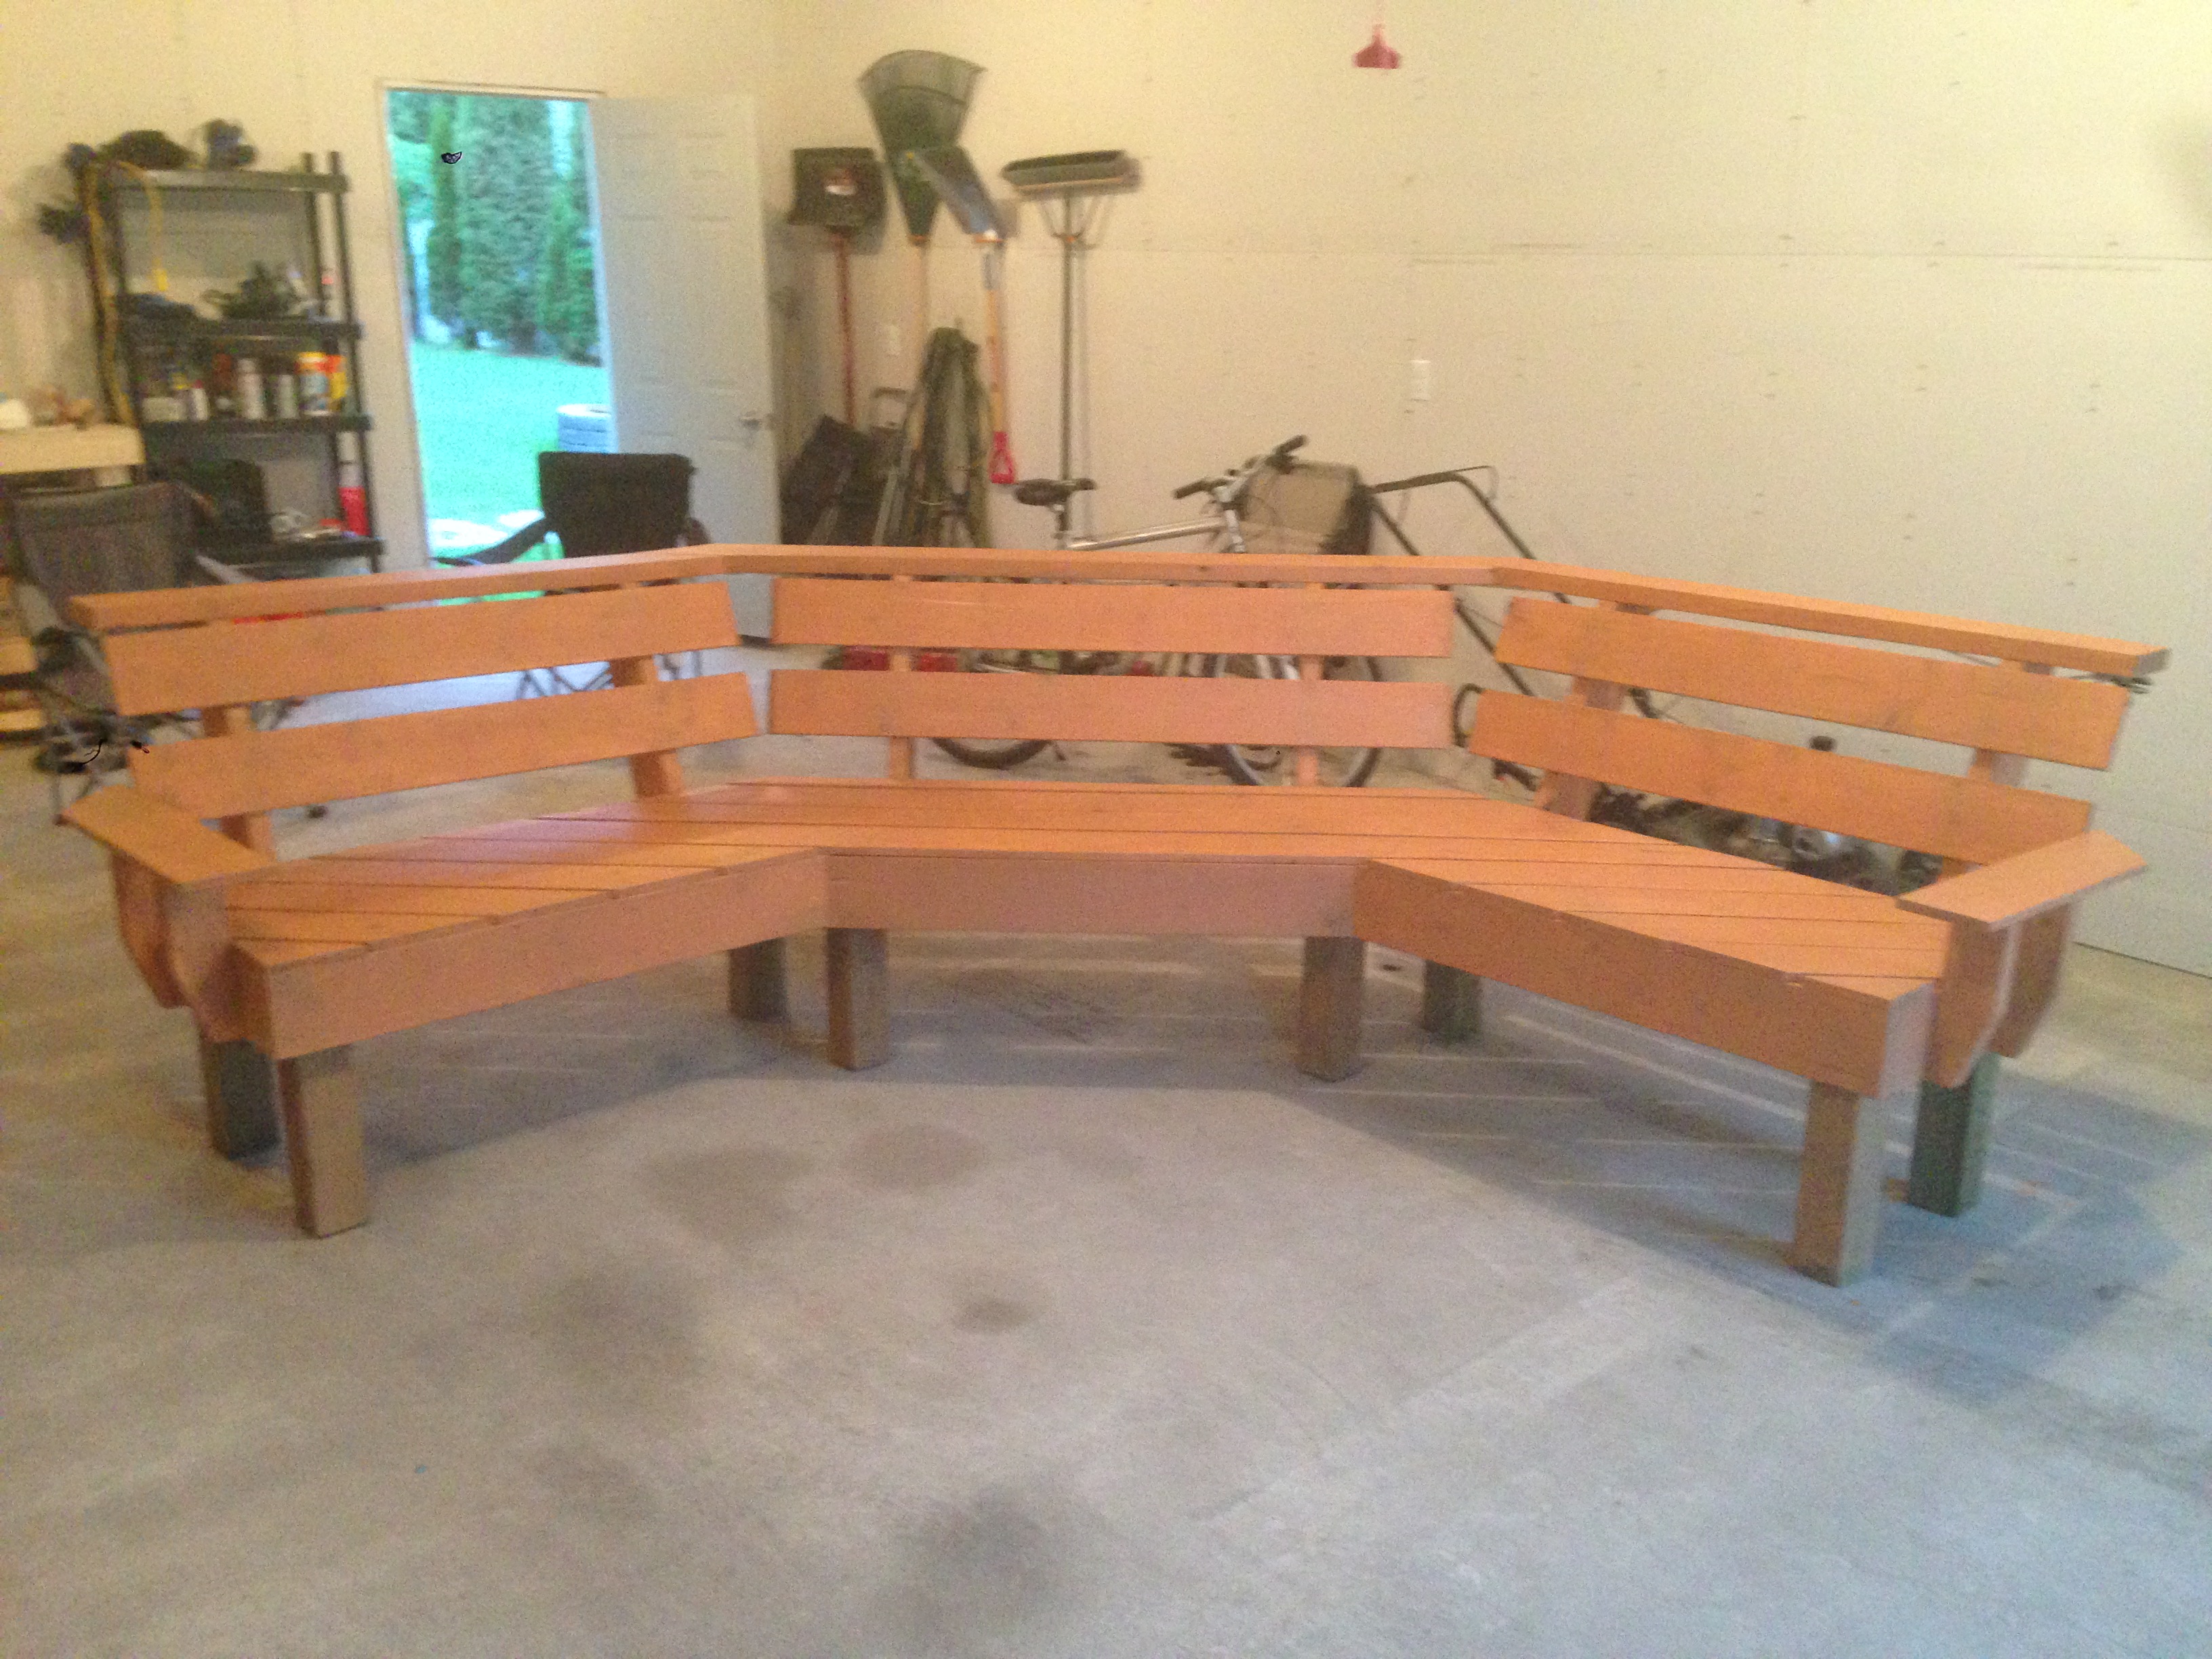
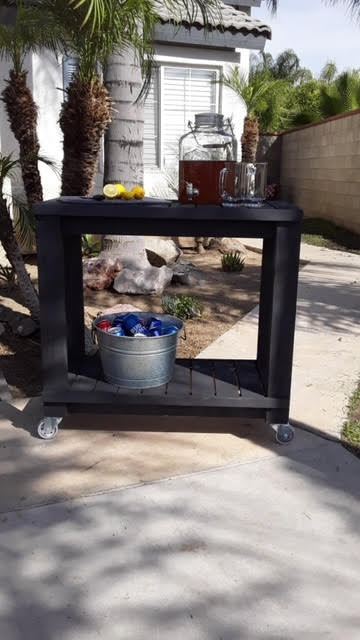
Curved Bench
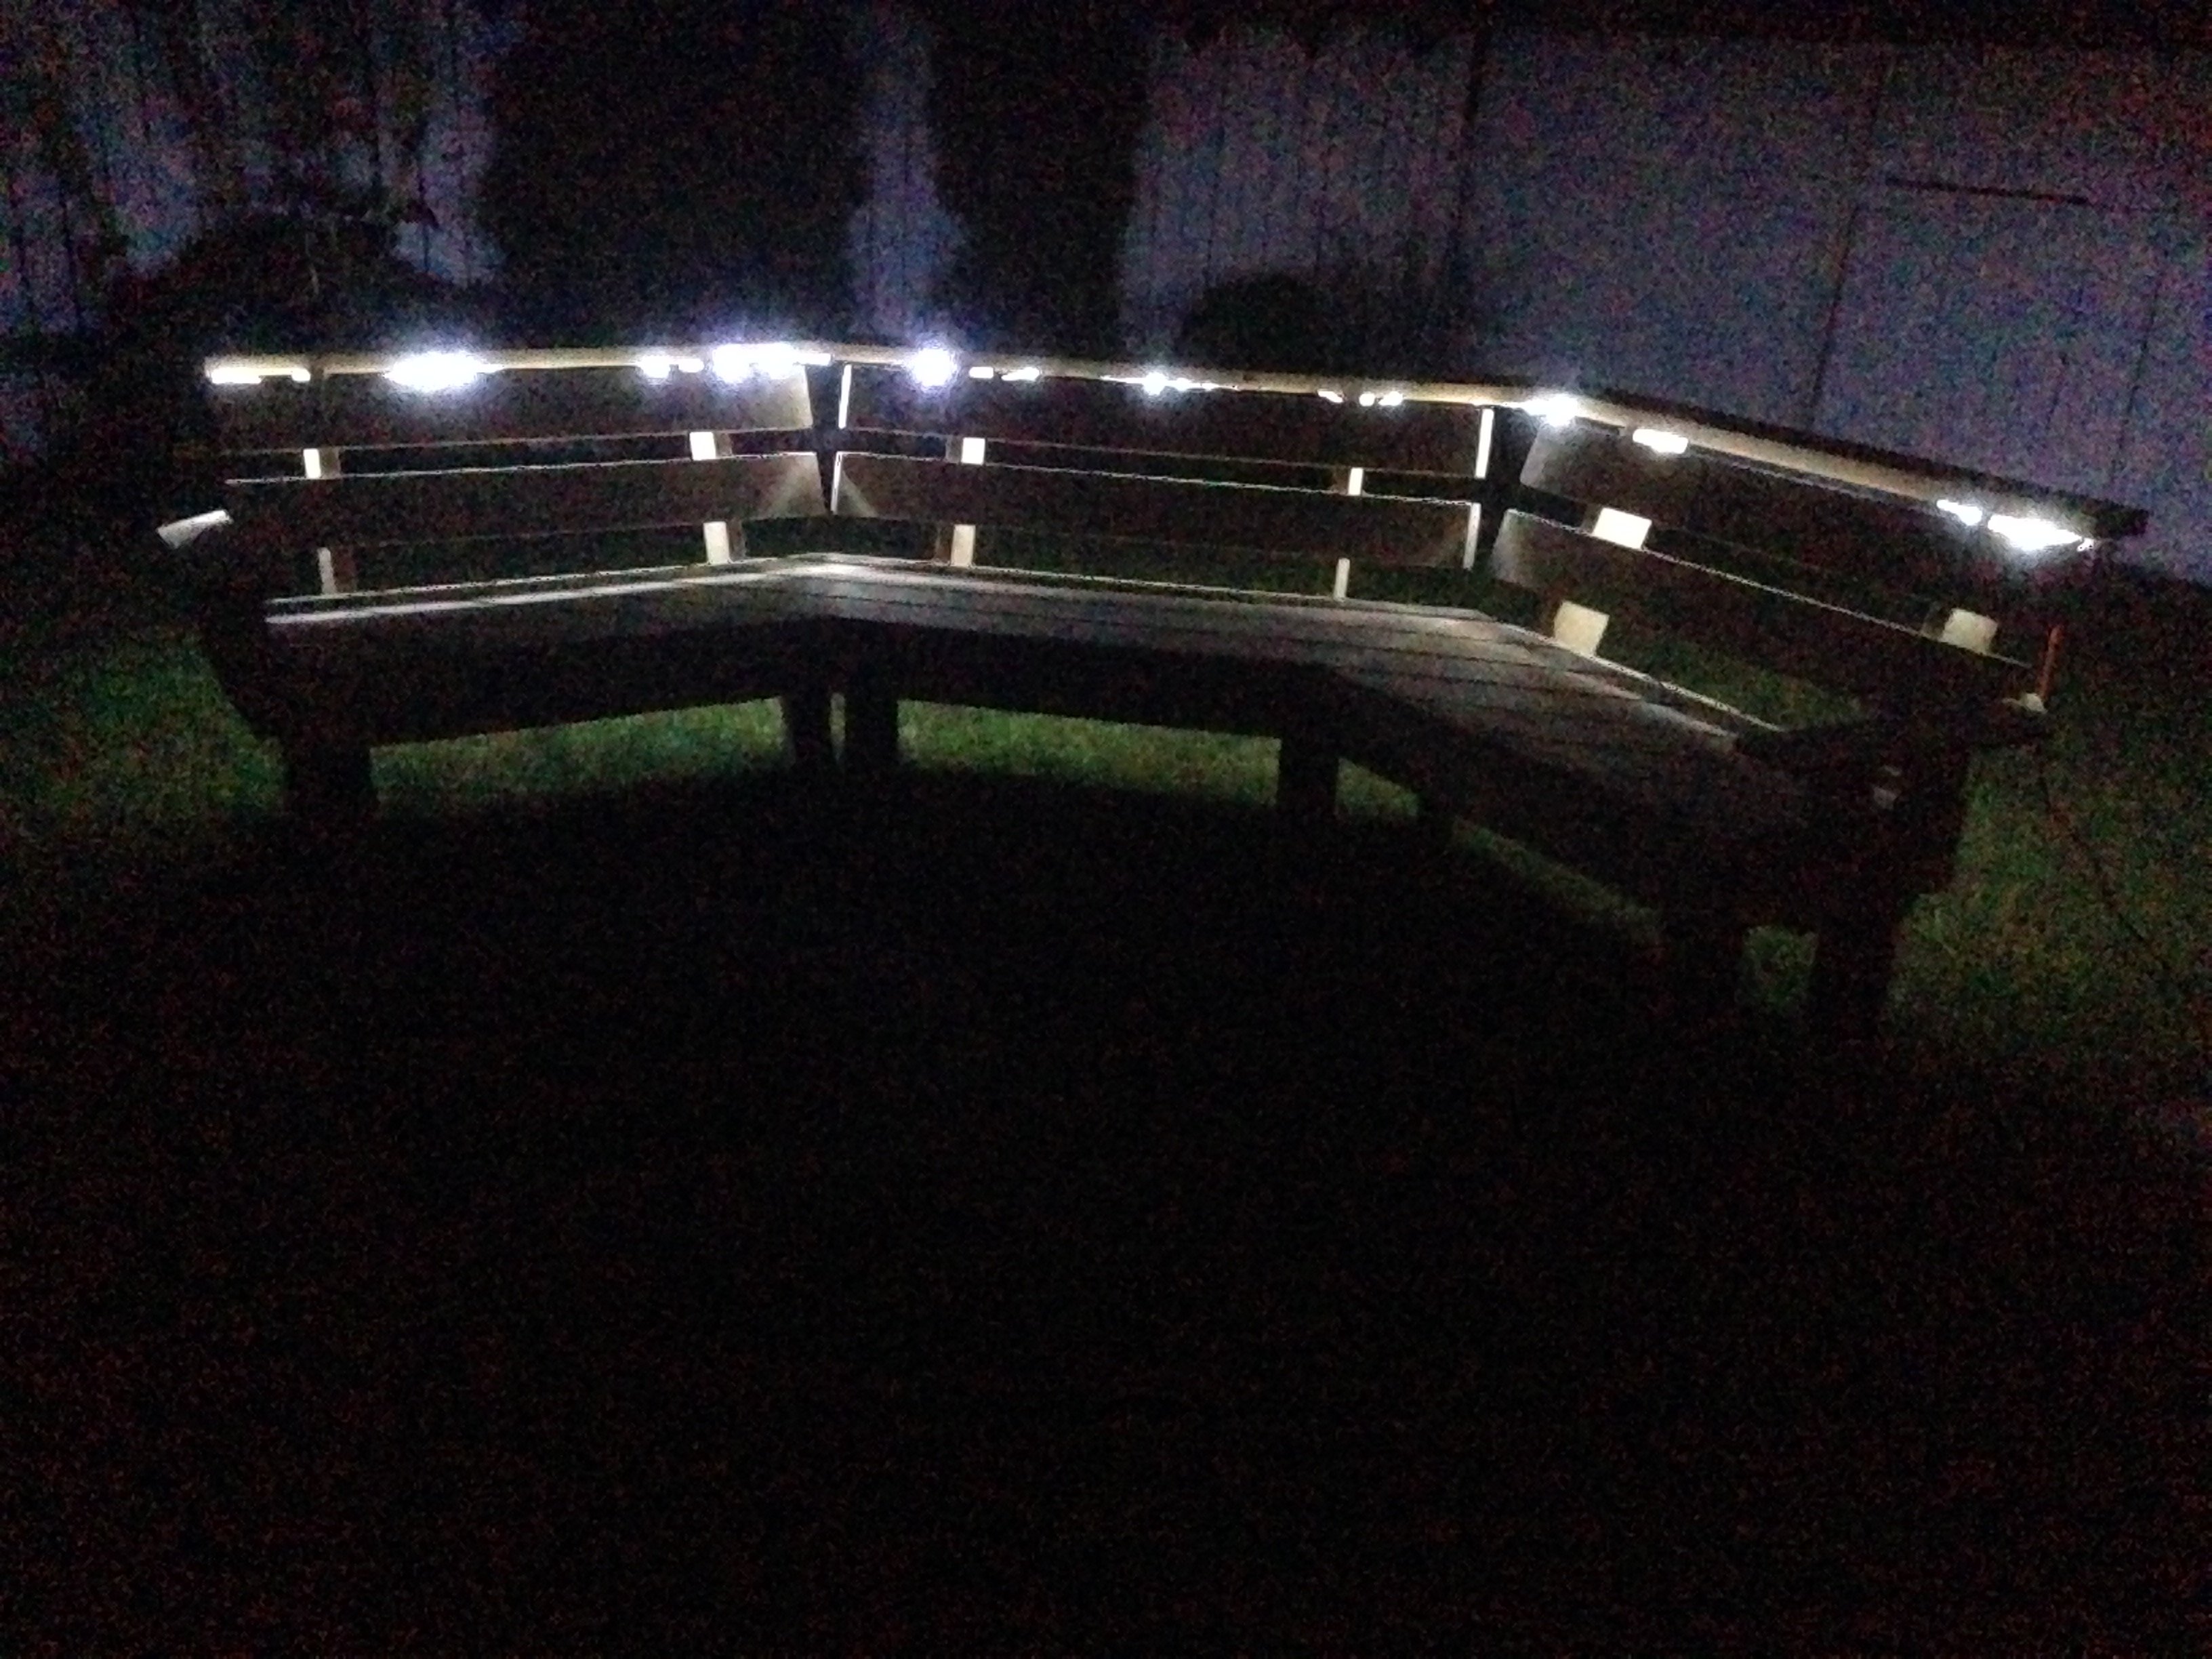
I followed your idea but i think my bench is a touch smaller. I decided to add arm rests on each end, I kept the top beverage ledge or "Bever-ledge" as I call it and ofcourse I added rope lighting along the underside. This was my first ever DIY project.
Built from Plan(s)
Estimated Cost
150
Estimated Time Investment
Weekend Project (10-20 Hours)
Finish Used
I used a Cedar Tone semi-transparent finish which turned out a little more orange than i though but it still looks good!
Recommended Skill Level
Intermediate
Memorial Urn
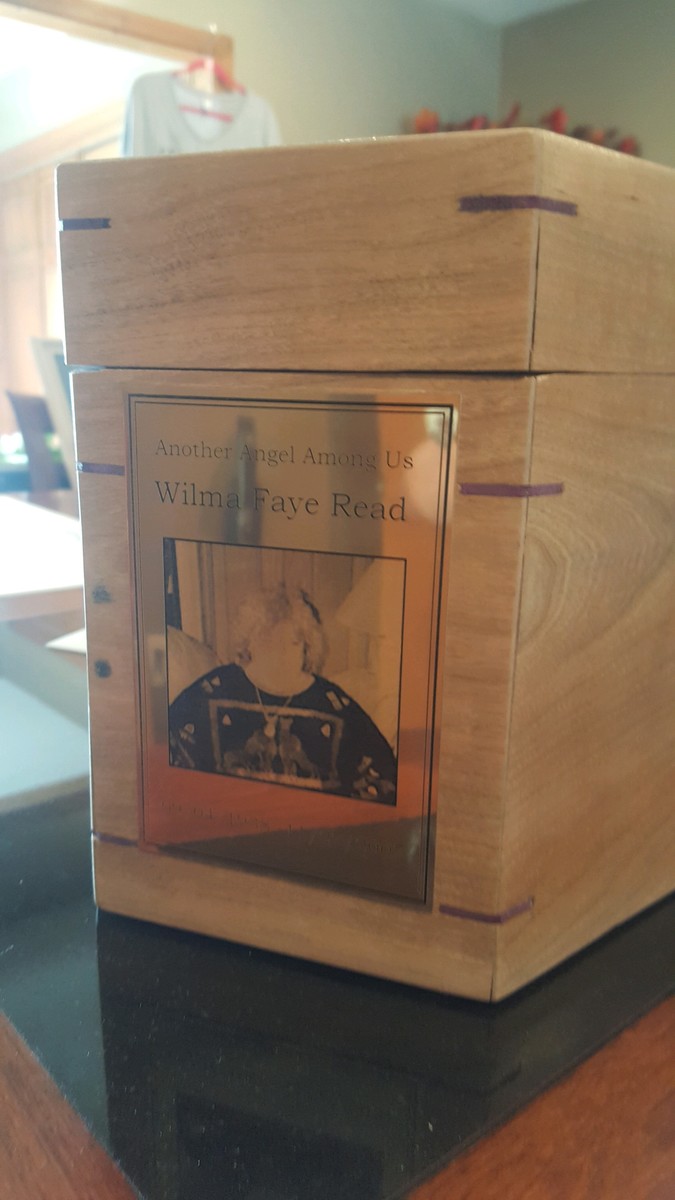
Memorial Box
Recommended Skill Level
Intermediate
Comments
Sun, 06/21/2020 - 07:09
This looks fairly straight…
This looks fairly straight forward but there is one factor that needs to be taken into account when you make an urn. You need at least one cubic inch per pound of the person whose cremains are going into it, so a 200 pound person needs 200 cubic inches.
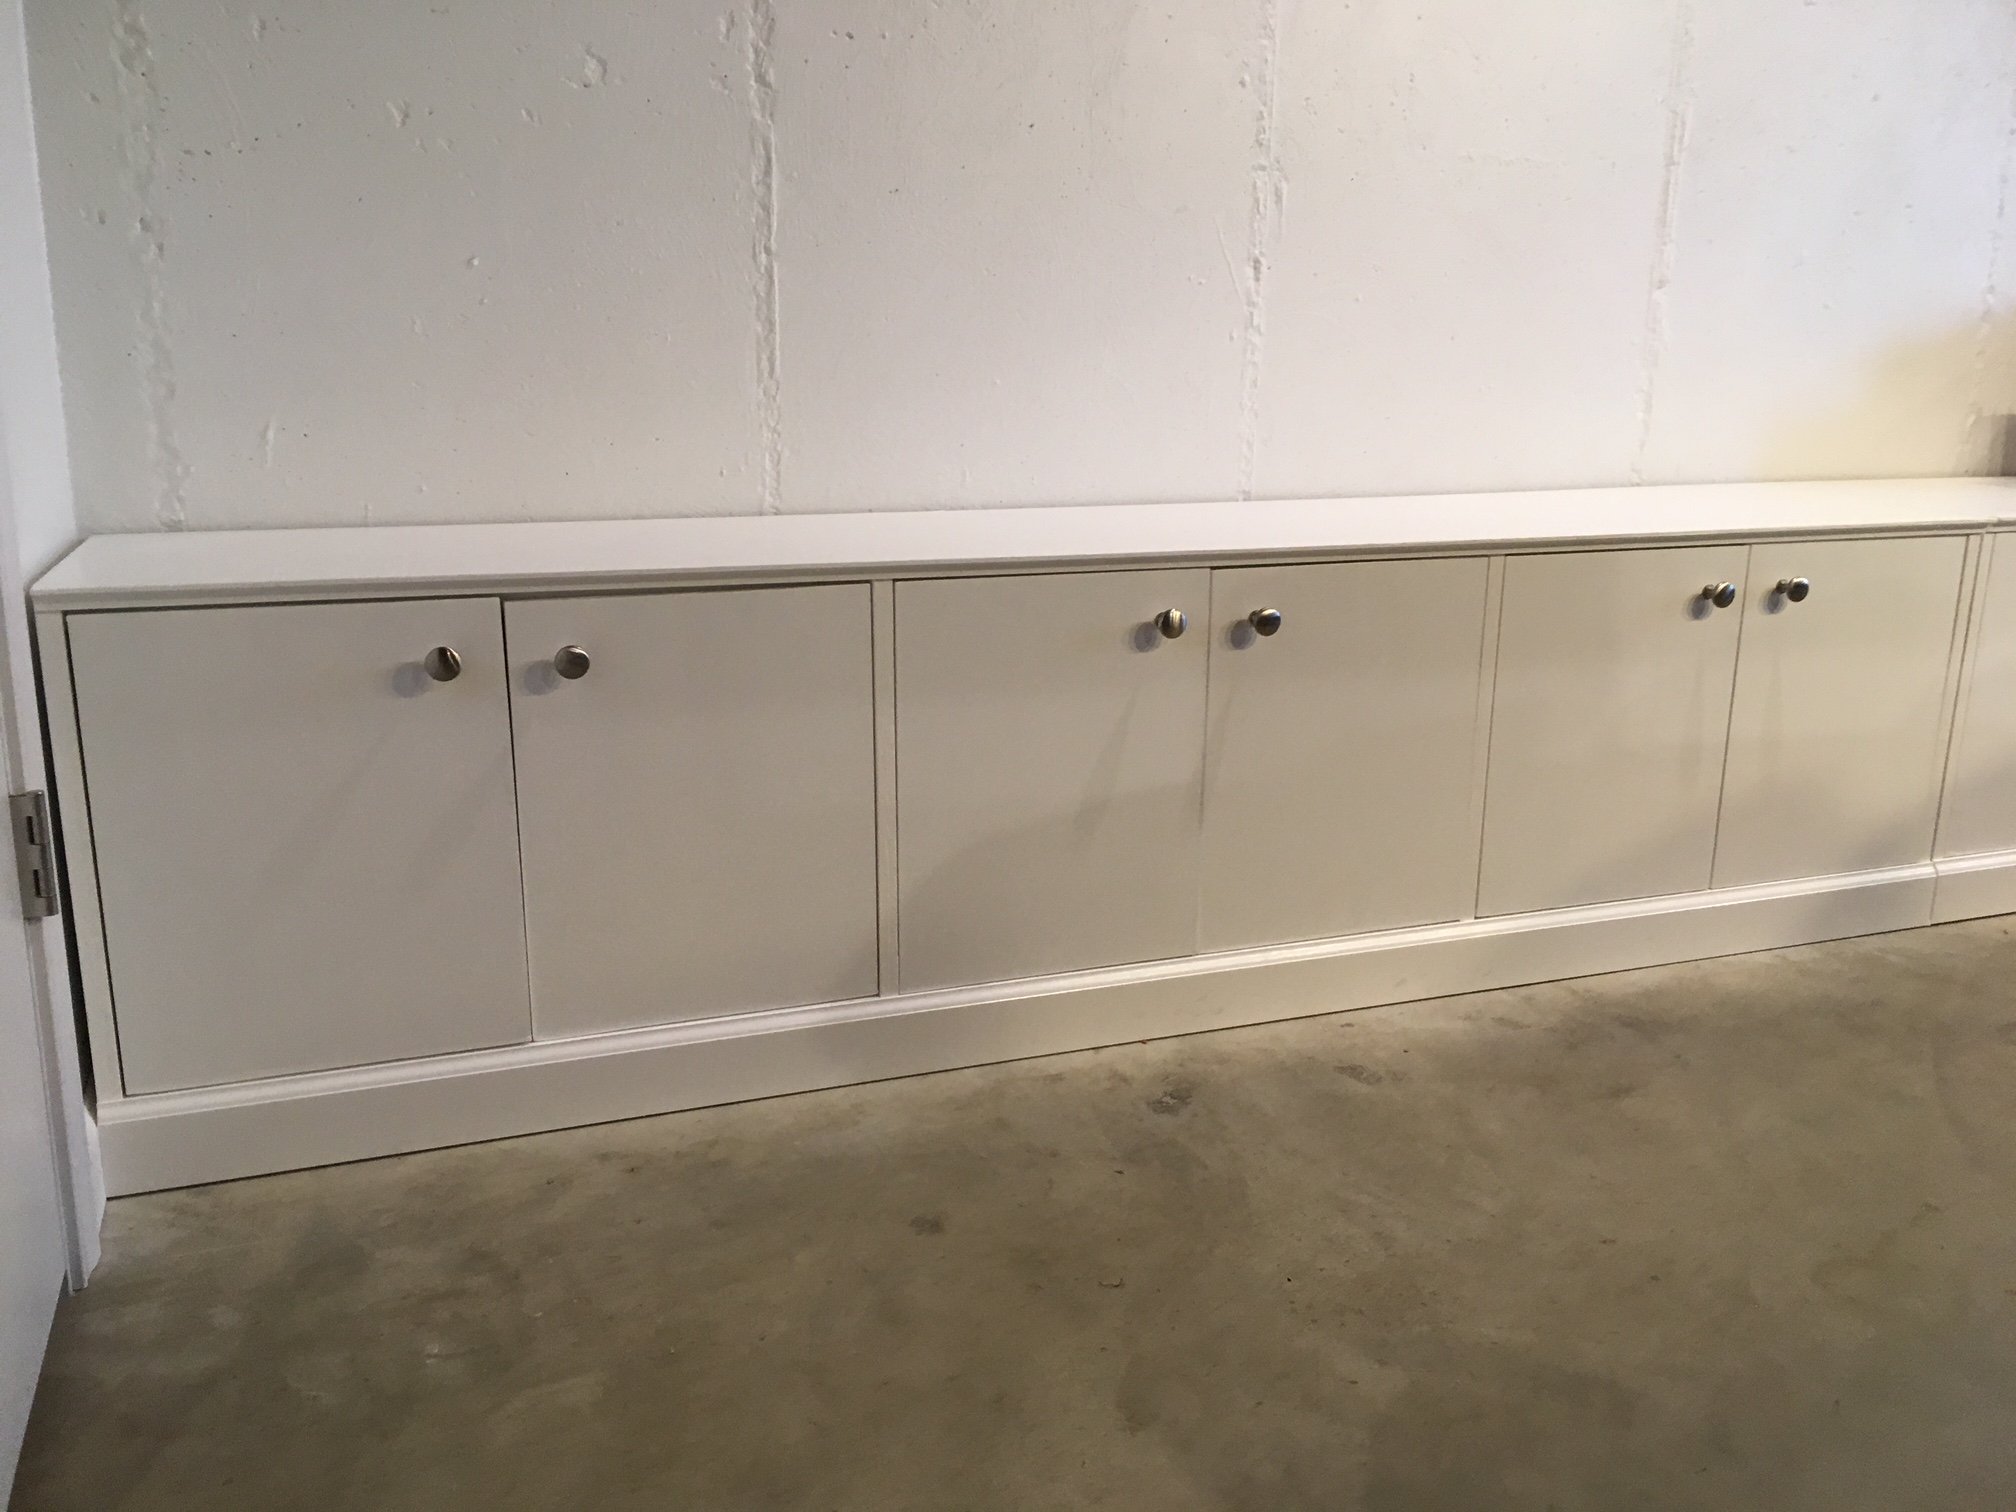
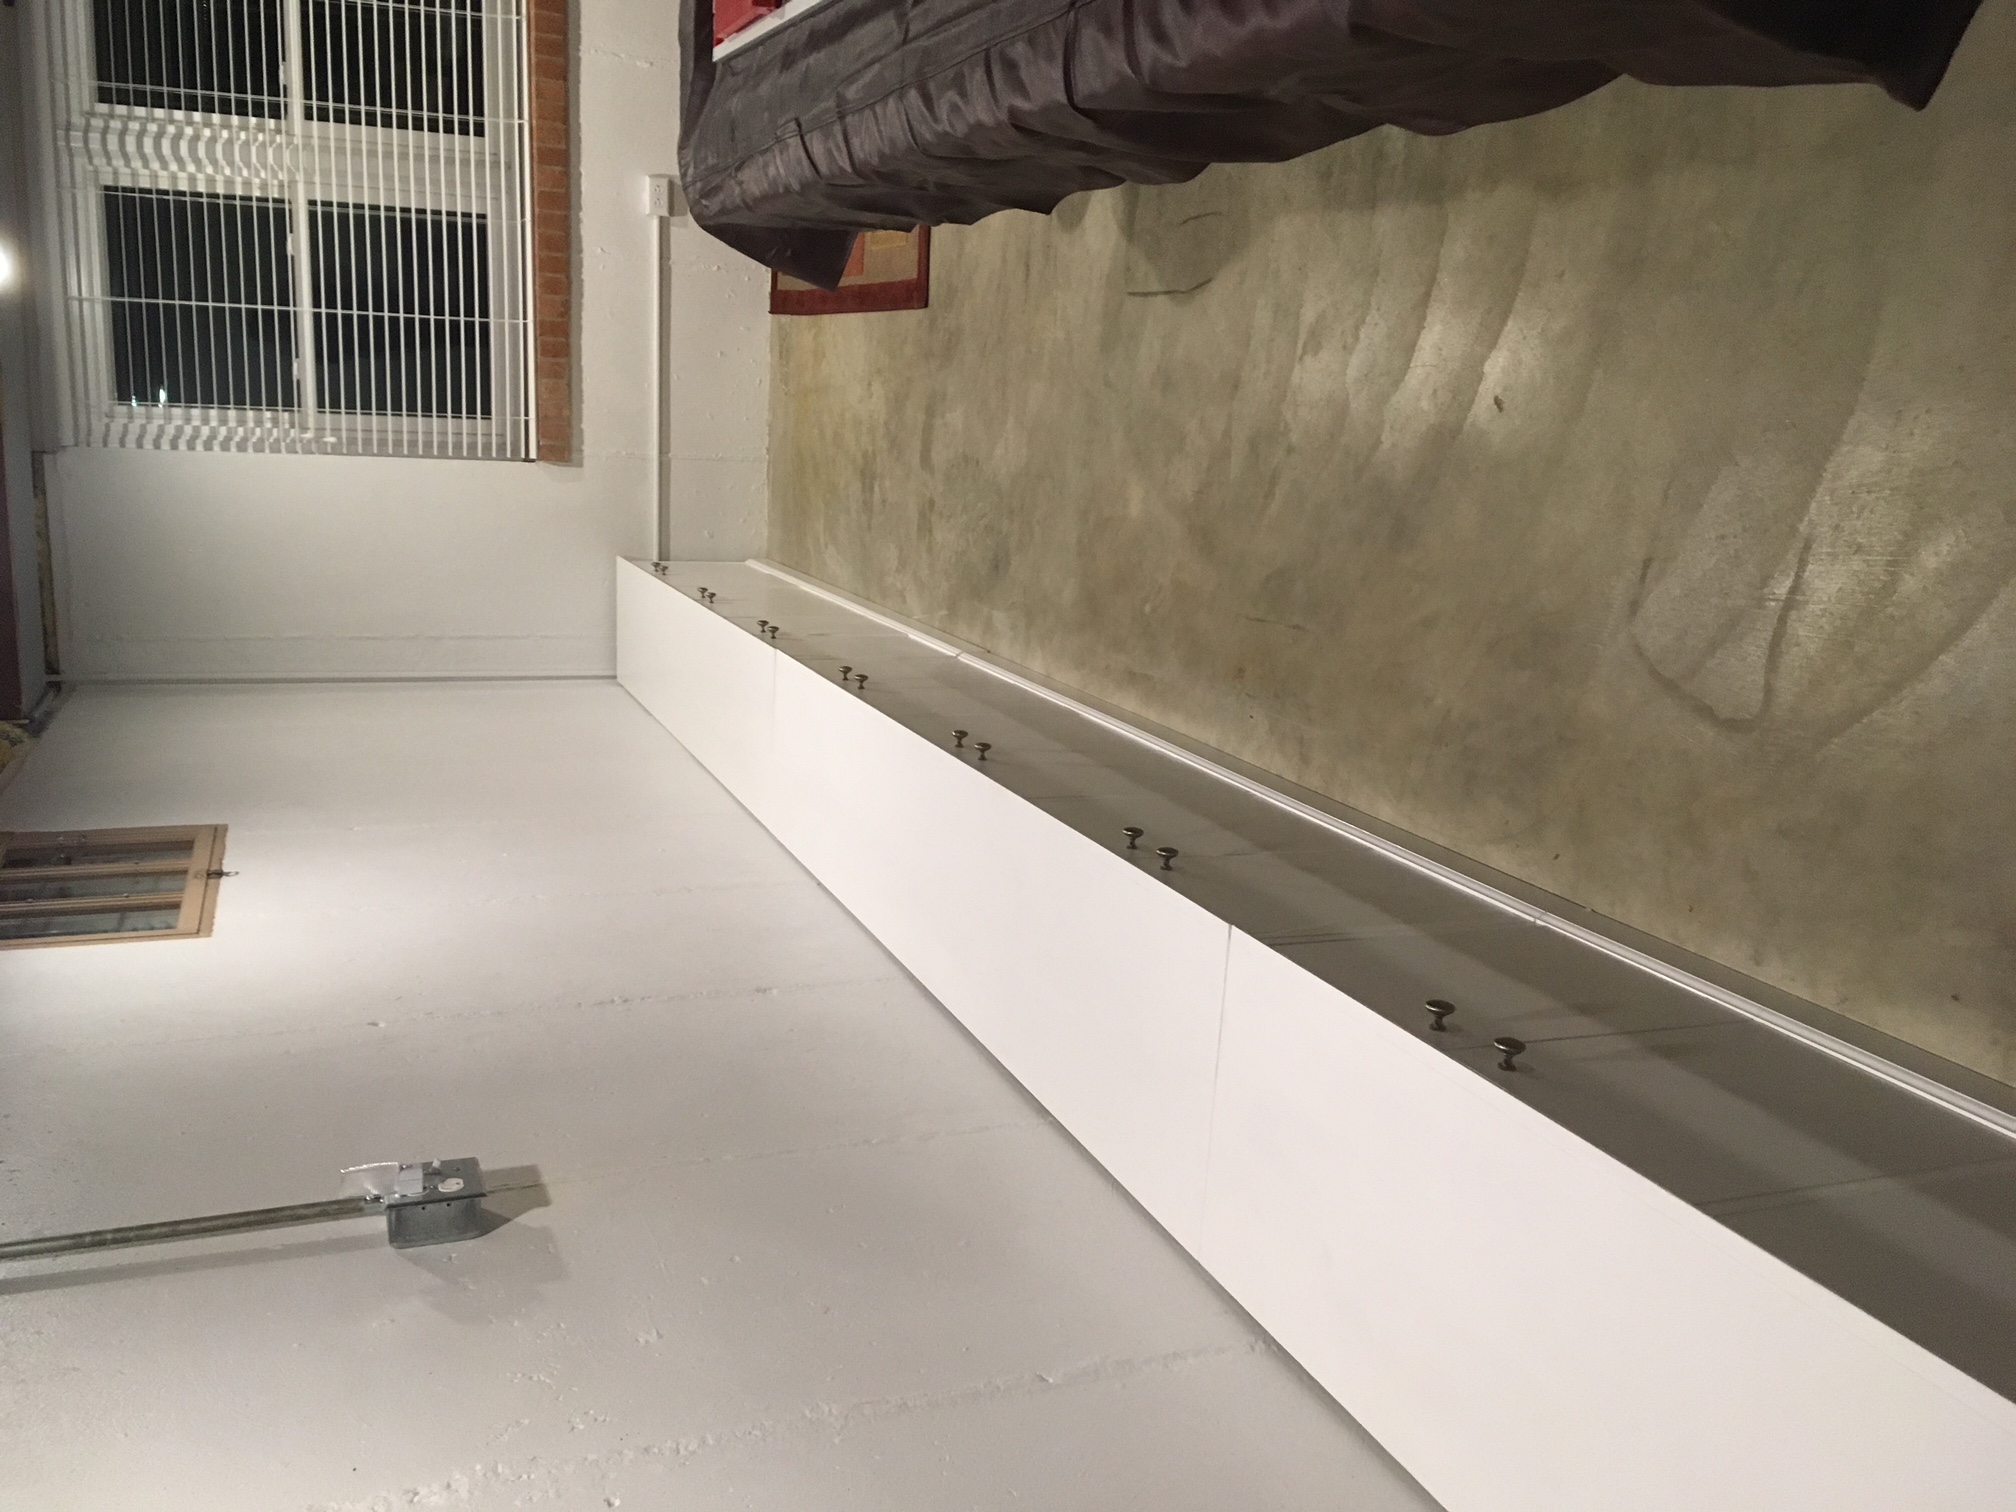
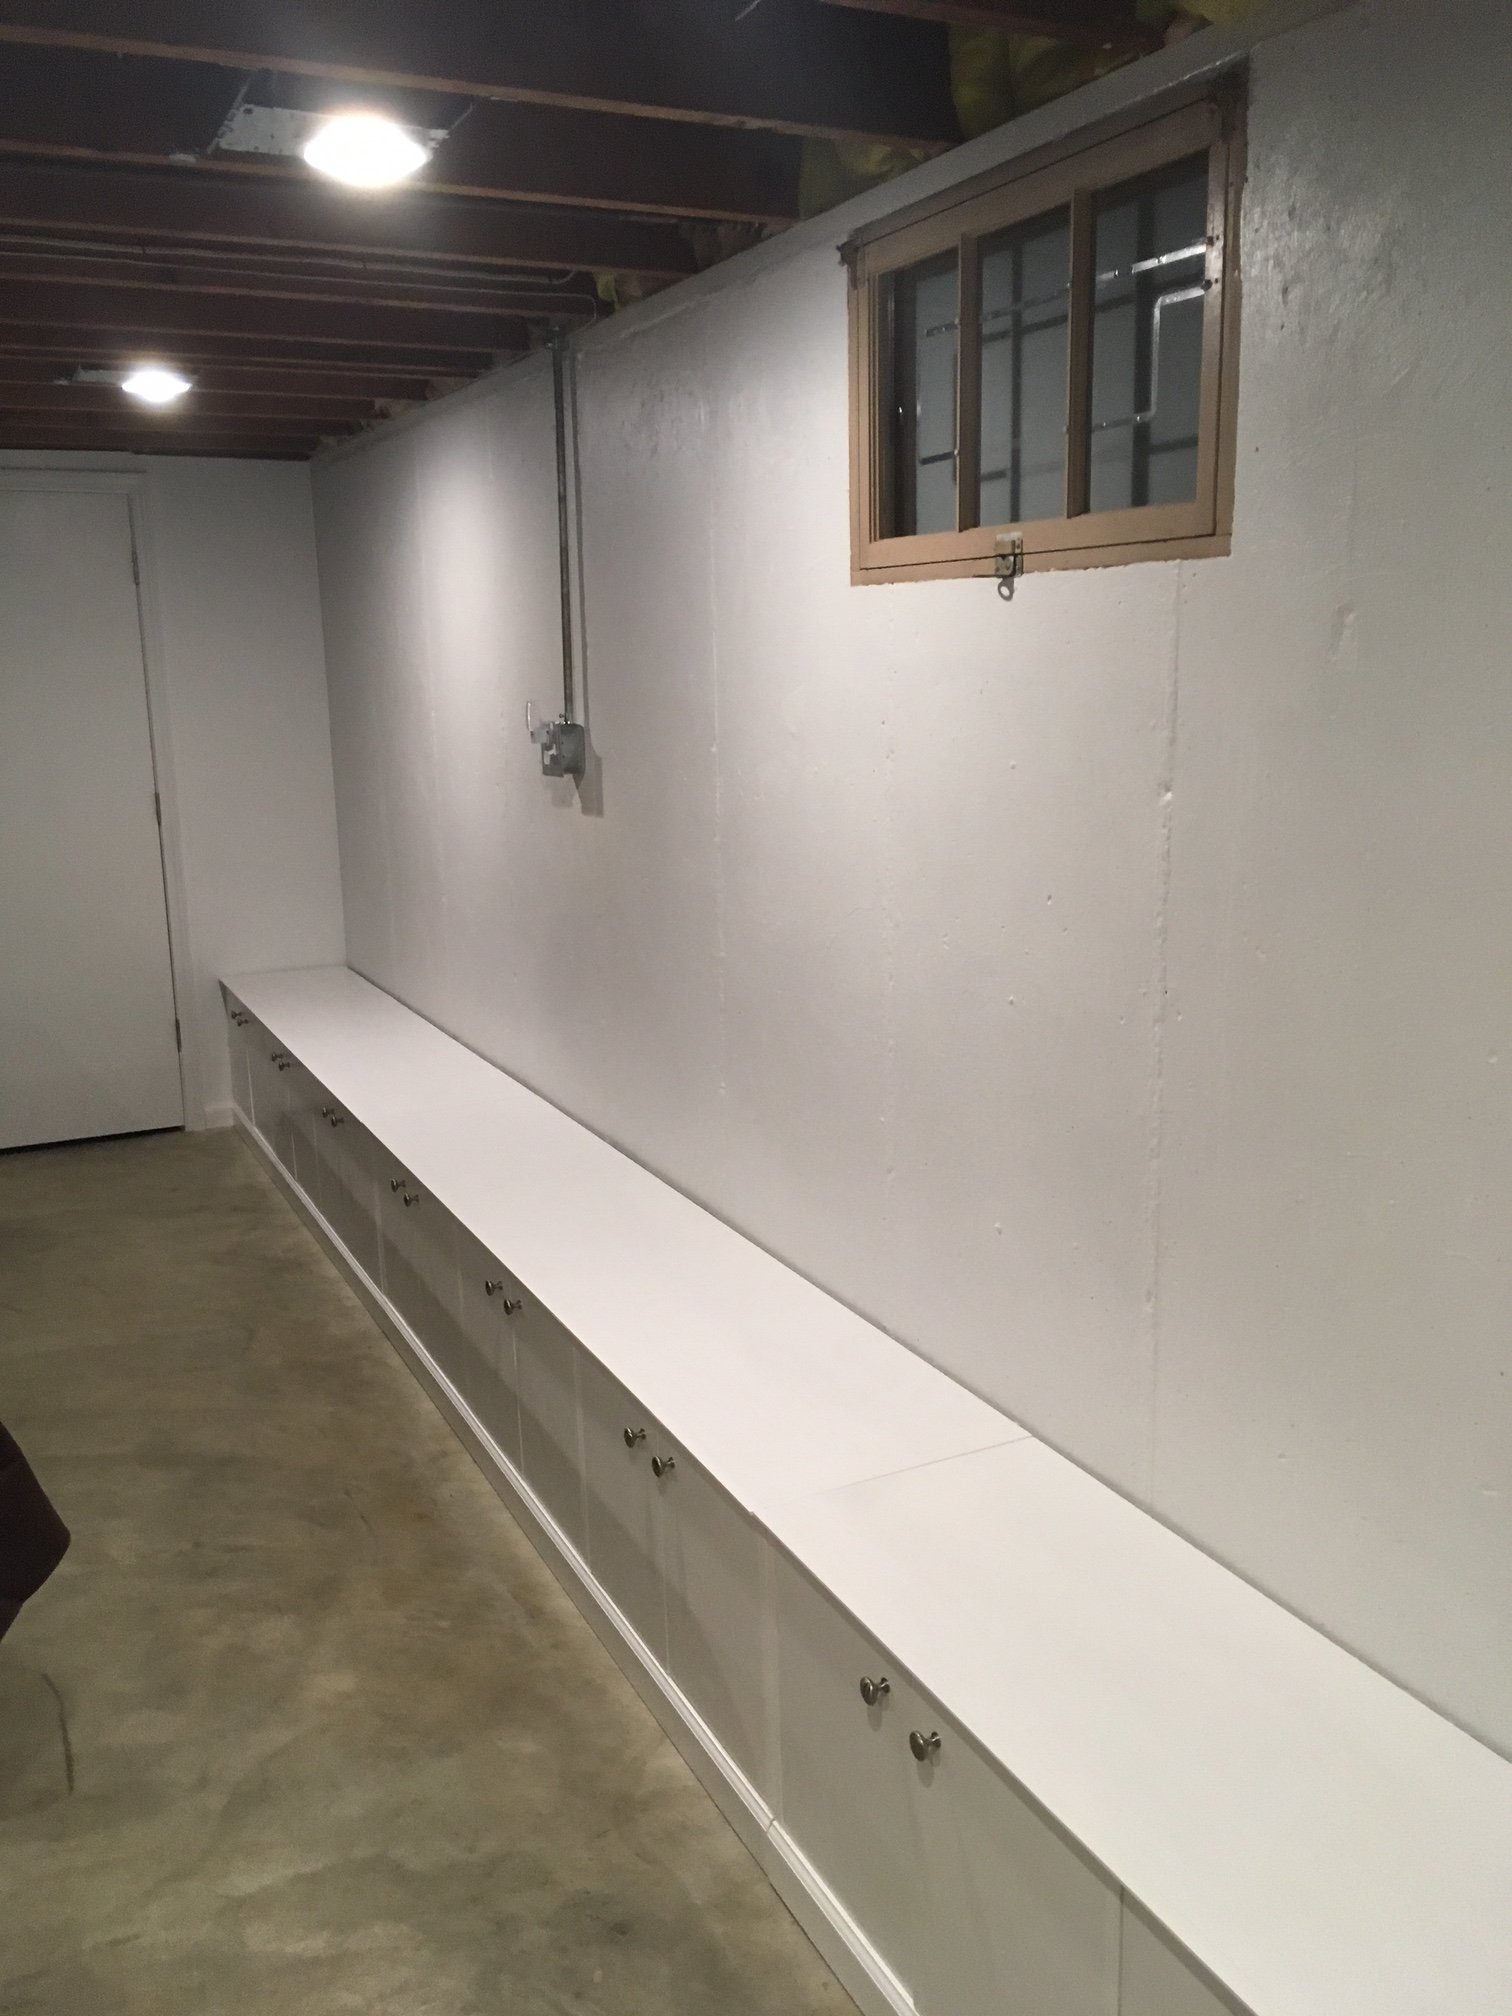
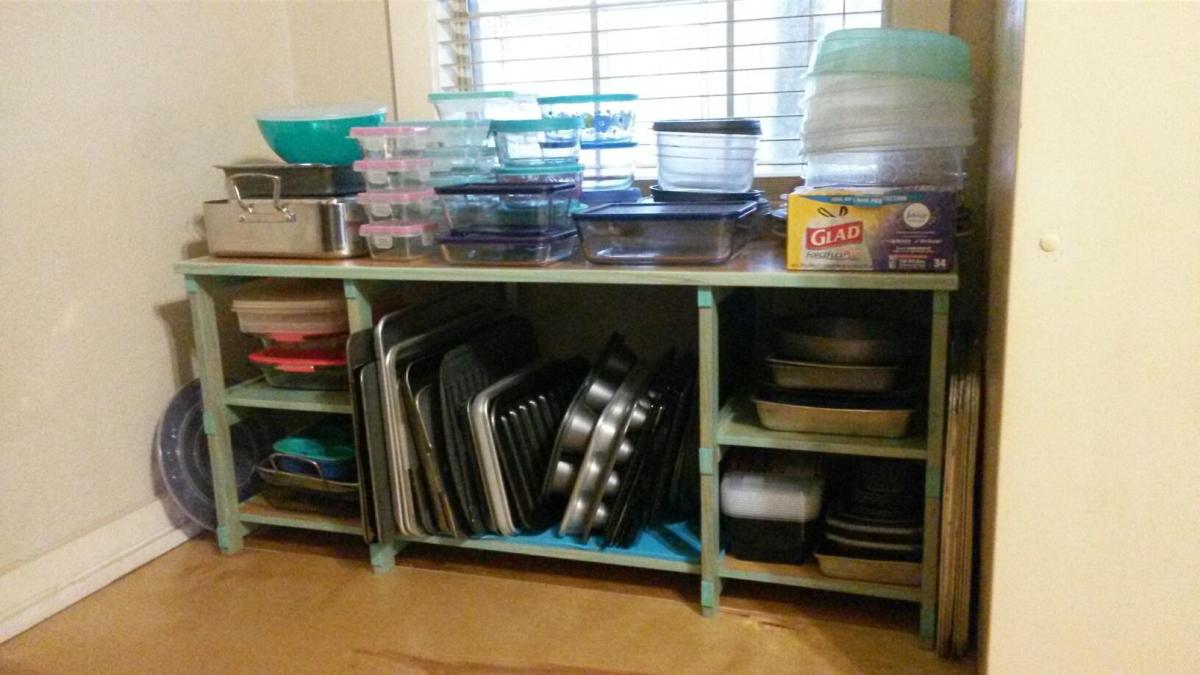
Needed a special kind of storage shelf
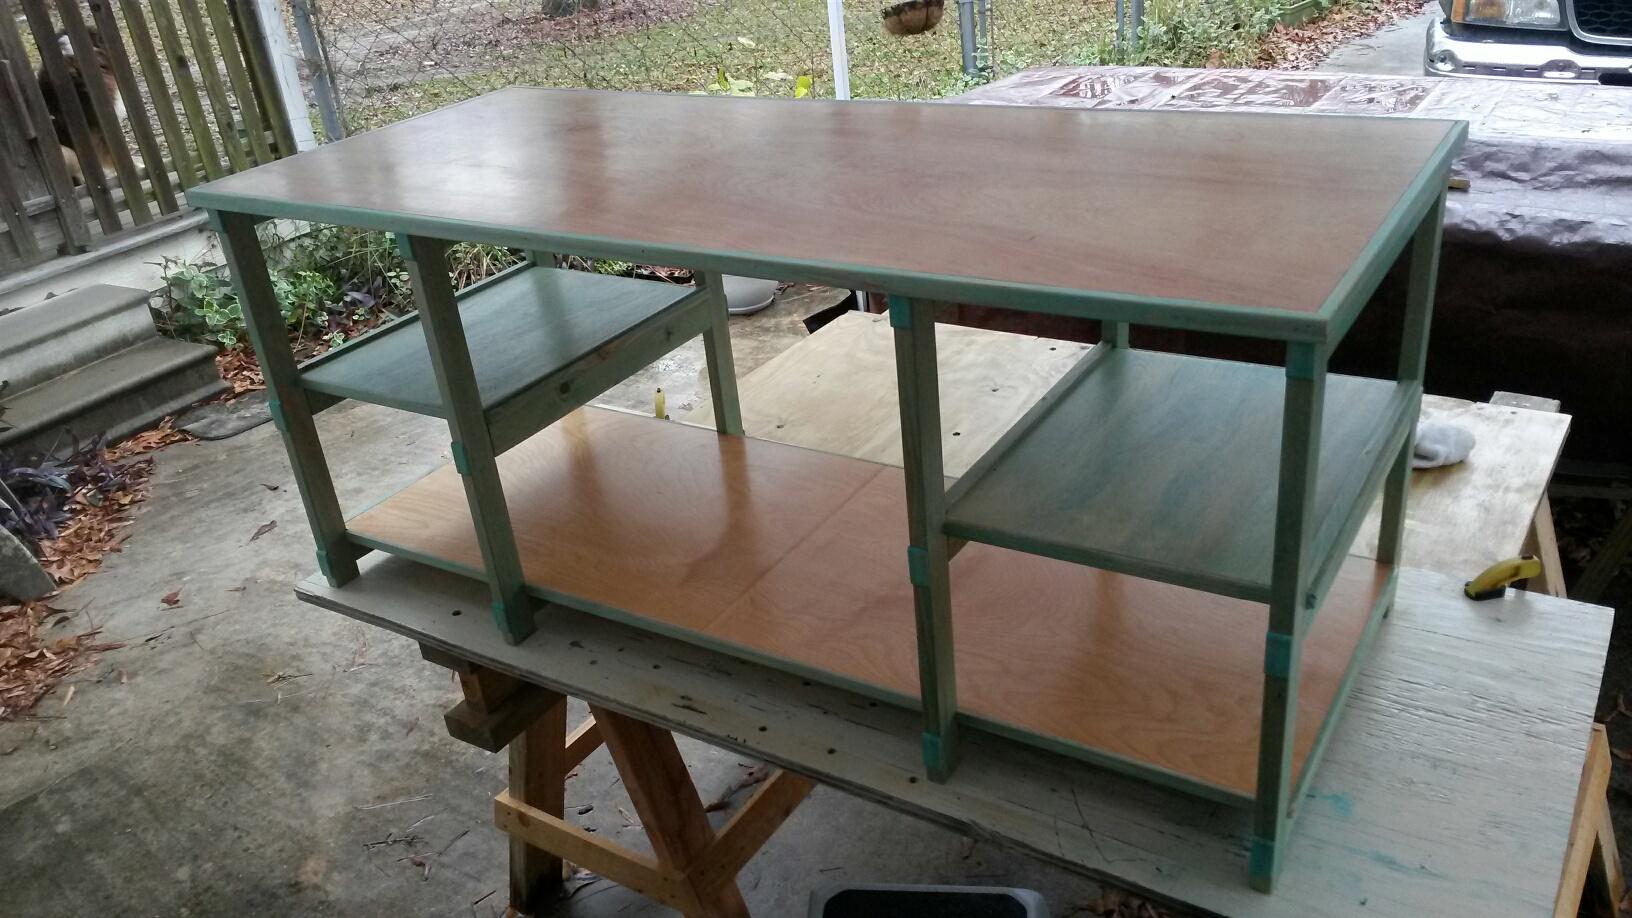
I needed an easy to access storage shelf for cookie sheets, roasting pans, and glass storage bowls. I couldn't find one I liked, so I built this shelf. I love building things. This one is very simple. It's built with 1x2s and 1/2" plywood. I made my own turquoise stain out of acrylic paint and water for the trim and side shelves, and the top and bottom shelves were stained with oil based honey oak stain. I finished it with 4 coats of polyurethane, which I hand rubbed.
Comments
Thu, 04/21/2022 - 20:36
Tons of storage!
Thanks for sharing, it looks great and is super functional!
Farm Dining Table
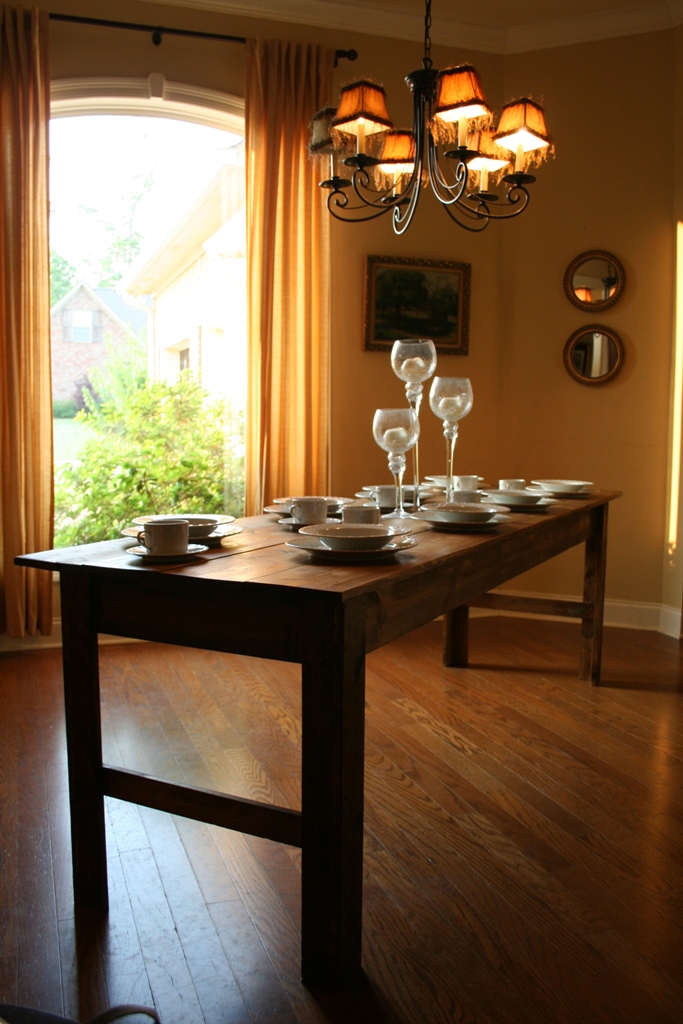
This project was much easier than it looks and turned out beautifully! I even impressed myself!
Built from Plan(s)
Estimated Cost
$80
Estimated Time Investment
Afternoon Project (3-6 Hours)
Finish Used
Provincal
Recommended Skill Level
Beginner
Comments
The Shipping Pallet Dining Table
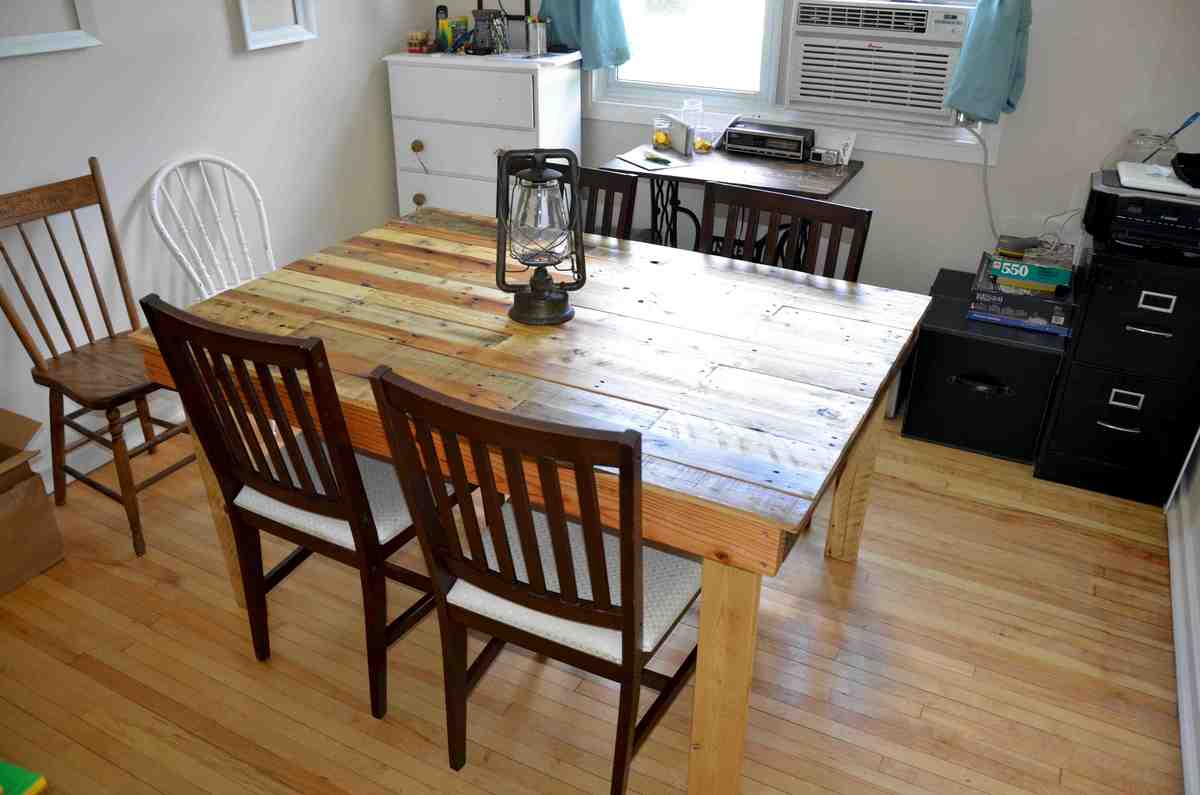
Table measures * 41" wide x 57 1/4" long x 30" tall.
We kept the measurement at 26" from floor to bottom of table.
Here is a list of what we used:
2 1/2" decking screws
2" finishing nails
8 pallets
Table Saw
Corded drill
Reciprocating saw
Bar clamps
1/2" plywood scraps
I wish I was thinking about taking some pictures along the way but here is a brief explanation.
We started with building the frame for the top.
2 - 2x4 @ 55"
2 - 2x4 @ 37 1/2"
3 - 2x3 @ 37 1/2" (we ripped the 2x3's on table saw from other lumber lying around)
Instructions are simple for the frame. Attach the 55" 2x4's to the 37 1/2" 2x4 and note the 37 1/2" ones go in between the long ones not on the end of them.
Next step is to run the 3 2x3 supports. 1 in the middle then the others go in the middle of the next gaps roughly.
*Note*
We did not do the pocket hole screws or try and hide the screws in any way. We screwed the entire frame together from the outside.
So now onto the more challenging step. So the top we have no guide for. We used
our reciprocating saw to get the boards off the skids. Then we had to de-nail the materials. Took approx 8 skids worth. Next was to run them all through the table saw to clean up the edges and remove any crowning or bowing? In a nutshell make all the board edges flush and straight.
After that long process we then started to do our dry fit so we would know which boards we wanted to use and how long we wanted each one to be. Then proceeded to cut them to the lengths and keep them in their respective groups as there were many varying widths as we wanted the top to be very different.
The next step was simple start laying them in place and attaching them to the frame.
During this process we had to bust out the clamps as we had a few troublesome boards that had to be pulled in flush. We used the 2" finishing nails to attach all the boards. After they are all attached this is the ideal time to sand the top.
*Note*
Decide what you want your overhang to be all around during the dry fit process. That will also be the time where you can play with ripping some thinner to make it unique.
So now we have all the boards attached it was time to counter sink ann the finishing nails. After we completed this we wanted to make secure everything just a bit more so we added 1/2" plywood to the bottom of the table in between the support sections.
After this was done it was simply time to cut the legs. We cut our legs @ 28"
We sanded these before attaching them.
*Note*
For the legs we had to assemble the legs in the room as the table is simply too large to bring through a door assembled. Keep this in mind if you decide to use a different design for the legs. We attached the legs with 4 - 2 1/2" screws which was perfect.
After that was done all that was left was to get it finished the way we like it. We used Minwax Antique Protective Oil Finish
If you used my notes to get by hopefully you have something beautiful in your dining room.
Thank you for visiting.
We would like to thank Ann from
http://littlepaths.wordpress.com/2012/08/26/the-shipping-pallet-dining-… for providing us with their design that inspired us.
Estimated Cost
$20
Estimated Time Investment
Weekend Project (10-20 Hours)
Finish Used
Minwax Antique Protective Oil Finish - We followed the directions on the can and applied 3 coats.
Recommended Skill Level
Intermediate
Simplest Stool
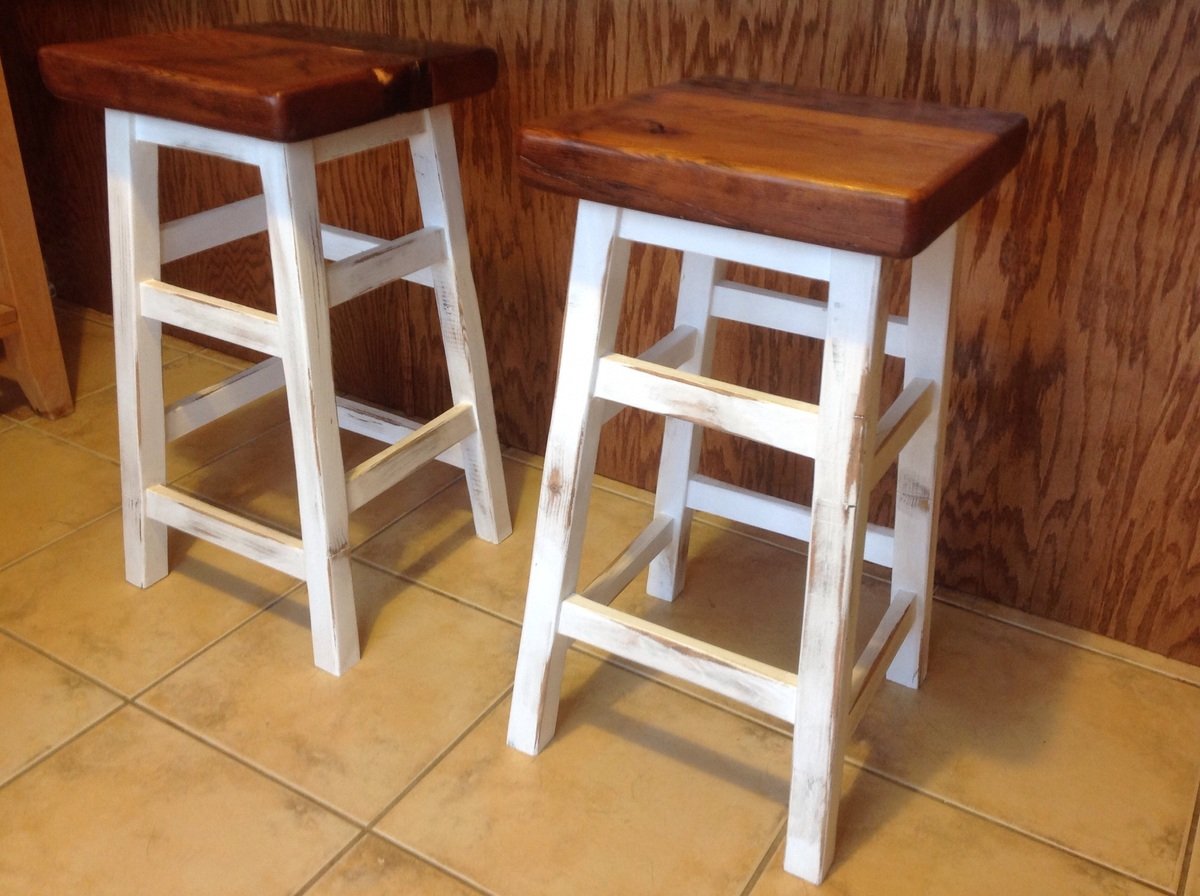
I modified the Simplest Stool plan for this project to use some old threshing floor boards that I had leftover from another project. I like the blocky and chunky look it gives it. We chose to distress these stools to make them look as though they've been around for awhile. The stools didn't take long to build, but since the finish needed time to cure between coats, the overall length of time for the project was about a week.
Built from Plan(s)
Estimated Time Investment
Afternoon Project (3-6 Hours)
Finish Used
Minwax 'Early American' with two coats of polyurethane. The legs and rungs were painted with Behr semi-gloss white paint, and distressed using Minwax 'Early American' stain.
Recommended Skill Level
Beginner
Comments
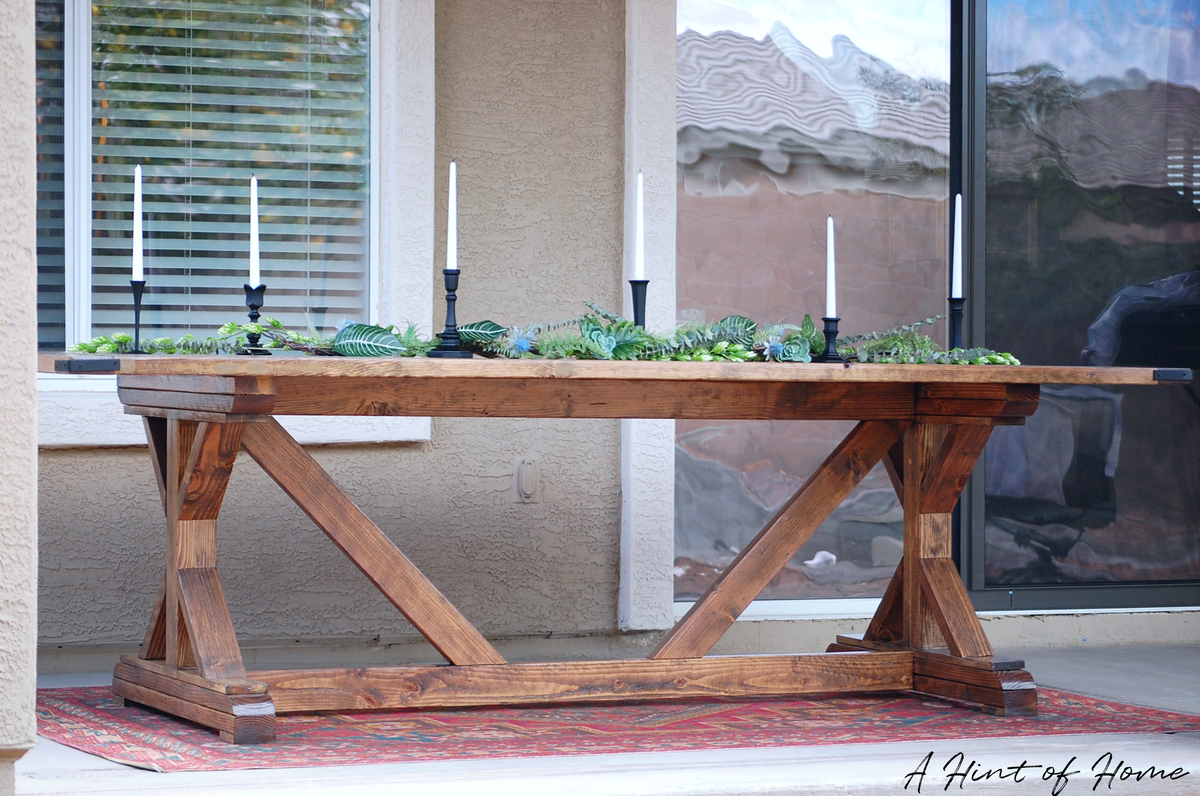
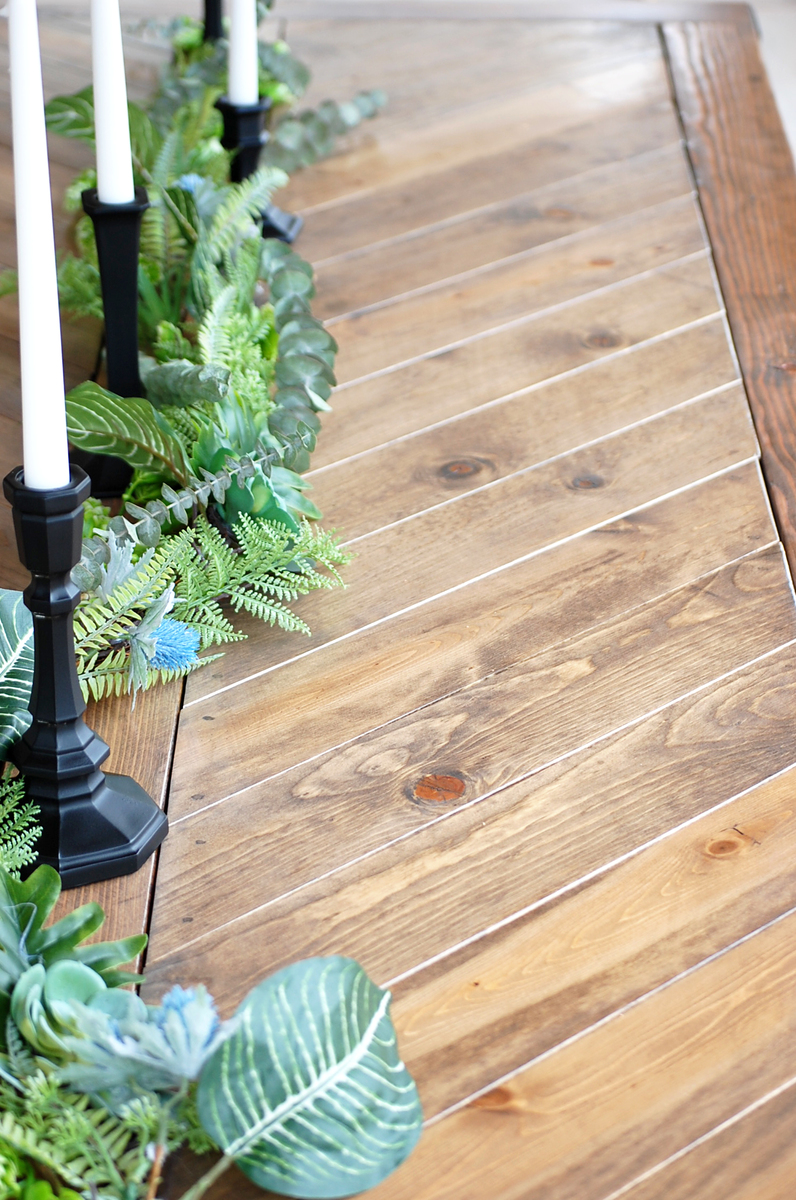
DIY Outdoor Dining Table
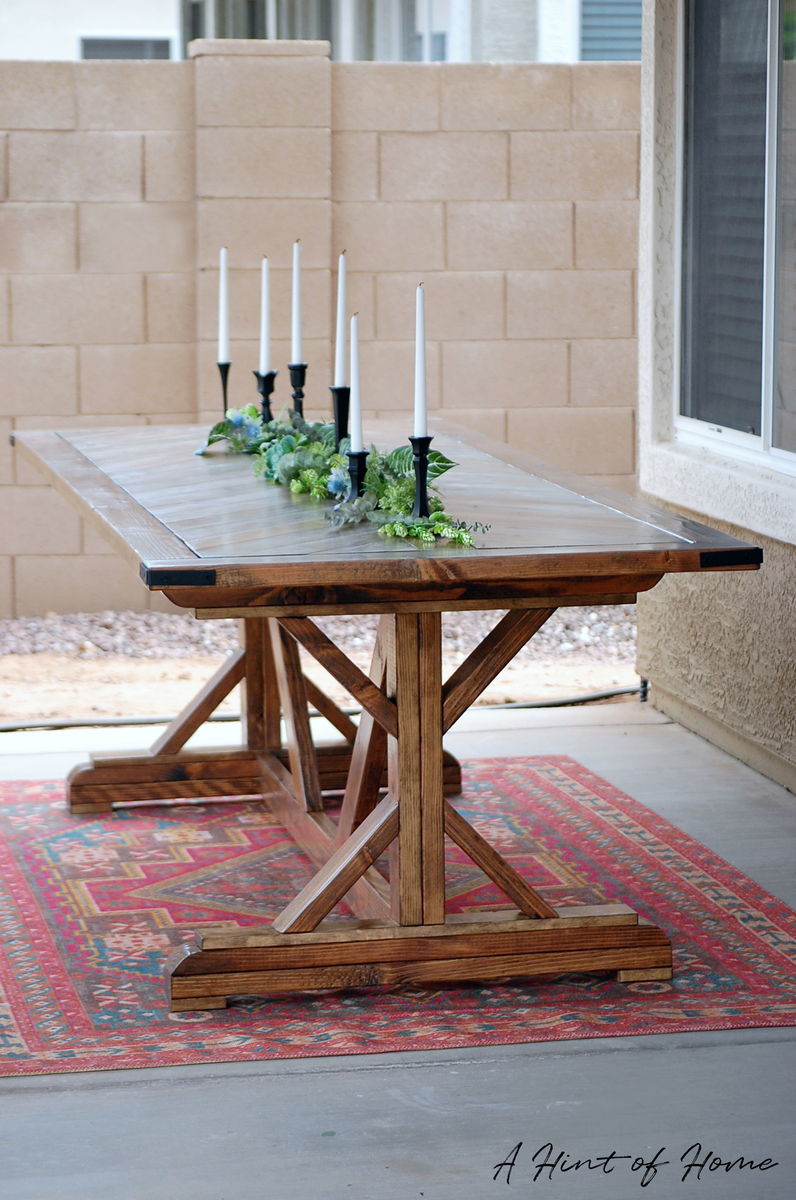
I followed Ana's Fancy X Farmhouse Table to build my base, but switched her tabletop out for a split herribone design. The tutorial for the tabletop is on the blog!
Built from Plan(s)
Estimated Time Investment
Weekend Project (10-20 Hours)
Recommended Skill Level
Intermediate
Comments
Wed, 04/18/2018 - 22:46
Beautiful!
Thank you for the inspiration on the table top. I followed your plans to make mine in the Chevron pattern as well. Well done! And the bench looks great, too!
Modern Adirondack Chair
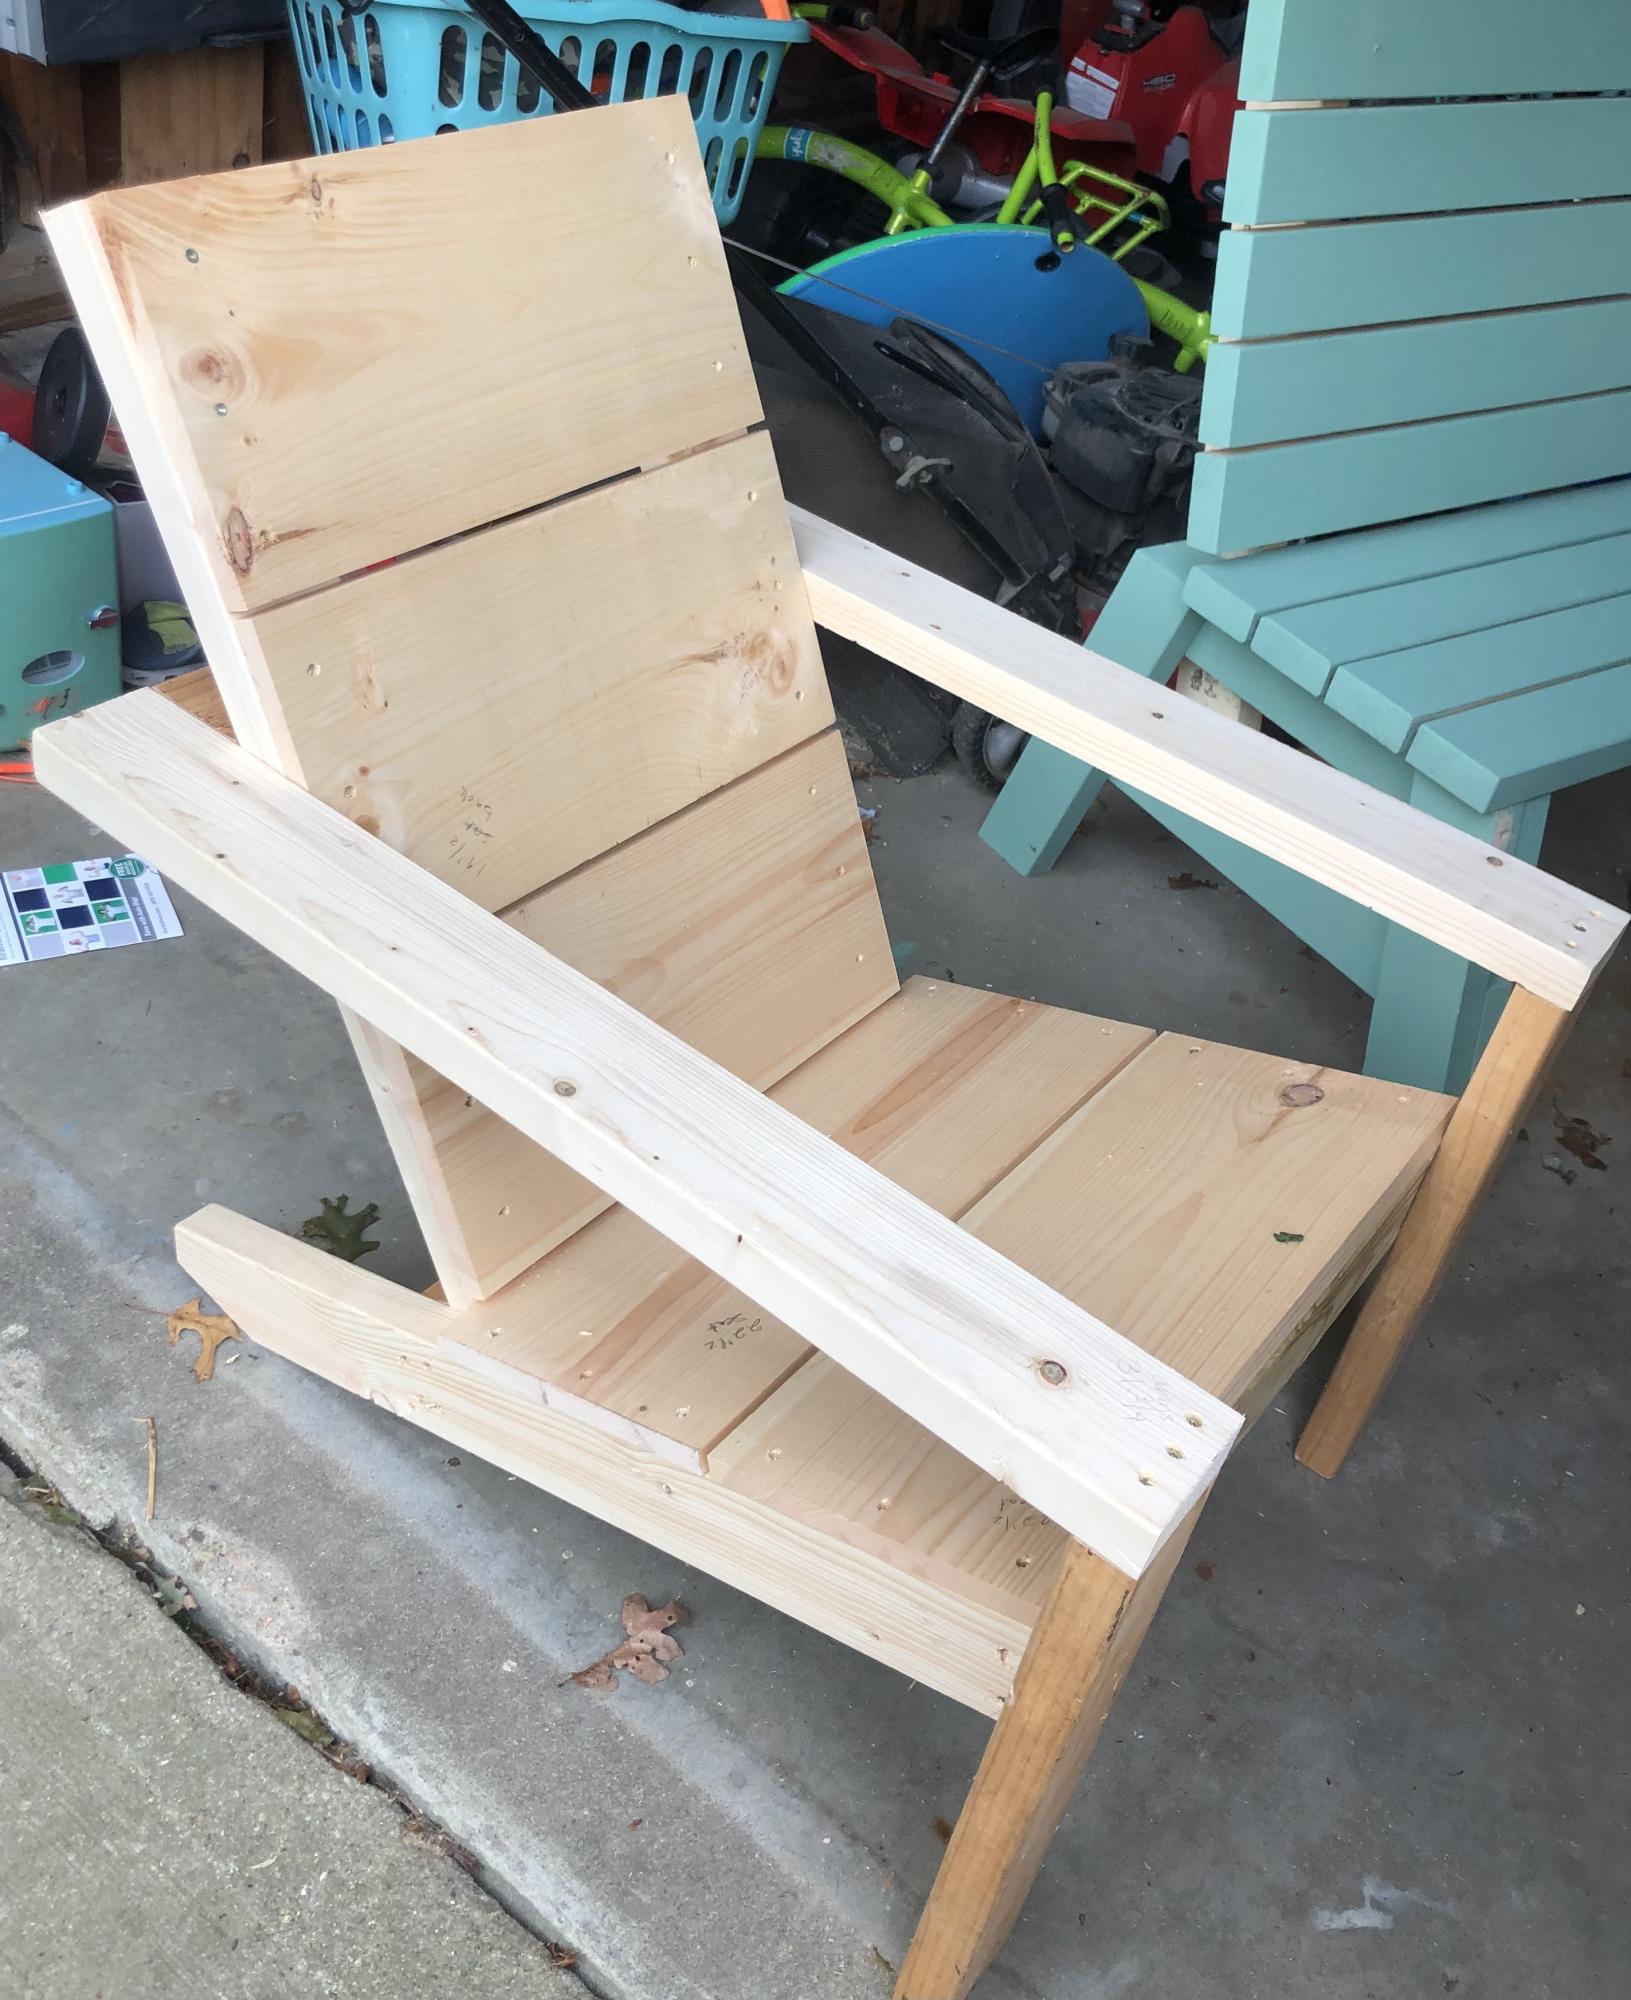
My very first build back in 2020!
Comments
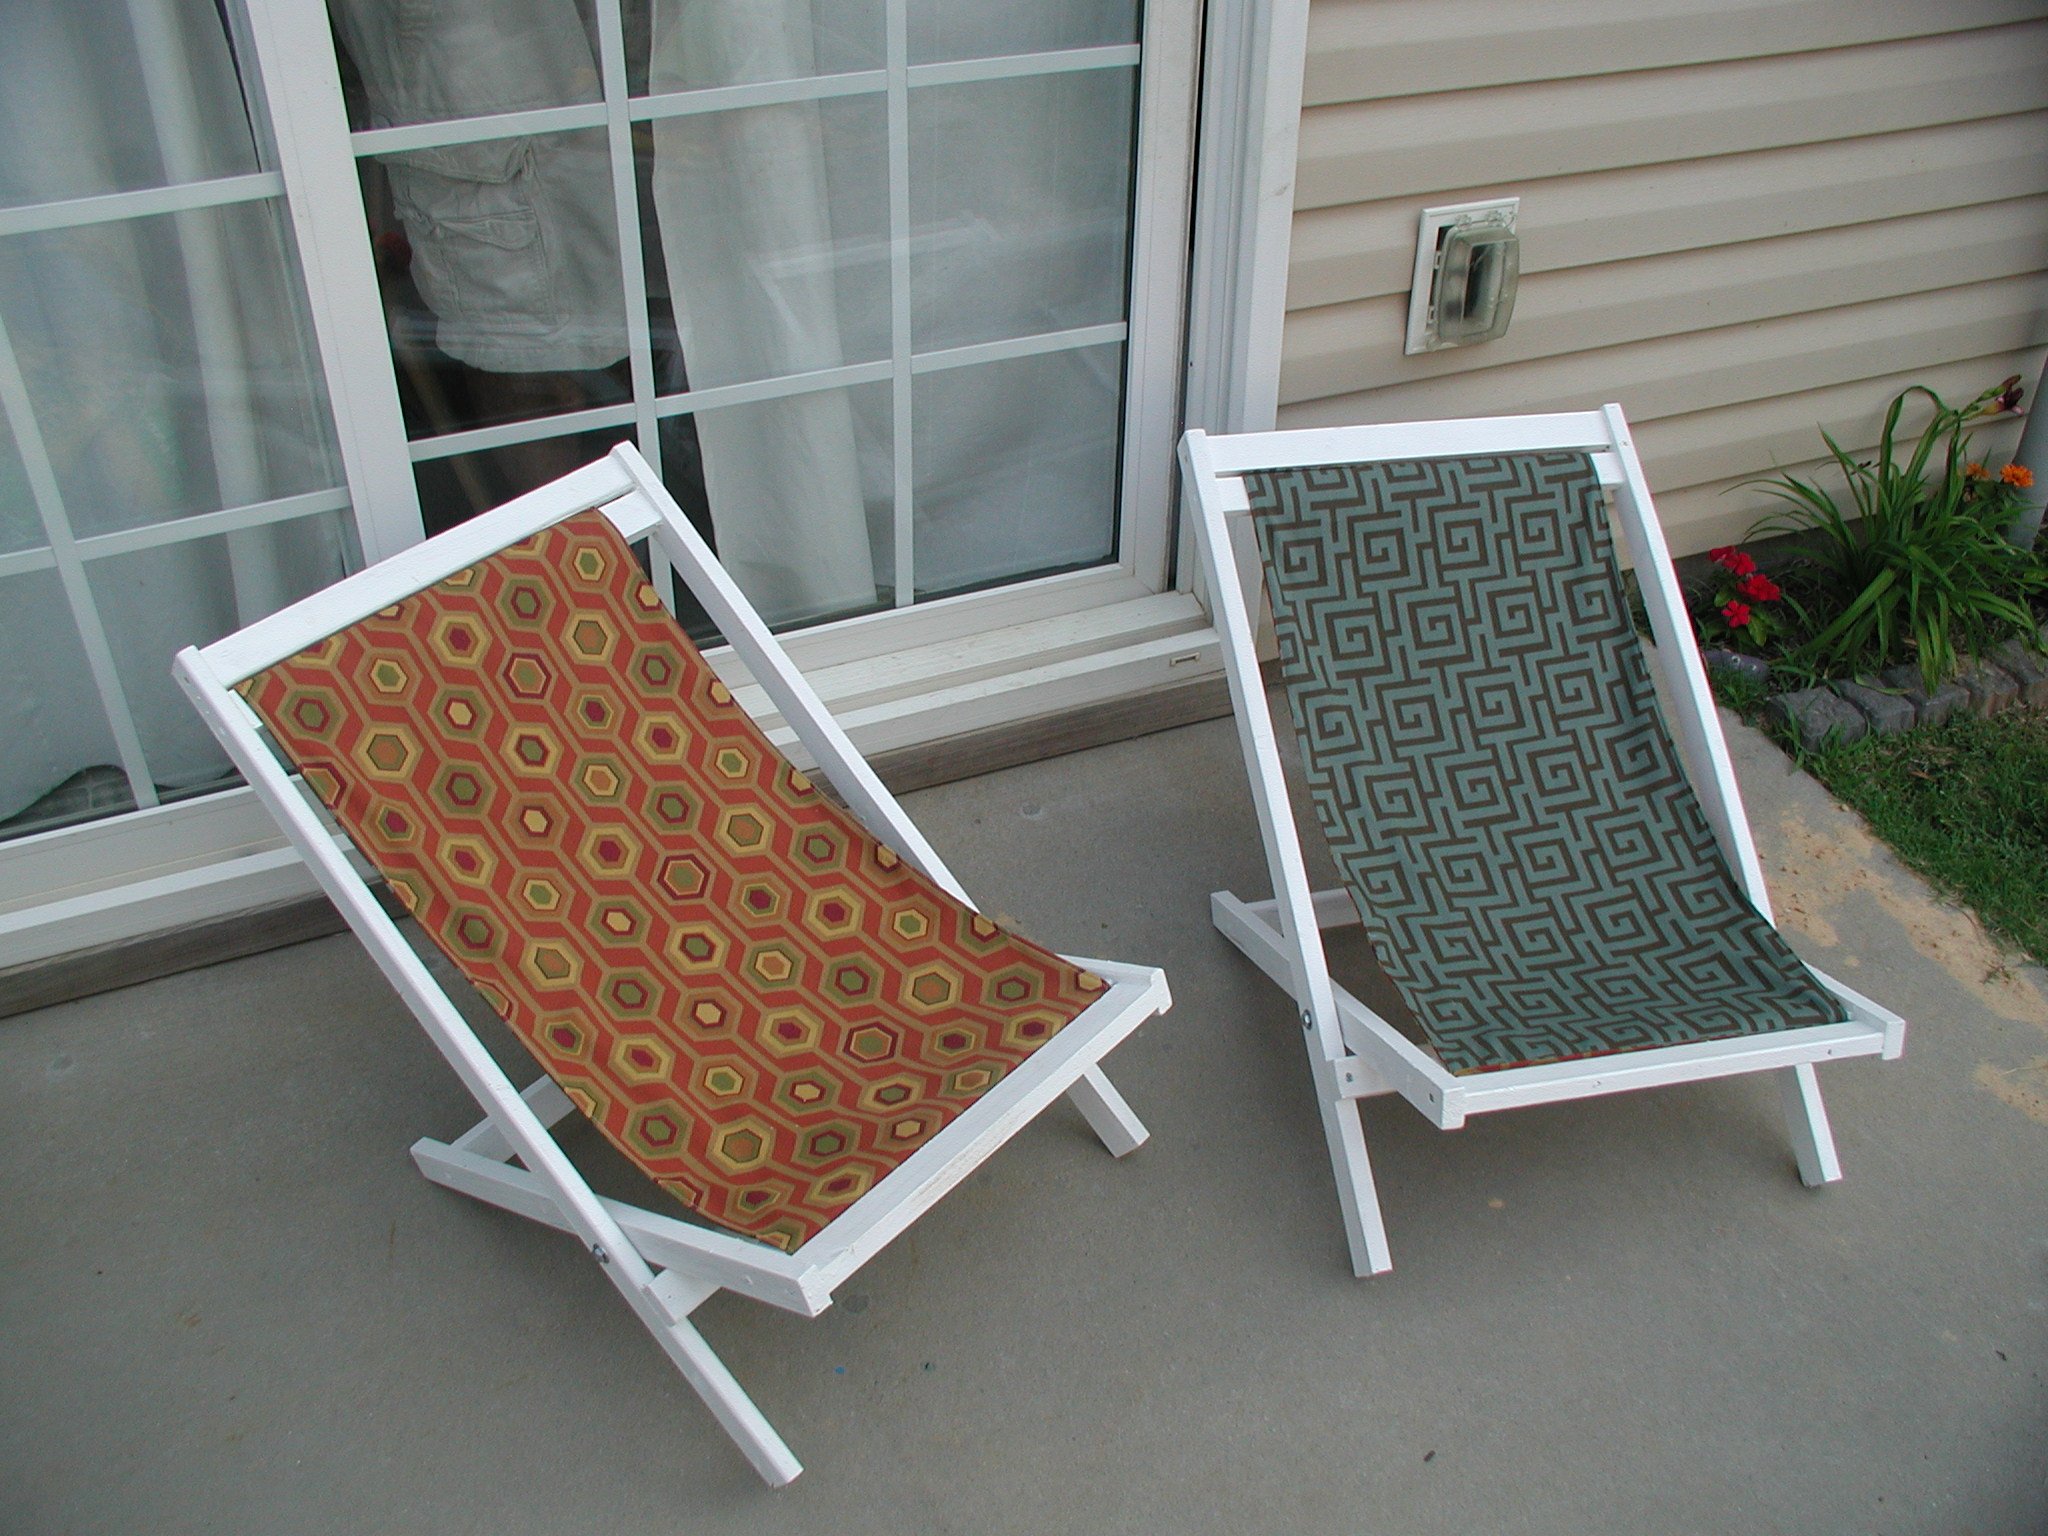
Boys' Sling Chairs
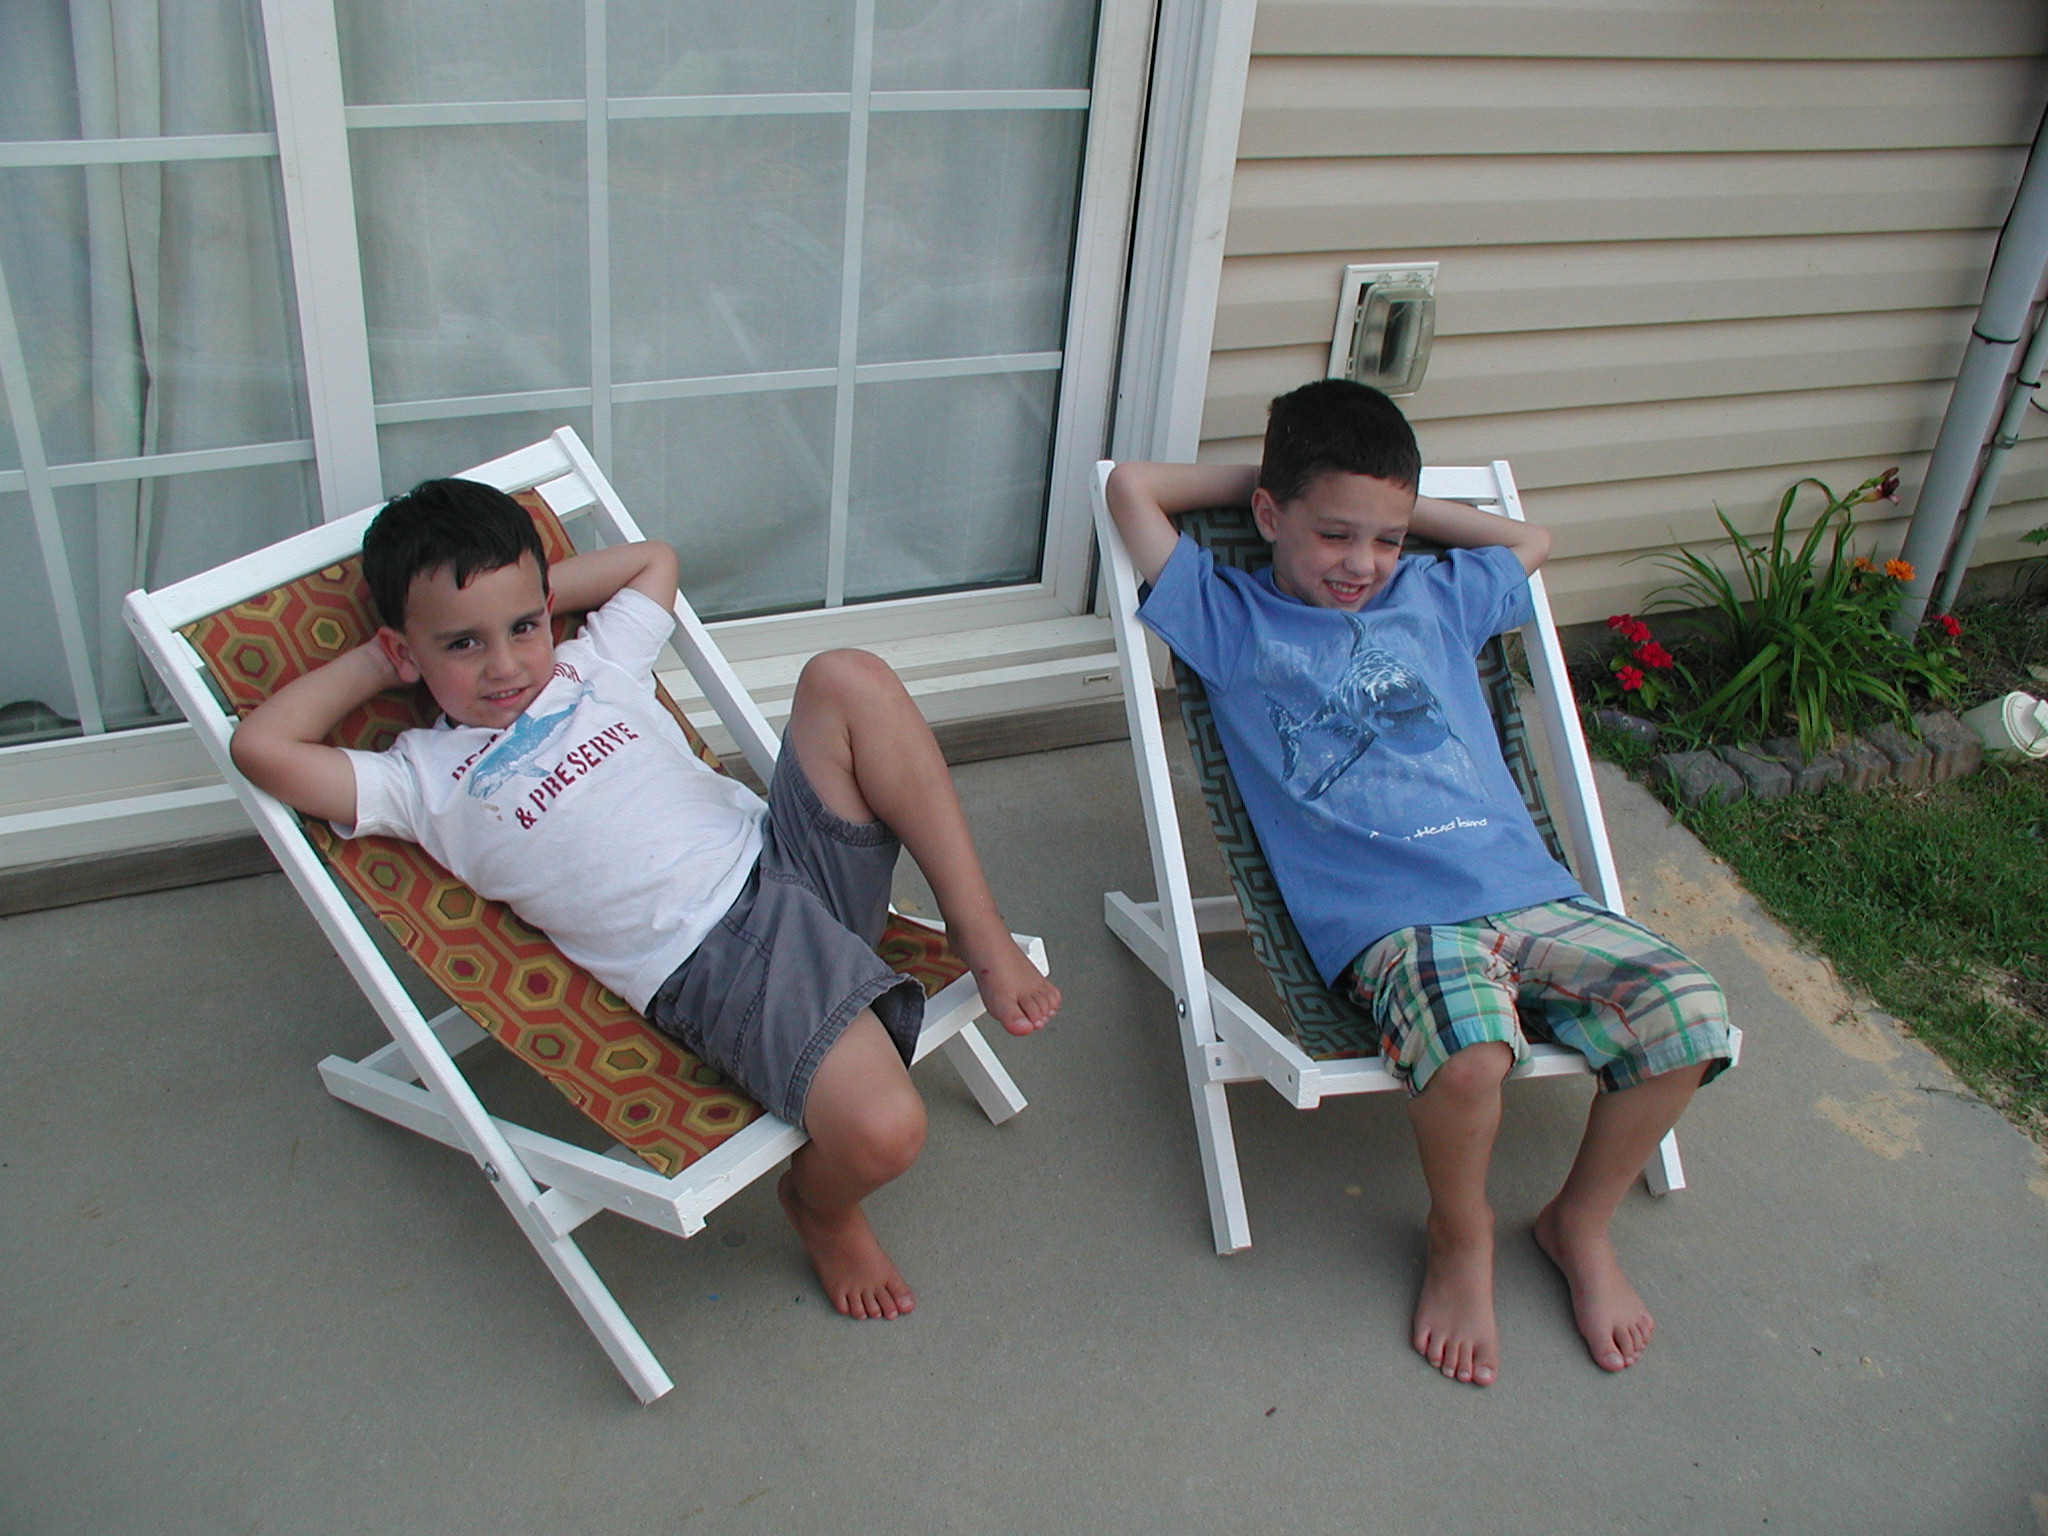
I have built a few beds from this site, but when I saw the chairs I knew this would be my next project! I don't have a nailer, so I used screws throughout. I found the outdoor fabric on the clearance rack at the fabric store. My boys helped me paint them with some extra white paint I had left over from a previous project (just Ultra bright white paint from Lowes). As you can see, my boys love to lounge in style! Thanks again Ana!!
Estimated Cost
under $25 FOR 2
Estimated Time Investment
An Hour or Two (0-2 Hours)
Finish Used
Ultra white paint
Recommended Skill Level
Beginner
$10 Dresser Made Over Using Only RECLAIM Beyond Paint!
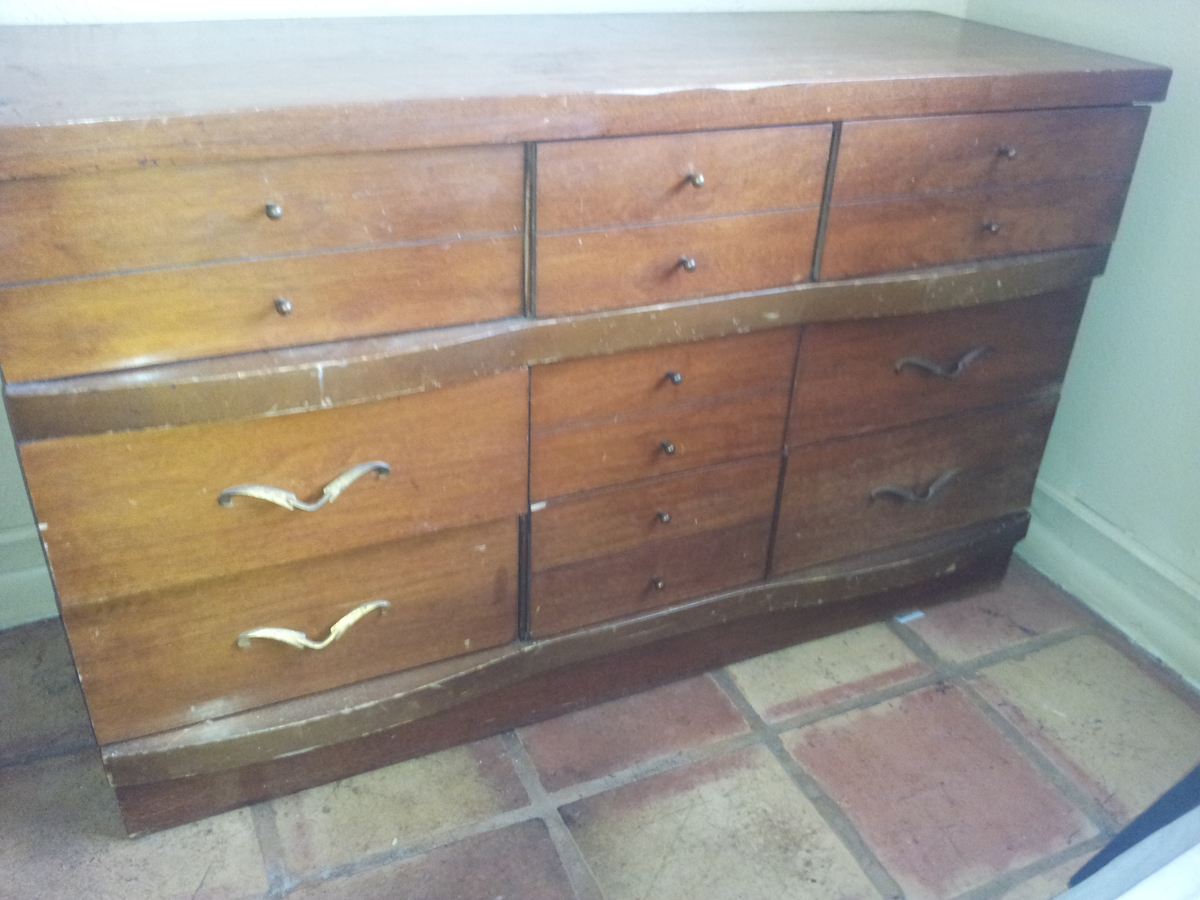
Bought a dresser for $10 from a garage sale by my house, and thought it would look great redone. As I was looking around for different methods online, I found a product called RECLAIM Beyond Paint while Googling DIY methods and products.
I picked up a small can from their Home Shopping Network page, and gave it a try.
The claims that there were no priming, sanding or prepping were pretty surprising. They do recommend cleaning, though.
The results pretty much speak for themselves. The project took a total of about an hour or so, including removing the hardware and spray painting it with a metal like paint I got from Home Depot, and then reattaching it.
I have to say the results were more than impressive. I had only used about an 1/8th of the can, so I'm going to try it on a few other items!
If you'd like to know more, I found it at www.reclaimbeyondpaint.com
Estimated Time Investment
An Hour or Two (0-2 Hours)
Finish Used
Just used the RECLAIM as directed on the can. Very simple roll-on product.
Recommended Skill Level
Starter Project
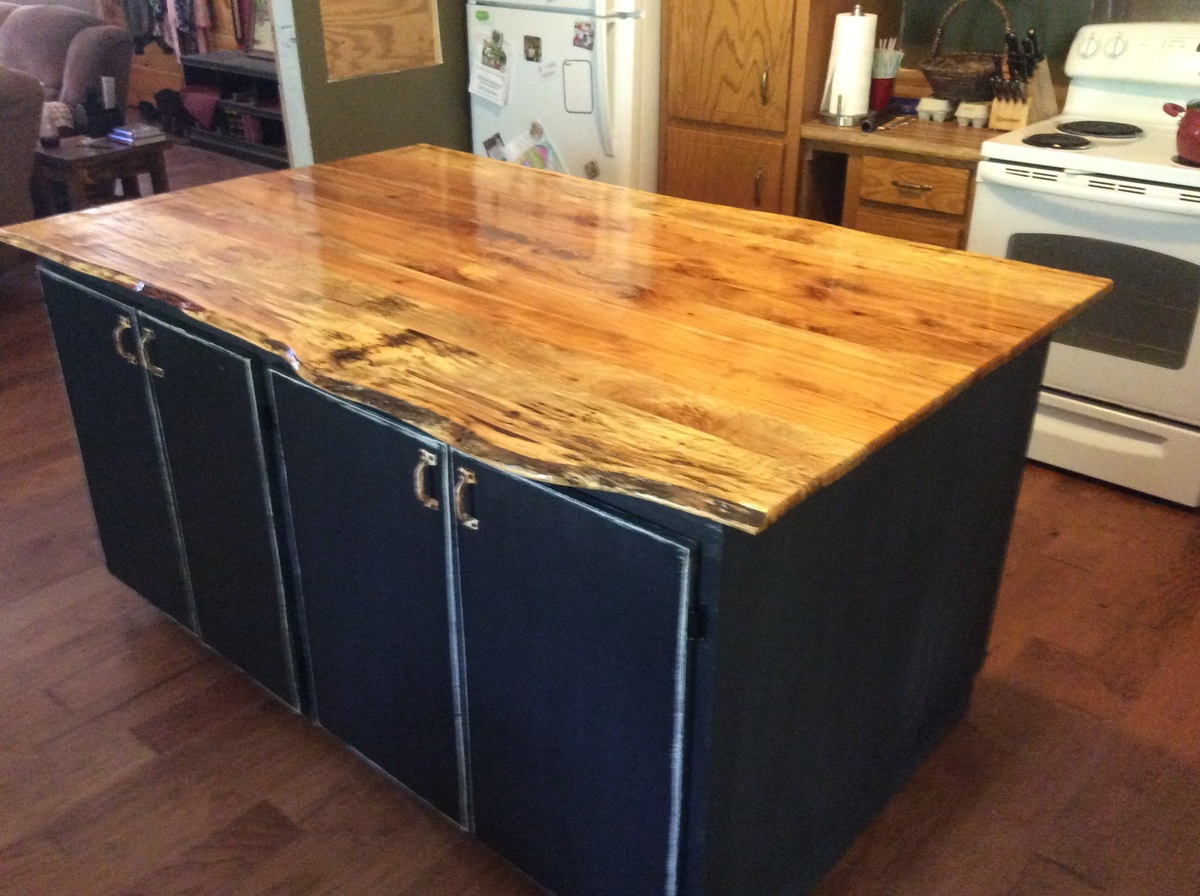
Kitchen island fom base cabinet plan
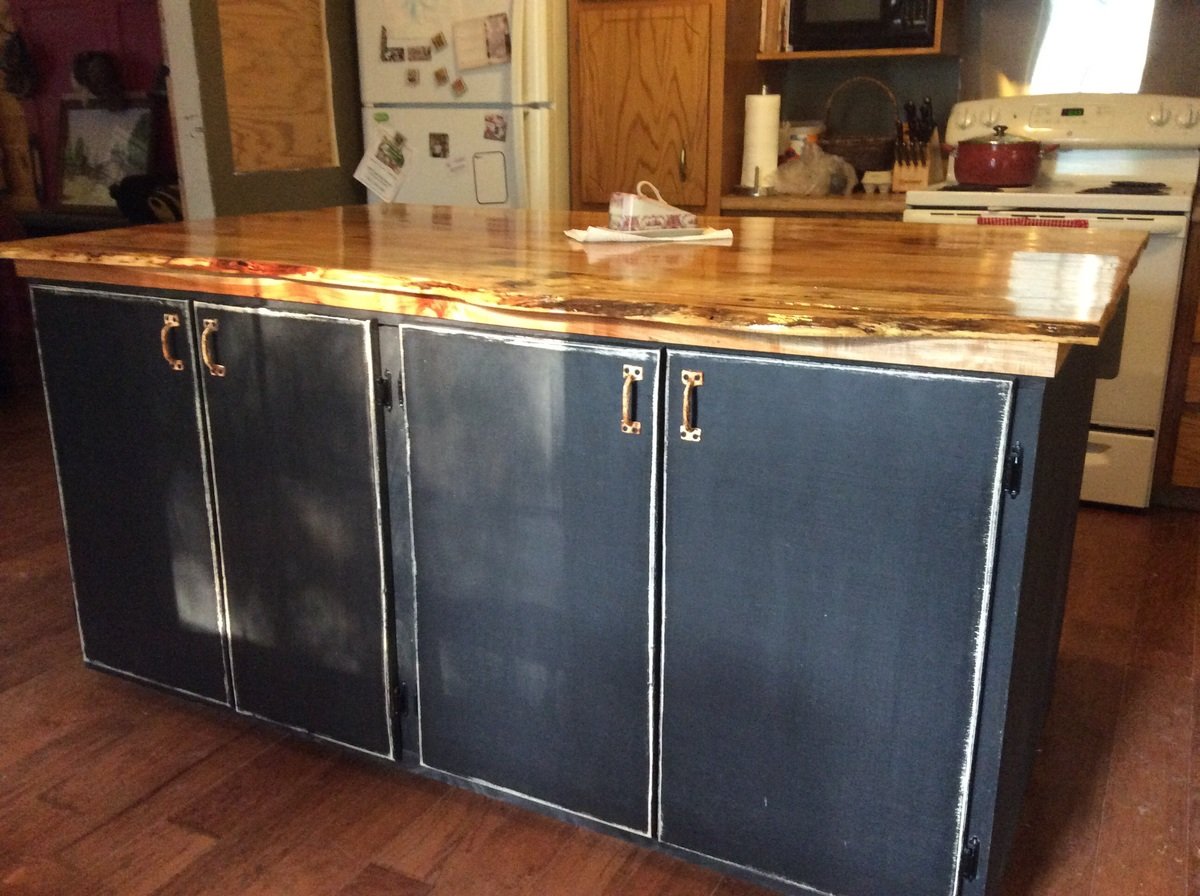
Using Anna's plan for base cabinets, I expanded our small kitchen island from 20" deep to about 40" deep and added a pecan live edge top made of 1x4's. I made two bases 34" wide so I could exactly match the width of the original island. By doing this I could match up the ends while leaving a small gap in between the base for adjustments. Then that was covered by a 1x2 so it is not noticeable. The live edge pecan top matches our "Fancy X Farmhouse Table" built a few months ago. My wife painted the base with a mixture of flat black paint and plaster of Paris to make chalk paint. The top is just 7 coats of semi gloss polyurethane. The build was less than 2 days and I got to use my new Kreg Foreman pocket hole machine for all of it. The poly was several more days of sanding, application, and drying time.
Built from Plan(s)
Estimated Time Investment
Week Long Project (20 Hours or More)
Finish Used
Black "chalk paint" for the base. Minwax semigloss polyurethane for the top.
Recommended Skill Level
Intermediate
Farmhouse Table - Modified
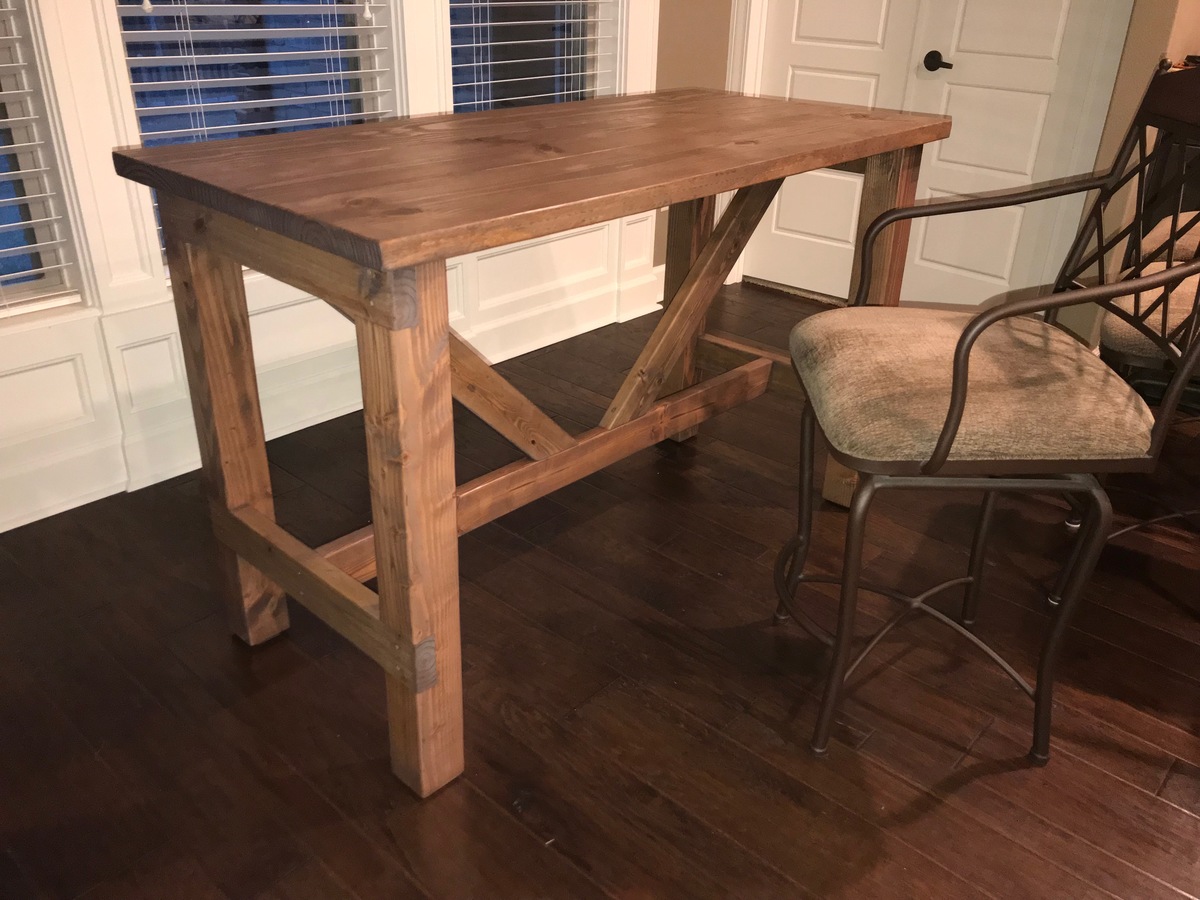
The Breakfast Nook is a small space with doors on either side. The Bar-Stools are a little bit "higher than normal" and they have an obtrusive arm. Very comfortable for sitting; but, cannot have an apron on a table or bar. Needed room for 2 stools on each side.
To meet all these requirements, end up with a table that's long-ish, narrow, and tall. Desired dimensions: 58 L x 28 W x 36.25 H.
Problems: (1) worried about it being "wobbly" (tall & could not have an apron on the length); (2) needed to fit those bar-stools between the legs.
Solution: I "merged" the plans for the Farmhouse Table with elements of the Truss Beam table for structural integrity.
Top is typical: used pocket-hole jig / screws (Kreg) to join three 2 x 10's. Final Width: 27.75". Cut even with straight-edge and framing saw (used a 60 T Fine-finish blade - nice!).
Set the end stretchers into the legs; attached with brown-colored deck screws. Attached length-wise stretchers to the end stretchers with deck screws. Could have used pocket-holes; but, this way, it's symmetrical and everything matches.
Added 45 degree supports for stabililty - used combination of pocket-holes and deck screws.
Base is sized so that top has a 1.5" overhang all-round.
Attached the top to the base with pocket-holes / screws - to top end stretchers and legs, and top length-wise stretcher.
Built from Plan(s)
Estimated Cost
130
Estimated Time Investment
Weekend Project (10-20 Hours)
Finish Used
First, pre-stain wood conditioner (oil-based). Then a 2-stage stain: Special Walnut followed by Weathered Oak (the wife got this scheme from AnaWhite.com). Finished with Satin Polyurethane (Wipe-on). All Min-Wax products.
Recommended Skill Level
Intermediate
Console Tables, Outdoor Furniture and Beds!
All these awesome projects build by Laticia!
Built from Plan(s)
Shark Shack

I had my eye on this clubhouse bed from the Pottery Barn kids catalog and was so excited when I came across this plan and my hubby offered to build it for my 4-year-old. I think it actually turned out cuter than the Pottery Barn version! Thanks so much, Ana!


Estimated Cost
$350
Estimated Time Investment
Week Long Project (20 Hours or More)
Finish Used
Eggshell Paint
Recommended Skill Level
Intermediate
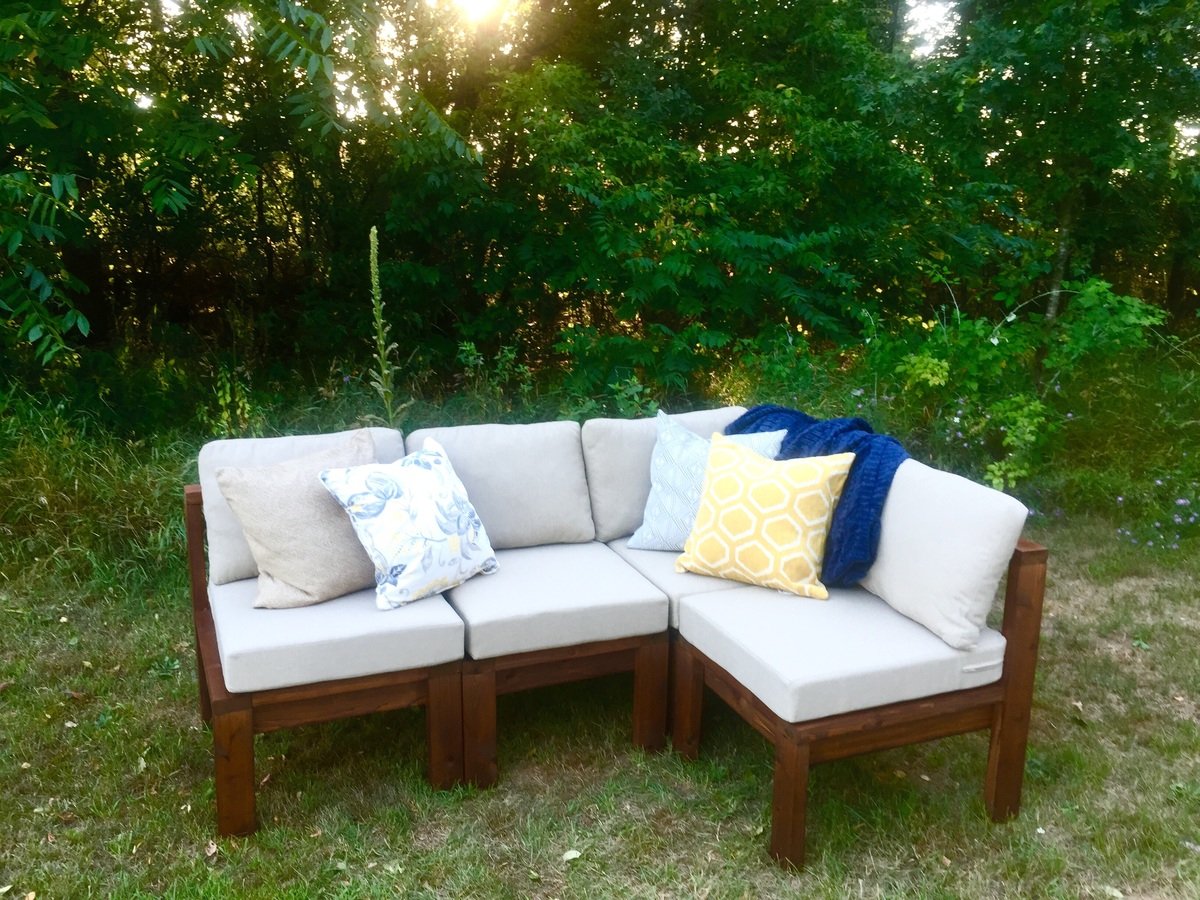
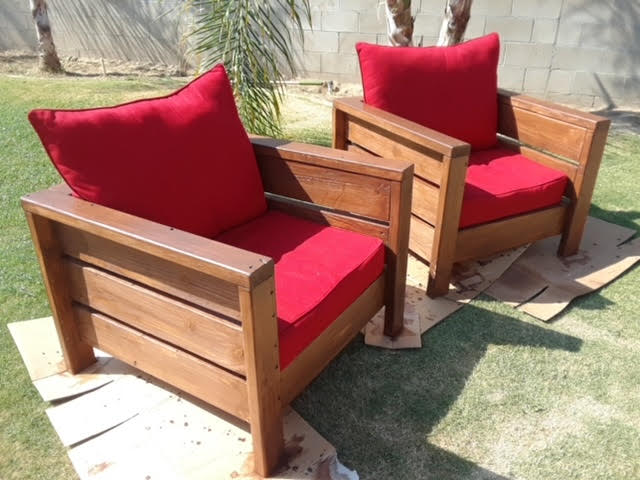
Outdoor sofa
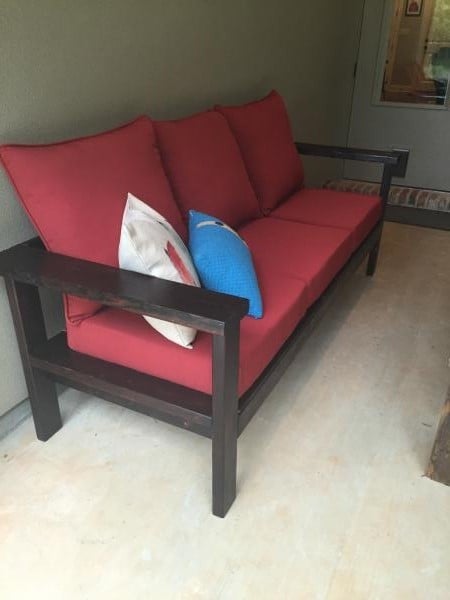
Tweaked the plans a bit. Used 2x6s for arm rest (to support a cocktail better) and back rest. Also tilted the back 2x6 to make it more comfortable. Burnt wood with a torch. Then stained and used a spar urethane.
Estimated Time Investment
Weekend Project (10-20 Hours)
Finish Used
Burnt wood, stain and spar urethane
Recommended Skill Level
Intermediate
Comments
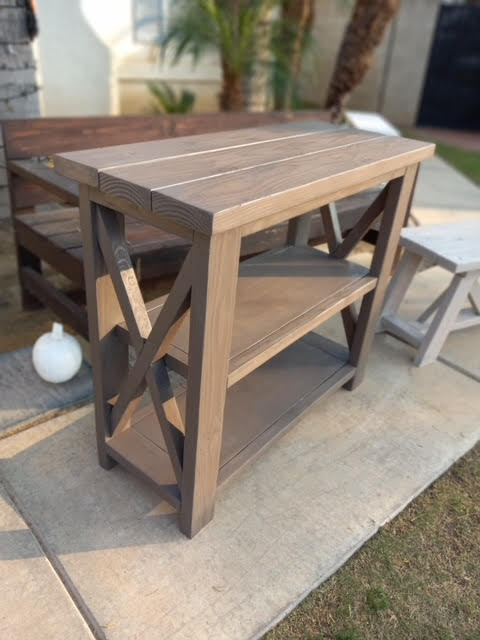
Workbench Console
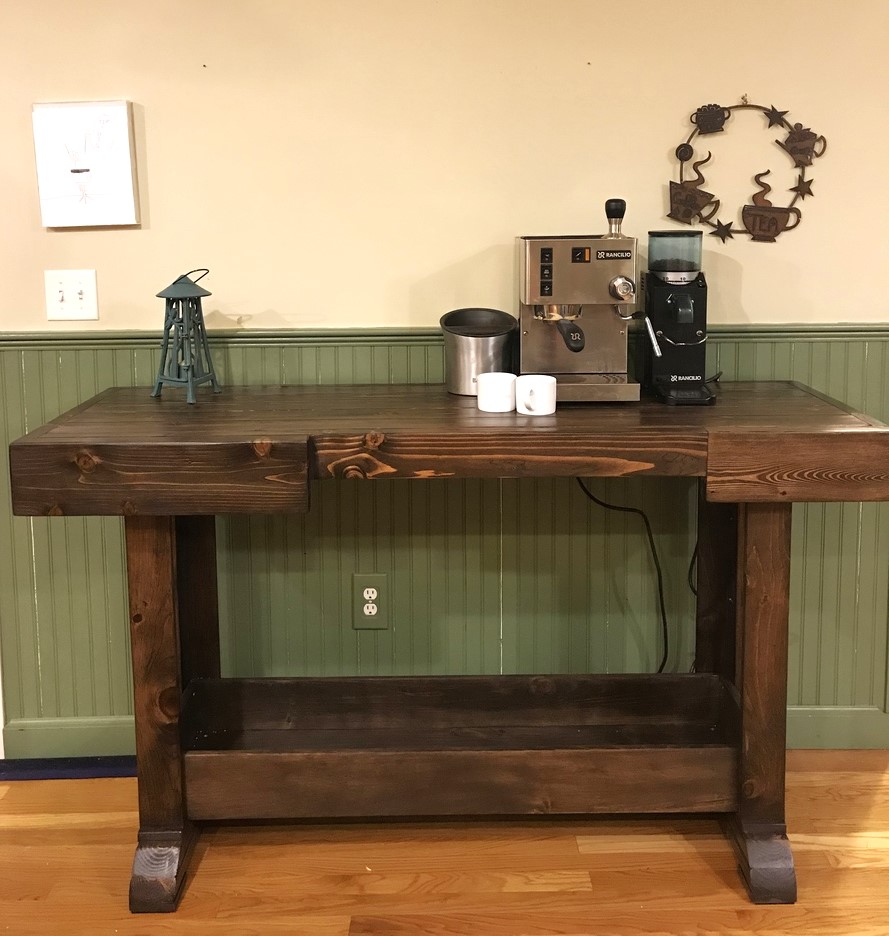
This table was fun to build, but took me a looonng time. Things I learned doing this project: First, when the pros tell you something can be put together in a few hours, they do not mean for mere mortals. Second, good staining really requires you to know your wood. I had several pine boards with a very pink undertone that made it impossible to get the color I wanted. I had to restain this twice. Third, this console table can support at least 130 pounds!
Built from Plan(s)
Estimated Cost
130
Estimated Time Investment
Week Long Project (20 Hours or More)
Finish Used
After several failed attempts at something lighter, I went with Minwax Dark Walnut and a one-coat polyurethane.
Recommended Skill Level
Intermediate