Community Brag Posts

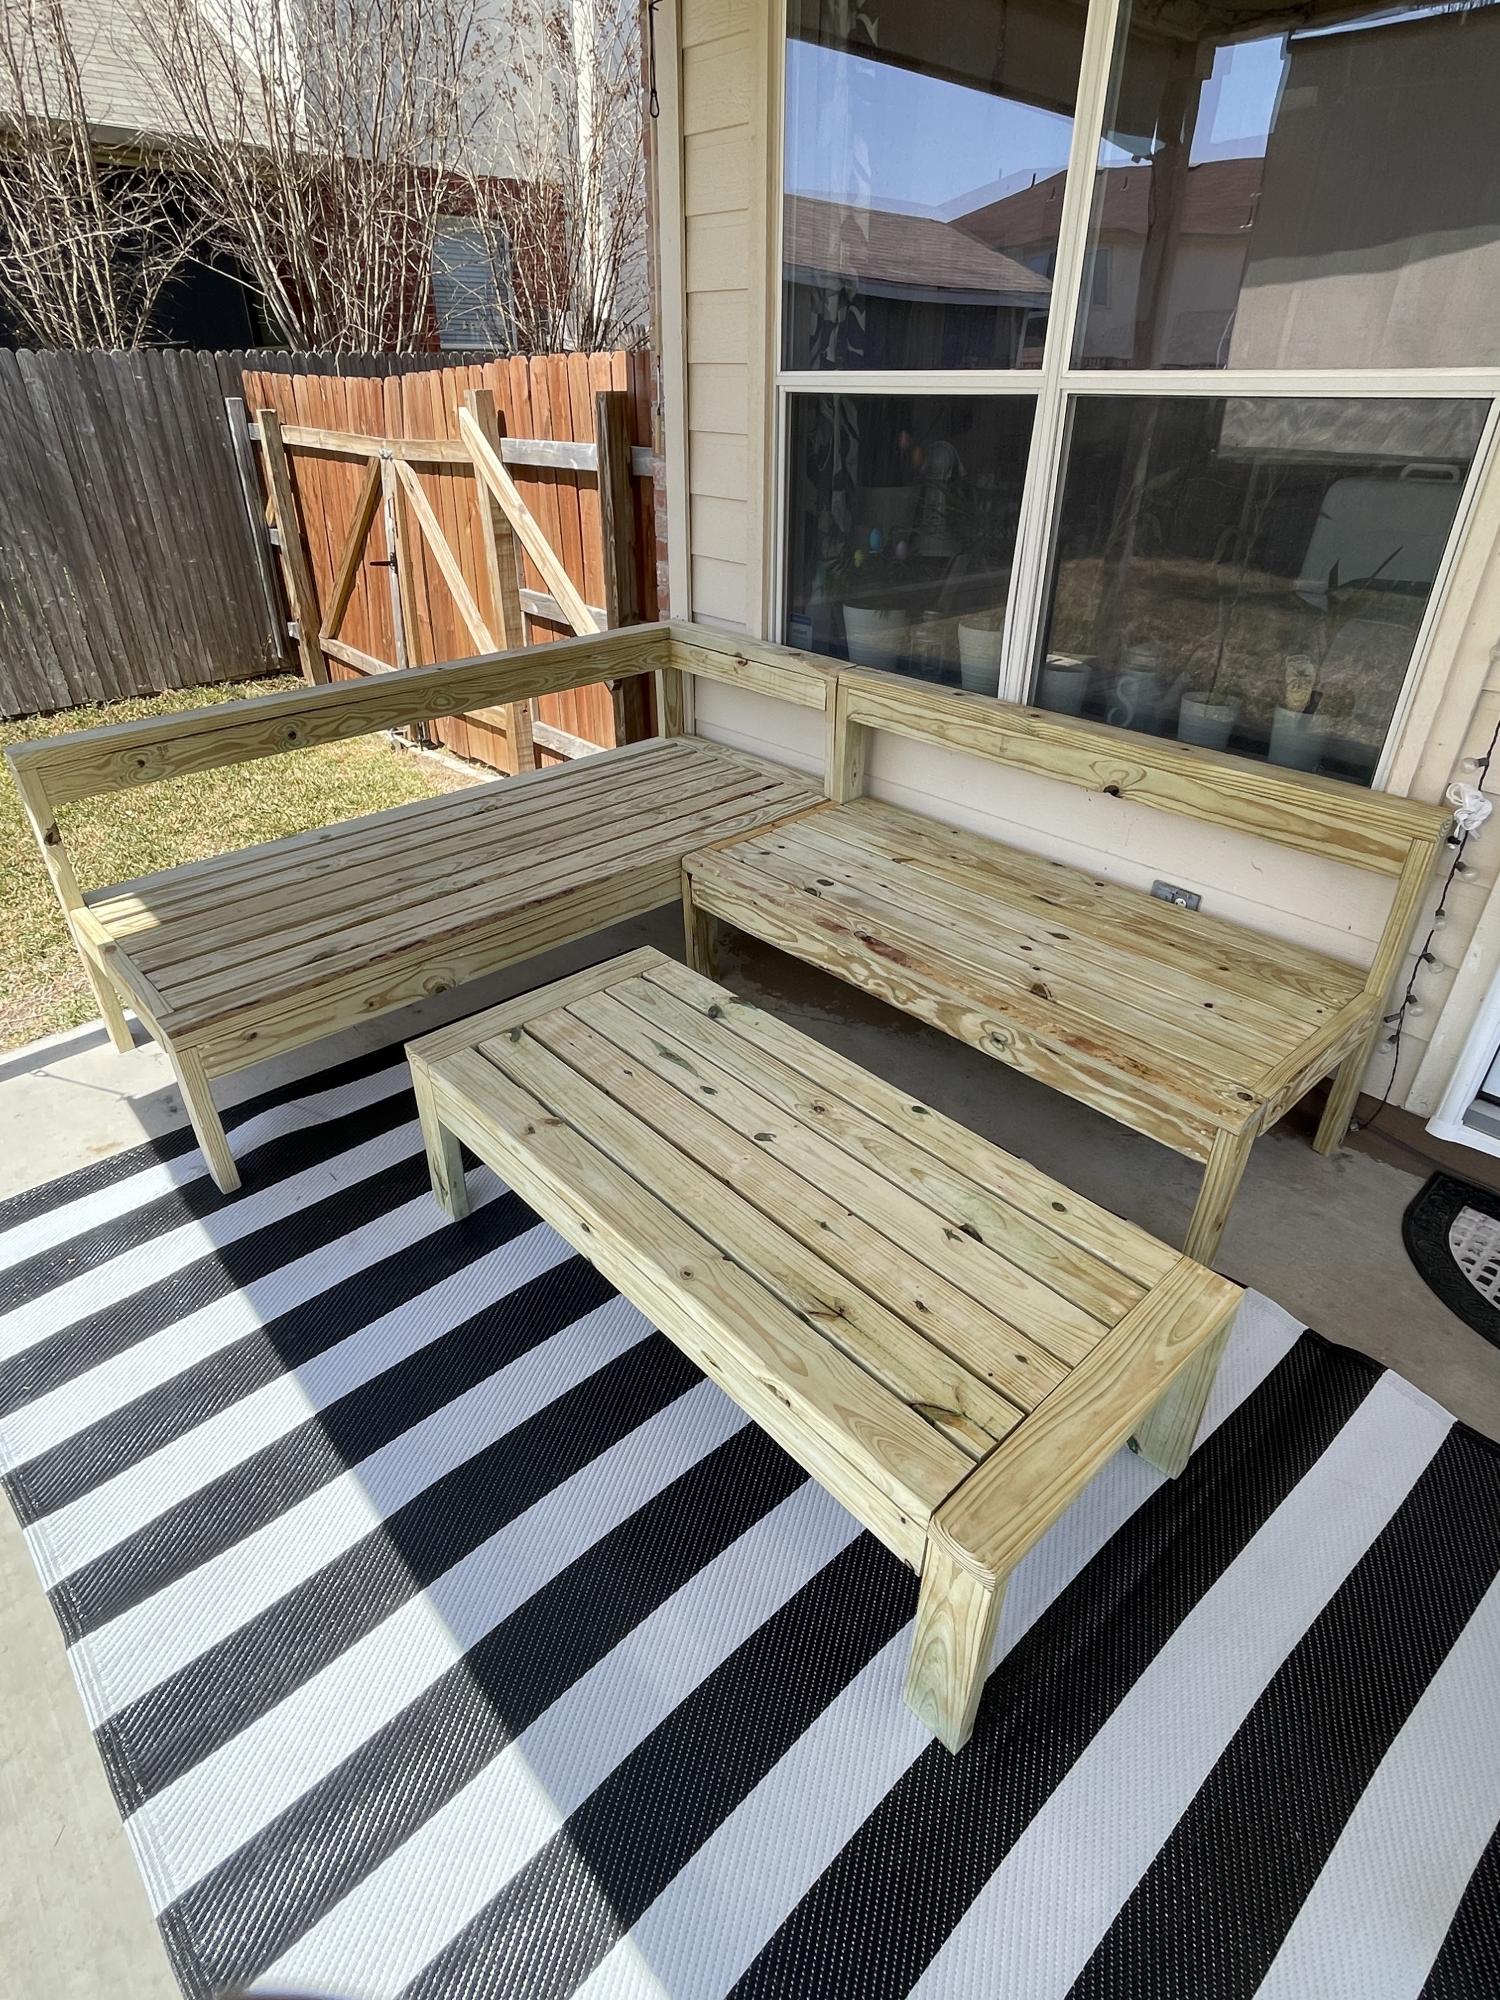
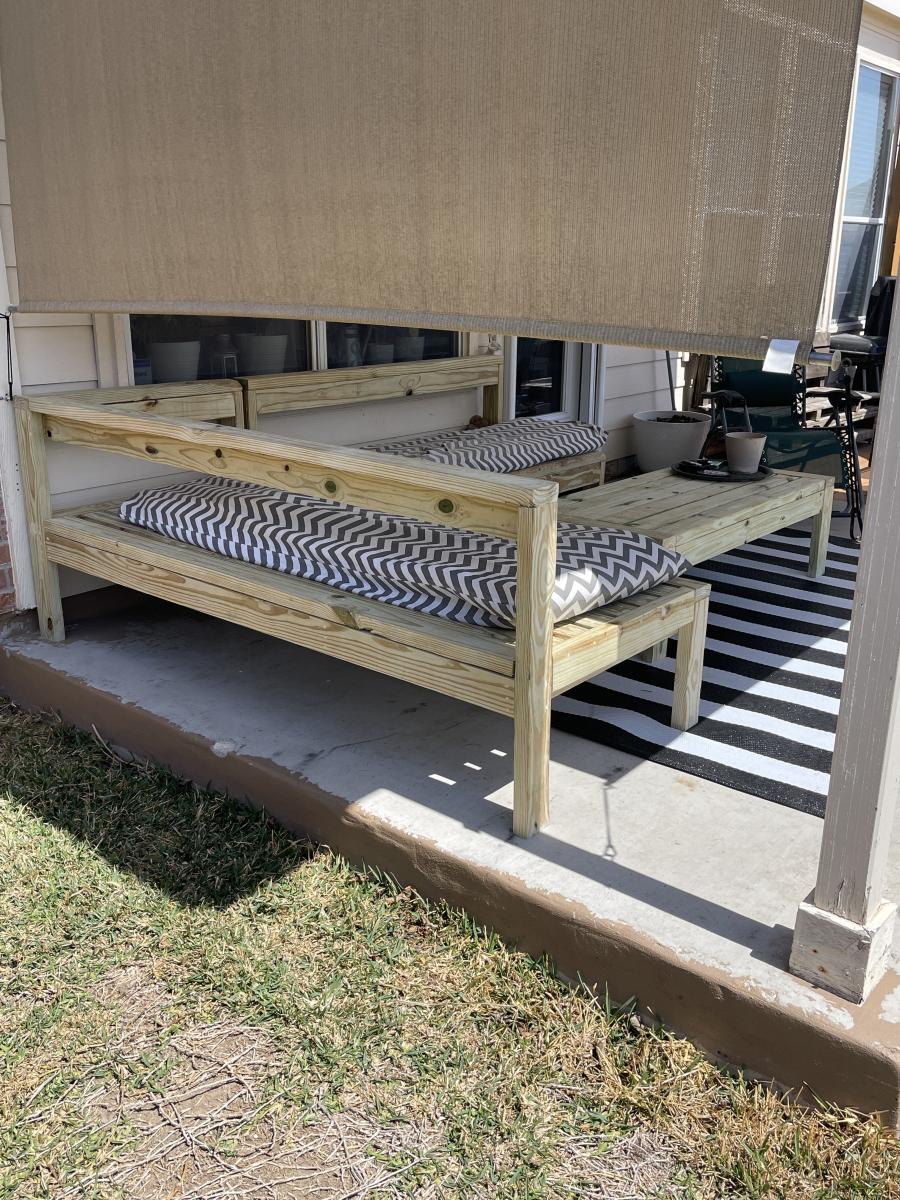
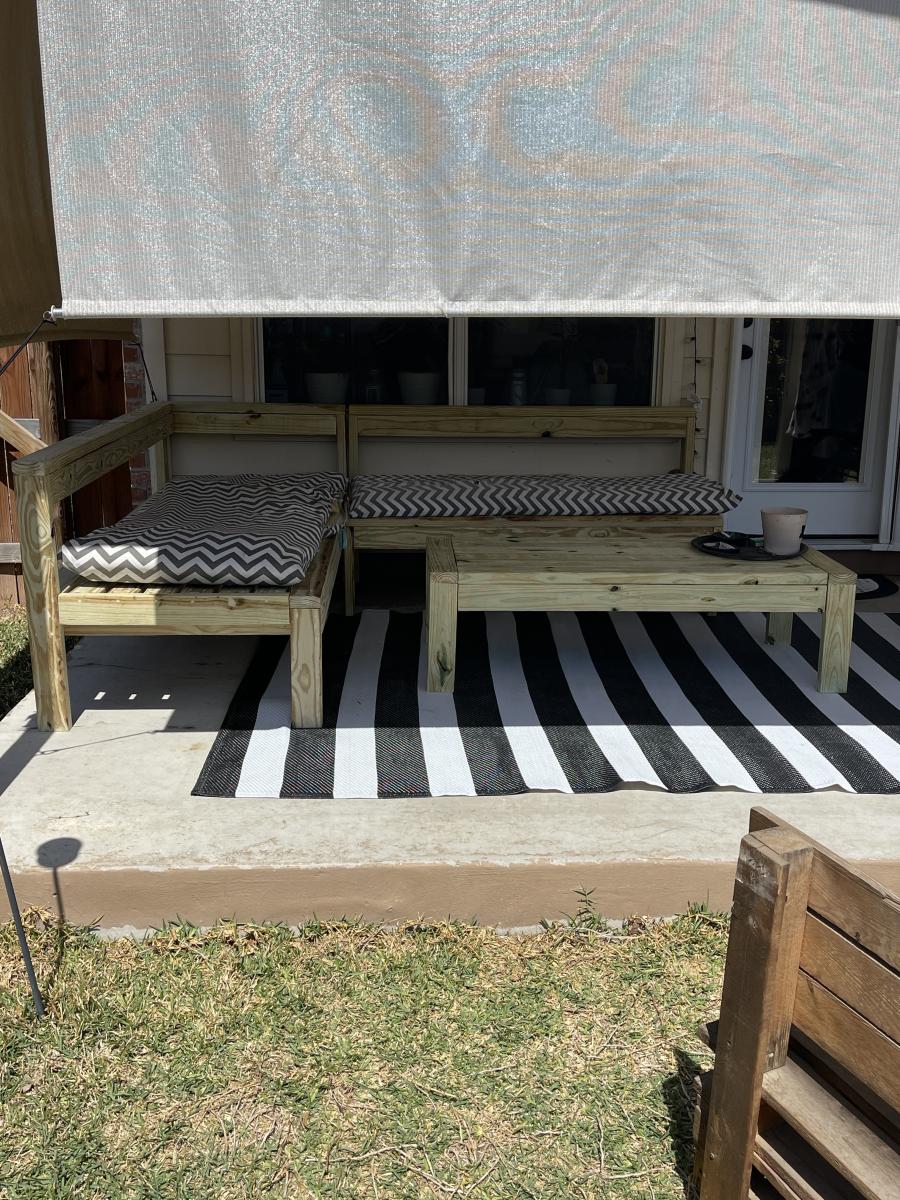
Fancy x farmhouse table... my version!

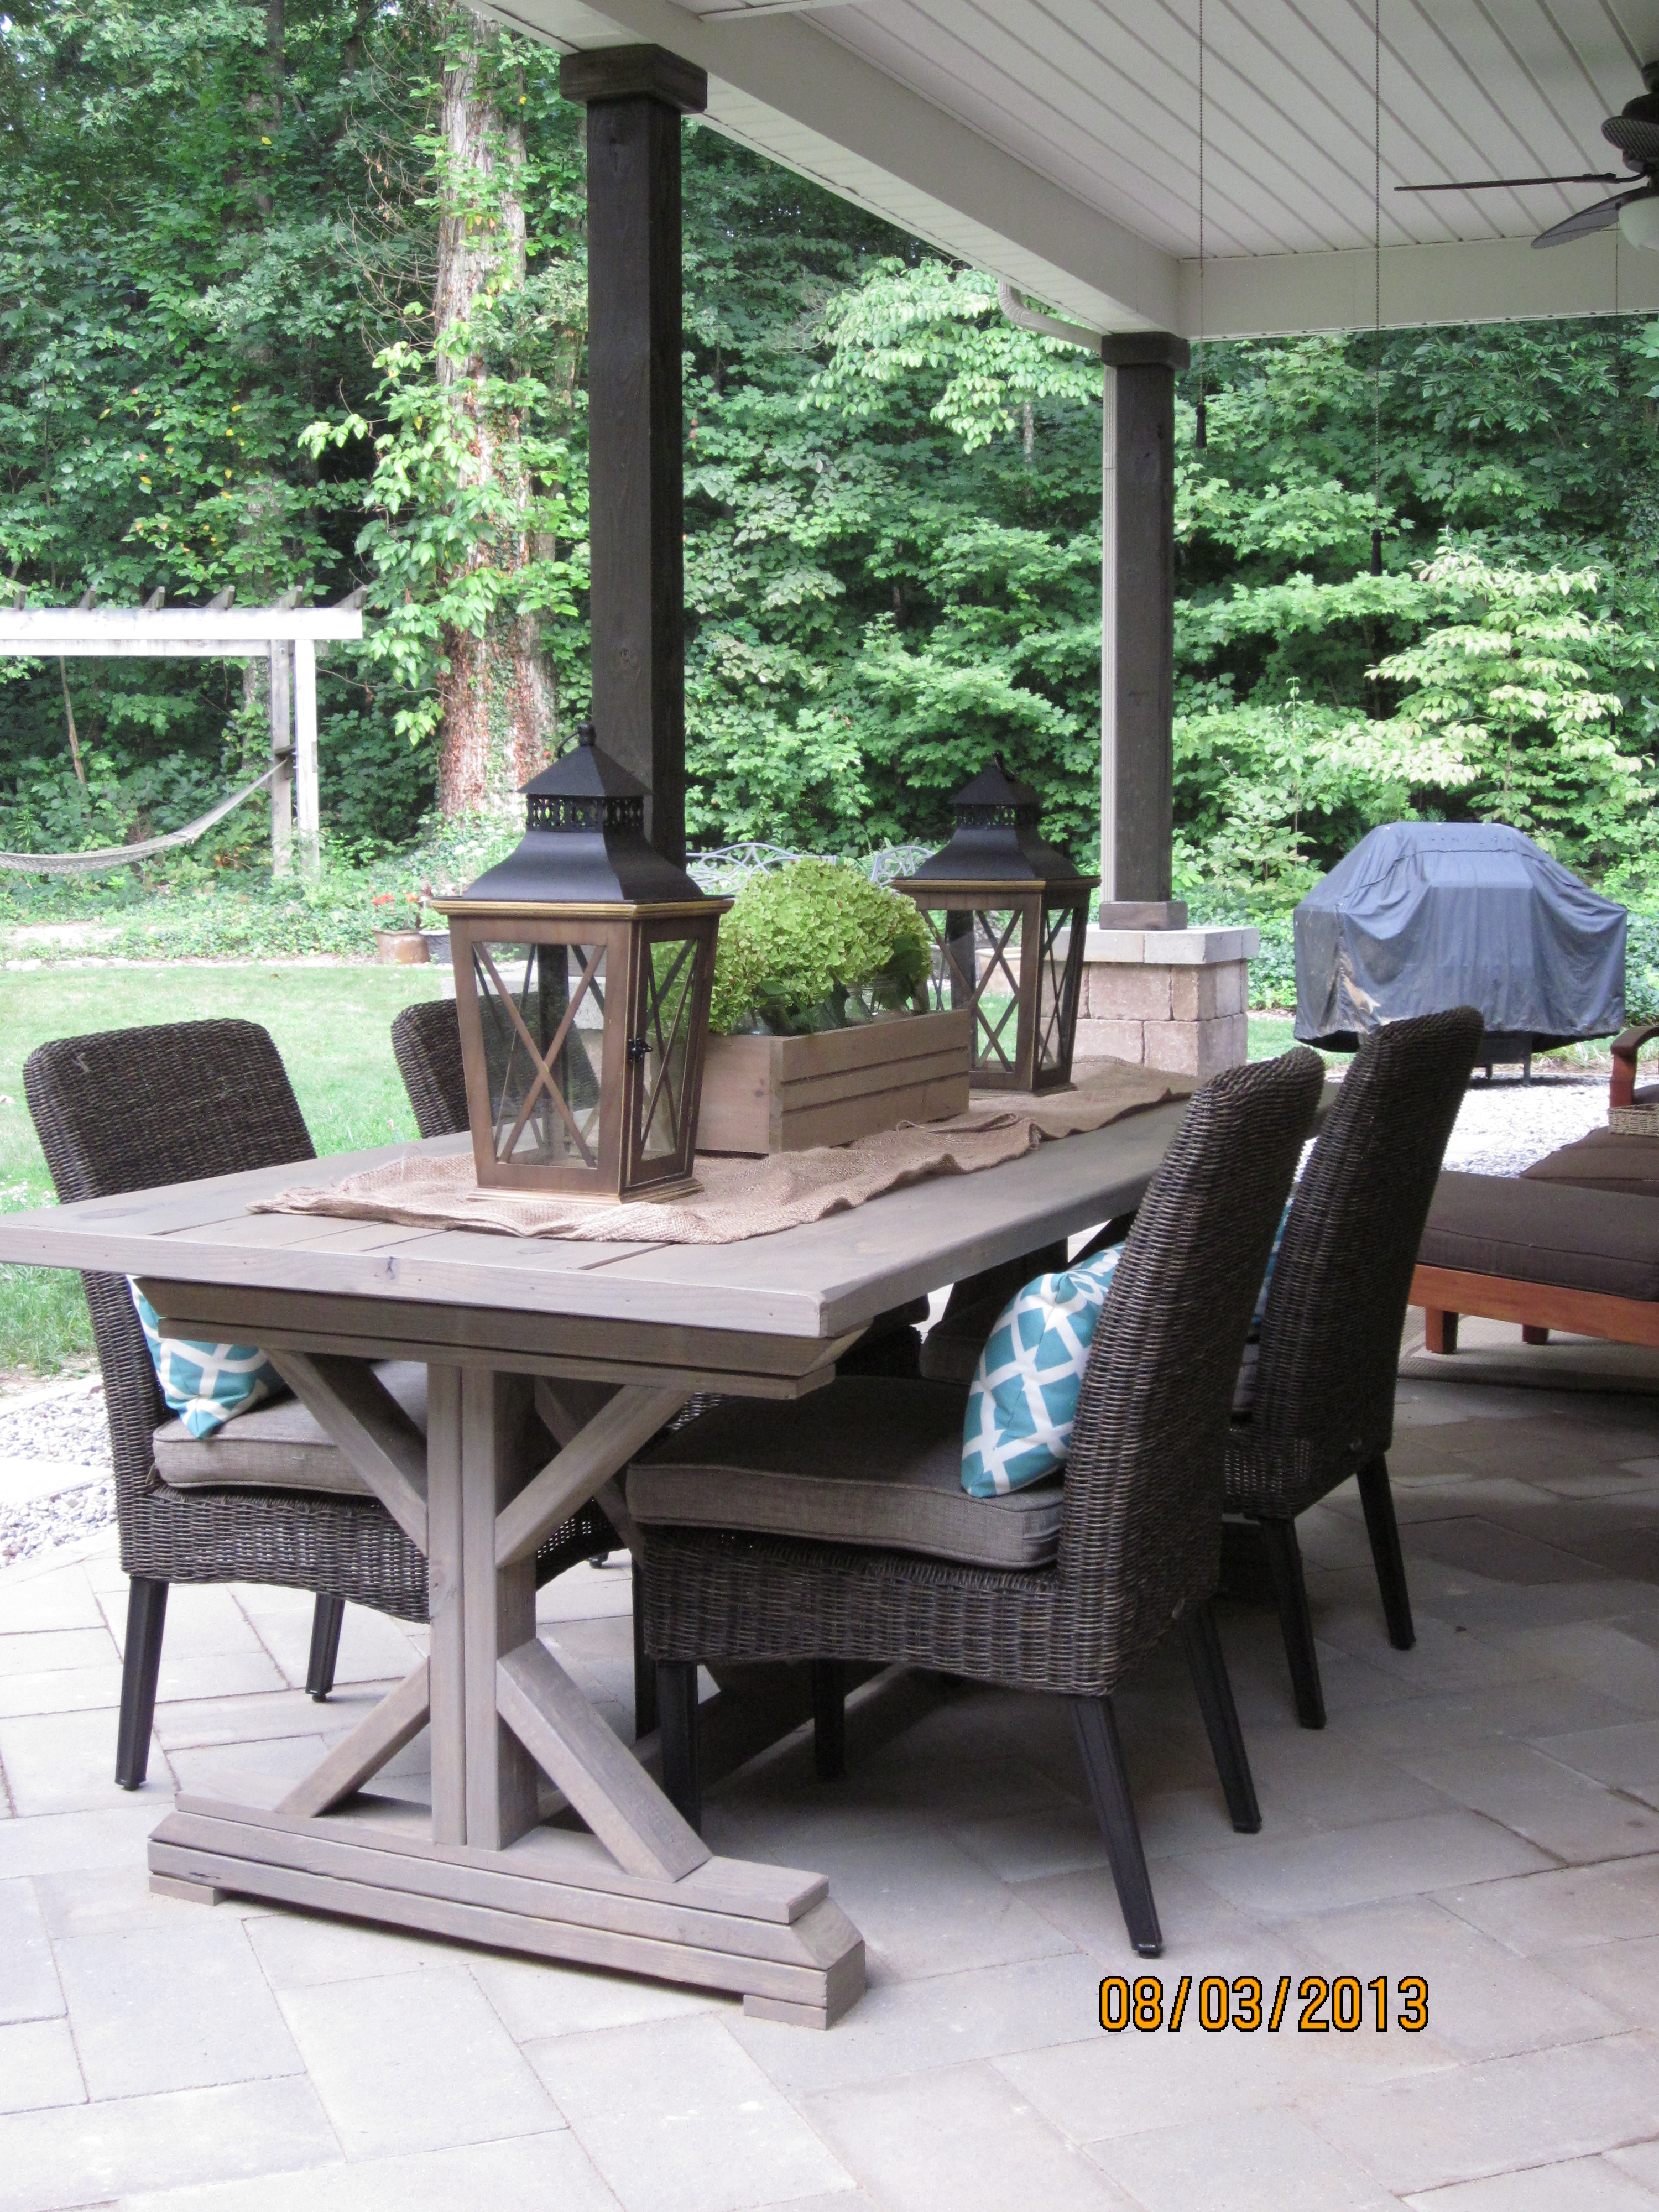
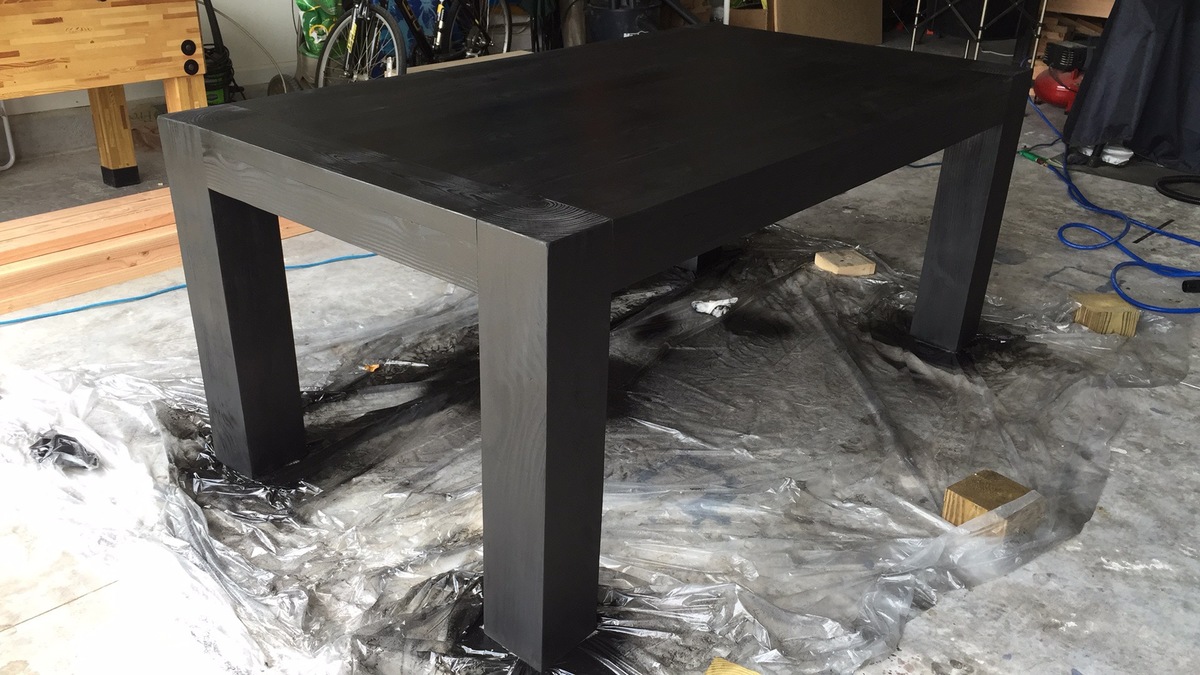
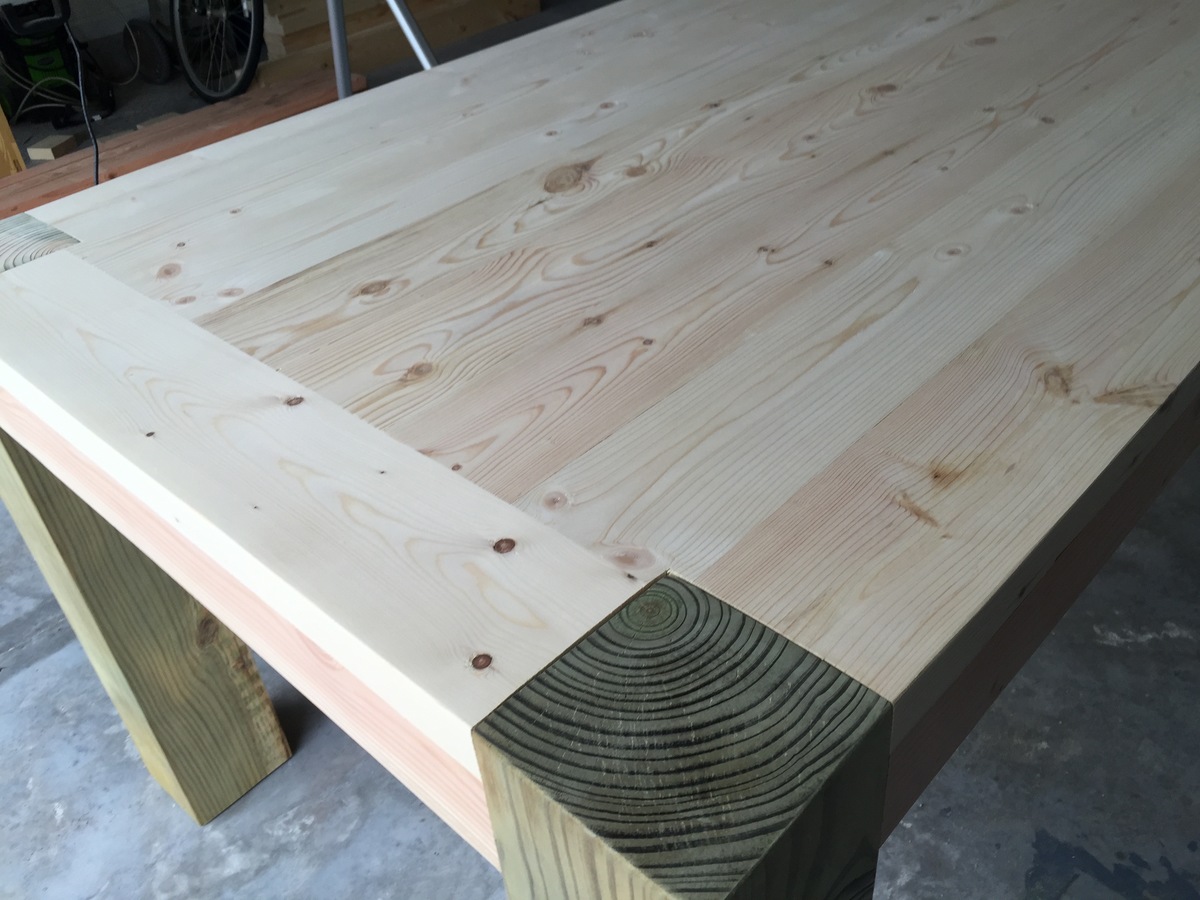
My version is a 7' table. I made the distance between legs 60" with a 8" overhang on each side. The stain is Olympic Driftwood. I also added 1 x 2 pcs on the ends for a more finished look & to secure the 2 x10's. One last thing, I used a router to round out all the outer edges of the table top and the legs.

Highly recommend....

I used some T braces/plates on the bottom of the table to connect legs with 60" pcs. Otherwise there is nothing to keep the legs square with the table.

Love the look...thanks so much for the plan!

Other notes: I used treated lumber so it's VERY heavy.

Built from Plan(s)
Estimated Cost
$130 ($100 lumber, $30 stain)
Estimated Time Investment
Day Project (6-9 Hours)
Finish Used
Olympic Driftwood
Recommended Skill Level
Intermediate

Comments

stepdiva

Sat, 08/30/2014 - 19:33

hi there..your table is great! can i ask if u think there is enough room at ends of table for a chair with the 8 inch overhangs that u did? i would like to do the same. thanks so much!!!
Tanya

King Farmhouse Storage Bed

Submitted by emtrahan on Mon, 08/24/2015 - 11:57

We were looking to make a king size storage bed in the farmhouse style, but couldn't find anything that was exactly what we wanted, so we stole pieces from several plans and ended up with this! 

Estimated Cost
$300 for everything, lumber, paint, you name it!
Estimated Time Investment
Weekend Project (10-20 Hours)
Finish Used
Sherwin Williams escape grey and dover white, over a coat of kilz.
Recommended Skill Level
Beginner

Patchwork Reclaimed Wood Headboard

I used the Reclaimed Wood Look Headboard plans to make a headboard out of found, discarded wood. The only new wood is the vertical 1x3s and 1x2s that form the sides of the headboard. The bed is also made of reclaimed wood, using a modified version of the Hailey Platform Bed plans.

The plans are modified to create a patchwork look using scraps of wood in different sizes and thicknesses. The wood scraps were cut so that when put together they make up the total length and width of the horizontal planks in the plans. I glued and nailed all the patchwork pieces to a piece of MDF board I found, and added a vertical 1x2 for added support down the middle of the back.

The top 2x4 is made up of two pieces glued end-to-end with dowels in between, because I didn't find any long 2x4s I could reclaim. I didn't put the top and bottom trim on the back side, because it was already quite heavy and sturdy.

Estimated Cost
30
Estimated Time Investment
Weekend Project (10-20 Hours)
Finish Used
The original finishes have been sanded off and the wood sanded to 240 grit before assembly. The finish is two coats of Cabot's water-based stain and varnish in Sutherland Teak, applied with a varnish brush and then re-brushed with a dry brush to remove the excess.

The sanding took a long time - it would have been a shorter project if I left the original finishes.
Recommended Skill Level
Starter Project

Comments

Bathroom Mirror

Submitted by AndyH on Thu, 08/27/2015 - 19:31

Bathroom mirror made from 1 by 6s and a 24 inch by 20 inch plain mirror.

Estimated Cost
$25
Estimated Time Investment
Afternoon Project (3-6 Hours)
Finish Used
Minwax Jacobean, then vaseline on the bits you want to show through the wood. Extra white satin paint sanded slightly and then another coat and sanded smooth by hand with 400 grit sandpaper.
Recommended Skill Level
Starter Project

Sliding Barn Door Loft Bed

Hi friends!

Jen Woodhouse here, super excited to share our latest DIY project with you - a Sliding Barn Door Loft Bed! We built this full-size loft bed for our 7-year-old daughter because we wanted to make the most of her small bedroom. And as an Army family, we move around every two years or so, so I drew up the plans so that the bed can be easily disassembled. We all love it so much and hope you do too! I'd love to see you build one for your kiddos (or yourself - no judgement!). Be sure to tag me @jenwoodhouse if you share photos of your build on social media!

And because some people have asked:

  • Our ceilings are 9 feet high.
  • Plans are for a full-size mattress, but I'll be drawing up plans for a twin size shortly.
  • Changing the sheets and making the bed is super easy because we use Beddy's (affiliate link) - Beddy's is an all-in-one fitted/flat sheet/blanket/comforter bedding set that zips up. It really is a game-changer!

Get all the details and the plans on JenWoodhouse.com!

Estimated Cost
$550
Estimated Time Investment
Week Long Project (20 Hours or More)
Finish Used
Benjamin Moore's Simply White latex paint, Varathane's Golden Oak wood stain, General Finishes Arm-R-Seal
Recommended Skill Level
Intermediate

Flat Wall Bookholders - Small Size

Submitted by cdswhite on Sat, 07/02/2011 - 17:38

We really needed a place to organize my daughters books in the living room. These were fairly easy to make - my husband built them and I did the finishing.

I HIGHLY recommend the water-based poly. It is almost twice as expensive but it isn't near as smelly and it has a much lower VOC level.

Estimated Cost
approx $10 for both (not including paint & poly)
Estimated Time Investment
Afternoon Project (3-6 Hours)
Finish Used
Black flat paint (2 coats) and Water-based Poly (2 coats).

We used black paint because I found a $5 gallon at HD from the discount shelf. I couldn't resist saving a ton of money and not having to pick a color and then wait around for a can to be mixed.
Recommended Skill Level
Starter Project

DIY Dollhouse

When my daughter asked for a dollhouse for her 3rd party I decided to just make her one and this Dream House plan was just perfect. I got a little carried away and added an extra floor. I also made some furniture out of scrap wood and I plan to add an elevator. This was a very fun project and my little one is already making requests for more furniture, pillows, blankets and a TV and video game room for the house.

I only spend about $50 total but that was using the cheapest wood I could find. The floors were made using plywood that was pre-cut at 24" x 24" . This project was a big hit with my little one. Thanks for the plans Ana.

Estimated Time Investment
Weekend Project (10-20 Hours)
Recommended Skill Level
Beginner

Shanty Patriotic Square Planter

Submitted by Sue Hill on Sun, 05/20/2018 - 13:50

I loved the design of this planter and have been making wood quilts. This was a natural combination, incorporating a red, white & blue Americana quilt design into the front panel. The only modification I made was that the boards were 14" long instead of 15 3/4".  This way the 1x4 boards could create square sides. I also made the 2x2 corner posts 20" high.

Built from Plan(s)
Estimated Cost
$15.42 not including the paint.
Estimated Time Investment
Afternoon Project (3-6 Hours)
Finish Used
Rust-Oleum spray paint, I used painters tape to mark off the design for each color.
Recommended Skill Level
Beginner

Comments

Ana White

Tue, 06/05/2018 - 14:48

Love the paint on this planter!  Thanks so much for sharing a brag post, much appreciated! Ana

Seasonal And Holiday

Just one of many Honey to Do projects

Submitted by Anonymous (not verified) on Tue, 04/26/2022 - 04:53

My wife wanted a patio set and I initially made a set using pallets but I knew I could make a better one so after seeing one Ana made on Pinterest I went to work. I have now painted it white and my wife will be make the cushions for it as I made it a little wider than the actual plans called for.

Comments

Just what my little readers needed!

Submitted by hoffer5353 on Tue, 07/05/2011 - 21:44

This was the first project in many years and I was pleasantly surprised how easy it was. I am so happy with the results. It was a great starter project to get me excited to do more projects.
This book shelf can be done even cheaper had I left the base trim off. It would have looked fine without it as well.

Thanks for the great plans!

Built from Plan(s)
Estimated Cost
Less than $30.00
Estimated Time Investment
Afternoon Project (3-6 Hours)
Finish Used
Unfinished pine currently. I am hoping to use Minwax-Red Oak, Minwax-Polyurethane-Semi Gloss, to match the full size simple bed that I made for my son.
Recommended Skill Level
Beginner

Functional Mudroom with Tons of Storage

I was inspired by the Cutest Mudroom project. Our previous mudroom didn't work for us at all. There was wasted desk space and not enough storage. It was also a mis-match of cupboards, and without a window in the room, the wood and wall color made the room feel small and dark. We ripped out the previous shelving and desk and repainted a light blue color. I drew up plans based of the plans here to maximize our storage space. My husband and brother-in-law built the custom bookshelf towers on each side. We went all the way to the ceiling to maximize storage. I also decided to add cupboards across the top. We painted the entire thing white to keep things bright. We made the bench into a lift-top for storage of winter hats and mittens inside the bench. I upholstered the bench with fabric from Jo-Anns and found bright orange pillows at Linens and Things to give the room a pop of color. We put doors on the top and bottom cabinets and left the rest of the cubbies open and used fabric storage bins to keep everything organized. I love the touch of wainscoting in the middle and the hooks in the middle are for the kid's coats and backpacks. In the center of the whole unit is our family messaging and mail system.

Built from Plan(s)
Estimated Cost
500
Estimated Time Investment
Week Long Project (20 Hours or More)
Finish Used
Behr paint and primer in one from Home Depot, color: Frost
Recommended Skill Level
Intermediate

Rustic DIY kitchen island 24 x 42

Submitted by Anonymous (not verified) on Mon, 05/02/2022 - 17:48

I built this for a friend so it will work for his kitchen….and he just loves it!

Comments

Play sink and stove (modified)

Love this site! My grandaughters were coming to stay and I was in the process of making a playroom/bedroom for them. I stumbled across this site just in time. I made the kitchen using the stove and sink plans from grace's kitchen except I combined them into one. So instead of having two seperate units, I just combined them together using one side panel for both, (making 3 20" long panels instead of 4) and placed one long countertop and backsplash. I used a candlestick holder (painted red) for the faucet, glued in a 1/2" in. threaded plastic nipple I had from the outdoor sprinkler system, and screwed on a hose for an icemaker for the refrigerator, (found at lowes in the plumbing department (cost 3.99)(I'm a widget girl!!) I love to look for things that could be used for something else. Then walaa, a faucet!!

Estimated Cost
20.00- I had wood leftover from the farmhouse daybed with trundle for the playroom (will upload later)
Estimated Time Investment
Week Long Project (20 Hours or More)
Finish Used
220 grit all/ valspar white primer/ then 220 grit again/ 2 or 3 coats Behr paint in semigloss-swiss coffee/ side panels, trim faucet and oven door, Rustoleum 2x coverage in red. (LOve this spray paint because it goes right where you spray it and covers beautifully!) Had a rough time with the hardware, use eurohinges and save yourself some grief!! I also would (please for the love of all mankind, heed my advice on this one) Cut the sinkhole first before painting and before placing the countertop. I waited until it was all finished and placed in the room before I cut the hole, thinking it would be so simple, made a huge mess and had to reputty with woodfiller and paint over mistakes AGHHH! Used a new dogbowl for sink.
Recommended Skill Level
Beginner

Comments

justagramma3

Fri, 07/08/2011 - 12:43

My color inspiration for this project came from the clabborgirl baking powder tin, (pictured). Just to let you know inspiration can come from just about anywhere!!

Keri Beth (not verified)

Wed, 08/01/2012 - 05:08

I was thinking of doing a combination sink and oven just like this! Yours looks great.

Easy Peasy Garage Shelves

Submitted by NickInHB on Mon, 09/07/2015 - 13:12

This was such an easy project to complete although it did take some time to measure and cut all the boards.  I could only transport 2x4s at 8' so after cutting the height to 6' for the braces I used the extra 2' for the shelf width.  The extra width really helped with some of my storage totes.  I made the first section at 5' in length to handle the heavier totes, and the second section I used the full 8' board with a brace in the middle.  I wish my garage was a little deeper to handle 16' of shelves as it would have saved me a good bit of time.  I'm also glad I have an extra ryobi battery to charge while I assemble.  Gotta love how fast those things charge.  Can't wait to try another one of your plans.

Estimated Cost
Around $130 from the Depot. 2x4 at 8' $2.73 a piece and two boxes of screws.
Estimated Time Investment
Day Project (6-9 Hours)
Finish Used
none
Recommended Skill Level
Beginner

Comments

alipettaway

Sun, 05/31/2020 - 22:32

Awesome job!! I’m wondering if plywood can be used for shelving instead of more 2x4s like on the non free standing garage shelves?

Pallet laundry bin

Submitted by LARMO on Fri, 07/20/2018 - 18:09

Built for our laundry room with pallets radiator cover  and casters attached to bottom all purchase from a local thrift store, with matching recycle bin.

Estimated Cost
$20
Finish Used
Natural
Recommended Skill Level
Beginner

Toy Box for my son

Submitted by KWJ on Tue, 08/13/2013 - 17:57

I had a leftover sheet of 1/2" plywood, so I built this toy box. The pocket holes didn't work very well on the 1/2" plywood, so I added some angle brackets for security, but it's a great toy box, bigger than I had imagined! I had to add a sheet of plywood in the open side because the bottom was too low for my 2 year old--toys kept falling in and he couldn't reach them, but kept trying to climb in after them!

Built from Plan(s)
Estimated Cost
$30
Estimated Time Investment
Afternoon Project (3-6 Hours)
Finish Used
Interior Latex paint with a coat of polyurethane
Recommended Skill Level
Starter Project

iTable as a dining table!

Submitted by dels on Sat, 09/12/2015 - 08:12

I have decided to build the iTable as a dining table last weekend and I am very happy, this is becoming our new dining table! I used 6x6 for the legs and stained with ebony stain, and protected with 3 coats of polyurethane.

Built from Plan(s)
Estimated Cost
150$
Estimated Time Investment
Weekend Project (10-20 Hours)
Finish Used
Sprayed the stain, removed the excess after 2 minutes like the instruction said.

applied polyurethane with a brush.
Recommended Skill Level
Intermediate

Bedroom Dresser

First time using drawer slides, and what a learning curve it was! The color is Varathane Weathered Wood Accelerator. This piece is huge and heavy! Absolutely love it and rebuilding other bedroom pieces to match this color. I also built a matching dresser which is taller and much more narrow. It can be found here: http://www.ana-white.com/2018/08/DIY_furniture/tall-bedroom-dresser

Estimated Cost
$200-$250
Estimated Time Investment
Weekend Project (10-20 Hours)
Finish Used
Varathane Weathered Wood Accelerator, Varathane Poly
Recommended Skill Level
Advanced

Comments

Outdoor sofa next to the fire

Submitted by Anonymous (not verified) on Sun, 05/22/2022 - 00:53

My husband loves seating on this sofa while reading his scriptures or sometimes to take a nap. I got the cushions and pillows from Ikea. I can't wait to build another one or two, possibly with my sister-in-law. Thank you for the tutorial :-)

Built from Plan(s)

Comments