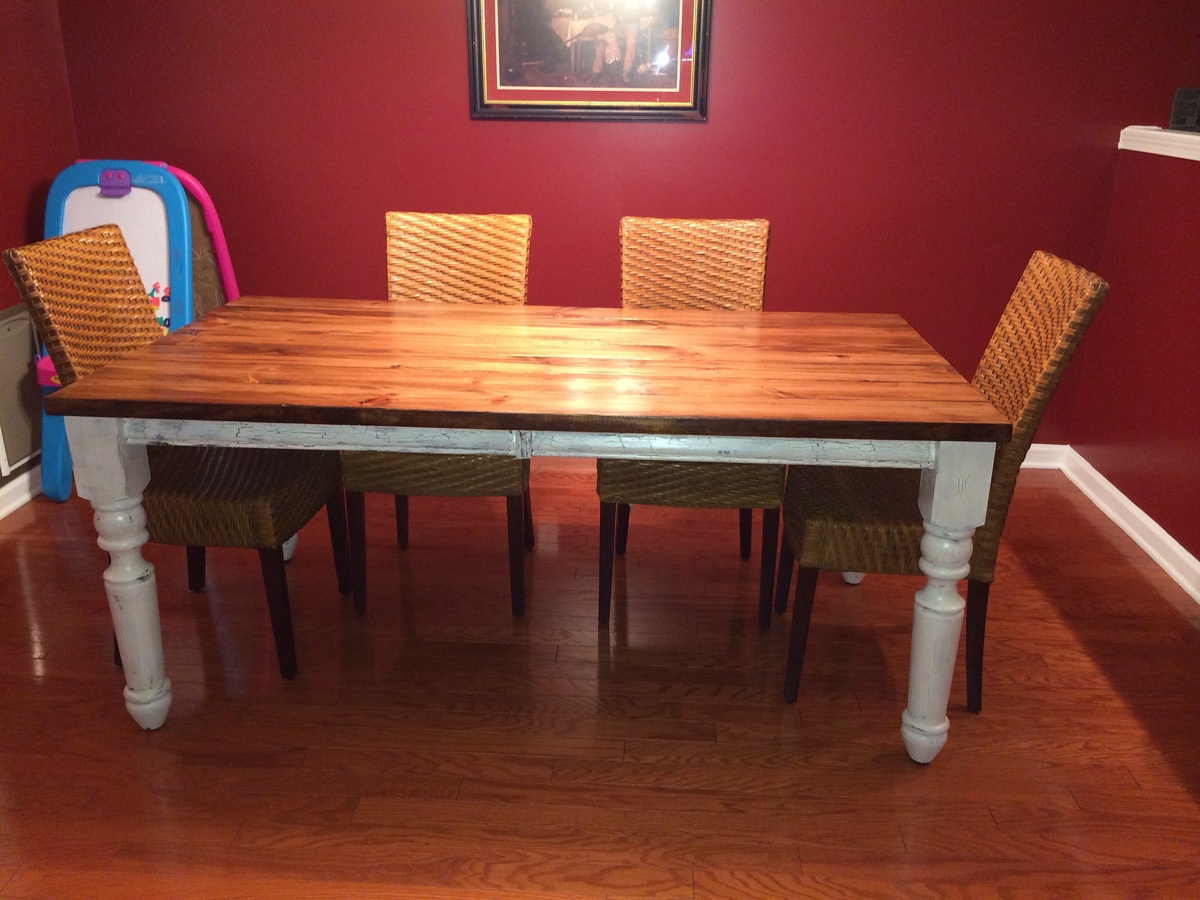
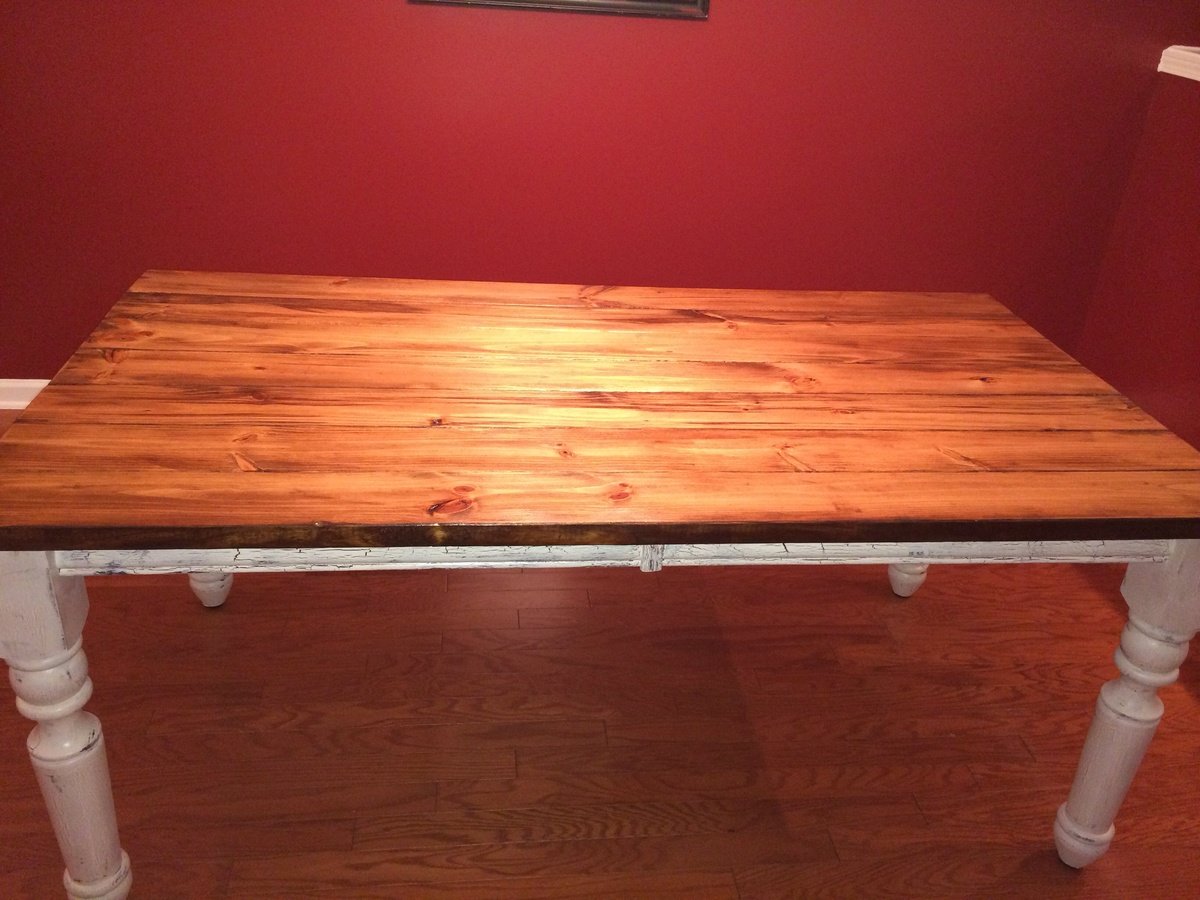
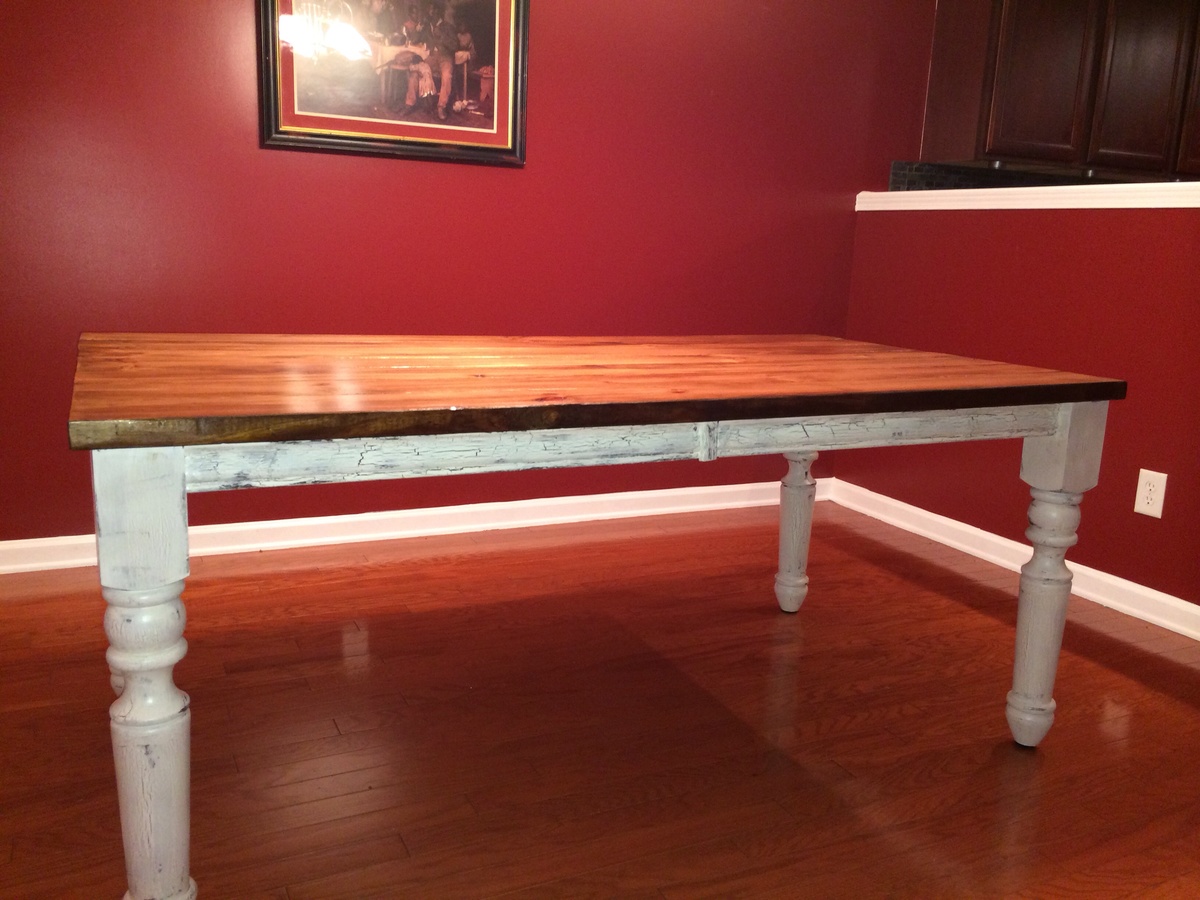
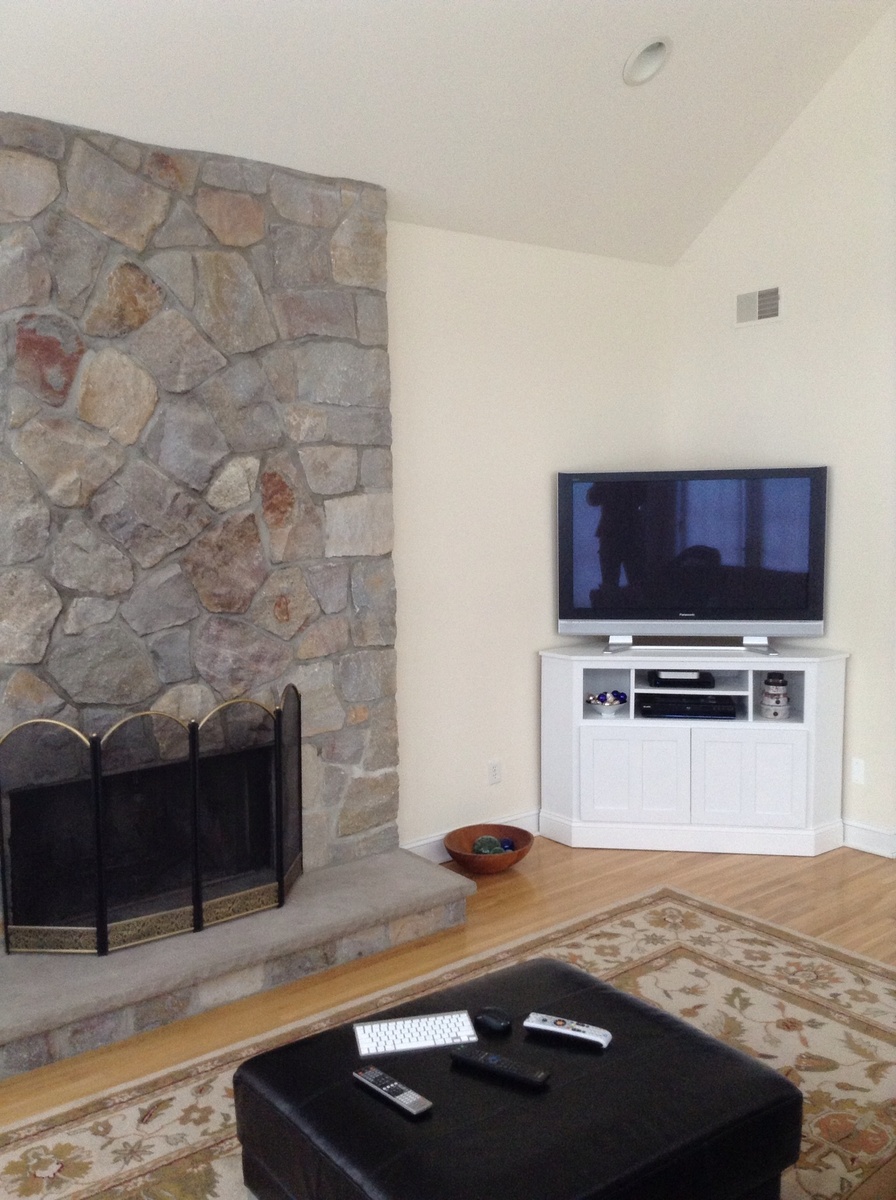
Community Brag Posts

Corner TV stand

Submitted by TBarn on Tue, 01/21/2014 - 12:41

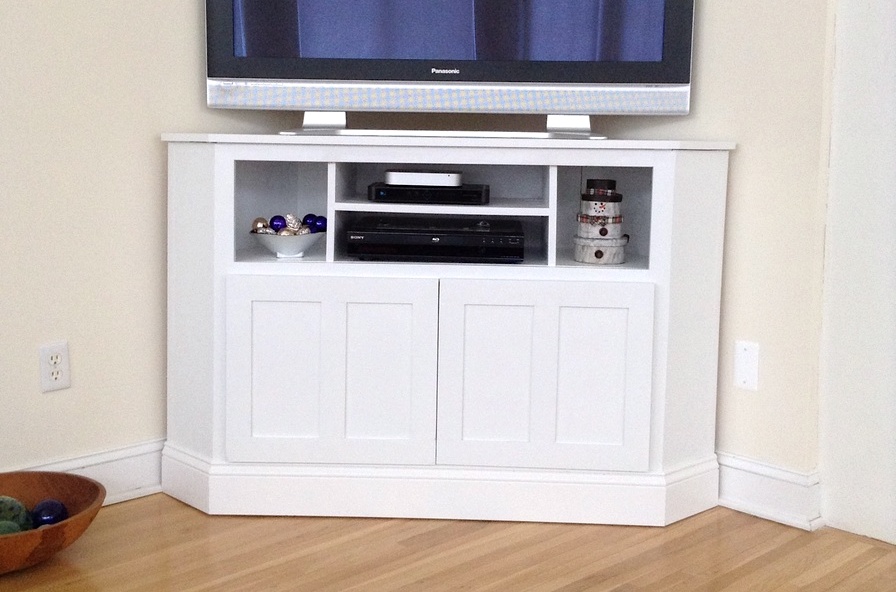
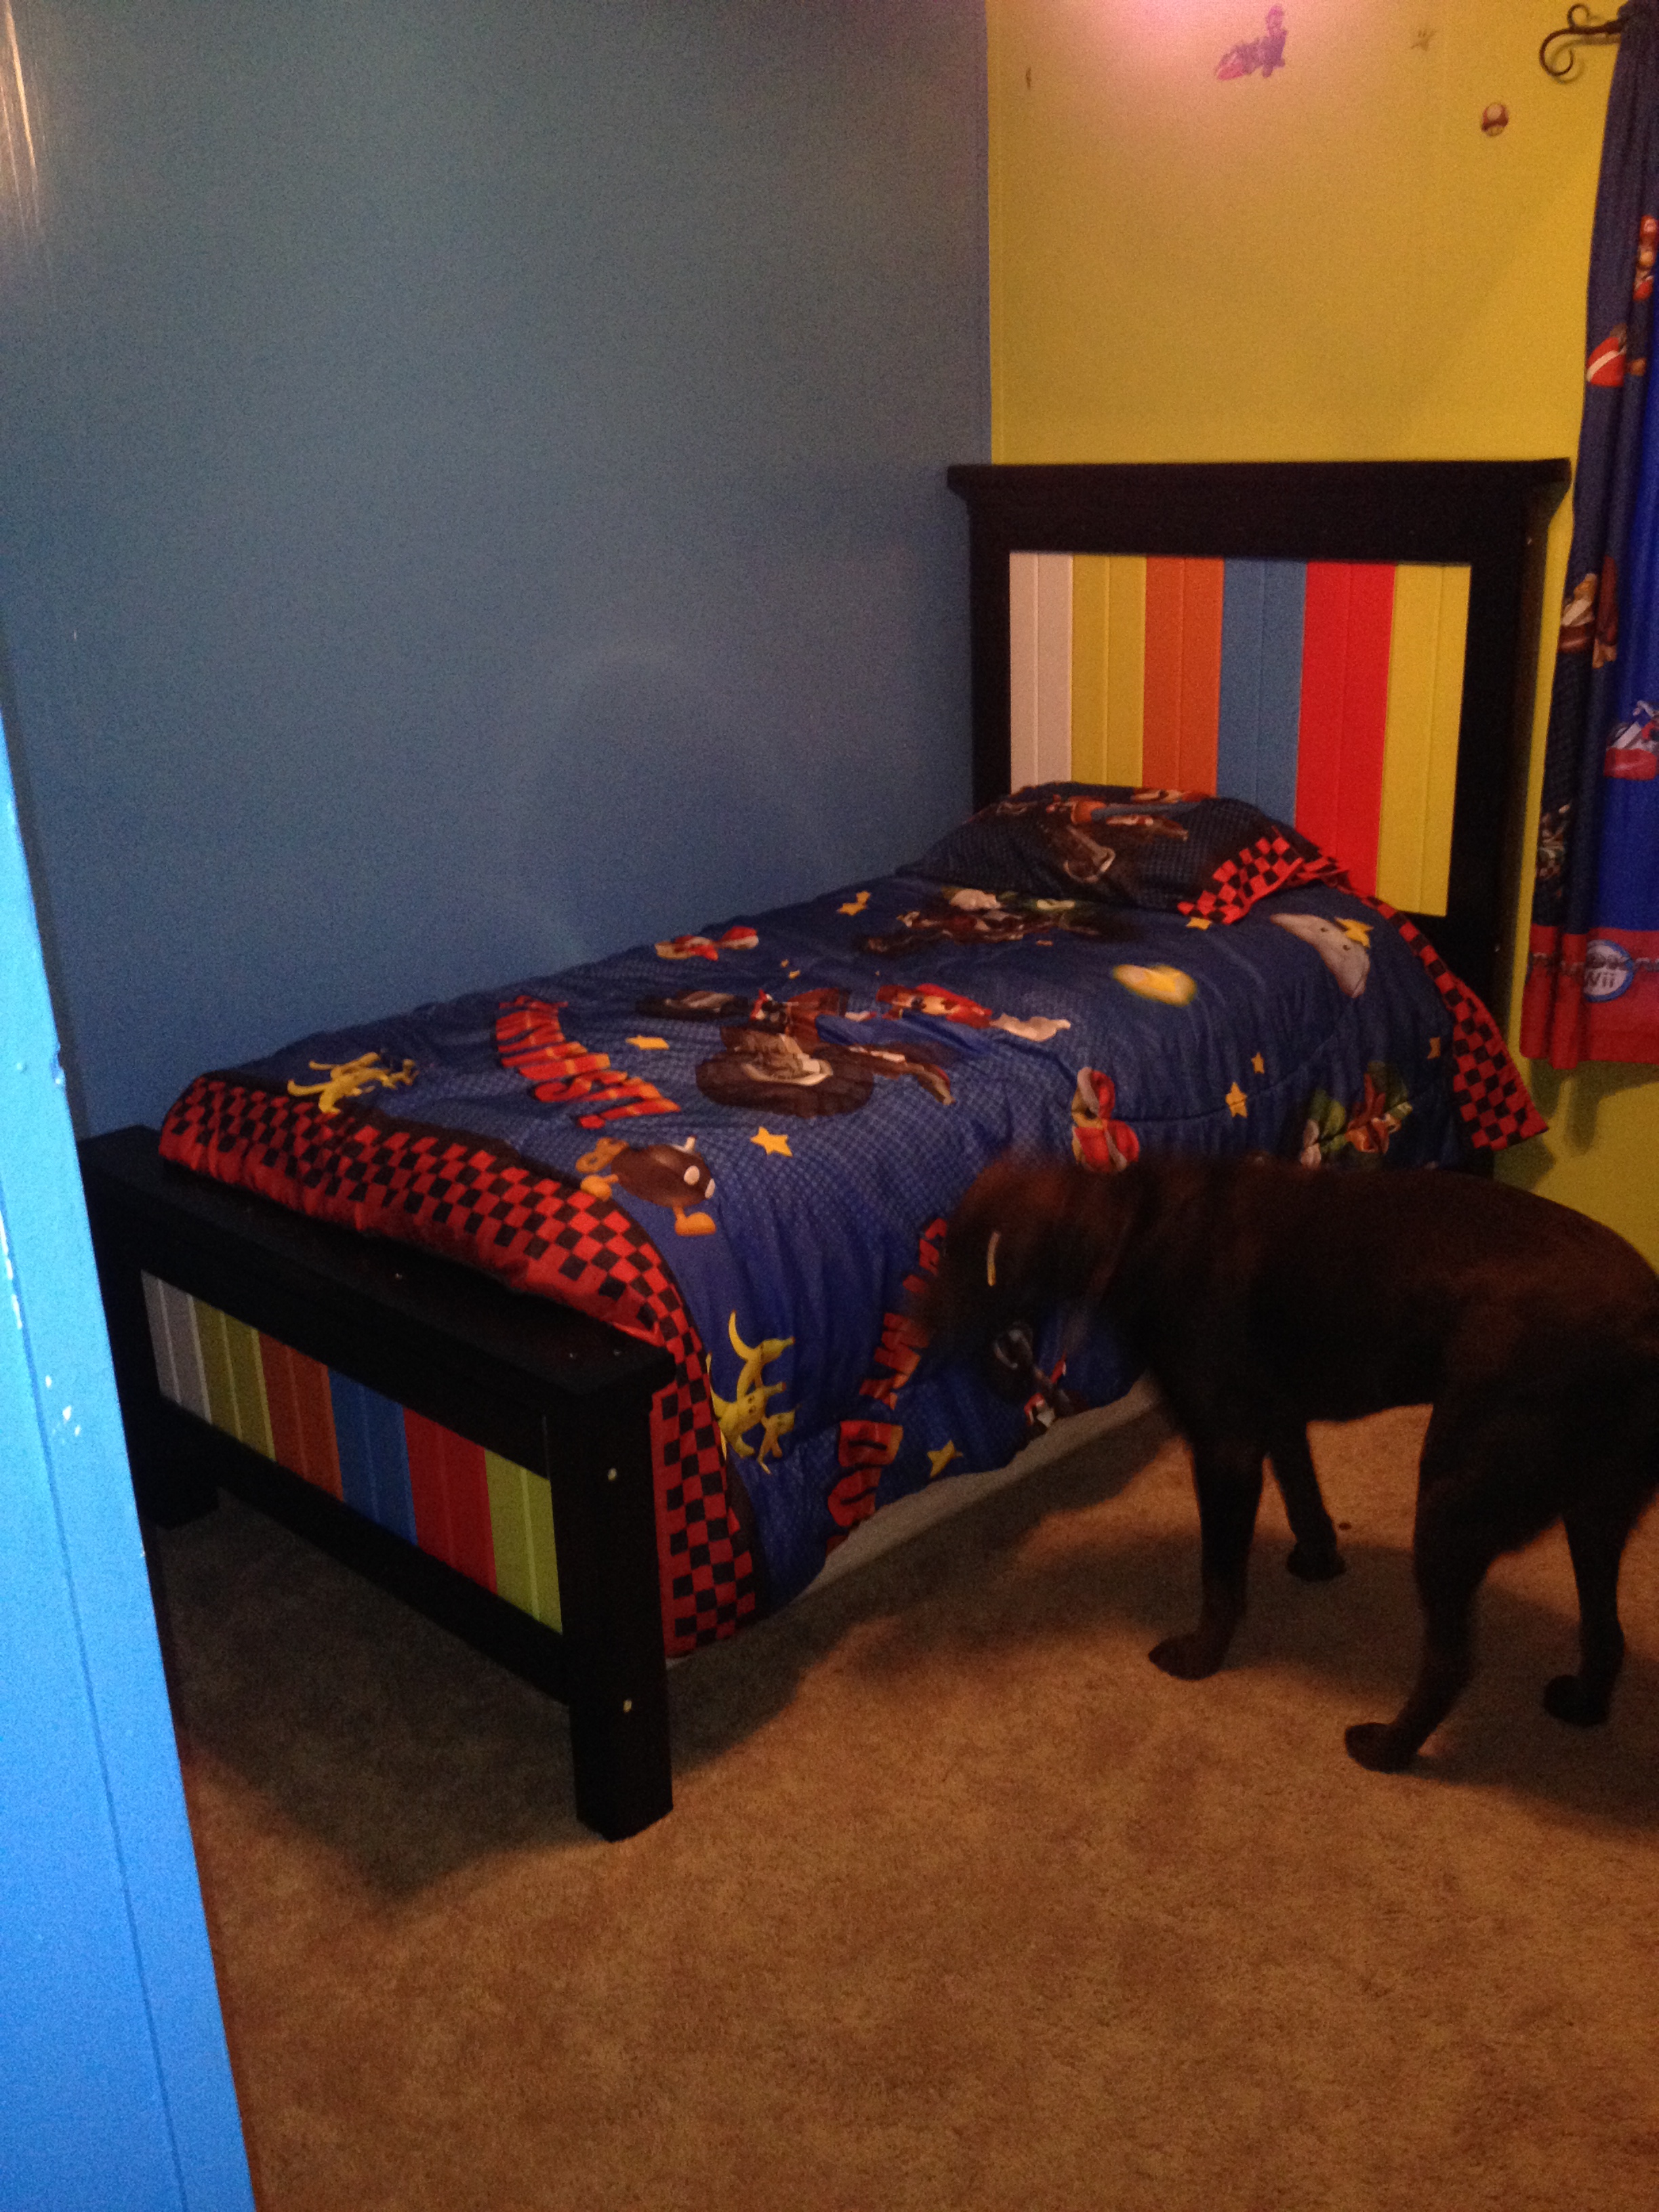
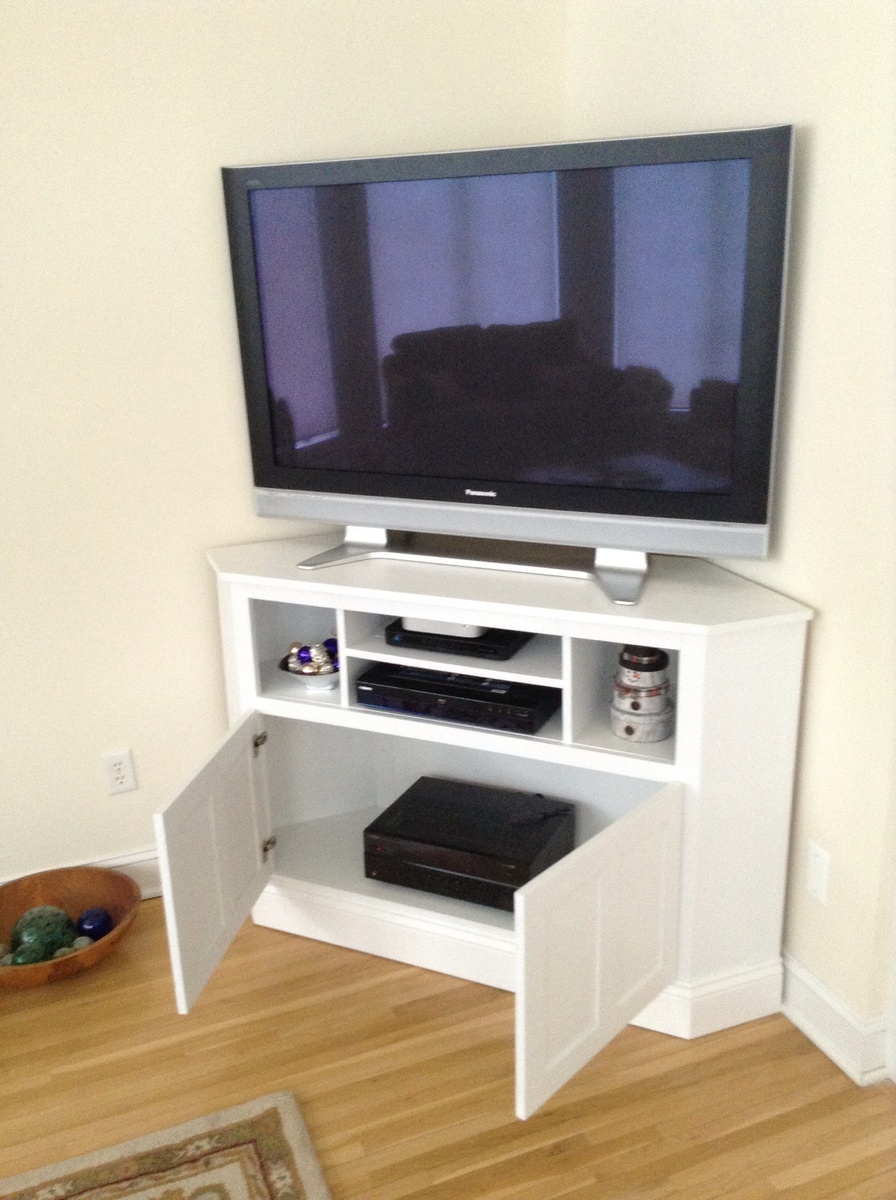
After a promise to get a new carpet and TV stand as an anniversary gift, I began a search for a corner stand that would fit a 50" flat screen and hid all of those ugly wires. Craig's List had nothing and the retail options were either cheaply made, ugly or crazy expensive. I stumbled upon Ann's page, and since my son has a wood shop in the basement, I figured why not try to build something. I used the original plan, but borrowed ideas from other brag posts to create a 36" tall model with overlay doors that we think looks great. Next project: bar stools for the kitchen island.

Built from Plan(s)
Estimated Cost
$200
Estimated Time Investment
Weekend Project (10-20 Hours)
Finish Used
Zinder Primer and Gidden (America's Finest) Semi Gloss
Recommended Skill Level
Intermediate

Faux Oars

Submitted by Smooter on Thu, 04/14/2016 - 10:13

Built these Ana White Faux Oars out of scrap pine. I experimented with the finish, trying to make a more weathered look. I used Minwax Special Walnut and Jacobean and white washed. I also rounded the edges using a router and orbital sander. Easy and fun project!

Built from Plan(s)
Estimated Cost
Free
Estimated Time Investment
An Hour or Two (0-2 Hours)
Finish Used
I used Minwax Special Walnut and Jacobean and white washed. I also rounded the edges using a router and orbital sander.
Recommended Skill Level
Beginner

Lego and Art Table

Submitted by ahicks6 on Fri, 12/27/2019 - 08:57

I looked everywhere for a Lego table that would fit my needs and not be super expensive, but I kept coming up with nothing. So I decided to make my own and to make it a place for my kids to do their art as well.

This was my first time using a Kreg Jig as I wanted it to be really stable. I found the drawers at The Container Store. They house all of the color coordinated Legos together.

It has been amazing so far and I'm so glad I didn't settle for any old Lego table on the market that didn't suit our needs. 

If you want more info regarding sizes, cut list, etc, let me know and I'll try to post them. 

Estimated Time Investment
Weekend Project (10-20 Hours)
Finish Used
Homemade chalk paint, Minwax Red Chestnut stain, Rustoleum Clear Enamel Spray
Recommended Skill Level
Intermediate

Benchwright Farmhouse table and bench

I started this Table and bench because, we have a one year old and we had a bar height table. Something a little shorter was needed, so I picked the Benchwright plans since they were most like our style. I used all white wood from Lowes and some pine 2x4's. Since the original plans made the table a little too large for our house I shortened the length on the table and bench by 15". This was the largest project I have done so far, but the plans are so easy to use, that the major time spent for me was getting the wood, and sanding and staining. I submitted the last picture here, because I originally picked out a Rust-oleum Sunbleached stain, or so it said. As you can see from the photo it just made everything grey, and was not the look I or my wife were looking for. I recommend very carefully picking a stain color out and testing it on similar wood before using it on your finished project. I spent two hours after this mistake sanding off the stain, and since it was grey it still shows through a lighter color. In the end we are both happy with the final product, and you don't learn until you try and mess-up a few times. I really had a lot of fun with this project, and can't wait for the next thing to build.

Estimated Cost
$200
Estimated Time Investment
Day Project (6-9 Hours)
Finish Used
Minwax-Ipswich Pine 221(two coats on table)(One coat on bench), Minwax-Bombay Mahogany Satin 380 (one coat left on for 15 mins on cross members)
Recommended Skill Level
Intermediate

Comments

Britterz (not verified)

Wed, 04/18/2012 - 11:43

Wow! Your table looks spectacular! Great job! I especially love that bench. I would like to build a bench to go with my benchright table. How did you do it?

dklunde

Wed, 05/30/2012 - 11:25

I dont see any screws on the ends of the planks into the top of the table.
Did you only screw up from the bottom? Did you do that on the plank ends
also?

Thank you for the in process photos too. It really helps alot. Also helps to
see that everything doesnt have to match up perfect seam-wise. I get too used
to manufactured stuff...and forget how beautiful hand made items can be
simply because of their imperfections in the woods.

In reply to by dklunde

Kevin.Leach

Wed, 06/06/2012 - 19:59

I used finish nails from the top into the structure, and then used wood filler to
Fill in the holes. The ends are only held on by the two bolts on the ends.

I appreciate the handmade quality of real wood furniture as well. Even when small mistakes are made here and there, the end result is something to be proud of.

dklunde

Wed, 05/30/2012 - 11:26

Sorry...just thought of another question.... Did you glue in between your planks?

In reply to by dklunde

Kevin.Leach

Wed, 06/06/2012 - 20:10

I did glue between the planks and underneath, I figured anything to keep the boards closer together and fill in the gaps would help.

Lego Farm House Bed

Submitted by Mamabear2 on Thu, 01/23/2014 - 07:32

we recently used the plans for the farm house twin bed, and created it with our own little twist for our 3 year old son! Instead of the normal slats we used car siding to create the "blocks" for my Lego vision. The bed is stained with a black gel stain by min wax, and the slates are painted from colors I picked out a Lowes. I wanted him to have a matching bed to his dress. I got this really neat dresser from a friend and I stained the out side and painted the draw fronts bright colors like Legos. our next project for his room will be night stands and possibly a bookshelf

Estimated Cost
150.00
Estimated Time Investment
Weekend Project (10-20 Hours)
Recommended Skill Level
Beginner

Comments

Greenhouse Build

Submitted by Chris Rose on Tue, 12/31/2019 - 18:43

A microburst storm destroyed my first green house (last pic). I wanted something that would be stronger, I found Ana's plan and built a replacement. Was able to recycle some of the metal channels and panels from the destroyed one to cover the end sections and the door.

Workbench Console Table

Submitted by DadsShop on Tue, 04/10/2012 - 17:37

Built this table over the weekend with the intention of selling it. My wife isnt so sure she wants to let it go now though! I used a 2 in 1 stain and poly that i am not happy with the results of. From now on im going to stick with the tried and true method of doing the stain and finish seperatly. Overall, i like the plans and will probably build a few more of these to sell.

Built from Plan(s)
Estimated Cost
125.00
Estimated Time Investment
Weekend Project (10-20 Hours)
Finish Used
Minwax 2 in 1 Dark Mahogony
Recommended Skill Level
Intermediate

DIY Farmhouse Table

Submitted by tnkrise2 on Sat, 01/25/2014 - 20:21

DIY farmhouse table built by my wonderful husband. We used legs from Osborne wood and the apron and legs were stained and antiqued using a crackle glaze and antique white paint. Love it. The plans were great. Our cost was high because we had to purchase a kreg jig. But it will get a lot if use. Next project will be the corona coffee table-square

Estimated Cost
450-500
Estimated Time Investment
Week Long Project (20 Hours or More)
Finish Used
Same as recommended in the plans.
Recommended Skill Level
Beginner

Tk u for all ur designs

Submitted by Cgovalle on Tue, 04/19/2016 - 15:05

Needed shelves for my shed. Ur design fit the bill. Cannot wait to make more

Estimated Cost
$70
Estimated Time Investment
Afternoon Project (3-6 Hours)
Recommended Skill Level
Beginner

Comments

Bedside Table

Submitted by AlHoward on Sat, 04/14/2012 - 10:18

Easy!

Built from Plan(s)
Estimated Cost
$55
Estimated Time Investment
Afternoon Project (3-6 Hours)
Finish Used
Painted one coat of semi gloss and sanded.
Recommended Skill Level
Beginner

Started with plans, then...

Haven't quite finished this, but here it is all put together. I started with her plans then changed then dramatically. I wanted a 60x60. So I added 17" to the sides. Required me to buy 10' boards instead of 8' boards. When building the base I added 17" to the lengths since that is what I did for the top. I left the center post the same height since I wanted a regular height table.

When it came to the top, I didn't want to do the 1x4, instead I have 2x4 and 2x6 in there. Making the crosses in the squares added lots of time, but it was well worth it. Not sure how many hours I have into this, but its a lot. Materials is right now about $130.

I'll update more when finished.

Recommended Skill Level
Intermediate

Comments

MSteed7931

Sat, 01/27/2018 - 11:01

Just found this.  This looks great.  Thanks for the additional information on the changes you made for your table.

My first shot at furniture making! I'm hooked now!

Submitted by Anonymous (not verified) on Sat, 04/23/2016 - 09:26

My first shot at furniture making. Two benchright farmhouse tables. Made from reclaimed lumber I found in my barn and poplar milled by Wayne my neighbor. Thanks Wayne and Anna White. These are in the dinning room of our Country Road House B&B located Clendenin WV. Look us up, stay and eat breakfast on these tables!

Estimated Cost
$25 parts. Lumber free. New tools.... Well....
Estimated Time Investment
Week Long Project (20 Hours or More)
Finish Used
Mahogany gel stain by minwax. Water based poly also minwax. Exterior house paint for legs and sides.
Recommended Skill Level
Beginner

Comments

Fancy Jewelry Box

Easy to make and made an amazing Christmas Gift. 

Estimated Cost
$100
Estimated Time Investment
Weekend Project (10-20 Hours)
Finish Used
Minwax Dark Walnut Stain
Recommended Skill Level
Beginner

Work Bench

Submitted by mrsg08 on Tue, 04/17/2012 - 08:48

I followed the directions to a "T" from the originial post, but some of the cut list specifications were off. I purchased an already finished sheet of wood for the top and ended up making a full shelf for the bottom.

Super excited to start on my list of projects now that I have a work bench.

Built from Plan(s)
Estimated Cost
$40
Estimated Time Investment
An Hour or Two (0-2 Hours)
Recommended Skill Level
Starter Project

Comments

Sweet Pea Bunk Bed Plans turned into a dream for our Little Girl

Submitted by ShushiGirl on Thu, 01/30/2014 - 09:01

We loved the Sweet Pea plans so much but we didn't need bunk beds. We turned it into a loft bed with a playhouse underneath. We also inverted the shelves on the stairs to be inside the playhouse due to her room size. Added a second roof and window boxes. This project was fun and took us 10 days to complete. Thank You so very much for sharing these AWESOME plans!!

Estimated Cost
$1100.00
Estimated Time Investment
Week Long Project (20 Hours or More)
Finish Used
We used Baer Premium Paint sold at Home Depot
Recommended Skill Level
Intermediate

Comments

junior2725

Sun, 02/02/2014 - 22:11

I am looking at making this for my daughter and I also want to do a playhouse on the bottom as she is a single child. Did you just extend the opening to the bottom bunk to the floor and then extend the bottom windows down some to let in more light? Also, I love the idea of switching the storage from the stairs to inside the playhouse. If possible could you elaborate on how you did this. Thank you.

ShushiGirl

Tue, 02/04/2014 - 15:46

We omitted the bottom bunk and took it straight to the floor. We left the side panel clear but the frame until we built the stairs then added trim & side boards around the cubbies.

nadia37

Sat, 05/24/2014 - 07:51

First of all, what an amazing job on your build! I was looking for ideas for a playhouse and I will be modifying the plans for Sweet Pea Bunk beds and your build let's me know how get it can be. But what colors did you use? The look great together!

E81firegirl

Sun, 07/17/2016 - 14:49

I love the changes on this!  I had a question.  What did you use for the roof and is the lower roof section built to the same specifications as the upper roof?

My daughters Castle Bed

Submitted by bartdiy on Wed, 04/27/2016 - 11:53

The plan for this great castle bed on this blog inspired me to make this castle bed for my daughter Elise. I basically just followed this plan and adjusted it to my own idea:
http://www.ana-white.com/2011/10/plans/castle-loft-bed

Thanks very much for all the great ideas!

Bart
The Netherlands

Estimated Cost
€350
Estimated Time Investment
Week Long Project (20 Hours or More)
Recommended Skill Level
Intermediate

Kennedy's Christmas Surprise

Submitted by Anonymous (not verified) on Mon, 01/20/2020 - 07:37

My granddaughter had been wanting a loft bed for well over a year. We decided after a year it wasn't just a phase so I went to Ana's website and got the plans. Can't thank you enough Ana! Easy to follow instructions, sturdy finished product and most of all a VERY HAPPY granddaughter! We call that a Win/Win.

Built from Plan(s)
Estimated Cost
$170
Estimated Time Investment
Day Project (6-9 Hours)
Finish Used
Valspar White
Recommended Skill Level
Beginner

Rough Sawn Spruce Dining Table!

Submitted by Anonymous (not verified) on Mon, 09/18/2023 - 09:01

This was really fun! Actually used Spruce from a tree on my property that I had cut down and taken to a Saw Mill 6 Years ago. Been in the barn drying. The rough sawn boards were only 1.25 thick after the planer I could only maintain 1.00”. Extended the length of the table to 10’. Decided to reverse the underneath support angled boards to add support to the center of the table due to the added length and only 1” thick boards. Used biscuit joints to add strength and alignment. We love it at the lake home!


Matt Menges

Built from Plan(s)
Back