Community Brag Posts


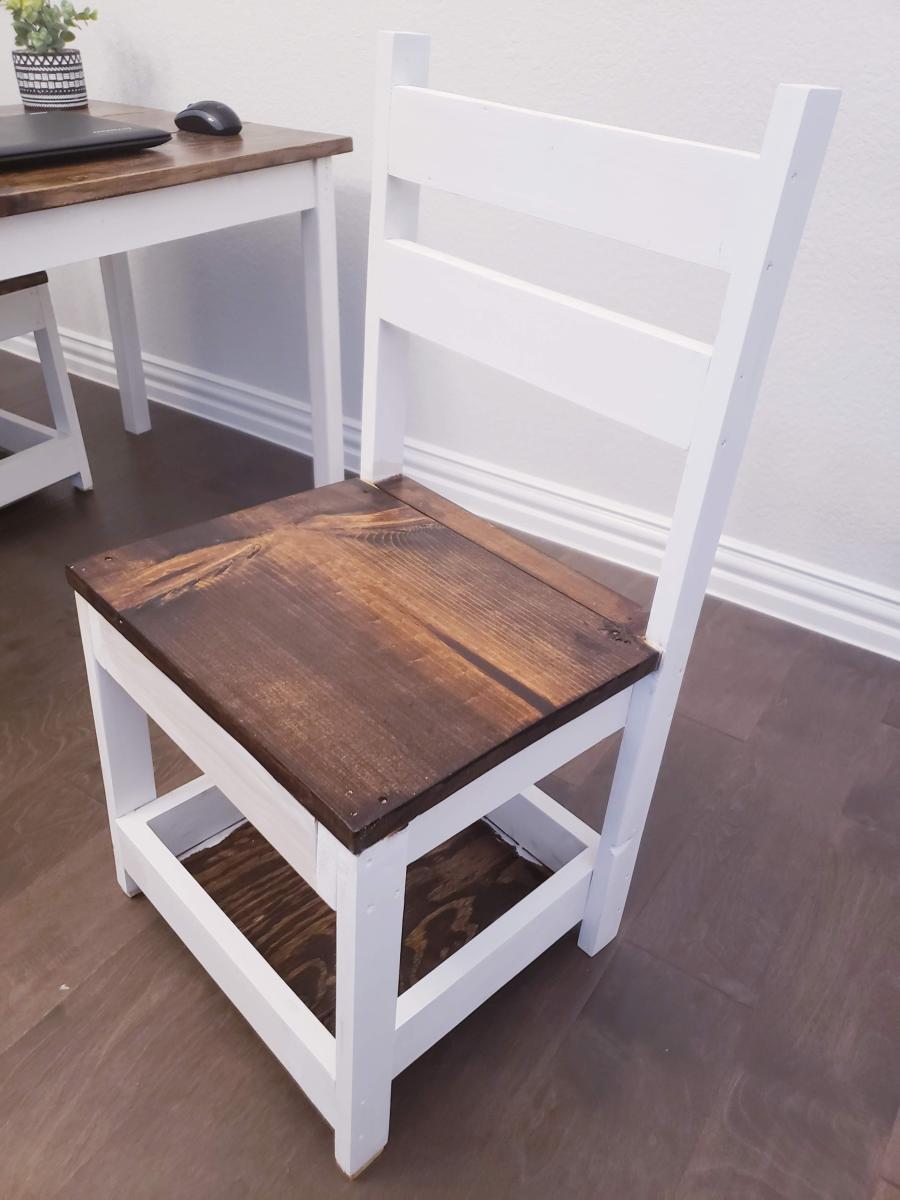
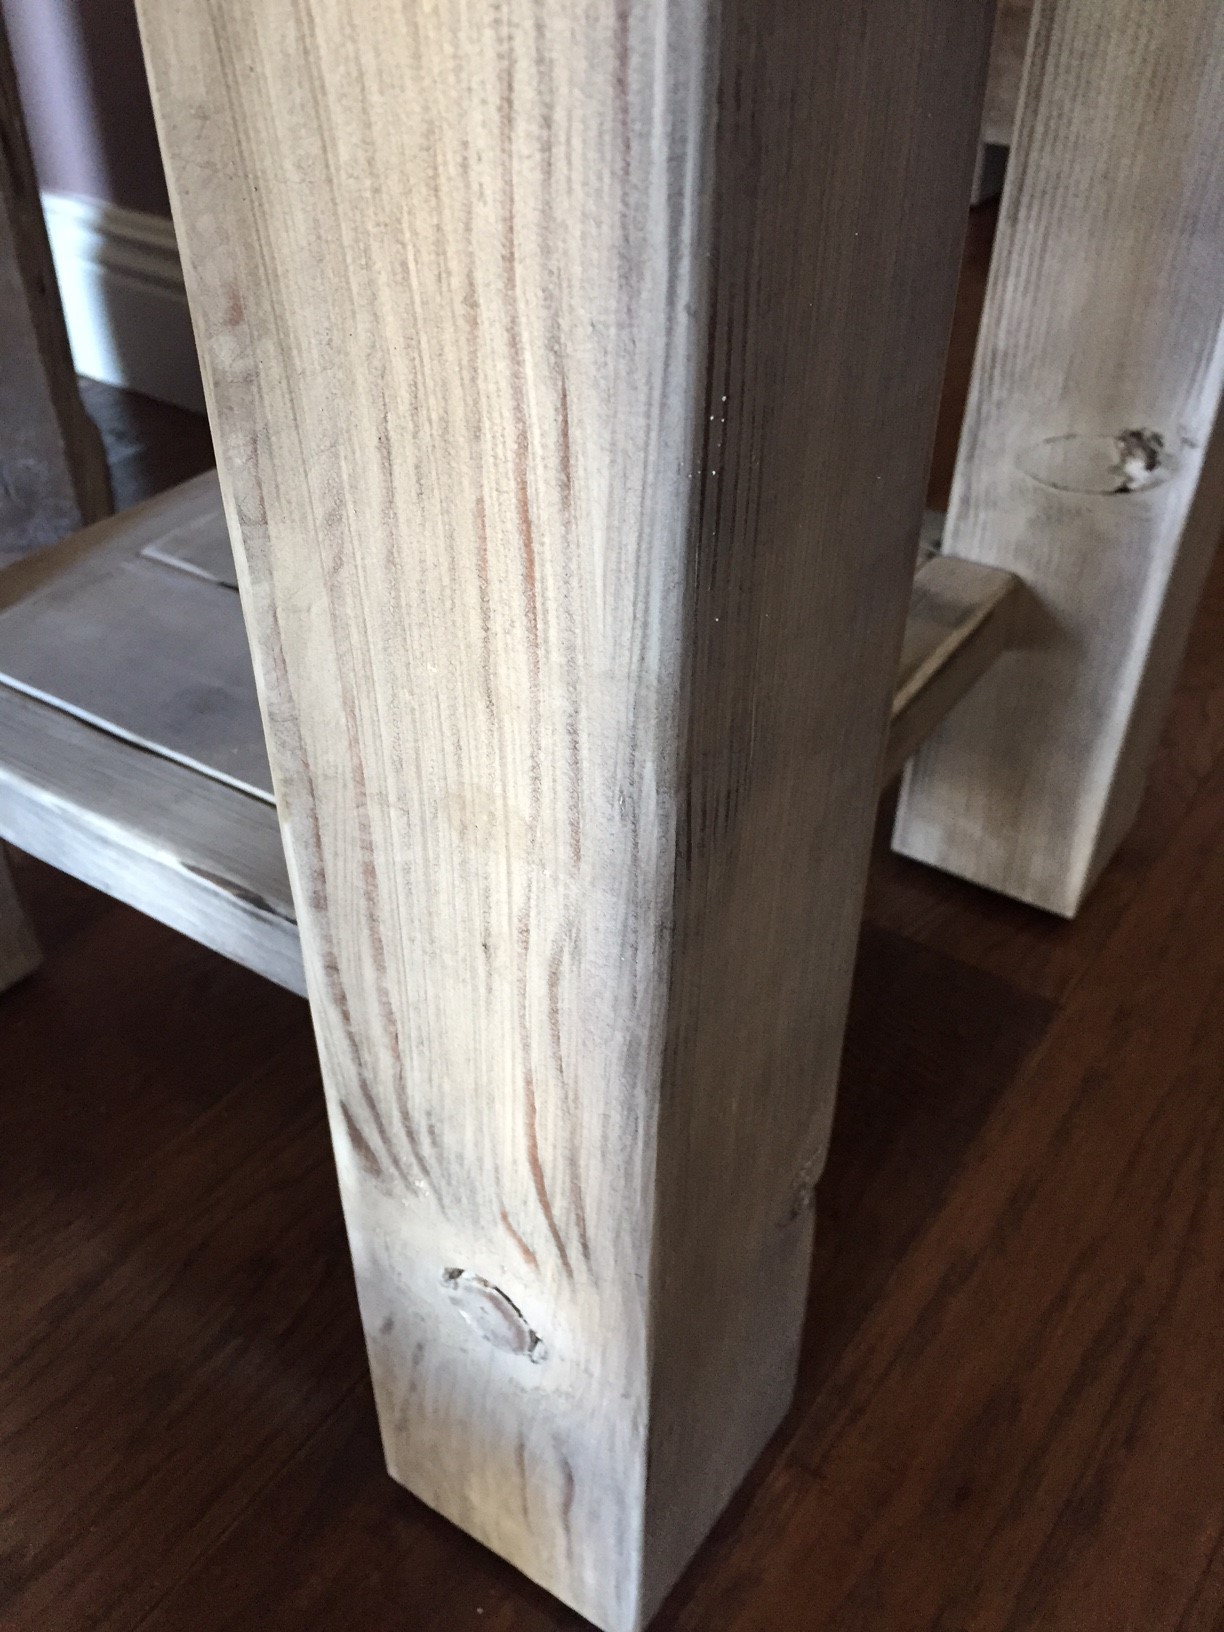
Kids table with chairs/storage
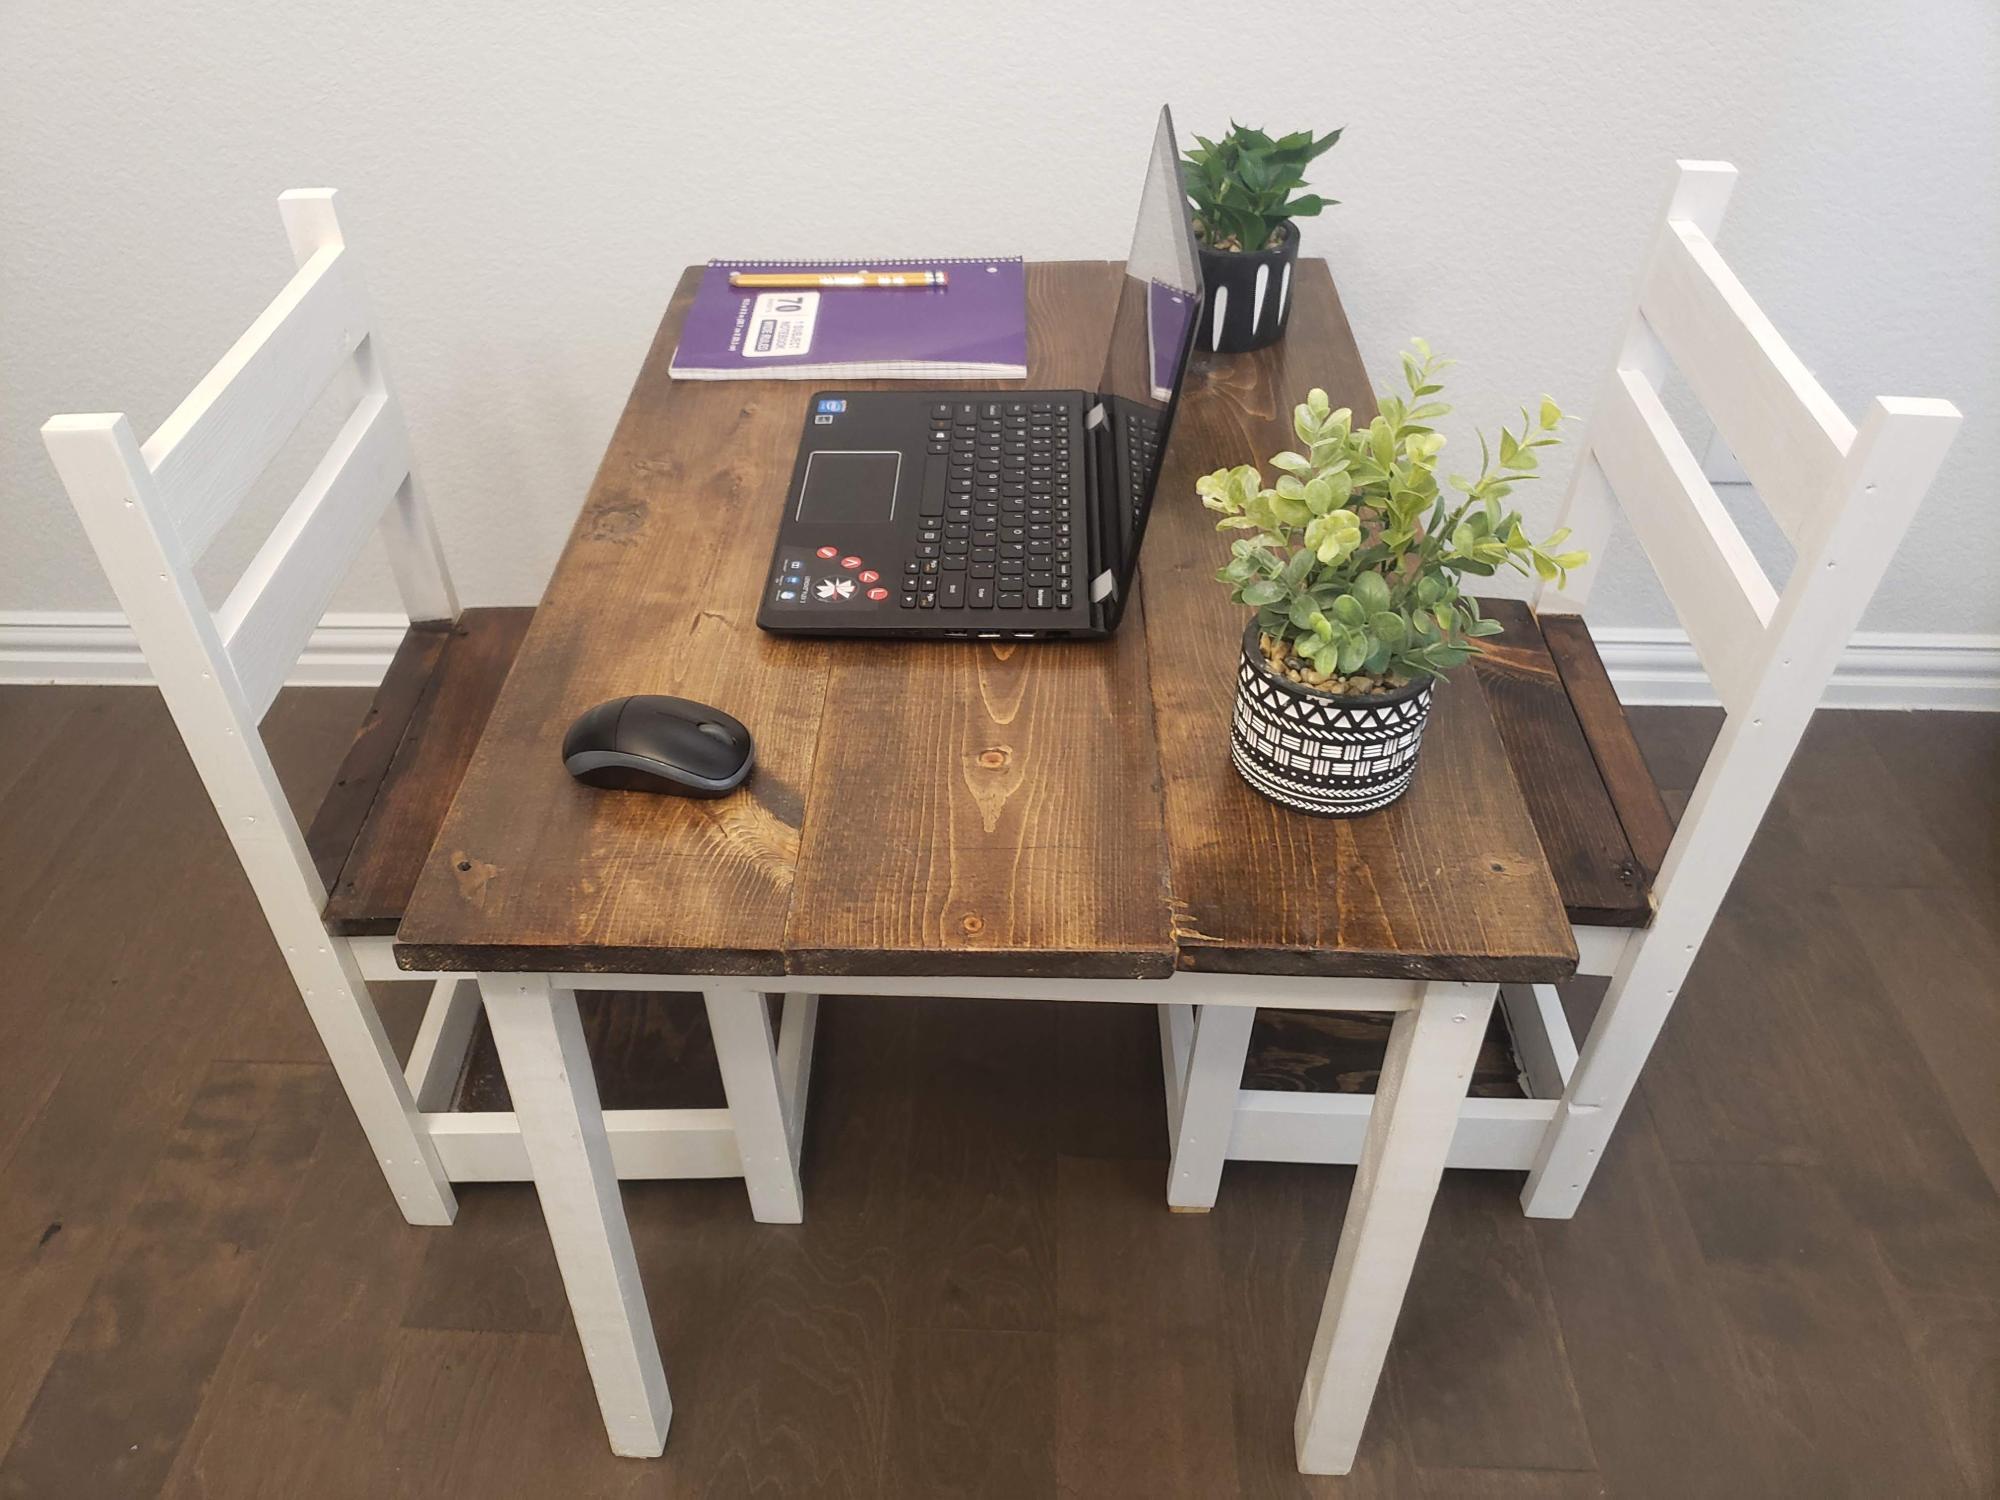
I love woodworking and trying different techniques...Thank you Ana for the detailed plans!..My niece loves it
Built from Plan(s)
Comments
Mon, 12/27/2021 - 22:21
Such a nice little set!
Awe, love this, it looks great! Thank you for sharing:)
Modified Subway Tile bookcase
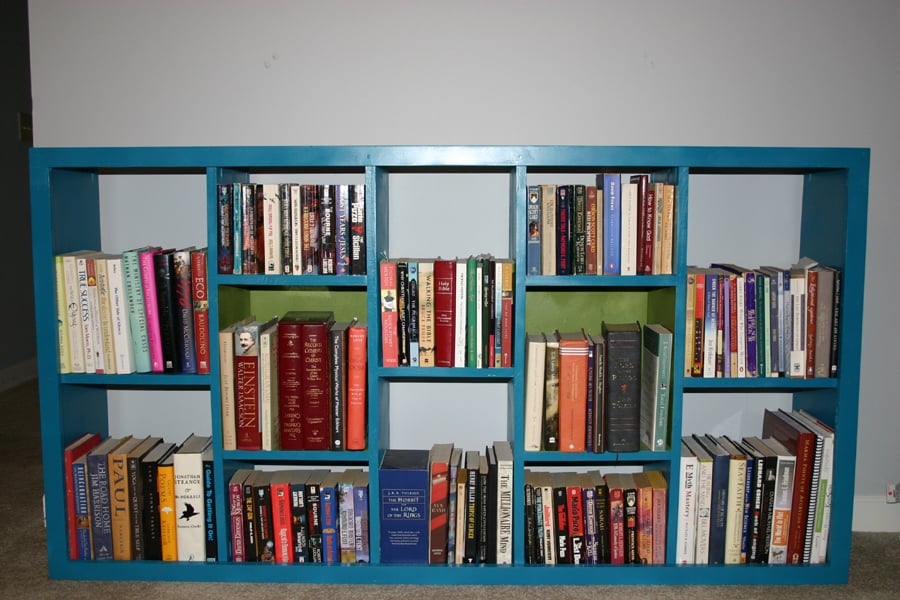
The next part of the master bedroom makeover is finished! This is by far the most square project that I have done to date, and the first one that is built almost entirely with the kreg jig. I LOVE that tool--thanks Ana for letting us all know about it!
I modified this in length and width, and omitted the footer at the bottom. I built this (at Dh's suggestion) in such a way that it could be turned vertically. You would see a few of the pocket holes, but not much. Other than that, it was built to the plans.
Sanded, woodfilled, sanded, sanded...primed and painted. I used spray paint--Rustoleum this time. I am the world's worst photographer--it's just not my skill set!
Built from Plan(s)
Estimated Cost
~70.00 for the wood and paint/primer. All else I had on hand.
Estimated Time Investment
Day Project (6-9 Hours)
Finish Used
Rustoleum primer and paint--ultra cover satin in Lagoon and Eden(green). Several thin coats applied.
Recommended Skill Level
Beginner
Fireman's Dog Bed
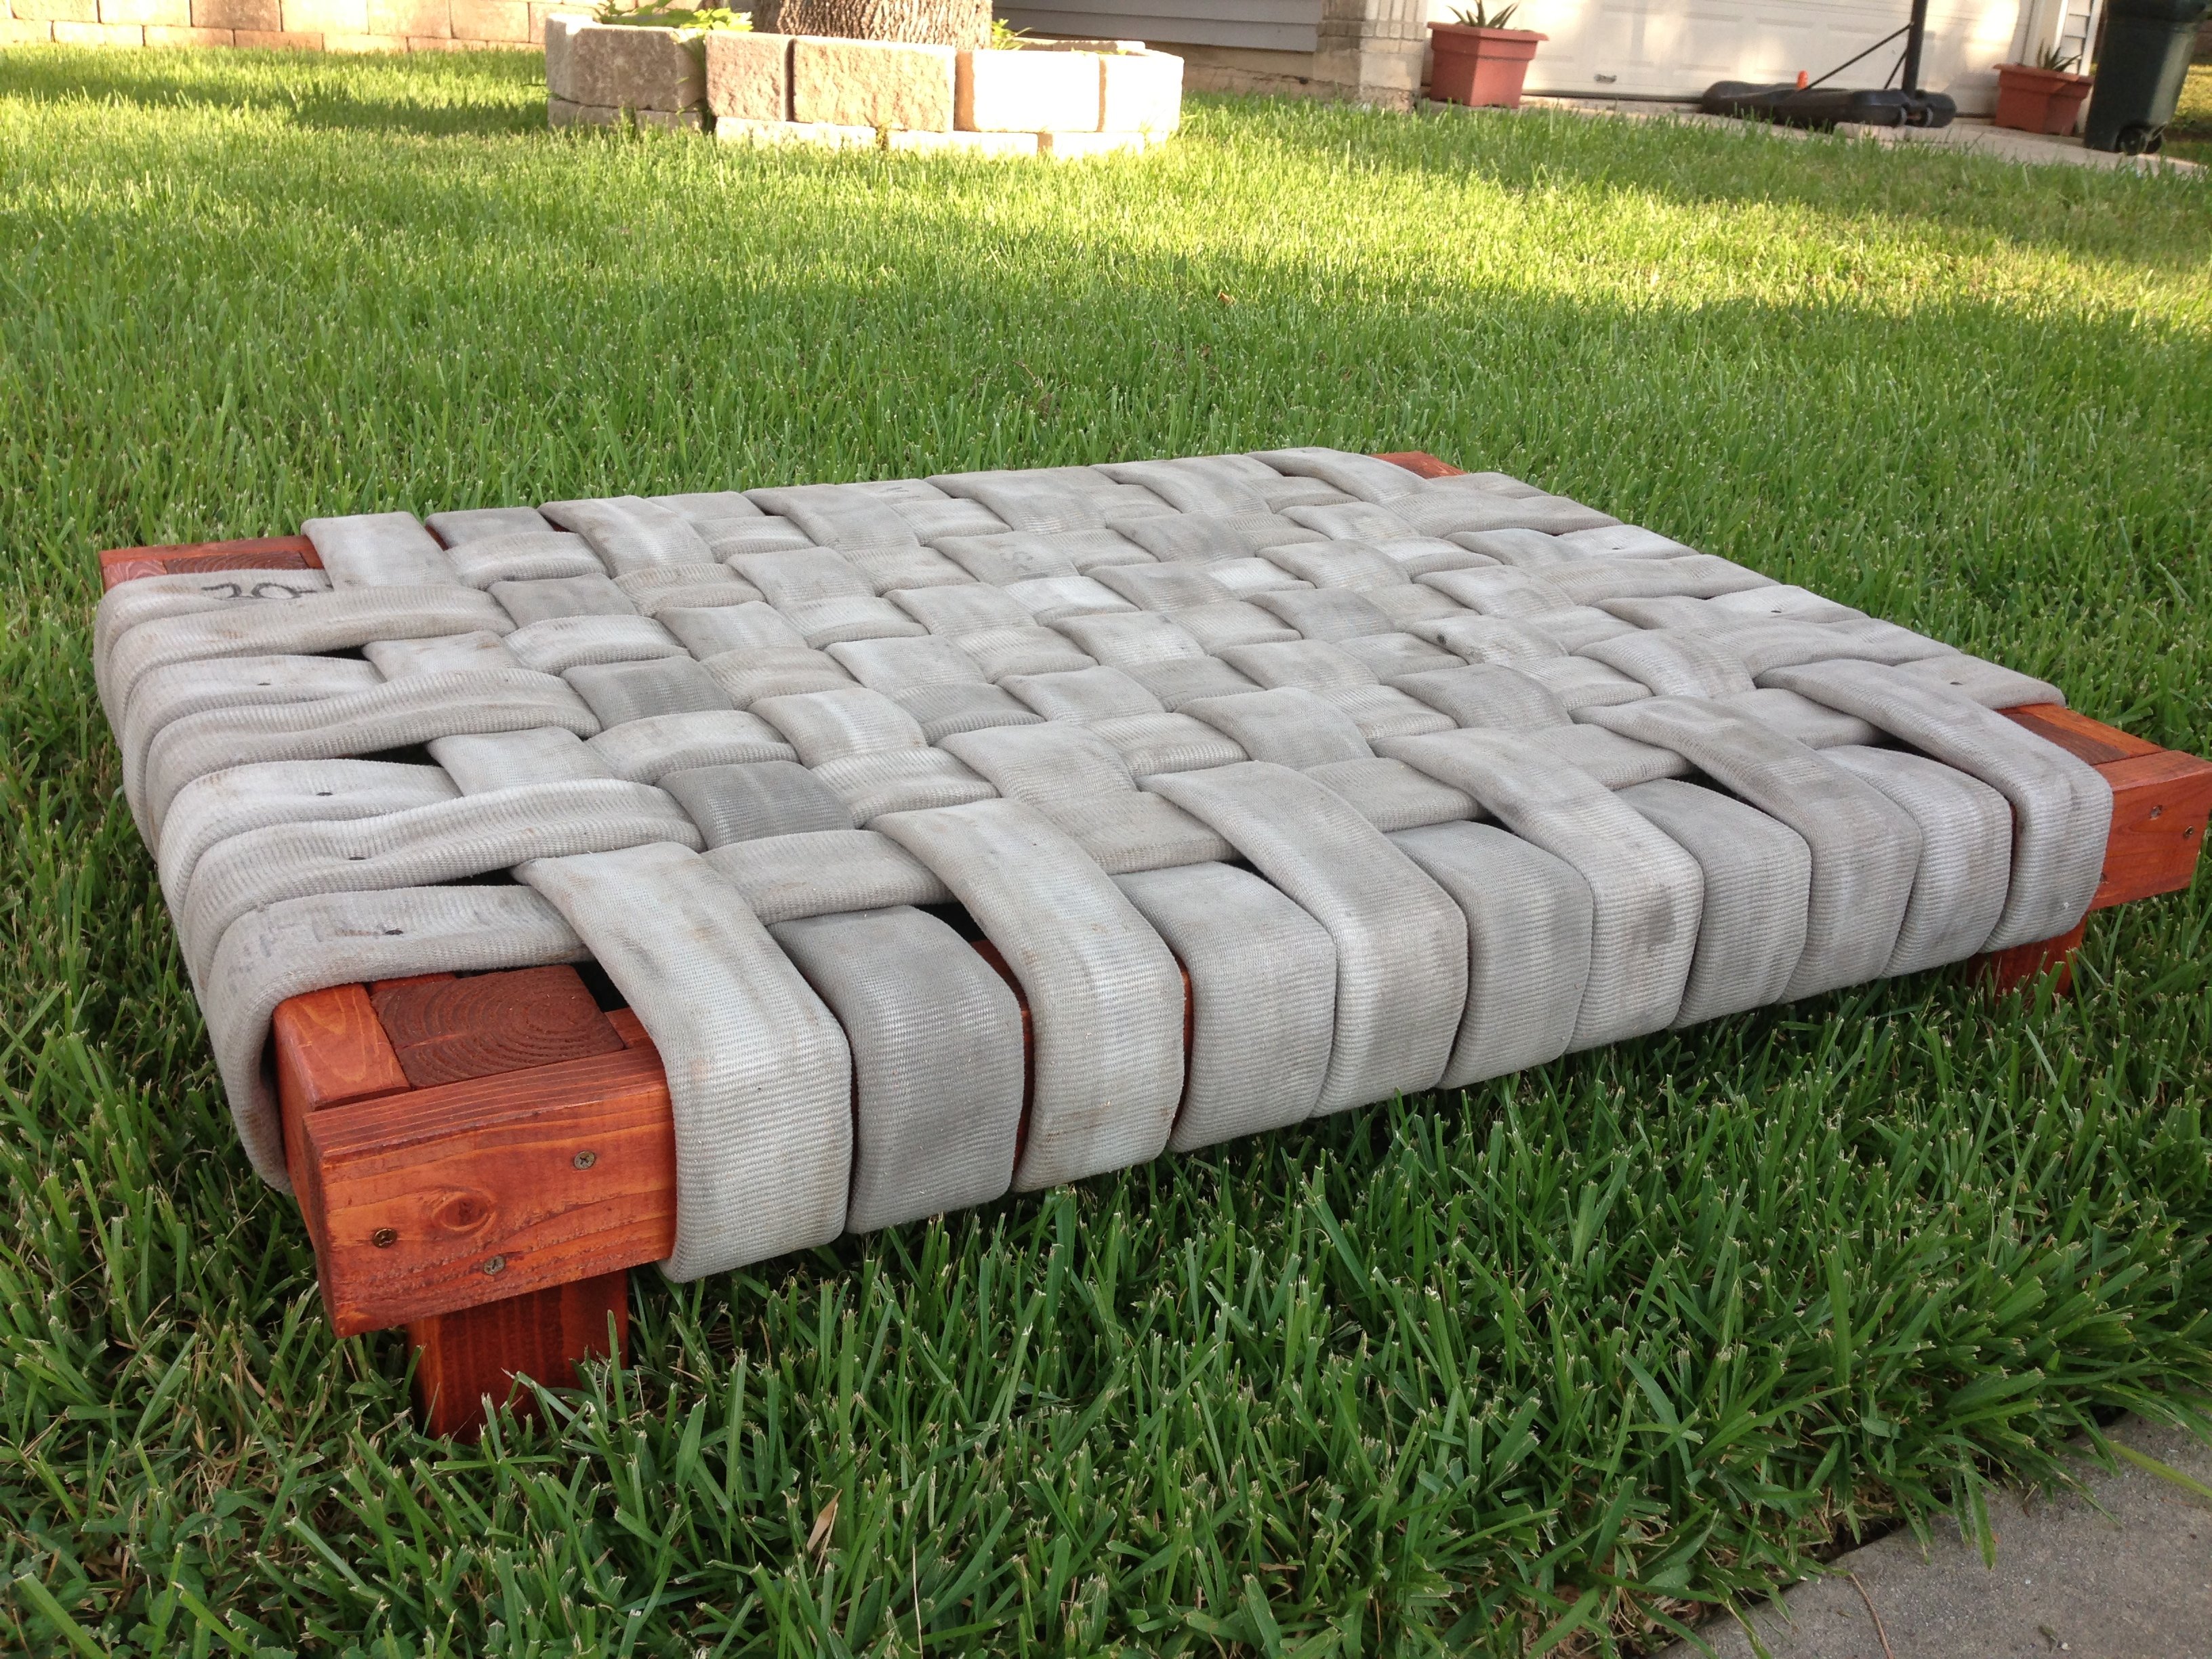
I needed a heavy duty dog bed for my puppy after he destroyed two regular dog beds. I used 4x4s, 2x4s and fire hose. He has not been able to destroy this one and he loves it.
Recommended Skill Level
Beginner
Comments
Mon, 07/08/2013 - 15:48
Cool
I have a pit bull. Shes the sweetest thing but loves to chew up her own beds. She wont chew the shihtzus bed or the cats beds just her own. I'd like to see her try this one out.
;) Now if I could figure out a way to get my dad to give up one of his fire hoses. hehe
Great job, great idea
~Melody
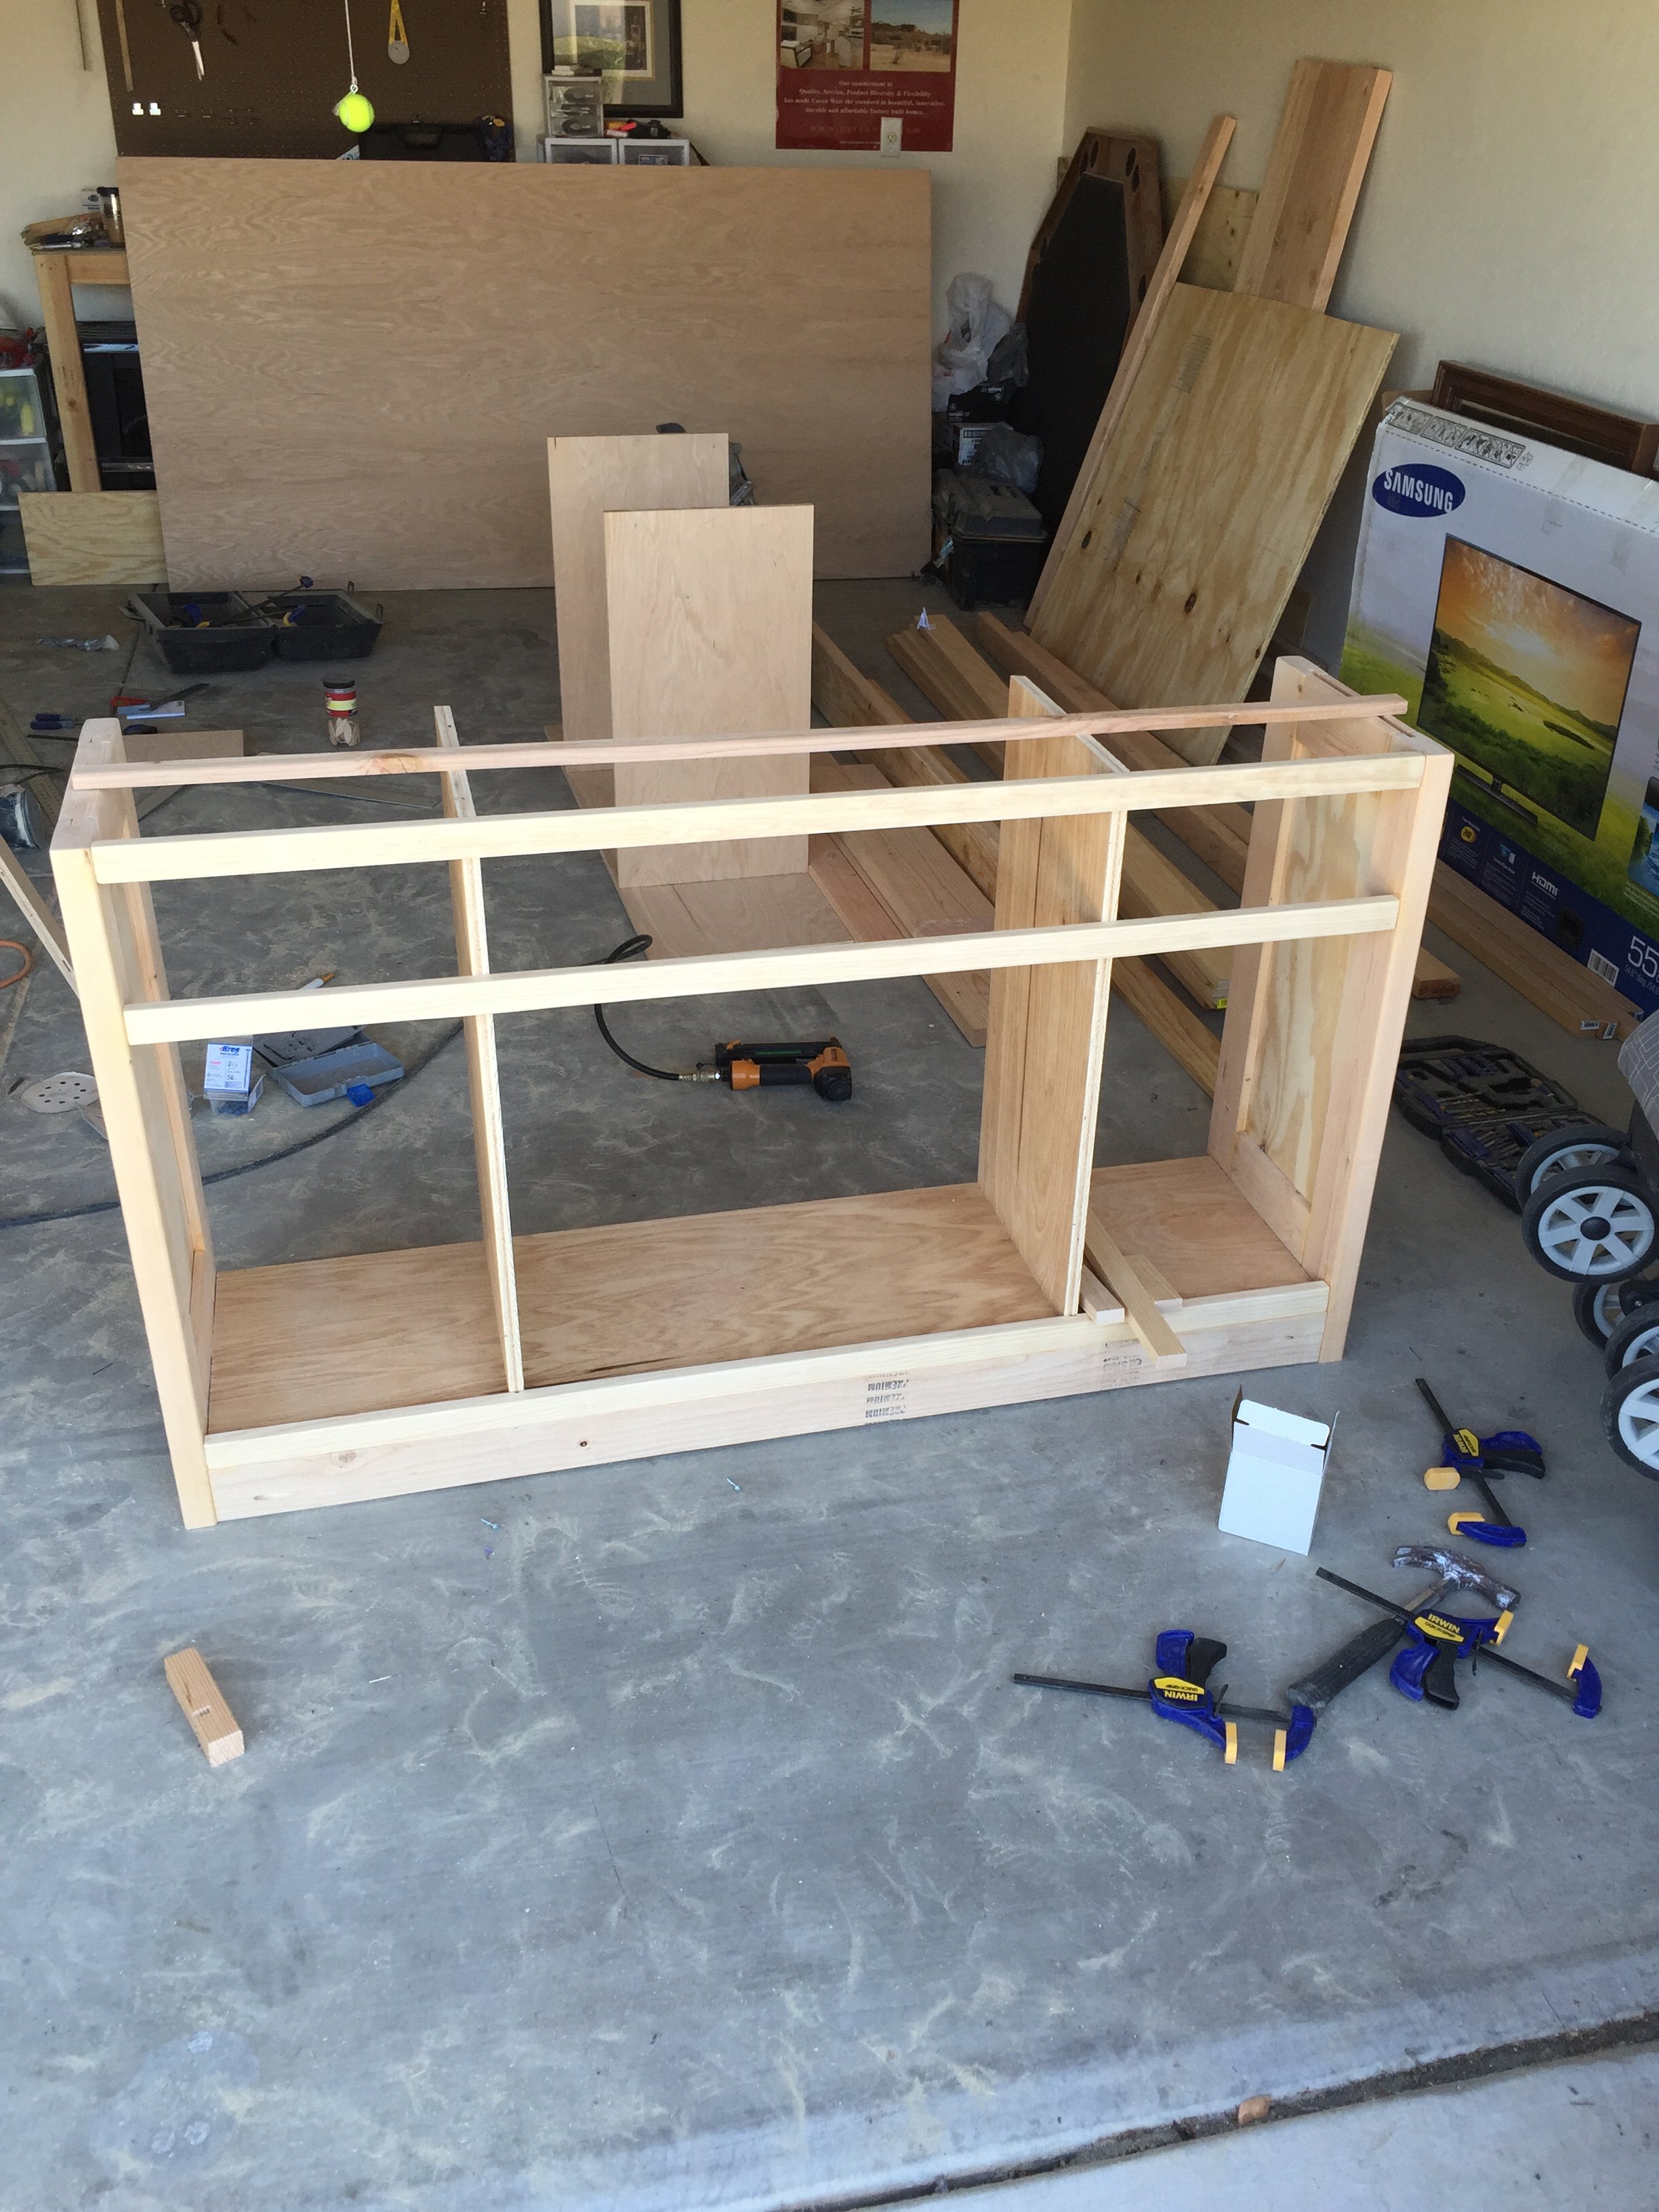
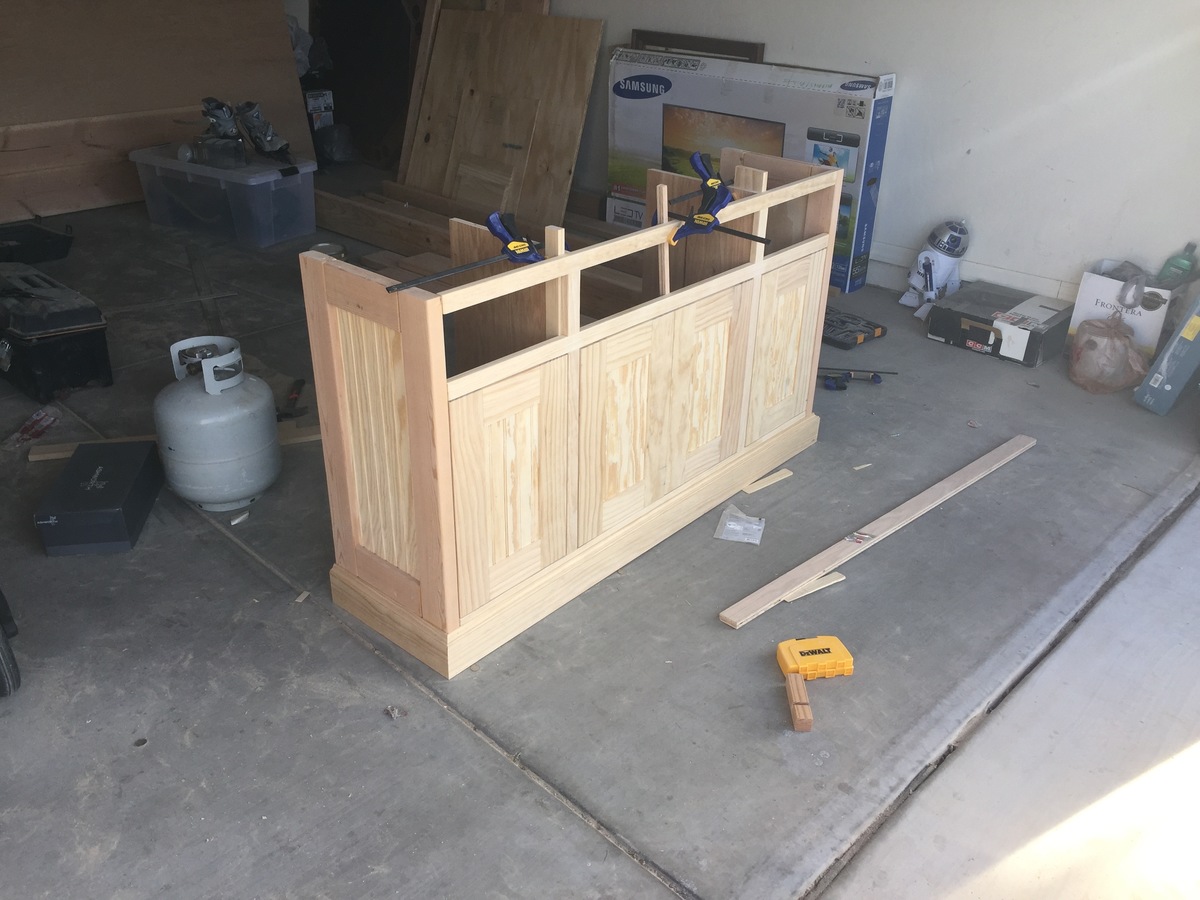
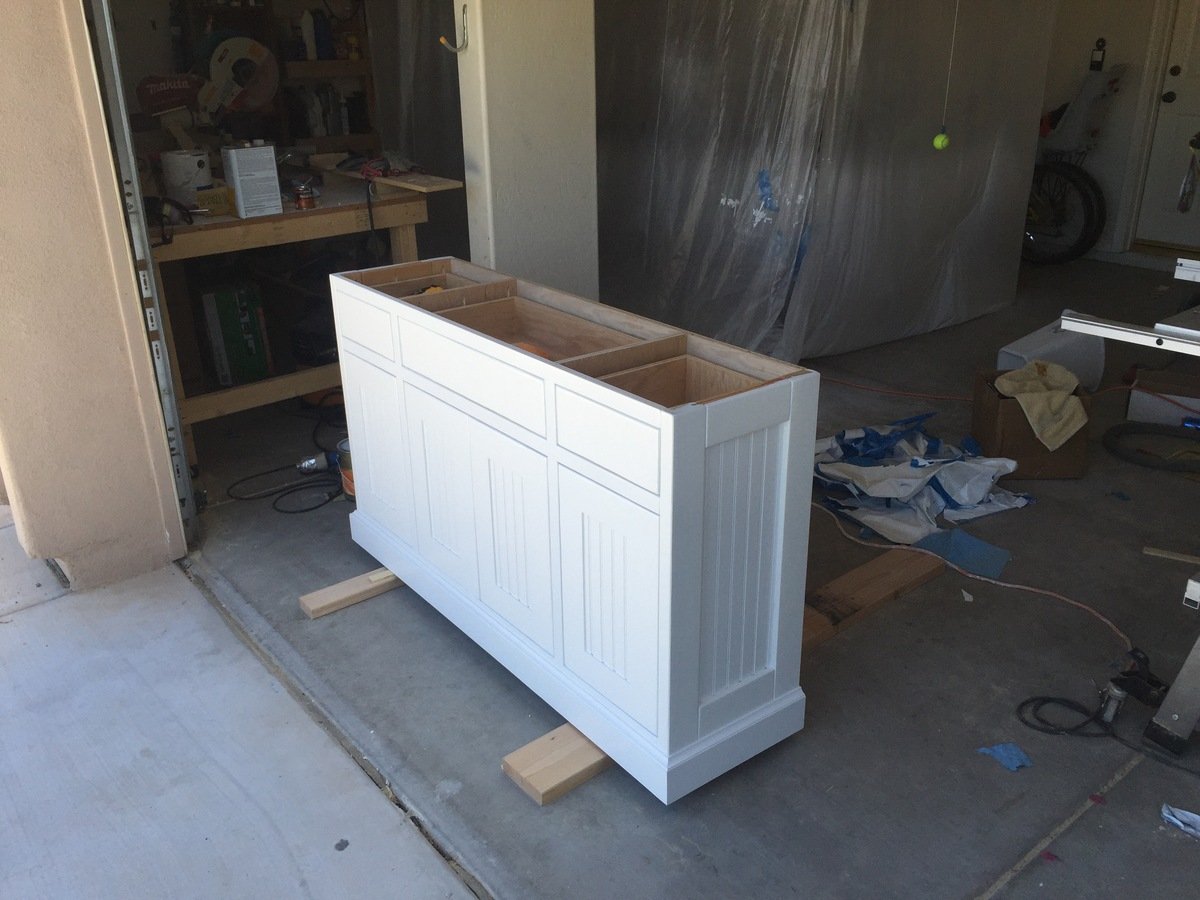
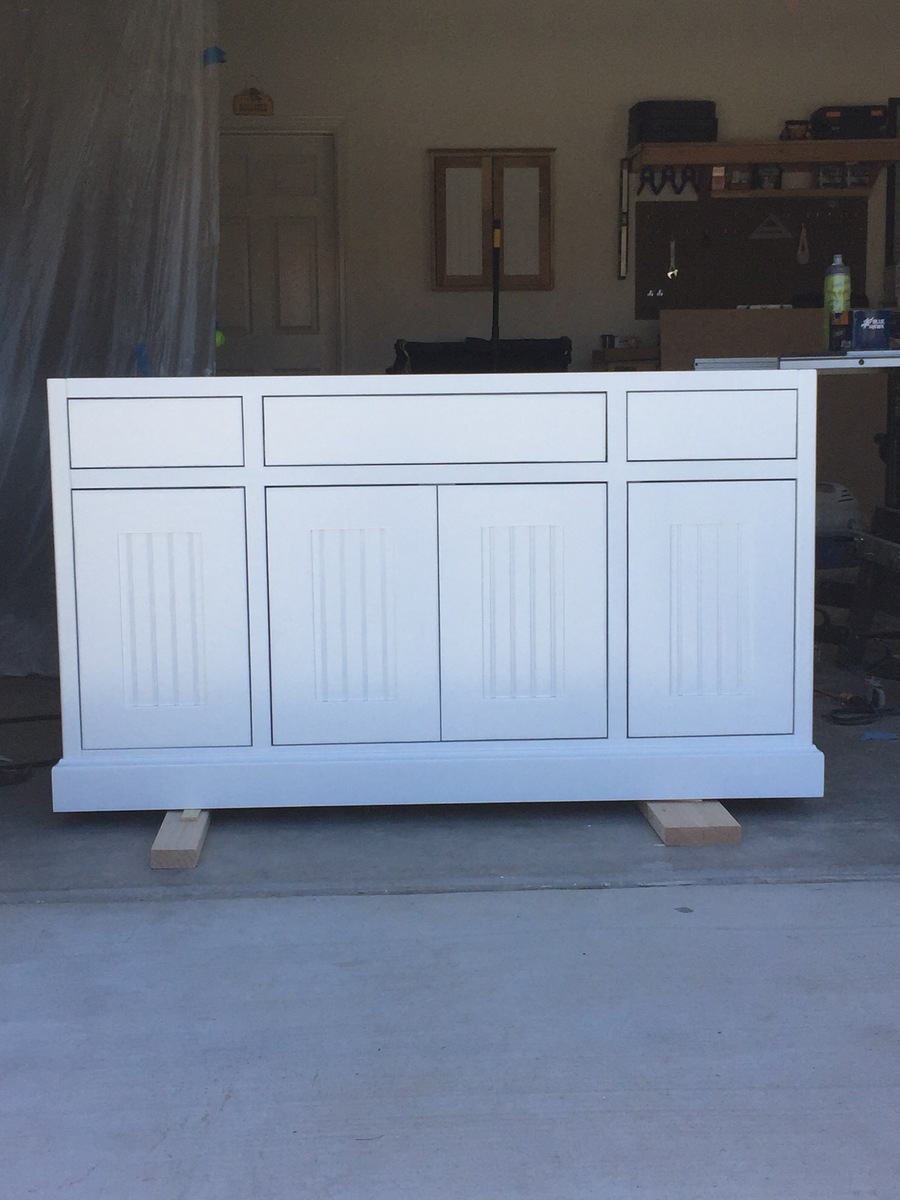
Sideboard Table

So many great plans on this website! I am constantly looking to Ana's website for inspiration for my next project around the house. The inspiration for this piece was that we needed something to fit an odd space in our home. Looking through the site we found the perfect fit. We based our design off Ana's planked wood sideboard table with a few minor changes. First since we wanted to do a two-tone finish, so I added an additional piece to the top of the face frame to keep the look symmetrical. I also used two 2x10's for the table top instead of what the plan called for and beadboard for the inset panel in the doors and sides. I decided to use tongue and groove construction for the sides of the table and for the doors. A technique for building inset doors that has worked for me is to build the doors to the exact size of your door opening and use the table saw to trim the tops and sides to fit as needed. This way I am to achieve a very uniform fit that can be difficult to obtain otherwise (unless you are a pro, which I am not!) I finished the inside of the sideboard table with satin polyurethane, the exterior base and doors with sprayed high gloss paint. The top was finished with min-wax ebony and 3 coats semi gloss polyurethane. Everyone in the family was very happy with how this turned out.
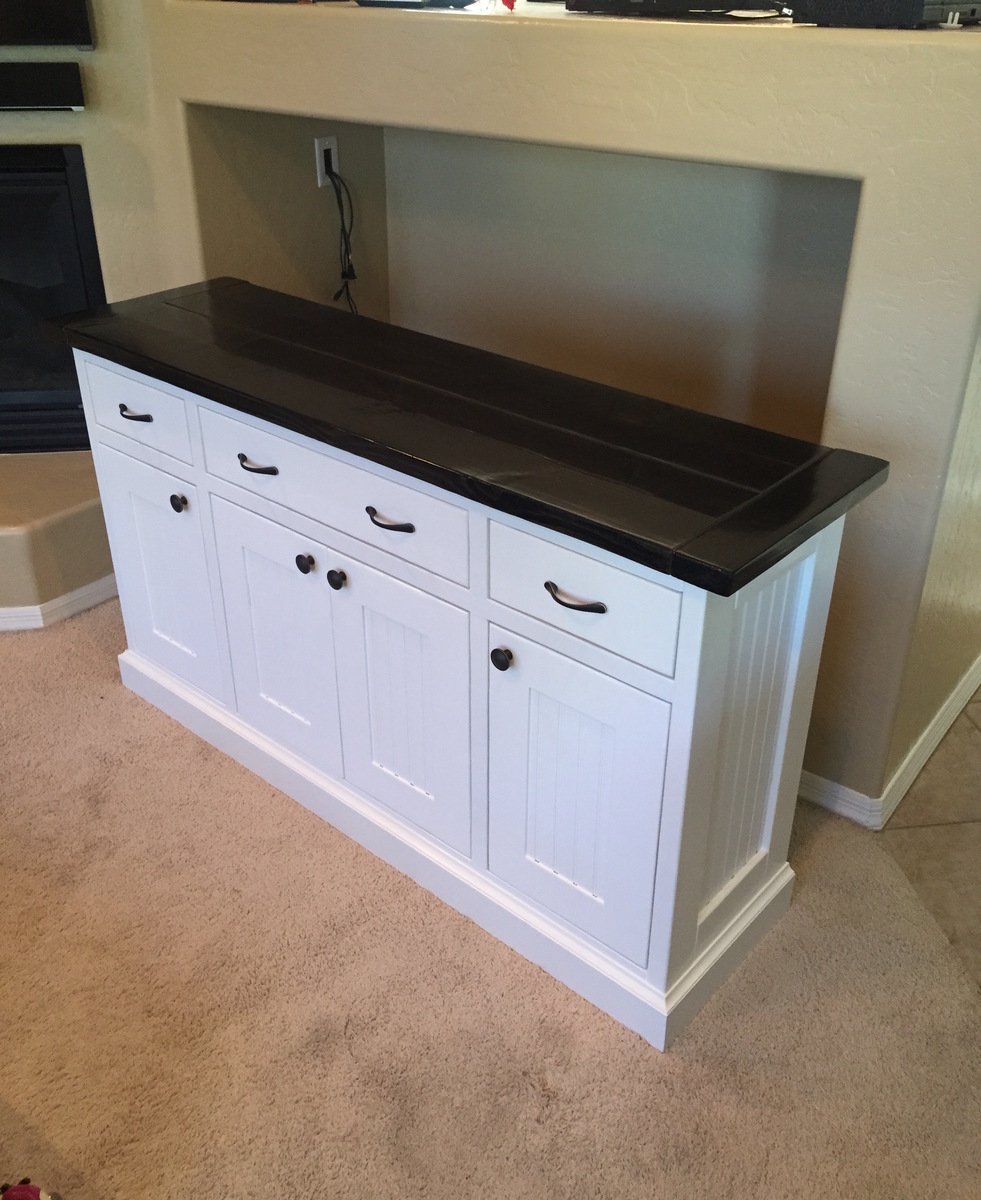
Built from Plan(s)
Estimated Cost
$300
Estimated Time Investment
Week Long Project (20 Hours or More)
Finish Used
2 coats paint, 2 coats stain, 3 coats brushed polyurethane (light sanding between coats)
Recommended Skill Level
Intermediate
Comments

Fri, 06/26/2015 - 19:21
this looks really great. I
this looks really great. I love the two tone colors. a nice stain + white paint is my favorite combo :)
Wed, 08/19/2020 - 18:32
hi do you happen to have the…
hi do you happen to have the dimensions and break down of how you made this particular one?
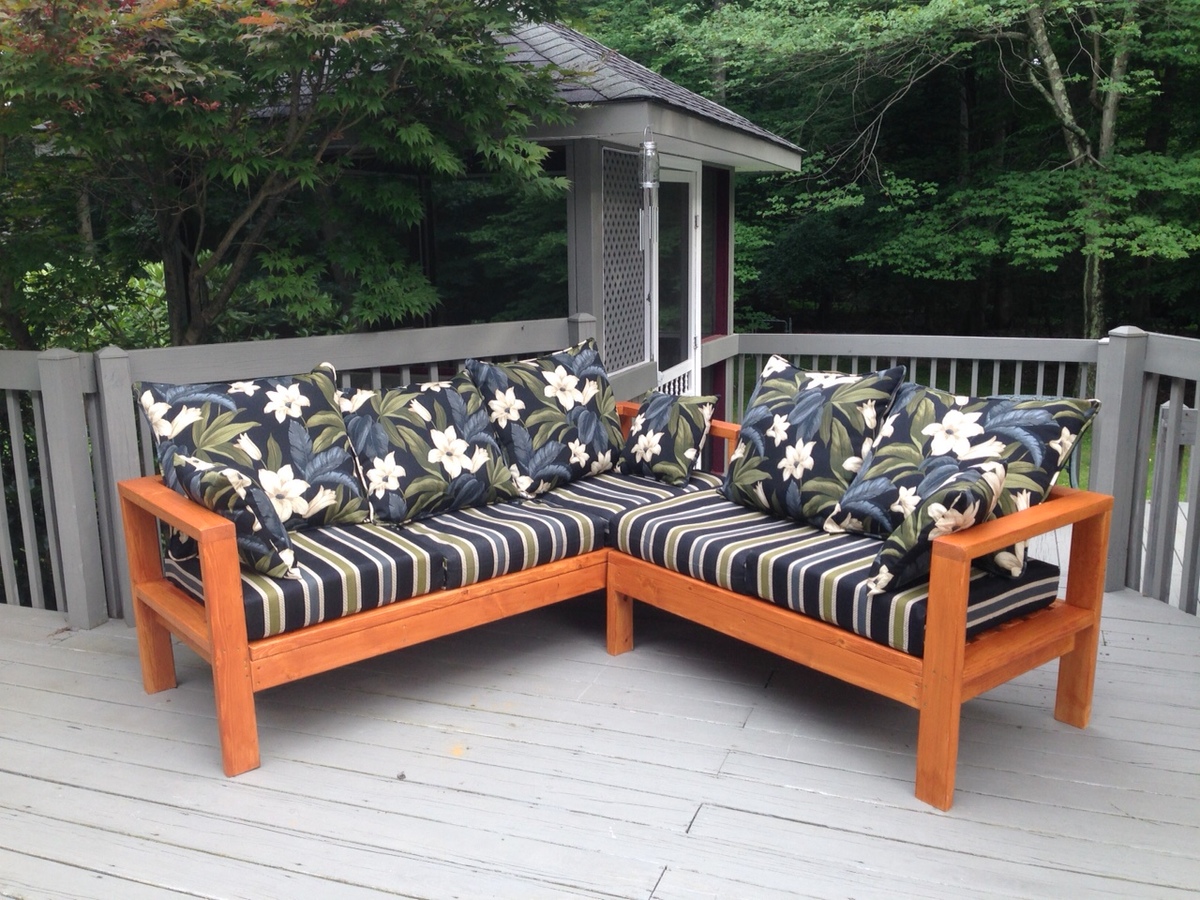
Amazing 2x4 Outdoor Sofa

We have wanted nice deck furniture since we moved into our house 22 years ago but just couldn’t justify the cost. I have made several projects from Ana’s website and I love her easy to follow and FREE plans! But this project was my favorite as you can see by the pics. I used cedar and my wife finished the furniture with stain. Thanks to Ana for providing these plans and helping a DIYer to feel proud!
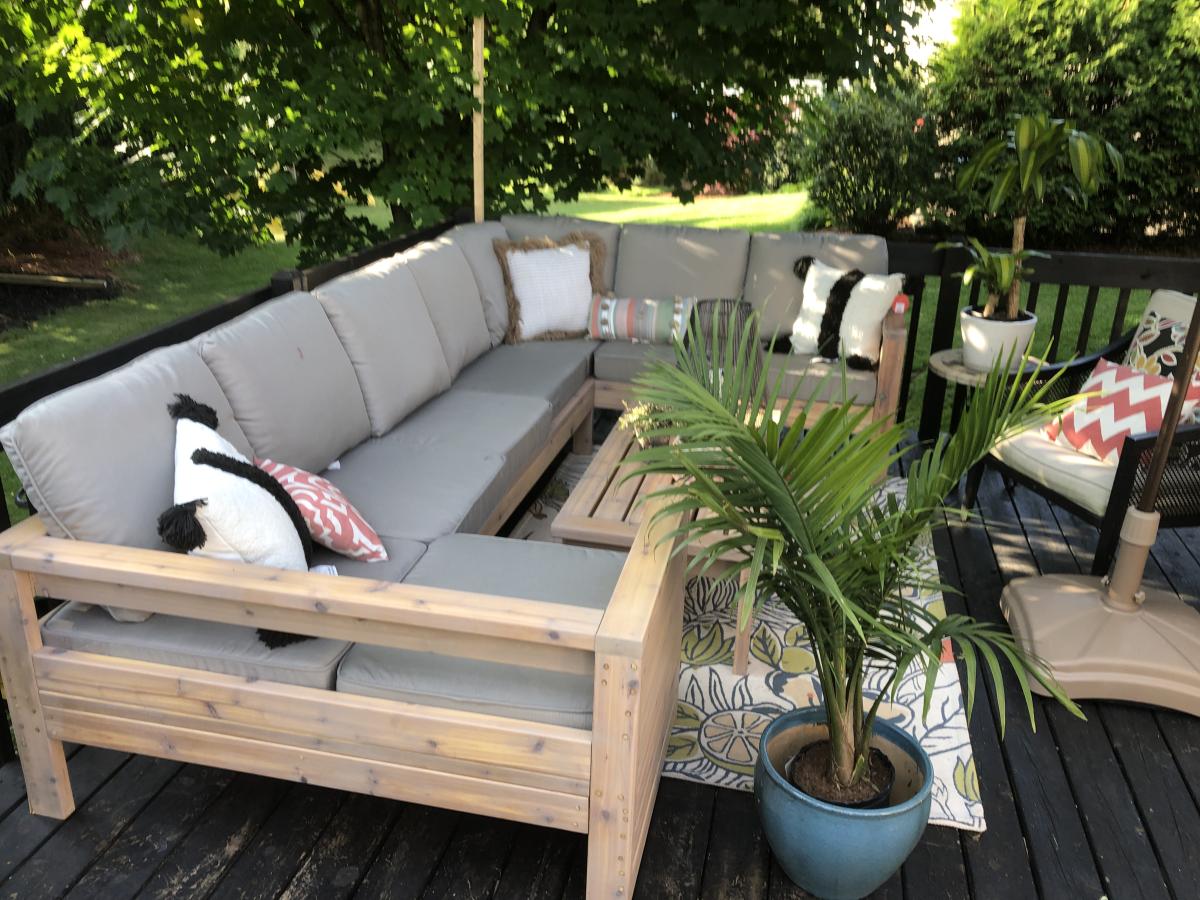
Built from Plan(s)
Comments
Sat, 01/01/2022 - 12:57
AMAZING SECTIONAL!
WOW, that is stunning and so inviting, love the outcome! Thank you so much for sharing!
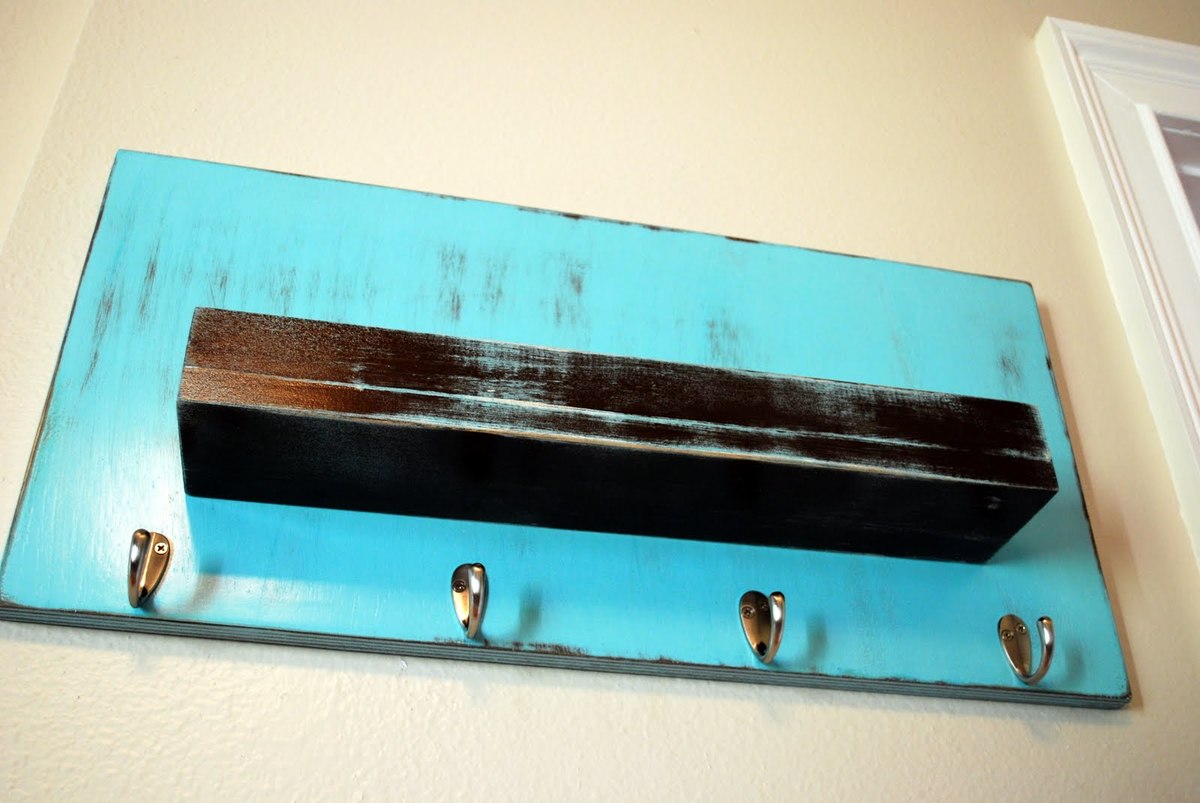
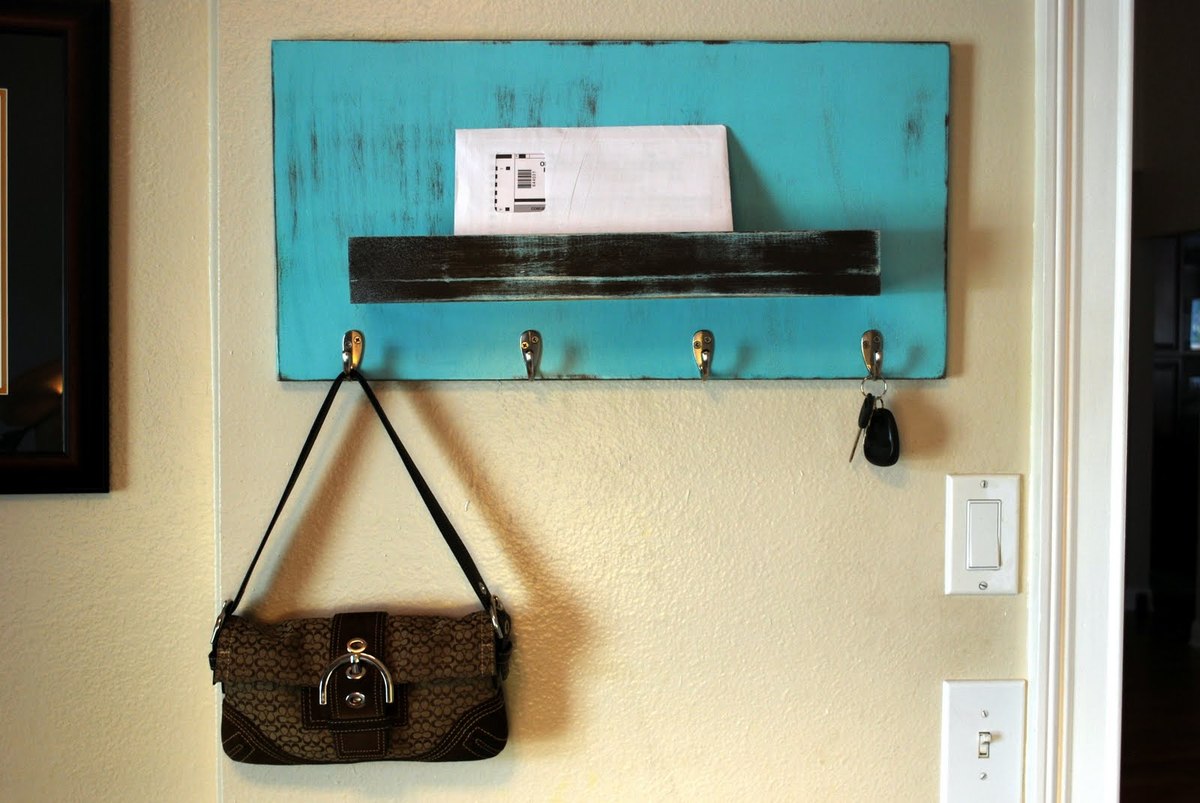
Mail Holder

Ana gave me the courage to know that I could build something without a set plan. This was my first attempt at building something that I just envisioned in my head. Thanks Ana!
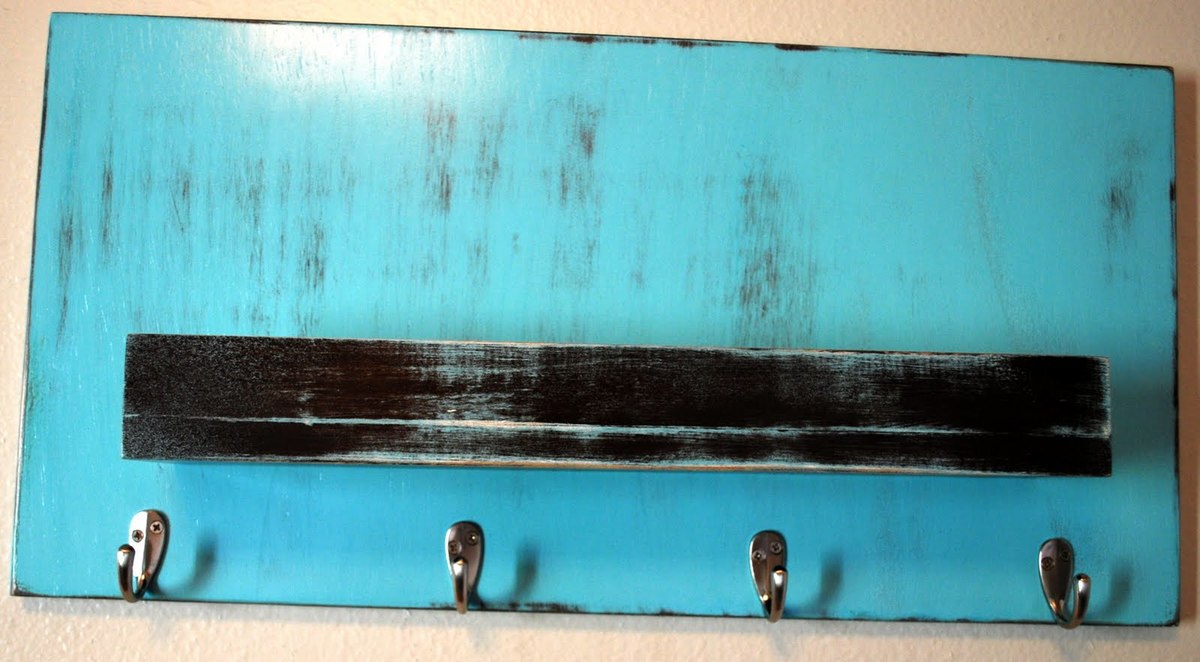


Estimated Cost
$10
Estimated Time Investment
An Hour or Two (0-2 Hours)
Finish Used
I stained the entire board, then spray painted it. I then distressed the board to get the stain to show back through, and added a coat of polycrylic to seal it.
Recommended Skill Level
Beginner
Adirondack Coffee Table
One of my first projects, made from the Adirondack Coffee Table plan using 2x4's and 1x4's. Pocket holes, stain, paint, and sealer. Beginner afternoon project.
Built from Plan(s)
Estimated Cost
$25
Estimated Time Investment
Afternoon Project (3-6 Hours)
Finish Used
Minwax dark walnut stain for the top. Leftover white primer and paint for the base. Minwax clear matte sealer in the spray can.
Recommended Skill Level
Starter Project
Comments
Country Table

Country Table - dark walnut stain and satin polyurethane coat.
Estimated Time Investment
Week Long Project (20 Hours or More)
Finish Used
Dark walnut and clear satin polyurethane.
Recommended Skill Level
Starter Project
Comments

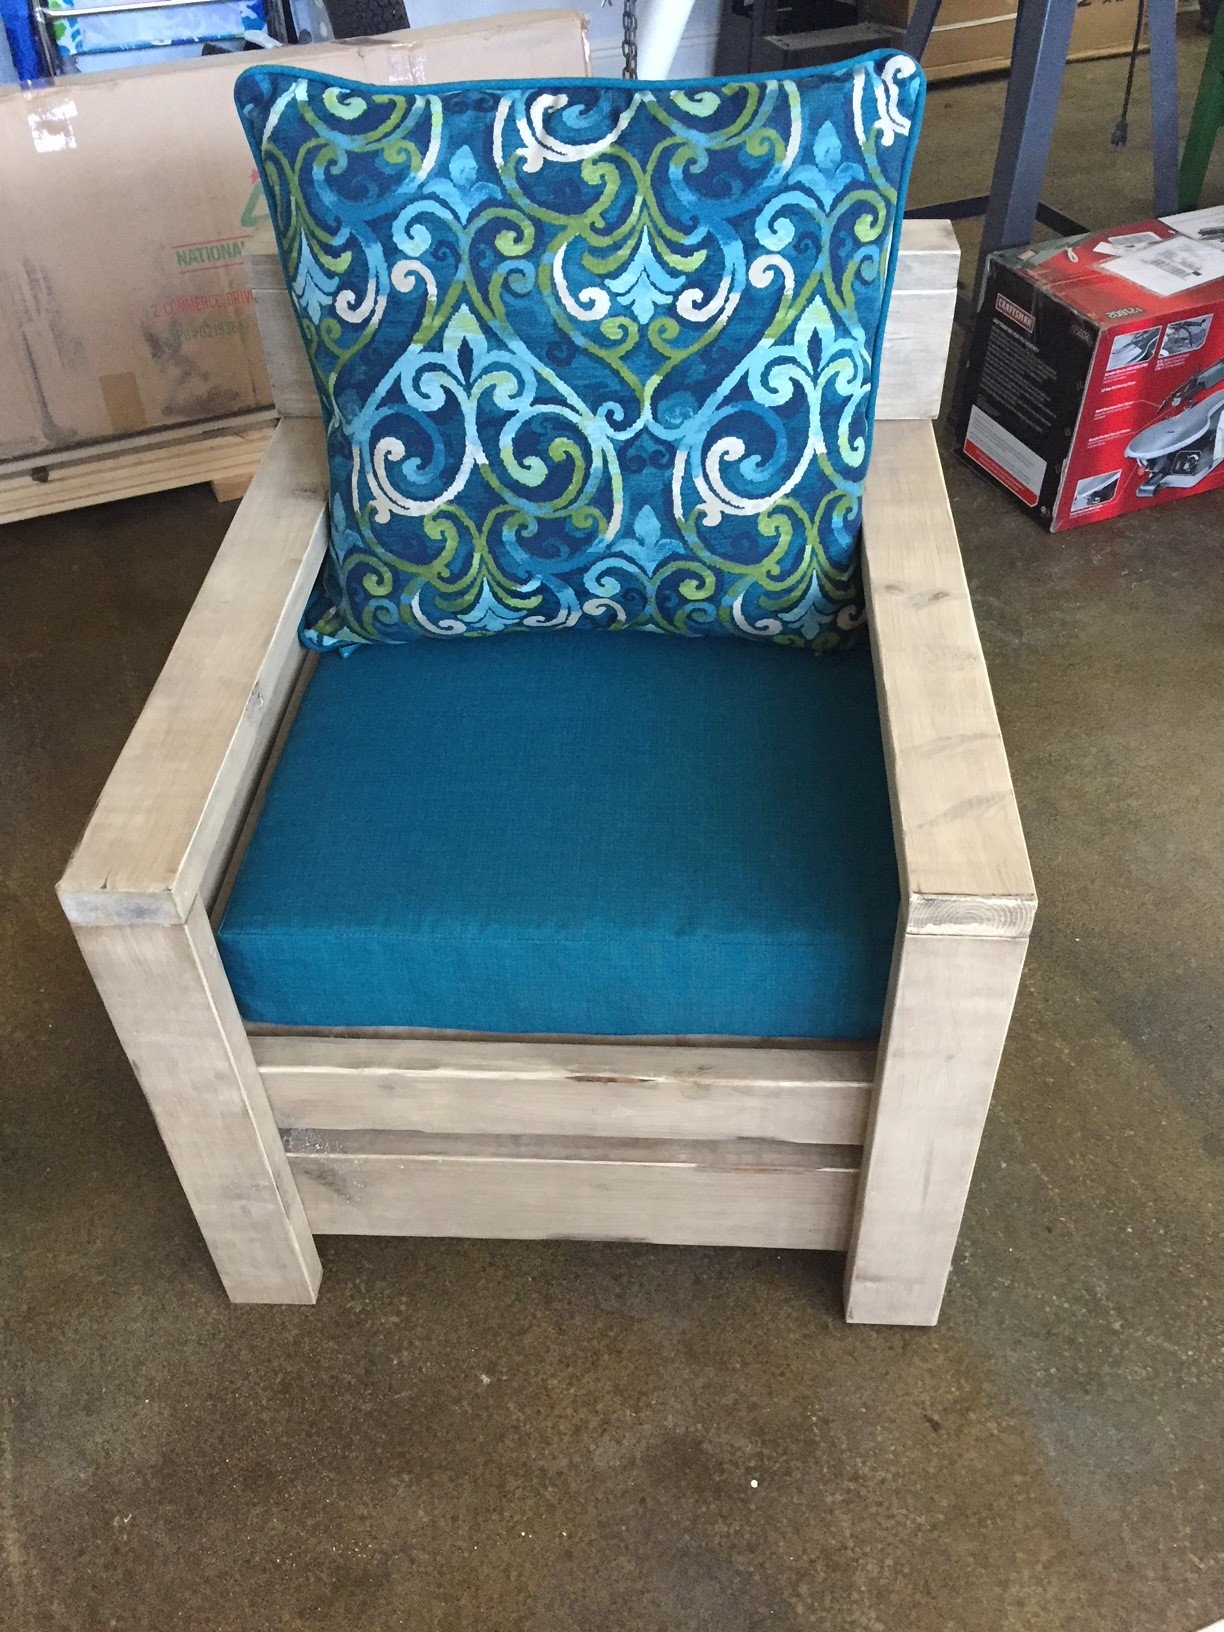
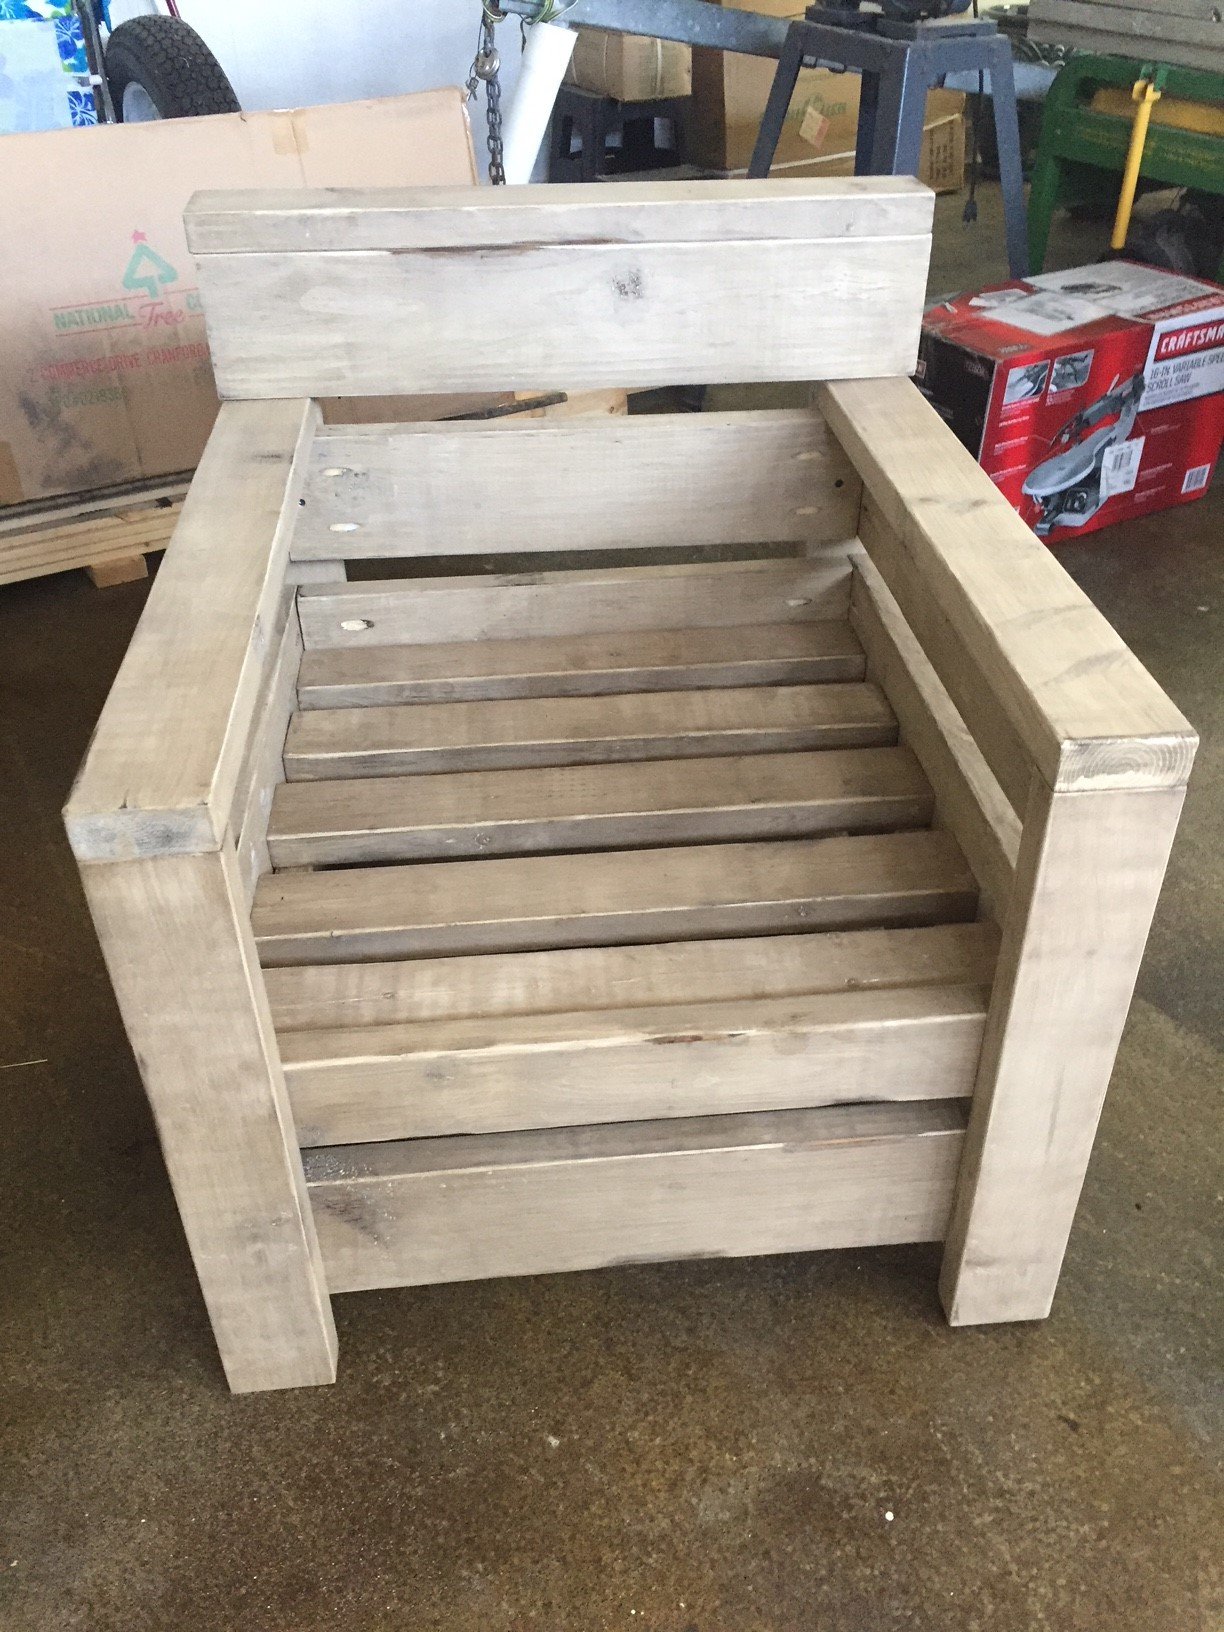
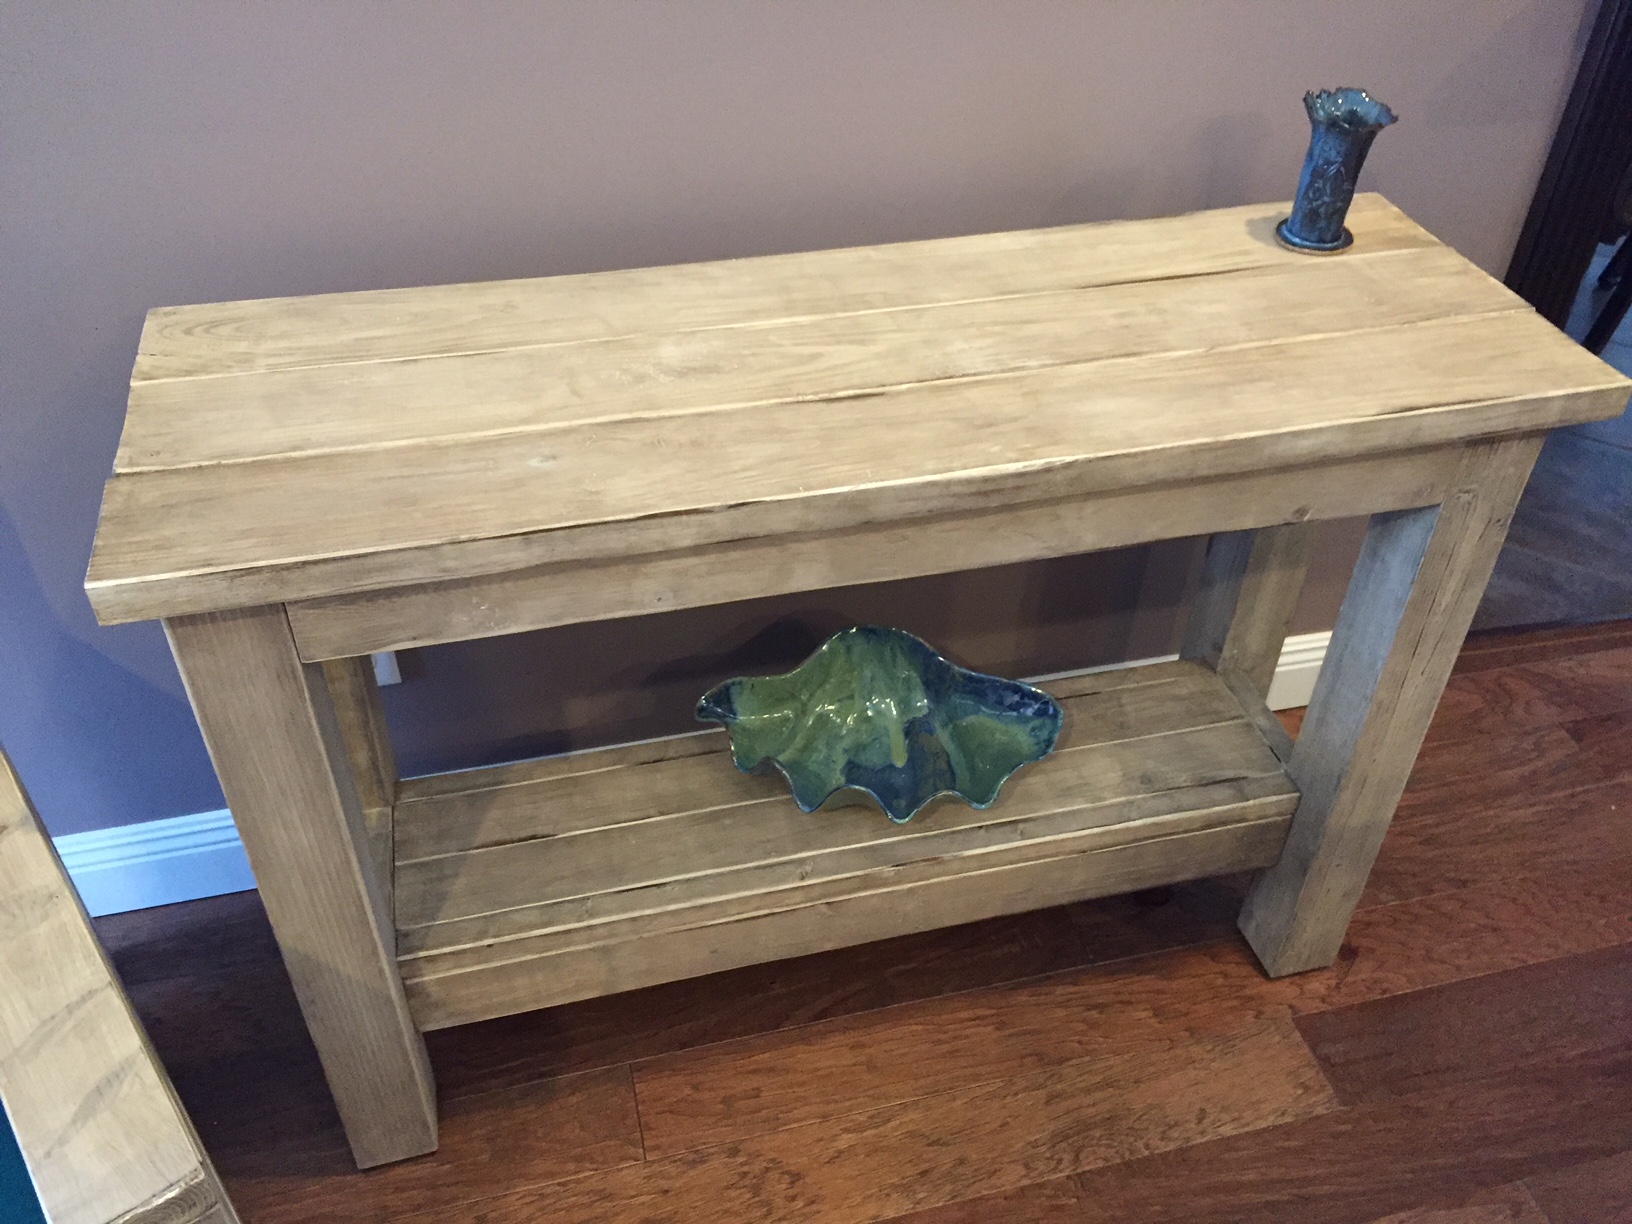
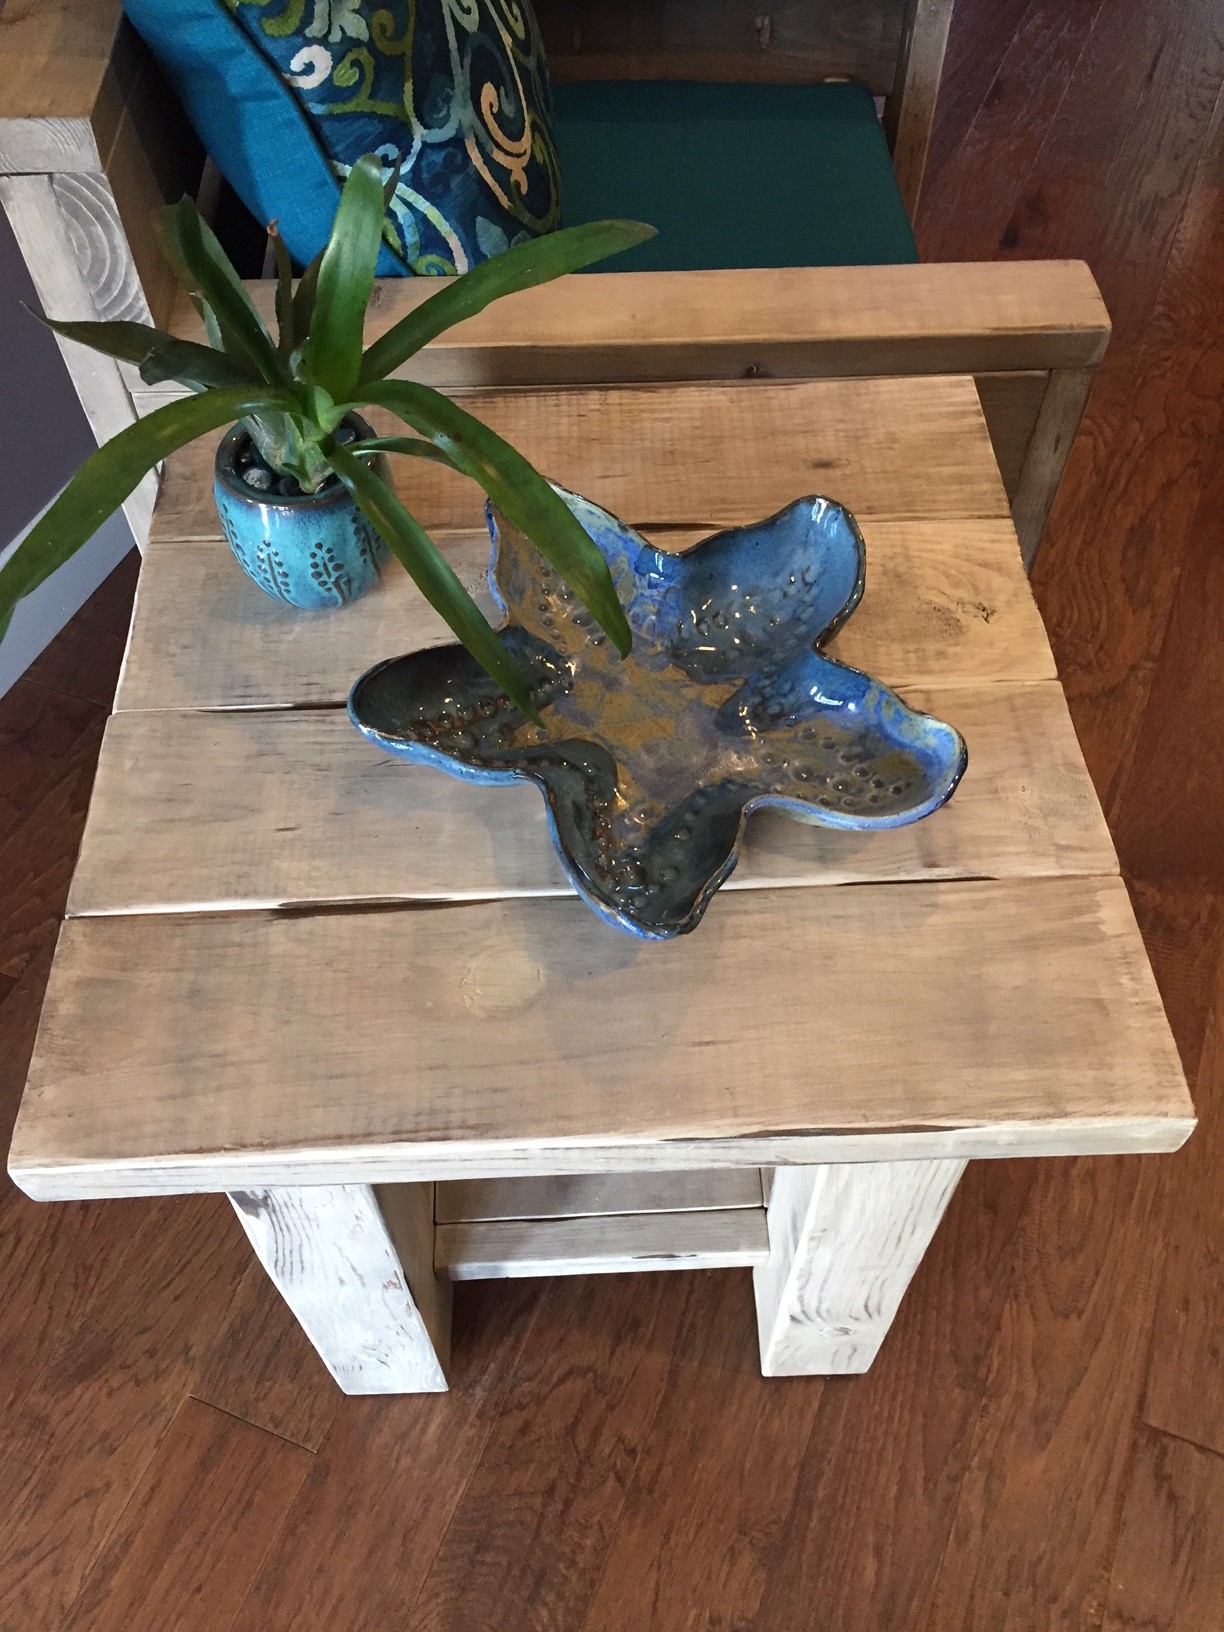
Modern Outdoor Chairs (2x4s & 2x6s) w / Matching Tables
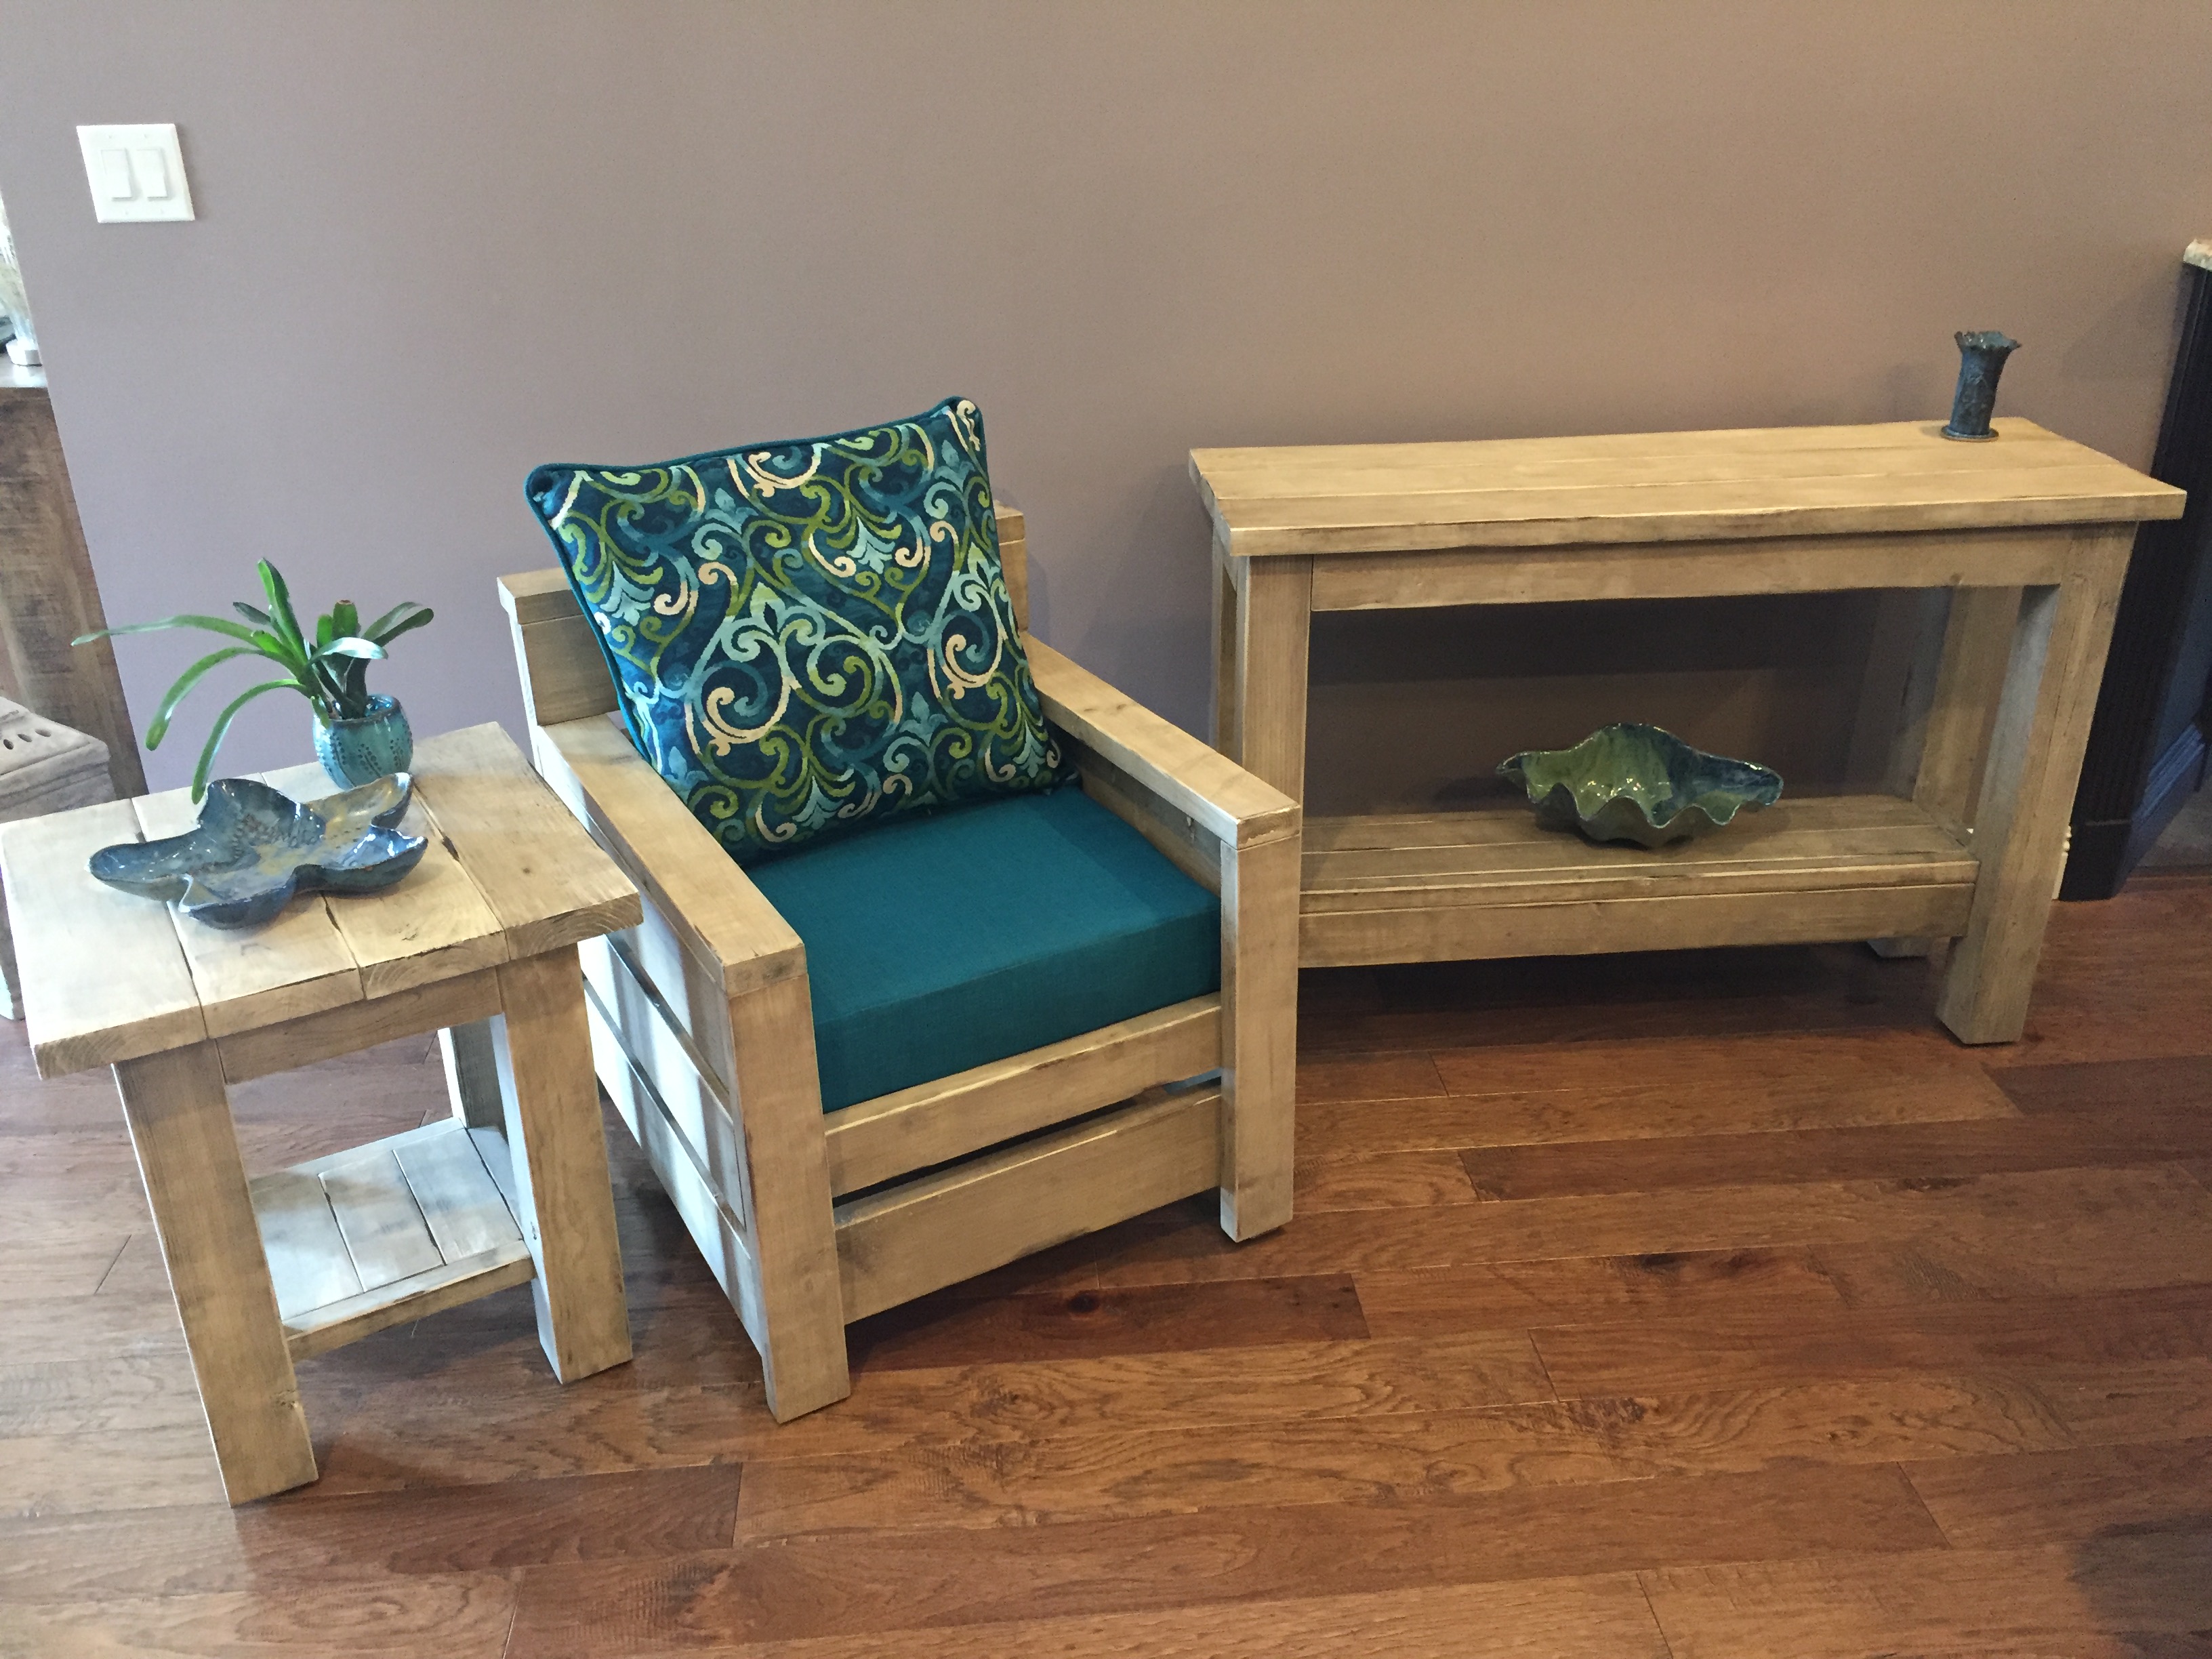
My mother had a cheap particle board sofa style table on her back porch that was coming apart. She said she'd like to replace it, so I told her I would her one.
I decided to make her a few end style tables to go with it as well.
Finally, I had seen these chairs and decided to make her a few of these also. I liked the Ana White plan, but I didn't like the idea of seeing all the screw holes, so I developed my own method using Kreg and my own assembly method that allowed me to make them strong, without seeing all the screws.
I (and my mother) were very pleased with the final project.
Built from Plan(s)
Estimated Cost
~$200 (Cushions cost me ~$80)
Estimated Time Investment
Weekend Project (10-20 Hours)
Finish Used
Olympic Stain (1 coat white), slight sanding, wiped down with Minwax Dark Walnut.
Recommended Skill Level
Beginner
Comments
Mon, 06/10/2019 - 18:49
Nice set
Thank you for posting this! I built the chair as is from the plans but I realized it really needed a backrest. I like how you added one and if you don’t mind, I think I’m going to “borrow” your idea. I lucked out on the cushions-I got mine from Home Goods for $40. I don’t think everyone has a Home Goods near them though. Love the tables too!
Farmhouse Storage Bedroom with Drawers

I started this bed months ago, thinking I would have plenty of time to get it done in a weekend. Ha! Well actually to tell the truth most of it was done in a weekend...but, maybe I should start at the beginning... Beware this is a picture heavy post, I tried to do collage photos as much as possible to cut back...
Comments
Mon, 01/03/2022 - 10:34
Awesome Storage Bed!
That is gorgeous, love the natural look and hardware choice!
Baxter's elevated feeding station
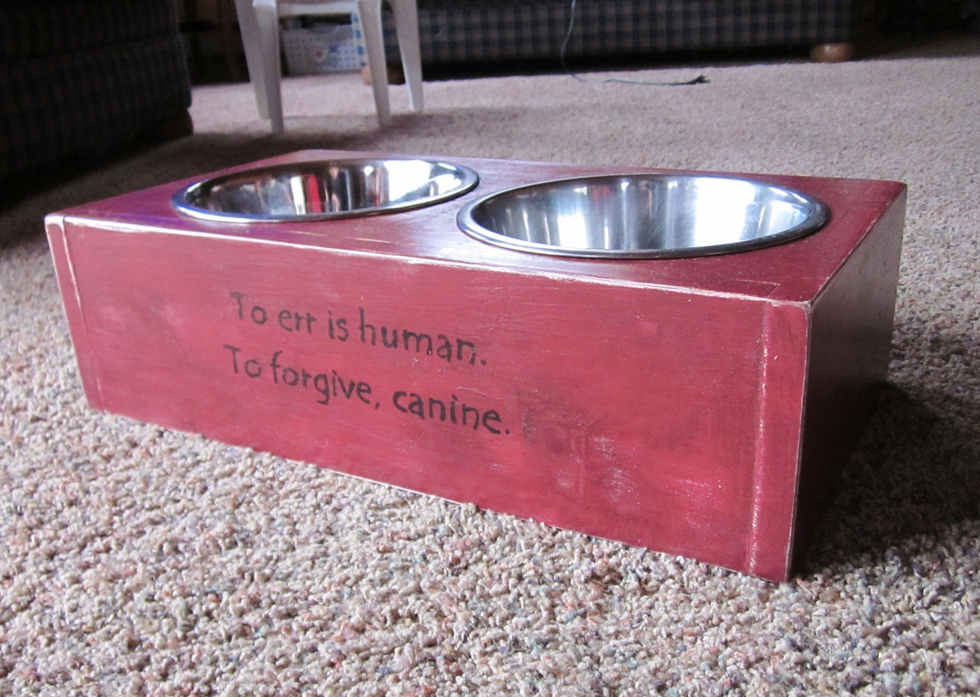
I saw Ana's plan for an elevated dog dish, but our little cockapoo (still a puppy) wasn't really ready for that height. So I made a basic box and cut out the holes in the top for the bowls. He is still growing, so when he's a little taller, I'm going to put tennis balls on the bottom as feet which will raise it up a little more. Thought I would dress it up with a quote I found somewhere online.
Used some leftover paint and glaze from making the pantry and finished the same way.
Estimated Cost
Scraps used . . . . estimated at less than $10
Estimated Time Investment
An Hour or Two (0-2 Hours)
Finish Used
Valspar Red Cabin paint
Valspar Antiquing Glaze
Valspar Antiquing Glaze
Recommended Skill Level
Starter Project
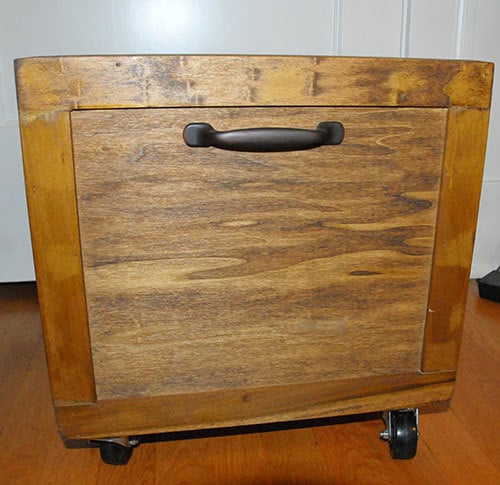
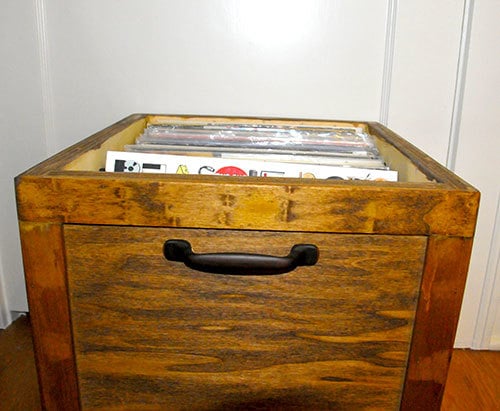
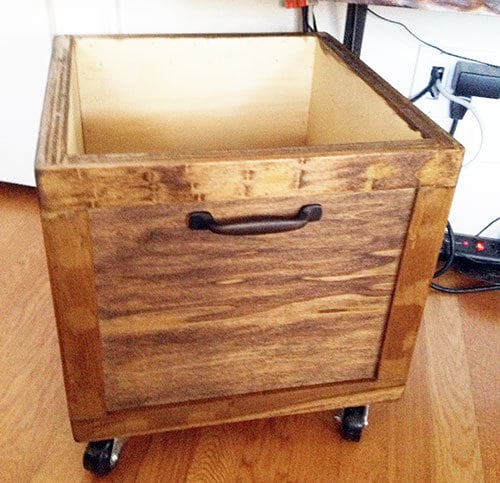
DIY LP Vinyl Record Storage Box with Wheels
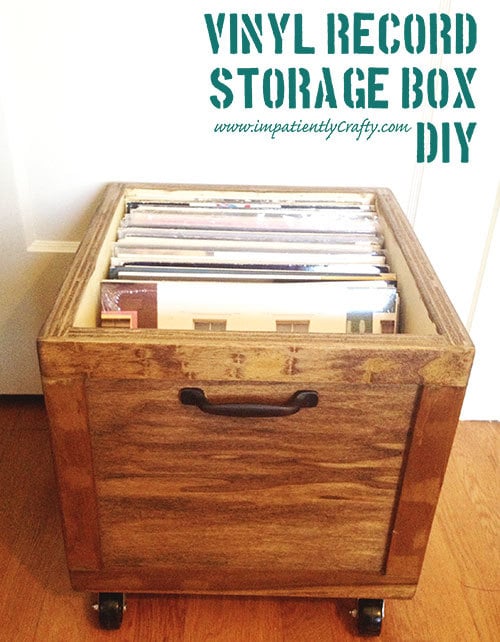
I have to say, there is something about listening to music on vinyl that just gives me the warm fuzzies! A little bit of crackle, fuzz and hum.. physically having to flip over the record to get to the next side, & listening to an album start to finish just has a nostalgic feel to me and I love it.
We’ve started quite the collection of LP’s and quickly found we needed some good storage for them. Since vinyl isn’t exactly the most popular form for listening to music, I just had to make my own.
I knew it had to have 3 things.. size to fit, wheels and easy of searching through records.
I had some scrap poplar plywood lying around, and just had to purchase some casters and furring strips to frame out the box. I even had an extra cabinet handle laying around to use.
I made it 12 inches wide by 16 inches deep, framed it out shaker style with furring strips and then stained it.. added casters and a handle ;)
Estimated Cost
$18
Estimated Time Investment
Afternoon Project (3-6 Hours)
Finish Used
minwax dark walnut stain and 2 coats of matte finish polycrylic
Recommended Skill Level
Intermediate
Comments

Tue, 07/09/2013 - 10:59
Cute upcycling
I love how you appreciate vinyls and gives things you have on hand new purpose. This storage box is nicely done.
I looked at your blog and went straight to the Upcycle tab, since that's where my interest lies too. I love seeing a "pile of useless" restored to use. =D
First time project
This was my first attempt at making anything. Thank you to Ana for providing such easy plans and the encouragement to try something. I think I'm hooked!
Built from Plan(s)
Estimated Time Investment
Day Project (6-9 Hours)
Recommended Skill Level
Beginner
Comments
Sun, 05/31/2020 - 13:21
Beautiful! where did you get…
Beautiful! where did you get the cushions from?
Toy zoo
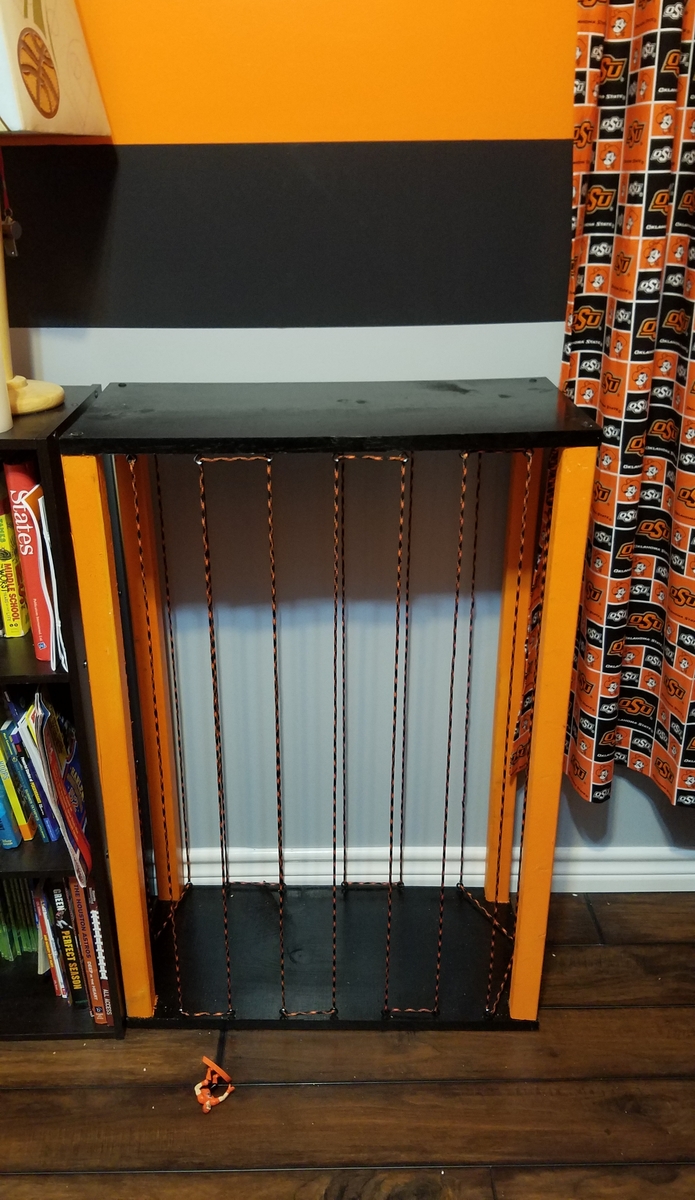
My son has a very specific color scheme in his room (Go Pokes!), and finding something to keep his toys in, that looks like it belongs, is simply impossible. I chose to do it cheap and quick way, but it came out exactly like I hoped it would. I really liked the eyelets idea, and since I wanted the zoo to be movable and able to serve as a shelf, I just screwed them in directly into the top and bottom
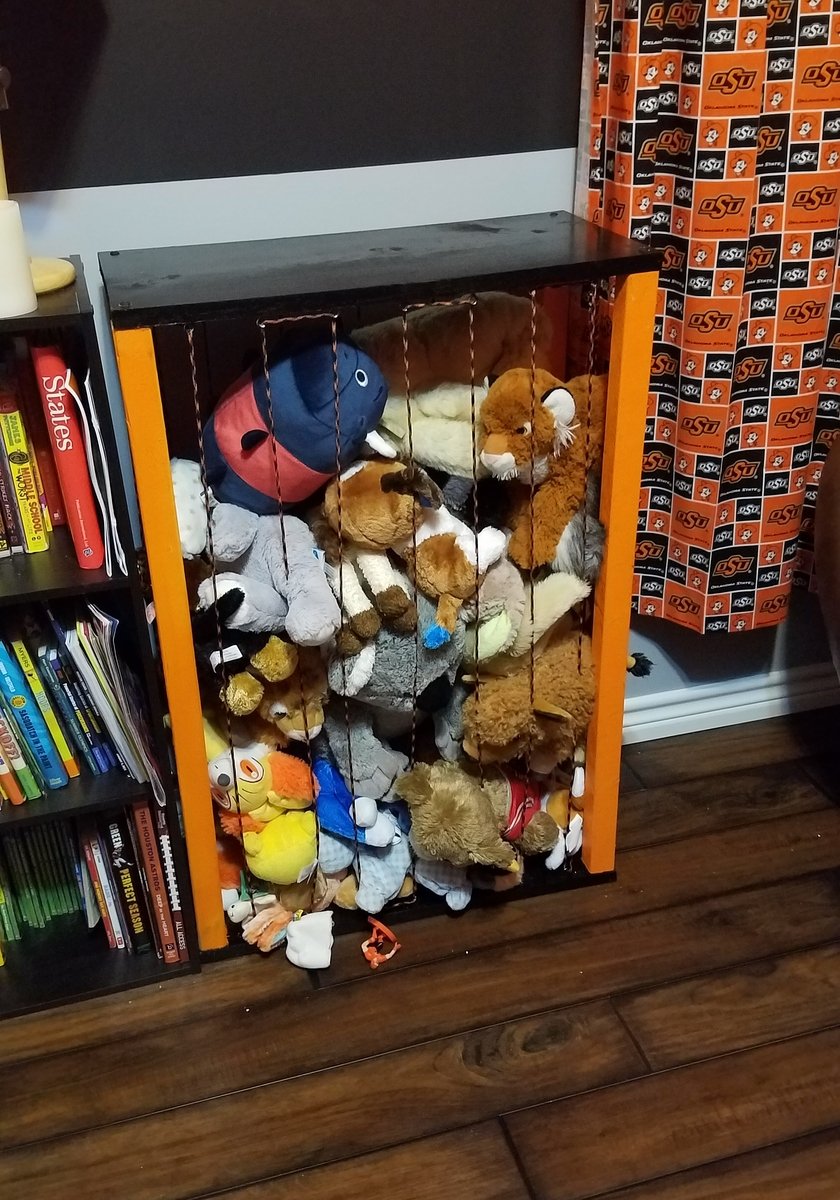
Built from Plan(s)
Estimated Cost
$35
Estimated Time Investment
Afternoon Project (3-6 Hours)
Finish Used
Spray paint
Recommended Skill Level
Starter Project
Wood Closet Shelving
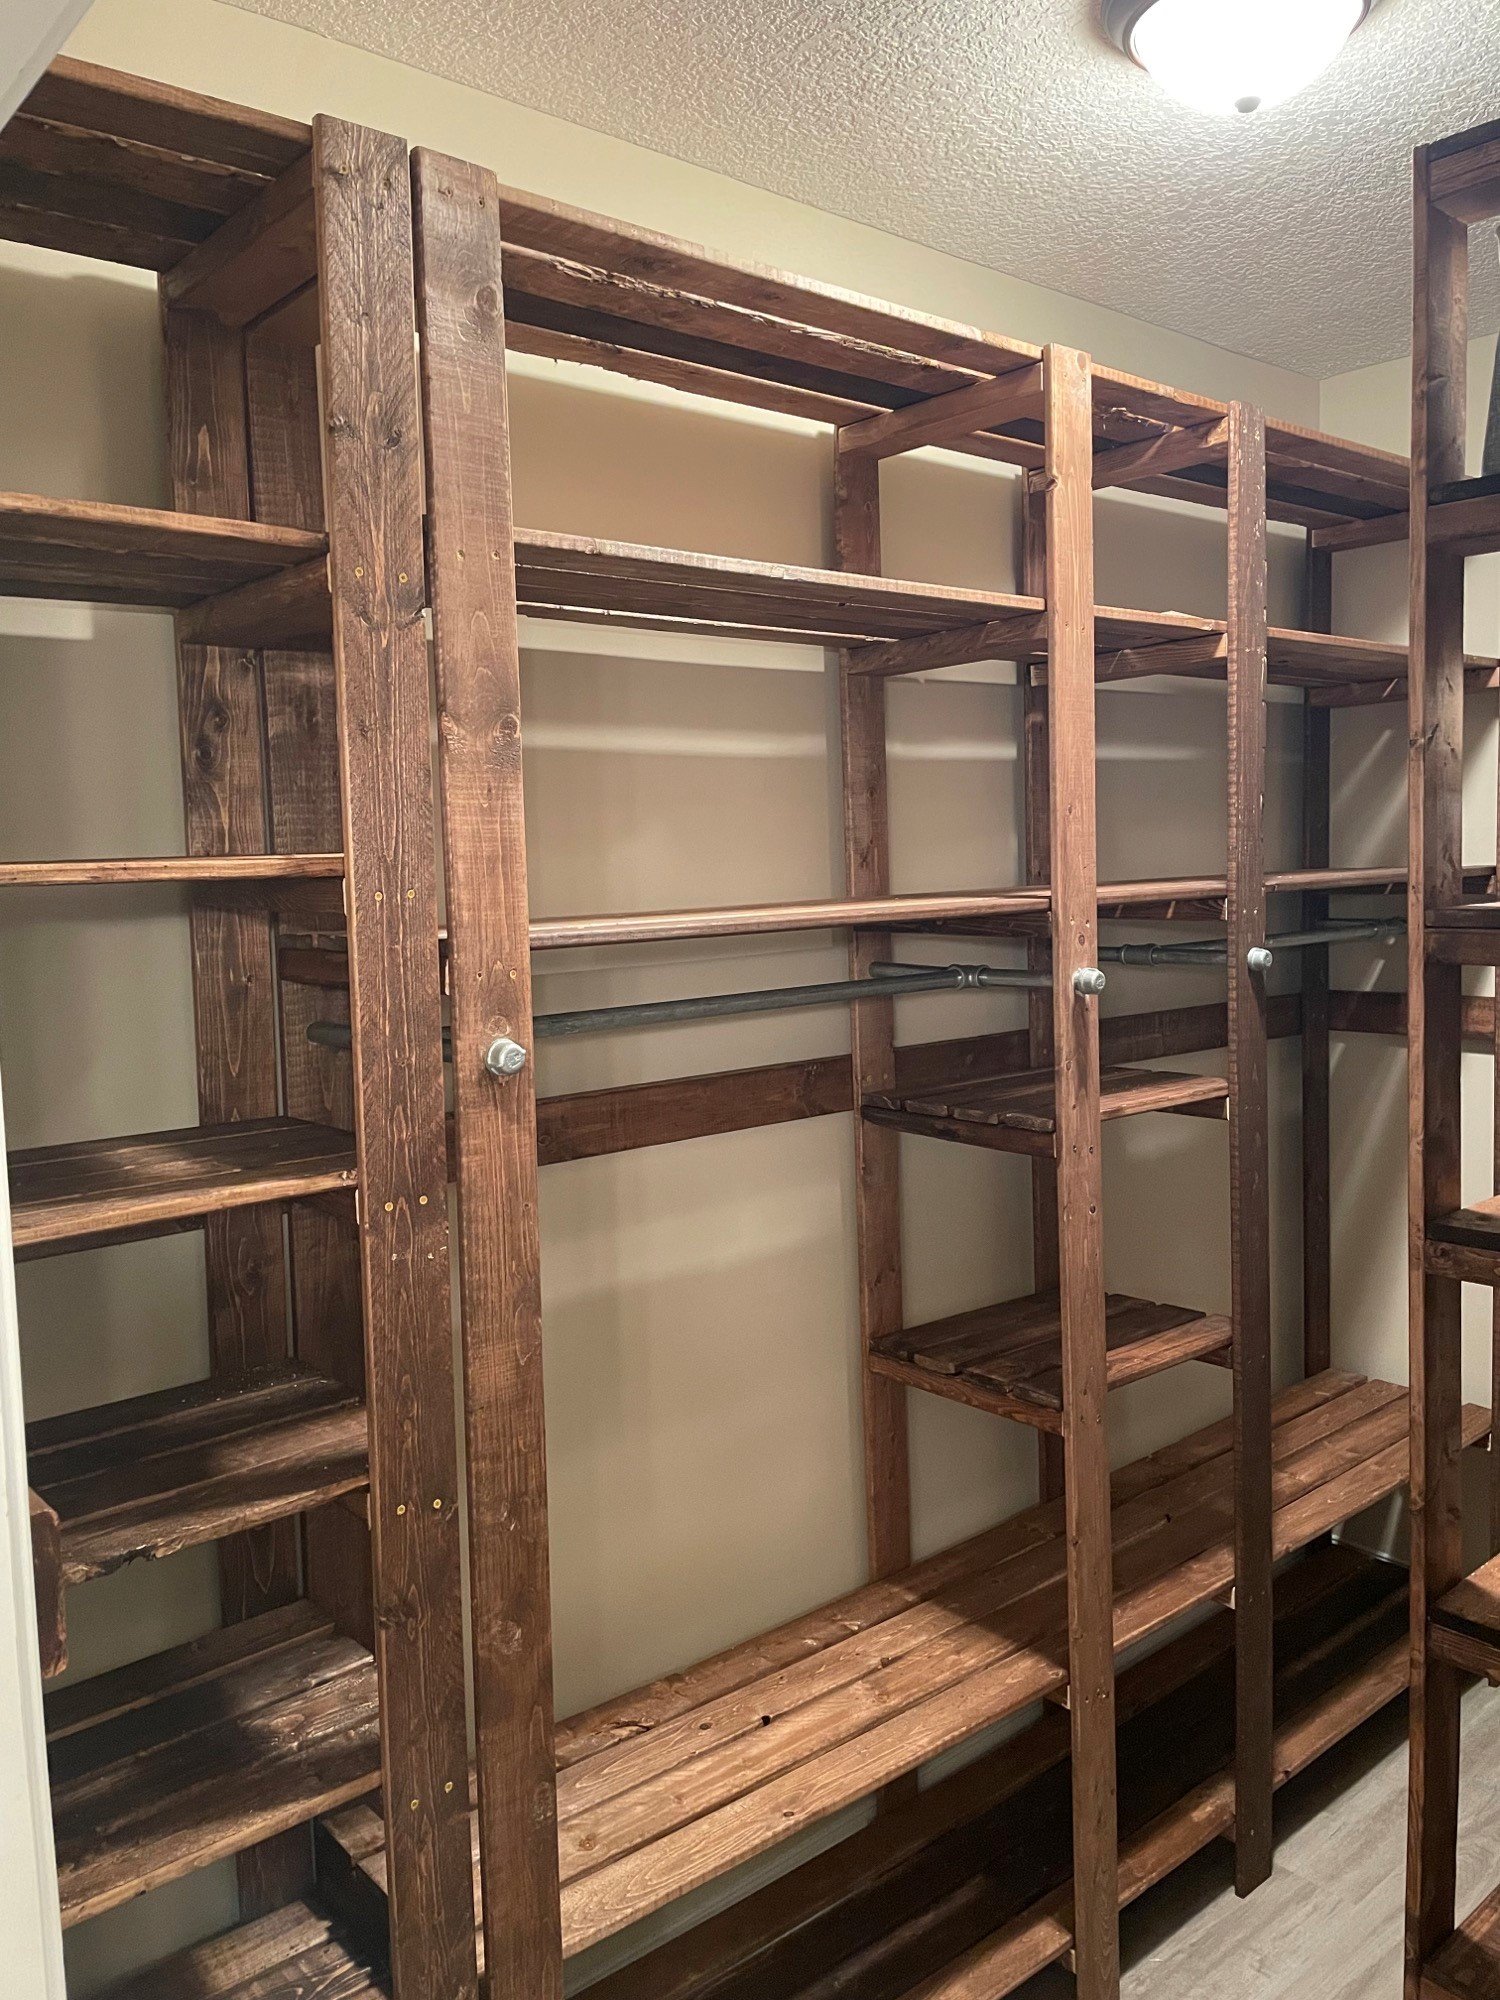
My closet system is four separate units that I butted up together and attached to the wall with a "decorative" 2x4 railing around the entirety of the closet. The main unit looks the closest to the real design but is 8 feet long and 8 feet tall to avoid extra cutting of boards. The smaller unit only has one area for hanging up clothes and is around 5 feet long which is just the length of the wall. I also built a unit for holding sheets and towels and another for my wife's shoes.
The plans are really easy to follow but I would suggest a few things:
-Do stain and boards before cutting; this would have been a nightmare otherwise.
-If you use the metal clothing rods (if I could go back in time I would have used wooden dowels) make sure that you put those in before you attach any boards between the support structures. I ended up having a 35 inch gap instead of a 36 inch gap and it killed my momentum.
-I made mine 8 feet tall because it was less to cut and then re-stain; time wise it probably was a scratch cause I had to build it in place and at the end it was very tight to work in the space.
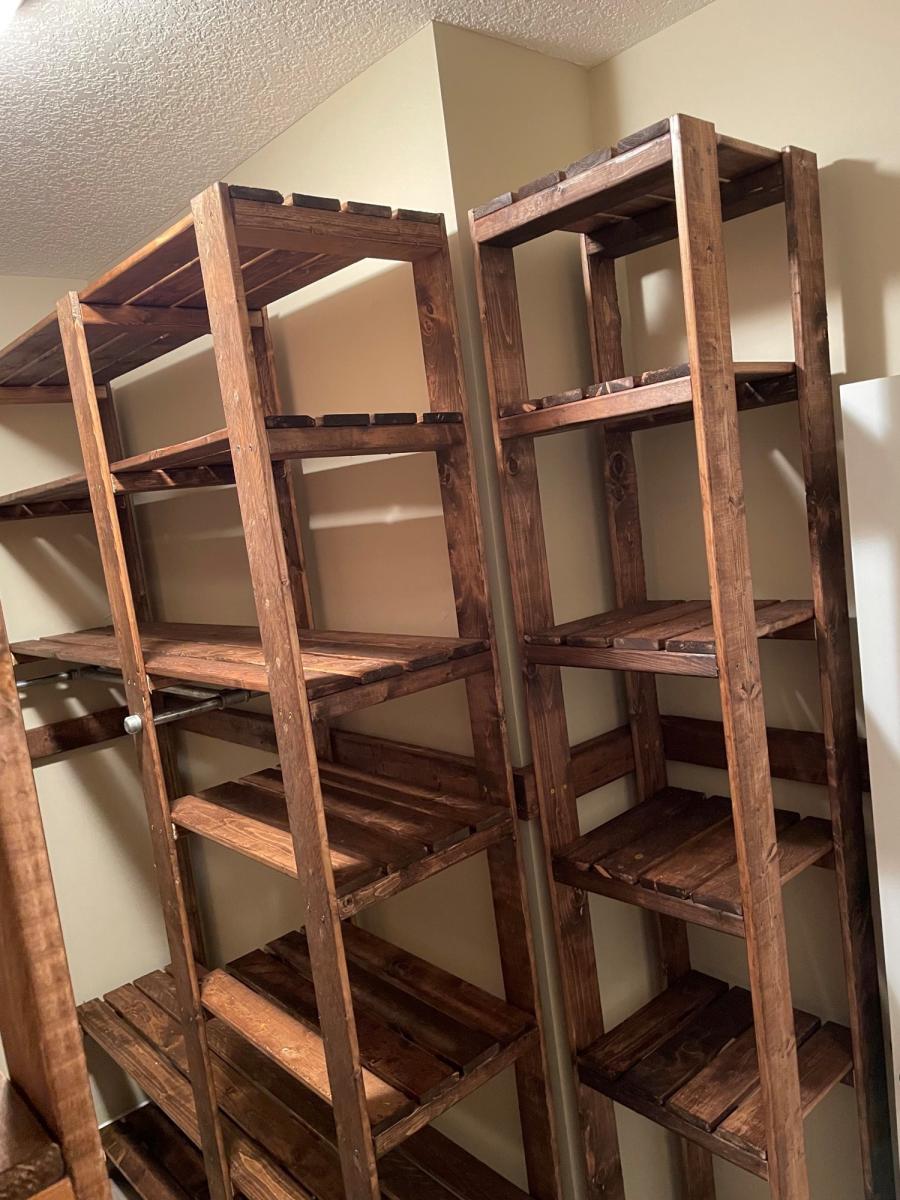
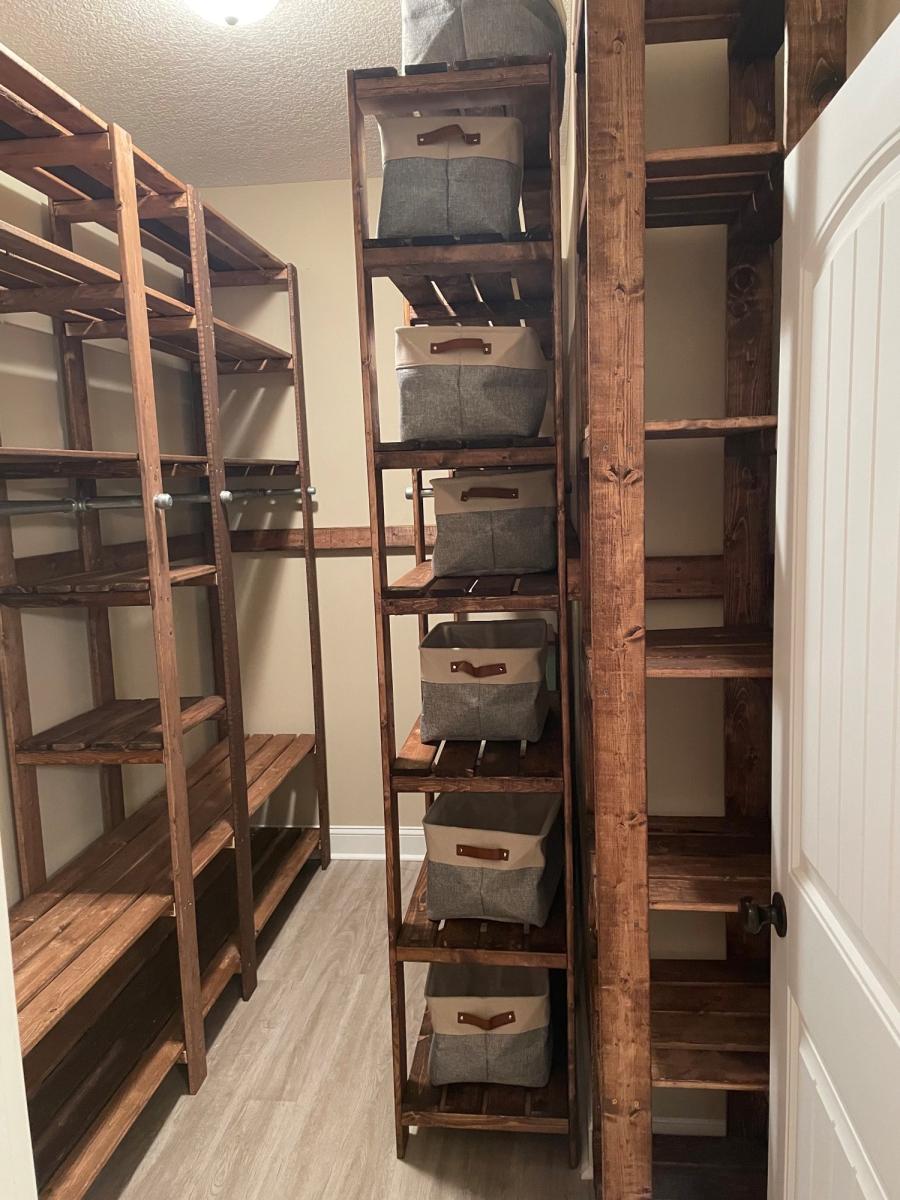
Built from Plan(s)
Comments
Gallery Shelves
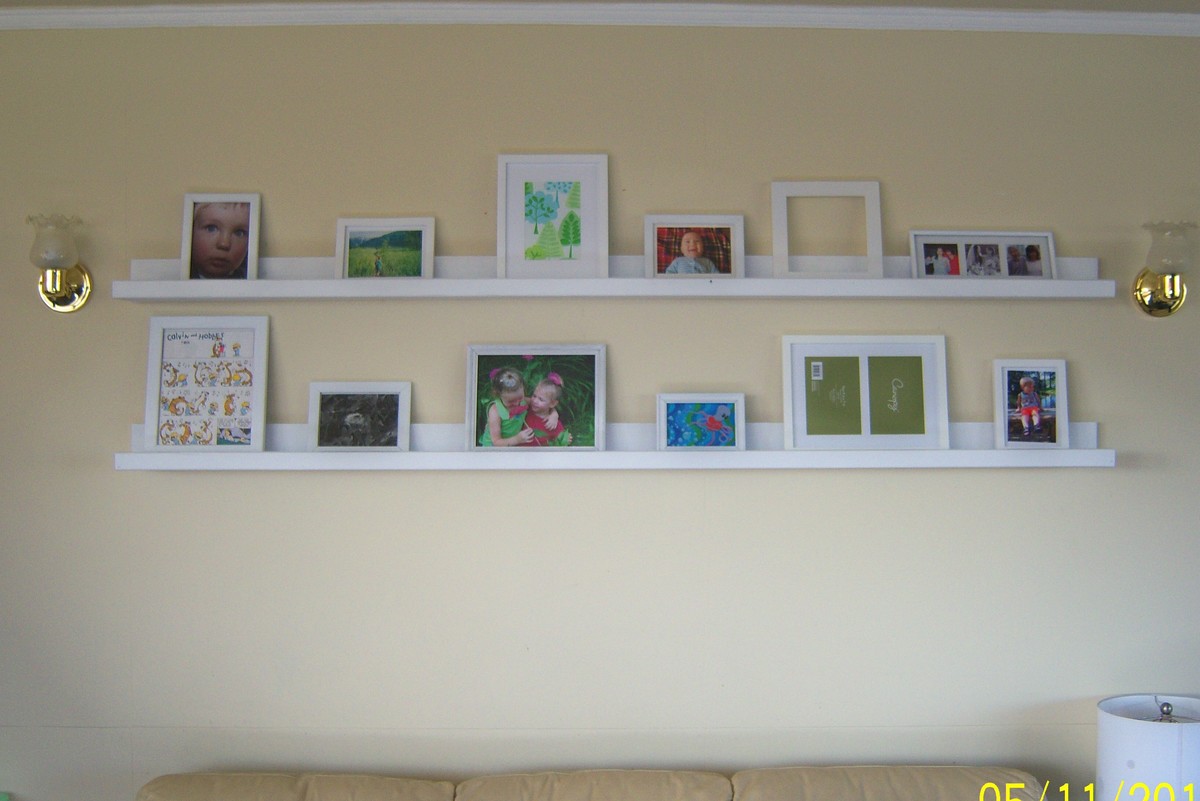
I live in Ketchikan, Alaska right smack in the middle of a rain forest, so I had been waiting for a sunny day for quite a while so i could get outside and get these built and painted. I got all the wood and about a week later my day came, I got outside and had them built, primed, and painted in less than 3 hours. I painted all my frames the next day and had my husband help my put them up. I have gotten SO many compliments on them and they look so great in our living room, after we put them up, I realized how naked that wall had looked before!
Built from Plan(s)
Estimated Cost
30 dollars
Estimated Time Investment
An Hour or Two (0-2 Hours)
Finish Used
Used a spray on primer, then finished with 2 coats of semi-gloss white. The frames I spray painted first, but as that didn't cover the black and brown frames enough, I went over that with some of the leftover paint.
Recommended Skill Level
Starter Project
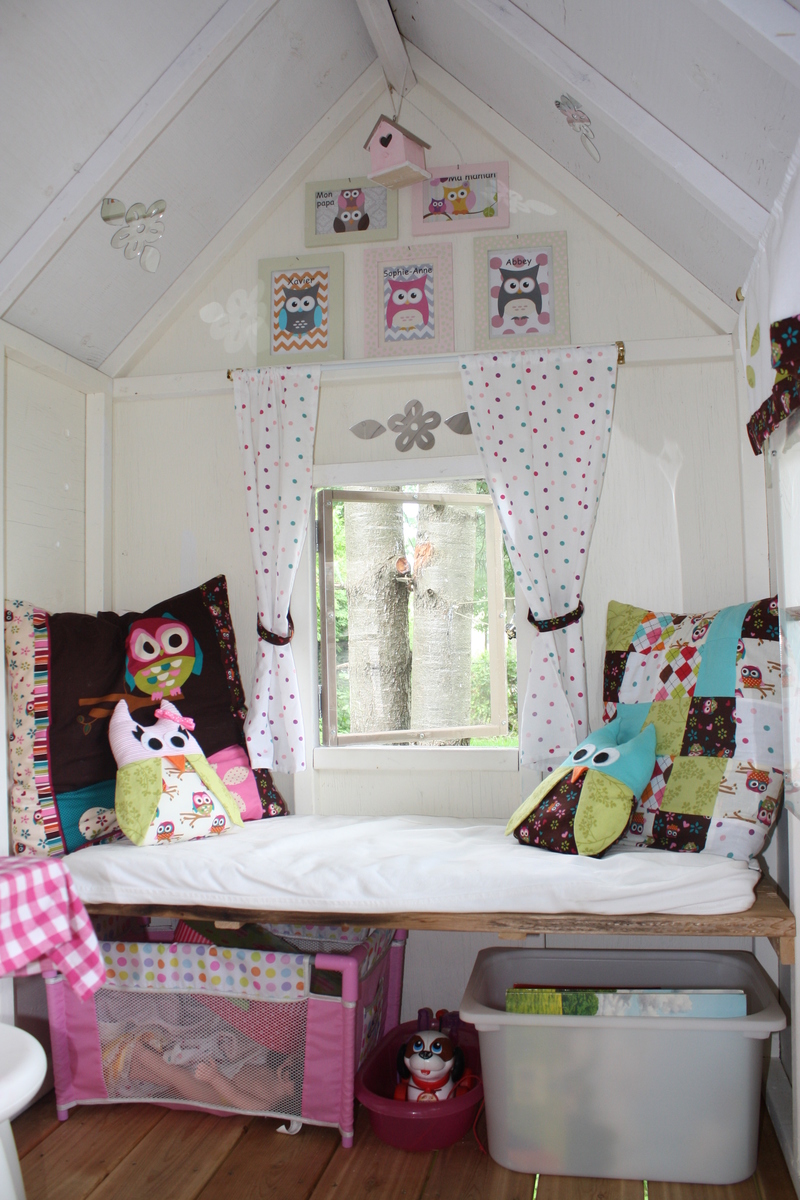
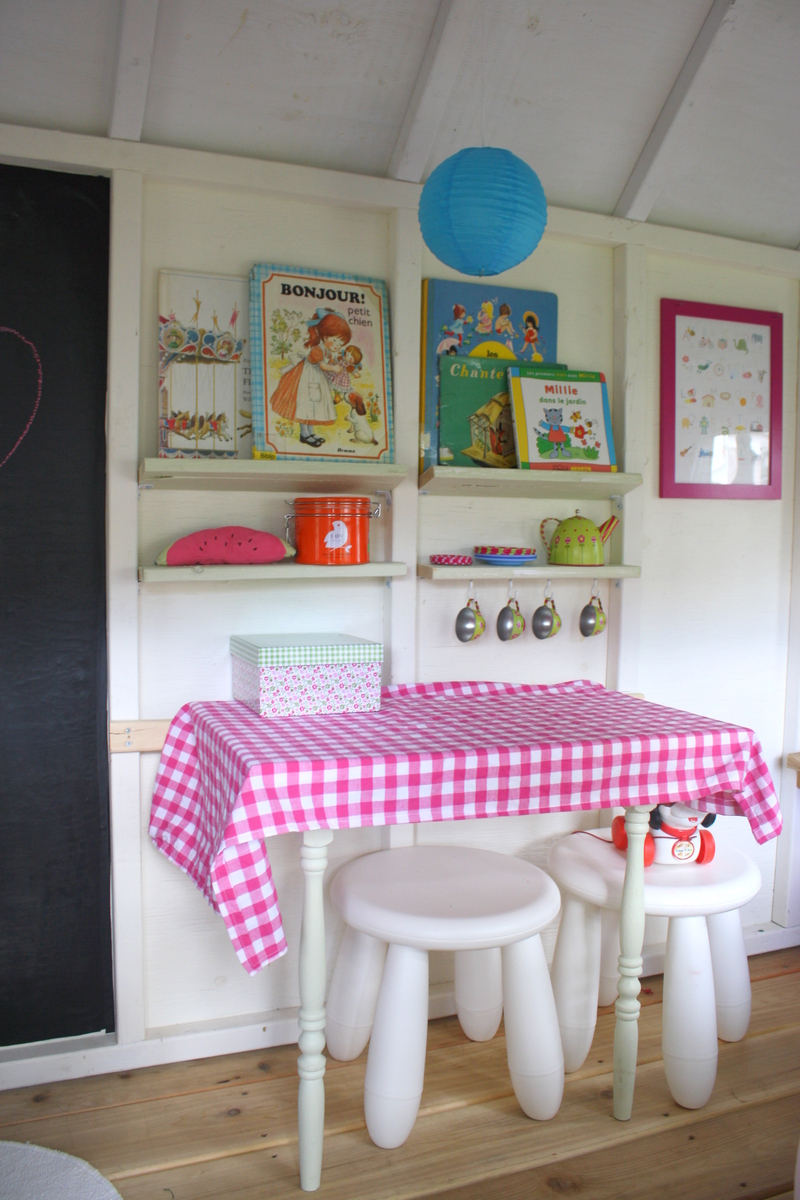
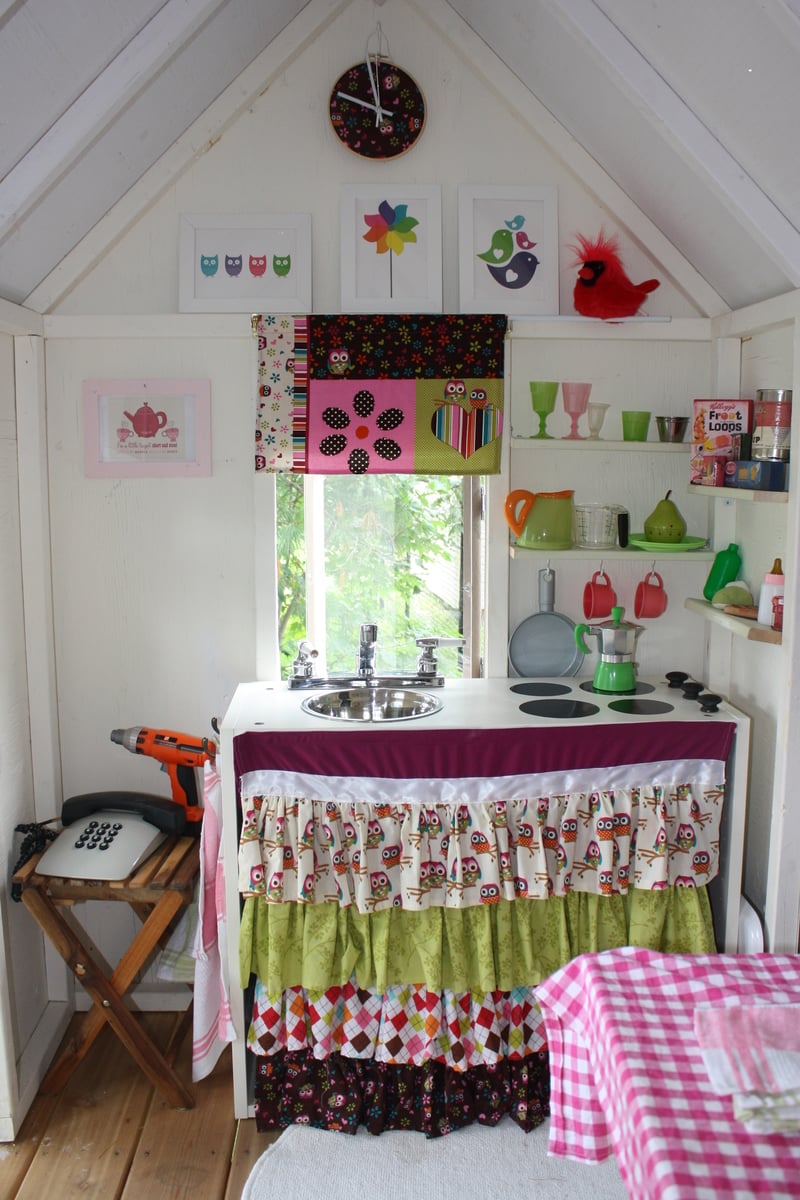
The playhouse project!
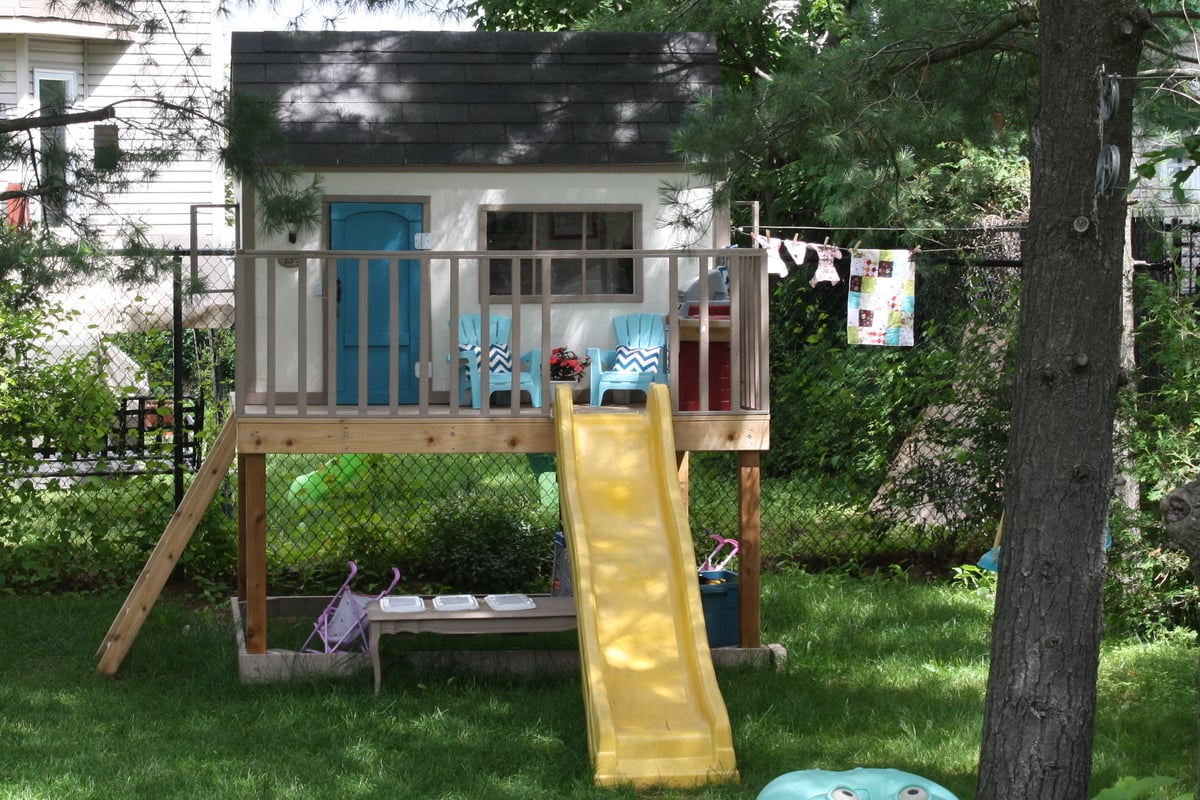
We started this project a few months ago. My husband made most of the construction, and I decorated the inside. We added many little details, including a clothesline, windows with plexiglass, a BBQ, a little kitchen, a doorbell, a solar light, a slide, shelves, a table, a bench, etc. The kids loooooove their new house. The whole project took many many hours, but I am really happy with the results. Thank you so much Ana for the plans!!
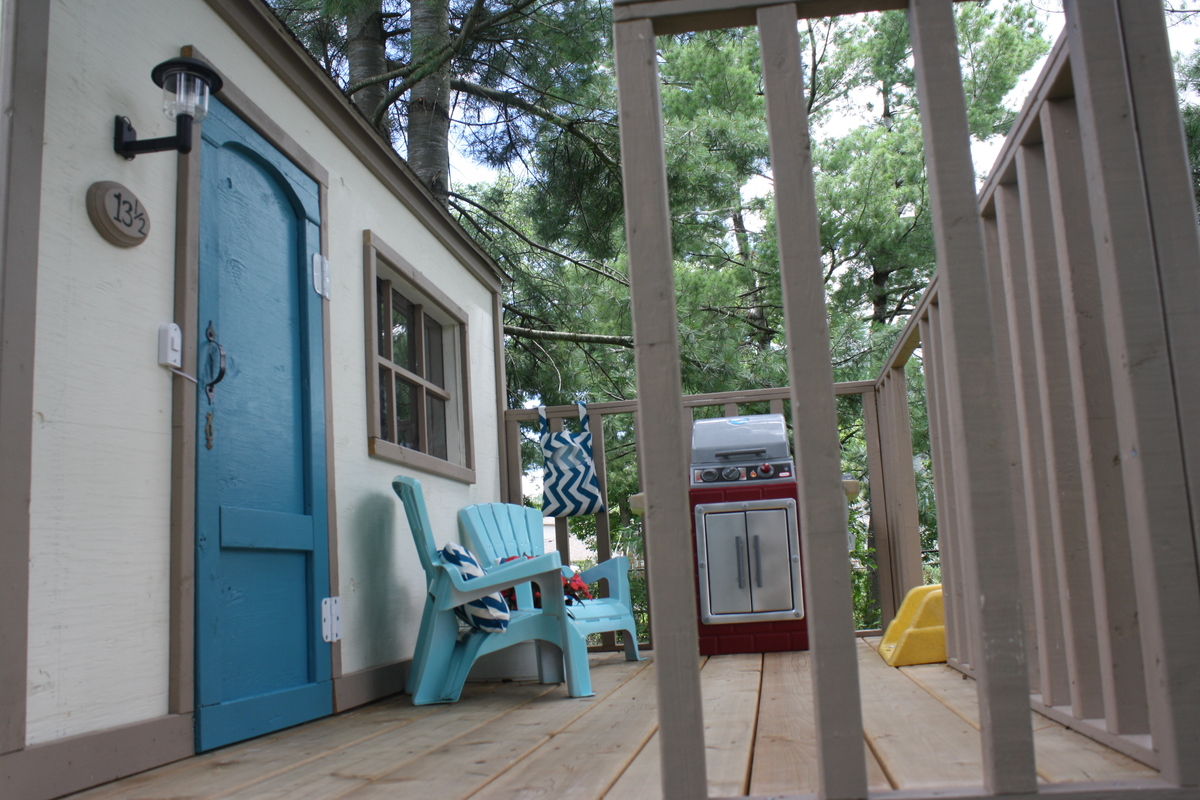
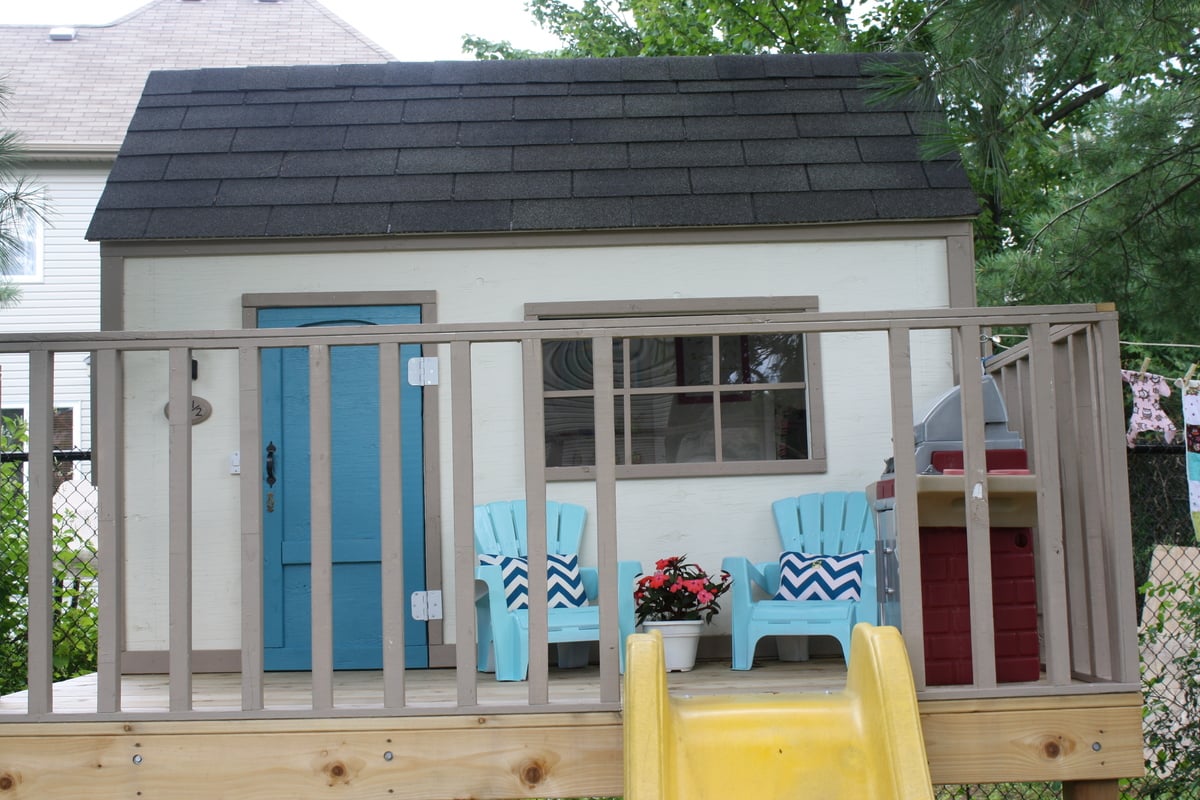
Built from Plan(s)
Estimated Cost
900 $
Estimated Time Investment
Week Long Project (20 Hours or More)
Finish Used
primer and extorior paint
Recommended Skill Level
Intermediate
Comments
Sun, 07/14/2013 - 21:10
Love the Details
Looks like your child has everything they need. Including a phone! I love the bench seat and the pillows with the window. So cool. You put a lot of work into this. Well done.
Thu, 04/03/2014 - 08:23
Playhouse
Love, love it! Couple of questions... how did you attach the walls to the decking and how far apart? How tall is the railing? I'm curious to know the sturdiness of the project overall and my SIL has concerns about the 3/4 roof sheeting over 1/4 walls. Comments please. My son-in-law and I have just started this project.
Owen's bench
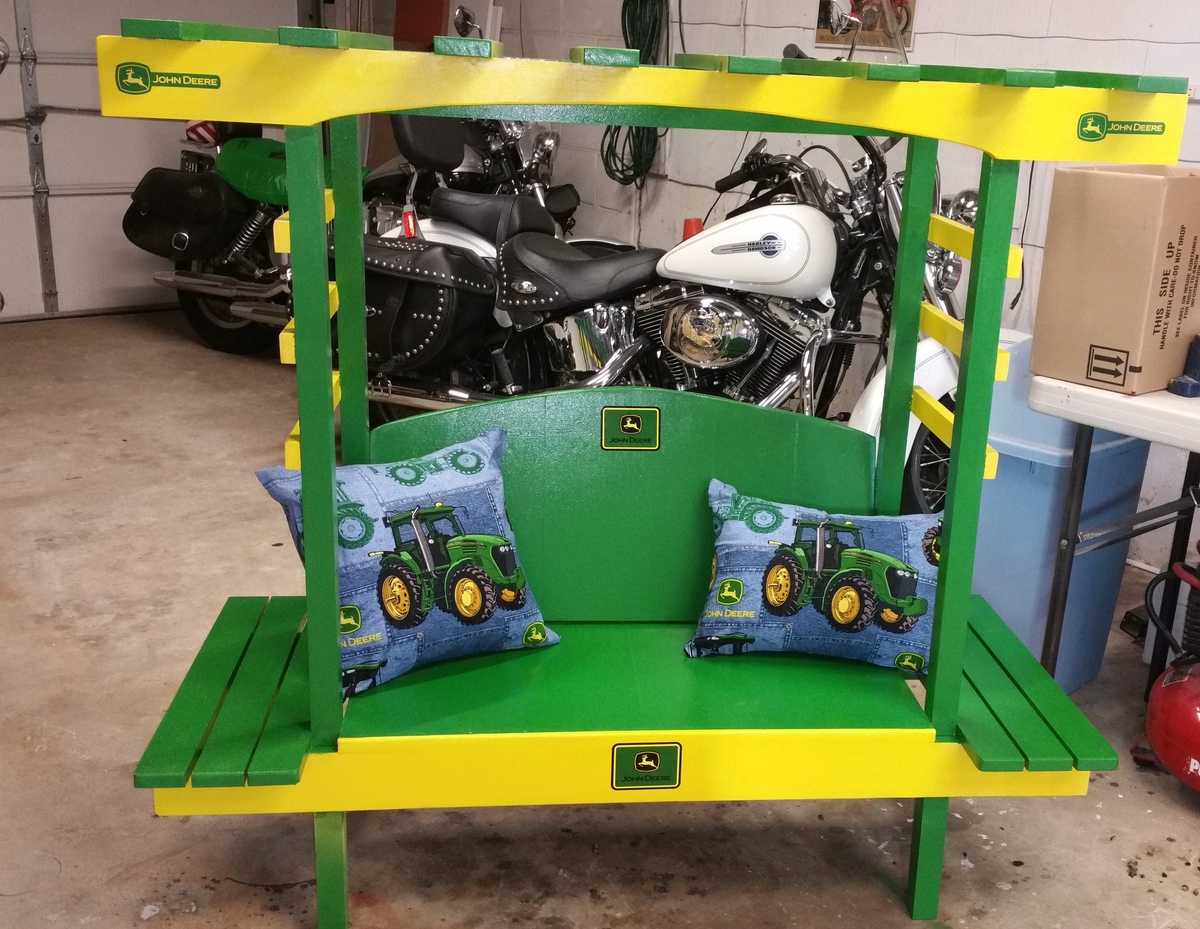
I made this for my grandnephew and it was really easy to build. I put it together first using a power brad nailer and then went back and screwed it all together for extra strength. The cut/build took just a few hours. The painting took several hours since I didn't prepaint and had to tape off where the colors were different (lesson learned for next time).
Built from Plan(s)
Estimated Cost
Approx $100
Estimated Time Investment
Afternoon Project (3-6 Hours)
Finish Used
Exterior Enamel
Recommended Skill Level
Beginner
Workshop Now in Session!
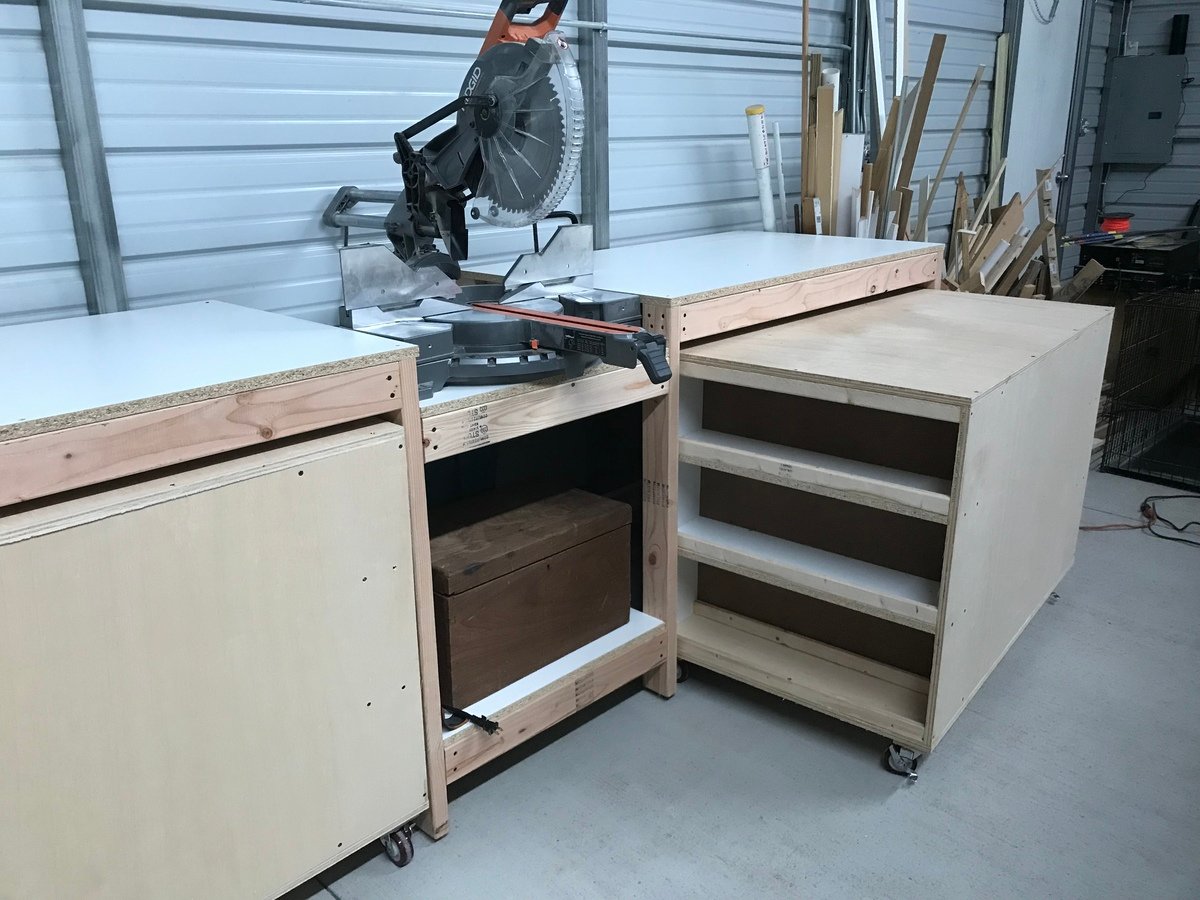
Easy instructions and simple design. One cart houses table saw, and the other I plan to make a router table. I did make a slight modification in design by adding T-nuts and 5/16” bolts for feet. (My shop floor is crowned). I also used 3/4” melamine white panels for table tops. Difficult to work with but cheaper and has a smooth surface. (Be careful using for structural parts due to glue not impregnating through melamine)
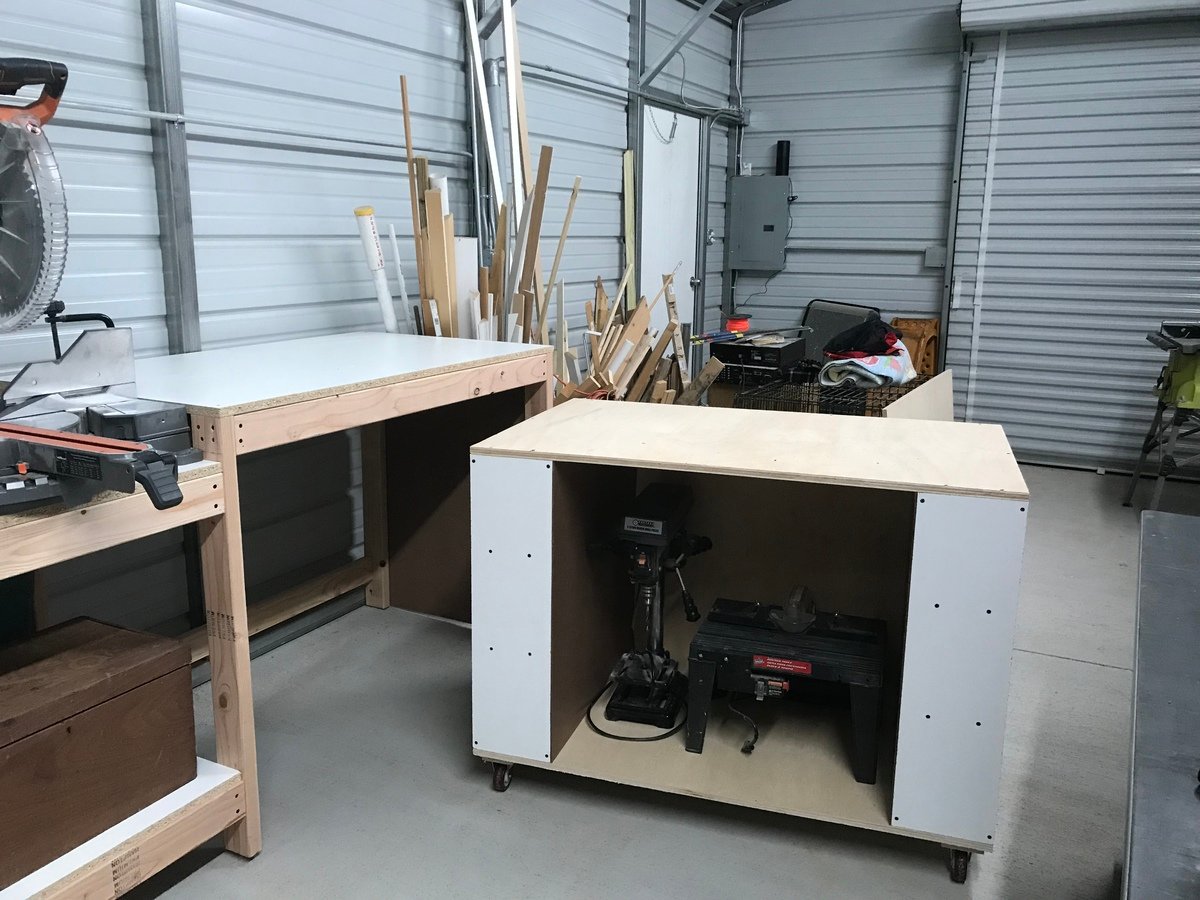
Built from Plan(s)
Estimated Cost
$250
Estimated Time Investment
Weekend Project (10-20 Hours)
Recommended Skill Level
Starter Project