Community Brag Posts

Twin size Fancy Bed

Submitted by boomer4676 on Fri, 08/24/2012 - 07:01

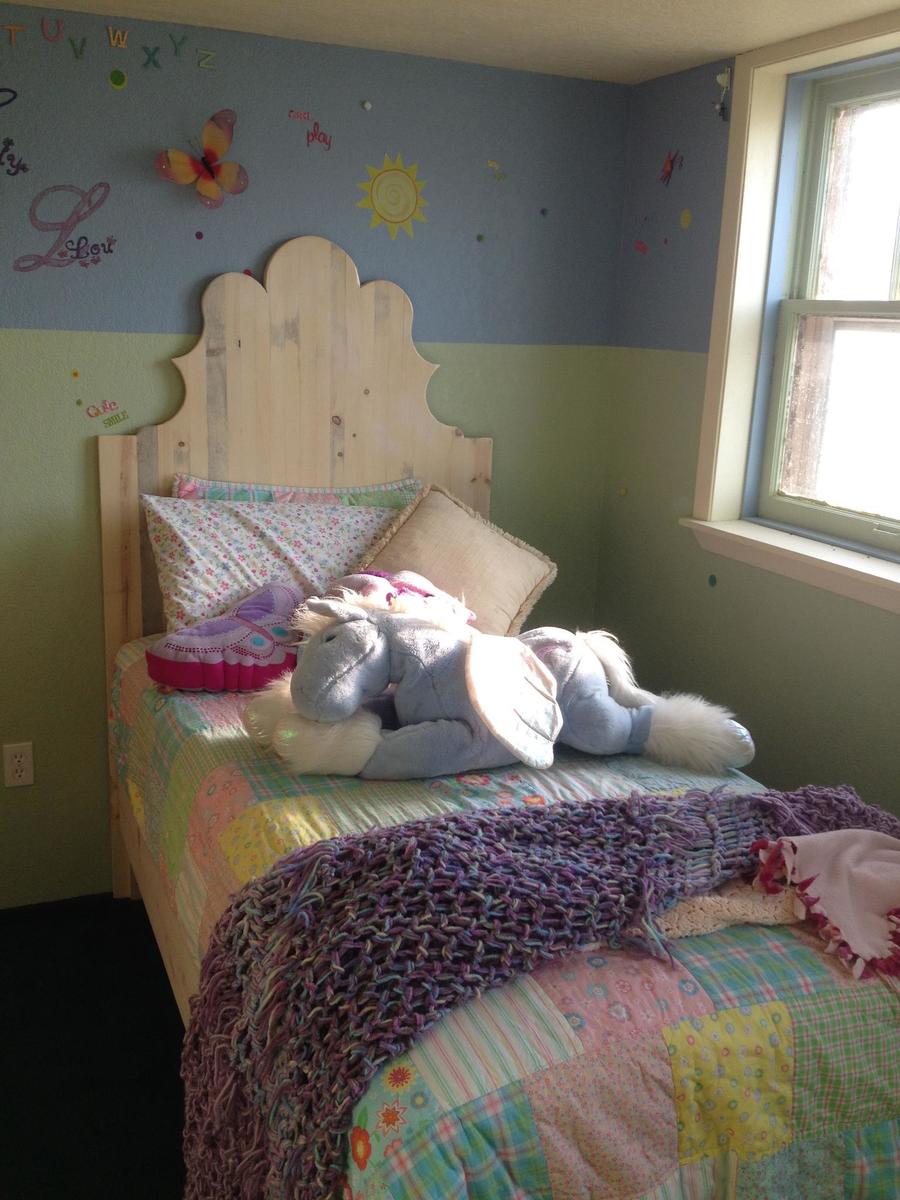
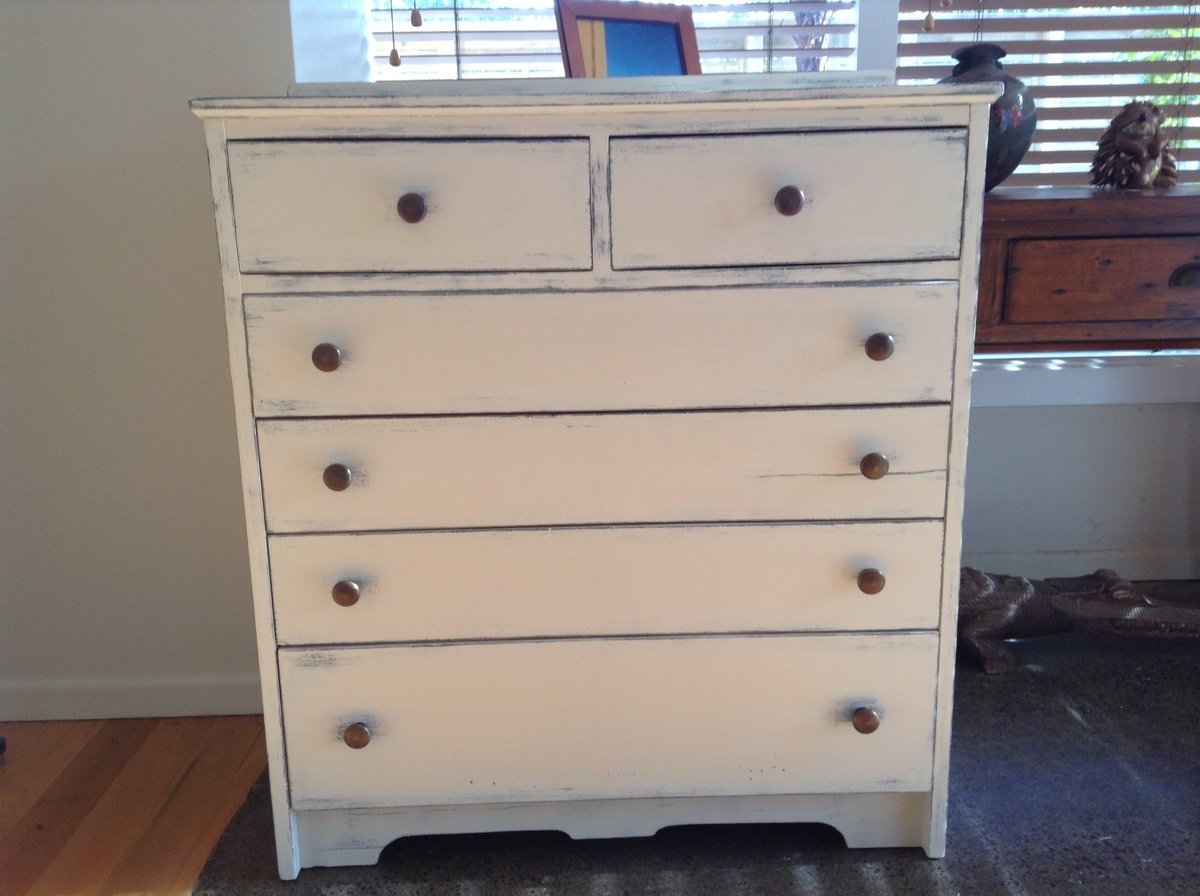
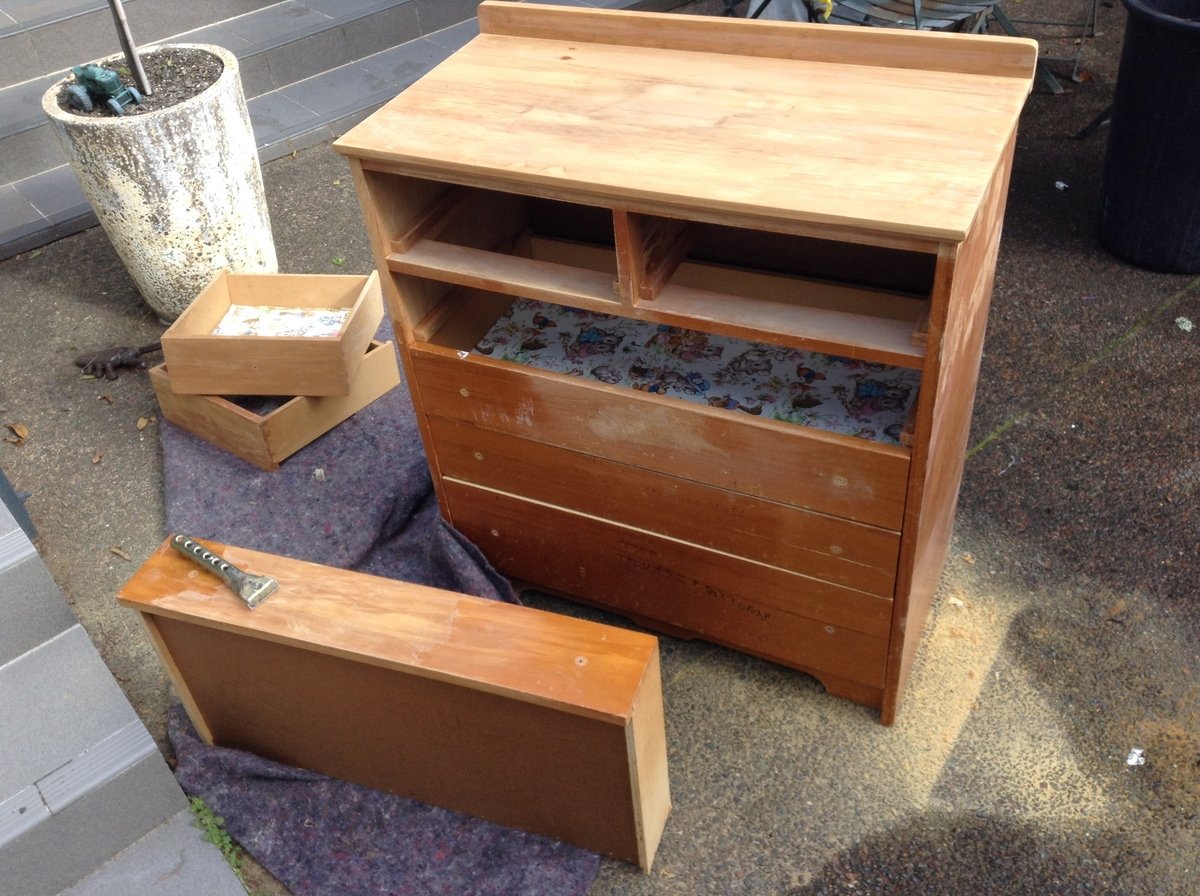
Wanted to build a new bed for my daughter and ran across the fancy one on here...I'm not too great at mimicking design shapes so I made my own. Stained with white country and a high gloss finish. I love it! Thanks Ana for making such easy to follow plans. It took me 3 days from start to finish. I use all rough cut lumber ran in a planer. Can't wait to build more!! I shrunk the plans down to fit a twin size mattress.

Estimated Time Investment
Day Project (6-9 Hours)
Finish Used
Country white
Recommended Skill Level
Beginner

My First Project

Submitted by MargaretB on Mon, 06/16/2014 - 16:15

This is my first attempt at recycling old furniture. I'm pleased with how it turned out with the slight distressing on the corners.

Estimated Time Investment
Weekend Project (10-20 Hours)
Finish Used
I used only what I had on hand, which was black gloss for the edges, then Half Spanish White paint on top which I sanded at the edges for the worn look. After this I intend to invest in new supplies specifically for this type of work.
Recommended Skill Level
Starter Project

Simple Modern Shelves

Submitted by Anonymous (not verified) on Wed, 09/14/2016 - 08:06

These modern style shelves are easy to make and can be used for a myrid of things. We are using them primarily as DVD storage, but they will work for books, small toys, and other display items. 


My daughter likes movies and by likes, I mean she loves movies!! Her world, much like many other 4 year olds, revolves around Disney characters. At this point she is hung up on Toy Story, for the second time. When next week rolls around, who knows who or what it will be next.

My wife and I have been buying her Disney movies and all other various cartoon movies since she was first born. The problem with that is, you start to run out of places to store them after a while. Our dvd storage racks have been overflowing for the last couple years and we finally decided enough was enough. I had to build some more storage, preferably in her room this time. This would alleviate some room for us and put the movies where she could more easily access them. I knew I wanted something colorful and not too complicated, I was pretty happy with what we came up with. 

You can check out the rest of the article and the instruction here and get the plans here.

Estimated Time Investment
Weekend Project (10-20 Hours)
Finish Used
Primer, If you really want them to stand out, use a high gloss paint
Recommended Skill Level
Beginner

Cedar Storage Box

My wife and I constructed this cedar storage box over a few days. We lined the inside with heavy-duty plastic in the hopes of keeping it dry(ish). It will store the cushions for our patio chairs, which otherwise would be laying around in our master bedroom taking up space. The legs on the storage box still have the bark attached to the boards, which gives it a great unique effect. We purchased a whole bunch of cedar from a mill for cheap - they are "off cuts," or edges with bark on them. There are a ton of useable boards that we've pulled and the rest we'll use as firewood. It was a great deal, but a lot of labor to go through the huge pile. Overall, very worth it when you consider the price per useable board is <$1 for cedar. This was our first major woodworking projects and I have to say -- the box came together beautifully. Thank you for the detailed plans. I'm very grateful for this online community!

Estimated Cost
<$5, but see details in description
Estimated Time Investment
Weekend Project (10-20 Hours)
Finish Used
None yet, weighing our options
Recommended Skill Level
Beginner

Long Outdoor Table

Submitted by Anonymous (not verified) on Thu, 04/18/2024 - 12:44

We built your farm table following your instructions for a table on our back deck. It was our first project and we had no clue what we were doing, but it turned out wonderfully! We have already received many compliments! Very excited to do the benches next!

rachellake.ca

Hailey platform bed and headboard

took my time and followed the plans with the exception of modifying them for a king size bed. Turned out great! Thanks a lot.

Estimated Cost
250.00
Estimated Time Investment
Weekend Project (10-20 Hours)
Finish Used
none yet
Recommended Skill Level
Beginner

Comments

Kristin Swanson

Thu, 02/28/2013 - 20:16

Hi. Would you mind sharing the king size dimensions please? I love this bed, but am worried I'm going to mess up the conversions and cut list. Thanks in advance! Kristin

Outdoor Sectional with Coffee Table

Submitted by HeidiT on Fri, 06/20/2014 - 10:35

My FIRST furniture making project ever! Previous woodworking project was a sorry-looking wall shelf made in high school shop class. The plans for this project were VERY easy to follow! Thank you, Ana!

Once I set up the sectional on our screened porch, I realized I really wanted a coffee table. So, I used the Accent Table for Simple Modern Outdoor Sectional plans as a guide. I lengthened the side and underneath supports to accommodate a longer top (46 1/2" for side supports and 45" for underneath supports) and made 13 top slats, instead of only 6 for accent table. Finished coffee table measures 48" length x 23 1/2"width x 17" height and used 7 boards, plus a scrap 17" piece leftover from sectional pieces.

Project Costs for 4 armless sections, 2 corner sections & coffee table (Maryland):

40 1x4"x8' common boards
2 boxes 2" dipped wood screws
1 box 1 1/4" dipped wood screws
bottle of wood glue
Quart of Kilz outdoor primer
Quart of Benjamin Moore "Ben" Low Lustre Exterior paint in Bittersweet Chocolate
Four Rolston 2-piece and Two Rolston 3-piece replacement outdoor cushions in Beige from Target (now discontinued). (Biggest chunk of cost, $520)

TOTAL = $~765

P.S. Find and buy the cushions first! It took me a long time to find them online. And when I went back to reorder more, after I decided to make sectional bigger than I originally planned, they had discontinued the corner sections. So, I just used a 2 piece cushion for one end. I actually like the way it looks (see pictures).
P.P.S. Our dog especially loves to sleep under the sectional...

Estimated Cost
~$765
Estimated Time Investment
Weekend Project (10-20 Hours)
Finish Used
one coat Kilz indoor/outdoor primer (hides pine knots better than regular primer)
two coats Benjamin Moore BEN Low Lustre Exterior in Bittersweet Chocolate
Recommended Skill Level
Beginner

Comments

Camey21

Sun, 09/14/2014 - 22:18

Hello! I LOVE your build!! Did you happen to modify the size of the armless sections? I want to make two chairs (instead of a sofa) for my porch but am having a hard time finding cushions that will fit. Ana states that a 20x20 cushion will fit but everything I have found online is larger than 20x20.  I found the same ones you used but they are larger than 20x20. Are you willing to share your dimensions? Thanks so much!!! I can't WAIT to start on this set!!!

HeidiT

Fri, 02/05/2016 - 07:48

Sorry for the delay in responding!  I had no idea anyone had commented...  Anyway, you have probably finished your project and moved on to another one by now.  But, in case you are actually waiting for me to respond still (I hope not!) the cushions I used are bigger than what was suggested, but I squished the ends in between the two back pieces.  That actually worked out better because it holds the cushions in place, rather than having them slide around.  Good luck!

Our relaxation area

Submitted by Anonymous (not verified) on Mon, 09/19/2016 - 13:25

I had fun doing this project, it was pretty simple.  One of the boards said wrong on the plans, but I like my finished project!

Estimated Time Investment
Weekend Project (10-20 Hours)
Recommended Skill Level
Intermediate

Laundry Room Table

Submitted by TX Shaun on Wed, 07/01/2020 - 21:05

I modified the plans for the farmhouse console table to create a laundry room table. I changed the shelf height and used 2x4s running the entire length for the shelf.

Built from Plan(s)
Estimated Cost
$50
Estimated Time Investment
Afternoon Project (3-6 Hours)
Finish Used
Minwax grey stain and white paint.
Recommended Skill Level
Beginner

Harvest Table

This was our first attempt of any form of woodwork. The plans were easy to follow and after each step in the process of building this table, we became more confident in what we were doing. The great thing about this table was that with the exception of the wood used for the table top, we were able to scrounge around from various construction sites, the wood needed to complete the project. Most of the wood for this project was wood that was destined to a land fill so it was nice to salvage what materials we could to save our environment. Thanks Ana!

Estimated Time Investment
Week Long Project (20 Hours or More)
Finish Used
Walnut stain with a poly coat.
Recommended Skill Level
Beginner

Milk Paint Bookshelves

Submitted by SaraLodise on Fri, 09/23/2016 - 12:53

Some built-in bookshelves finished using milk paint. 

General Finishes 'Lamp Black' base coat + 'Driftwood' top coat, sanded down so 'Lamp Black' showes through. Yellow Ochre Glaze coat to add an aged look, then a quick coat of polycrylic for protection

Estimated Time Investment
Day Project (6-9 Hours)
Finish Used
(see description)
Recommended Skill Level
Intermediate

Comments

Modern round table

Extended round tanke with a middel section and a cross skapes leg structure. Loves working with the table top. I Sander down the old tanke top, jigsawed out the desired shape, brunt it with a blow torch, Sandnes and oiled with a stain. So satisfied.

Built from Plan(s)
Estimated Cost
5$
Recommended Skill Level
Advanced

Eco-Office With Divider

Submitted by reyncloud on Wed, 08/29/2012 - 19:00

I finally completed all of the pieces for the Eco-Office Desk! Needless to say, I love it! Once I bought the Pure-Bond Plywood for the middle desk and desktop, I wish I'd spent the few extra dollars and used the same materials for the end cubbies. The wood in the Pure Bond is beautiful, and there is really no comparison to the other plywood. I *may* redo the end cubbies in the future, but for now I'm looking forward to using the space.
For the finish on the middle desk and desktop, I used the Satin Minwax Polycrylic, and it looks great. Couldn't be happier.

Estimated Cost
$55
Estimated Time Investment
An Hour or Two (0-2 Hours)
Finish Used
Minwax Satin Polycrylic
Recommended Skill Level
Beginner

Barn door media wall suite

Submitted by Anonymous (not verified) on Sun, 09/25/2016 - 20:04

This was the first thing my husband has EVER built. He's the kind of guy that's better with his mind than his hands, so this is a huge accomplishment for him.  We truly love this piece and are proud to have it in our home. 


We would like to add crown molding to the top in the near future. Also debating on adding a shelf in the middle to raise the TV so that the TV will sit in the center of the opening. 


Built from Plan(s)
Estimated Time Investment
Week Long Project (20 Hours or More)
Recommended Skill Level
Beginner

My first workbench

Submitted by DaDeDeuce on Mon, 07/06/2020 - 08:46

This is my first attempt and first woodwook project ever. I used the plans from this site for the workbench with space for a table saw. I changed the dimensions to 4'Wx7'Lx3'H (originally 3x6x2 1/2). It ended up bigger than I imagined though. But hopefully not bad for my 1st shot at a project of this scope. Next step is a polyethylene finish. It looks like the plan has been removed from this site though.

Estimated Cost
$200
Estimated Time Investment
Weekend Project (10-20 Hours)
Recommended Skill Level
Beginner

Comments

Braden Entryway Collection_Modified

This was the first piece of wood work that I have worked on since I was 19; however, your site is so filled with such beautiful work, that I just had to make something.

Luckily we were in need of an entryway--a place to sit and tie shoes, hang coats, and have cubbies to store hats, mitts, scarves, as well as my gardening tools!

I modified your Braden Entryway Collection to fit the space I had, but I hope you agree that it turned out quite nicely, despite my novice alterations.

I'm very fond of the look and smell of bare pine, so the piece is only finished with Tung oil.

Thank you so much for such a rich site, and for an incredibly detailed 'how to,' I don't think I could have managed without it. I also couldn't have managed this without prednisone. I have Lupus, and normally I can't move very much without very severe pain, fortunately the middle to weeks of this prednisone journey left me feeling like superman! Lupus is degenerative so this may be the last piece I make, so I am inordinately fond of it!

The only drawback was that i had to borrow (and purchase) bar clamps, which I found indispnsible.

Many thanks again,
Jennifer

Estimated Cost
$150.00 Canadian
Estimated Time Investment
Weekend Project (10-20 Hours)
Finish Used
Tung oil (3 coats - with approximately 24h between coats)
Recommended Skill Level
Beginner

Laundry area table

Submitted by zen on Mon, 09/03/2012 - 14:40

Work table for our laundry area

Estimated Time Investment
Weekend Project (10-20 Hours)
Recommended Skill Level
Starter Project

Comments

Sunrhyse

Sun, 03/04/2018 - 08:01

Are there plans on how to build this work table? Supply list, Cut list.

Cedar Spa Bathroom Step Stool

Submitted by Tea Granny on Mon, 06/30/2014 - 20:44

After searching the town high and low for a 10" high wooden stool, I decided to make one. Ana had the perfect stool pattern to modify for our needs - A little shorter, a little wider.....et Voila!

It's the perfect height for little ones to reach the taps in the bathroom, as well as helping out in the kitchen from time to time. And, the cedar smells wonderful.

Finished height: 10"
Top measures: 11.25" x 16.5" (2 boards, cut 16.5" long + a space in the middle)
Footprint: 12.375" x 17.375"

I also lined up the rails (instead of staggering them), similar to the Harriet Higher Chair plans. The joint will be weaker, but I prefer the cleaner lines on such a short step stool.

Thanks Ana for the great plans!

Estimated Cost
less than $15 (cedar)
Estimated Time Investment
Afternoon Project (3-6 Hours)
Finish Used
No finish added, exposed screws.
Recommended Skill Level
Beginner
Back