First rustic build
My wife loves the farmhouse style, so this was my first build based on the X console plans for sofa tables. Its very "rustic" to say the least, but is very functional and was a great project to get started.
My mom and I made these together as our first Ana White project! So much fun making both these chairs and memories! Next up is the three pedestal farm table and bench!
This was something I build a couple years ago, it's not the same as this plan, but very similar. When we moved in to the house, the slab was already poured, with 4x4s already in place, I just used what was there and my imagination for the rest.
This was such a fun build! When I found out my youngest sister Lindsay was expecting her first baby, I wanted to make her something special and when I saw the plans for this scooter I knew it was perfect as both of us love scooters. I made a few adjustments to the plan (thicker hardwood for the main body, cross supports attached to inside of rails with pocket hole etc.). I also added a bell on the handle bars and a mirror. I can't wait to give it to her. My 2 1/2 year old daughter isn't sure she wants to share it. May need to make one (slightly bigger) for her!
Wed, 03/04/2015 - 07:42
I know this is an old post but this scooter is adorable! Where on earth did you find that cute little mirror? And did you cut out the 2x10 out with a jigsaw or a bandsaw?
Thu, 12/03/2015 - 20:49
What an adorable little build! I would love to know how you created the "wheels" and like the above poster, how you cut out the 2x10. :)
Made with 1X6 pine. Stained with Minwax Classic Grey, tree is latex white paint I had, and birds are chalk paint that I already had in my supplies.
Just love your site so many great ideas
The Vanity was my first attempt ever at building any type of furniture. Then the console table w/ matching end tables. It was not hard at all I’m not even a carpenter. Just a guy who enjoys working with wood. I Just follow Ana White’s plans. This will not be my last builds bc my wife keeps finding things she wants me to build. Happy wife, Happy life.
Thu, 12/16/2021 - 13:39
Thank you so much for sharing, those are all lovely!
Super simple and great looking shelves! Because of my set up, I chose not to do the key-holes on the back and instead drilled directly through the back lip. I also adapted the shelves to be 6" deep vs. 4". In order to make it easier to lift my jars from the shelves, I trimmed the front lip a 1/2". The color is "Ebony". It goes on jet black, but ends up looking like old barn wood--with out the splinters! They turned out perfect!
Modified corner cupboard to use as corner bookshelf in boys room. Omitted the lower doors otherwise shelf cut to specs. Painted with bold blue to match boys colors.
Added front to the drawers using the scrap 12x1 and feet on the bottom for maximum leveling
This was a great project. My son and I took your design from "Barn Door Cabinet with Mini Fridge and Microwave" and changed it up a bit. Let me start off I needed something small to a mini fridge in my "man cave". When I saw you design I used the plans to make the frame but then I took old fence slats and gave it a twist. All we need now is the mini fridge.
A big thanks to Ana for the original plan and to Kelly Hurt's brag post. Between the two, I got up the courage to repurpose my old table with Ana's farmhouse table. All was done with the Kreg jig so no holes to fill!
Recycled raised herb garden. Simply removed all the innards of an old grill I was going to throw away. Once it was gutted I pressured washed it and touch up the paint. Then I built a simple cedar box and placed it inside. Wa-la added basil, parsley and oregano.
Plans were great, thank you. We made our table a little deeper to accommodate 3 to 4 little ones, and purchased some little chairs at IKEA.
I made this for my 4 year old Granddaughter, and the first time she sat down she said “it’s just my size.”
I made the desk two and a half inches shorter than the plans.
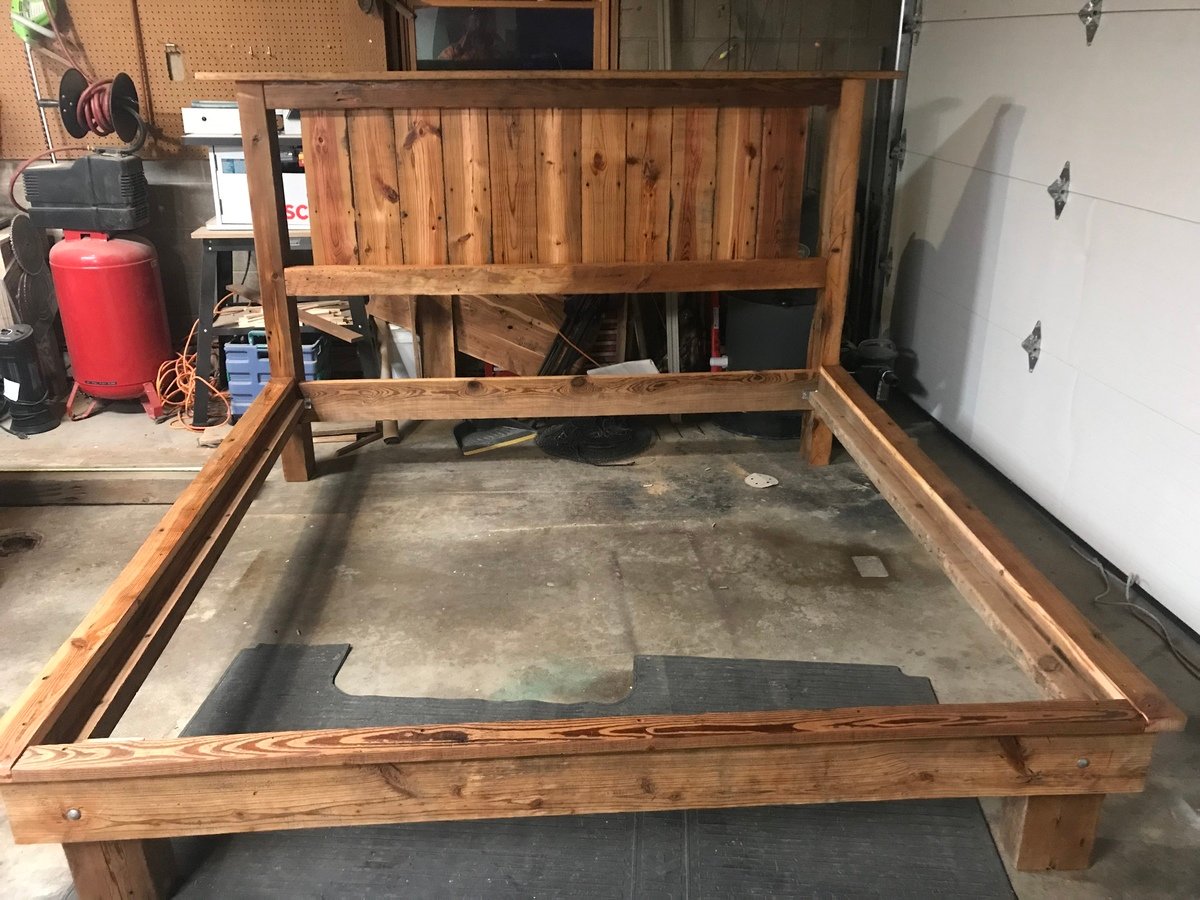
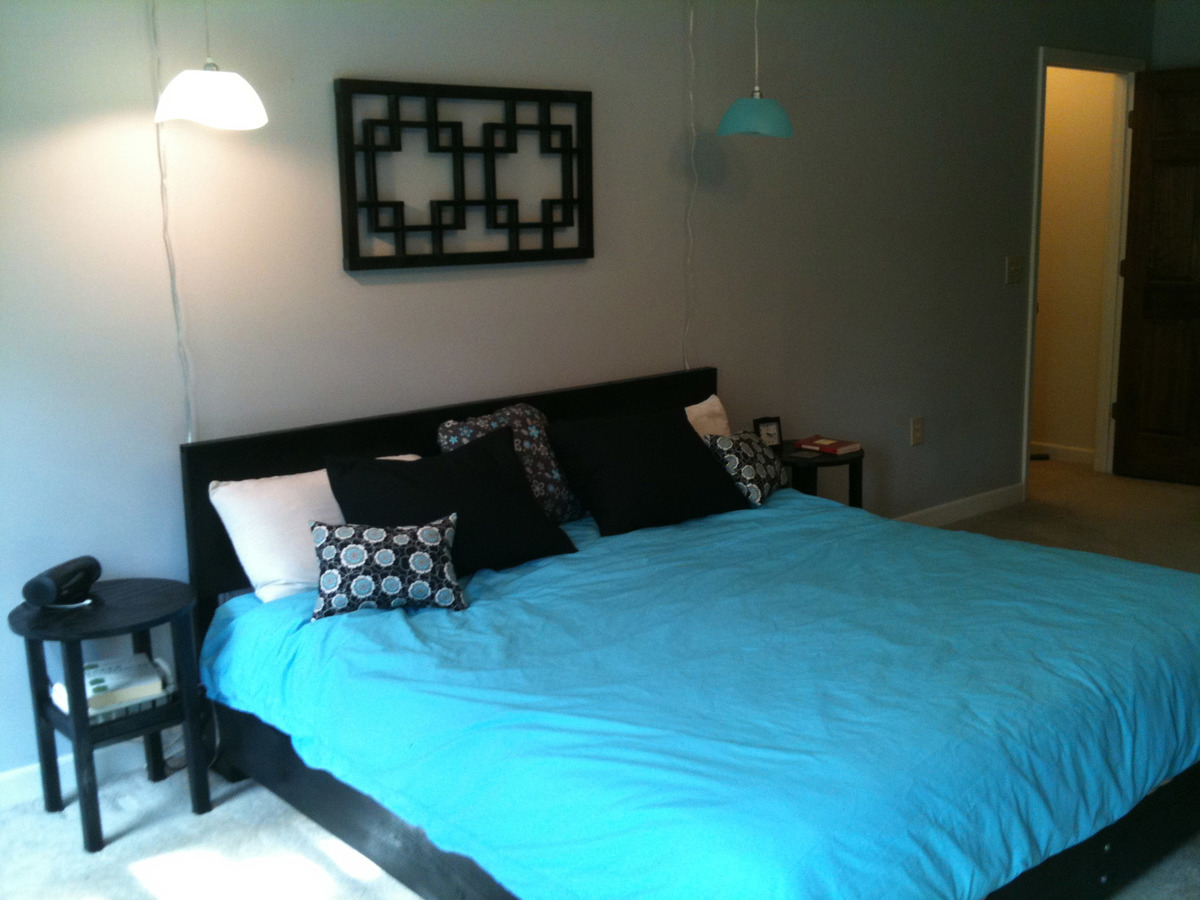
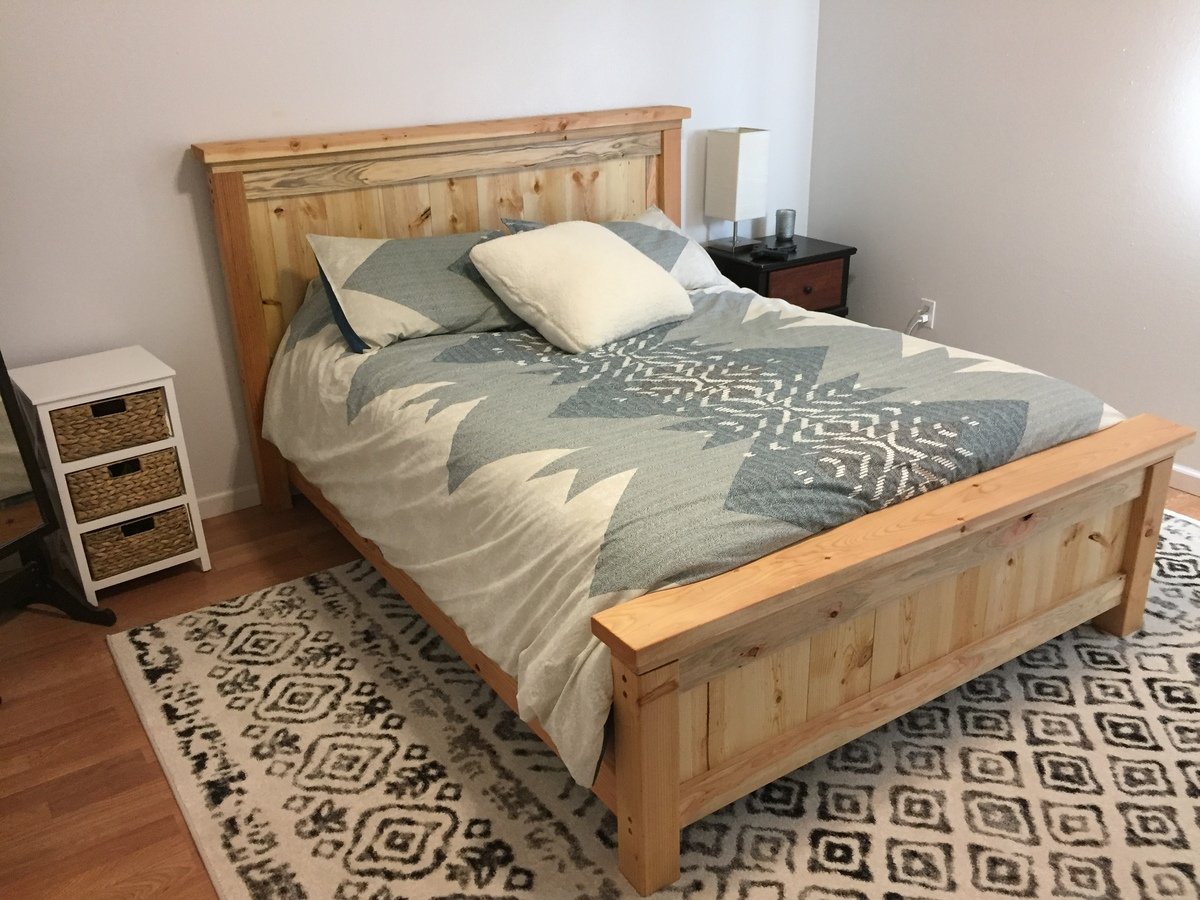
I've been on a building spree lately, and one of the things I have been wanting to do was change the look of our bedroom. We had a nice, traditional sleigh bed that we had since shortly after we got married(13 years ago), but really hadn't done much with our room since. We talked about platform beds, and I toyed with making the west elm one for a while. Finally hubby went out of town and I could get to work.
I decided to use 2x6s instead of 1x6s for a few reasons:1)It's a king bed and I wanted a heavier feel, 2)the 2xs were way straighter and way cheaper than the 1xs at my local store!
Just fyi--be sure that yo take into account the fact that you are using 2xs when you take your measurements! I was sloppy there and had a few tense moments when I thought I would have to do two sides over, but I made it work. Our mattress fits, but not as it is supposed to. I should know better by now, but live and learn.
The frame came together great. The legs look like they are separate, but I ended up going with that look and making it deliberate.
Headboard: I used Ana's plans for the low modern cut out, but without the cut out. I used scraps! Yay! The structure is the same, but I used 2x3s for the legs and 2x2s for the interior frame. I happened to have a piece of 1/4" ply sitting around that was the perfect length and used it for the front. Then I used two shorter scraps for the back.
Finish is valspar glossy black spray paint. I like spray paint. A lot. I use it for everything.
Squared art: I originally wanted the squared headboard, but ditched the idea because I lean against my headboard while I have that first life-affirming cup of coffee, and it looked two uncomfortable. Then I picked up the latest issue of the Do It Yourself mag, and they showed a room where there were two painted decorative screens on the wall very similar to the this pattern. I was super excited, because I knew I had plenty of scraps for this one. I started out with the kreg jig, but then decided that since the piece didn't need to bear any weight, I would use glue. Glue it was, and it went together fine. If you measure, there are some...creative differences in the squares, but most people won't notice. Impatience is my biggest downfall!
Finally--duvet cover is two 8.00 queen sheets sewn on three sides. The small pillows were what sparked the color scheme. I wanted the whole duvet cover to be that fabric, but it came from my stash and has been discontinued. The side tables are my own very convoluted plan, and were also made from scraps(I had a LOT of scraps). The lights are two 2.00 plastic bowls from Big Lots, with a hanging bulb-type fixture that I purchased from Pier One. I'm still on the lookout for a different shade, so those may change, as they are not quite long enough for me.
Now, it's time to turn the rest of the room into the same century and get rid of the mish-mash of broken old stuff that we have. Bookcase and dresser are next up.
It's such a solid piece and it's super heavy so I am glad we built it inside, because I am not sure the two of us would have been able to get it inside. Once it was built and the X's were fit in, we moved it to the kitchen to start staining.
I made a few changes. I added walls and a hinge to the table to allow for a cooler to fit inside. I also decided to paint mine. The was a fun project and I love how it turned out.
Mon, 06/08/2015 - 09:20
How did you go about adding walls and a bottom to the middle? I was thinking about doing this, it seems that the seat slats would need to be shorter to accommodate this, is that what you did? Any information would be very helpful. Looks great!
Wed, 07/01/2015 - 05:08
I wanted to add an ice chest to mine as well. Was thinking to close the sides but leave the facade. slip in a couple cross boards at the bottom and that should suffice. Add some hinges on the back end and you should be set.... that's my thought process for how i may make my next one. Would love to know how they did this
I built this bed frame with the general guidelines for the queen sized farmhouse bed. I adjusted some of the dimensions to better suit our layout.
One of my favorite projects. I used lumber salvaged from my brothers house build and Screws I already had. It was super easy and customizing for my needs was a breeze.
I adjusted the plans to shorten the table to 70 inches, taking out one of the pedestals in the process.
For the finish, I used 6 different colors of the Miniwax Water-based Wood Stain. Working with 2-3 at a time, I blended them into each other (work WITH the grain!!!). I purchased custom stencils online for the border and used a Polycrylic spray (3-4 coats), then stained over top and wiped off the excess.
Similarly, on the stretcher, I taped off a chevron pattern with painters tape. Then I sprayed with the Polycrylic, and stained over top of it.
We love this table!
Fri, 08/02/2013 - 04:17
I purchased the stencils from http://www.stencilsonline.com/. You can enter whatever text you like and adjust the size and font. Each phrase I ordered came in one long stencil. Total cost was about $60 for the two of them.
I taped paper over the tabletop so just the edges were exposed, and then I laid the stencil over the wood. I then sprayed 3-4 coats of Miniwax Polycryclic Spray http://www.amazon.com/Minwax-34444-Water-Based-Polycrylic-Semi-Gloss/dp…. After it dried, I applied the stain (Miniwax Water-based). Then I wiped it off with a cloth. It takes a little rubbing to get the stain to come off the poly. I would suggest testing the process on some scrap so you can get an idea of the process.