Community Brag Posts

Triple Pedestal Farmhouse Table

Submitted by pde00311 on Wed, 03/04/2015 - 07:45

Because we were hosting Thanksgiving this year, we decided to fill our new dining room with a table that had space to fit both families. Then, we found these antique chairs on Craigslist. This table fills the room and matches the style of the chairs perfectly. We still need to refinish the cushion part of the chairs, but we loved the finish on them so much that we had Sherwin Williams match the stain on them. We also built the triple pedestal bench to match.

Built from Plan(s)
Estimated Cost
$100
Estimated Time Investment
Week Long Project (20 Hours or More)
Finish Used
Custom stain from Sherwin Williams to match chairs with gloss Minwax Polyurethane
Recommended Skill Level
Advanced

Comments

Fancy X Farmhouse Table tweaked

Submitted by Anonymous (not verified) on Fri, 06/02/2017 - 12:01

Thank you for your plans on the Fancy X Farmhouse Table. Those where the foundation from which I built this new table for my family. Although tweaked a little my inspiration was a direct result of the beautiful table you built. 

Built from Plan(s)
Estimated Time Investment
Week Long Project (20 Hours or More)
Finish Used
Ebony for base and too framing. Espresso used for top.
Recommended Skill Level
Intermediate

Tree house bed

Submitted by Anonymous (not verified) on Sat, 07/10/2021 - 07:51

I wanted to post my sons tree house bed I made inspired by you I changed a few things to make it my own but I couldn’t have done this without following your framing and measurements :) thanks so much

Comments

Washer and Dryer Pedestal

This thing is awesome! The access to my crawlspace was conveniently put under the dryer, but with both the washer and dryer on the pedestal I can slide it forward by myself if I need to get into the crawlspace. Bonus! I couldn't find any basecap so I used a plain old piece of trim. I also had some 1/8 inch plywood that I ripped to trim the front and sides. Very happy with how it turned out.

Estimated Cost
50 (but I had spare OSB for the bottom, so I only bought 1 4x8)
Estimated Time Investment
An Hour or Two (0-2 Hours)
Finish Used
Sealed with Kilz and then Painted with Valspar white.
Recommended Skill Level
Beginner

King Bed

Submitted by sawdust on Sat, 03/07/2015 - 15:10

I made this bed frame without the headboard, I just put the same legs on all four corners. This is one sturdy frame, but watch it, when you stub your toe, the bed doesn't give!

Built from Plan(s)
Estimated Cost
$60.00
Estimated Time Investment
Weekend Project (10-20 Hours)
Finish Used
white wash pickling stain- minwax
Recommended Skill Level
Beginner

TV Console

Submitted by Anonymous (not verified) on Mon, 06/05/2017 - 16:39

I built this for my younger brother and his wife for their new home.

Built from Plan(s)
Estimated Cost
$80
Estimated Time Investment
Weekend Project (10-20 Hours)
Finish Used
Paint, stain, and polycrylic protective finish
Recommended Skill Level
Intermediate

All Season Stand

Followed the plans pretty much to the letter, made the sign reversible so it works for summer or winter.
3d printed the words instead of cutting out or purchasing wooden letters

Estimated Cost
20
Estimated Time Investment
Afternoon Project (3-6 Hours)
Recommended Skill Level
Beginner

Comments

TV Stand

This is my very first project. This is a cross between the Rustic X console and the Tryde media console. I liked the top of the Tryde, but the ease of the Rustic X.

I painted the trim in slightly off-white, the sides, top and shelf are done in a satin polyurethane.

I was amazed at how easy this was to make following your plans. The hardest part was getting my husband to let me use the power tools (most of which I have either bought for him as gifts or I owned before we got married). He says, "I thought you were afraid of the table saw?" Only when you use it, dear!

This took a day to build, and then forever to finish (it was like waiting for paint to dry ;)

Thank you for all of the amazing plans you have on this site. You may just be my new hero Ana!

Next up, a dining room table for my daughter, then the farmhouse bed for the other daughter. With a few tools, a little patience and couple of bags of O negative blood on standby, there is nothing you can't DIY. (I kid, I hurt myself with hand tools, never power tools).

Estimated Time Investment
Weekend Project (10-20 Hours)
Finish Used
CIL semi-gloss in Silk Moon for trim, Minwax satin finish polyurethane for shelves, top and sides. Three coats.
Recommended Skill Level
Beginner

Comments

Sonyah27

Fri, 02/19/2016 - 07:29

love the table. what size boards did you use for the top and shelves? same as rustic x console? thanks!

Shoes shoes used everywhere.

Submitted by Stevomul on Wed, 03/11/2015 - 12:34

Really enjoyed making this.. Shoes used to be everywhere, and really annoyed me. Great area to store away seasonal or occasional shoes.

Estimated Cost
£40
Estimated Time Investment
Day Project (6-9 Hours)
Finish Used
White satin wood
Mahogany stain
Recommended Skill Level
Beginner

Comments

Love your site!

Submitted by Anonymous (not verified) on Fri, 06/09/2017 - 15:55

I'm so glad I found your blog/website. It is exactly what I was looking for. I'm going to tackle the farm table & benches next and then adjust the porch swing plan to make a bed swing for a friend. Thanks for the great ideas!

Built from Plan(s)
Estimated Cost
$30
Estimated Time Investment
Afternoon Project (3-6 Hours)
Finish Used
Stain/Sealer
Recommended Skill Level
Beginner

Modern Farm Table (Square)

Submitted by LelandM on Tue, 04/23/2013 - 10:41

I needed a smaller table than the one I had, so I decided to build a new one. I loved the look of the Modern Farm table that was posted on this site and I just modified the plans to make it a 36" x 36" square. I finished it with a Kona stain.

Built from Plan(s)
Estimated Time Investment
Afternoon Project (3-6 Hours)
Finish Used
I applied a Minwax Kona Stain and wiped it off with a rag after 10 minutes then applied 3 coats of Polyurethane to protect.
Recommended Skill Level
Starter Project

Side Street Bunk Beds

Submitted by ananda473 on Fri, 04/26/2013 - 07:45

We built these beds Nov/Dec 2012 for our boys ages 2 & 4. This was our first furniture project. It was fairly easy but I did learn a few things along the way. They may seams dumb to most of you, but being our first project we encountered a few problems. My #1 tip is to cut your pieces, THEN SAND THEM. Before constructing the beds. We sanded afterwards, and trying to sand in the little gaps between the slats was hard. Like other posts, we had some trouble with the ladder. The side pieces were not long enough. We just re cut them and added another "rung". The finish is Valspar's Fly By Night blue. It is a very deep navy. Although I sanded my heart out and used a whole tub of wood filler they are still made using 2x4s and have dings and nicks that just come with soft woods. Our boys love them, and no they're not perfect but I think it will work to our advantage. Now when the boys act like boys I'm not away or stressing or any little dings they might be creating to the bed.

Built from Plan(s)
Estimated Time Investment
Week Long Project (20 Hours or More)
Finish Used
Valspar Fly By Night
Recommended Skill Level
Beginner

Dining Room Table

My first woodwork project from the DIY on this website and I'm very happy with how it turned out!

Built from Plan(s)
Estimated Cost
$90
Estimated Time Investment
Weekend Project (10-20 Hours)
Finish Used
English Chestnut for the Table Top
White Paint, distressed then coated with Weathered Oak stain for base
Recommended Skill Level
Beginner

Comments

Face frame cabinets with shaker doors and metabox drawers, swedish drying cabinet

Submitted by sylvialh on Fri, 08/27/2021 - 05:37

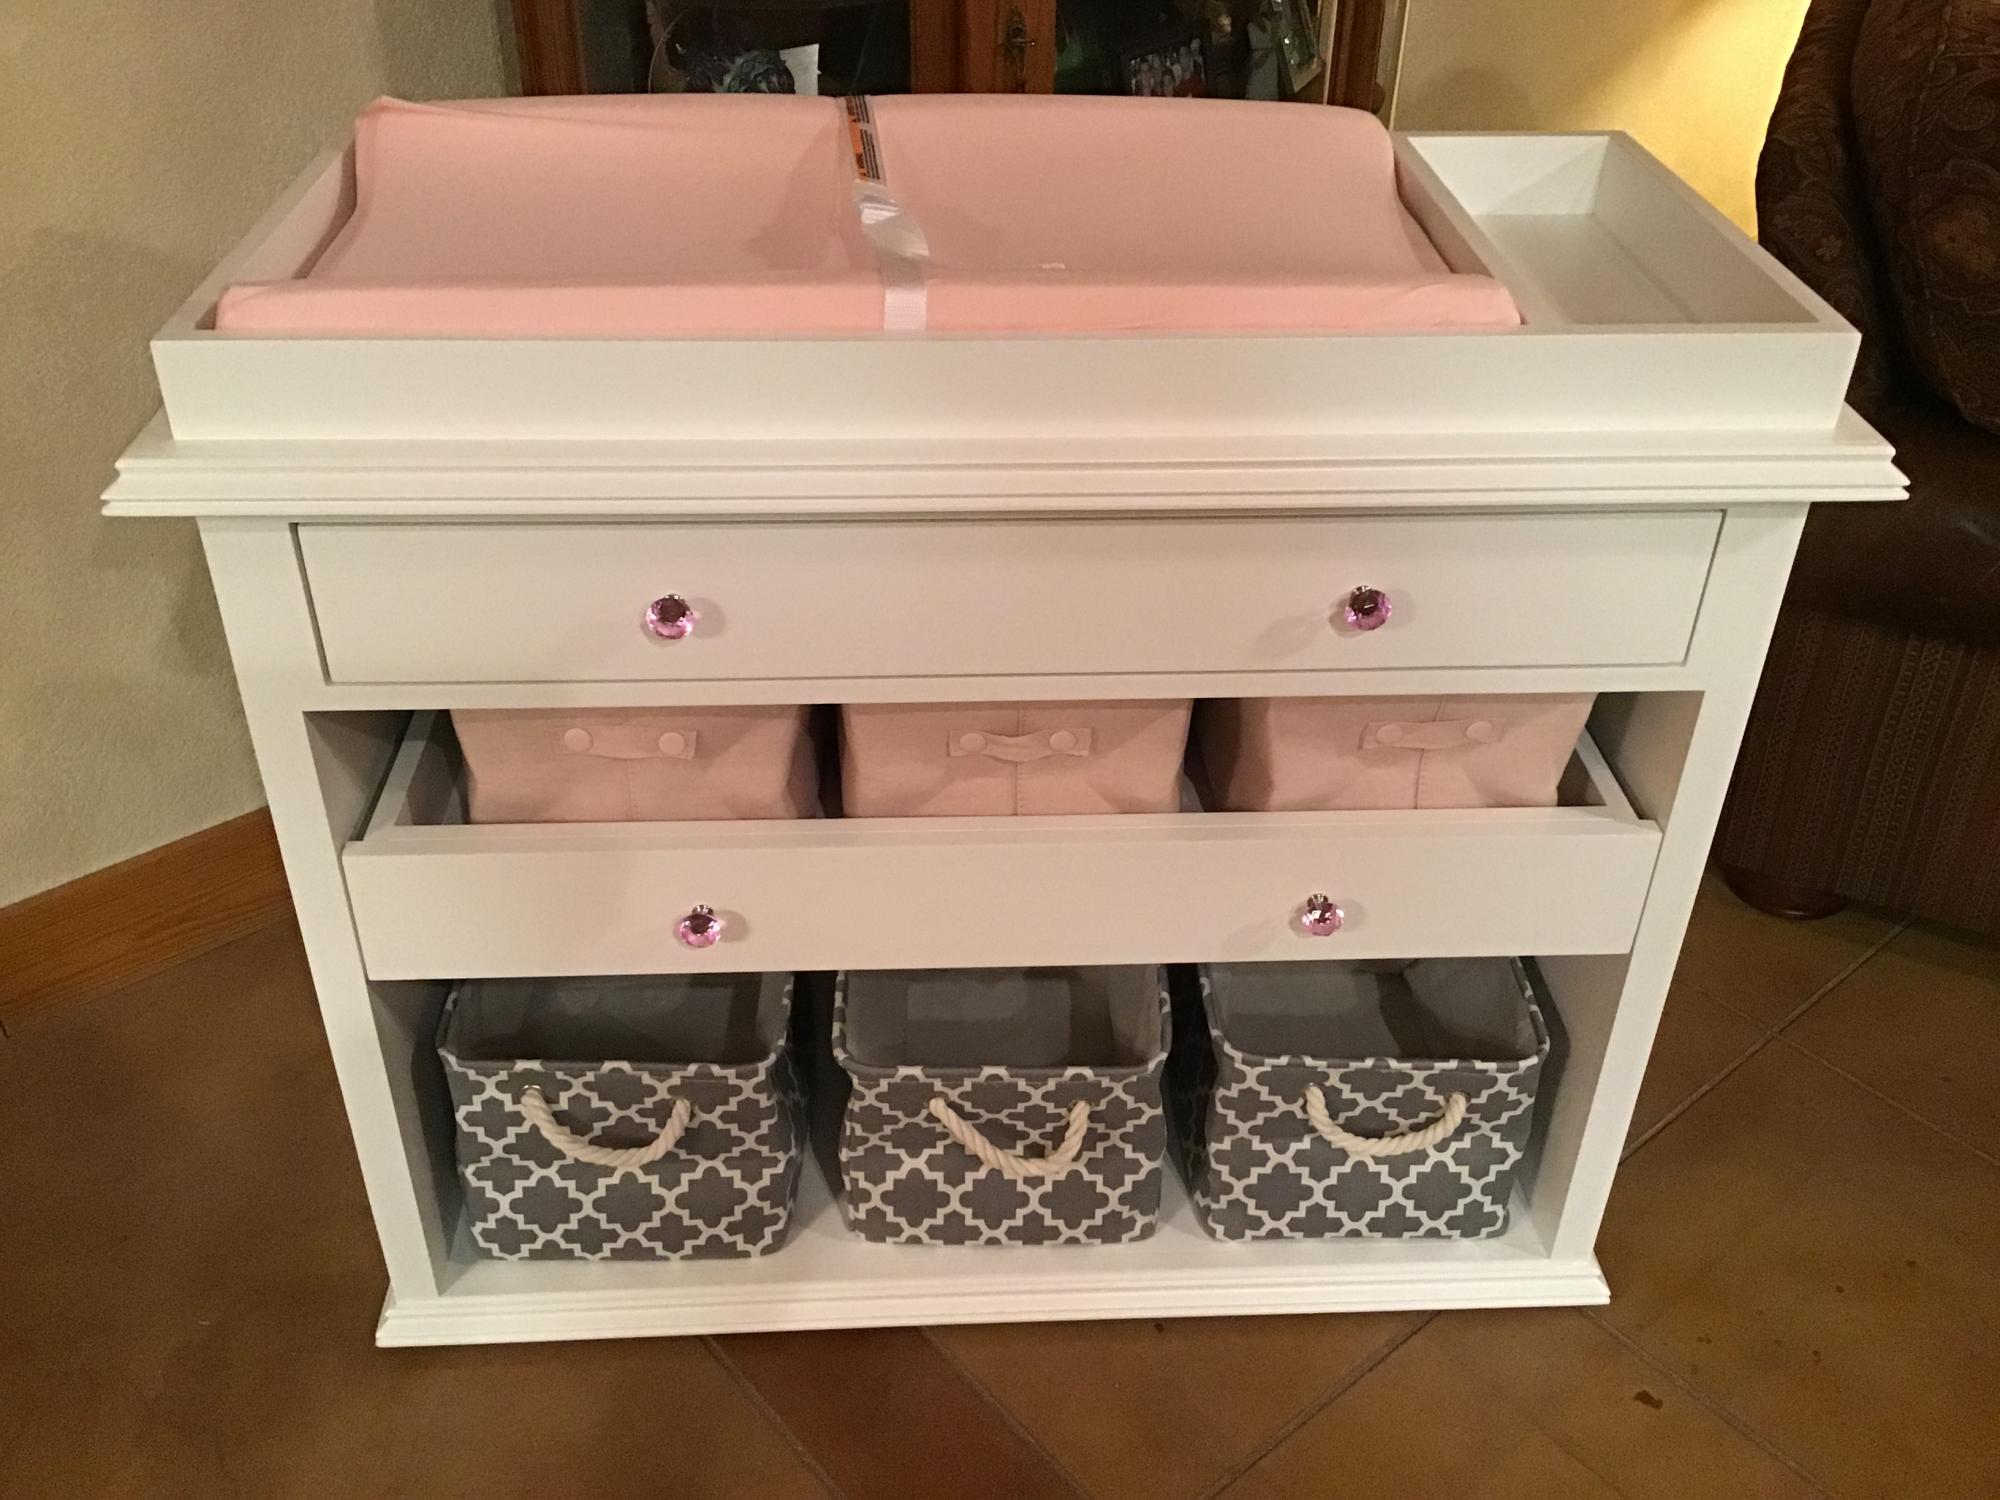
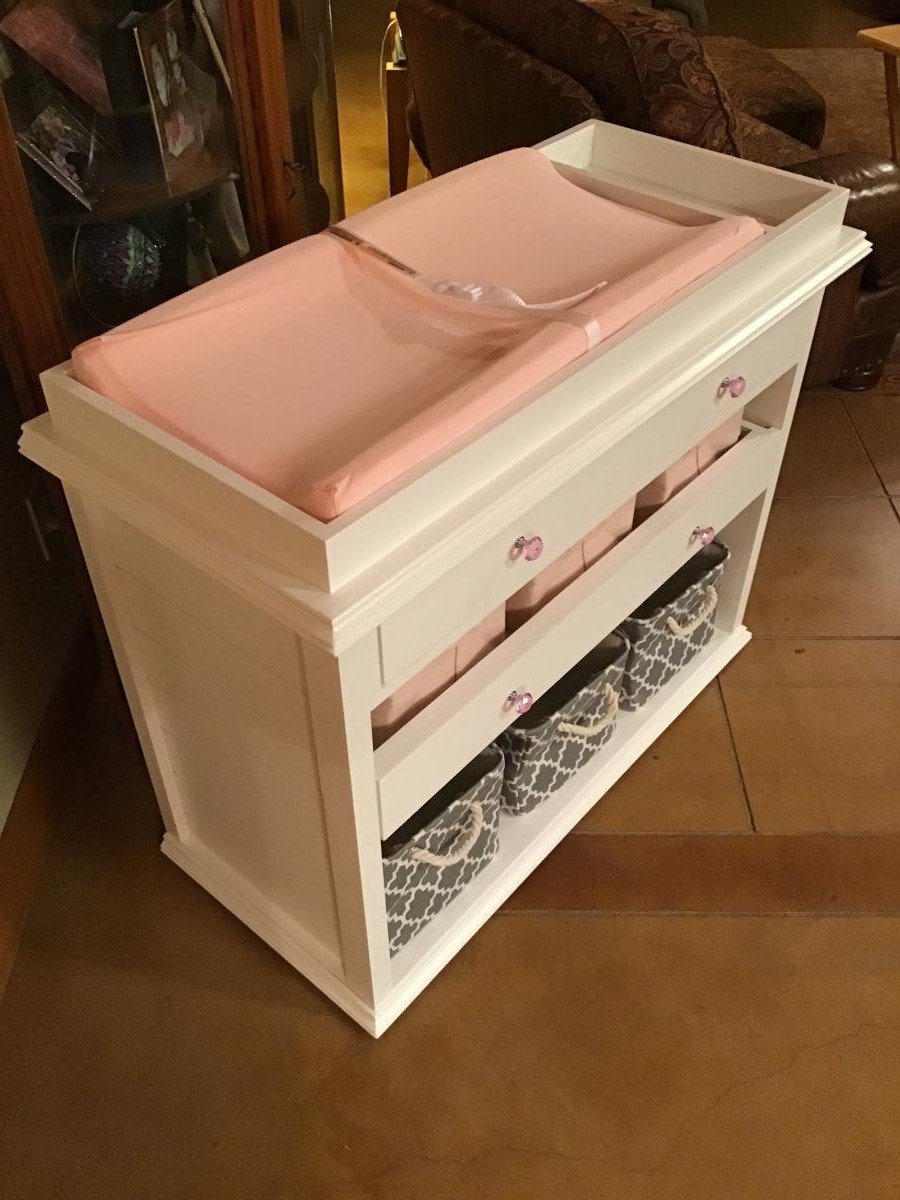
My first projec twith drawers! the metabox drawers were definetly easy to make and use and work beautifully.

I made the carcase using plywood and did 1x2 poplar for the face frame. Shaker doors are 1x3 poplar and sureply underlayment for the inserts.

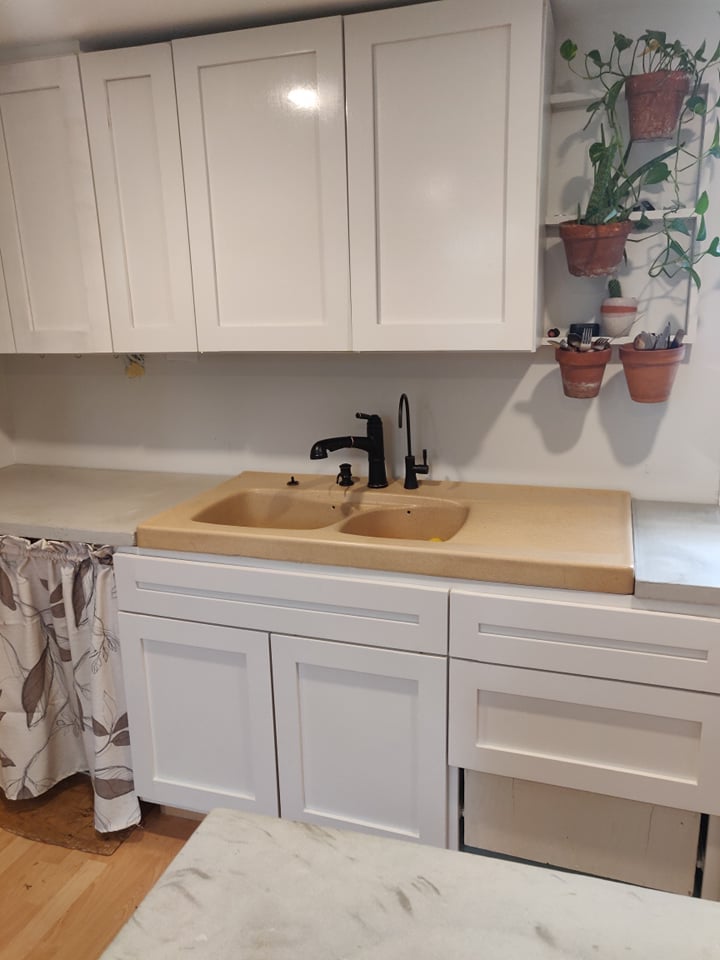
cabinet doors were finished using BIN primer (2 coats with sanding) and then Benjamin Moore Advance cabinet paint in High gloss silver satin. Interiors were finished using leftover / mistints, and I still need to do some filling and sanding on the insides of the doors (I have to take them down to do a final coat but am waiting until I have finished the other set of doors)

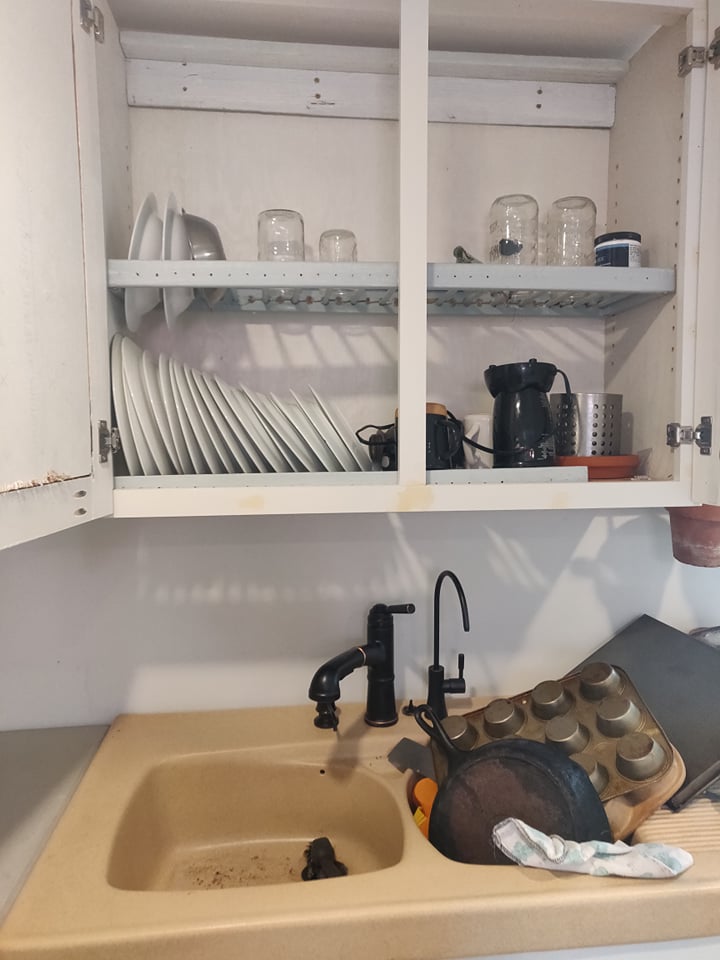
the upper cabinet is a dish drying cupboard so I omitted the bottom plywood piece and instead used 1x3 on the front and back so the bottom would be open. then I made the shelves using 1x2 and dowel (paint the dowel first before cutting!!). This thing is a dream to do dishes in!

Used Kreg pocket screws, Kreg jig for the euro hinges (1 1/4 and 1/3" overlay), and also a kreg jig for the shelf pins. Metabox hinges for the drawers. Still trying to decide on handle hardware so I'm using painters tape at the moment.

Countertops are concrete using Rapidset mortar mix and the michael builds method (linked below).

Planters are just a small poplar shelf using leftover 1x3 with metal terra cotta pot hooks attached to the front. I lined the pots at the bottom with plastic yogourt tubs with holes in the bottom so the cutlery doesn't chip the pots. Those also drain onto the drain rack below. everything is painted the same colour although I used high gloss for the door fronts, so the shelvings behind the pots matches the wall perfectly and sort of dissappears into the walls to highlight the terracotta.

sink is a "new" vintage ceramic sink that I found on FB marketplace for 50$!!! had never been installed and didn't even have the holes bored out. unfortunately the drain holes were very deep and requied some macgyvering but luckily my husband had a great attitude about it and managed to make it work with a lot of googling for odd sized drain bins. Props to husband for doing all the plumbing on this bad boy, including moving over our RO system from the other side of the kitchen and installing a new hose bib under the sink for the other side of the house (why not?!).

I learned so much from this project! Including to store your poplar inside and on the flat surface or it will warp and your doors will not be flush. luckily it only affected one door but it is still super annoying.

thank you ana for everythign! loved the comment "Get on board with these euro hinges!" you are so right they are so forgiving!!

Comments

Ana White Admin

Fri, 08/27/2021 - 08:31

Love the integrated flower pots and the dish rack is so cool! Thank you for sharing, I can tell a lot of work went into it!

Trestle Table with Mahogany Top

My grandfather built the base for this table decades ago. I never got to know him because I was very young when he passed. I told my mom that I loved this table and she gave it to me under the condition that we split it into two pieces. I get the base and she gets the top. That way I can build 2 tables from this and we can both keep the memory.

I made a new table top from Brazilian Mahogany and painted the base that was made from pine. Soon I will be making a new base to attach to the old table top and send it to my mother.

Minwax Antique Oil Finish is awesome. I have trouble with finishing and this worked like a dream. No stain was used.

Estimated Cost
n/a
Estimated Time Investment
Day Project (6-9 Hours)
Finish Used
Minwax Antique Oil Finish, Foam Brush
Recommended Skill Level
Intermediate

Rustic X Entry Table

Submitted by tedgray86 on Wed, 03/18/2015 - 22:01

Rustic x end table build

Built from Plan(s)
Estimated Time Investment
Afternoon Project (3-6 Hours)
Recommended Skill Level
Beginner

Comments

Weekend Project King Bed

Submitted by Anonymous (not verified) on Sun, 06/18/2017 - 10:26

First ever wood project. Under $200 in materials! Less than a weekend of work (for two people). Beautiful results!!!!! Built from plans on Ana-White.com The only change we made to the build was adding some additional support legs in the middle of the bed. 

Built from Plan(s)
Estimated Cost
$200
Estimated Time Investment
Weekend Project (10-20 Hours)
Finish Used
Satin Medium Walnut
Minwax water based poly stain combo
Recommended Skill Level
Beginner

Baby Changing Table for First Granddaughter

Submitted by Anonymous (not verified) on Sun, 09/05/2021 - 19:09

We are expecting our first granddaughter in October 2021. We used Ana White’s plans for a baby changing table as our inspiration and this design was the outcome of our efforts. We surprised our son and daughter-in-law and they were elated!

Built from Plan(s)

A Pair

We built a pair of these for our kids. Wanted to surprise them with a little shelf for each and it was really easy to do. Kids never saw them until it was all done since we bought the wood for this at the same time as we bought the wood for our own bed that we made.

Spray painted them using Krylon spray paint had more trouble locating appropriate paint (needed pink & purple seems most places didn't have this actually in stock!) than we had making the actual shelves. Took quite a few coats of paint though to get them looking nice.

Biggest complication that we actually had was finding the wood in suitable straight pieces. Ended up taking quite a while to select suitable pieces since most were bowed or warped to the point of being useless for our needs.

Final result though looks great and the kids absolutely love them. They are perfectly sized for water bottles and both kids had them in usage within mere minutes of them going up on the wall.

Built from Plan(s)
Estimated Time Investment
An Hour or Two (0-2 Hours)
Finish Used
Krylon Spray Paint
Recommended Skill Level
Starter Project

Comments

Box Train Bookshelf Knock-off

Submitted by efmolly on Sat, 03/21/2015 - 10:32

I recently found a photo of Pottery Barn Kids Box Train shelves. The have been discontinued, so I decided to build a set of my own. They were really easy! I was able to build 3 shelves from (2) 1 x 8's, (1) 1 x 4, and (1) 2 x 4. Plans, silhouette file, and printable image available in my blog post. 

Estimated Cost
$40 for all three shelves
Estimated Time Investment
Afternoon Project (3-6 Hours)
Finish Used
paint and custom designed image which was decoupaged on.
Recommended Skill Level
Beginner

Comments

Rustic Lanterns

Submitted by naomi on Fri, 06/23/2017 - 06:17

I always have heaps of scrap wood so I decided to make some lanterns.

These lanterns are larger than the last lanterns I made.

They are huge and they make a great statement.

I used old rusty fencing wire for the handles.

I also added some alluminium sheet to the 'ceilling' of the lantern so that there is no risk of burning.

The only cost was for the candles.

Estimated Cost
$0 made from scrap wood.
Estimated Time Investment
An Hour or Two (0-2 Hours)
Finish Used
walnut stain
Recommended Skill Level
Beginner