Community Brag Posts

Grandy console table

Submitted by Anonymous (not verified) on Tue, 08/30/2016 - 06:39

I bought a piece of remnant silestone for the top.  It was a pretty simple build but the hardware was the hardest part.  Use wheels with bearings and 1/4" flat bar.  Otherwise it was not moving smoothly.  Love the finished product!

Estimated Cost
$400 mostly for the cost of the Silestone
Estimated Time Investment
Weekend Project (10-20 Hours)
Finish Used
Paint
Recommended Skill Level
Beginner

Modern 2x4 Adirondack Chairs

Submitted by Anonymous (not verified) on Thu, 06/11/2020 - 12:33

Modified with 1x6 for seat and seat-back. Need to purchase 4 - 8ft 1x6s for mod.

Estimated Time Investment
Day Project (6-9 Hours)
Finish Used
Cabot Gold - Sun drenched Oak
Recommended Skill Level
Beginner

Gaby Kitchen Island

The how I made this video can be seen at http://youtu.be/AoysTtE9blw?hd=1

I built this project using driftwood I had collected from the beach and using the Gaby Kitchen Island plans. The only thing I altered from the plans was instead of putting in drawers I put up a hand towel rail using a driftwood stick.

Built from Plan(s)
Estimated Cost
$10 because I found the driftwood
Estimated Time Investment
Afternoon Project (3-6 Hours)
Finish Used
Minwax Polycrylic - 2 coats
Recommended Skill Level
Beginner

Comments

Ana's Favorite Adirondack Chair Plans

I've made 6 of these chairs! This was only my third woodworking project and I'm really happy with how they turned out. They are just the right size for me, I'm 5' 5", and my husband, he's 6'1". They are very comfortable and look great around the fire pit.

Estimated Time Investment
Afternoon Project (3-6 Hours)
Recommended Skill Level
Beginner

Revised : Sausha's Washer/Dryer Pedestals

We had to shorten the length to 57" for this project to fit our space of 60", due to baseboards and shoe molding. It was just a few inches too large to fit through our doorway, which we also could have adjusted if we'd have thought ahead! I was worried that the 3 small baskets wouldn't fit with our plan but they fit perfectly, Especially if you push them back from the edge a bit.

Overall cost was around $120, the screws were around $20 b/c you have to get a box each of 2" and 3" length. We weren't able to get any "untreated" 4x4's at our Lowe's so we opted for the 2x4's sandwiched together- worked just fine.
Due to such a tight space, we only faced the front of the pedestal with the plywood, but I would have liked to do the whole thing- it would've made the molding much easier to square up!
I'm a much happier Homemaker with this in place! No more moving baskets around to open the dryer door! Thanks so much for sharing this with us, now onto the loft bed!

Estimated Time Investment
Day Project (6-9 Hours)
Finish Used
"Kona" Rustoleum wood stain
Recommended Skill Level
Beginner

Barnwood Frame

My second project with my new miter saw. I plan to make 3 altogether but so far this is the only one done due to having a one and a half year old under foot.

I used Ana's Barnwood frame plan as a guide. I didn't have enough 1x2 to make the edges and the innner frame so the edges are made of lathe.

12x12 scrapbook paper fits inside this frame prefectly (didn't purposely make it that way but it works) I cut down a piece of foamboard to hold everything in the back. Then I found a quote a liked on Pintrest and printed it out and used thumbtacks to hold it to the foamboard.

Estimated Cost
Free (I used scraps, probably a couple of dollars worth of wood if I had bought it)
Estimated Time Investment
An Hour or Two (0-2 Hours)
Finish Used
I tried to do the iron acetate finish with vinegar and steel wool but the lathe turned a completely different color than the 1x2 and it just looked weird. So I decided to water down some Glidden interior paint in French Grey and paint over it. I just kept going over it until I liked the finish.
Recommended Skill Level
Beginner

Rustic X End Table

Submitted by brew003 on Mon, 09/05/2016 - 06:40

This was one of the first projects I did, practicing to build a custom Oak bar table...

Built from Plan(s)
Finish Used
Minwax Jacobean stain
Recommended Skill Level
Beginner

Farmhouse Storage Bed

Submitted by Jack-1961 on Wed, 06/17/2020 - 06:29

The plans for this bed were great! I made 2 queens and one double bed using these plans with minor modification to add extra durability. Instead of using screws to attach the head and footboards, I used carriage bolts. I added 2X6s for additional bed feet (3 per side) as well as 2X4s (unattached-for ease of being able to move the bed). I also used 3/4" ply instead of slats in the middle section of the bed, this also allows for additional hiding/storage space in the middle of the bed. I could have chose to go another step forward and added hinges and an inset door handle to that middle ply for ease of using that space.

Estimated Time Investment
Week Long Project (20 Hours or More)
Recommended Skill Level
Beginner

Tent / Reading Nook / Play House

Submitted by miceathome on Sun, 08/12/2012 - 20:27

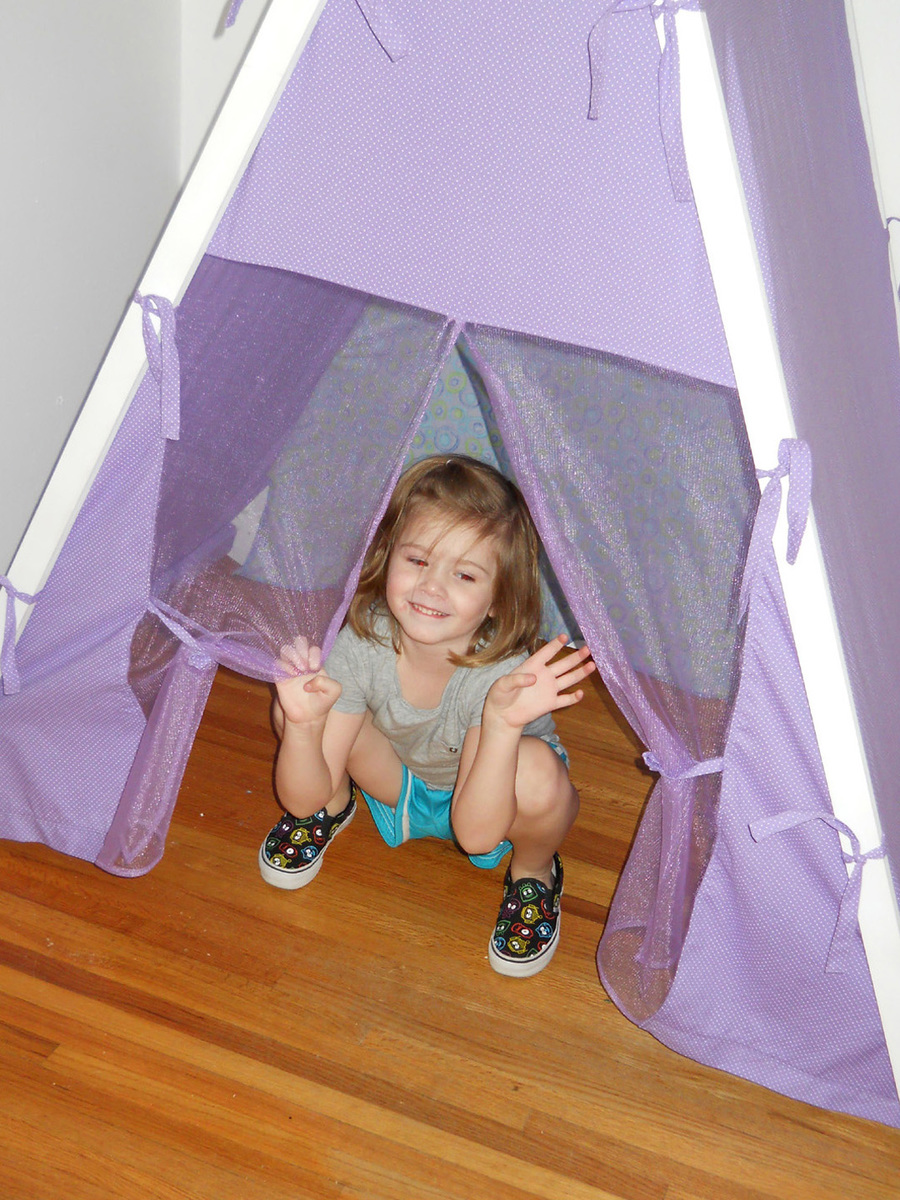
Our little girl Lucille is a wild monkey. I don’t say this lightly-she is wild! She scales walls and hangs from chandeliers; she lives for danger! She loves to play in a tent as most kids do (kids on the spectrum especially). We have gone through several from various stores. I was getting tired of it and began thinking of making her a stronger one but hadn’t found the right project or design.

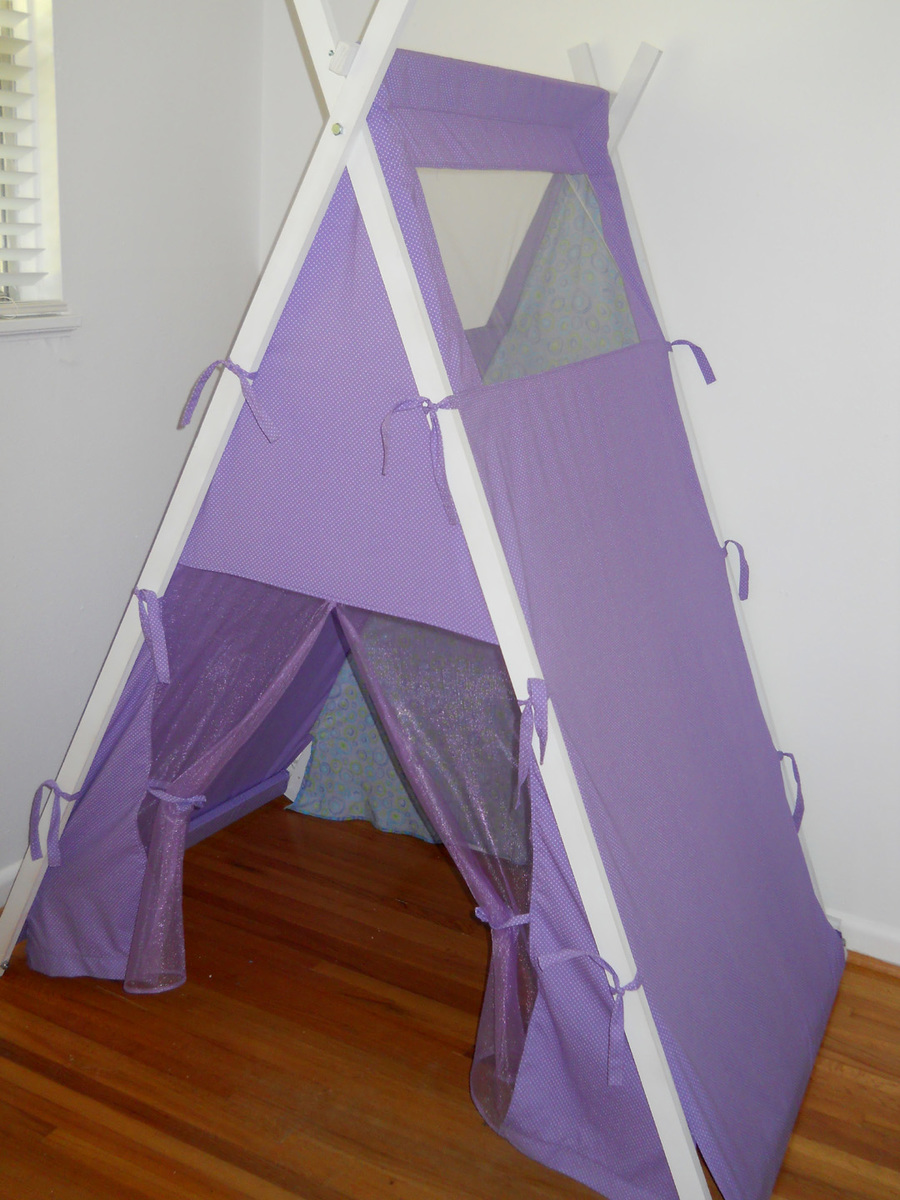
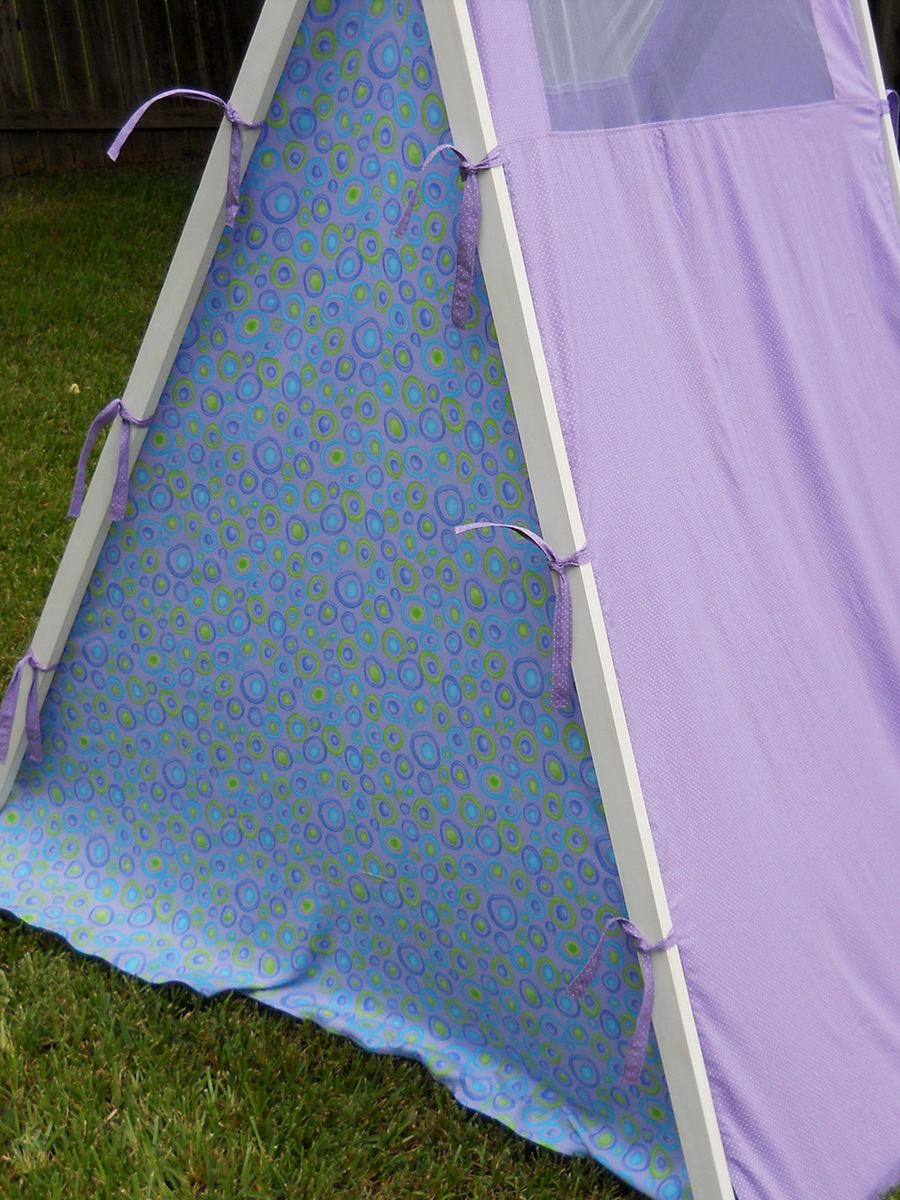
The tent is now spectacular! It stands at almost 6’ tall’ and is 38” deep and nearly 52” wide.

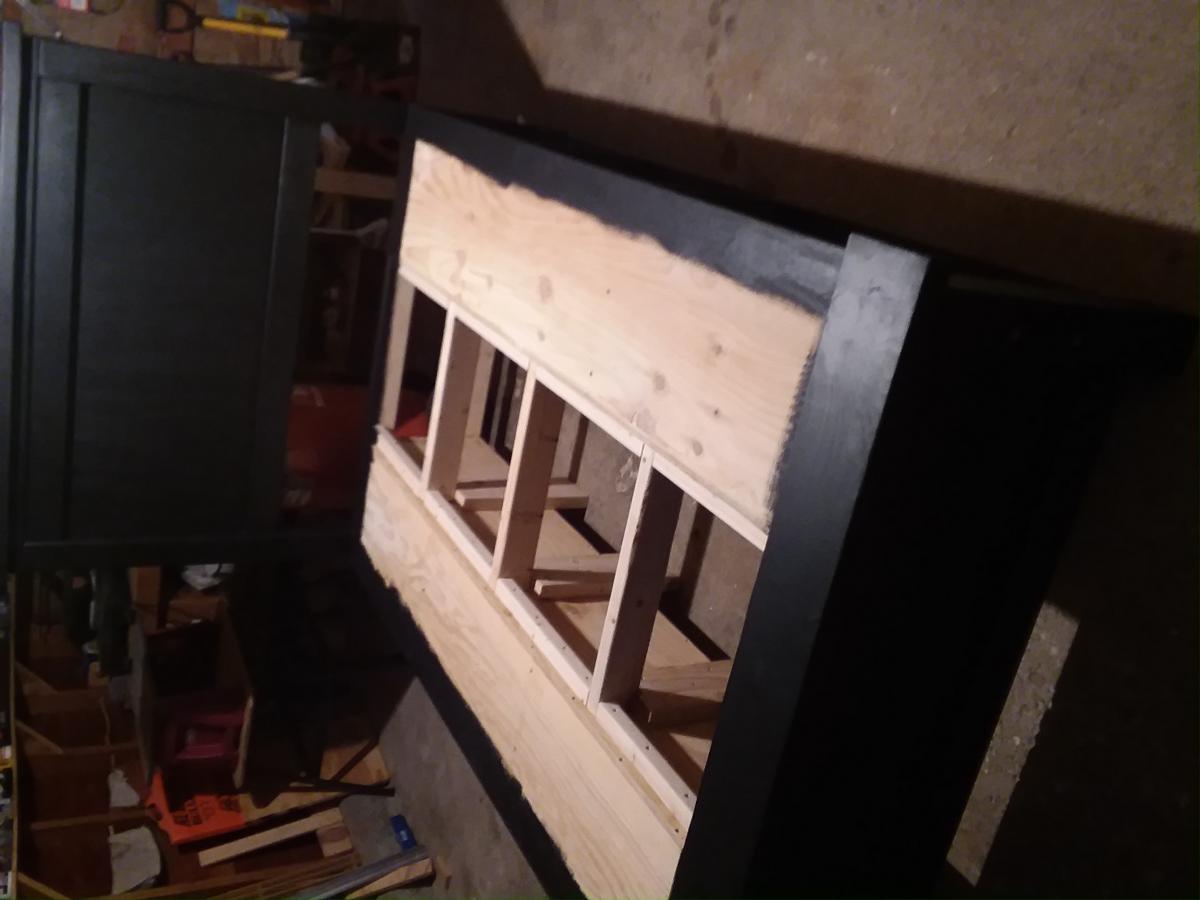
Here are some of the changes that I made to the original plan:

- Added a brace in the back that screws into the baseboards in two places.
- Bolted the top to the wall and secured the cross pieces.
- Adjusted the size of the board at the top (holding the cover).

Sewing the cover:

- Measured the sides and taped paper at the front to get the angle for the front and back.
- Used about 6 yards of the purple, 1 yard of the lavender organza, 2 yards of the print in the back (improvised), and ½ yard of the nylon mesh.
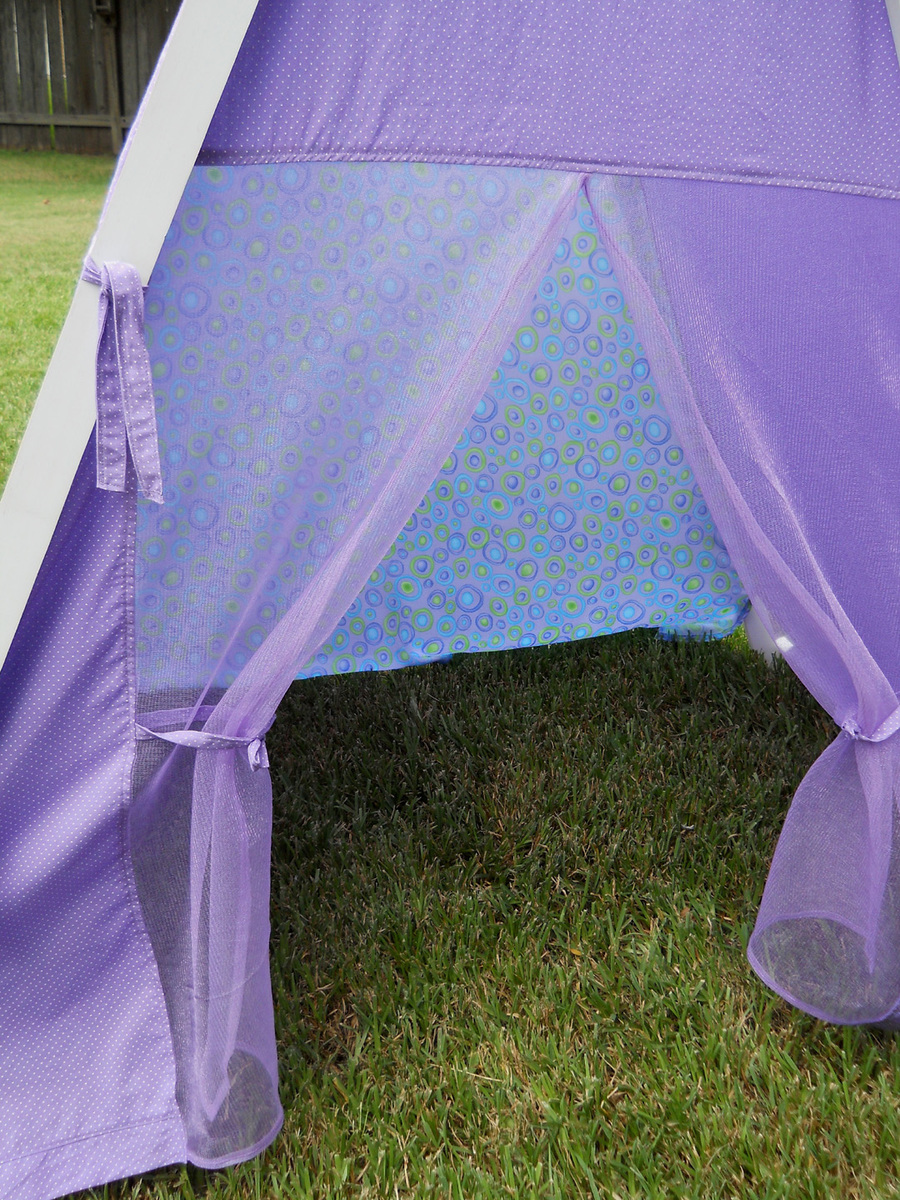
- Attached 12 straps (3 on each side) to attach the cover to the frame (much needed addition) with 2 smaller ties on the front.
- Used nylon mesh to create the skylights (Adorable).
- Glued velcro on the frame itself rather than attach to the cover.
- Finished every edge of the fabric because the main purple fabric had lots of fraying (In hindsight, I should’ve used a poly or something that wouldn’t fray).
- Stitched all seams and then top stitched for strength (which is why I used almost three rolls of thread!!)
- Released the seams in all four corners at the bottom about 4 inches, so it would hang well and allow the sides to wrap around to velcro.

It looks great and will hopefully stay in her room for awhile, although I may have gone a bit overboard with the skylights and transparent organza in the front. She isn’t too interested in it yet and I'm wondering if it's too open and doesn’t give her that closed-in feeling that she likes. I may need to cover the skylights or switch the organza with some fabric.

Estimated Cost
75.
Estimated Time Investment
Week Long Project (20 Hours or More)
Recommended Skill Level
Intermediate

Comments

Hybrid Hall Tree

Submitted by jfloyd on Fri, 06/19/2020 - 08:17

We utilized Ana's rustic x bench to fit our hall tree design. Love the bench.

Built from Plan(s)
Estimated Cost
$50
Estimated Time Investment
Day Project (6-9 Hours)
Finish Used
Shellac, clear; leftover white paint
Recommended Skill Level
Beginner

Comments

Yard Bench

Submitted by Jamaunzie on Sat, 06/07/2014 - 06:02

I wanted a simple but stable bench for my back yard. I built a Harriet Chair from plans I found on this site, it went together very fast and has held up so well even with my weight ( which is over 300 pounds ) I decided to modify the plans and came up with this I used 2x3 instead of 2x2. The angle cuts are the same and the height for the base is the same just made three legs, made it 4 feet long. The back was a little tricky because of the middle leg but the Kreg Jig saved the day.
So if you want a fun quick and sturdy bench for around 40 dollars wood, screws and all this in my opinion is the way to go from start to finish about 2 hours. Have fun

Estimated Time Investment
An Hour or Two (0-2 Hours)
Finish Used
Yellow Paint
Recommended Skill Level
Beginner

Rustic X Table and Chairs

Submitted by becca9872 on Sun, 08/19/2012 - 19:26

I wanted to build a table and chairs for my daughters wedding shower gift so i printed the coffee table plans and modified it to make the dining table. We just measured my sisters chairs and built the chairs.All of the lumber is white pine.We used 2x4s for the legs and frame, 2x10's for the top and 2x2's for a crossbrace under the table. The chairs are 2x4's ripped on the table saw to 2x2's with 1x4's for the seat. we routed the edge of the table and all pieces on the chairs.I spent $50 on the lumber on Monday and had it finished by Saturday for her shower. It is minwax red mahogany brushed on and wiped off and 2 coats of gloss polyuretane. It needs a couple more coats on the table top and the seats for a smoother finish. Lydia and Adam were thrilled, as was their friend who had us build her one just like it. She wanted hers in white pine with no stain and it has 4 coats of polyurethane for a very smooth finish. I love that we built a gift that will last them a lifetime!

Estimated Time Investment
Week Long Project (20 Hours or More)
Finish Used
Minwax Red Mahogany and Minwax Gloss Polyurethane Ace Brand Gloss polyurethane on the white pine table and chairs
Recommended Skill Level
Beginner

Comments

Cindy from Indiana (not verified)

Mon, 08/20/2012 - 03:24

Absolutely gorgeous! Great job and I love the price, too!

I am so excited - I'm going to finally get a kreg jig in the next few weeks and now I will have to add this beautiful project to my growing list of things to build!

spiceylg

Mon, 08/20/2012 - 05:25

This is incredible. Your daughter is certainly very blessed for all of your efforts you have provided for her new married life.

Tera

Sat, 02/07/2015 - 16:04

Yes I would also like to know if there are plans for these chairs! Love them.

rld

Tue, 01/12/2016 - 18:20

Do you have the plans for this, would love to make them to go with rustic x farm table

rld

Tue, 01/12/2016 - 18:21

Would love to get the plans for this if you have them

DocRob58

Fri, 01/20/2017 - 10:10

Plans for those chairs would be great. are they available? 
 

Queen Reclaimed look Headboard

This was my very 1st major build. I've done the crate boxes, planters, wall items, shelves, etc. I absolutely love the end result. Received many compliments on the headboard. Can't to make more big items! Took me about 3 and 1/2 hours, another 45 minutes for the staining.

Estimated Time Investment
Afternoon Project (3-6 Hours)
Finish Used
Rustoleum Dark Walnut Stain
Recommended Skill Level
Beginner
Back