Community Brag Posts

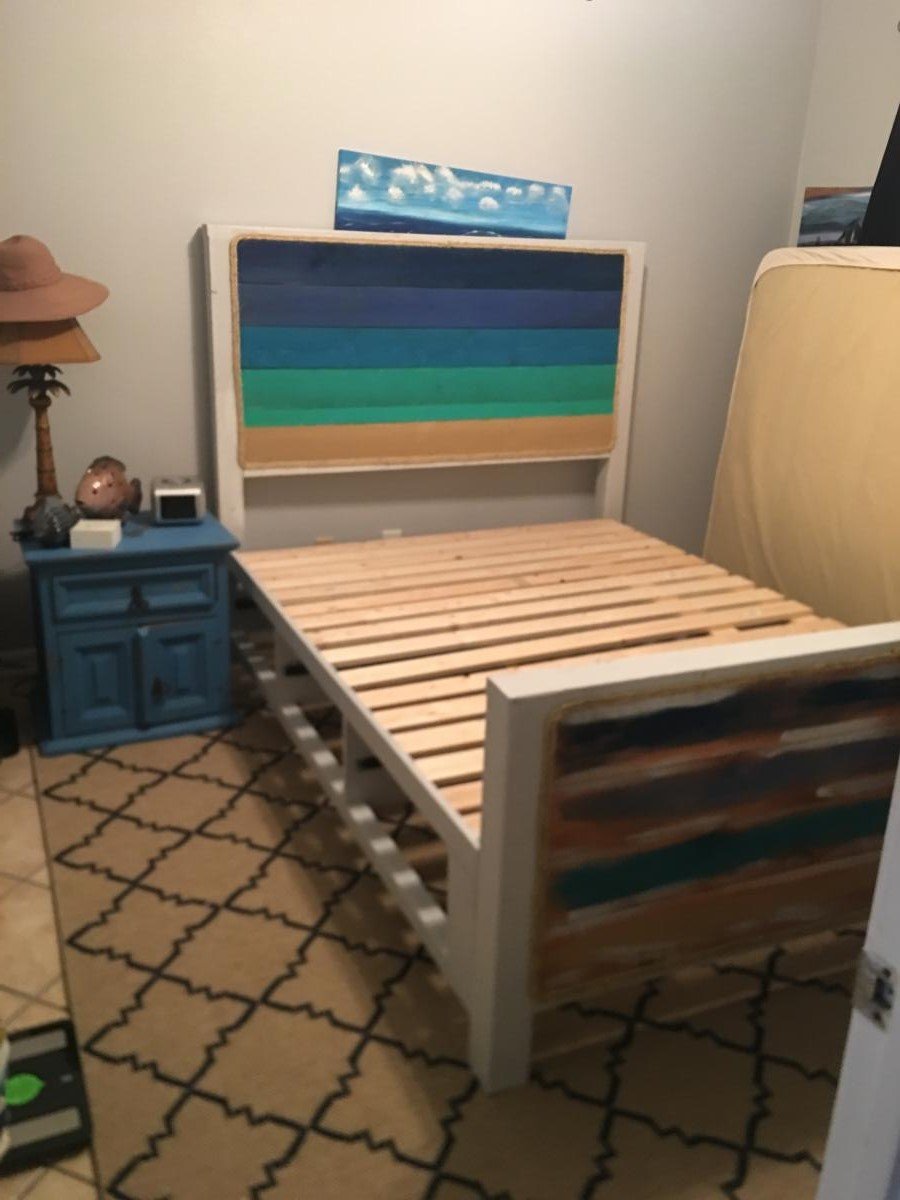
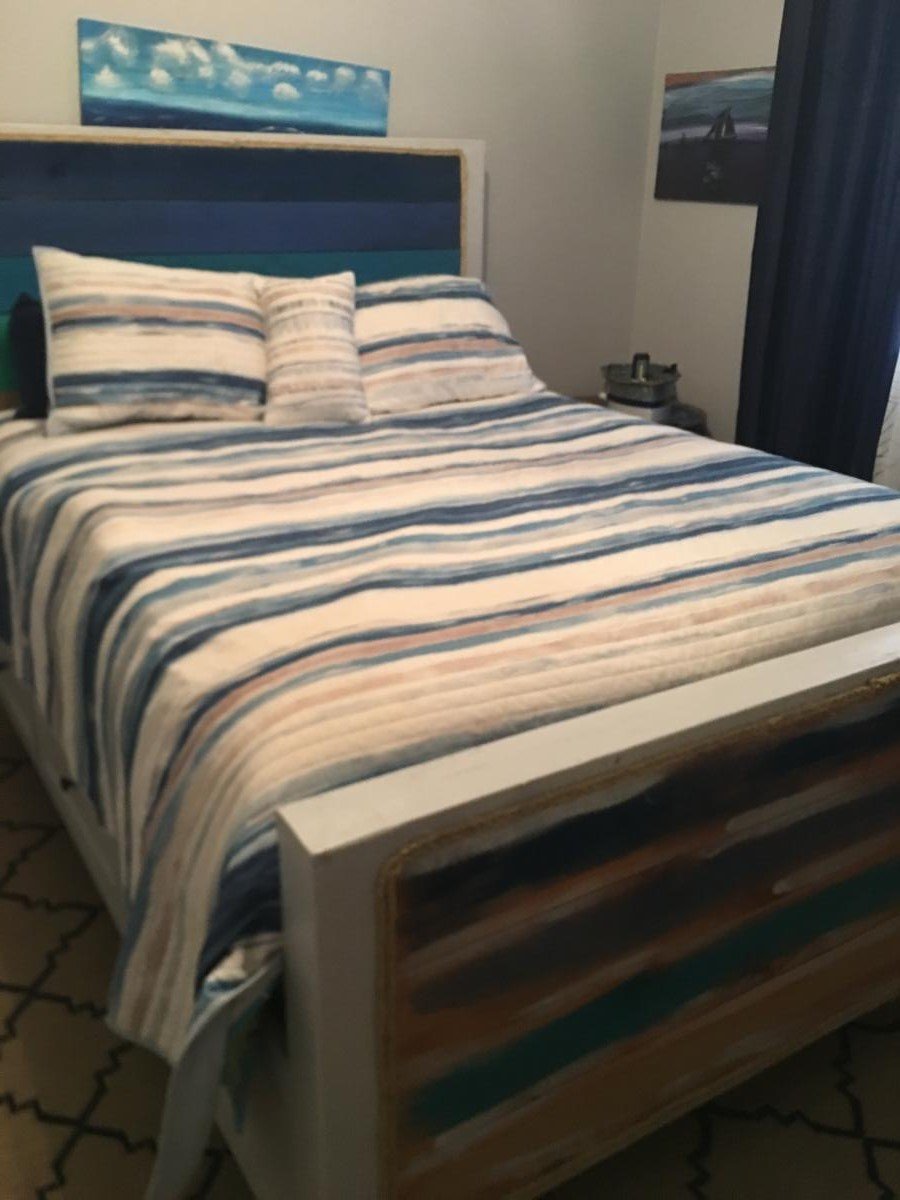
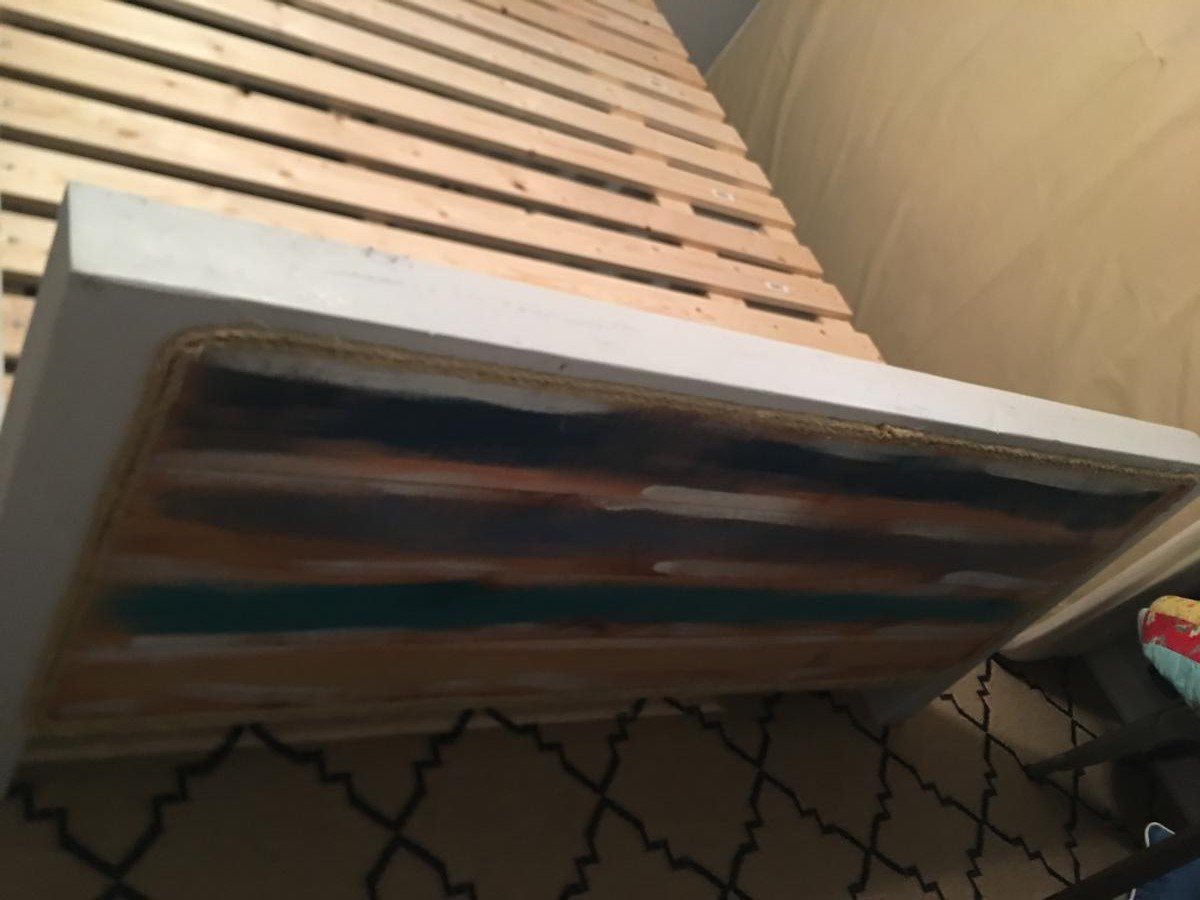
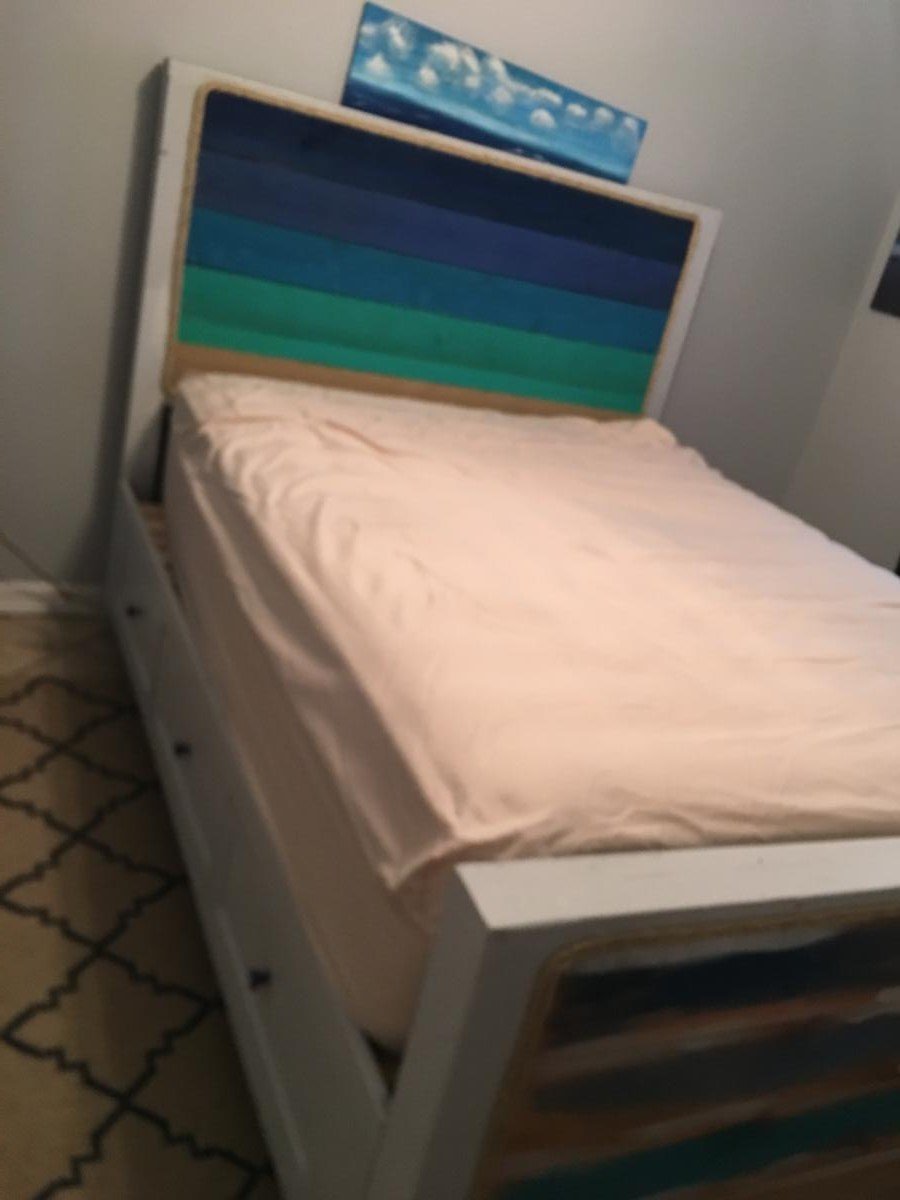
Farmhouse Queen Bed Made

Submitted by AKMan279 on Tue, 07/23/2019 - 22:11

This bed is amazing.  Great design, very sturdy and another Ana White project in the books!

Built from Plan(s)
Estimated Cost
$200
Estimated Time Investment
Week Long Project (20 Hours or More)
Finish Used
Satin white paint with 3 coats of poly.
Recommended Skill Level
Intermediate

Toys boxes

Submitted by Cheryl on Fri, 12/30/2011 - 21:15

We made two toy boxes for the Make Two Challenge. A single mom with two small children needed a little boost for christmas this year. I used the stacking toy box plans but dressed it up a bit with trim and added casters. The plan was very easy to follow.

Built from Plan(s)
Estimated Cost
$40.00
Estimated Time Investment
Afternoon Project (3-6 Hours)
Finish Used
Red and blue spray paint and minwax stain
Recommended Skill Level
Beginner

Comments

Rustic X Coffee Table

Submitted by Celeste808 on Mon, 11/18/2013 - 17:24

Modified the plan to have no legs and added caster to the bottom so that it can be rolled easily around. Easy to build. I am in love with Ana's plans! Only cost $40 in wood!

Built from Plan(s)
Estimated Time Investment
Afternoon Project (3-6 Hours)
Finish Used
Top: Minwax Ebony and Minwax Driftwood Stain
Bottom: White Semi-gloss paint
Recommended Skill Level
Beginner

Farm Table

Submitted by Anonymous (not verified) on Thu, 02/04/2016 - 13:55

I followed the building plans from here: http://www.ana-white.com/2012/11/plans/triple-pedestal-farmhouse-table

I changed the plans slightly. I used Brazilian Walnut unfinished tounge and groove flooring that I got at a  reduced price at lumber liquidators. This wood is so beautiful I couldn't help myself! This added about 50 lbs to the weight of this table and about 10 more hours of labor but it is worth it! 

Estimated Cost
Because I used thebBrazilian Walnut wood it upped the cost to about double. So about $350.
Estimated Time Investment
Week Long Project (20 Hours or More)
Finish Used
Triple thick lacquer sanded in between. 3 coats.
Recommended Skill Level
Intermediate

DIY Corrugated Metal Wood Awning

Submitted by Anonymous (not verified) on Mon, 08/05/2019 - 12:11

DIY CORRUGATED METAL WOOD AWNING

Made in less than 4 hours

(Awning takes 24 hours to get aged look)

Simple & fun way to add character above a wall mural, a family photo, a sign, or even a window indoors!

This DIY cost us under $100 to do and is 11 ft long

We do have a full tutorial on how to make it on our Youtube channel Living it Country

It's no mud room, but it sure helps!

Submitted by Debi G on Tue, 01/03/2012 - 17:29

My husband, who is otherwise amazing and free of bad habits, always set his work bag, jacket, lunch box, keys, and more on the kitchen table. Our house does not have a coat closet, entryway, or any sort of nook near the door, so I used the only available space in our kitchen to craft a locker for his stuff. There's a cut-out for a light switch (deck light) and an outlet, which made it easy to craft a charging station on the middle shelf. The dog food and water is on the bottom, with a rubber mat beneath them. His hats and lunchbox go on the top shelf. Now we're both happy!

Built from Plan(s)
Estimated Cost
two pine boards for the sides, and two 2' by 4' sheets of thin plywood for the back. Everything else is from scraps.
Estimated Time Investment
Afternoon Project (3-6 Hours)
Finish Used
Behr premium poppy seed with primer
Recommended Skill Level
Beginner

Comments

Debi G

Sun, 03/04/2012 - 05:54

Thanks! It's been a big help, and now my son wants one too.

Fire truck bed

Submitted by mari beth on Wed, 11/20/2013 - 15:28

Had a great time building this bed for my 2 year old son. The toughest part was building a slanted ladder that he could climb up. The project turned out way better than I expected and my son loves it.

Estimated Time Investment
Week Long Project (20 Hours or More)
Recommended Skill Level
Starter Project

Comments

JoanneS

Wed, 11/20/2013 - 15:37

You did a marvelous job on this, and your details are fab! Wonderful build! Your son is lucky his mom is an amazing builder. And this was your first project? I'm blown away! :)

Wine Buffet

Submitted by UTskier05 on Sat, 02/06/2016 - 17:24

Hopefully the picture is vertical this time.

My wife wanted the basic buffet style cabinet but shorter and with wine storage. Design was modified to suit. Top is select pine with min-wax stain and polyurethane finish. Had a blast making it and can't wait to start another project!

Built from Plan(s)
Estimated Time Investment
Week Long Project (20 Hours or More)
Finish Used
Min-wax deep oak stain.
Recommended Skill Level
Intermediate

Patio couch

Submitted by Anonymous (not verified) on Tue, 08/27/2019 - 10:08

This couch was made using recycled wood from an old deck. The cushions were made using material from an extendable awning. Overall the project cost me $60 for the foam and stain.

Estimated Time Investment
Week Long Project (20 Hours or More)
Recommended Skill Level
Intermediate

2x4 TrussBench

Submitted by Anonymous (not verified) on Sun, 05/07/2023 - 05:37

Gave your 2x4 truss-style bench a try! Love the end result with a burning and clear top coat!

Built from Plan(s)

Comments

Doll Canopy Bed

Submitted by tifhamer on Thu, 01/05/2012 - 18:59

I adapted the bunk bed to make the 70s style canopy bed for Julie.

Estimated Cost
$ 25 for wood and fabric
Estimated Time Investment
Afternoon Project (3-6 Hours)
Recommended Skill Level
Beginner

Comments

Farmhouse Table Brag Post

Submitted by nate_kara on Sat, 11/23/2013 - 10:10

I can't say enough how much I love my farmhouse table! Oddly enough, it took me three years to post these brag photos. We changed the plans to make a table suitable for 10 people and have filled it many times over! It has made two big moves almost completely unscathed. Because we tend to move a lot, we used 4 lag bolts to attach each of the legs and didn't glue them on. The table is very sturdy with this modification, so much so that I can stand on it to change light bulbs in our chandelier without any movement at all! We used spar urethane to seal the wood. We did five coats so that coasters and hot pads were optional. We have no water or heat marks even with a lot of careless use.

Estimated Cost
$75
Estimated Time Investment
Weekend Project (10-20 Hours)
Finish Used
We used one coat of gunstock colored stain rubbed on with a dry cloth and rubbed off with another cloth after sitting for a couple of minutes. Once the stain dried, we used steel wool 000 to flatten the raised wood grain a little and gave it the first coat of urethane. We gave it a total of five coats, with steel wool between each coat and none after the final coat.
Recommended Skill Level
Intermediate

ClubHouse Minecraft

Submitted by MrDanDHN on Mon, 02/08/2016 - 20:02

Built this for my son that we adopted from foster care. He is into Minecraft and we need an extra bed for future foster. Thus the Full over Twin and the twin is removable for a play area underneath.

Built from Plan(s)
Estimated Time Investment
Week Long Project (20 Hours or More)
Finish Used
Chalk Paint with a brushed in accent
Recommended Skill Level
Intermediate

Comments

jasminemary

Sat, 03/05/2016 - 11:45

Can you take a picture or explain what you did for the bed support to make it a full? I fear without a board running down the middle to the head and foot, crossbars may not be enough. I love the full over twin idea. I want to make ours a full as well.

MrDanDHN

Tue, 04/26/2016 - 19:44

I did use a 2x4 support down the middle with Metal L brackets to ensure safety. I put this directly under the crossbars. After he has been in it about 9 month I think I would have put a solid piece of plywood to support the mattress better. We have had as many as 5 sleeping on the top bunk with no problems though.

Family Tree

Submitted by Anonymous (not verified) on Mon, 05/15/2023 - 20:38

Thank you for sharing such a neat project plan! I threw this together with some pallet wood that I stripped a few weeks ago. Quick work with the mitre saw, brad nailed it, a quick sand, threw on some stain with a rag, and freehanded the rest. Not real good on the letters but it worked. This was a Mother's Day gift for my wife. She loves red birds. She was in love with this when she saw it!!!! I think I got some brownie points! :)

Gary G.
Athens AL

Built from Plan(s)

Comments

Nesting Tables

Submitted by jenn923 on Sun, 01/08/2012 - 10:40

I was really excited when I saw this plan. I needed a side table for my guest bedroom and these are perfect. The plans were very easy to follow - the only thing I did differently was I left off the angle braces. The hardest part of the project was waiting on the paint to dry. I've done a few other projects but this my best work so far...I'm getting better and better with each build. So excited to start something else...

Built from Plan(s)
Estimated Cost
$20
Estimated Time Investment
Afternoon Project (3-6 Hours)
Finish Used
Very light blue - Oops paint from Lowe's
Recommended Skill Level
Beginner

Comments

Kate (not verified)

Sun, 01/08/2012 - 13:08

They look great! I'm sure your guests will love them.

I'm currently still in the painting stage of a modified version of just the large of the Preston tables. I love seeing one fully completed!

Laura Fama

Sun, 01/08/2012 - 13:37

Awesome!!! ... What a great job you did!!! I am making these too... glad to see how great they look... can't wait to finish mine now!

Turned Leg Farmhouse Table

This projected started with a mishap. I bought table legs from Lowes that were 35" tall, and after trying to decide if I could somehow make our chairs taller...I returned them for the correct set. The set I used was from Waddell online (the manufacturer). 29" Country Pine legs. With shipping these were the most expensive part of the entire project. The rest went according to plan. Once the table was done I decided on a whim to make a matching bench. I bought the bench legs from Home Depot and a bit more pine for the seat. The bench legs were 15" country pine also. I guessed on the measurements for it, and it came out okay. The only hard part was that my drill didn't fit with the Kreg bit on it when I was trying to screw in the bench supports. I actually had to borrow a shorter drill and bit from a friend to complete it! The staining took me a long time because I don't have a heated garage and the temperatures dropped below comfortable to work on it.

Built from Plan(s)
Estimated Cost
$130 for table and bench
Estimated Time Investment
Weekend Project (10-20 Hours)
Finish Used
I used oil based pre-stain by Minwax so the stain would cover evenly (mostly because I used such a soft wood). Then two coats of Minwax oil based stain in Special Walnut. I was planning on going darker, but this Special Walnut had that Pottery Barn rustic look I love. Lastly I did 3 coats of Minwax oil based Polyurethane in Satin finish. The first coat looked great, the second coat ended an ugly cloudy gray color. So...I didn't read the instructions and now I know. STIR STIR STIR. You have to stir this finish for a long time prior to each application. I thought stirring it was was enough. Don't make this mistake! Then I sanded forever and started over...3 coats.


UPDATE: I moved to a house with grey wood floors and the table didn't match at all. So I sanded the top coat of poly off and added Minwax Classic Grey Stain over the Special Walnut from last year. One more coat of poly and this table looks like it was made to match the floors!!
Recommended Skill Level
Beginner

Comments

DIY Skateboard

I attempted my first homemade skateboard, this was a present for my 7 year old nephew for Christmas. The deck was made out of Birch veneer, maple is also very common material to use. More details and photos on my blog if interested: http://www.woodworkingfourdummies.com/blog/diy-skateboard Cheers, Ian

Estimated Cost
- $30 for wood veneer for the deck
- Spray paint - $7/can ( I had some black already)
Estimated Time Investment
Weekend Project (10-20 Hours)
Finish Used
Oil based Polyurethane
Recommended Skill Level
Beginner

DIY Folding Camp Stool with Burned Wood Finish

Submitted by Anonymous (not verified) on Wed, 09/25/2019 - 08:30

I used Jaime Castiglio's tutorial and Ana's plans to build this folding camp stool. I modified the plans slightly and just stapled the canvas seat to the frame. I used a heat gun to create the burned wood finish on the stool. I also used the heat gun and a bar of fabric wax to waterproof the canvas seat.

Built from Plan(s)
Estimated Time Investment
Afternoon Project (3-6 Hours)
Finish Used
I used a heat gun to create a wood burned finish. You can seal it with a clear topcoat.
Recommended Skill Level
Beginner
Seasonal And Holiday

Mailbox

Submitted by loniwolfe on Tue, 01/10/2012 - 13:50

My grandmother has been in terrible need of a new mailbox. The one she had was original to the house, 1972, I believe. Needless to say it was falling apart.
My stepdad and I built this for her, and my sister painted on the name adn address.
All better now!

PS, I chose Grace's Mailbox plan because you have to choose a plan when posting a brag blog and we didn't use one, we just kind of winged it.

Built from Plan(s)
Estimated Cost
$20-$30
Estimated Time Investment
Afternoon Project (3-6 Hours)
Finish Used
Clear wood sealer, spray can
Recommended Skill Level
Beginner

Comments