Community Brag Posts

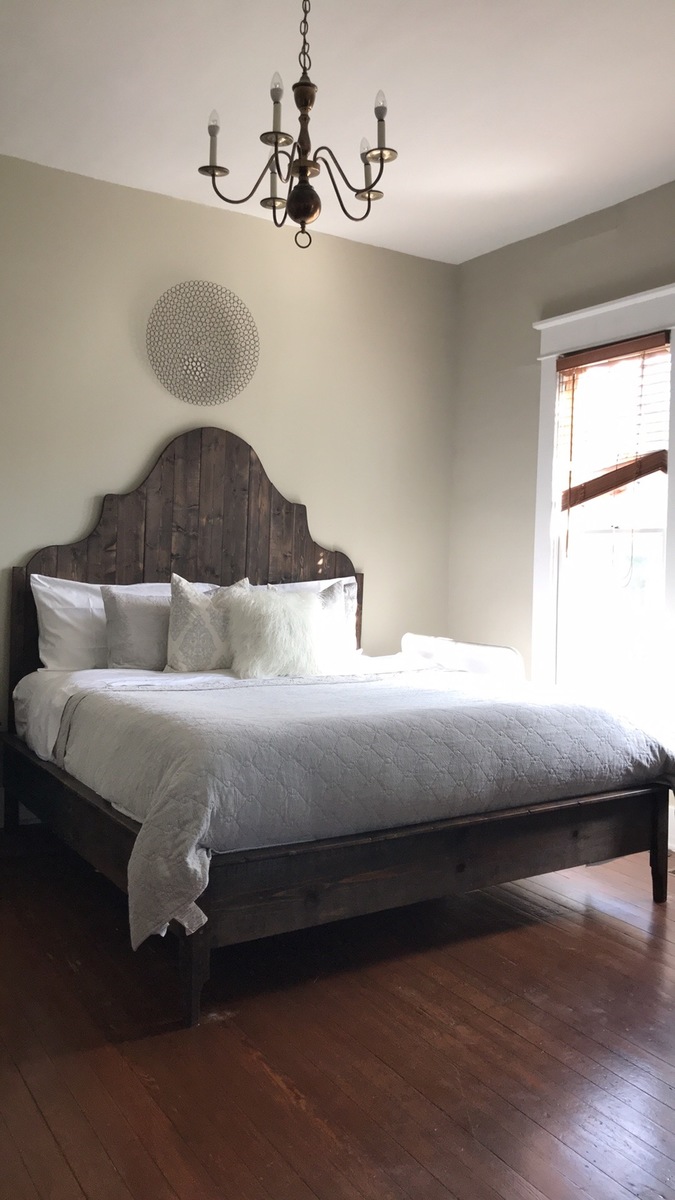
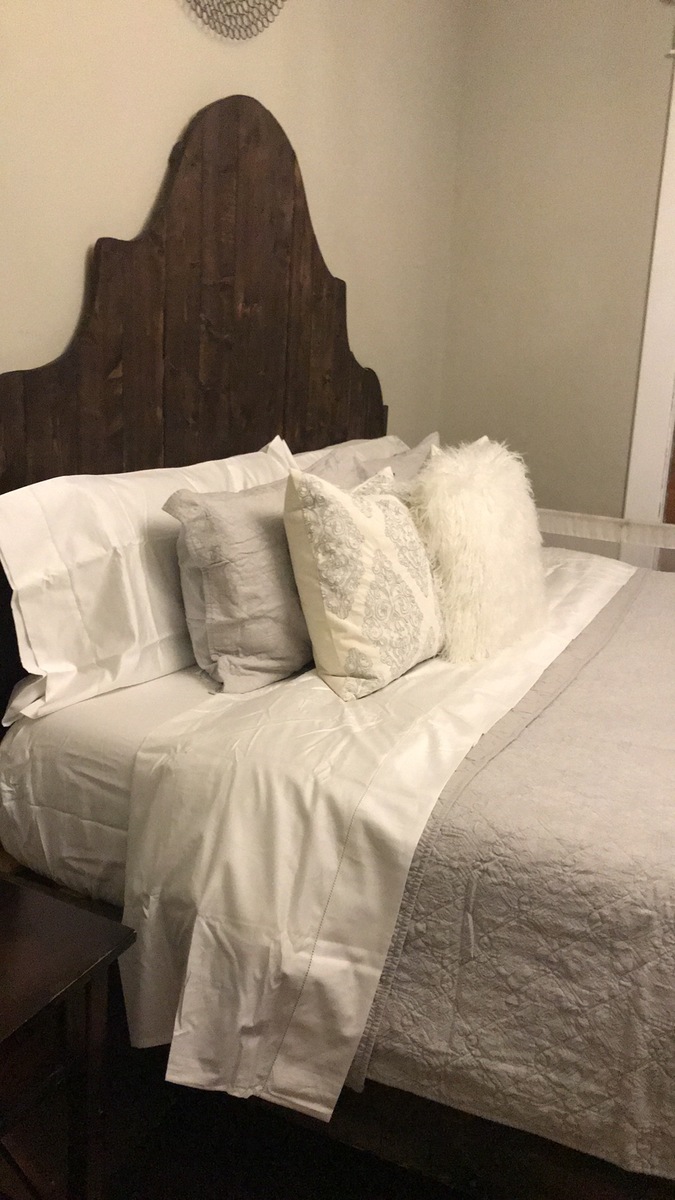
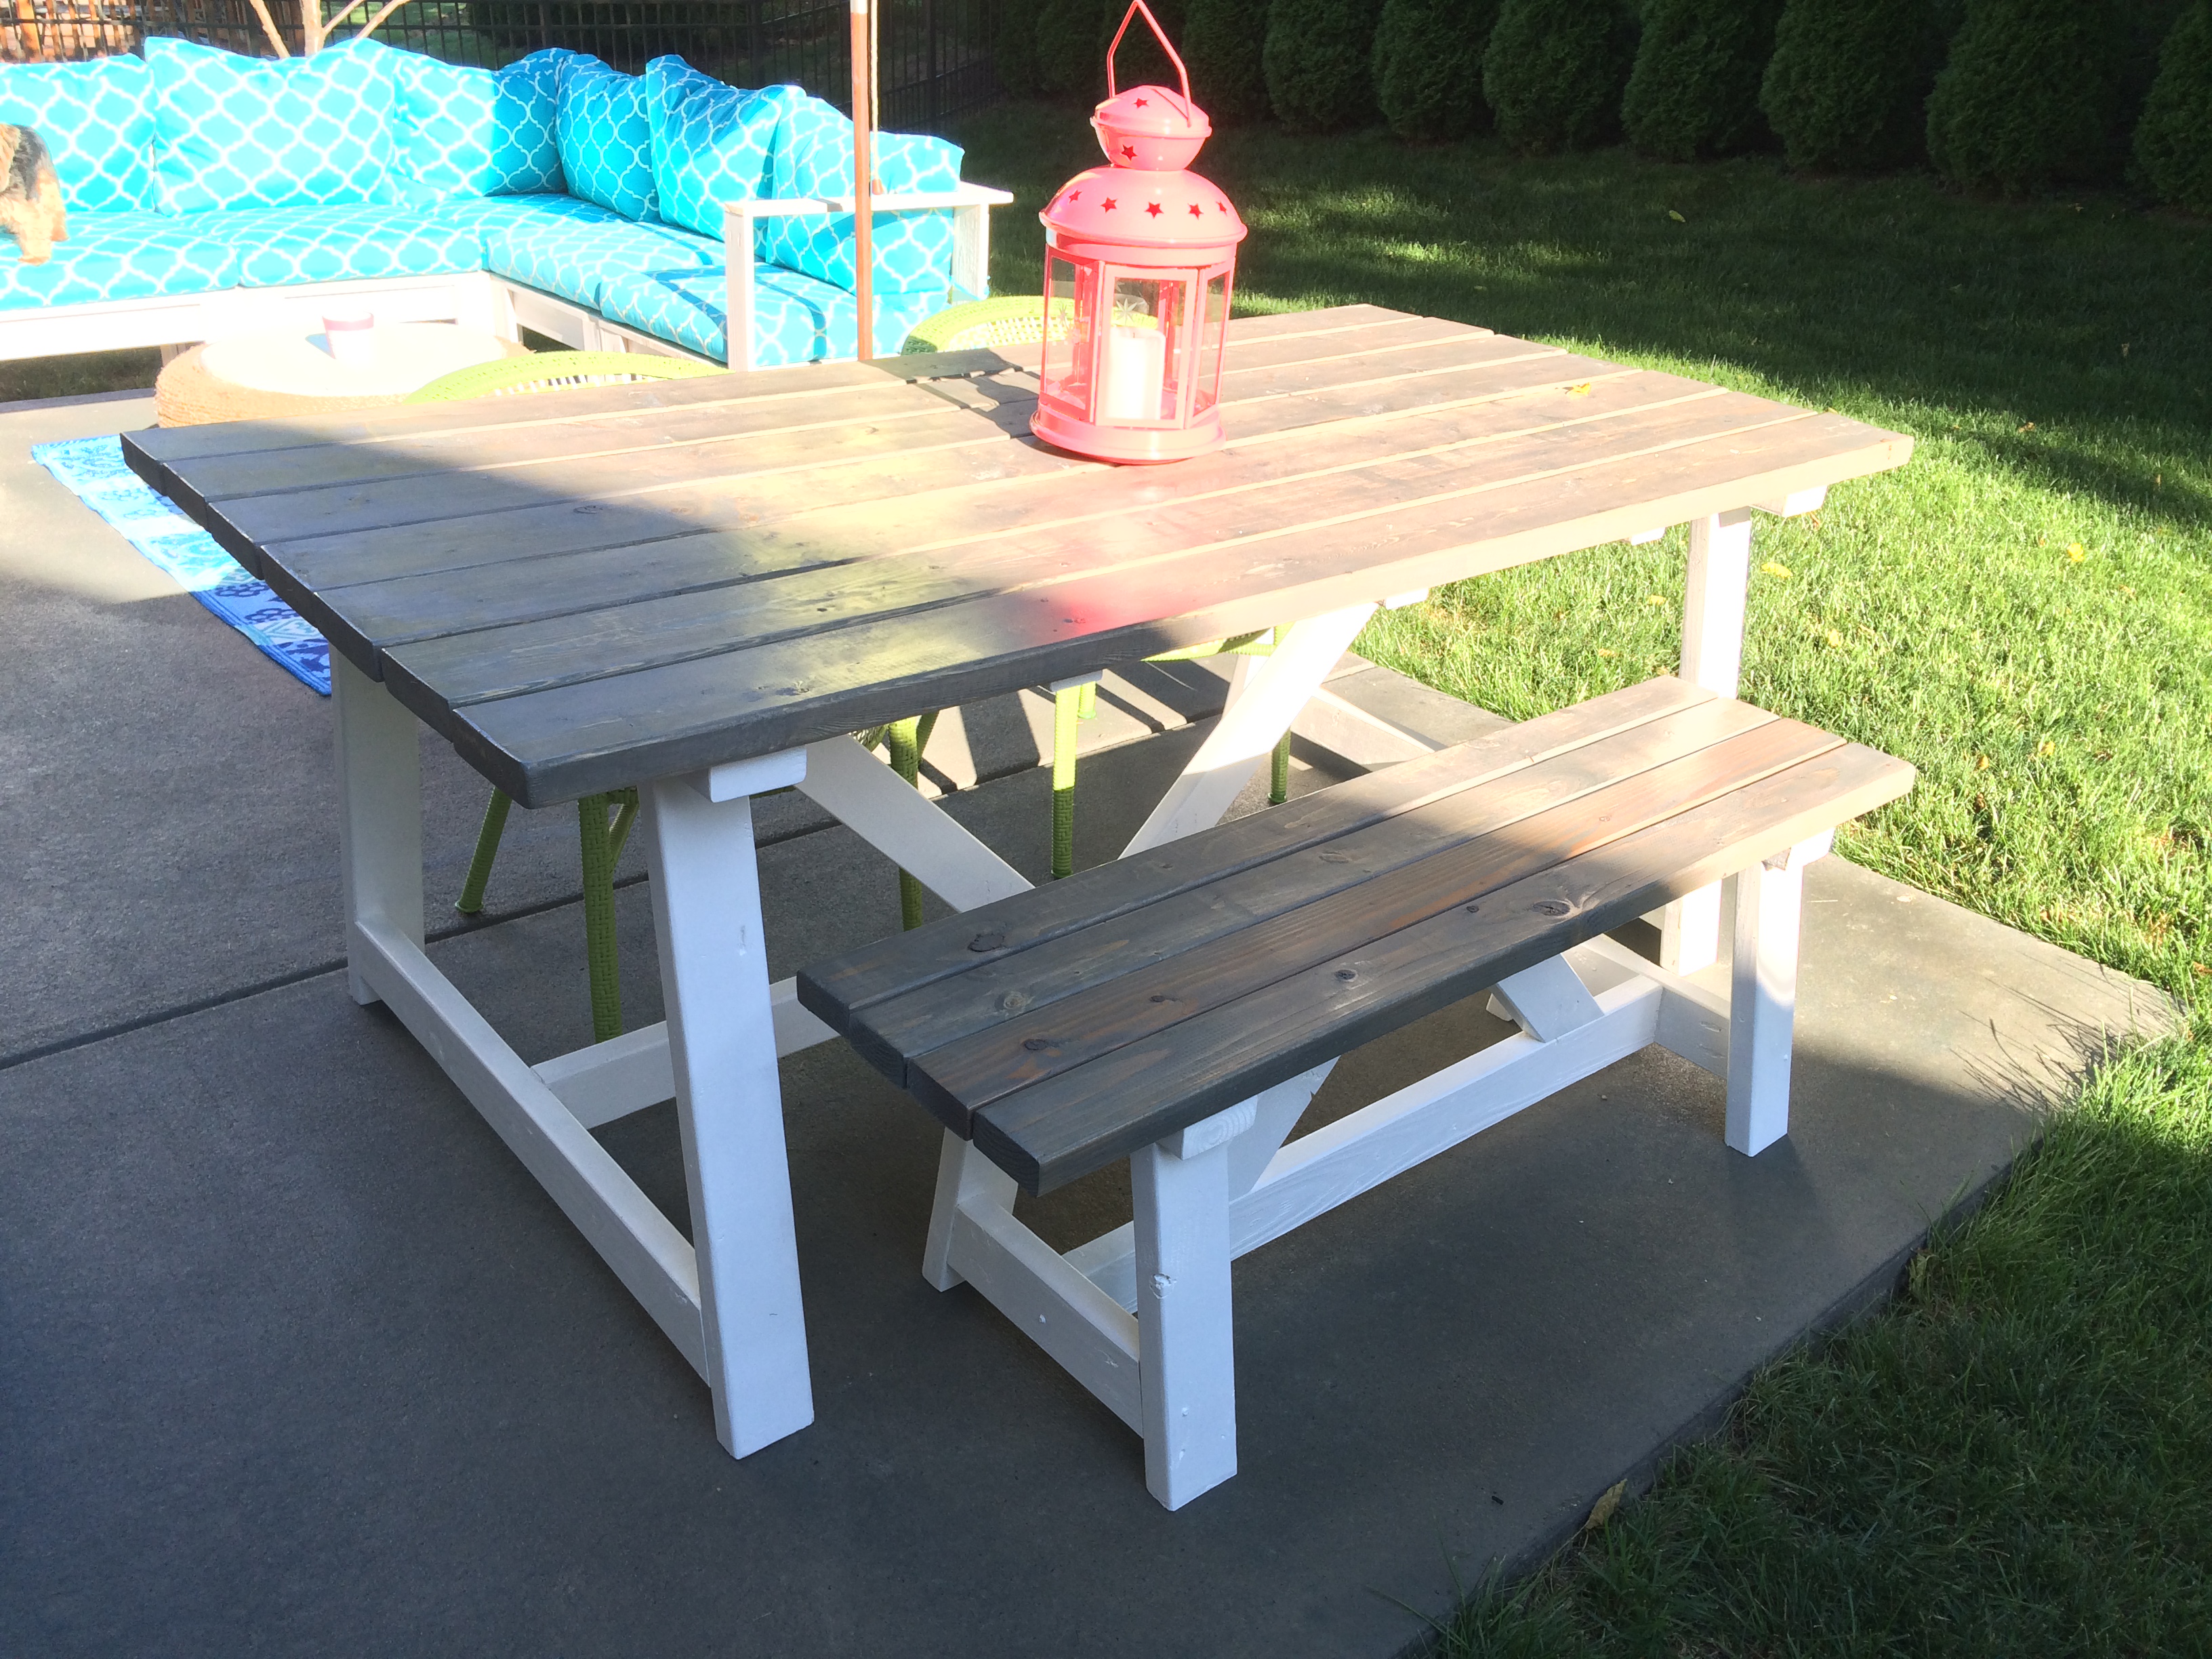
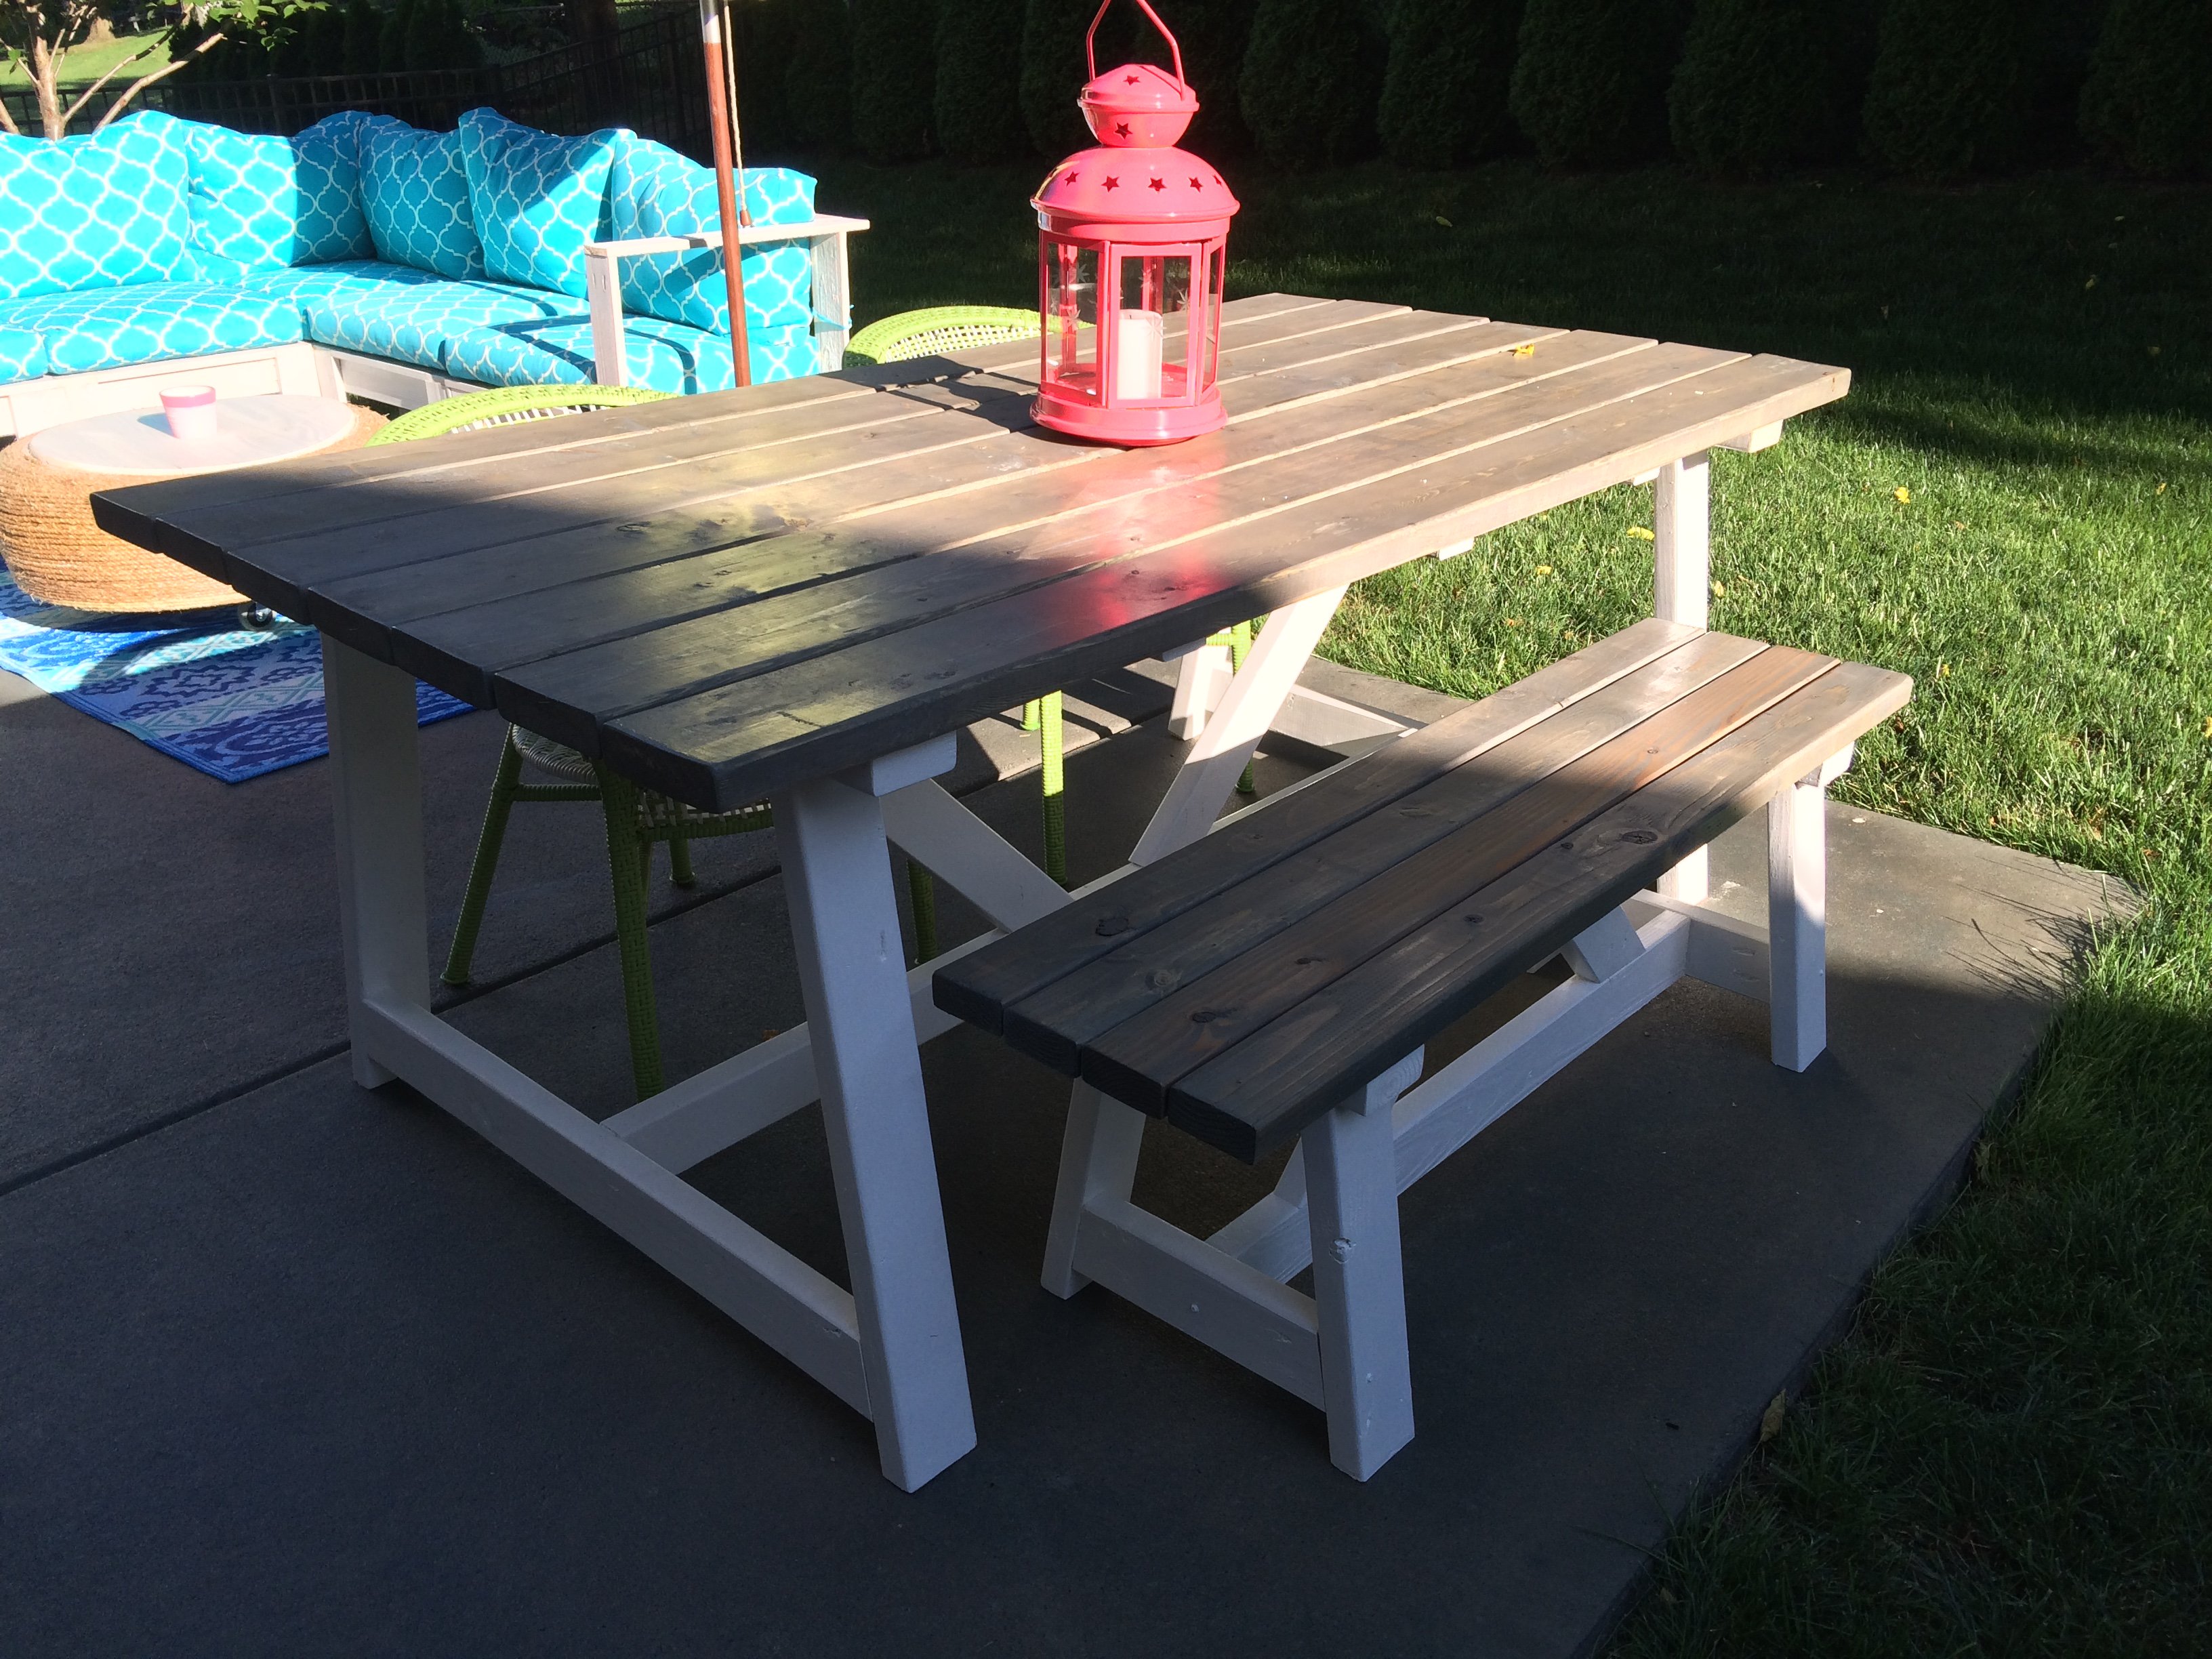
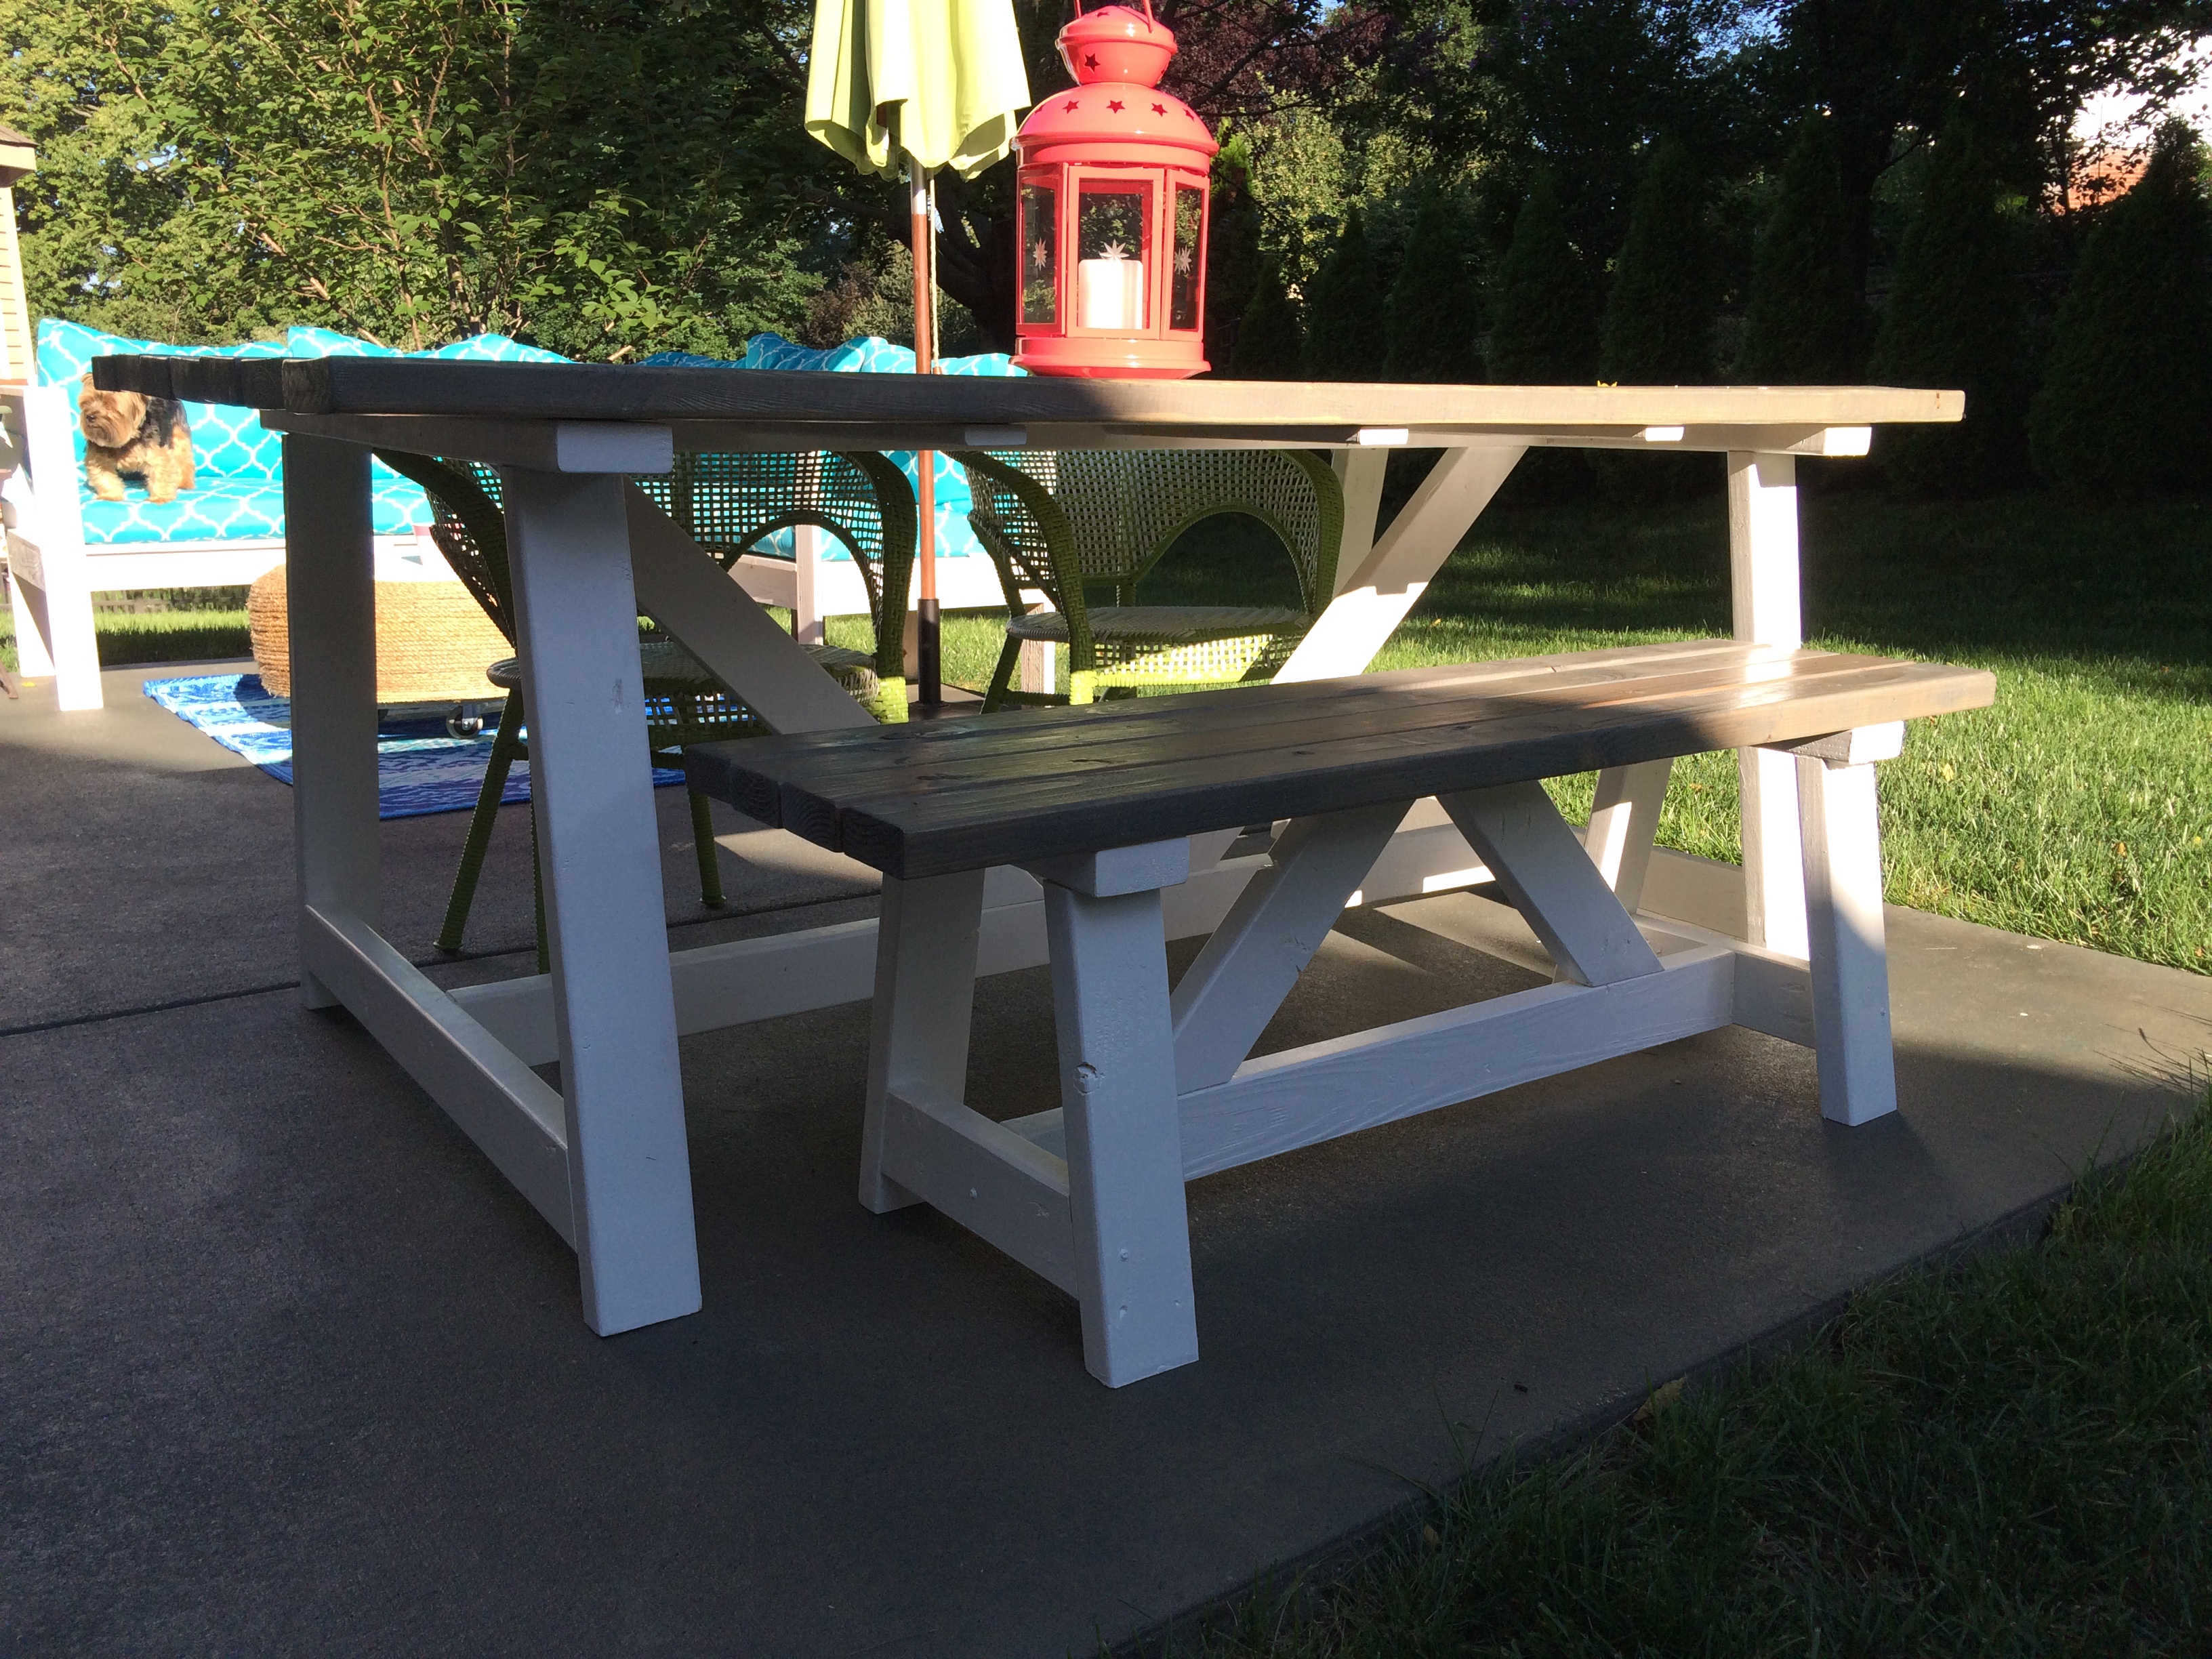
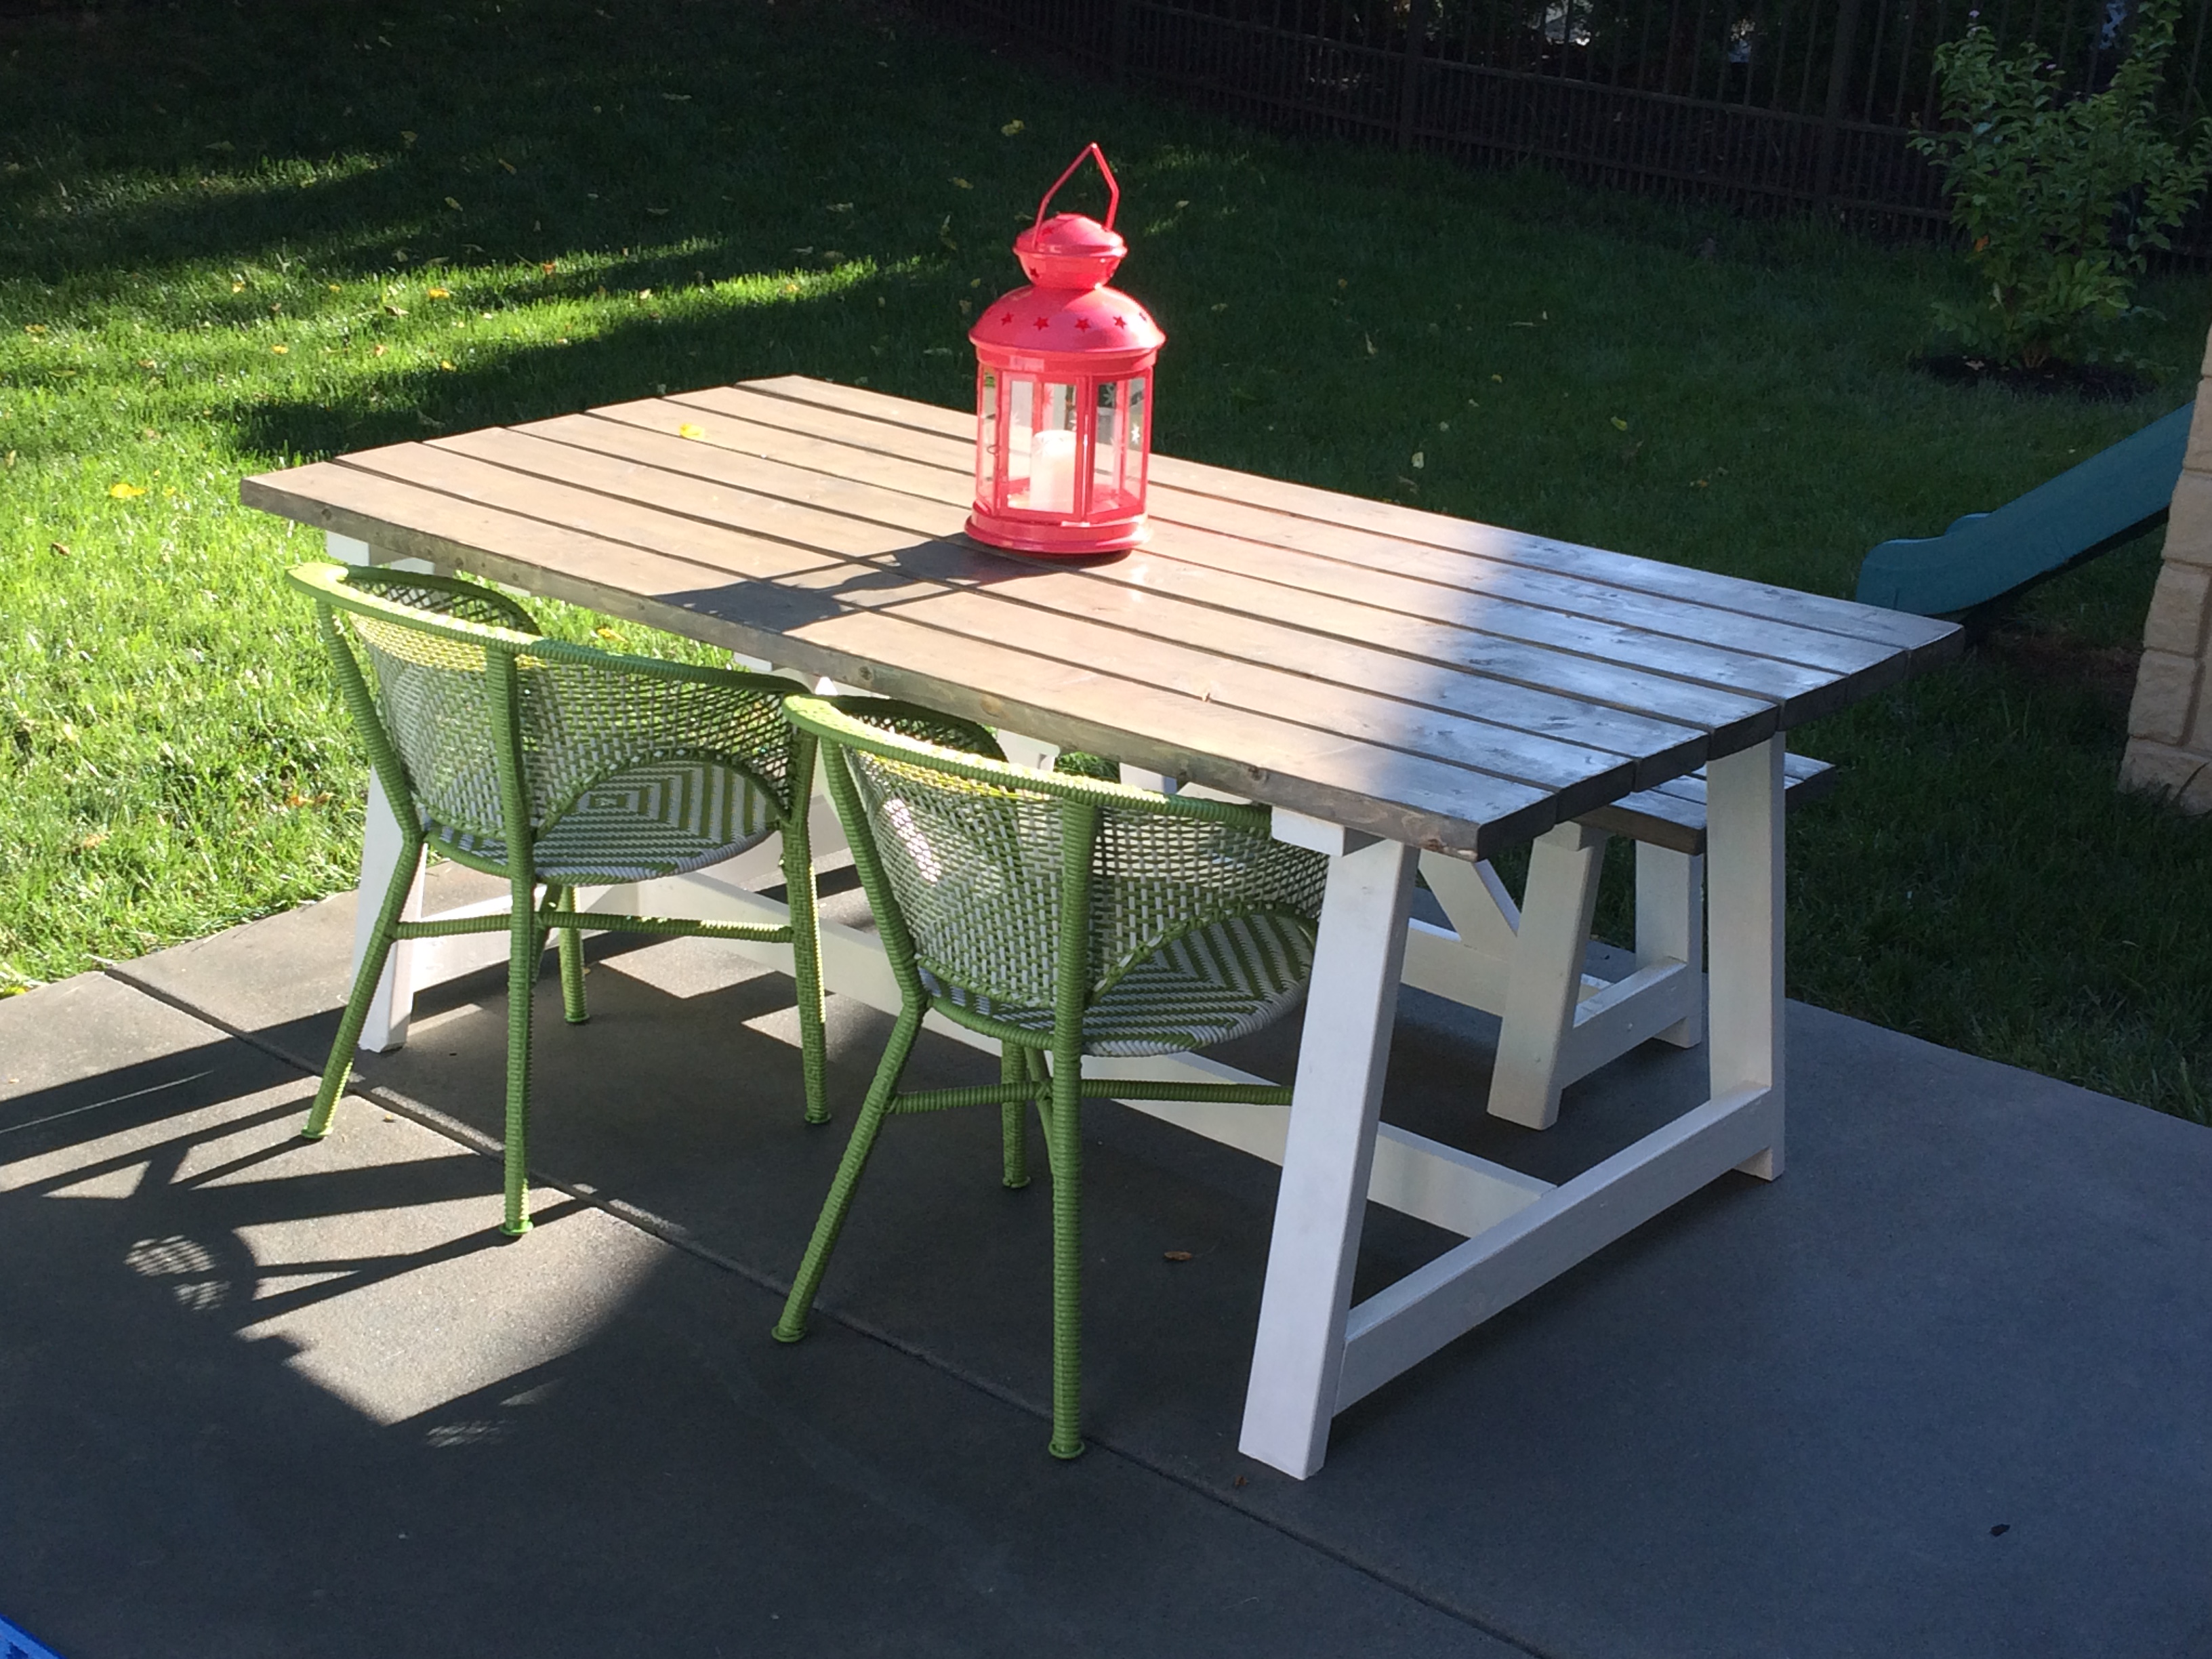
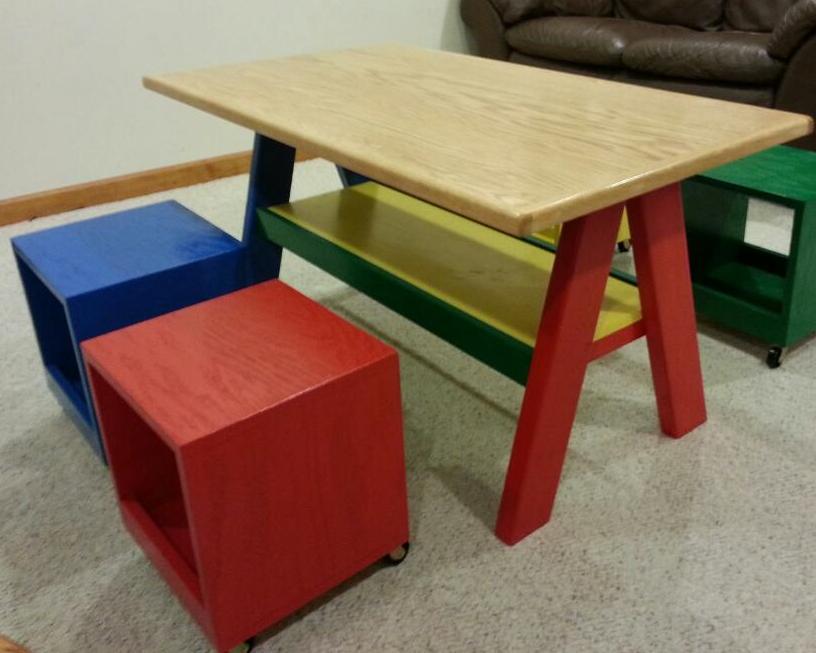
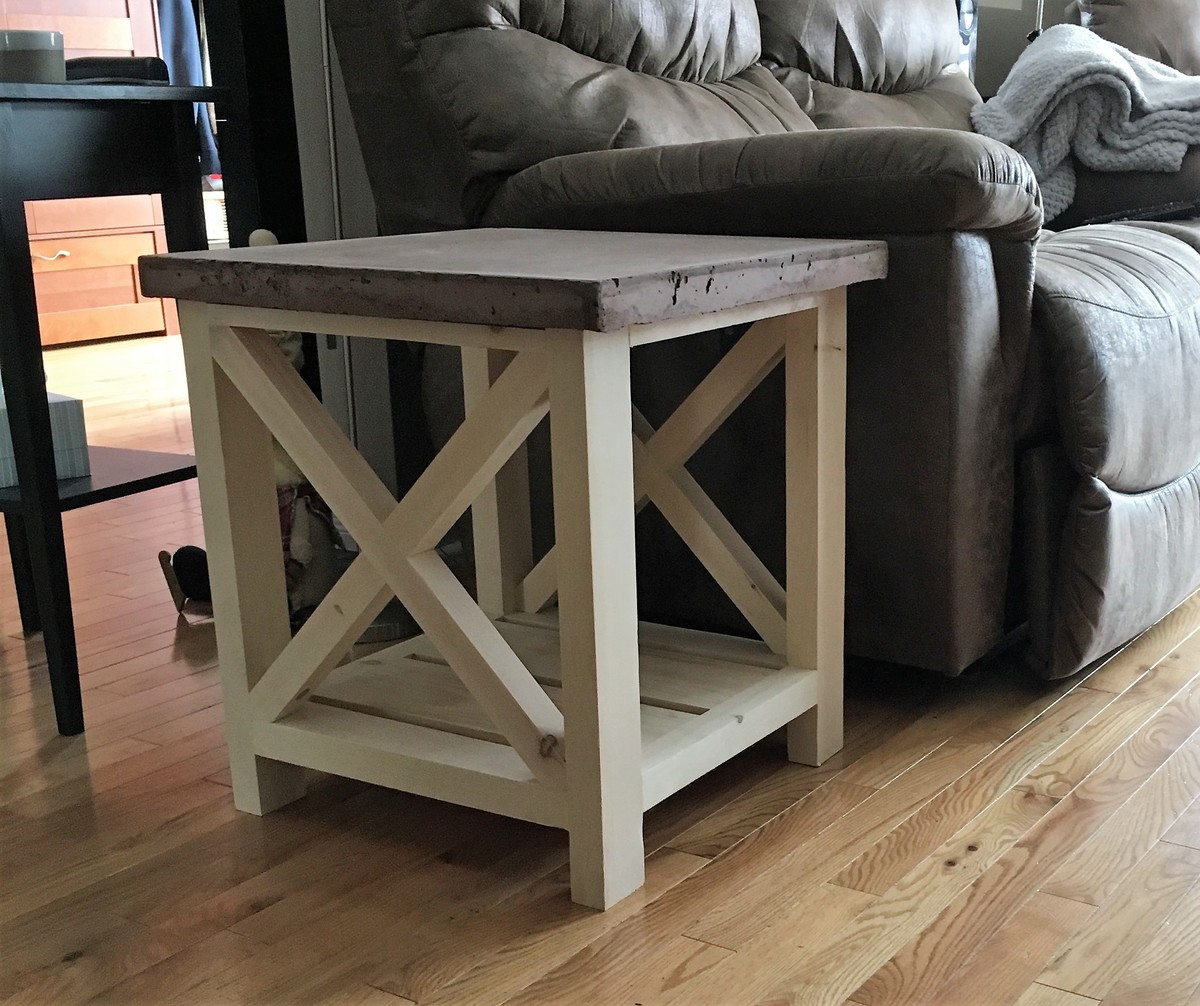
Modern Dining Room Table

Submitted by Highway6 on Thu, 07/16/2015 - 11:22

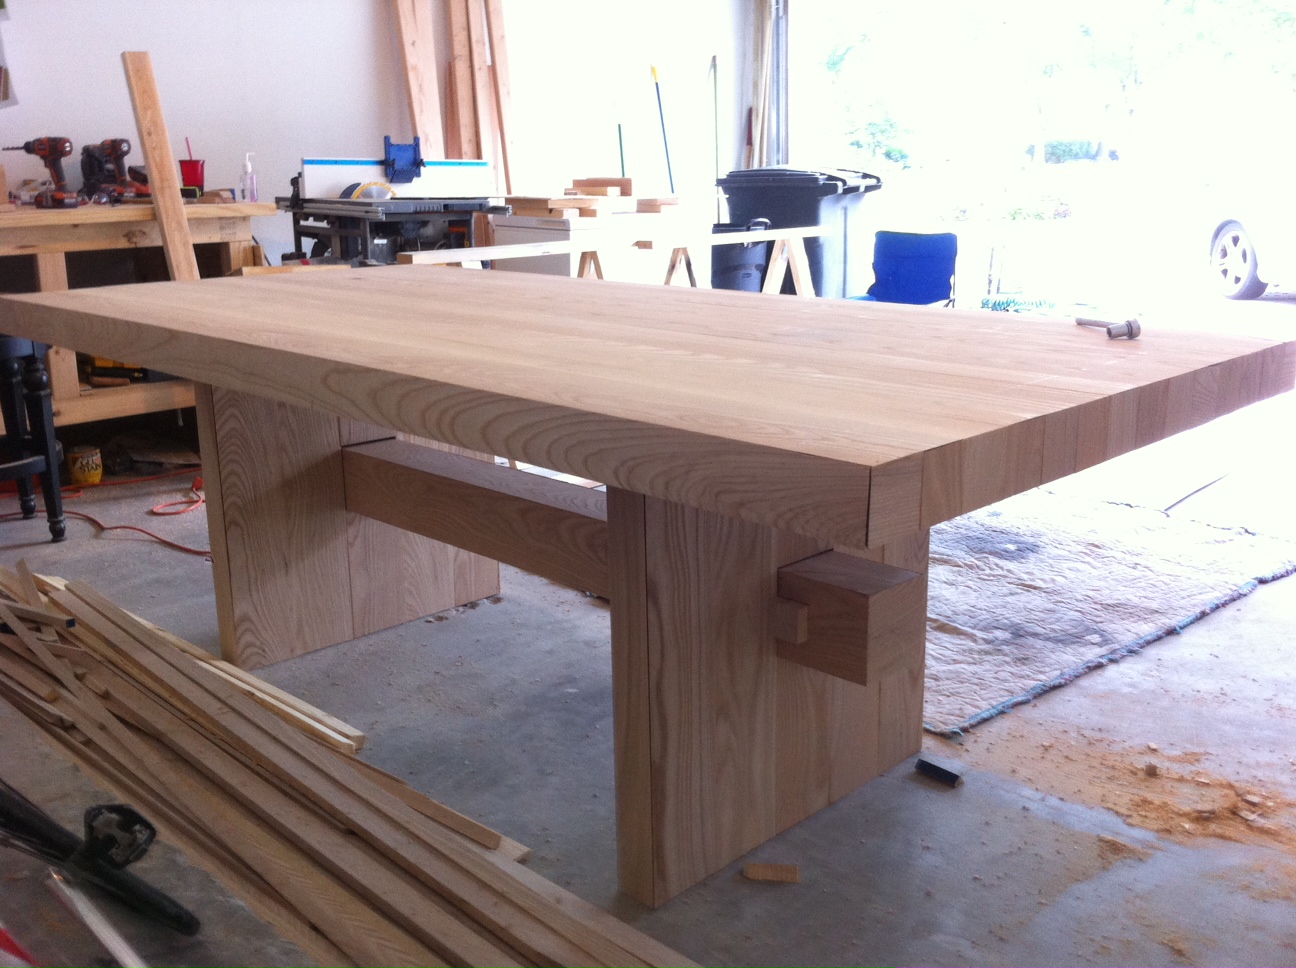
Plans developed myself after sneaking photos from the underside of the table at West Elm. 

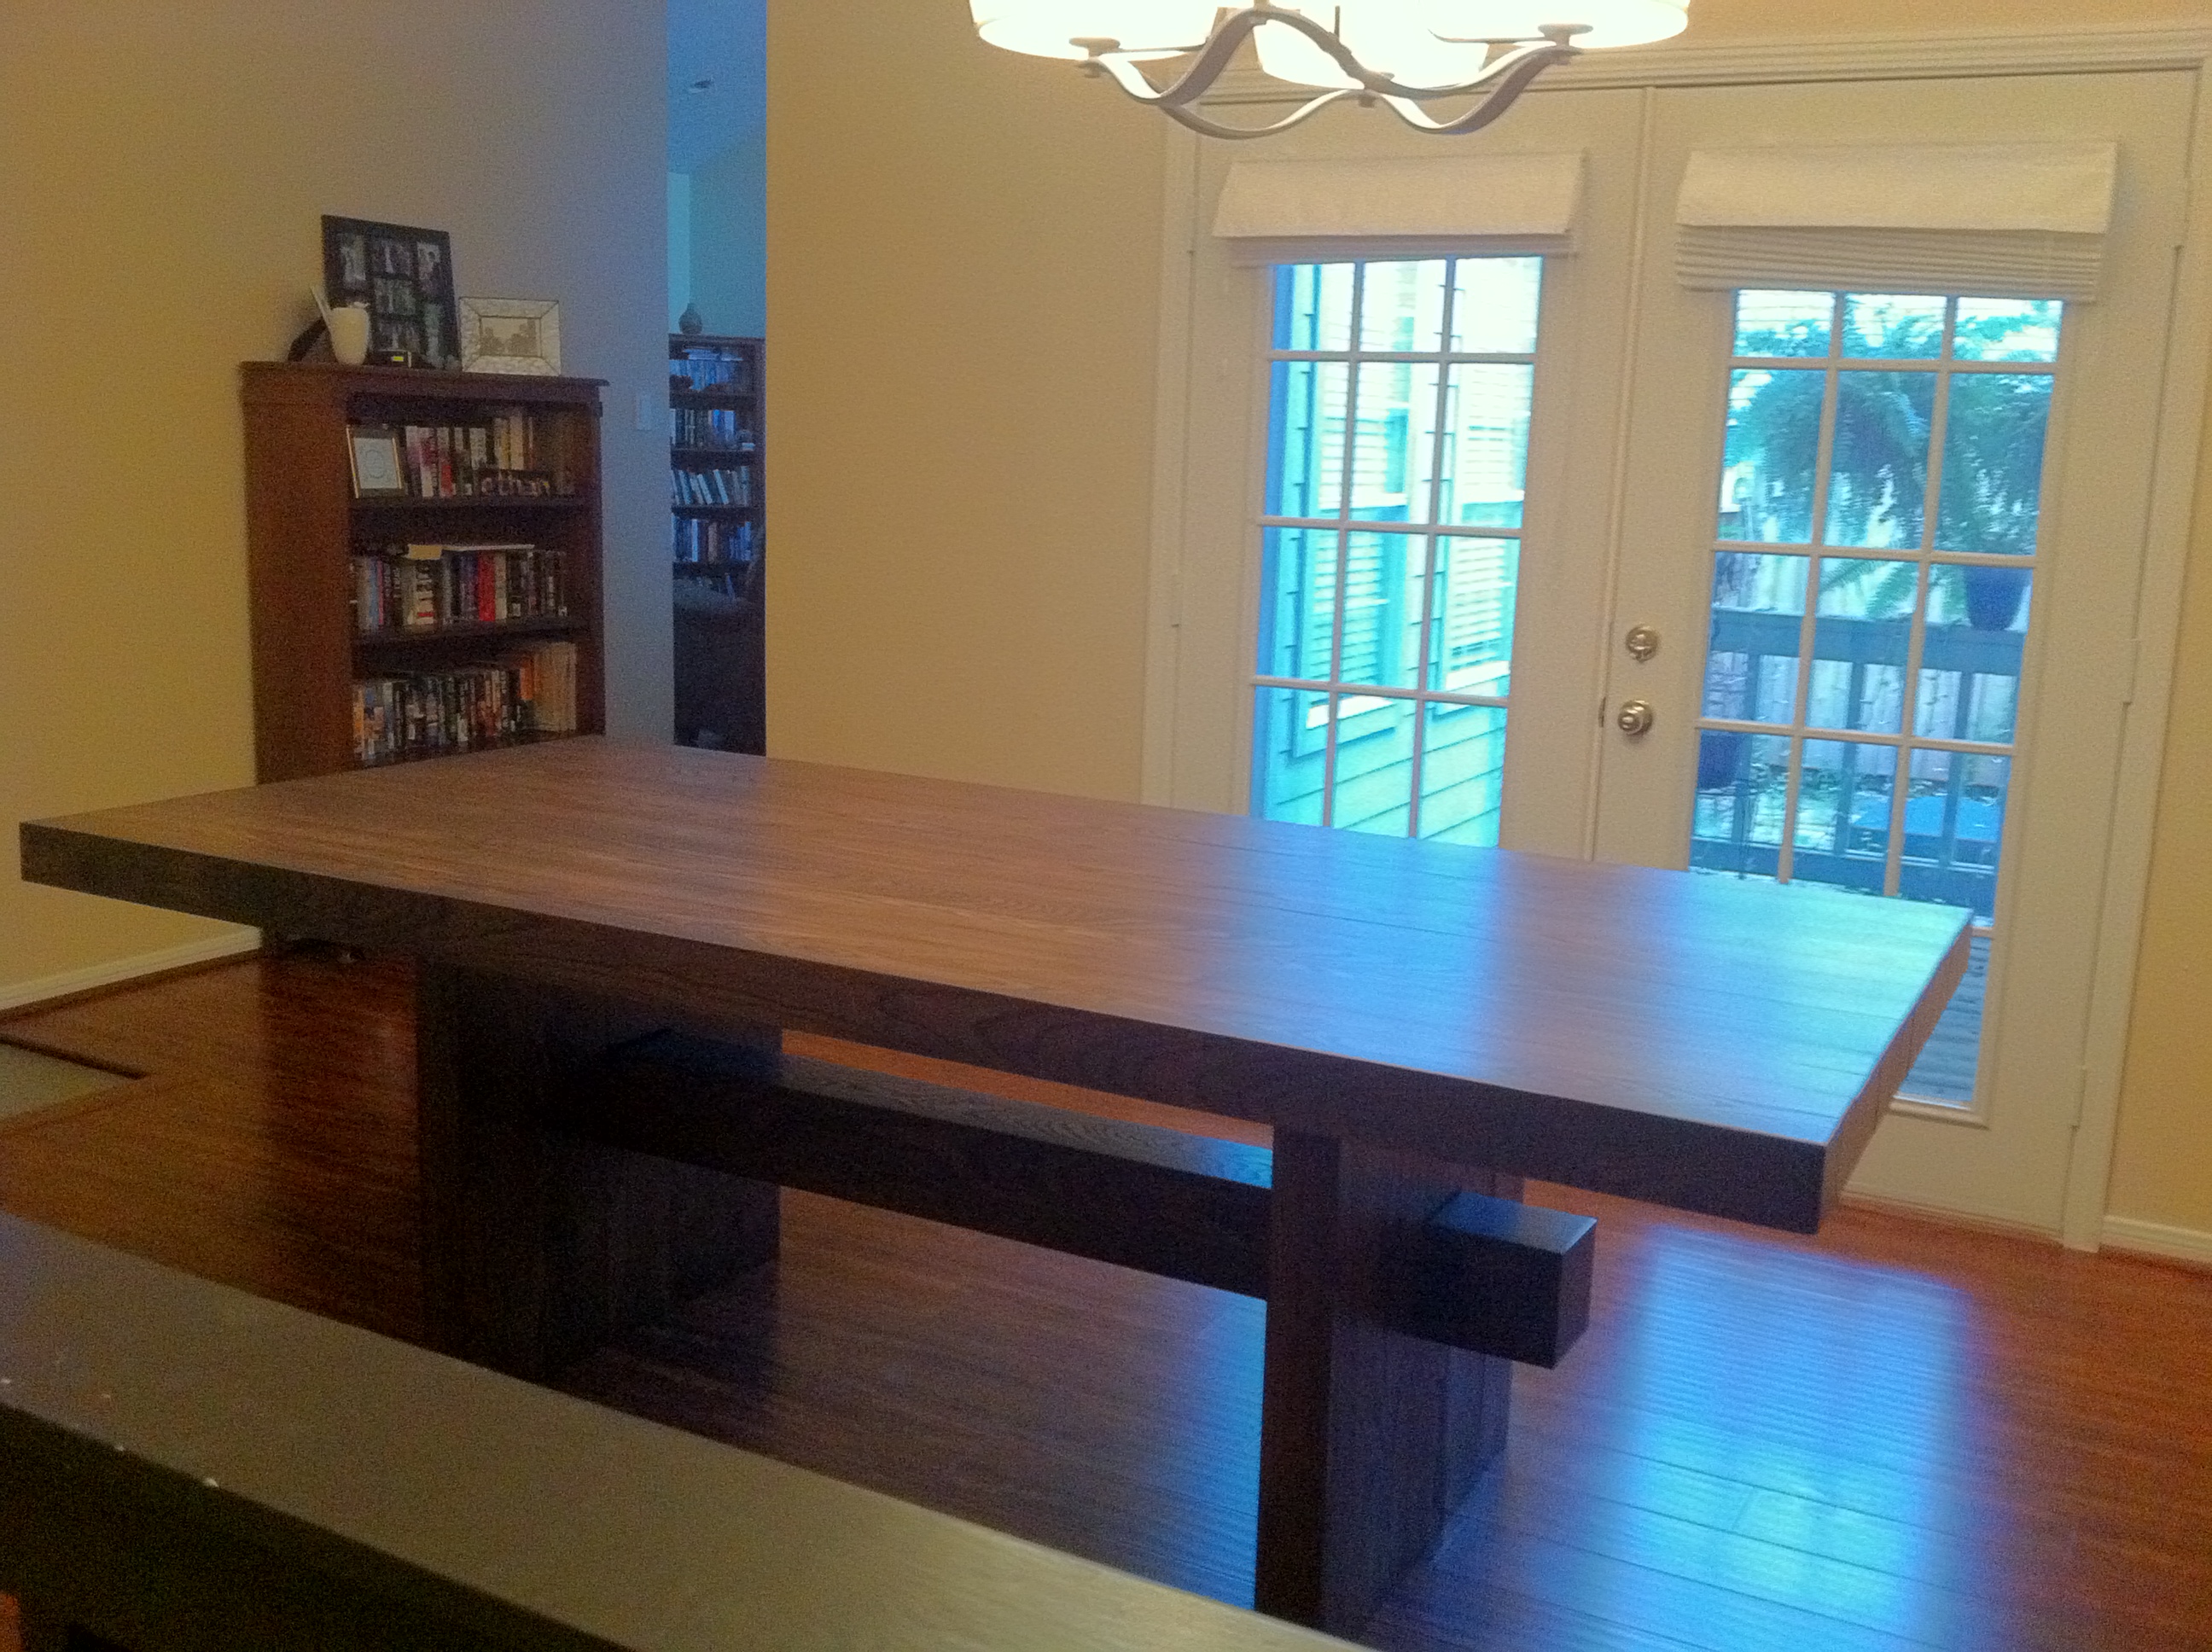
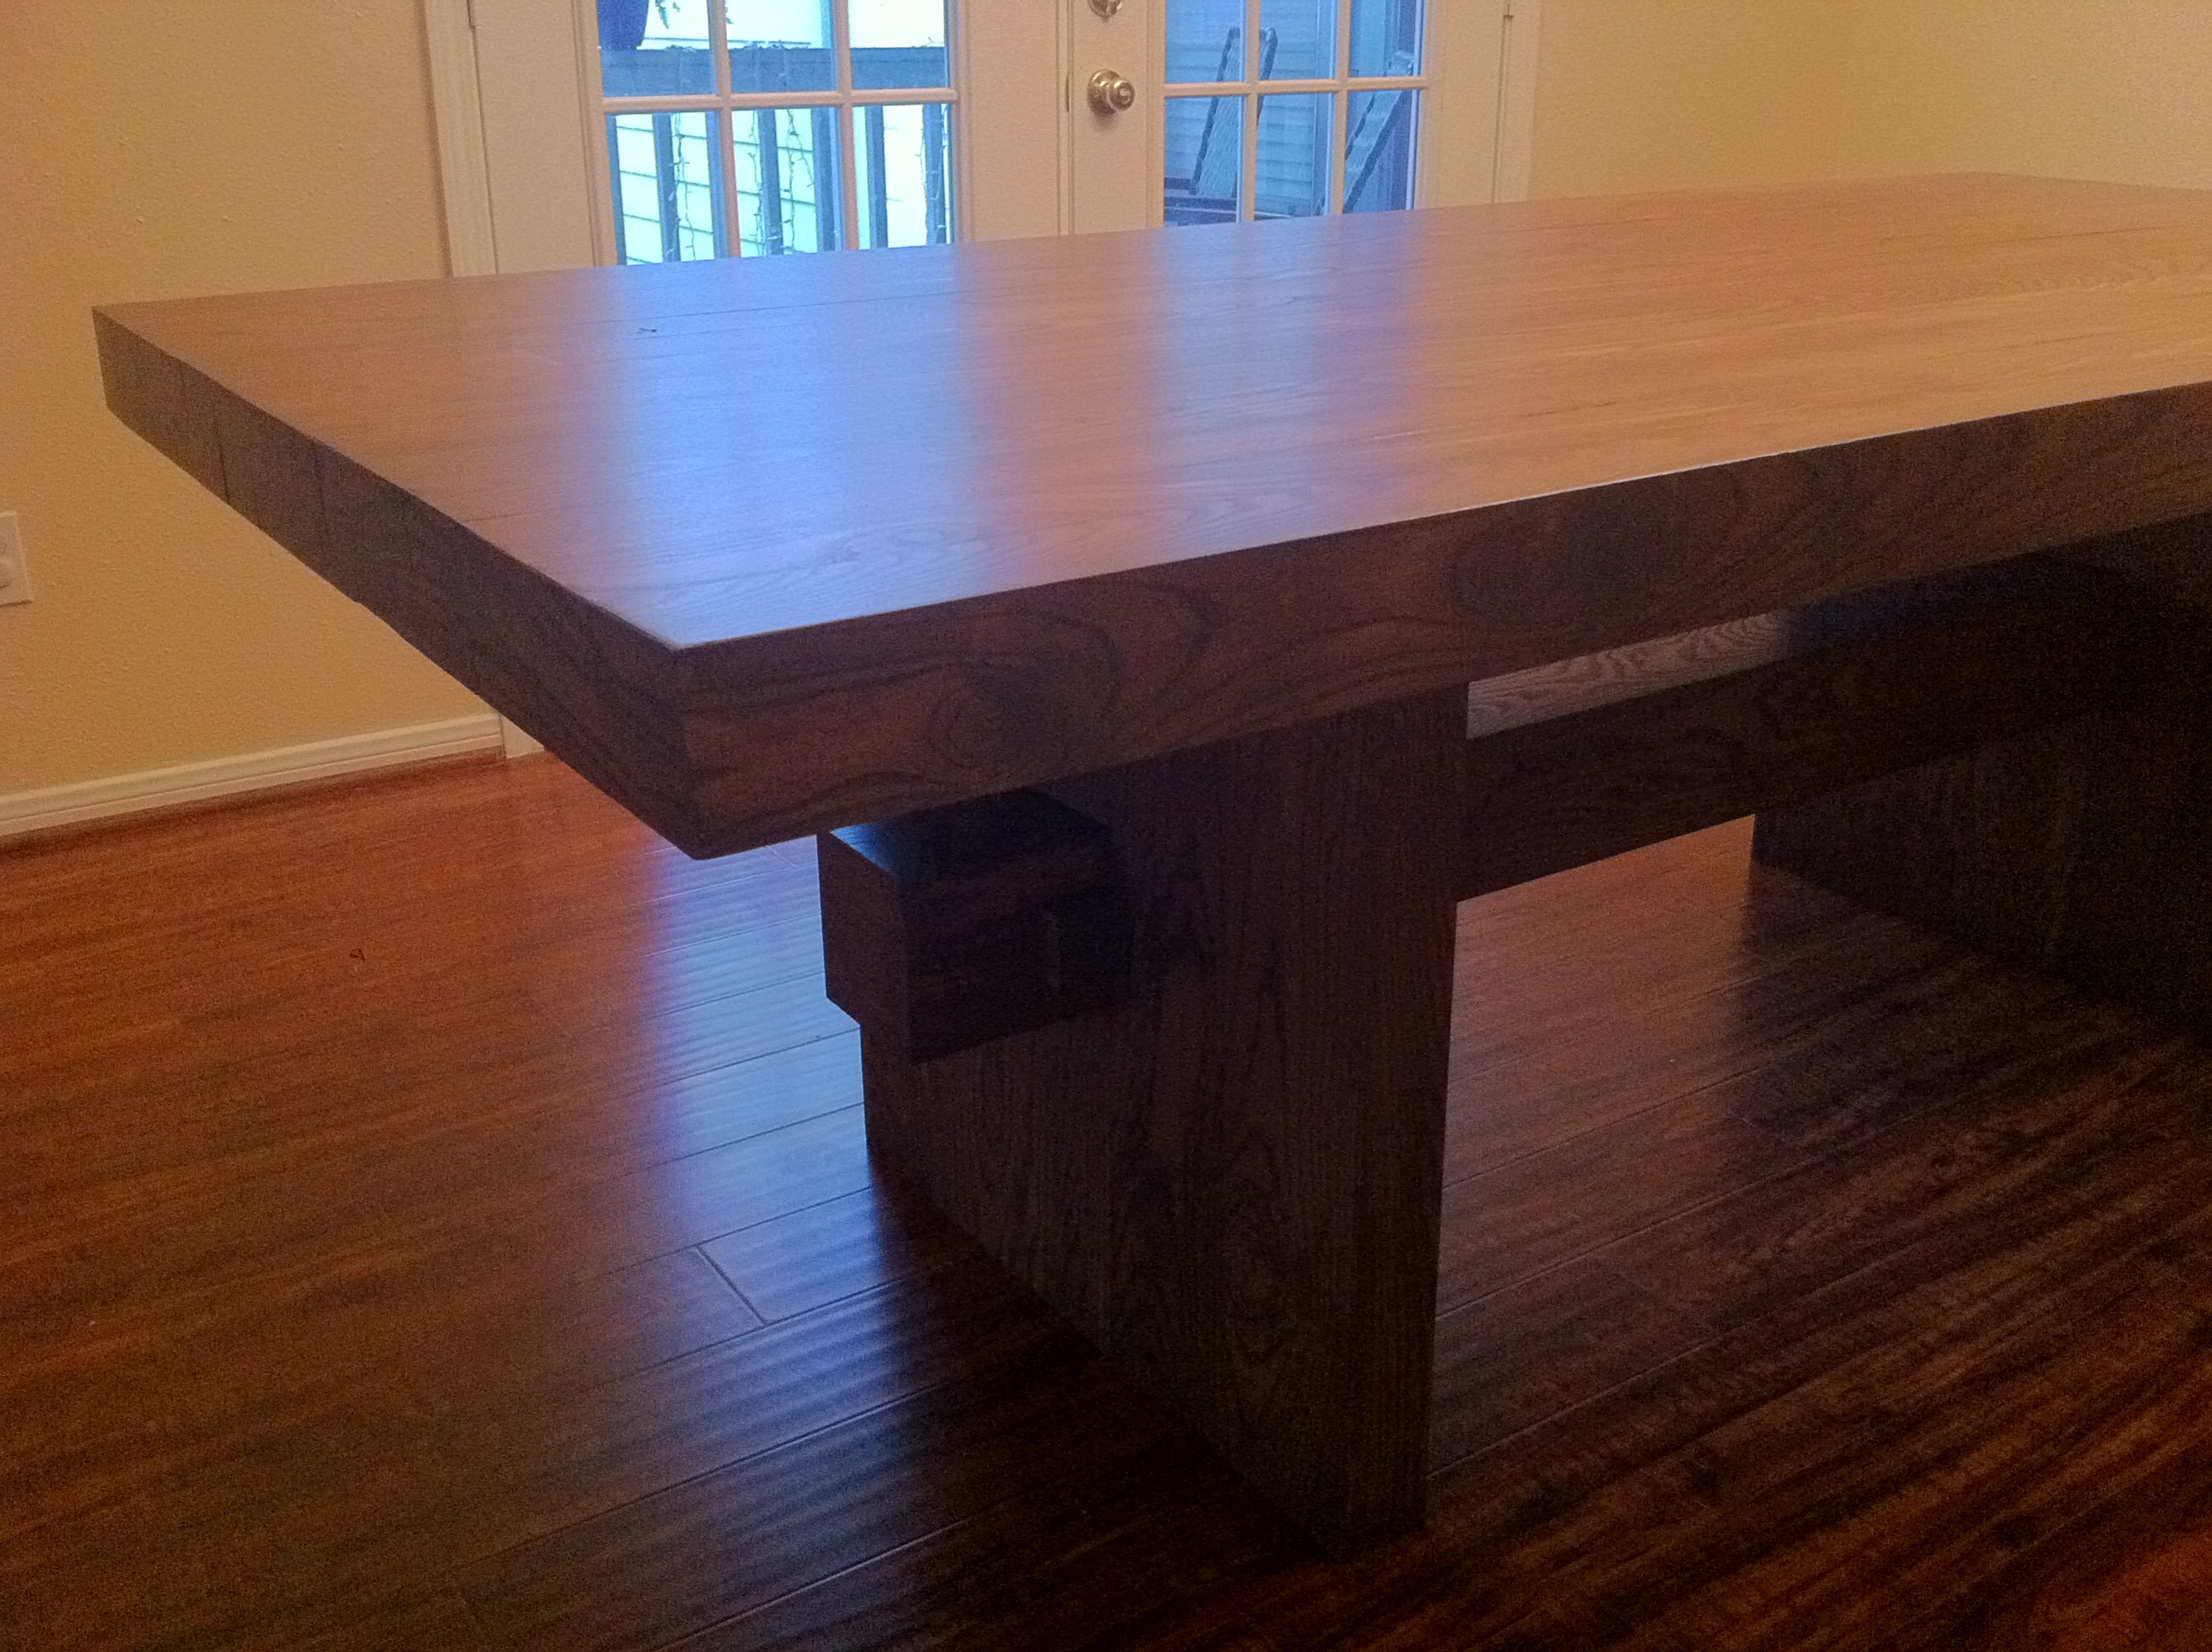
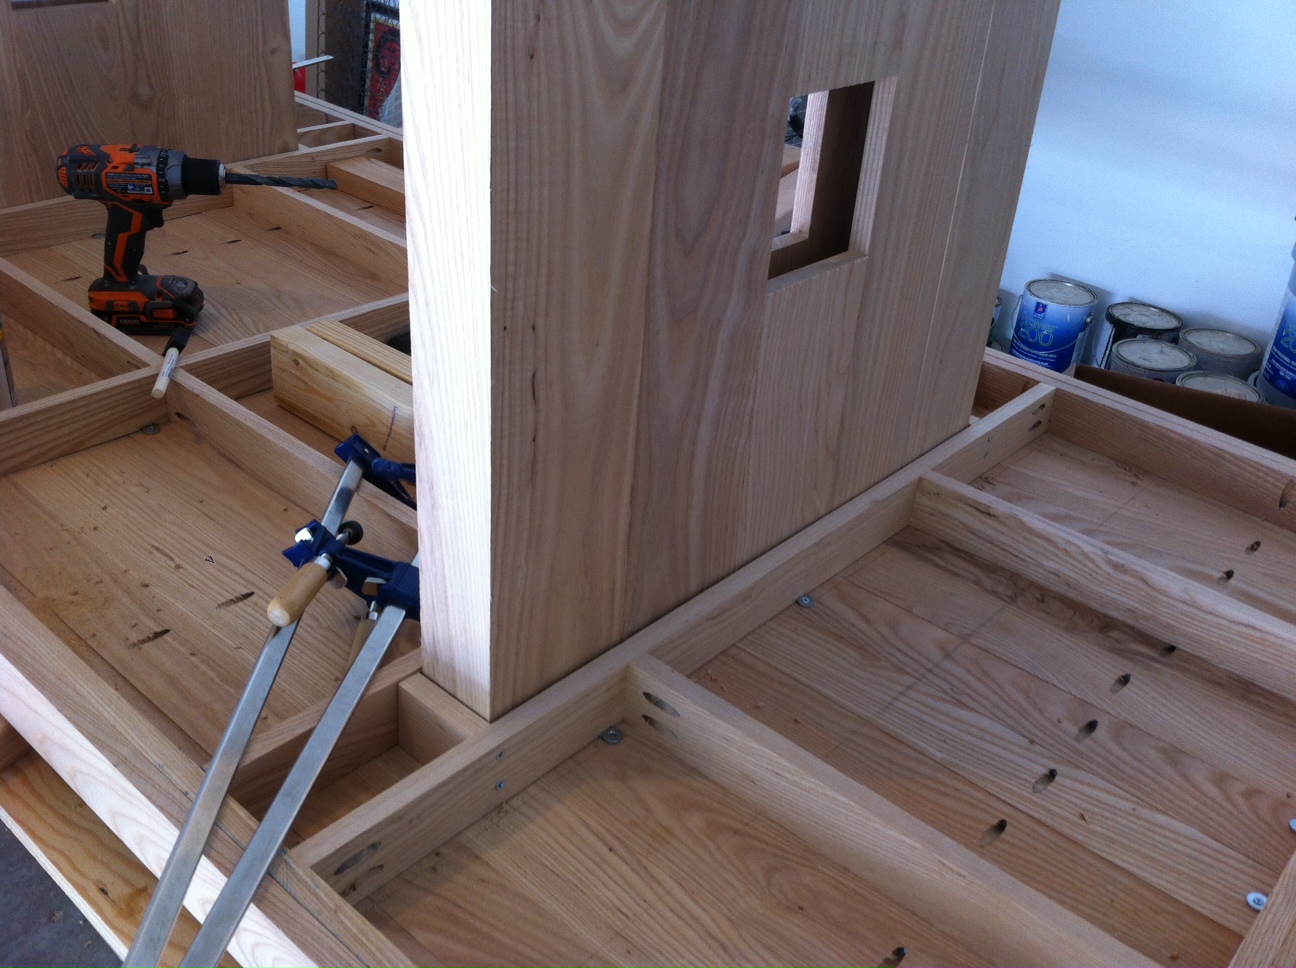
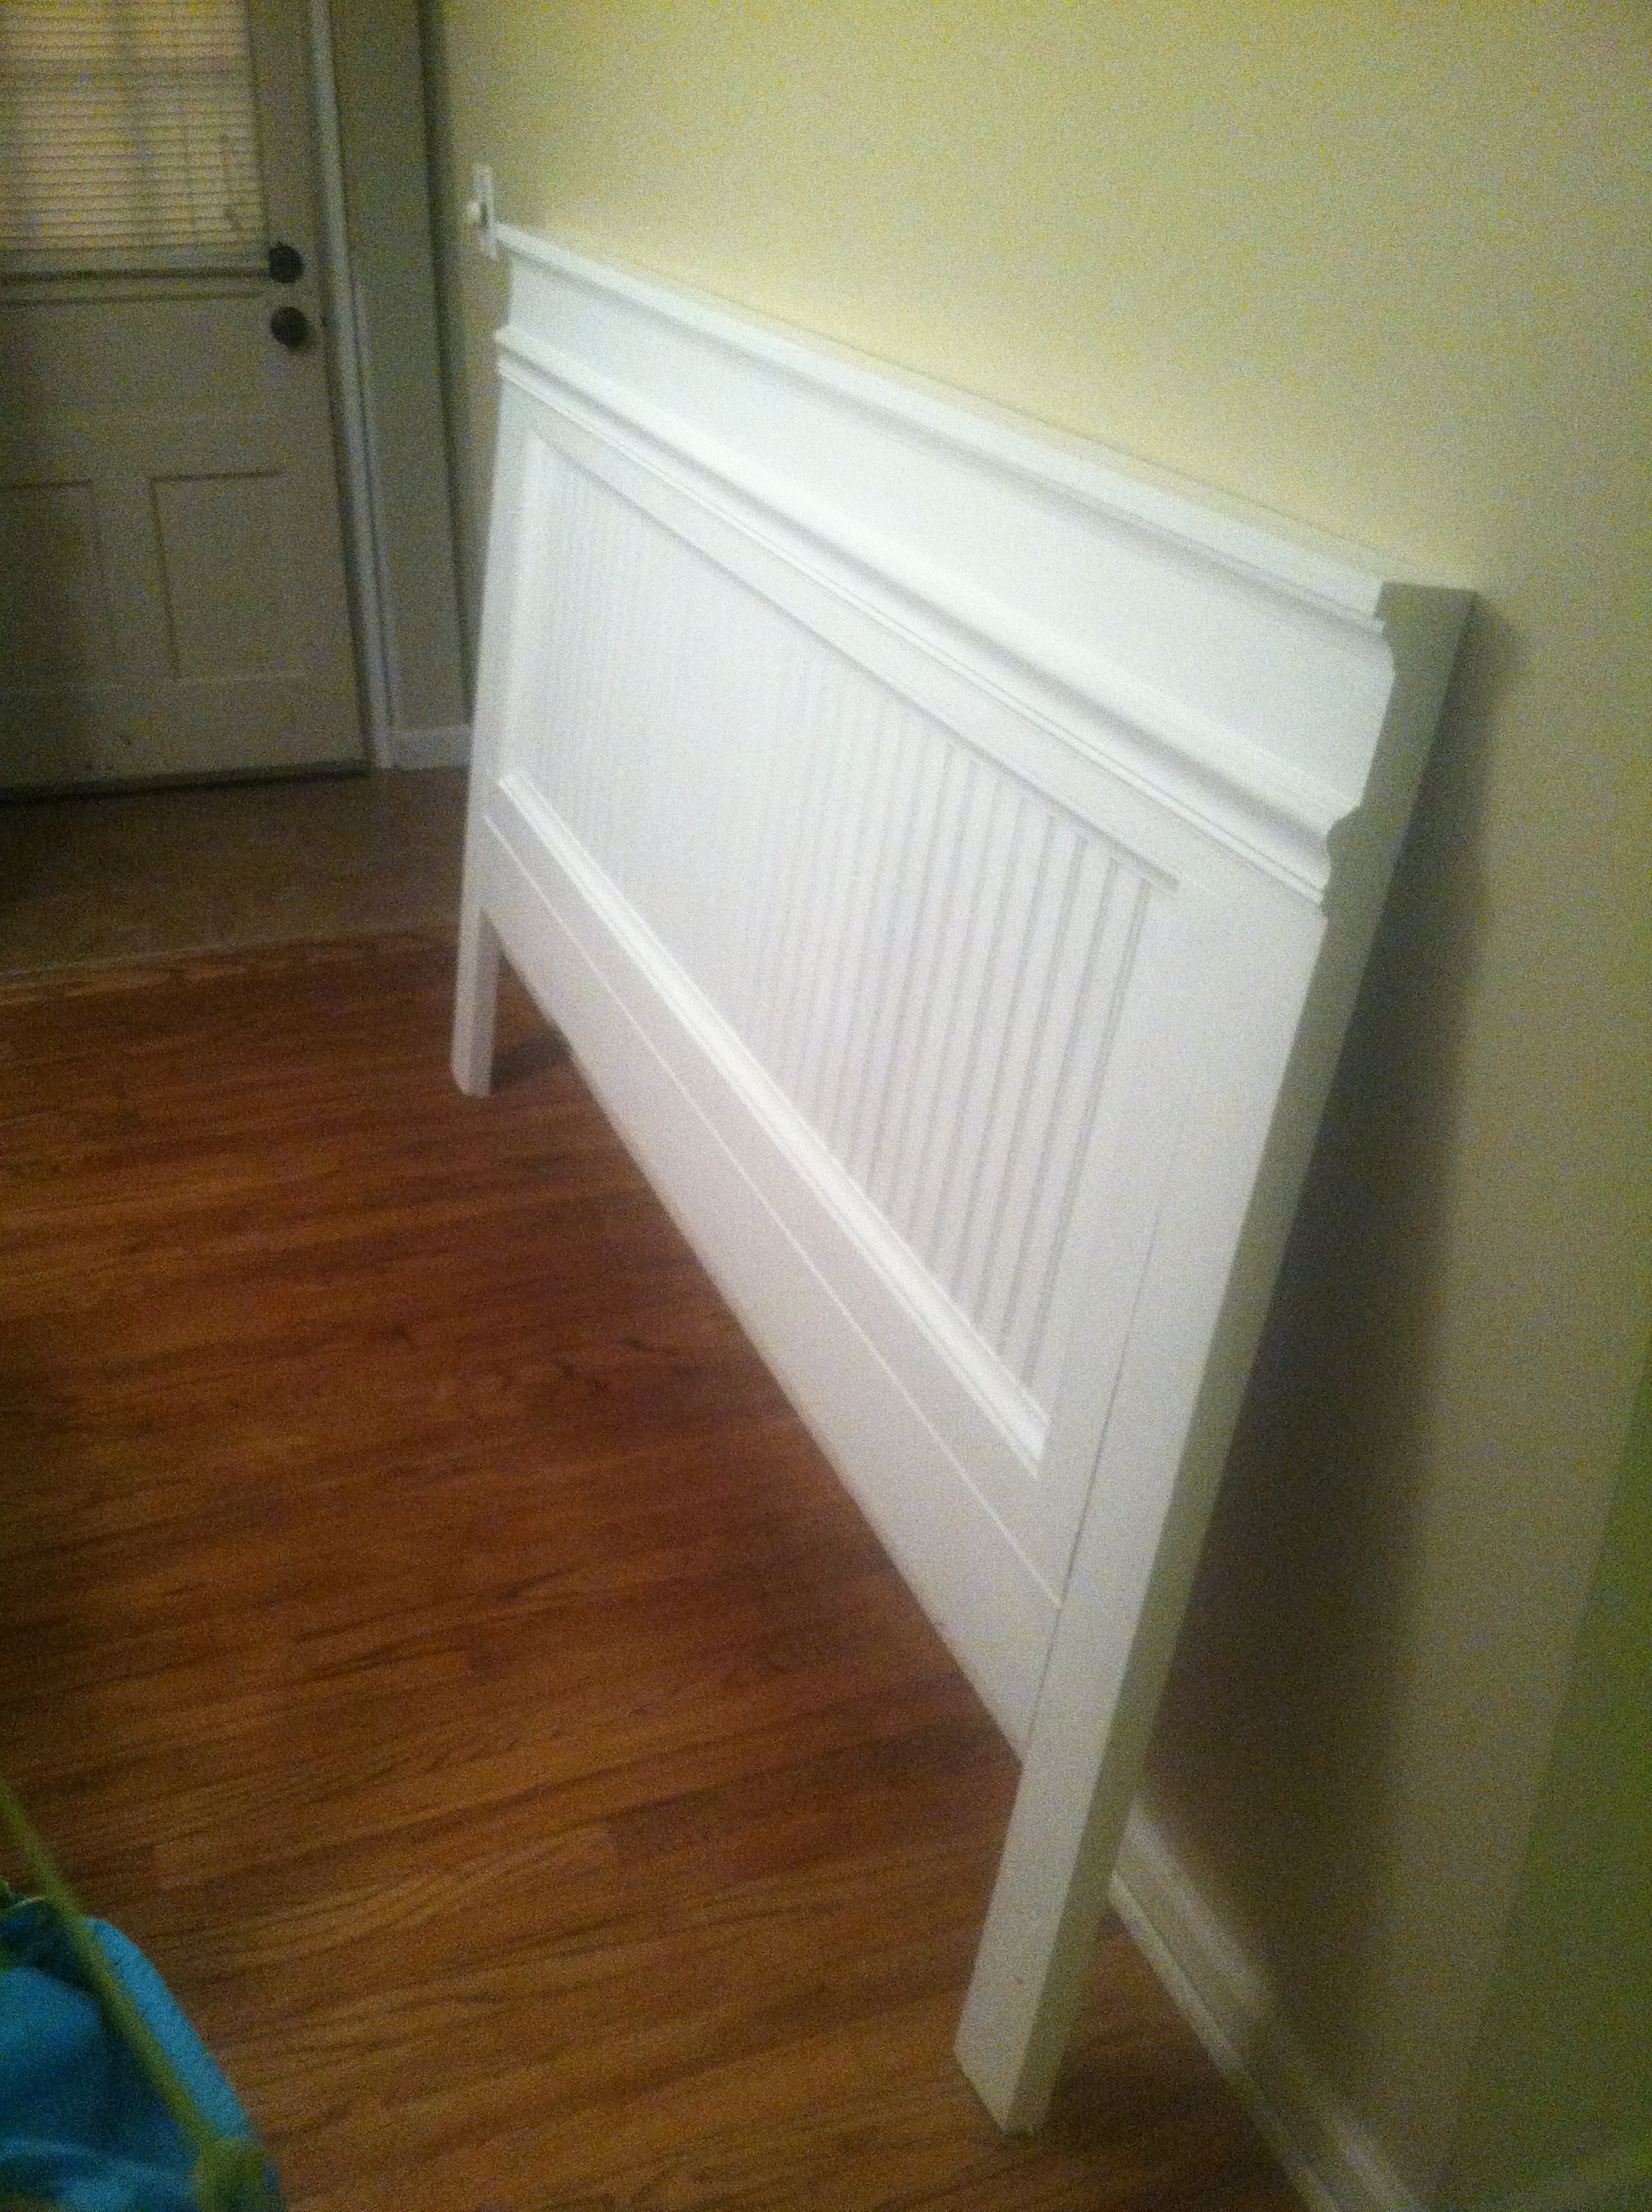
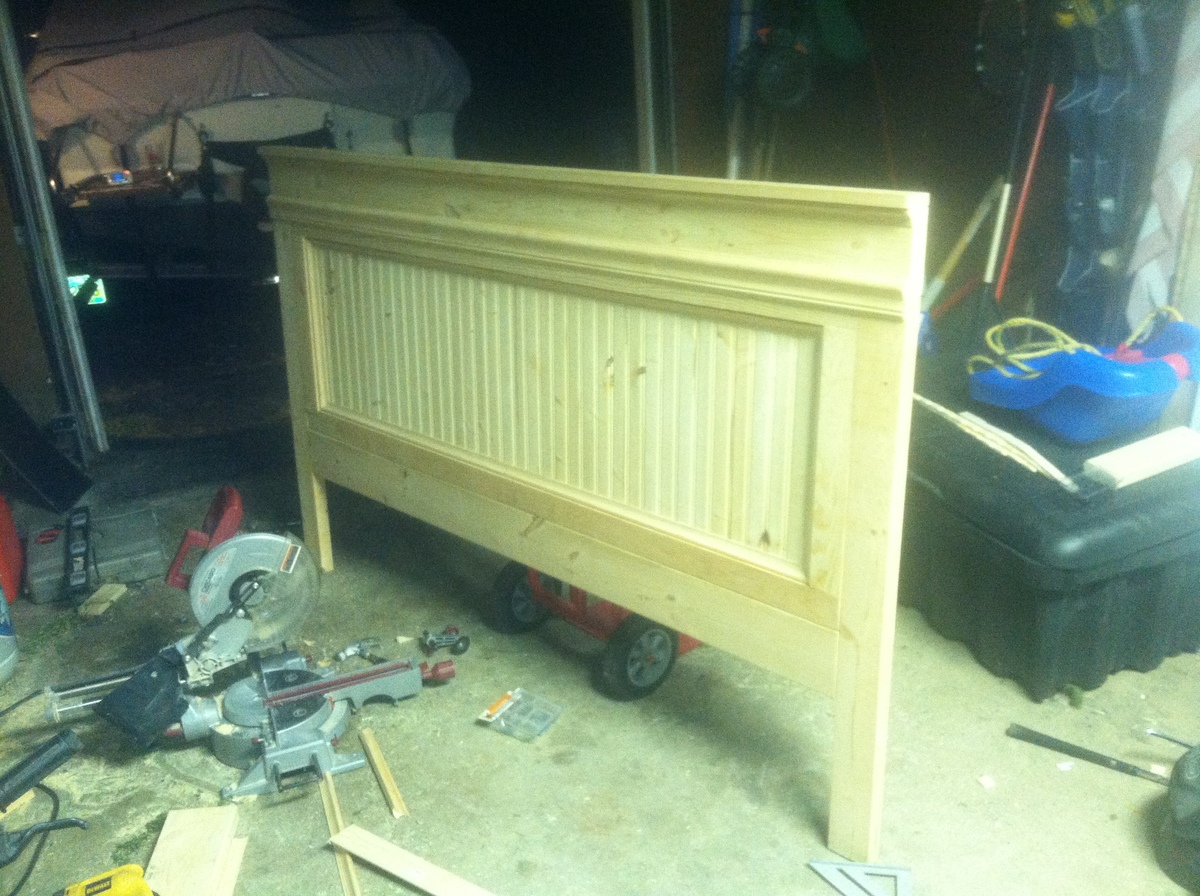
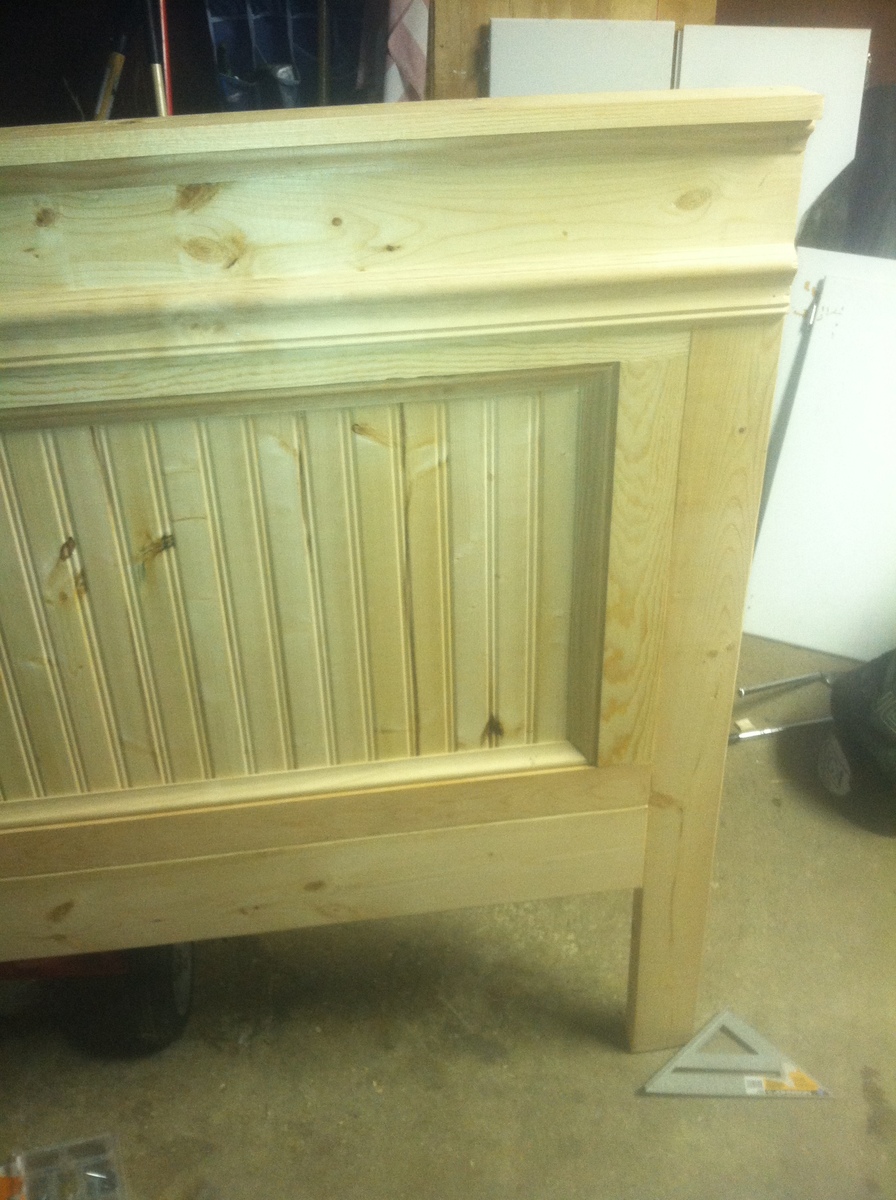
Pine 2x4s make up backbone of the 2 legs and the horizontal piece underneath.

Used the figure 8 fasteners for members going across the table top to allow for any slight seasonal movement of the table top.

Not shown, but each leg is secured to the table top with (4) 2.5" bolts and a countersunk t-nut

Because I'm a beginner, this has taken up 75% of my weekends since mid-March.  Would not recommend this as a 1st major project.  3 way bevels are a pain in the arse. Thank God for the Timbermate filler.. that stuff worked great to give me crisp corners.

modern dining table

Estimated Cost
$450 in Ash.
Couple hundred more in finishing materials, screws, pine 2x4s, miscellaneous odds and ends
Estimated Time Investment
Week Long Project (20 Hours or More)
Finish Used
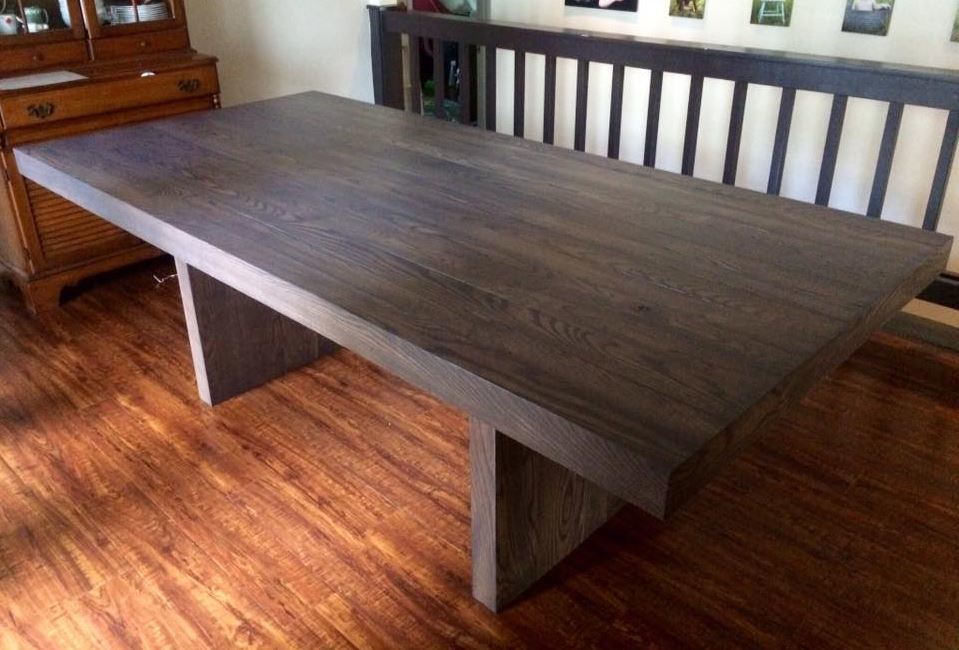
50-50 Rustoleum Kona and Weathered Gray.

Polycrylic Clear Satin - 3 coats (5 on table top) with brown paper bag sanding between coats.
Recommended Skill Level
Intermediate

Comments

Highway6

Wed, 01/13/2016 - 13:54

I don't have plans, sorry.

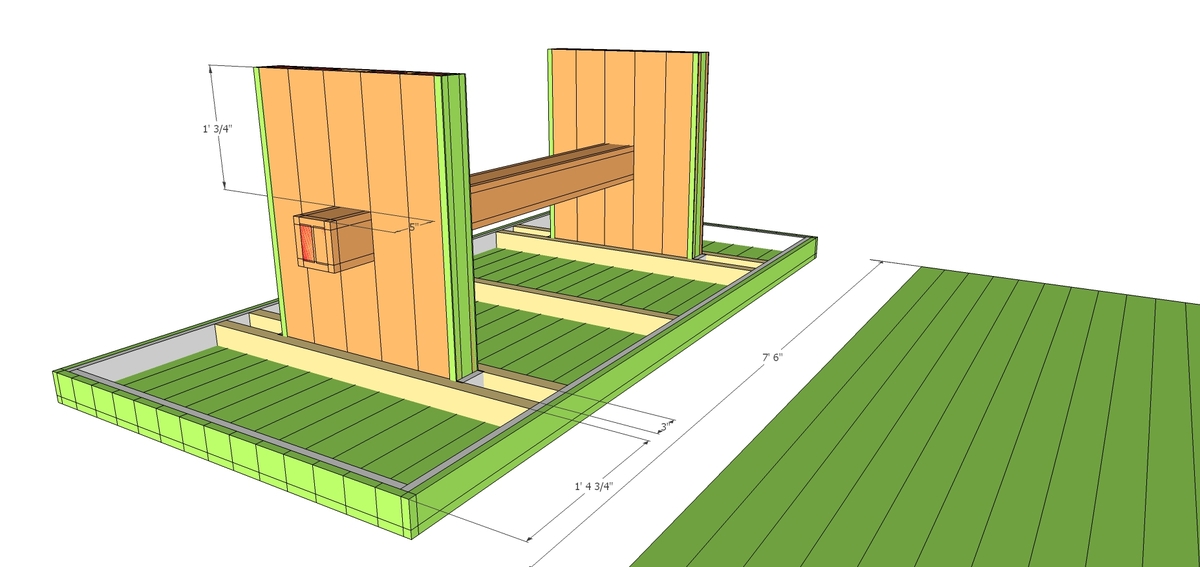
I'm a heavy sketchup user... had a detailed sketchup model that I put some key dimensions on (what you see above), and an exploded table view that color coded my pieces by wdith and gave the lengths of each board.. Lot of it was measuring as I went along.

jwells1

Thu, 03/03/2016 - 16:41

This is the table i want to build. It is the only my wife and i both agree on. Is there any way you could go through the steps? the sizes of wood you used and how you kept them together. Please responf back here or Message me!!! The way you did the legs is what really has me.

Fancy arch bed

Submitted by Rdw0711 on Sun, 02/04/2018 - 07:35

Beautiful bed. Arches were a little difficult to achieve symmetry. 

Built from Plan(s)
Estimated Cost
$120
Estimated Time Investment
Weekend Project (10-20 Hours)
Finish Used
Jacobean stain
Recommended Skill Level
Intermediate

Miter Saw Cart

Submitted by Anonymous (not verified) on Tue, 02/22/2022 - 08:51

Followed the plans and it came out great. I am still thinking about the extension on the right side since the hinges are so expensive.

Built from Plan(s)

Comments

All by myself!

Submitted by jessige on Fri, 05/27/2011 - 07:01

These tables are the first thing I've ever built all by myself, and I couldn't be more excited. I think I'm addicted...

Estimated Cost
$15 + paint
Estimated Time Investment
Afternoon Project (3-6 Hours)
Finish Used
The paint is Cavalry by Pittsburgh in high gloss. The weathering technique is basic: I primed the pieces, then used a 3" foam brush to put a light, inconsistent coat of blue on all surfaces. The trick is to make complete strokes, from one edge to the other; it's also helpful to start your stroke away from the edge and move back and forth in complete strokes to avoid dark edges.

Once the paint had dried, I sanded the edges to complete the weathered look. I put 2 coats of spray polyurethane on the top surface only, because I'm sure we will use them a lot!
Recommended Skill Level
Starter Project

Herb Garden

Submitted by frog428 on Wed, 07/17/2013 - 12:24

Herb Garden Planter Project - Such a simple project that costs less than $5.00

I added L brackets to the corners for a different look. I spray painted the brackets with a copper finish. I did not need to use wood filler because I covered the nails with the L Brackets.

Estimated Cost
$5.00
Estimated Time Investment
An Hour or Two (0-2 Hours)
Finish Used
Minwax Wood Finish and Minwax Quart Helmsman Semi-Gloss Spar Varnish
Recommended Skill Level
Beginner

King Storage bed

Submitted by Pbelton40 on Mon, 07/20/2015 - 06:57

From start to completion, it was exactly two weeks.  One of those weeks, I was sick and didn't get a chance to do much.  I believe we picked the hottest days to work on this project, so we were taking more breaks than actually working.

Built from Plan(s)
Estimated Time Investment
Week Long Project (20 Hours or More)
Finish Used
Bombay Mahogany stain
Recommended Skill Level
Beginner

Kid's Beach chair

As soon as I saw the beach chair I knew I had to make one for my daughter. My wife is an expert seamstress, so I enlisted her help on the fabric portion. She already had the fabric, and I had left over wood. We love the beach and this will be perfect for the summer. See how to make the beach ball pillows in the bottom picture at my blog http://www.makeitlovely.com

Estimated Cost
Free
Estimated Time Investment
An Hour or Two (0-2 Hours)
Finish Used
None
Recommended Skill Level
Starter Project

Our Fancy Farmhouse Headboard

Submitted by REEPJP on Fri, 07/19/2013 - 07:01

This was fairly easy for my first project and has already received a ton of compliments from friends and family that can't believe I made it.

Finally turned our bedroom from college dorm looking to elegant family looking with just this one piece.

The Kreg Jig is an amazing tool. Now that I have it, I'll be looking for more projects to get to use it.

Estimated Cost
<$100
Estimated Time Investment
Day Project (6-9 Hours)
Finish Used
Valspar Ultra White (Satin)
Recommended Skill Level
Beginner

A version of industrial closet in white, plus two nightstands!

Submitted by kalabarge on Thu, 07/23/2015 - 06:59

My husband and I live in a 1935 house with very little closet space, so this is perfect for us!  We painted it white to match our molding and bed, and adjusted the design a bit to fit the space.  We made it 7 ft. tall to match the height of the molding on the door next to it (which turned out well for us, as you can hang pants without them touching the bottom shelf).  We had less than 6 ft. of space for the width, so had to do without the center shelves.  We used 1/2 in. pipes because we needed to use a cross piece in the middle to connect the pipes, and the hardware store only had them in 1/2 in. sizes.  Decided to leave the screws exposed to go with the exposed pipes.  It all worked out very well!  So much so, that I decided to make two matching nightstands out of the extra wood we bought (all by myself smiley)!  Thank you, Ana!

Built from Plan(s)
Estimated Cost
About $200.
Estimated Time Investment
Weekend Project (10-20 Hours)
Finish Used
White semi-gloss interior paint. Used small roller for smoothest finish.
Recommended Skill Level
Beginner

Modified miter saw cart

I love having this new addition! Freed up space in my small shop and now it’s more functional and organized. I followed the plans with modifications in the leaves using scrap 1x’s (which I may decide later to change to 2x4s but I had 1x’s on hand) instead of the brackets and then the extra 1x’s holding on the leaves so they would fall flat to the sides. Love it!

Built from Plan(s)
Estimated Cost
Under $75 (don’t remember exactly)
Estimated Time Investment
Weekend Project (10-20 Hours)
Finish Used
Didn’t finish
Recommended Skill Level
Beginner

Book ledges

Submitted by Anonymous (not verified) on Mon, 04/04/2022 - 14:54

I took your plans for the beginner book ledges and modified them for our 90 degree space. I had to learn about mitre and bevel cuts so that was fun.

I also learnt that when the wood is slightly warped it pays to be attentive to the eventual install and how stress will flow through the work.

Built from Plan(s)

Comments

Shoe organizer

Submitted by Liz H. on Wed, 06/01/2011 - 21:26

I took the 25 cubbies plan and changed the dimensions to fit shoes. I made a simpler version for my husband too. This project went together quickly and was so fun to build.

Estimated Cost
$10
Estimated Time Investment
An Hour or Two (0-2 Hours)
Finish Used
White paint
Recommended Skill Level
Starter Project

My first doll bed

This is my first ever building project! I used a jigsaw and realized (the hard way) that I can't get square angles with that type of saw. I am thankful that it isn't too evident in picture. I will try again, but I had to share my first attempt. I ended up using a 1X8 for the headboard because I liked the thought of a full headboard. I know it's not perfect, but for me to show something that's not perfect is progress for me. :)

Estimated Cost
$4 including the yarn for the blanket
Estimated Time Investment
Day Project (6-9 Hours)
Recommended Skill Level
Beginner

Patio Revamp, Part 2

Submitted by BrookeEye on Mon, 07/27/2015 - 08:54

We needed a new table for our patio, so we looked no further than Ana's plans. I was going back and forth deciding between various table plans until I saw the plans for the Providence Table and Providence Bench, and it was love at first sight. The whole project turned out to be a relatively easy build for us, and we are just about as "amateur" at woodworking as it gets! We used white pine for the entire project. We shortened the table about 18 inches to fit our space. It is so gorgeous, we have gotten tons of compliments from guests so far and we absolutely love it! Thanks, Ana!!

Estimated Cost
$70 for the wood
$20 for the paint
$15 for the stain
$20 for the Kreg blue kote screws and brushes;

$125 Total.
Estimated Time Investment
Weekend Project (10-20 Hours)
Finish Used
Behr Exterior Paint in Pure White for the bottom;
Minwax Classic Gray stain for the top boards with Minwax Spar Urethane (for exterior use) in Satin as a sealer (on the top only).
Recommended Skill Level
Beginner

Comments

Kitchen Table

Took inspiration from several small builds.  Simple 2x4 sides and braces accross the tops and one at the back.  2 pieces of 3/4 ply for the top.  A little overkill for the top but I want to make sure it was strong and held everythigng together.  Copied Ana's idea of painting wood white but wanted a more natural look for the top so just stained the ply and then poly varnish.

Estimated Cost
$100.
Estimated Time Investment
Afternoon Project (3-6 Hours)
Finish Used
American Walnut wood stain and polyurethane varnish for the top. Pure white gloss paint. All joints in the wood are pocket hole as I needed to practice using the jig. I used pieces of ¾ ply cut into 4" strips for the braces, not a good idea 3x1 or 4x1 would have been better.

Job took an afternoon to build but the painting an varnish took a day for each coat so altogether it took a week.
Recommended Skill Level
Beginner

Sofa

Submitted by Anonymous (not verified) on Sat, 04/09/2022 - 05:28

Sofa made out of 2x4 & 2x6 painted in a light French gray with sapphire blue cushions. I also made a matching love seat (not pictured). Turned out nice!

Comments

toy box #2 & #3

open toy boxes with personalization

Built from Plan(s)
Estimated Cost
$35.00 each
Estimated Time Investment
Day Project (6-9 Hours)
Finish Used
1. one coat primer
2. two coats semi-gloss white

1. three coats Behr paint + primer Signature blue
Recommended Skill Level
Intermediate

Comments

karab

Sun, 06/05/2011 - 18:43

These are beautiful! What do you use for the lettering? I recently made the stackable toy boxes for my nieces and wanted to put their initials on them. I practice on a piece of plywood, but I didn't like the results.

In reply to by karab

jaimecostiglio

Mon, 06/06/2011 - 02:47

Karab,
I printed out the names (Engravers font), taped the paper to the box, traced with a pen to get an indent into the wood, painted inside the indent. Good luck.

brookifer86

Mon, 06/06/2011 - 13:54

Your work is always so beautiful! Love these toy boxes, they're pure perfection

In reply to by brookifer86

jaimecostiglio

Mon, 06/06/2011 - 14:10

I actually recognize your wedding guestbook bench from all the linky parties but I had no idea you were also a builder over here at Ana's place. Nice to have fellow buildy gals.

Guest (not verified)

Tue, 08/30/2011 - 18:30

I agree with the others, your builds are always so beautiful. Question on cost: I noticed Lily's toy box cost you $50 and these cost you $35. Was it because these weren't cabinet grade. My co-worker wants me to make one for her daughter for Christmas and I'd like to keep the cost down while still having a nice product, of course!

Jaime (not verified)

Wed, 08/31/2011 - 03:36

because I was able to use some scraps for the sides and short molding pieces. They are still cabinet grade, I wouldn't recommend using regular 3/4" plywood - it's too rough even with sanding it would be very rustic. One sheet of cabinet grade 3/4" plywood costs $29 at my HD, you can definitely get all your pieces from one sheet. Plus to keep costs down make the base molding out of plywood scraps rather than buying new especially if you are painting. I guess if you have to buy everything: 3/4 ply, 1 x 2s and cove molding it would be closer to $40 plus paint and primer. Good luck, such a nice sizable, sturdy, functional gift.

Jaime (not verified)

Wed, 08/31/2011 - 03:35

because I was able to use some scraps for the sides and short molding pieces. They are still cabinet grade, I wouldn't recommend using regular 3/4" plywood - it's too rough even with sanding it would be very rustic. One sheet of cabinet grade 3/4" plywood costs $29 at my HD, you can definitely get all your pieces from one sheet. Plus to keep costs down make the base molding out of plywood scraps rather than buying new especially if you are painting. I guess if you have to buy everything: 3/4 ply, 1 x 2s and cove molding it would be closer to $40 plus paint and primer. Good luck, such a nice sizable, sturdy, functional gift.

Brad chunn (not verified)

Sun, 01/01/2012 - 17:41

I really like the look of this toy box! Would it be hard to add a lid with hinges ? Thanks

In reply to by Brad chunn (not verified)

jaimecostiglio

Sat, 01/07/2012 - 12:27

Brad I don't think a lid with hinges would be hard. Watch out for pinched fingers on those little ones - it inevitably always happens! Go for the slow closing hinge.

Guest (not verified)

Tue, 03/13/2012 - 06:53

Hi, is the footer attached with nails or screws? Anna's directions aren't clear because step 2 which outlines the footer is a duplicate of step one which is about fastening the sides and front.

In reply to by Guest (not verified)

jaimecostiglio

Tue, 03/13/2012 - 14:14

with 1 1/4" wood screws. Considering this is the support for the box unit I definitely recommend screws, 3 per long sides.
Good luck.

Guest (not verified)

Tue, 03/13/2012 - 20:35

Thanks a bunch! One more question, I have the same base moulding you chose, how did you get the top corners to line up so seamlessly? When I put mine together as a sample they don't fit well at the top

In reply to by Guest (not verified)

jaimecostiglio

Wed, 03/14/2012 - 04:35

I used 3/4" plywood and cut out the arch with a jig saw. The corners should line up fine if your box is square. Once you attach the footer piece then miter cut the cove moulding and it should sit perfectly on the ledge of that footer. You can see more process picks in my posts here:

http://thatsmyletter.blogspot.com/2011/11/t-is-for-toy-box-4.html

http://thatsmyletter.blogspot.com/2011/05/t-is-for-toy-box.html

GMBC

Wed, 02/28/2018 - 05:25

hi Ana, love your plans. Made the toddler helper in a folding style now have to make another by request. I have a question on the cutting measurements for the open toy box. The side says cut 15 1/2 inche wide yet the bottom is 16 inch wide.Is that correcgt as would have the bottom stgicking out past the ends?? Could just adjust the base size just not sure if there is reaason for the difference am i missing something.

Kids Trestle Table

Submitted by gcolegrove on Tue, 07/23/2013 - 02:57

Table made for friends grand-kids using left over oak plywood. Storage cube seats from Shanty2chic plans. http://www.shanty-2-chic.com/2012/07/rolling-storage-cube-stools.html

Built from Plan(s)
Estimated Cost
< $70
Estimated Time Investment
Weekend Project (10-20 Hours)
Finish Used
Rustoleum paints - gloss finish.
Recommended Skill Level
Beginner

Comments

YankeeBelle

Tue, 07/23/2013 - 19:01

I built this as one of my first projects...it was a great confidence builder!! I love the way yours turned out and your colors are so cheerful and fun! Great job!!

Floating Shelves

Submitted by wmbnbama on Fri, 07/31/2015 - 08:20

Floating shelves for small master bathroom.  1x2" with thin poly on top and bottom.  Ripped a 1x4" to cap the front.  Stained with dark walnut. 

Estimated Time Investment
Afternoon Project (3-6 Hours)
Finish Used
Dark Walnut with top coat of poly.
Recommended Skill Level
Beginner

Concrete Top End Table

I decided to go with with a concrete slab on the top this project was quite simple especially with the well formatted plans  

the slab is 20x20 so I had to make adjustments in my sizes!

Built from Plan(s)
Estimated Time Investment
Weekend Project (10-20 Hours)
Recommended Skill Level
Beginner

Pantry shelves adapated from Garage Shelves

Submitted by Anonymous (not verified) on Sun, 04/17/2022 - 06:07

Thanks for the plans, adapted it to new pine standers but was able to obtain beautiful cherry tree panels from a defunct wood worker in the next village over. Planed those and used those to make a slightly more 'posh' version of your basic model. The supports on the wall you see are from the previous formica shelves. I left them in case the cherry starts rounding down.

Comments