Community Brag Posts

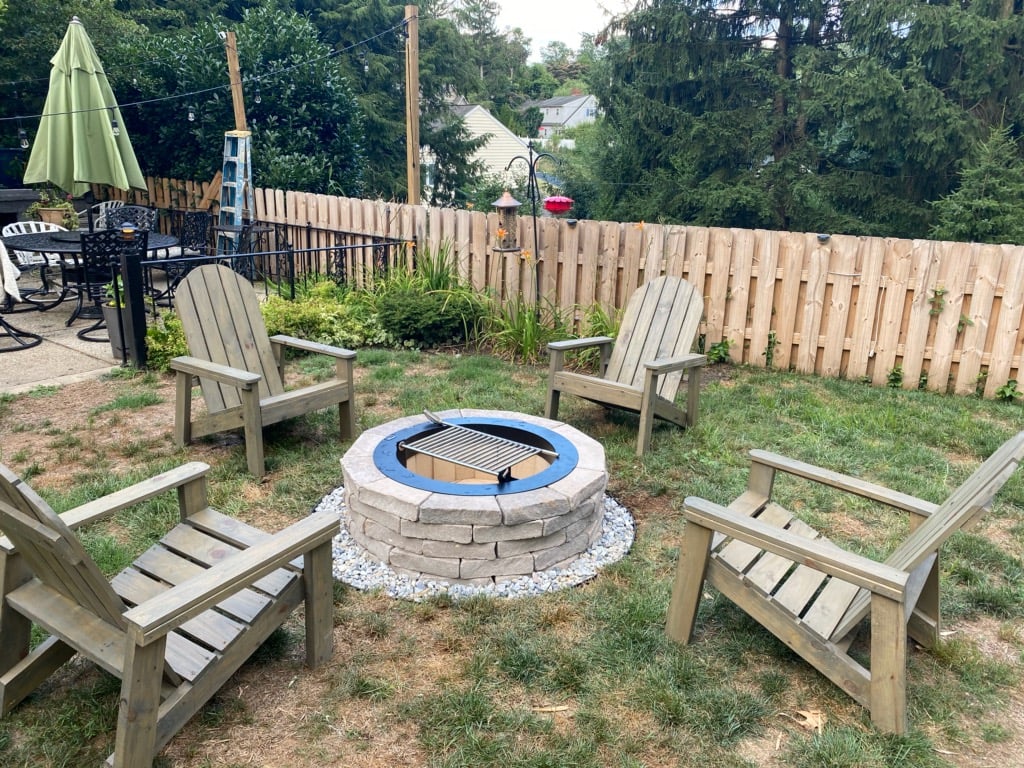
Outdoor double bench and Adirondack Chairs!
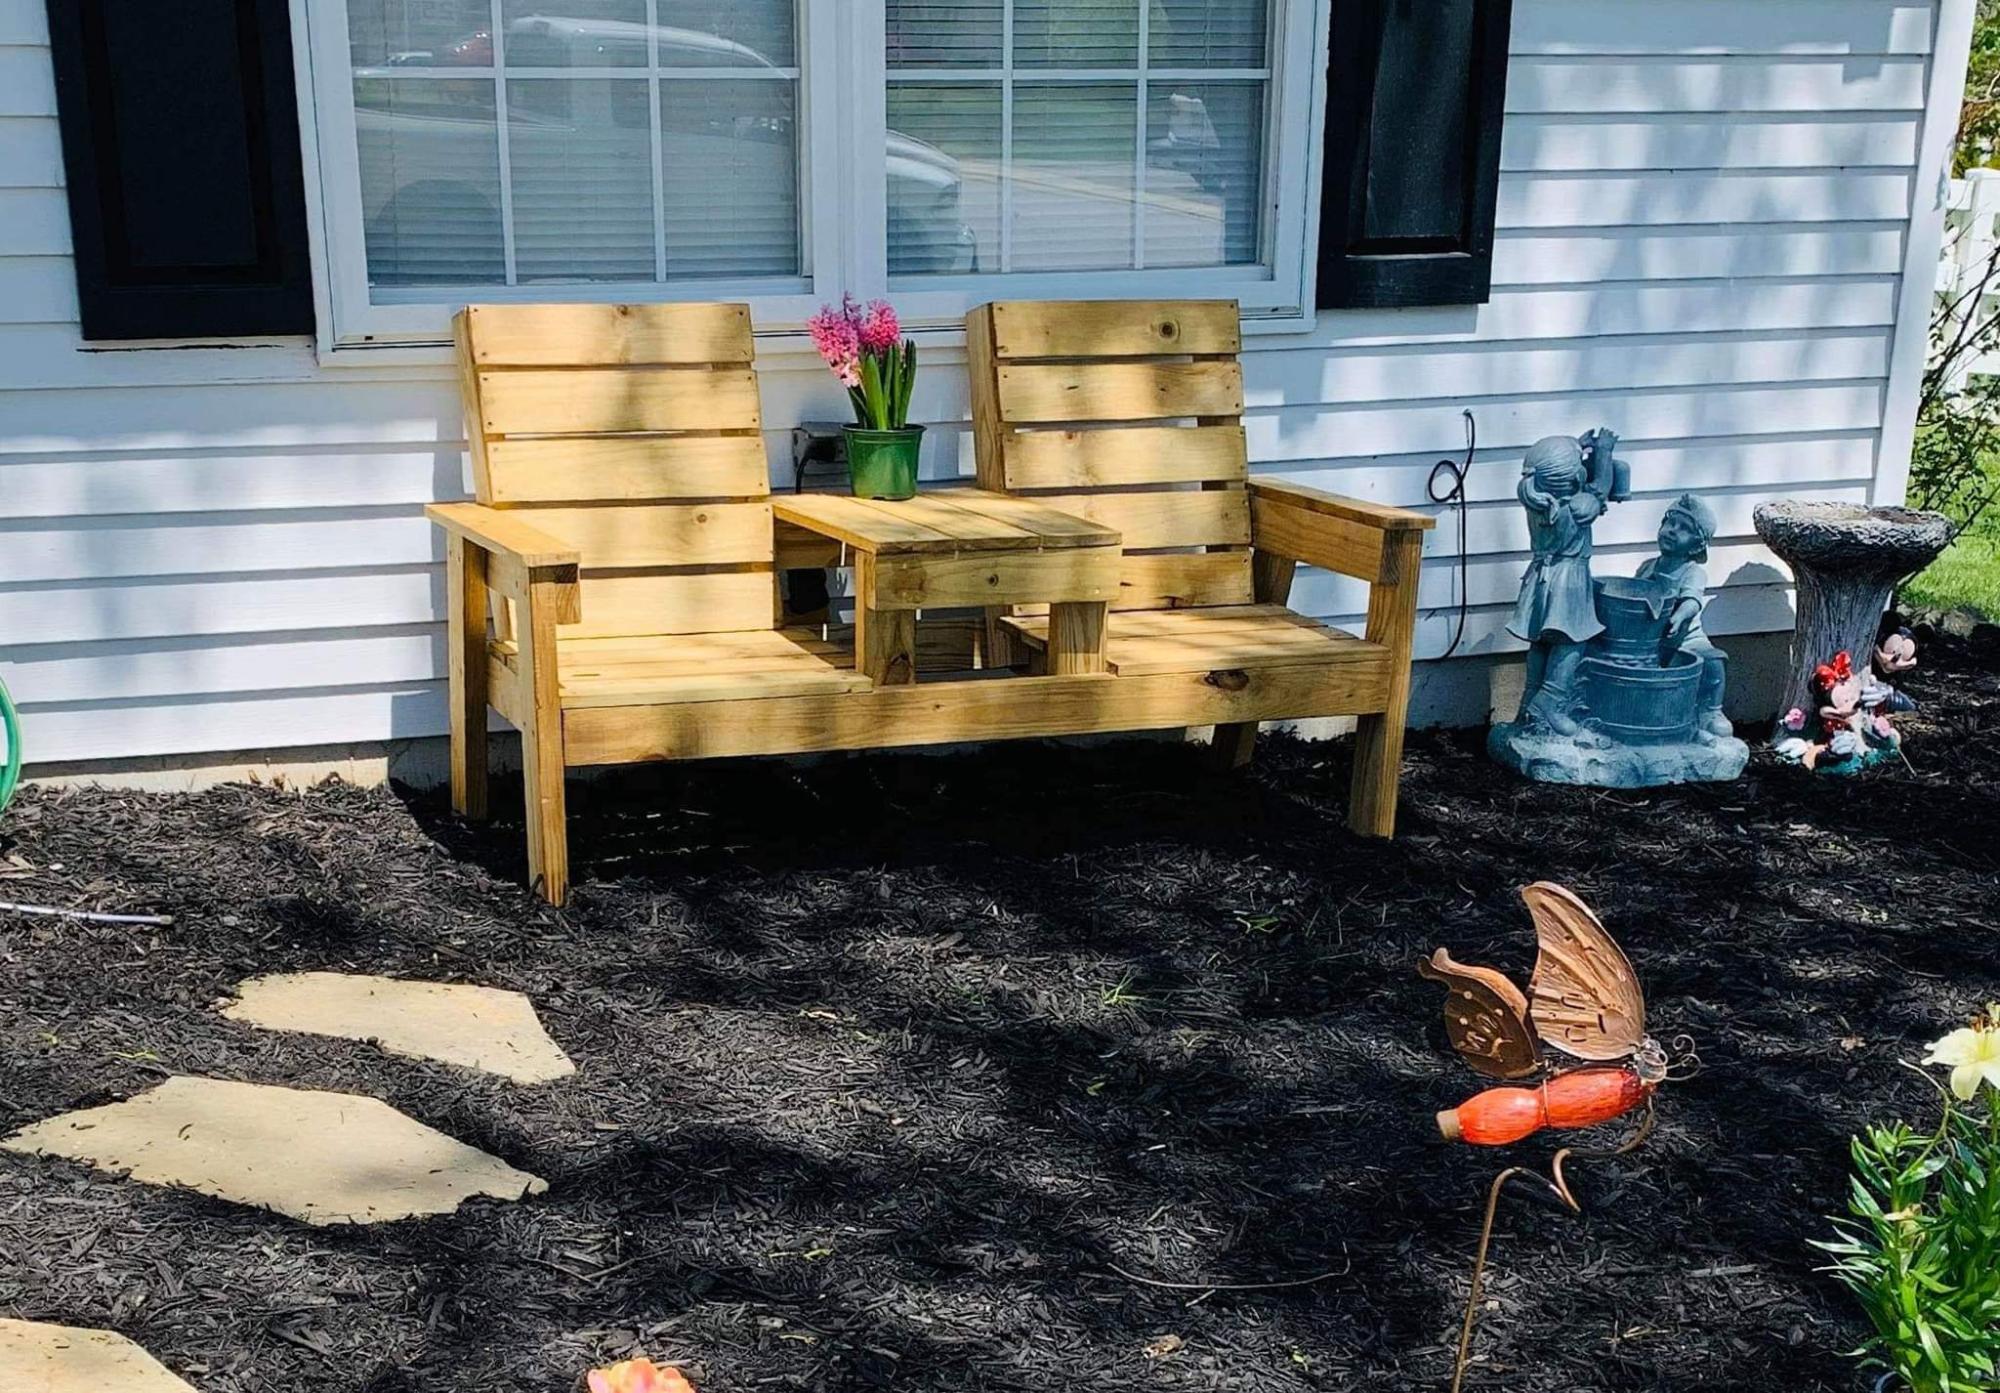
Nice outdoor bench and adirondack chairs by Nick!
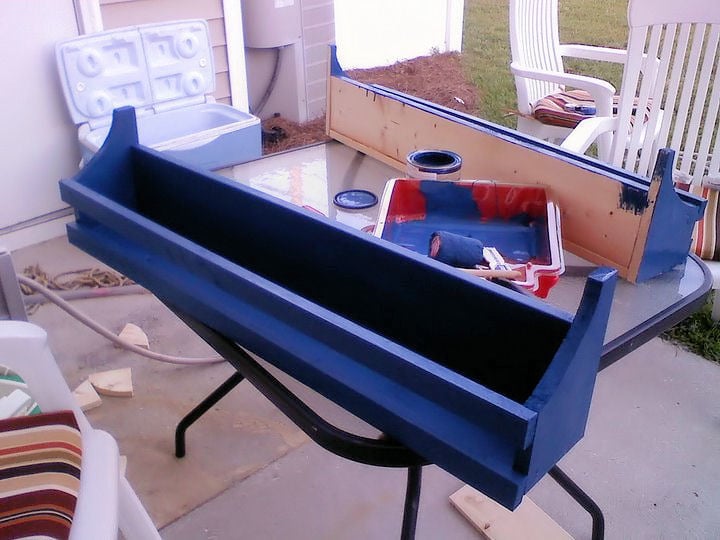
Love these Shelves!
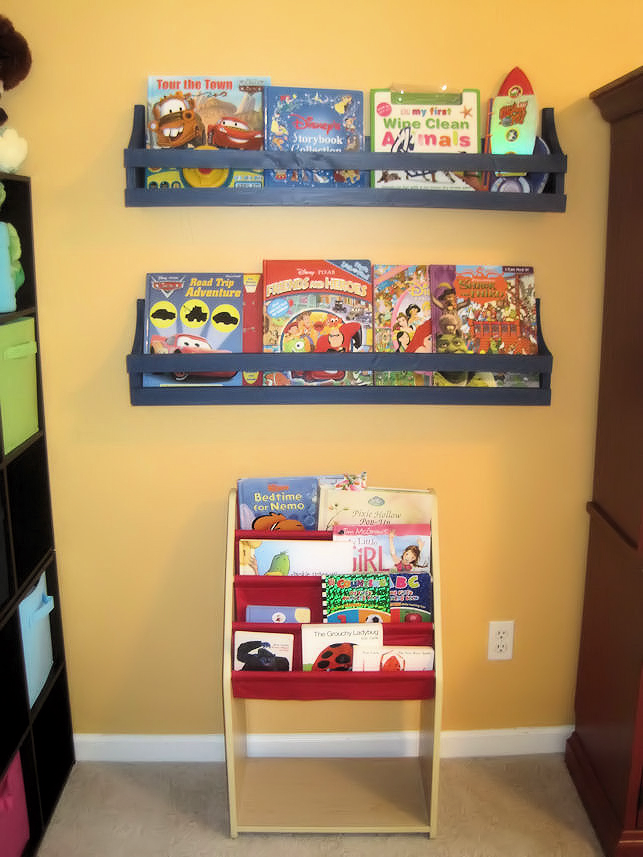
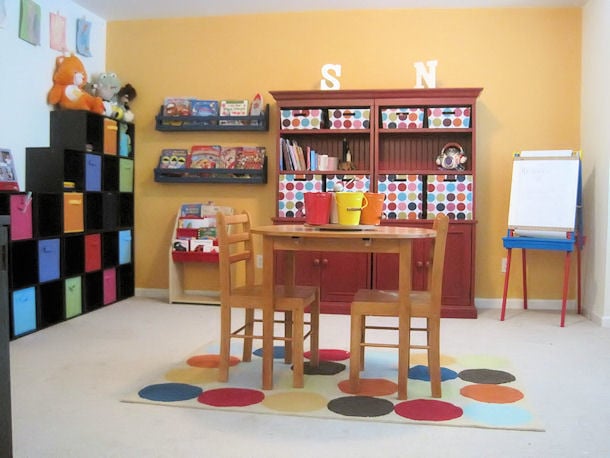
While my husband was deployed for a year I decided I wanted to redo the kids playroom. I wanted them to have a space that was organized. Somewhere easy so that what they were taught about putting their toys and books in a specific spot at school could be followed at home too! Well this is the plan that I had found Ana's site with. I loved these shelves on PBKids.com but hated the price. It was an amazing day in the Clark house hold finding Ana's blog! I had to build them right away! and well I did! they are Amazing and the kids love them! (keep in mind this was my first time building anything lol)(sorry for not posting this sooner)

Estimated Cost
$5 ea.
Estimated Time Investment
An Hour or Two (0-2 Hours)
Finish Used
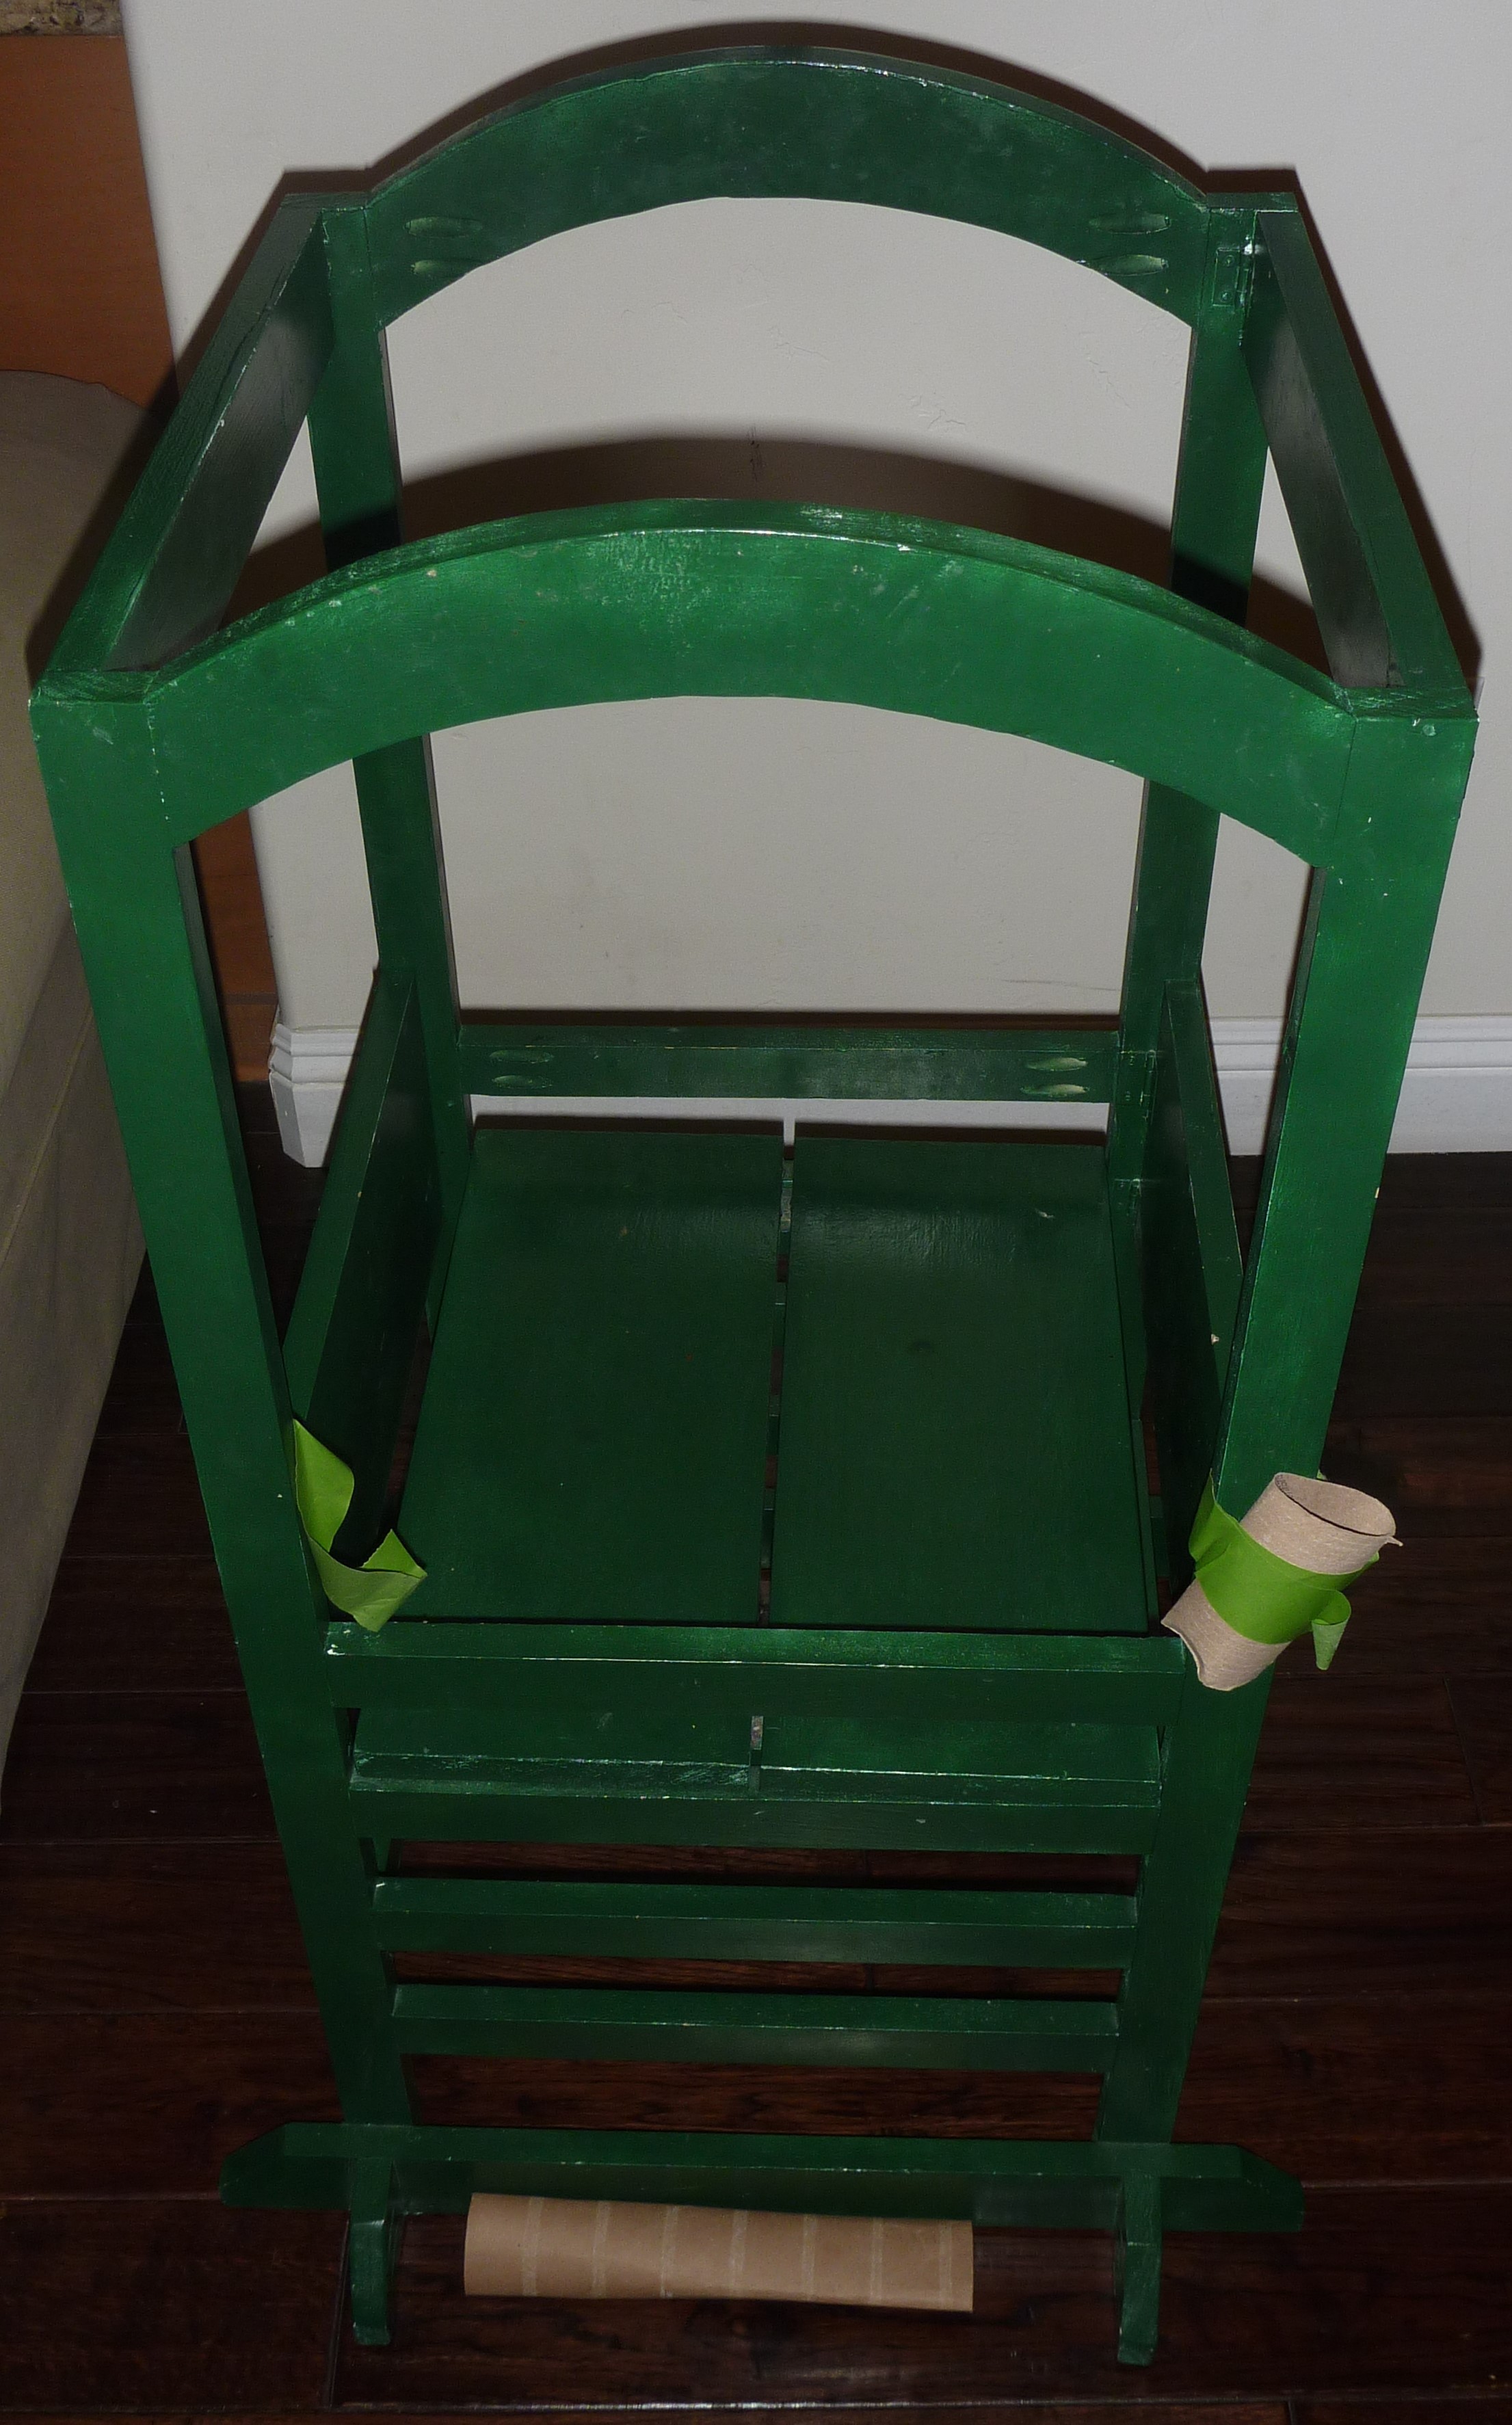
Semi Gloss Valspar blue. I would defiantly sand them down more if I make them again. Love the way they turned out even though I messed up on the first one but anyone who has ever seen them hasn't noticed lol.
Recommended Skill Level
Beginner
Comments

Wed, 06/15/2011 - 19:09
What a cute room!
I love the color of the shelves. They look so good in that adorably decorated room!
In reply to What a cute room! by brookifer86
Fri, 06/17/2011 - 12:07
Aww
Thanks hun! I love them... and thanks about their playroom.. I had just known what I wanted and worked hard to get it just right lol.. they love it too!
Mon, 06/27/2011 - 13:00
How to install
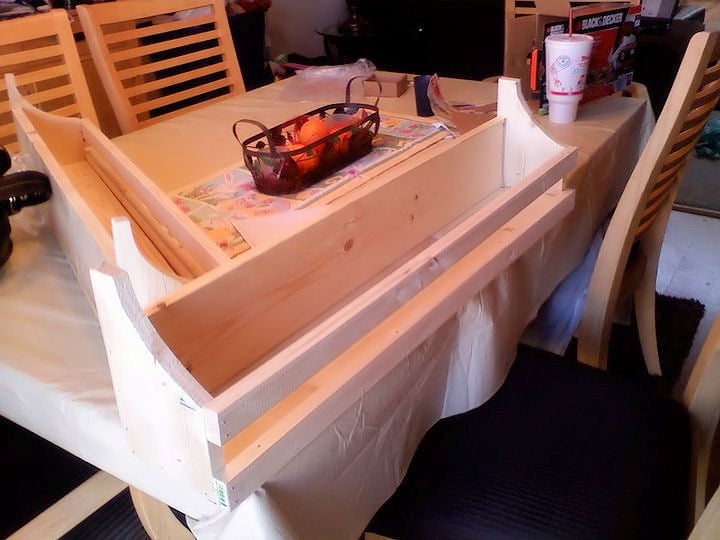
Hi - We've got ours all finished but not sure how we are going to install them. We know they'll go into a stud but I'm curious how you did it.
In reply to How to install by Guest (not verified)
Mon, 06/27/2011 - 15:39
The way i did it.
well the way i did it was get two screws found where the studs were and right above the top bar i rested my drill on it and I put each of them into the back of the shelf because I knew a book would cover the screws... now you can always add the same color paint over the screws to help them blend better when there isn't a book in there. Hope this helps. It made them really secure for when the little ones would get the books down. I know some suggested picture hooks.. but to me it just didn't seem sturdy enough.

In reply to The way i did it. by mandylynn523
Mon, 06/27/2011 - 19:14
That's what we're thinking too
We thought the same thing and I'm definitely not worried about a screw showing if a book is missing. :) I actually thought of picture hooks too but knew right away it wouldn't be sturdy enough for my kids.
Thank you!
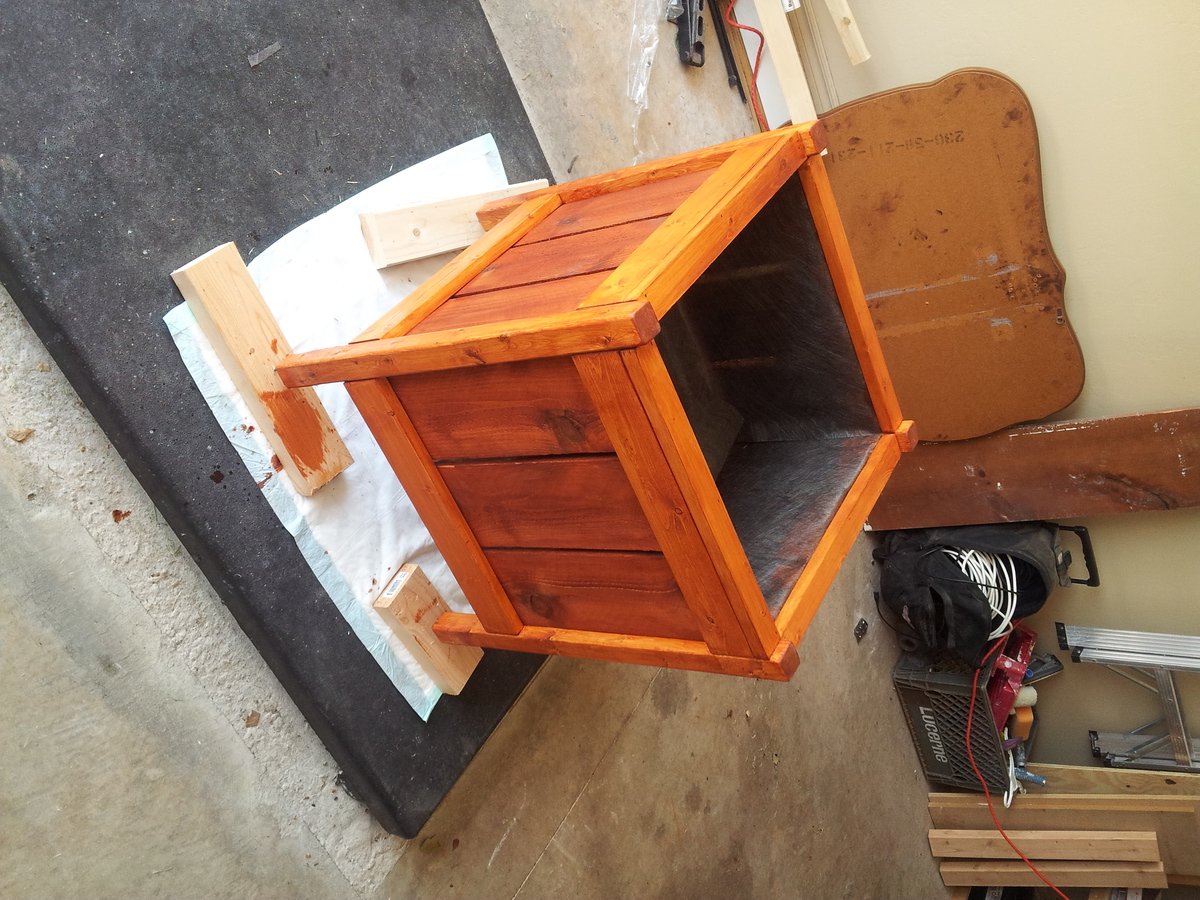
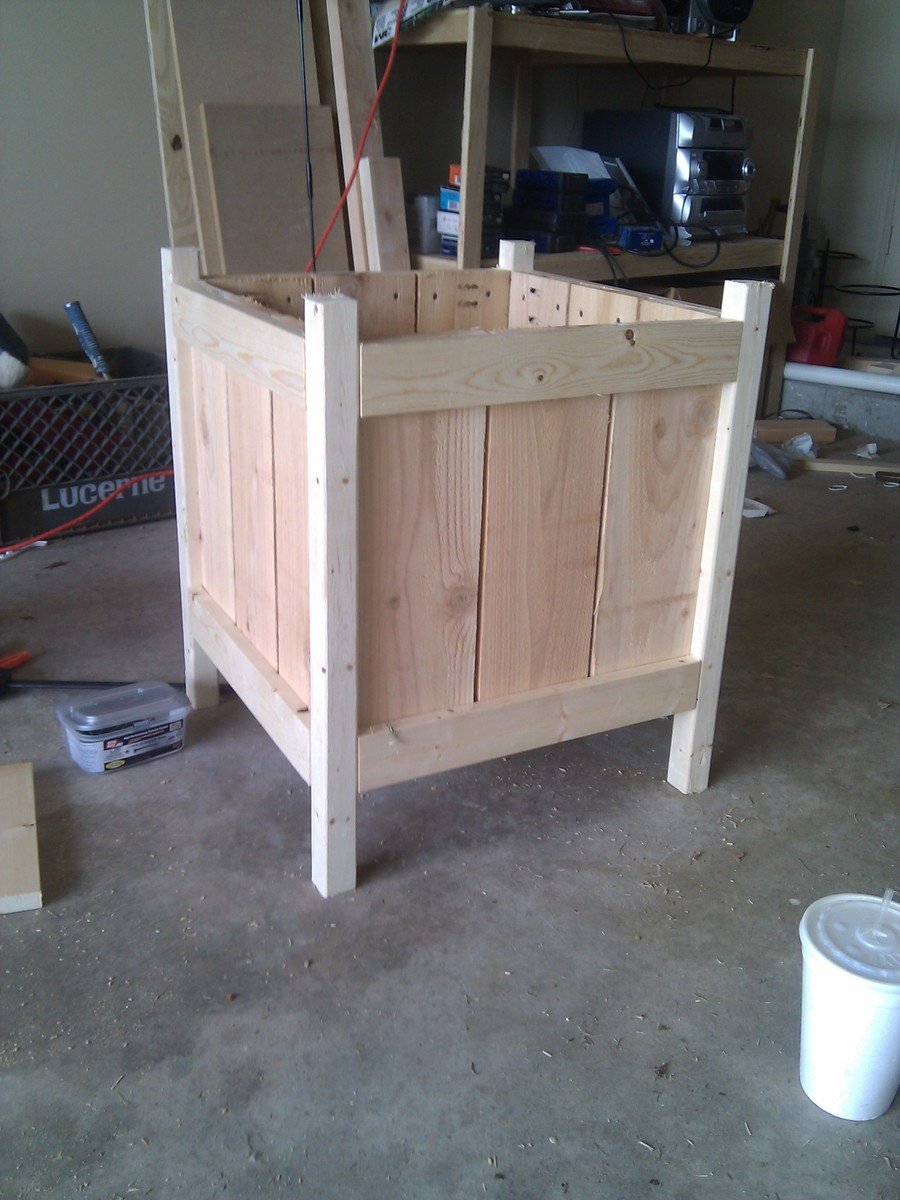
Cedar Planter
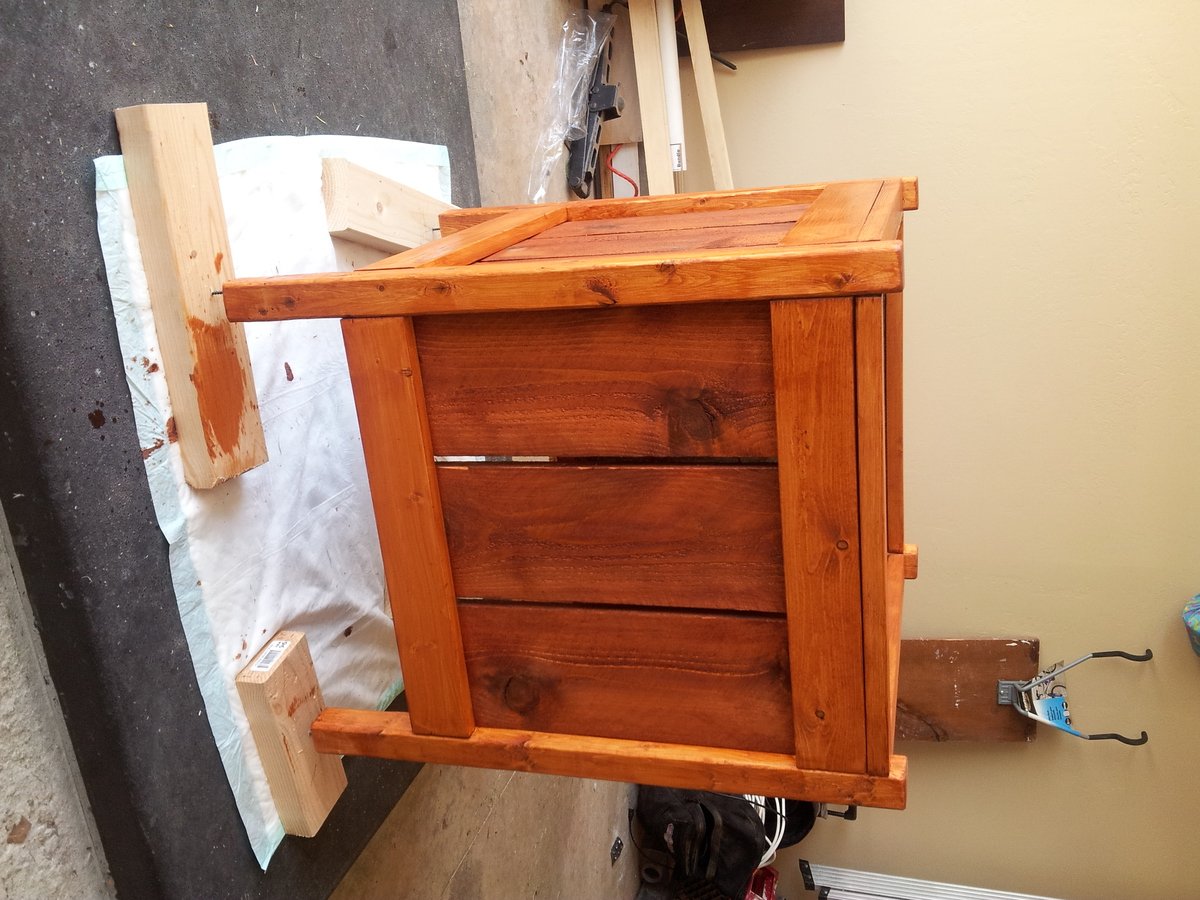
This is a cedar planter created using the plans from this website. I modified the legs some and also put a 1x2 across the top to finish it out. It is stained using Cabot Australian Timber Oil Stain in Mohagony Flame. I think it turned out great...and so does my wife!
Built from Plan(s)
Estimated Time Investment
Afternoon Project (3-6 Hours)
Finish Used
Cabot Australian Timber Oil Stain in Mohagony Flame
Recommended Skill Level
Beginner
Little Helper
This was the first project I made from this website...my wife wanted to make it for our 2 year old (at the time).
Built from Plan(s)
Estimated Time Investment
Weekend Project (10-20 Hours)
Recommended Skill Level
Beginner
My Garden Shed
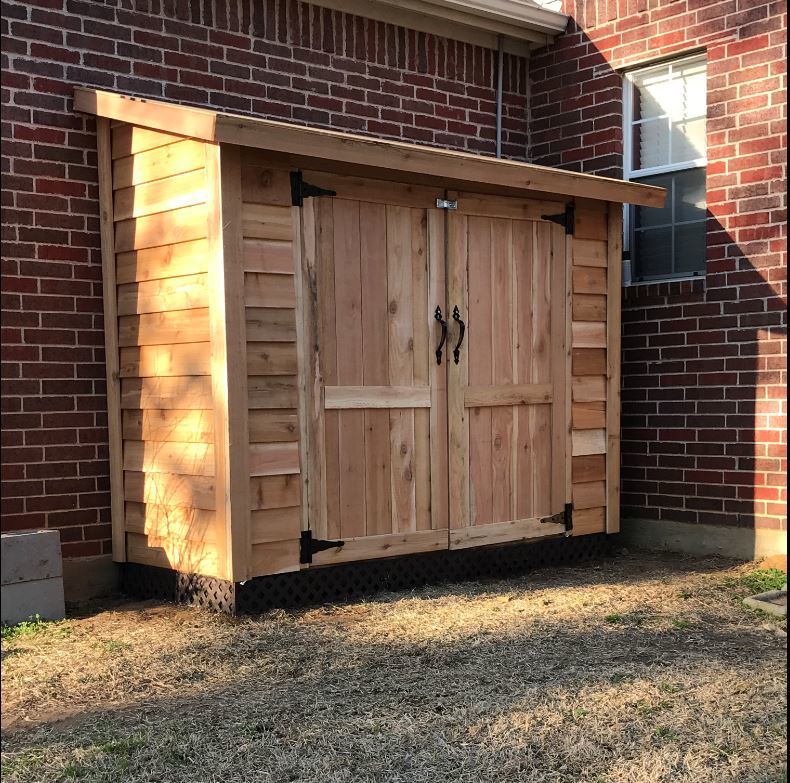
I used these plans of this project. Only differences are I used 2X3 studs. I also made the shed longer,, its 3ft X 8ft.. Also on the back I used two siding sheets since it wouldnt be seen. Did it over the weekend. Just needs shingles and stain. Anyway I love it. Had a spot behind the house where it fits perfectly. Thanks
Built from Plan(s)
Estimated Time Investment
Weekend Project (10-20 Hours)
Recommended Skill Level
Intermediate
Adirondack Chair with Vertical Slats

Built one of your Adirondack chairs today. Love it!
by Neil
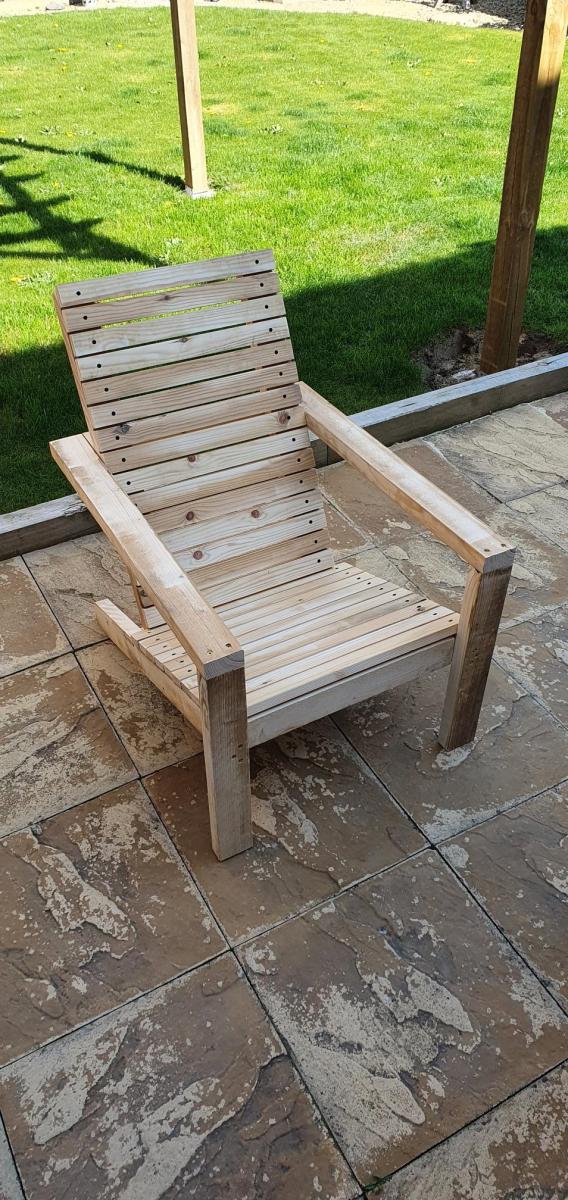
Built from Plan(s)
DIY Barn Door From 2x6 Boards
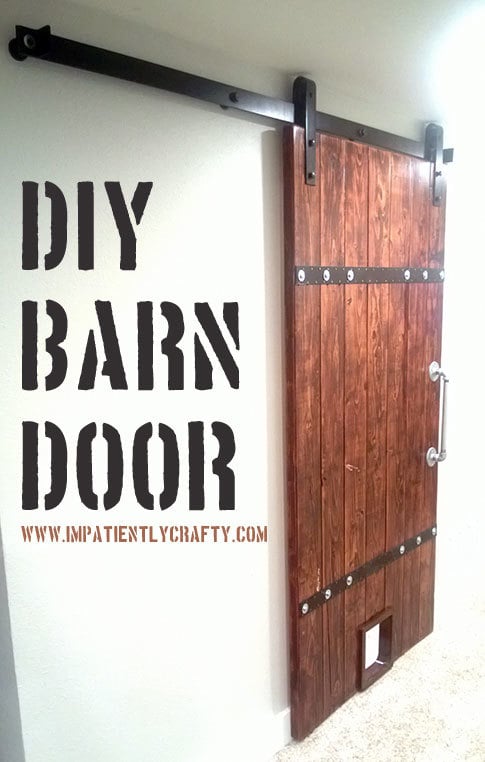
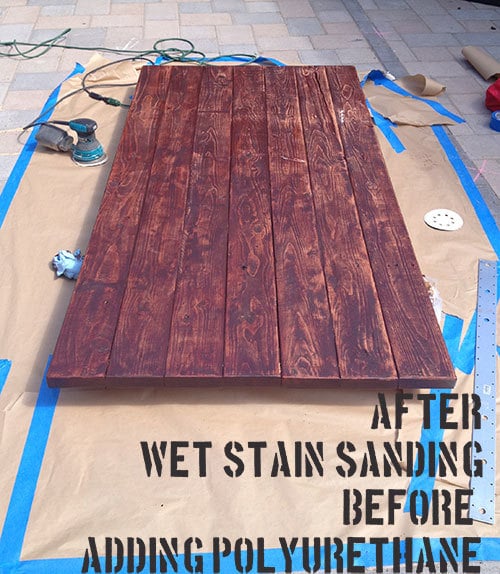
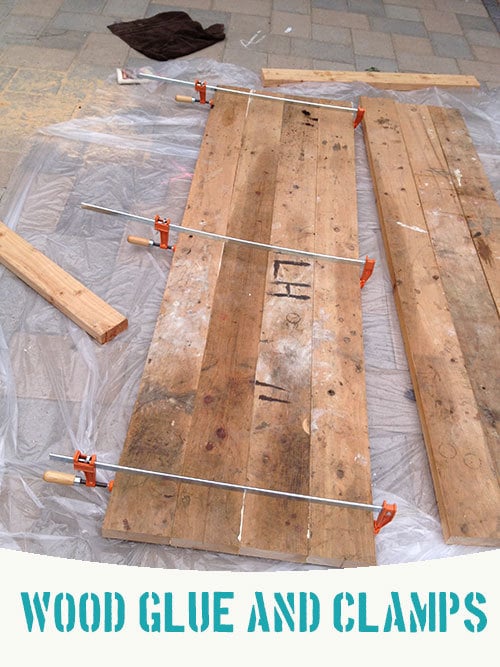
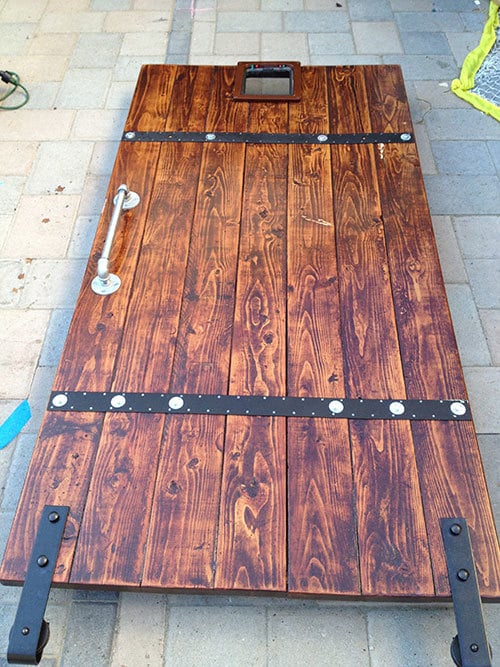
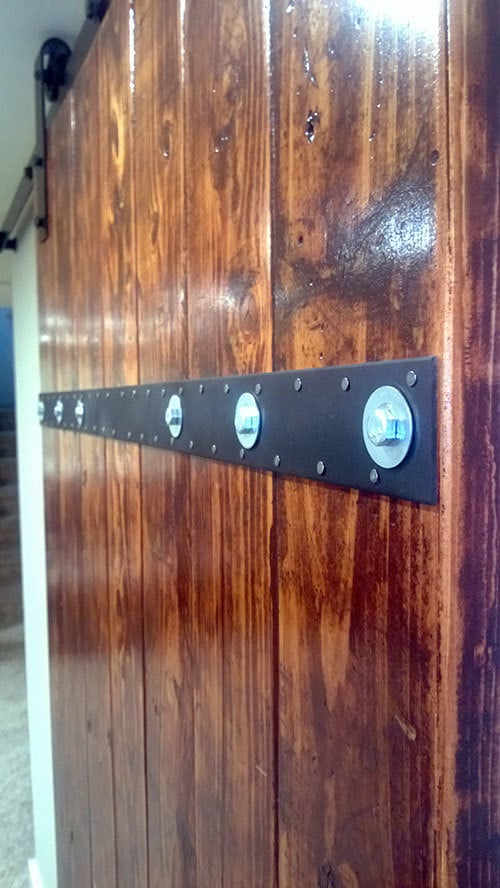
I made his Barn door out of the wood that was left in our garage when we moved in. Using (7) 2x6 boards and adding stain sanding and hardware, it became a super functional industrial rustic (is that a design style LOL) door! (I added a cat door to for our cat ;))
Estimated Time Investment
Afternoon Project (3-6 Hours)
Finish Used
Rustoleum summer oak, varathane cabernet, flat black spray paint, and polyurethane semi gloss. I have the full tutorial on my blog and am more than happy to answer any questions ;)
Recommended Skill Level
Beginner
Comments

In reply to I love the strapping. This by Pam the Goatherd
Thu, 08/01/2013 - 11:08
Thank you! I was just super
Thank you! I was just super happy that I didn't have to cut the strap ties lol. now if our cat would just get used to using the cat door.....
In reply to I love the strapping. This by Pam the Goatherd
Thu, 08/01/2013 - 11:08
Thank you! I was just super
Thank you! I was just super happy that I didn't have to cut the strap ties lol. now if our cat would just get used to using the cat door.....

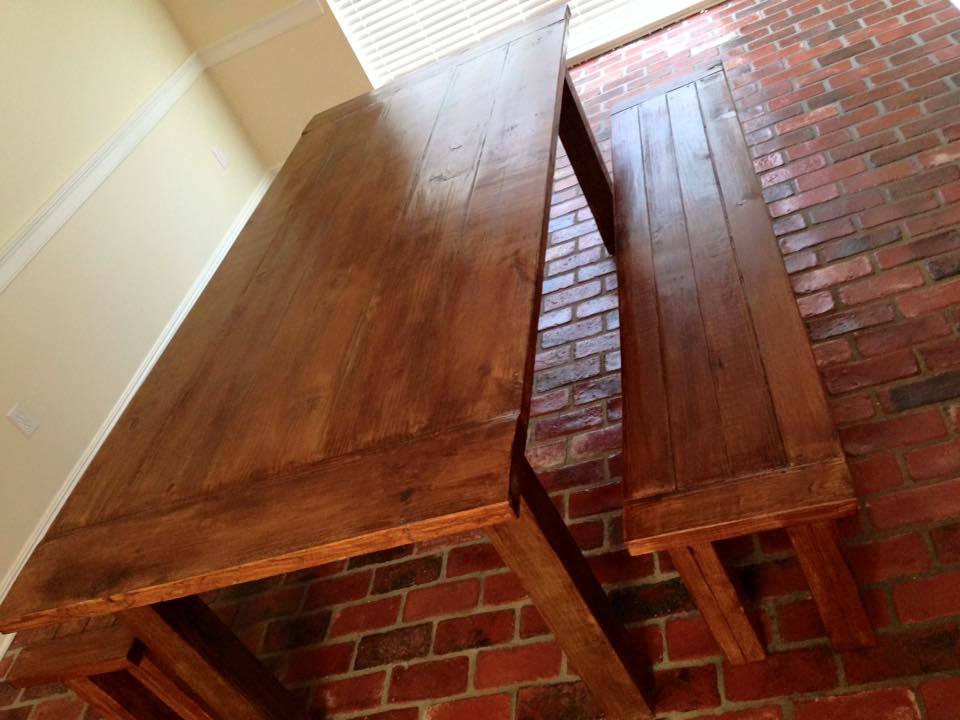
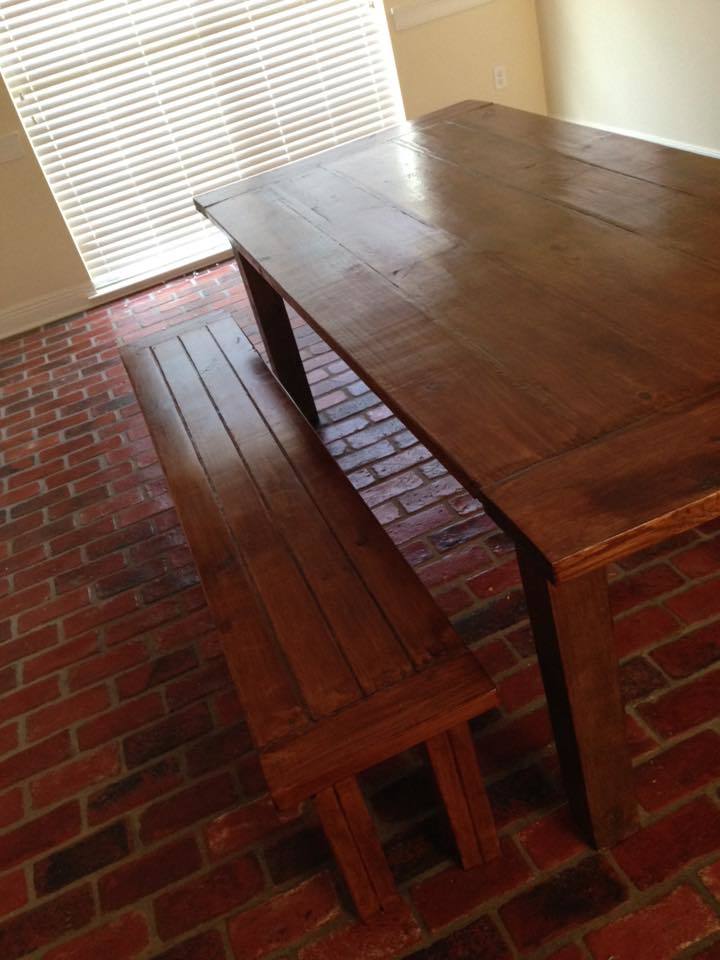
Farmhouse Table and Benches
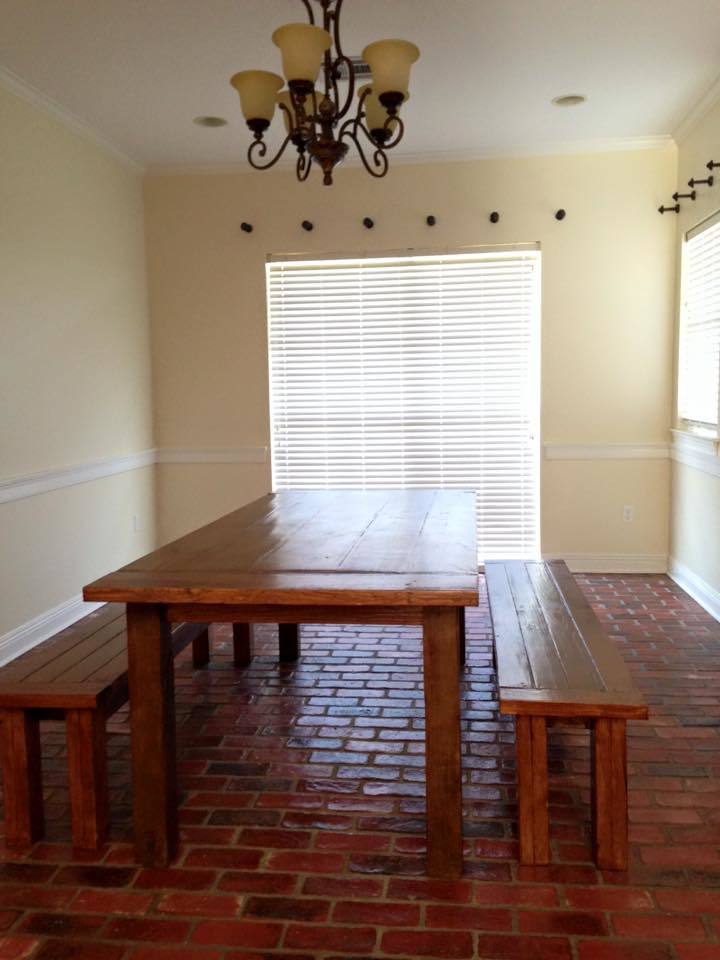
This was the first project my husband and I built and it is for our new home!
We excluded the bottom part of the farmhouse table.
After building we conditioned the wood, used a stain poly mix, and then waxed it.
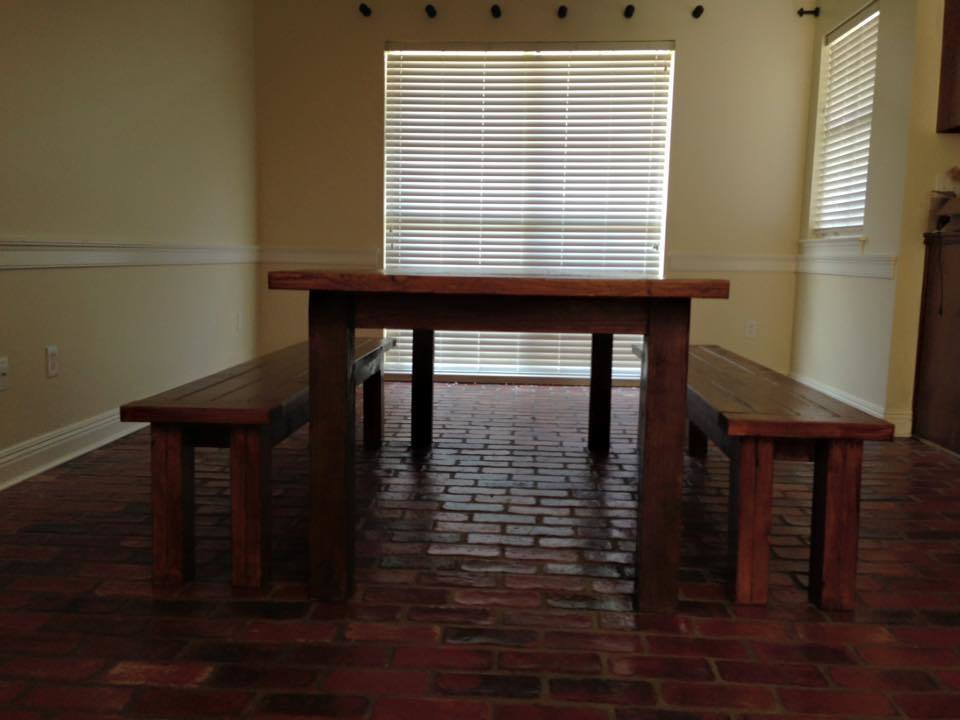
Built from Plan(s)
Estimated Cost
Since this was our first project we did have to buy some big tools, but excluding the power tools, we spent about $200-250 on wood, screws, and finishing product and materials.
Estimated Time Investment
Weekend Project (10-20 Hours)
Finish Used
Coat of Pre-stain conditioner
Two coats of Minwax Antique Walnut w/poly
Waxed and buffed
Two coats of Minwax Antique Walnut w/poly
Waxed and buffed
Recommended Skill Level
Beginner
Lift Top Coffee Table
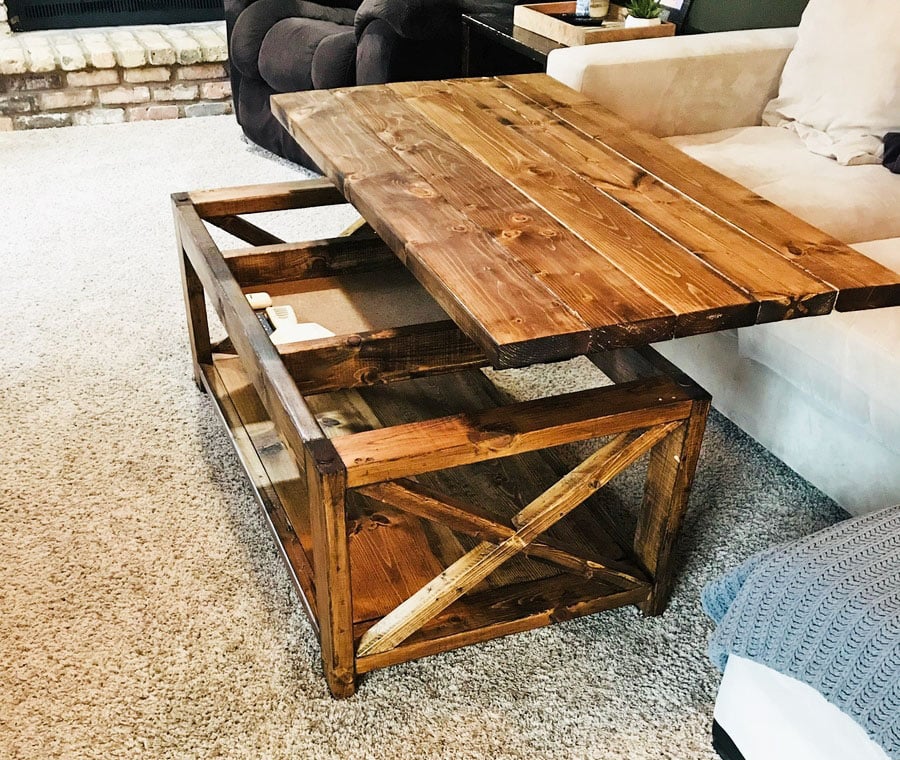
Instead of attaching the top to the coffee table base as done in the plans, the top is attached using a set of coffee table lift top hinges.
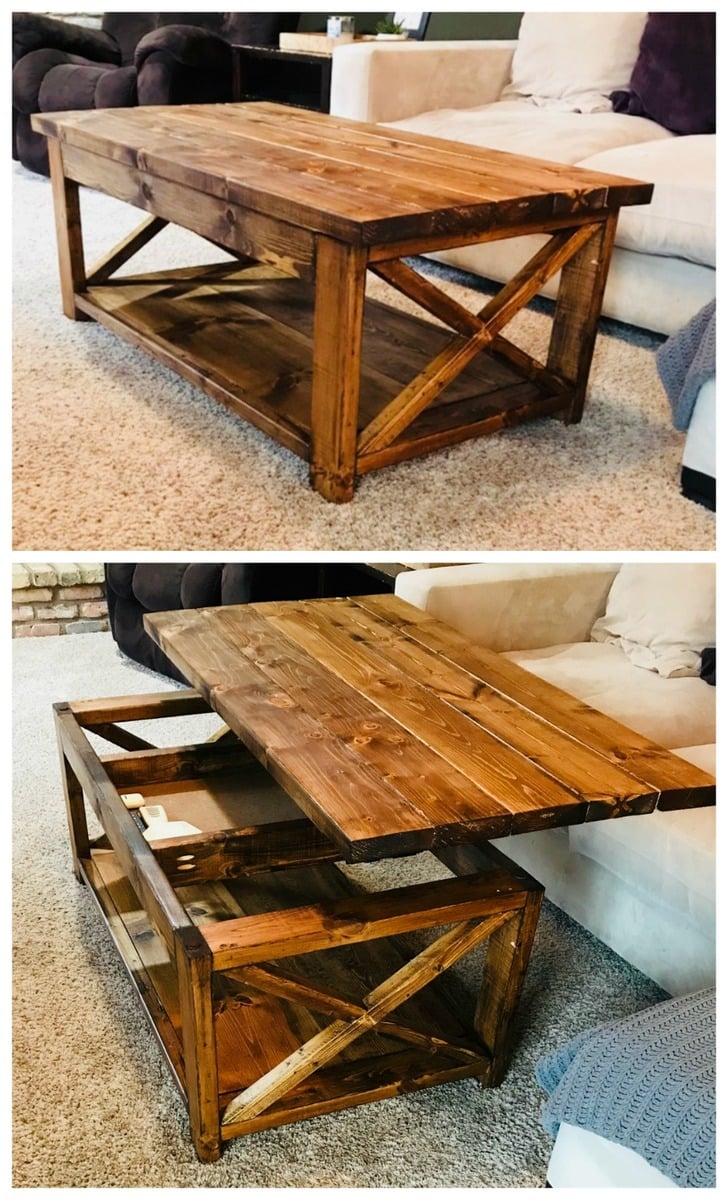
Built from Plan(s)
Estimated Time Investment
Weekend Project (10-20 Hours)
Recommended Skill Level
Beginner
Comments
Fri, 08/21/2020 - 23:38
Looks wonderful, love the…
Looks wonderful, love the finish. What kind of stain did you use?
Wed, 09/30/2020 - 19:59
I love this table. It is…
I love this table. It is just what l have been looking for. Is there any instructions. I would love to make this.
thanks
peggy
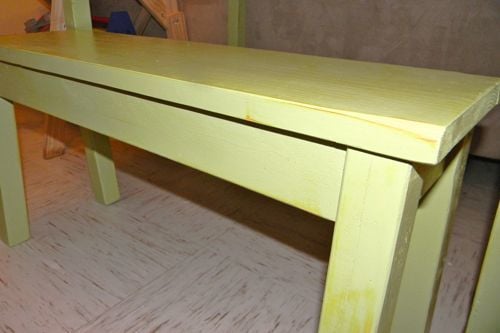
Big kids picnic table
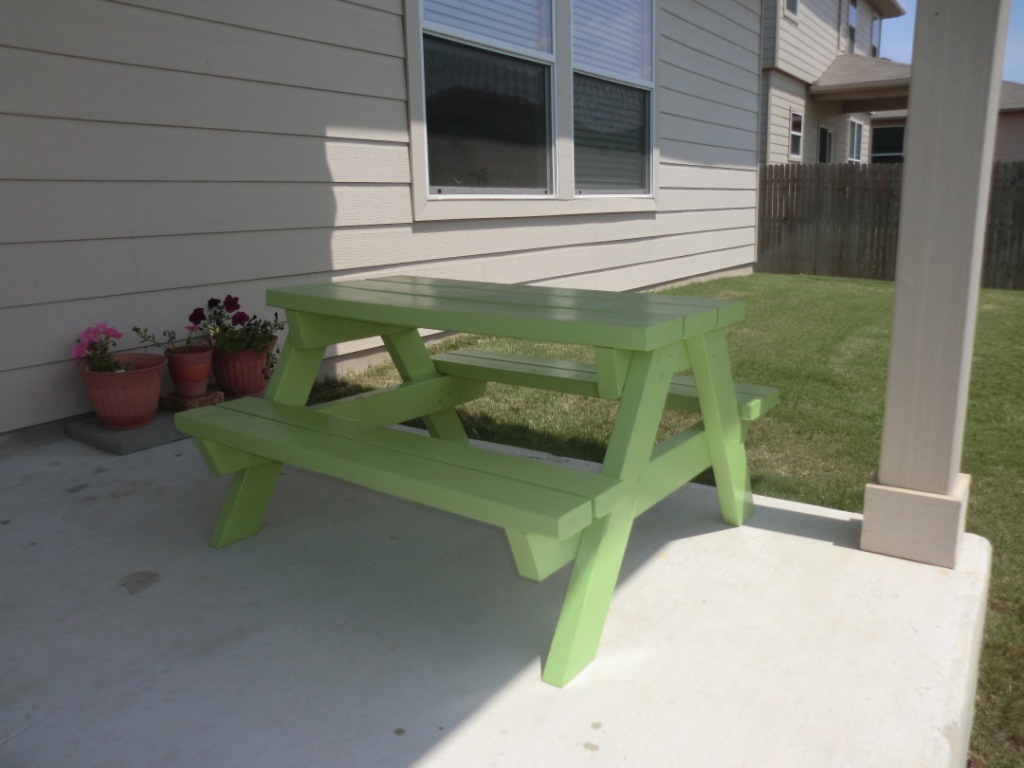
My kids needed a picnic table and I was less than impressed with what the stores in the area had to offer... I ended up with some leftover wood from the builders in our developing neighborhood and voila! A picnic table. It took 2 or 3 hours to construct, and a few more for sanding and painting.
Built from Plan(s)
Estimated Cost
5$ for paint
Estimated Time Investment
Afternoon Project (3-6 Hours)
Finish Used
1 pint (sample size) of Lime Rickey from Sherman Williams. I also used water based spar urethane by miniwax.
Recommended Skill Level
Starter Project
Comments
Tue, 05/19/2020 - 18:58
Just built this and the…
Just built this and the plans were great. One error I noted. It only takes 5 2x4s if your plan the cuts.
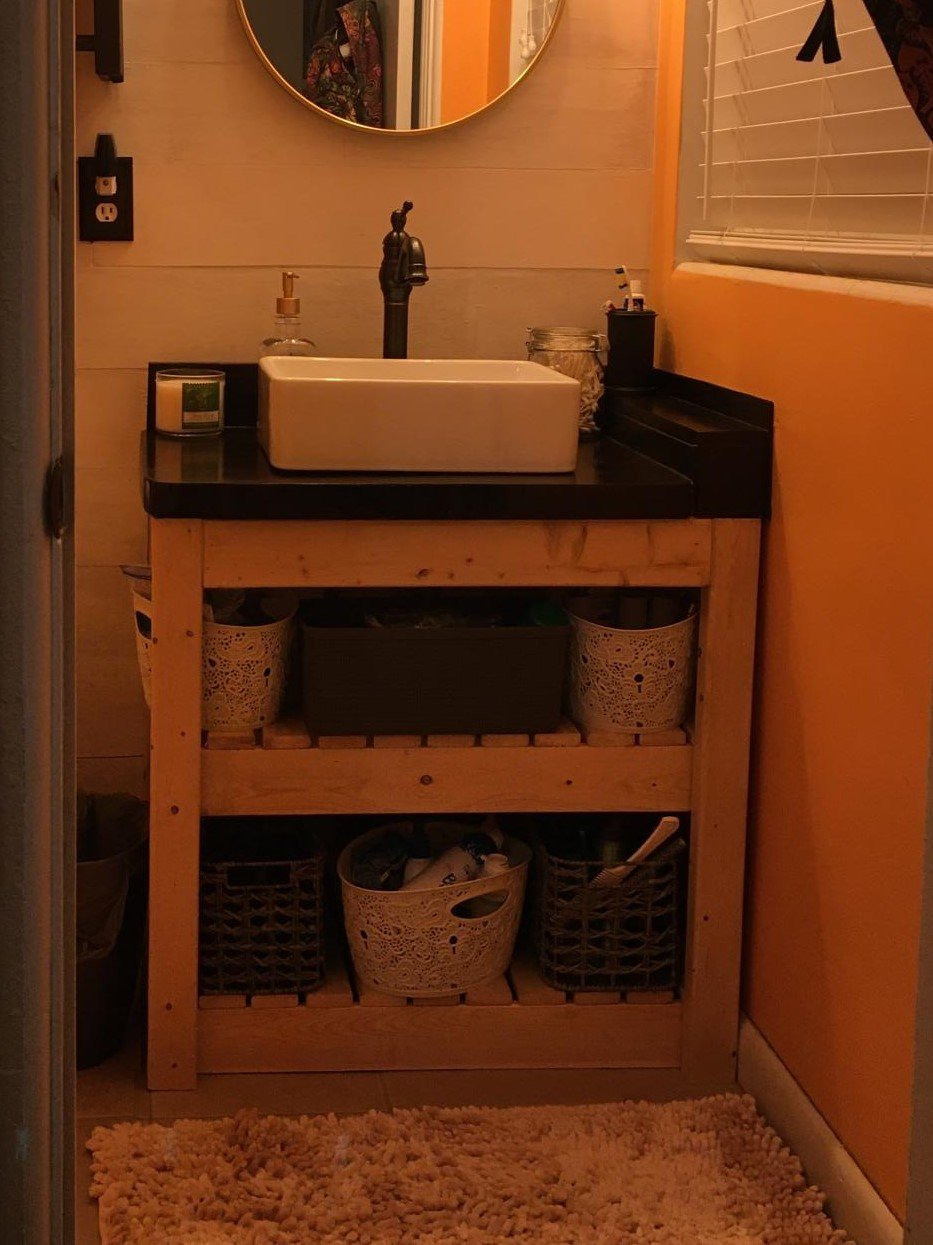
Potting Table
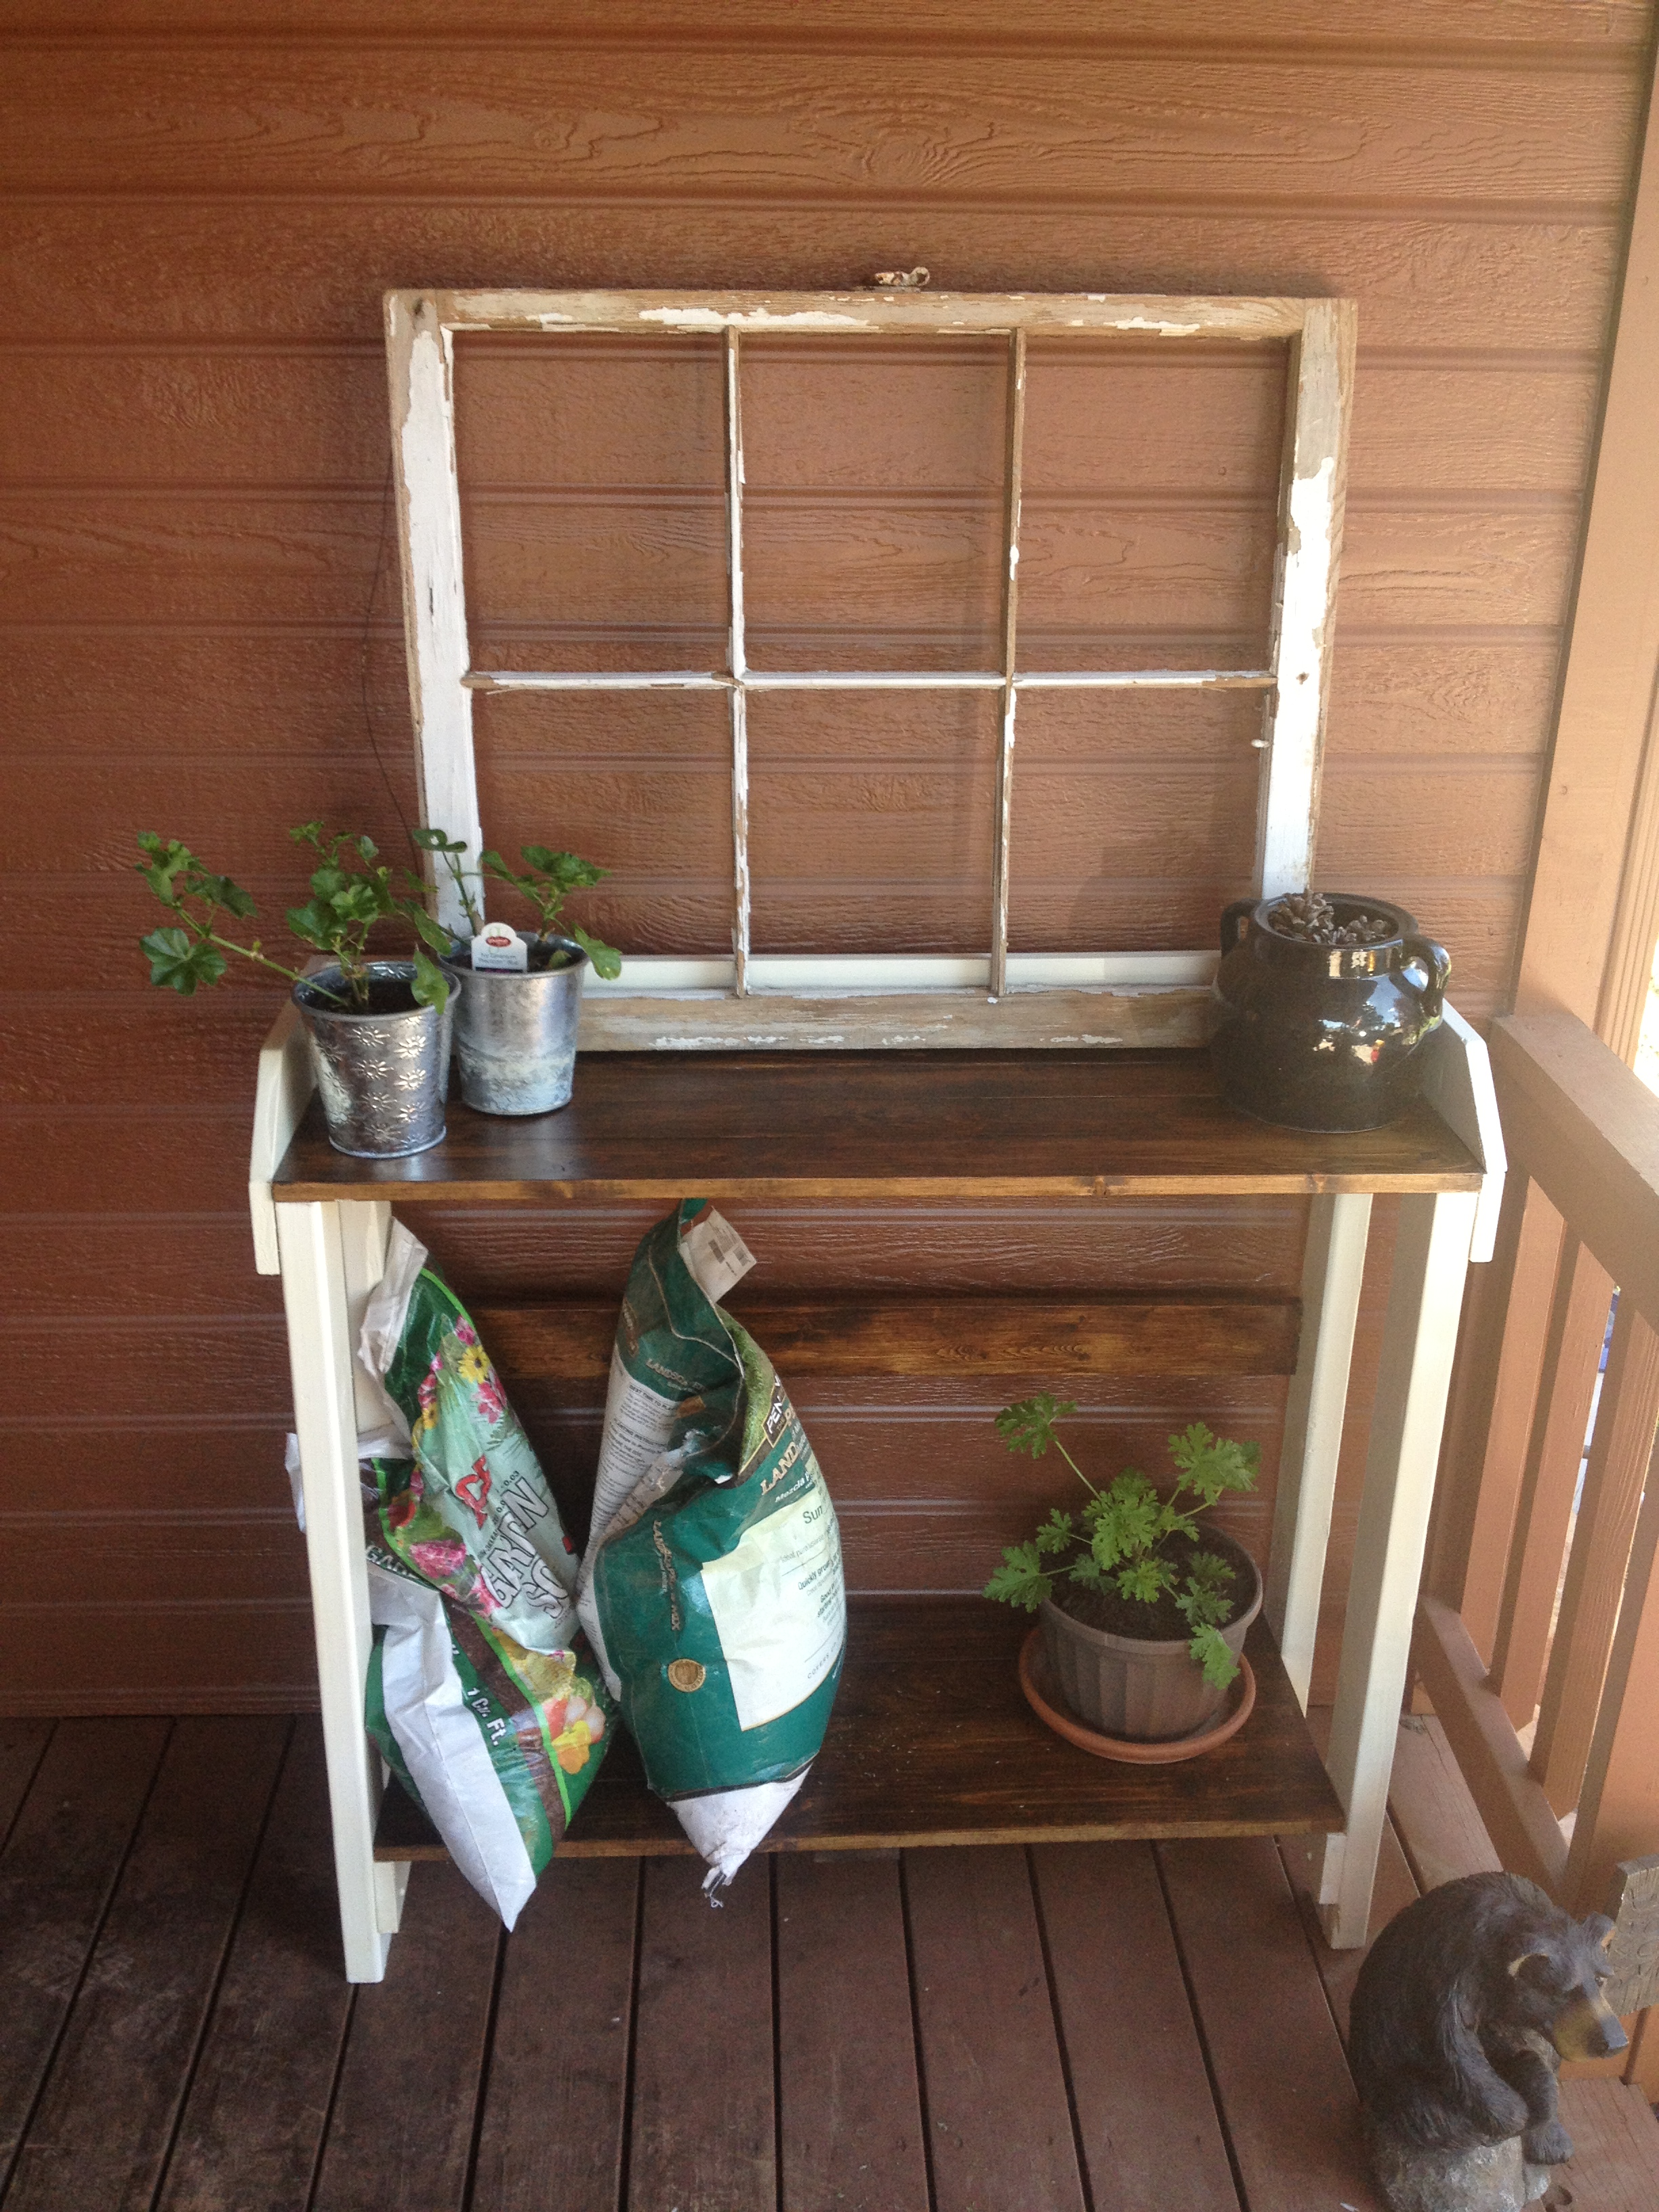
One afternoon and $0 spent!
I had wanted a potting table for my front porch, and finally got it done one afternoon while my son was napping! I wanted a table that was functional but pretty enough to be front and center.
My table is a combination of Ana's and the one I found on 2 Crafty 4 My Skirt (http://2crafty4myskirt.blogspot.com/2012/04/mothers-day-potting-table.h…). I combined and modified the plans so that I could use scraps (could easily be built with pallet wood, too), so my dimension are a little weird, I know. My table is 39 1/2" from bottom to top (the top shelf sits at 36") x 44" wide. It's on the tall side, but it works well for our space.
Tools Used:
Compound miter saw
Kreg Jig system
Ryobi driver
Kreg screws
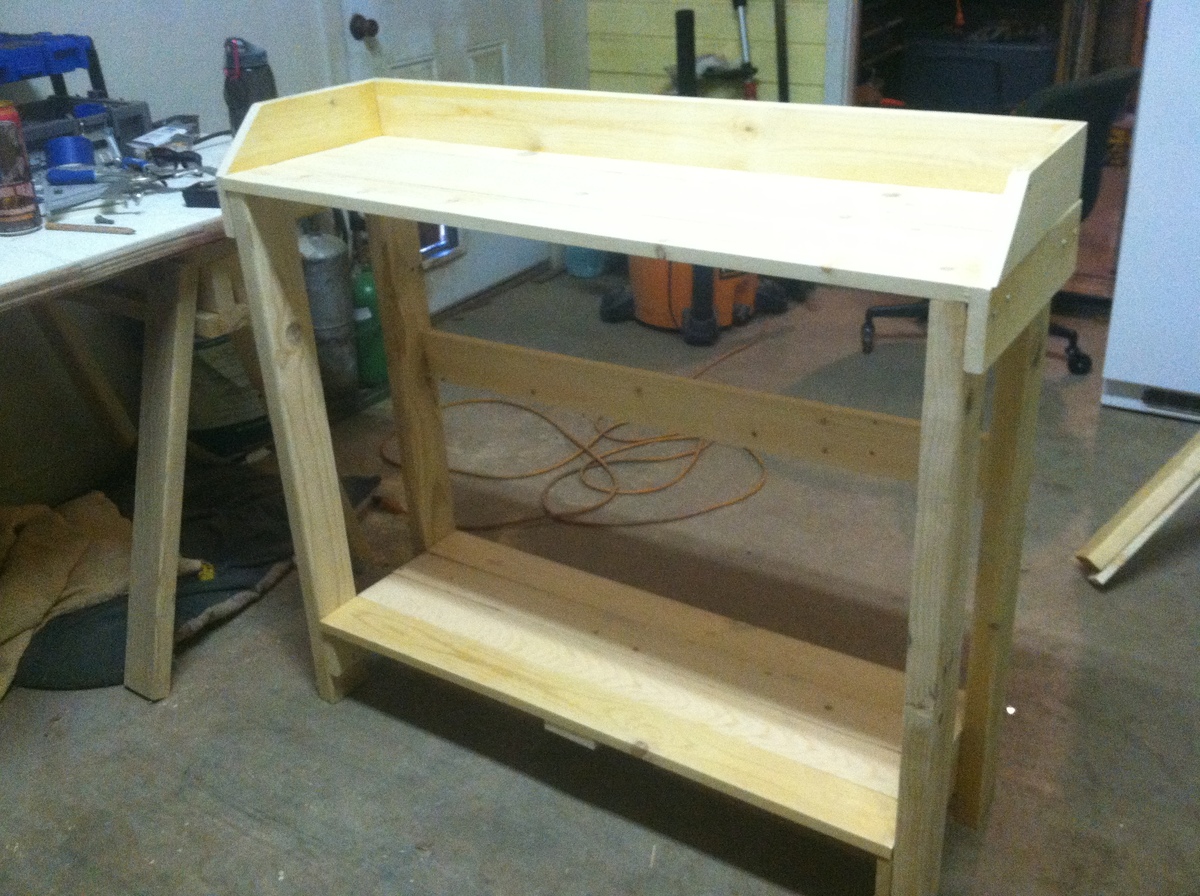
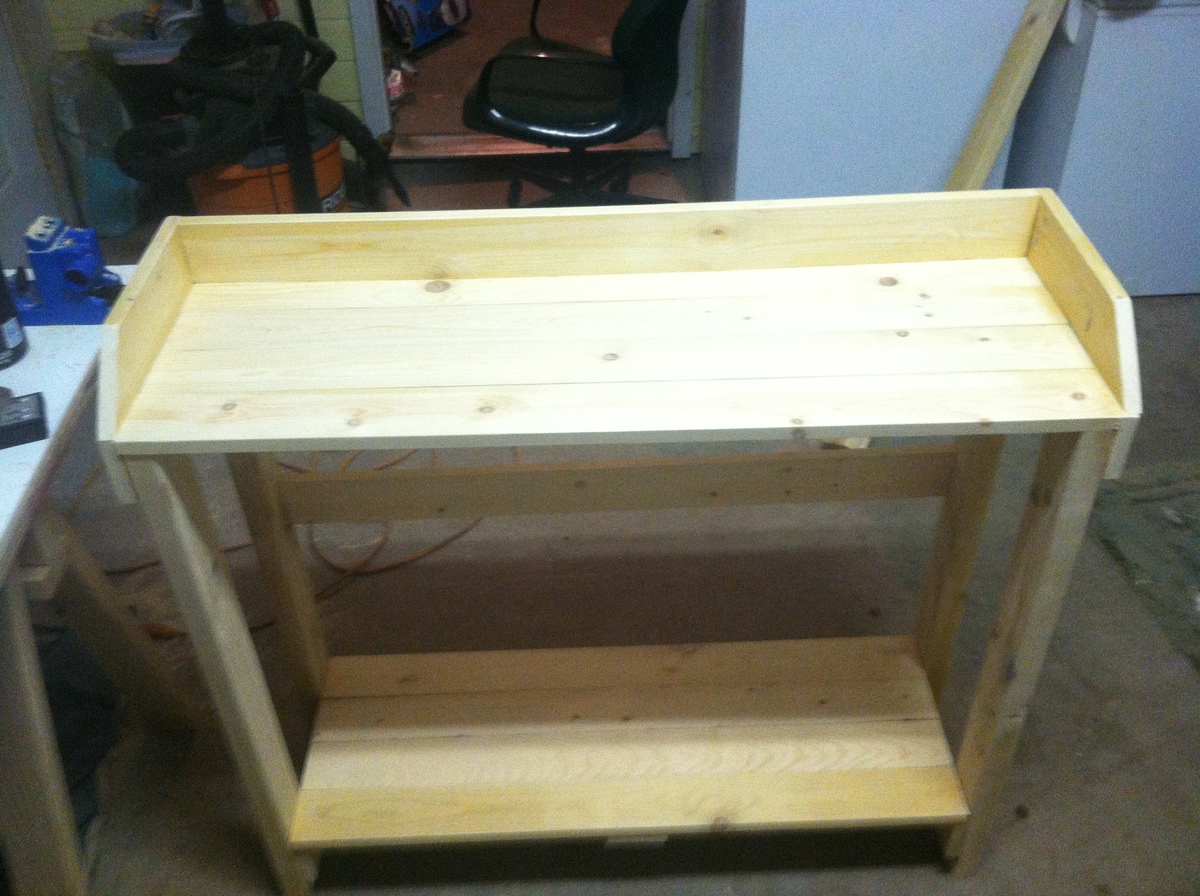
Built from Plan(s)
Estimated Cost
scraps
Estimated Time Investment
Afternoon Project (3-6 Hours)
Finish Used
On frame: Zinsser Bulls Eye 1-2-3 Primer, Olympic Paint (can't remember the color!)
On Shelves: Minwax Prestain Wood Conditioner, Minwax Stain in Walnut
On Shelves: Minwax Prestain Wood Conditioner, Minwax Stain in Walnut
Recommended Skill Level
Beginner
Comments

Wed, 10/09/2013 - 21:28
Looks great!!!!
I love the use of the window and the color contrast is fantastic!!!
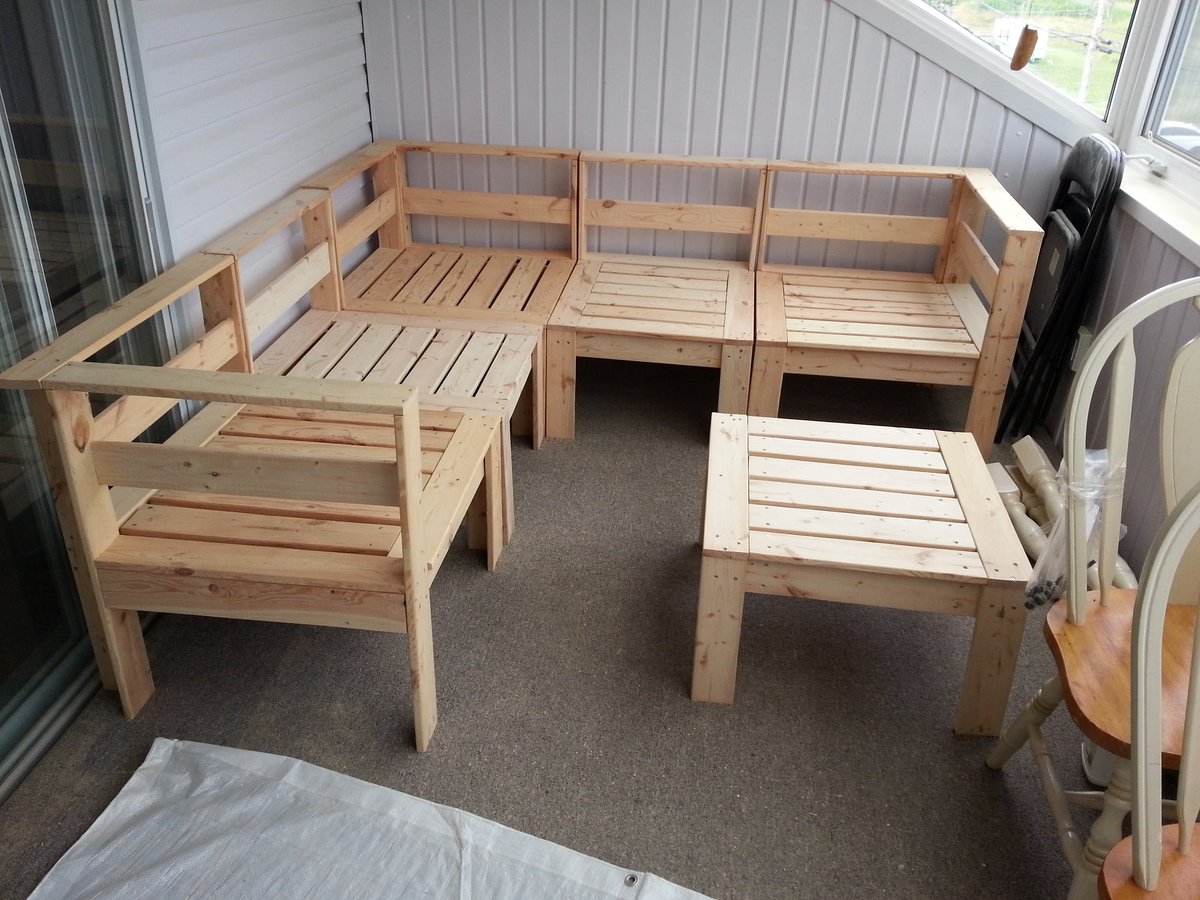
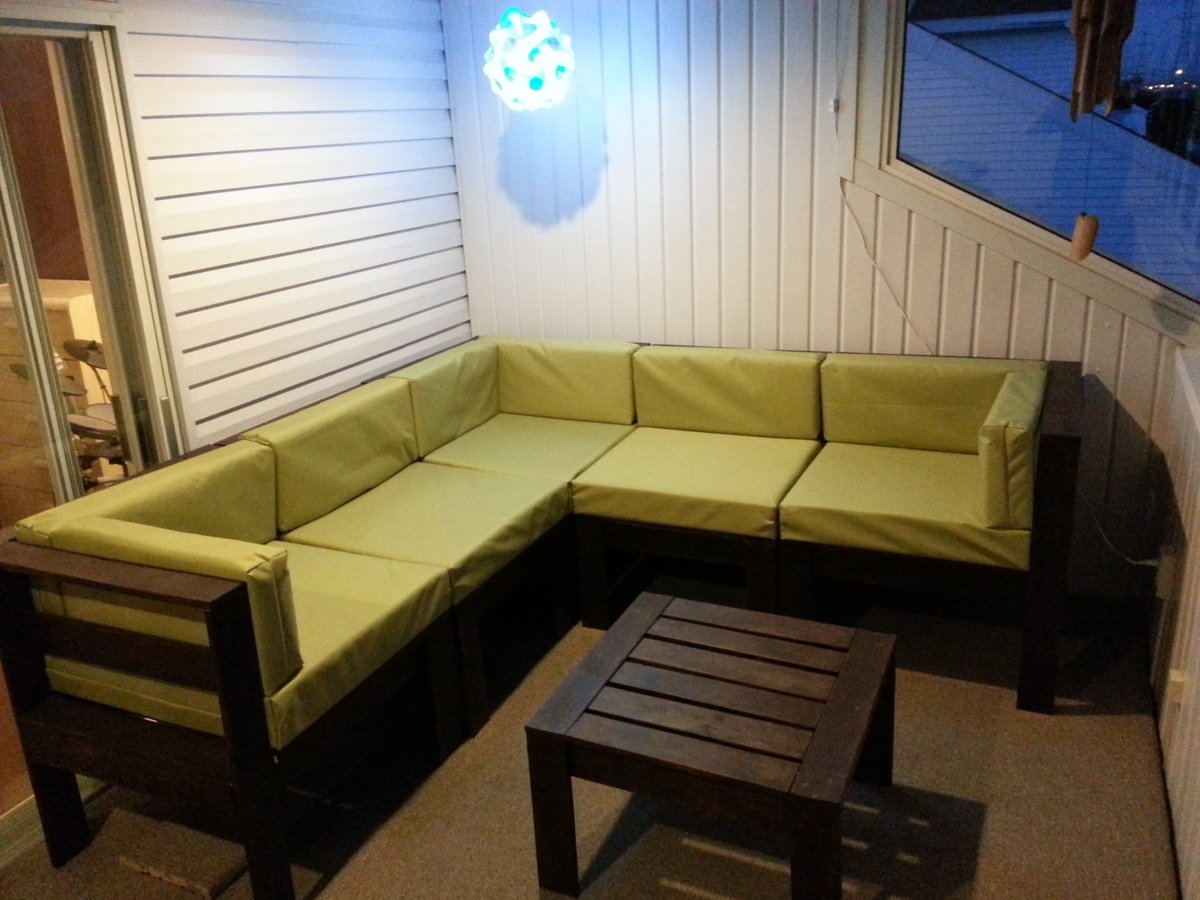
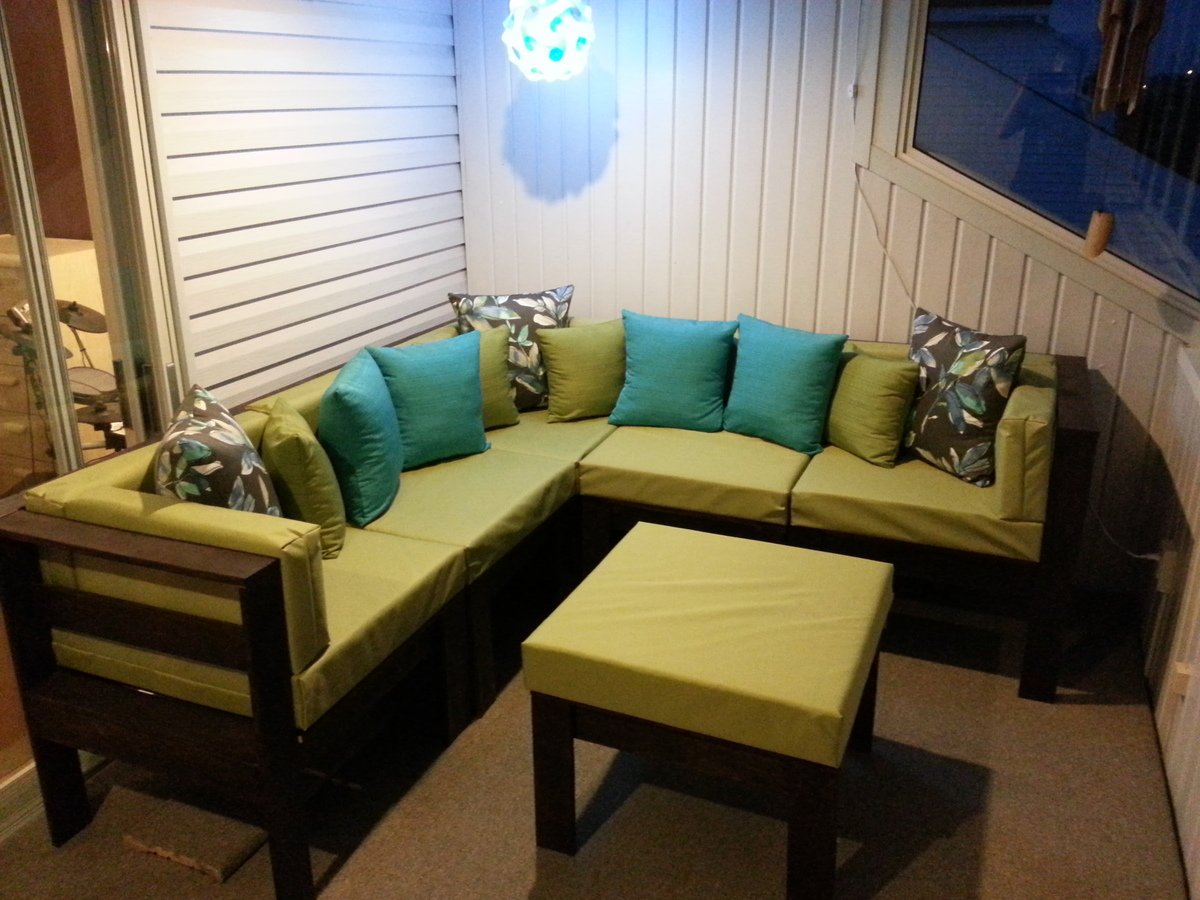
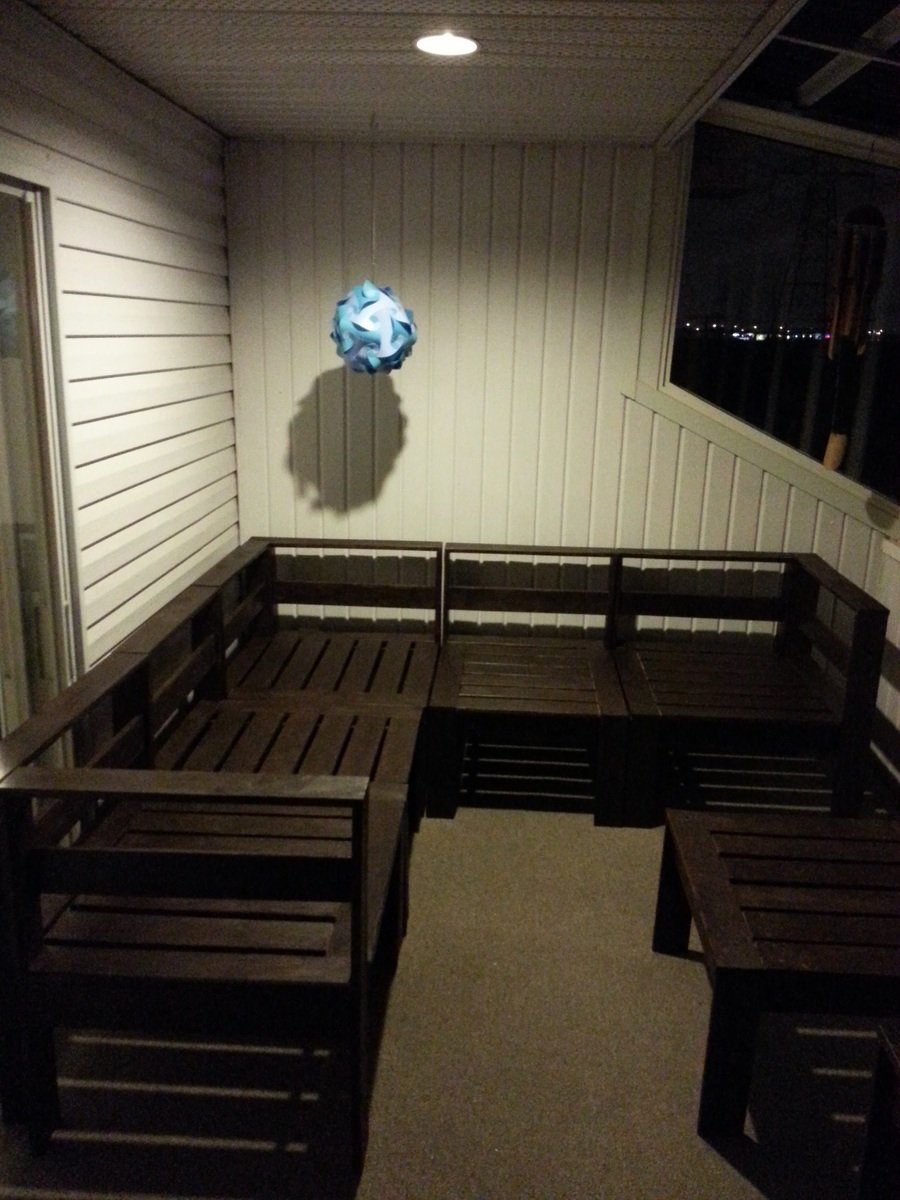
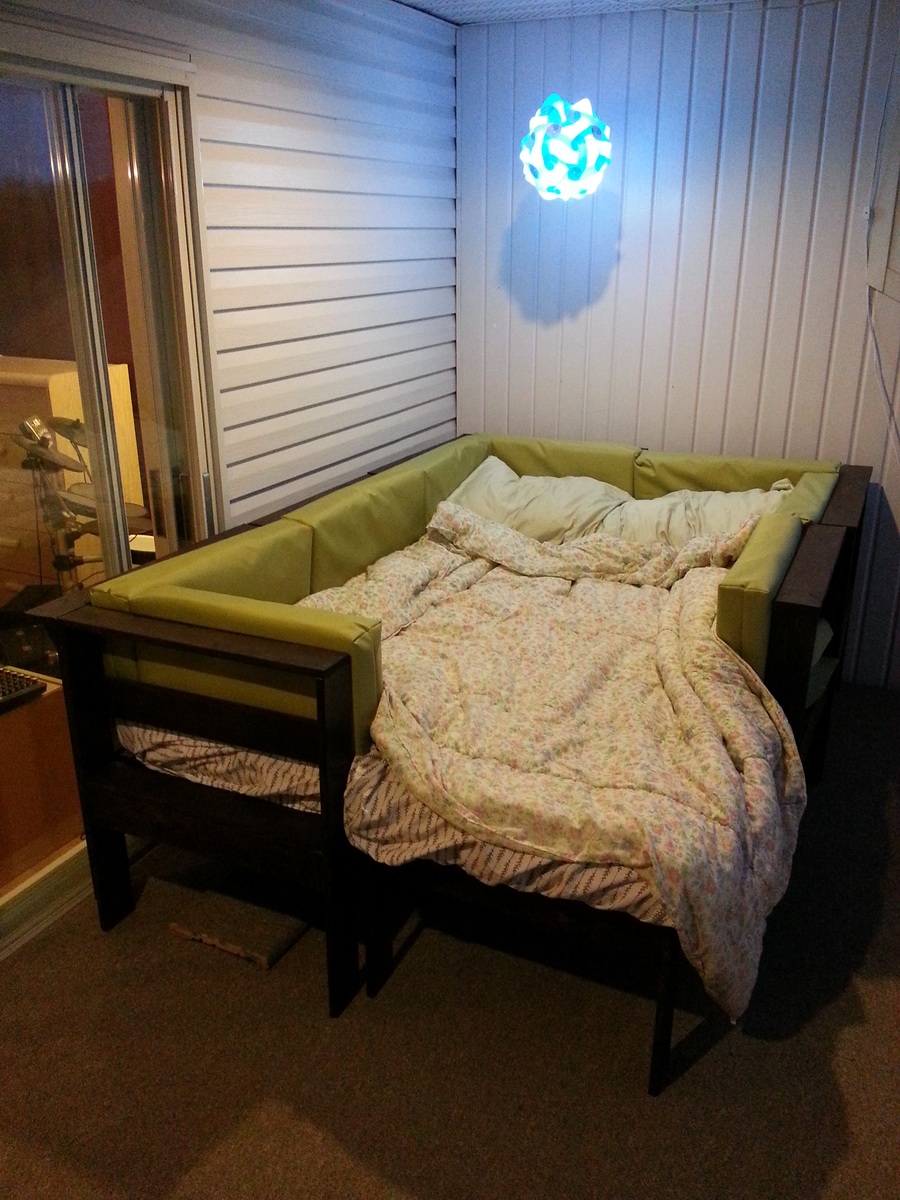
Outdoor sectional for the veranda
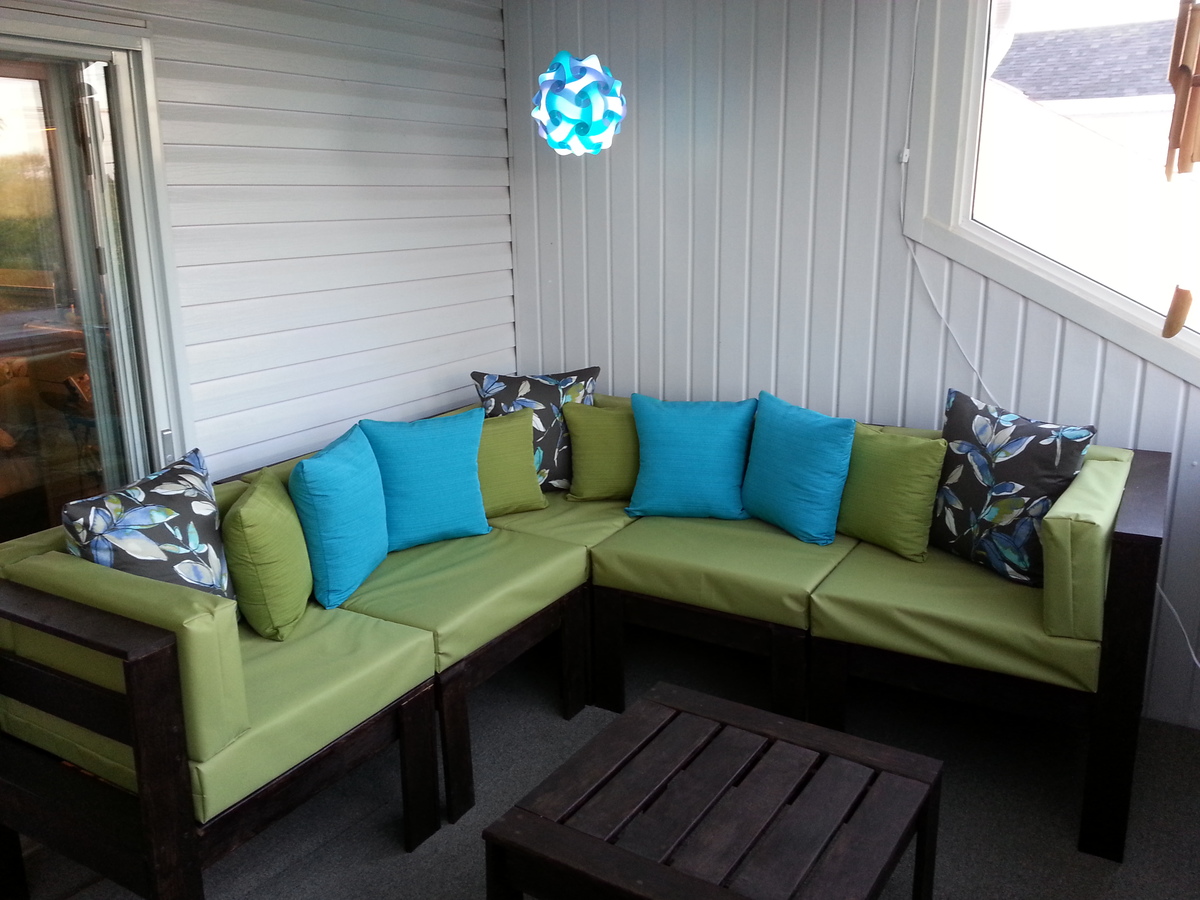
First ever woodworking project!
I wanted to add a sectional in my veranda, but all the models at stores around my place were at least a 1000$ and didn't had the proper dimension. The plan given on this website was ideal for my space, since my veranda is limited in space (was converted from a balcony, 7'x14').
The whole project went slowly since I did it part time, but overall it went well. However, the entire project from A to Z was time-consuming since I decided at the beginning to do the wood working AND the sewing part, and I'm a beginner that doesn't have any experience in any of these fields. I did literally everything by myself, from cutting 148 pieces of wood with a rented mitre saw, sanding each single one of them, staining the assembled chairs and table after assembly, cutting various pieces of foam for my cushion with 72"x30" sheets of foam, and lastly do the sewing of all the green cushion AND the smaller squared cushions. That was a lot of things to learn for a first timer and fortunetely I was enough motivated to do them, and most importantly patient. I had the moral support of my girlfriend during the whole project and showing the progress of the project to my friends, family and coworkers did help a lot to keep me motivated to finish the project.
I learned a lot from this project, whether it's wood cutting, sanding, assembly, staining or machine sewing. These skills will help for future projects for sure!
Thank you very much Ana for helping me, with these simple plans, learn new skills that enabled me to create something amazing!!!
Built from Plan(s)
Estimated Cost
Wood: 90$
Screws: 30$
Wood filler: 8$
Stain: 40$
Foam: 175$
Fabrics: 150$
Total: around 500$
Screws: 30$
Wood filler: 8$
Stain: 40$
Foam: 175$
Fabrics: 150$
Total: around 500$
Estimated Time Investment
Week Long Project (20 Hours or More)
Finish Used
Sico semi-transparent English oak outdoor stain, applied after assembly.
Recommended Skill Level
Intermediate
Comments
X end table
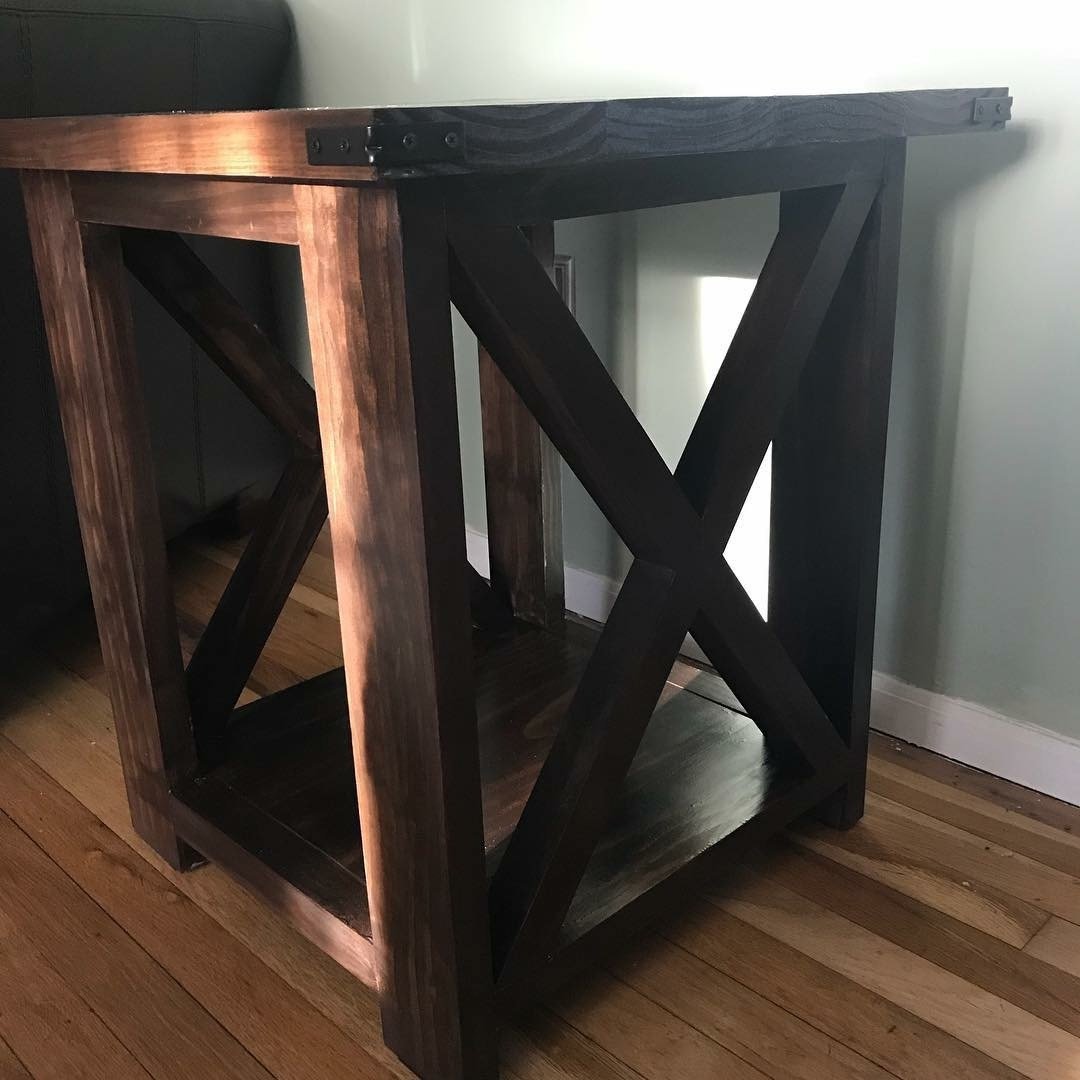
End table to go along with coffee table.
Built from Plan(s)
Finish Used
Kona stain satin poly
Recommended Skill Level
Beginner
Weatherly patio set-modified
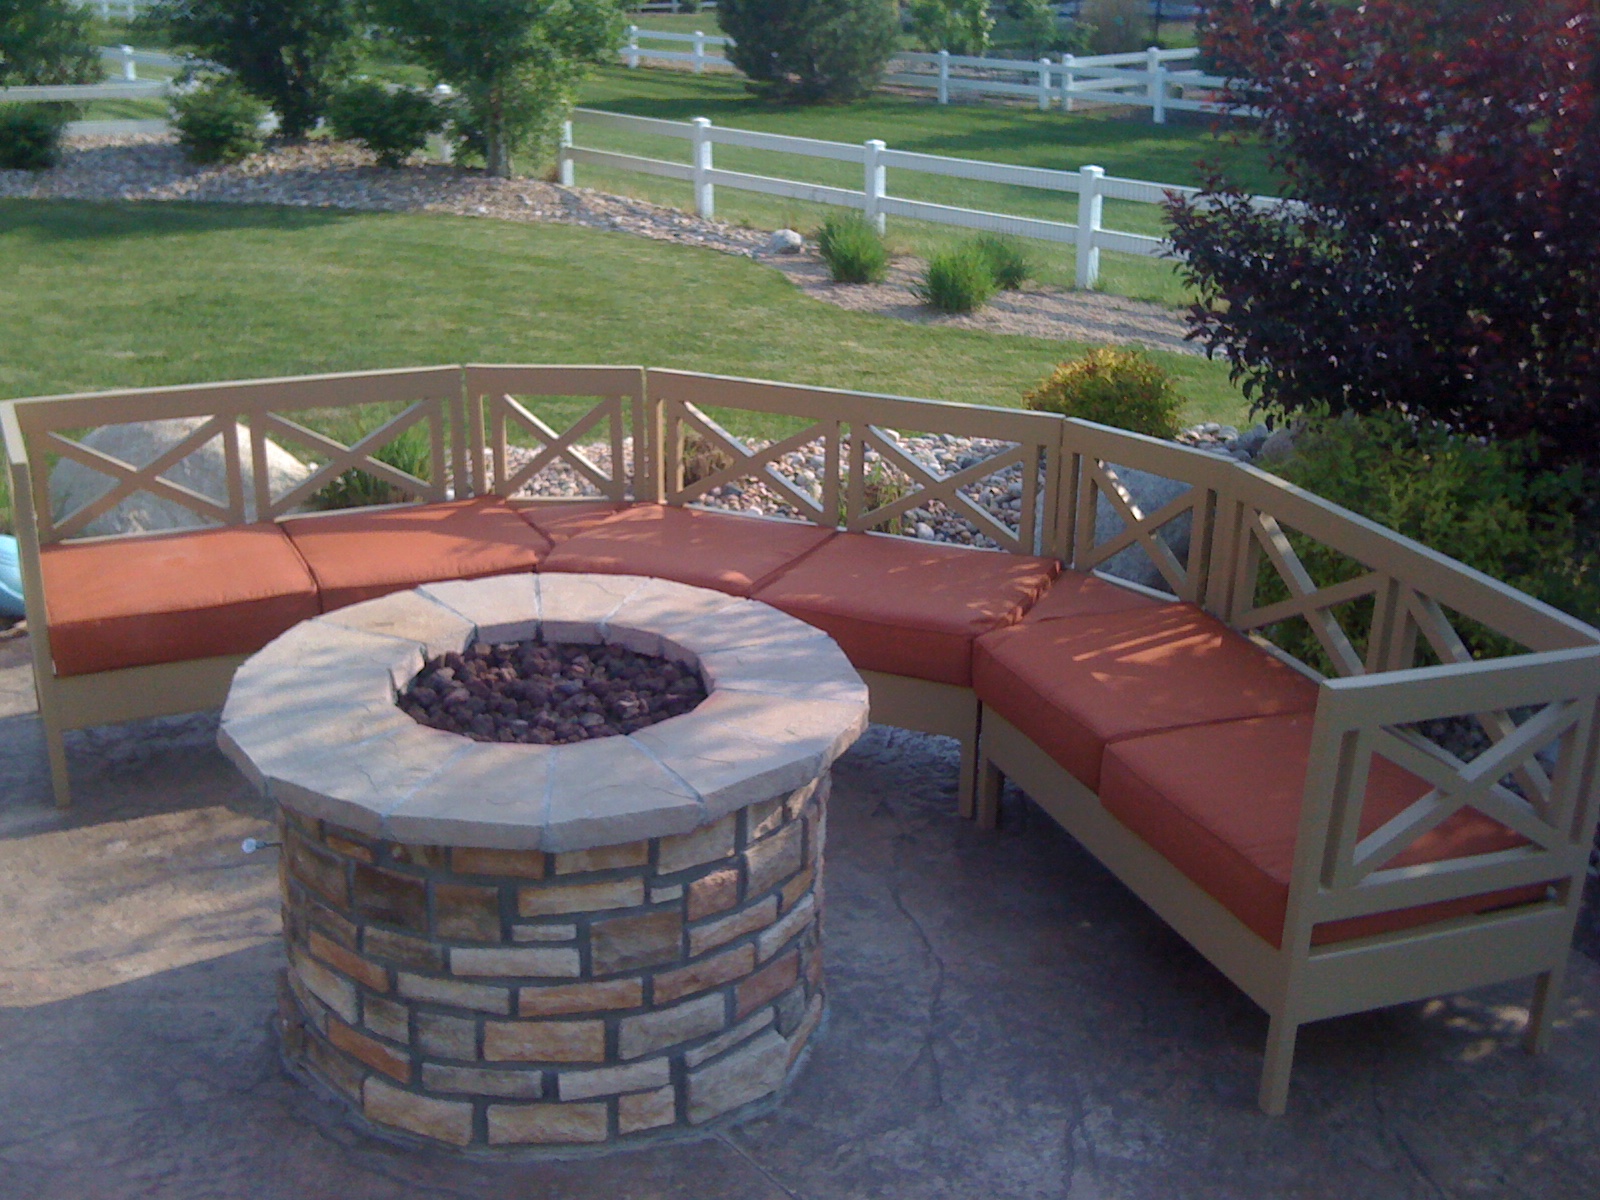
We have been searching for 3 years to find a sectional that would fit around our fire pit. The only thing we ever found were two curved sofas that cost $5000 needless to say, we kept looking. When I saw the weatherly plans I knew that I could modify them to curve around the fire pit. The piece is made up of three sofa sized pieces and connected by two triangular pieces. The HARDEST part of this project was finding the dimensions for the triangle pieces. It took 2 days, my dad and brother throwing trigonometry formulas at me, and a lot of trial and error. After that it was easy! I combined the plans for the sofa and the loveseat, so the loveseat would have the ends on them.
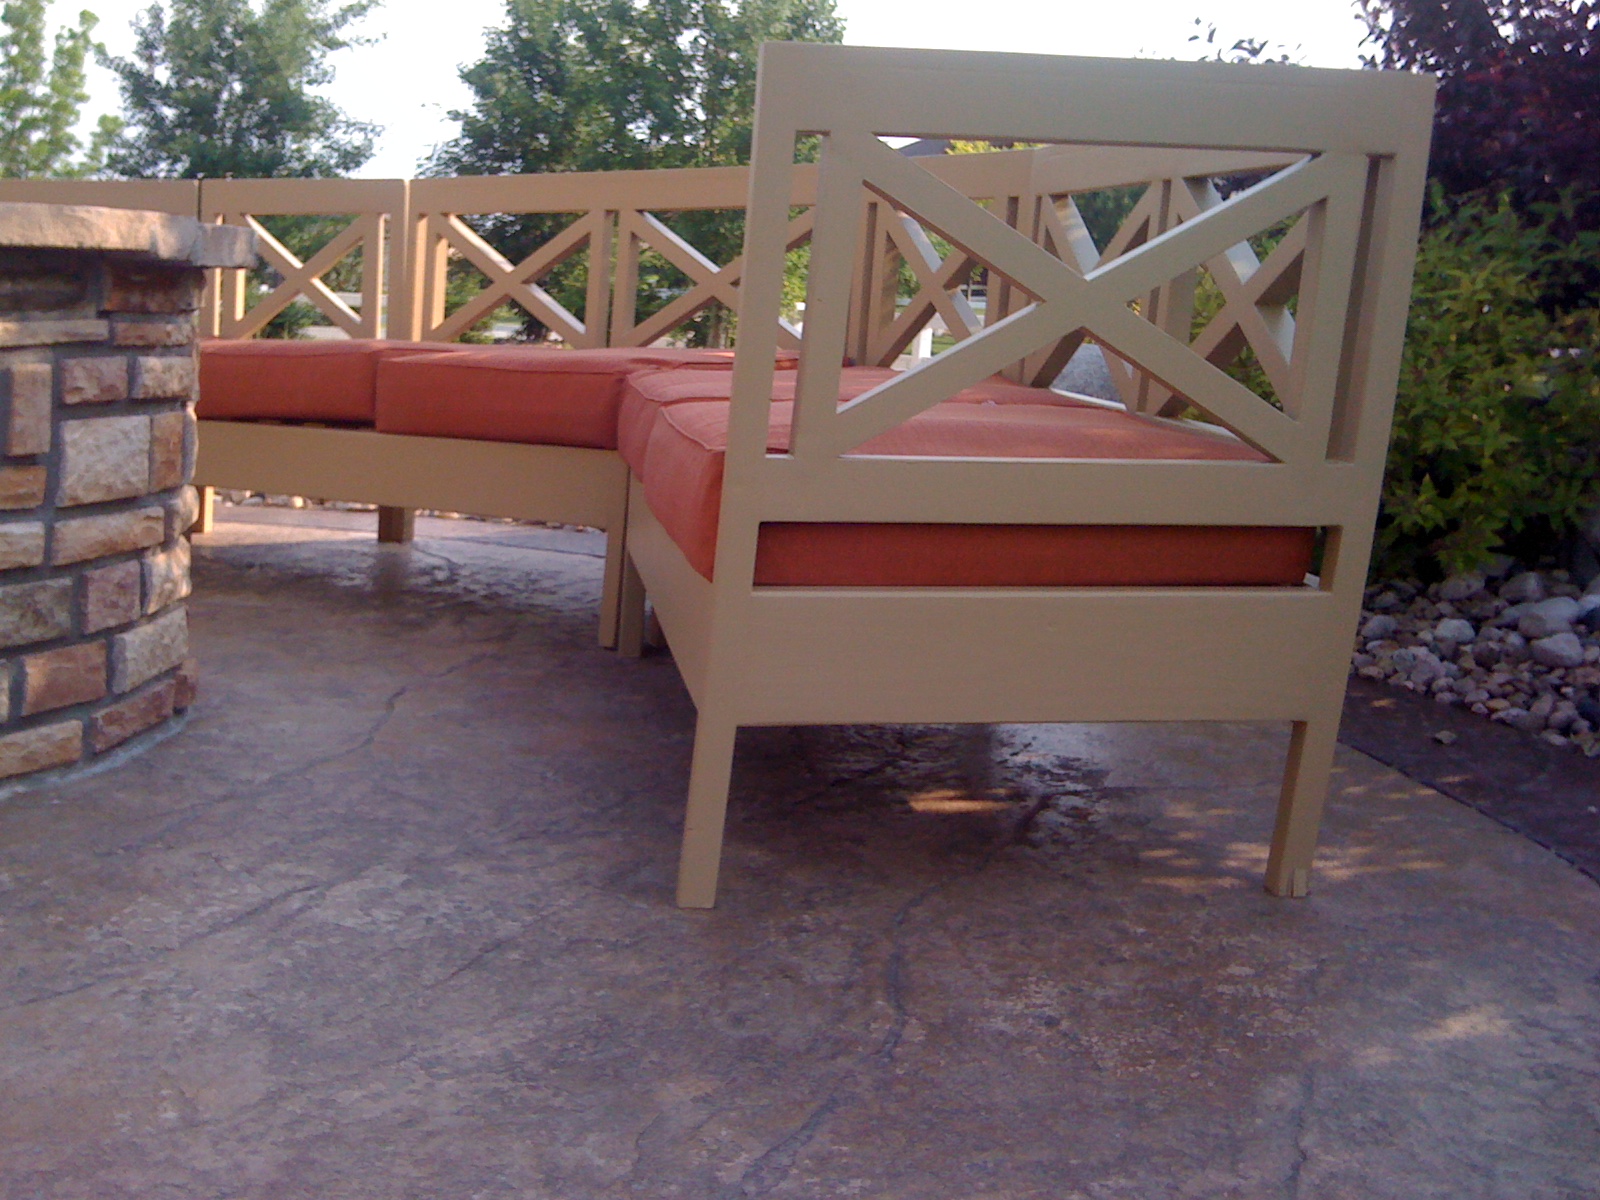
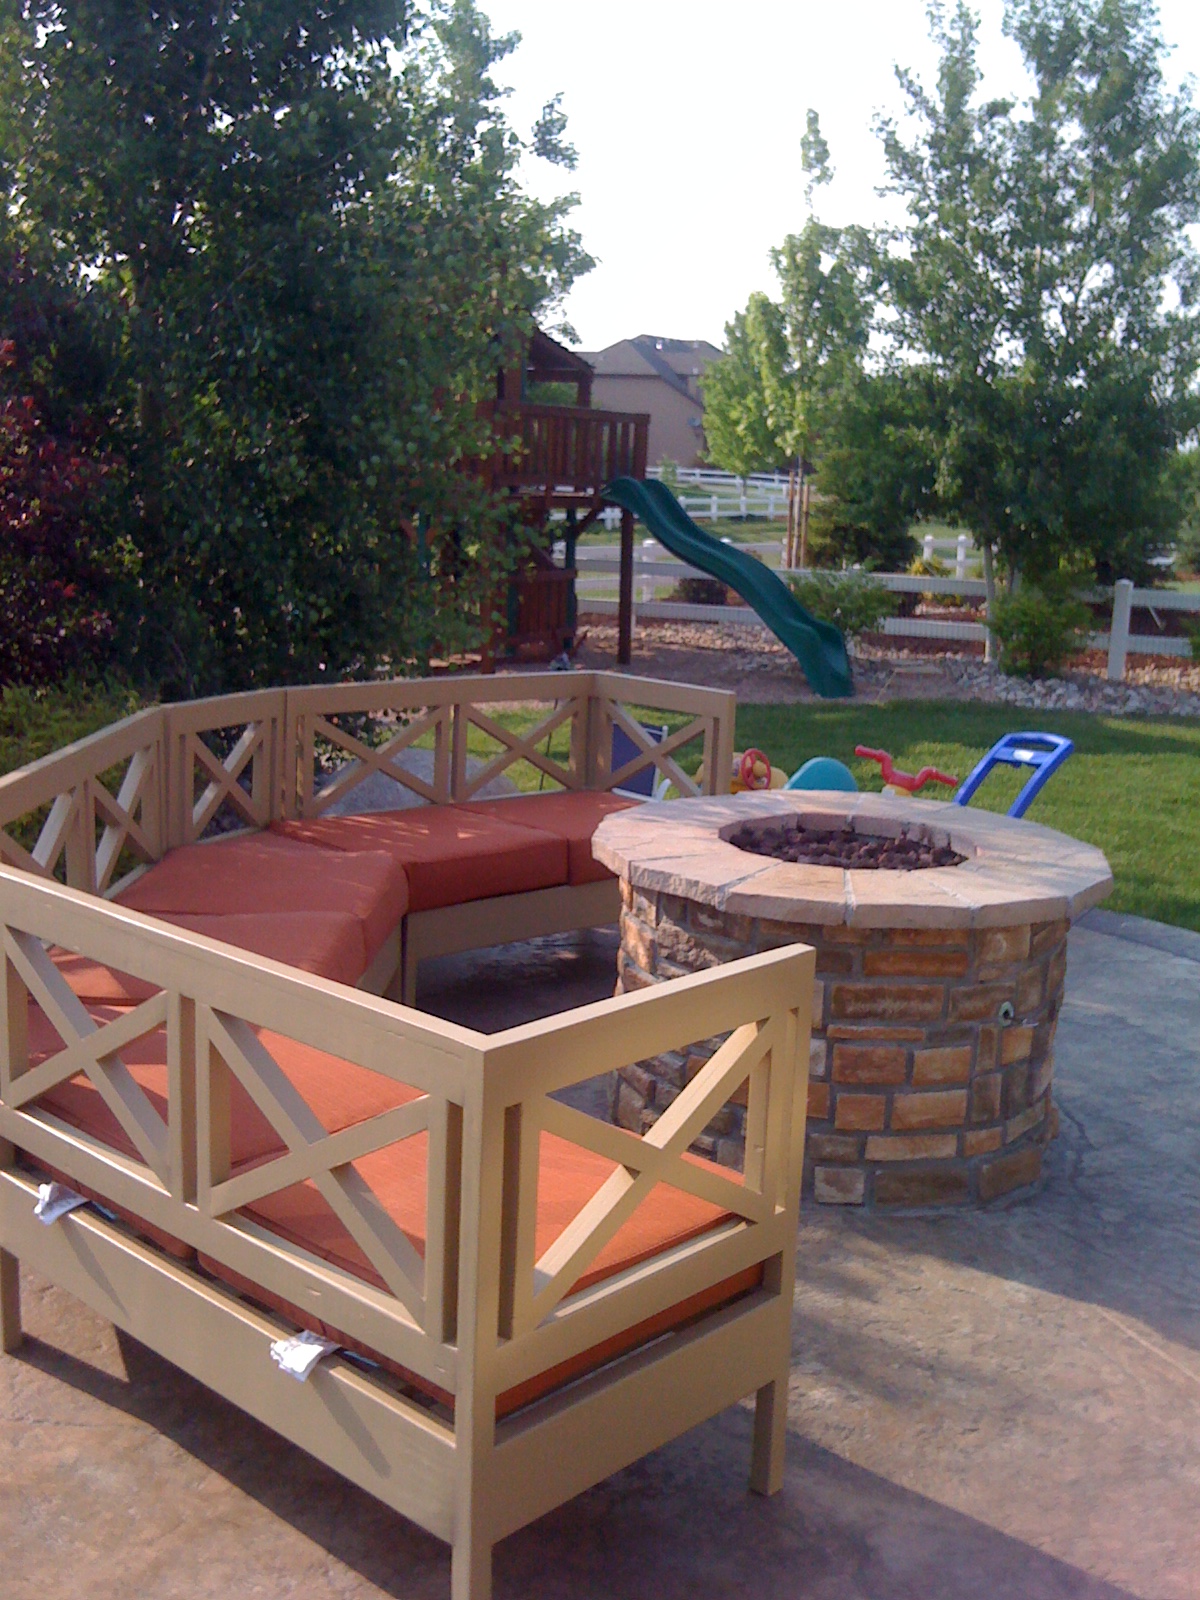
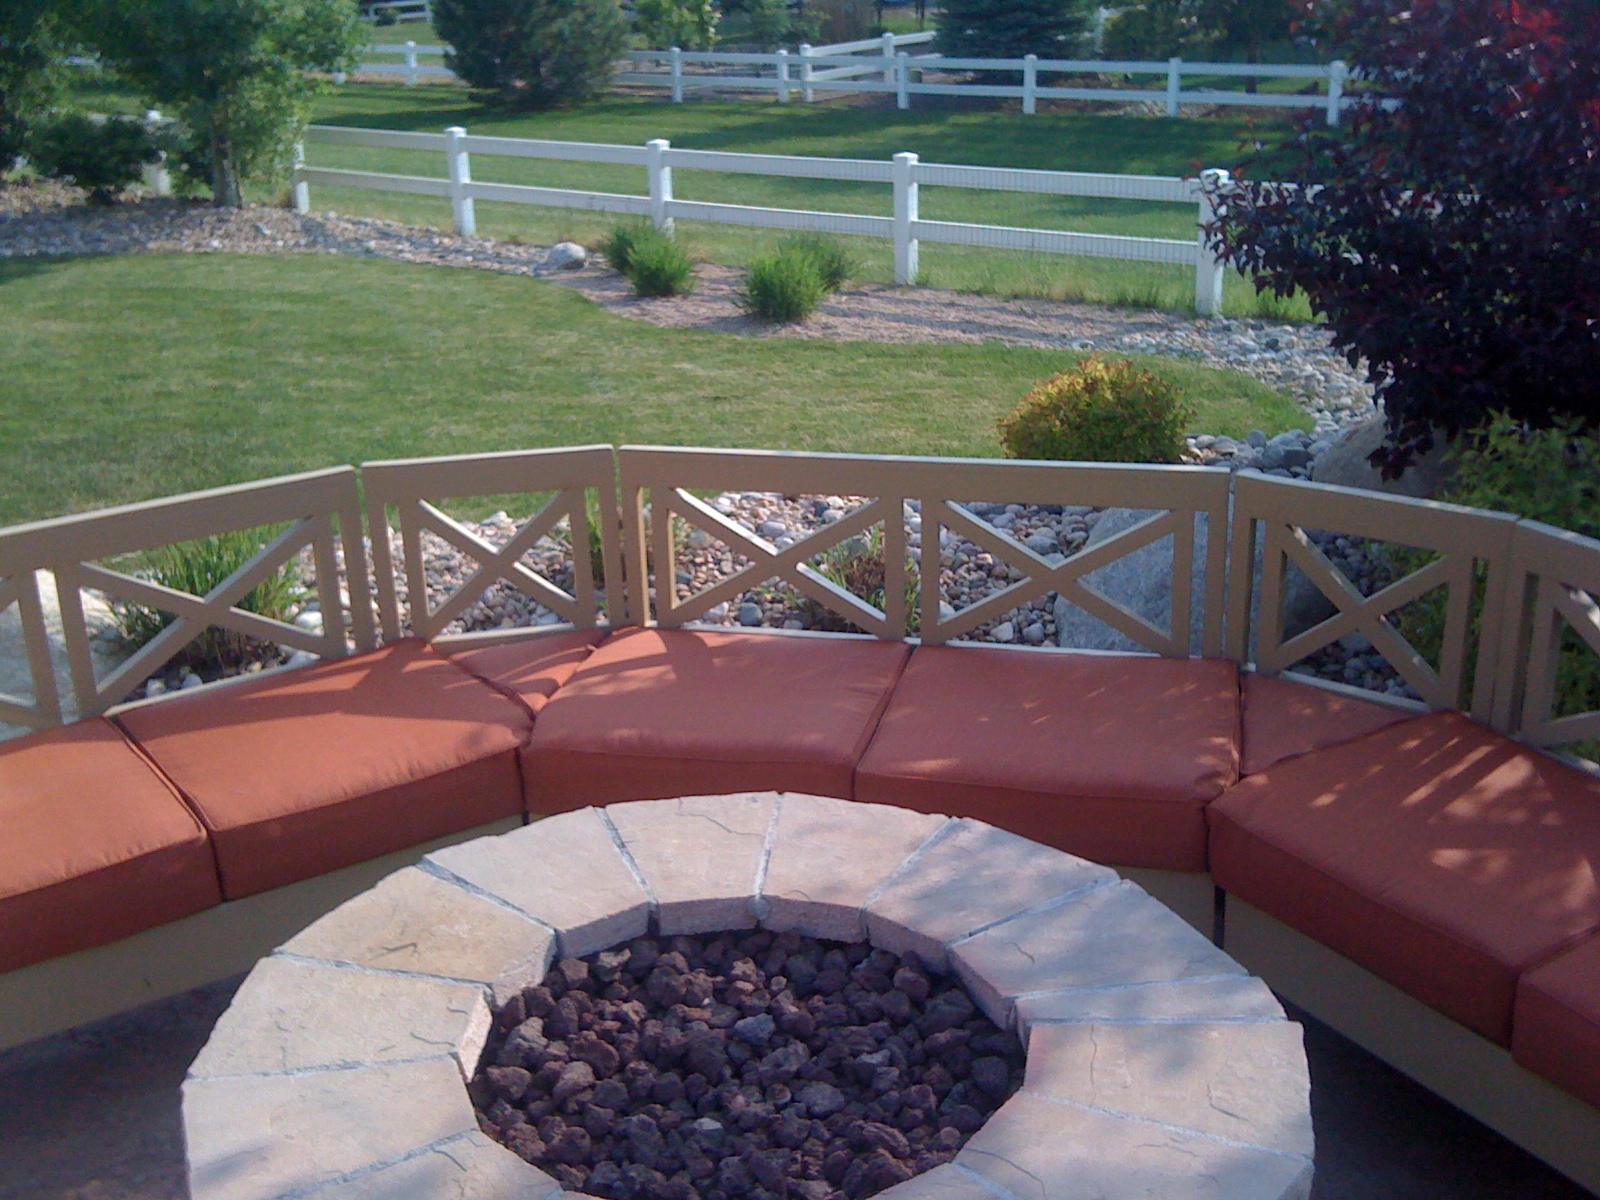
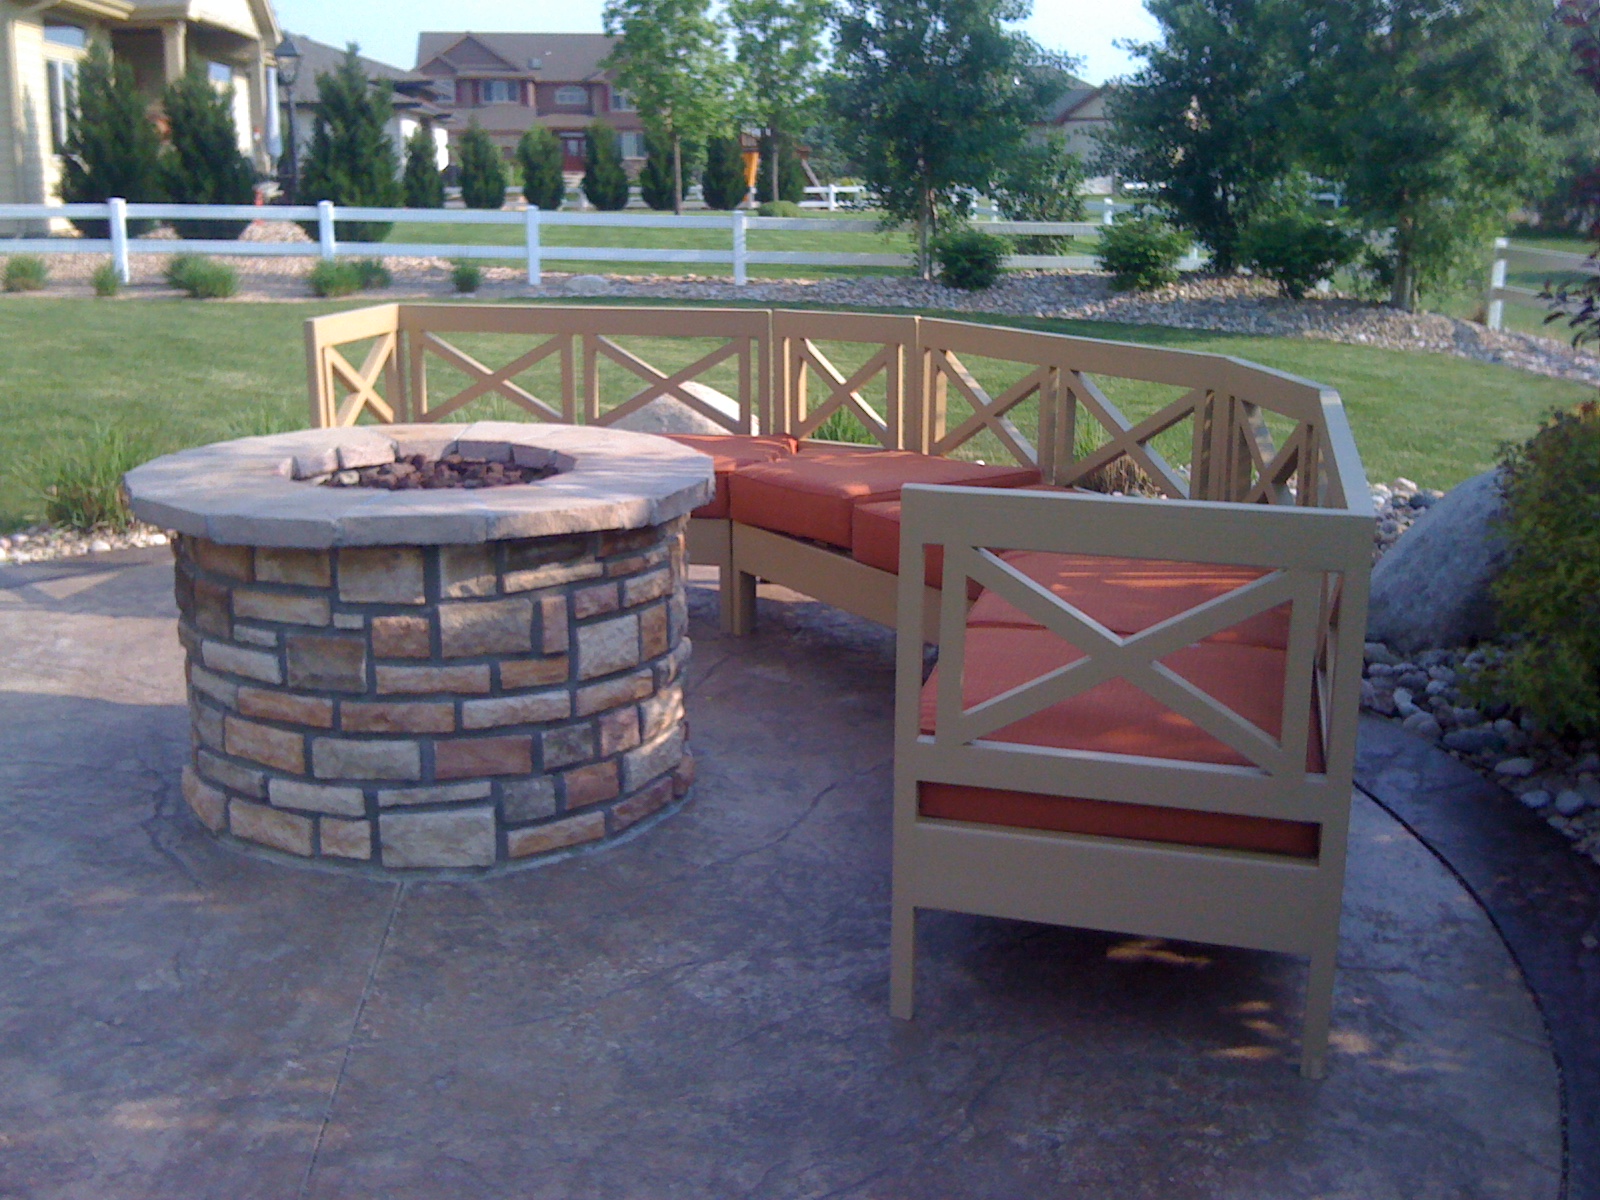
Built from Plan(s)
Estimated Cost
$200 for wood. $300 for cushions
Estimated Time Investment
Week Long Project (20 Hours or More)
Finish Used
I used a primer, then a solid stain.
Recommended Skill Level
Intermediate
Comments

Sun, 06/26/2011 - 15:23
Awesome
I am building a "bench in the backyard" and agonized about using an angle other than 90 degrees. I finally decided to go simple and easy as possible. We will see soon if it works out.
Isn't it so wrong that the wood for this whole project cost LESS than the cushions!
I am so envious of wherever you live. Beautiful!


Fri, 11/04/2011 - 09:49
Love the idea!
But I think my triangular sections would be raised (to cushion height) table tops...
Now to build a deck so I can build THIS!!!
Tryde outdoor kitchen surface

This is my second project - I made an outdoor cookng surface modeled after the Tryde coffee table. The 4x4's are 36" tall and made it 21" deep - this is great for my outdoor grilling station.
I truely enjoy this desig, and I try to use it for anything going forward.
I love the deep color that the minwax red mahogany stain brings - this has 3 coats of polyurethane.
If you notice the table next to the tryde table - my father in law came up with a design to make the grill tops taller than the standard configuration - I will try to send a cad version of this to Ana so that she can post it up on the site.
the ground is not level with the slate.


Built from Plan(s)
Estimated Cost
$50.00
Estimated Time Investment
Weekend Project (10-20 Hours)
Finish Used
Minwax red mahogany
minwax poly urethane glossy
minwax poly urethane glossy
Recommended Skill Level
Beginner
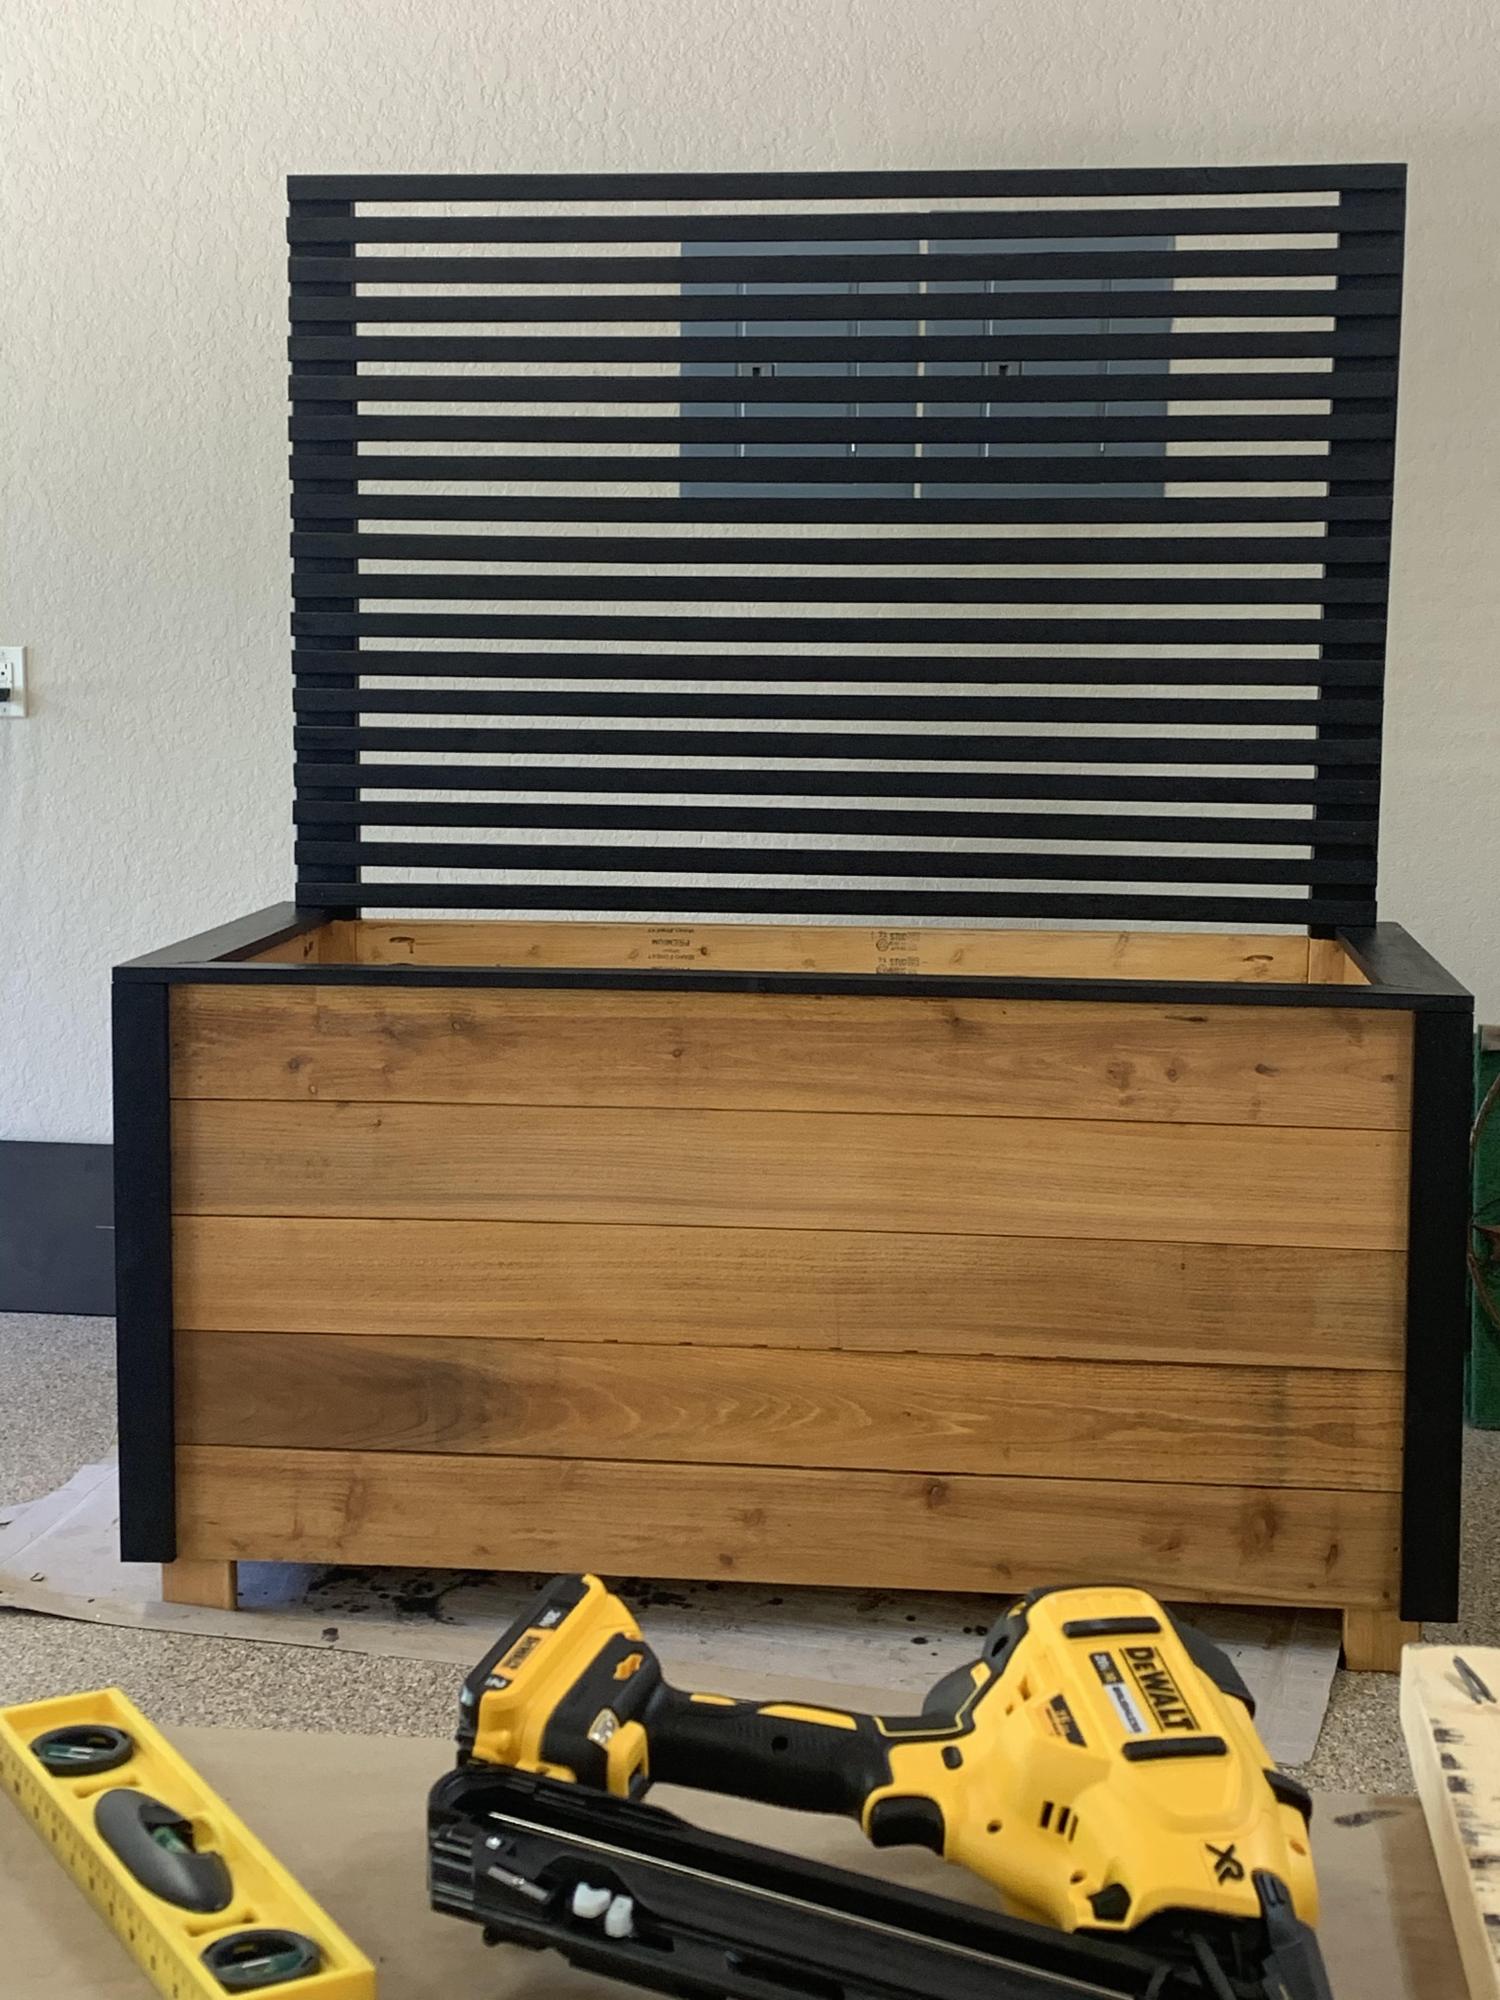
Handmade by Tim
Really handy for getting more storage space without taking up extra floor space
Built from Plan(s)
Estimated Cost
$500
Estimated Time Investment
Week Long Project (20 Hours or More)
Finish Used
MinWax Dark Walnut,
Recommended Skill Level
Advanced
Comments
Tue, 08/25/2015 - 17:39
Assembly tip
A plate (biscuit) joiner is really helpful for building the cabinets, especially if you're going to have the drawers.
Sometimes Re-purposing and Refinishing Is As Good as Building

We took an old hand-me-down buffet that we've dragged around for 10+ years, ripped out the top two drawers, and added a few coats of chalk paint and wax. Now we have a "brand new" piece with a built-in microwave. We went from hating this old piece to loving it.
More pics are available on our blog: http://famousartisan.com/refinished-buffet-with-integrated-microwave-shelf/
Estimated Cost
$25
Estimated Time Investment
Afternoon Project (3-6 Hours)
Finish Used
chalk paint and wax
Recommended Skill Level
Beginner