Community Brag Posts

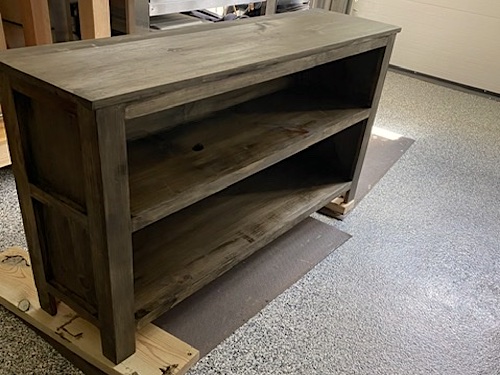
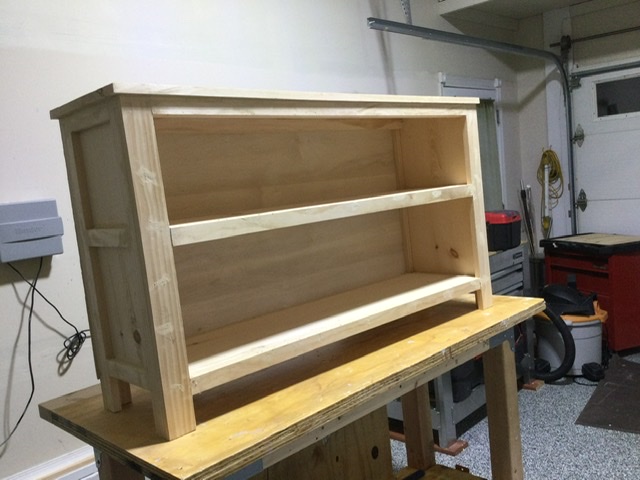
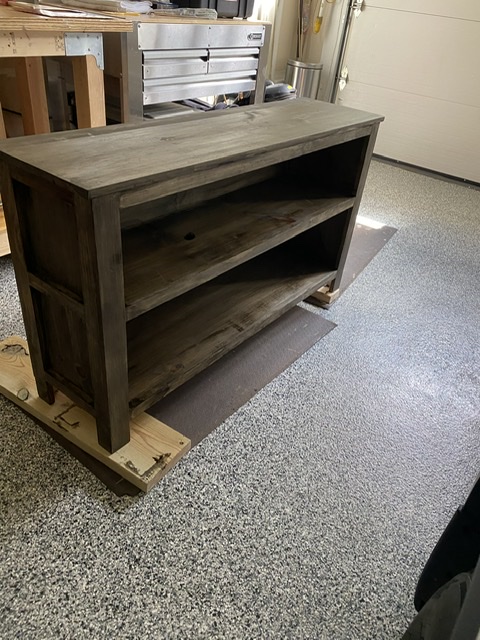
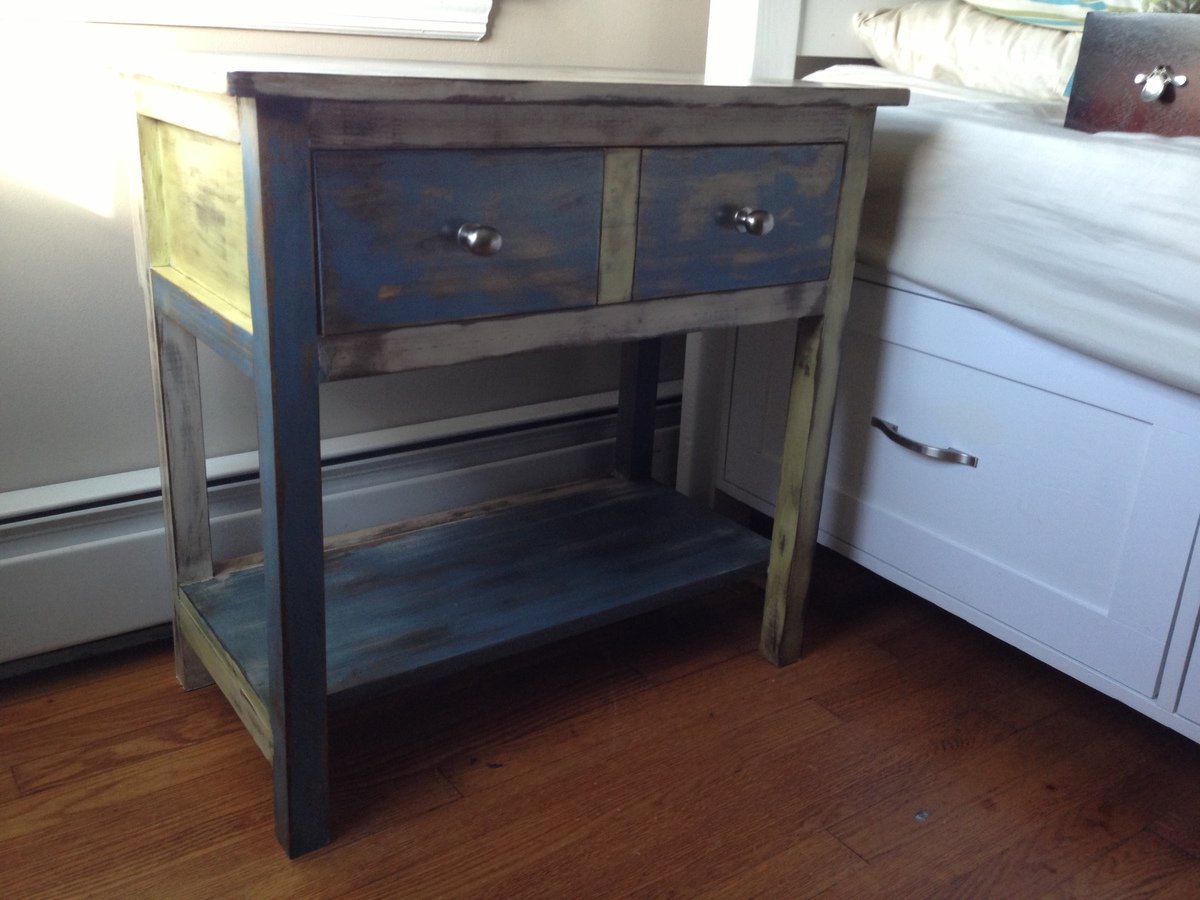
Improvised Modern Patchwork Dresser

Submitted by andrea6 on Tue, 08/06/2013 - 14:56

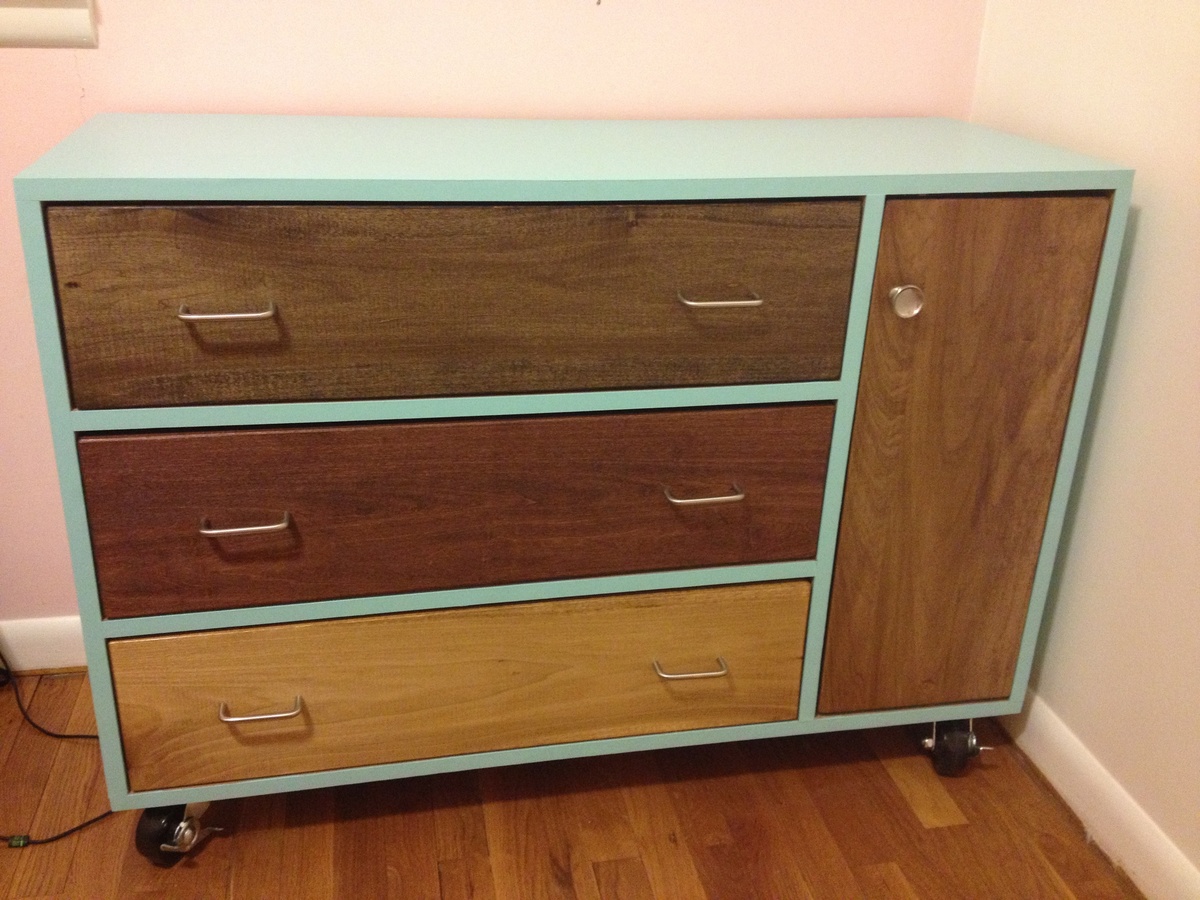
We used MDF board for the frame, and covered the cut edges with veneer. We used Poplar premium wood from Lowes's for drawer fronts and cabinet door. We shortened the length by about six inches, and replaced the three drawers on top with one large drawer so that it functions better for us.

Built from Plan(s)
Estimated Cost
$250
Estimated Time Investment
Weekend Project (10-20 Hours)
Finish Used
Top drawer- Dark Walnut, middle drawer- Red Oak, bottom drawer- Golden Oak, cabinet door- Special Walnut, frame- Bay Mist Valspar Signature satin finish
Recommended Skill Level
Intermediate

Comments

moira

Fri, 11/22/2013 - 08:20

Hi Andrea. I love your dresser. I wanted to ask you about staining the poplar. I have read that poplar does not stain well. Did you condition the wood first, or did you just wipe the stain on the bare wood?

Double Pedestal Farmhouse Table (small)

This table is adapted from the triple pedestal farmhouse table, so that it would fit in my dining room. I don't care as much for the curved accents in the origional plans, so I left them straight.  

Lesson learned when choosing lumber: kiln dried studs when buying 2x4's is slightly more expensive, but worth the extra cost. The cheap stuff is wet and difficult to work with, and can sometimes shrink after it dries over the course of a month. 

Built from Plan(s)
Estimated Cost
$100
Estimated Time Investment
Week Long Project (20 Hours or More)
Finish Used
I used early american penetrating stain by Minwax after I treated the wood with pre-stain. The pine absolutely benefits from the extra treatment and prevents uneven stain spots.

I applied the pre-stain with a cloth and gave it 30 minutes to soak in before applying the stain. The stain went on smoothly with a cloth and dried for a day before applying two coats of satin polyurethane with a fine bristle brush.
Recommended Skill Level
Beginner

Comments

Almost Farmhouse table

Submitted by bmccaskill on Thu, 05/03/2018 - 05:04

I choose to make the farm house table and try my hand at Shou Sugi Ban (Japanese wood burning) as a way of finishing the table. The burning left the wood with such a beautiful finish and the end grain was awesome, that I decided not to cover them the bread boards. Thank you for the plans Anna!!!!!

Estimated Cost
$120
Estimated Time Investment
Weekend Project (10-20 Hours)
Finish Used
Shou Sugi Ban and butcher board conditioning oil
Recommended Skill Level
Intermediate

Laundry room closet shelves

Submitted by tashmoore on Mon, 07/04/2011 - 10:05

Our house came with a laundry room (yeah! : ) ) that had a small closet with a basic wire shelf and a door. I thought "how silly" and I knew there had to be a better use of the space. Inspired by Ana's laundry dresser I decided some shelves for dirty laundry would be better then putting it on the floor and the other shelves are nice for other things.

It took me weeks to complete because I have small children and needed them to not be near the saw or paint and I needed time for the paint to dry. Actual time was not long though. Could probably be done in a weekend (allowing paint to dry).

Materials-
2 sheetes of plywood. I got 4 shelves from one sheet so I have a large leftover piece
primer
paint
braces
self tapping screws

I cut the shelves with a circular saw to fit exactly then primed and painted. I found the studs and marked them at 13, 26, 39, 52, and 65 inches and then put in braces and put in a shelf. I had to do one set of braces and a shelf at a time or the next shelf wouldn't fit since it was a tight fit.

The 12" between each shelf is perfect for laundry items and other things we store there. It has made the whole laundry room feel much bigger and more organized.

Built from Plan(s)
Finish Used
Shelves- Warm Mahogany C31-6 Olympic Premium from Lowe's. (looks brown online, much redder irl)
Wall-Spring Bud by Benjamin Moore, similar to the lighter C11 from Olympic. A very light yellow/green
Recommended Skill Level
Starter Project

Comments

Farmhouse Dog Bed

I reworked the dimensions for the Farmhouse Doll Bed to accommodate my 20 lb Japanese Chin, Delilah, and reinforced the bottom to support her weight with an additional center leg and 3/4" plywood.  I used 4" foam for the mattress and fleece fabric to make her "bed spread" and pillows.  She loves her new fancy bed!

Estimated Cost
$20 if you buy all supplies new...most or all of this you can do with scraps from other projects!
Estimated Time Investment
An Hour or Two (0-2 Hours)
Finish Used
Benjamin Moore Dove White in gloss
Recommended Skill Level
Beginner

TV Console

Submitted by Anonymous (not verified) on Wed, 04/27/2022 - 10:11

Used knotty pine, and finished with Varathane using stain color “Jacobean”. Modified from a bookcase plan.

Built from Plan(s)

Comments

DIY Kitchen Island

Submitted by pamreagan on Thu, 07/07/2011 - 08:39

or maybe I should say DDIFM?
Dad, do it for me?

I really needed a place to store my cake plates...
other than their current home on top of our fridge.
The rattling and shaking that went on every time we opened the freezer
was about to give me a heart attack.
I found this beautiful table that was constructed DIY
from plans on the anawhite website and fell in love.

So my dad got to building, and sanding, and building, and staining. Then he brought me this gorgeous table last weekend. I can't stop staring at it. I am obsessed with the wood grain. The slats. The perfect handmade storage solution. The contrast between the dark wood and my mostly white serving pieces. The height. The endless entertaining possibilities.
I promise the pictures do not do it justice...

Built from Plan(s)
Estimated Time Investment
Day Project (6-9 Hours)
Finish Used
stain, maybe polly later
Recommended Skill Level
Beginner

Comments

child's airplane swing

Thank you for the great idea!

I built this for my nephew's birthday.

I took the child's airplane swing and modified it to look like the character from Disney's Planes.

Built from Plan(s)
Estimated Cost
$40
Estimated Time Investment
Weekend Project (10-20 Hours)
Recommended Skill Level
Intermediate

Comments

JoanneS

Sun, 08/11/2013 - 05:55

This is soooo cute, your nephew is going to love it!! I love how you gave it a Disney character's face!

Jacob's Toy Box - 5 Year Old

Submitted by CTShearer on Sat, 09/05/2015 - 21:01

Our 5 year old's toy box. My son chose the colors and my awesome wife painted it. Letters are from Hobby Lobby and the lock on the left was actually my son's idea.

Built from Plan(s)
Estimated Cost
$40, letters $1 each
Estimated Time Investment
Afternoon Project (3-6 Hours)
Finish Used
Bear Race Car Red, we can't remember the blue's name, it was also Bear.
Recommended Skill Level
Starter Project

DIY Leaning Bathroom Shelf

Hi friends!

Jen Woodhouse from the House of Wood here. 

Today I'm going to share with you an amazing storage solution for those of you who are renters, are looking for a non-damaging way to add more space, or just in general want an affordable storage option. I'm walking you through the entire project so even if you're a beginner woodworker, this DIY Leaning Bathroom Shelf may be a great project for you! 

Be sure to tag me @jenwoodhouse if you share photos of your build on social media. I'd love to see it!

You can get all the details for this build on my website jenwoodhouse.com 

Estimated Time Investment
Afternoon Project (3-6 Hours)
Recommended Skill Level
Beginner

Greenhouse

Submitted by Zhang on Fri, 05/06/2022 - 22:55

Greenhouse is nominal 10X20. Internal square footage 192.6 sq-ft so no permit required (< 200 sq-ft). Modifications planned:

1. No metal on vertical walls since sun light is desired at all levels. Planting will be directly in the ground as well as in cedar boxes an on shelves.
2. Let in (mortised) 1x4 diagonal bracing to provide strength since no metal will be used on the verticals.
3. Two windows in the back wall (truss). Not sure yet where to source these - suggestions please? Might build them from scratch.
4. Dutch door on the front wall so that the top half of the door can be opened in combination with the back windows to allow air flow the length of the greenhouse.
5. Metal flashing on the exterior corners just for a nice finished look.
6. Has a 6 x 6 preassure treated (rated for ground contact) perimeter foundation. All other wood ,except the diagonal bracing is pressure treated rated for above ground. Finding 1 inch pressure treated wood seems impossible.
7. Ridge poles will be 2x6 so that sloping joist hangers can be used to attach the rafter legs to the ridge poles.
8. Will have a middle truss so that two 10 ft ridge poles can be used. I believe finding a nice straight 20' pressure treated 2 x 6 would be difficult or impossible.

Will add more photos as the build progresses.

Comments

Night Stand

this project it was nice and easy to do it I had make the farm house bed then I saw this night stand and I had to have it

Built from Plan(s)
Estimated Cost
$70
Estimated Time Investment
Afternoon Project (3-6 Hours)
Finish Used
multiple colors
Recommended Skill Level
Beginner

Comments

Coffee Table Side Table Combo

My 2 girls  like to play board games on the floor, instead of the dining table. Which I don’t mind. But as I get older, it’s getting less and less comfortable each time. That’s when I decided that we need a coffee table to make playing board games on the floor more comfortable for everyone concerned… no matter what their age is.

But I don’t like coffee tables taking up space in the middle of the room. I love having the room nice and open without furniture sitting in the middle of the floor getting in the way, when it’s not being used.

That’s when I decided that instead of a Coffee Table, what I needed was a Side Table, that could also be used as a coffee table when needed. Either for a board game, or for when you have visitors and you need a place for coffee cups and snacks.

I think it turned out great!

Estimated Time Investment
Day Project (6-9 Hours)
Finish Used
Walnut Stain plus Satin Varnish - both water based
Recommended Skill Level
Beginner

Simple Bed in Full Sized for our Daughter

Submitted by AmyRobert on Tue, 07/24/2018 - 17:34

We orignally planned to make the bunk set, but as we went along decided we didn't need a bunk full-time but wanted the extra sleeping space. Our solution was to make sure there was enough room under the side rails for a trundle. We also attached the side rails on with barrel nuts and bolts to make it easier to get upstairs and take apart for future moving. This was our first time making furniture. Over all, we are happy with the finished product!

Estimated Cost
Around $100 CDN. We had cedar on hand to make the posts. Not sure what that would cost to buy. We couldn't find suitable posts at local hardware or box stores.
Estimated Time Investment
Week Long Project (20 Hours or More)
Finish Used
Behr porch and floor paint in white
Recommended Skill Level
Intermediate

Potting bench

Submitted by Anonymous (not verified) on Sat, 05/14/2022 - 18:53

Thanks to Ana White for the inspiration, plans, and instructions to make our own Potters Bench. We had a little help from grandchildren for the final steps. We used cedar and made it 60” long rather than 48” just for a little more useable space. After purchasing the wood, we got busy and completed the whole project in a Saturday afternoon, with just the finish coat left to apply.

This was a very satisfying project to work on and complete. We will always look at it with pride and be able to say “we built that”!

Pat & Lawrence
Calgary, Alberta, Canada

Built from Plan(s)

Comments

Operation: Electric Panel

Submitted by loniwolfe on Wed, 07/13/2011 - 10:43

It's an awful eye sore builder's always seem to put in the most obvious places even when there's an attached garage, or a basement, or even a large closet somewhere.

Solution: Build a frame out of 2x2's around the panel. Build a smaller frame out of trim (or whatever you like as a picture frame). Attach the smaller frame to the frame on the wall with self closing hinges (ok, maybe paint everything first, lol) and insert a photo or painting of your choice.

Unfortunately you can't do anything about placement, hello 1 inch from my countertop and cabinets (also preventing me from building more upper cabinets on that wall)
But, it's better than staring at that ugly gray box :)

Estimated Cost
Less than $20
Estimated Time Investment
An Hour or Two (0-2 Hours)
Finish Used
white gloss paint (same paint as the window trim) But you could stain it to really look like a picture haning on the wall
Recommended Skill Level
Starter Project

Farmhouse bedside table in figured Walnut

Submitted by docspence1 on Sun, 09/13/2015 - 19:15

This farmhouse bedside table was made from figured black walnut and finished with Sutherland-Welles Tung oil.  I used a Kreg pocket hole jig for the joinery work

Built from Plan(s)
Estimated Cost
$350
Estimated Time Investment
Week Long Project (20 Hours or More)
Finish Used
Sutherland-Welles polymerized Tung oil
Recommended Skill Level
Intermediate

Wife's Kindergarten Classroom

Been a while since I had time to actually build anything worth posting about! My wife wanted some items for her Kindergarten classroom this year, so built several items, most inspired by the Farmhouse family.

Estimated Time Investment
Day Project (6-9 Hours)
Recommended Skill Level
Beginner

2x4 Sectional & Handmade cushions - LOVE!

Submitted by Anonymous (not verified) on Thu, 05/26/2022 - 21:46

Building this project and sewing the cushions was like a love letter to my family. I made them a year ago while on a high dose of Prednisone for my asthma and chronic pain (so helpful!). I finally felt capable of doing something that would bring our family together outside. A year later it continues to serve us well.

The instructions for the sectional were very well done. Super friendly and made me want to keep going! I used black analin dye to stain the wood. Swoon!

For making the cushions:
- I relied heavily on Sailrite's resourceful web site & tutorials for their thorough and detailed instructions on making cushions, cutting foam and sewing piping.
- Home Depot has the best pricing on foam.
- Used the brand 'Cushion Qwik' Silk Film (Amazon) to wrap the foam so they can withstand PNW rain.

Comments

Spa Bench

Submitted by canesa on Fri, 07/15/2011 - 00:36

This is the bench that got me started! My very first Ana White project and I love it! Oh, and I'm also addicted! I've come a long way since this build and most importantly, so have my tools!

Built from Plan(s)
Estimated Cost
$25
Estimated Time Investment
Afternoon Project (3-6 Hours)
Finish Used
I painted it with Sea Spray by Glidden and then I distressed it with Ralph Lauren Smoke glaze.
Recommended Skill Level
Starter Project