Sandbox with seats
This was my first project ever. I had a lot of fun and it didn't quite turn out right but next time it will be perfect.
I was browsing Etsy for a plate rack and my Hubby said that he could just make me one. So I knew just where to go for the plans! He added crown moulding to the top, bead board to the back and painted it to match our cabinets. I love it! I use it to display his late mother’s Currier and Ives Plate collection. Thanks Ana!
This was a great project to begin with. I used pocket holes instead of finishing nails. I also added another shelf and trim work.
thanks for the plans! Took me about three hours to build, sand and stain!
This was the first piece of furniture my husband built. He also built a matching sideboard/buffet table.
I built a modified version of the rustic modern 2x6 platform bed. I used 2x10s (instead of 2x6s) for the sides and feet to raise it up a little. I also added another 2x6 to the headboard to make it taller. If I had it to do over again, I'd probably use 1x for the headboard as it's incredibly heavy. The entire bed is immoveable without being deconstructed so it's going to be a challenge when I move. Overall, I'm really pleased with the result.
Our new place has a kitchen island, so we needed stools. We had been searching the internet for vintage drafting stools, but could not justify spending over $200 a stool. We stopped at the local Goodwill and found two stools for $7 a piece. To make it even better they were on sale. We spent under $10 for the two.
Check out my blog for more photos of the process.
Super easy. Under $50 .. wanted an industrial look to match new shelves, and could storage laundry baskets. Wanted a certain width / color. Added extra pieces to bottom shelves to create a cubble shelve.
Love the outcome!
Wed, 09/01/2021 - 11:44
This is amazing! Love the custom size and turned out beautiful!
Amazon had an awesome sale on hairpin legs and I couldn’t pass them up. We had a few unused pallets, so I just created this beautiful table console and side table. Happy creating y’all!
Modified the original plan to meet our needs of a laundry sorter. Had problems with the hinges so ditched them. I used dowels with a combination of a chamfer cut on the bottom of the door. Dado-ed the trim on the doors and slide the bead board panels in. The face frame is all held together with pocket hole screws, which I highly recommend because it eliminates nail holes and keeps the face frame square. This was my first wood working project, took me a little long to get it done. Thanks for looking.
Modified January 28
So here are some more pictures of my project. I don't really have any good pictures of the dowels. But what I can tell you is, I drilled holes through the sides of the face frame and the trim pieces and then measured where the holes would be in relation to the "drawer". I then drilled holes in the drawers at those measurements, I was careful to not go to deep. I think I went in half an inch. After that I started at one end and placed the dowels in, then put each drawer in. It wasn't easy but with a little patience it worked. The key is to wax the dowels so they will last longer as well. I also am including pictures of the top and bottom trim. On the top the original plans called for an overhang piece and I didn't like the way that looked. I ran the top board an inch long on each side and then wrapped it in quarter round trim. I did this because I plan on adding the Mimi Hutch Top. The bottom was built per the plan, but I ran into a problem with my bottom trim not being level and you could tell. So I raised the whole unit on 1 1/2 legs then placed it on a level surface and again wrapped it in a decorative trim. The key on both trims was a nice miter joint. Last picture I added was of my stoppers. I took scrap from the 1x2 trim and cut them to an inch and a half or two (can't really remember), then using the Kreg Jig drill bit drilled recessed holes. I then opened the doors until the side 45s were level then mounted the blocks on each side. I feel that it is better than a chain or string catch. Again thanks for looking and I hope I answered all of your questions.
Tue, 01/22/2013 - 11:29
Dowels! What a great idea! Would you mind sharing how you did it? Could you possibly add some pictures showing the dowels? You did a great job. It looks beautiful.
In reply to Dowels! What a great idea! by moosmani
Tue, 01/22/2013 - 20:11
Yes I will send you the info you requested, I'll try to get it out to you tomorrow or Thursday.
Wed, 02/15/2017 - 11:05
Can you send the plans to me?!?! I need this for my new home! [email protected]
Thu, 01/24/2013 - 09:27
I love what you have made! Could you post pictures of the top and the bottom trim? I'm very impressed that this is your first project!
Sat, 11/16/2013 - 18:23
I am a little confused. I love the three bin laundry sorter, but everyone is mentioning plans. I am not finding plans for it on the site. Also, what goes in to hold the clothes? There may be obvious answers, but I am not seeing them. I'd appreciate any help you could give.
Tue, 12/02/2014 - 02:58
I've been thinking of working up one very similar to this, also with 3 bins, but I didn't want to use chain either. Those stoppers will be ideal - do you put them on both sides or is one enough? Thanks for the share!
Sat, 01/24/2015 - 11:29
Hi-
Im not sure if you still have the plans to this awesome project, but if you do, would you be able to share them with me? Ive been looking to make something like this forever, but just couldnt find any help!
thanks,
karah
[email protected]
Wed, 02/25/2015 - 12:35
If you still have these plans, could you please send them to me? [email protected]
THANK YOU!
Wed, 02/25/2015 - 16:45
I am searching for the plans for the gray corner entertainment center. Does anyone still have them that could email it to me….
Tue, 01/19/2016 - 17:43
Hi there! If you still have the plans for this I would love to have them! Thanks a lot
Tue, 04/12/2016 - 18:51
I would love to have the plans for the laundry bin if they are still available, Thank you!
Wed, 02/15/2017 - 07:16
Can i also have the plans! This is perfect for what we want to do in our laundry room
Wed, 02/15/2017 - 11:24
Can you please send me the plans! [email protected]
Mon, 07/10/2017 - 04:19
I absolutely LOVE your laundry sorter!!!! You did a fabulous job and the TRIM, WOW amazing!!!! I've searched Ana's website and cant find the plans' could you please email me the plans to [email protected]. I started building my own furinture back in October 2016 and the reward is amazing... Keep up the good work.
Happy Building,
Lisa
Tue, 01/16/2018 - 19:55
Love this! Can you email the plans to [email protected] please?
Thank you
Tue, 01/16/2018 - 22:18
I'm too new at woodworking to be able to tackle this right now, but would love to download the plans for future. My most successful project so far is a pretty standard bookshelf. I got a free plan, with lots of guidelines and explanations, at https://tinyurl.com/ydeup8lo -- it came with a 440 page guide, "The Art of Woodworking" that has tips and techniques, and am plowing through that right now.
Wed, 02/28/2018 - 12:53
This is amazing. I am very new to woodworking. Could you send me the plans please? I would be most appreciatative
Wed, 03/11/2020 - 23:27
I would love to have the plans for the three bin laundry sorter to build for my laundry room. Are the plans available? Awesome work!
Thu, 07/16/2020 - 14:14
Looks amazing!! I want to build one just like that, can you please email me the plans, thanks!! [email protected]
Tue, 01/12/2021 - 06:26
This looks like something I can build. Would you please e-mail me the plans? The address is [email protected]
Greetings from Brazil. Thank you very much for the dollhouse bookcase plans. I did it to my goddaughter and she love it!
About This Project
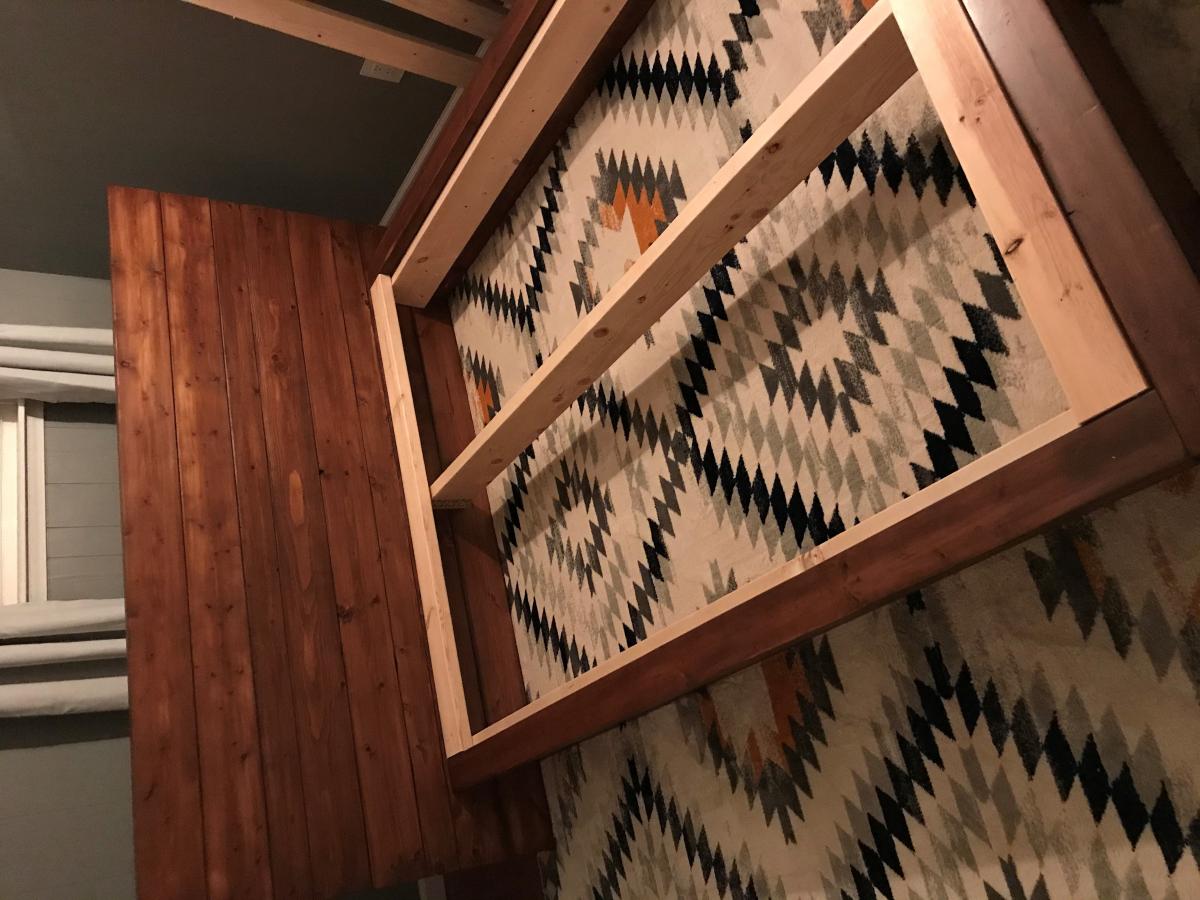
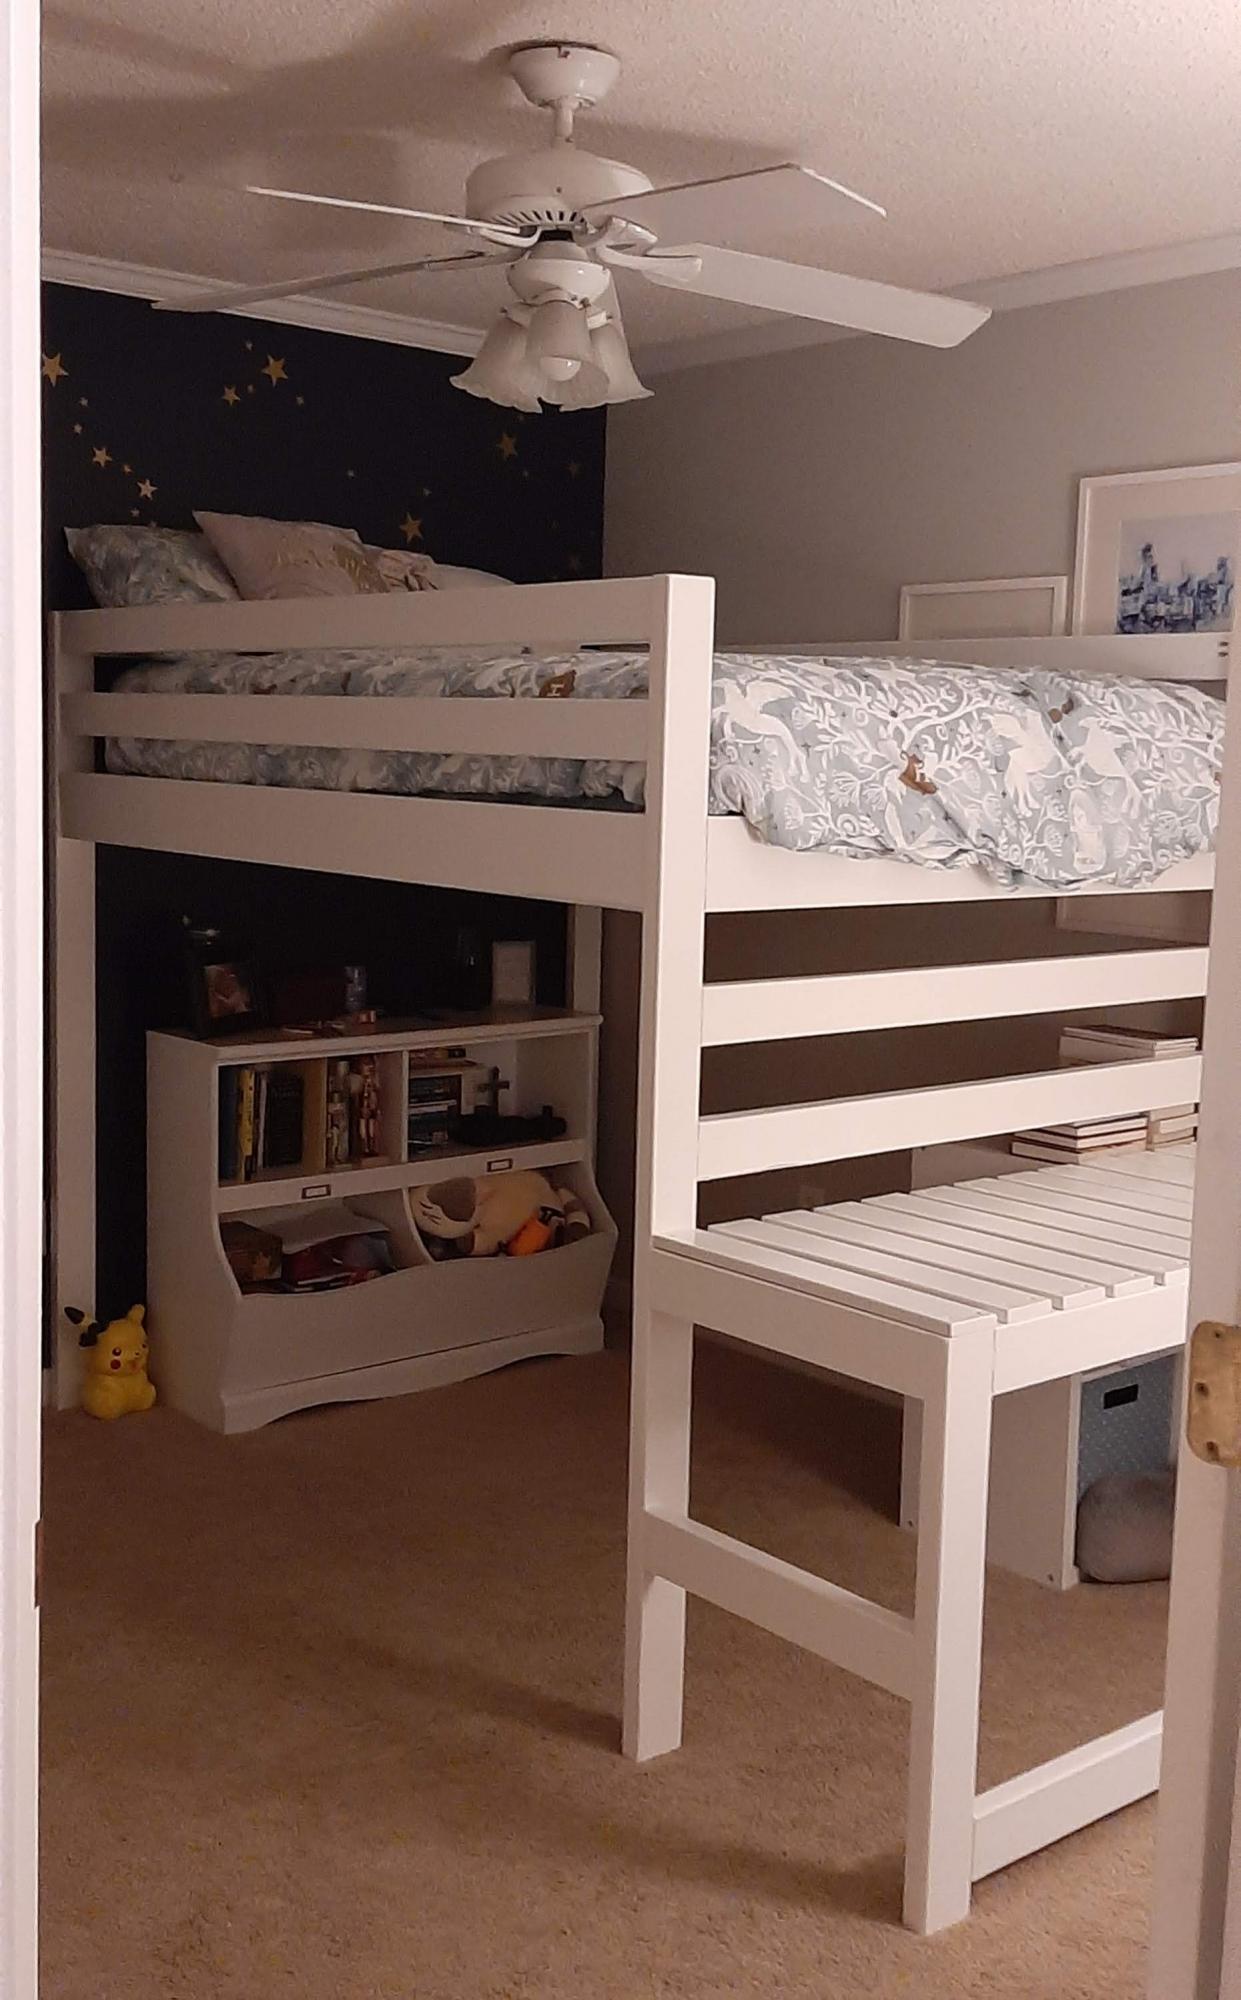
Our 10 year old daughter has a small room so we decided a loft bed would be ideal, as it would open up some needed floor space. However, spending $1000 on a loft bed from a store was inconceivable, so we were THRILLED to find this camp loft bed plan on Ana White!
My husband modified the plans to accommodate a full-size mattress, added two inches of height to the underside, and removed the stairs.
Cost of wood was just under $300 as prices are high in our area at the moment. Still far less than any store would offer a bed of this size and configuration, so still a win!
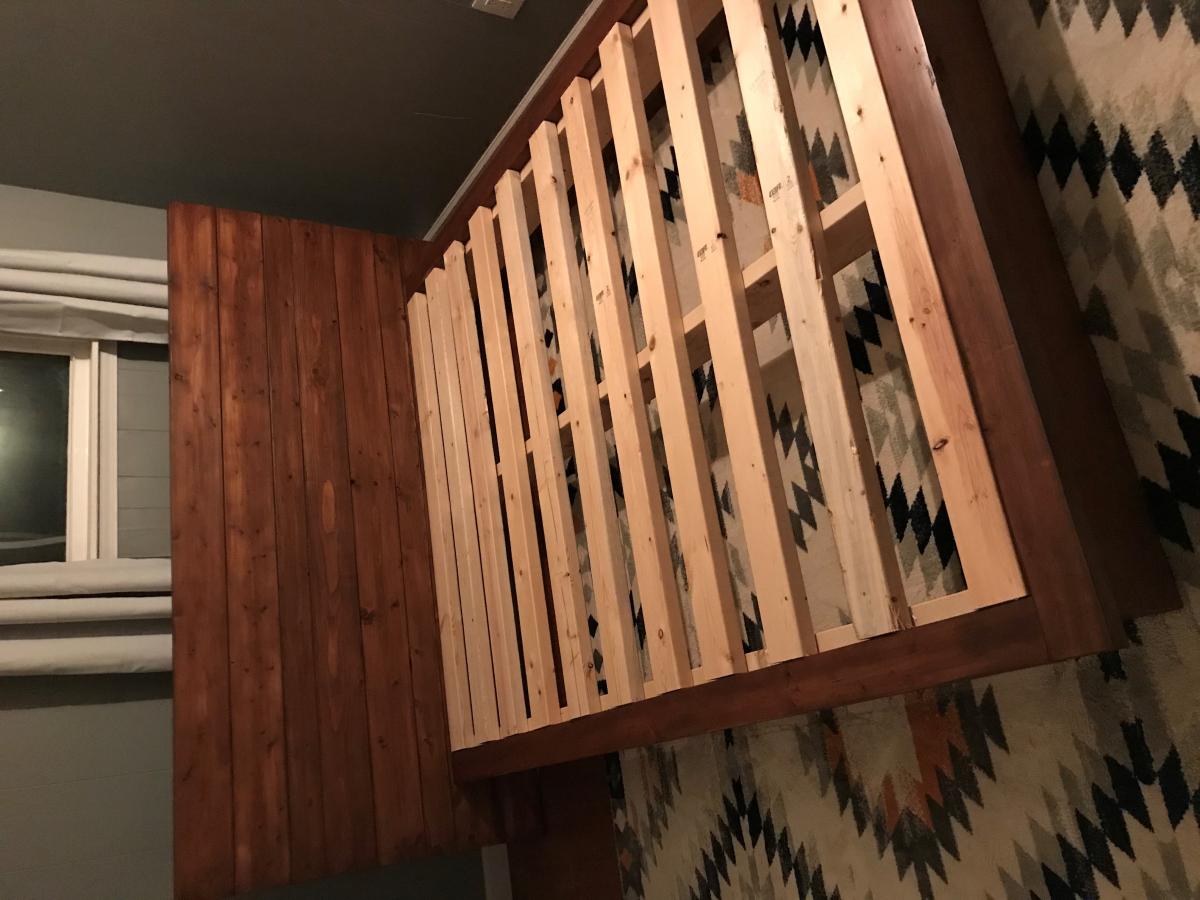
The build took two full weekends. He had to be able to disassemble the piece in the garage in order to take it upstairs to reassemble in her room.
It was painted white with Kilz Interior Sealer and Stain locker. It was a HIT and now our son wants one too! :) Great project that affords her SO much more floor space for her books and eventually a chair underneath.
Fri, 12/11/2020 - 05:48
Would it be possible to share the modifications I would love to make this for my daughter. The twin size is too small. Thank you in advance
Mon, 07/11/2022 - 23:46
How did you do the slats? I am trying to make an oversized loft bed and nervous about the supports for under the mattress
Great Project! a ton of fun!
Thank you for the inspiration! My daughter and I made a similar. We did a how to video here.
quick build, turned out solid
We have a pretty small place and not a lot of room for our sewing/crafting stuff. We would leave our machines by our piano, on the floor, every time we brought them down stairs. We needed a better way to store them and this was the perfect solution, and it added a few more seats in our little family room. I build the bench with a one-piece top and added a removable tray for the cords.
This is the prototype build for the Book Box plan. It was a lot of fun coming up with the decoration ideas, and the build was quick and super-easy. I plan on making more of these! I used scrap wood and left over finishes for this build.
Mon, 11/24/2014 - 12:10
What a great use of scrap wood! Looking good! Thanks for sharing.
Tue, 11/25/2014 - 14:11
Thanks Ana! I had a lot of fun with this project. Your Handmade Holidays collection inspired me! Happy Thanksgiving to you and your family! :) Joanne
I loved the rustic X console, but it was a bit too big for our space. We decided to go with the Henry Media Console, but I had my dad add "X"s to each end. We took breaks and worked in between our busy schedules, but this could totally be a day project.