Community Brag Posts

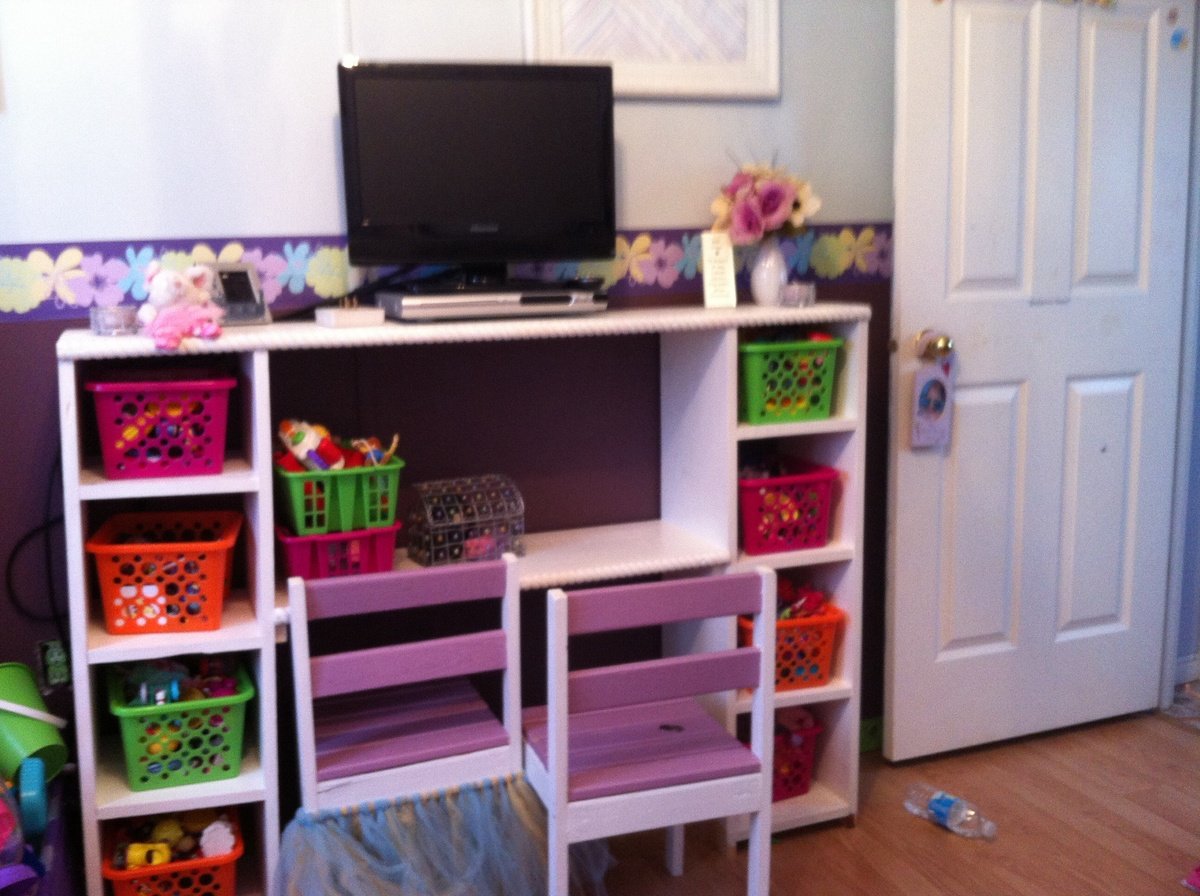
Modular Office Wide Bookcase Base

Submitted by solomonson on Sat, 07/07/2012 - 20:29

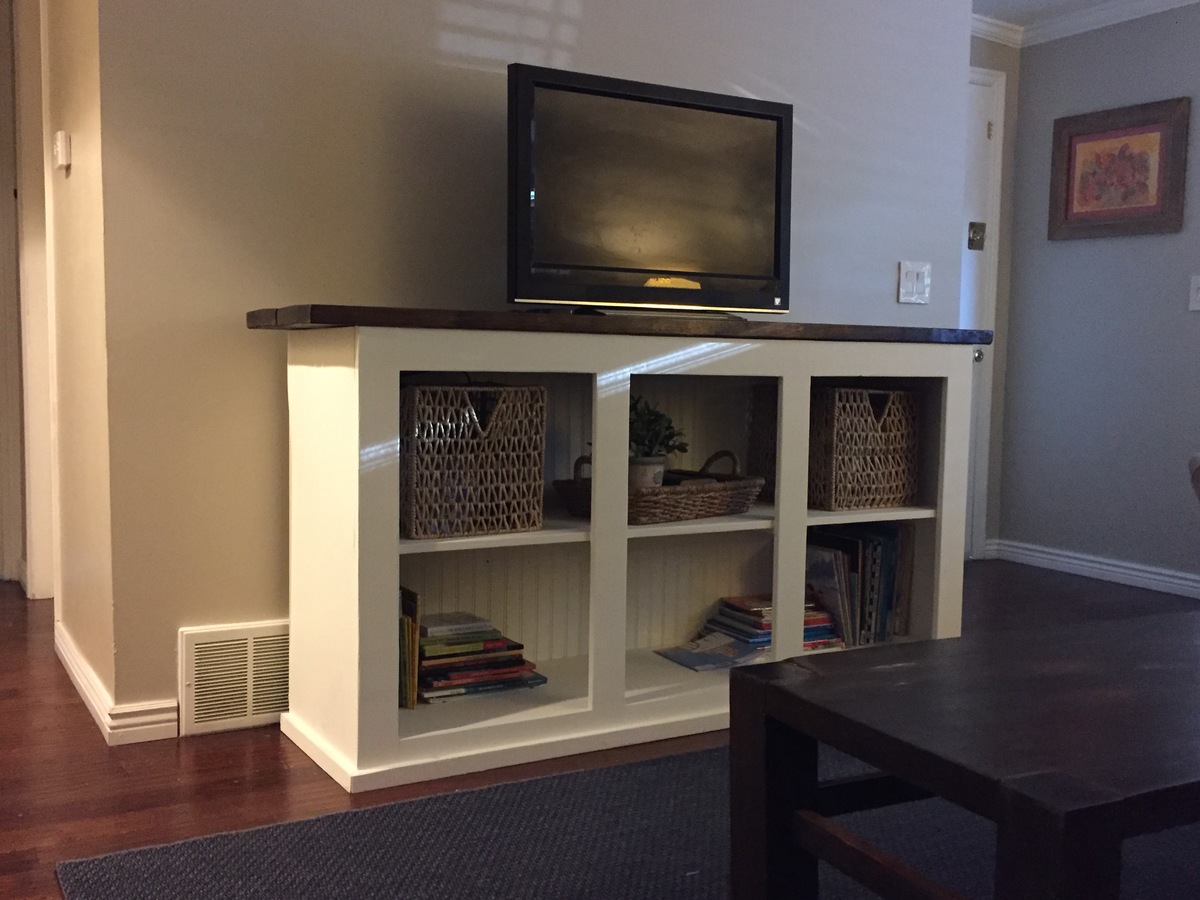
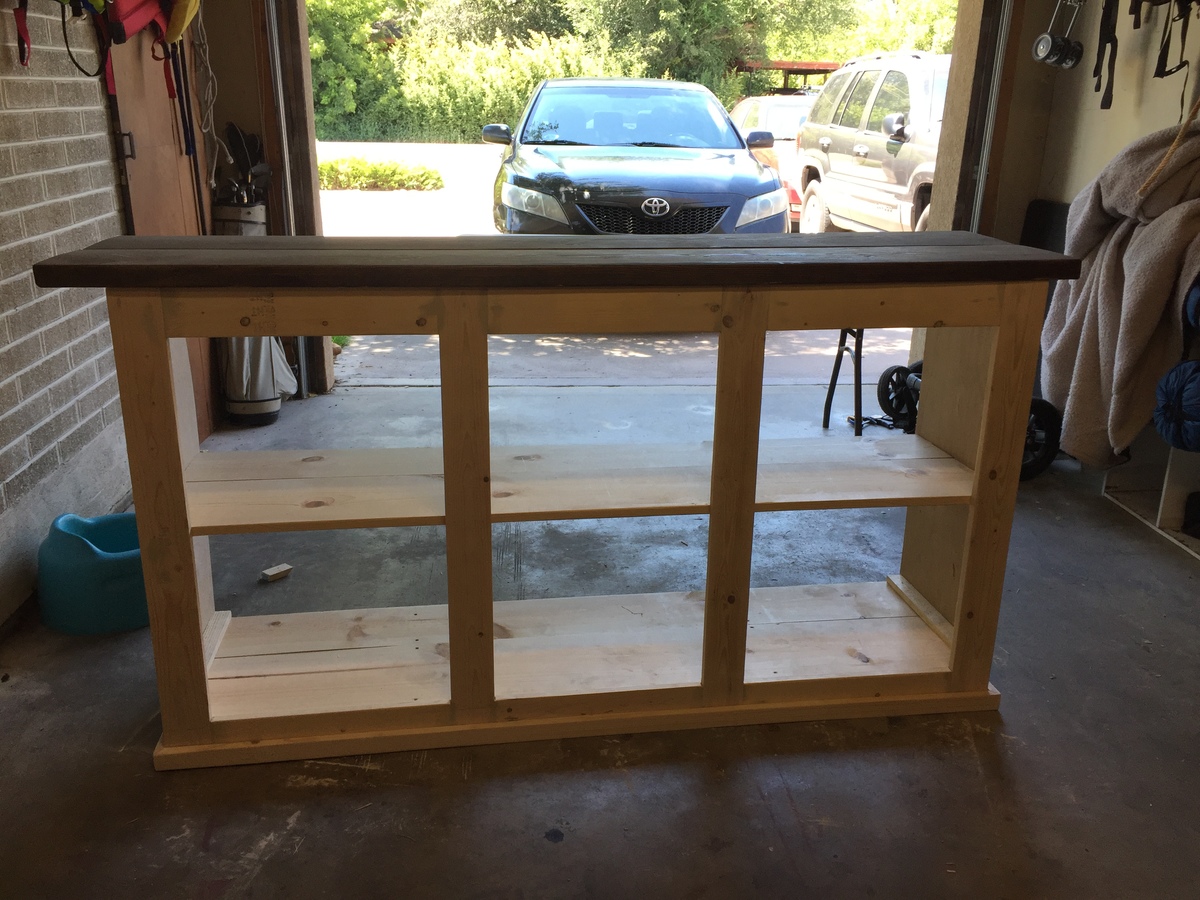
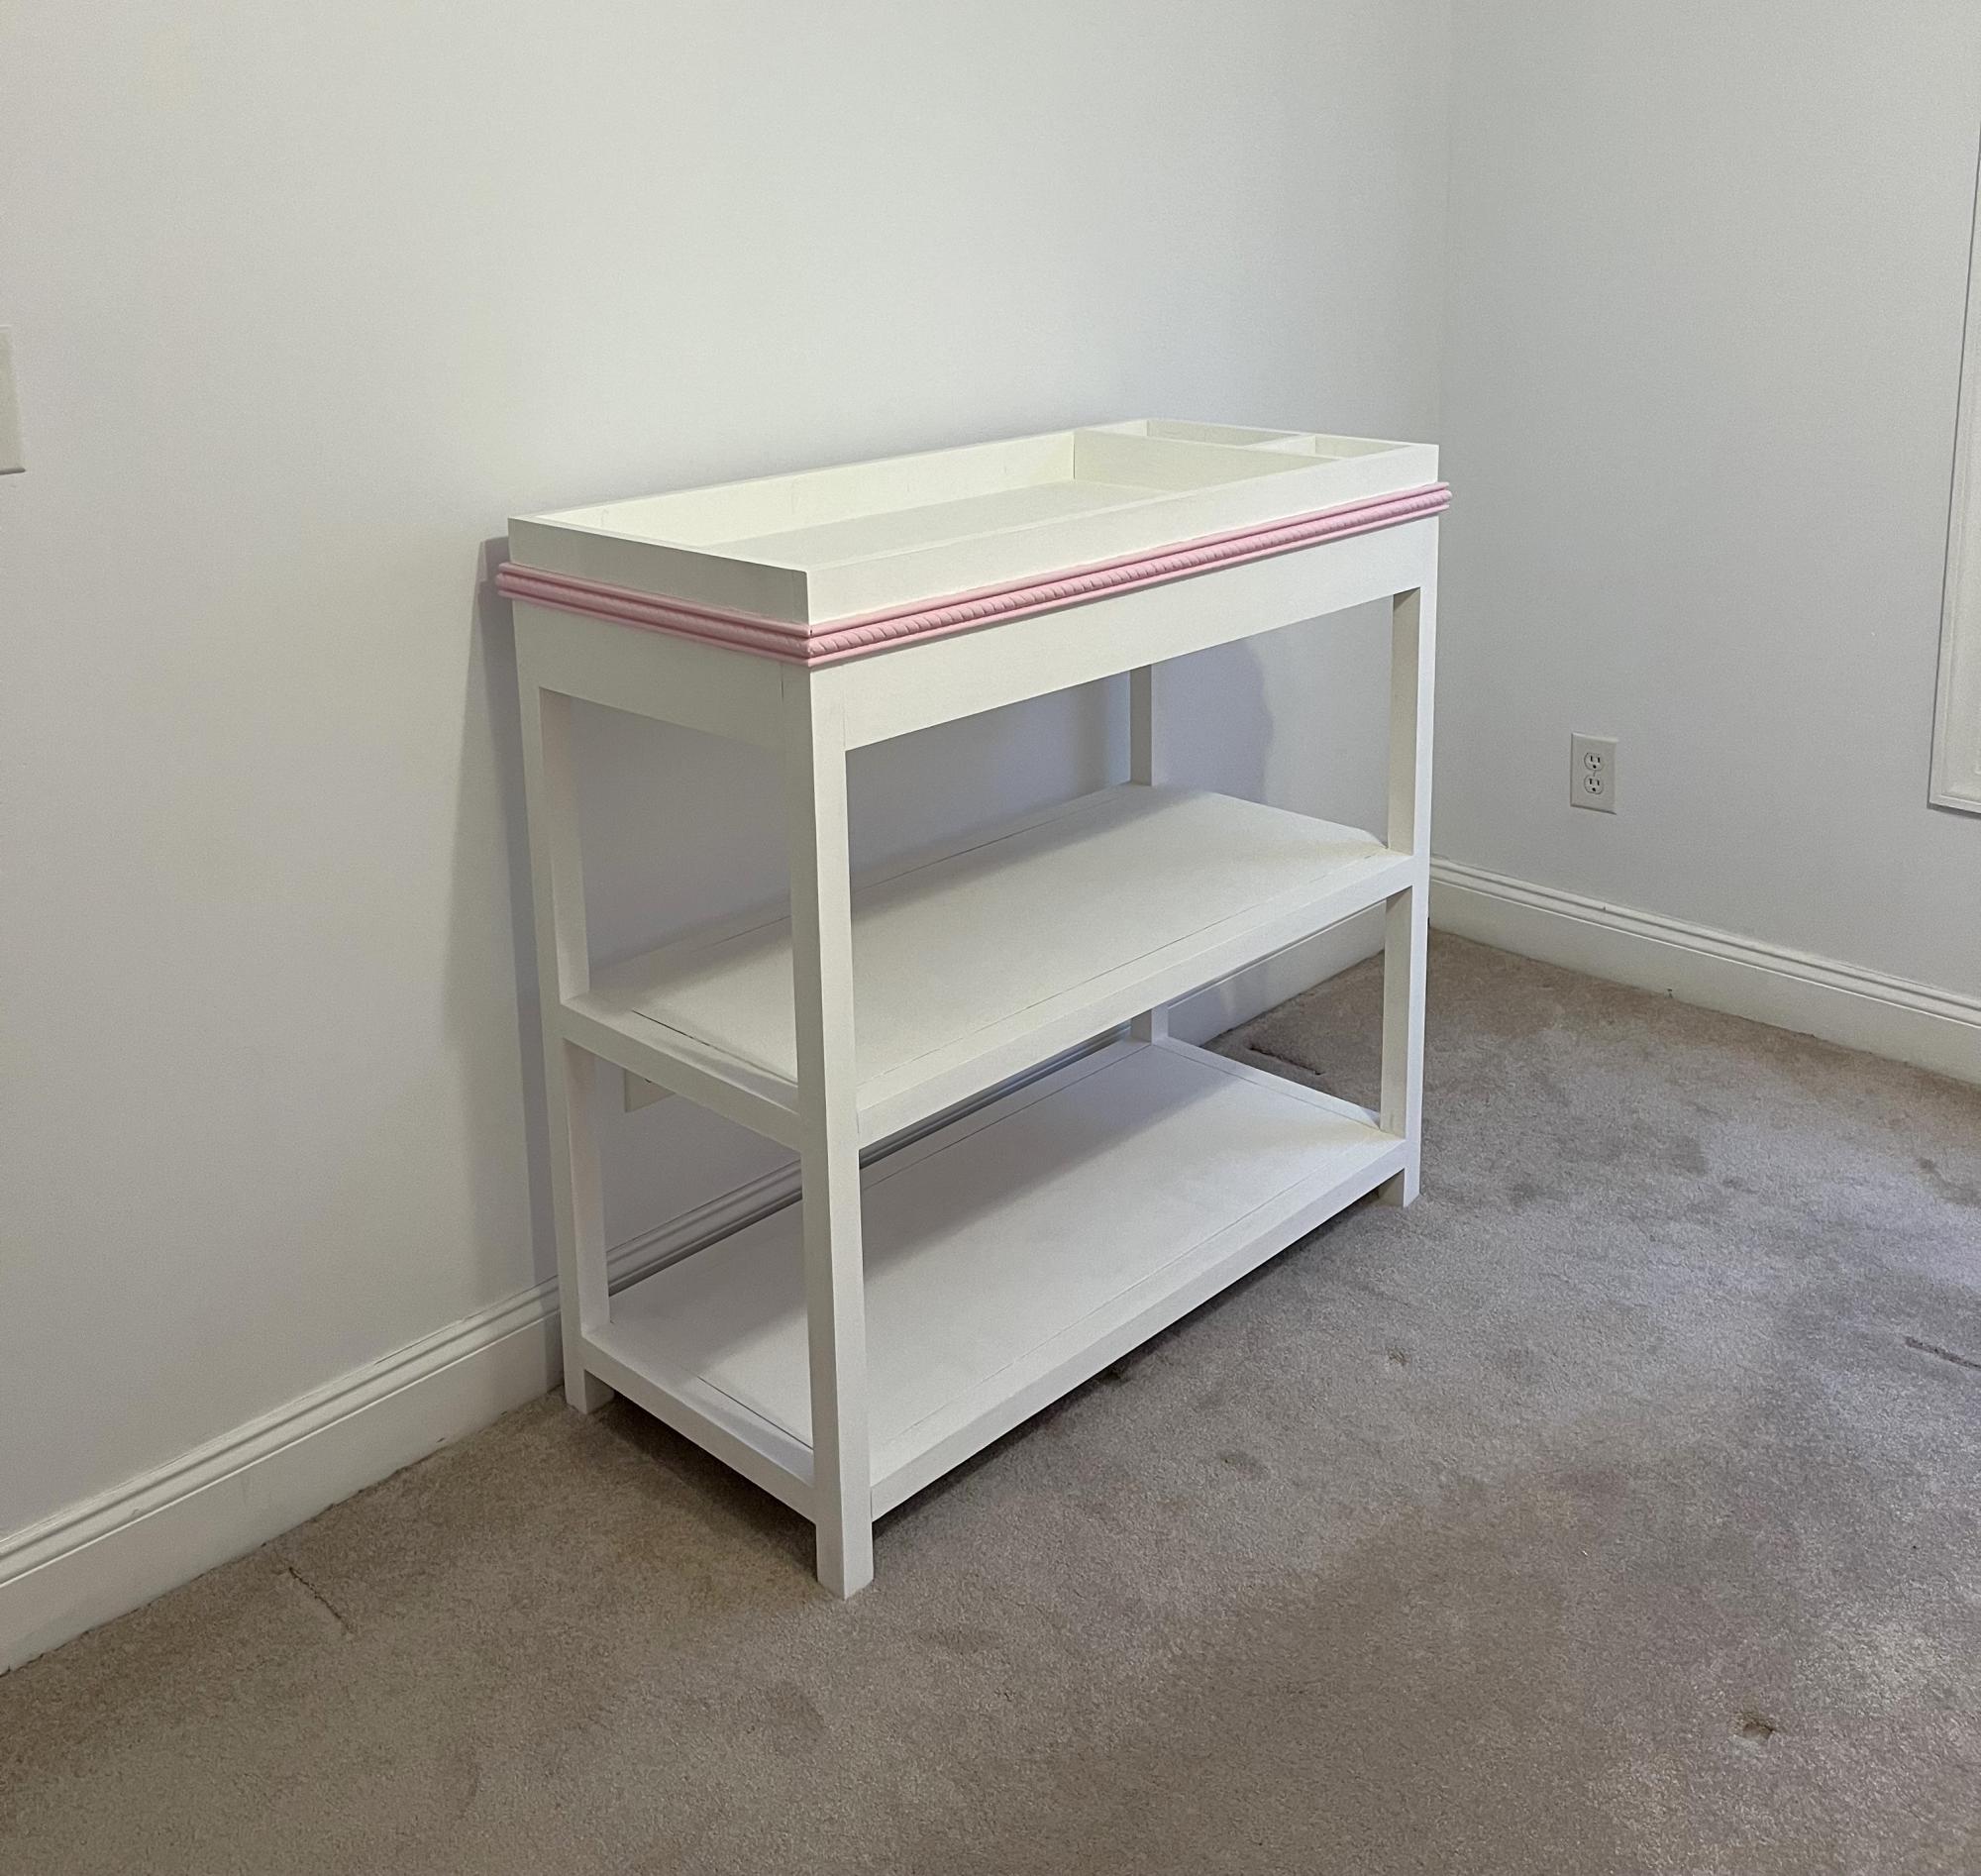
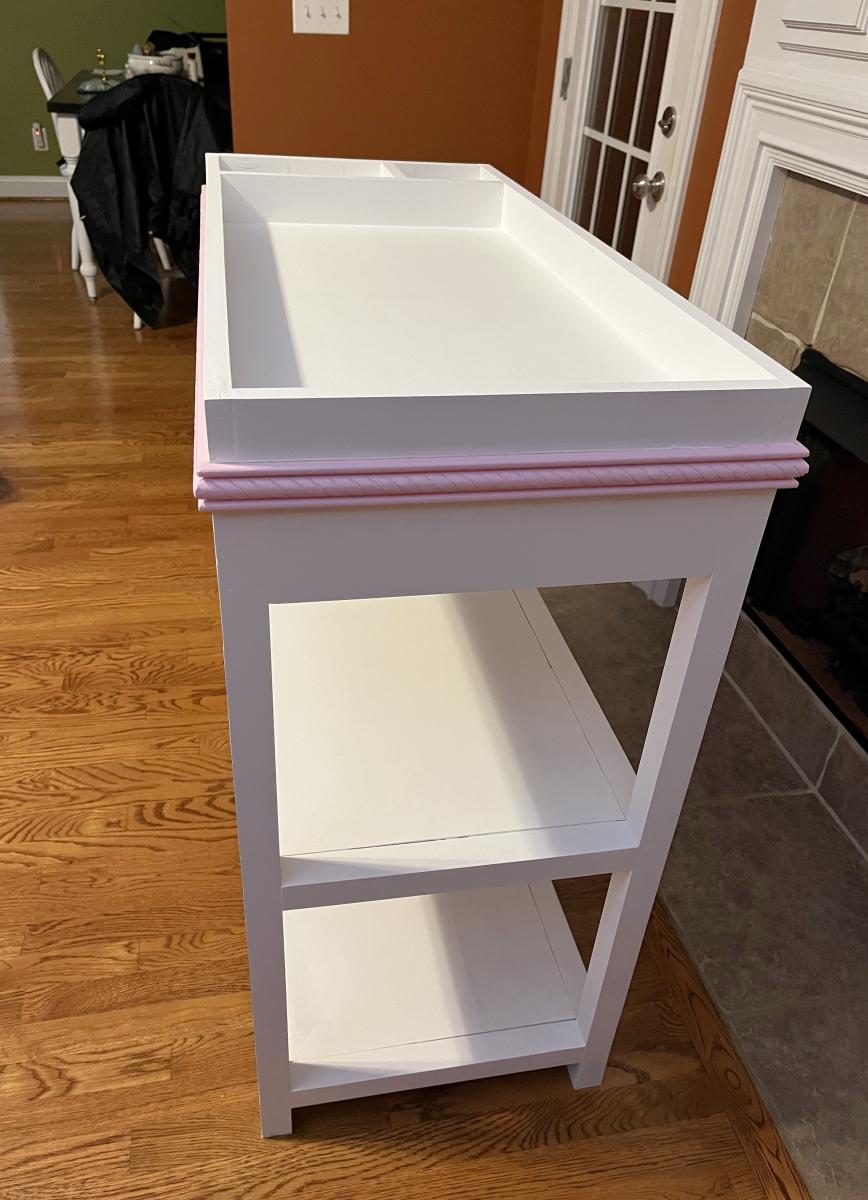
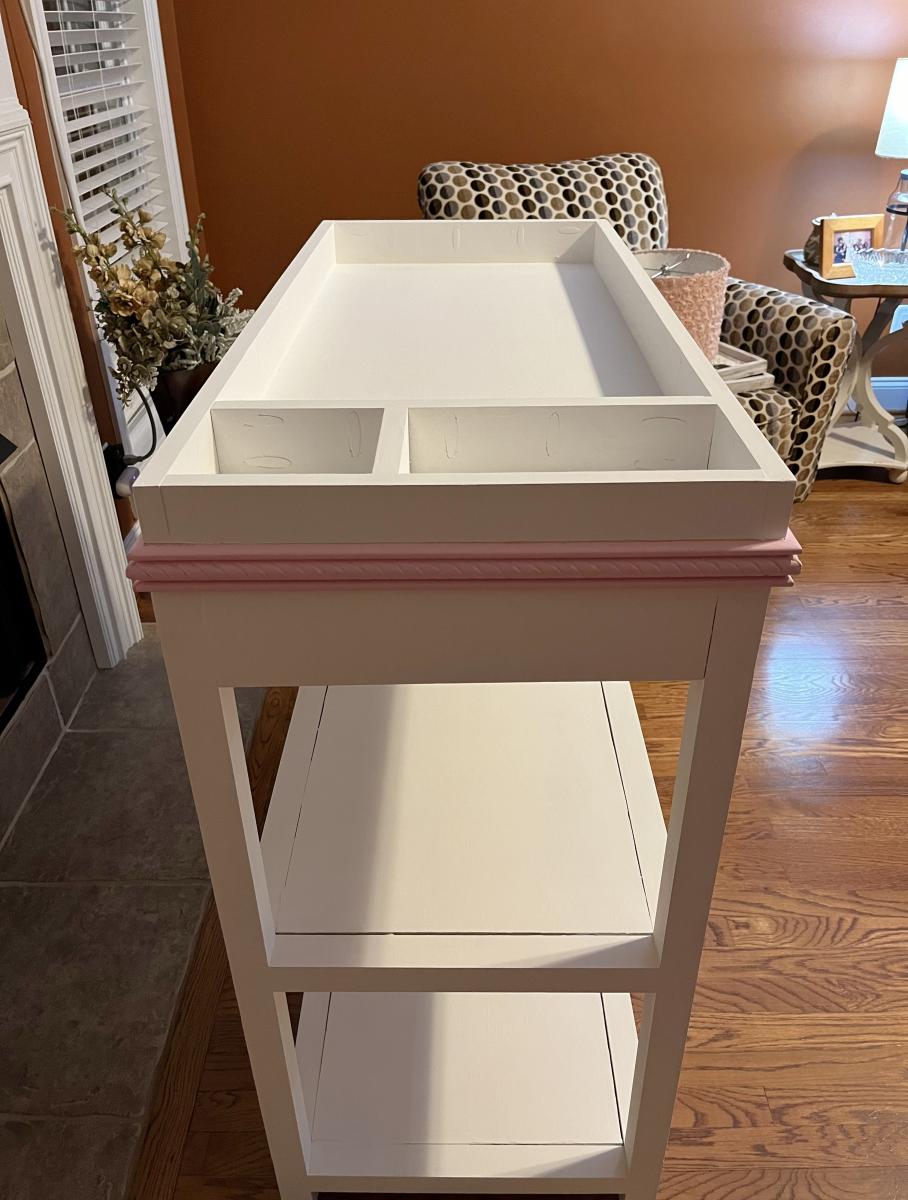
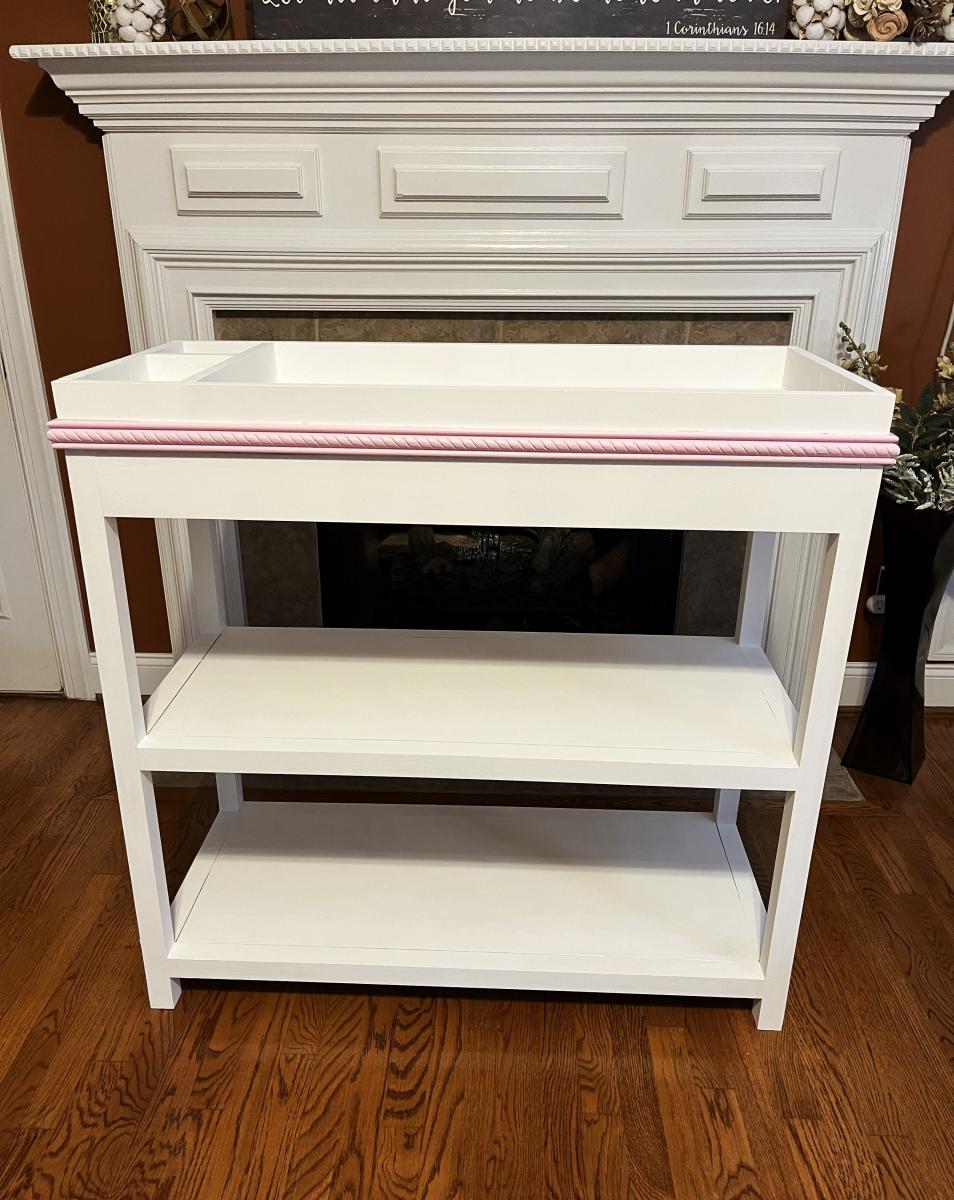
The toy room needed some attractive storage for the books and puzzles instead of the floor! Enter this plan. I shortened the shelves to 36" and fastened the shelves to 1x2 stretchers that I fastened to the inside of the sides. I hid them by nailing a face frame to it made of 1x2s. I used beadboard for the back, which I painted before attaching it.
I had a hiccup when I forgot to use my square and had to backtrack some, which made this project longer than I anticipated.

Estimated Time Investment
Weekend Project (10-20 Hours)
Finish Used
Used some conglomerate for the back of lots of little samples of oops paint I had lying around. I used Valspar white everywhere else and Minwax spray-on poly.
Recommended Skill Level
Beginner

Tv stand from Grandy sliding door console

Submitted by Anonymous (not verified) on Mon, 07/25/2016 - 20:52

Built this at the request of my pregnant wife, got to crunch time with baby and sliding doors will have to wait until the craziness of the baby dies down. Prioritiezed and built the changing table first.   Cut it down from 4 openings to 3 due to size of our wall.  

Built from Plan(s)
Estimated Cost
$160
Estimated Time Investment
Weekend Project (10-20 Hours)
Recommended Skill Level
Intermediate

Comments

Modern Farmhouse Bed

Submitted by Anonymous (not verified) on Sun, 05/17/2020 - 16:52

Made this in a weekend, took us about 12 hours total. Loved how it came out and used the recommended stain. I ended up doing three coats on the headboard. My boyfriend and I used douglas fir, definitely came out very sturdy. We did have to make some adjustments and it was a bit of a learning process with the pocket holes. The plans should be a little more detailed but if you take your time the pieces come out so great!

Built from Plan(s)
Estimated Cost
$200
Estimated Time Investment
Weekend Project (10-20 Hours)
Finish Used
We used varanthane weathered wood accelerator in gray. I sanded everything done with 320 grit and stained the wood twice. The boards for the headboard needed a third coat. I also used a rag and rubbed additional stain on any errors that looked thin and to remove excess brush marks.
Recommended Skill Level
Intermediate

Comments

$10 Ledges

Submitted by sraper2 on Mon, 07/09/2012 - 19:49

These are super simple and easy to build. The stained ones are in my dining room and the blue ones are in my craft room. Not sure how much they cost since I used scrap wood.

Estimated Time Investment
An Hour or Two (0-2 Hours)
Recommended Skill Level
Starter Project

Di Bello Family

We needed a table for the breakfast nook in our new home that we will be moving to in June. We were so excited about this table that we built it ahead of time and sold our other dining room table. We love this table! Thank you so much for the awesome plans.

Estimated Time Investment
Week Long Project (20 Hours or More)
Recommended Skill Level
Beginner

Comments

Smaller Version finished in colonial

Submitted by Anonymous (not verified) on Thu, 07/28/2016 - 09:21

I modified the table to be a little smaller for a space. it came out beautifully. Love this build as it allows for a very large yet stable table that allows for seating on the ends as well. 


Side note i found notching out the x brace and using only two solid pieces to a be a more effective way of creating both a solid joint as well as well as a smoother looking joint. 

Built from Plan(s)
Estimated Time Investment
Weekend Project (10-20 Hours)
Finish Used
Minwax Colonial
Recommended Skill Level
Intermediate

Truss table

Submitted by Anonymous (not verified) on Wed, 05/20/2020 - 01:46

My dad and I built this table together just the 2 of us last Tuesday

Built from Plan(s)

Comments

Washer and Dryer Pedestal

Submitted by blkbltwmn on Thu, 07/12/2012 - 06:38

This is my first build. I found the plans for it almost perfect but made a couple of adjustments.

FYI- if you do the 5 crossboards on both platforms, you will need to buy 3 more 2 x 4's to get the cuts you need for everything.

I also added posts in the center to ensure that there is no future sagging.

To get it into my closet sized laundry room that is right off of my kitchen, we painted it before assembling it inside the house. We attached the posts to the bottom and installed that first, then added the top. The clearance in my space would not allow it to be completely assembled before we put it in.

The extra posts don't allow for 3 baskets, but it does still allow for two. I'm also thinking of doing some pull out drawers or something in the bottom.

We painted with metallic silver spray paint and it worked great.

Estimated Time Investment
Afternoon Project (3-6 Hours)
Finish Used
Metallic Silver Spray Paint
Recommended Skill Level
Starter Project

Comments

blkbltwmn

Thu, 07/12/2012 - 06:39

I just noticed that it looks like it is not centered. FYI, that is because my house was built in the 1970's and a lot of things are not centered, including my laundry room. LOL

Toddler vanity turned toddler sized media center

I found the plan for a small vanity and fell in love! I really wanted to build it for my 3 year old. With her room being small and all of her toys having separate spaces for each her room was getting crowded! So with some thinking I came up with a plan to double the whole plan and got myself a media center that took up less space than everything else while still looking pretty! My little girl loves that she can store all her toys, still have her desk and be able to watch movies from her bed.

Built from Plan(s)
Estimated Cost
$30
Estimated Time Investment
Afternoon Project (3-6 Hours)
Finish Used
Used a white paint that is durable and can easily be wiped down. Not sure of the name.
Recommended Skill Level
Beginner

Adirondack stool /end table

Submitted by ranlim on Mon, 08/01/2016 - 16:05

Cheap and easy. My cuts weren't the best on this one so it has a slight wobble. I plan to have match the finish of my adirondack chair

Estimated Cost
$5
Estimated Time Investment
Afternoon Project (3-6 Hours)
Recommended Skill Level
Beginner

Sturdy Work Bench

I built this using the sturdy workbench plans. I hesitate to call it a brag, as it is my first project, and I used some 2x4s from Home Depot. Premium... Yeah right!

Despite my crooked cuts and warped wood, the sum of the parts is actually pretty sturdy!

I did modify it a bit. As I'm 6'2", I made the legs approximately 35" and used 2 3/4" Sheets of 24x48 MDF as the top. This gave me a total height of about 36 1/2" of height, which is pretty comfortable.

I would have preferred more workspace, but I'm limited to a portion of my one car garage, so 24x48 will have to do!

Finally, though this was definitely an hour or two worth of project, it took my about 2 weeks to complete, working in increments as small as 15 minutes, sue to having a 4 month old son!

Now to decide what to build next!

Estimated Cost
About $50 worth of wood, if you already have the tools.
Estimated Time Investment
An Hour or Two (0-2 Hours)
Recommended Skill Level
Starter Project

Comments

Computer Desk

This is my first furniture project I wanted to replace my cheap computer desk that was falling apart. The build was pretty simple, the only problem was finding a good project board and finding a good stain. Tried several different stains an a piece of scrap before deciding on red elm gel stain. Project took longer than I anticipated but most of that time was in getting the finish right, the build part was pretty quick.

Estimated Cost
$175
Estimated Time Investment
Week Long Project (20 Hours or More)
Finish Used
mini wax red elm gel stain
clear matte poly spray
almond color paint
Recommended Skill Level
Beginner

Comments

CSaintD

Mon, 05/05/2014 - 08:29

Well done. I feel your pain in looking for good boards - it takes me about an hour at Lowes just to find 4 or 5 good boards. Wish I had a lumber yard close by.
I like your finish on the top. I will try that one next time.

Not your typical garage shelf

Submitted by lookitsash on Wed, 08/03/2016 - 11:08

After undertaking many home improvement projects over the past few years, my garage was getting a little out of control. I had too many bulky tools taking up space, making it hard to get work done efficiently. I decided to build a storage shelf, but looking for more of a challenge, I wanted to add sliding shelves to provide easy access to items in the rear.  Check out my blog post at JustMeasuringUp.com for all the details.  I documented the project from beginning to end with lots of pics.


http://www.justmeasuringup.com/blog/creating-more-garage-storage


The shelves are 3 ft deep and stores a lot of stuff now.  When I need something at the back, rather than wading through the stuff at the front, I just grab a handle and slide the whole shelf forward.  So if you're looking to improve upon the pretty standard garage shelf design out there, check out mine!

Estimated Cost
Under $200 (even had extra wood to build a standard wall mounted shelf for additional storage)
Estimated Time Investment
Day Project (6-9 Hours)
Finish Used
No finish, I like the natural look of wood
Recommended Skill Level
Beginner

Rebecca Media Center Console

Submitted by shastacoke on Wed, 07/18/2012 - 10:18

I have been needing an entertainment center for so long. When this plan popped up, my husband and I went into action. We designed this piece a little differently though. For one, the plan is too narrow for us and our tv-so our console is wider but shorter-to save on costs. Another note-we needed a place to put our computer so it can charge without our twin boys getting ahold of the cord. You can see that feature on the lower left hand corner. I also used a picture in a very well known catalog and I used the picture to get the stain just right. This might just be my favorite piece so far. I will be adding the bookcases and hutch to this. I am also in the process of adding 2 doors to this console. They needed to be stained before I could add them though.

Estimated Cost
$150
Estimated Time Investment
Weekend Project (10-20 Hours)
Finish Used
I used Minwax Ebony Stain. Then I used 240 Grit sandpaper and sanded just a tiny bit-it seemed to give the piece a more matted look and it exposed the grain more. After that, I used Martha Stewart's Copper Penny Metallic Glaze. I brushed the glaze over the parts where I wanted to make it look aged. I'm not a fan of painting hard woods or you could just paint it, then wax it and then use a copper paint. I wanted to be able to see the wood grain through the stain-so I used stain and did it this way. After the glaze dried, I used 1 coat of semi-gloss polyurethane.
Recommended Skill Level
Intermediate

Comments

shastacoke

Wed, 07/18/2012 - 10:22

I also wanted to note-we will be adding bead board behind the middle part of this console. We are leaving the other 2 backs exposed because I don't have a router to notch out holes in bead board. :)

redhead_61

Fri, 10/19/2012 - 12:14

Yours looks so great. Glad that our plan could inspire something for your needs. Looks great. I love the design.

shastacoke

Fri, 10/19/2012 - 12:43

Thank you!! I saw the stain at EA and since I don't like to paint furniture I stained it black and took some copper paint from Martha Stewart and 'aged' it. I love the outcome much better than painting and waxing.

Dog Crate

Submitted by mdgervais on Thu, 05/08/2014 - 08:44

Recently I added a family member and his name is Myles. He needed a home so before we picked him up I built him one of these for him to grow into. The one pictured is actually the second one I built that was built for a friend. I followed the original instructions. I used a couple different bits of material. My table top is 1x4's and for the sides i used bead-board. I painted it an off white with eggshell finish. The table top is stained with Minwax Ebony stain. I love how it turned out and most of all my puppy enjoys it as well.

I left the bottom open. The dimensions in the plans make it so you can set the crate right on top of a crate replacement trey series 700 from PetCo. This makes it very easily to clean by just lifting the crate off the trey and hosing it off and also prevents the wood from absorbing any liquids.

Built from Plan(s)
Estimated Cost
$125
Estimated Time Investment
Day Project (6-9 Hours)
Recommended Skill Level
Intermediate

Old pallet wood, wine holders

Submitted by Anonymous (not verified) on Mon, 08/08/2016 - 16:39

I had to make the back legs longer, since I used all pallet planks for this, threw me off a bit. And I made the arms an extra 5" long to notch in wine glass holders. If I do it again, I'll angle the back a bit more, but as is its pretty great. Guess who picked pink?

Estimated Cost
Free pallet planks and screws, $27 gallon of paint.
Estimated Time Investment
Weekend Project (10-20 Hours)
Finish Used
Satin latex outdoor paint.
Recommended Skill Level
Beginner

Farmhouse Potting Bench

Submitted by jhunch on Mon, 05/25/2020 - 10:58

We had a pile of old wood and an old fence in the backyard that I wanted to repurpose. I had a spot along my house in the back yard that was empty, that really needed something. Thanks to Ana's "Farmhouse Potting Bench" tutorial and plans, we got inspired. We changed the measurements to make sure we could incorporate an old stained glass window that I've had, just waiting for a purpose. We also changed the measurements to accommodate the different sizes of wood that we had on hand. Our project took a much longer time, because of all the measurement changes and wrapping our head around how to mount the window, but it was worth it. We're really happy with how it turned out.

Built from Plan(s)
Estimated Cost
very little. All material on hand
Estimated Time Investment
Day Project (6-9 Hours)
Finish Used
special walnut
Recommended Skill Level
Intermediate
Back