Community Brag Posts
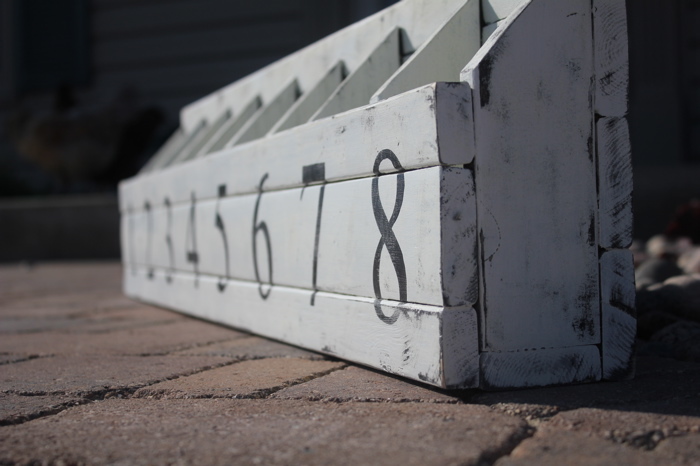
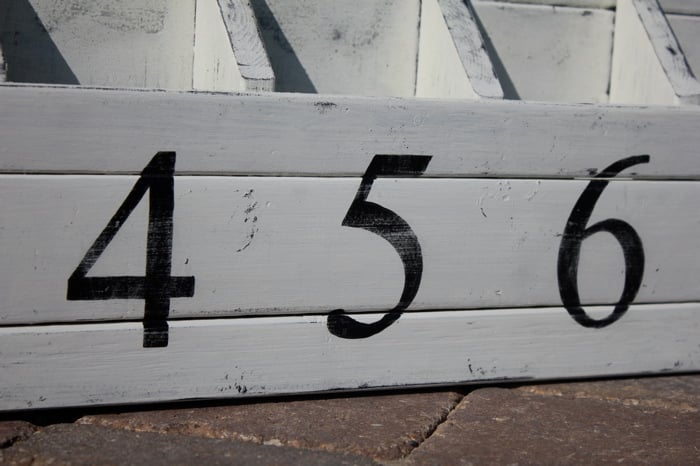
Numbered Cubbies on the Wall
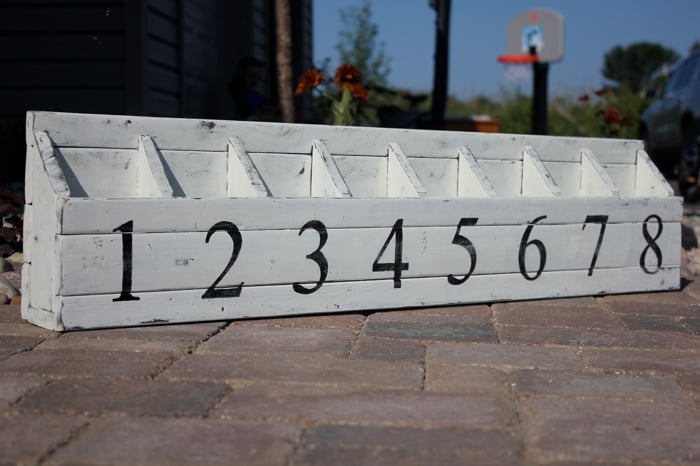
This is not my first Ana project, but it is my very first brag post! :) I am thrilled with the way this turned out.
Built from Plan(s)
Estimated Cost
Less than $10
Estimated Time Investment
An Hour or Two (0-2 Hours)
Finish Used
I used black satin spray paint for the first coat and then brushed on two coats of satin China White. After the paint was dry I traced on the numbers, filled them in with a black satin paint pen and sanded with 150 paper to show wear.
Recommended Skill Level
Beginner
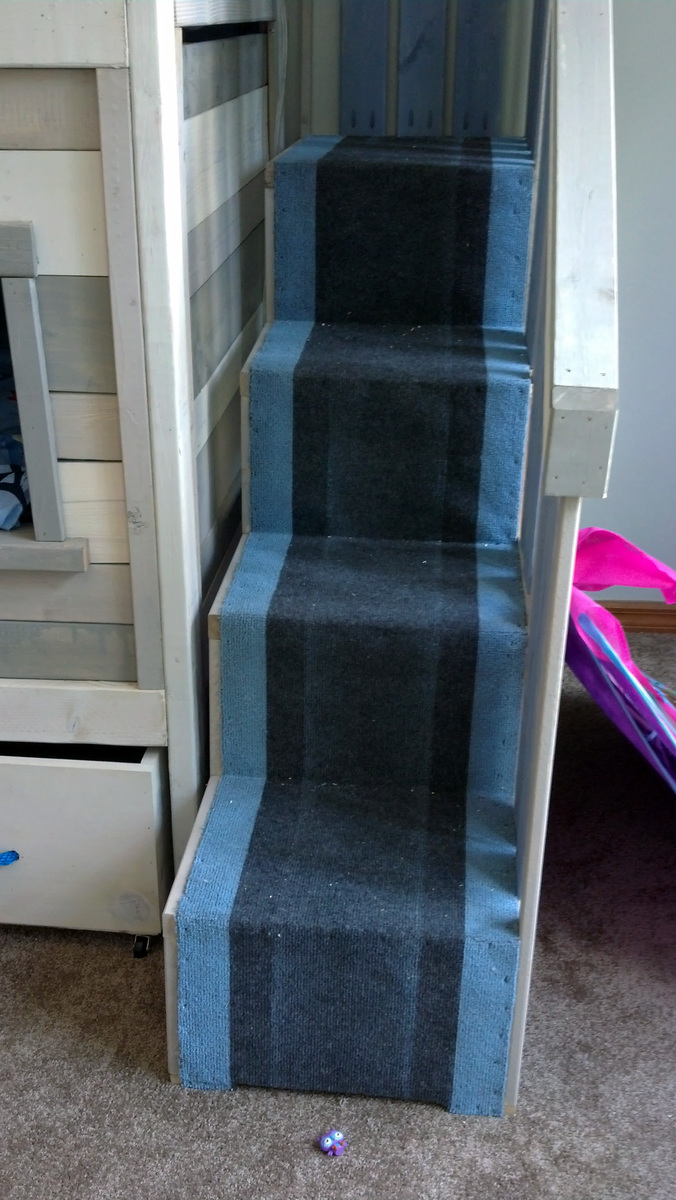
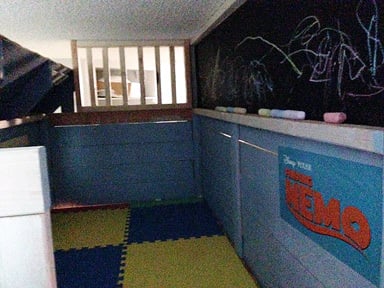
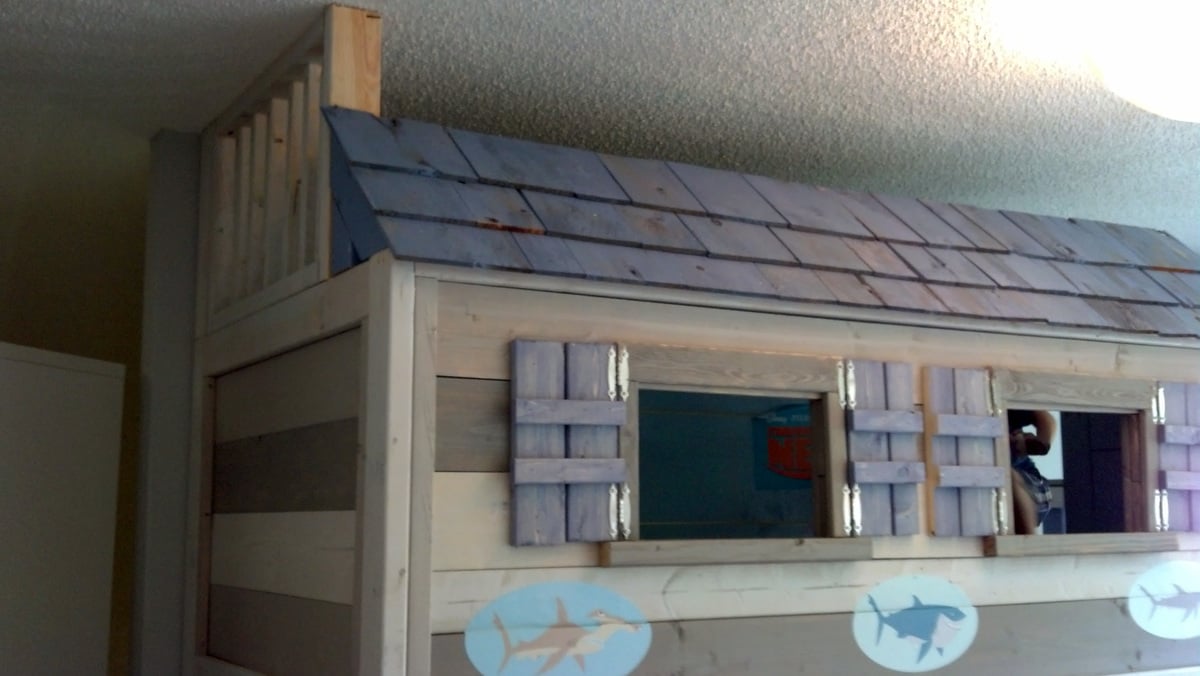
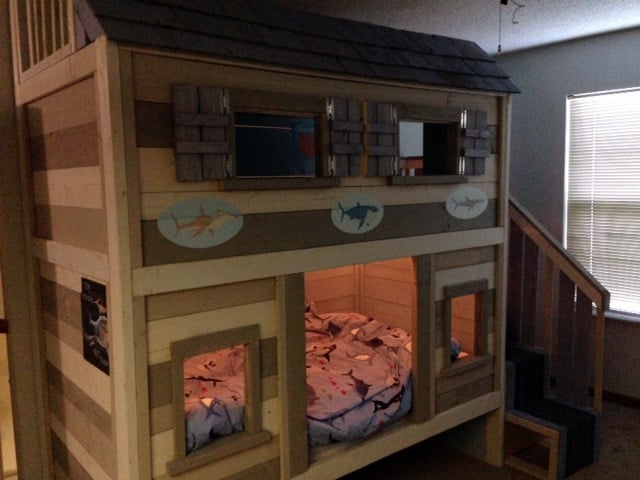
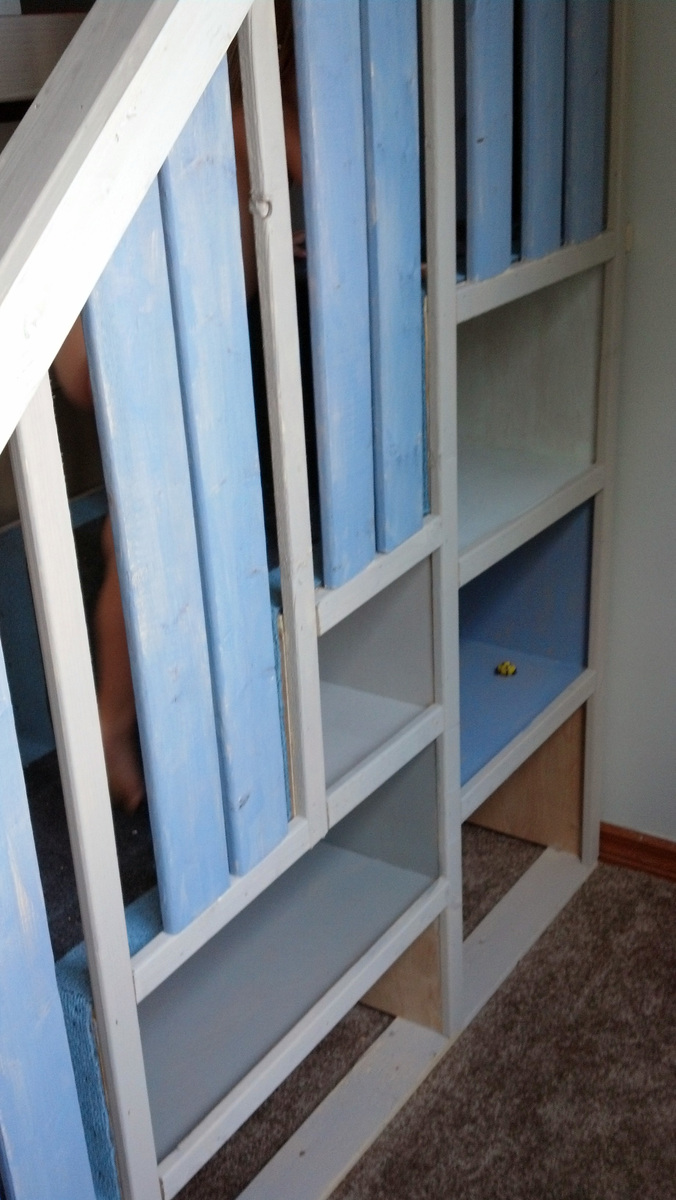
Lex's Shark Shack
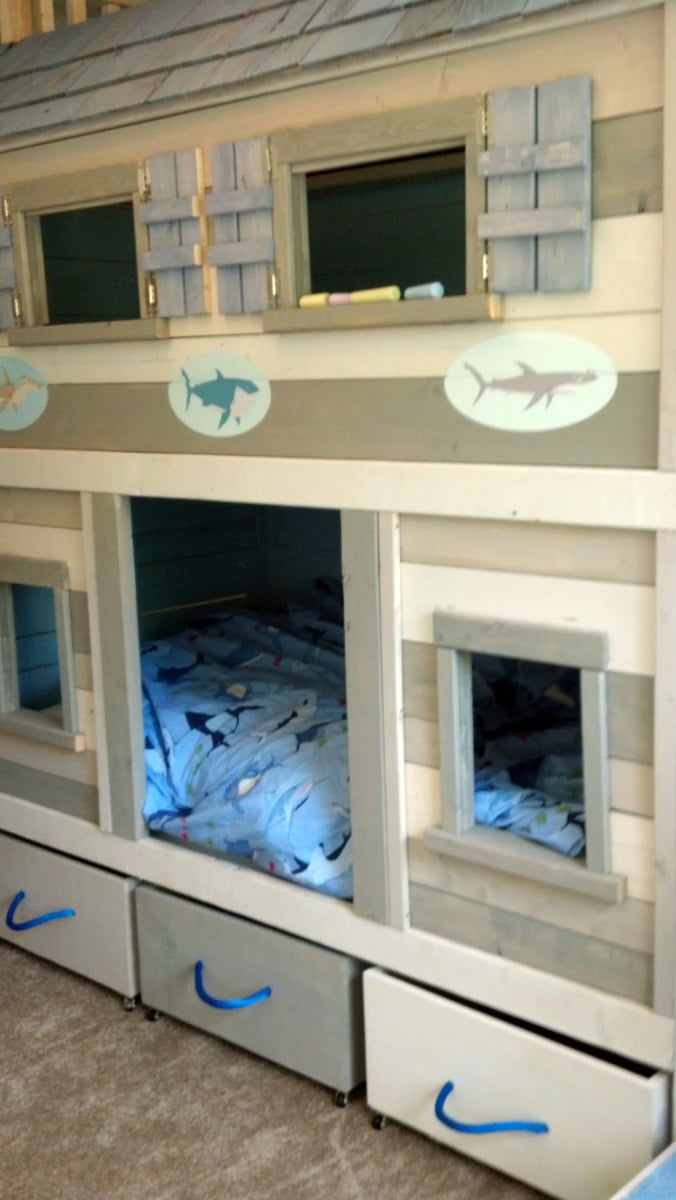
We to make a Loft turn into a closed room for my grandson. We used the Sweet Pea Plan and made it a boy bed. We enclosed the back of the bed. the top bunk is a play area for him and my grand daughter. He loves it. Thanks for the Website.
Finish Used
White Wash. 50% Paint 50% Water
Recommended Skill Level
Intermediate
Comments

Mon, 09/09/2013 - 13:32
Wonderful!
This is an awesome project! I love how you took the plan and customized it to be a boy's space. And the shark motif - how cute is that!?! Love it, great job!
Mon, 09/09/2013 - 21:35
Amazing!!
I absolutely love this! You did a great job with converting it to a boys bed. I was actually going to do the same thing to this exact plan when we move in a few months! Very well done. Love your taste.
Thanks for the inspiration!!

Tue, 09/10/2013 - 21:23
I love this! The play area up
I love this! The play area up top with the chalkboard wall is so cool! I love the stain you used on all the boards too. Impresssive!
Dan's Salsa Console
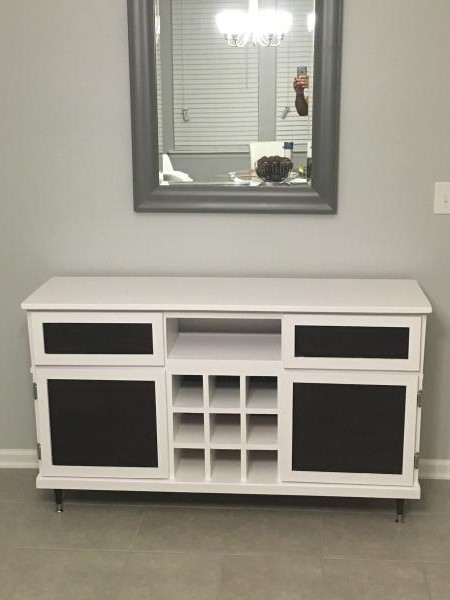
This was my first big project. Came out out pretty well.
Built from Plan(s)
Estimated Cost
$200
Estimated Time Investment
Week Long Project (20 Hours or More)
Finish Used
Espresso wood stain and satin polyurethane. Universal white eggshell paint and primer
Recommended Skill Level
Intermediate
Comments
My Christmas present!

I was looking for a console table just like this one. A friend of mine told me to check out your website and I found this one. I was so excited. My husband bought a miter saw and I got my table. Lol. Love it.
Built from Plan(s)
Estimated Time Investment
Afternoon Project (3-6 Hours)
Finish Used
Weathered Gray and Kona stain.
Recommended Skill Level
Intermediate
"Pearce's Library"
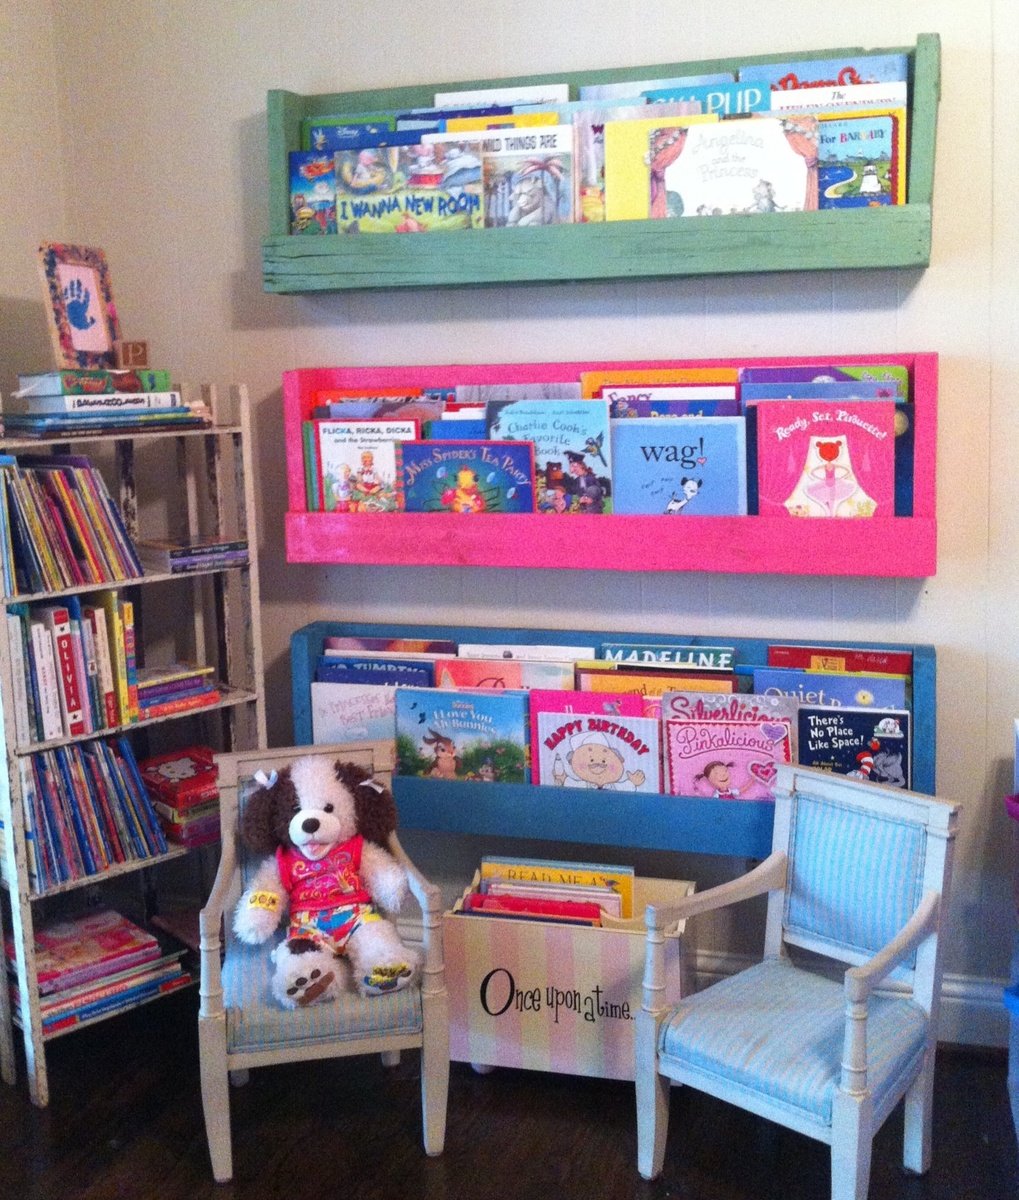
I wanted 3 shelves so I took apart the entire pallet (44 x 44) Sanded and spray painted two coats. Only advice is next time I will make sure the pallet is in better condition. Less time sanding. My 4 year old daughter loves her new reading area!
Estimated Time Investment
Day Project (6-9 Hours)
Recommended Skill Level
Starter Project
Table + farmhouse benches
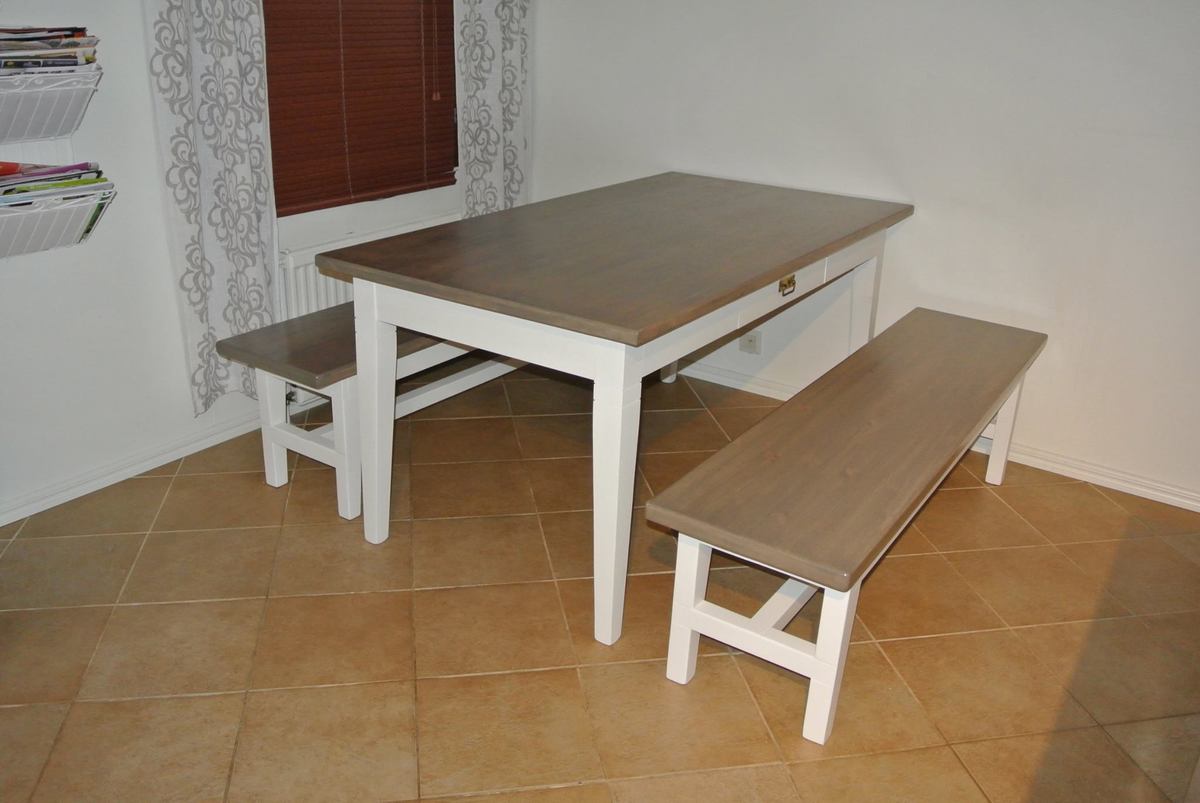
I've fixed up an old table and borrowed Ana's plans for farmhouse bench. I've modified them, and this is the outcome.

Built from Plan(s)
Estimated Cost
about 300-400€ (in Finland)
Estimated Time Investment
Week Long Project (20 Hours or More)
Finish Used
Legs "Kitchen white"
Tops "Raindeer"
Tops "Raindeer"
Recommended Skill Level
Beginner
Country Table - picnic
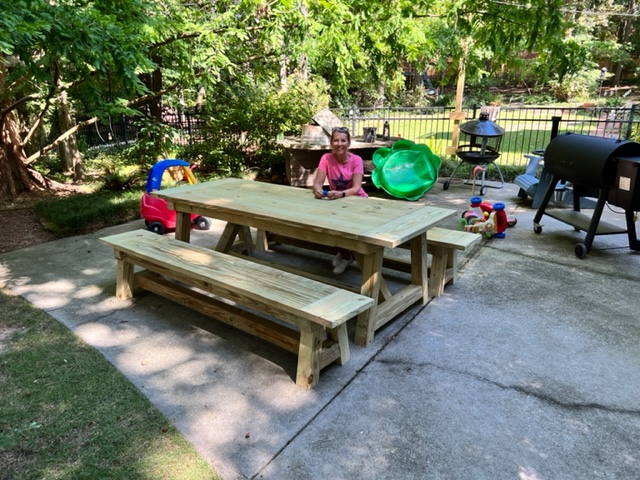
Outdoor - pressure treated; added 1 foot to length.
Built from Plan(s)
Comments
Entry way console table
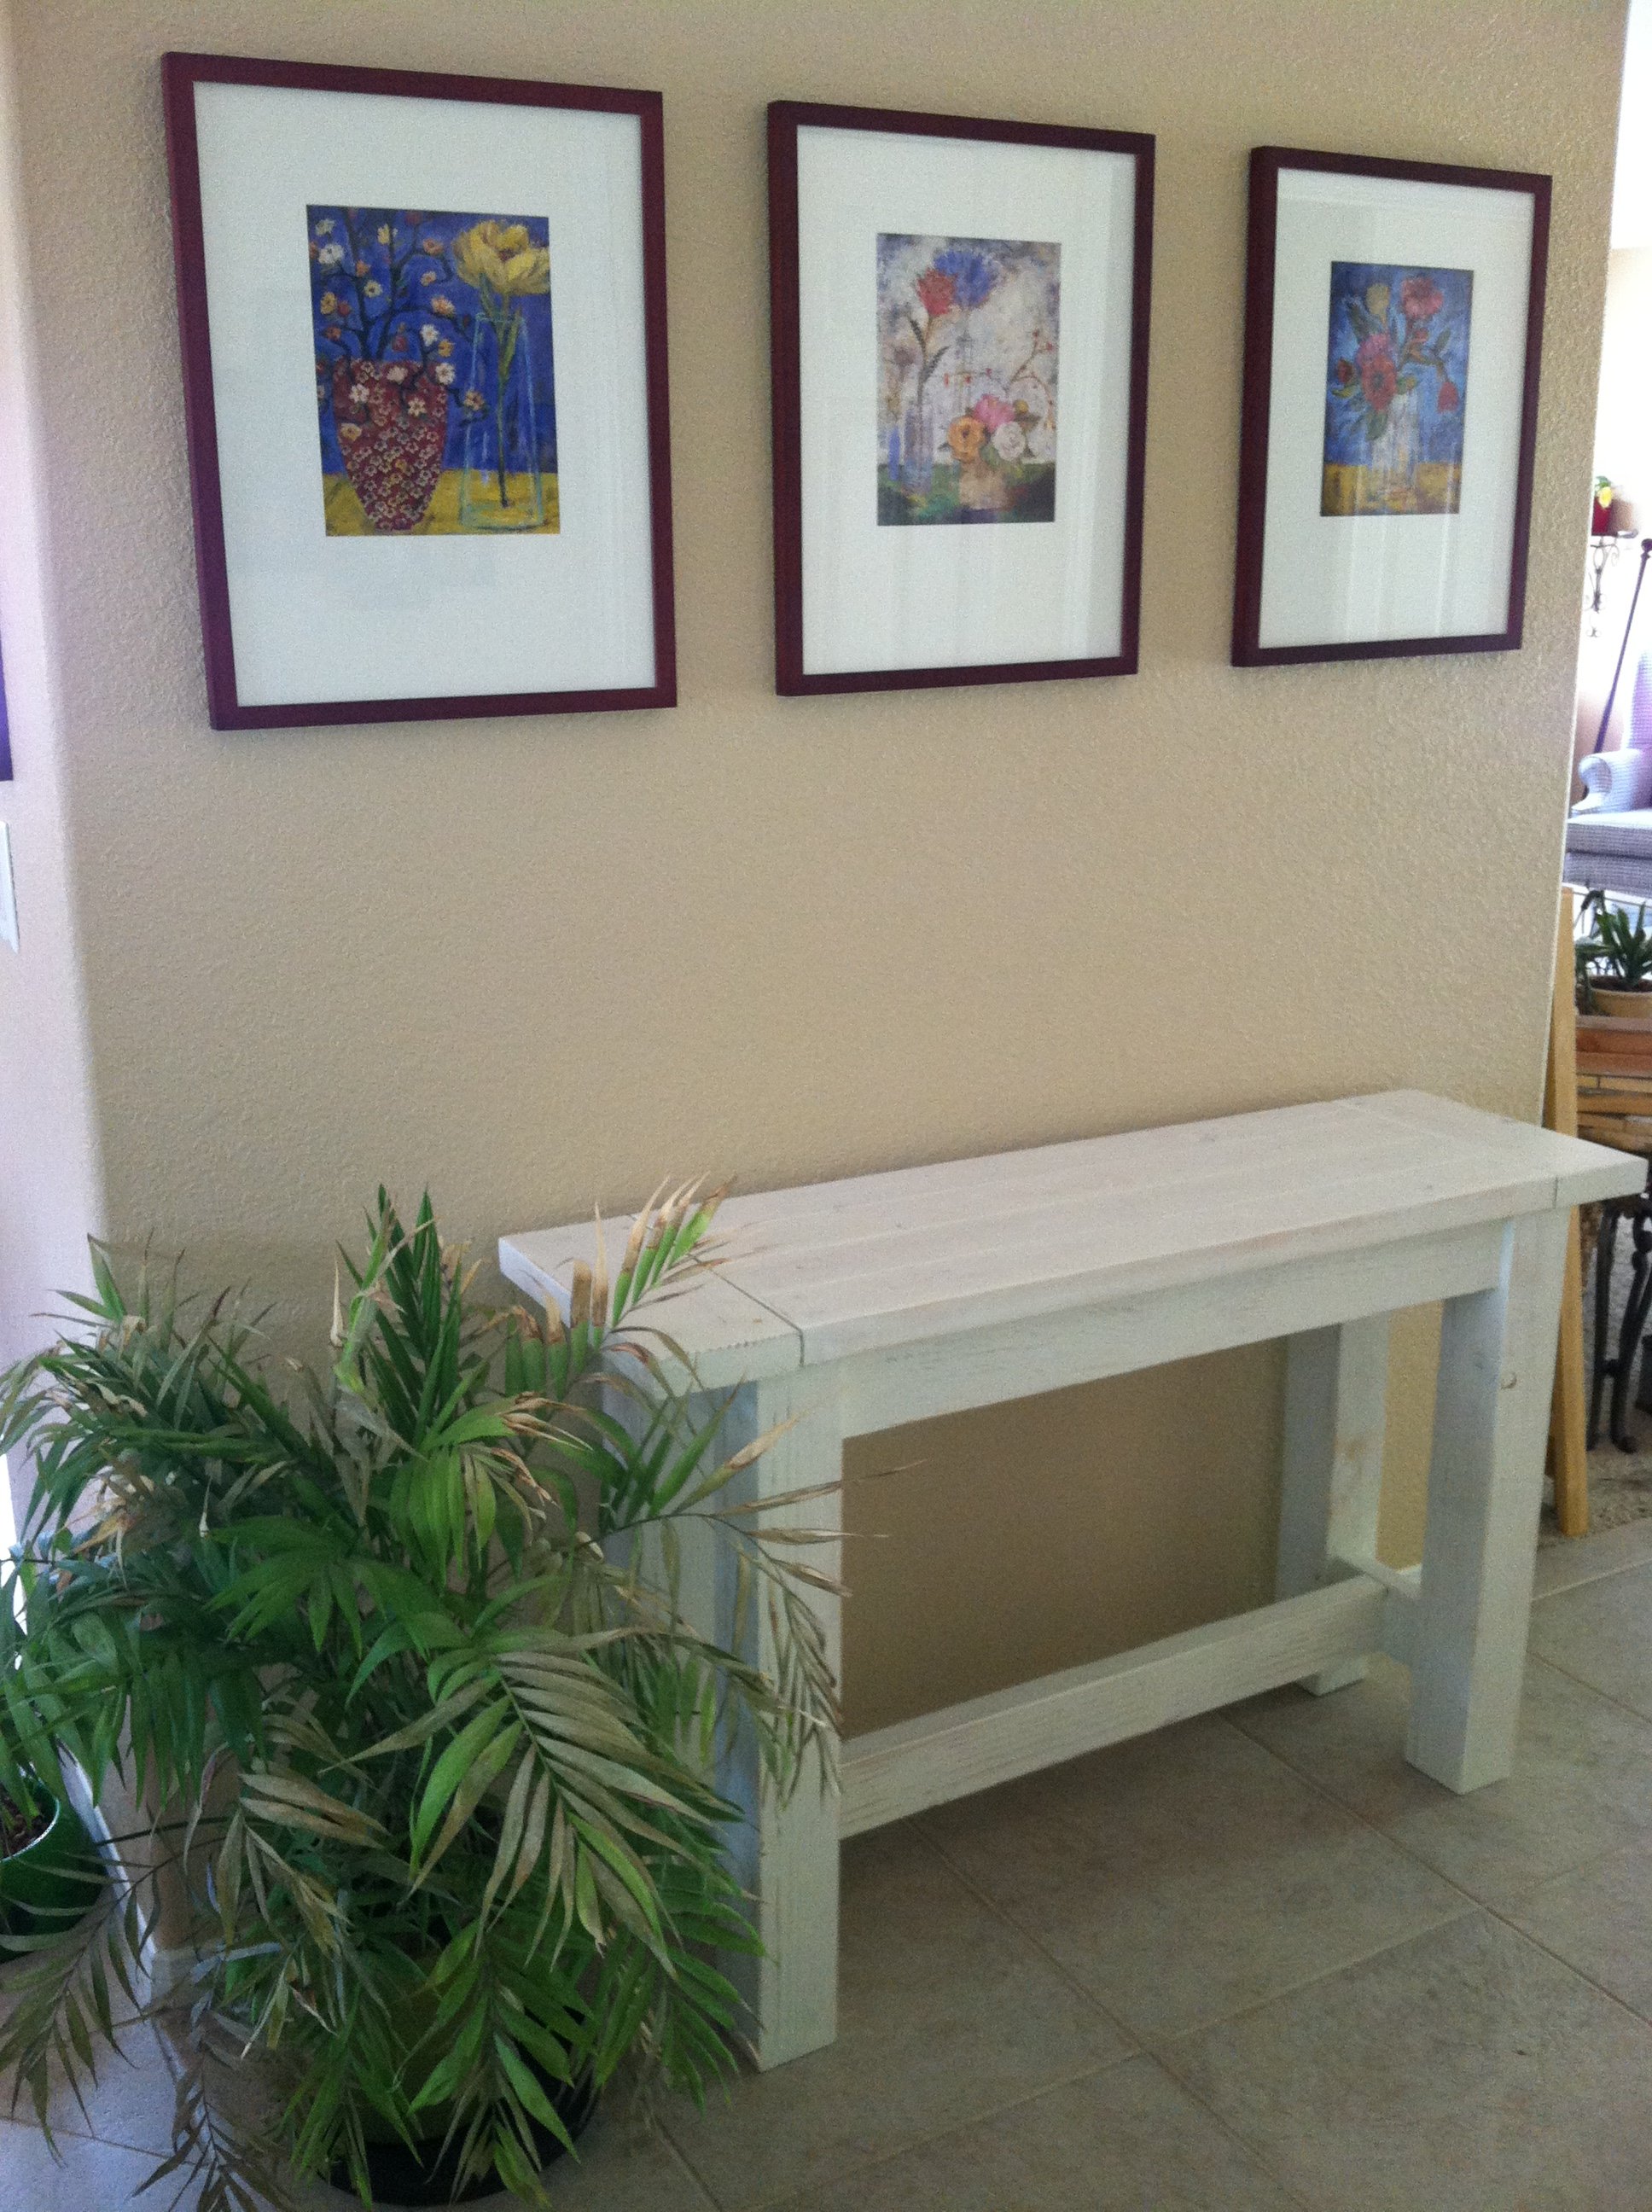
This was my second project. My eleven year old son and I had great fun building it together.
Estimated Cost
$30
Estimated Time Investment
Afternoon Project (3-6 Hours)
Finish Used
I painted it lightly with milk paint in antique white so the grain of the wood was still visible. Then I sanded down the edges to reveal some wood tones and give a rustic look.
Recommended Skill Level
Beginner
Comments

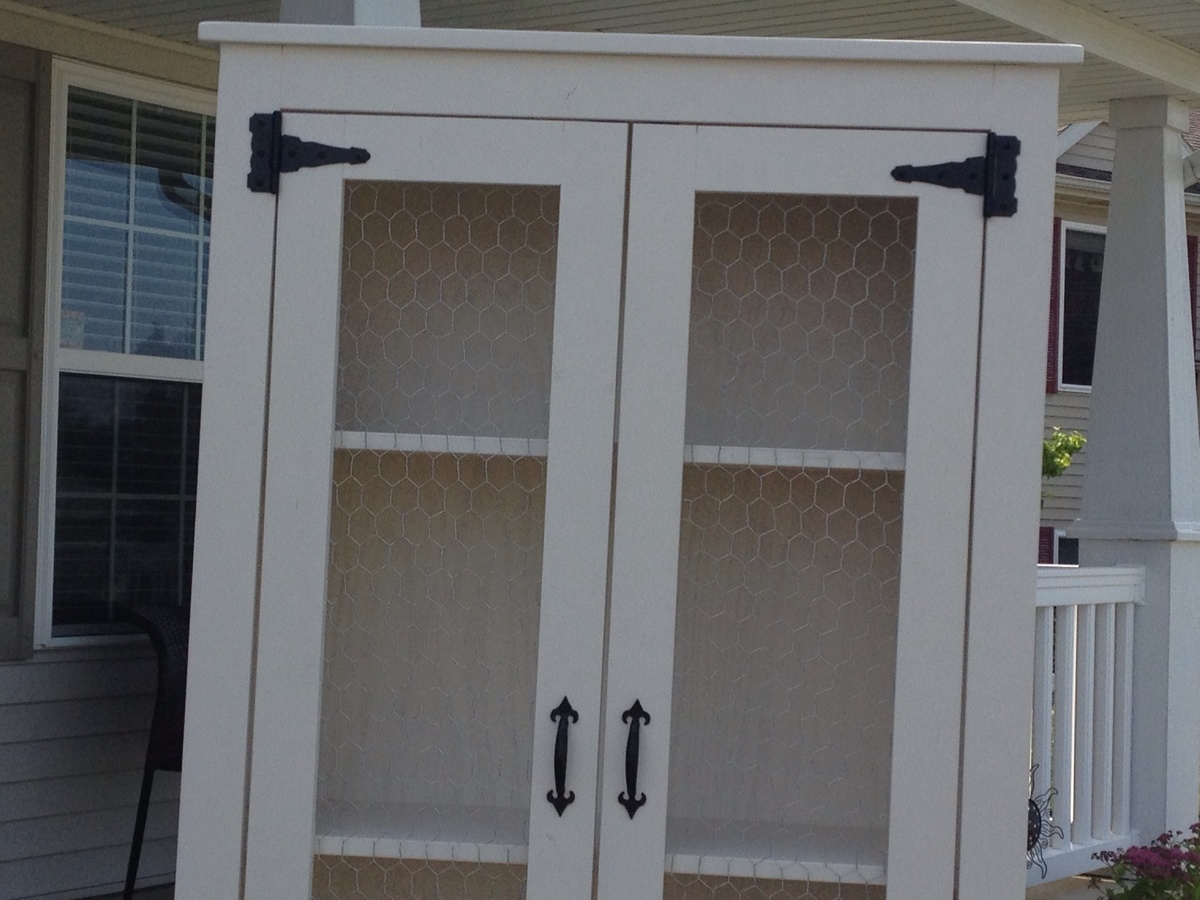
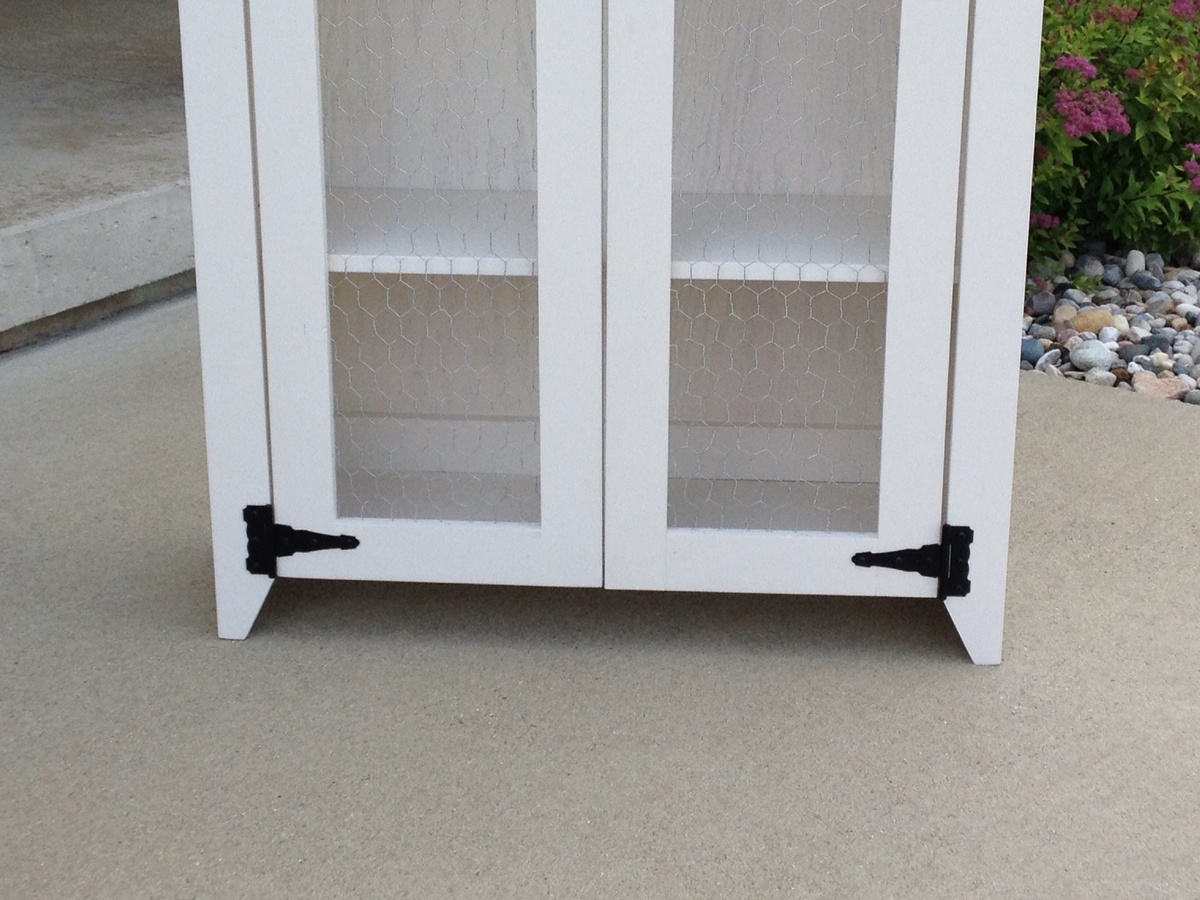
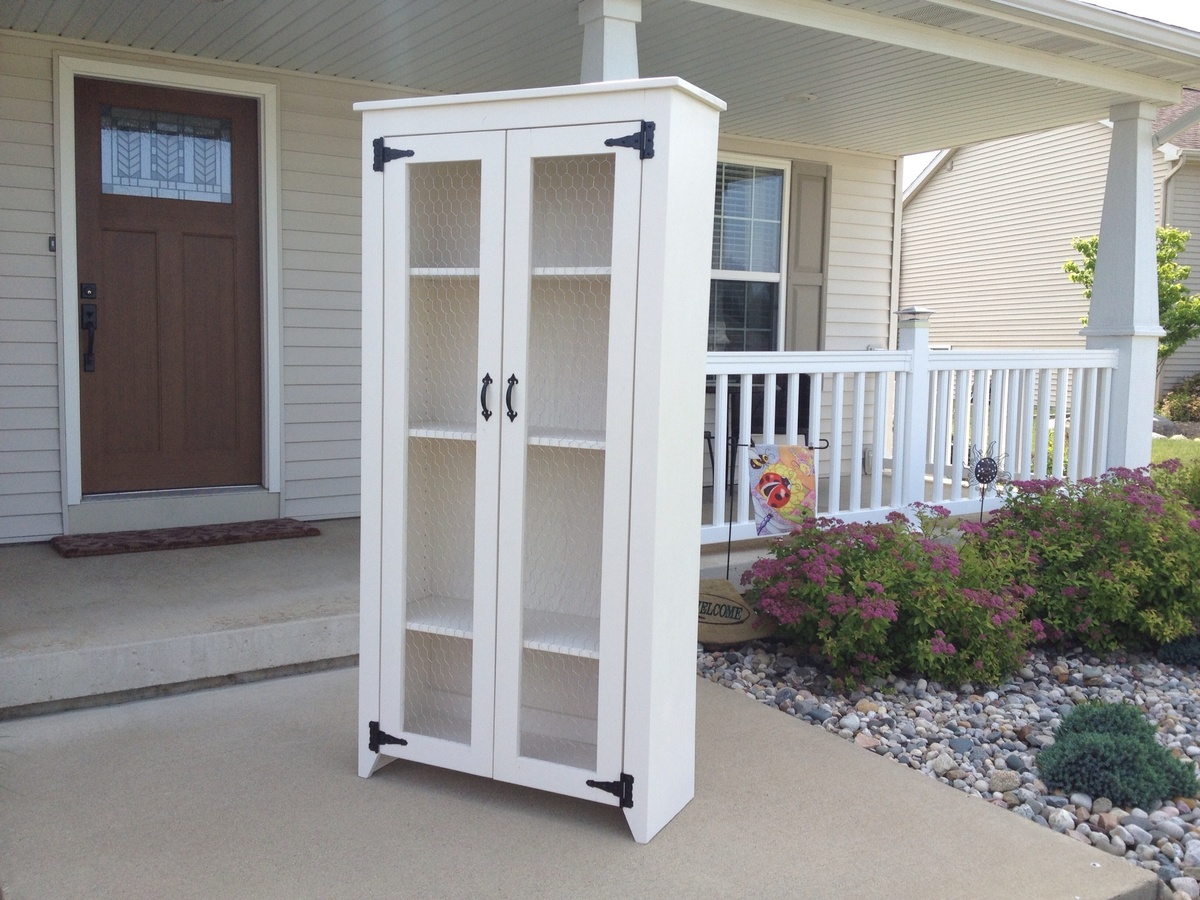
Chicken wire pantry
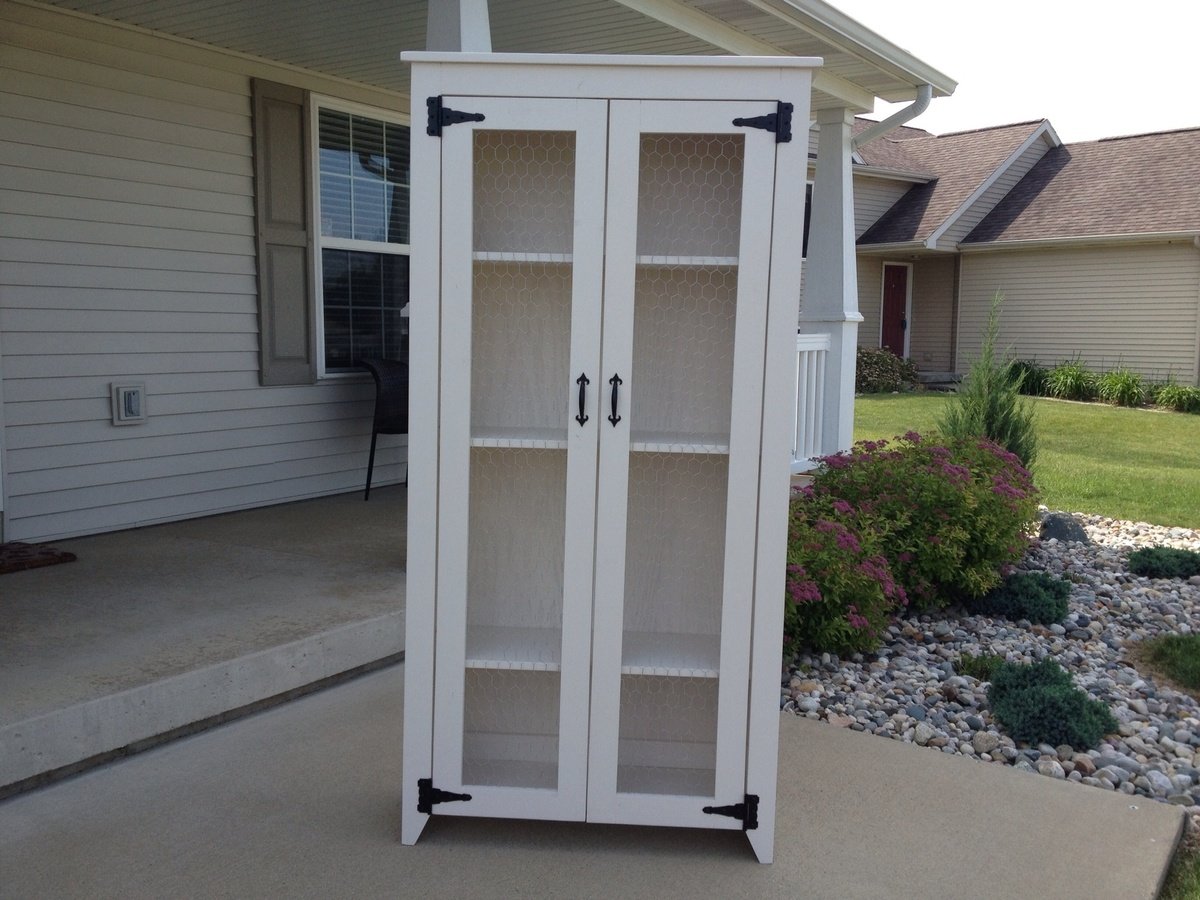
This is my version of Patrick's jelly cupboard. I made some changes to he dimensions by making it taller and a bit wider.
Estimated Time Investment
Weekend Project (10-20 Hours)
Finish Used
I used a latex off white paint then put a wax on it with minwax paste wax.
Recommended Skill Level
Beginner
Comments
Sun, 09/15/2013 - 17:57
Thank you very much I also
Thank you very much I also forgot to add that the shelves are adjustable.
Wed, 06/11/2014 - 05:00
Jelly Cupboard
My husband and I built one of these last year and made it into a wine cabinet. My Mom wants us to build her one but she would like it to be a little bigger also. Do you mind me asking what you changed the measurements to? It looks like the perfect size for her. :)
Wed, 06/11/2014 - 12:23
Jelly Cupboard
I believe the measurements are 72" high by 35" wide by 12" deep. I built that last year and I sold it at a antique shop that I had a booth at. But to the best of my knowledge that was the measurements. Thanks for taking a look at it!!
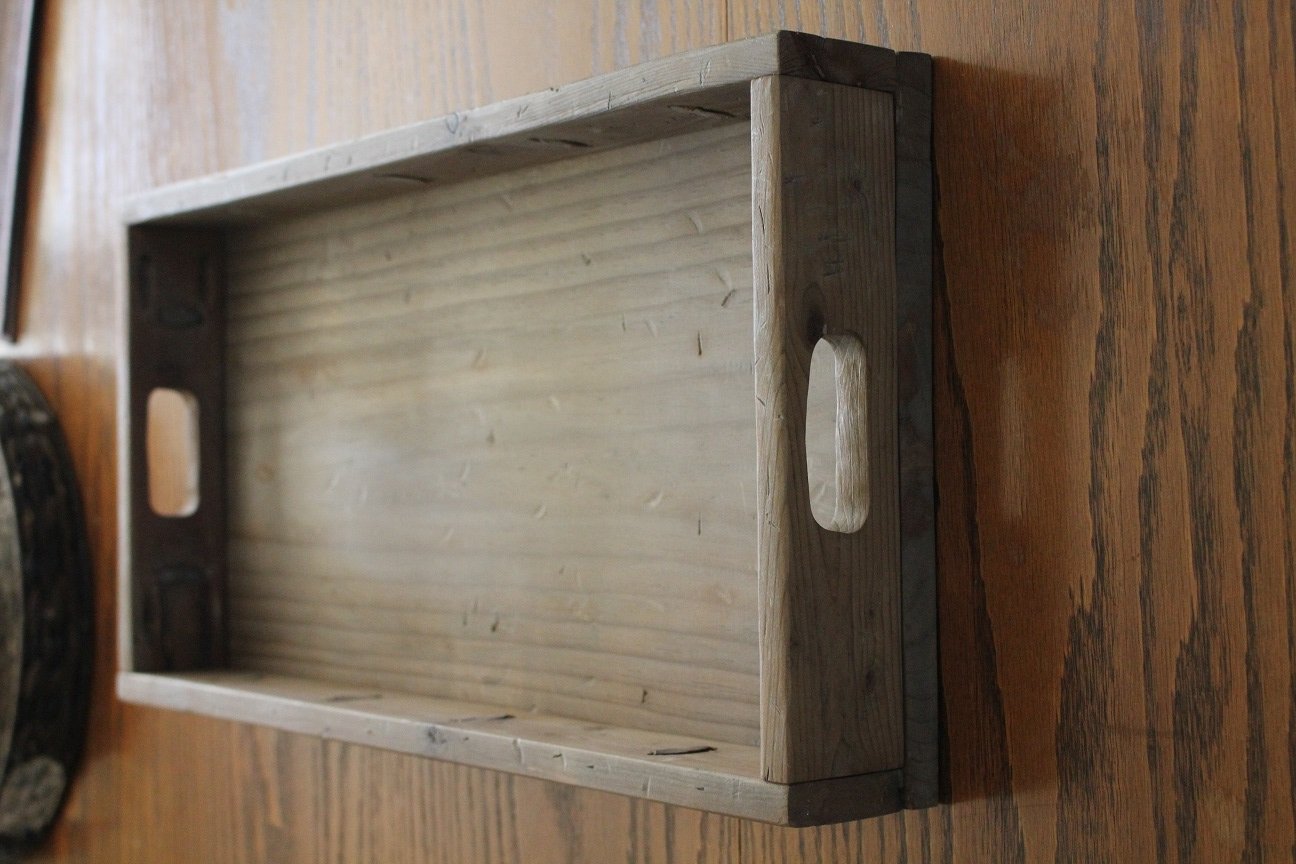
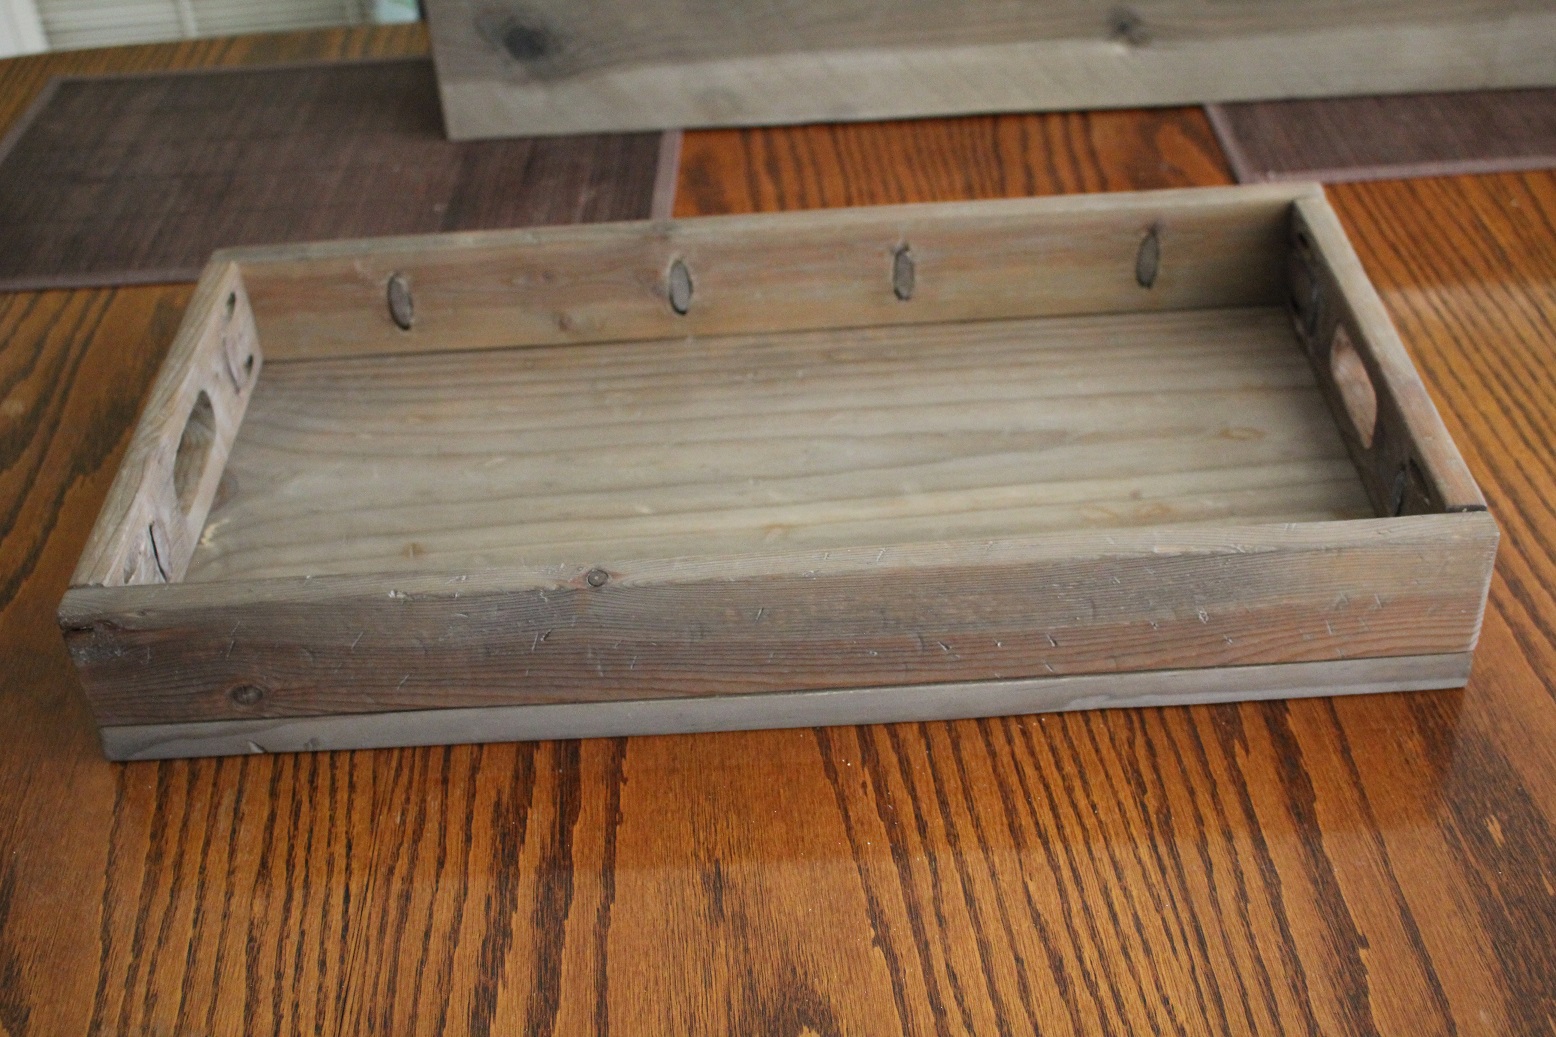
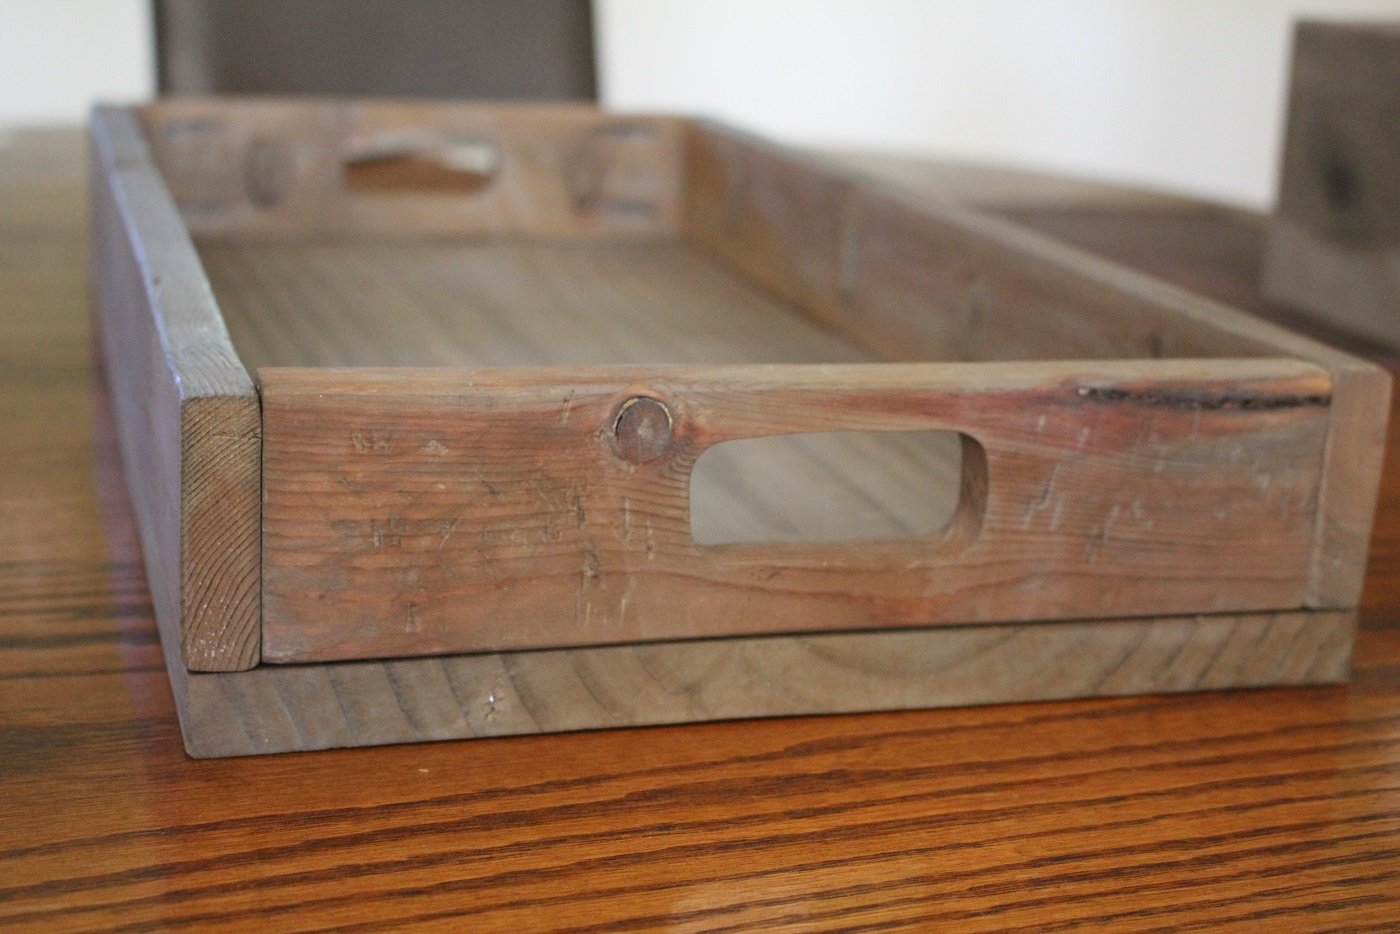
Drink serving tray
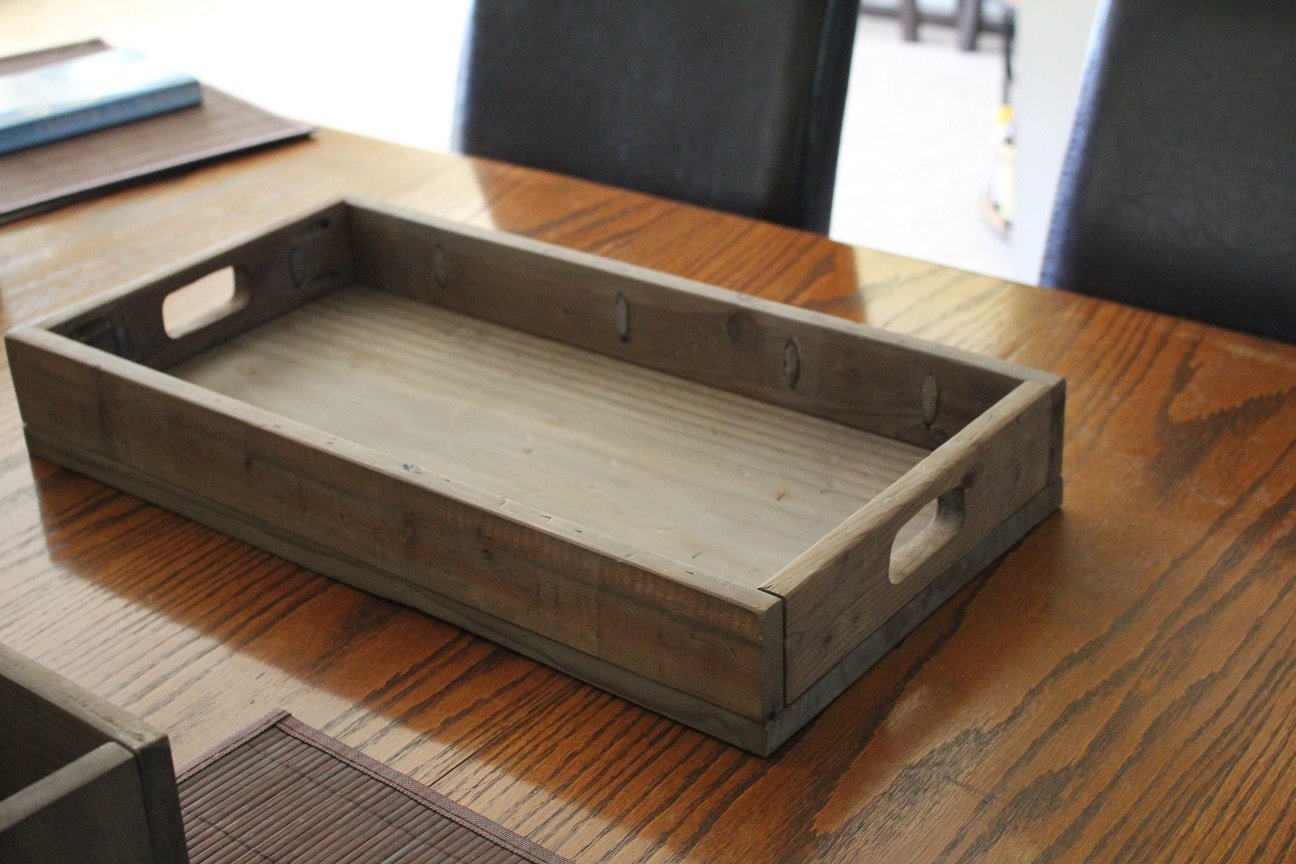
Used scrap pine sitting around- a 1x10 and 1x3's. Most time consuming part was cutting out the hand holds. Wanted a rustic look, so I weathered the boards by first beating them with hammer, screwdriver and crowbar, then with tea and steel wool vinegar "stain" to age the boards. One coat of poly on top. Made the plugs with dowels, adds to the rustic look.
Estimated Cost
Free- Scrap wood
Estimated Time Investment
An Hour or Two (0-2 Hours)
Finish Used
steel wool and vinegar mix painted on after a tea stain. Poly on top.
Recommended Skill Level
Beginner
Truss Shelves
The entire project cost $70. Also, I finally bought a Keg pocket hole jig for $35.

Built from Plan(s)
Comments
Farmhouse Bedside Table from Scraps!
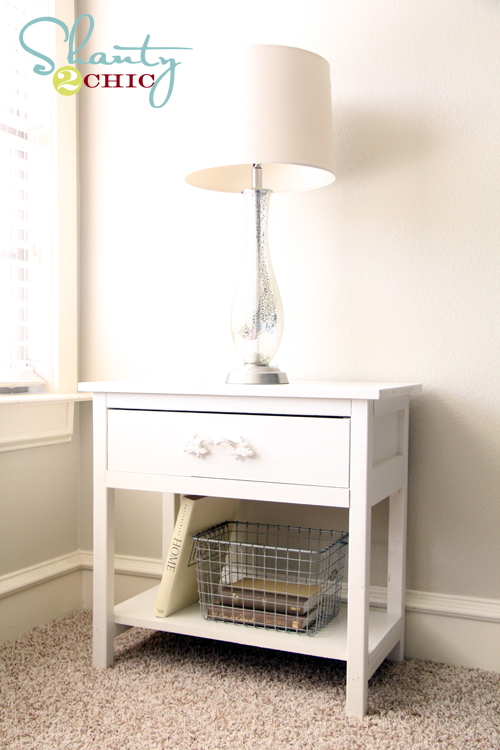
I spent about $9 and my scrap pile to build Ana's Farmhouse Bedside Table. I used scrap MDF and furring strips. I got it finished during a nap time... Easy peasy!
You can see more at http://www.shanty-2-chic.com/2011/08/farmhouse-side-table.html

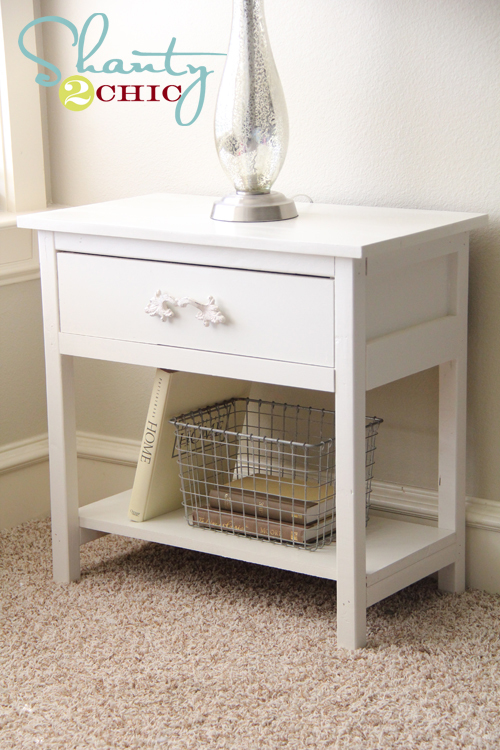
Built from Plan(s)
Estimated Cost
$9 and scraps
Estimated Time Investment
Afternoon Project (3-6 Hours)
Finish Used
2 coats of Olympic Off White in satin
Recommended Skill Level
Beginner
W/D Pedestal
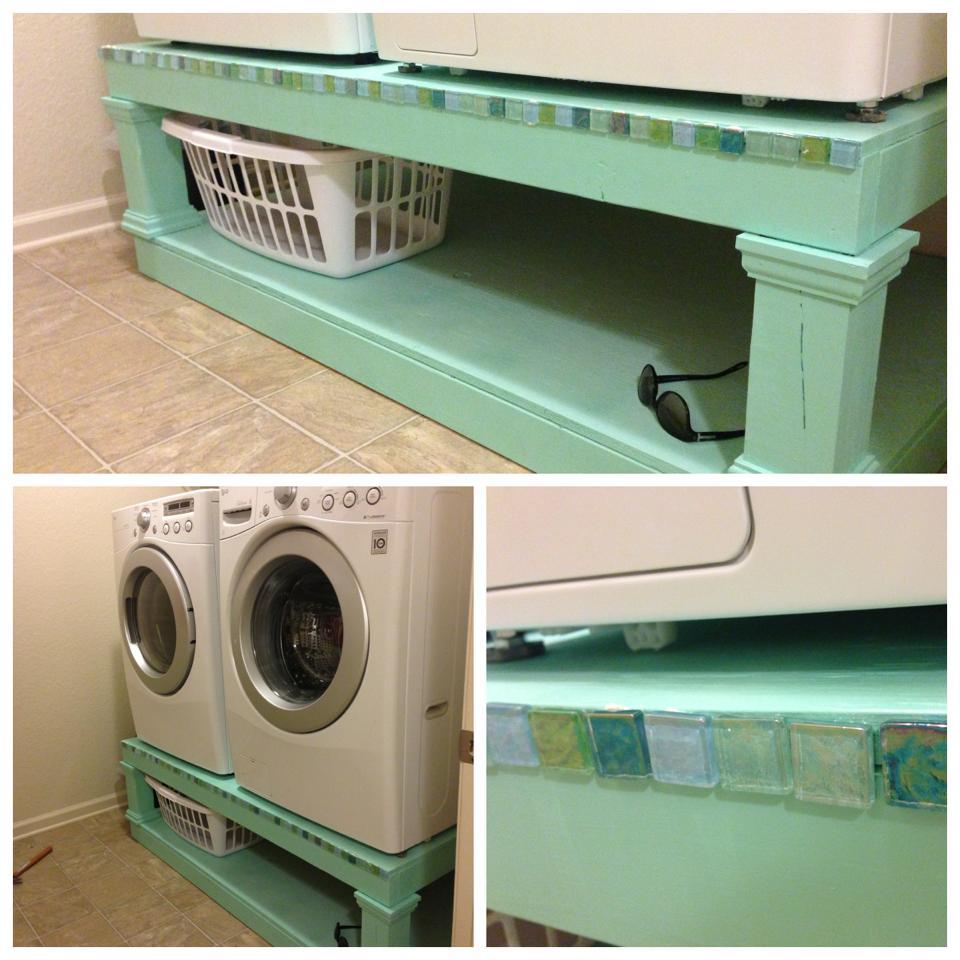
Built according to plan, adding embellishment to cover decking seam. Painted with three coats of paint and a sprayed clear coat.
Built from Plan(s)
Estimated Time Investment
Weekend Project (10-20 Hours)
Finish Used
Simply Seafoam (Valspar - SemiGloss)
1 Sheet Glass Tile Mosaic, cut individually
1 Sheet Glass Tile Mosaic, cut individually
Recommended Skill Level
Intermediate
Upholstered head board
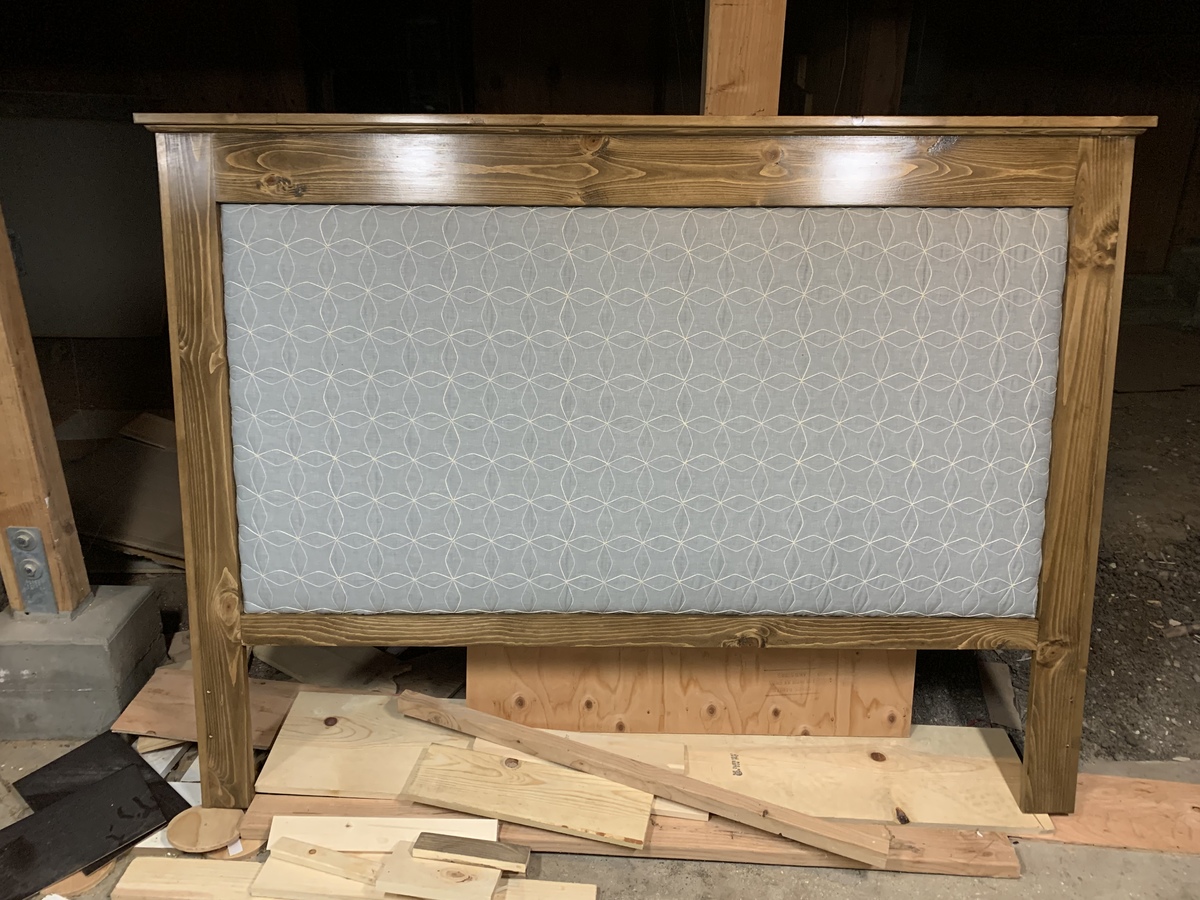
Customized for a California king.
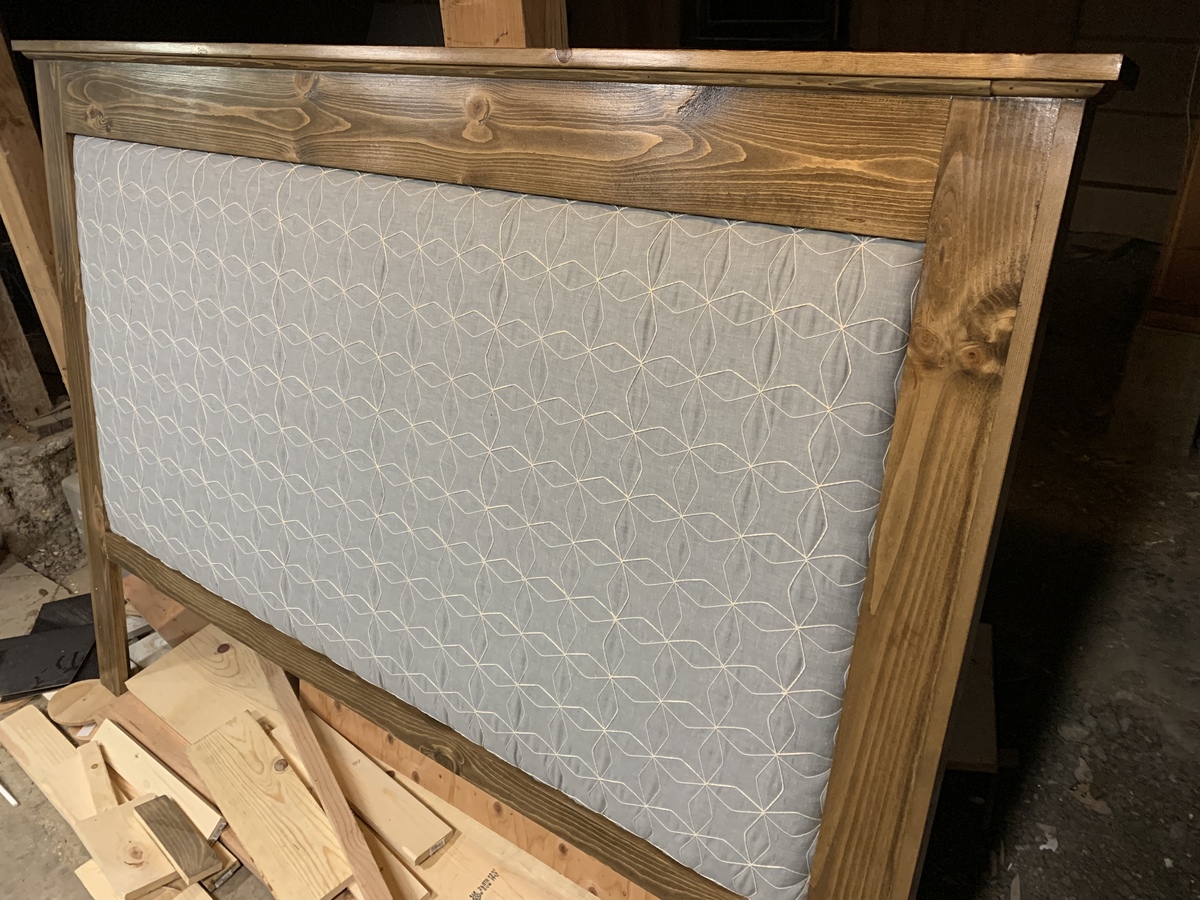
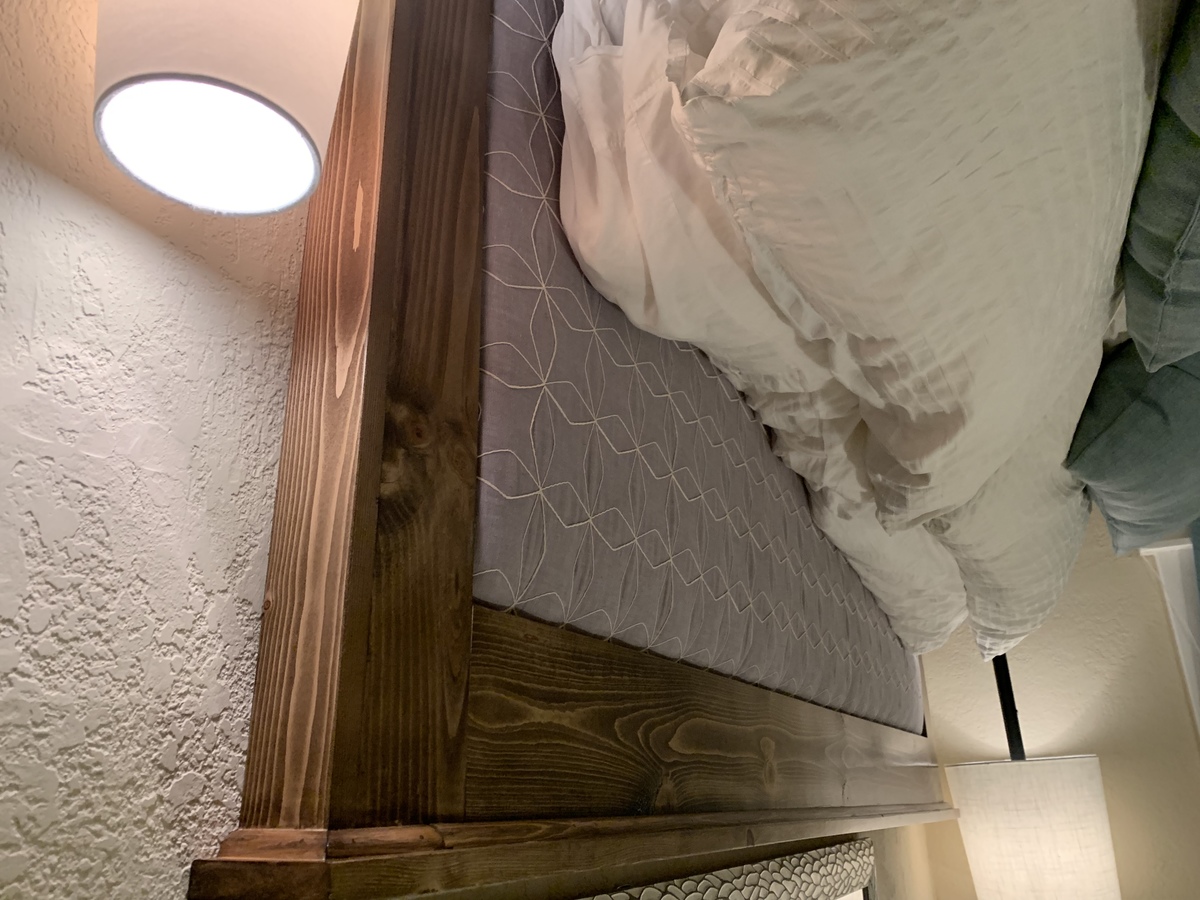
Built from Plan(s)
Estimated Cost
$100
Estimated Time Investment
Weekend Project (10-20 Hours)
Recommended Skill Level
Intermediate
Wood Tilt Out Trash Cabinet-Pallet boards how do I love thee!

We modified the plans to be the height of our countertops, roll and to be the dimensions of a nice cutting board we have. We originally were going to have a custom butcher block made for the top, but after having a built in one in our old house (we just moved) we decided it would be nice to be able to take the cutting board on and off to cut. We only put two locking caster wheels in the back as we have small kids and wanted to be able to stop the kids from pushing it around as much. If I hadnt wanted the hinges to be flush and a wooden knob and metal handles on the side we could have built this out of pallet boards, scraps and things we allready have! We also put small L brackets on three sides to hold the cutting board in when we cut. The cost is just caster whees, the wood knob, and the side handles as we had all the wood and paint from other projects. Also things take us a lot longer with kids and no one to watch them (and I am 8 months preggo!) so I could have done this even with drying time in a day or two. As it was I think it took me 4 days working an hour or two every day

Estimated Cost
About $8
Estimated Time Investment
Day Project (6-9 Hours)
Finish Used
Watered down Folk Art paint with a polyurethane over it
Recommended Skill Level
Beginner
Comments

Sun, 08/28/2011 - 14:56
photo quality
Sorry for the less than great photo! We are still unpacking and I havent found my good camera. This was a cell phone camera so I will try to post better ones later.
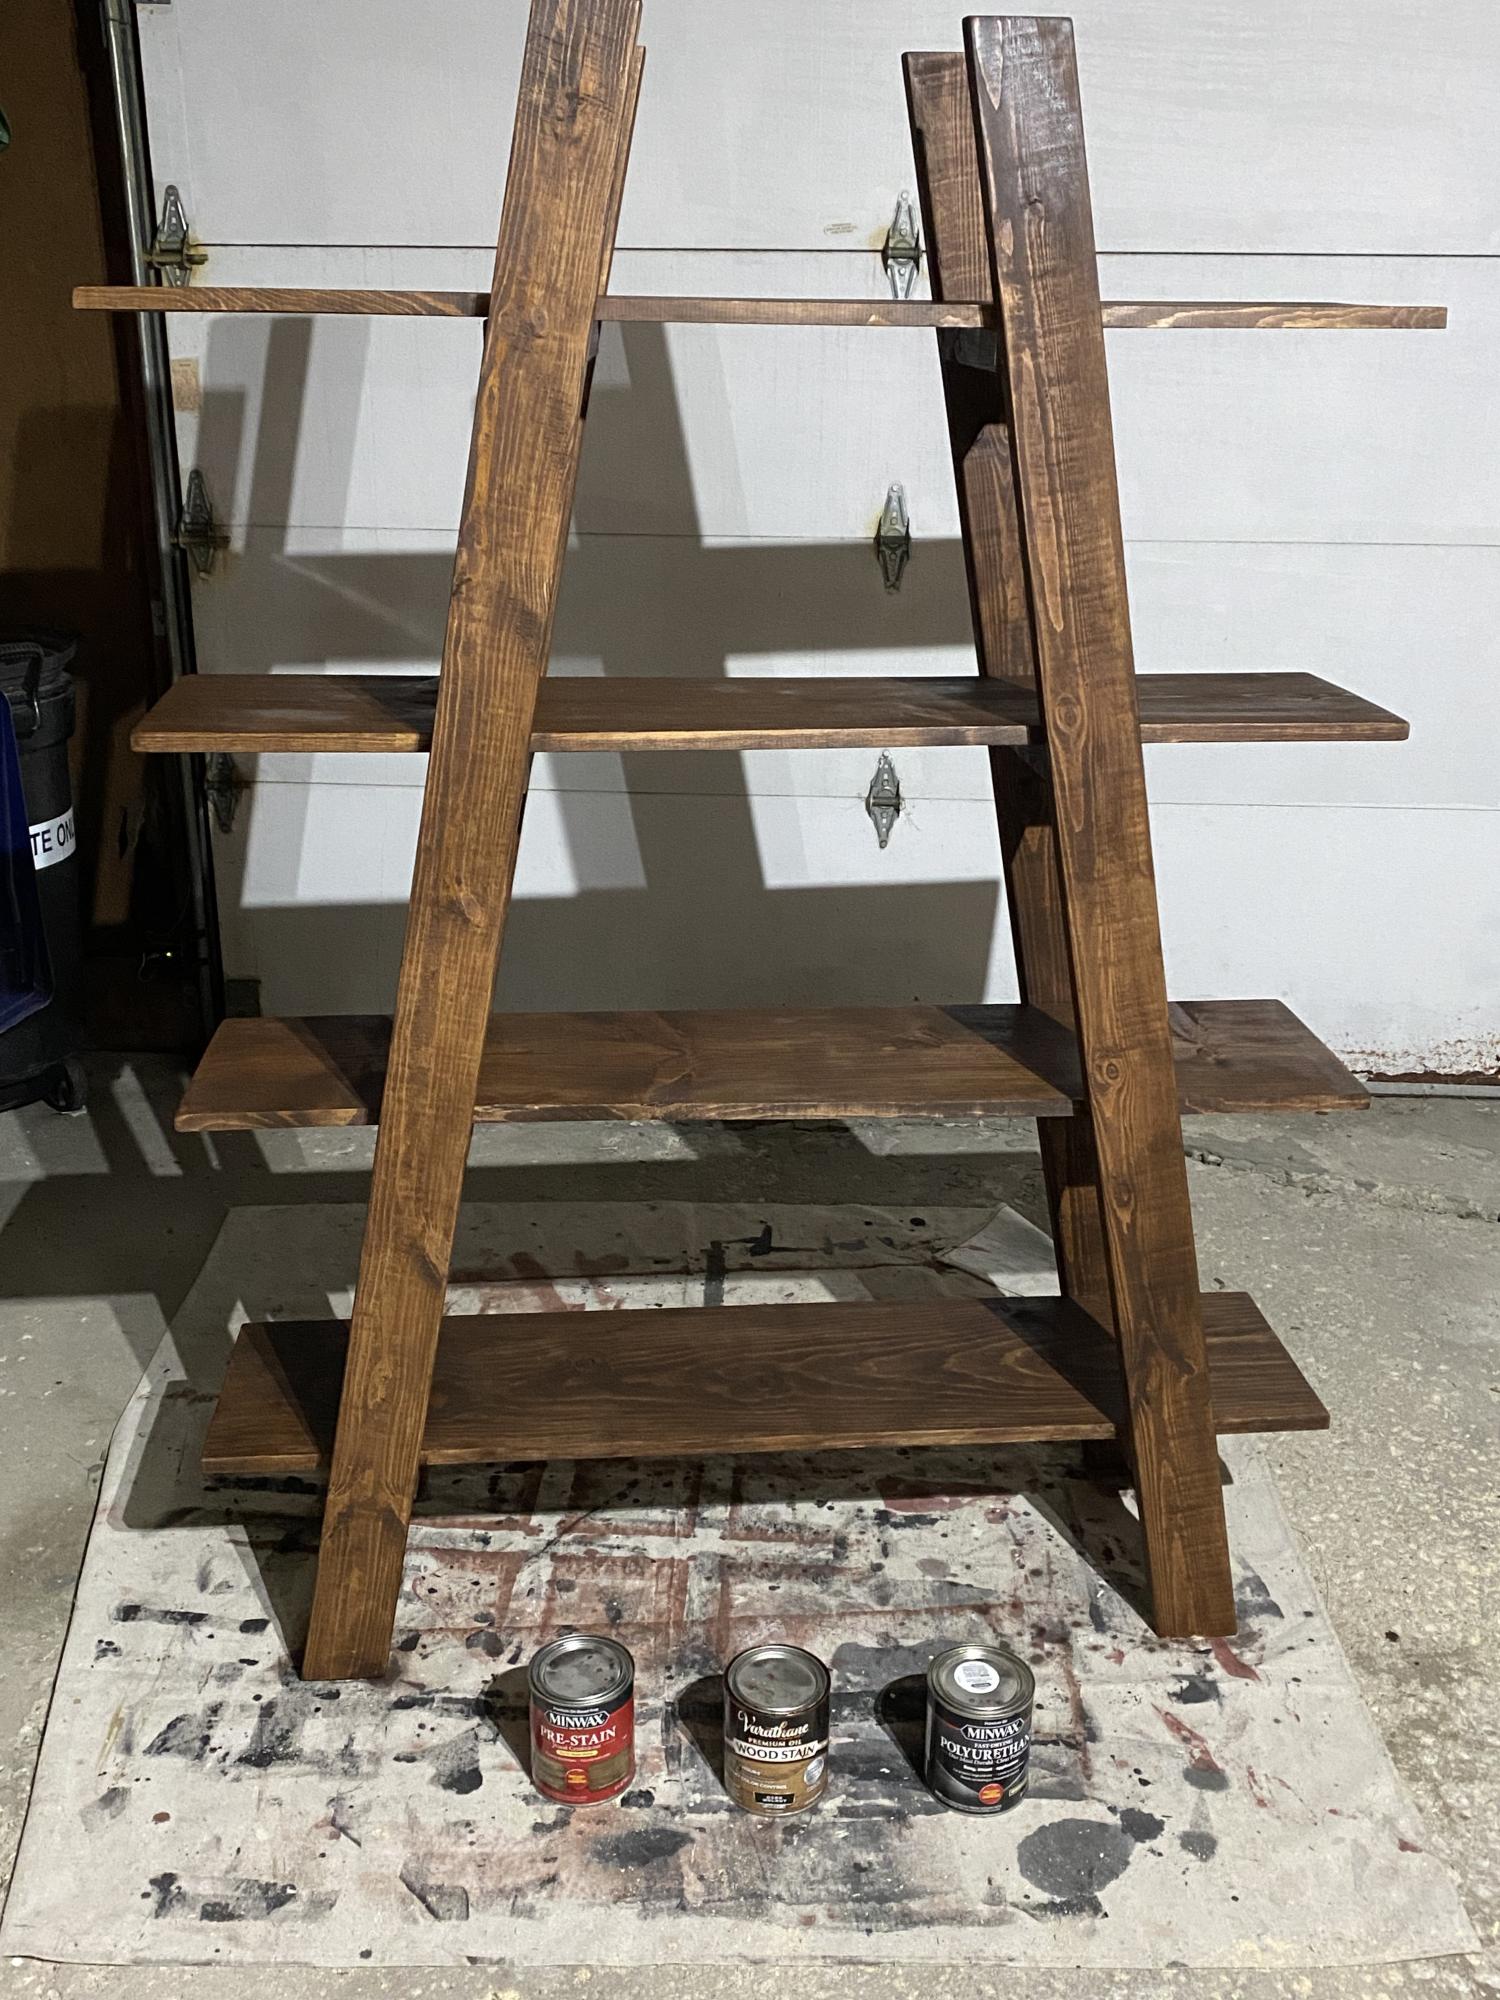
8 Foot Kentwood Bookshelf
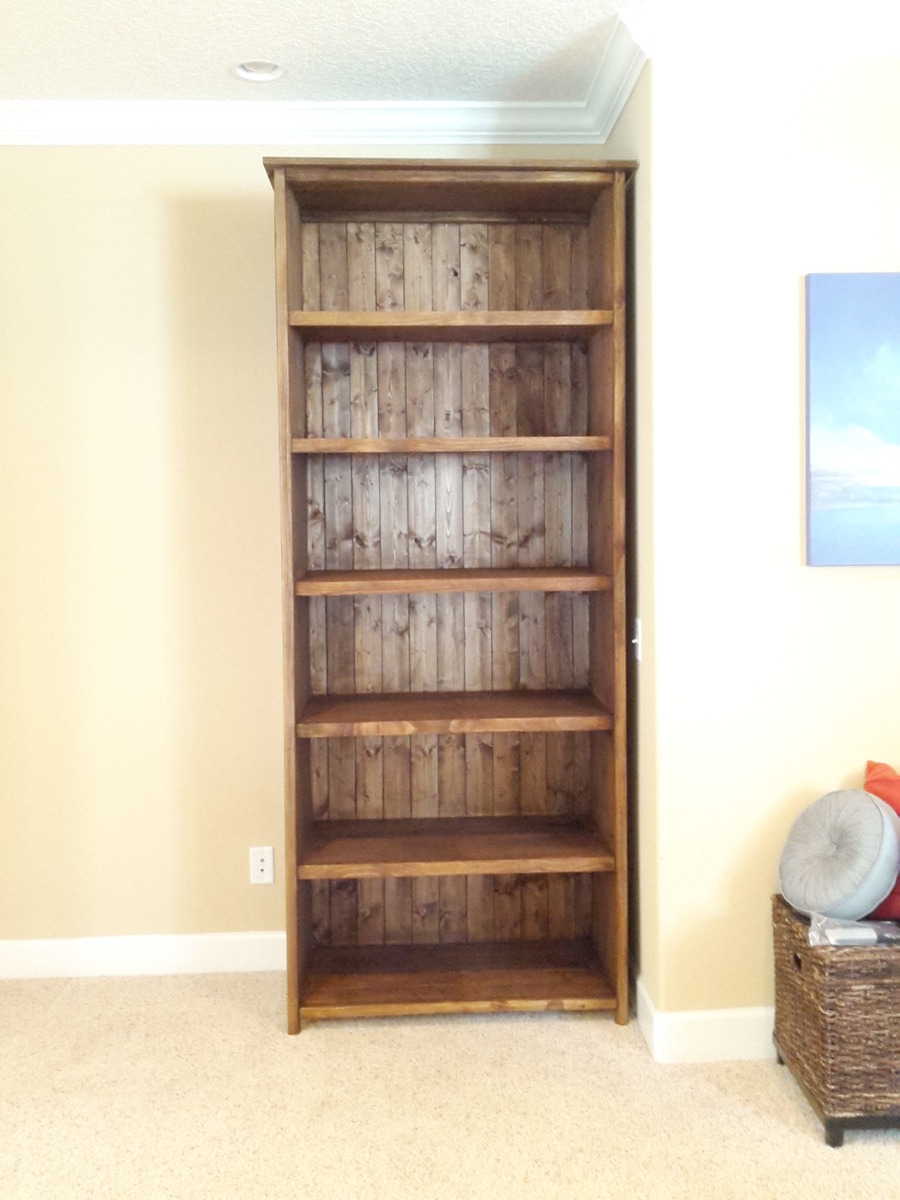
My wife loved the original kentwood plan, but wanted it....bigger. So it is 96 inches tall in total, and for the sides and shelves i used 1x16 project board from Lowes. This means that the shelves and sides are cedar, while the remainder is pine. Turned out fantastic and she loves it. I am currently building a second one to match.
Estimated time: 12 hours.
Built from Plan(s)
Estimated Cost
$200
Estimated Time Investment
Weekend Project (10-20 Hours)
Finish Used
Rust-O-leum ultimate wood stain "Dark Walnut". No finish.
Recommended Skill Level
Beginner
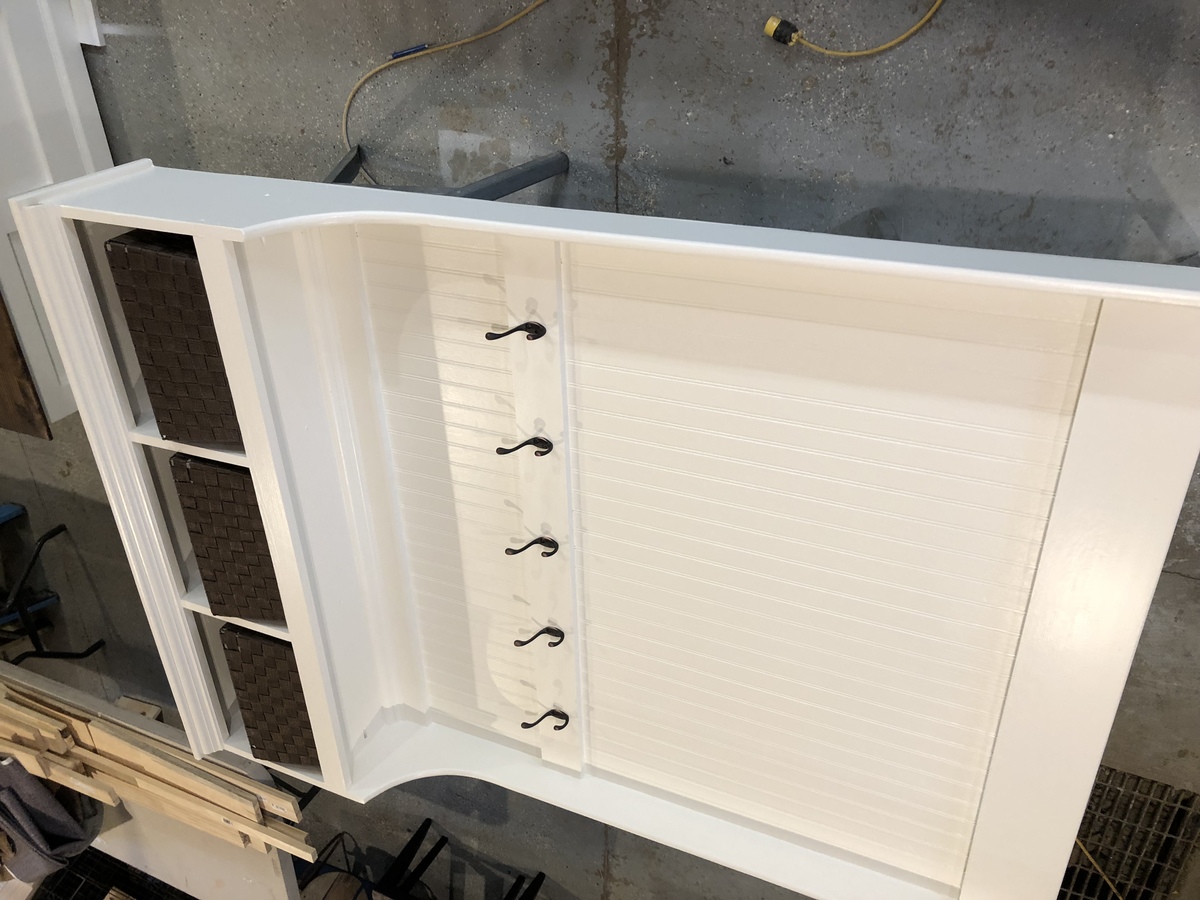
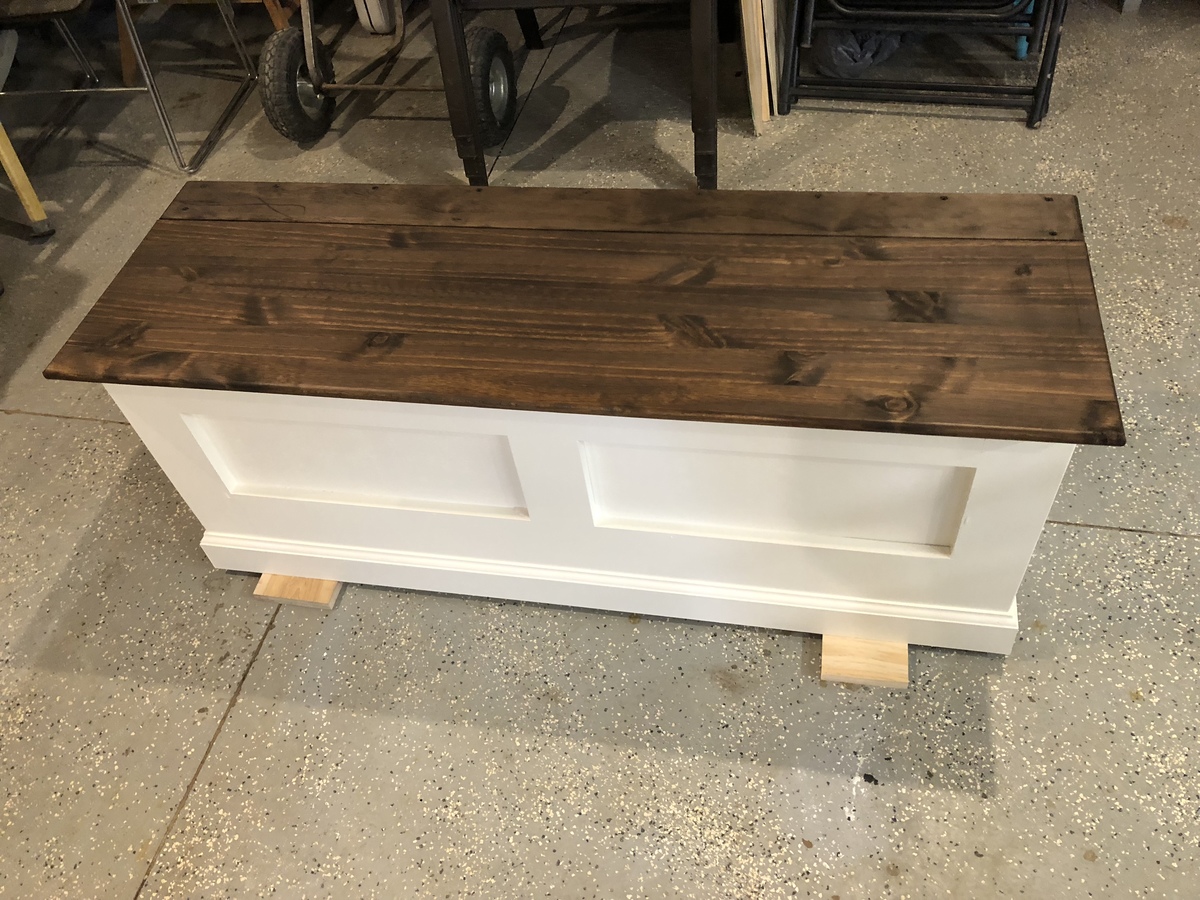
Christmas for my daughter
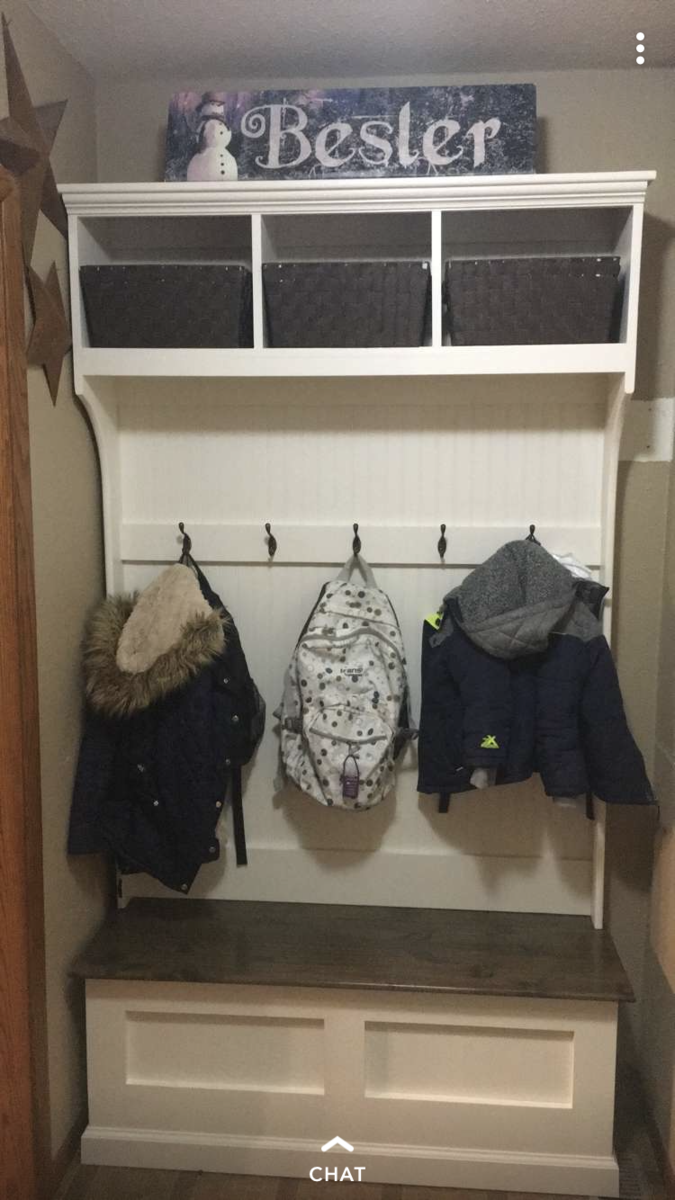
I was inspired by Anna Whites post, and went to work to alter the plan to fit the space in my daughters entryway. So final size is 48” wide and 80” high.
Estimated Time Investment
Weekend Project (10-20 Hours)
Finish Used
Laytex paint and stain with triple thick varathane varnish on seat/bench lid.
Recommended Skill Level
Beginner
Spa Bench
So excited!~ I've got big projects in mind but I just wanted to test it out first with a simple one. So easy to follow and I can't wait to do more!
Built from Plan(s)
Estimated Cost
$22
Estimated Time Investment
Afternoon Project (3-6 Hours)
Finish Used
Black interior paint
Recommended Skill Level
Beginner
Comments
Miter Saw Cart
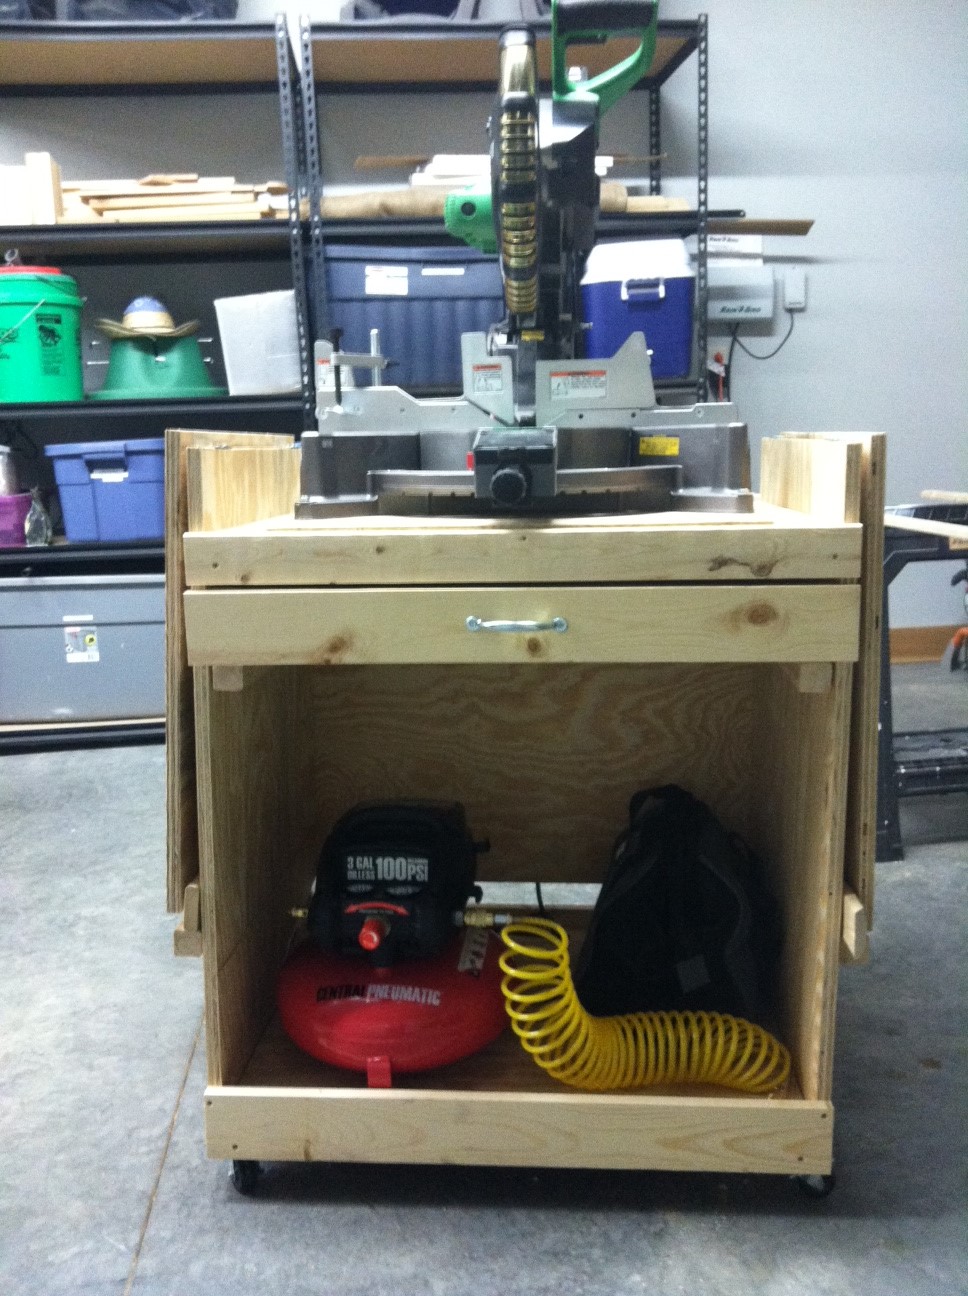
Great project - fun to build and helpful for wheeling my new miter saw around the garage.
I made a few modifications from the original plan:
- I used a 1x4 instead of a 1x3 for the bottom supports to add a bit more of a lip to keep things from rolling off of the shelf. The shelf is big enough to hold my small pancake compressor and ciruclar saw.
- Like others, I added a drawer (1X4 front/sides, 1/4" plywood bottom, 2x2 drawer guides).
- Like others, I went with simple strap hinges and then used some wood to support the wings when open. When closed the supports tuck neatly under the wings.
- I added some 1/4" plywood to make a back. I left enough of a gap at the bottom to be able to sneak my extension cords out to a power strip I mounted on the back.
- I made a fence extension out of a 1x4. I attached this to the left wing using wing nuts and hanger bolts so it is easy to remove if I need to. I spent time measuring carefully to make sure it lined up exactly with the saw's fence. It is nice for supporting longer boards and keeping them straight.


Built from Plan(s)
Estimated Time Investment
Weekend Project (10-20 Hours)
Finish Used
None
Recommended Skill Level
Beginner
Comments
Sun, 09/22/2013 - 05:27
Great work!
I love the way this came out. I believe I have your exact saw and I intend to use Ana's plan as well. Do you know how long you made the sides to accommodate the saw fence, or what your measurement was on the saw fence?
Sun, 09/22/2013 - 06:54
I followed Ana's plan for the
I followed Ana's plan for the main carcass. My flip-up sides are a bit shorter than the plan, but only because I failed to follow the directions carefully and cut both of my sides from the same 24" strip of plywood (instead of a 36" and 30" per the directions) and was a bit short on 3/4" plywood. My sides are 24" long.
I made my fence extension from a 1x4. You can cut it to length so that it will fit any side.
Sun, 09/22/2013 - 17:49
What I meant to write was
What I meant to write was saw deck, not saw fence. Lol whoops.
Mon, 09/23/2013 - 06:12
Sorry, misunderstood your initial question
The deck is 3 3/4" from the top of the sides. That makes it level with the extensions when they are flipped up.
I have a 12" hitachi saw (not sliding), so if your saw is not the same then the measurements might be different.
Comments
Ana White Admin
Fri, 09/09/2022 - 12:24
Very cool!
This looks great, thank you for sharing!