Community Brag Posts
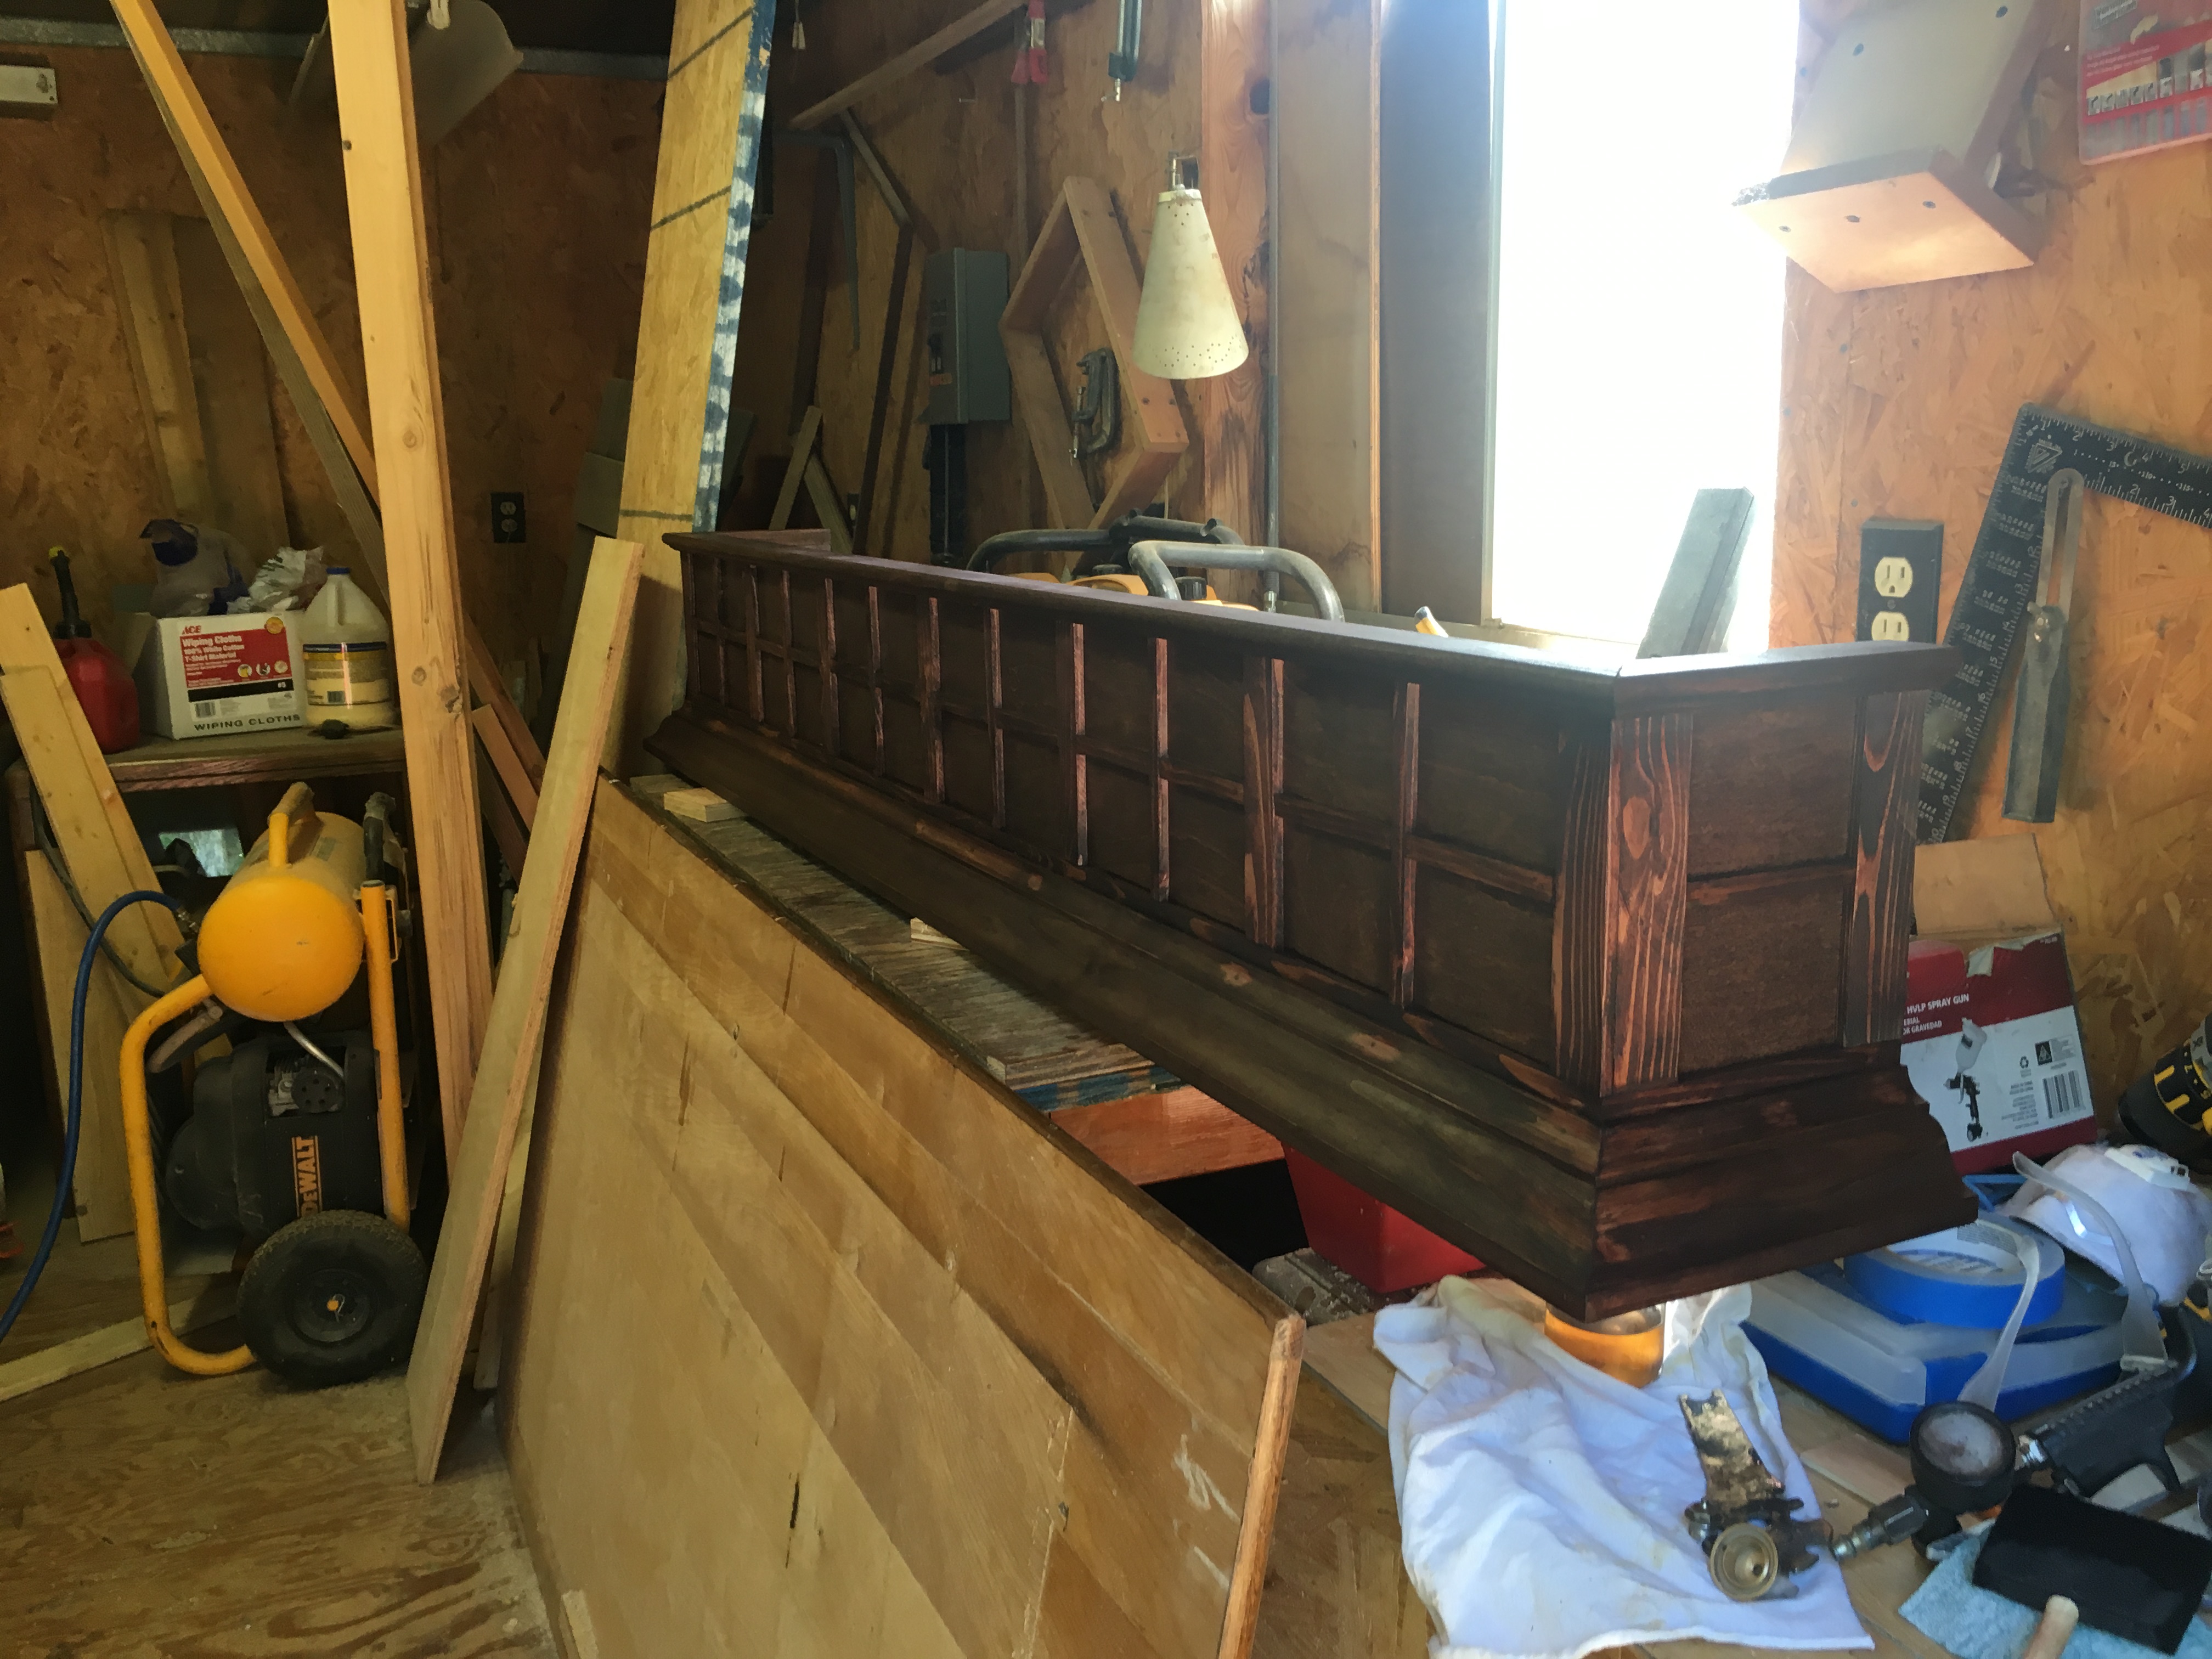
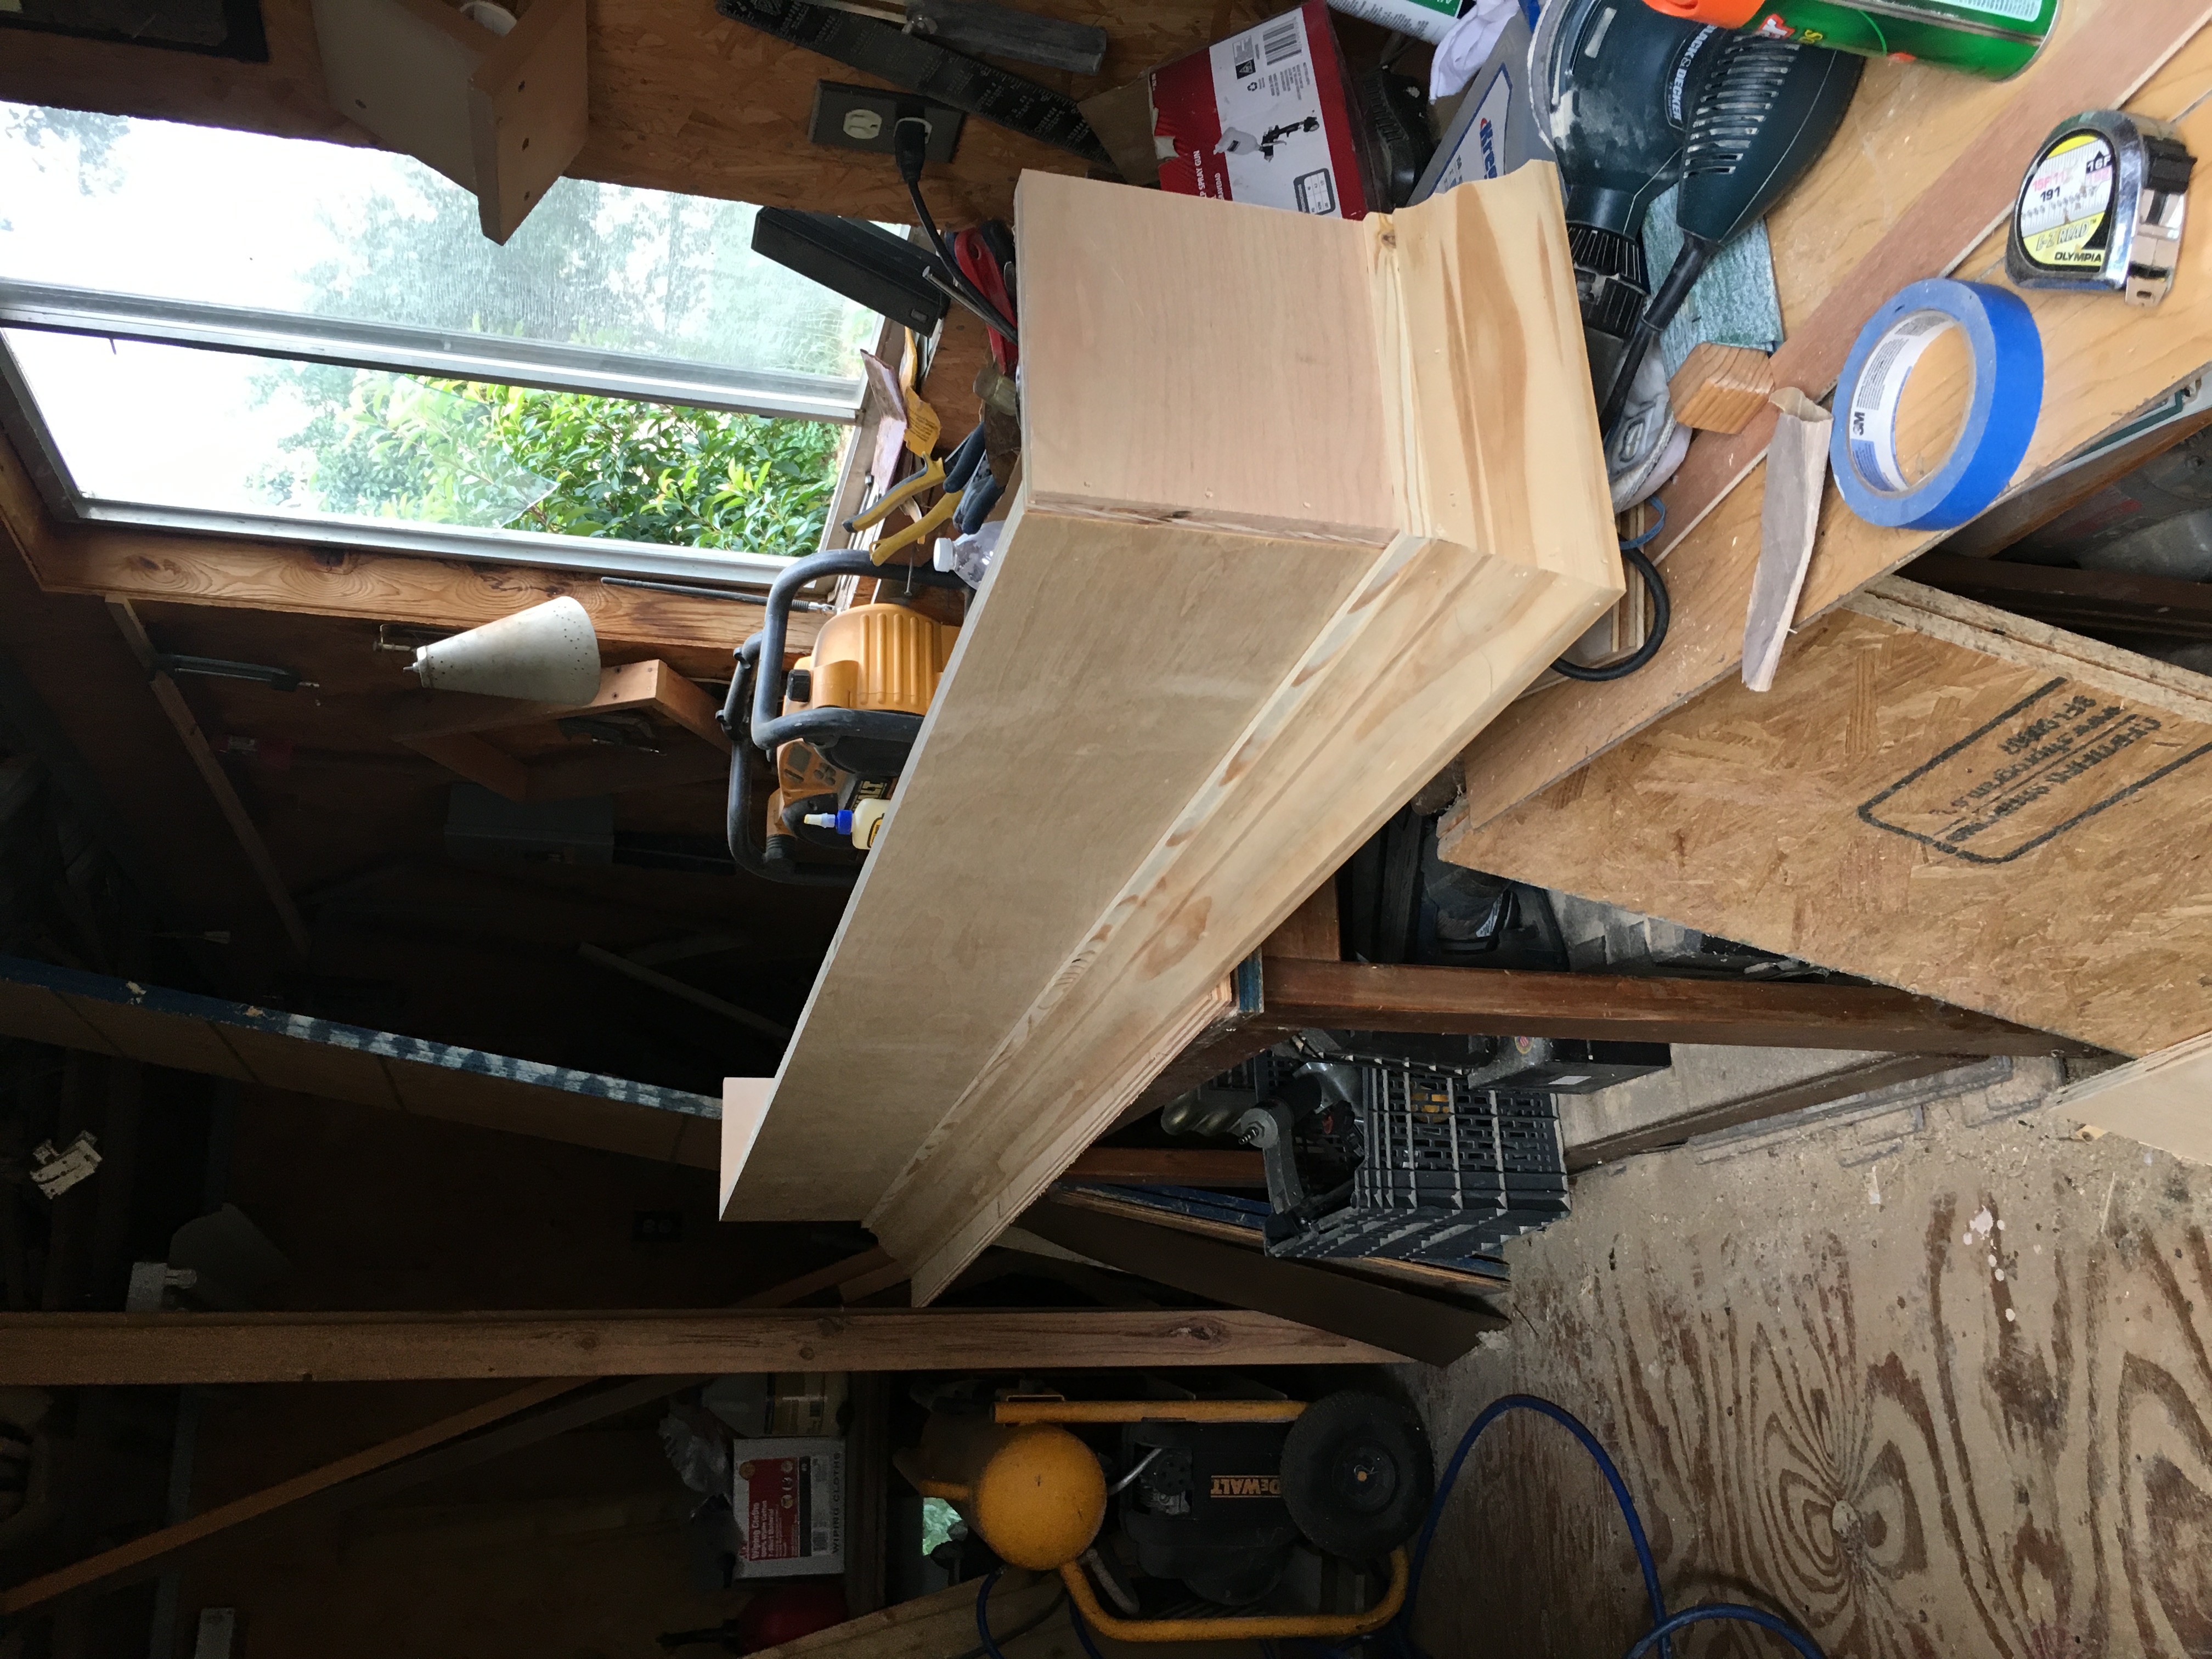
Planked Wood sideboard
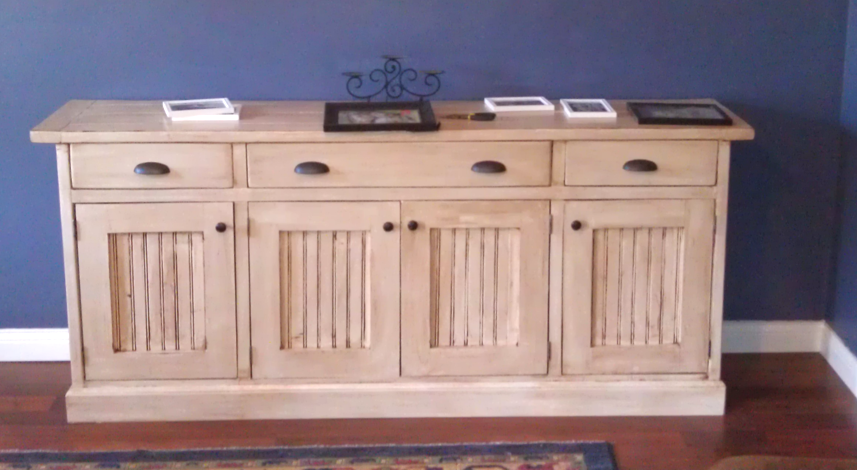
A sideboard I built. Took about two weeks. Finish is General Finishes antique white milk paint with a van dyke brown glaze over it. Finished with a top coat of polycrylic
Built from Plan(s)
Estimated Time Investment
Week Long Project (20 Hours or More)
Recommended Skill Level
Intermediate
Comments

Mon, 08/13/2012 - 18:33
Looks great :)
It does look great and I second birdsandsoap, love the finish and beadboard. On a side note... I also like the color of your wall! What is it?
Tue, 08/14/2012 - 09:20
wall color
thank you for the commnets. The wall color is Distance by Sherwin Williams and thats funny you say that I have been thinking about changing it because it seems a little too dark
Rustic X coffee table

This was my first woodworking project and I absolutely love it. I think it turned out amazing and was actually very simple to do. I just got some construction grade lumber from Home Depot and borrowed some tools and got started. I did have to buy a Kreg Jig, which is an amazing tool by the way. I am not complaining about having to buy it since I have used it on many projects since!
Built from Plan(s)
Estimated Cost
$180
Estimated Time Investment
Weekend Project (10-20 Hours)
Finish Used
I used steel wool dissolved in vinegar to chemically distress the wood. Then I sanded it down and applied a dark stain, I can't remember exactly which one. I applied two coats of stain, then I applied 3 coats of polyurethane, sanding in between each coat.
Recommended Skill Level
Beginner
Maple Edge Grain Cutting Board
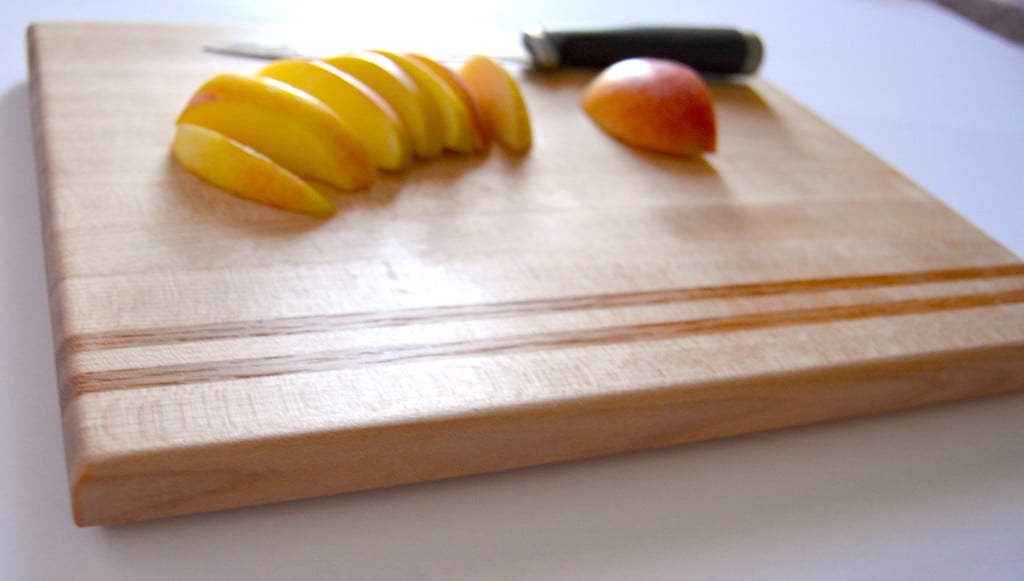
A cutting board seems to be a right of passage for any new wood worker, that and making a mallet! I’ve already made a mallet and have been putting off making a cutting board so I figured now was as good a time as any. I’ve always liked the look of edge grain maple and I had some scraps of maple that were too narrow for most projects so I figured that I would go for that look. To spice it up a bit I decided to add a couple of accent strips of Oak.
Estimated Time Investment
Day Project (6-9 Hours)
Recommended Skill Level
Beginner
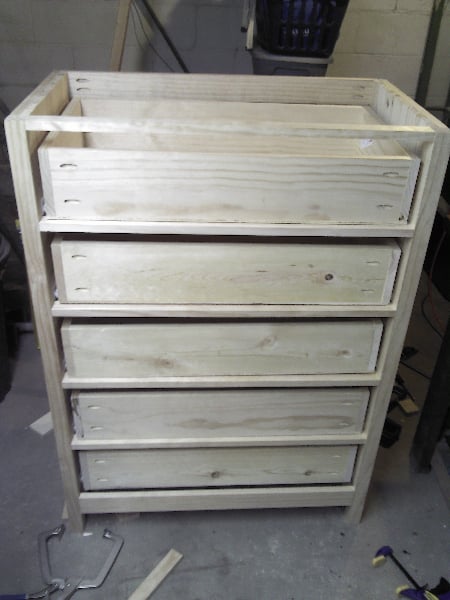
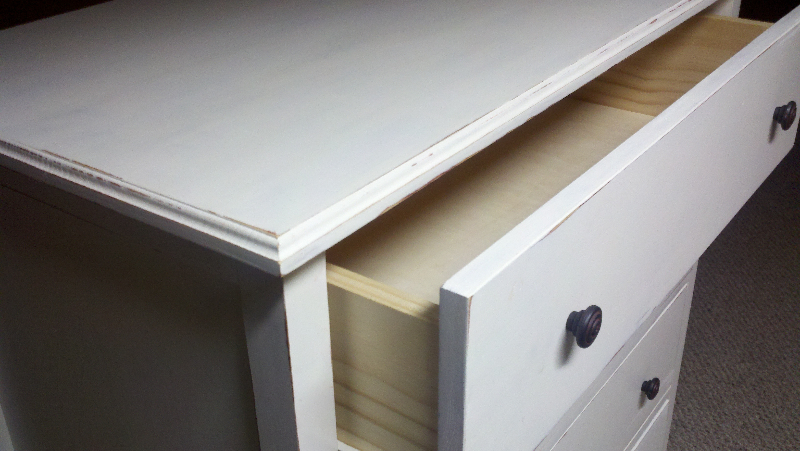
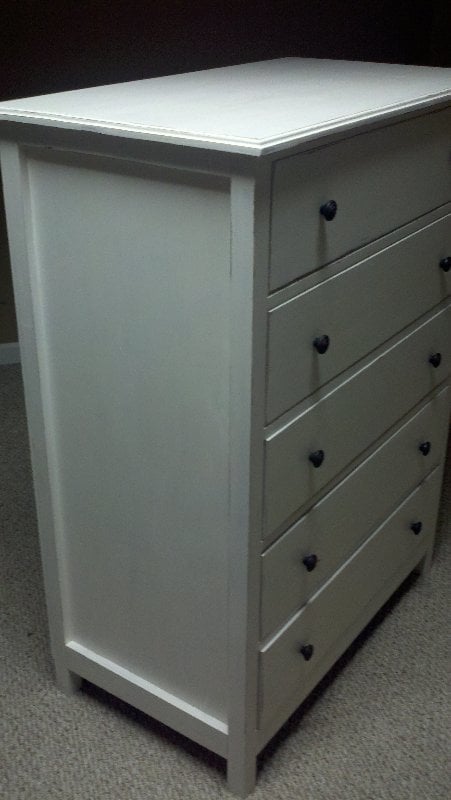
Patrick's Beach Cottage Dresser Expanded
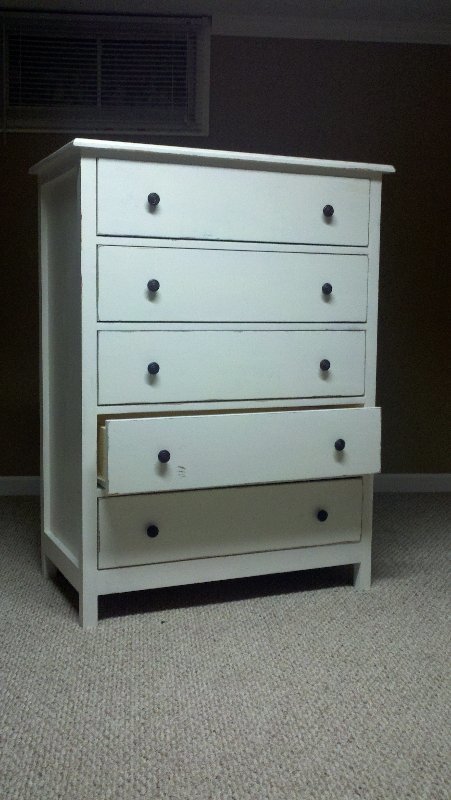
I took Patrick's design and expanded it. The dresser is deeper and has one more drawer than the original. The finish is only slightly distressed because that's how my 'client' wanted it. The drawer slides were the toughest part. The carcass MUST be square or at least very close. I built the whole thing, then tore the carcass apart and rebuilt it because my first attempt was not square enough. Obviously the drawers won't slide smoothly if it isn't square.
Edit: I get a lot of requests for the plans and/or cut list for my modifications. I do not feel comfortable re-posting the plans on my website and can not do it here either (only pictures can be uploaded). Please feel free to e-mail me (bbomerATgrvland.com) or request the plans in the comment section of my blog (linked below) and I will send you a .pdf that shows my modifications at each step.
Edit 2015-01-26: I do not believe that I am getting notifications for all the comments here, so please use one of the methods above.
Edit 2015-01-28: I have posted my alterations here: http://grvland.com/wordpress/2015/01/28/dresser-plan/. Please comment there with any questions, because I can not guarantee that I will get notified if you comment here.

Built from Plan(s)
Estimated Cost
$150 including all hardware
Estimated Time Investment
Weekend Project (10-20 Hours)
Finish Used
3 coats latex, 2 coats Minwax Polycrylic
Recommended Skill Level
Intermediate
Comments
Sun, 03/16/2014 - 19:08
Plans
I would love to receive a copy of your modified plans. My email is [email protected]. It looks great and is just what I need for my daughter's room!
Wed, 04/02/2014 - 20:24
Modified Plans
Please send me the modified plans to [email protected]. This piece looks amazing, and I can not wait to try it out!
Thanks,
Sara Mitchell
Mon, 09/15/2014 - 07:36
Please send a copy of your
Please send a copy of your modified plans! This dresser is beautiful, and I would love to try and recreate it. Please send the plans to [email protected].
thanks!
Lauren

Tue, 11/04/2014 - 12:13
Modified plans
Please send me a copy of your modified plans. The dresser looks great! You can send it to me at [email protected]. Thank you very much!
Ana
Sat, 12/13/2014 - 20:24
PLANS REQUEST
Please send me a copy of your modified plans! Its just what I'm looking for. [email protected]
Sat, 12/27/2014 - 17:17
Patrick's Beach Cottage Dresser Expanded
I would love your modified plans for this dresser! my email is [email protected]
Thanks

Sun, 12/28/2014 - 09:07
Expanded plans
If possible I would also love to use your expanded plans. My email is [email protected].
Thanks and happy holidays.
Steve
Sun, 12/28/2014 - 17:07
Plan request
I would love o get the updated plan for the larger dresser. Please email to [email protected]. Thanks!
Sun, 12/28/2014 - 21:58
Love the plan.
I would love to have a copy of your plan as well. My email is [email protected]. Thank you in advance.
Sat, 01/03/2015 - 14:35
Love your modifications
Hello,
I would also love a copy of your plans. My email is [email protected]. Thanks in advance :)
Tue, 01/05/2016 - 10:32
Free Plan ?
Hi .. I was just wondering if I could get the free plan for a three drawer dresser ? Nothing fancy , just wat to make one for my wife for her b-day , comin up soon ,, any help would be great ,, Thanks , and hope you have a happy new year/ Bye for now , Claude.
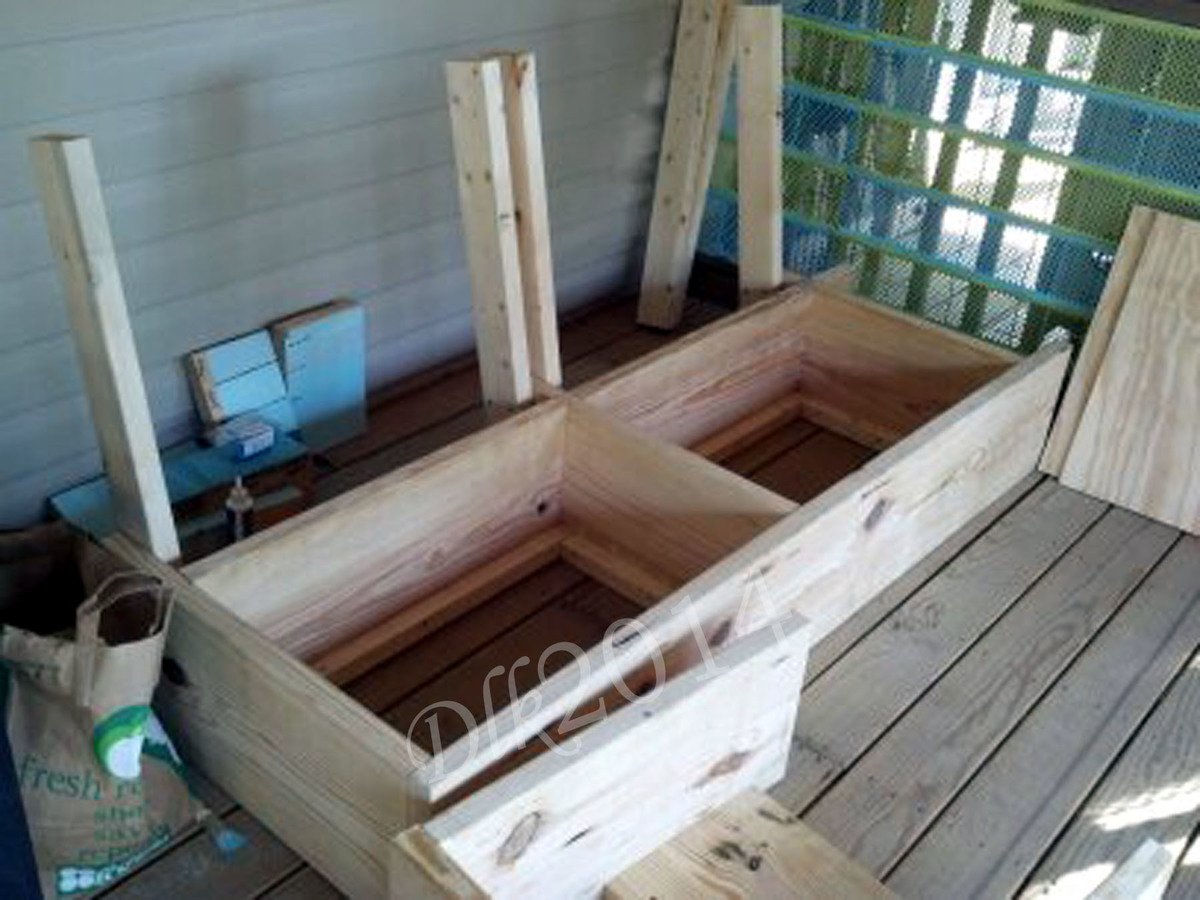
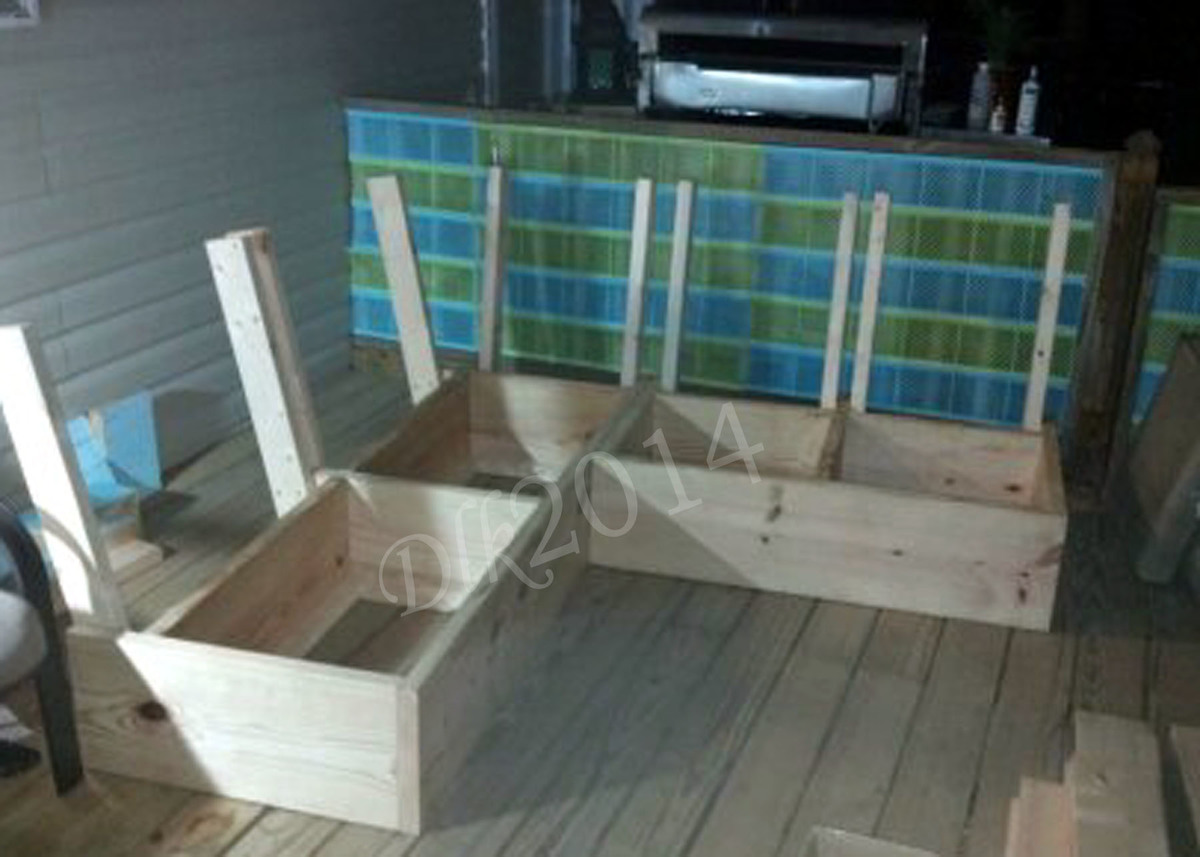
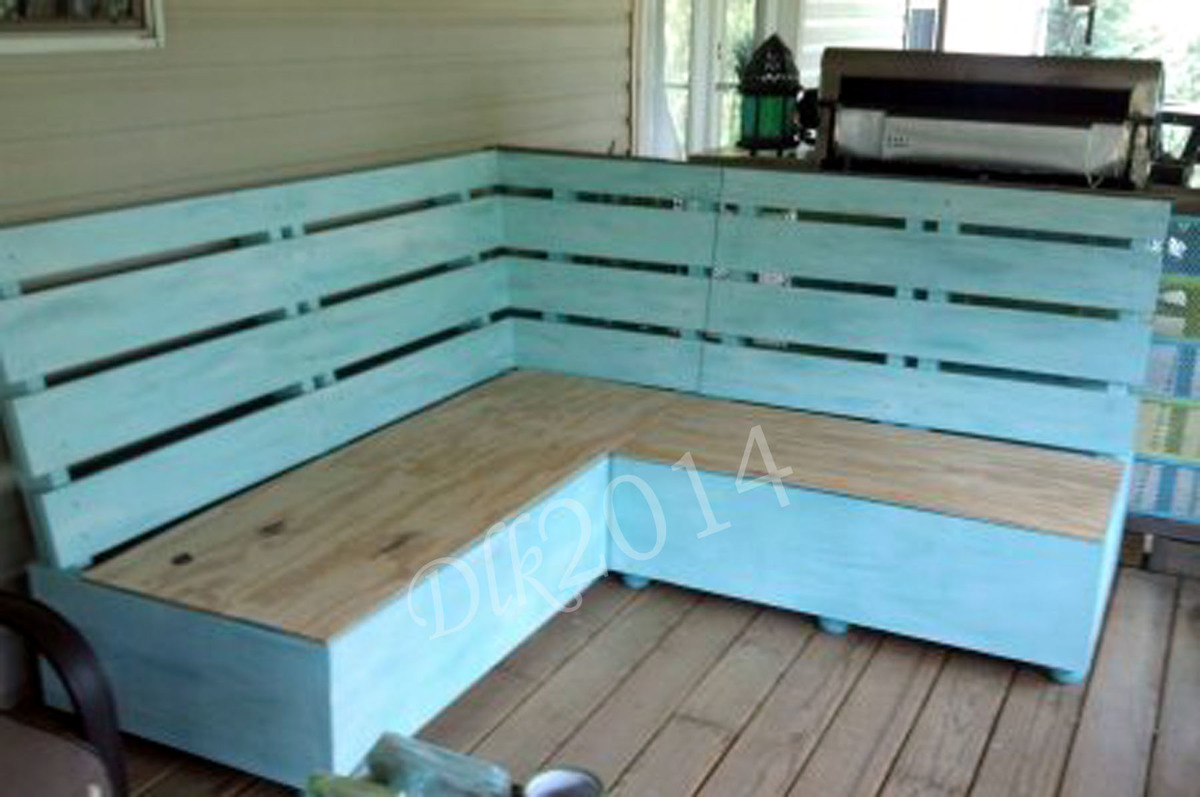
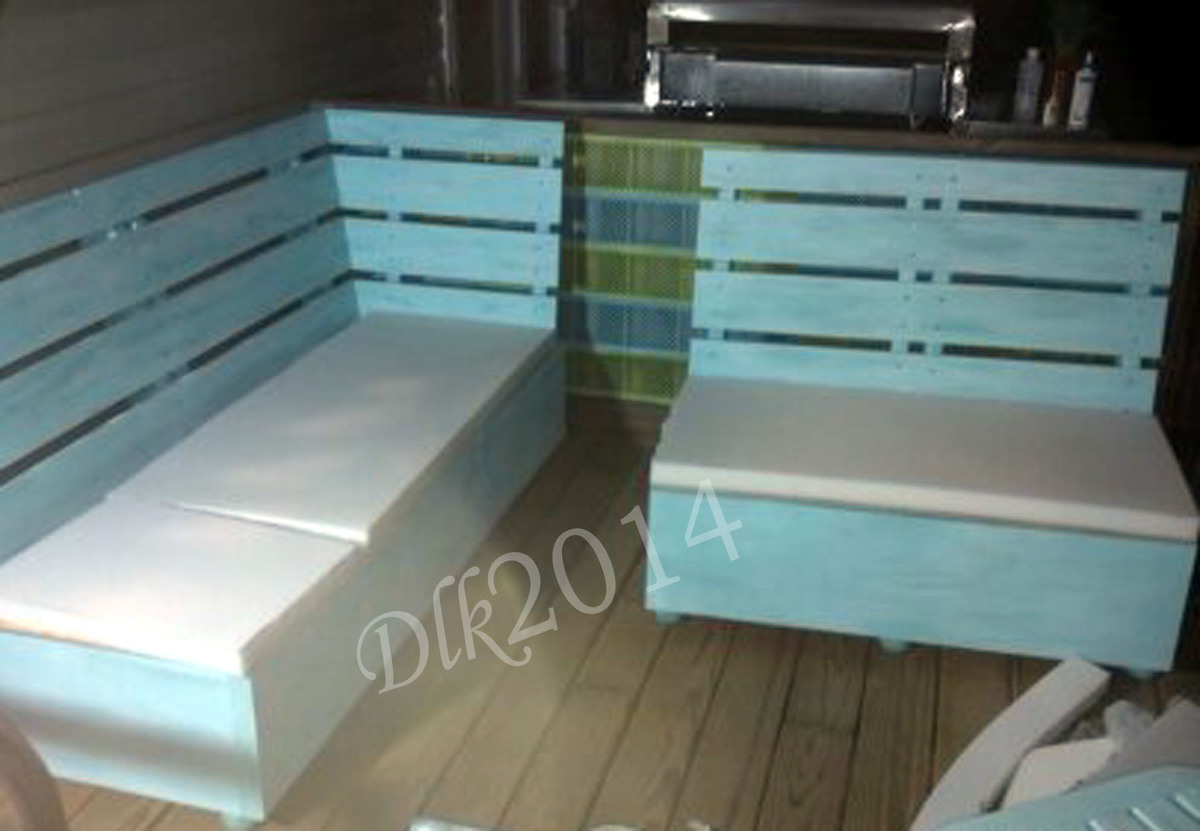
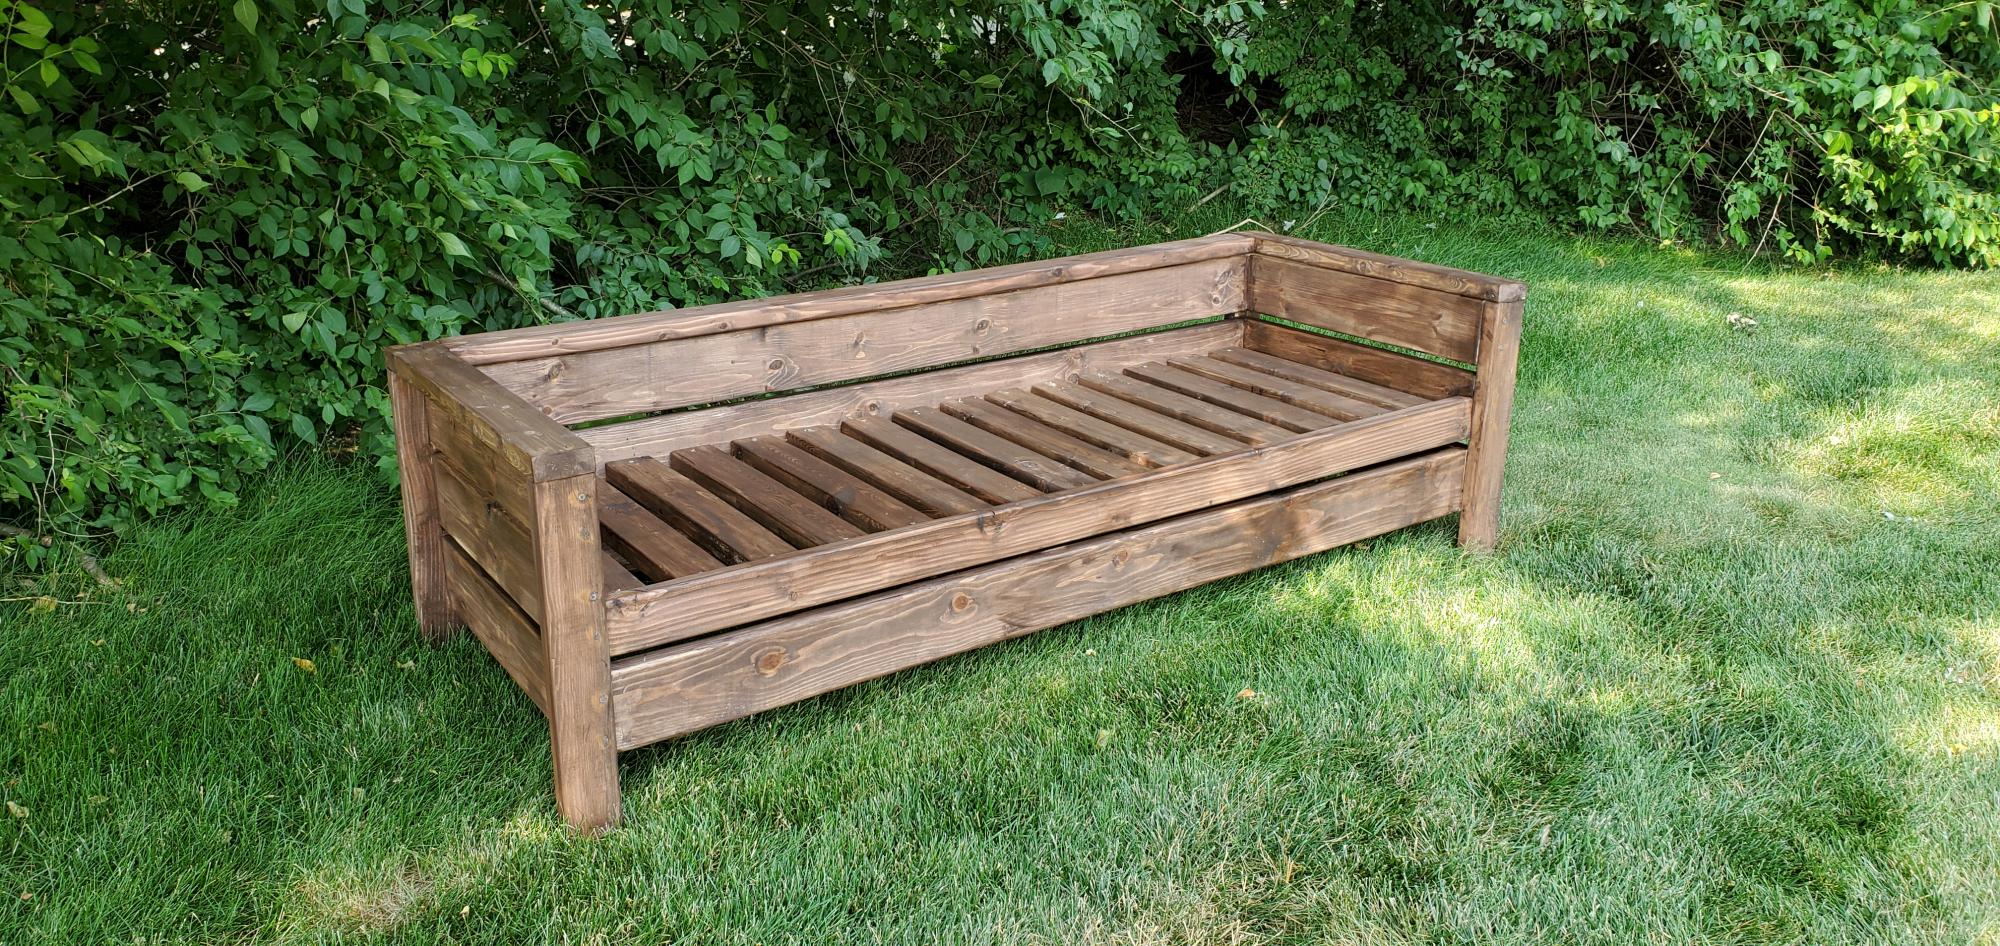
Storage Sofa
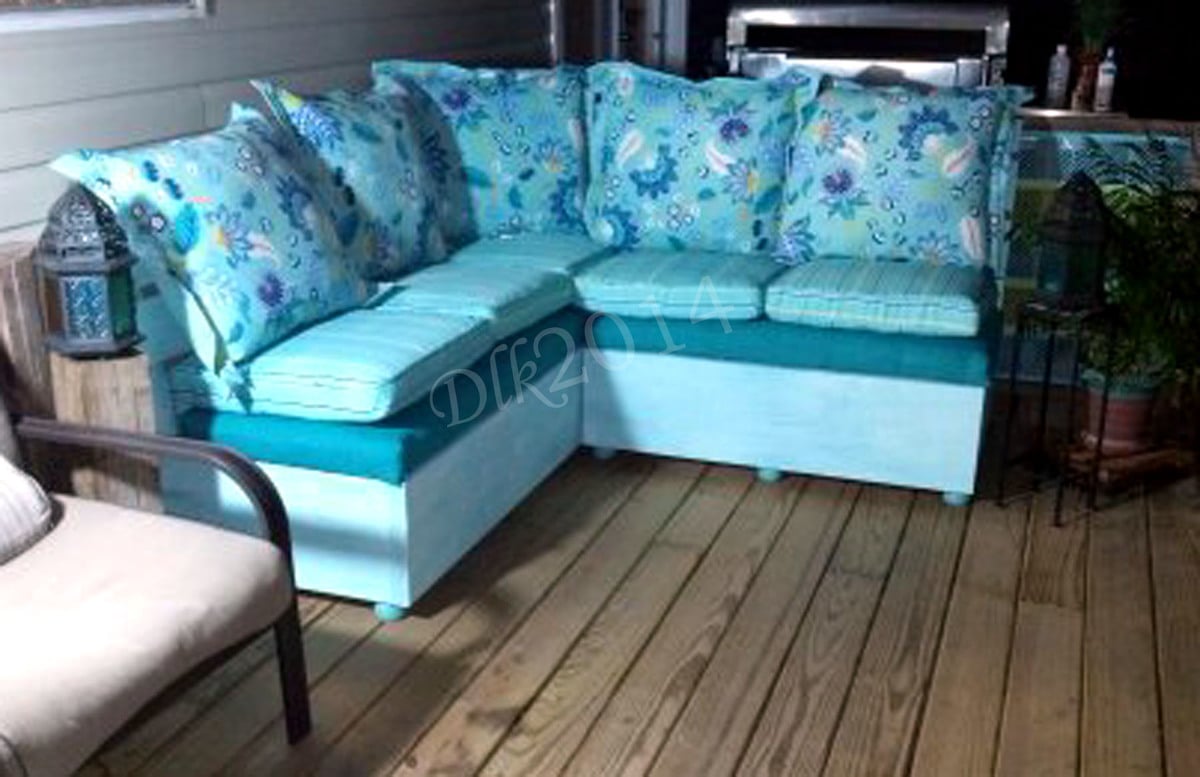
This is a project I completed last summer. I made some revisions to the original plan. First off, I wanted a corner sofa, so I had to figure out how the corner would work. This was my first ever wood working project and I'm not an architect or engineer, so it was quite challenging. I made a mini model out of foam core to give me a visual of how it would all work together. That was a tremendous help and I recommend doing this to anyone just starting out.
I did not use the part of the plan that included the foot pedestal. Instead, I built the sofa flat on the ground and in the end added store bought feet mainly because I liked the looks of them.
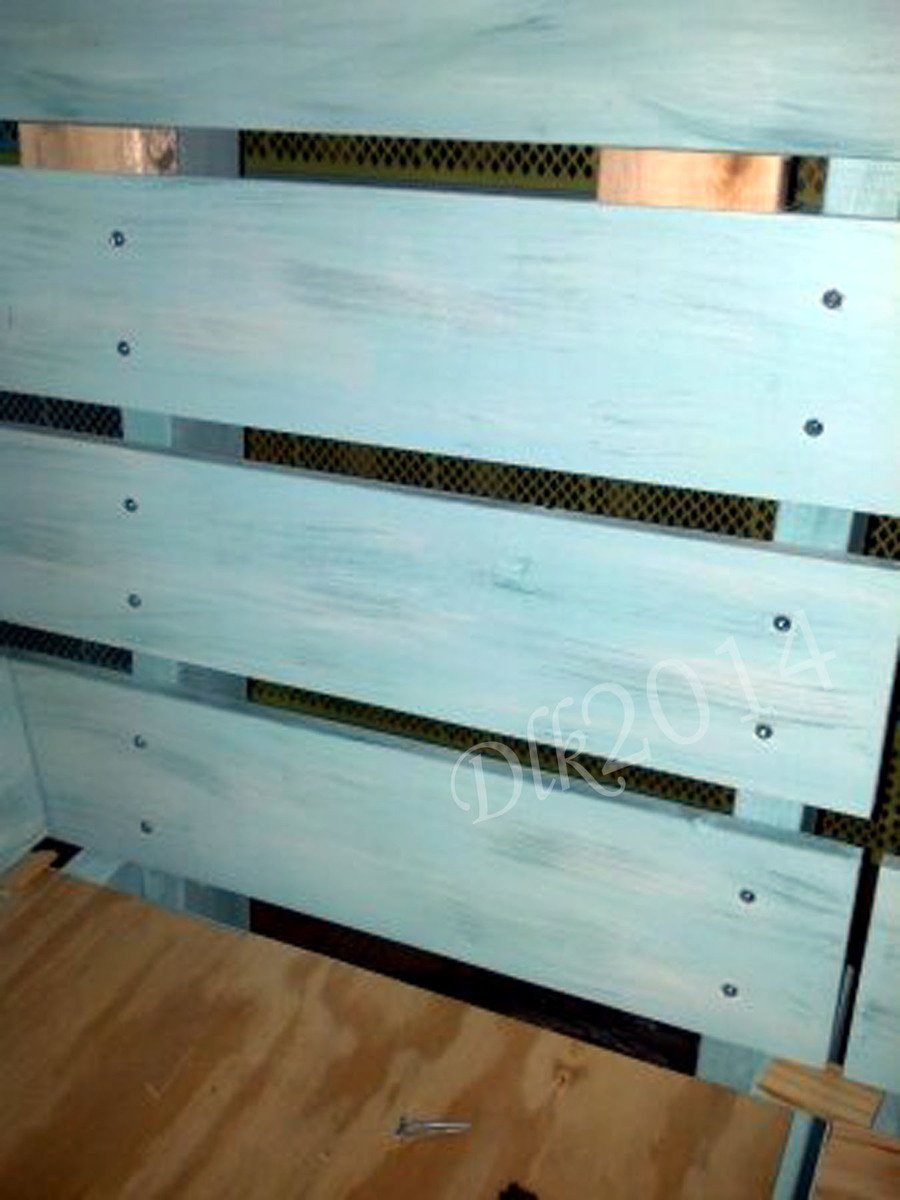
The sofa was built exclusively with the Kreg Jig, except for attaching the horizontal back pieces. I could have use the jig for that part as well, but liked the rustic look that screwing them in to the back braces provided.
I didn't want a padded back because the sofa sits outside on a covered, screened in patio year round. I wanted the ability to take off and wash all the cushions, or to use the bench without the back cushions sometimes.
The 2 sections of the couch were built as independent units and are movable, so one can sit across from each other. Both sections have ample storage.
Built from Plan(s)
Estimated Time Investment
Weekend Project (10-20 Hours)
Finish Used
A base coat of a light teal, with several shade of lighter and darker teal dry brushed over it. Topped with a thin white wash.
Recommended Skill Level
Intermediate
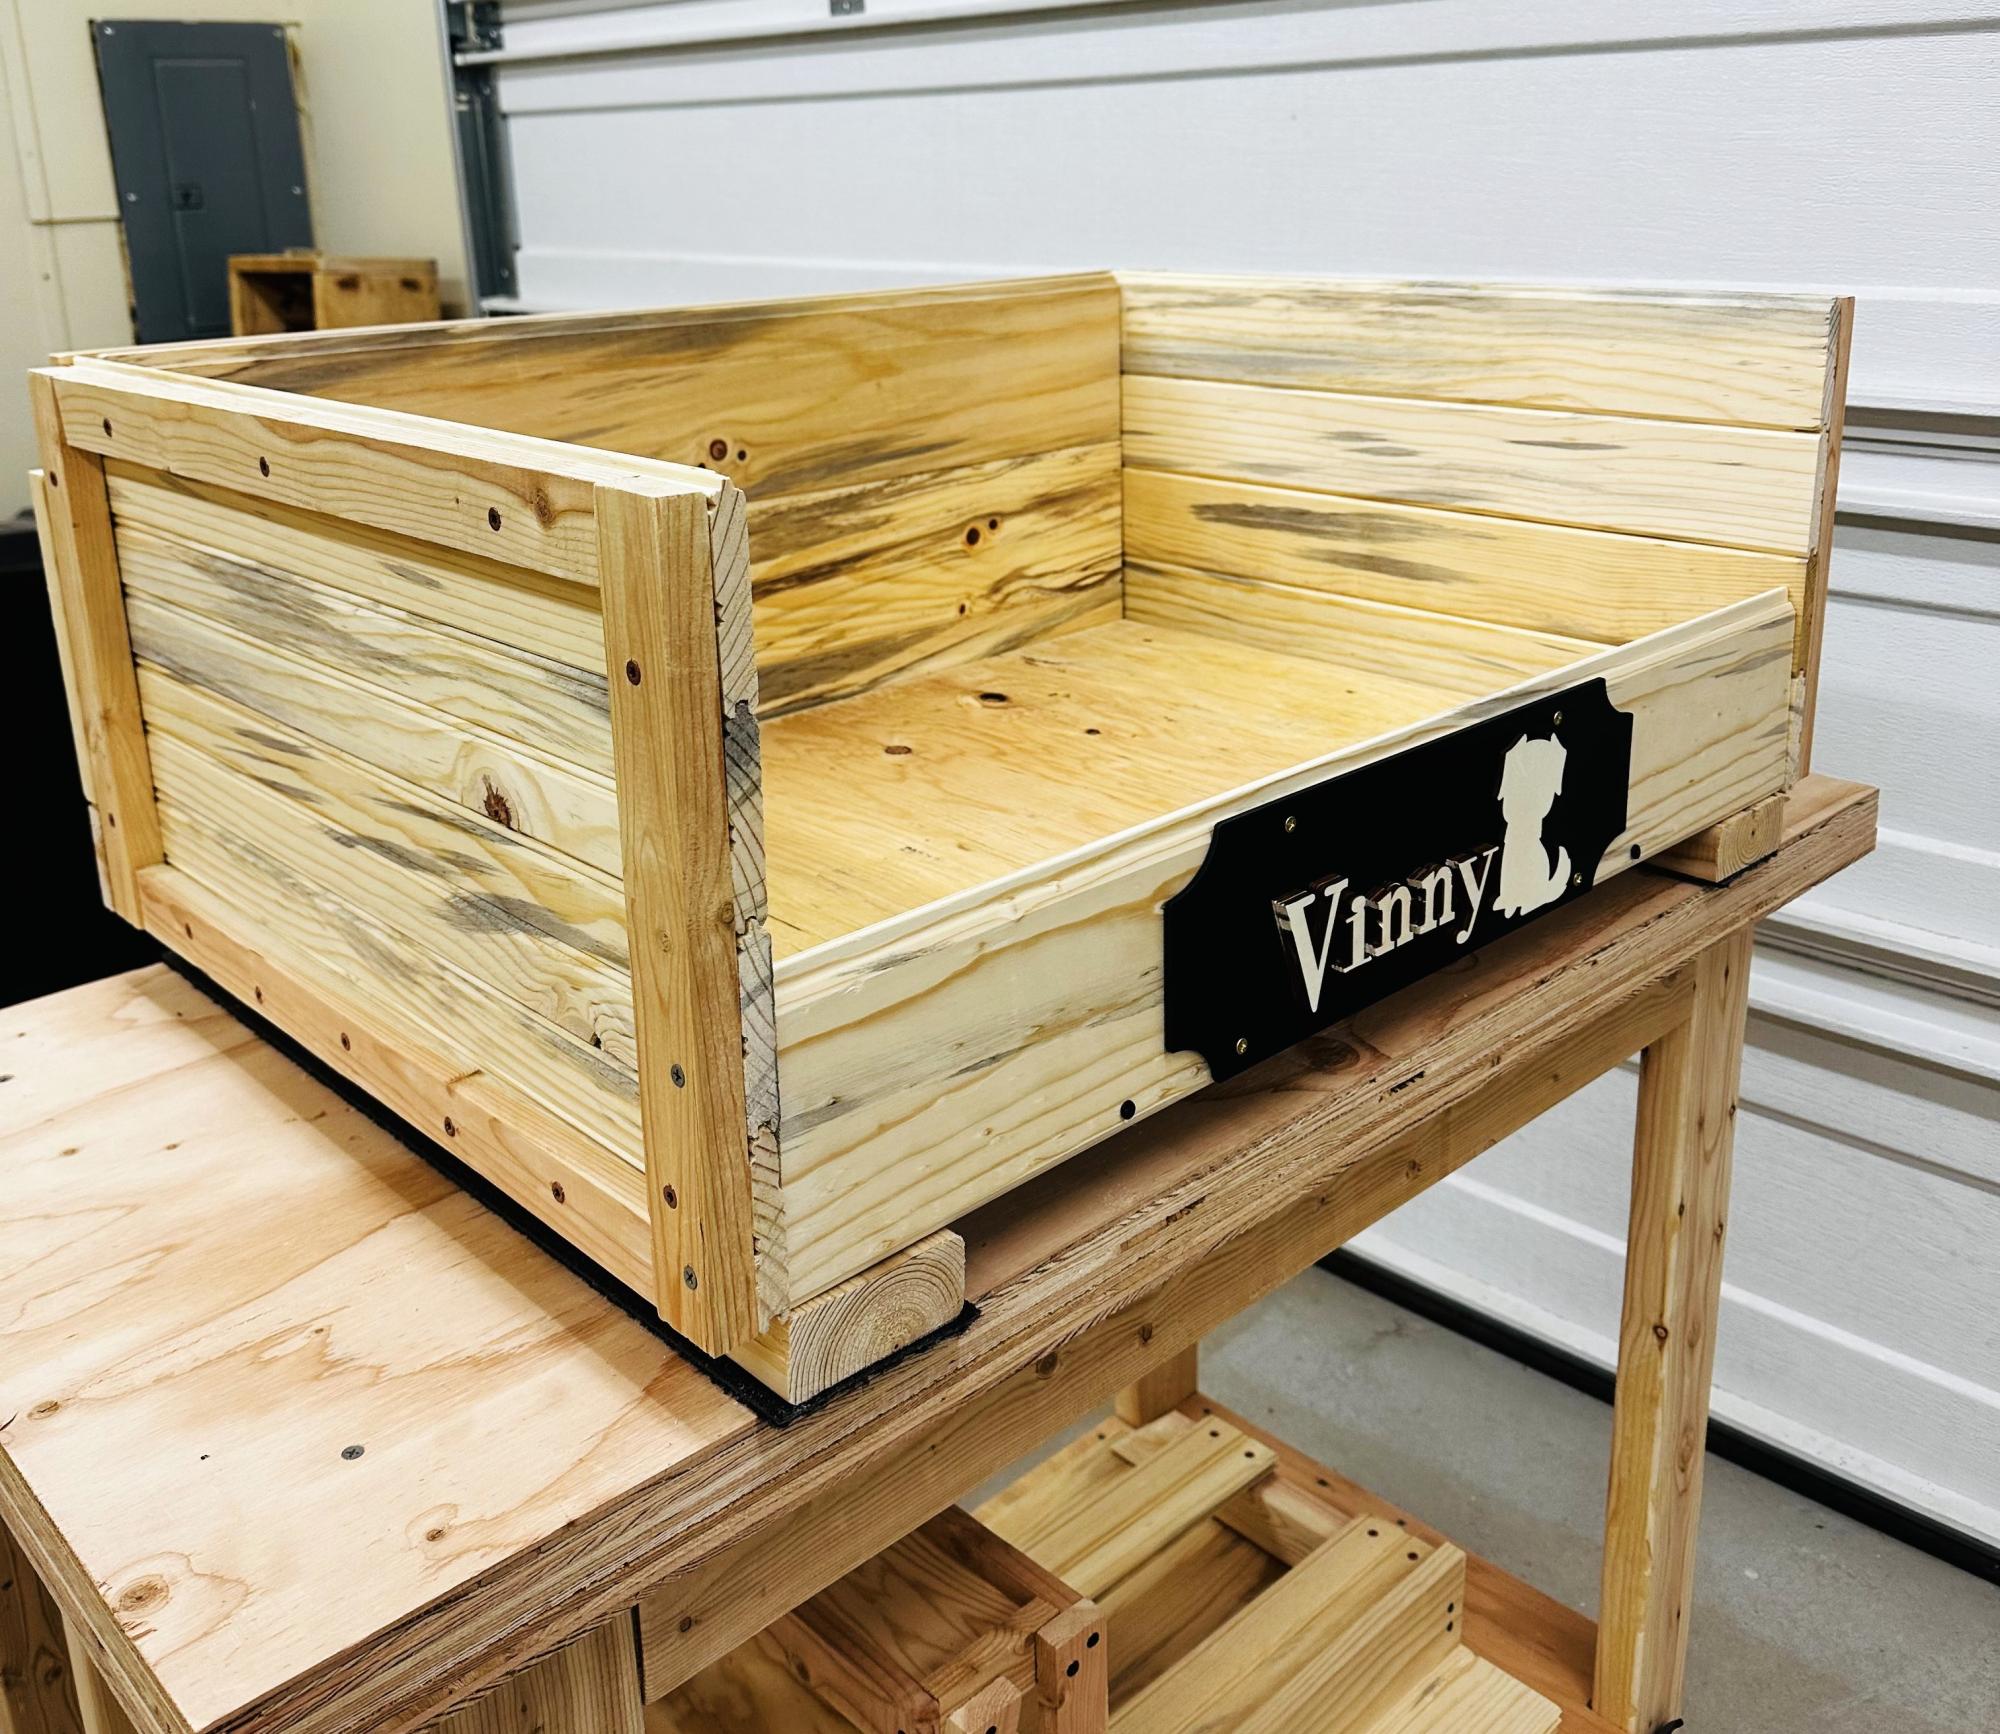
Dog kennel
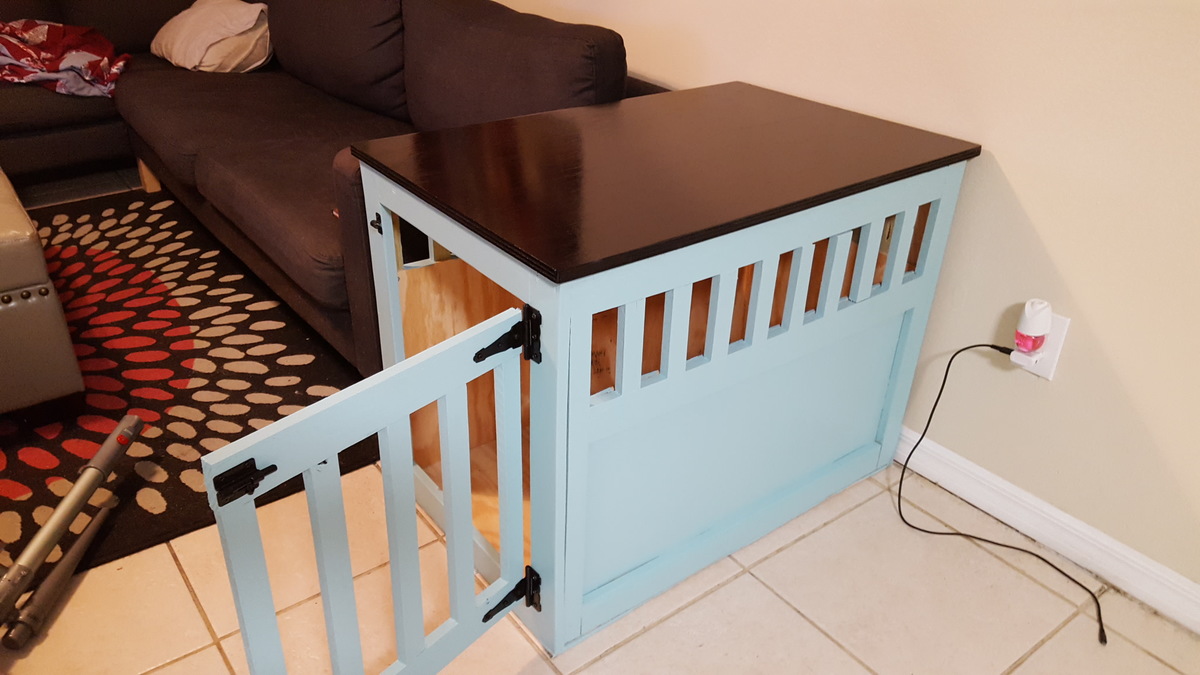
My husband and I took this on as our first project.. very happy with the results!! Our american bulldog gets kennel anxiety so we thought we would try this and he loved it right off the back! It is nice and lg he is 90lbs and our little one has made his way in with him to and he is 25lbs they both fit comfortably!!!
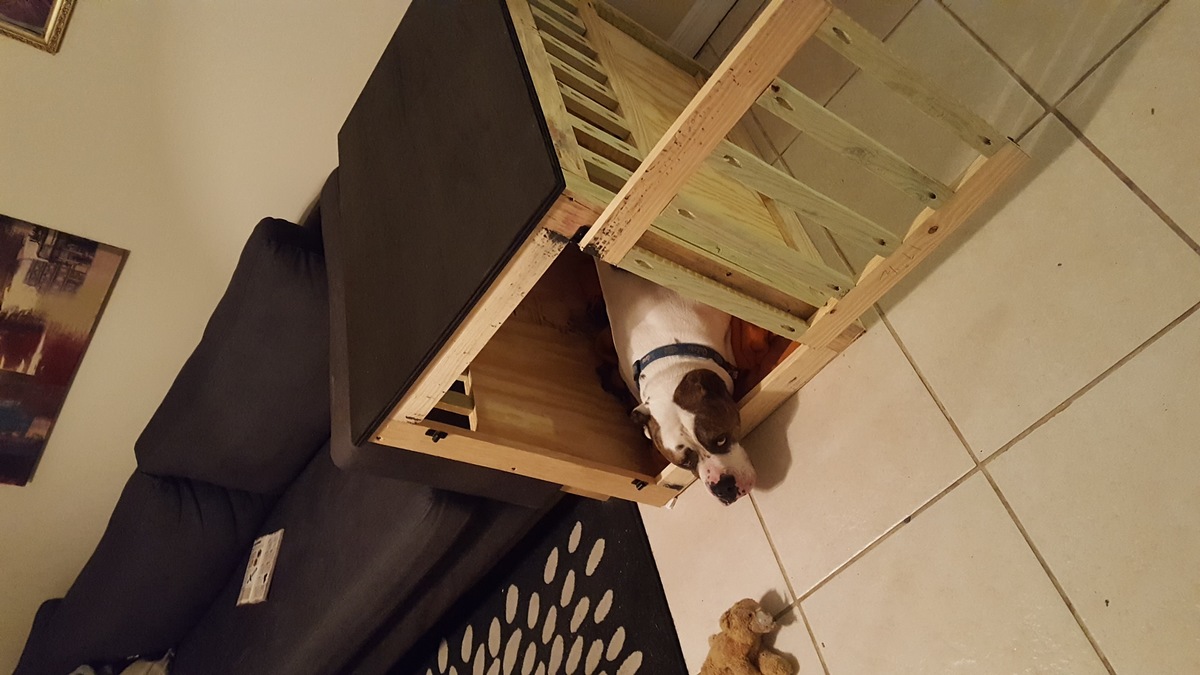
Built from Plan(s)
Estimated Cost
$100
Estimated Time Investment
Day Project (6-9 Hours)
Finish Used
Ebony stain and polyeurathane with a baby blue latex based paint
Recommended Skill Level
Beginner
Farmhouse coffee table
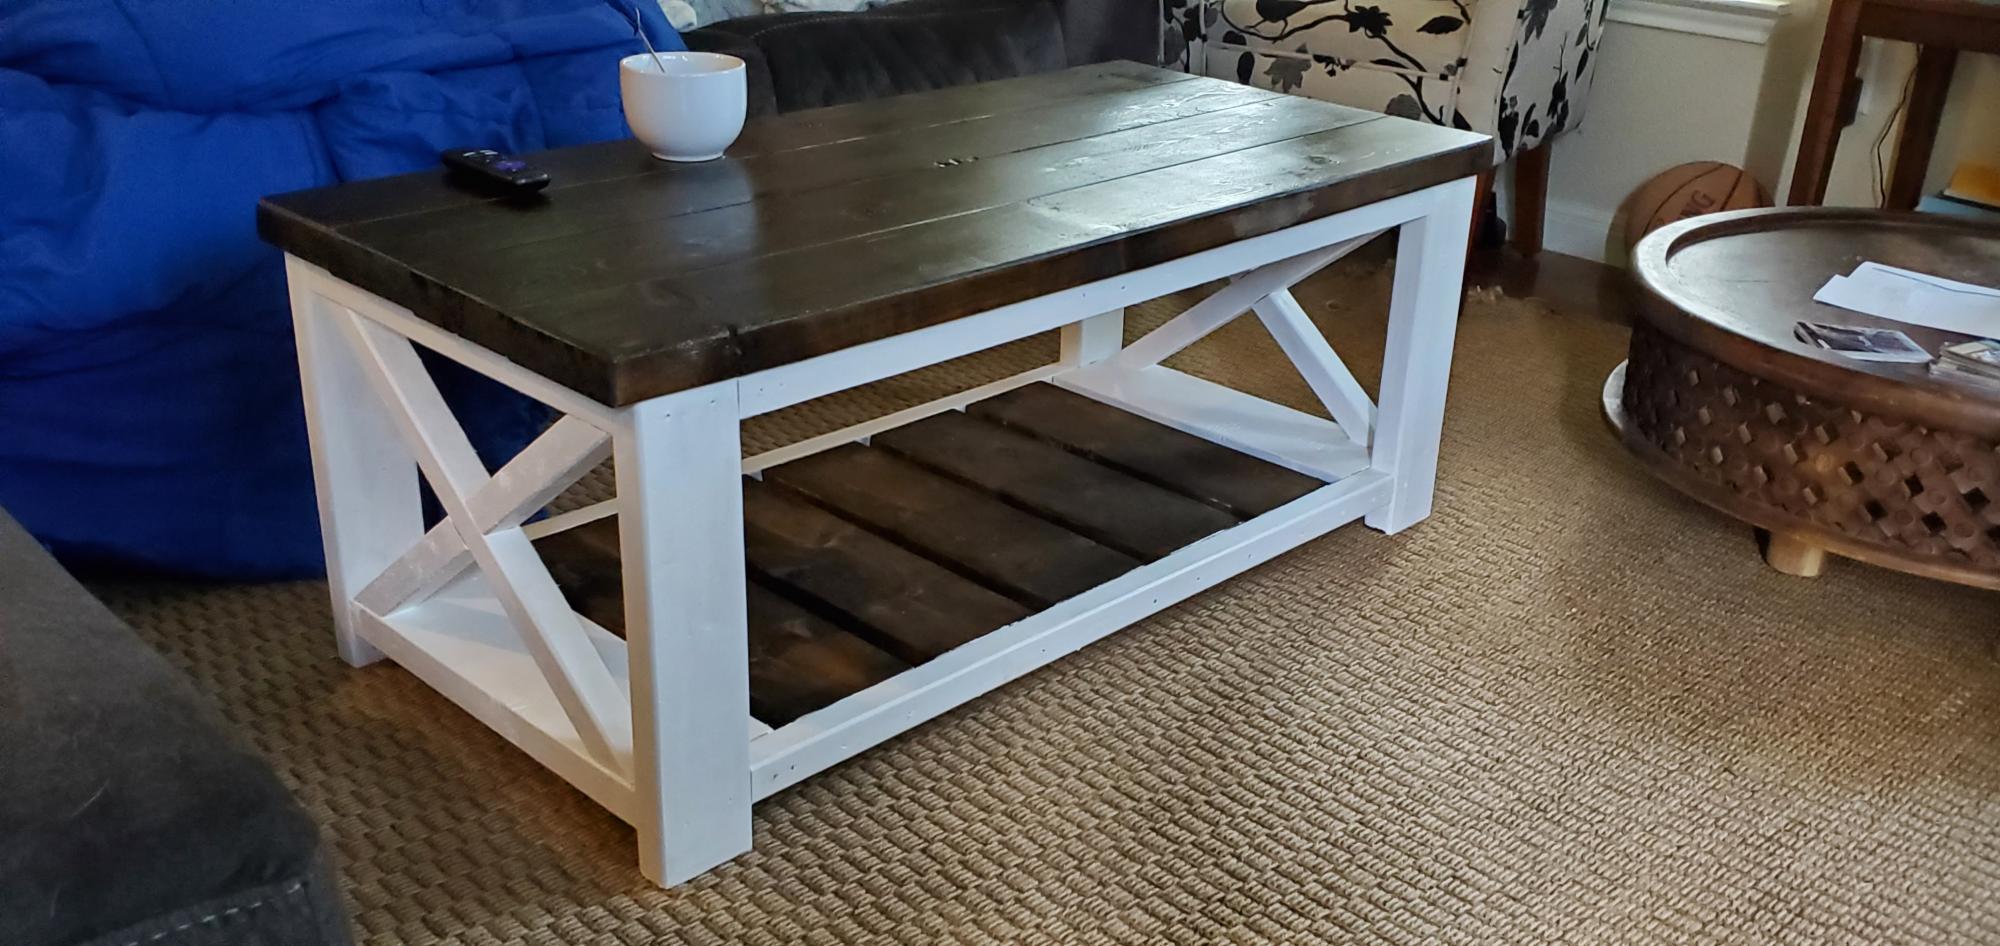
Followed the farmhouse instructions - worked great!!
The two tone finish matches the table I built
Built from Plan(s)
Estimated Cost
50
Estimated Time Investment
Afternoon Project (3-6 Hours)
Finish Used
Minwax jacobean with Valspar bright white
Advice - paint/stain everything but the top first to decrease the cracks and crevasses you need to get your brushes into to avoid getting paint on stained surfaces or vice versa
Advice - paint/stain everything but the top first to decrease the cracks and crevasses you need to get your brushes into to avoid getting paint on stained surfaces or vice versa
Recommended Skill Level
Beginner
Firehouse Loft Bed
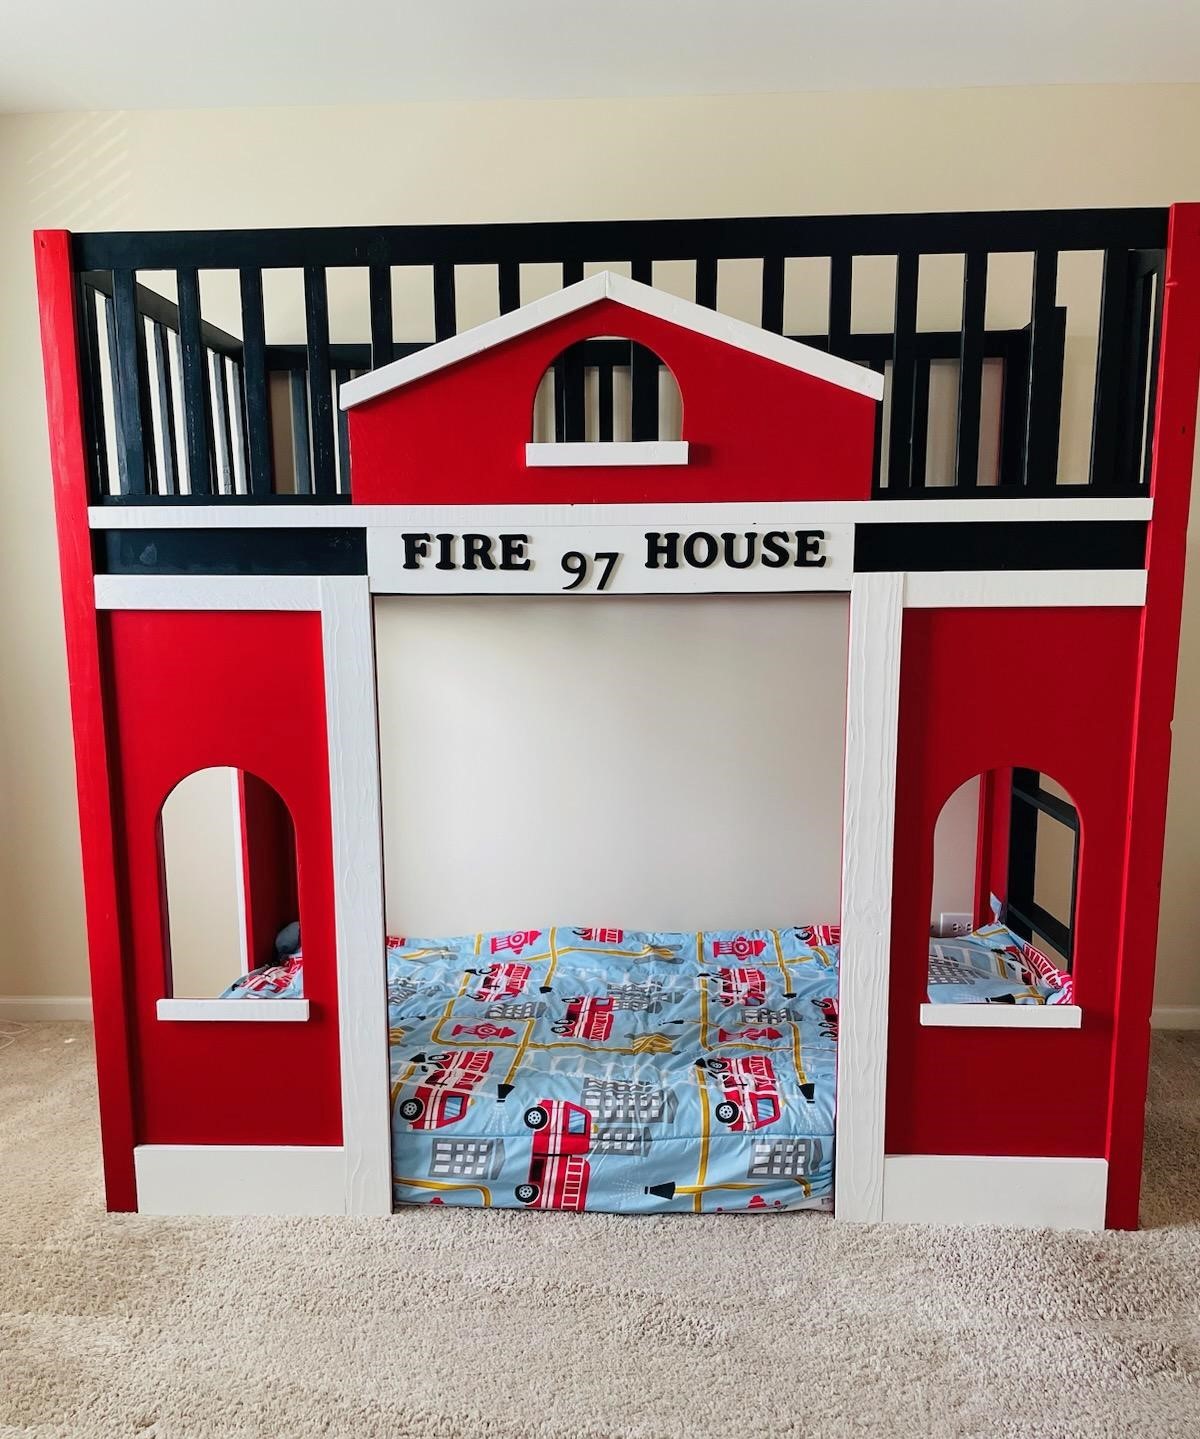
Our son moved up to a big boy room and we made him the Fire Station bed. He LOVES it. Not quite ready for him to use it as a loft bed so he is sleeping on the bottom for now.
Kaity
Built from Plan(s)
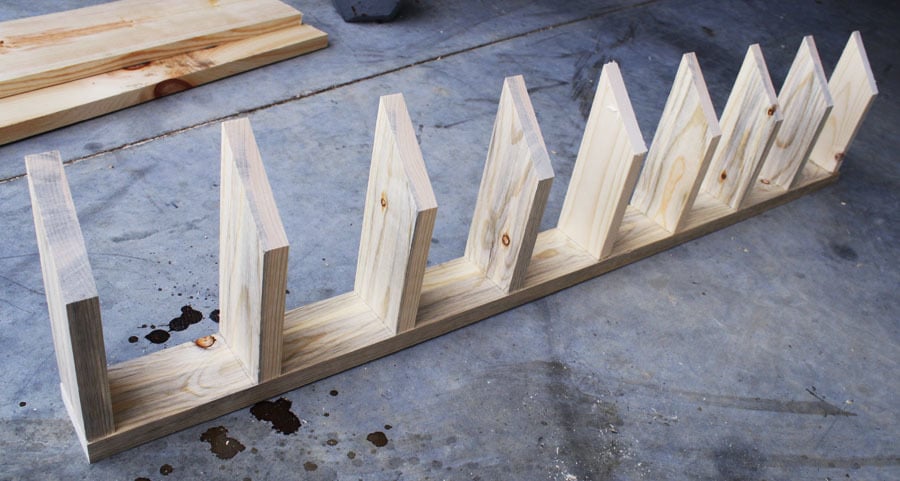
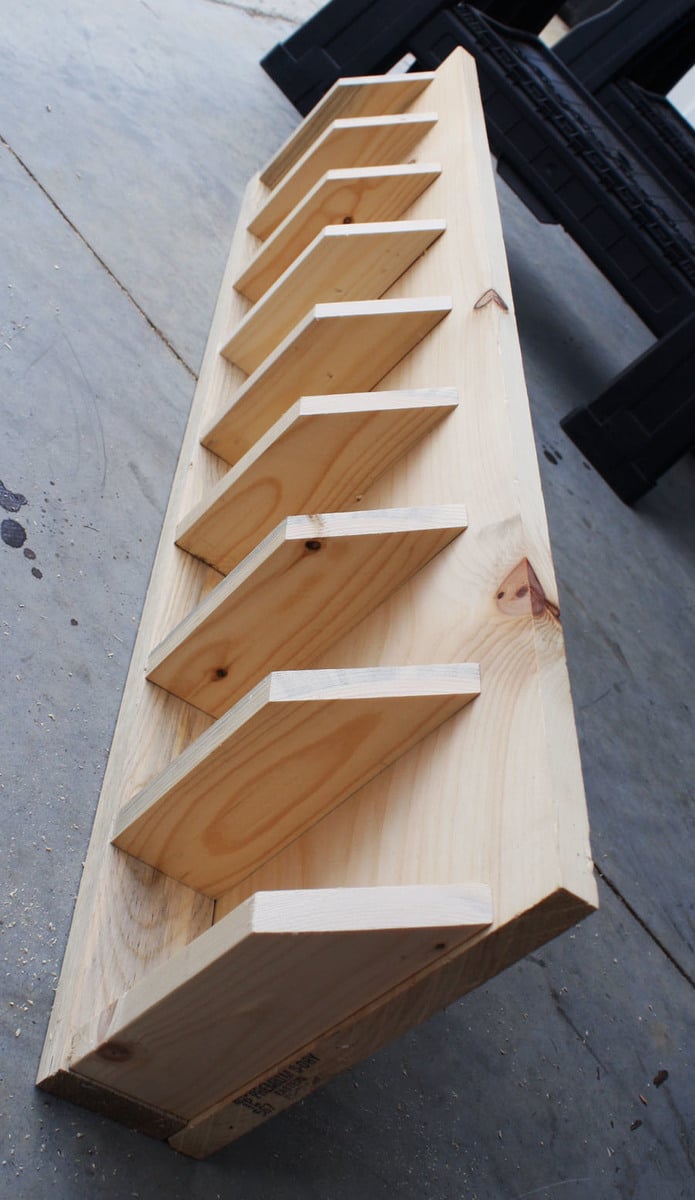
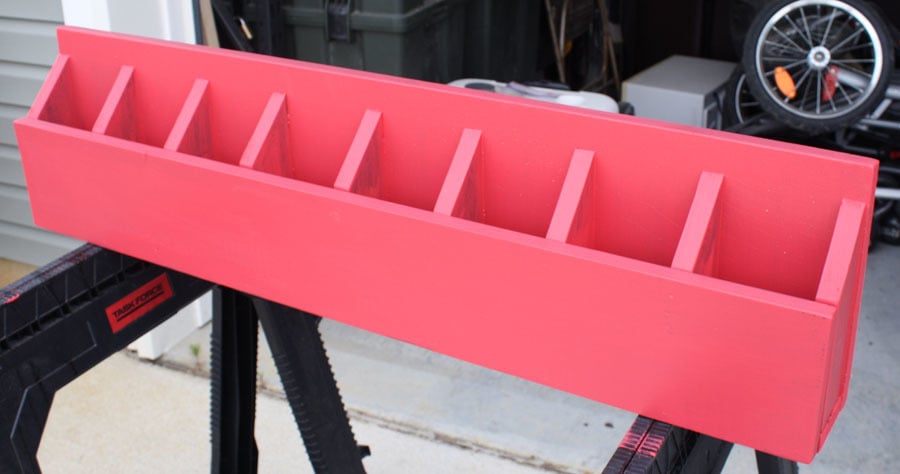
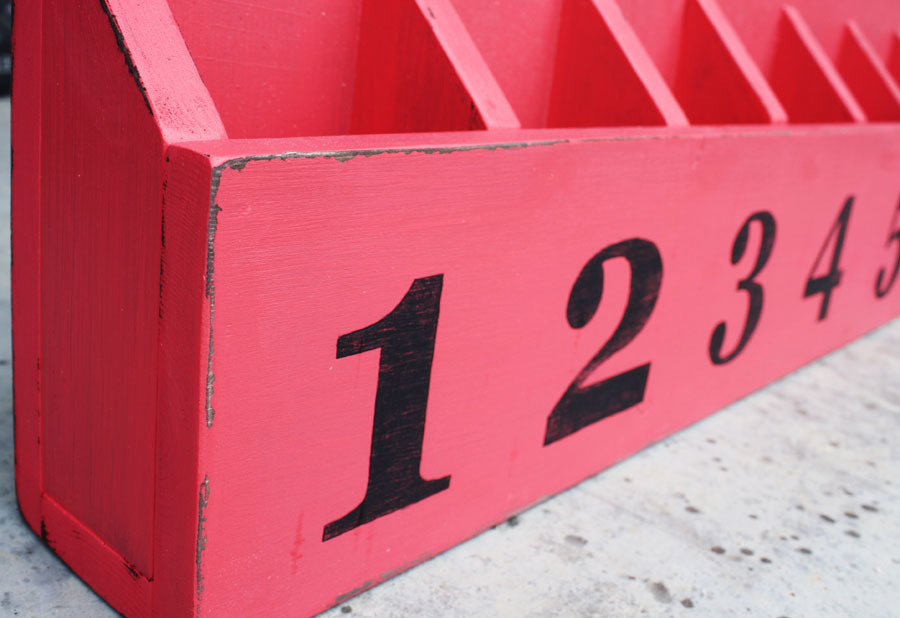
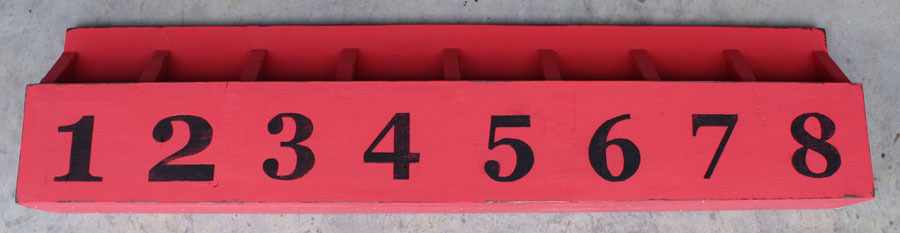
PBK Cubby Wall Shelf Knockoff
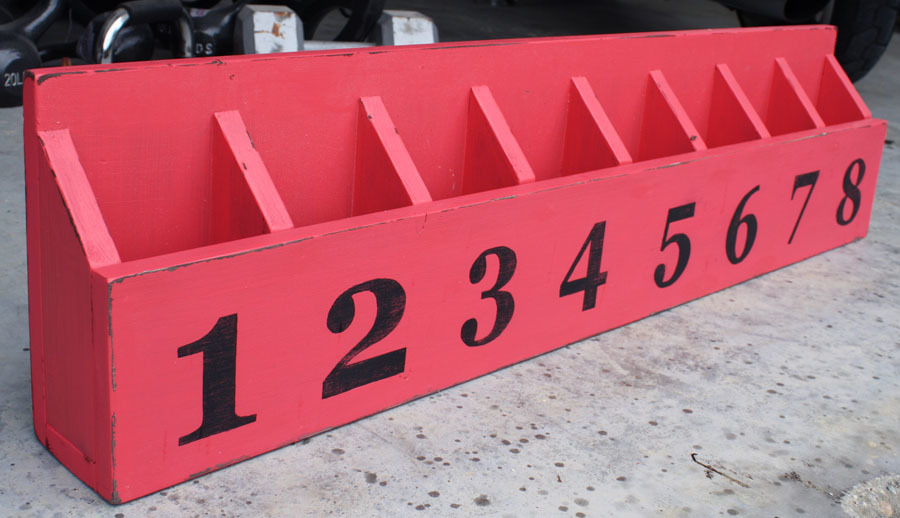
This project was super easy and free! I just used some scrap wood I had, along with stains and finishes already on-hand and built this Pottery Barn Kids knockoff shelf while the baby napped! For the complete play-by-play, click my blog link!
Built from Plan(s)
Estimated Cost
Free!
Estimated Time Investment
An Hour or Two (0-2 Hours)
Finish Used
Stained with Rustoleum Ultimate Wood Stain in Dark Walnut, then painted with red Valspar paint, hand-painted numbers with black acrylic paint, then distressed on edges and corners to reveal dark walnut stain, and sealed with 2 coats of Rustoleum Satin Polyurethane.
Recommended Skill Level
Starter Project
Comments
Tue, 08/21/2012 - 21:24
This looks great! I just
This looks great! I just finished the wood part of this project, and was looking to see what everyone used for a finish. Yours looks pink in the photo, but you say it is red paint. Is the picture true to color?
My rustic Farmhouse queen bed
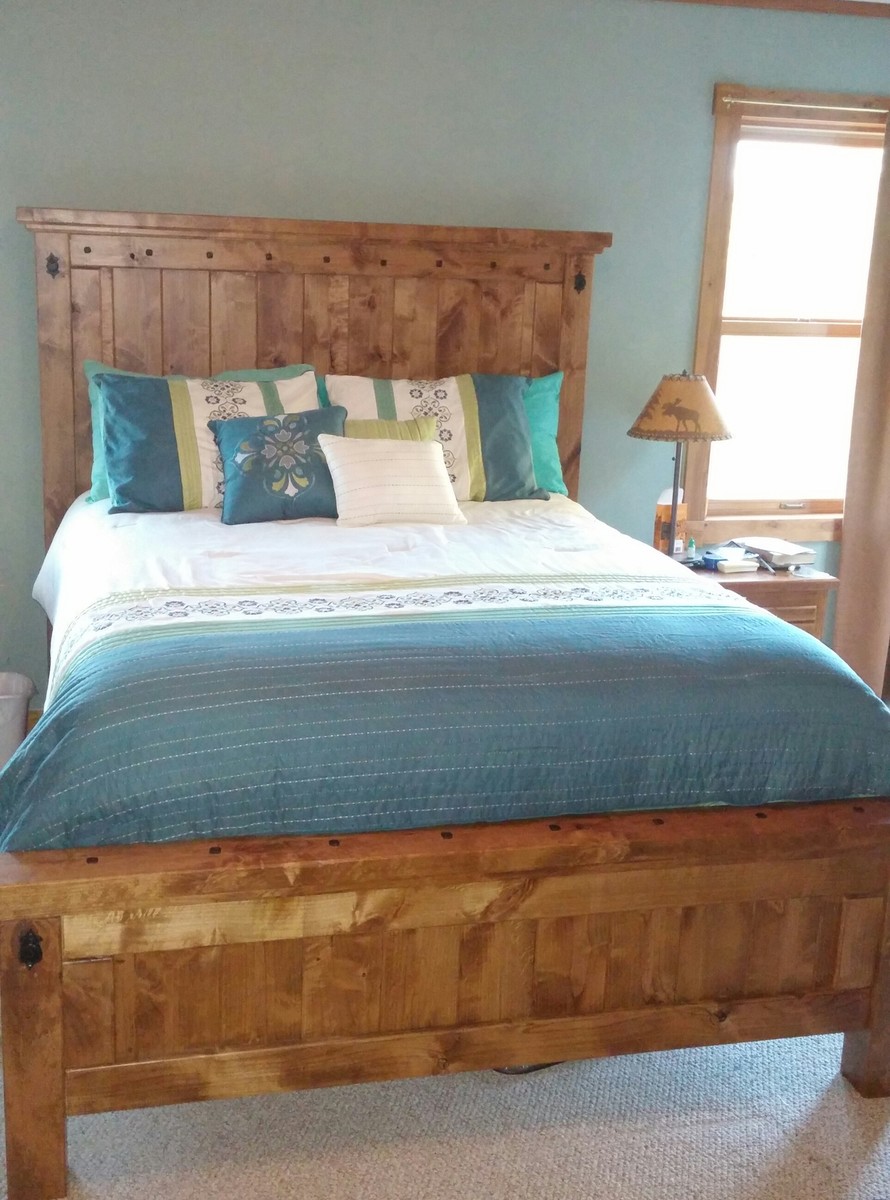
I found a bed on line that I loved but I didn't want to pay the sticker price. I found the plans here that were very similar and we built it from your plans with a few modifications. One being the side boards are 12' wide so that it will completely hide the box spring. I love the finished look. Thanks Ana!
Estimated Cost
$280
Estimated Time Investment
Week Long Project (20 Hours or More)
Finish Used
Aged oak Gel stain and 4 coats of varnish
Recommended Skill Level
Intermediate
Outdoor couch
I get so many orders for this couch! I modified the loveseat plans to make it bigger. Love how sturdy and gorgeous it is. Great piece. Thank you for the plans!
Comments
Adirondack Chairs and Side Tables for Firepit
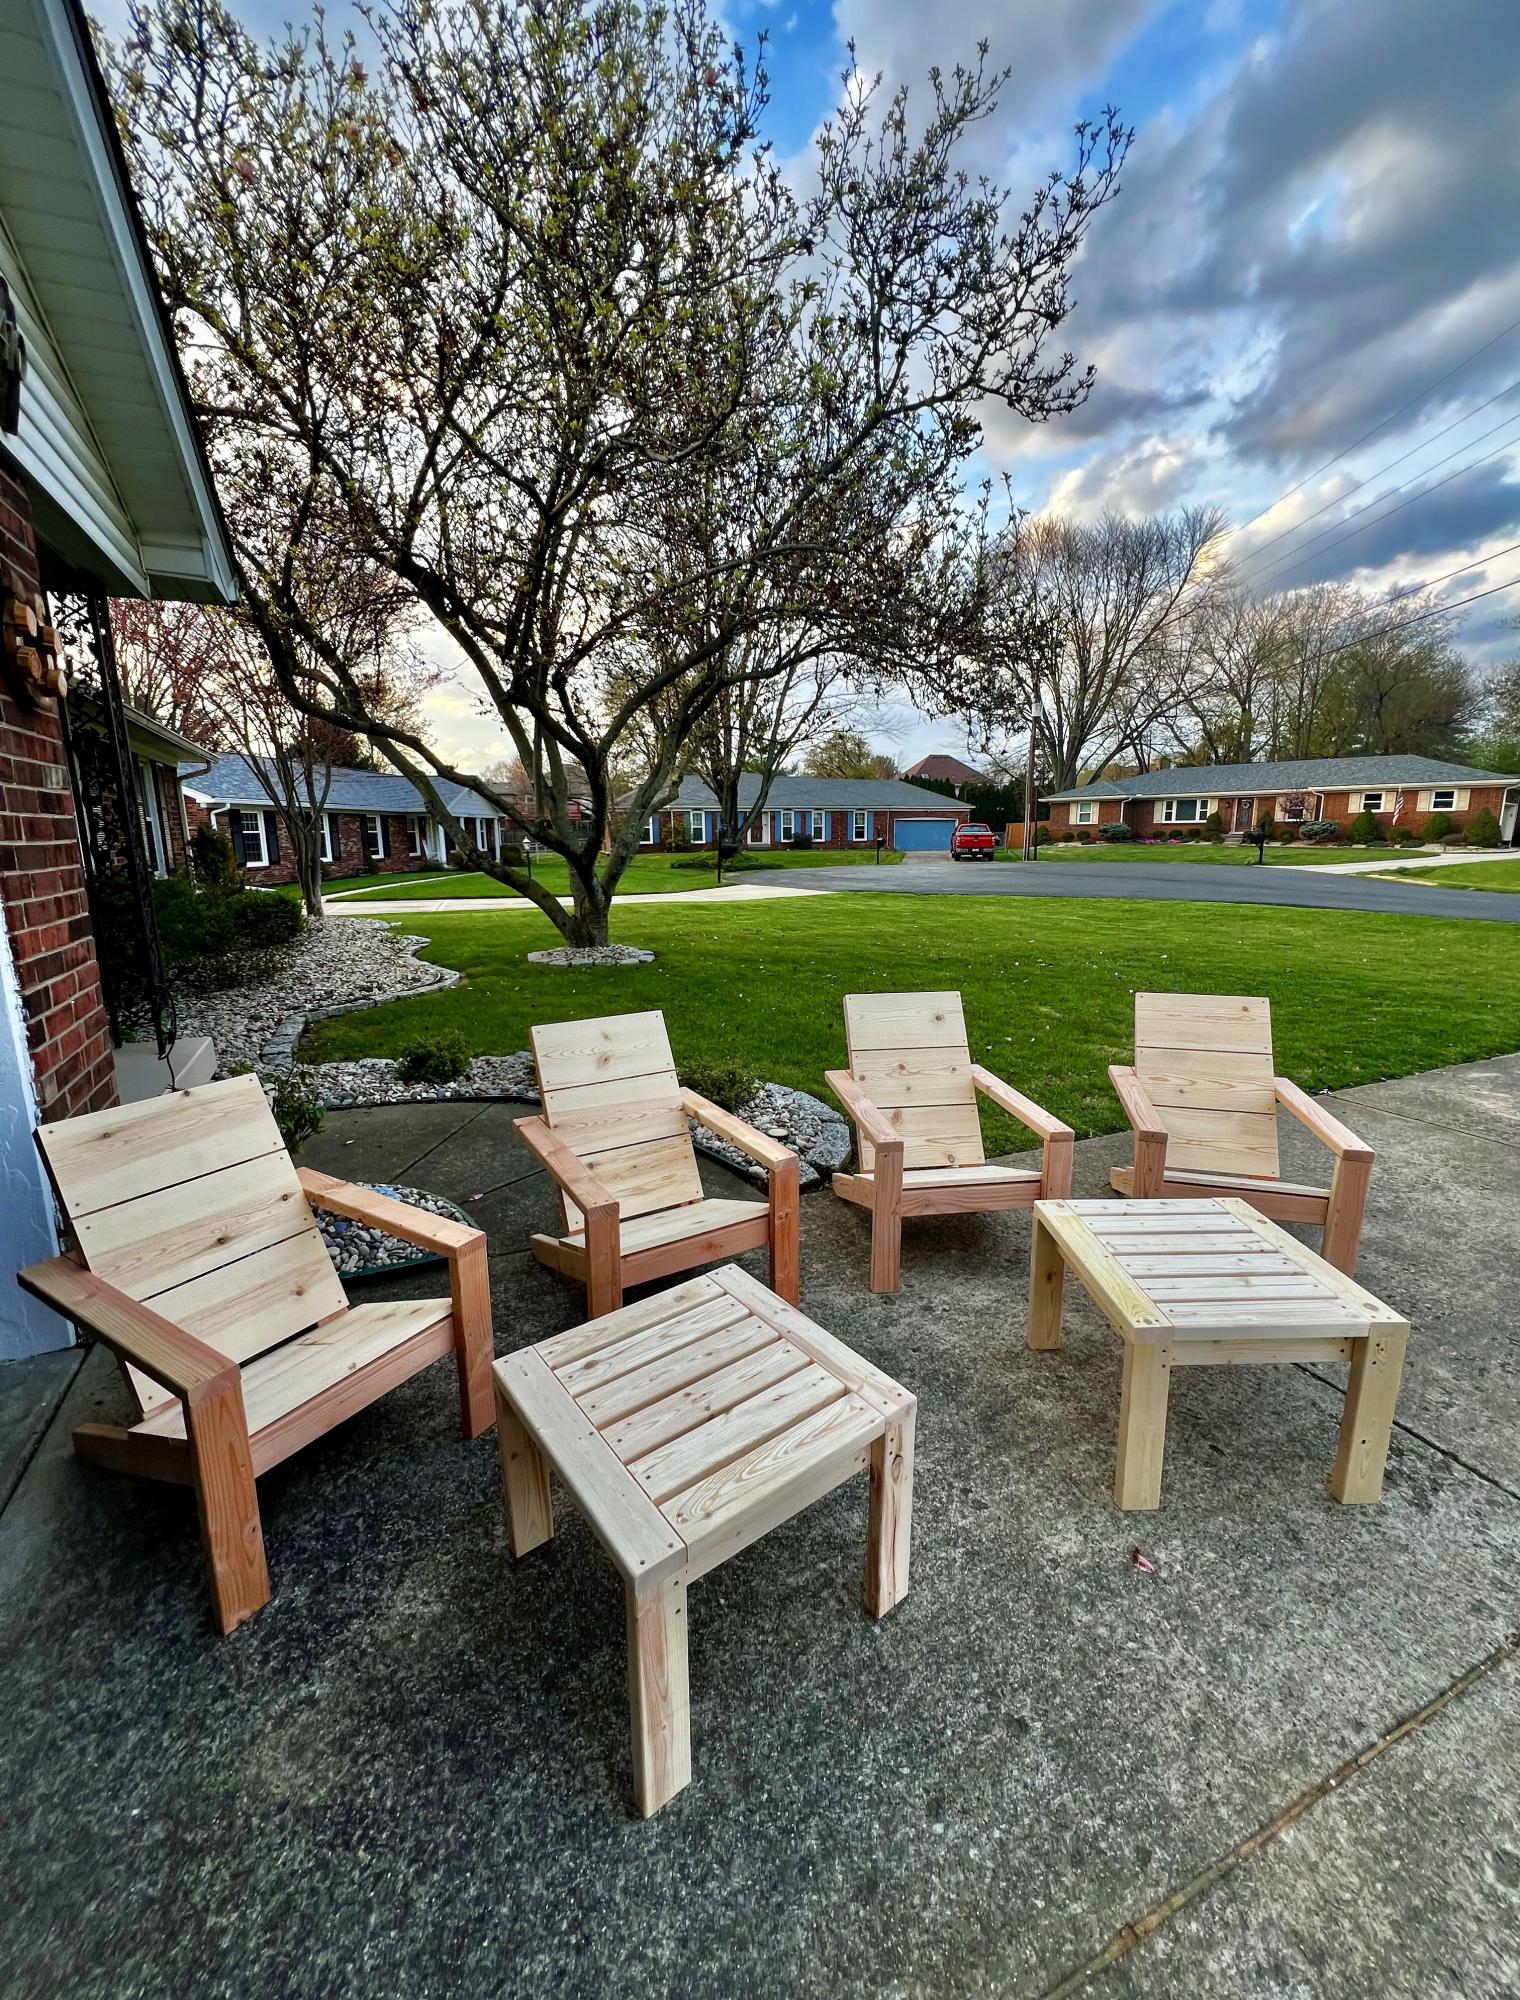
We needed a new fire pit area for the back yard. Your Adirondack chair and side table designs were a perfect fit.
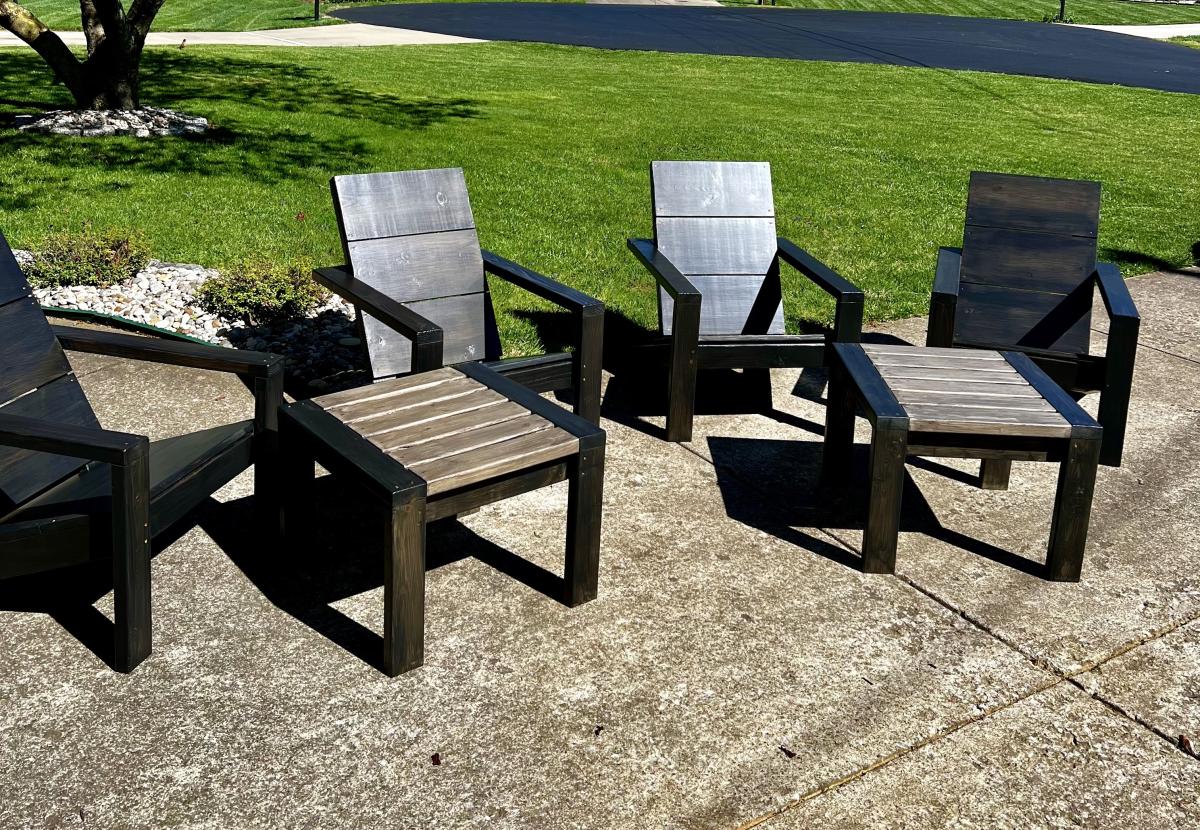
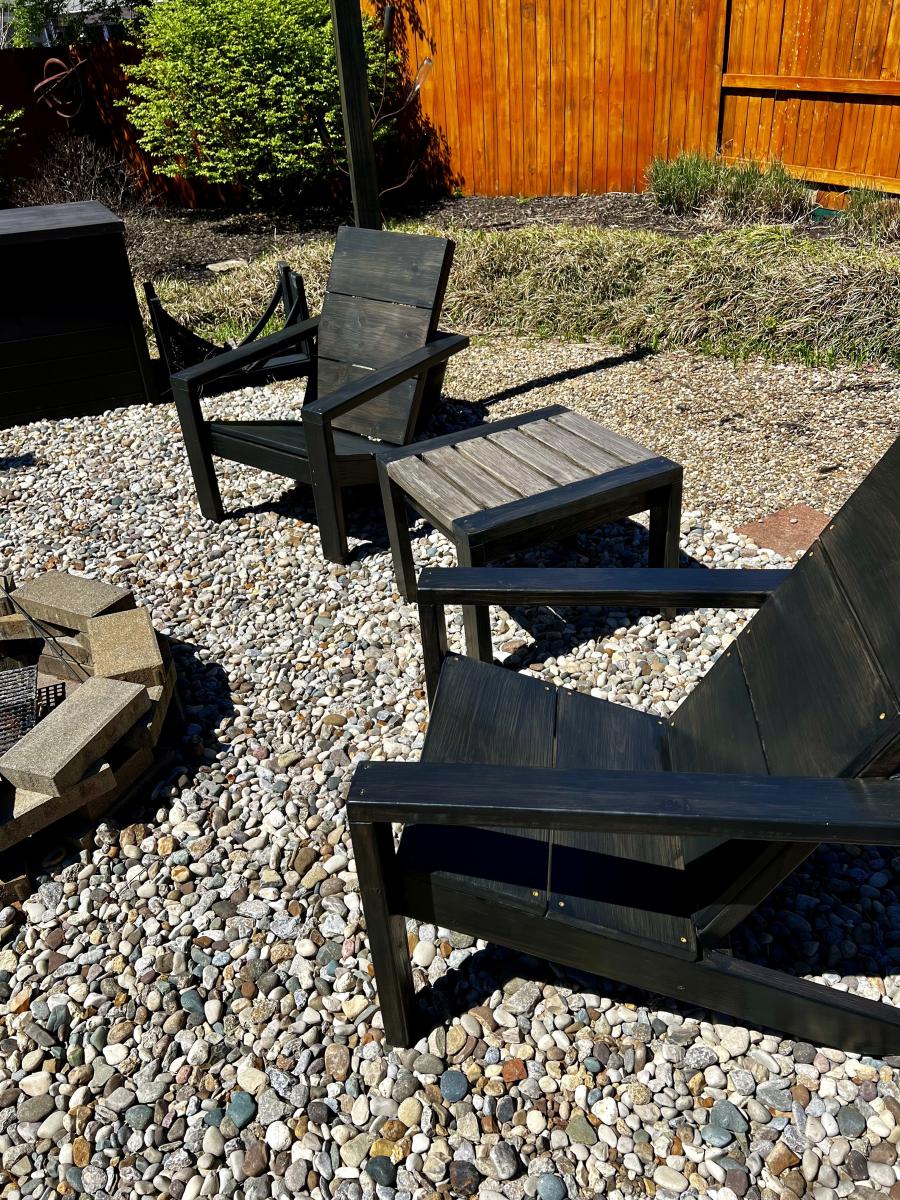
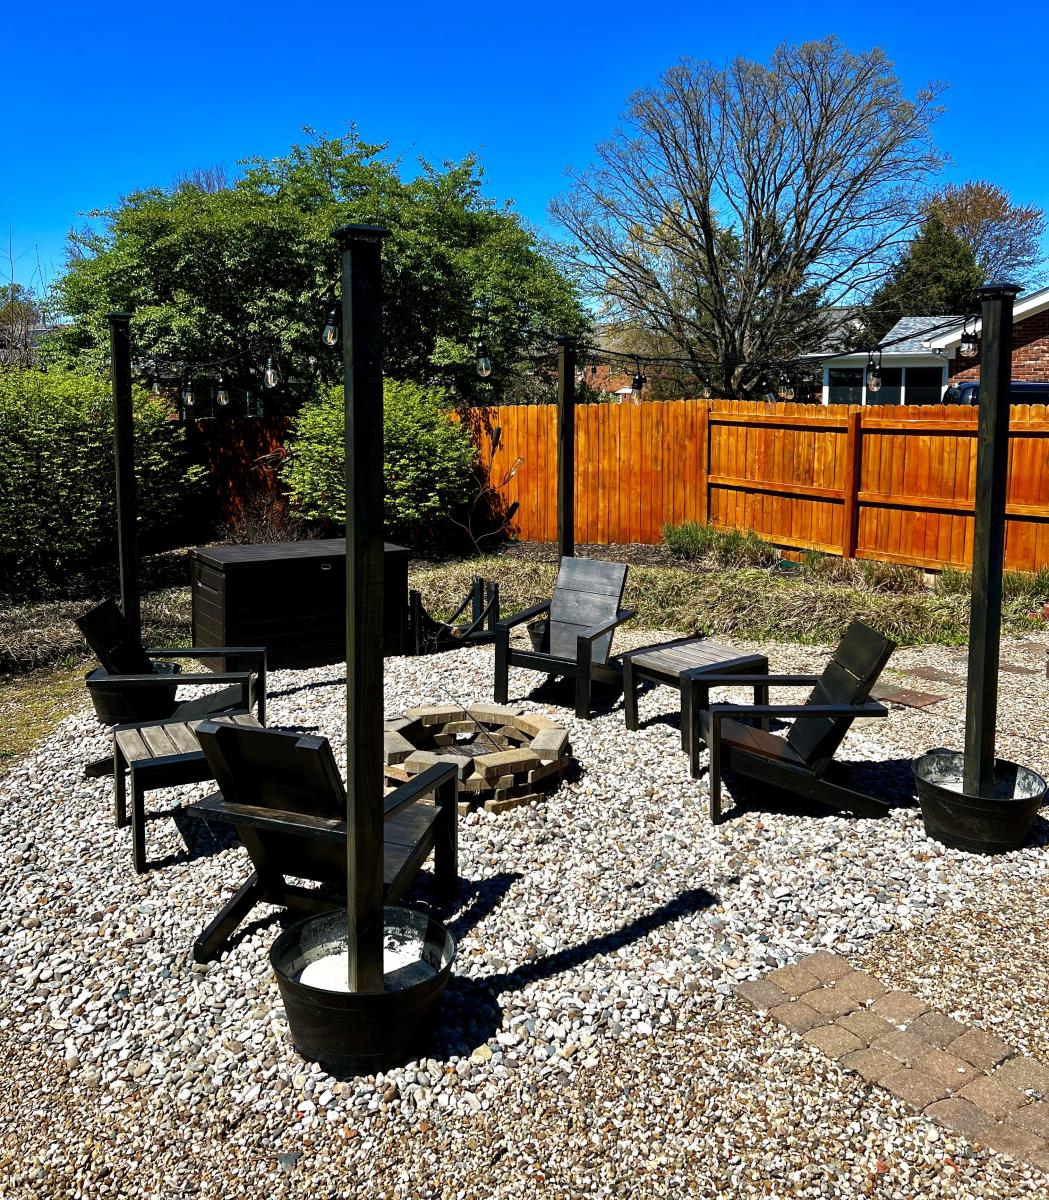
Built from Plan(s)
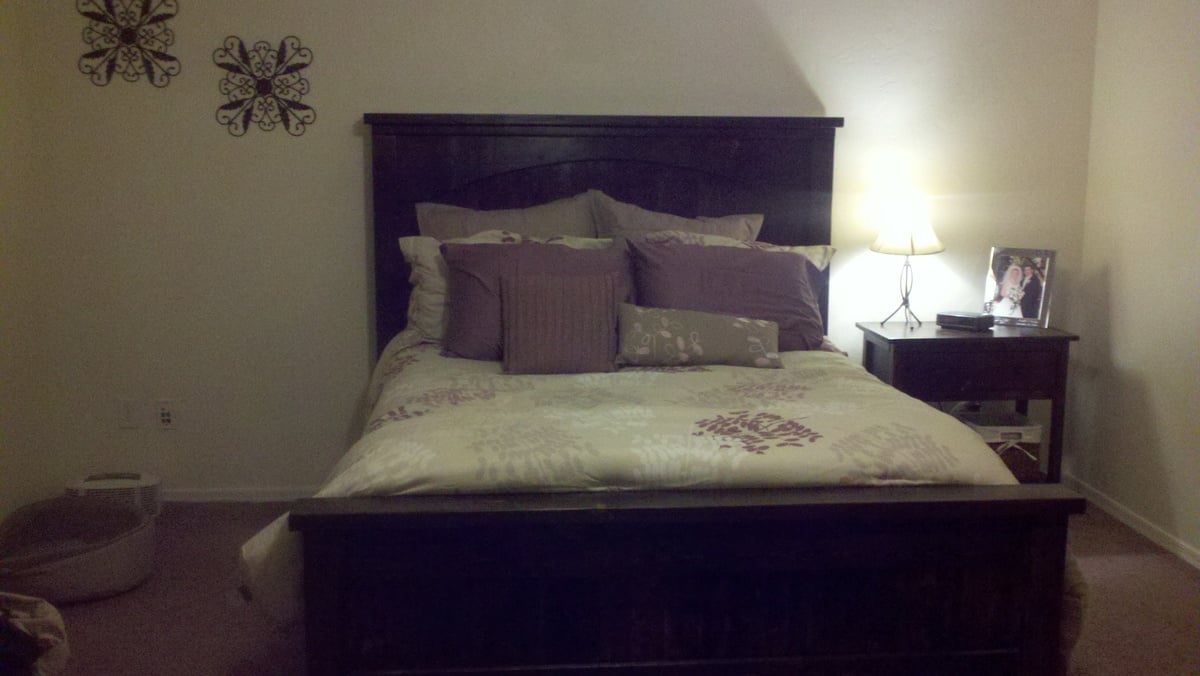
Queen Farmhouse Bed with Arch
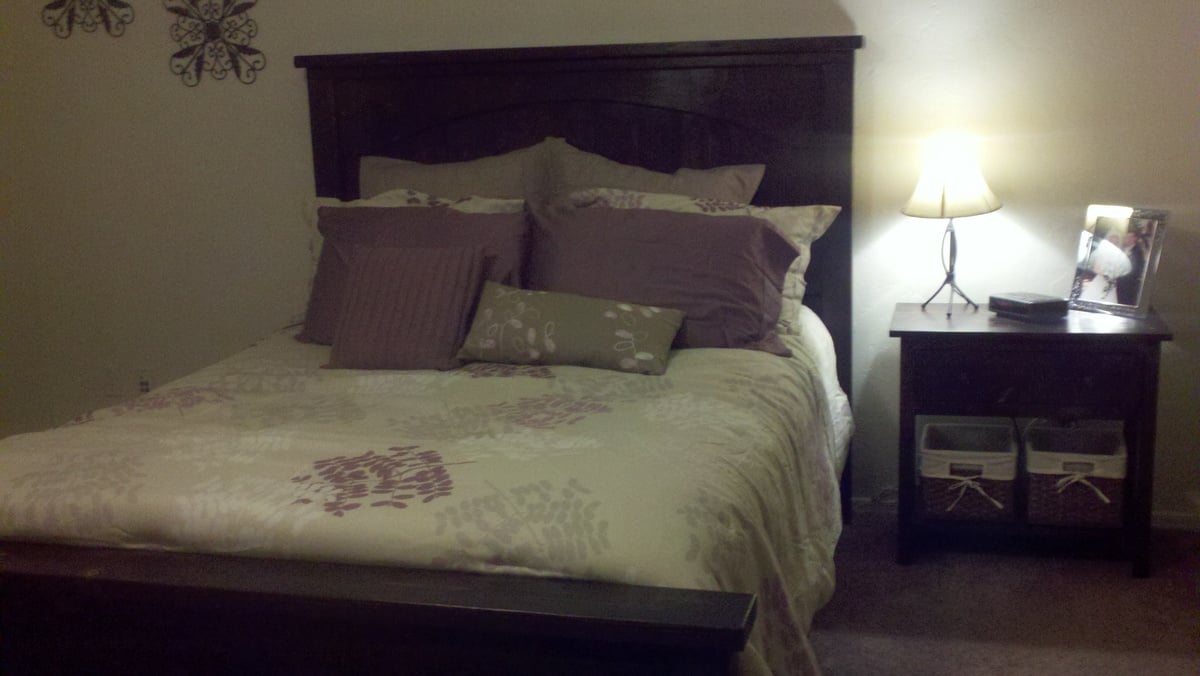
We saw this bed and decided to make it after getting tired of the sad state of our bedroom furniture. My husband built this as a weekend project. We also built the Farmhouse Nightstand, and plan to build the Wide Cabin Dresser stained to match. The bed is very sturdy, even with three kids horsing around.
Built from Plan(s)
Estimated Time Investment
Weekend Project (10-20 Hours)
Finish Used
Rustoleum Java Stain
Recommended Skill Level
Beginner
Rustic Side Table
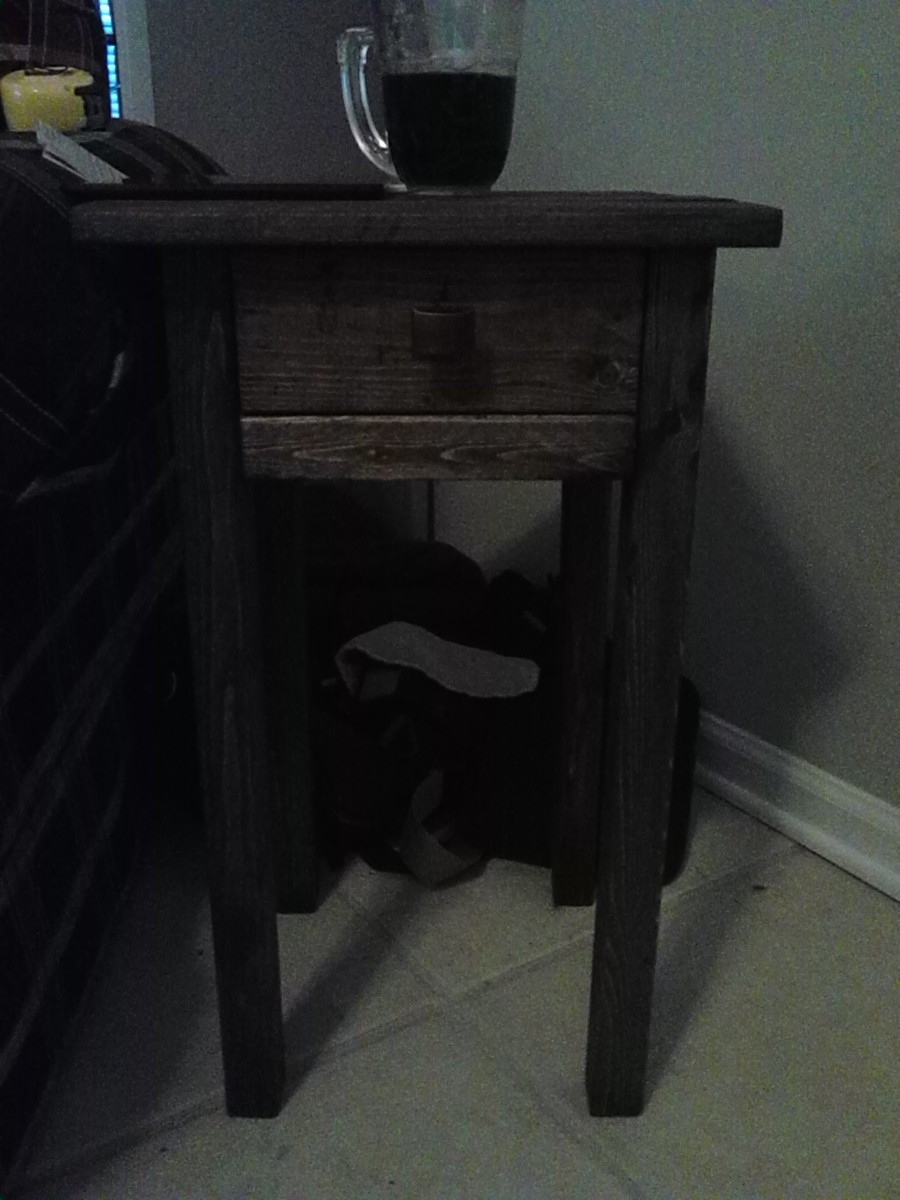
We've moved into a new house and I have lots of furniture I want to build. The side table was a pretty easy build, I did it in a couple hours in the afternoon. This is my first project with a drawer. The tricky part to it was putting the bottom in. I think i need to get a router so I can cut some grooves to slide it in. Trying to put brads into a 1/4 inch thick piece of plywood was really tricky. I didn't really use a plan, I just put it together based on the wood that I had available. I built it pretty much from scraps from other projects I've done.
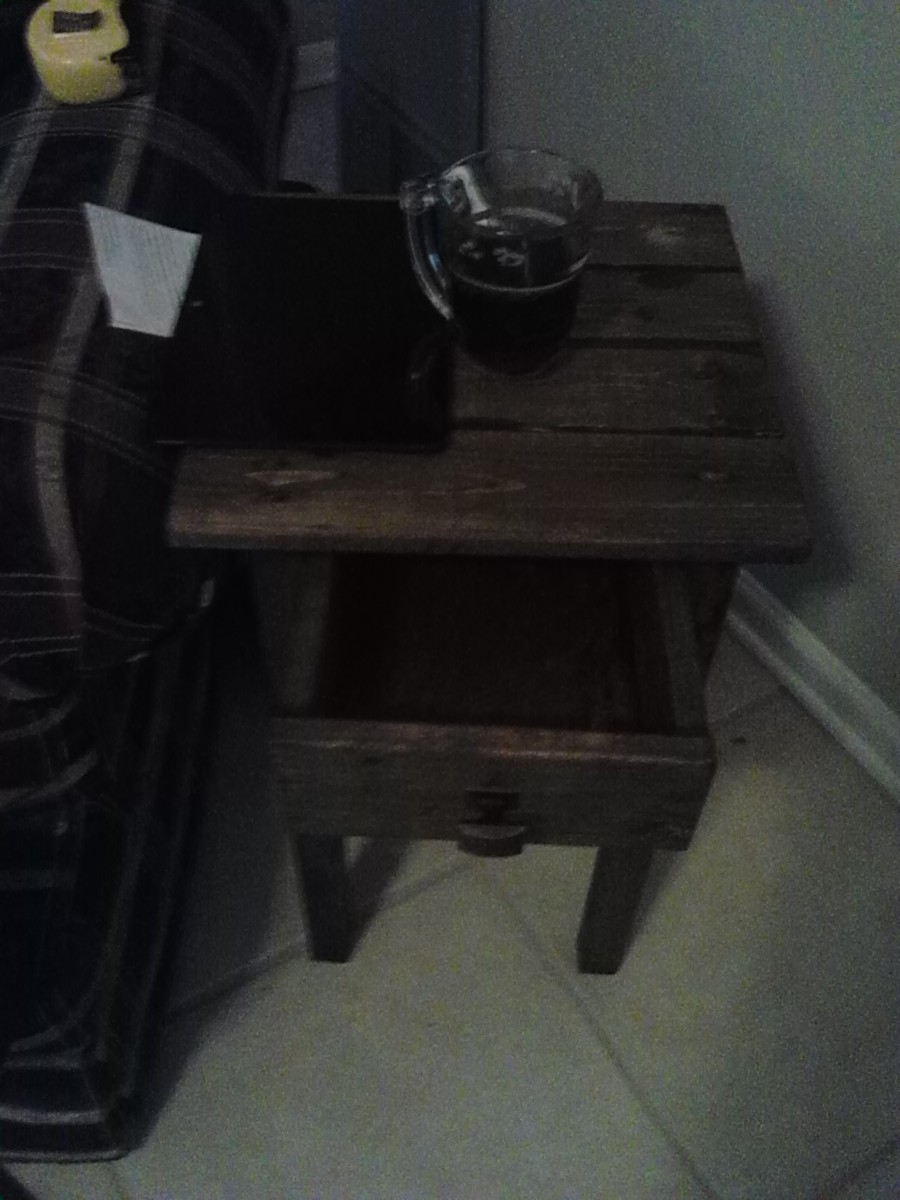
Built from Plan(s)
Estimated Cost
$6 for the drawer pull and a small piece of plywood for the bottom of the drawer
Estimated Time Investment
Afternoon Project (3-6 Hours)
Finish Used
Minwax Dark Walnut (personal favorite) with a spray paint clear coat.
Recommended Skill Level
Intermediate
Wood Custom Windows balance (Templary Style)
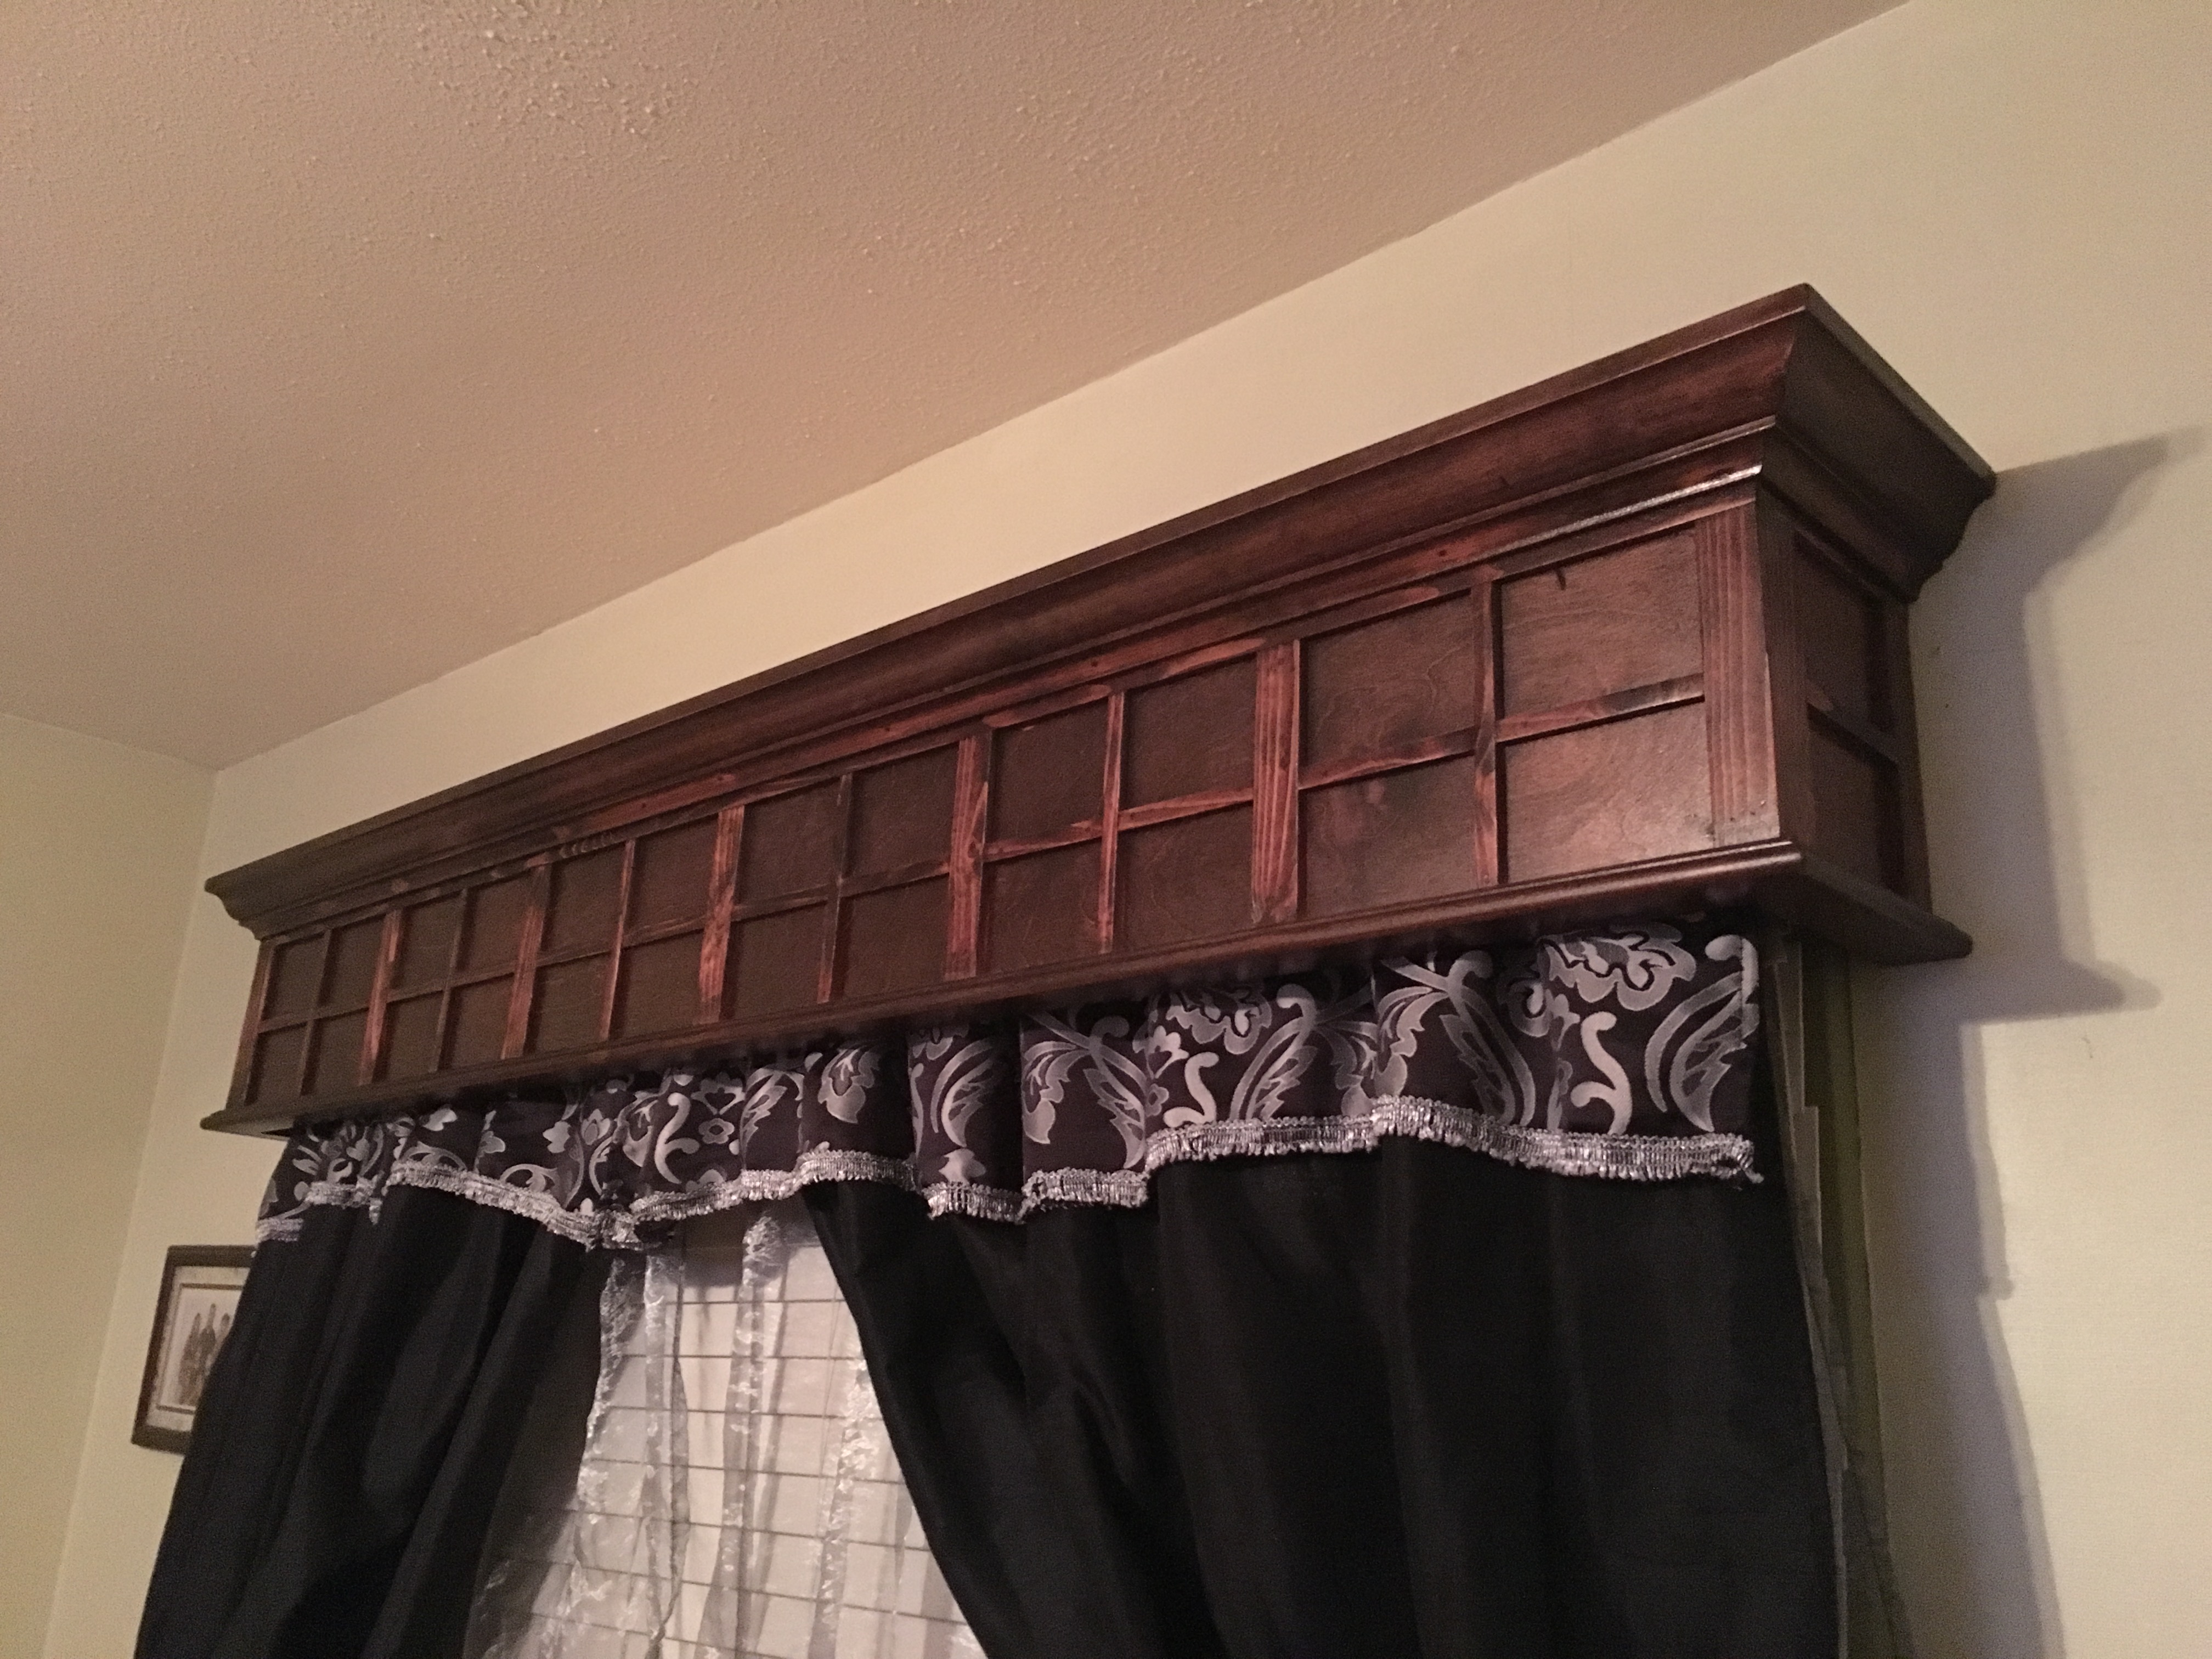
I just Get up and saturday morning and I felt inspired and start to build that window balance for my bedroom and I call it Templary Style
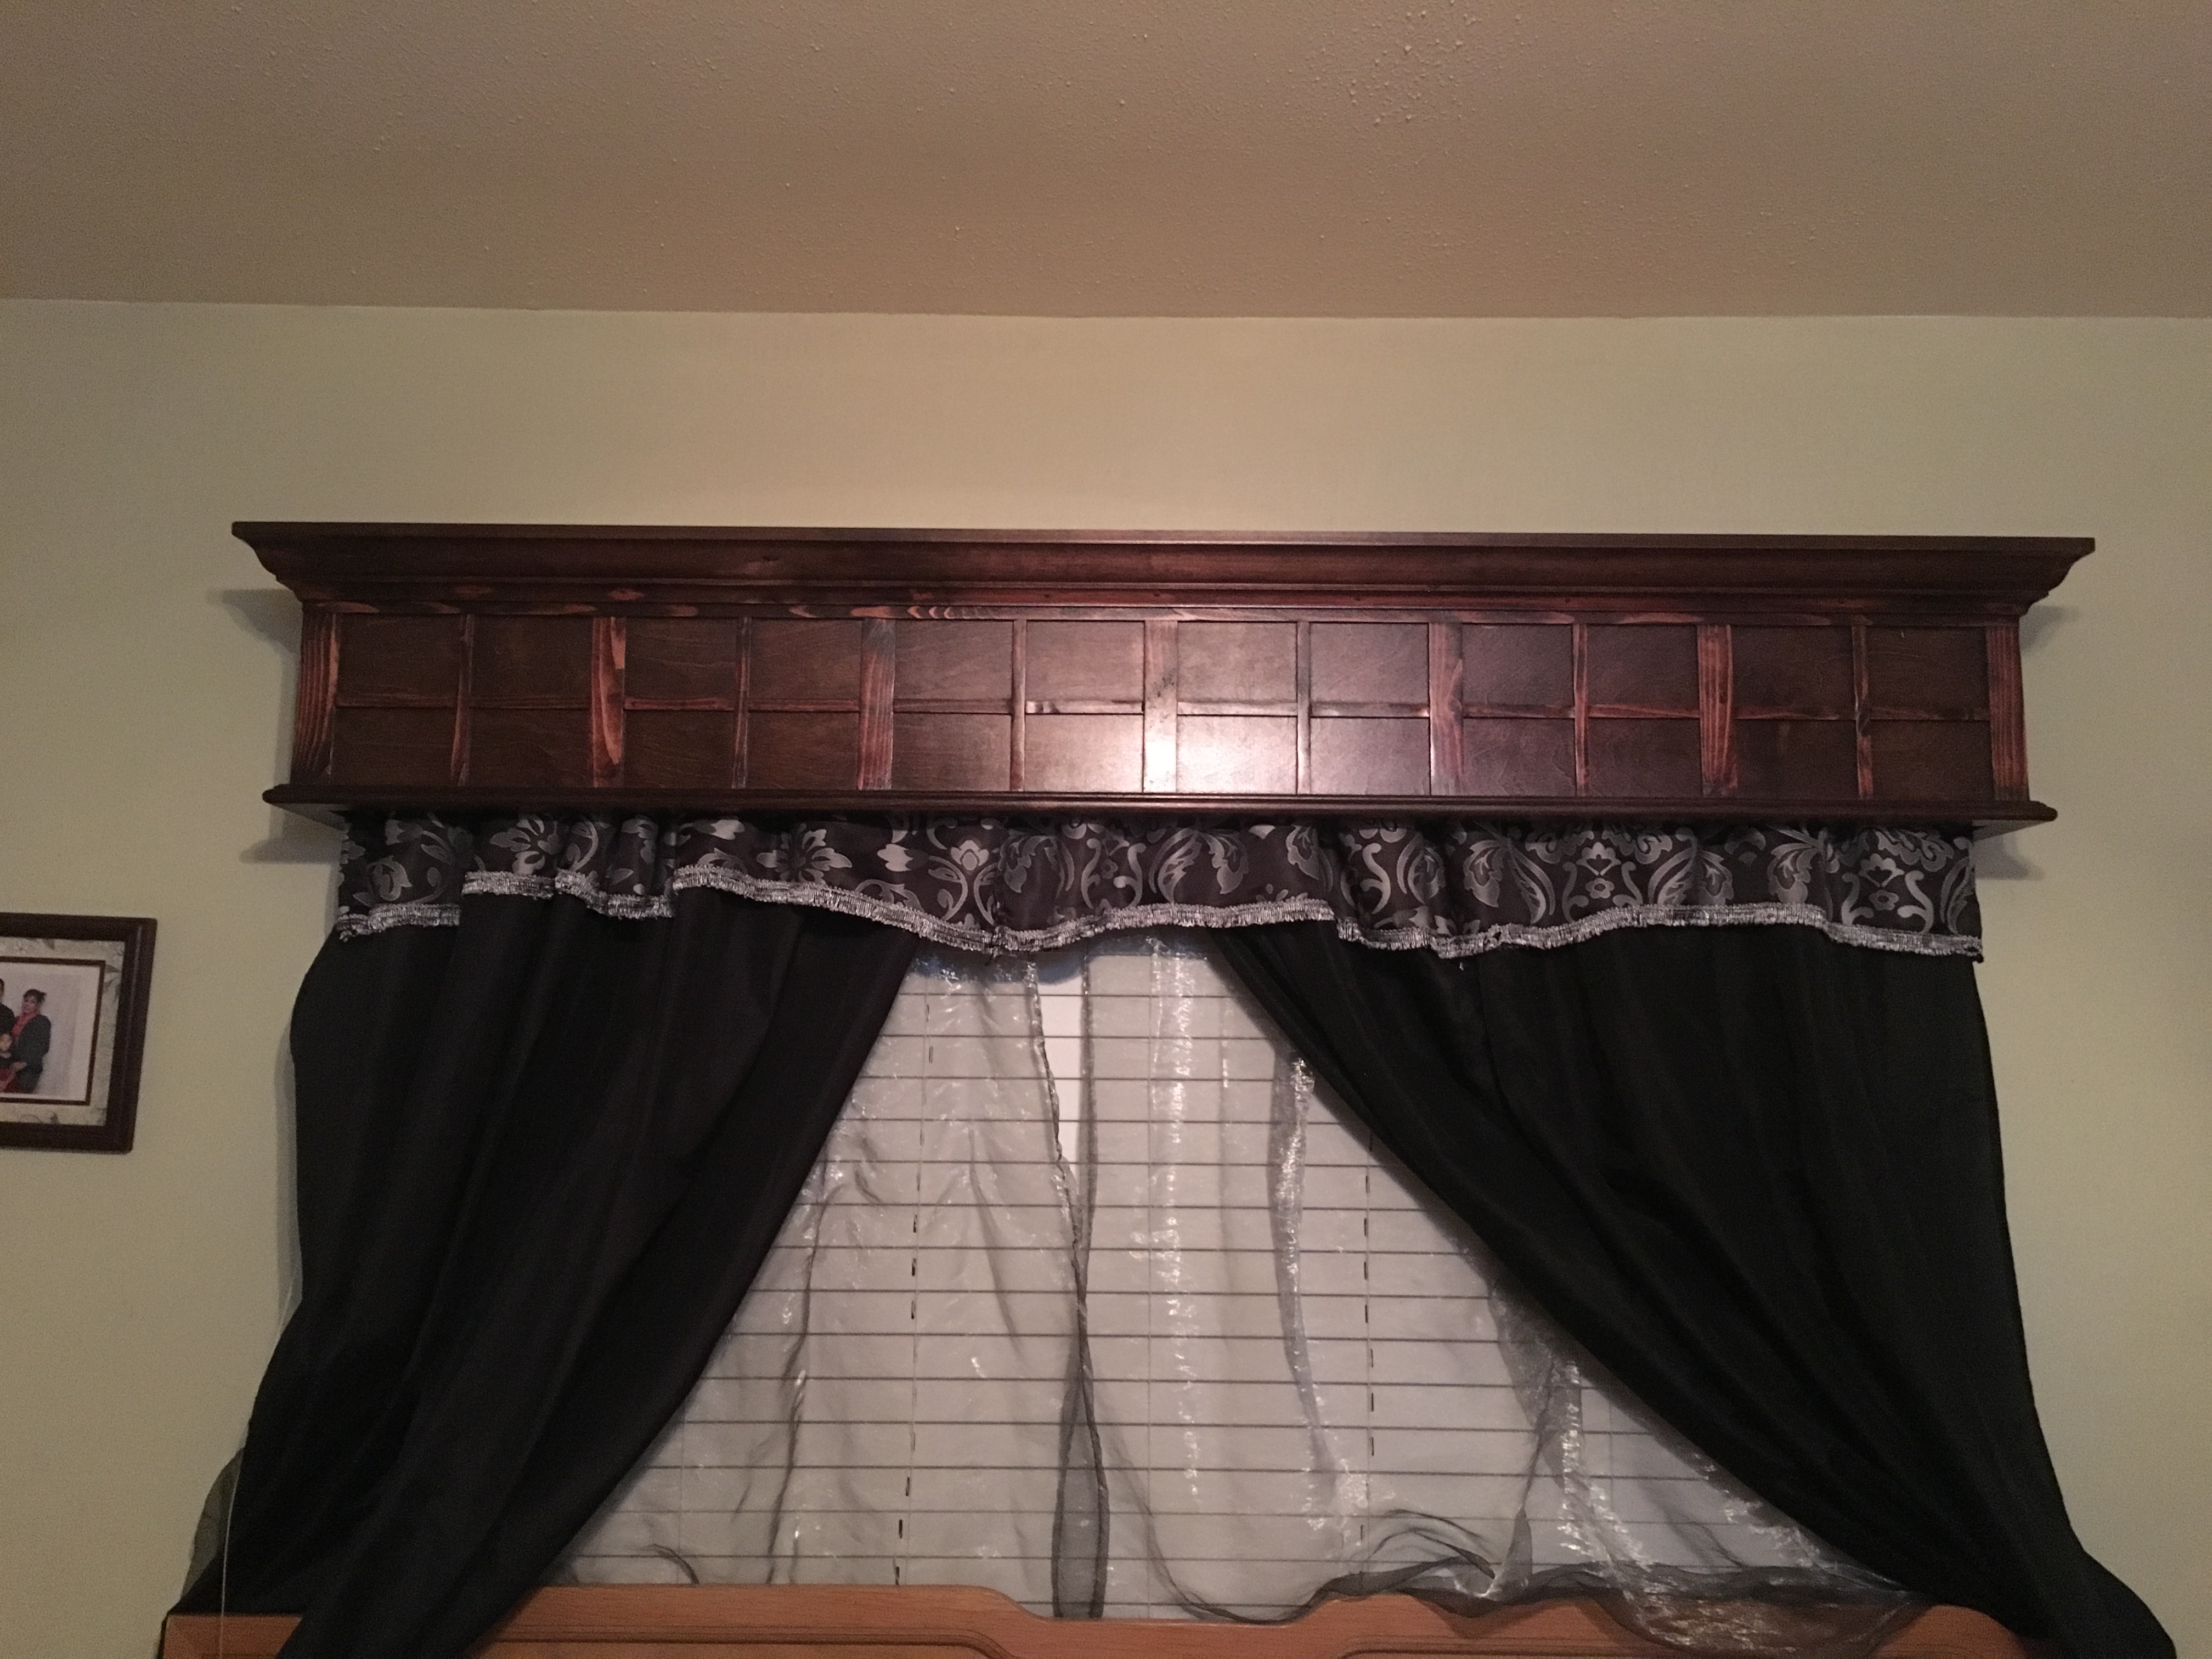
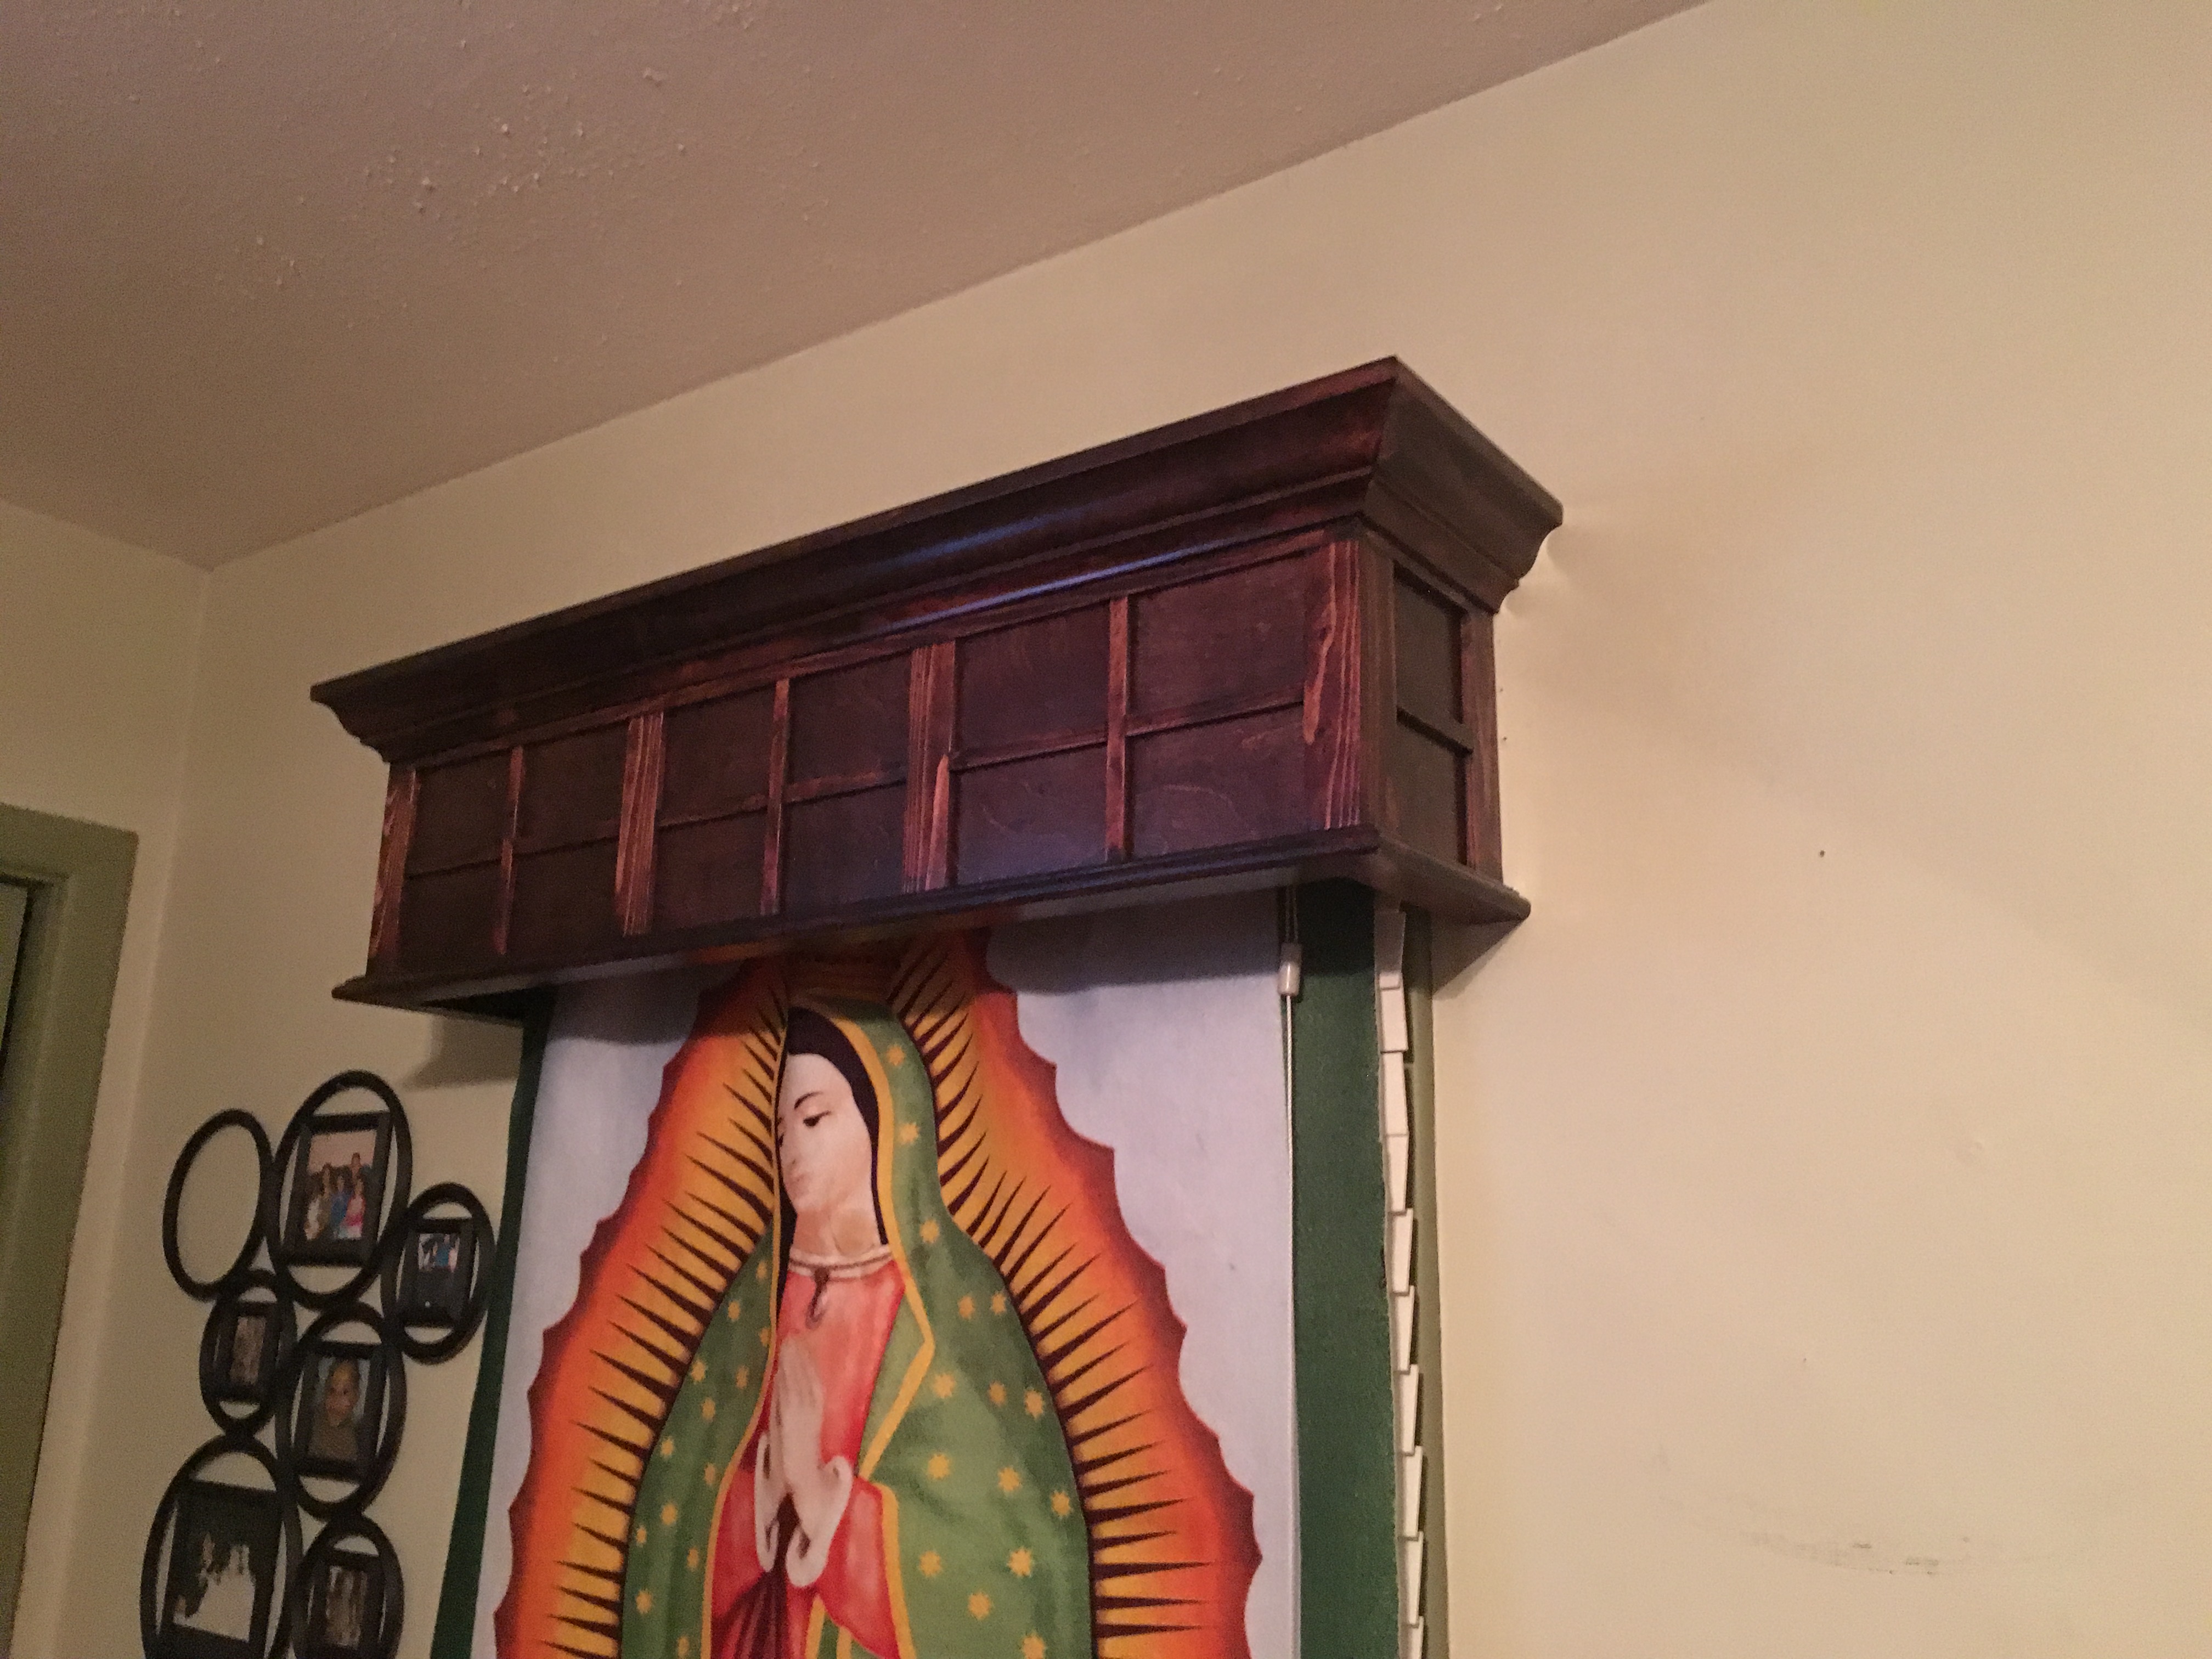
Estimated Cost
$75 Dlls
Estimated Time Investment
Afternoon Project (3-6 Hours)
Finish Used
Red Mahogany Minwax Stain and Lacquer sealer and two coats of lacquer finish satin
Recommended Skill Level
Beginner
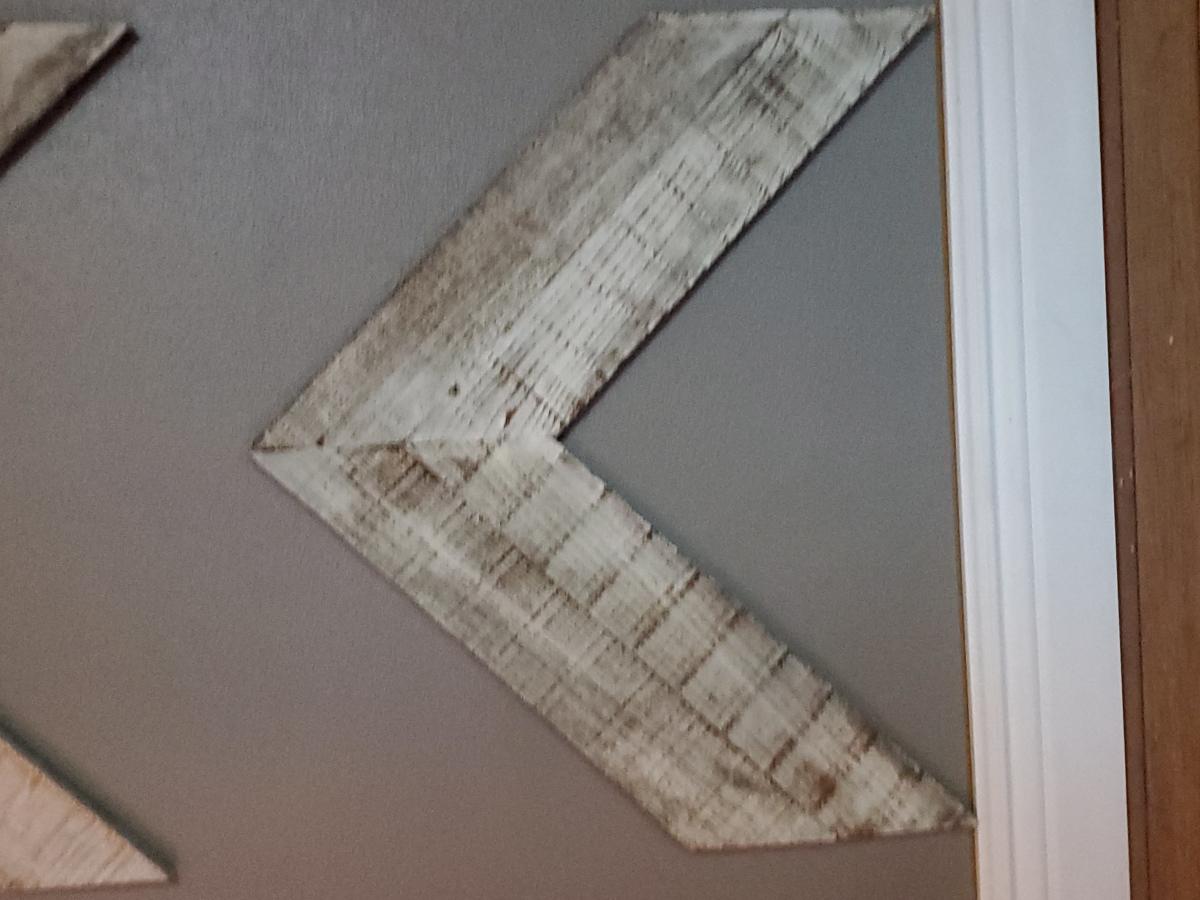
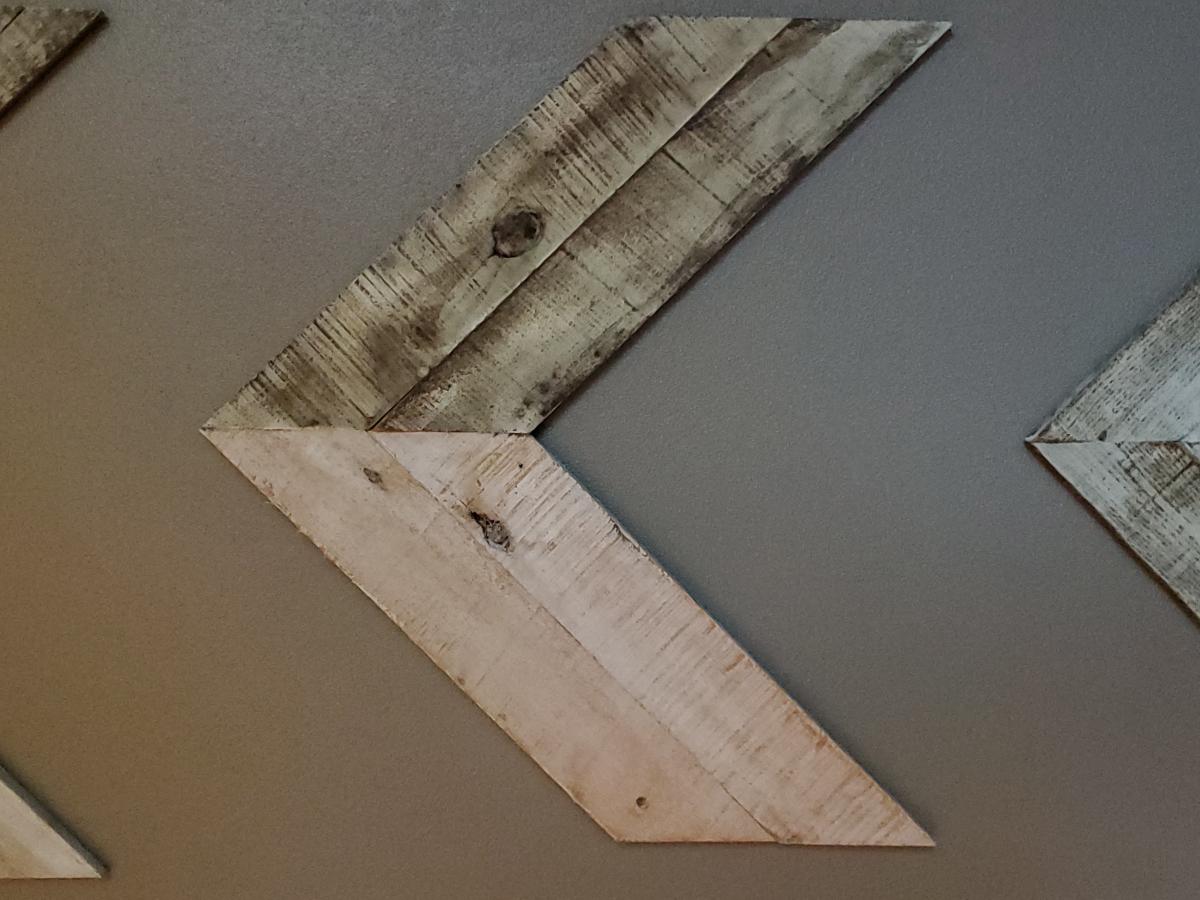
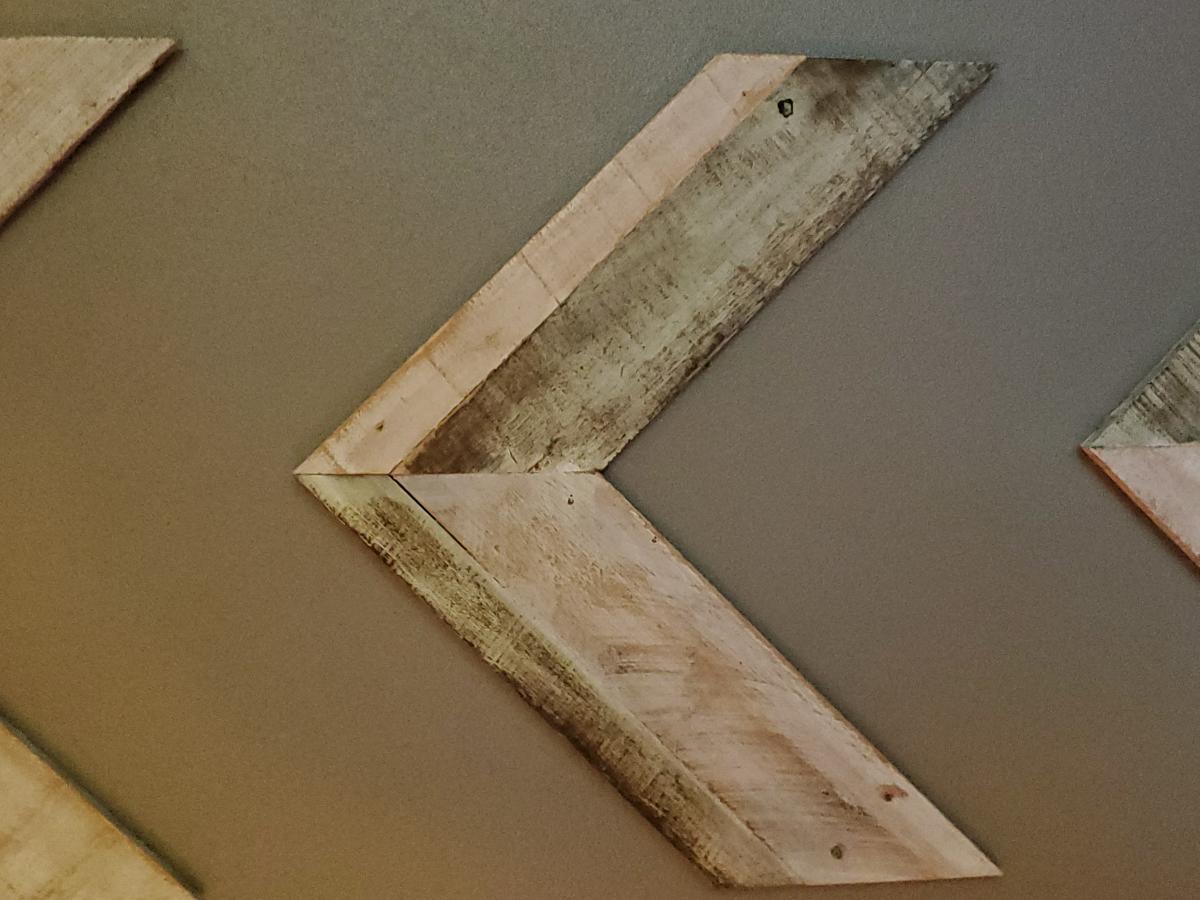
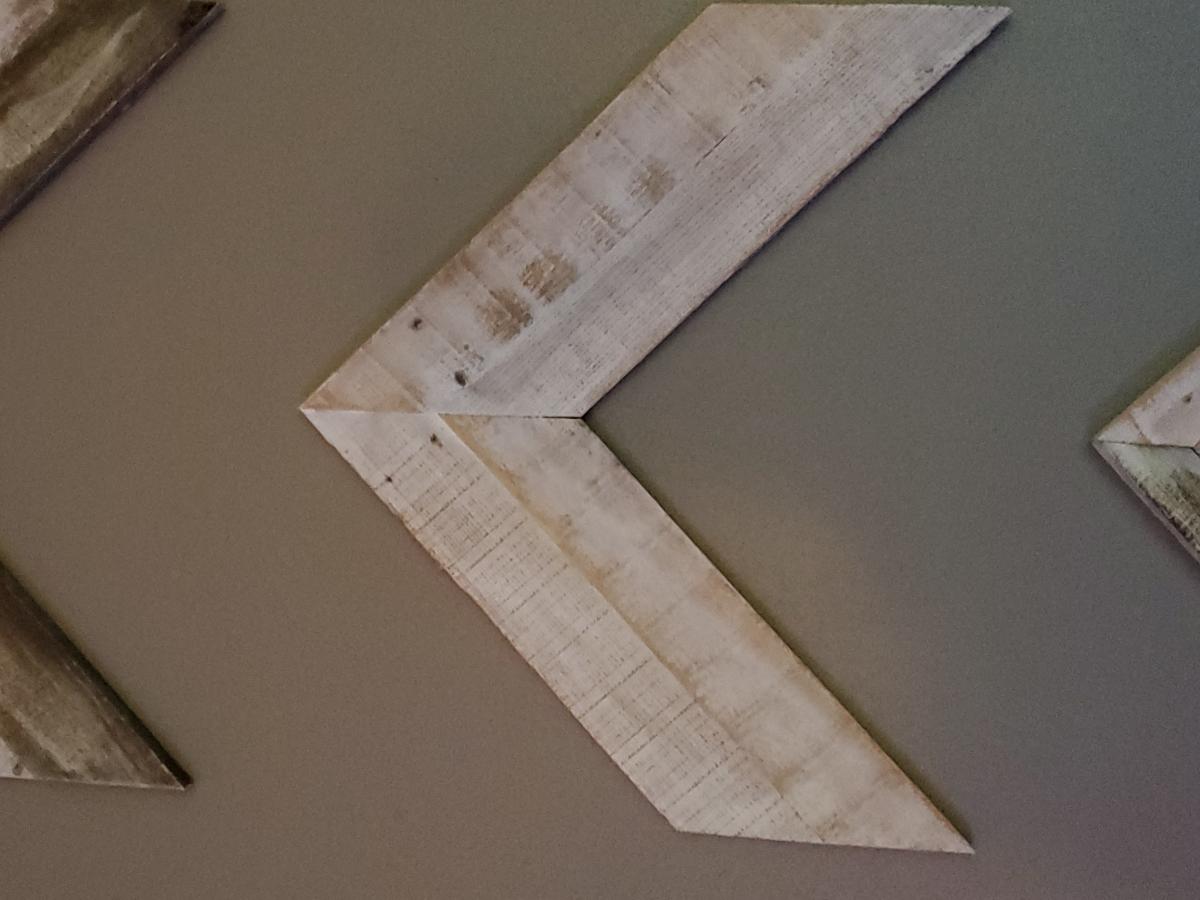
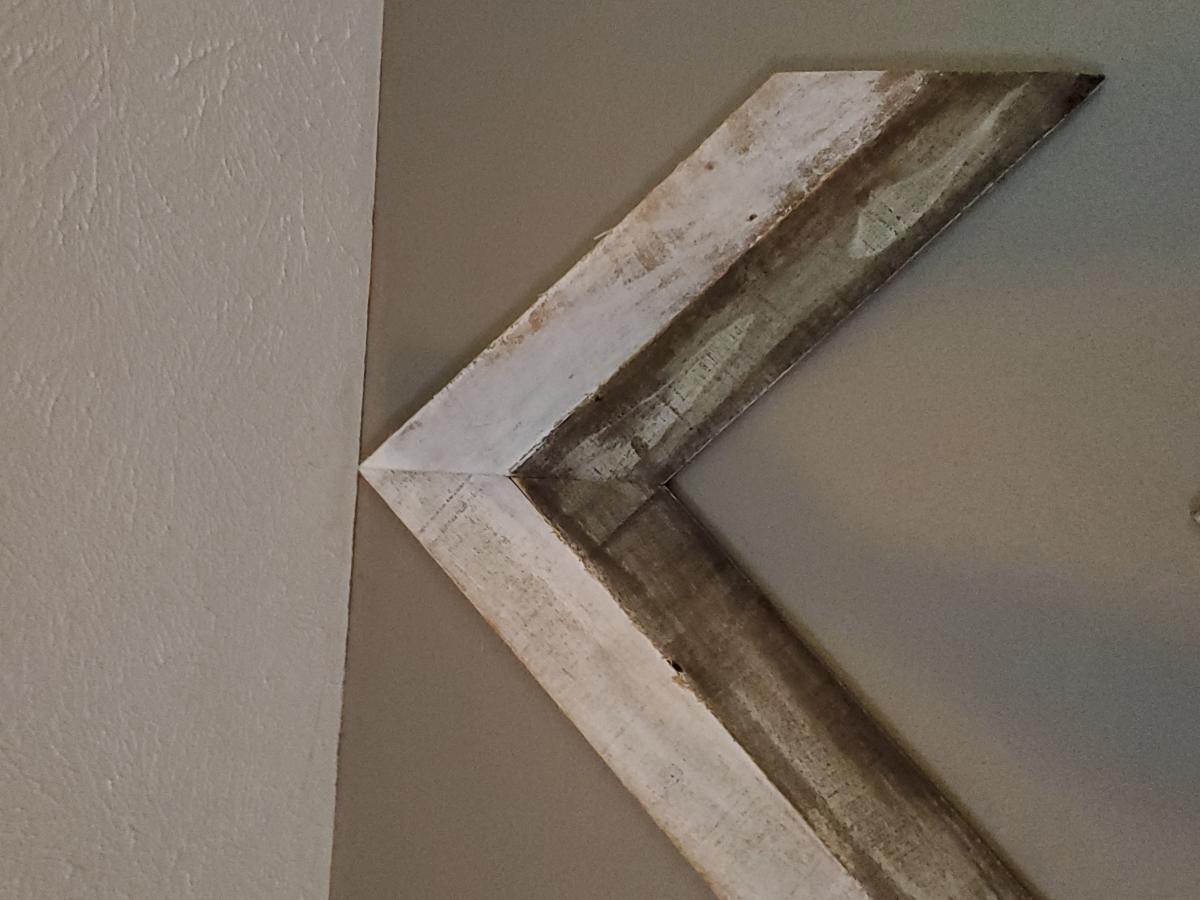
Pallet chevrons

My wife wanted some chrevons (1 for all members of the fam). We are moving to a rustic feel so thought some pallet wood would do the trick. Left them rough (unsanded until very end). No real plans just figured it would as I went.
Estimated Cost
free
Estimated Time Investment
Weekend Project (10-20 Hours)
Finish Used
minwax stain (2 different. 1 dark and 1 light) sorry do not remember the shades. Then a whitewash paint.
Recommended Skill Level
Starter Project
Two Tone Console Table
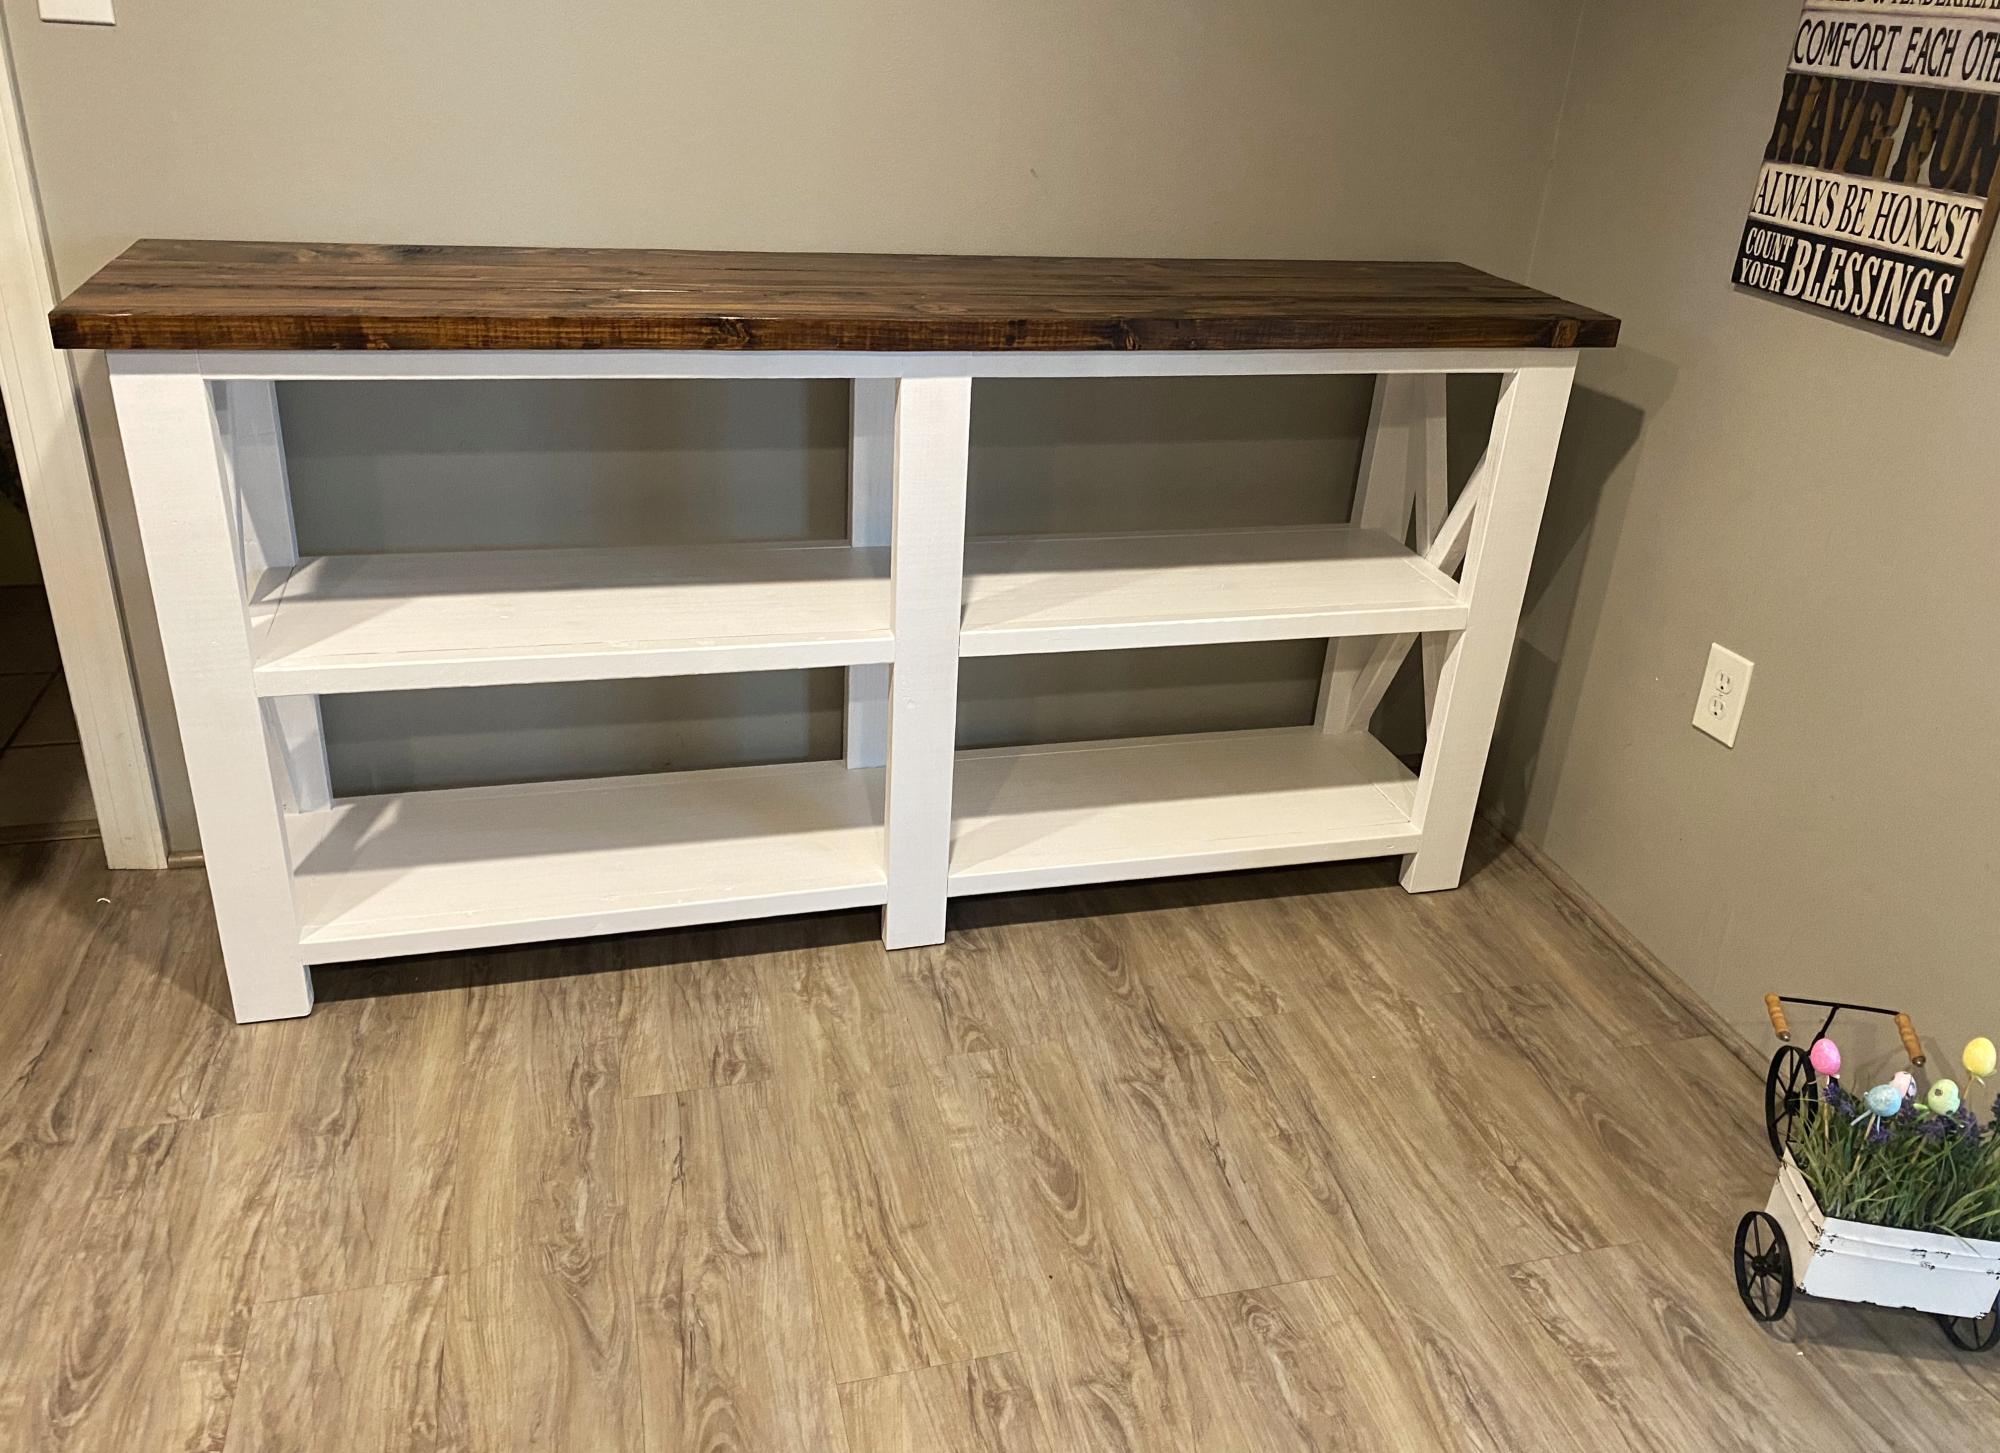
This is the 3rd table I built. Love all of your work. Ross
Built from Plan(s)
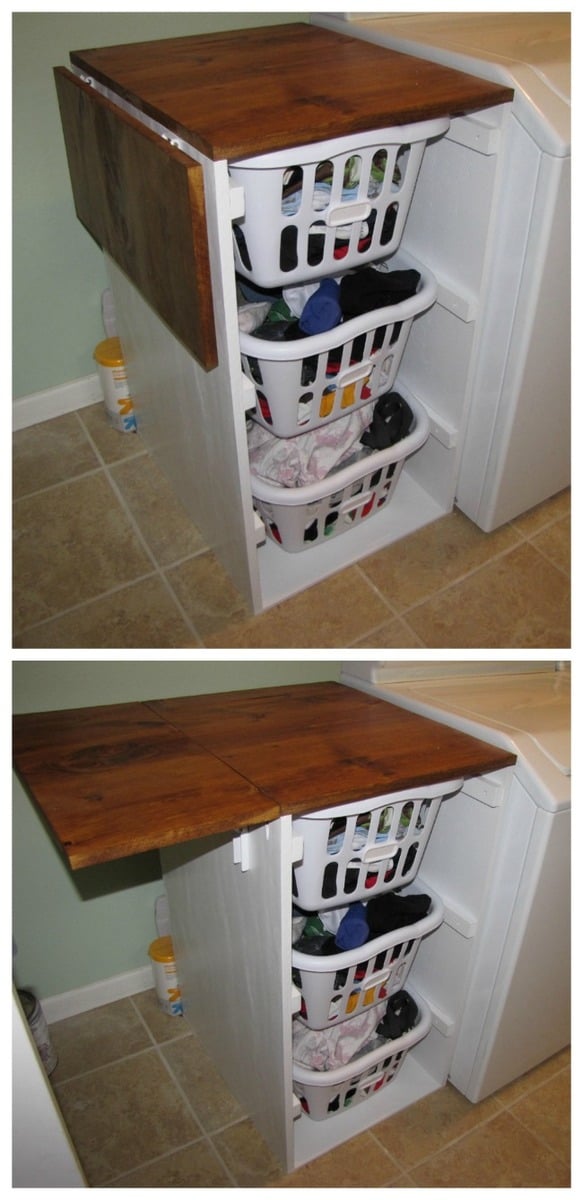
Laundry Cabinets - Shorter Brook laundry basket dresser with folding table
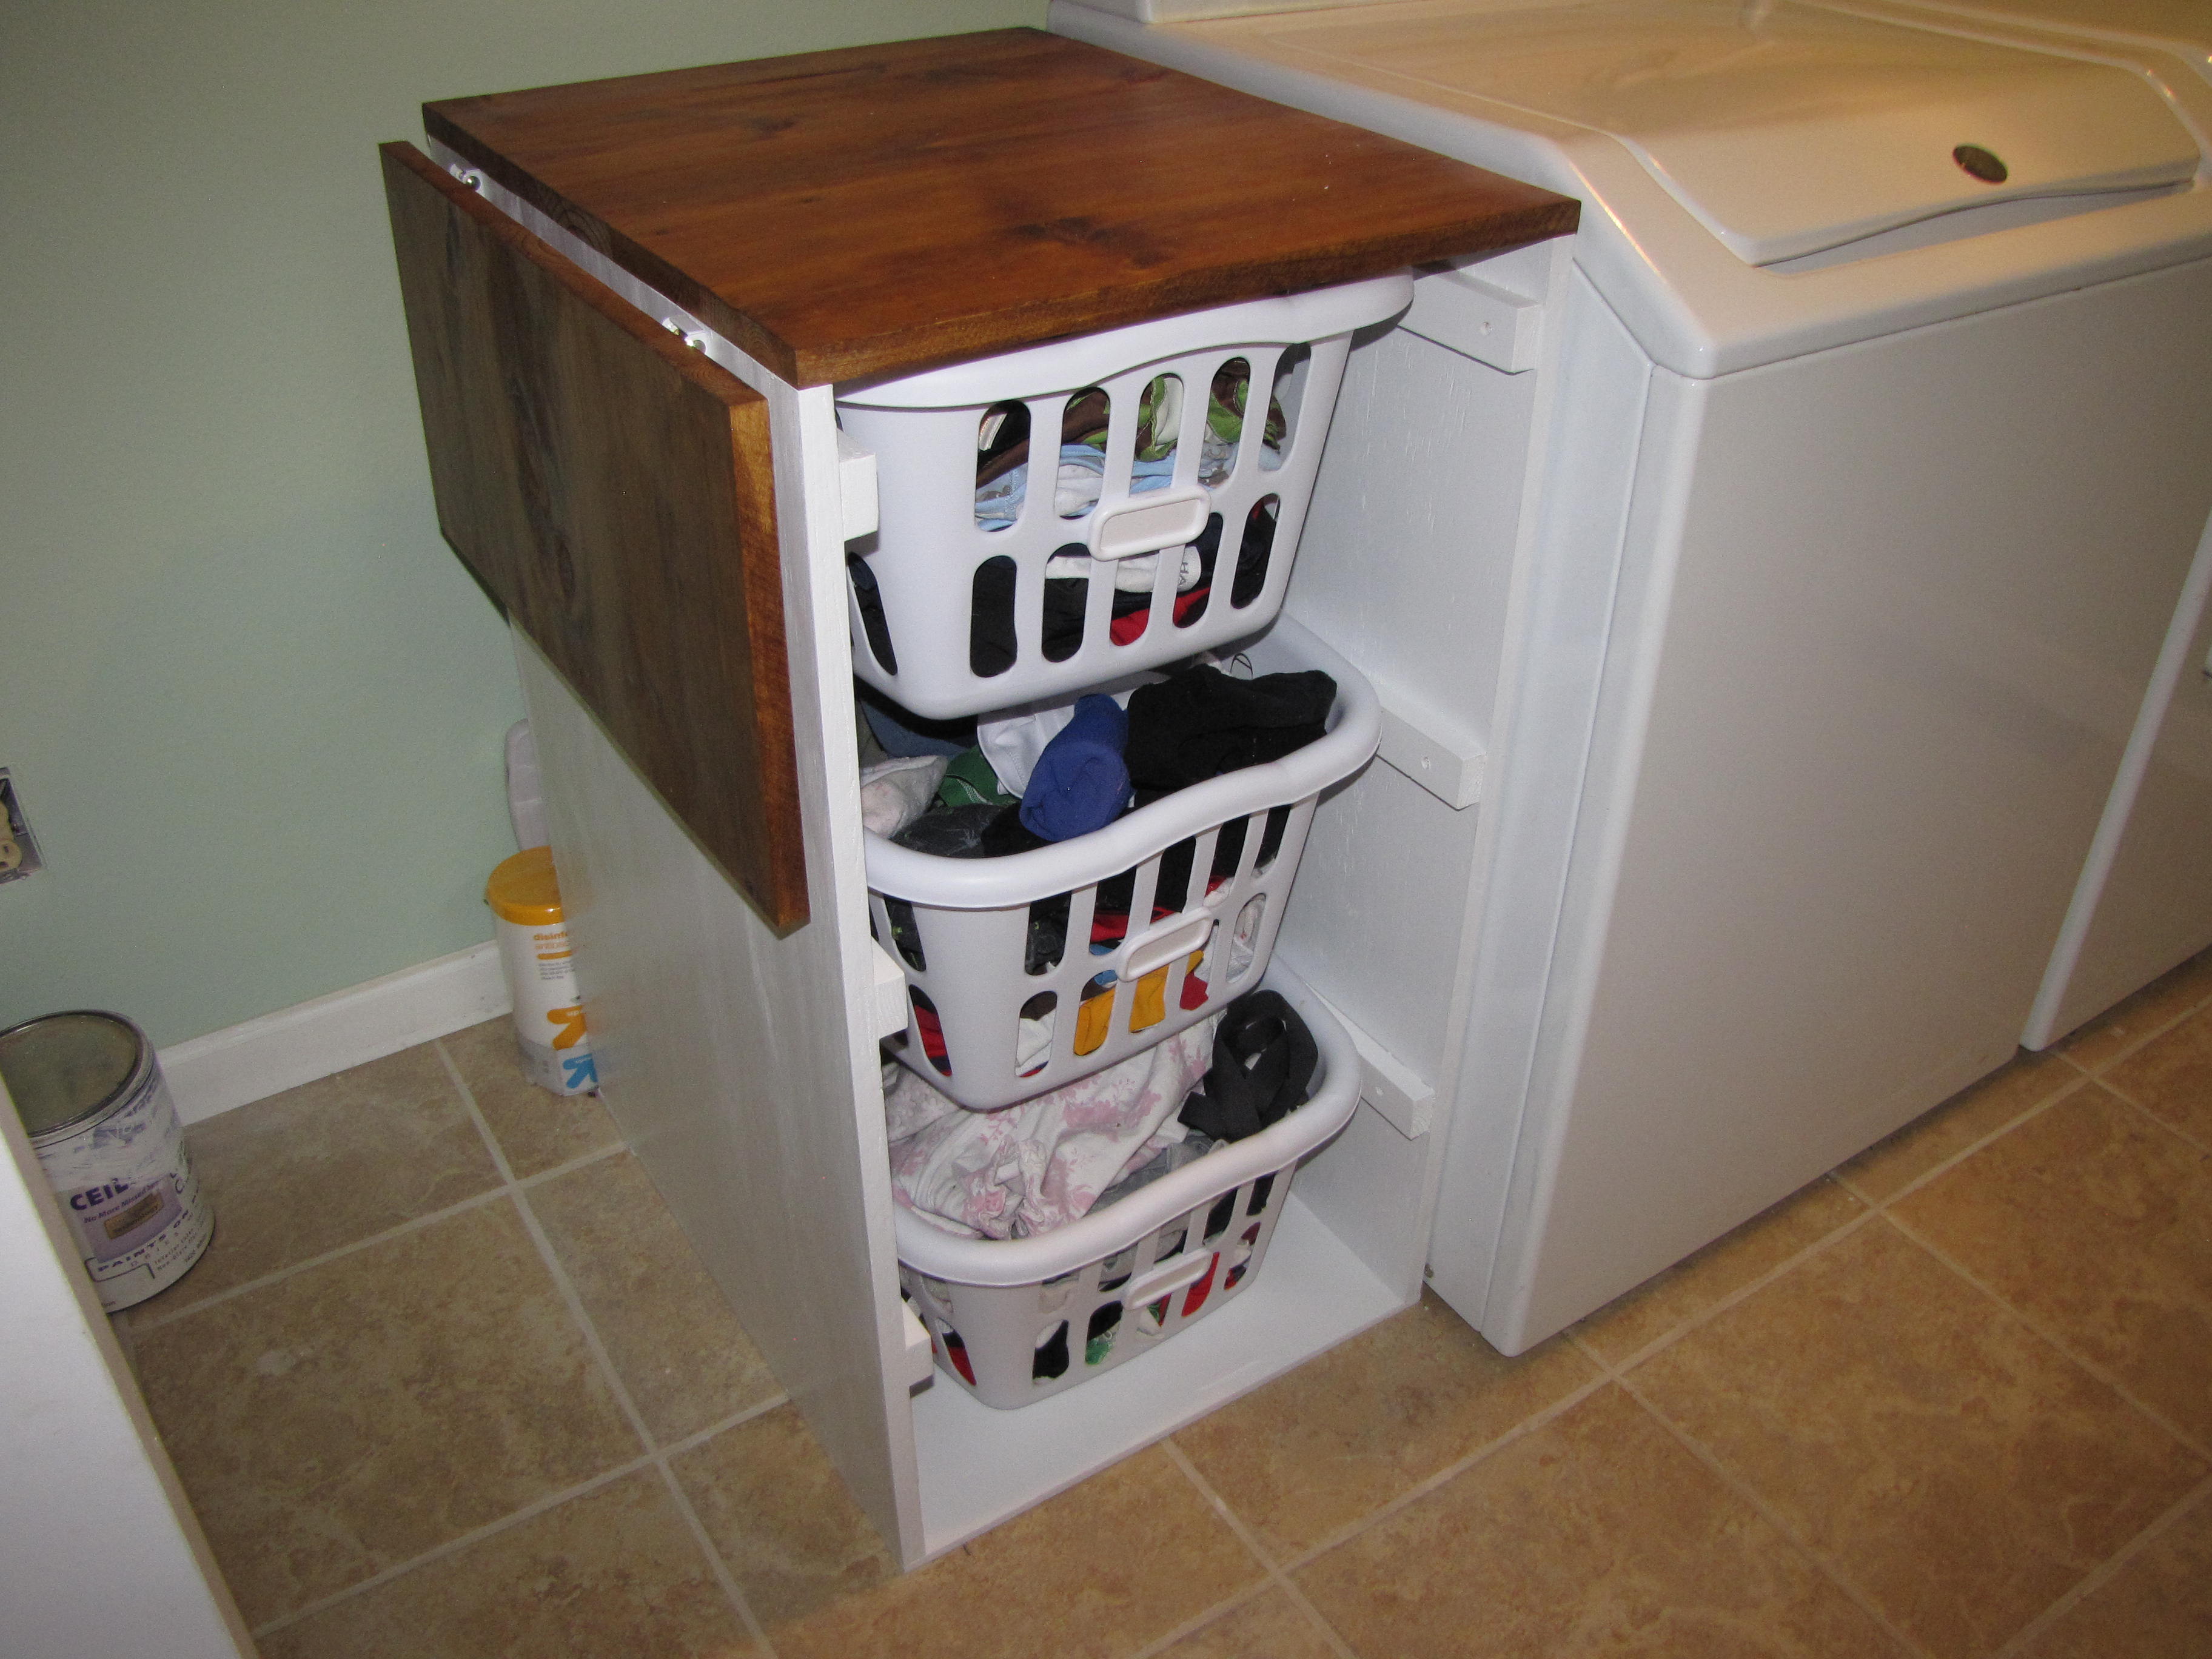
To finish my laundry room off I decided to build laundry cabinets - this laundry basket dresser is perfect! I used 8in. fold down shelf brackets (like the ones in Lady Goats Miter Saw cart). I also cut corners on the back since I was out of plywood after building my laundry cabinets. I used 3 1 X3s to support the back. I used a pine project board for the top which is only 24in deep so I did adjust the plan for that and the baskets still fit!

Built from Plan(s)
Estimated Time Investment
Afternoon Project (3-6 Hours)
Finish Used
Minwax Golden Oak on top and Valspar Semi-gloss white paint
Recommended Skill Level
Beginner
Comments


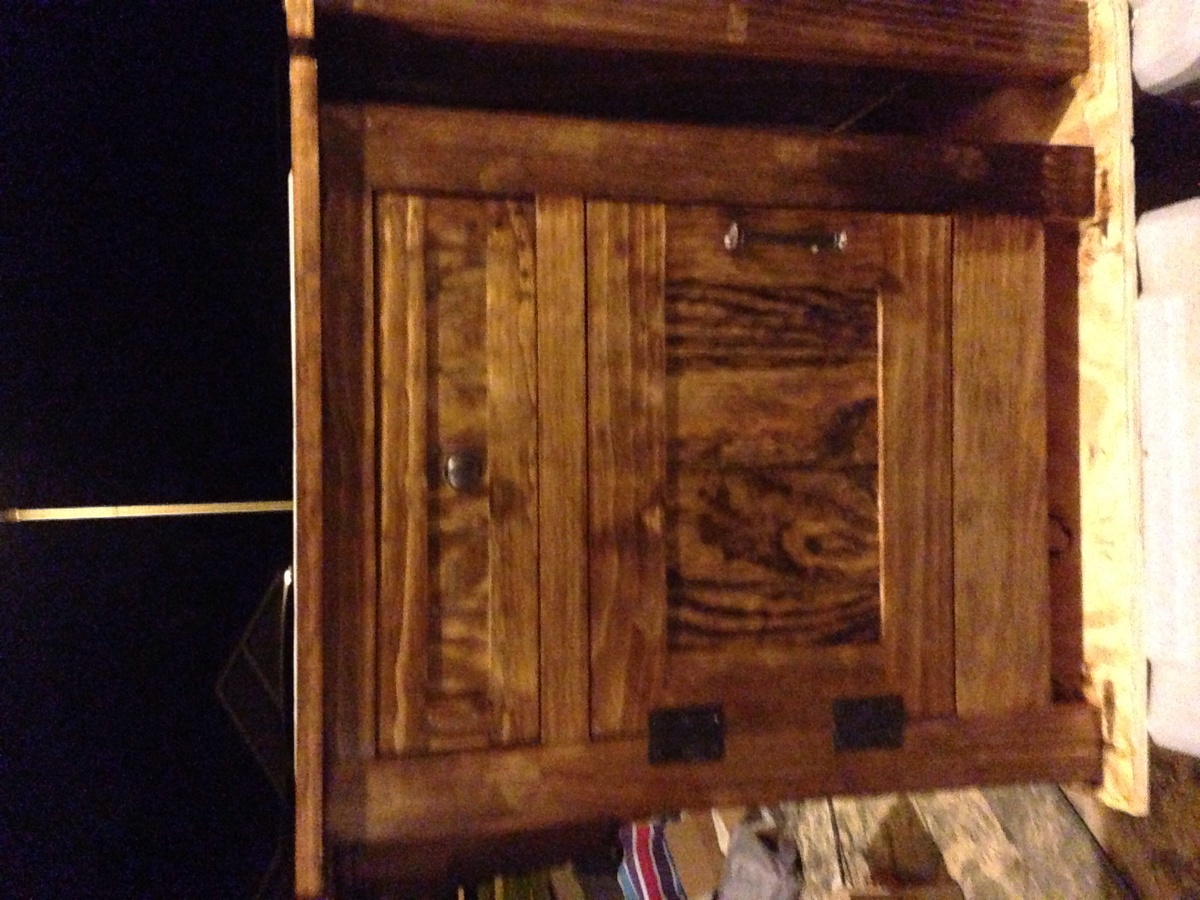
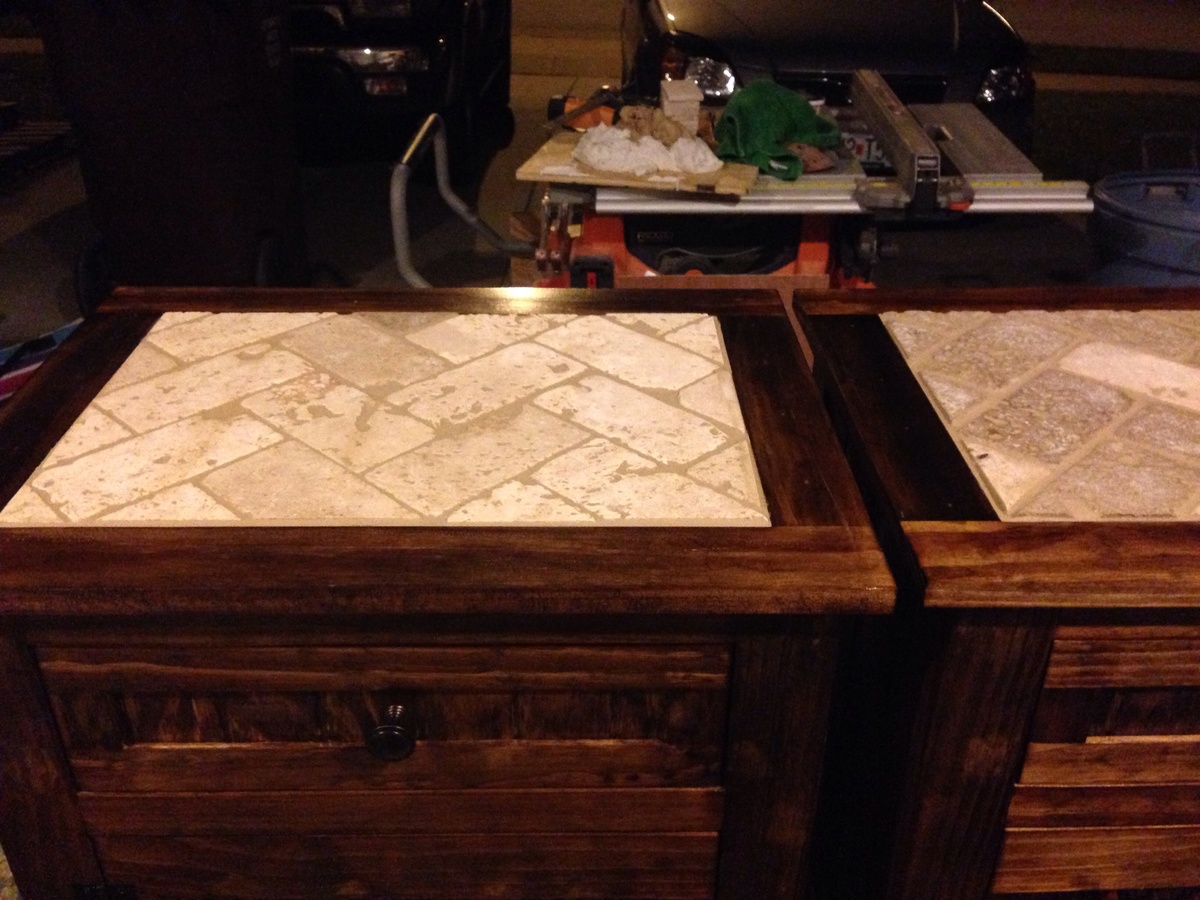
Tiled top kent wood nightstands

I followed the basic plans for the kent wood nightstand but made a few changes. I made paneling out of 3/4" plywood for the sides and door/drawer and routed a 1/2" by 1/2" channel into the face frames to slide the panels in. I added a drawer and made the door smaller. Instead of using the strips of wood for the top I framed it with 1x3's and inset a piece of Wedi tile underlayment. Wedi is a closed cell foam that is coated with a cement membrane. It is pretty durable and completely waterproof. I then used white thinset mortar and set 3x6 tumbled travertine in a herring bone pattern using a 3/16" v notch trowel. Grouted the top of the tile and caulked with color matching latex caulk where the tile meets the wood frame.
Estimated Cost
$350-$400 for both
Estimated Time Investment
Week Long Project (20 Hours or More)
Finish Used
1 coat of Min Wax provincial wood stain. After 24 hours 1 coat of Min Wax polyurethane was added. After 24 hours I sanded the irregularities and put a second coat on. I used 3x6 chiaro tumbled travertine with poly blend linen grout and sealed it with 2 coats of miracle sealants impregnator sealer enhancer for porous stone
Recommended Skill Level
Intermediate