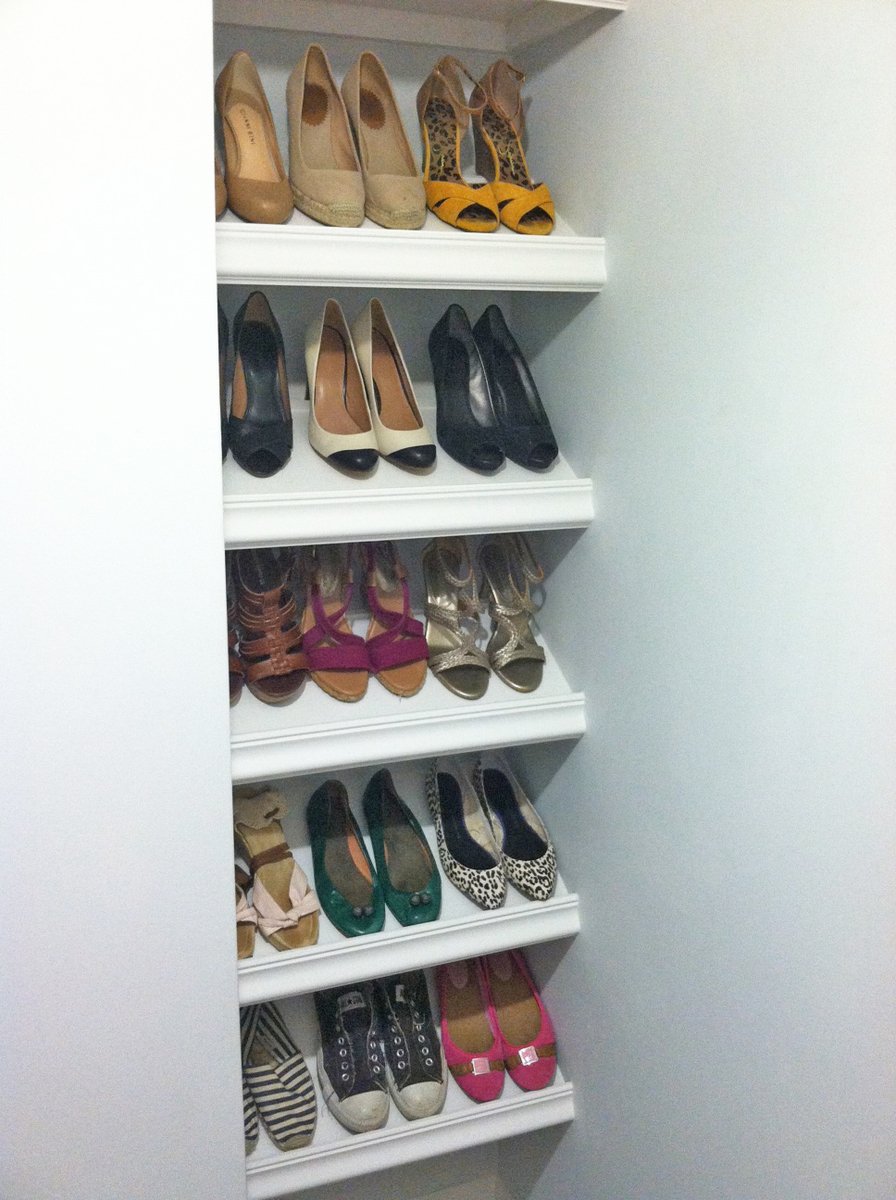
Community Brag Posts

Rustic Farmhouse Table with Distressed Finish

Submitted by petesveen on Tue, 10/15/2013 - 13:06

When I saw Ana's plans I had to make this table for my home. I like the rustic look, and so I distressed the wood using a steel wool and vinegar solution. I modified the top by using four 2x8's and one 2x10. Otherwise everything is the same. It turned out great and everyone who has seen it at my home loves it.

Built from Plan(s)
Estimated Cost
$130
Estimated Time Investment
Weekend Project (10-20 Hours)
Finish Used
Brushed one coat of steel wool and vinegar. Then brushed on 2 coats of Minwax semi-gloss. Next, I sanded using 400 grit. After sanding, I wiped on a very thin 3rd coat of poly using a clean rag.
Recommended Skill Level
Beginner

Comments

Kabarie

Mon, 11/04/2013 - 14:00

The finish you chose just sold this table to me. Love it love it! Great job!

beccalc1981

Fri, 09/05/2014 - 05:55

So very very new to all this wood working but very excited to get started! I LOVE the finished look of this table. I had never heard of steel wool and vinegar, but just googled and can't to try it! Thanks!

charchav

Wed, 11/25/2015 - 07:14

I Love this Table . You should just come to our house and make it for us.LOL

I was just wondering what type of wood did you use? We live in the south east and cant find any Douglas Fir wood. what other wood would you suggest?

thanks Char

Misha1dibbs

Tue, 08/09/2016 - 07:12

The table looks fantastic. I know you built this two years ago. How has the top of the table held up? I am currently working on this table, and I am debating weather or not to use the kreg pocket screws or to use 7/16ths dowels for the body and mortise and tenon joints for the breadboards. However, that is more work than the kreg screws. If the kregs hold up well, than I would rather do that. Anyway, the table looks fantastic.

King storage bed

This bed was built using poplar, and pine wood. I used poplar for most of the stained pieces that are visible, and the stain is varathanes Early American. This is the fourth bed I’ve built with Ana’s Farmhouse Storage Bed plans, because it breaks down to four pieces, headboard, footboard and two side boxes, along with the drawers. This makes it easy to assemble on site.

Estimated Cost
$550
Estimated Time Investment
Weekend Project (10-20 Hours)
Finish Used
Varathane, Early American stain
Varathane satin polyurethane
Recommended Skill Level
Intermediate

Comments

Bengals97

Tue, 07/28/2020 - 14:33

I really like how you built this...I noticed you used the queen plans but made a king. Would you be able to share the changes you made to make this a king. I am still relatively new in my woodworking passion compared to your 25 years of experience. Thanks for sharing your end result...I would be open to pay for the updated plans if need be as I know your time and experience is valuable.

DIY Red Storage Sofa

Submitted by TracAttack on Mon, 11/07/2011 - 23:11

Thanks Ana White for the blue print to an awesome storage sofa. I used the similar dimensions except mine is a bit shorter in width (60 inches wide). Now I just need to find awesome pillows to go with it.

Built from Plan(s)
Estimated Time Investment
Weekend Project (10-20 Hours)
Recommended Skill Level
Intermediate

Comments

Erika (not verified)

Sat, 12/24/2011 - 18:57

How much did it cost you to build this?

Cynthia l. (not verified)

Sat, 12/08/2012 - 05:41

How has the sofa held up? I want to make one, and also would like to know how much it cost to make.

Mothersday Planter

Thanks for these plans! I was able to complete this planter in one afternoon.

Estimated Cost
$50
Estimated Time Investment
Afternoon Project (3-6 Hours)
Recommended Skill Level
Beginner

Comments

Sliding Door console with Cedar pickets

Submitted by KathrynK13 on Tue, 01/12/2016 - 18:46

My first big build and I love it! I followed the plans in concept but changed the materials. My frame is still 2x3, but all the trim and siding is cedar fence pickets. I love these! They need a lot of finish work (sanding for days!), but the look is so rustic and real.

I also came up with a great way to get the sliding door look for only $9 in materials. The other tutorials I found online would have been $60+ and I just didn't want to spend that much. Make sure to check out my tutorial for the sliding door hardware.

Built from Plan(s)
Estimated Cost
Under $100 with some scraps that will be used on the second matching piece
Estimated Time Investment
Day Project (6-9 Hours)
Finish Used
DIY distressed finish. Stained cedar pickets with Early American then did a quick painting with basic white I had on hand. Lightly sanded to reveal a bit of wood grain and distress.
Recommended Skill Level
Beginner

My Modern Farmhouse Table

Submitted by samsam06 on Wed, 11/30/2011 - 16:20

Started on Saturday Afternoon around 5pm and finished building on Sunday, sanding on Monday, stain and poly on Tuesday and we ate Thanksgiving Dinner on it on Thursday. All that is left is the wood putty! Not perfect but VERY happy with it :)

Built from Plan(s)
Estimated Cost
$70
Estimated Time Investment
Weekend Project (10-20 Hours)
Finish Used
Minwax Providence Stain & Satin Poly
Recommended Skill Level
Beginner

Outdoor Sectional with Slanted Back

Submitted by Anonymous (not verified) on Sun, 04/16/2023 - 11:28

Fun project! Started with rough western red cedar which I ran through a jointer and planer to get good lumber.

I made a few changes to the design. I used thinner seat boards and cut a leaning tilt in the backrests. I also added 2 boards on the back rests.

I used all pocket holes to hide the screws. Once they dry out I will seal the sectionals.

Got a full set of cushions on Amazon for $300. Total for this project was around $700. Not too bad!

Superhero Loft Bed

This was my first Ana White project and we had a blast putting it together. The plans were clearly explained and the end result is a sturdy loft bed for my son.

There were only a few modifications to this build from the suggested plans. First, I traded out the 2X6's for the bed supports and replaced them with 2X8's. I also replaced the cleats with 2X3's and used the same for the bed slats. Between the slats and the mattress is 1/2" OSB. We also did not use the steps as it took too much floor space for our needs. We added some 2X4's for a ladder step up to the landing.

The theme is Superhero so I designed a custom hero logo in Adobe Illustrator, printed it out and carved it into 3/4" birch plywood with a rotary tool and router.

We're pretty much done with the bed. We now just have to arrange the room and add some lights underneath and maybe some extra storage under the landing.

My boy loves his new bed and I loved building it with him and my dad. It was a blast and will be one of the most memorable weekends of our lives! There's nothing like building with family.

Estimated Cost
$200 (including new mattress)
Estimated Time Investment
Weekend Project (10-20 Hours)
Finish Used
The finish is two coats of Clark-Kensignton paint + primer availabled at Ace Hardware. The red accents are from the "oops" pile of paints I rummaged through while they mixed my gray paint.
Recommended Skill Level
Intermediate

My Queen Farmhouse Bed

Submitted by redhead_61 on Fri, 01/06/2012 - 07:34

My little two year old is sleeping on this right now, hehe, which is so funny to see his little body take up only 1 square foot of it.

We got a queen mattress from a family member and I had been wanting to build this bed for a while so what better excuse. I had a TON of 1x3's from other projects so used those as slats instead of 1x6's as in the plan. I also used some other scraps up so my headboard part is shorter than in the plan which I also was fine with. It barely fits in his little 10 x 10 starter home room, but I am still pretty proud of it.

Built from Plan(s)
Estimated Cost
$70
Estimated Time Investment
Weekend Project (10-20 Hours)
Finish Used
Primer Plus Glossy White Paint
Recommended Skill Level
Beginner

Comments

candyc327

Sun, 01/07/2018 - 11:13

I am a beginner and I understand what to do until this point. I am confused by this. Can it be explained in another way: Thanks.


Construct the frame as shown, leaving a 3 1/2' overhand on the headboard end to secure the frame to the headboard. Predrill to at least 4 holes to in this overhang to ease attatching to the headboard.

Pallet Scraps Table

Submitted by BERobinson on Tue, 02/09/2016 - 07:28

Had a bunch of scrap wood laying around from deconstructed and unused pallets. Great idea for a table top. NOTE: Table top will be uneven because of different widths and thicknesses of pallet scraps. Use a planer if you have access.

Estimated Cost
FREE
Estimated Time Investment
Day Project (6-9 Hours)
Finish Used
deep redwood stain on the top with a poly finish. Same stain on legs, then painted with white chalk paint, sanded down, and waxed with a dirty black paint rag.
Recommended Skill Level
Beginner

Farm house table based on "Rustic Table" plans

Submitted by timmoore2 on Fri, 11/29/2013 - 20:47

This was my first big project, so I opted to use these simple plans. I ended up making some changes on the fly at the lumber yard by switching the 2x4 legs out with 4x4s and the 1x10 top slats with 2x10s for added solidity. I also had to adjust the length of the table from 8' to 6' in order to fit into our dining nook. We painted the legs and skirts with Behr Anonymous Gray and the table top with Minwax Mission Oak Polyshades. We decided to use the 2 in 1 stain in the interest of time (needed to be done by Thanksgiving). The 2 in 1 didn't come out as well as I would've liked, but all in all it adds to the rustic feel of the table.... not to mention the process was an absolute breeze. The simplicity of the plans allowed me to make numerous easy adjustments to customize the table to our needs/wants.

Built from Plan(s)
Estimated Cost
$105
Estimated Time Investment
Weekend Project (10-20 Hours)
Finish Used
Two coats Behr Anonymous Grey paint on legs and skirts. One coat Minwax Mission Oak PolyShades 2 in 1 stain on tabletop.
Recommended Skill Level
Beginner

Comments

Shoe storage bench and coat rack

Submitted by SeanLC on Mon, 02/22/2016 - 10:07

Very easy project, just have to put stain and coat hangers on and all done. 

Estimated Cost
150.00
Estimated Time Investment
Afternoon Project (3-6 Hours)
Finish Used
Min wax
Recommended Skill Level
Beginner

Farmhouse coffe table

Submitted by vmederos on Fri, 10/04/2019 - 14:22

This was great easy project I could do for my wife while she was at work and surprise her before she came home. I use the same color recommended stain but added the valspar white glaze to makenit more gray and weathered look. Sealed with a matte finish.

Estimated Time Investment
Afternoon Project (3-6 Hours)
Recommended Skill Level
Intermediate

Comments

Modern Farm Table

Submitted by wade.k on Sat, 12/28/2013 - 15:36

First project! Modern Farm Table using a mix of the original and the updated pocket hole plans. Stained with vintage gray/brown on pine. Used Minwax® Fast-Drying Polyurethane in satin to finish. Table - 33" X 69"

Estimated Cost
$150
Estimated Time Investment
Weekend Project (10-20 Hours)
Finish Used
Vintage Gray/Brown
-Minwax® Pre-Stain Wood Conditioner
-Minwax® Weathered Oak
-Minwax® Special Walnut
-Minwax® Fast-Drying Polyurethane

One* coat of each.

*Be careful of air bubbles when applying polyurethane. Had to redo the top of the table! (Use less/thinner coat with long even strokes)
Recommended Skill Level
Beginner

Comments

Jystadtler

Tue, 06/30/2015 - 19:07

I've been looking for a DIY table plan like this for a while! My only question is I have a long kitchen and was thinking of makig the table a little longer, so I can seat one more person on each side. With the extra length, will I need any additional support towards the middle?

Small End Table from 2X4's

Submitted by jbknakal on Sun, 04/10/2016 - 11:55

I made a smaller version of the Tryde End Table with Shelf. I made 2 of them from 6 2X4's

Estimated Cost
$30
Estimated Time Investment
Afternoon Project (3-6 Hours)
Finish Used
Black Paint
Recommended Skill Level
Beginner

Comments

6'x6' Box

Submitted by Anonymous (not verified) on Wed, 04/20/2016 - 19:22

I found these plans online and was just waiting for the kids' grandpa to come out and build it. Could be built in one afternoon (depending on how many trips to your local Home Depot, and availability of the correct tools)
Modifications from original plan:
6x6 instead of 4x4
Brackets to hold patio umbrella for shade
Added seat gussets for additional support
Added "wooden flange" around bottom of box to run lawnmower on
One additional center back support on each bench
One centered handle (instead of a handle on each end)
Stapled landscape weed barrier fabric onto the bottom
Sanded all exposed edges

Materials:
4@2x10x8'
12@1x6x6'
2@2x6x12'
8 hinges
2 handles
3 1/2" decking screws (for attaching 2"x boards)
1 5/8" decking screws (for attaching 1"x boards)
2+ 1 1/4" 2-hole straps for metal conduit (for attaching patio umbrella*)
*Our patio umbrella pole was 1 1/2" diameter, but 1 1/2" straps had too much play, so we used 1 1/4" straps and misc flat washers to adjust the snugness to the pole
Cut lengths:
2@2x10 cut to 72" (long sides of the box)
2@2x10 cut to 69" (short sides of the box)
Cut one each of the following out of a 12 footer:
2@2x6 cut to 75" (long side "flange")
2@2x6 cut to 64" (short side "flange")
No cuts were made to the 12 1x6's
Used one leftover 2' from the 2x8x10's ripped in half cut to 11.5" for arm rests
Used two leftover 2' sections from the 2x8x10's ripped in half cut to 21" for back supports
Used the last 2' cutoff to make two seat gussets (cut about 9 1/2" off and then ripped it at 45 degrees)
Used the remaining piece (ripped in half length-ways) to attach to the center of the backrest for additional support and as the attachment point for our handles
We decided to do one handle in the center of the backrest so one reasonably strong adult could open the lid
The bottom "flange" was assembled with the box upside down. Basically a 2x6 screwed to the bottom edge of the box allowing 1 1/2" overhang all the way around
After making cuts, but before assembly, we recommend using a quarter-sheet pad sander (or similar) with 60 grit paper to break all of the edges and round over any ends or corners that will be in contact with sandbox users
Followed other general assembly instructions

Built from Plan(s)
Estimated Cost
$300 with umbrella and sand
Estimated Time Investment
Day Project (6-9 Hours)
Finish Used
We live in a very arid climate (Utah) so we chose not to varnish or paint this project
Recommended Skill Level
Beginner

Farmhouse Dining Table

Fish made the tabletop from white oak and the base is pine. We still need to build a bench for one side and purchase new chairs, but we are IN LOVE with this table...and it somehow has allowed us to dine as a family more.

Estimated Cost
$300
Estimated Time Investment
Week Long Project (20 Hours or More)
Finish Used
Minwax Special Walnut, two coats
Recommended Skill Level
Intermediate

Comments

DIY Bar Cabinet

Submitted by Anonymous (not verified) on Mon, 02/24/2020 - 16:27

I bought this tv corner cabinet for $40. I spent many hours turning into my perfect bar cabinet. I built a custom lighted liquor display. I have posted photos of the transformation.

Estimated Cost
$1000
Estimated Time Investment
Week Long Project (20 Hours or More)
Finish Used
Benjamin Moore- hale navy
Recommended Skill Level
Intermediate

Comments

frendlygrl

Tue, 07/06/2021 - 19:04

So this is not your project? Because there isn't much information or a before and after picture. This gave me an idea for our home.

Playhouse with swingset

Submitted by GreenEnvy on Tue, 02/25/2014 - 21:58

I combined a few different plans here, mostly the Playhouse deck, swingset.

I haven't finished it yet, this spring I want to finish the exterior as it's just primed plywood right now. Still going to add a window above the balcony (there is a loft up there).

I insulated the roof/ceiling and will insulate the walls when we finish it. In the bottom we'll be putting in a sandbox with a cover that folds up into benches.

It was a fun project and should give our girls many years of fun.

Estimated Cost
$1000
Estimated Time Investment
Week Long Project (20 Hours or More)
Finish Used
Right now the plywood is just primed, we'll be putting some sort of siding or other exterior sheets to finish it.
Recommended Skill Level
Advanced