Community Brag Posts

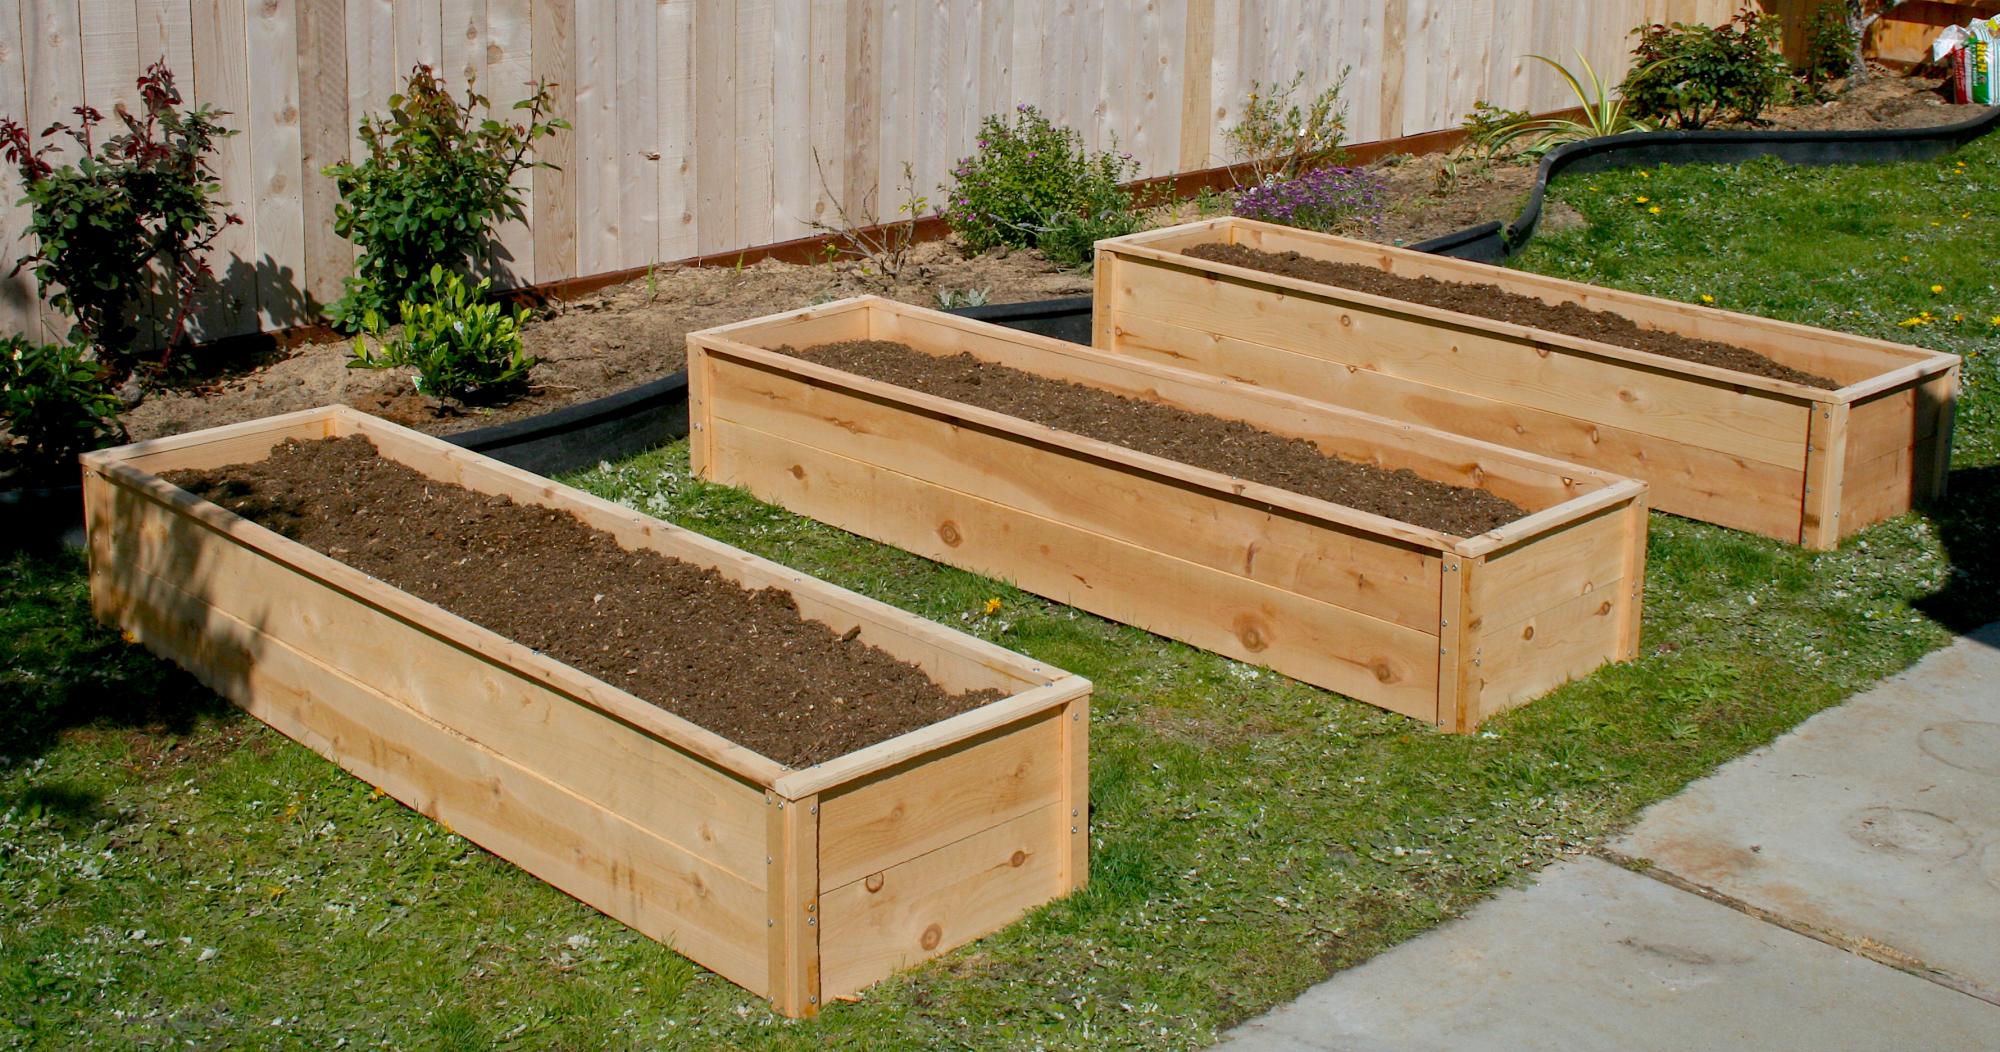
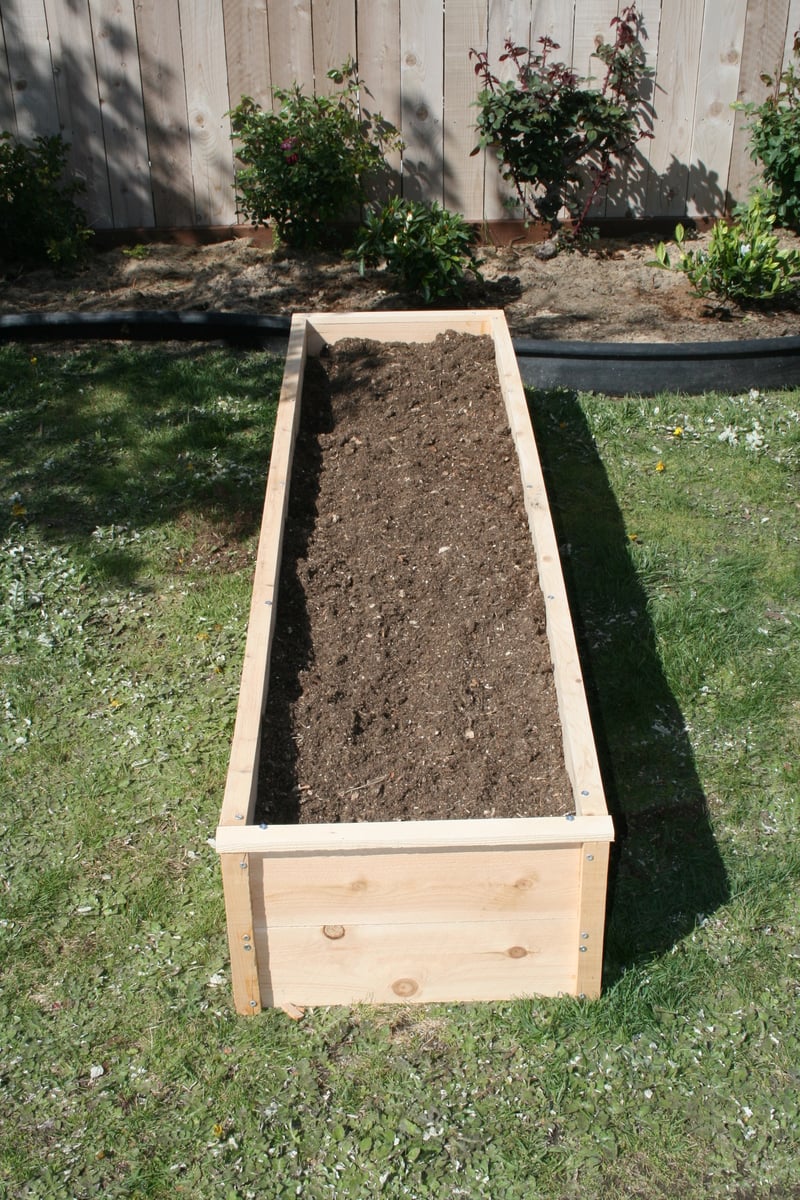
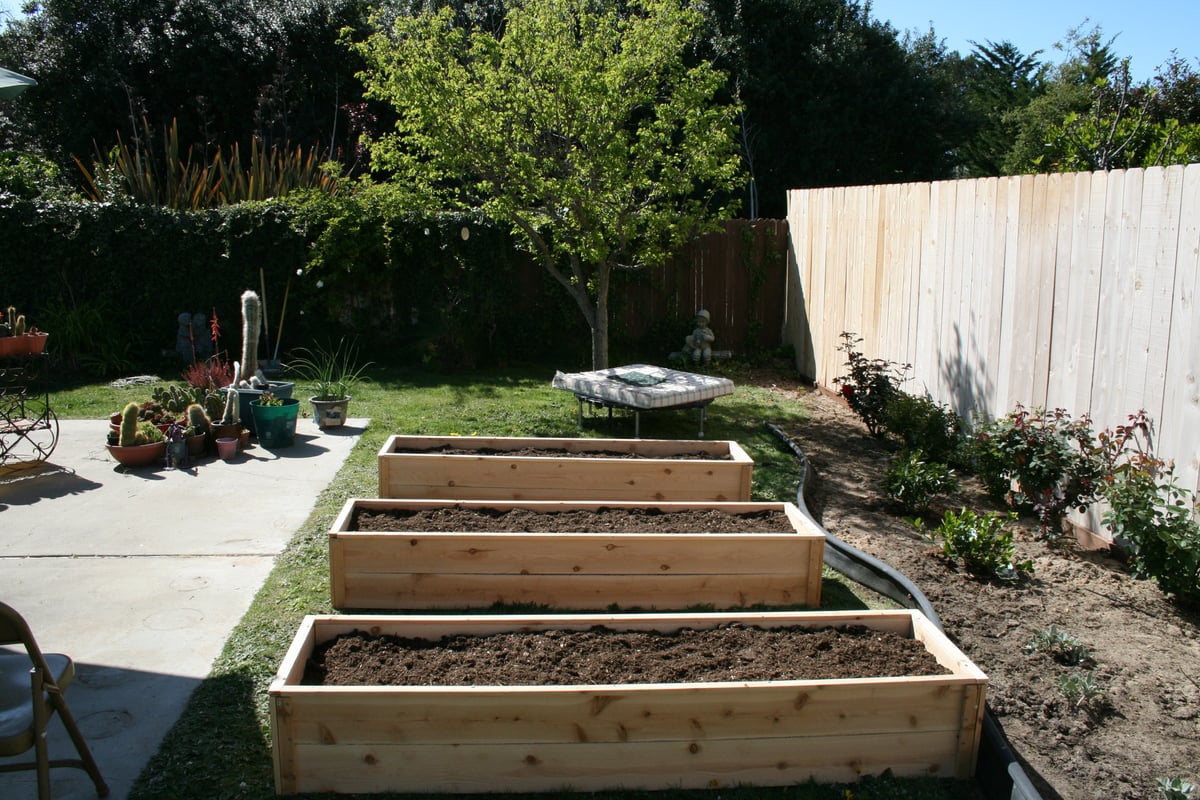
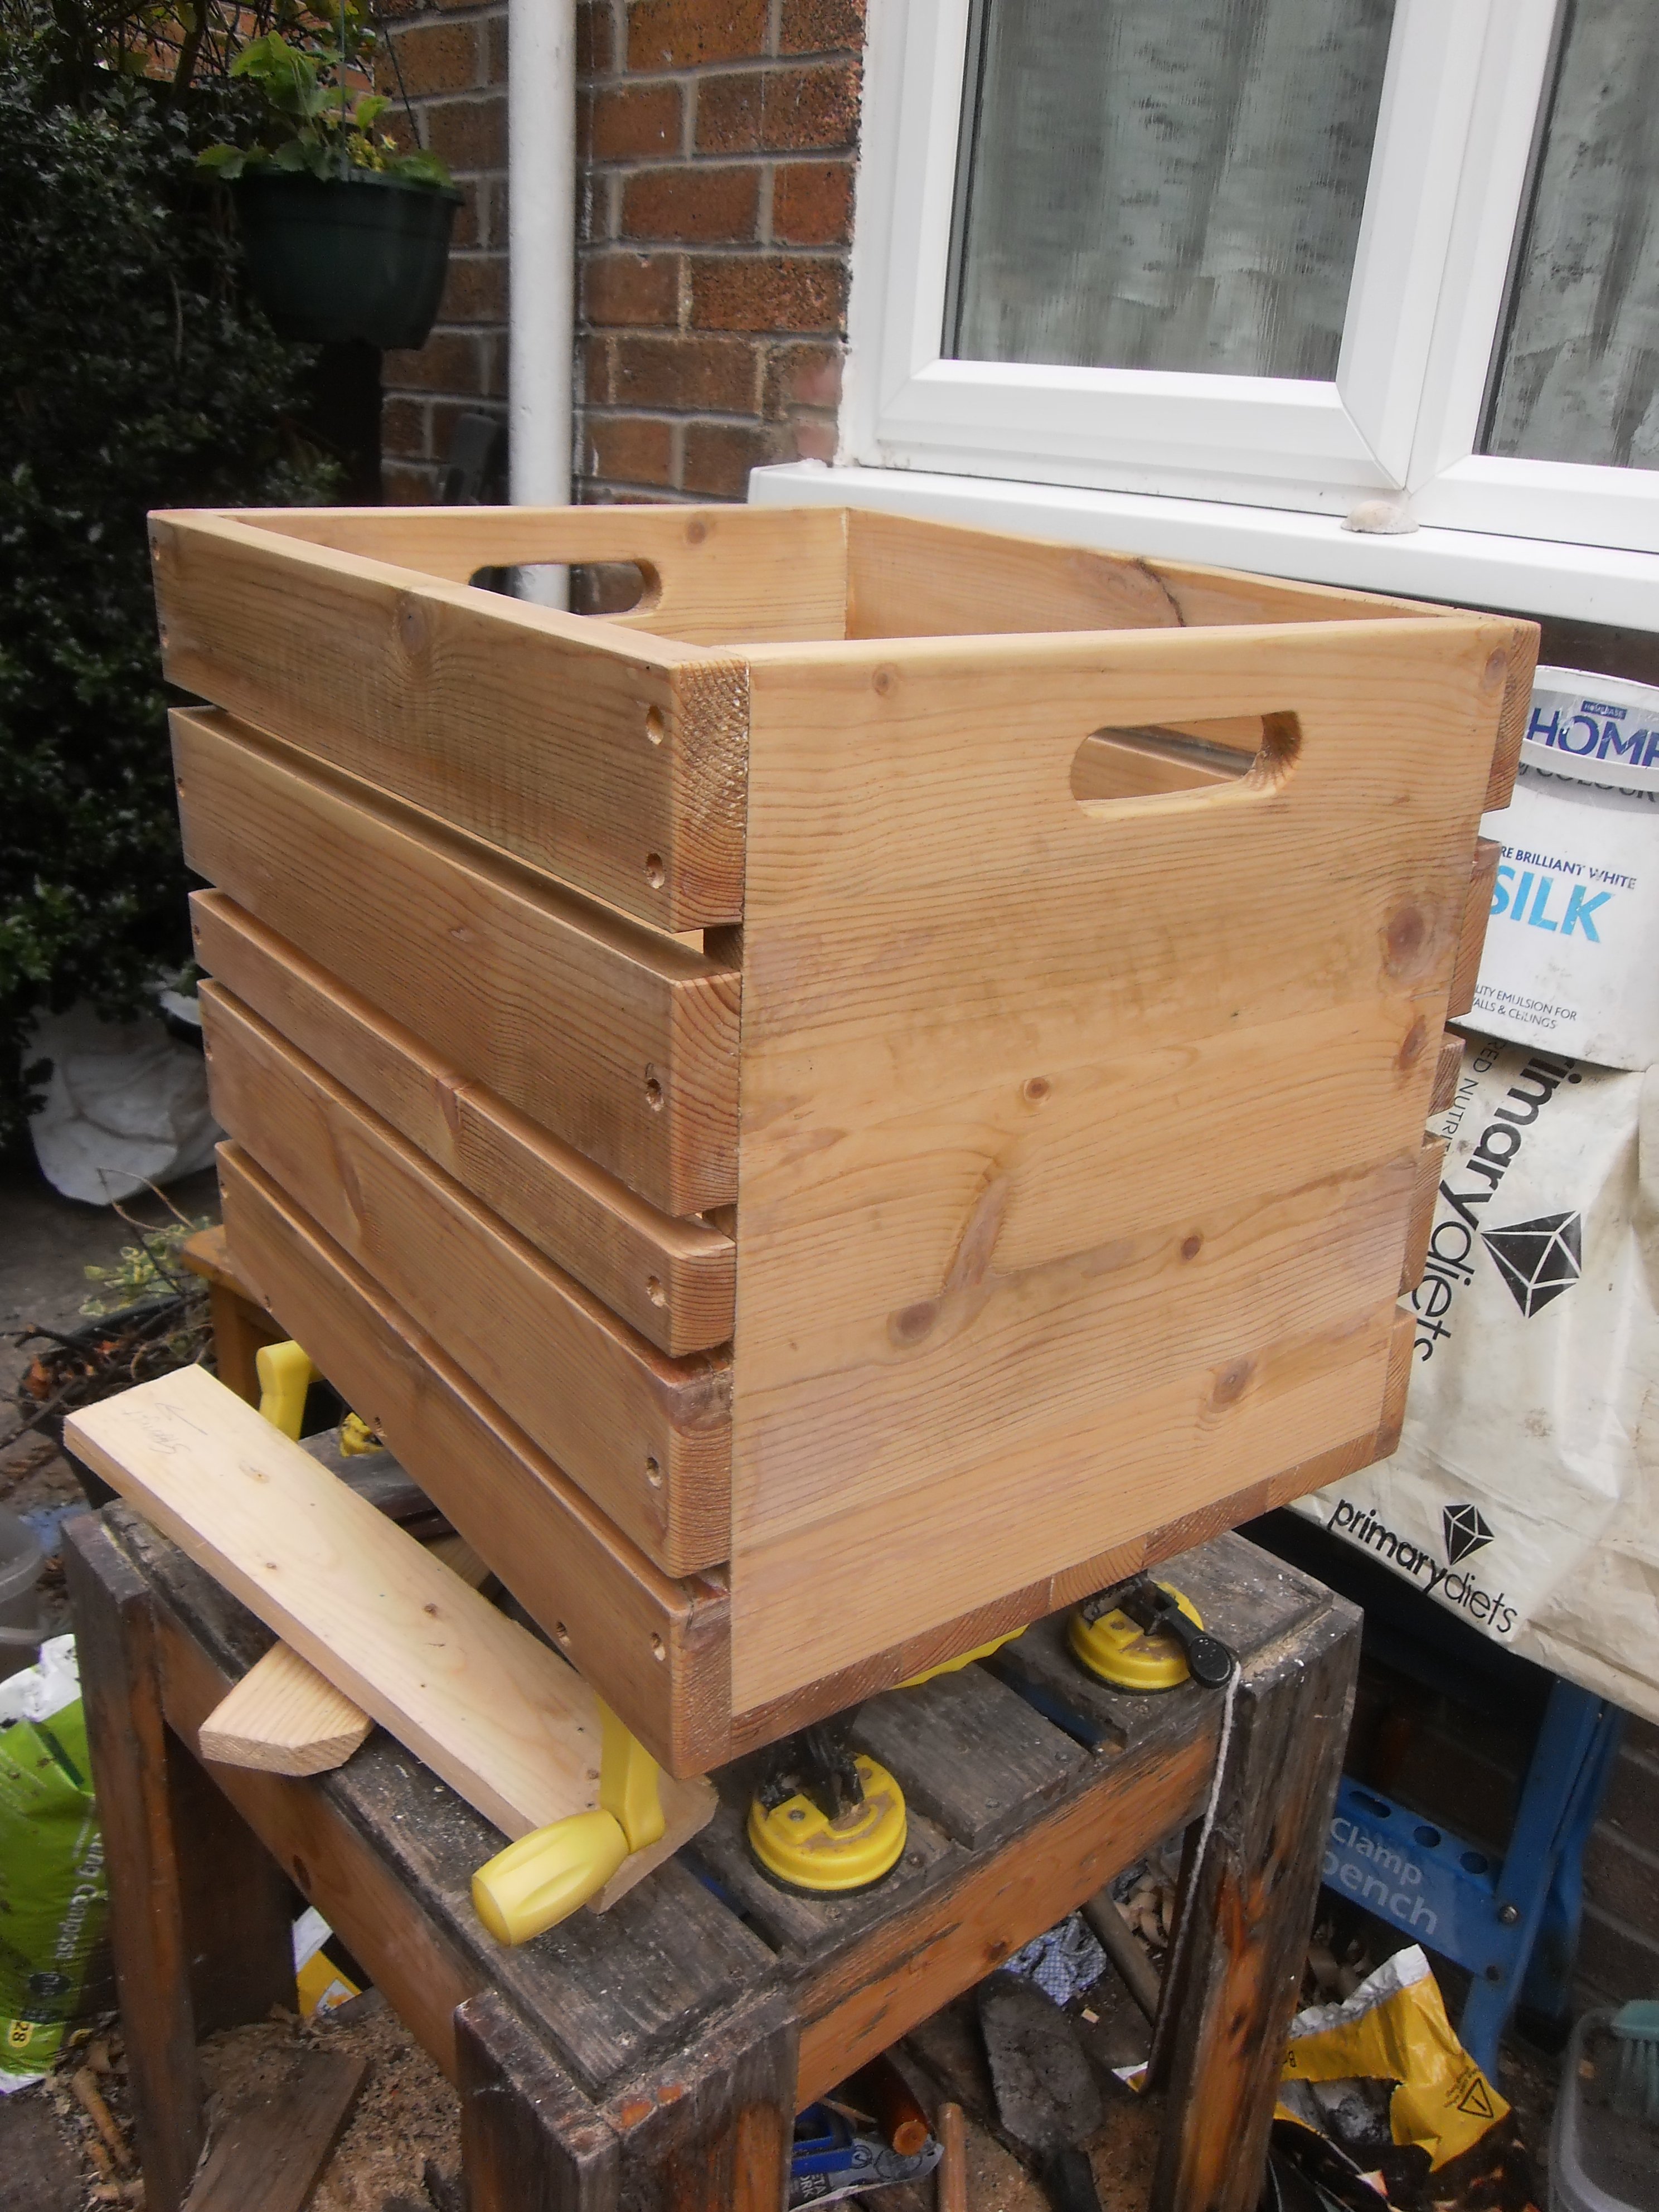
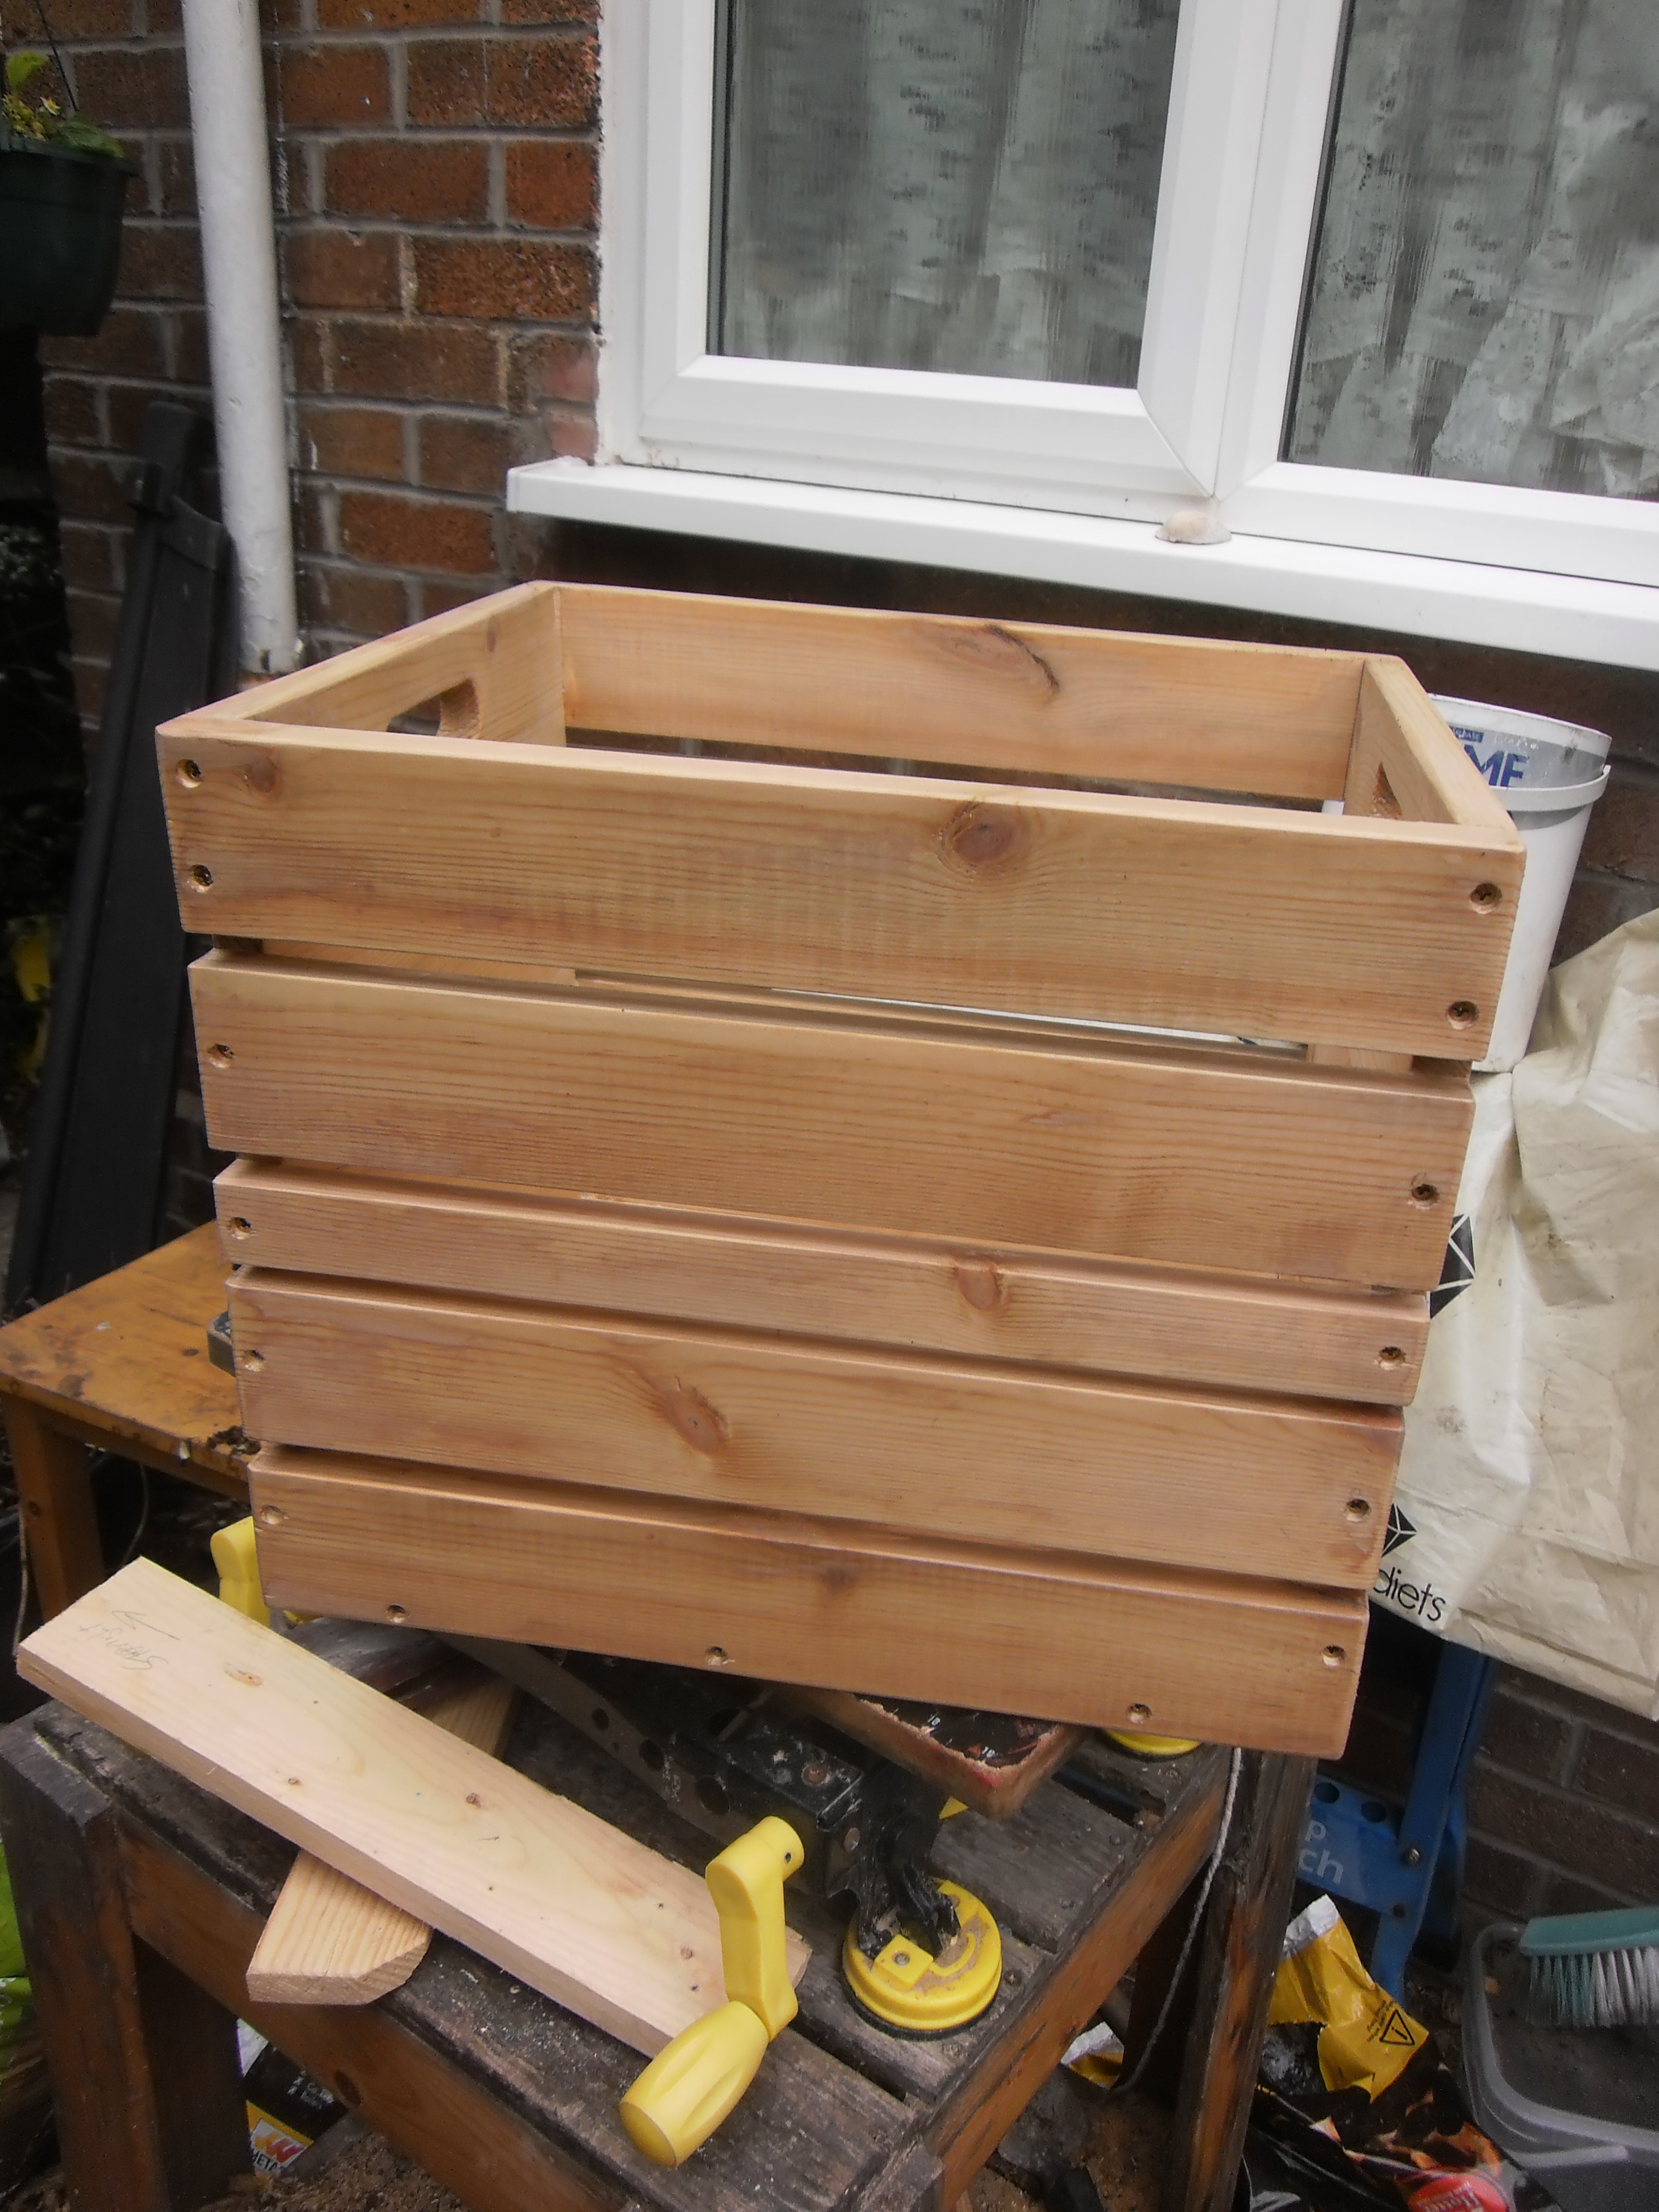
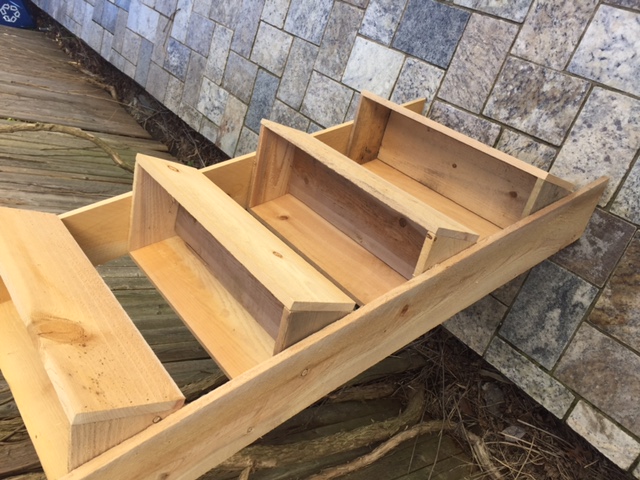
Cascading cedar planter

Submitted by Anonymous (not verified) on Sat, 04/08/2017 - 17:18

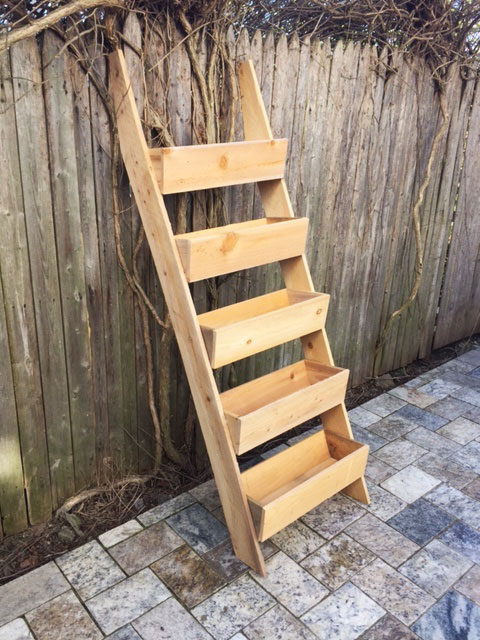
Instead of the 2X6, we used an additional cedar board to complete the sides and the ends of the planters.  This was more cost effective and still provides enough support to hold the planters.  This is a great alternative to the more expensive items we found online.  We will be building multiple to put in an unused space in our yard.  Great project!!

Built from Plan(s)
Estimated Cost
15 each
Estimated Time Investment
An Hour or Two (0-2 Hours)
Finish Used
no finish, we prefer the look of aged cedar
Recommended Skill Level
Starter Project

Twin Farmhouse Bed

I've been looking at this bed plan for several years, wondering if I had sufficient skills to scale up from small items to furniture. I finally did it! It was a family project, with 2 of my 3 kids getting involved. My son has been sleeping on it for several months now, and it's still rock solid. Now to settle on a desk plan for him. Thank you for all the great plans and inspiration!

Finish Used
Varathane weathered gray and worn navy.

Comments

Camp Loft bed with modified stairs

Submitted by Lissa on Wed, 03/13/2013 - 10:26

This was only my 2nd project after the tabletop easel. Due to my inexperience this took longer for me to build and required more trips to the store, but was overall a straightforward and uncomplicated build, and my girls love their new bed. The stain application isn't perfect, but I'm very happy with the color / informal look, and found the Minwax water based stain very easy to work with - my 5 year old was able to help.

Tips:
-To make construction easier I ultimately inset the side rails 1", using scrap 1/4" plywood and 1x4" to support the sides while the bed was on its side. This made it easier to get a more precise fit, and enabled me to manage it without an additional pair of hands.
-I should have accounted for the cleats interfering with the drill before putting pocket holes in the support 2x6's, as I wound up needing to redrill them after gluing on the cleats as the cleats got in the way of the drill.
-We do find the bed shimmies a bit back and forth, so will be adding another 75" support brace at the bottom.
-To fit our space I narrowed the platform 1.5" and there is still plenty of room to play on the platform, and the small ladder is easy to navigate.
-The full stairs wouldn't fit our space so I first tried adding 2 2x4's steps directly into the platform frame as a ladder, but my girls (3 & 5) found this a little difficult to navigate. So I wound up building a modified ladder from the Simple Bunk Bed plan and that works well.

Estimated Cost
$100-$150 for lumber and finish materials. Additional cost to purchase equipment (Kreg jig and orbital sander)
Estimated Time Investment
Weekend Project (10-20 Hours)
Finish Used
MinWax water based stain in Harvest Grain. Also used MinWax water based wood conditioner and Minwax Polycrylic protective finish in Satin (spray can.)
Recommended Skill Level
Beginner

Outdoor beverage cart

Submitted by Anonymous (not verified) on Thu, 04/20/2017 - 14:55

I love using recycled and refurbished wood.  I saw some Cedar leftovers and made this project.  @theshopbycecilia

Estimated Cost
$20
Estimated Time Investment
Day Project (6-9 Hours)
Recommended Skill Level
Beginner

Comments

8 foot long truss style farm bench

Submitted by Bigherd on Wed, 04/21/2021 - 05:01

I had a friend that loved the 48" long truss style farm bench. However, she wanted one 8' long. I modified the "2X4 Truss Style Farm Bench" and came up with this design. As you can see, she want a very specific stain color combination.

Built from Plan(s)
Estimated Cost
$80
Estimated Time Investment
Week Long Project (20 Hours or More)
Finish Used
stains and Minwax Polycrylic
Recommended Skill Level
Beginner

Comments

Cedar Fence Picket Raised Garden Beds

I made these for my 81 year-old Grandma, and I will be making some for my own front yard soon. I followed the plans and ripped the fence boards instead of buying the optional 1x2s. My awesome dad showed me how to use the table saw, but the rest I did all by myself! We decided to leave them unfinished for a natural look. It took me about 7 hours total broken up to make all three, but this is my first project and I was slow. Thanks Ana, for inspiring this working Mom to pick up a hammer and get stuff done!

Estimated Cost
$13 per bed in fence boards
Estimated Time Investment
Afternoon Project (3-6 Hours)
Finish Used
Left unfinished
Recommended Skill Level
Beginner
Seasonal And Holiday

Backyard Patio Set

Submitted by Theavy on Tue, 05/04/2021 - 15:03

Used Ana's plan for chairs, coffee table, sofa and lounger. Stained and clear coated. Wife is happy. What can be better!

Estimated Time Investment
Week Long Project (20 Hours or More)
Finish Used
SPAR Urethane
Recommended Skill Level
Intermediate

Comments

West Elm Rectangles Daybed

Submitted by xniamhx on Wed, 04/03/2013 - 11:18

We decided to build a daybed after we discovered that the space we needed to fill was a bit of an odd size and nothing we saw was going to work. We fell in love with West Elm's rectangles daybed but it was very much out of our budget as we are getting married in June. We recently acquired a kregjig and this was the perfect project to really test it's worth. Once all the cuts were made and the pocket holes drilled, putting this together was quite easy. We were lucky that it fit through our front door, and we attached the support beams after it was in place. We opted for spray paint to finish it off, but we didn't sand everything down beforehand so we may pull it back outside at a later date and smooth things out a bit. We are really impressed with how sturdy this daybed is and EVERYONE compliments us on it. This is our second Ana White plan we've used and only the second major woodworking project we've completed. We bought the ready to use slats at IKEA along with a twin mattress.

You can see the whole project here: http://nearlydomesticated.blogspot.com/2013/03/here-comes-sun.html

Built from Plan(s)
Estimated Cost
Not including the mattress and slats, we spent roughly $100 on materials, including pocket hole screws, lumber, and paint.
Estimated Time Investment
Weekend Project (10-20 Hours)
Finish Used
We simply spray painted the final project -- I highly recommend Rustoleom's paint that comes in cans that have triggers, saves your fingers for sure!
Recommended Skill Level
Beginner

Emmett & Luka's Hallway Murphy Desk

My wife and I live in a 575 sq ft Manhattan apartment with two young boys so space is extremely limited! Last year when our older son was 6 he had the idea to turn our tiny bathroom hallway area into a work space for his growing homework assignments. It took me a year, but it all fell into place when I found this design. Luckily we live in a quirky old 1844 brick row house and I've been lucky enough to craft a small space in the basement where I can keep my tools and work on projects. Even a small desk like this takes more space than you think!

I had to make it a bit smaller to fit the wall space we have. Then I realized the exterior hinges wouldn't have enough clearance because of the door frame. I found a neat set of interior hinges made by Pojjo but they attached to the sides as well as the bottom so the craft paper section was in the way. Then my wife said, "Can you flip it upside-down?" Absolutely. The only other hack I added was adjustable peg slots for the shelf on the left.

I did a twist on the chalkboard theme by painting the desk in a semi-gloss but the entire hallway in hot pink chalkboard paint--pink is my son's fave color =:-) Hudson Paints has an amazing range of chalkboard paint colors.

We love, love, love this design--thanks, Ana!

Estimated Cost
$50
Estimated Time Investment
Weekend Project (10-20 Hours)
Finish Used
Benjamin Moore Natura "Margarita Green" in semi-gloss; walls Hudson Paints "Sweet 13" pink chalkboard paint.
Recommended Skill Level
Beginner

Comments

New Workshop - Let the Fun Begin!

Submitted by ikeymedesu on Sun, 05/30/2021 - 18:33

I was really into building things and DIY over 10 years ago, but due to work/life I hadn't done anything since 2009. I was going pretty crazy working from home during the pandemic, and decided to get back into home improvement to have something to look forward to. After doing some painting and building a few accent walls out of shiplap and reclaimed wood (and loving it), I decided to turn my single car garage into a shop. This is when I found Ana White, and absolutely loved the plans and videos around the wall storage and workbench. I can't believe how sturdy everything is, how straightforward the plans are, and how well this turned out. It made me want to build all the things, and I'll be taking on many projects in the future. (my apologies for the pictures being in the wrong orientation - can't seem to adjust them)

Estimated Cost
500
Estimated Time Investment
Weekend Project (10-20 Hours)
Finish Used
None.
Recommended Skill Level
Intermediate

Comments

wood crate

Submitted by Anonymous (not verified) on Thu, 06/08/2017 - 14:15

Hi Ana, found your page very informtive and very easy plans to follow. Made the crate to keep my vinly records in and was well pleased with the en result. Think I'll add some castor wheels to it once I've finished painting the crate,

Built from Plan(s)
Estimated Cost
£18
Estimated Time Investment
Weekend Project (10-20 Hours)
Finish Used
home made stain Vinegar and steel wool
Recommended Skill Level
Intermediate

My First Greenhouse

This was my first attempt at building a greenhouse. I wanted my cucumbers to be able t climb high so I made the house higher than the plans showed. It's also a little larger too. Since I am in Europe my dimensions are in meters. The overall size is 3 x 6 meters. I also built it on top of 100mm x 100mm lumber (the equivalent of 4x4's). It took 5 sheets of 6mm thick polycarbonate in 2 x 6 meters.

Built from Plan(s)
Estimated Time Investment
Week Long Project (20 Hours or More)
Recommended Skill Level
Intermediate

Comments

The Greenhouse Gets a Custom Door Window!

Submitted by Anonymous (not verified) on Sun, 09/05/2021 - 06:00

I knew I wanted an unusual window in our new greenhouse door. It took a lot of looking, but finally found what I was looking for!

Built from Plan(s)

Comments

Leaning art easel

Submitted by Calmly on Tue, 03/31/2015 - 08:57

My husband and I built this to place our huge white board on for homeschooling. We altered it a bit by adjusting the length to 7 ft. It was painted lavender ( my favorite color). I may have to add another easel to prevent the white board from sliding off. Thank you Ana for your awesome plans.

Built from Plan(s)
Estimated Cost
The cost was about 20.00 which includes the white board. 2.70 each for 1 by 2 , white board cost 15.00 and I hade 1 by 3 scraps
Estimated Time Investment
An Hour or Two (0-2 Hours)
Recommended Skill Level
Beginner

Comments

Patio Table w/Built in Beer/Wine Cooler

Submitted by RoyBoy on Sat, 05/18/2013 - 06:58

After seeing the patio table with beer/wine cooler, I wanted to build this for my brother and wife who recently bought a house. I asked them if they were interested and of course they said yes. I modified the original plans by adding a 2x4 on each side of the cooler to make the table wider. I also made the legs out of 4x4 vs the 2x4s that were originally called for. I used redwood and then stained it and used a varnish for the final coating. I probably wouldn't use the varnish again for an outdoor table, because it looks like it should be an indoor table vs outdoor. Overall, I'm pleased with the results and the best part about it, I get to enjoy it every time I go over for a BBQ.

Estimated Cost
$225-250
Estimated Time Investment
Week Long Project (20 Hours or More)
Finish Used
Olympic Redwood Naturaltone Toner Exterior Stain
Cabot Spar Varnish Semi-Gloss
Recommended Skill Level
Beginner

Comments

Msharp1211

Wed, 07/03/2013 - 13:04

Awesome table, do you happen to have the measurements you used. I'd like to make the same table but I need the lumber yard to make the cuts.

4x4 Truss Table

Submitted by Mermac117 on Sat, 09/02/2017 - 17:43

Took us about a week but have two young toddlers... love the table. Awaiting Chairs from wayfair and my husband is starting the bench this week!

Built from Plan(s)
Estimated Cost
$200
Estimated Time Investment
Week Long Project (20 Hours or More)
Finish Used
Dark walnut
Recommended Skill Level
Beginner

Adirondack Chairs for fire pit

Submitted by Anonymous (not verified) on Wed, 10/06/2021 - 03:51

We have a contemporary house on a lake and the standard Adirondack chairs were not fitting in this setup. However, Anna’s modern Adirondack chair plan was just perfect for what we were looking for. The chairs are comfortable and the result is amazing! Thanks!!

Comments

Seasonal And Holiday

Sand Box with lid seats!

Submitted by Kabarie on Thu, 05/30/2013 - 18:01

I put a weekend project because I took the time to paint. I also used 2x8's for the sides so to account for the difference in measurements...Long sides stayed the same at 47 1/2", however, for the shorts sides, because of the extra almost 2"'s on either end, I cut them at 45" and the lid 8 ft 1x4's were just cut in half so measured 48".

Also, on the arms for the seat...I got a little crazy excited with my Kreg Jig...I love those pocket holes but probably just should have screwed the seat onto them..lol

I had seen an image with the cut outs on the lid so took a bowl, did my own measurements and used them for handles instead of purchasing more hardware. Kids love it! Thanks for the plan!!

Built from Plan(s)
Estimated Cost
60/70$
Estimated Time Investment
Weekend Project (10-20 Hours)
Finish Used
Nothing on pressure treated....colors on pine.
Recommended Skill Level
Starter Project

Comments

Dining Table

Submitted by Malka on Wed, 09/13/2017 - 00:43

Used the pub table plans, but went regular dining table height so as to make matching dining chairs. Painted in Rustoleum Latex Ultra White, and Stained in Minwax Espresso. Built using Douglas Fir lumber. Table top and chair seats are 2x4's and 2x6's that were biscuit joined. Table has adjustable leg levelers drilled into bottom of legs.

Built from Plan(s)
Estimated Cost
$200 for Table and 4 matched chairs
Estimated Time Investment
Weekend Project (10-20 Hours)
Finish Used
Rustoleum Ultra White paint, Minwax Espresso stain, Minwax Gloss Fastdry poly
Recommended Skill Level
Intermediate

Rory's House

In need of a replacement for my hideous (but large!) wire kennel, I was ecstatic when Ana posted plans for an end table kennel, just like the fancy ones in Sky Mall magazines! Once I got out of my first trimester of pregnancy, I enlisted a friend to help me out with the build. I spent a little too much on lumber (I accidentally purchased the good whitewood, as opposed to furring strips) but I'm chalking that up to pregnancy brain. After a million Kreg Jig holes, the assembly was maybe an hour or less to put all four sides together. We decided to paint the interior prior to assembly, and that was a good choice! I put the sides together with L-brackets, and honestly did a pretty poor job of it. But the main reason was to easily disassemble it should it need to be moved at some point. I splurged on the hinges and gate closure, and love love LOVE the finished product! These were great, well-laid out plans!

Built from Plan(s)
Estimated Cost
70
Estimated Time Investment
Afternoon Project (3-6 Hours)
Finish Used
I sanded it with 100, then 150. I gave the MDF edges a quick coat of DAP to smooth things out, then sanded with 220. It's painted with 4 coats of semigloss white.
Recommended Skill Level
Intermediate