Community Brag Posts
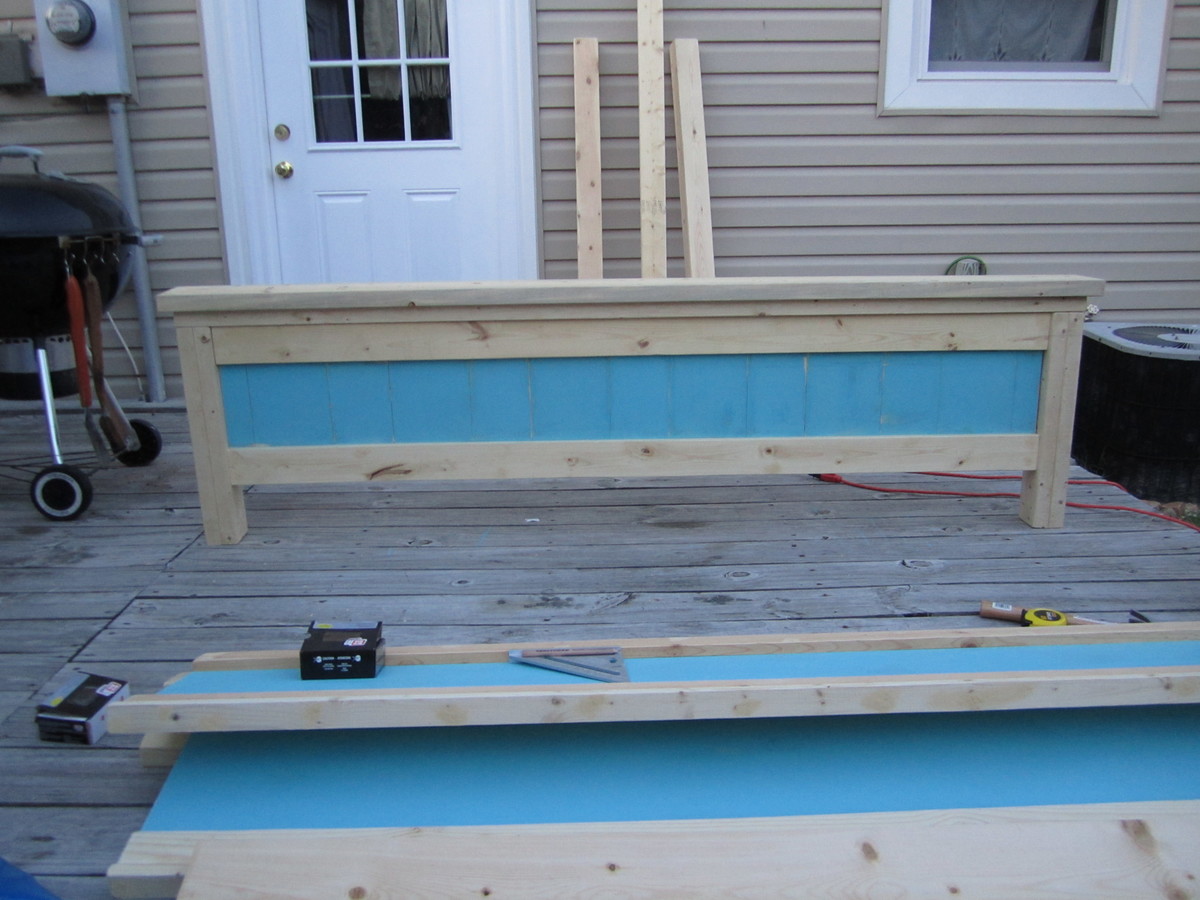
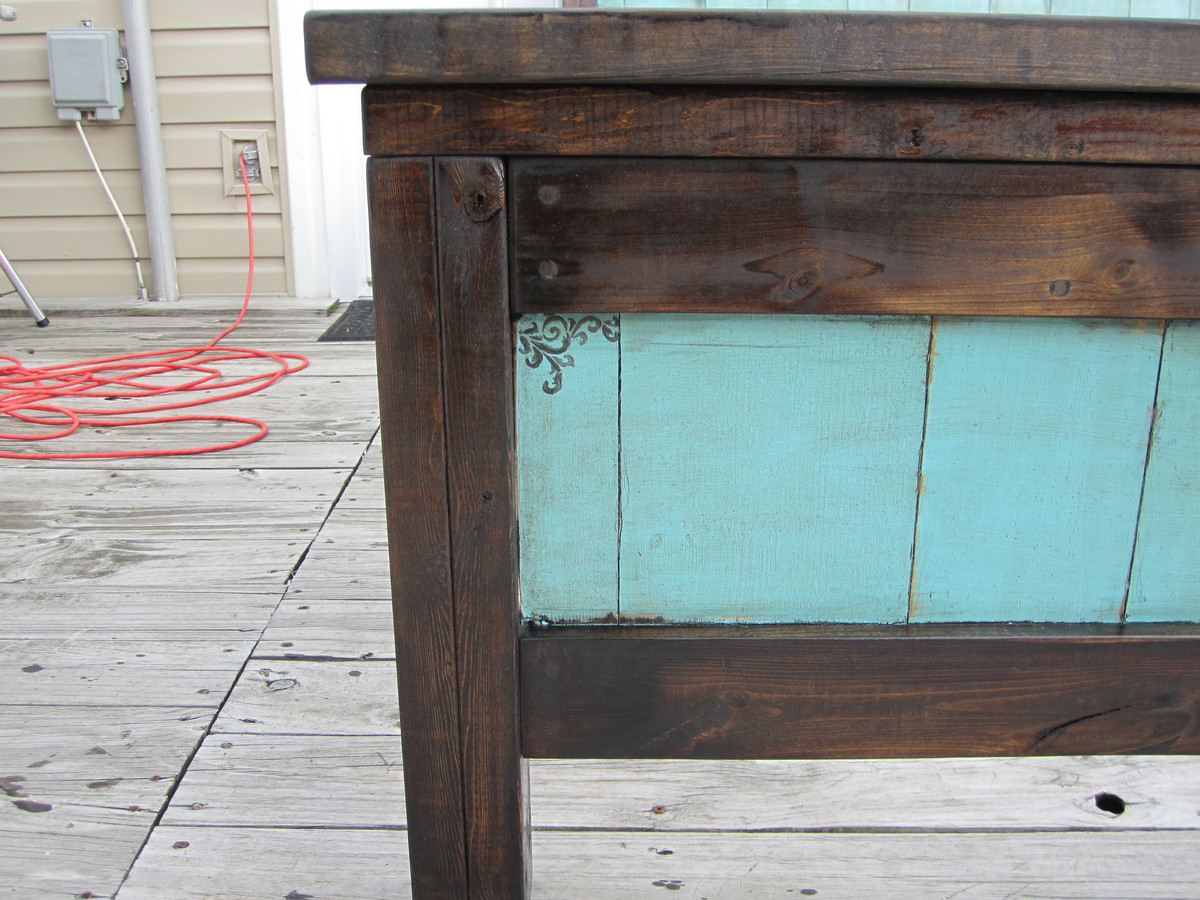
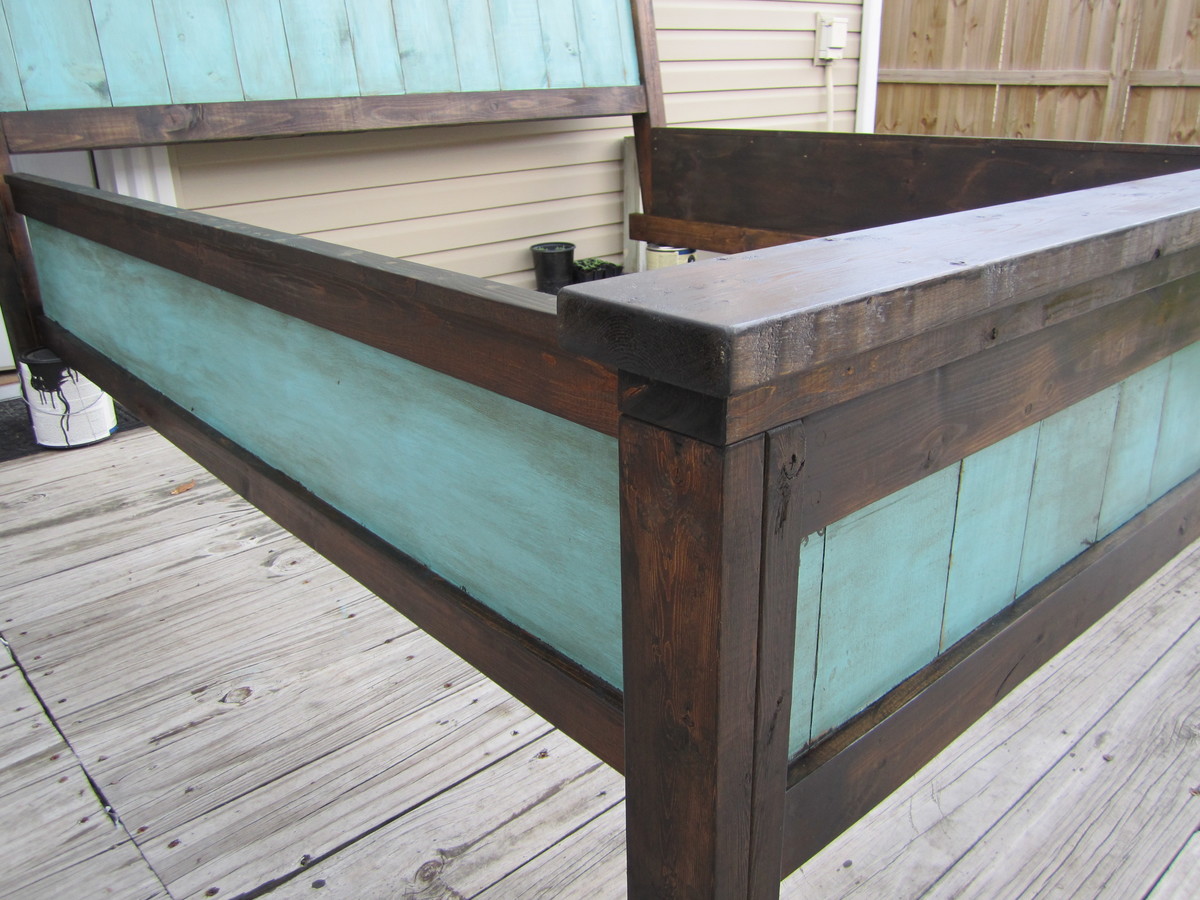
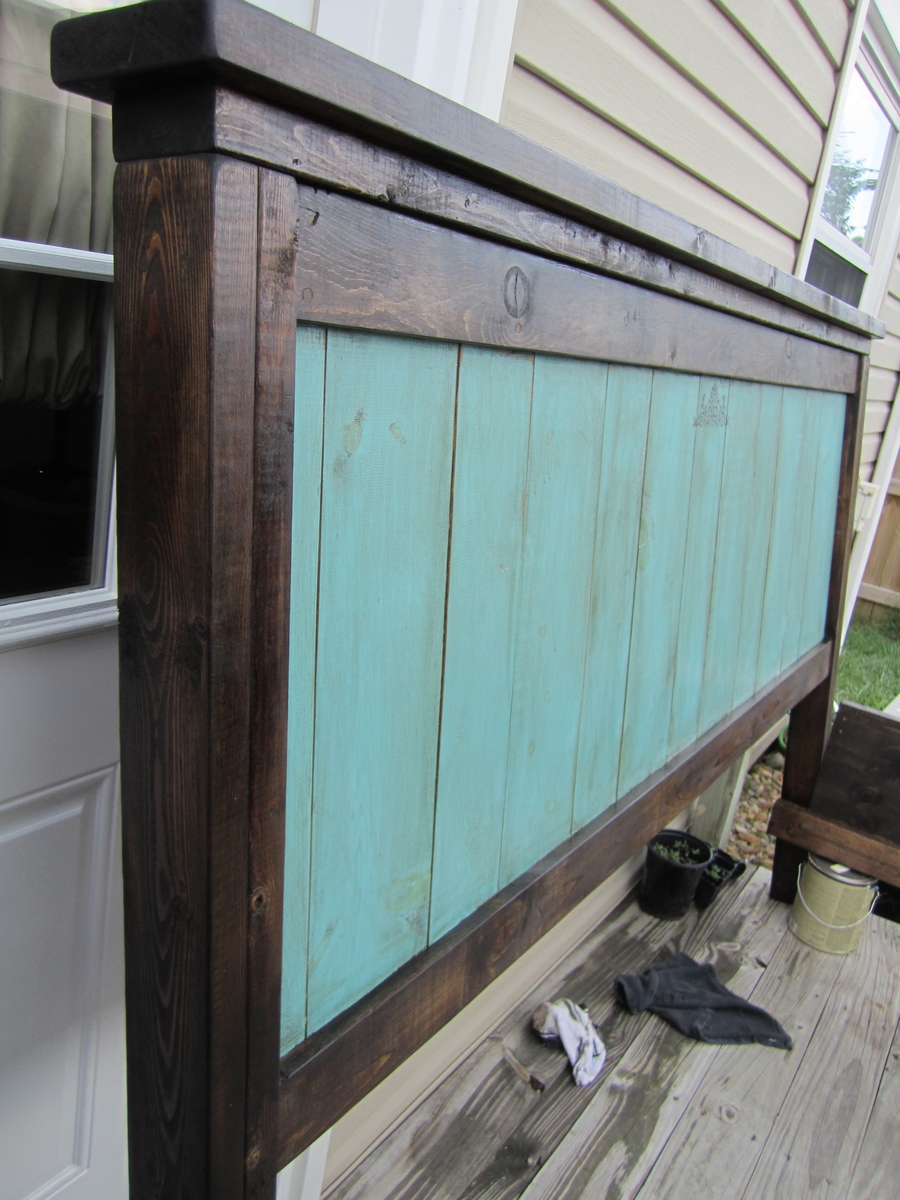
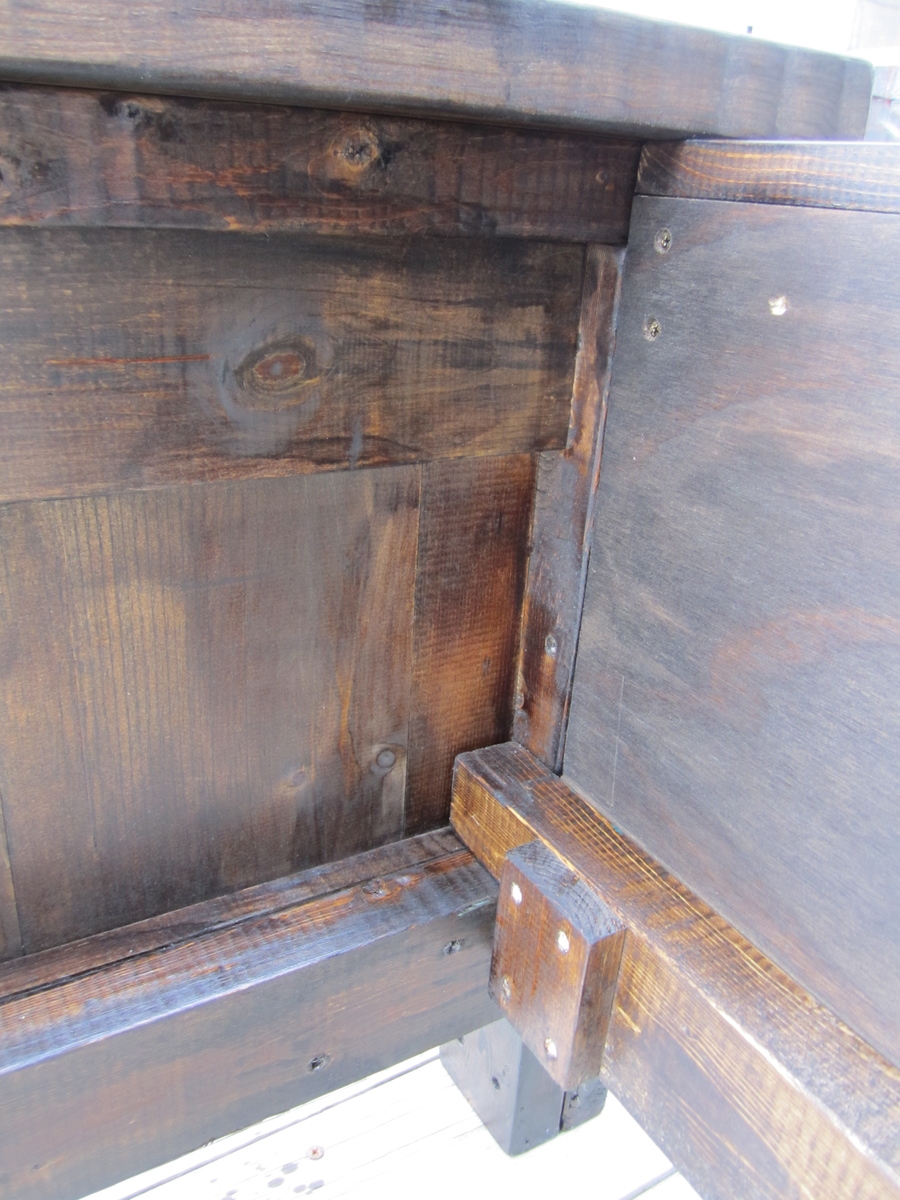
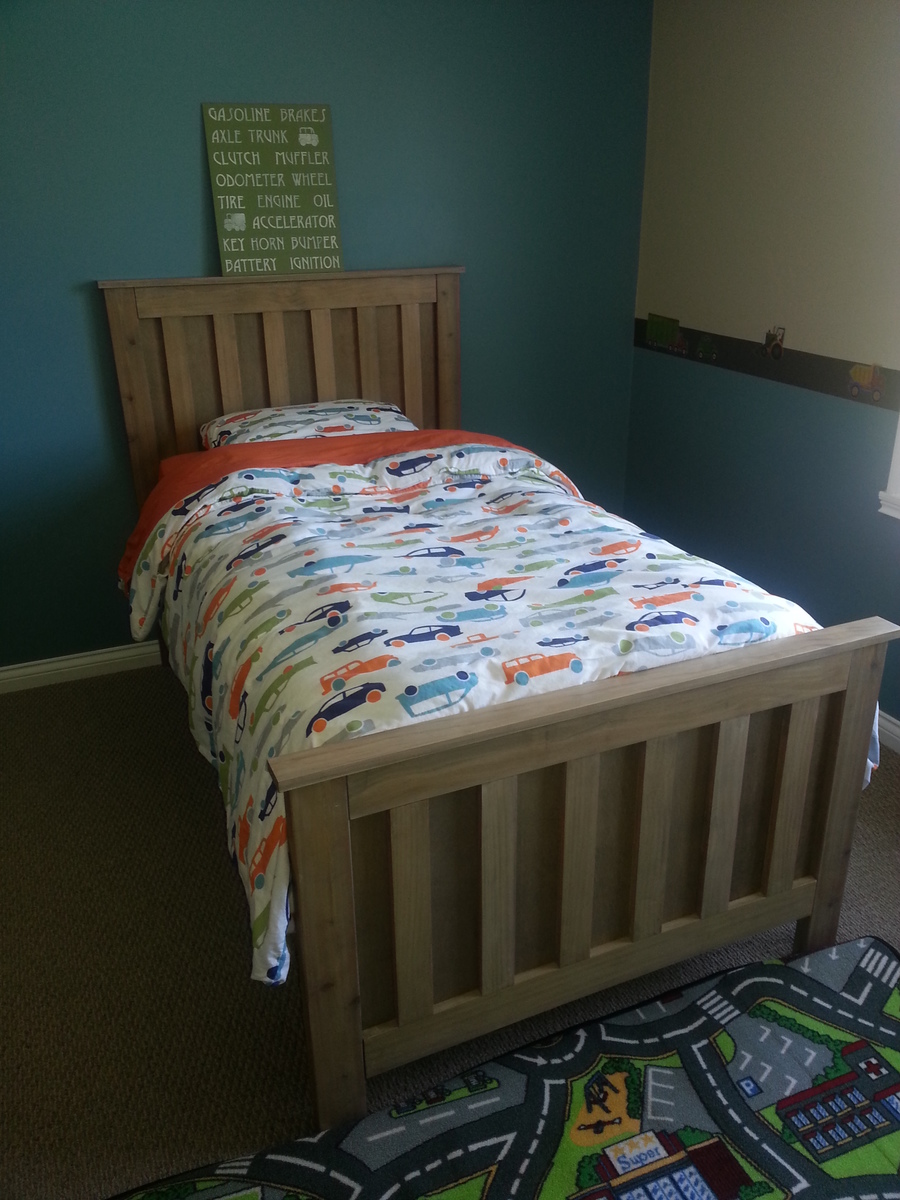
Farmhouse Bed
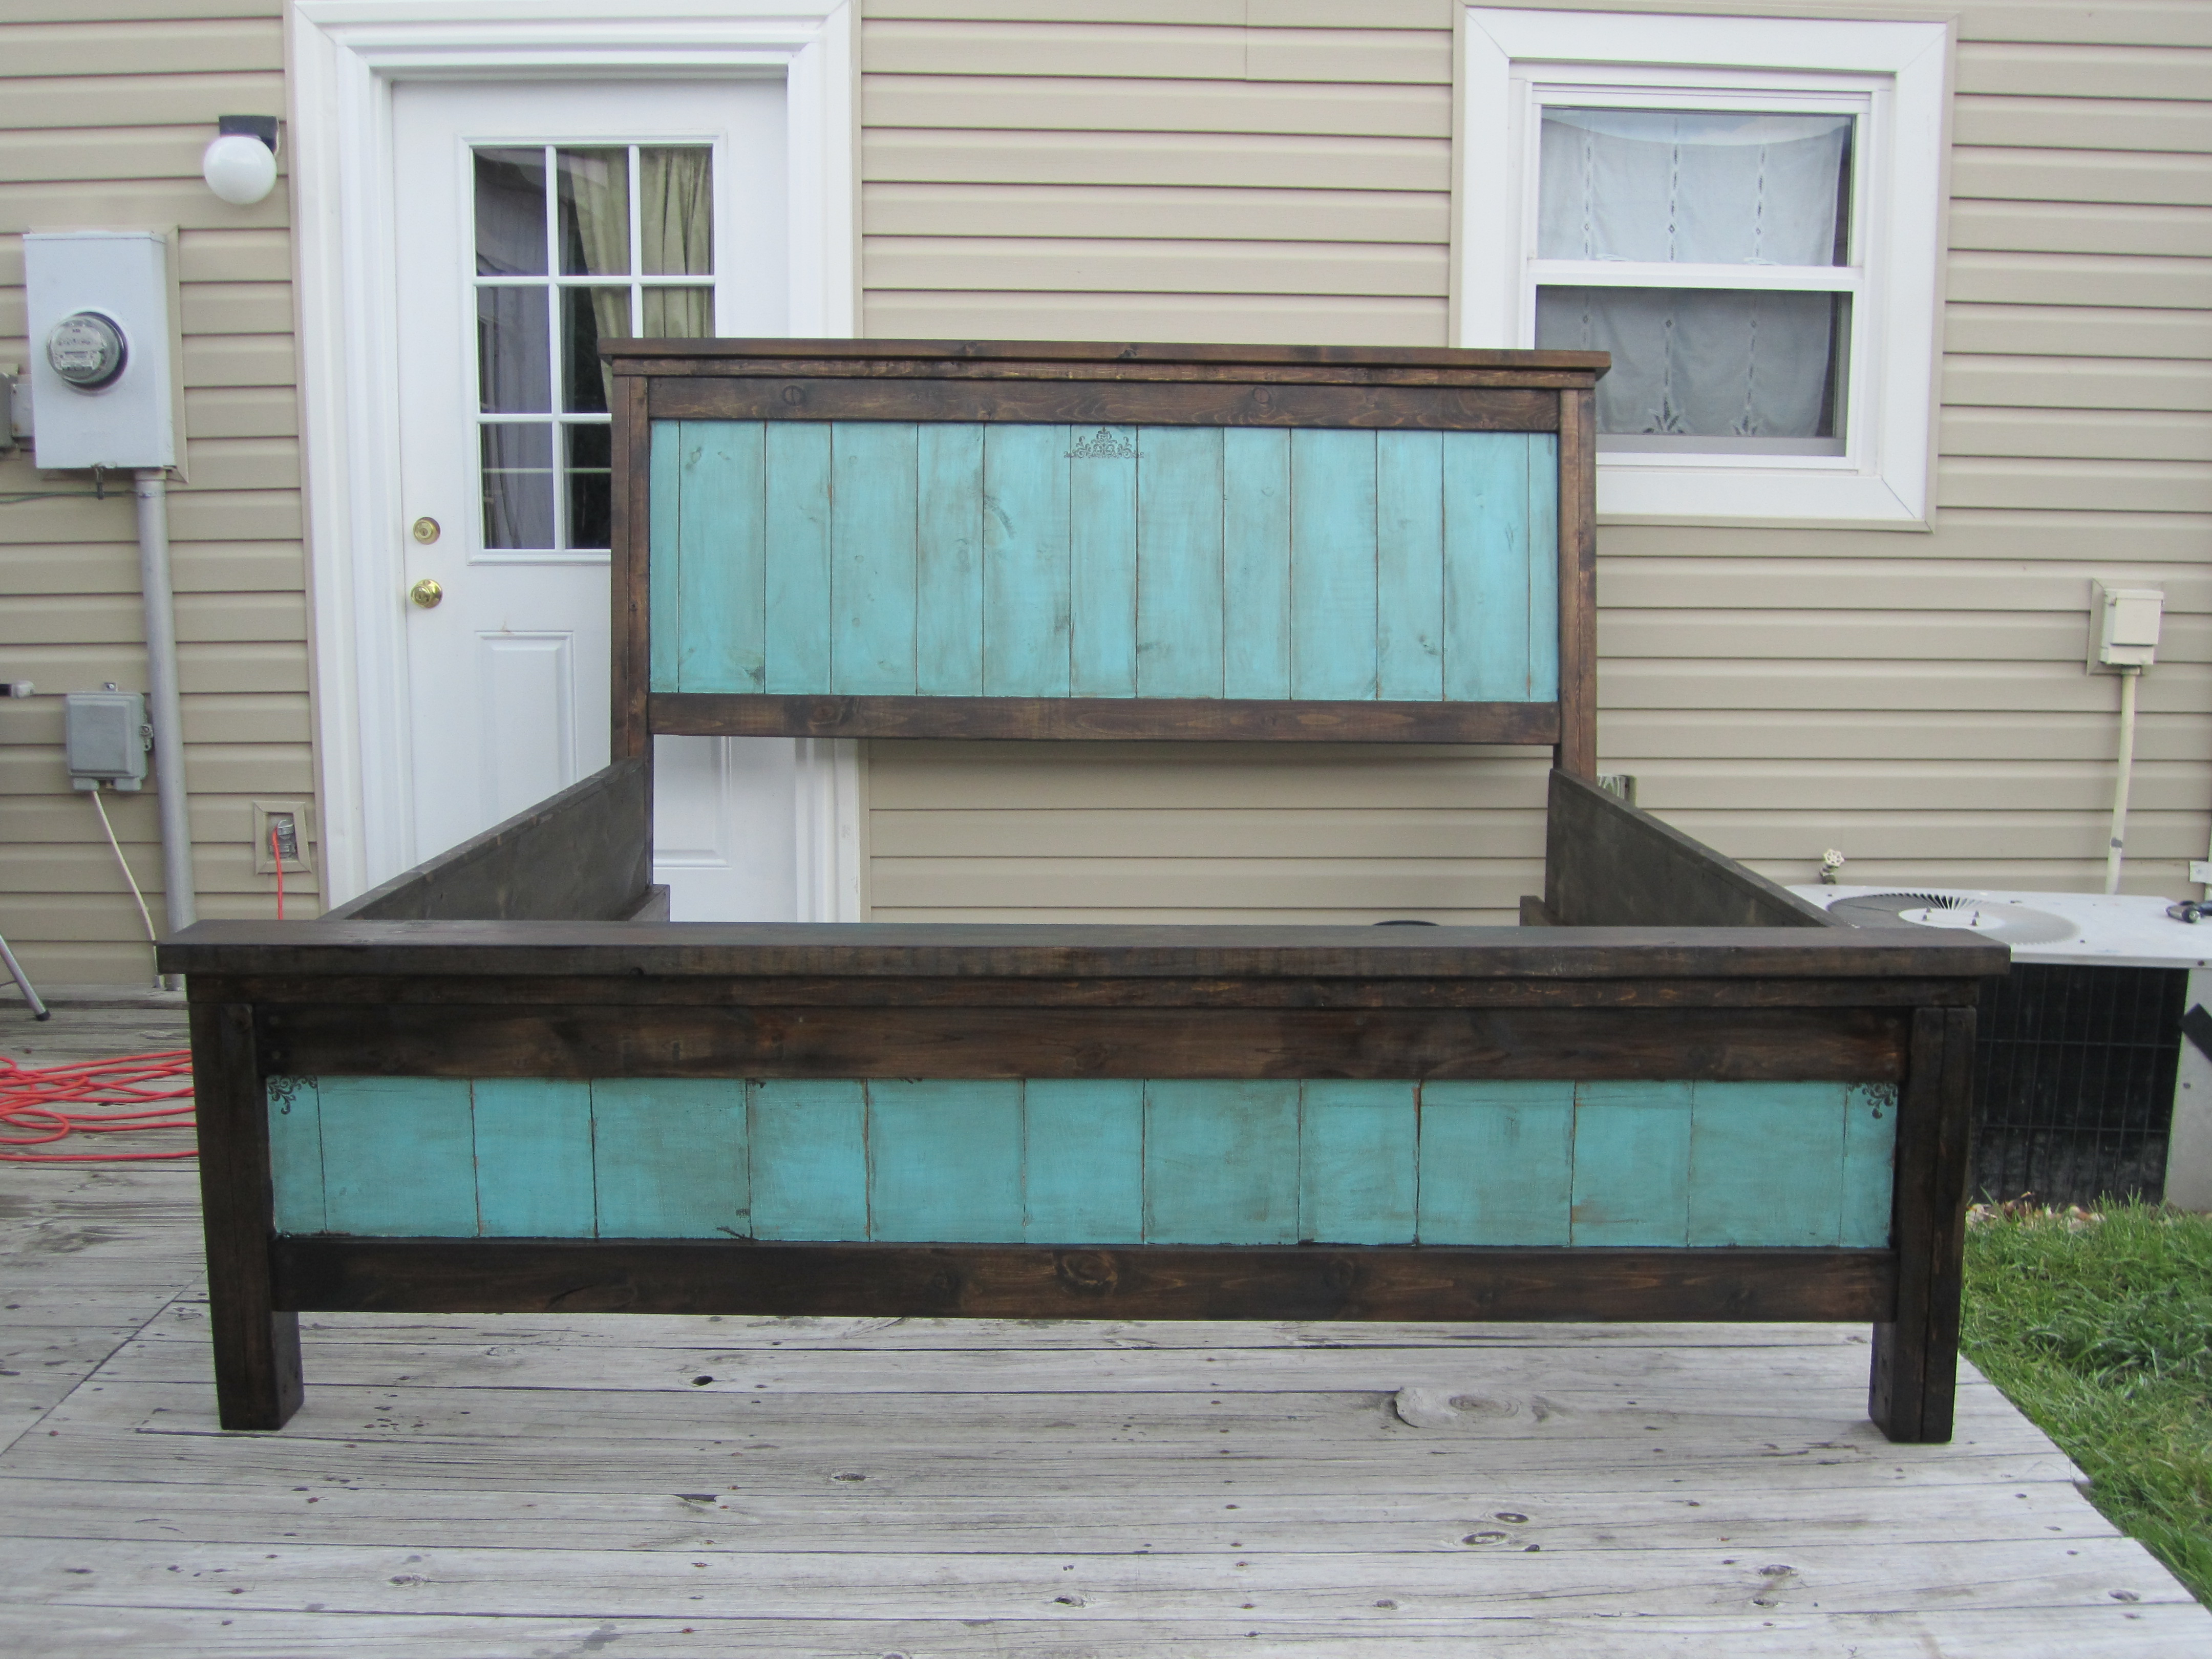
This was our first build alone. I've helped my dad build various things through out the years but was this first time me and my husband built something together.
The bed plans were great and it went together easily. We couldn't find untreated 4x4 posts so we went with two 2x4 sandwiched together, and then we bolted the headboard posts to the footboards. The side rails are plywood trimmed with 1x3's and topped with a 1x2. We also used L brackets to attach the side rails to the head and footboards and addition to bolts on the headboard and 2" screws on the footboard. We needed to assemble the bed in a way we could easily disassemble because we are moving soon.
Built from Plan(s)
Estimated Cost
160+
Estimated Time Investment
Weekend Project (10-20 Hours)
Finish Used
I followed one of Ana's featured finishes, distressed turquoise with chocolate glaze.
I used dark walnut stain and Valspar's semi-gloss Sea Exposure, and Valspar's Glaze.
I used dark walnut stain and Valspar's semi-gloss Sea Exposure, and Valspar's Glaze.
Recommended Skill Level
Beginner
Comments

Wed, 08/15/2012 - 14:46
I LOVE the turquoise finish!
I LOVE the turquoise finish! It looks like a piece of jewelry for your bedroom!
Kentwood Twin Bed
Two year old is being evicted from the baby room by the baby and we decided to build him a big boy bed using the Kentwood Twin Plan. Used only pine and the mattress is supported by slats. The bed looks great and is incredibly solid. Thank you for the plan, Ana.
Built from Plan(s)
Estimated Cost
$100 (bought some stain/poly that I'll use on other things)
Estimated Time Investment
Weekend Project (10-20 Hours)
Finish Used
Largely followed the copycat Restoration Hardware finish instructions on this site. Pre-Stain, Special Walnut, Weathered Oak, White Pickling, then Special Walnut. I applied one coat of poly with a brush, followed by a second coat of rubbed on poly, which I thought gave it more depth.
Recommended Skill Level
Beginner
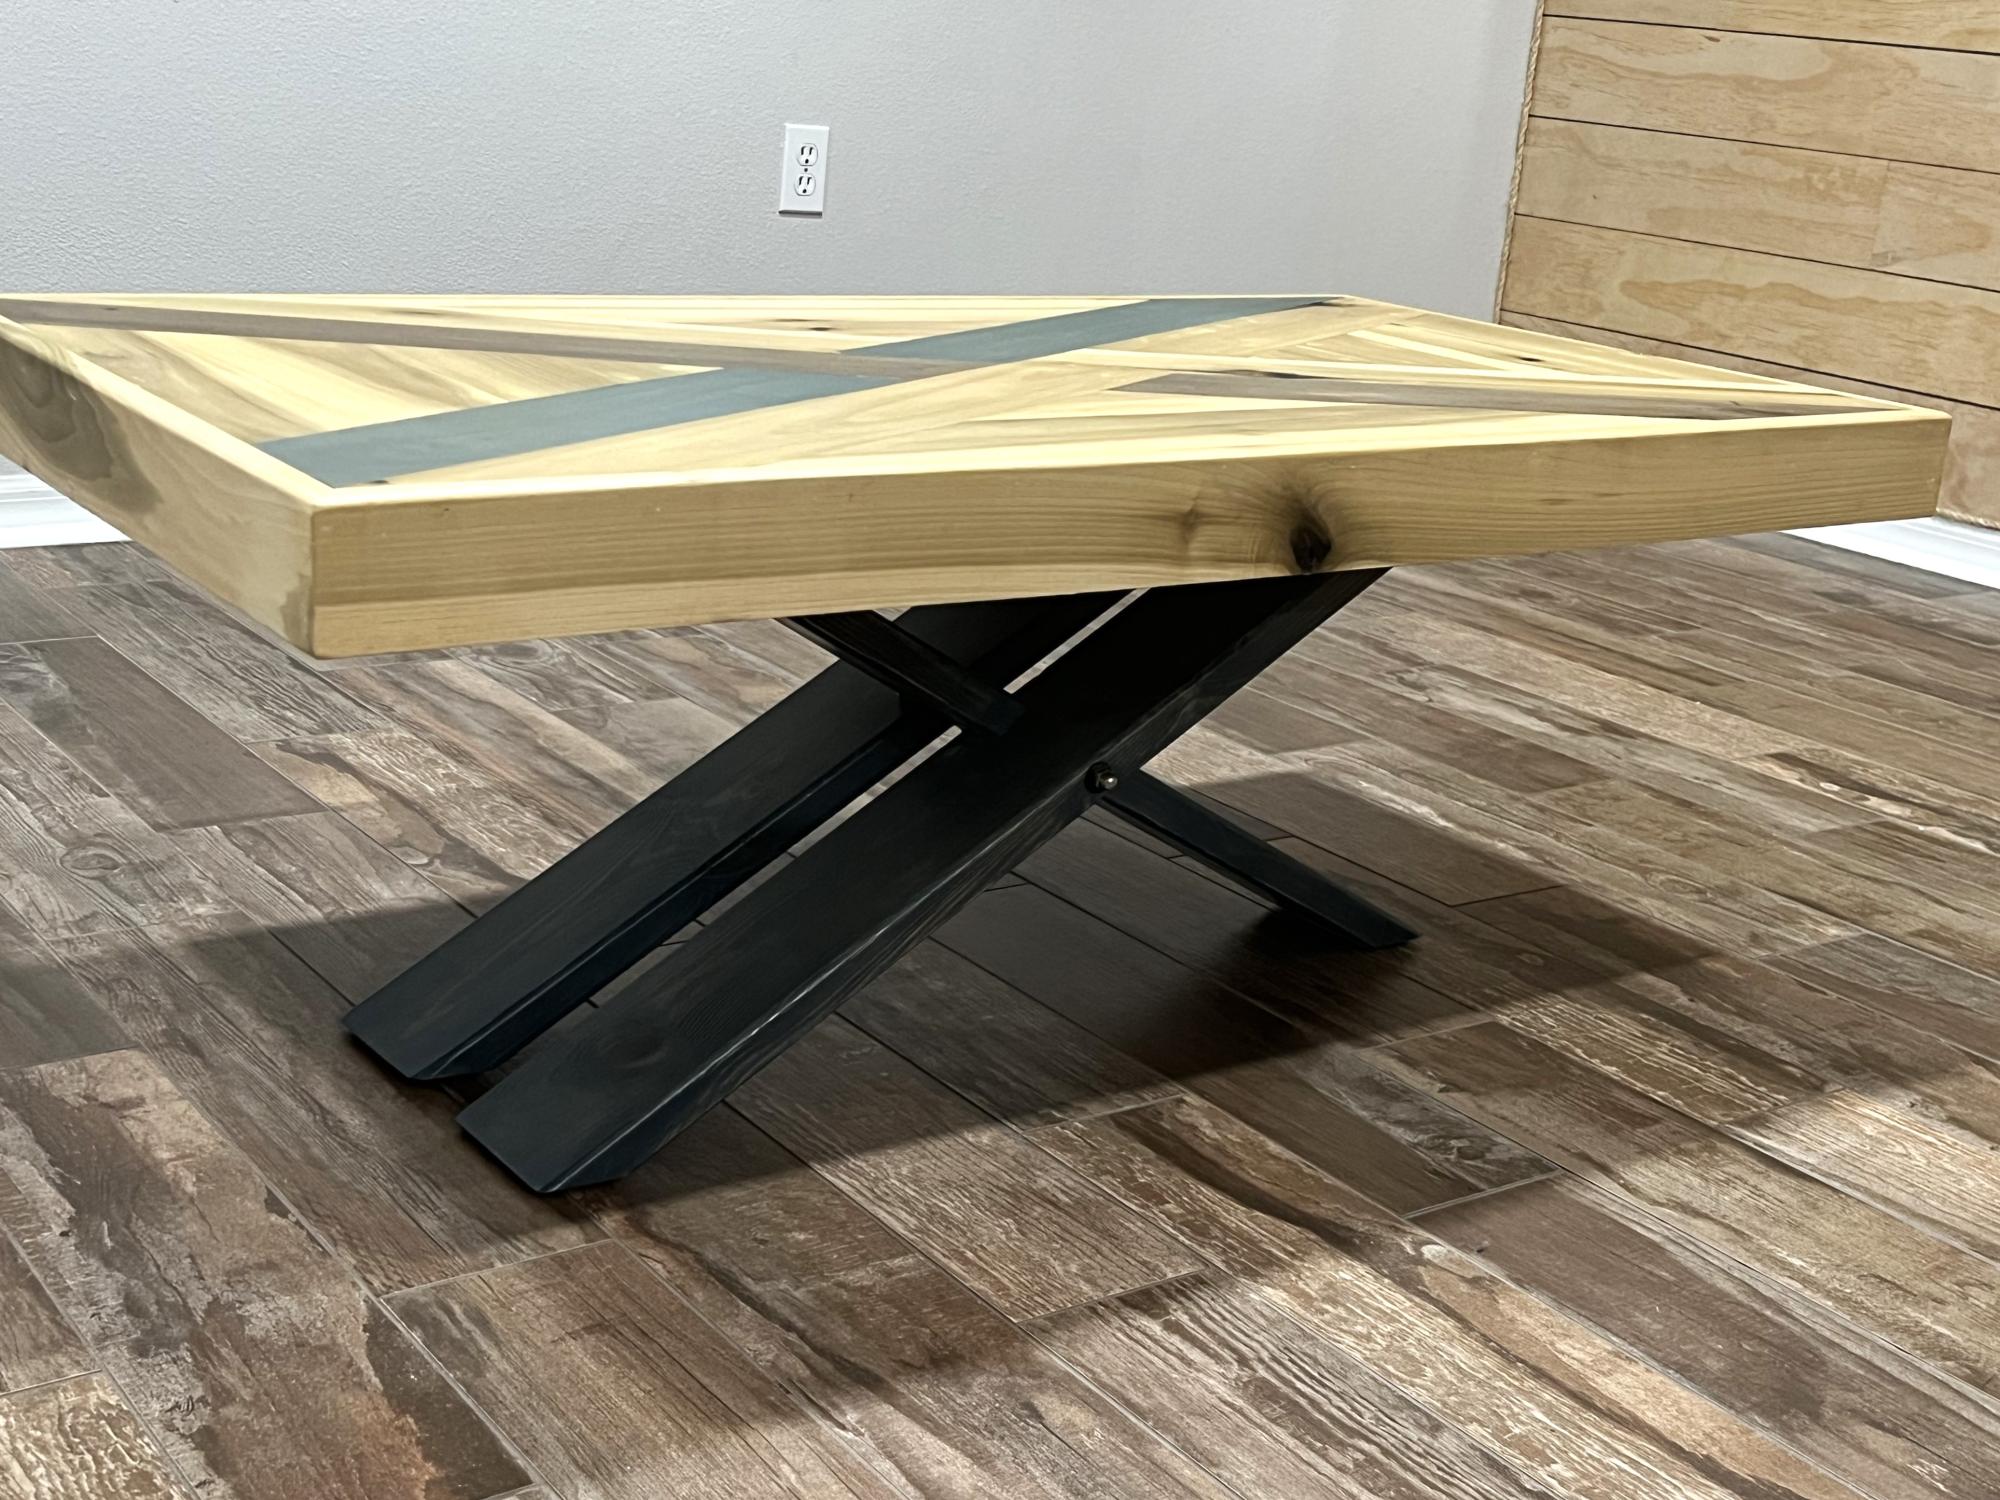
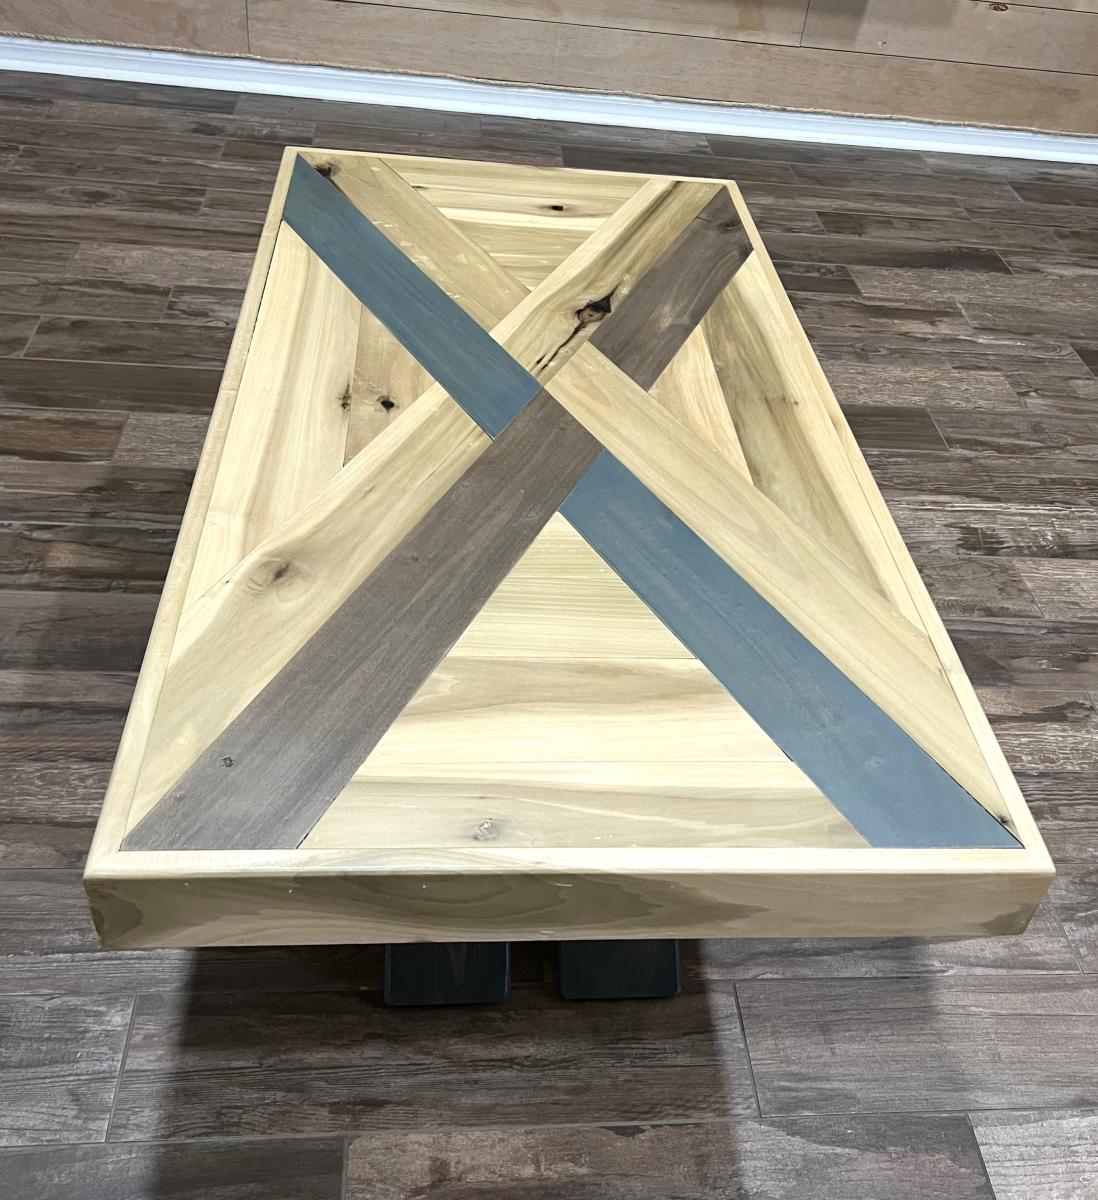
X rustic coffee table
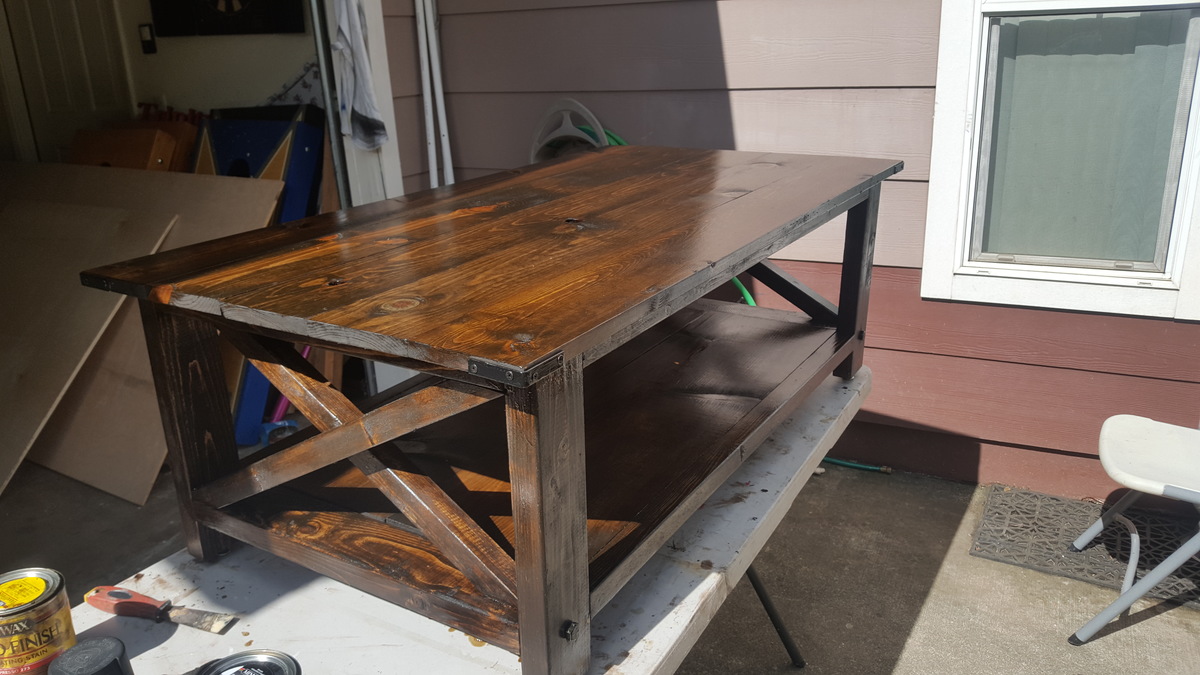
Heres my final product of Anna's X Rustic Table.
Check out my page for future projects.
Estimated Cost
70$
Estimated Time Investment
Weekend Project (10-20 Hours)
Finish Used
Espresso/ polyurithane
Recommended Skill Level
Intermediate
My Greenhouse
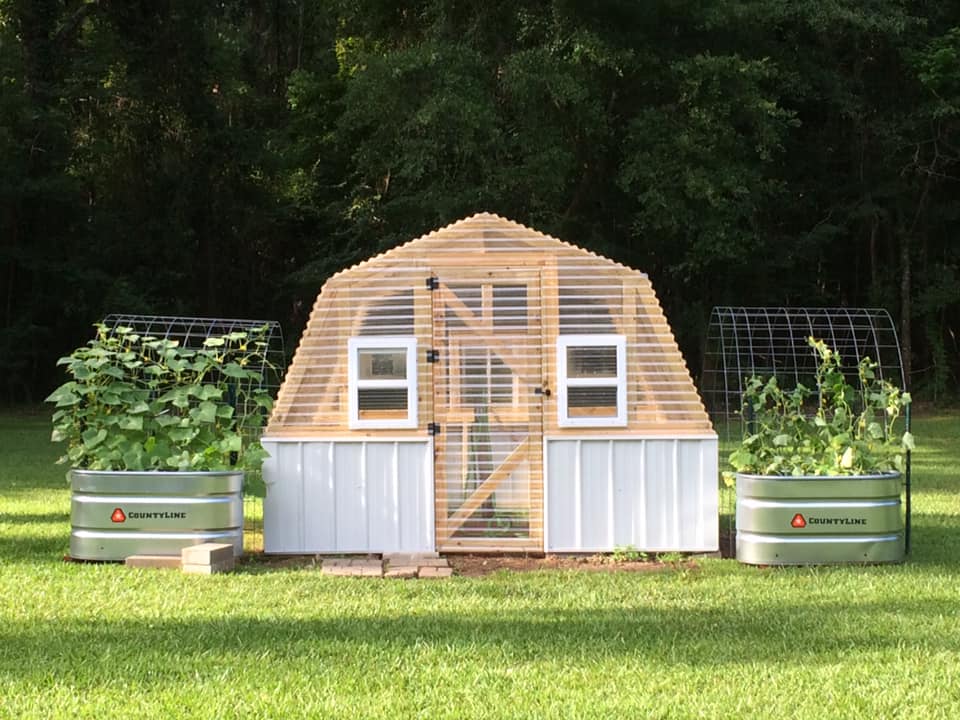
I went from a 6 x 8 Harbor Freight Greenhouse to this one 10 x 12. I added a few windows...
Built from Plan(s)
Comments
Seasonal And Holiday
Wood Queen Size Headboard
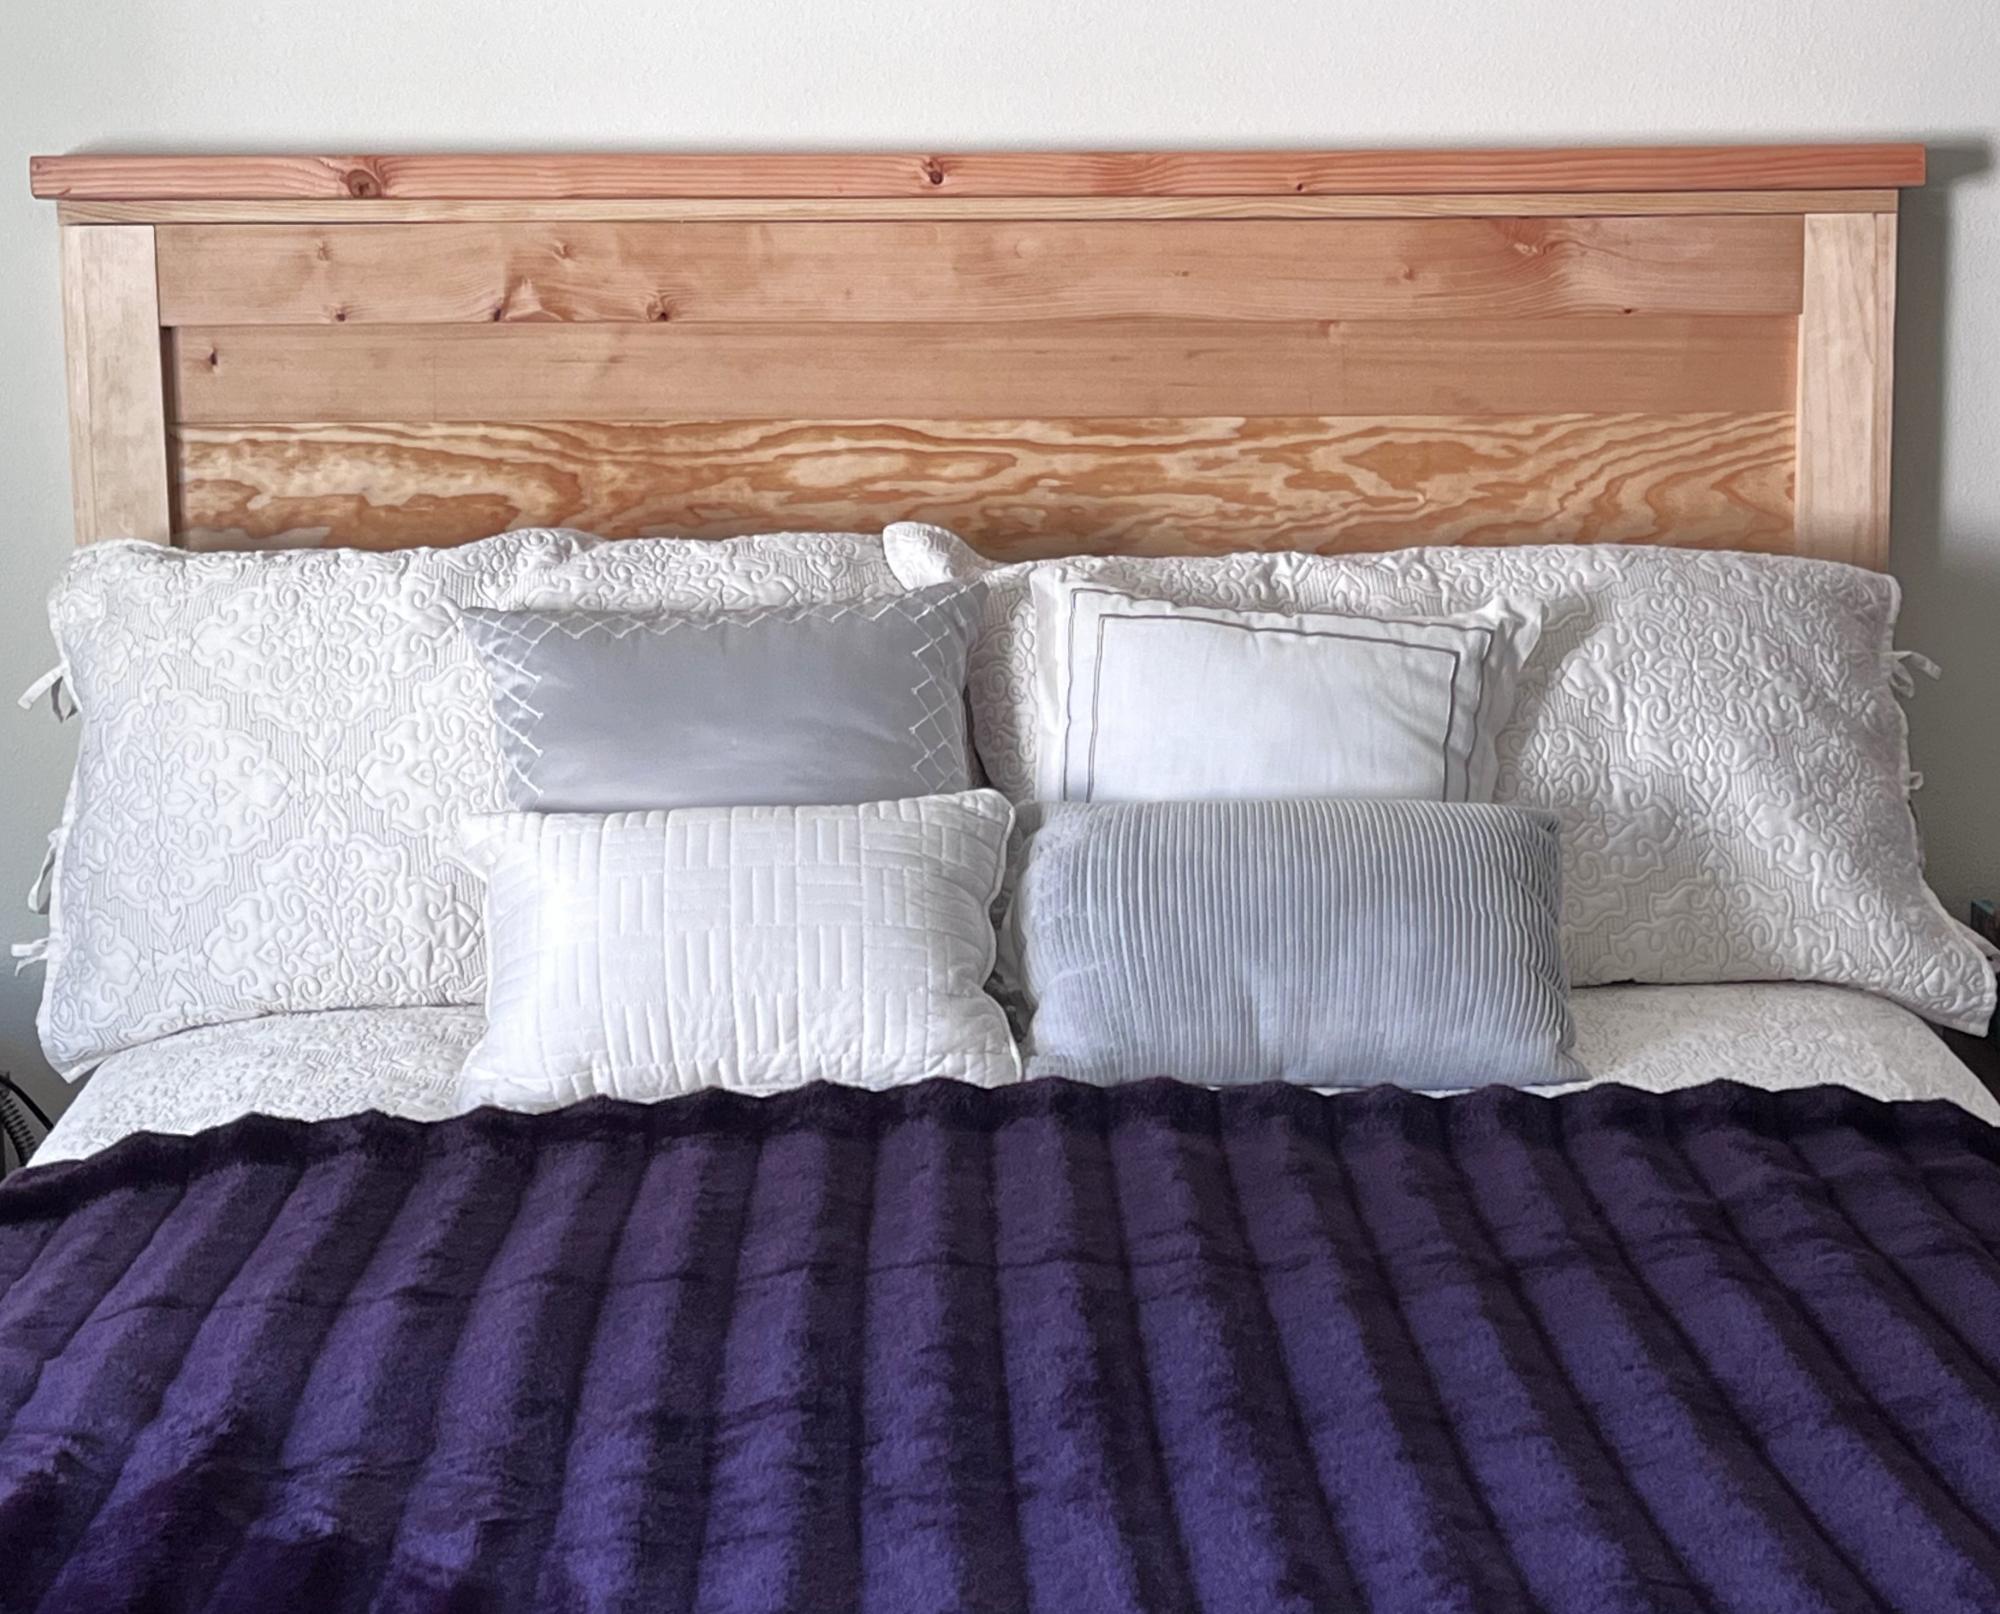
Queen size head board.
Jeanne L.
Built from Plan(s)
Truss Shelves: Cheap Garage Storage
Made of old fence rail (the dark pieces) and cheap 2x4s and 1x12s .
This is not as stable as I hoped, but for an afternoon's project that got all those tools off the workshop floor, it's not bad. I will add a diagonal brace at the back later. Much later.
NOTE: My engineer friend notes that 2 braces at the rear, below the bottom shelf and below the top shelf, would minimize side-to-side wobbling, and 2 braces front to back, both under the bottom shelf, would minimize the front-to-back wobbling, They could be a scrap of plywood, a 1x6 or wider scrap. Just nail them in two or more places on each of the ladders and they make the structure more rigid. Screw them in if you want a shelf unit you can disassemble.
TIPS:
If you are using pockethole screws, start the screws in all the holes before you put the crosspieces on. Stop when you see the tip of the screw come through the first piece.
Clamp scrap 2x4 to the uprights to hold the crosspieces in place as you drill.
To get the shelves in place, lean the ladders against each other and attach the bottom and top boards on one side. Than pull the other ladder out as far as it needs to go and screw that side of the shelves in place.
Don't try this without clamps.
It could have been cheaper if I had used all reclaimed fence 2x4s, and if my errand runner had bought cheaper 1x12s. He bought top-grade when #2 would have worked for half the price,
Estimated Cost
$ 30
Estimated Time Investment
Afternoon Project (3-6 Hours)
Finish Used
None
Recommended Skill Level
Intermediate
Simple Outdoor Bench and Table
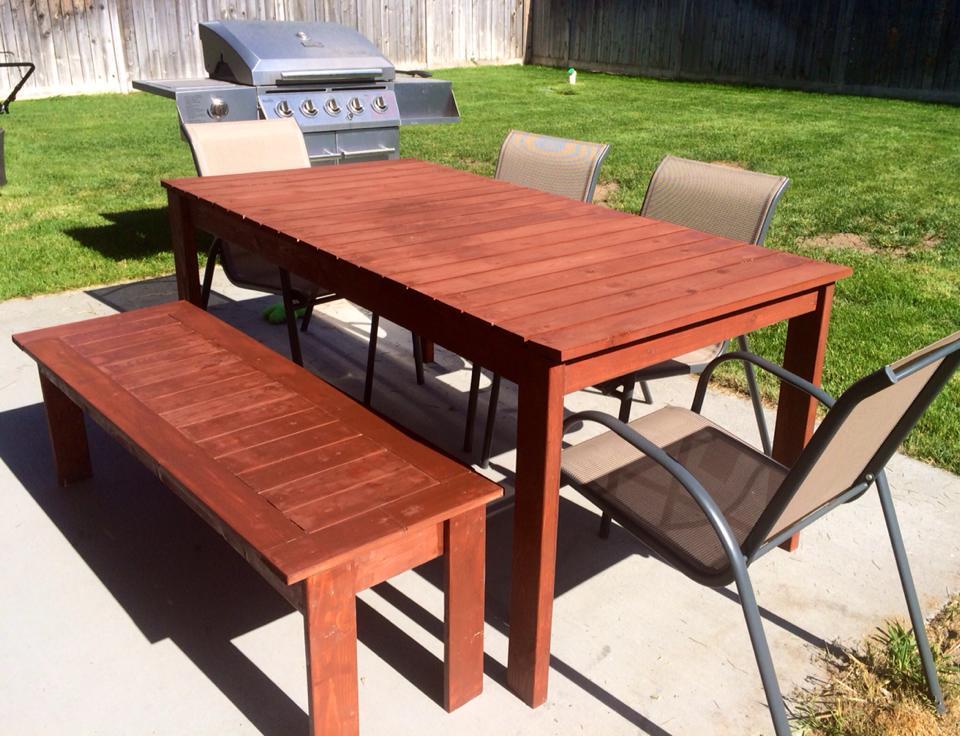
This was my first project, my wife and I started with the table, which took us a little while but ended up being pretty simple. Unfortunately we do not own a saw but discovered that Lowes will happily cut the wood for you. After we completed the table we started working on the bench, which is where we ran into a slight problem. Some how our frame boards ended up being two short, so as a fix we did not put any spaces in between the seat slats and used four 7 inch pieces we had left over to complete the full frame. We also altered the plan to make our bench a little longer than the original its 57 inches instead of 52.
Estimated Time Investment
Weekend Project (10-20 Hours)
Finish Used
Lowes Stain: Brick Red
Recommended Skill Level
Starter Project
Leaning Bathroom Ladder Shelf
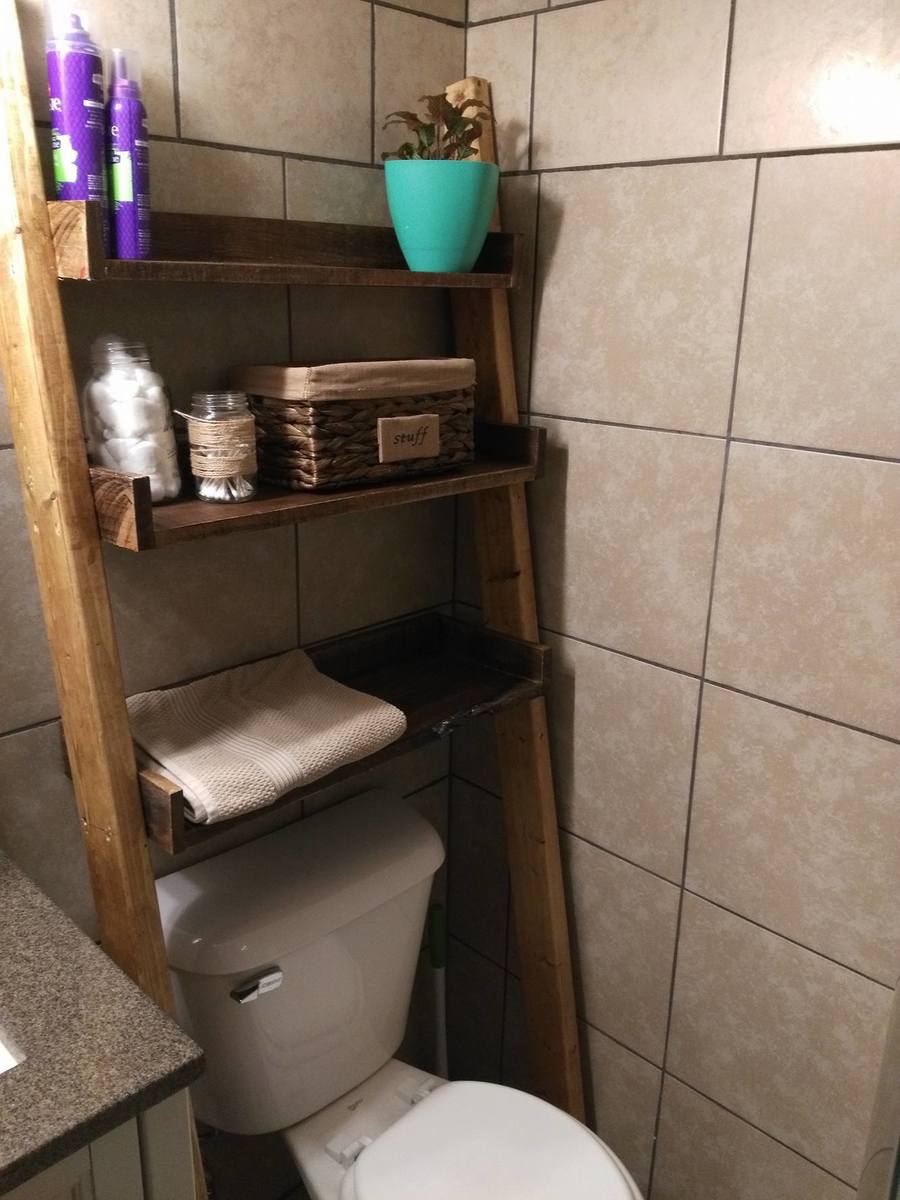
This leaning shelf was the perfect solution to my tiny (and tiled) bathroom. I didn't want to have to put screw holes in the walls and have been searching for a project.
I made the shelves out of reclamed barn wood which made the project a little bit harder to get perfect square and level but it was worth it. The legs are 2x4s. The hardest part was definitely making sure the shelves were level on the legs. Lots of clamps helped!
Built from Plan(s)
Estimated Cost
20 dollars
Estimated Time Investment
Afternoon Project (3-6 Hours)
Finish Used
Early American and Rust-Oleum Triple Thick Poly in Clear Matte
Recommended Skill Level
Beginner
Planter Boxes
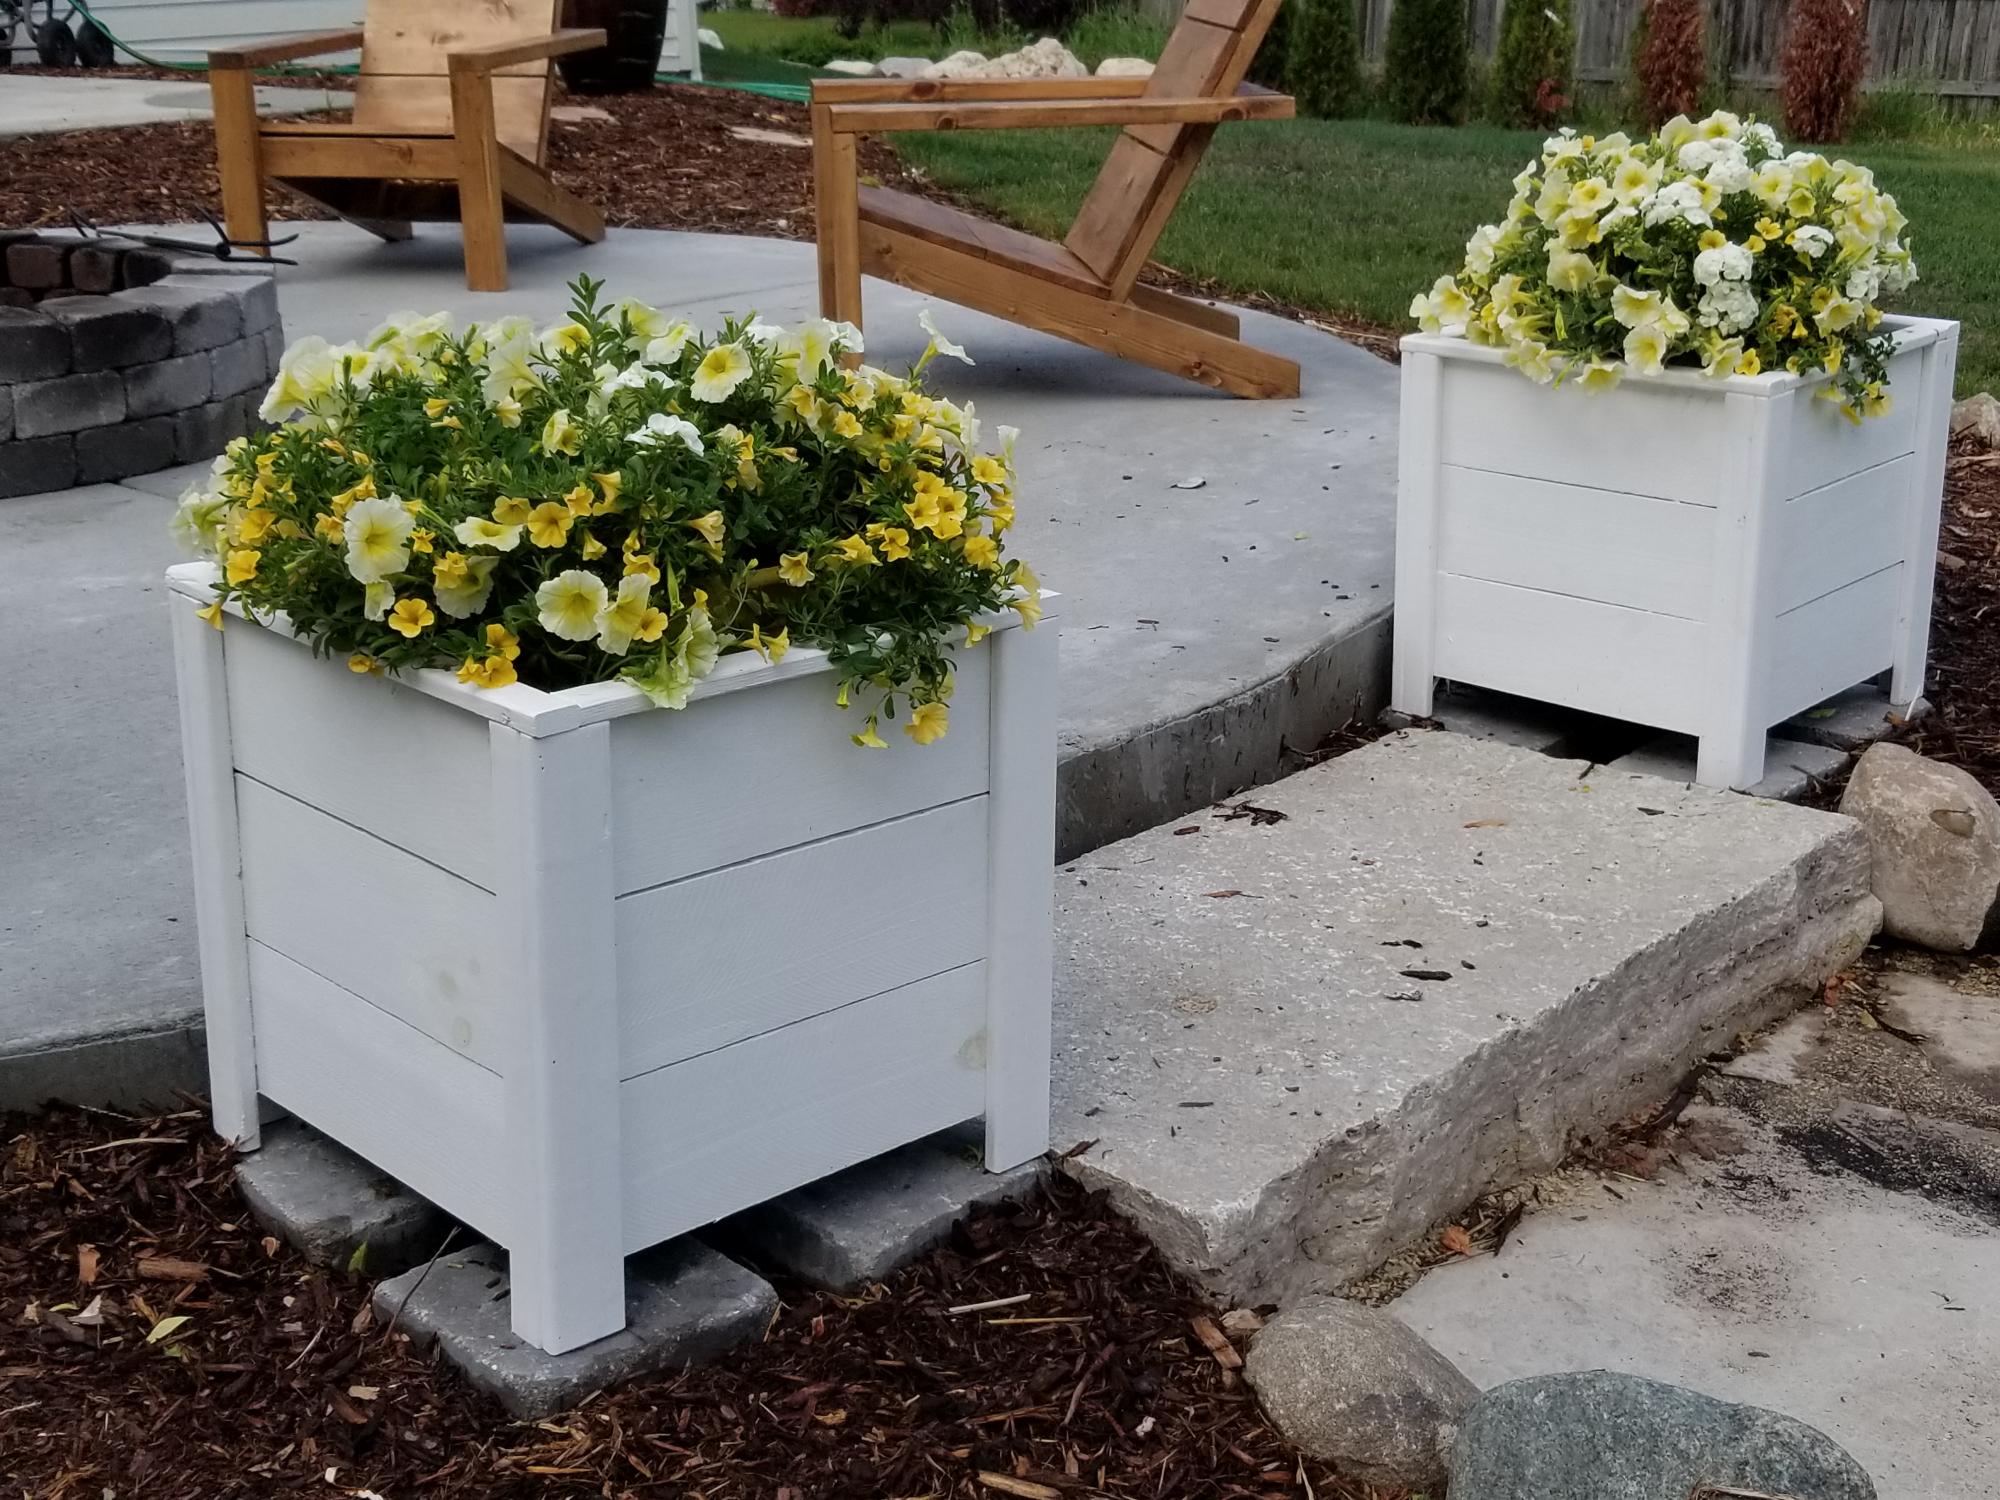
I followed the plan exactly including the suggestion of the fence paint (2 coats). This was a very easy build. It took much longer to paint than it did to build. These boxes are the perfect accent on our new patio/firepit.
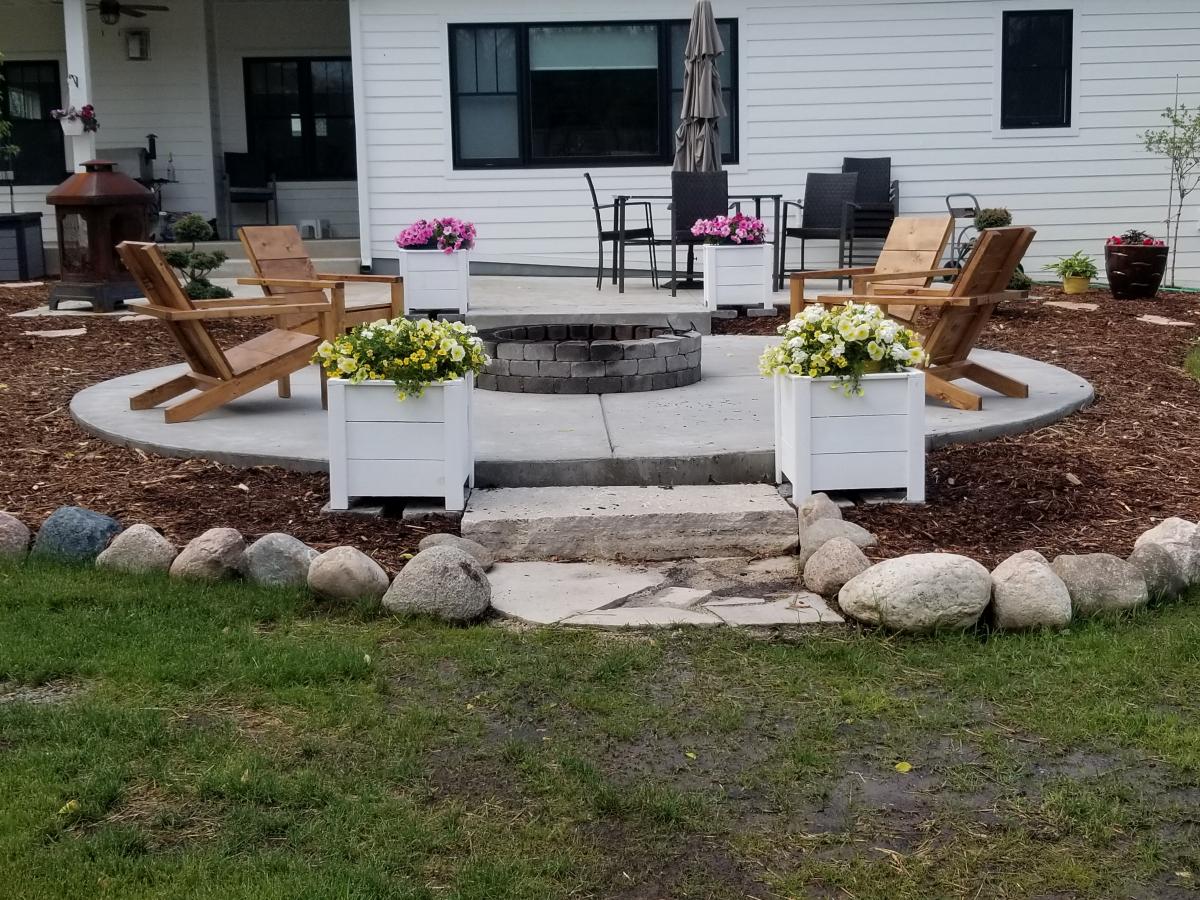
Built from Plan(s)
Estimated Cost
$10/box for the wood
Estimated Time Investment
Afternoon Project (3-6 Hours)
Finish Used
Behr Fence Stain (white) 2 coats
Recommended Skill Level
Beginner
Comments

Fish Adirondack Chairs and Stools
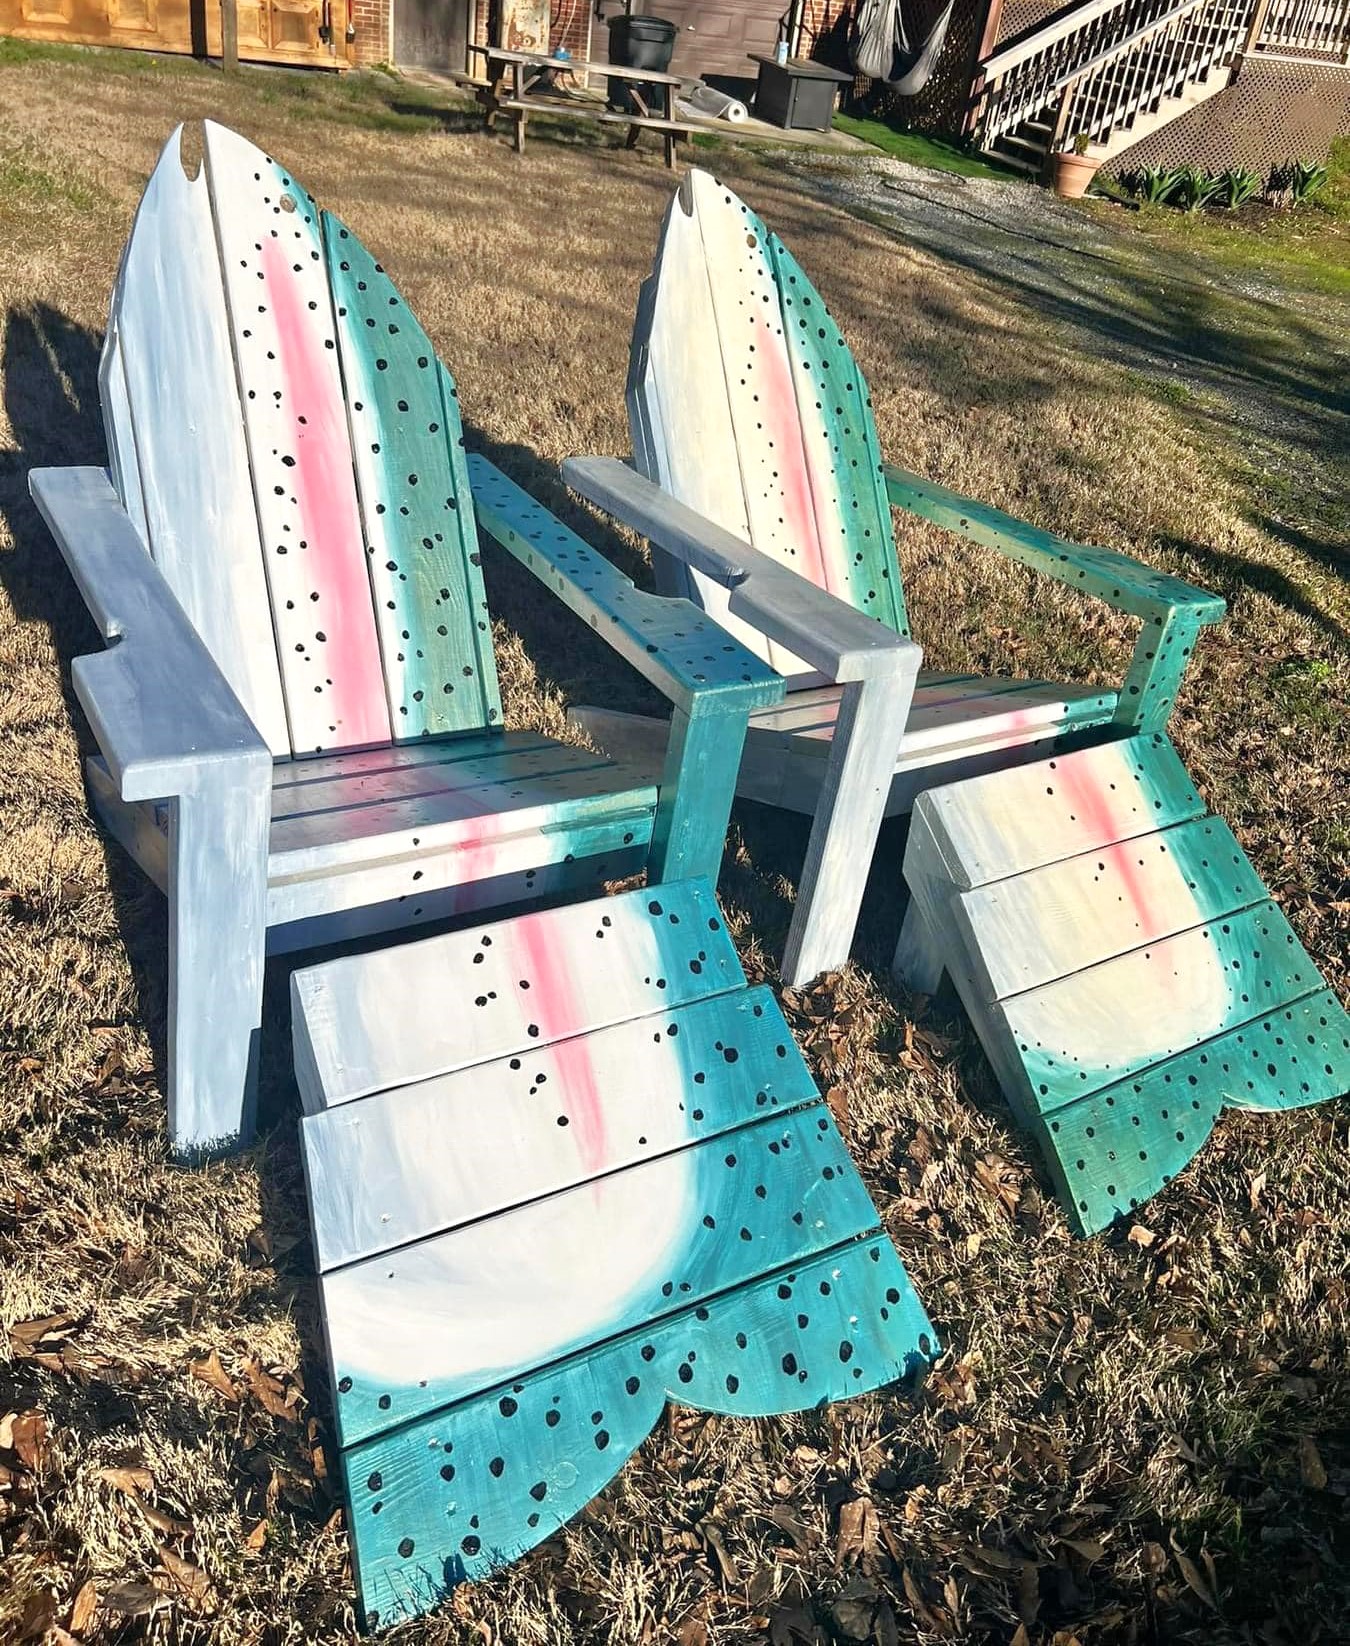
I have used your plan, to build several of the 2x4 Adirondack chairs, made a few modifications here and there but basically the same frame.
Built from Plan(s)
Landon's Mischief Step Stool
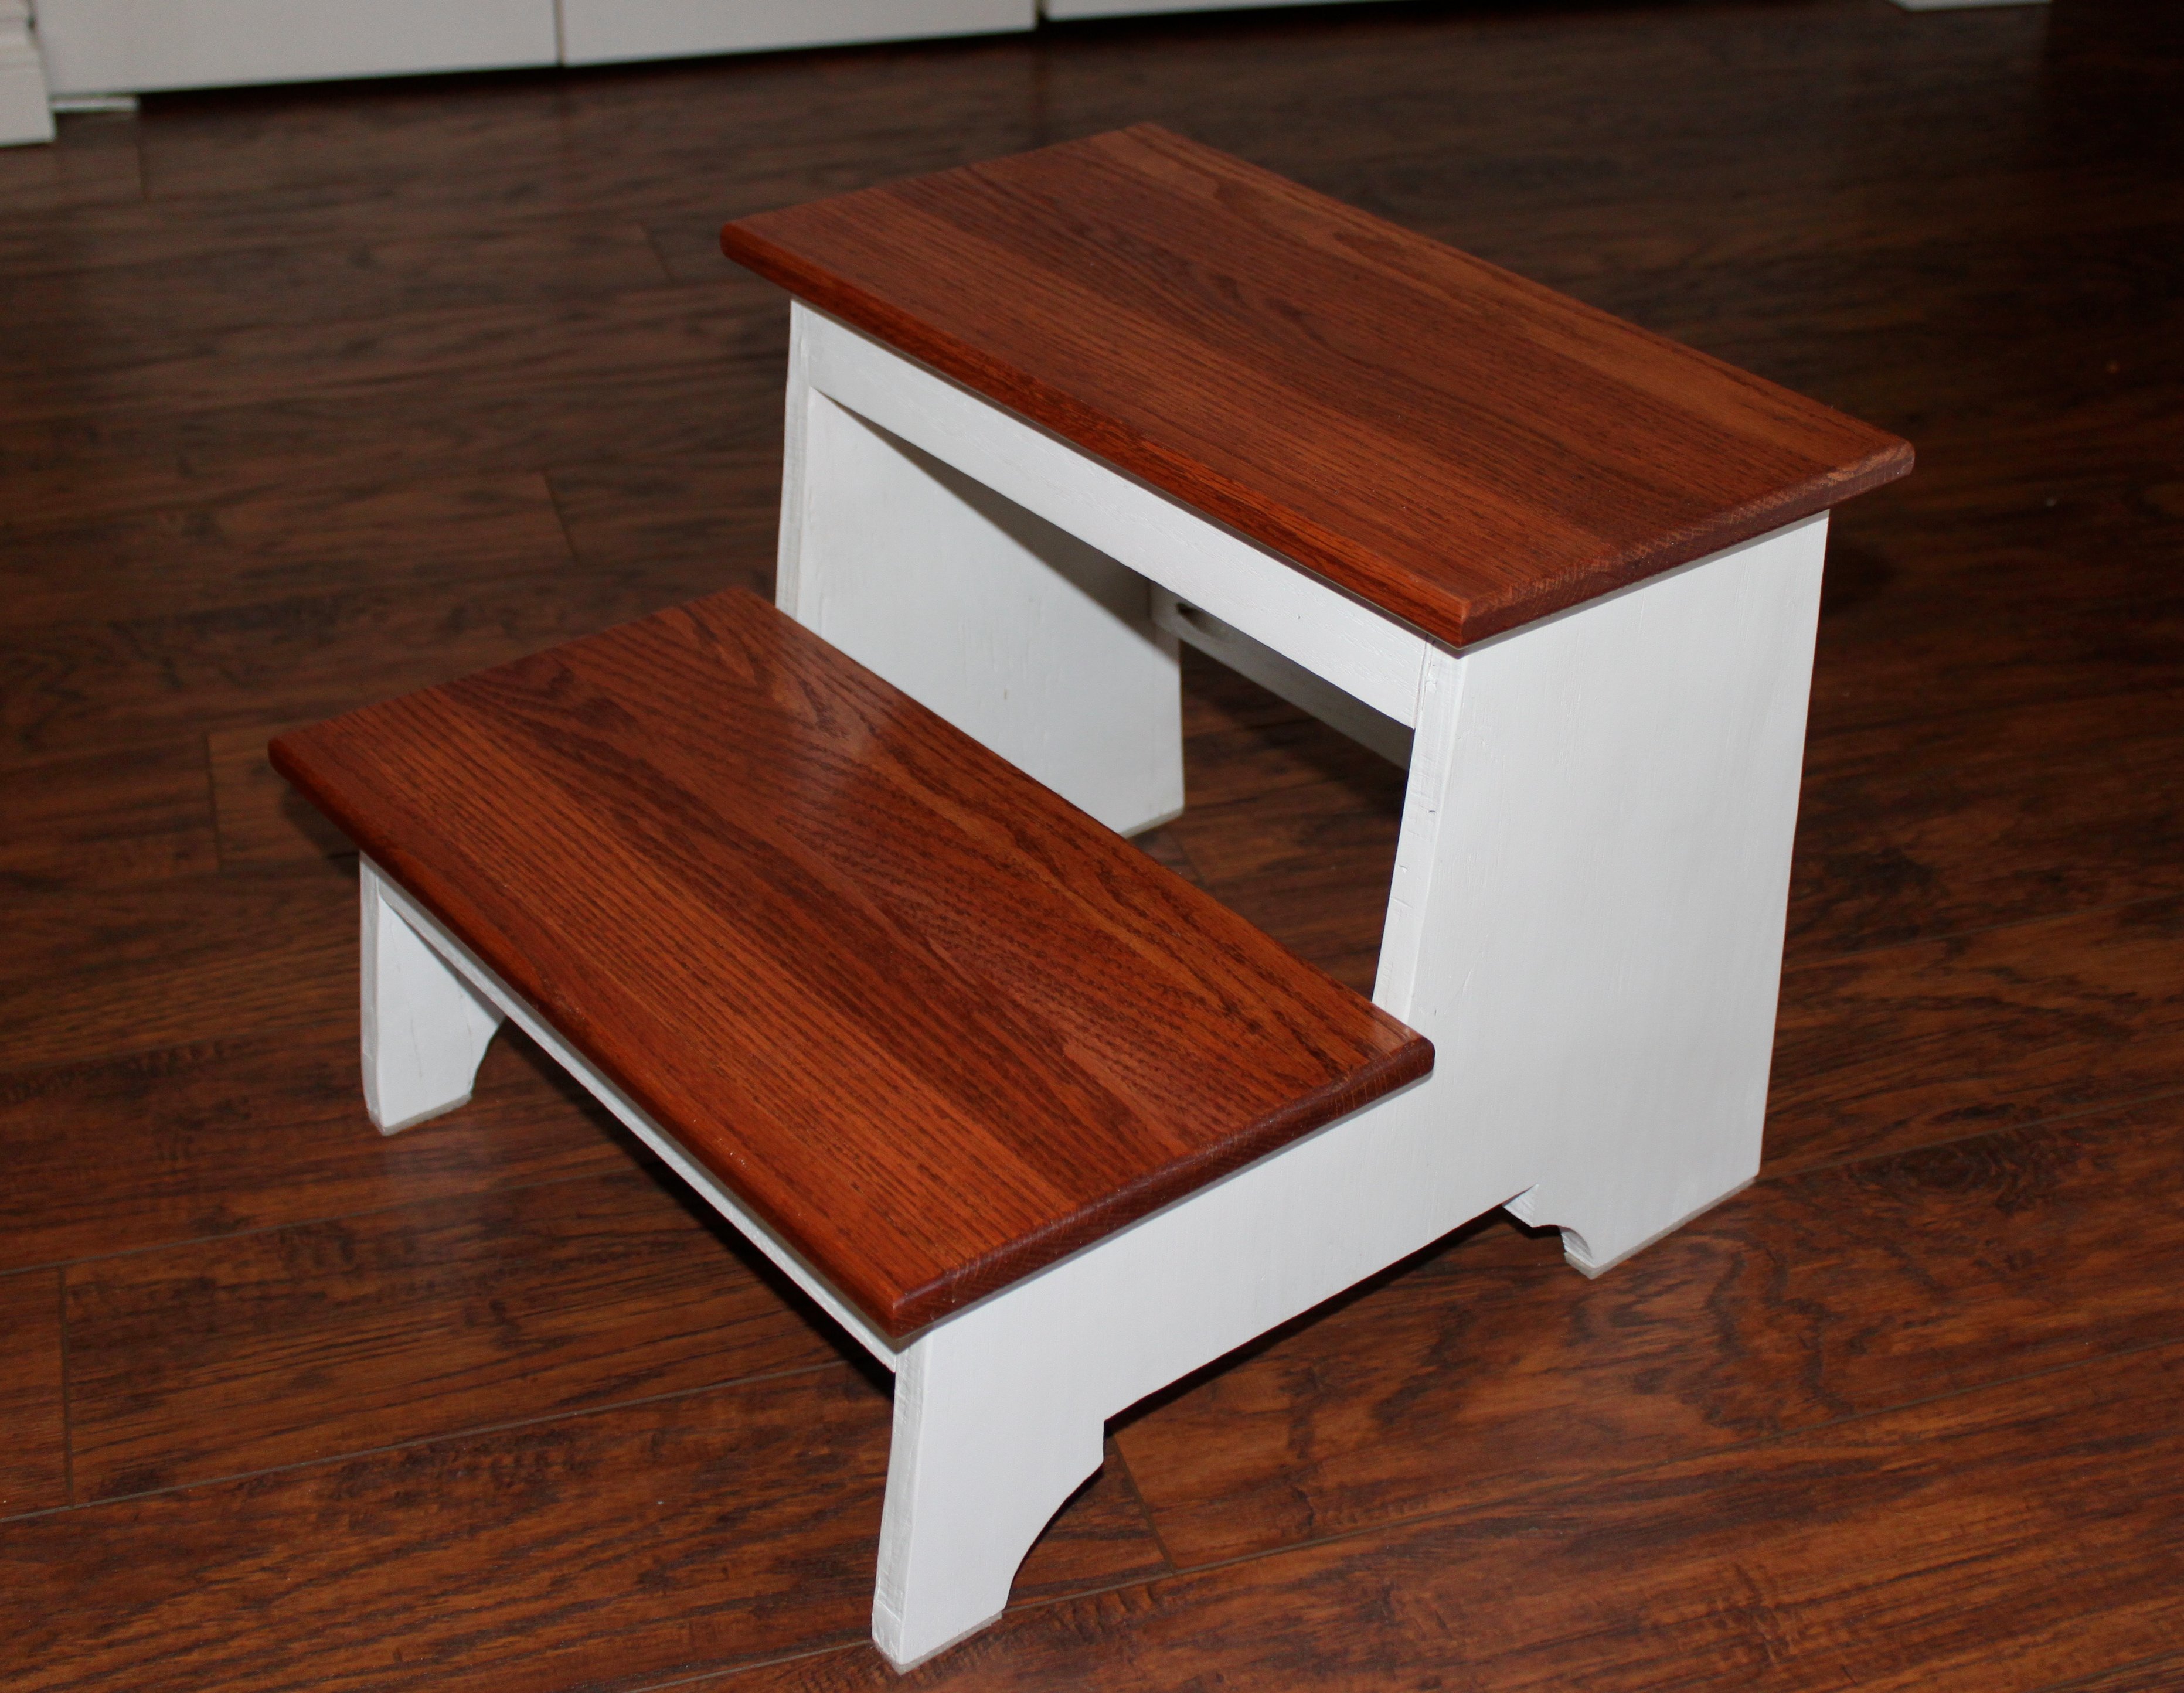
Very sturdy and stylish step stool built for my son in a style to match the kitchen and bathroom in our house.
This entire project was built using scrap plywood from a previous project and reclaimed oak boards that we demoed from our house while remodeling.
The sides were simply cut using a table saw to the rough dimension and then I added the details using a bandsaw. The stairs and rails were rough cut on the tablesaw and then milled using a jointer and planer to the specifications in the plan. Once cut I used a pocket screw jig to drill all the necessary holes before finishing assembly on the base. Each section was finished separately and then I used pocket screws to attach the steps last.
Very easy project that I made slightly more complicated by using reclaimed wood and a 2 tone design. Would recommend pocket screws to ensure strength and durability...I can stand on this and it doesn’t even budge!
Thanks for the plans!!
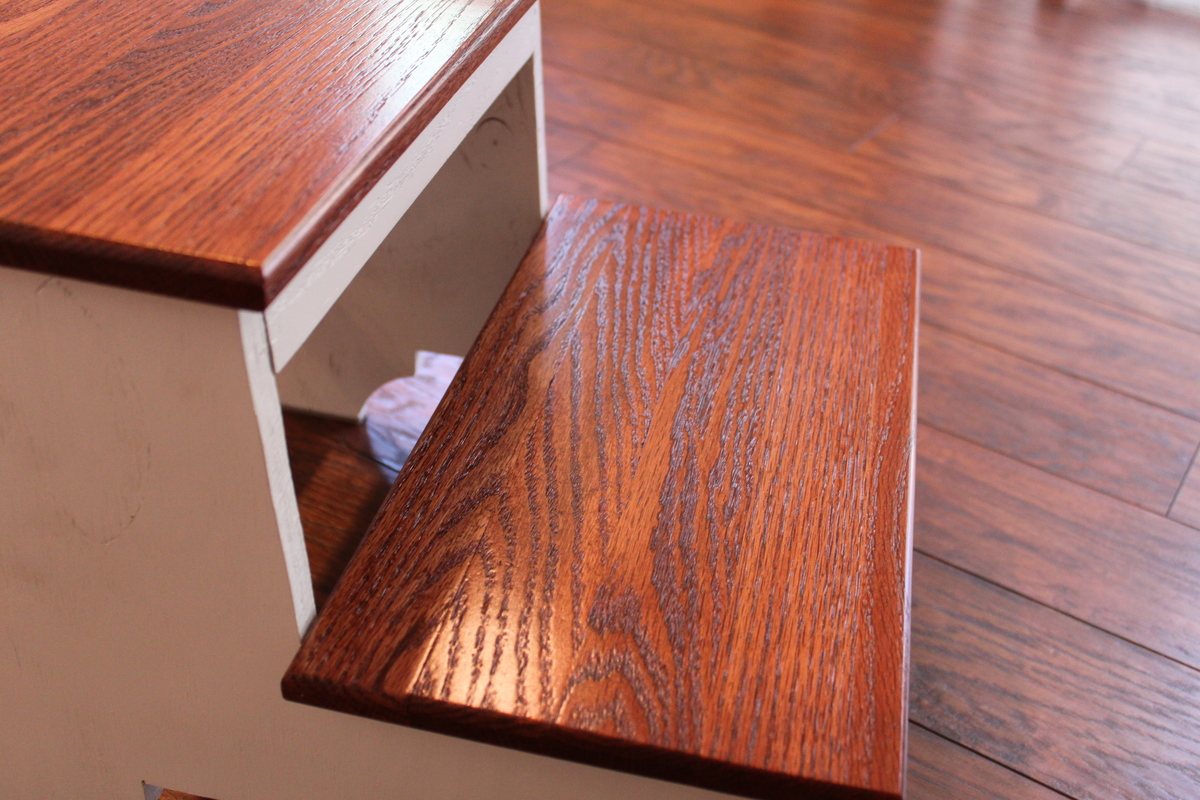
Built from Plan(s)
Estimated Cost
$10ish
Estimated Time Investment
Day Project (6-9 Hours)
Finish Used
Sides got an oil based primer followed by a high gloss trim latex paint applied using a HVLP Sprayer.
Steps were stained using Minwax Red Chestnut oil based stain.
The whole thing was finished using 2 coats of a clear Poly applied with a HVLP Sprayer.
Steps were stained using Minwax Red Chestnut oil based stain.
The whole thing was finished using 2 coats of a clear Poly applied with a HVLP Sprayer.
Recommended Skill Level
Intermediate
Umbrella Stand (in PVC)
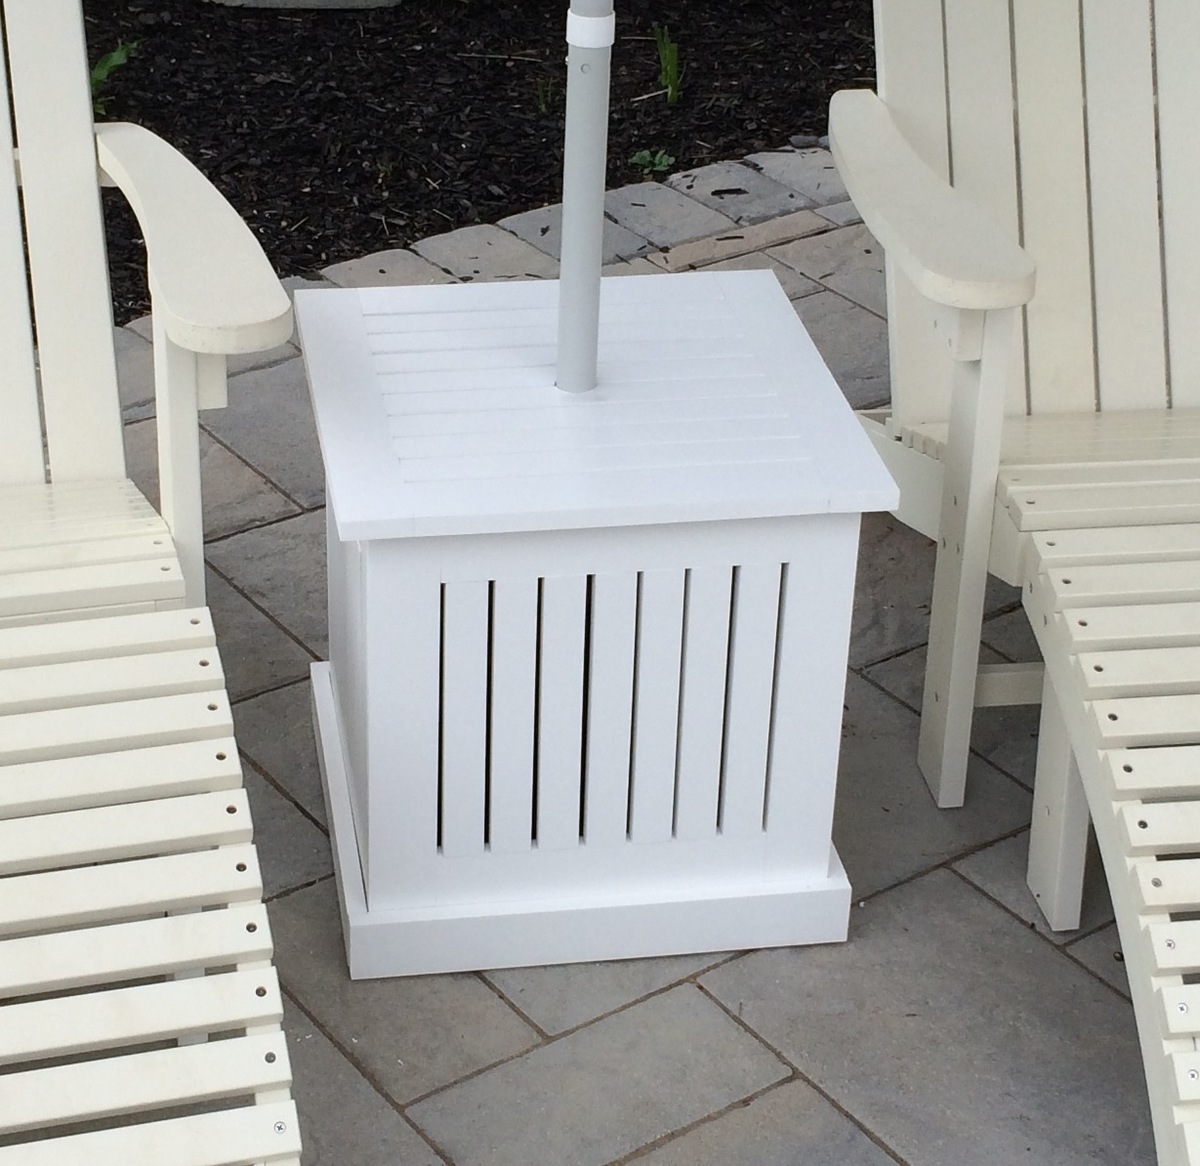
Great plans, Ana! I swapped out the wood for PVC trim, and used stainless steel screws to hopefully make this thing weatherproof.
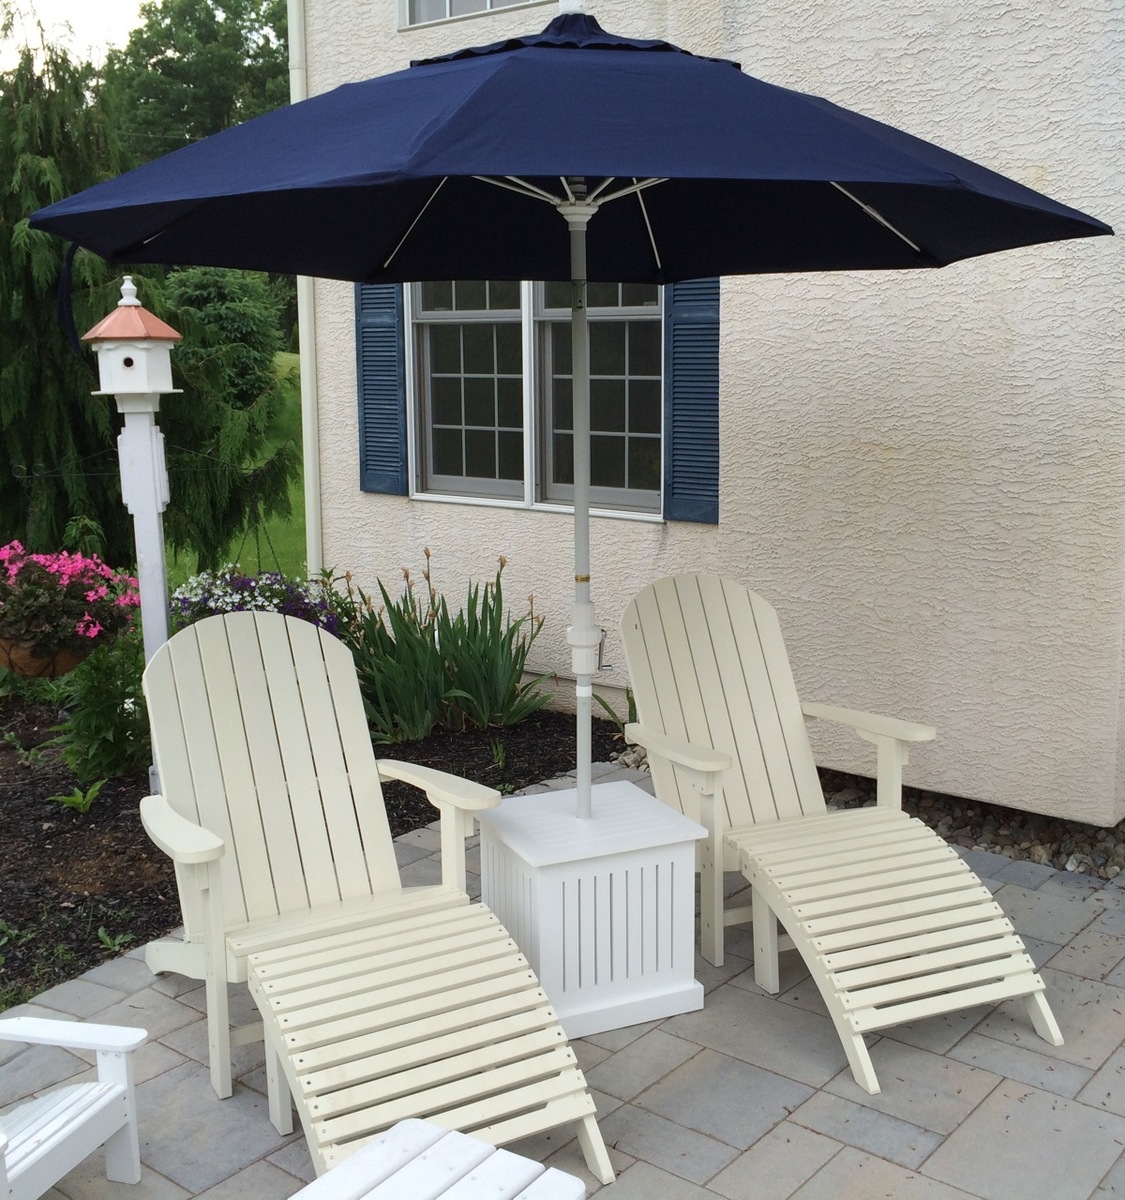
Built from Plan(s)
Estimated Cost
$80
Estimated Time Investment
Day Project (6-9 Hours)
Finish Used
None. The PVC comes white, and I wanted a white table!
Recommended Skill Level
Intermediate
Three Cube Bench
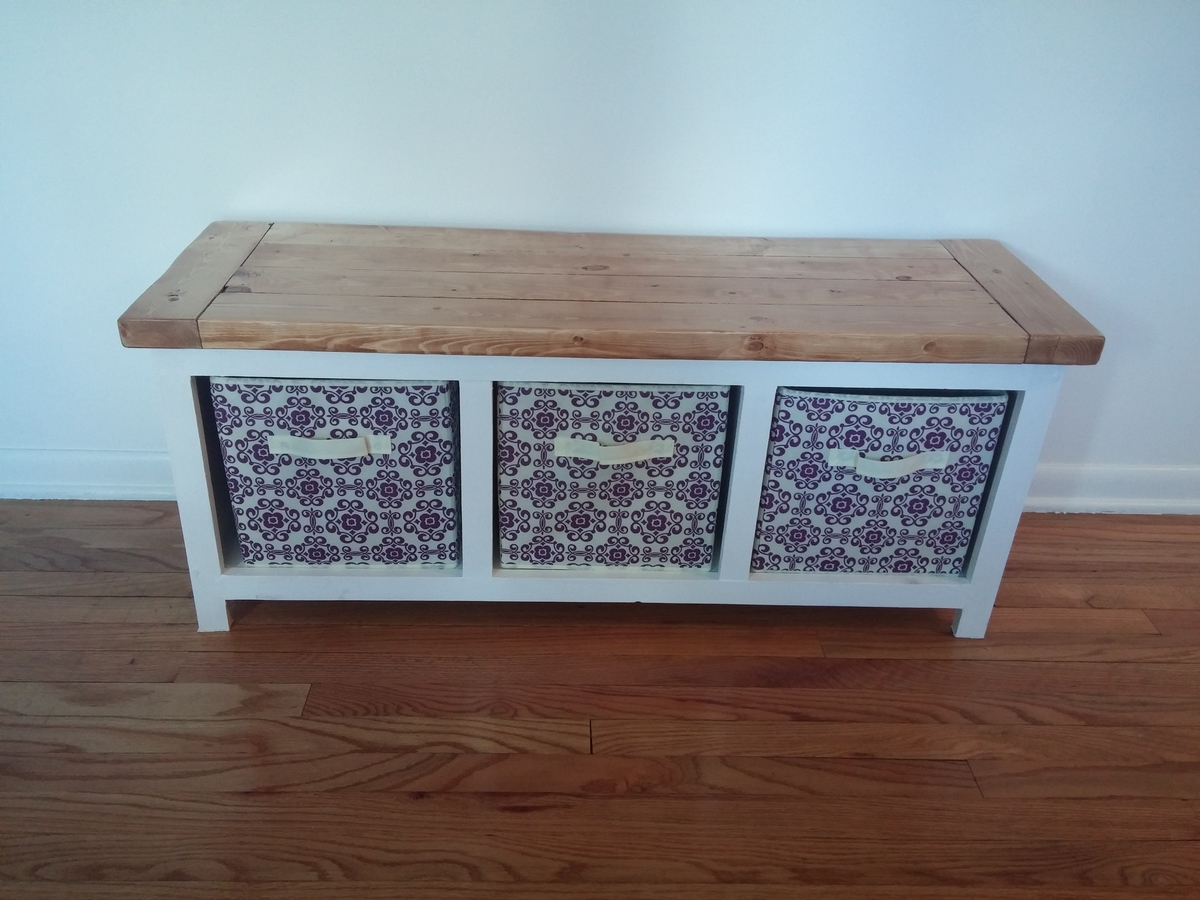
I used the bench top from Ana's Farmhouse Table and took 1.5in off the legs to compensate. Got the baskets on Amazon.
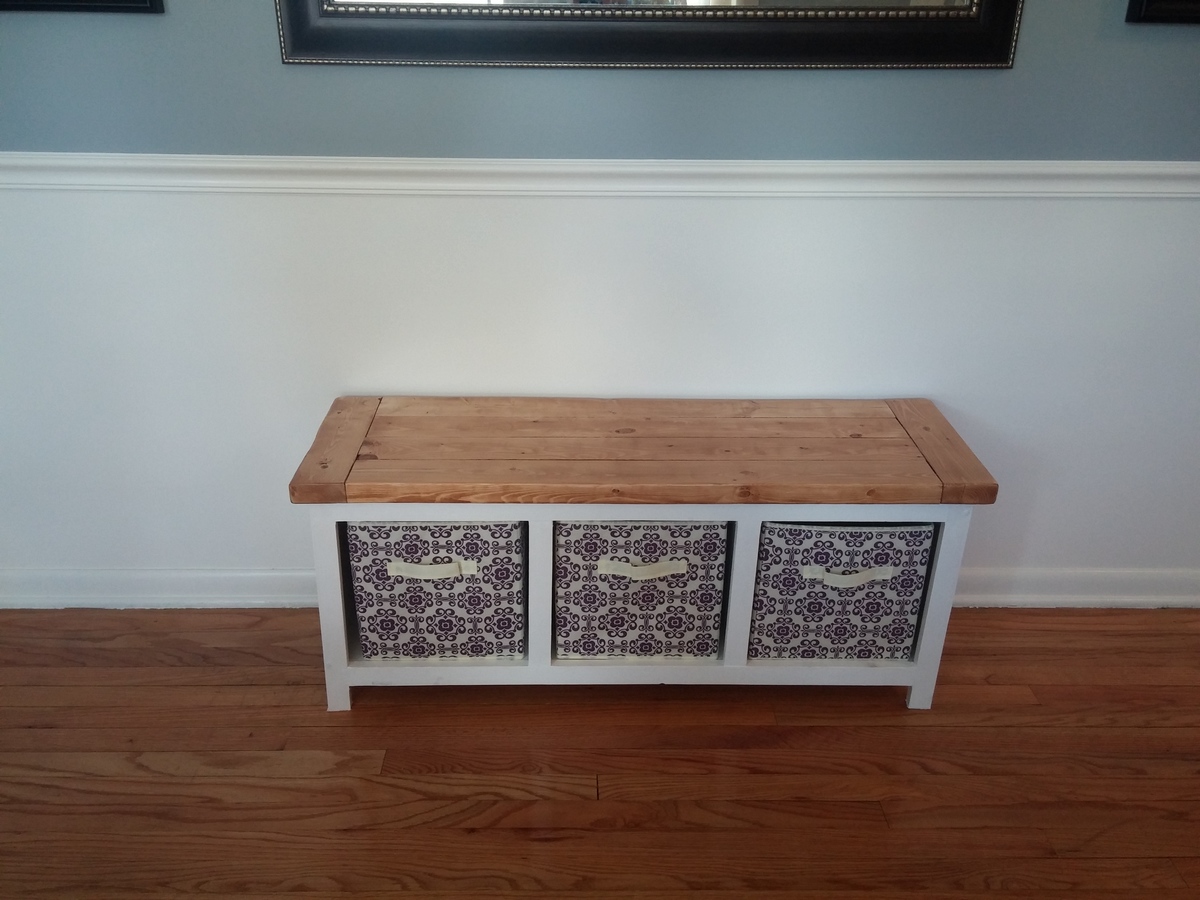
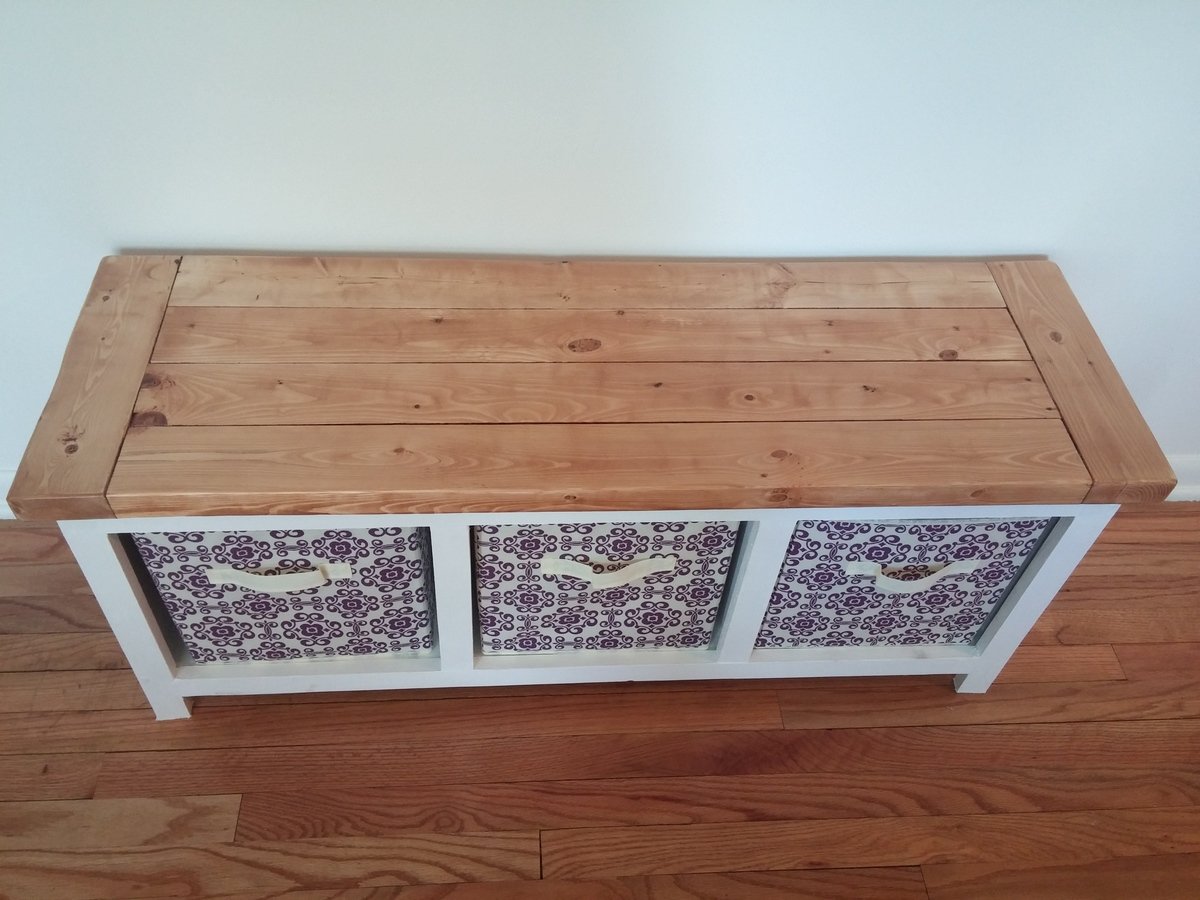
Built from Plan(s)
Estimated Cost
$60
Estimated Time Investment
Weekend Project (10-20 Hours)
Finish Used
Special Walnut over Honey Oak
Recommended Skill Level
Beginner
Papa’s Treehouse
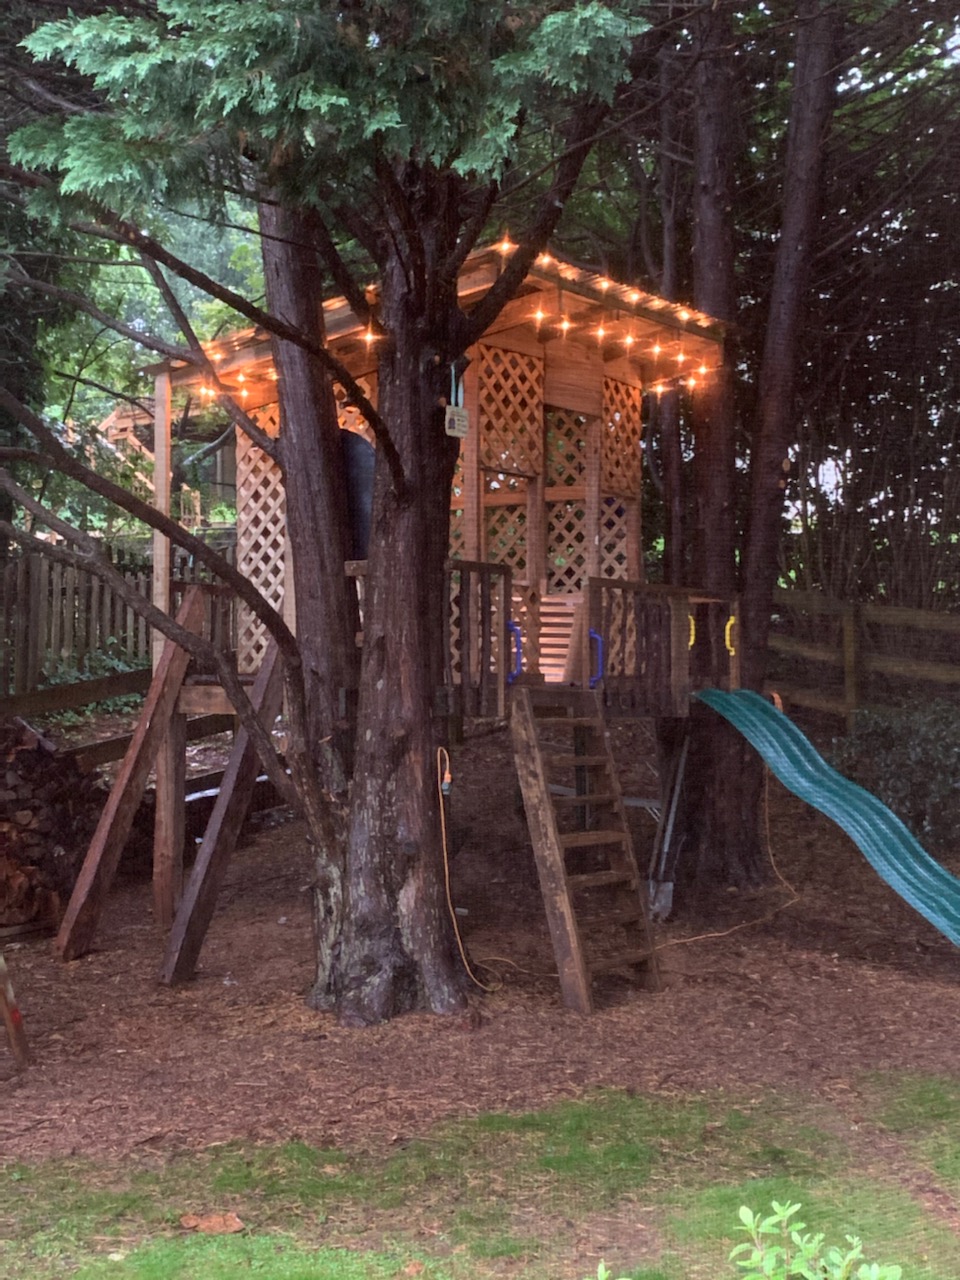
Have 3 granddaughters; 3, 2 and 6 months, so far 😉 Saw your treehouse video and made a modified version of your triangle platform using the trees I had available. Kinda went over the top a bit, but give you all the credit. Repurposed mostly old deck PT wood and rough hewn beams from neighbors.
Thanks!
Bill Magyar
Duluth GA
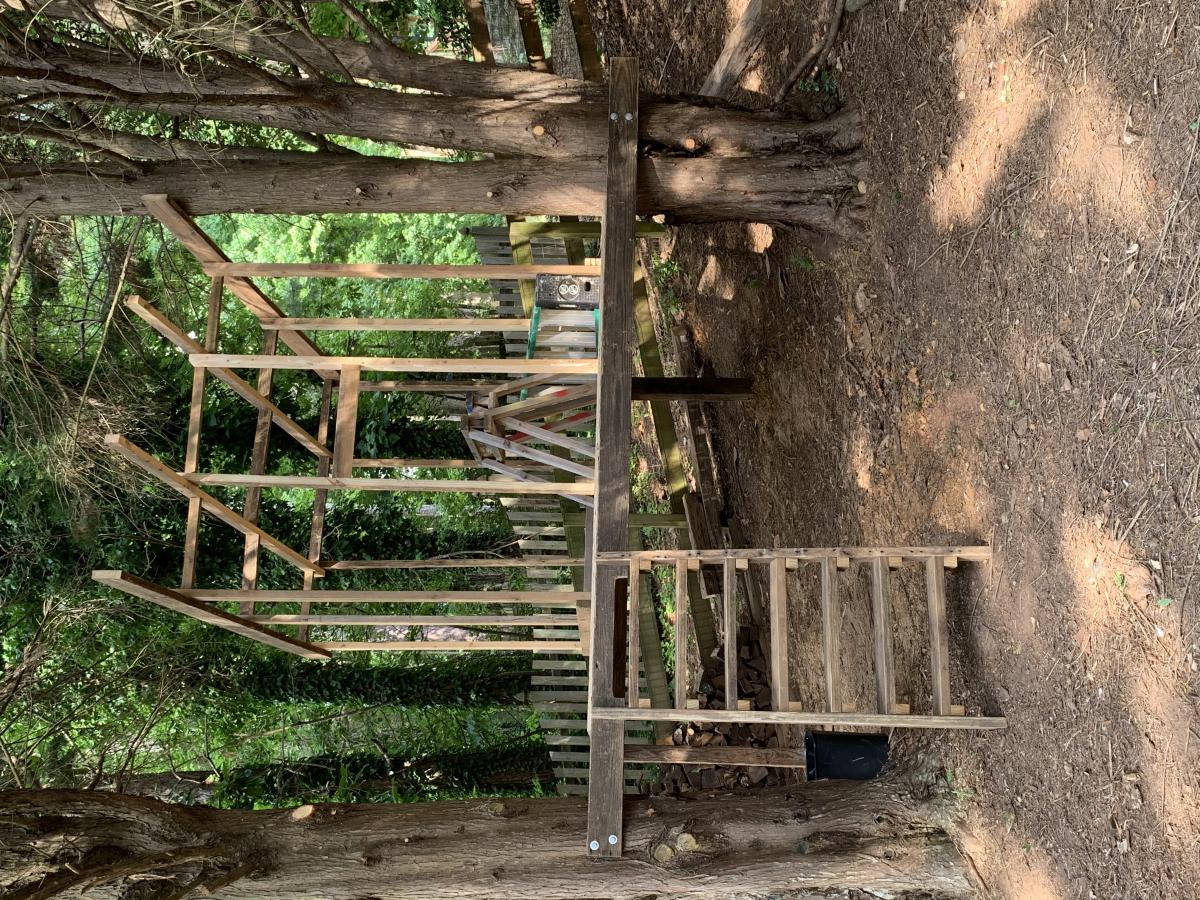
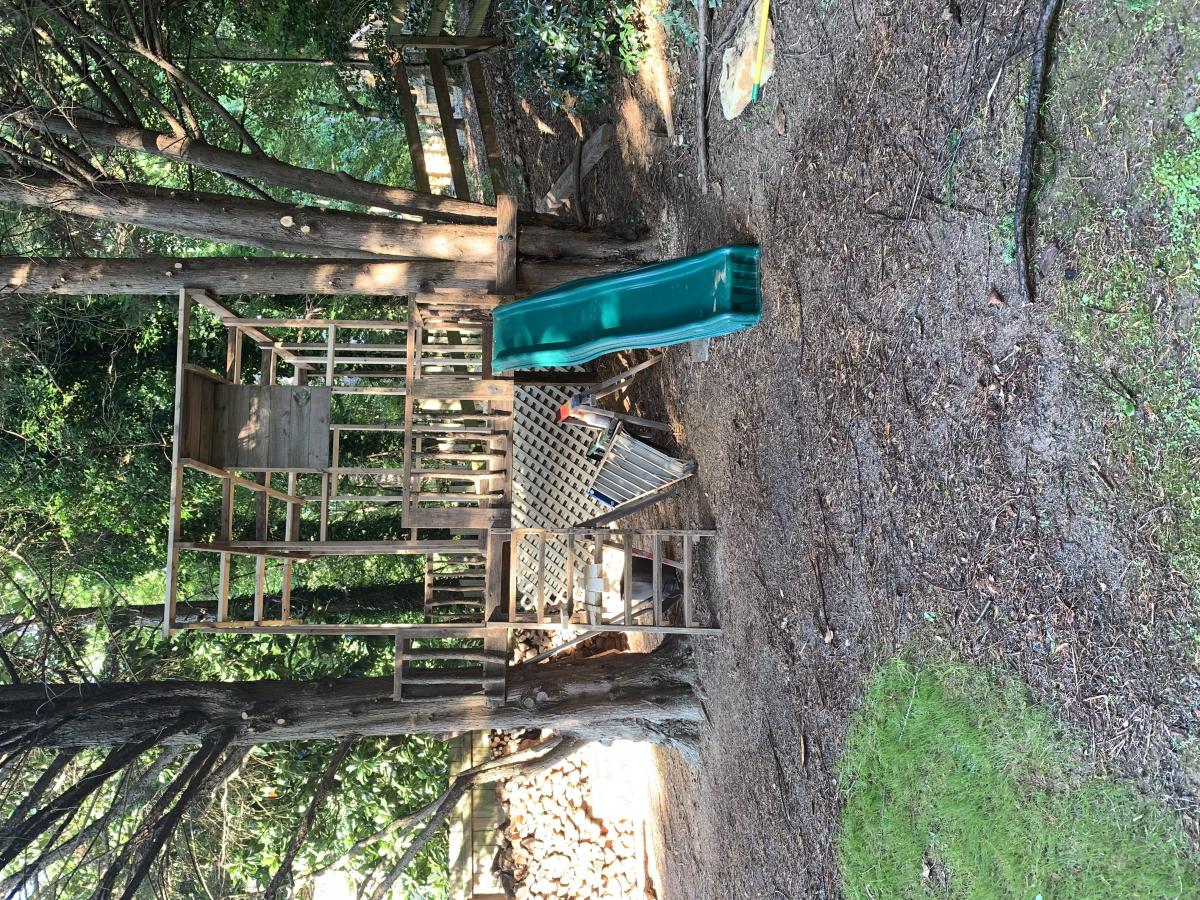
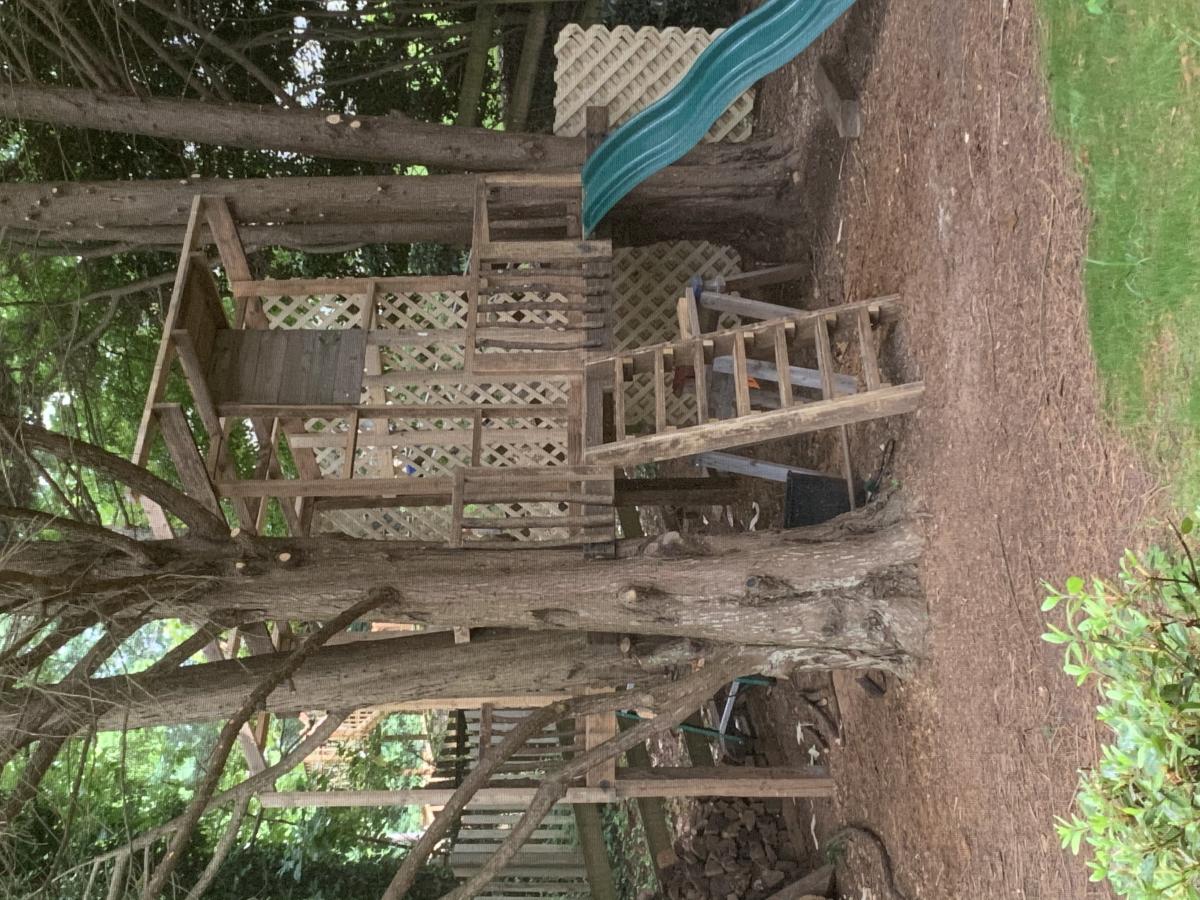
Estimated Time Investment
Week Long Project (20 Hours or More)
Finish Used
PT Wood patina and tea/vinegar aging solution on new.
Recommended Skill Level
Advanced
Dog Crate Side Table
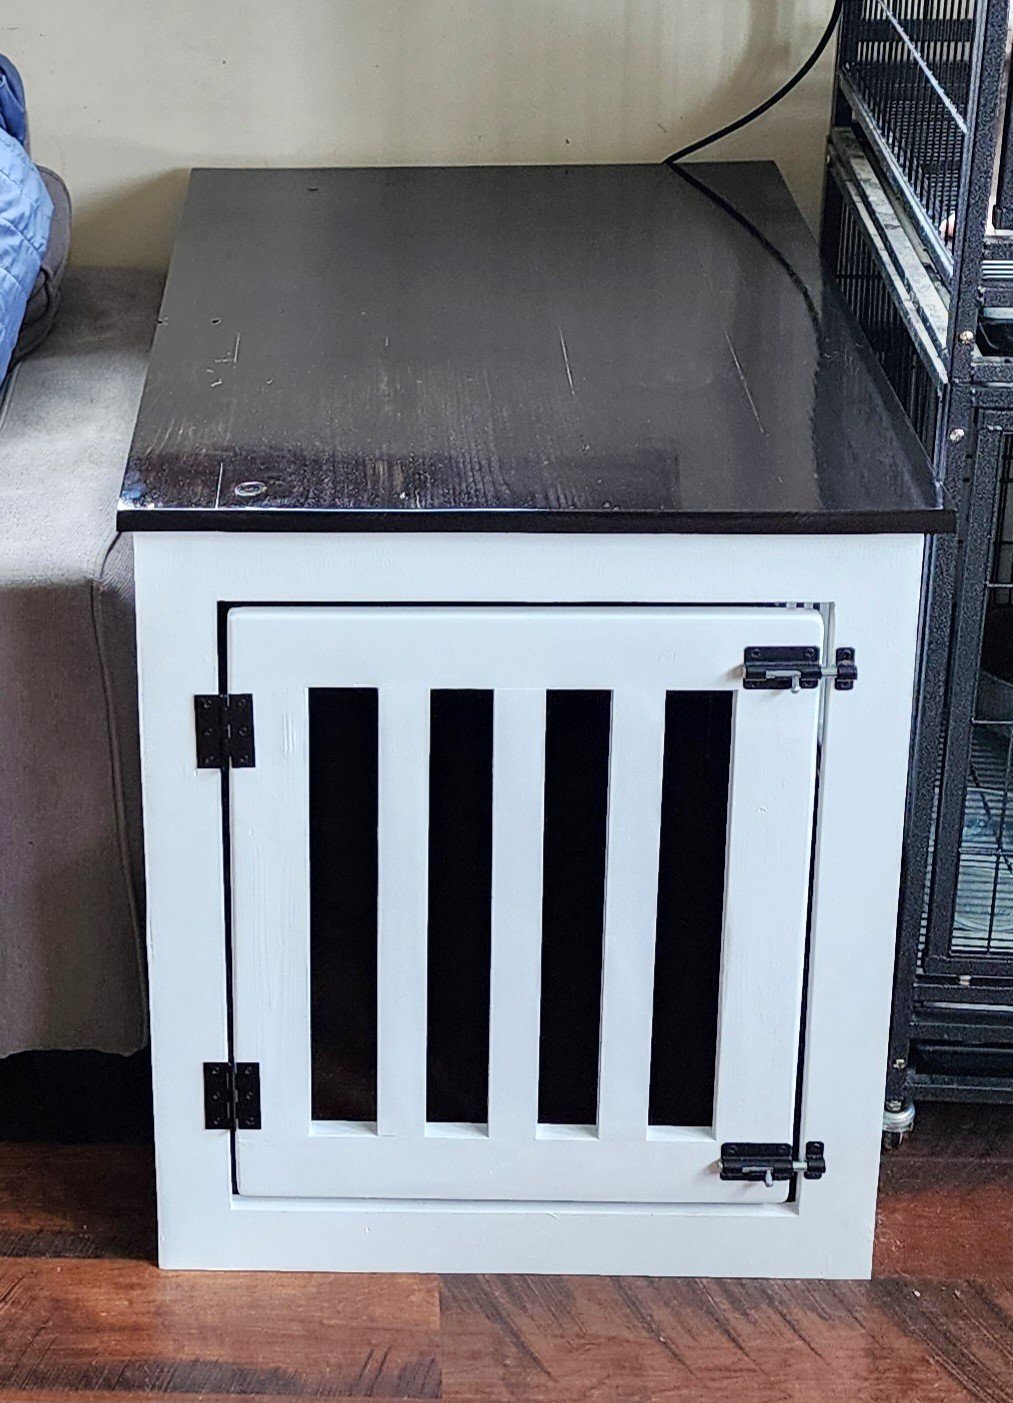
Made this out of free wood I got from my workplace.
A. Clark
Built from Plan(s)
Simple Kids Adirondack Chair
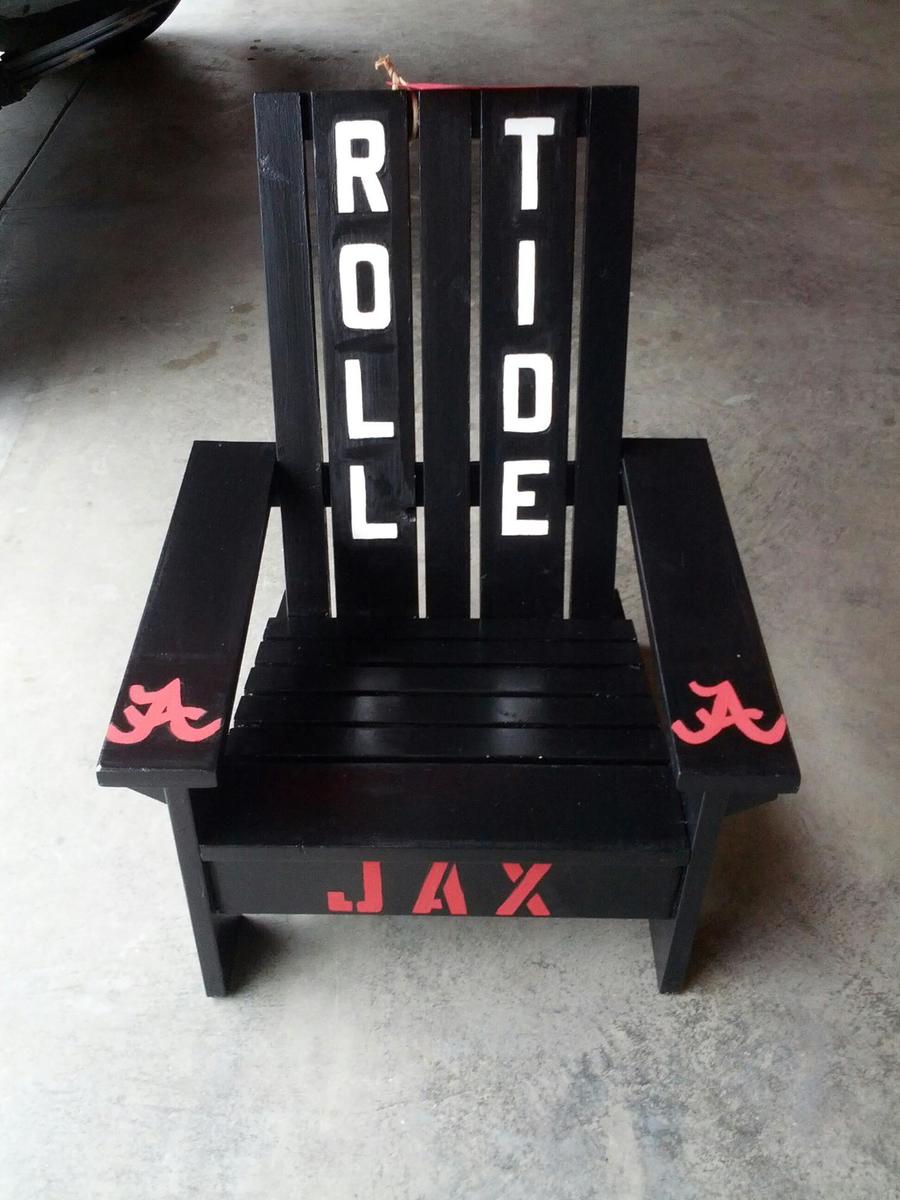
Chairs made as birthday gifts.
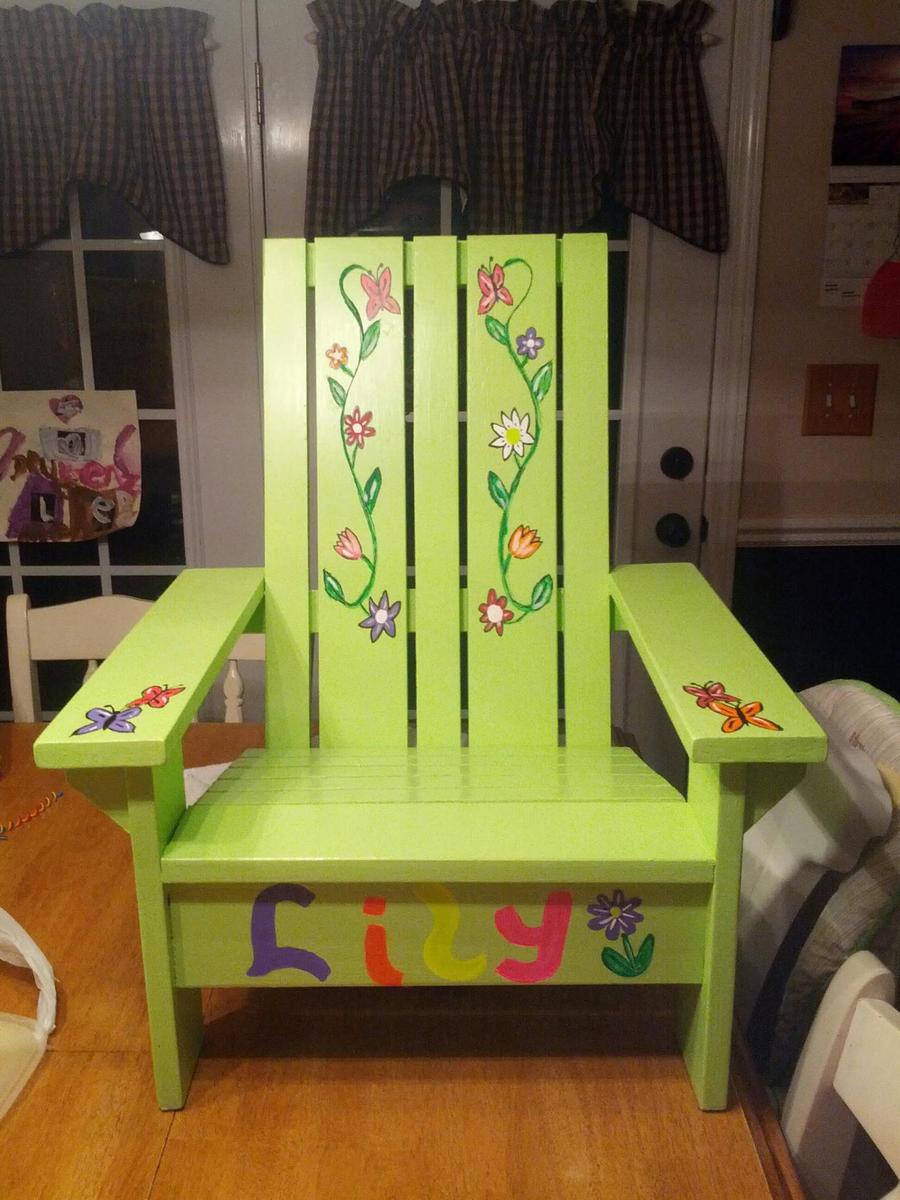
Built from Plan(s)
Estimated Cost
30.00
Estimated Time Investment
Afternoon Project (3-6 Hours)
Finish Used
Paint
Recommended Skill Level
Beginner
Sand Box

We adjusted the plan and created a 4x7 sand box with toy box and canopy. We are in love with the way this has turned out!
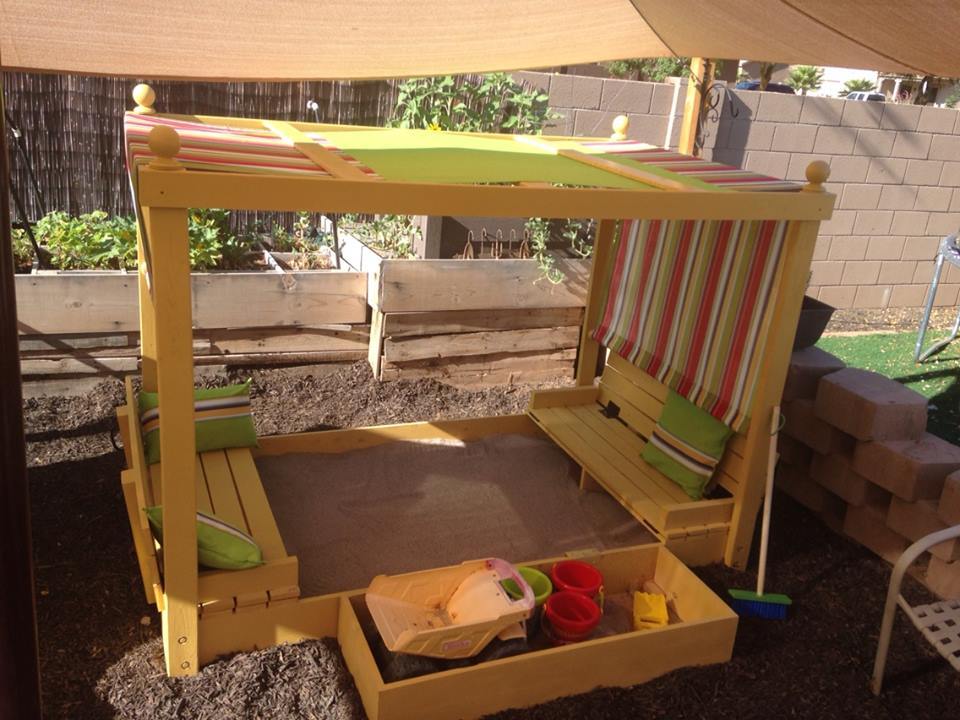
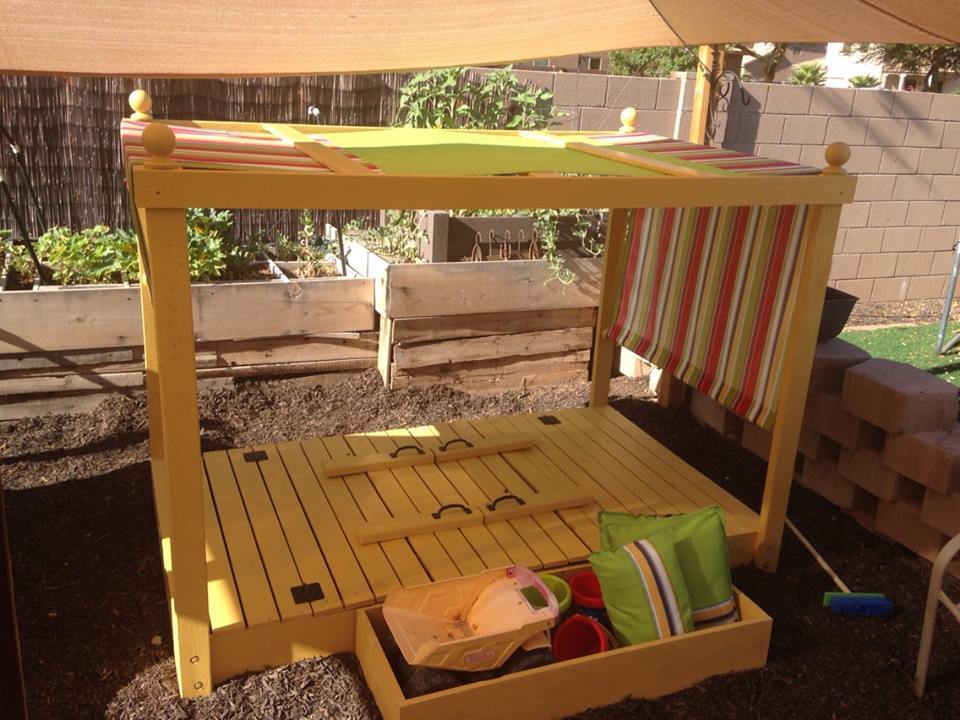

Estimated Cost
300
Estimated Time Investment
Weekend Project (10-20 Hours)
Recommended Skill Level
Intermediate
Comments

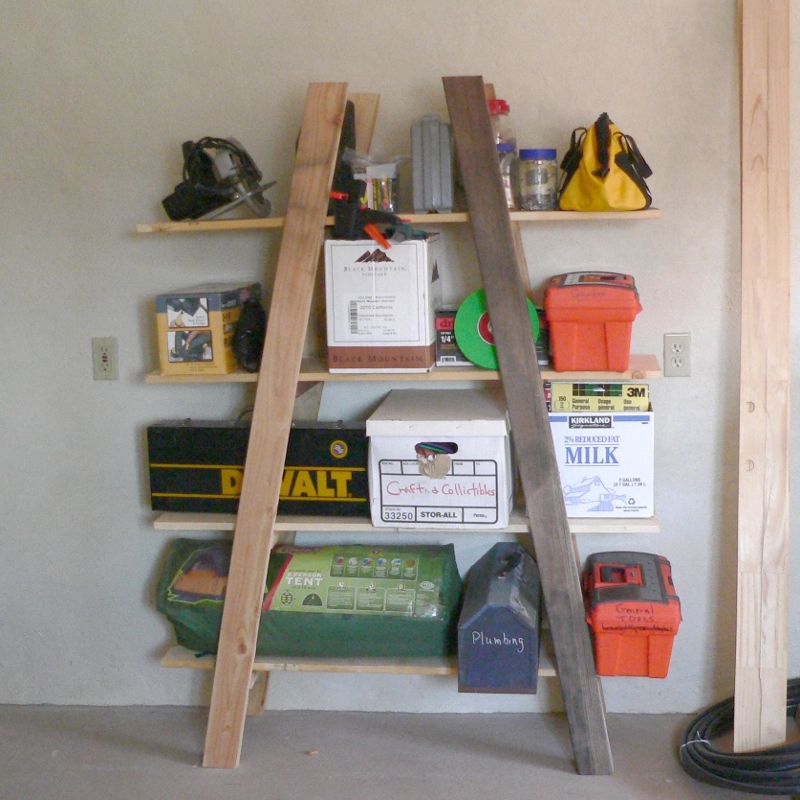
DIY Attached Garage Shelves
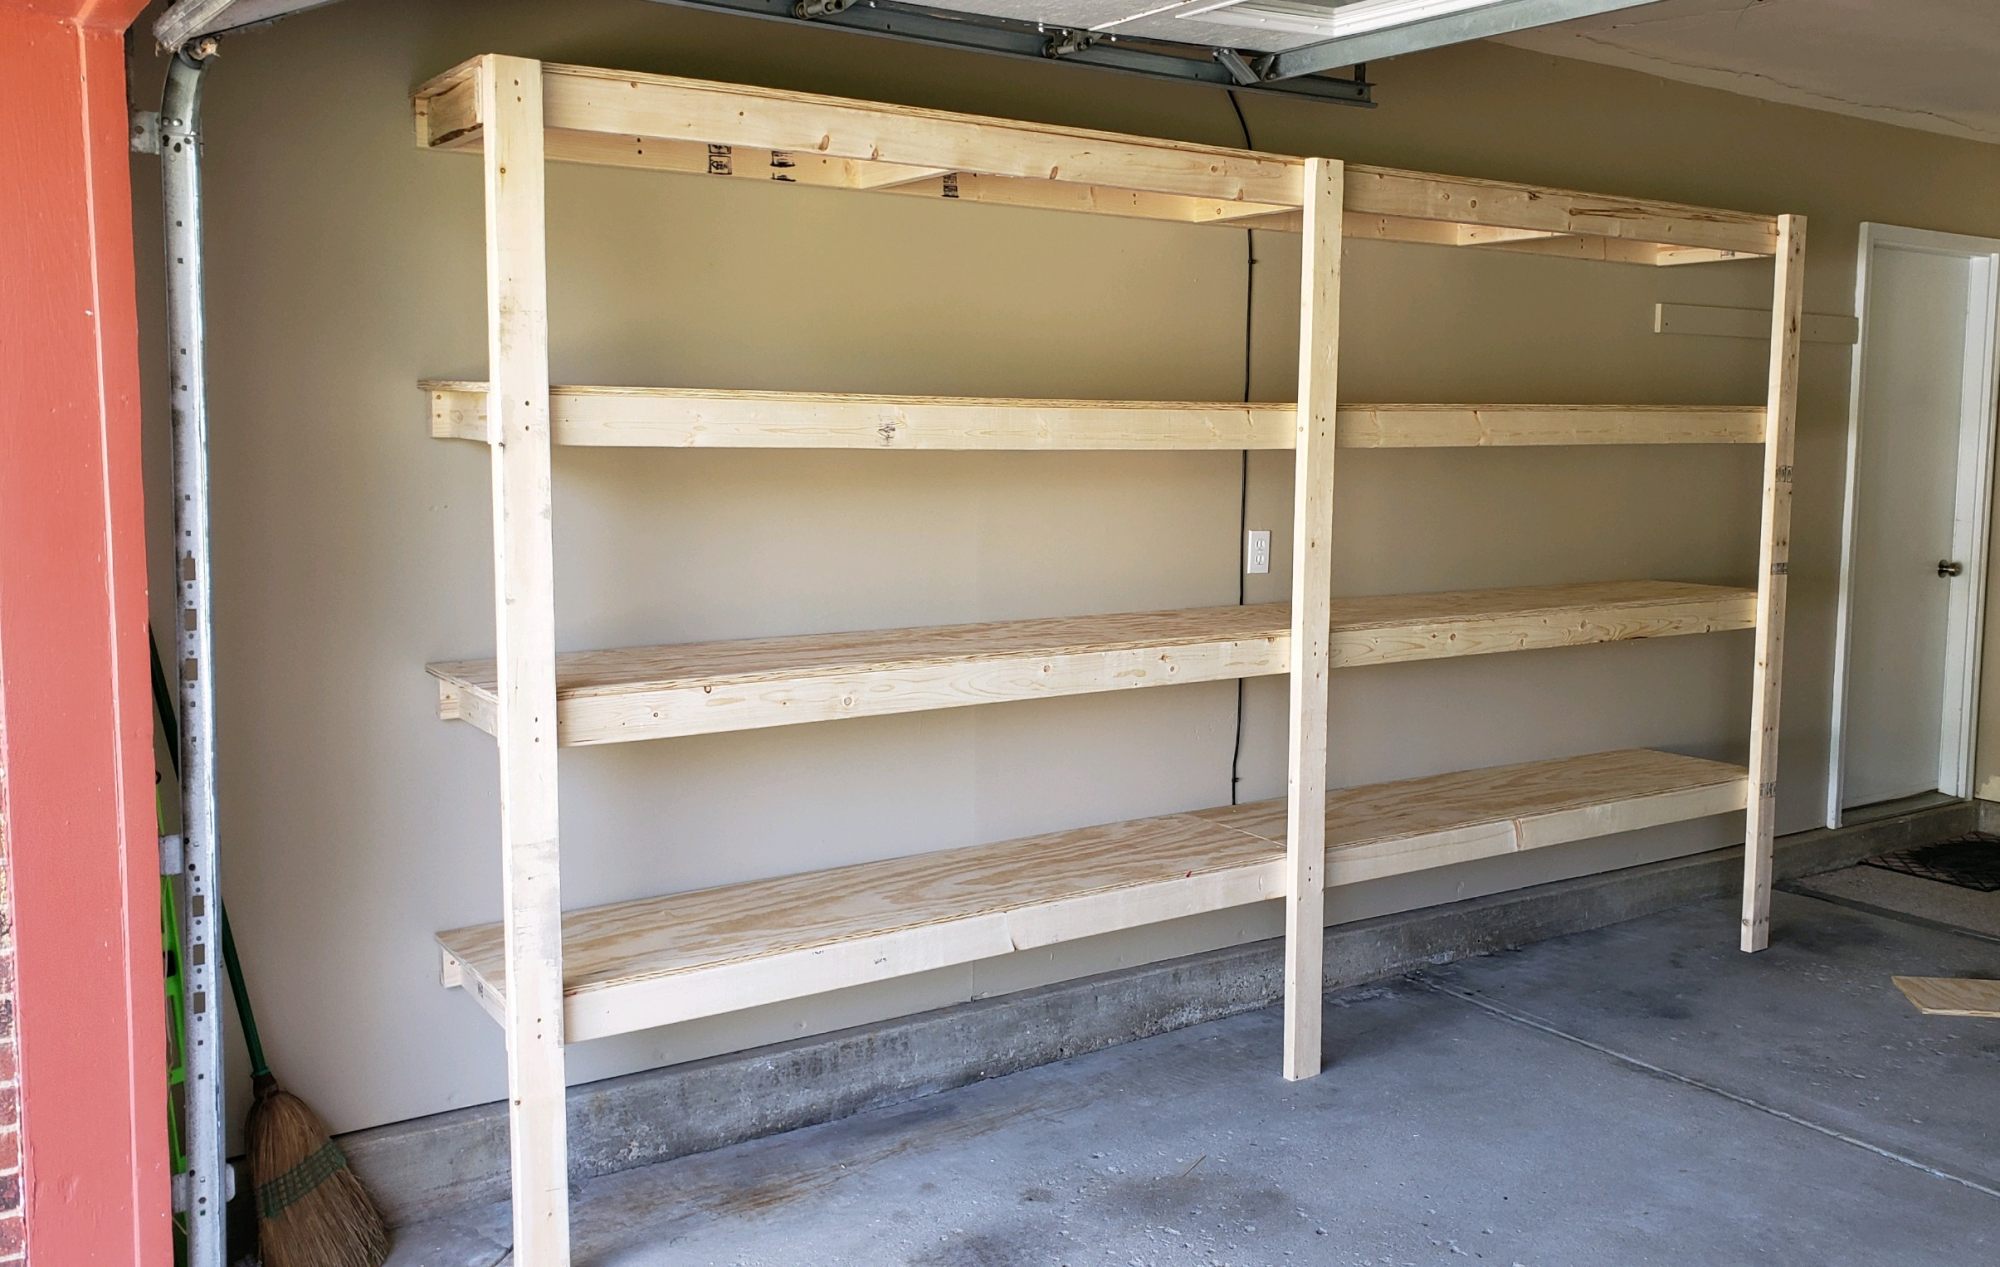
Thanks to Ana's plans for the attached garage shelves, we've managed to change 12' of garage space into 60! A quick trip to the local Home Depot and following the included instructions, these SUPER easy shelves were perfect for our needs. Thanks, Ana!
Built from Plan(s)
Estimated Cost
$160
Estimated Time Investment
Day Project (6-9 Hours)
Recommended Skill Level
Beginner
Simple Outdoor Lounge Chair and Ottoman
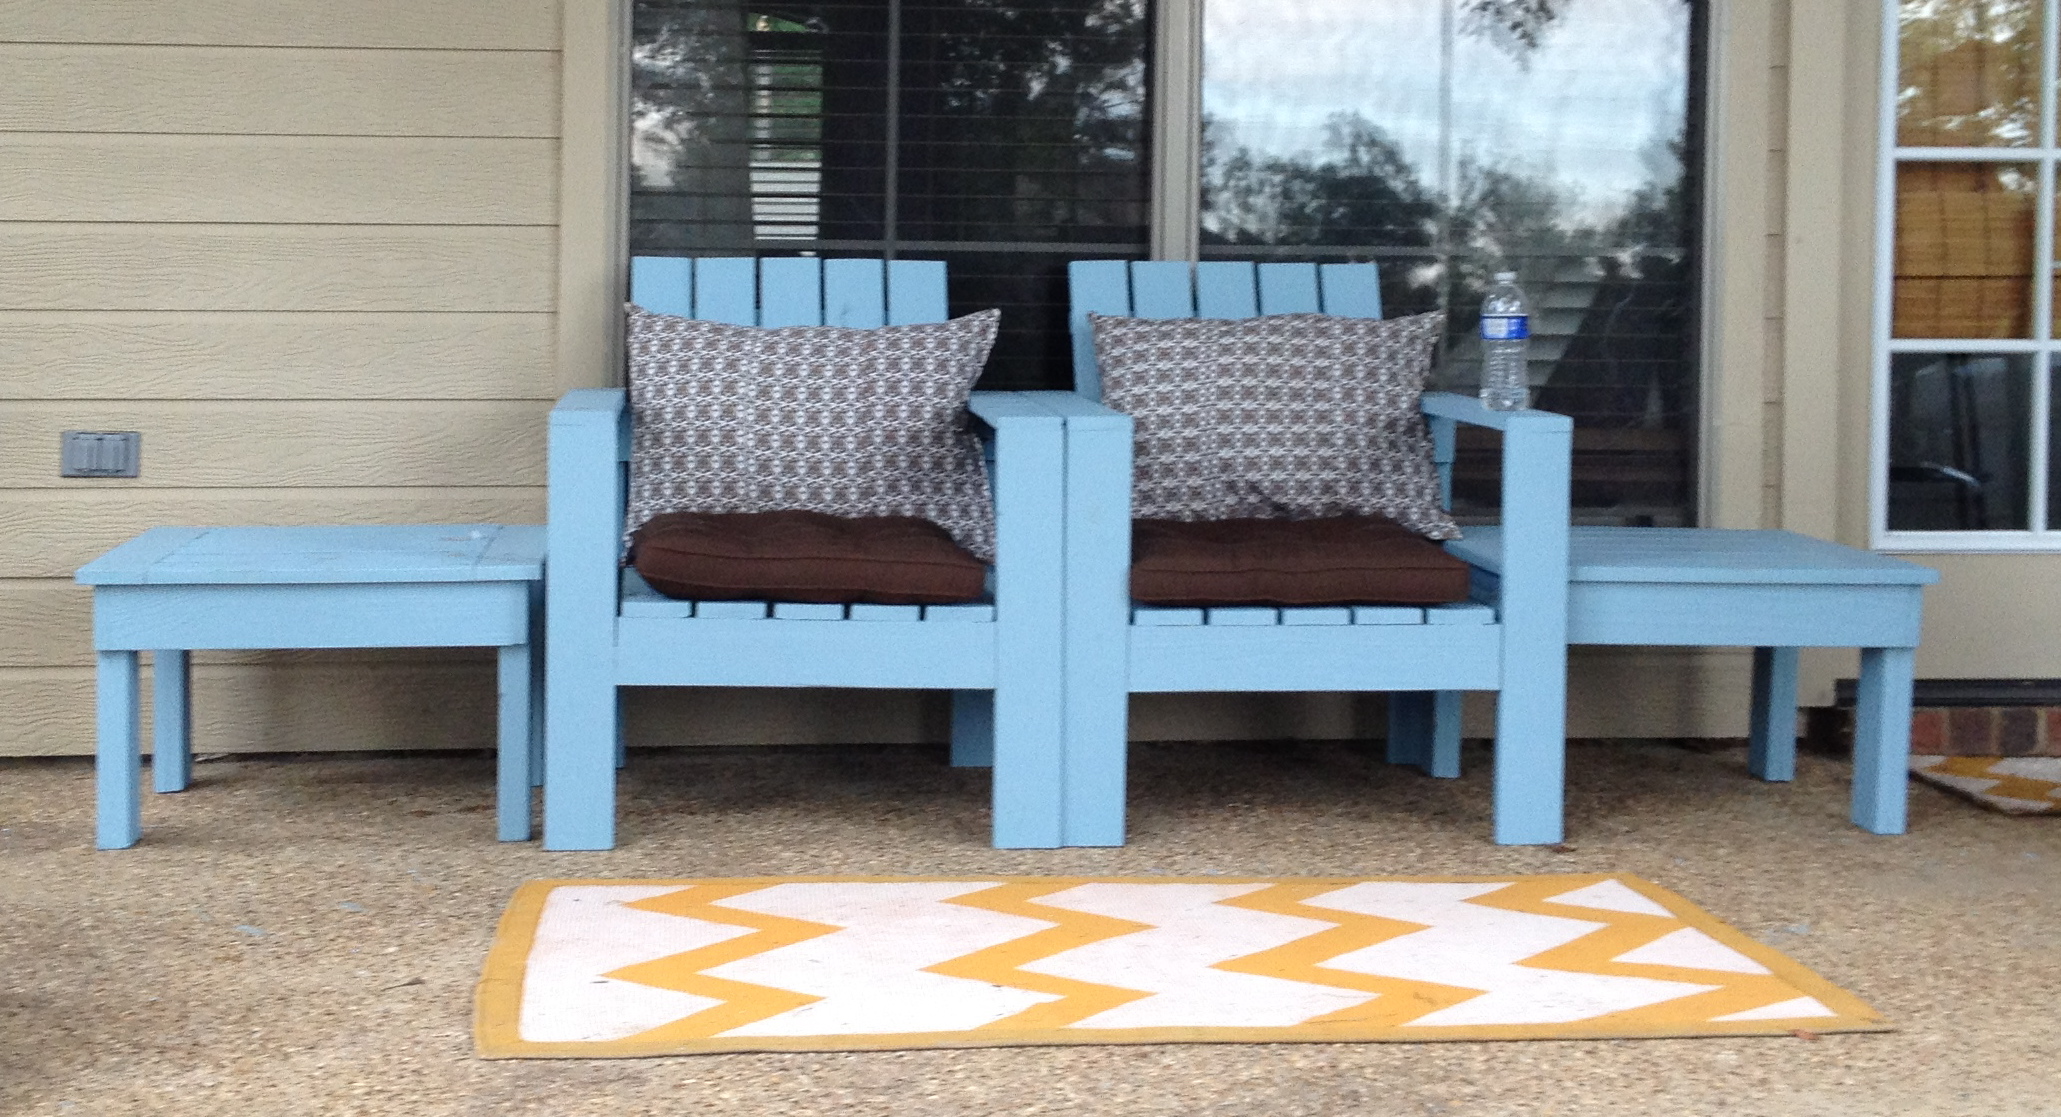
We wanted outdoor furniture but did not want to pay over $500. Very sturdy and will last forever!
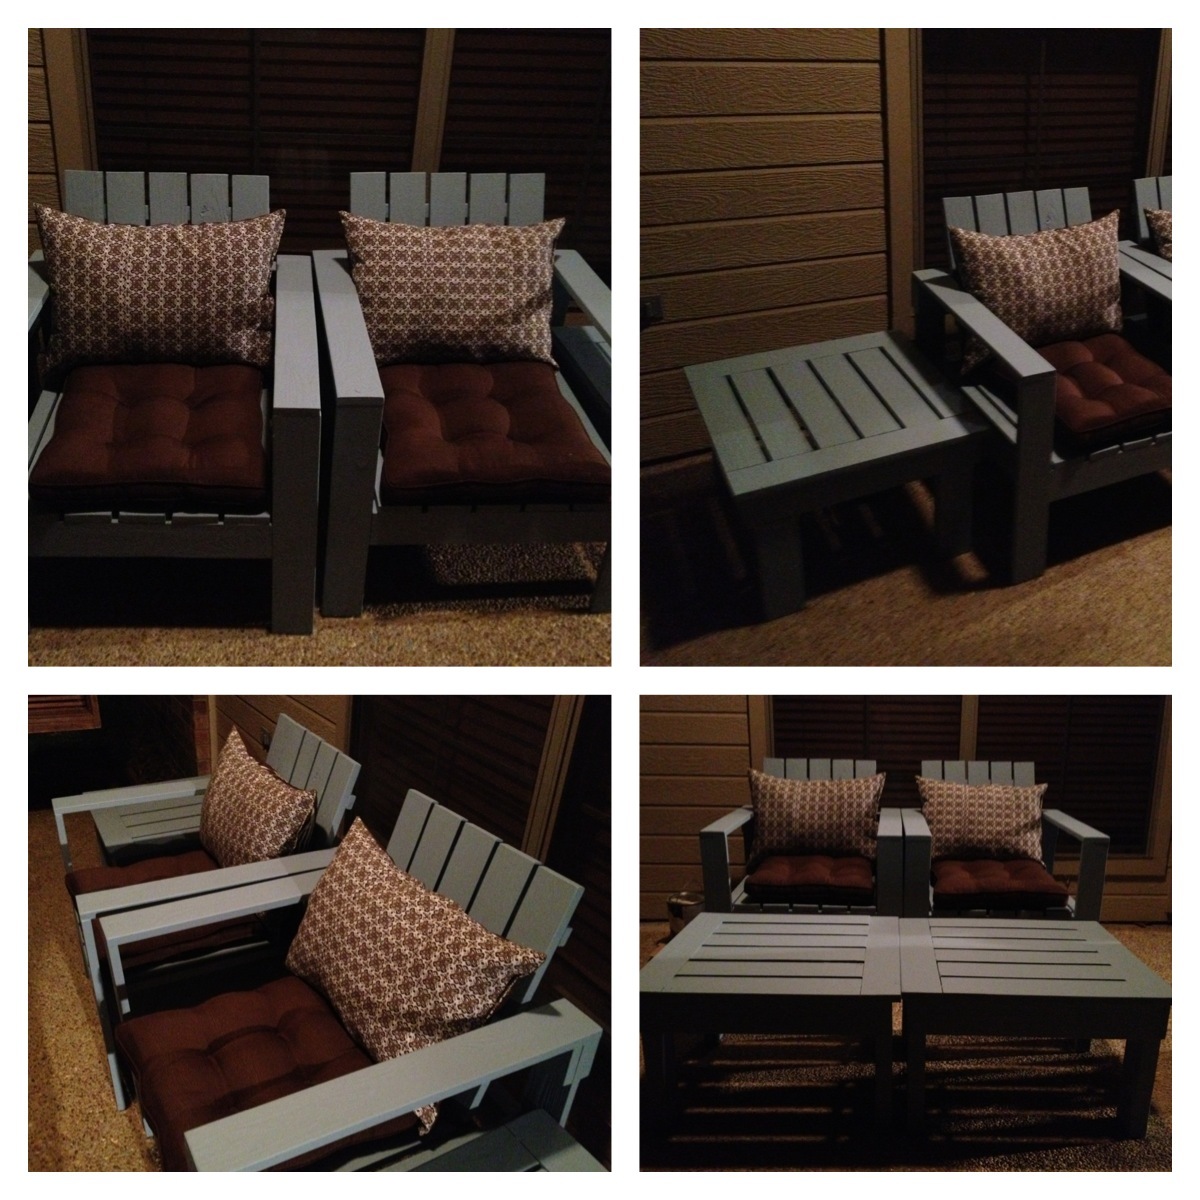
Built from Plan(s)
Estimated Cost
$80 for all wood and screws
Estimated Time Investment
Weekend Project (10-20 Hours)
Finish Used
Cabot Solid Stain
Recommended Skill Level
Intermediate