Search Results
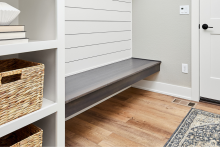
… … Mark a level line at 17-1/4" off the floor around the desired bench area using a level. Also mark studs in the wall just above the … two 2x3 or 2x4 pieces to the desired finished depth of your floating bench, minus 2-1/4". Attach the 2x3 or 2x4 pieces to the side walls of … front edges of the end 2x3s or 2x4s with two 3" screws. … Test the bench in the center. If it needs additional strength, you can add a …
Read More
Project Plan
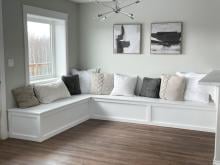
… seating. If doing multiple benches (corner or angled), start with one bench, then measure and cut the second and third benches to fit. If … Attach legs to insides of frame with 2-1/2" screws. Make sure the bench frames are level and set square on the floor. Make any … and does not rock or wobble. … Rip 1/4" plywood to the height of the bench. Then cross cut pieces to fit over the frames. Remember the ends …
Read More
Project Plan
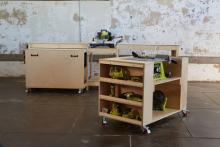
… Step 3: Bottom Support Attach bottom support to back legs of bench, 4” from bottom of legs. Use 3” wood screws and glue. … Workbench … plywood to side of workbench. Remember to plywood the outsides of the bench as shown in below diagram: … Workbench Step 5: Workbench Top … cart, following back of shelves and cutting to depth needed for your bench top tools. Make sure you leave about 2” extra for adding the cleat …
Read More
Project Plan
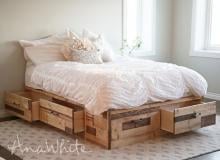
… Be safe, have fun, and ask for help if you need it. Good luck! … END BENCH (BUILD ONE) - Attach the side panels and middle panel to the top … entire bed gets "sided" so place pocket holes on the outsides. … END BENCH (BUILD ONE) - Tie in the bottoms of the bench with 1x4s. Keep pocket holes on outside for easy attaching and …
Read More
Project Plan

… all screws. … First things first, make sure that you potting bench is square by measuring diagonally accross the back and leveling … Trim corners off to avoid a sharp outside edge. And your potting bench or gardening station is done! … Simple Potting Bench …
Read More
Project Plan

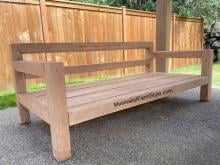
… pocket holes and 2 1/2" pocket hole screws and glue. … Build your bench top with pocket holes first (unles you are using outdoors and will … boards to allow water to drain). Then attach legs to the underside of bench top. Overhang is 10 1/4' from ends (see diagram 5) … You can … support and looks - check out how she did that here. … Sawhorse Outdoor Bench …
Read More
Project Plan
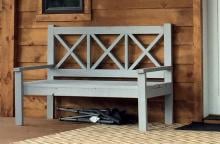
… can also add the decorative pieces now (may be easier to work on a bench top instead of at the back of the bench later on). … Build the seat framing either with pocket holes or … with 2-1/2" pocket hole screws and glue from back side. … Large Outdoor Bench with X Backs …
Read More
Project Plan

… to be absolutely square with all of your cuts. The drawer and the bench must be perfectly square or the drawer will not slide correctly. … by nailing board E (shown in green above) to the top and sides of the bench as shown above. Use 2″ nails and glue. Nail through the face of E … the trimout by nailing board G, shown in purple above, to the bench. Use 2″ nails and glue to nail into C. Then use 1 1/4″ nails to …
Read More
Project Plan
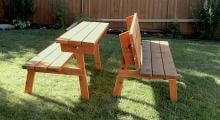
… luck! … Additional dimensions shown above. We found that this table/bench was most comfortable as a bench. If you are expecting to use the convertible picnic table bench mostly as a picnic table, I suggest you first review our free as …
Read More
Project Plan