

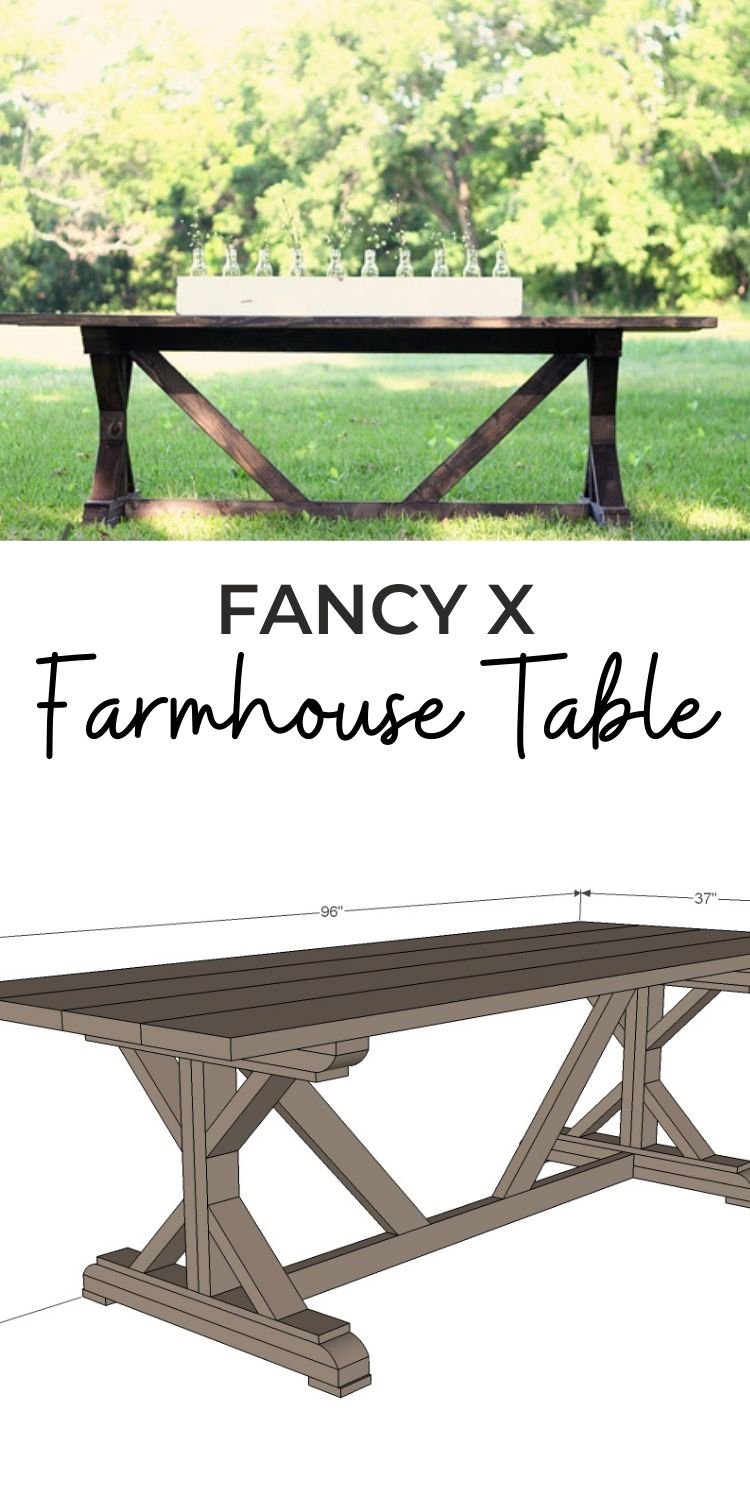
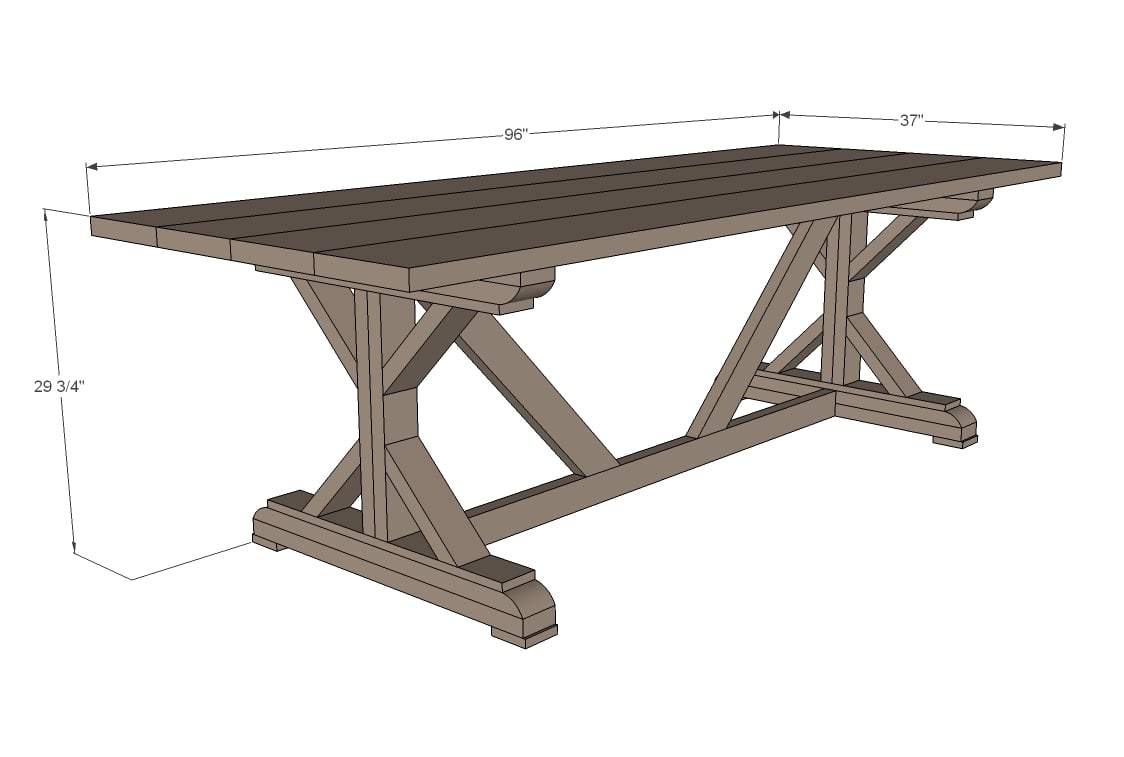
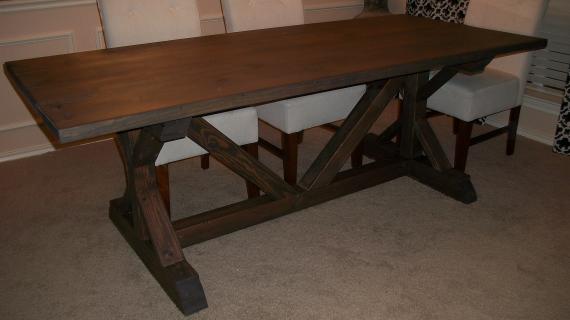
Build the Fancy X Farmhouse Table from 2x4s and lumber for $65. A reader favorite, this table has been built thousands of times!
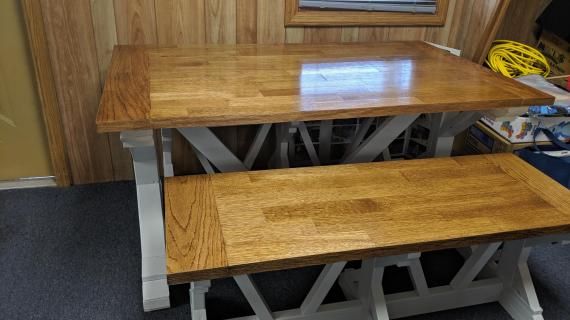
We also have plans for a matching bench and lots more farmhouse furniture plans.

Video - Watch this Table Being Built!
See More Photos and Build Post
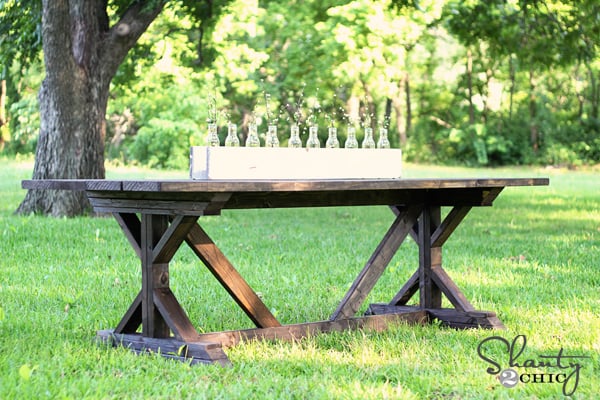
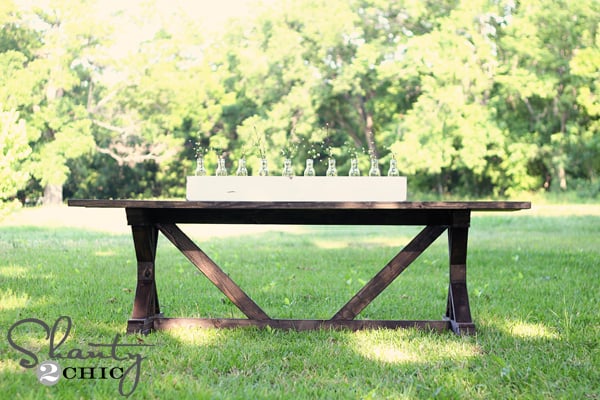
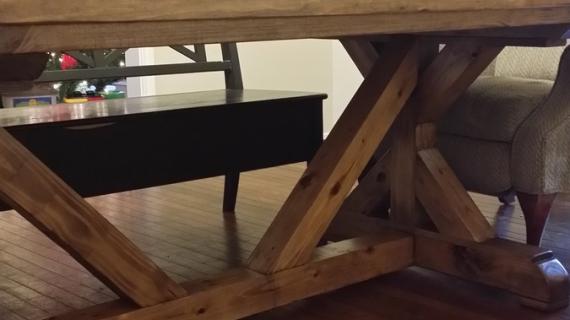
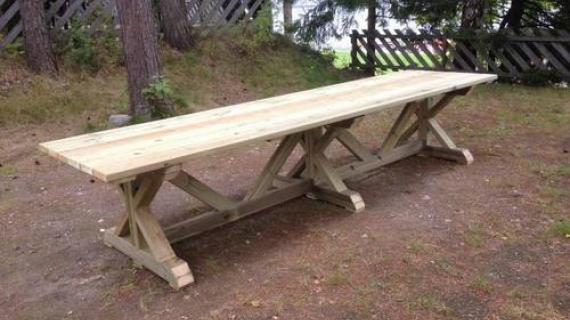
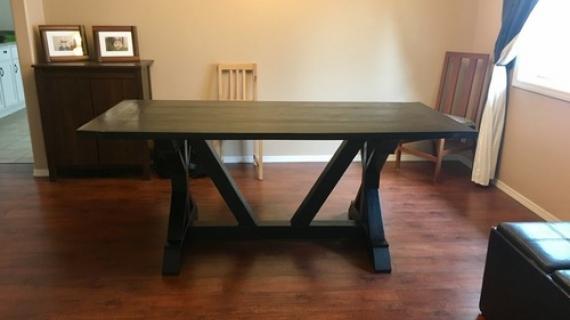
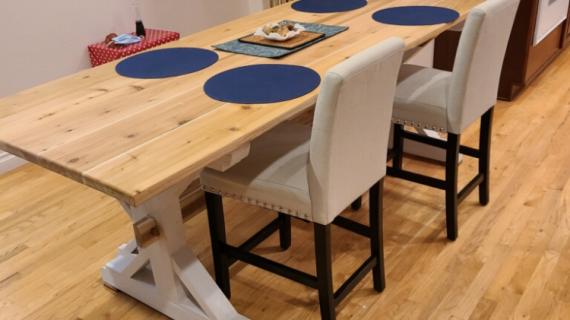
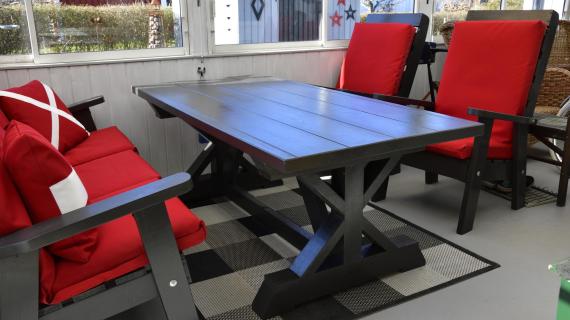
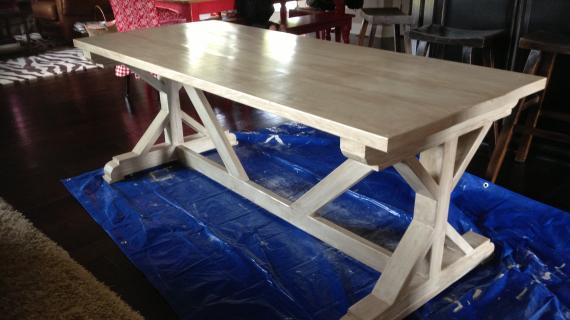
This table was built in collaboration with my friend Whitney from Shanty2Chic. Whitney has a family of seven, and wanted to build a sturdy and strong farmhouse table with a little bit of fancy to it to dine on outdoors this summer.
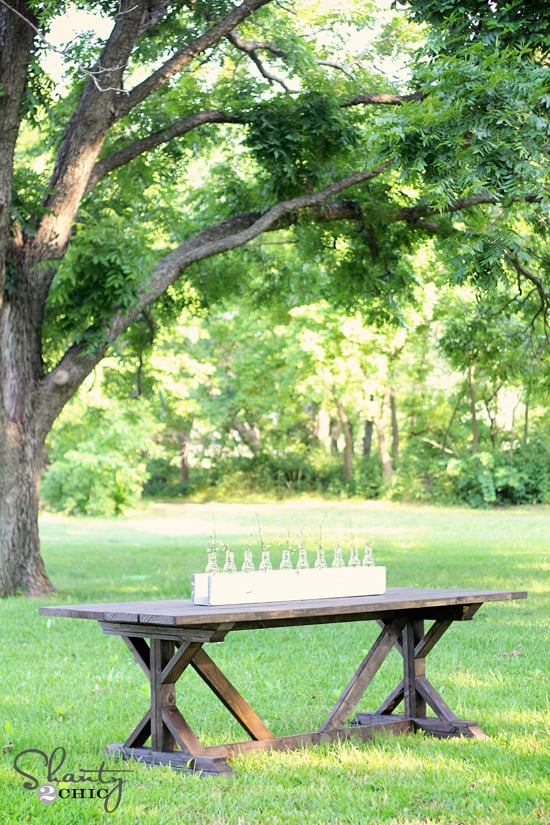
This is my very favorite build yet! I have been in serious need for an outdoor table to seat my family of 7. When we stumbled upon a beautiful, long farmhouse table from Anthropologie, I knew it was love at first sight. Everything was perfect about it... Except that $2,000 price tag... Ouch. That hurts to even write. But... I knew who to call to help me make my own at a very small fraction of that cost! This baby only cost me $65!
Head over to visit Whitney at Shanty2Chic to get all the details, lots more photos, and a peek at her construction process!
Thanks Whitney!!!
Pin For Later!
Preparation
4 – 2x10 @ 8 feet long
7 – 2x4 @ 8 feet long
1 – 1x4 @ 12 feet long
3” self tapping wood screws
2 ½” pocket hole screws
2” finish nails
ENDS
- 8 – 2x4 @ 11 3/8” (ends cut at 45 degrees off square, longest point measurement, NOT parallel)
- 4 – 2x4 @ 20”
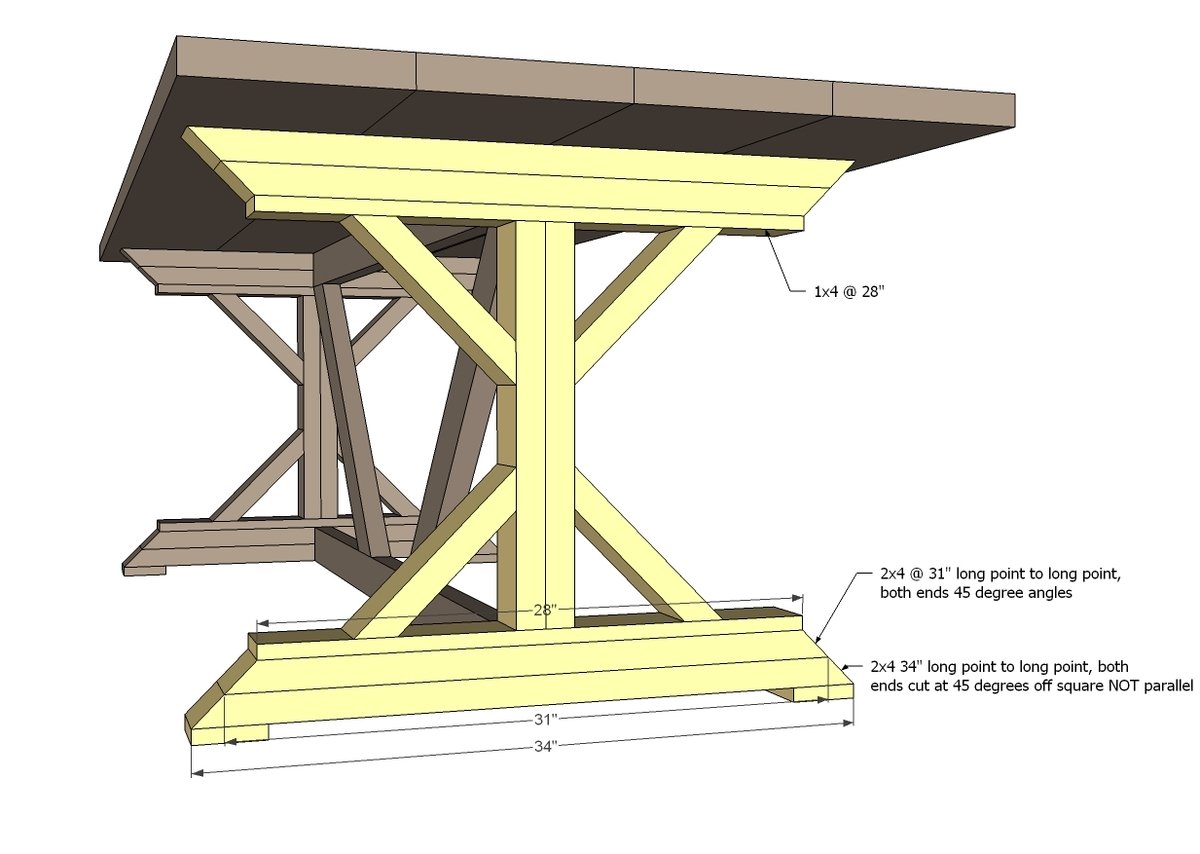
- 4 – 1x4 @ 28 3/8” **
- 8 – 2x4 @ 32 5/8” CUT TO FIT **
- 4 – 1x4 @ 3 ½”
MAIN TABLE
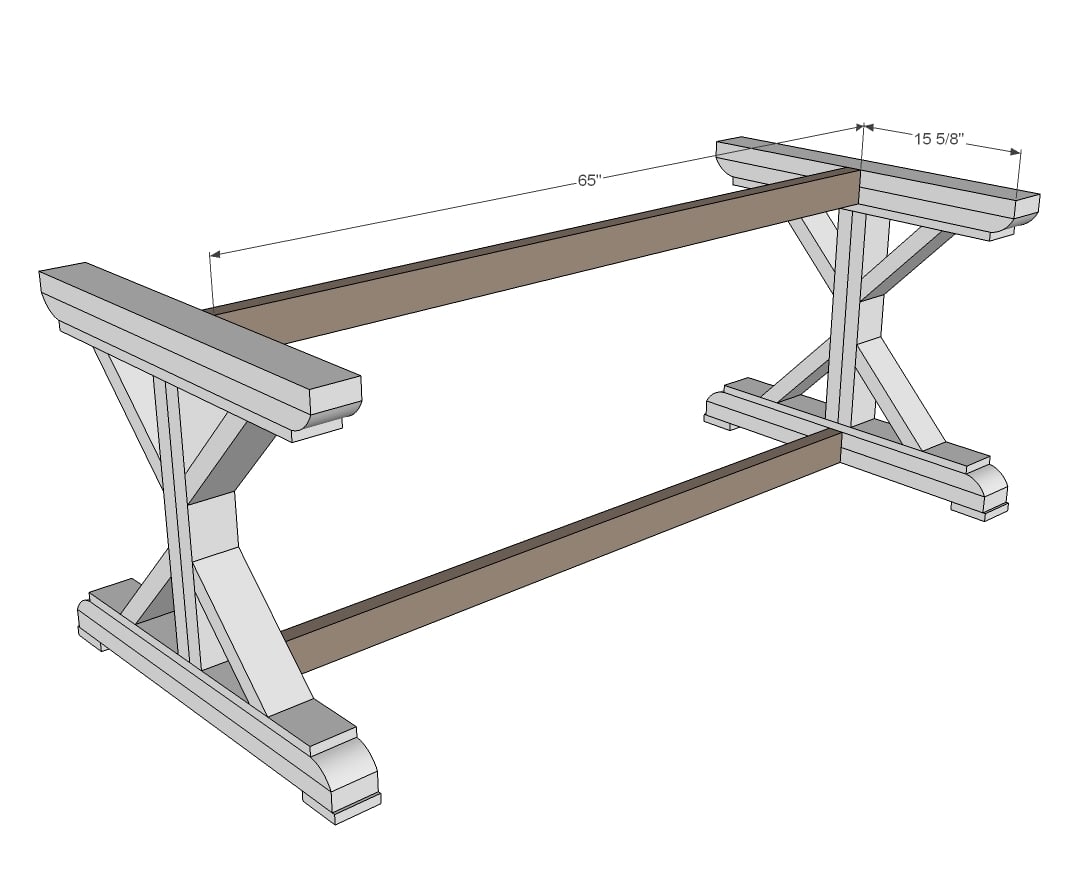
- 2 – 2x4 @ 65”
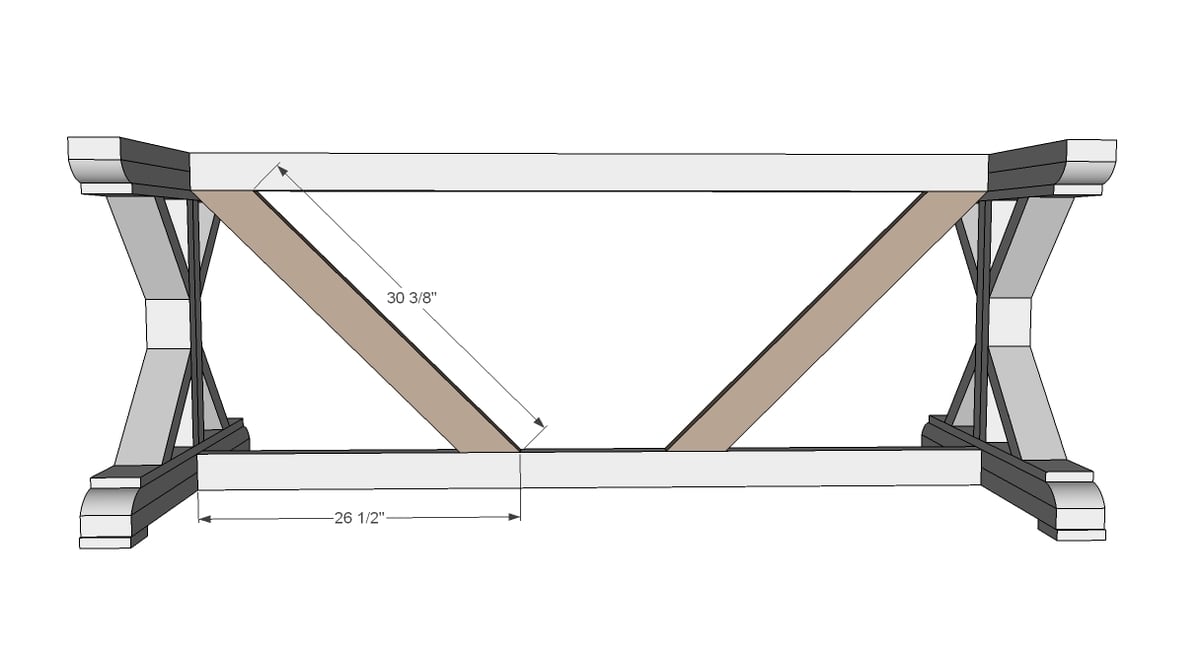
- 2 – 2x4 @ 30 3/8” (both ends cut parallel at 45 degrees off square)
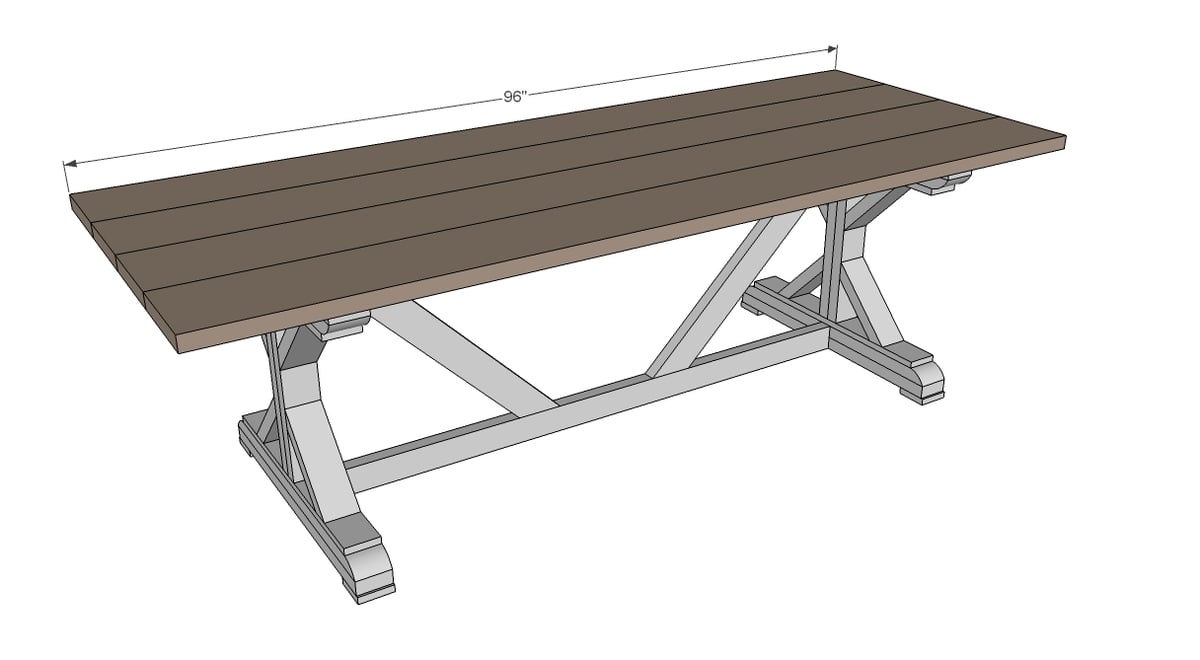
- 4 – 2x10 @ 96”
** For 45 degree cut tops and bottoms (easier) on the legs top and bottom (see steps 3-5 and step 10), replace these cuts with:
- 4 - 2x4 @ 31" (both ends cut at 45 degrees off square NOT parallel long point measurement)
- 4 - 2x4 @ 34" (both ends cut at 45 degrees off square NOT parallel long point measurement)
Please read through the entire plan and all comments before beginning this project. It is also advisable to review the Getting Started Section. Take all necessary precautions to build safely and smartly. Work on a clean level surface, free of imperfections or debris. Always use straight boards. Check for square after each step. Always predrill holes before attaching with screws. Use glue with finish nails for a stronger hold. Wipe excess glue off bare wood for stained projects, as dried glue will not take stain. Be safe, have fun, and ask for help if you need it. Good luck!
Instructions
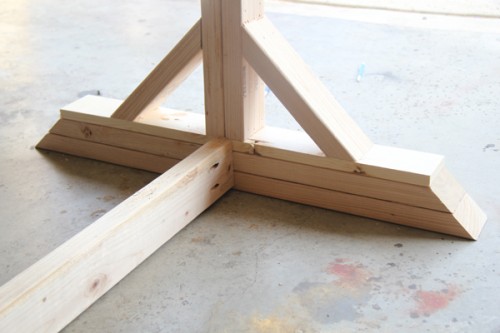
Step 1
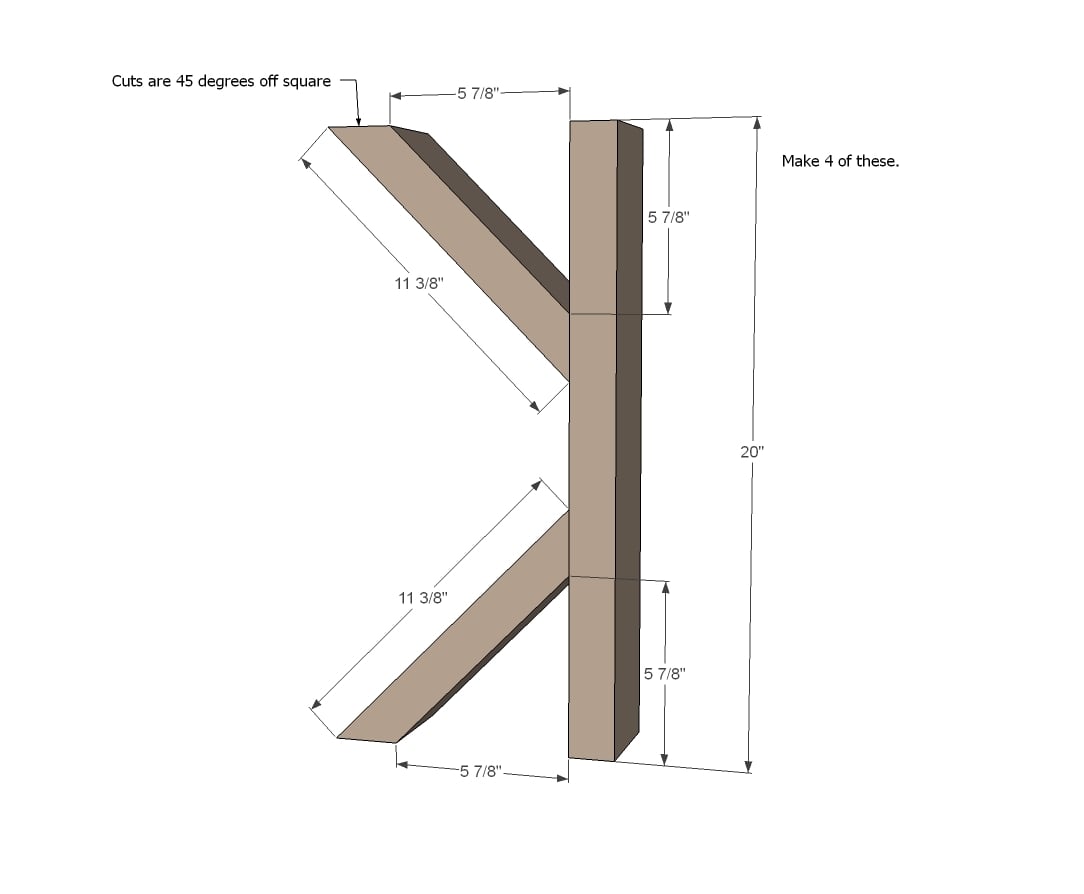
Build four of these. I’d simply countersink screws from the backs into the ends of the cross braces using 2-1/2" self tapping wood screws
Step 2
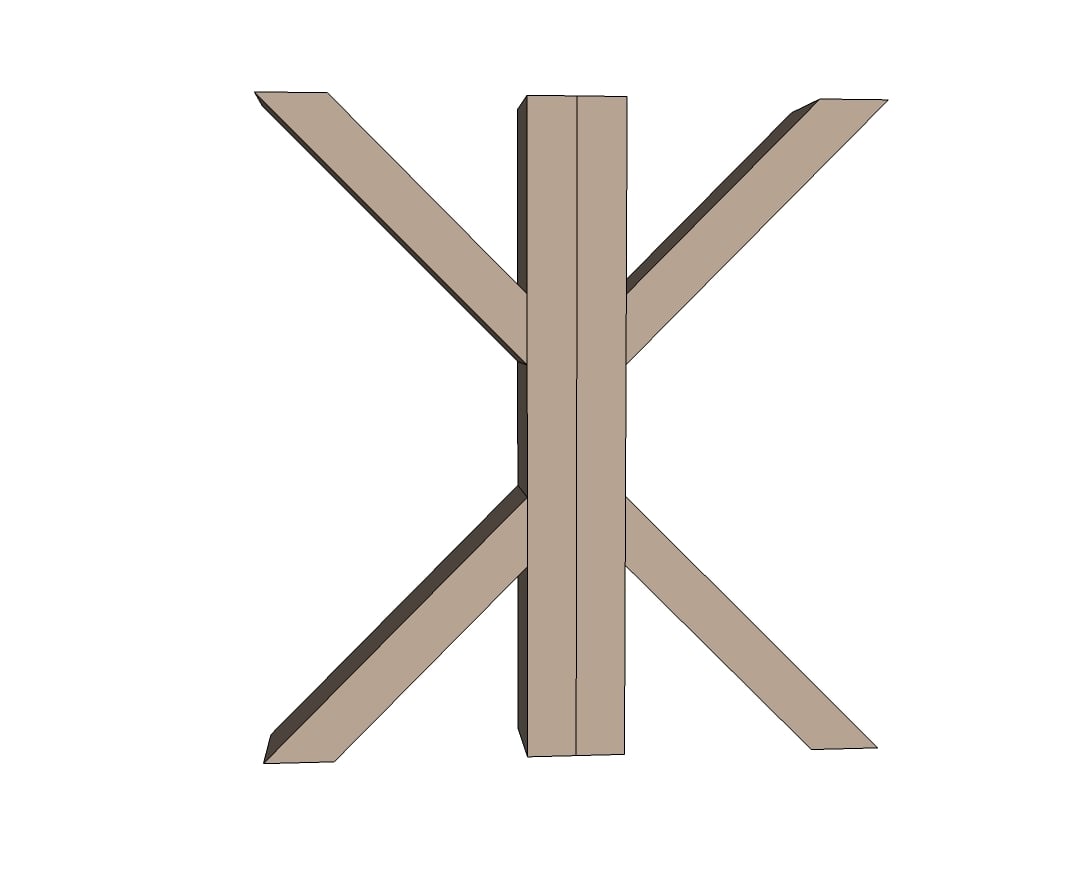
Then just attach two of the leg pieces together with glue and 2” finish nails from each side
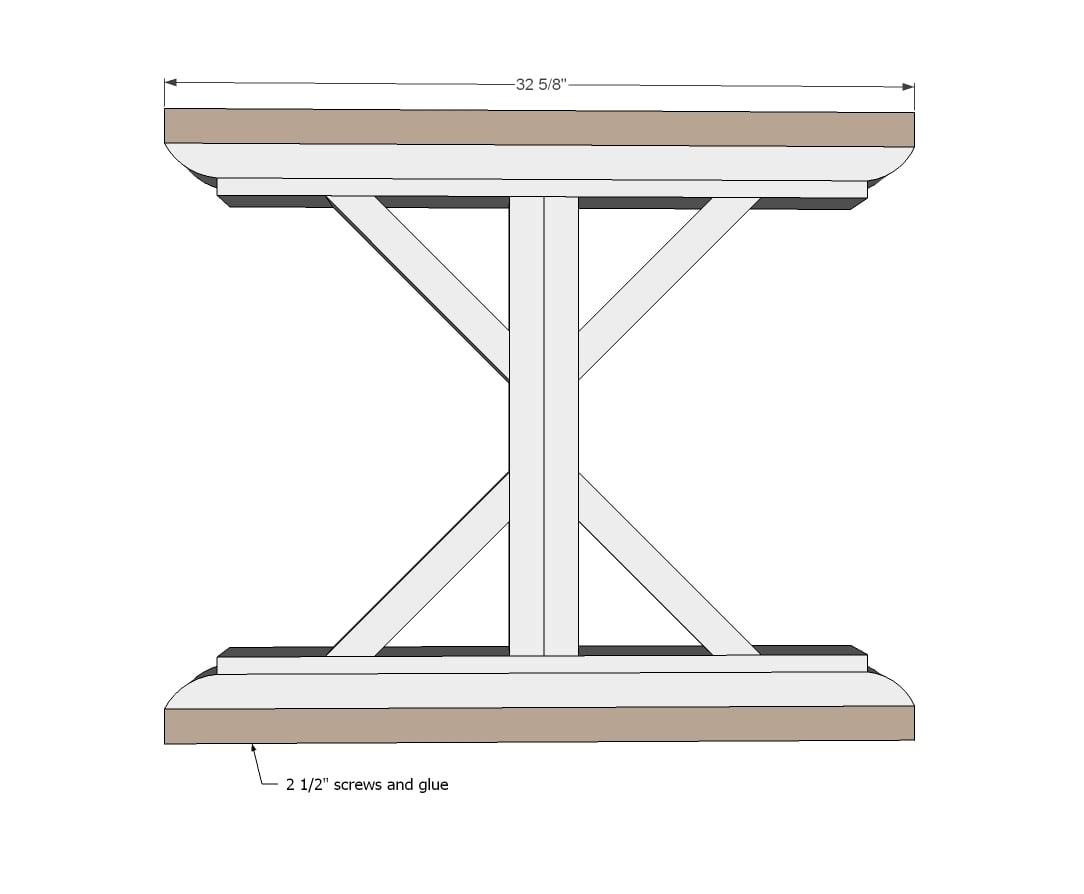
Step 3

And add the top/bottom. You can use 2” screws or nails here and glue.
Step 4

And then add the curved pieces. The ends may be a challenge – what I do is first cut a 2x4 32 5/8” long with both ends cut at 30 degrees off square, ends not parallel. Then make a second cut at 45 (or more if your saw cuts higher degree bevels) degrees off square and cut that same board 28 3/8” short point to short point.
Step 5
Repeat for the next layer of 2xs to build up your leg ends
Step 6

Followed by the little feet ...
Step 7
I'd recommend 1 1/2" PHs and 2 1/2" PH screws here ... hide on top and bottom edges
Step 8
The easiest way to attach cross braces is with pocket holes. But you will have to fill later with wood filler.
An alternative is to glue and screw through the cross brace into the top and bottom 2x4s with longer screws.
Step 9
And finally the top! I recommend building the tabletop first with pocket holes and then attaching.
If you are using the table outdoors, leave a little space between the boards for water drainage.
Step 10
And for the alternate ends like Whitney did - just use 45 degrees off square cuts.
Step 11
For more photos and construction details, please stop over and visit Whitney at Shanty2Chic!
It is always recommended to apply a test coat on a hidden area or scrap piece to ensure color evenness and adhesion. Use primer or wood conditioner as needed.

Comments
kash1211
Sat, 07/13/2019 - 20:12
Outdoor Table
Can this table be used for outdoors? I am looking at building an outdoor table. Any recommendations and what lumber do you suggest? Thanks
KGill88
Wed, 10/02/2019 - 11:23
Pdf plans?
Is there a pdf of the plans to download?
peoniespinkandpearls
Tue, 10/15/2019 - 19:14
3” self tapping wood screws
Just a heads up... supply list says "3” self tapping wood screws" but instructions say 2.5".
smazon
Sun, 10/27/2019 - 18:12
How did you attach the top…
How did you attach the top to the base?
trayambus
Mon, 12/02/2019 - 18:09
Attaching the table too
I’m about 90% done with the table but I’m trying to figure out the beat way to attach the table top. Any ideas for locations of fasteners. It might be helpful for future users to have these instructions as well. Love the design of table but trying to figure out the best way to keep fasteners hidden. I have been Using a pocket jig.
[email protected]
Wed, 12/18/2019 - 08:11
X farmhouse table legs to table top
Can someone please tell me how to attach the legs to the tabletop without going through the top of the table?? Thank you and if you have a picture that would help too
brownbottom
Fri, 01/10/2020 - 13:32
Slight change to the instructions......
If I may suggest..... I've made a few of these tables and I find steps 1, 2, 3 to be simpler by changing the order slightly on some of the steps. For the two 20" 2x4 legs, it's easier to screw them together back to back first then add the horizontal 1x4 and 2x4 to the top and bottom of it, then add the 45 degree angled pieces that are essentially the braces. Unless you have high end saws etc, the 45 might not be precisely exact same every time and that will cause fluctuation in the level of the boards when you go to add the 1x4 and 2x4.. (the 90 deg top of the 2x4 and the 45 deg of the brace must be perfect level or the 1x4 will be off a bit. If you add the 45 pieces afterwards, you just set in place as far in as you can get it and then fasten. It looks perfect and this way saves a ton of time. Even if one of the cuts is off by 1-2 degrees, it's unnoticeable. The main benefit is the vertical and horizontal pieces of the legs will be perfectly square, and then the 45's are added afterwards for strength and aesthetics.
Hopefully I worded this clearly enough to get my point across. Good luck.
AshleyBane
Sat, 02/15/2020 - 21:56
Attaching X pieces if I want to use a 4x4 for legs?
What is the rather than two 2x4s? Pocket holes from the 2x4s into the 4x4?
AshleyBane
Sat, 02/15/2020 - 22:00
Apologies for the cut and…
Apologies for the cut and paste error above. What is the best way to attach the X pieces if I want to use a 4x4 for the legs rather than two 2x4s? Pocket hole screws from the 2x4s into the 4x4? Just starting out with woodworking, so any tips would be helpful. Thanks!
kelwhitt14
Tue, 05/12/2020 - 18:07
Modify plan
How do I modify this (and the bench) to be a 10’ x 5’ table?
Punkyperez826
Thu, 05/14/2020 - 13:04
Bench for Table?
Is there a bench that I can build for this table that fits right underneath it? I can't find it but thought I saw it on someone's post on Pinterest not to long ago.
sandi@leonys
Sat, 05/16/2020 - 13:04
Fancy X Farmhouse Table
I built this table as a Mother’s Day present for my mom. I modified it a little to allow for an umbrella hole and made it six foot instead of eight. It turned out fantastic!
jasonrn
Mon, 05/10/2021 - 10:56
What did you do to allow for…
What did you do to allow for the umbrella hole? I am planning to do this as well. Did you just offset the long supporting braces?
jwat314
Wed, 05/20/2020 - 21:18
My first table
Thank you for making this so easy...what a great informative platform...I really appreciate all the knowledge and easy access information available on this site.
dclarke977
Mon, 05/25/2020 - 18:59
Can you extend this table to…
Can you extend this table to 12 foot without adding a support in the middle?
JustJ
Sun, 06/14/2020 - 14:25
How do you attach the top?
I am finishing this table up, but am at a loss as to how you attached the tabletop to the base (base was assembled with pocket hole screws). Normally the stretcher would lay flat,so you could just screw from the underside, up through that. Or the base ends are not as deep, so you can screw from the underside of those. But both the stretcher and base are too deep, or you would need a 4-1/2 inch screw. Help.
dclarke977
Tue, 06/23/2020 - 19:55
I just finished my table…
I just finished my table today and had the same question. So i took my pocket hole drill bit and drilled up a 1/2 inch into the stretcher as well as the end supports. Then i used a 4 inch wood screw. I did three on the stretcher and 2 on each end support. It’s doing the trick
jozamudio
Sun, 07/12/2020 - 13:54
Want to build it.
Want to build it.
Cwill1022
Wed, 07/22/2020 - 07:59
Does anybody know what stain…
Does anybody know what stain was used on the one in the pictures? Looking to get as close to possible. Also - Any recommendations on sealing this since it will be outside (under a covered patio) but will get some rain on it. Thanks!
In reply to Does anybody know what stain… by Cwill1022
trevorflaherty
Tue, 12/08/2020 - 14:49
Rustoleum dark walnut and…
Rustoleum dark walnut and rustoleum spar varnish is what Shanty says...
trevorflaherty
Tue, 12/08/2020 - 14:26
Love it, but question on the price for materials...
I am making this table now and am loving every piece of it. My frustration lies in the fact that every time I see one of these builds you have it priced out for a super cheap number. I have yet to build anything from your plans for anything close to what you say you can build it for. Shanty says this table was built for $65 but I spent $60 on the 2x10s alone. I know lumber prices have skyrocketed but even still I see no way to make these things for the prices you quote. Expect the blanket ladder I made for 12 bucks with 2 2x8s. (-:
Regardless, these plans in general are awesome and this table will be a fantastic Xmas present for my other half!!!
In reply to Love it, but question on the price for materials... by trevorflaherty
trevorflaherty
Tue, 12/08/2020 - 14:27
Sorry for the typos...except…
Sorry for the typos...except and 2 2x4x8s....
trevorflaherty
Tue, 12/08/2020 - 14:51
Attaching the table top?
Another quick question...there is no mention on how to connect the table top to the legs...is there a preferred method? I was hoping to hide the screws from underneath but the legs go pretty thick. I may have to go top, countersink a bit and add filler. Thoughts?
khuhn
Thu, 05/27/2021 - 08:43
Attaching the top
Same here...I am just about settled on dowel rods with an oblong space on the base for any future swelling or movement. I am just not sure on how to properly implement this technique.
rhines
Sun, 01/03/2021 - 12:47
Table top attachment
I am sure it has been asked but how is top attached to base?
khuhn
Thu, 05/27/2021 - 08:40
Farmhouse table
How is the top attached to the base in these plans?