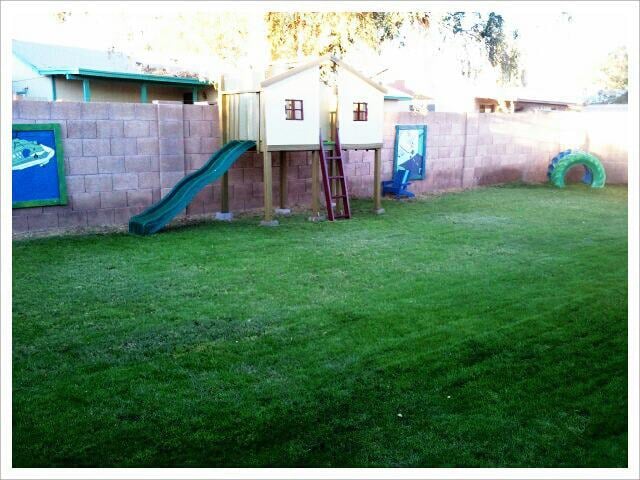
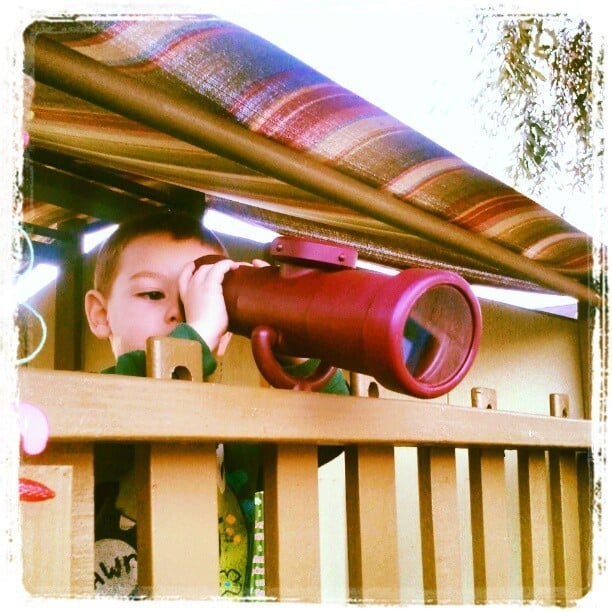
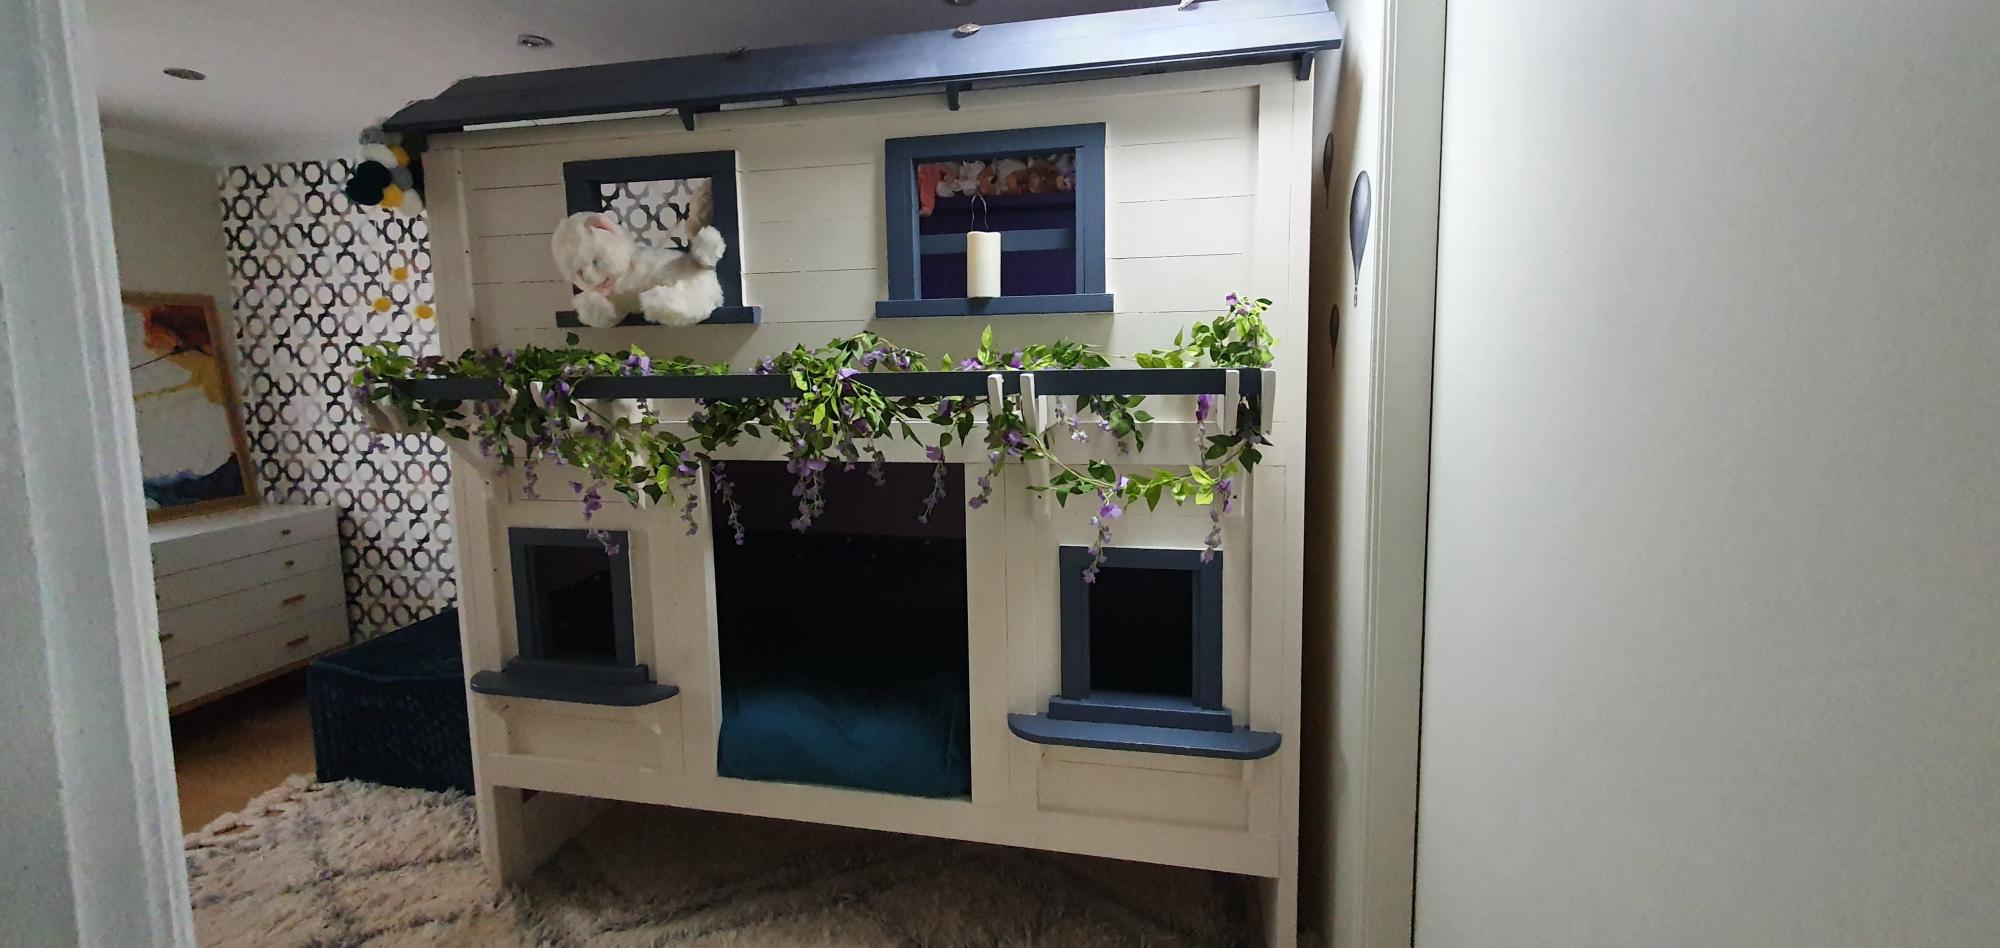
ClubHouse FORT
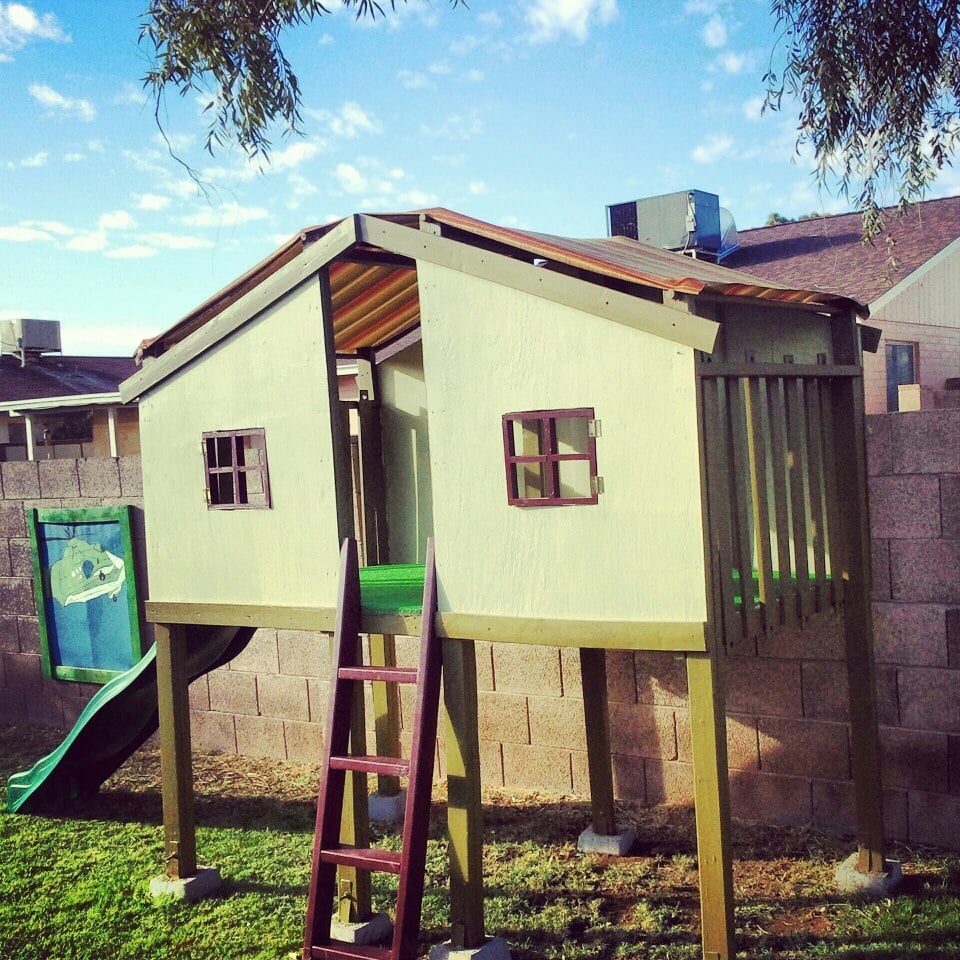
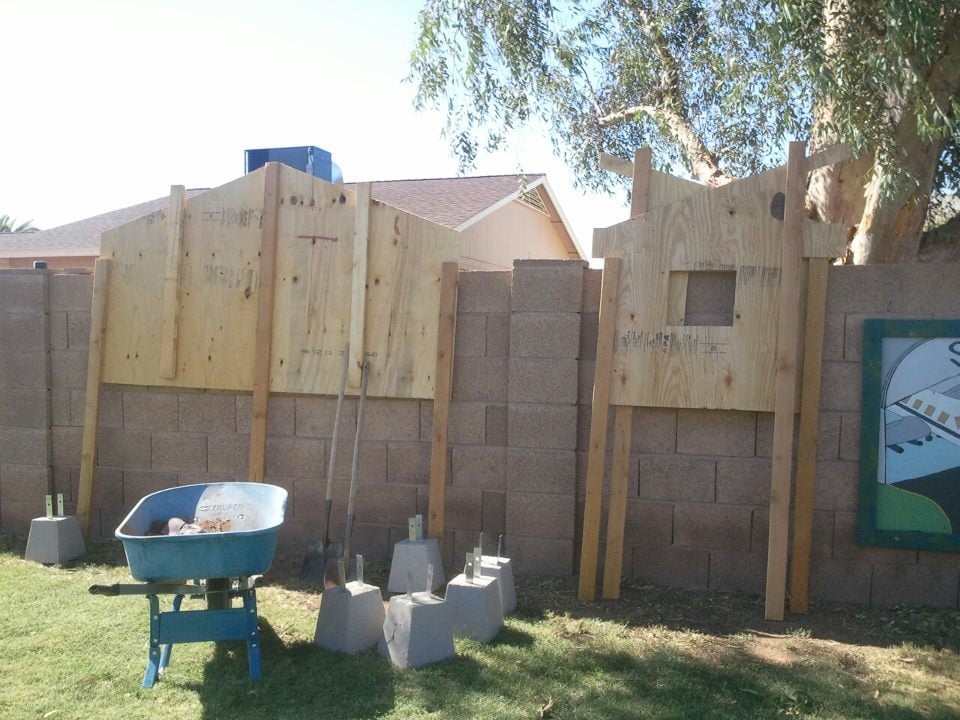
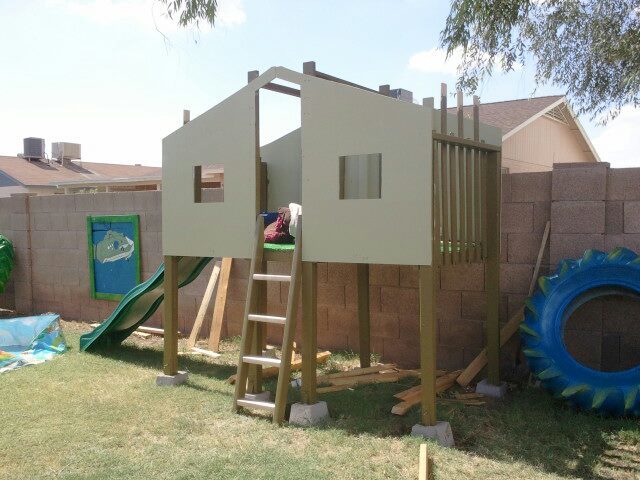
My sons awesome fort. It took some time to complete, as I was doing it on my own. The balancing and juggling act when attaching a few pieces would of made some priceless videos. I used plans from " Clubhouse Bed" as a general guide.
I built the Rustic X Console to store my growing collection of cookbooks. The plans were pretty easy to follow. I really struggled with warped boards!
You can check out my blog entry for more photos and details.
Used this plan as a "practice" platform for a larger version in the future. Very simple yet nice design. I would prefer to hide some pocket holes on the sides to avoid the extra work of plugging them next time. Also, Lauan plywood panels are cost effective way of finishing the back.
This is the final installment (#6) in the doll bed and high chair sets I've been building my great nieces. Each set was decorated with a lamb water-slip decal on the end of the bed (kind of a little theme going). This is the second crib I've built with dowels - I usually use 1" x 2"s - and I learned to use a spade drill bit rather than a regular drill bit. It doesn't split the wood around the holes. I've had a lot of fun building these for my nieces, and now I may have to start building them for my friends' children and grandchildren. :-)
The angles were very challenging. I wanted to replicate the angles of 55 degrees. But of course my saw wouldn't cut them. So I made a quick jig for my miter saw that allowed the supports to be cut on their side just 10 degrees off 45 degrees equaling 55.
I made the wood wine holder as a Christmas gift for my mother-in-law. It's great! I modified the plans a bit by routing the curved edges with a roundover bit. It was a great project for some scrap Fir I had from a bed project.
I have hunted for the perfect dining room bench for my large family but they were either to poorly crafted to withstand my crew, to small, or to pricey. Then I found this site showed the farm house bench to my husband and he said, "Hey I can build that!" and build it he did. He changed a few things here and there but the overall finished bench is AMAZING, and I LOVE IT!!! Thanks Ana!
Followed the plans pretty close on this one.
Fri, 12/19/2014 - 17:34
I really love how this turned out. What stain did you use? Thanks!
I've started building the Triple Printers Console. I haven't quite decided on the color.
In reply to I really love how this turned by handmadewithash
Mon, 12/22/2014 - 18:19
The stain was Cabot's Dark Walnut wood stain.
I absolutely love my rendition of the Fancy X Farmhouse Table (and bench). I took Ana's plans and combined them with some of the details from charmingimperfections.com to create the vision in my mind of exactly what i wanted. The build was not bad at all but the Kreg Jig is a MUST have tool! This was my frst experience with the KREG jig and i am now looking forward to many more DIY Builds! :)
My first end tables, used the Rustic x plan except for the bottom shelf. I used a white chalky paint, with a brown wax to give it the rustic look, and stained the top walnut stain. Working on the coffee table to finish the set.
I was so excited when I saw the plan for this! I love making crates out of wood. It was quick and easy and I already had a cedar fence post! It was less than 30 minutes start to finish! For more pictures check out my blog post. Thanks Ana!
I purchased a harvest table from a local store that sells only solid wood furniture. The store had the option of purchasing a bench. I decided that I could save some cash and make the harvest bench myself.
For details, check out my blog - http://www.woodworkingfourdummies.com/blog/harvest-bench
Cheers,
Ian
We took the plans for the twin headboard modification and added an x brace to make it look like a barn door. We also added a piece to the bottom for additional support for mounting to the boxspring as well as to prevent warping and narrowing of the posts.
My second ever project my wife said I could do followed your plans are use pocket hose after asking about using them and you sent me a link on how to use it. I did not use the X instead my wife wanted me to Make a cross so it would go with the crosses in our living room thanks for the plans.
This took me an afternoon because I have never used a compound mitre saw before so I was teaching myself through trial & error.
It was really fun to try and I will definitly be making more!
I used 1x6 cypress wood for the top as well as middle and bottom shelves. This wood was given to me from my in-laws and came from an old corn crib that was torn down on their farm. The remaining 2x2's, 2x4's, corner brackets and screws were picked up as used or broken pieces from a local Habitat for Humanity Re-Store. I also picked up the tung oil I finished with from the same place. The pics show the various stages of build from the initial raw pieces that had been planed/sanded to using Hillary's tea and vinegar oxidation; after a good bit of tung oil was used; finally right before I gave it away as a Christmas gift. I had never worked with old cypress wood previously and was very impressed with how it accepted the oxidation (nice and light) as well as the oil finish. I preserved the old nail holes in the wood as much as possible and you might even notice I left some the white paint from the old corn crib that was on the end of one piece. Great plans - fun little project!
We struggled with the angles because we made the table bigger than this tutorial suggests but all in all, awesome build.
Thanks so much for the plans to build the sweet pea bunk bed.
It was just the ticket.
My little girl loves it, we used glitter paint and used some to replicate the stars and night sky on the lower bunk ceiling
We made a little ladder only because of space (or lack of) and will make the shutters and drawers at a later date.
Many thanks.
Dan, Alena and Leonie
I duplicated this plan from Ann White's Smiling Mudroom Plan. My space was not as deep and was longer than the original plans, so we modified the plans to fit our space. . I liked the idea of a thicker seat that another person used, so we incorporated that. Materials cost us about $200 to make it. Thank you for the inspiration. I love it!
Tue, 02/19/2013 - 16:36
This is a beautiful, yet practical build. The empty space pictured is just begging to be filled. I especially like the wall color and the trim just above the seats that is repeated with the coat hangers. Great work - love it!
Tue, 02/19/2013 - 18:52
Phenomenal !!! Looks great. LOVE the colours too. what wood did you use?
Fun build. Took me a few weeks but enjoyed it. Gave a ton of storage for my sons room.
Comments
Linda7
Fri, 02/08/2013 - 17:39
Fantastic!!
You did this all by yourself??? This is just fantastic...lucky little boy!!
In reply to Fantastic!! by Linda7
moms got this
Sat, 02/09/2013 - 07:55
I did.. Thank you so much
spiceylg
Mon, 02/11/2013 - 06:28
Wowsa!
I'm seriously impressed you did this by yourself. Not that you aren't able, but the fact that there are so many big pieces which would have been really awkward and cumbersome with just one person. Beautiful job! Love the screen name, too, definitely fits!
spiceylg
Mon, 02/11/2013 - 06:28
Wowsa!
I'm seriously impressed you did this by yourself. Not that you aren't able, but the fact that there are so many big pieces which would have been really awkward and cumbersome with just one person. Beautiful job! Love the screen name, too, definitely fits!
In reply to Wowsa! by spiceylg
moms got this
Tue, 02/12/2013 - 08:05
thank you so much.. thank
thank you so much.. thank goodness I had a toddler trampoline to help hold at times as well as a ladder that allows me to pick its height and hold the floor up for me to at least get the bottom on
mairene
Wed, 07/31/2013 - 18:23
This clubhouse design is
nice.
Kateglez
Wed, 09/25/2013 - 08:36
Clubhouse
You did a great job, mom! Are there any plans available? I would like to try and build this for my 10 yr old grandson. Did you sink the posts, or are they only attached to the blocks?