Community Brag Posts
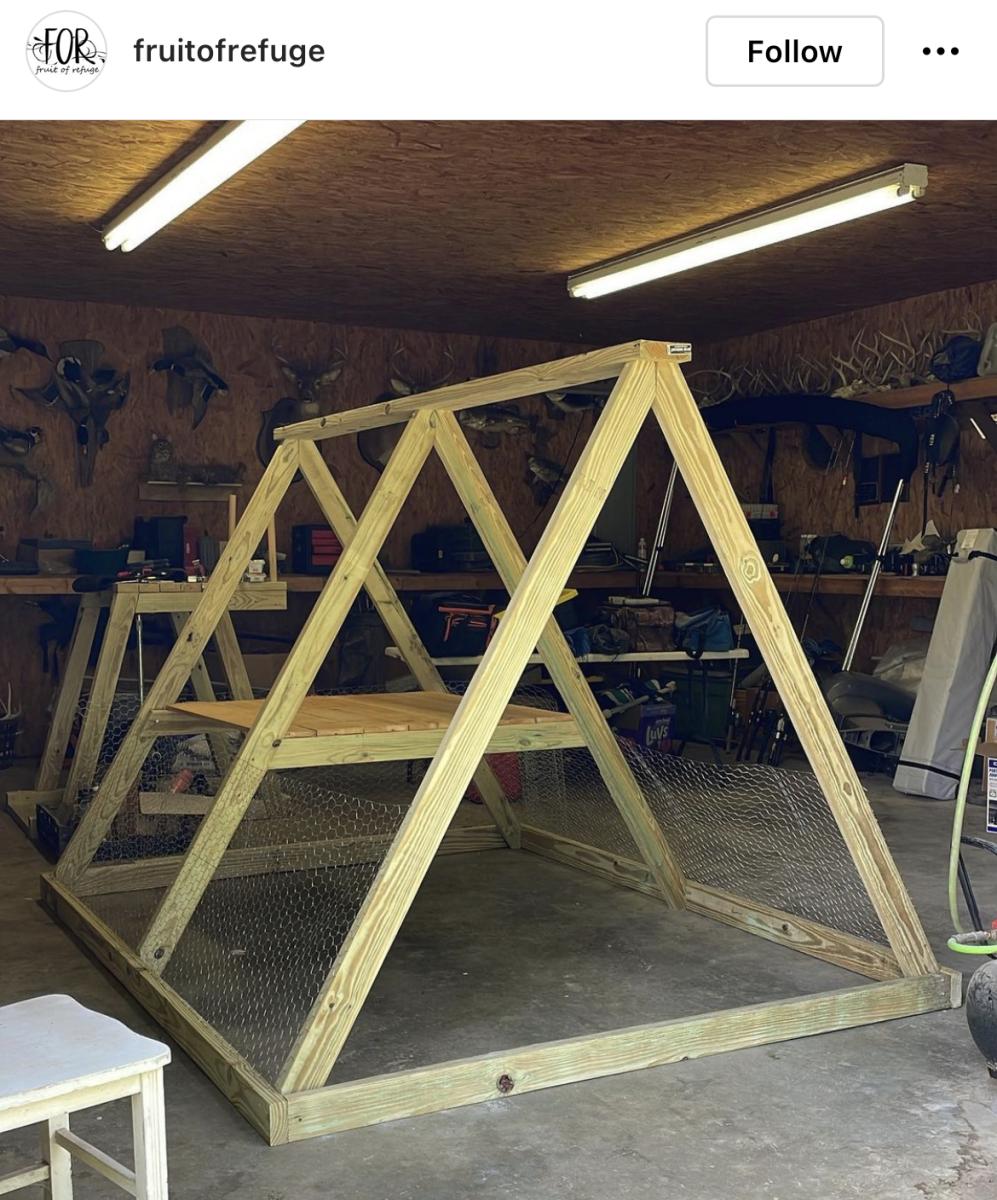
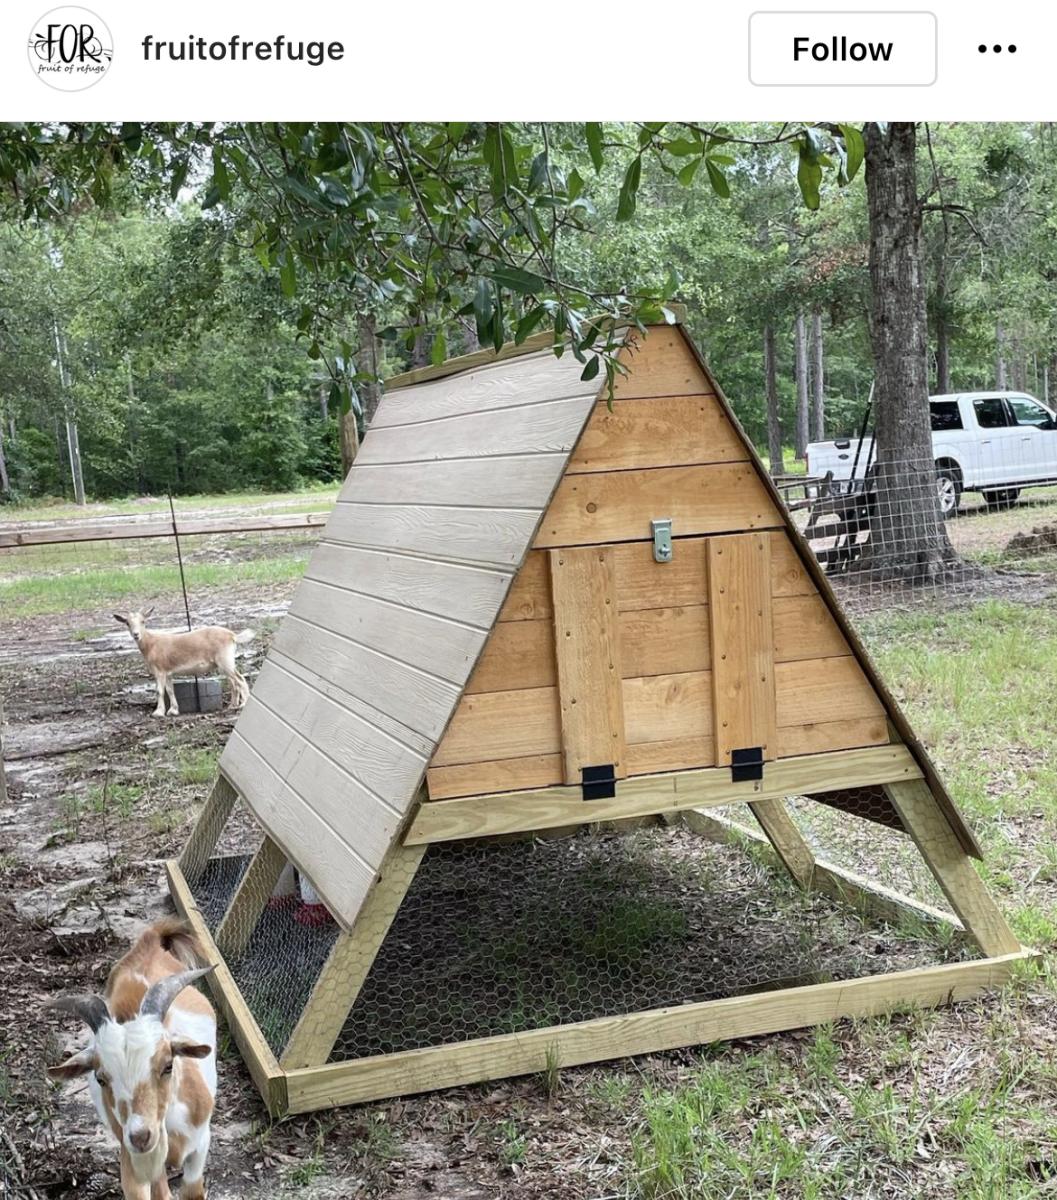
Chicken Coop
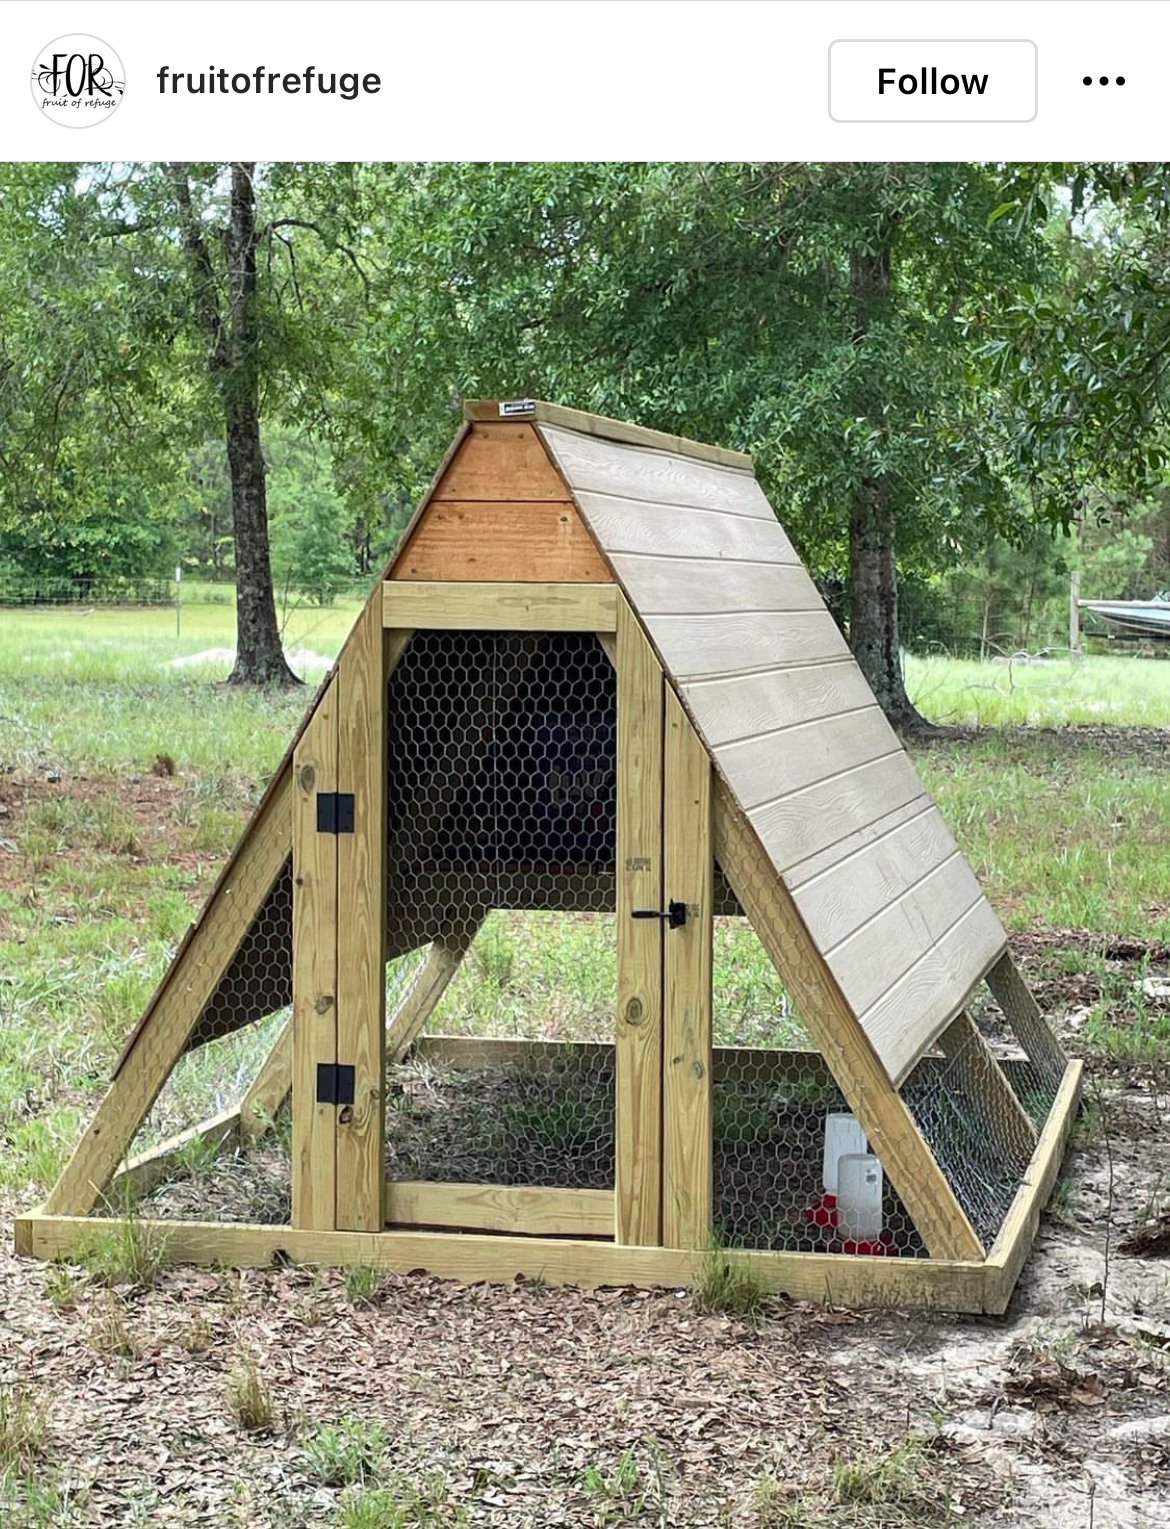
Great for a small flock of 5 or less.

Built from Plan(s)
Comments
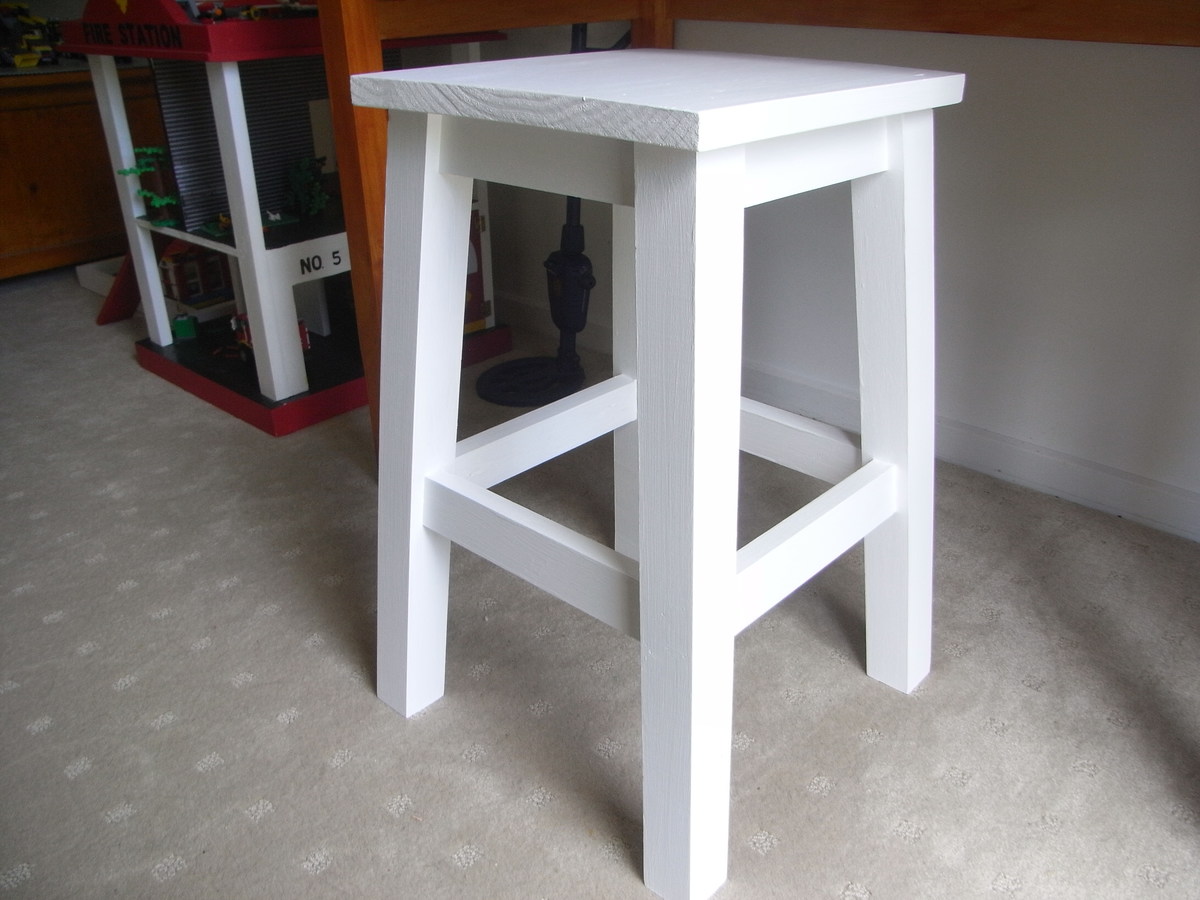
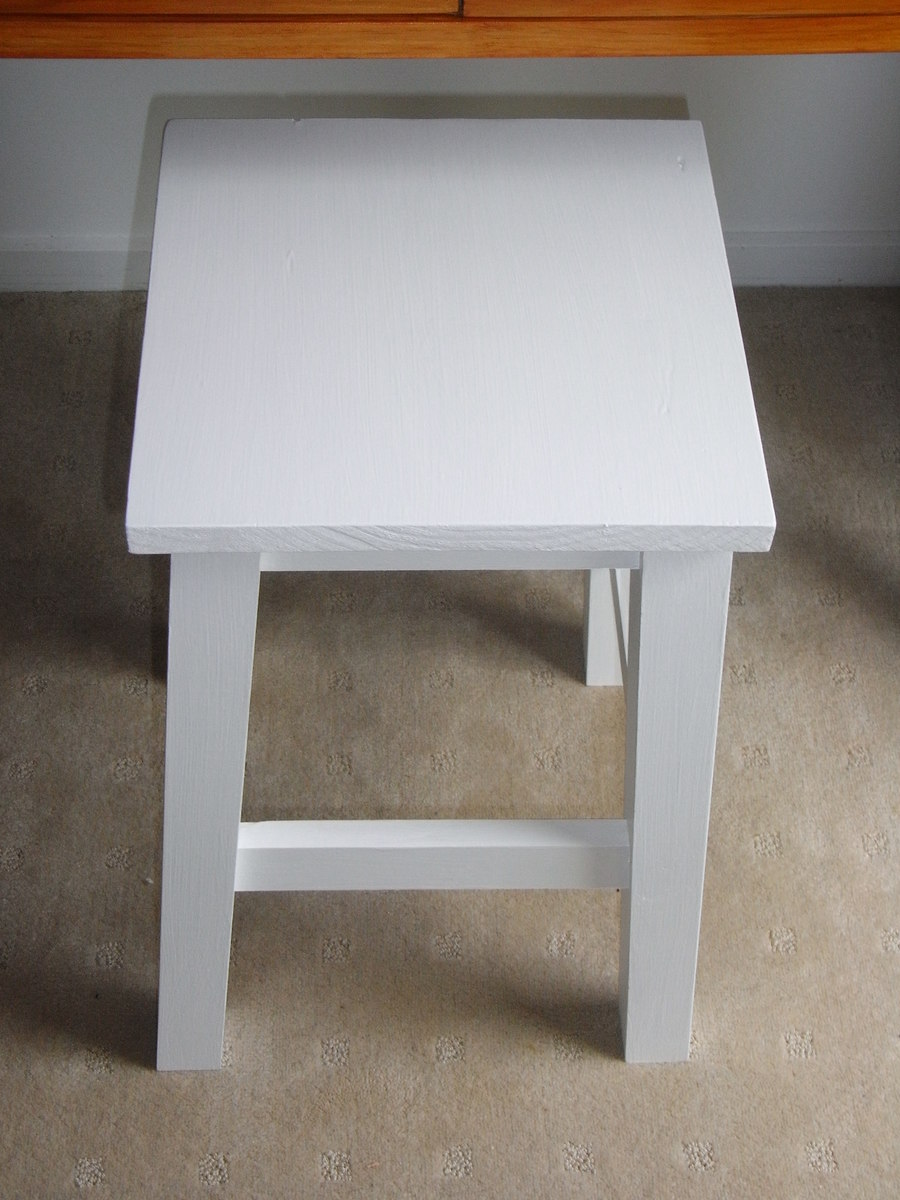
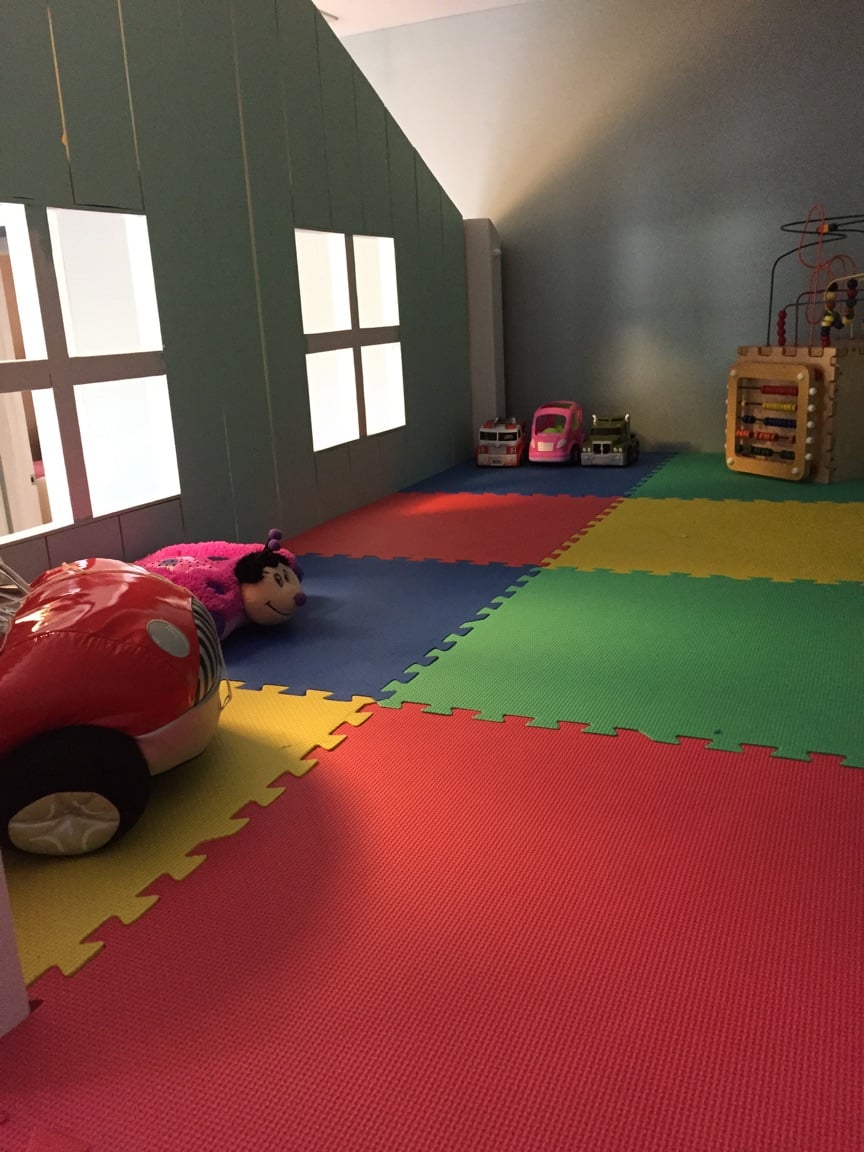
simple stool

I shortened the legs to 20 inches and left the lower rung off.
It lives in the playroom and is just the right height for our sons desk.
Built from Plan(s)
Estimated Time Investment
An Hour or Two (0-2 Hours)
Recommended Skill Level
Starter Project
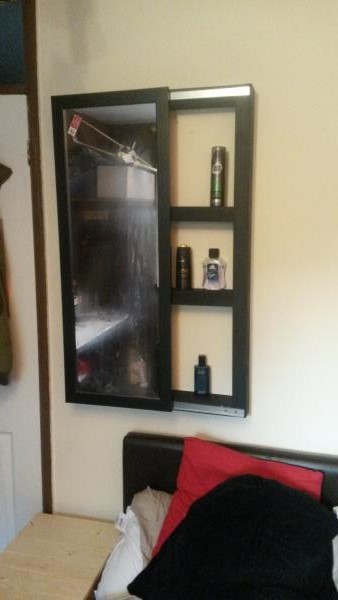
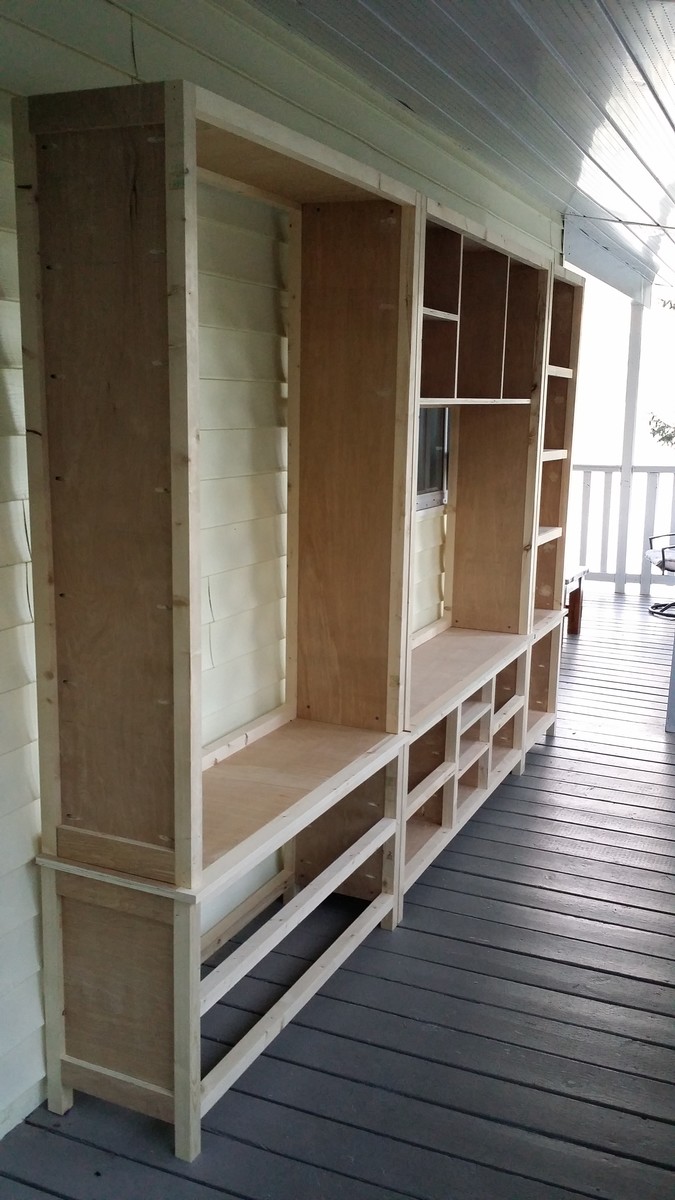
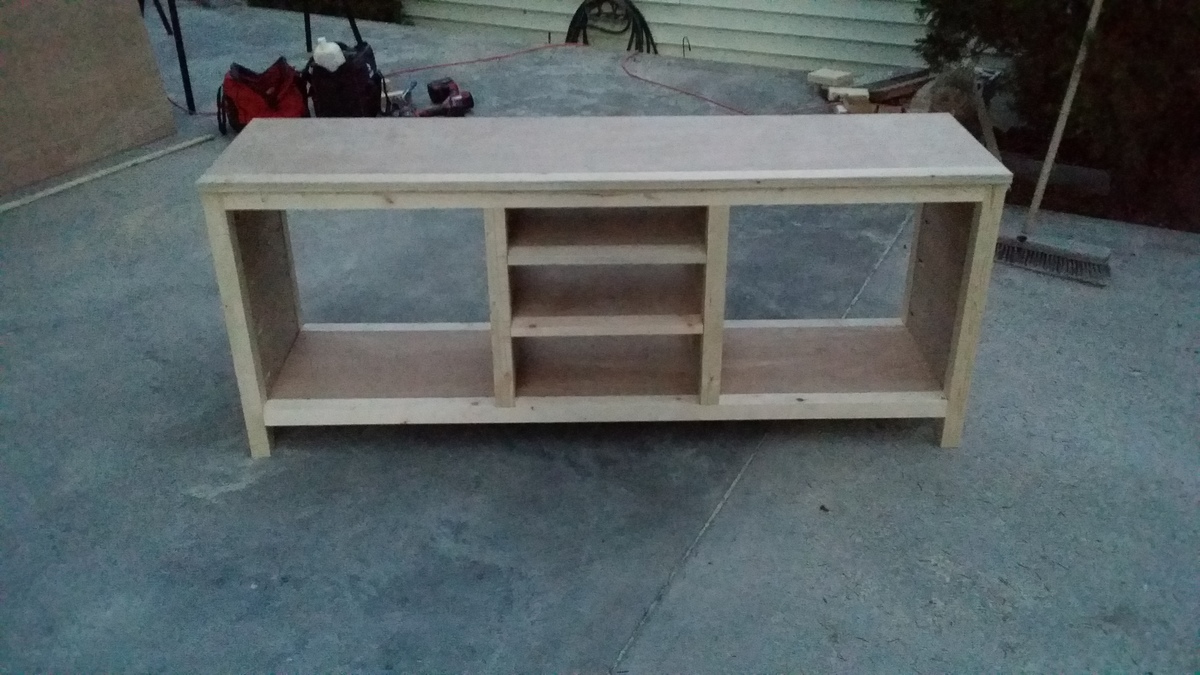
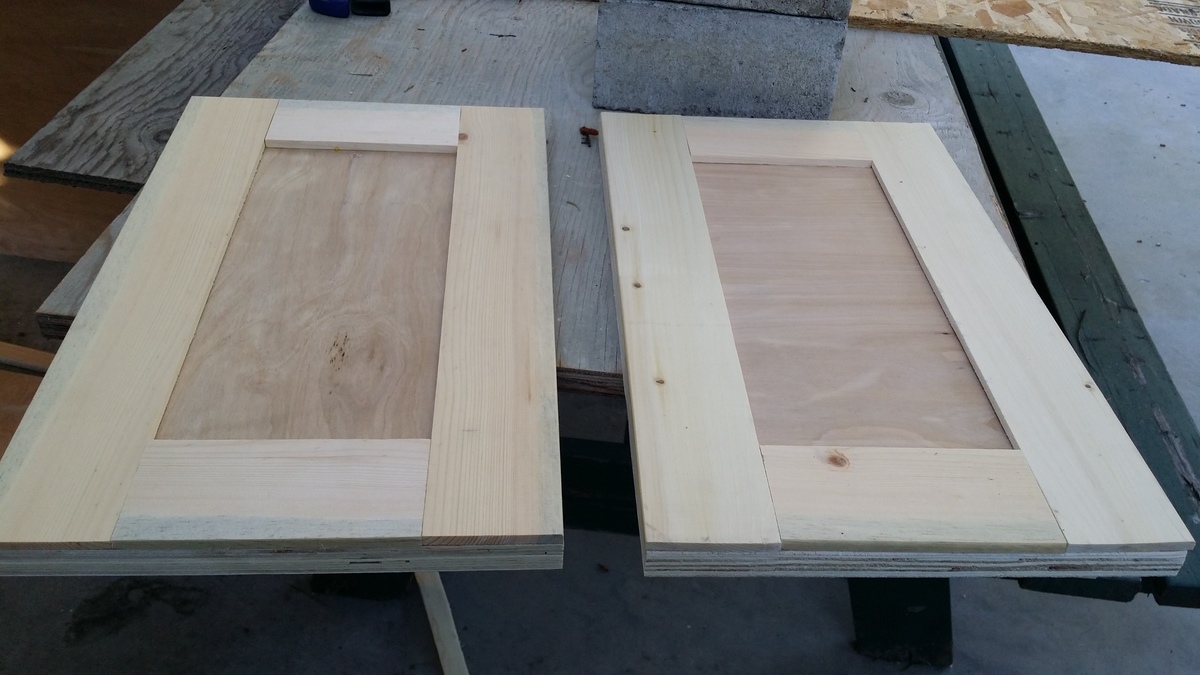
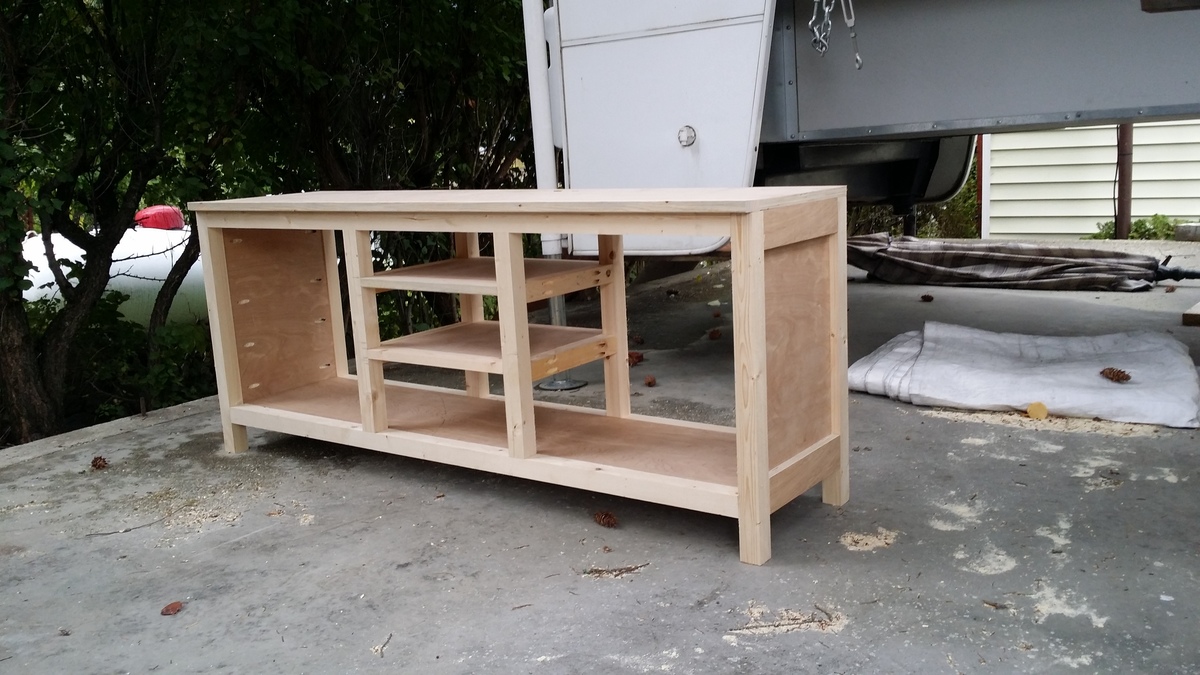
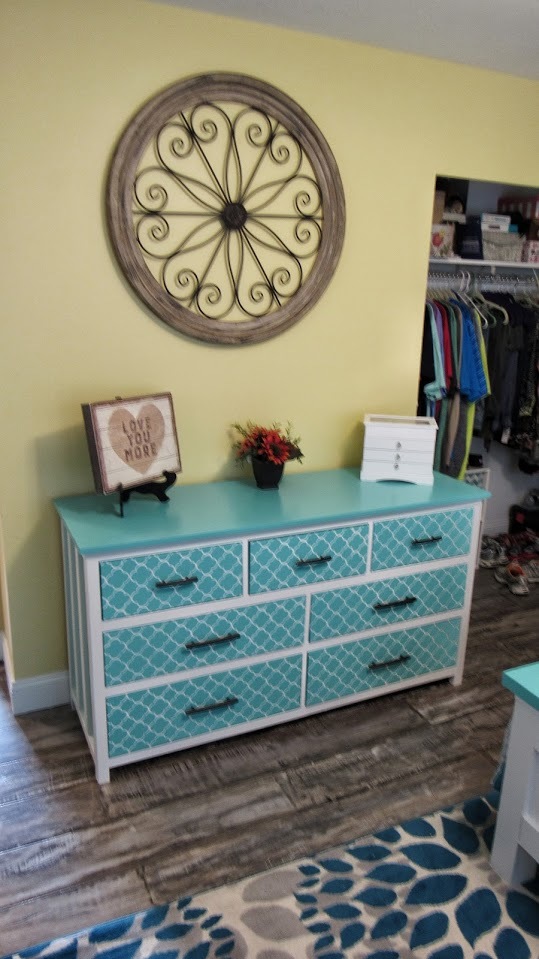
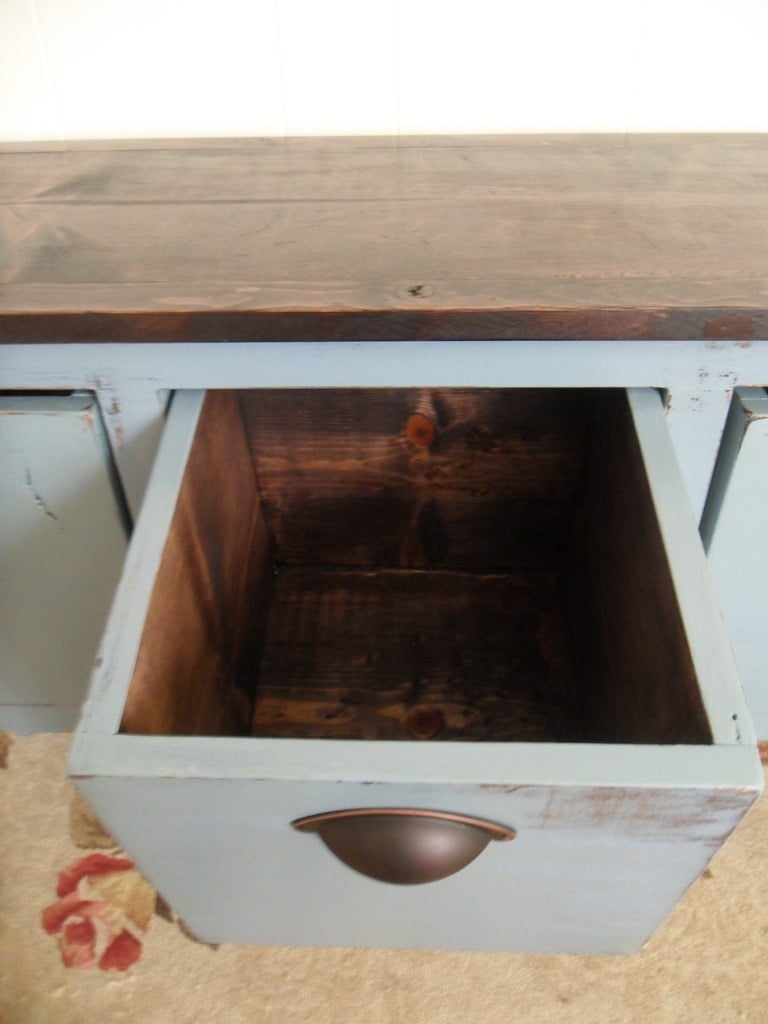
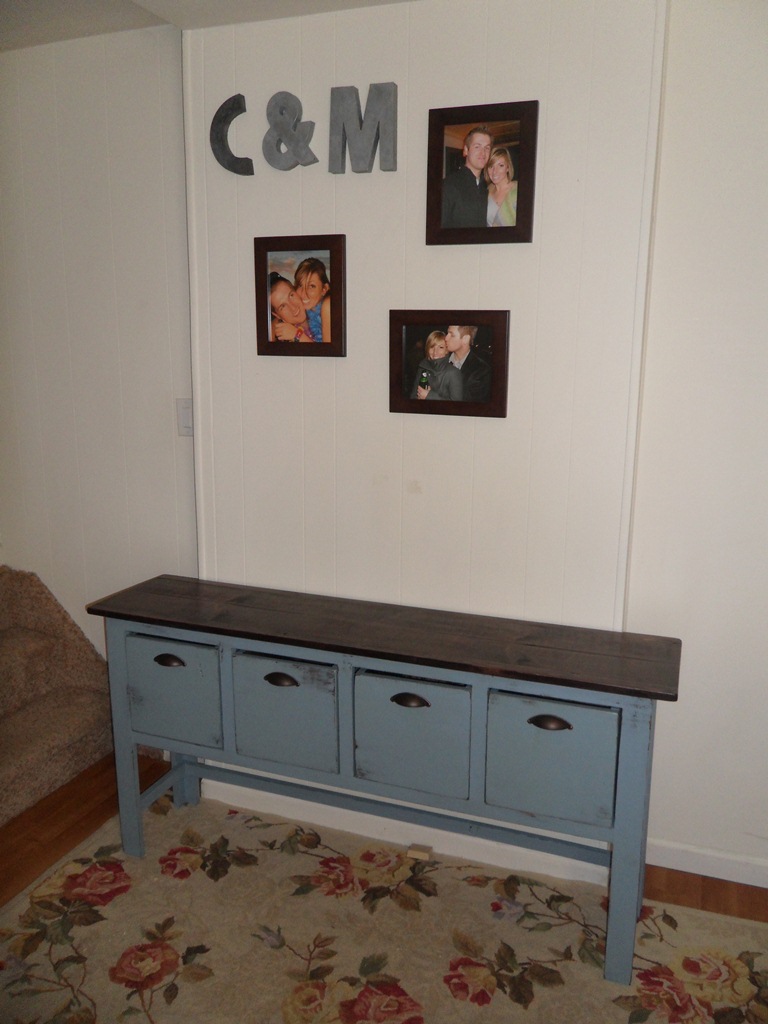
Media and Storage unit
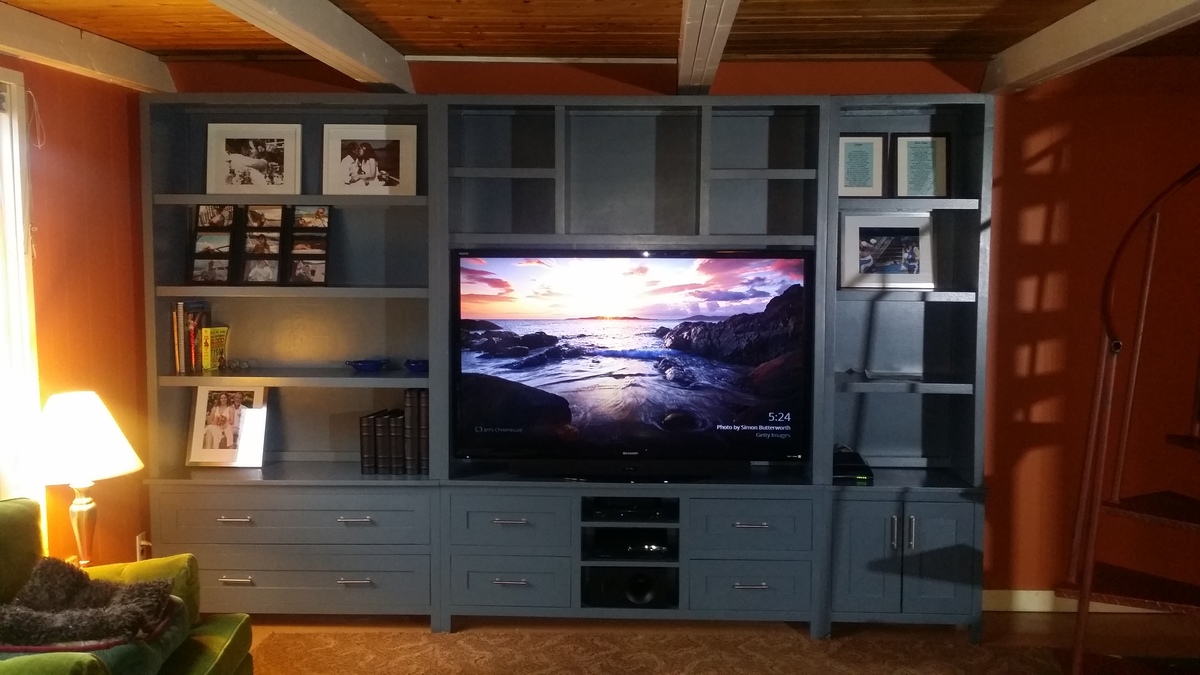
I followed the basic plans but adapted it to fit in my cabin. The whole unit is 82" high by 126" wide. I also put in more drawers and made the fronts in a shaker style. I used 2x4's that I ripped down to 2x2's and 3/4 inch birch plywood. I trimmed out the birch with 1" pine boards. I sanded the whole unit, primed with an oil primer and painted 2 coats of latex from General Paint in Grayling. I don't know how many hours I put into it. A lot. Probably around 80. Mostly by myself. My husband helped with getting the 4x8 sheets of plywood through the table saw and occaisonally when I needed a 3rd hand to pursuade some wood to do my bidding. I love how it turned out. Tons of much needed storage in my cabin.
Built from Plan(s)
Estimated Cost
Wood, screws, sandpaper, primer and paint. Approximately $600. I'm in BC Canada. Most things cost more.
Estimated Time Investment
Week Long Project (20 Hours or More)
Finish Used
Oil primer and latex paint from General Paint. Colour Grayling.
Recommended Skill Level
Intermediate
Comments
Mon, 10/12/2015 - 12:08
Impressive Build!
That looks fantastic, love all of the storage! Thanks for sharing!
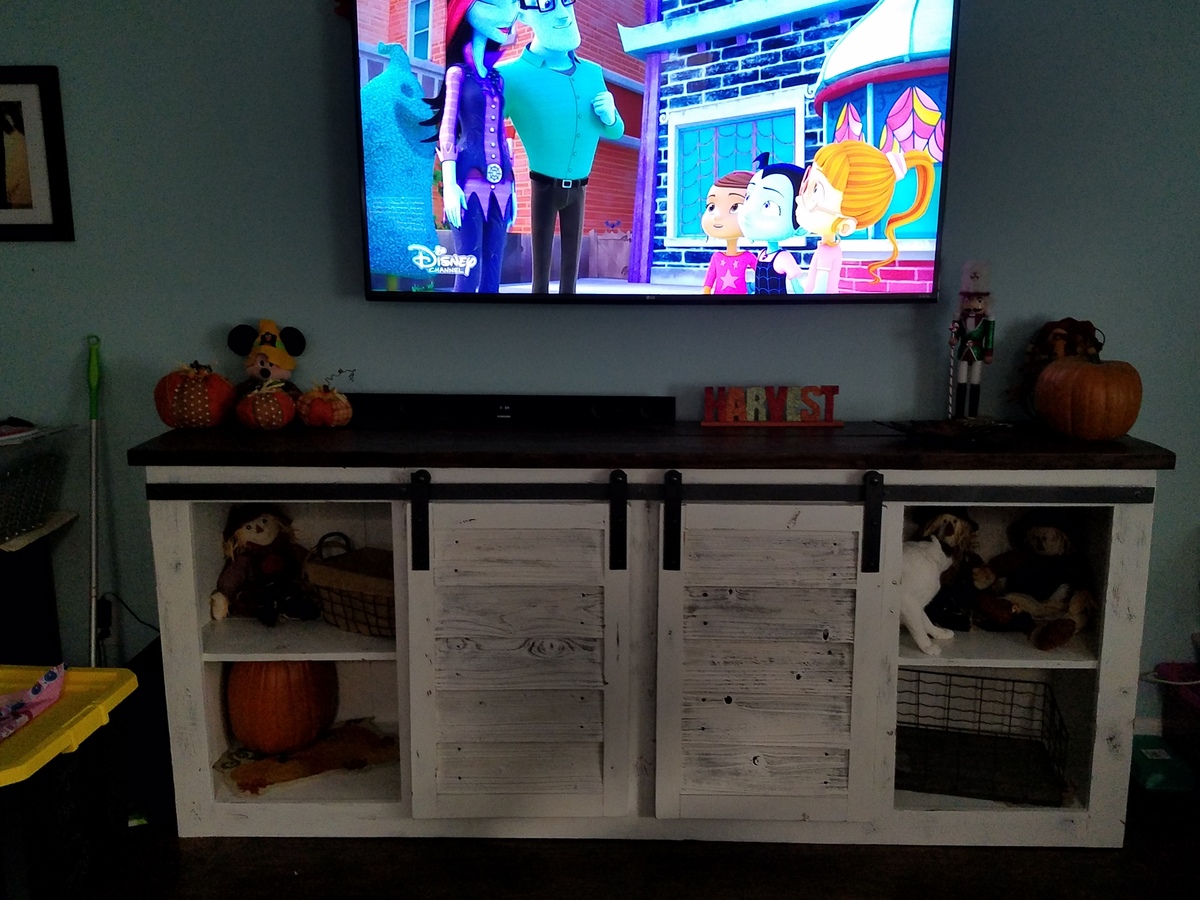
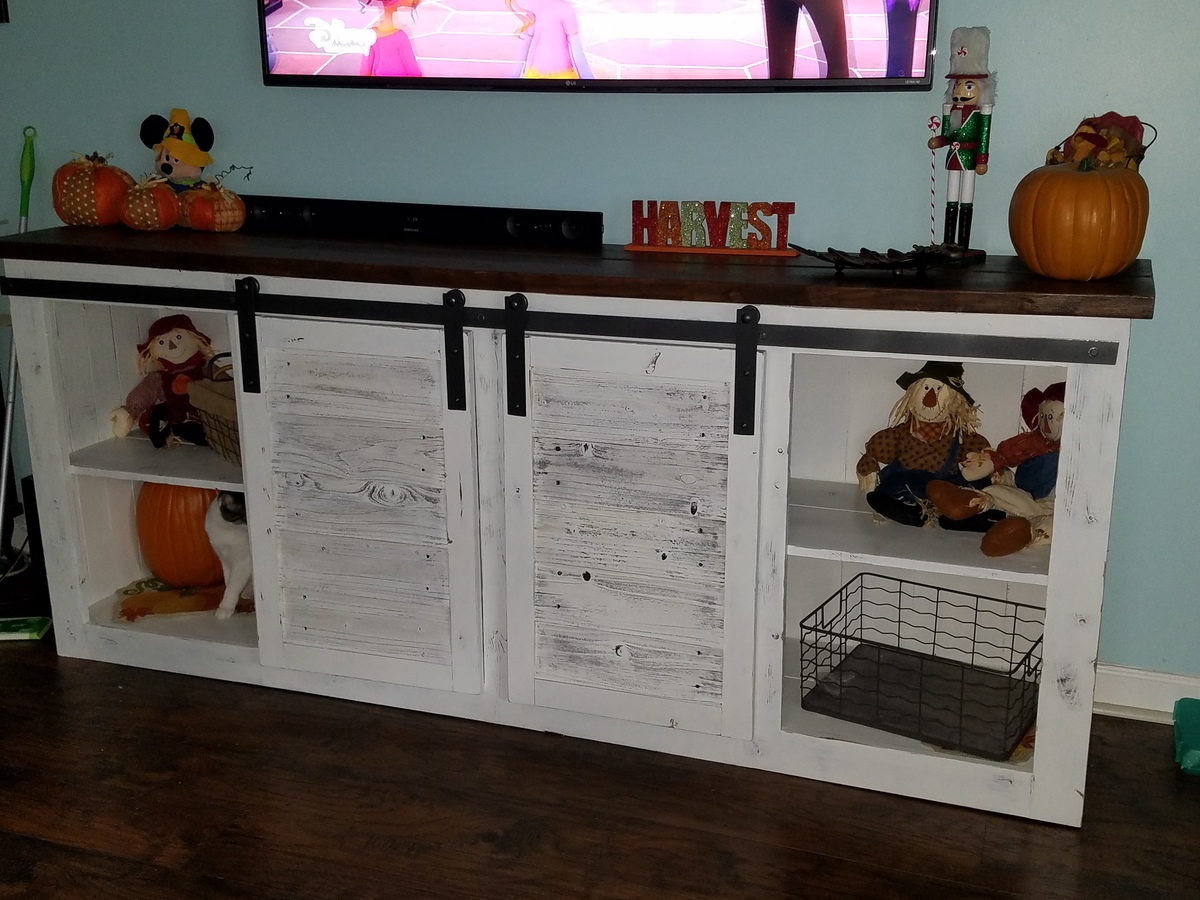
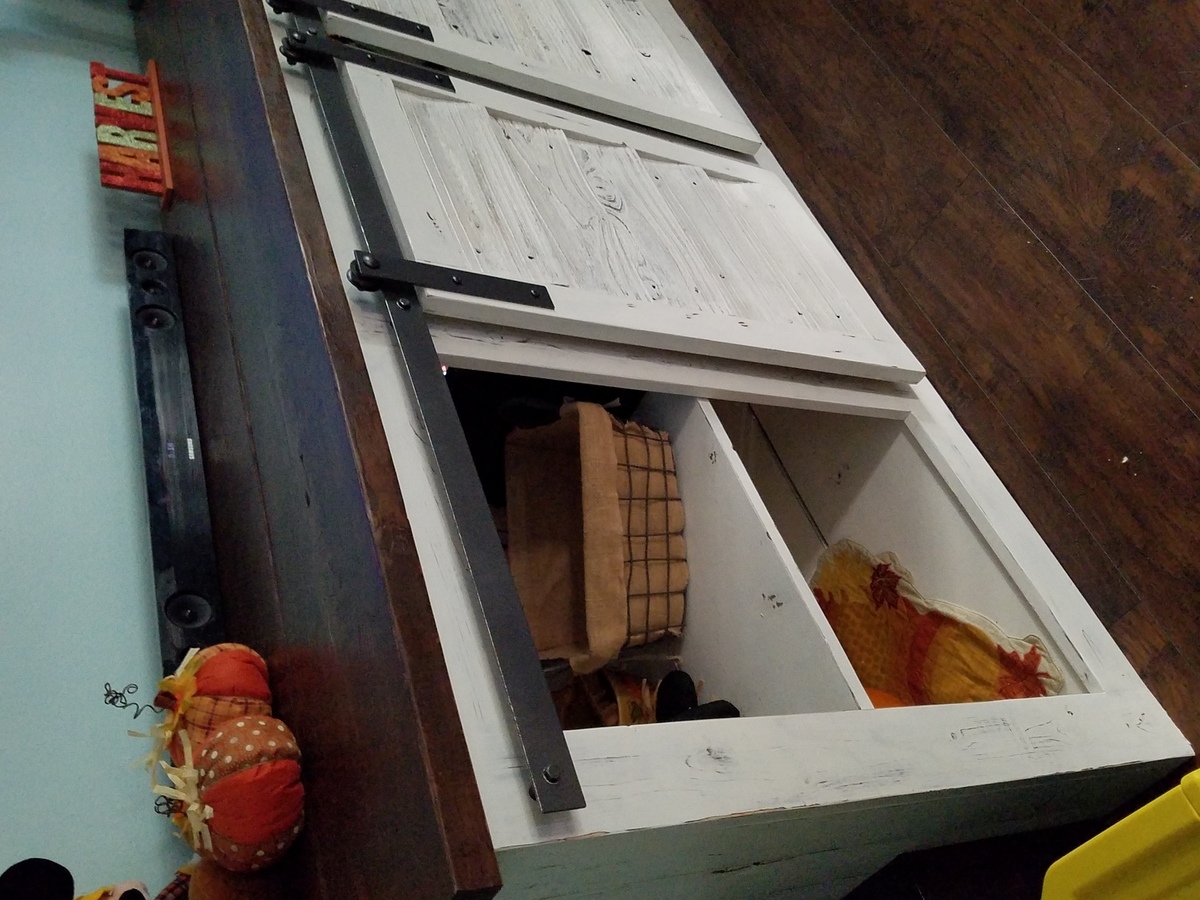
Modified Wide Cabin Dresser
We modified these plans to make this, liked the sides.
Built from Plan(s)
Estimated Time Investment
Week Long Project (20 Hours or More)
Recommended Skill Level
Intermediate
Comments

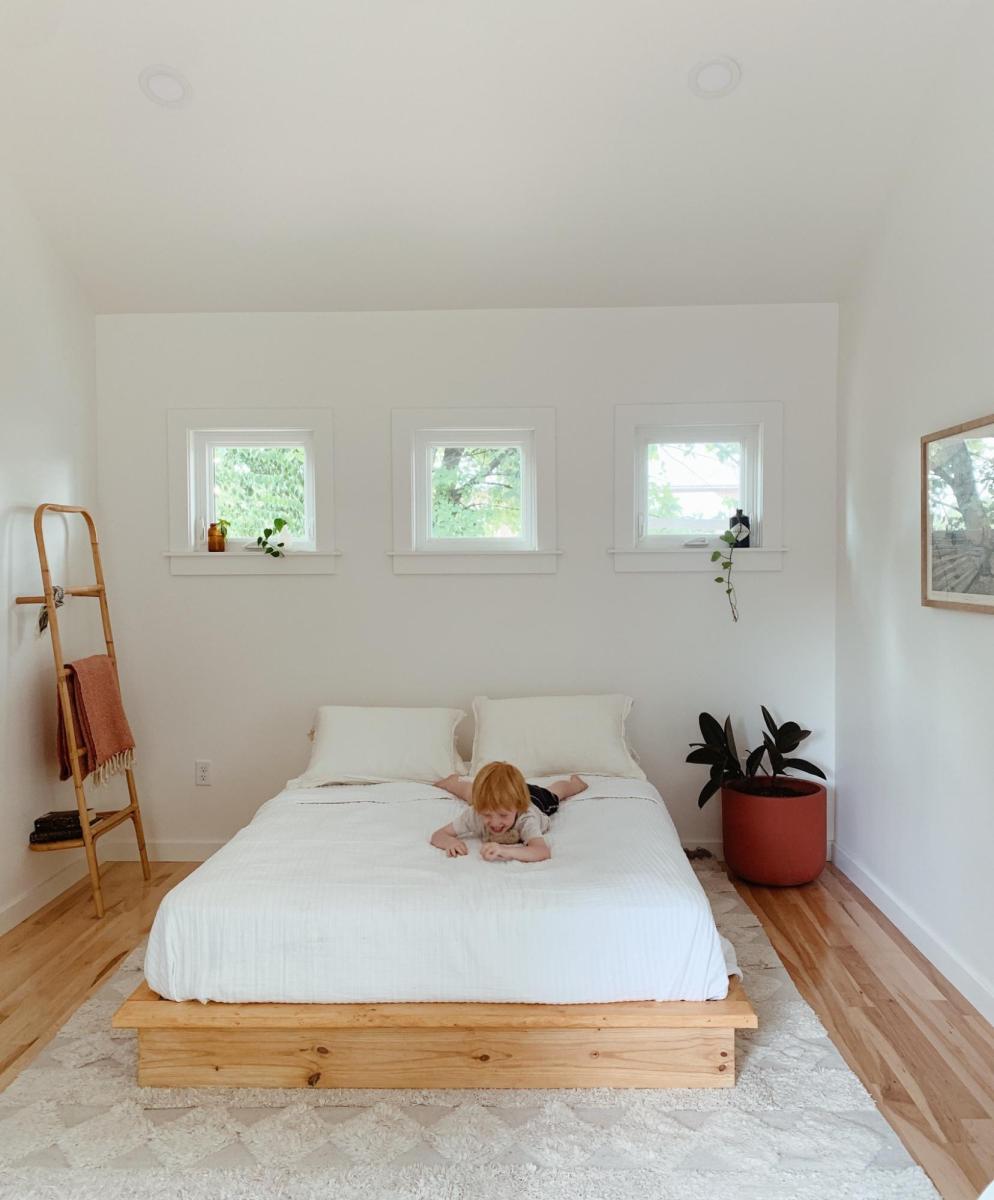
Finally Built a Platform Bed!
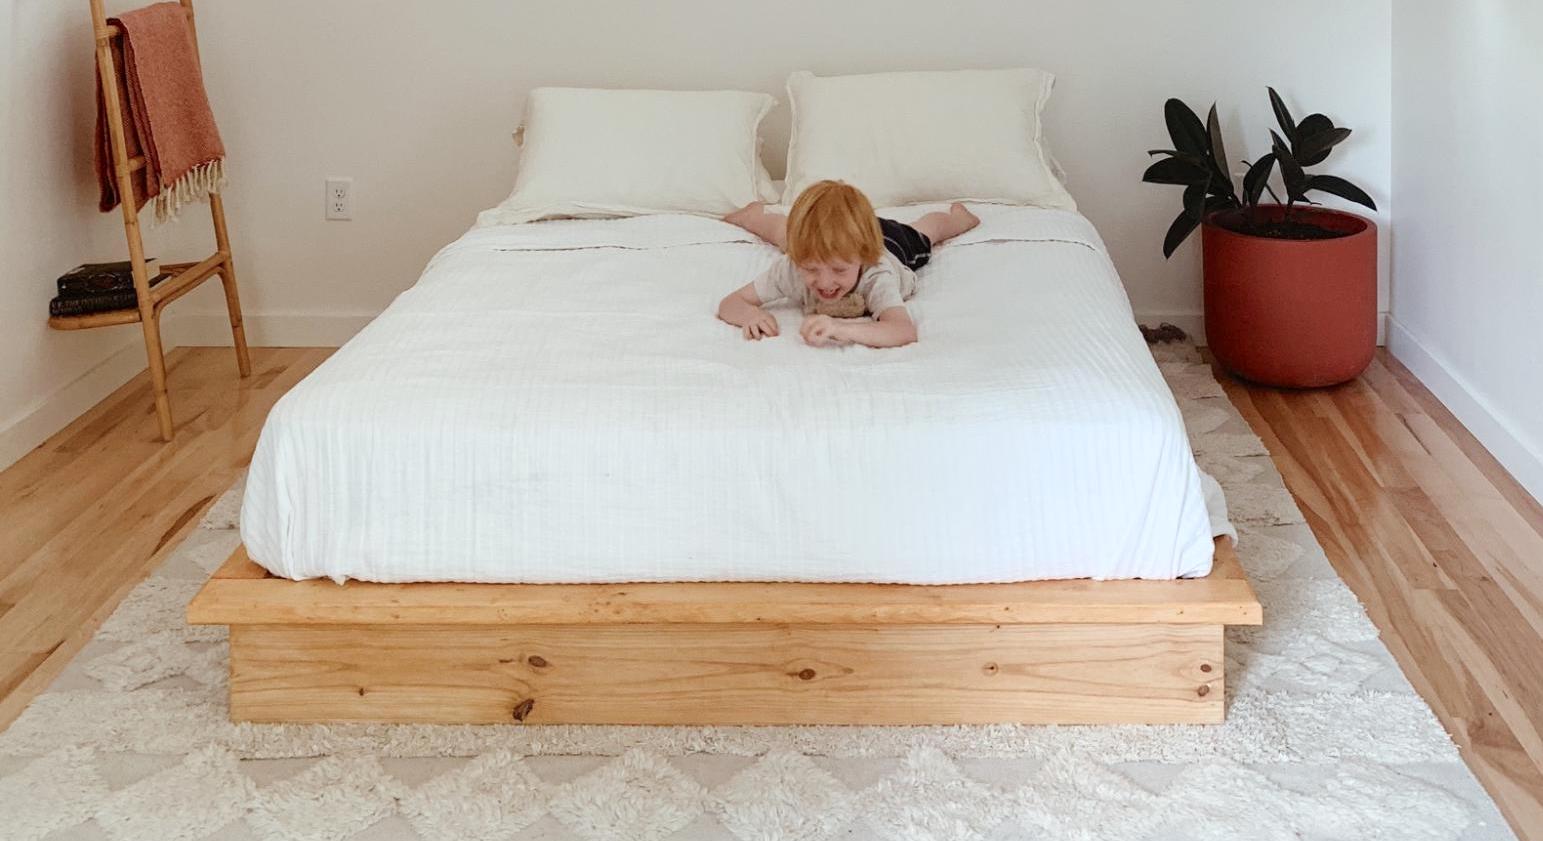
I've been wanting to build this bed for awhile and finally got around to it. I made a few small changes to the plans:
-I used 2x8's instead of 2x6s, so it wouldn't be so low to the ground.
-I ripped 3/8" off of the 2x8 supports in the middle so the mattress would nest inside the frame and not slide around
-I didn't add the headboard because it seemed a bit chunky/rustic for my taste. I will come back and do something else for the headboard. Maybe a cool paneled wall with built in sconces? We'll see!
Love these plans though, appreciate it!
Built from Plan(s)
Comments
Mon, 07/25/2022 - 21:44
Great bed!
Love the look and your mods, well done! Thank you so much for sharing.
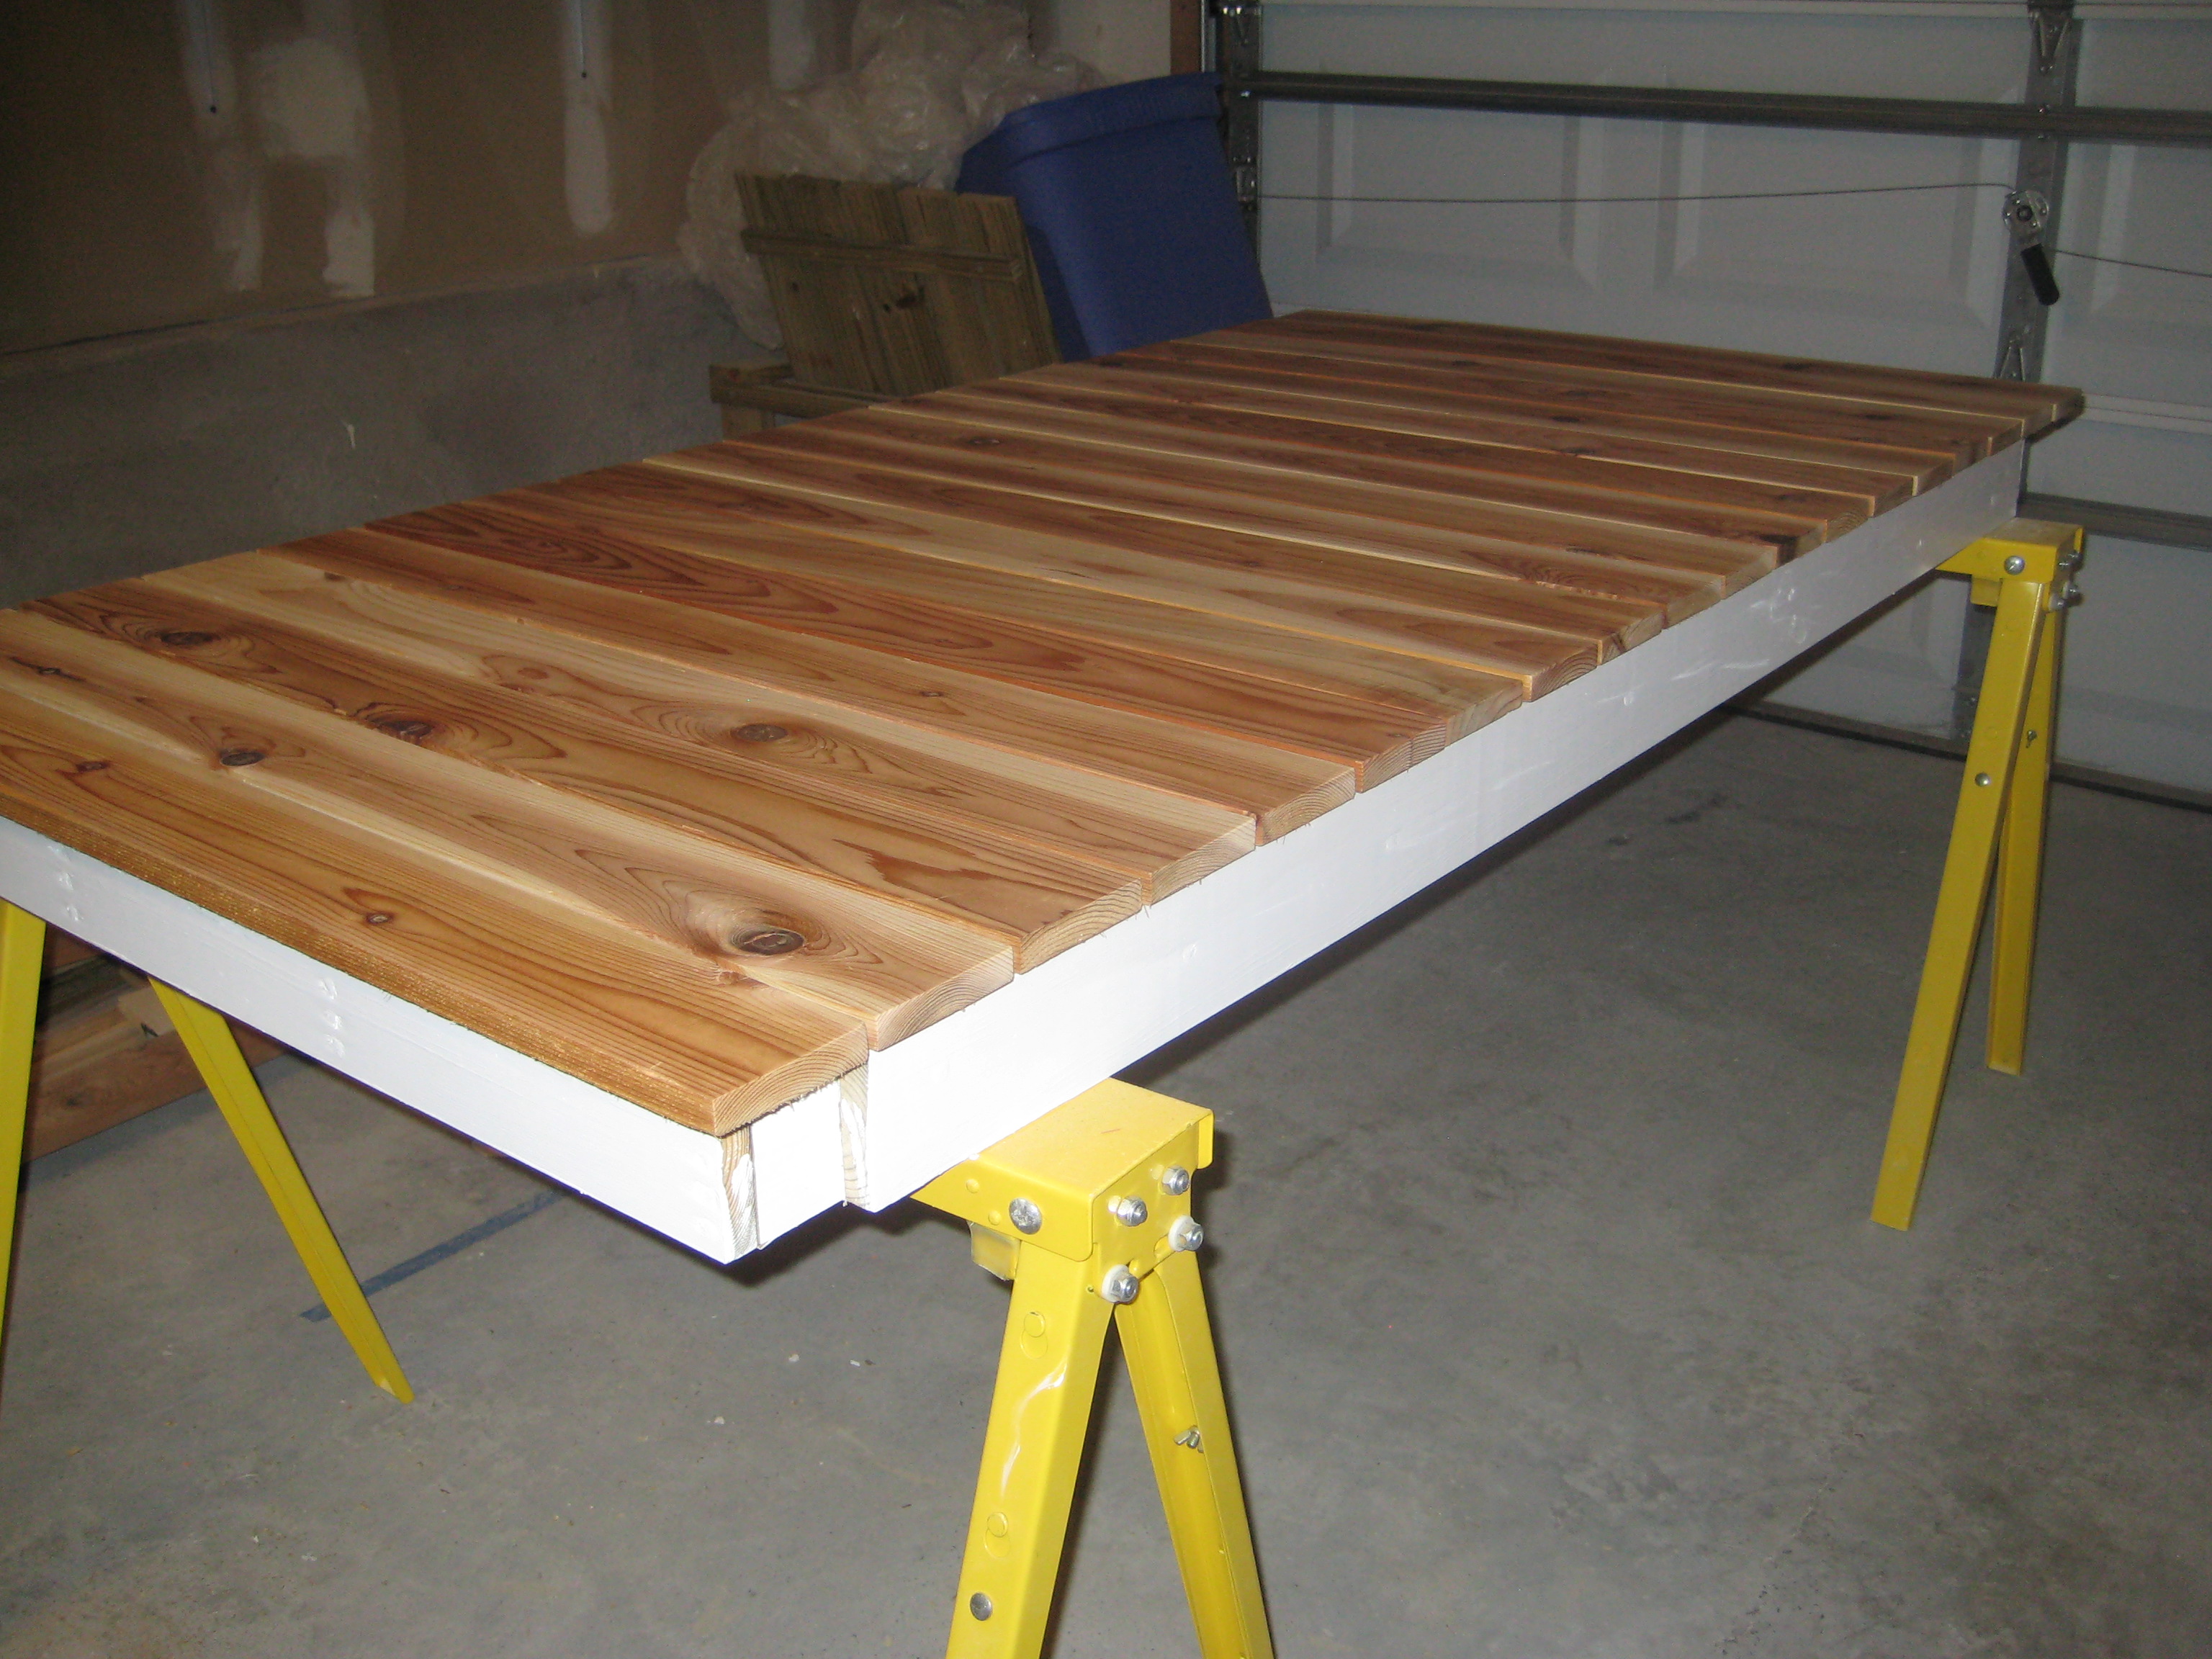
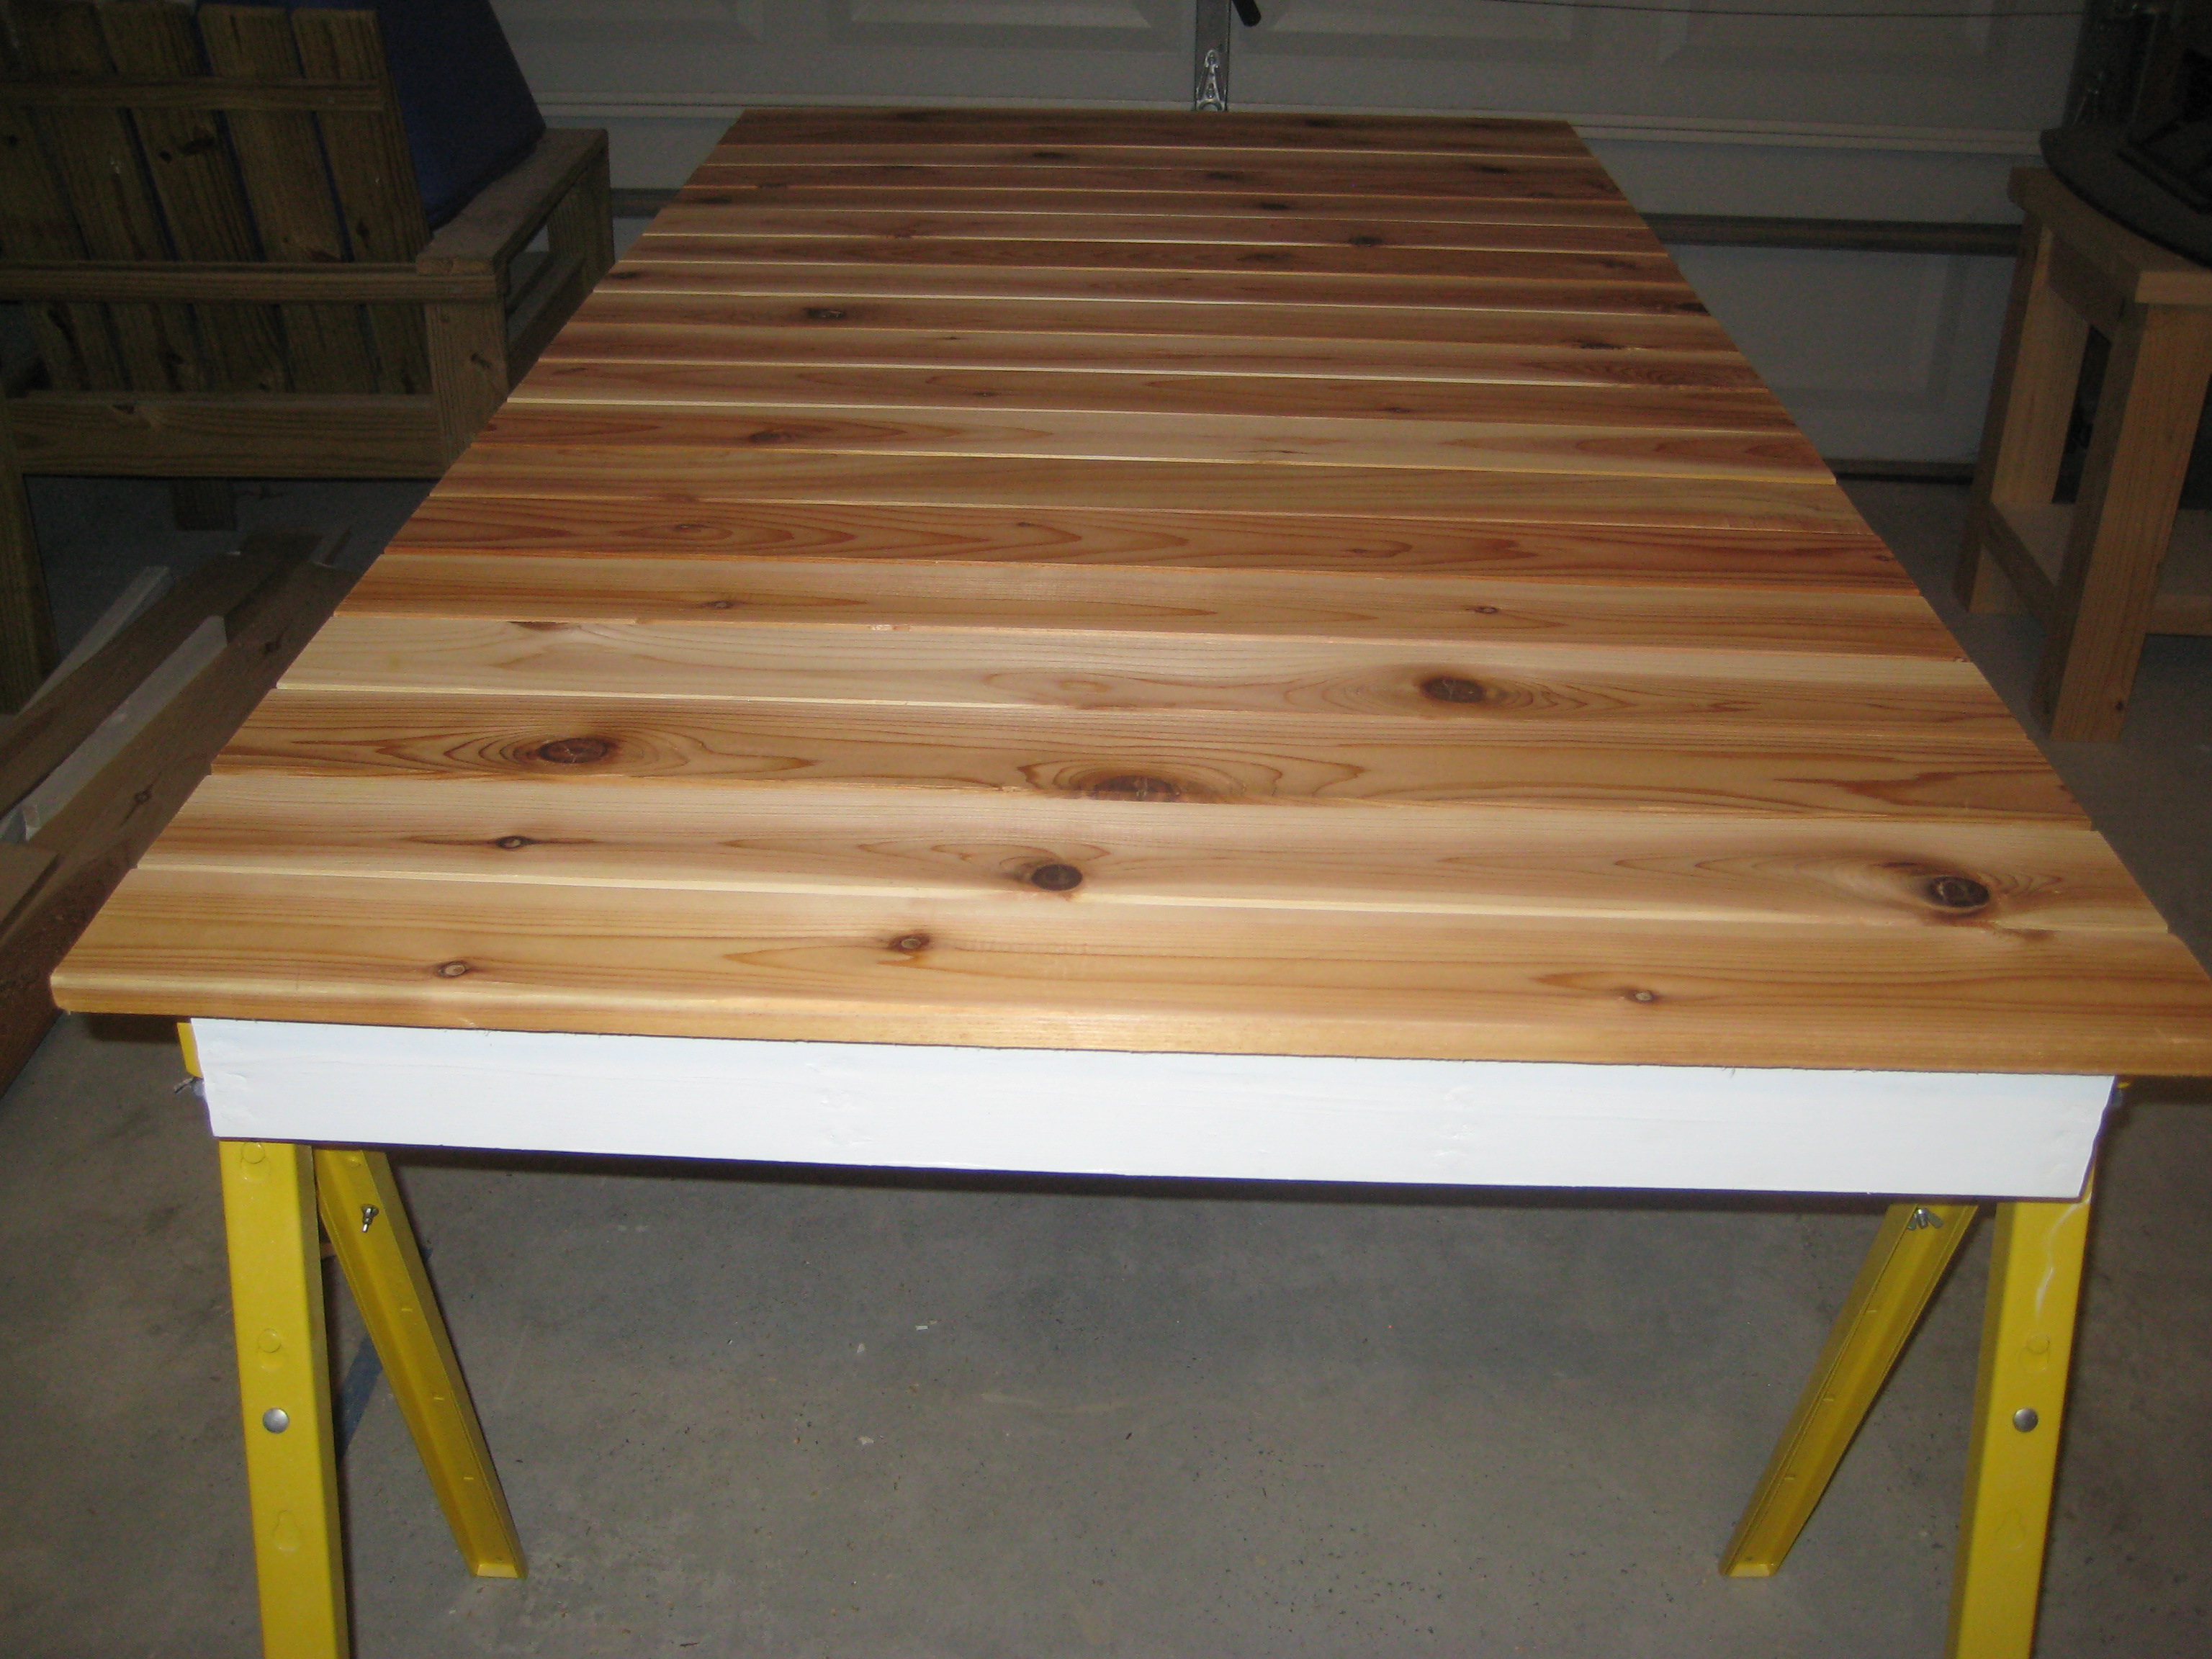
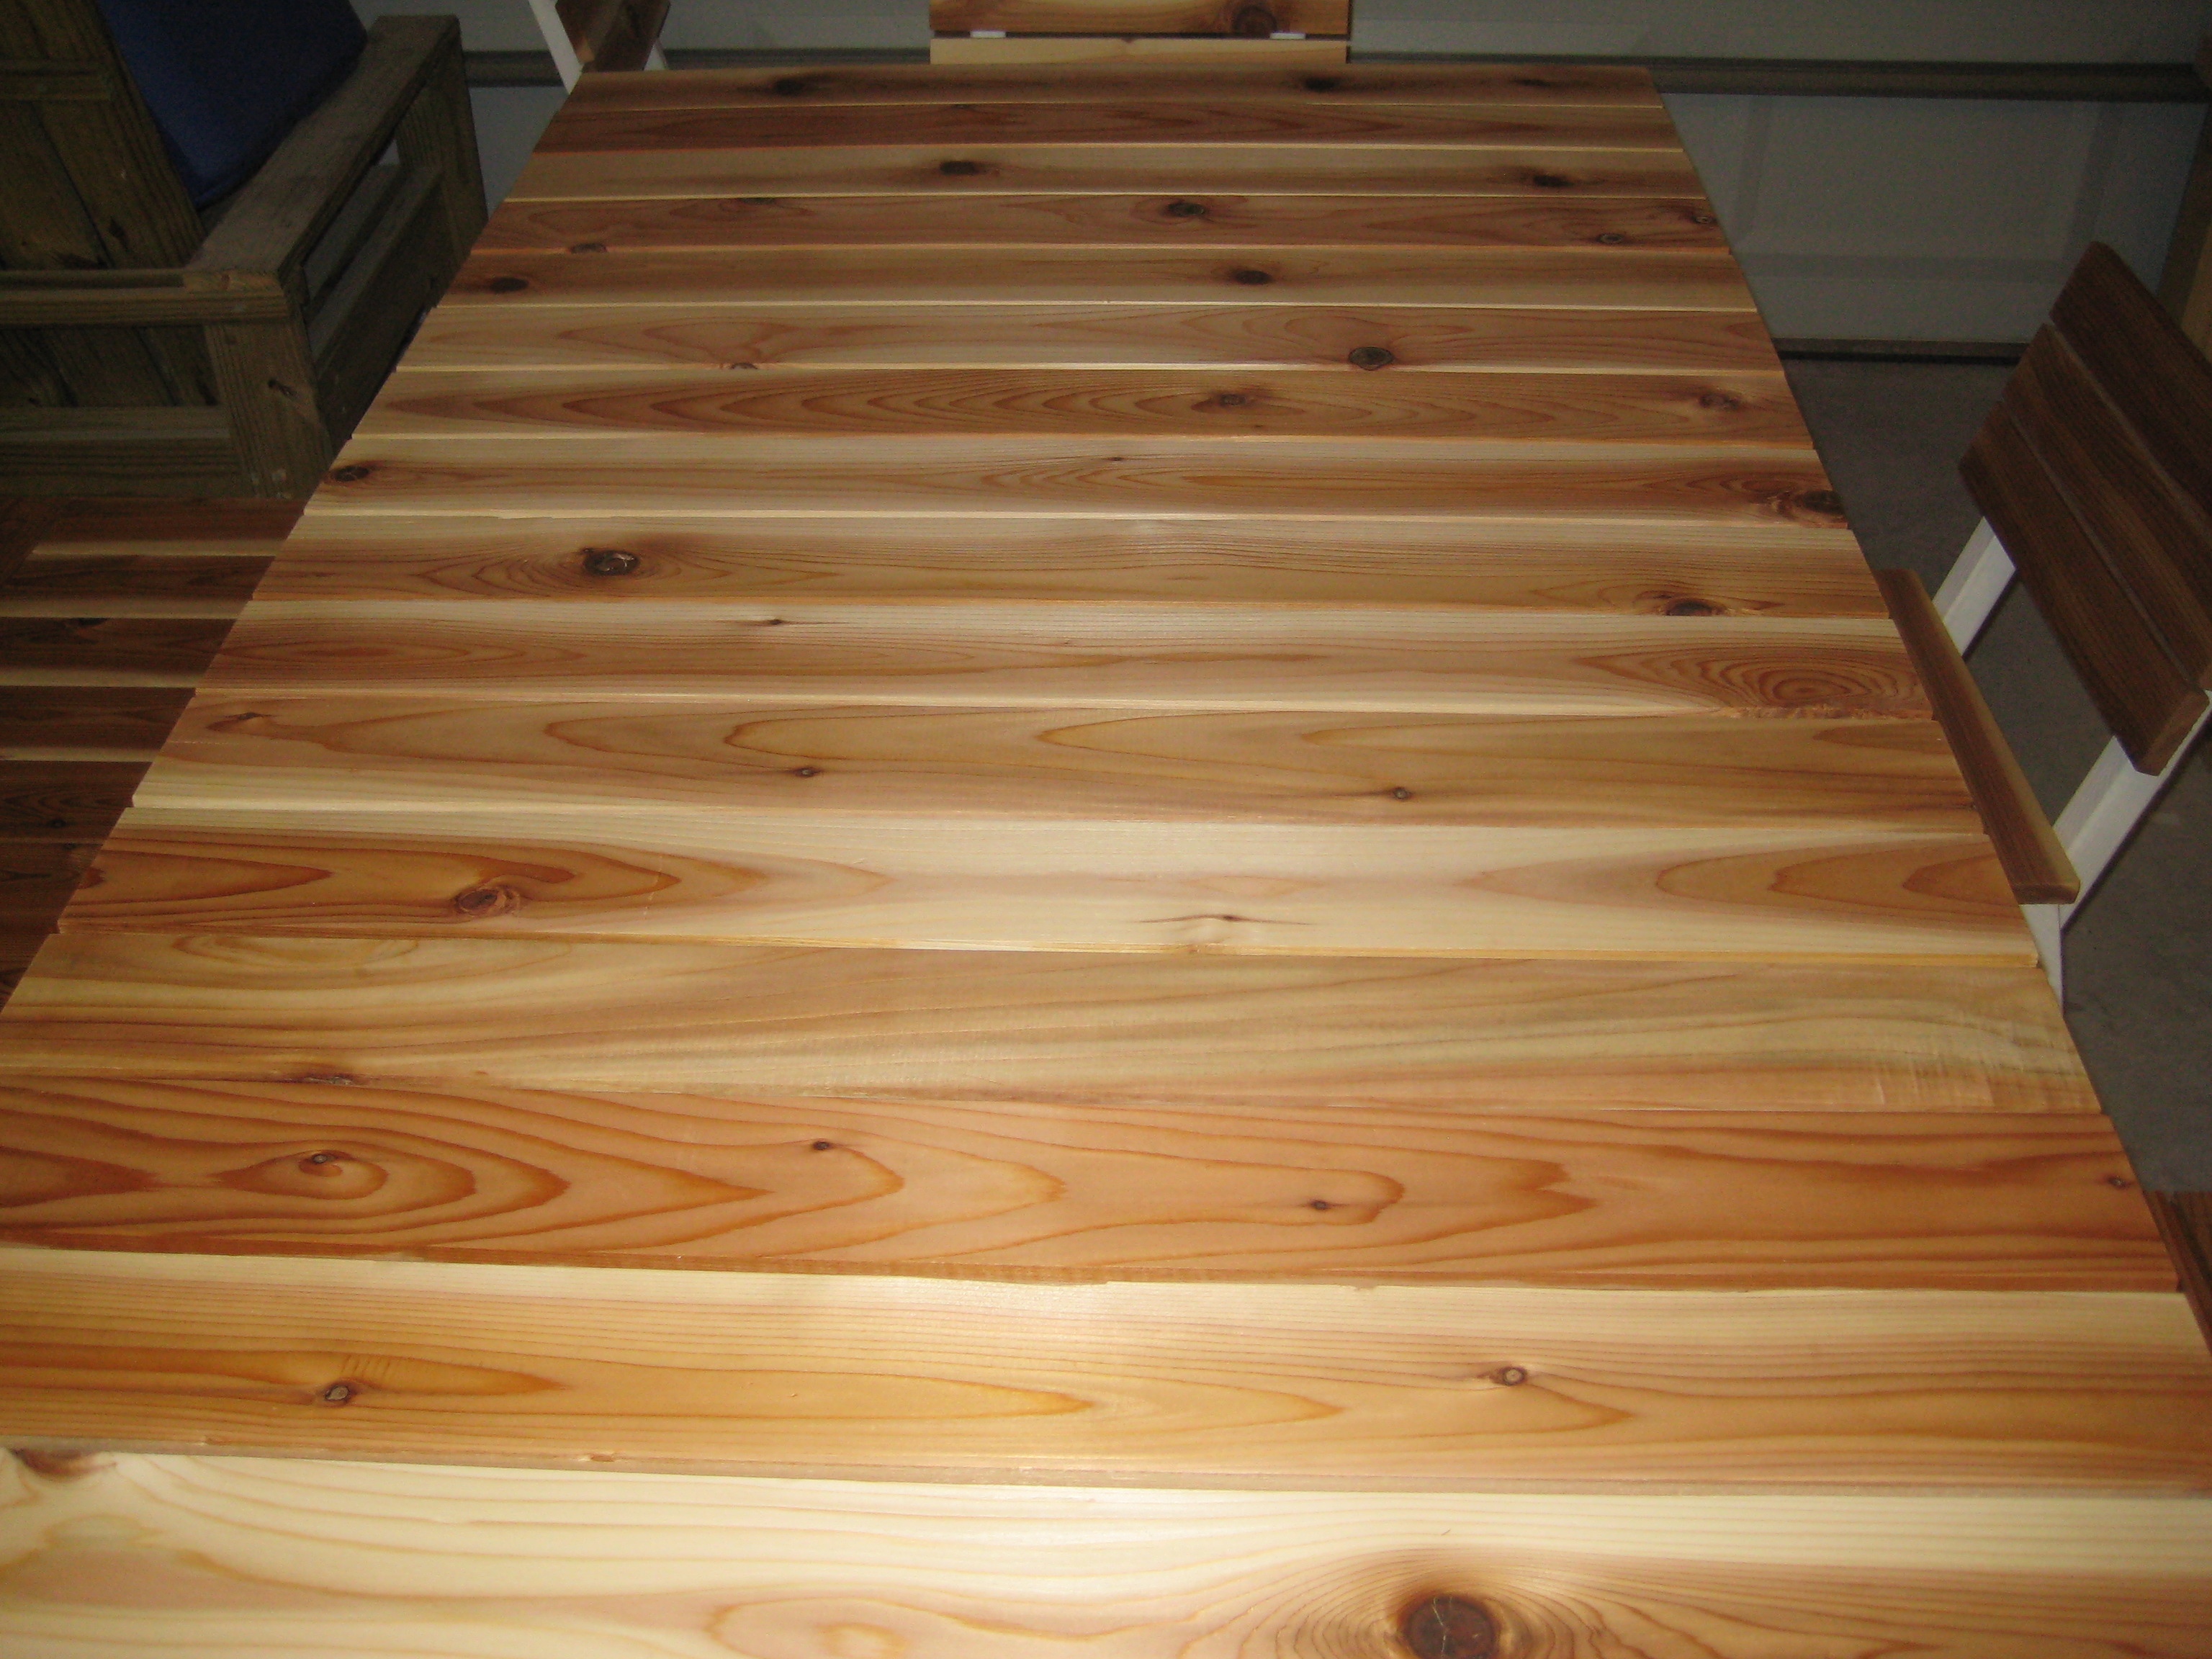
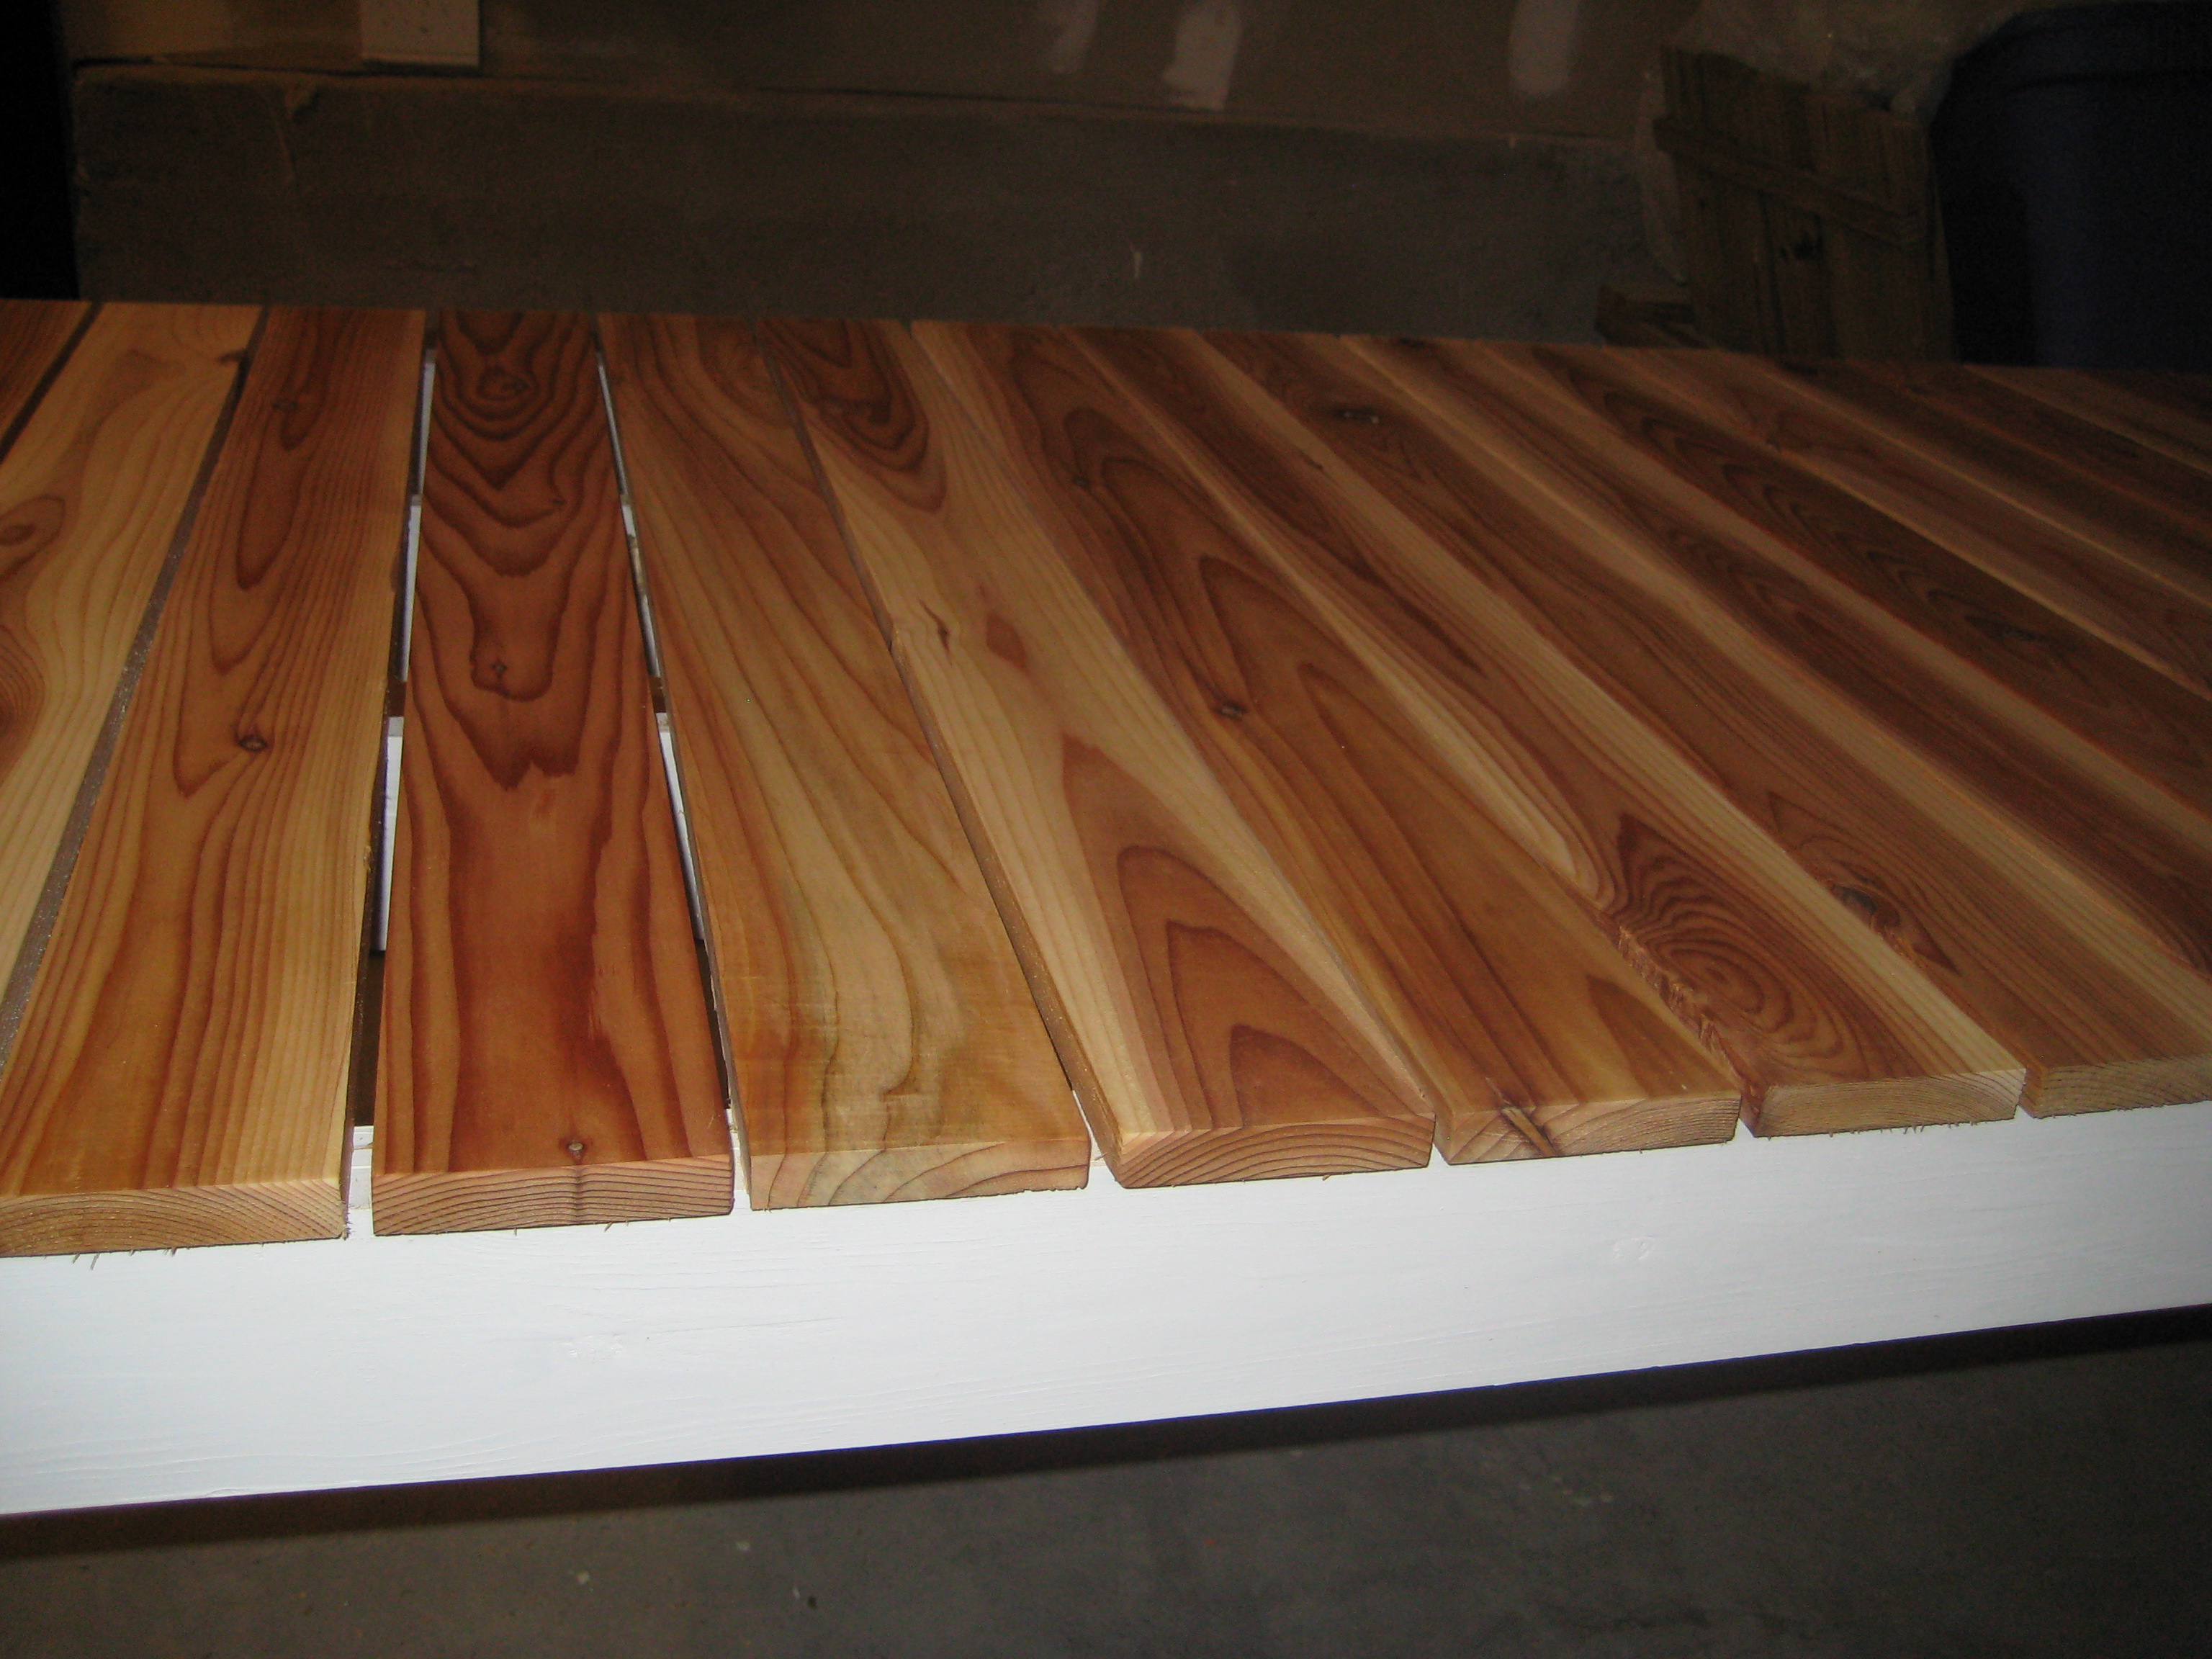
Simple Oudoor Dining Table
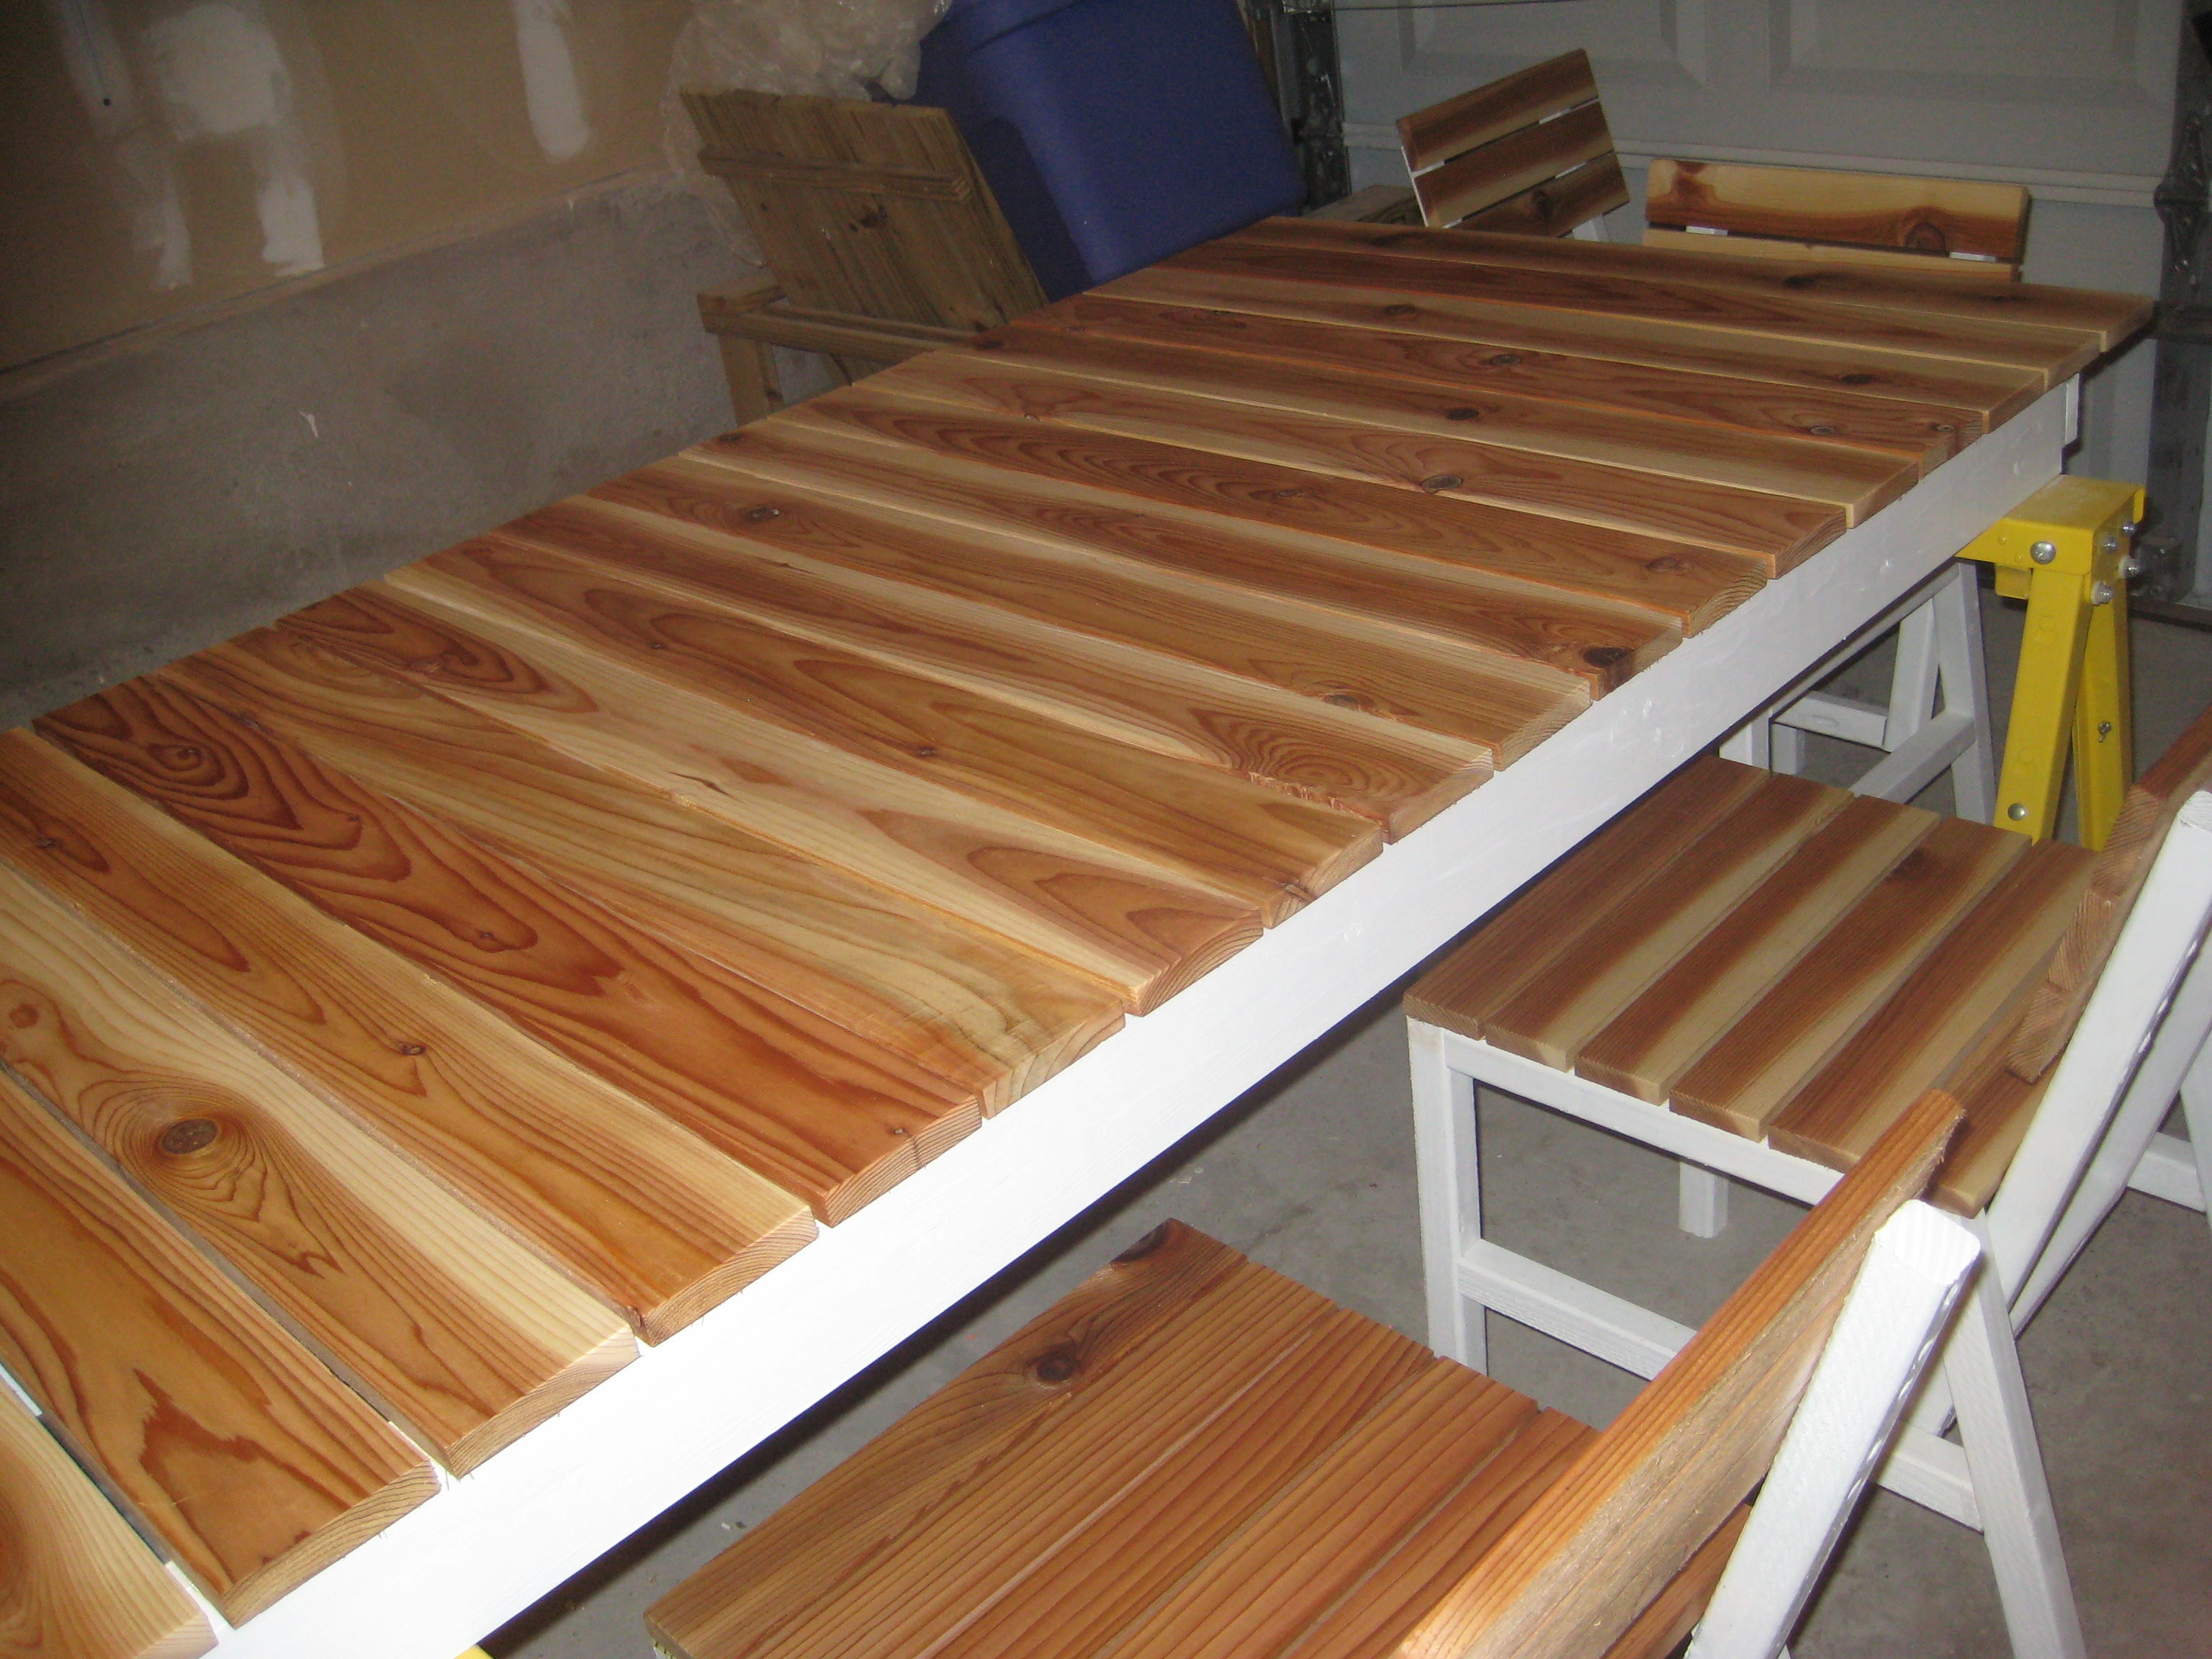
I know, I know...Where are the legs? Unfortunately, I have to store this until December while our multi-family mountain house is being constructed. This way I can store it up against a wall and save a lot room in storage for more Ana White projects. FYI - The legs will be white 2x4's about 29.5 inches tall. For the top I used 1x4 cedar slats spaced 1/4 inch apart. As for the painted white frame, I used treated pine. Why spend money on nice cedar if I am just going to paint over it, right? The contrast of the white and natural cedar was appealing to me for some reason. I used Thompson's clear wood protector/water sealer on the slats to prolong the natural cedar. BTW, if you can build the simple outdoor bench you can definitely take on this project. The two are not very different. I'll have to take pictures of the finished table with legs when I haul these up to the Blue Ridge Parkway and upload them again. Thanks again Ana!
Built from Plan(s)
Estimated Cost
$100
Estimated Time Investment
Day Project (6-9 Hours)
Finish Used
Semi gloss white, Thompson clear wood protector/water sealer.
Recommended Skill Level
Intermediate
Comments
Thu, 08/04/2011 - 08:31
This is lovely!! I love the
This is lovely!! I love the the two-tone finish, and your chairs look great!

Fri, 08/12/2011 - 04:43
The cedar is fabulous!
I love this piece. You totally showcase the gorgeous cedar! Great job!

Fri, 08/12/2011 - 13:30
Thanks debandtom and lori e.
Thanks debandtom and lori e. I am almost finished with a matching outdoor sink with cedar countertops. I'll try to post it in the next couple of days.
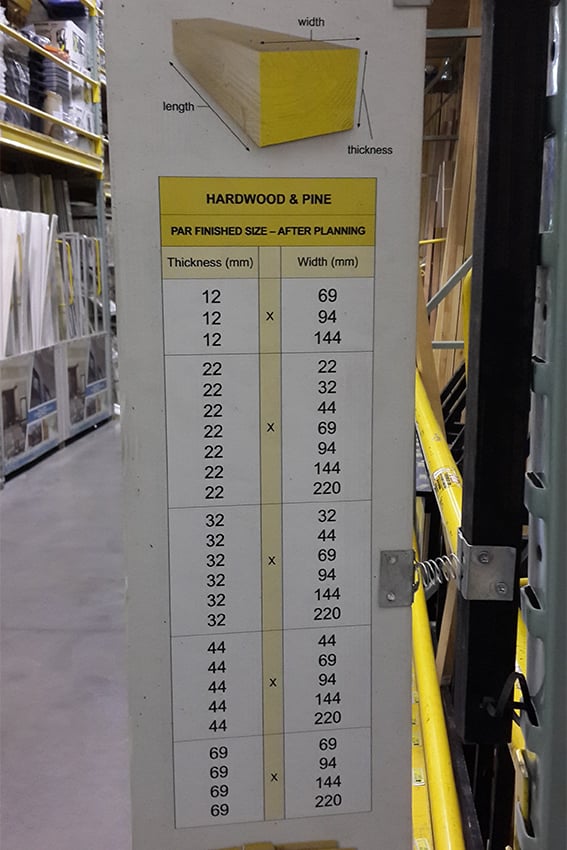
Casual 2x4 (sort of) Desk

I had to a quick conversion from the original plans as we get metric wood sizes so decided to use the following:-
Desk frame: 44 x 94
Desk frame front: 44 x 69
Desk Top: 32 x 144
I drew up new plans to fit my 1500mm space I needed the desk to fill, with the new wood sizes.
The purchase of the Kreg Jig was my best investment as it made construction so easy.
I finished the desk off in Antique Oak after wanting to add a little Antique White to it, but got scared that I would mess it up!
Total cost for wood and finishing materials was R1,500.
Estimated Time Investment
Day Project (6-9 Hours)
Finish Used
Nova 18 - Novadye (Antique Oak)
Woodoc 10 Indoor Polywax Sealer (Velvet)
Woodoc 10 Indoor Polywax Sealer (Velvet)
Recommended Skill Level
Beginner
Comments
Thu, 09/05/2013 - 08:39
Many thanks for the
Many thanks for the compliment. The design is based on the casual 2x4 desk on this site, however I made adjustments and redrew them due to the standard timber size I could get hold of and also a bit of personal preference. I have the plans in electronic format should you wish to have a copy.
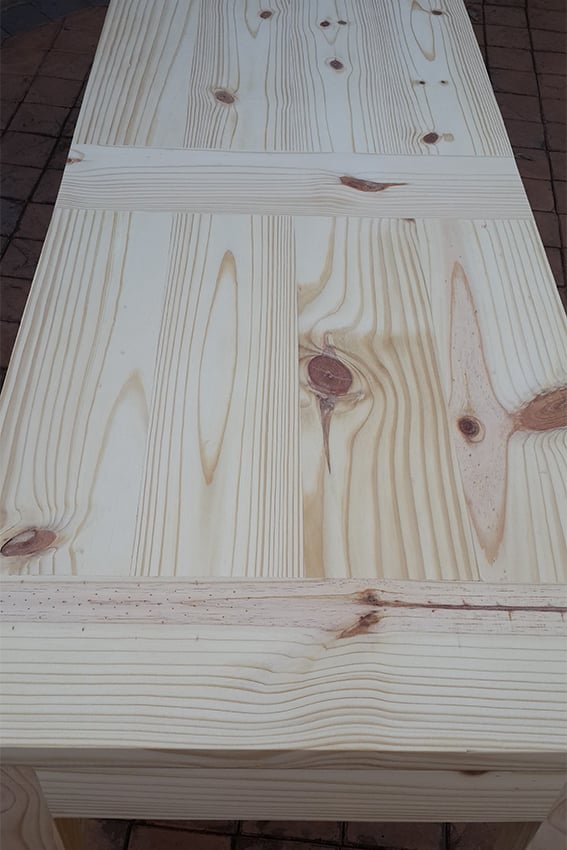
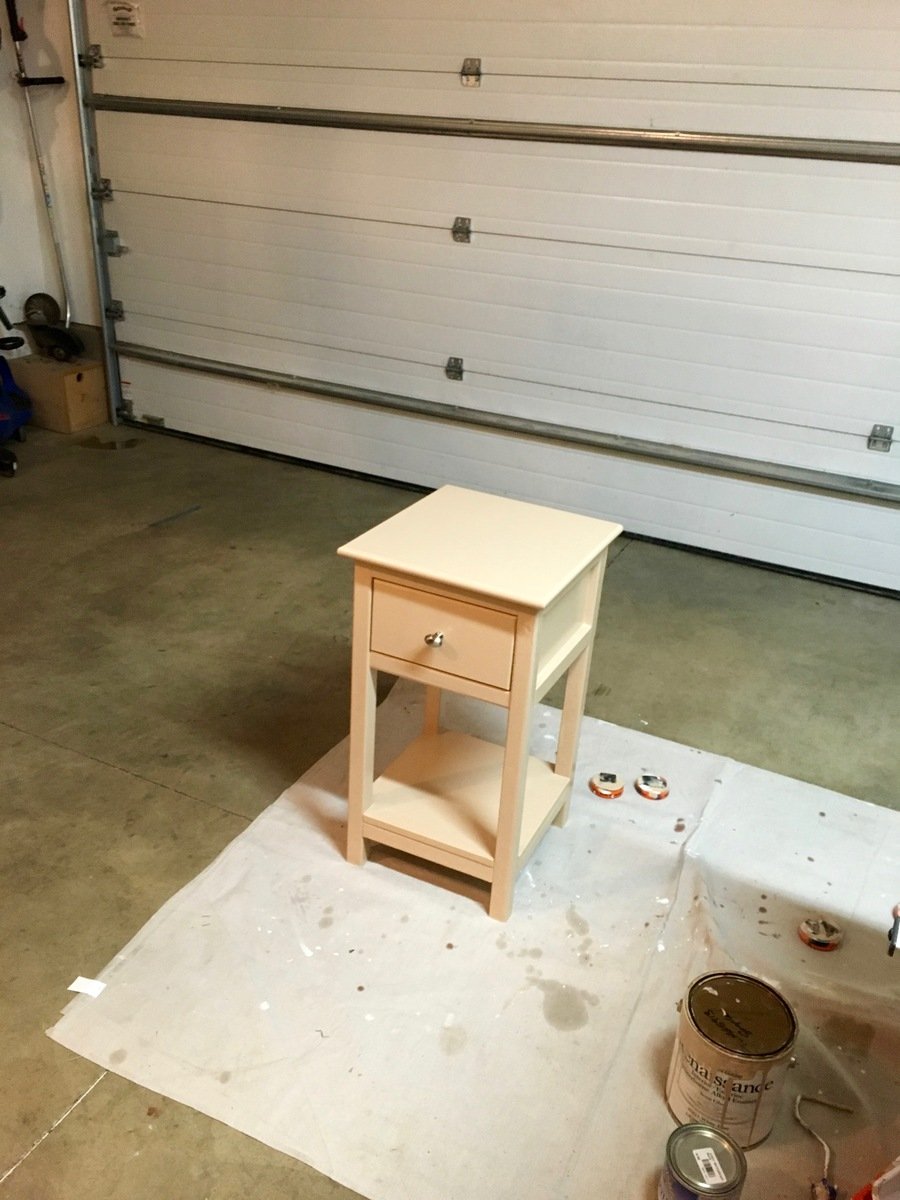
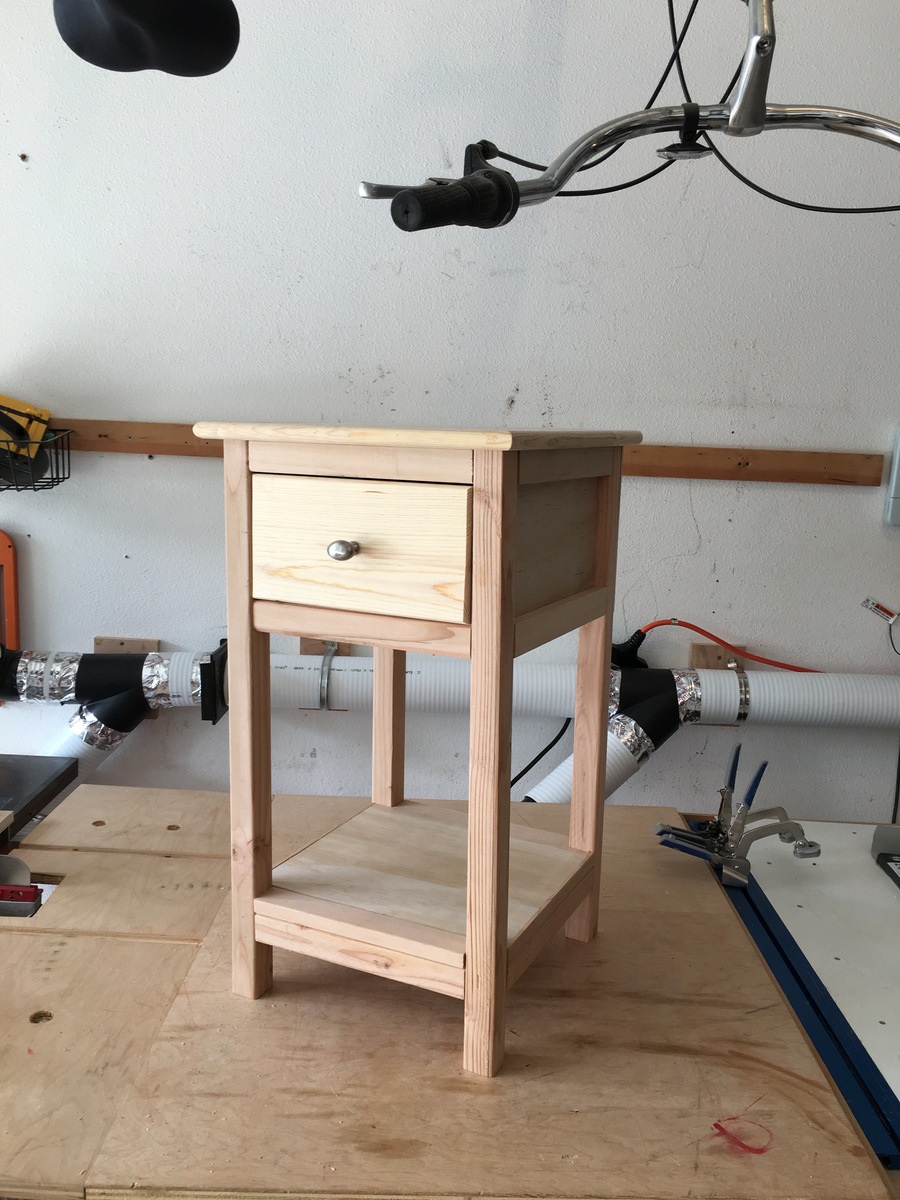
Easy night stand!
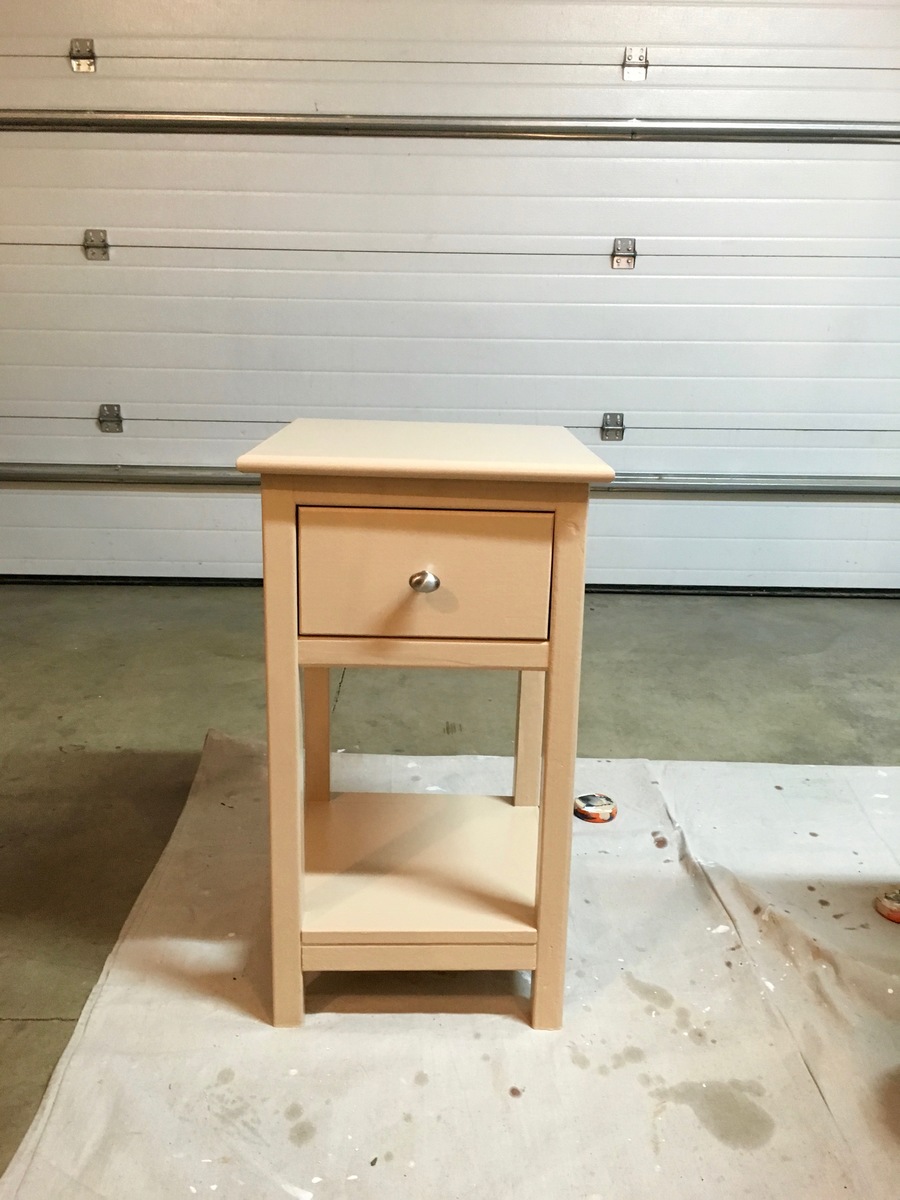
I made this fast and easy table, I was using as a small night stand in a small bunk room at my work for a coworker. I used scraps that I had and had him choose a paint I had on hand! Covered the top with polyacrylic to add some protection!
Built from Plan(s)
Estimated Cost
Free, since I used stuff on hand, otherwise 40-50???
Estimated Time Investment
Afternoon Project (3-6 Hours)
Finish Used
I used two coats of an old based primer and than two coats of paint, which was Renaissance Alkyd paint. 3-5 coats of polyacrylic on the top surface.
Recommended Skill Level
Beginner
Comments
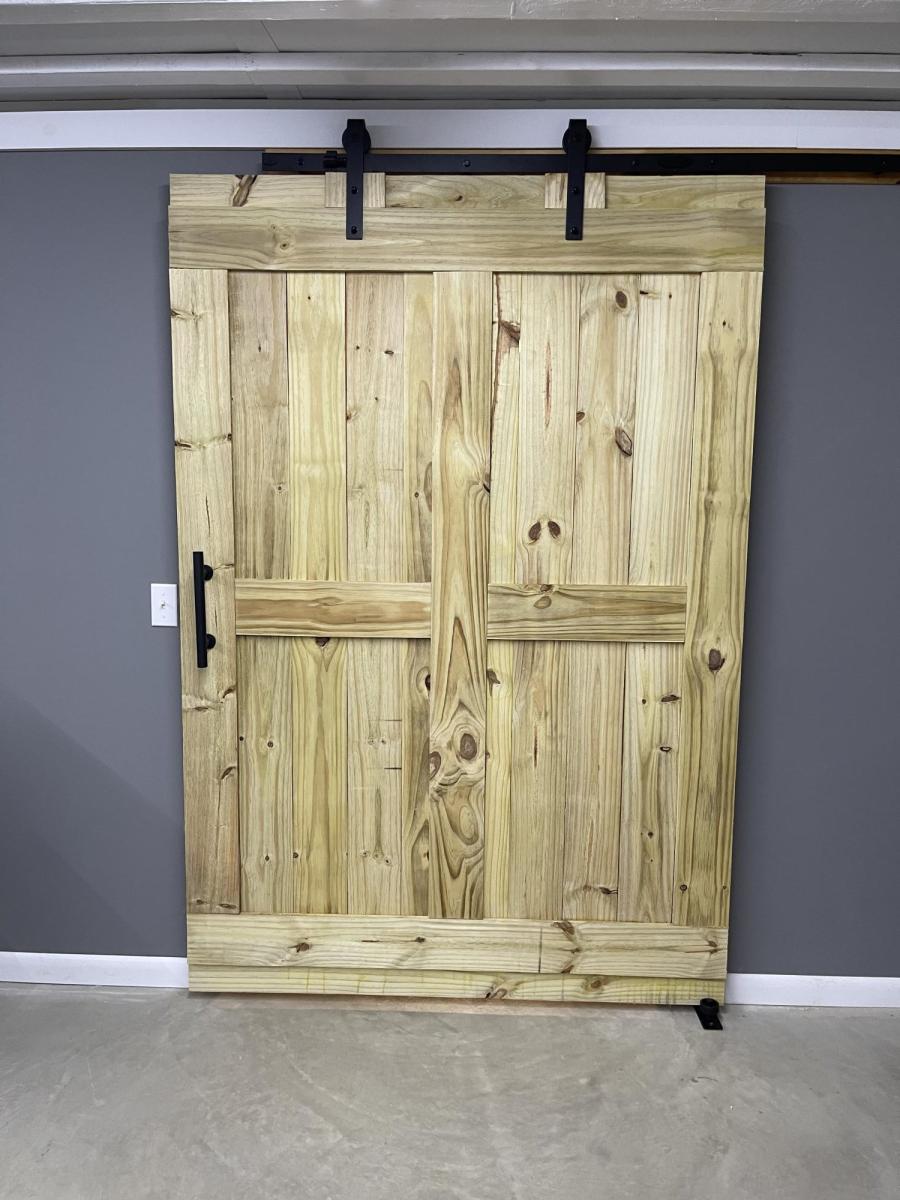
Rustic barn style door
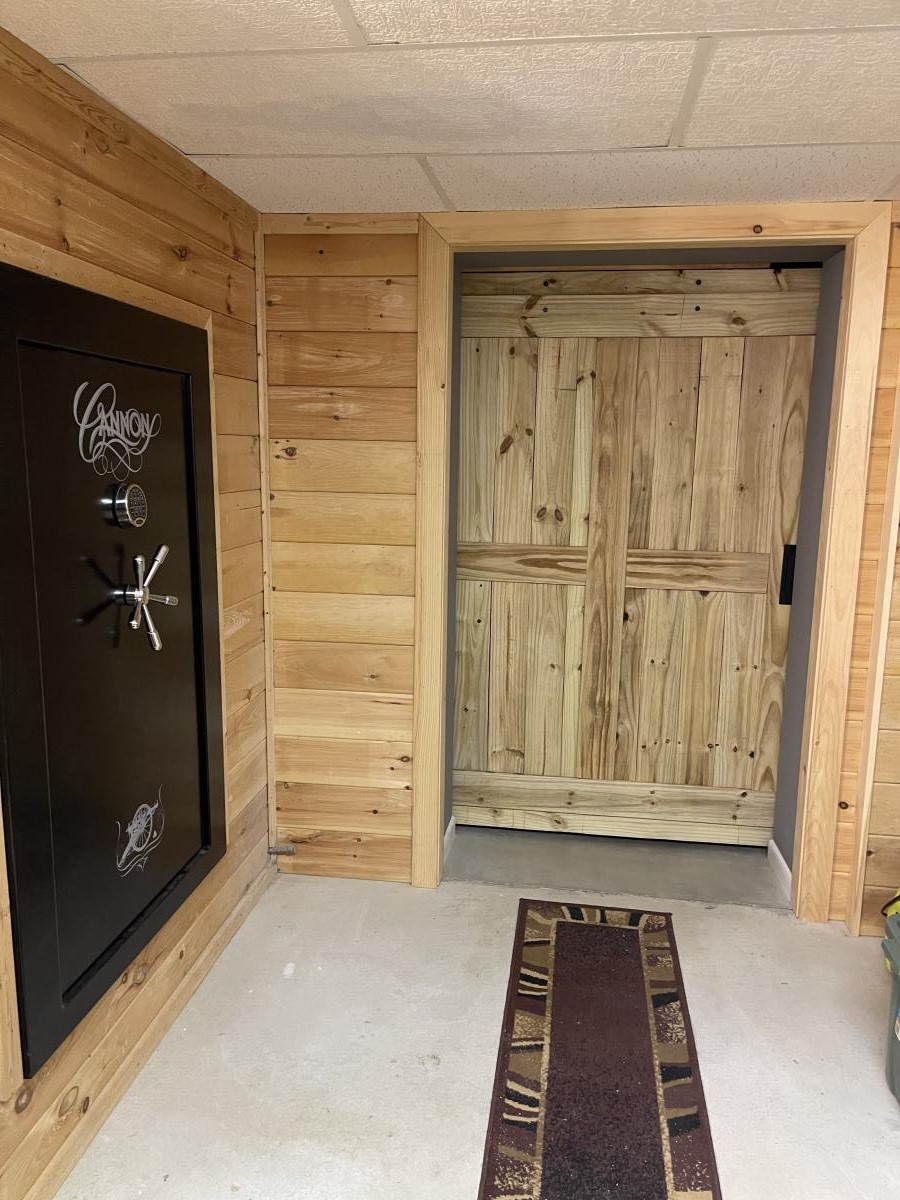
Using cedar fence slats, my son and I built this barn style hanging door for a space between two rooms in his partially finished basement. We planed each fence slat to achieve a smoother surface and to join the boards together. We finished it with a liberal amount of butcher block oil and beeswax to keep the wood from drying too quickly. We think it turned out beautifully!!
Comments
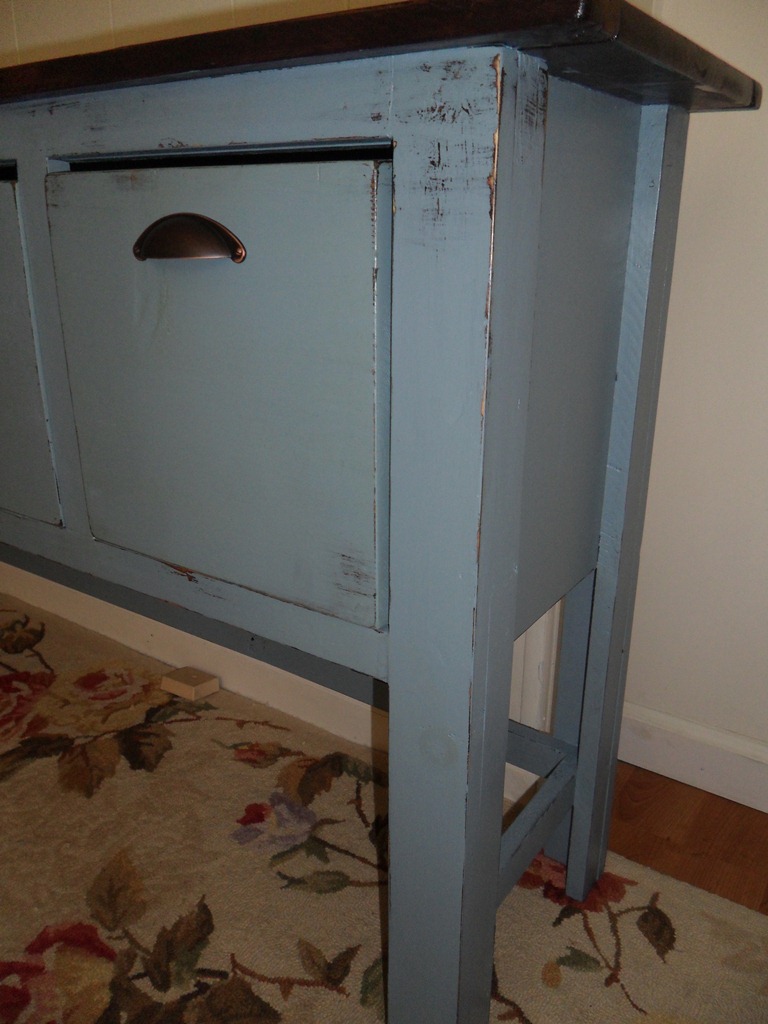
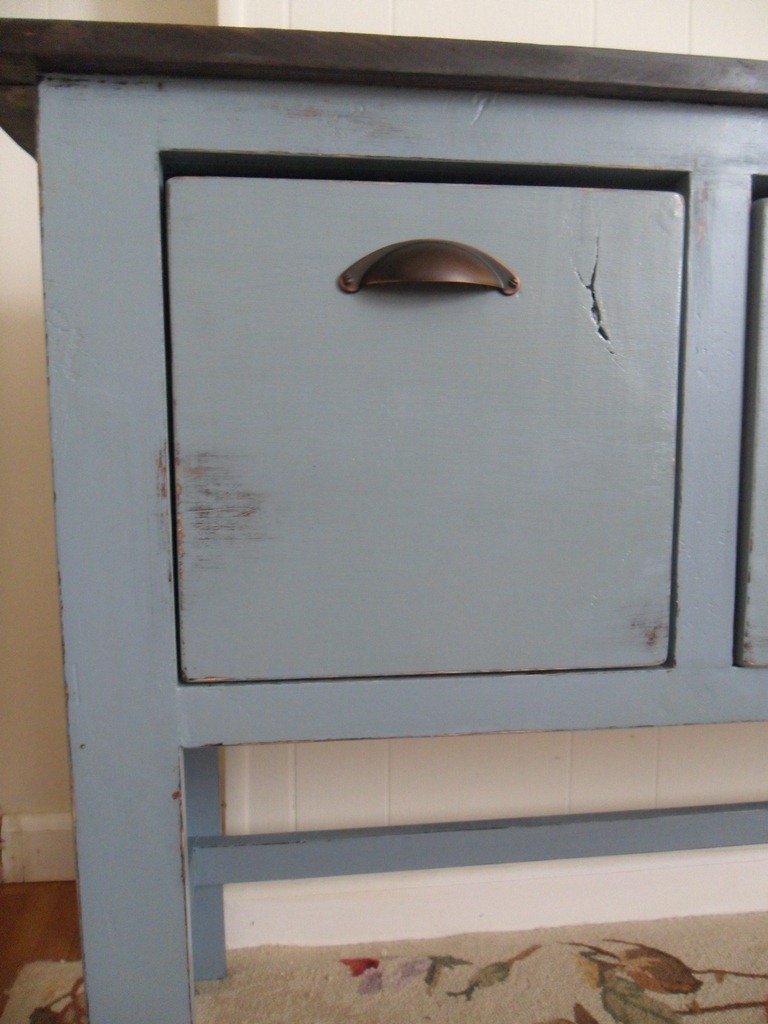
First Furniture Console

This is my version of the Balin Console, presented by Ana White.
I used knotty pine for the wood and finished the piece first in two layers of walnut stain.
Over the stain, I painted two layers of Vast Sky blue by Sherwin Williams.
To finish it off, I used a polyurethane satin finish varnish--two coats.
Built from Plan(s)
Estimated Cost
$200.00
Estimated Time Investment
Week Long Project (20 Hours or More)
Finish Used
Stain the piece with a dark colored oil based stain--2 layers.
Rub a candle on the corners and edges where you plan to sand to give a distressed appearance.
Coat the piece with 2 layers of polyurethane paint.
Use fine grit sandpaper to sand edges to give a distressed vintage look. The candle wax applied to the stain will protect the wood from the sandpaper--sanding will only remove the paint layer and leave the stain layer intact.
Cover with two coats of a satin finish varnish to protect. Make sure there is plenty of drying time between the varnish layers--2 days +
Recommended Skill Level
Beginner
Comments

Sun, 08/07/2011 - 14:16
I really like the color of
I really like the color of paint with the walnut stain!

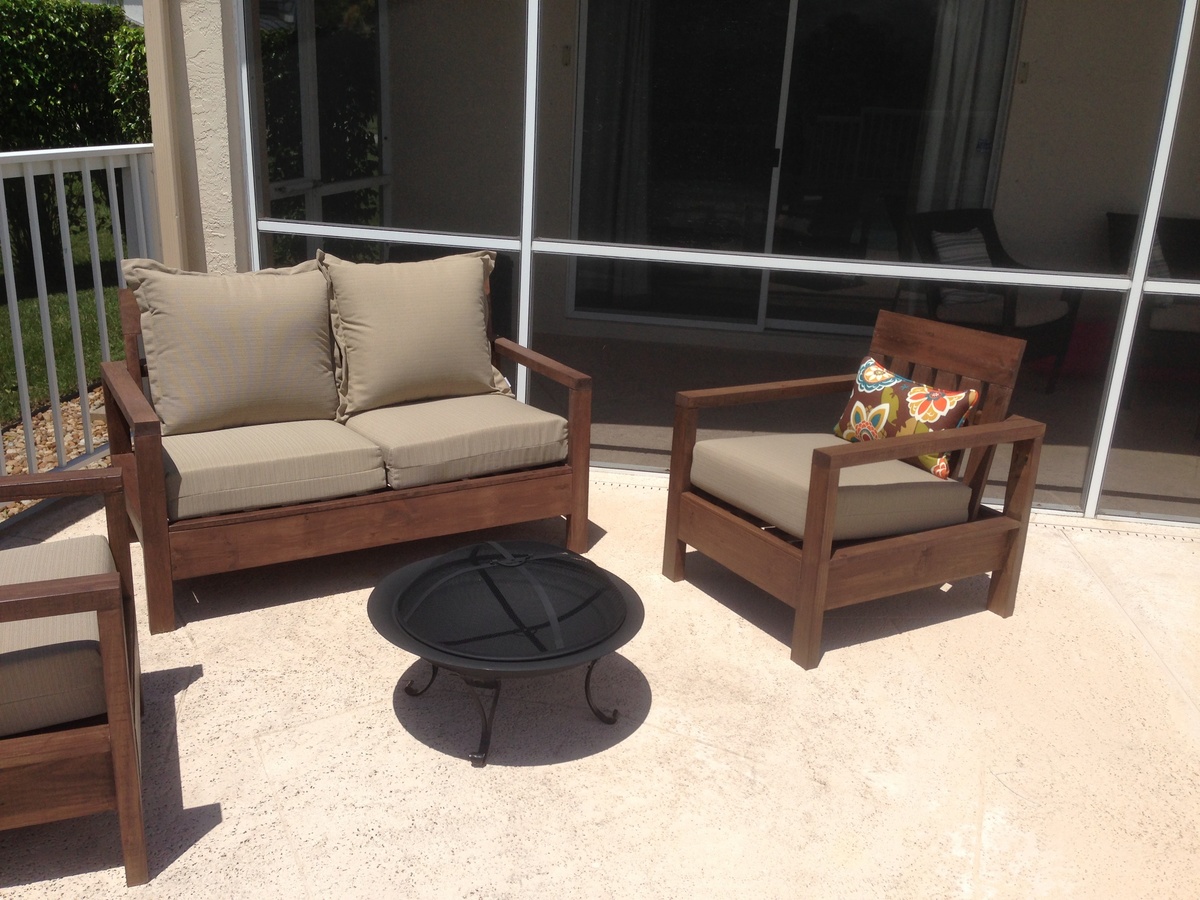
Cozy outdoor seating at last!
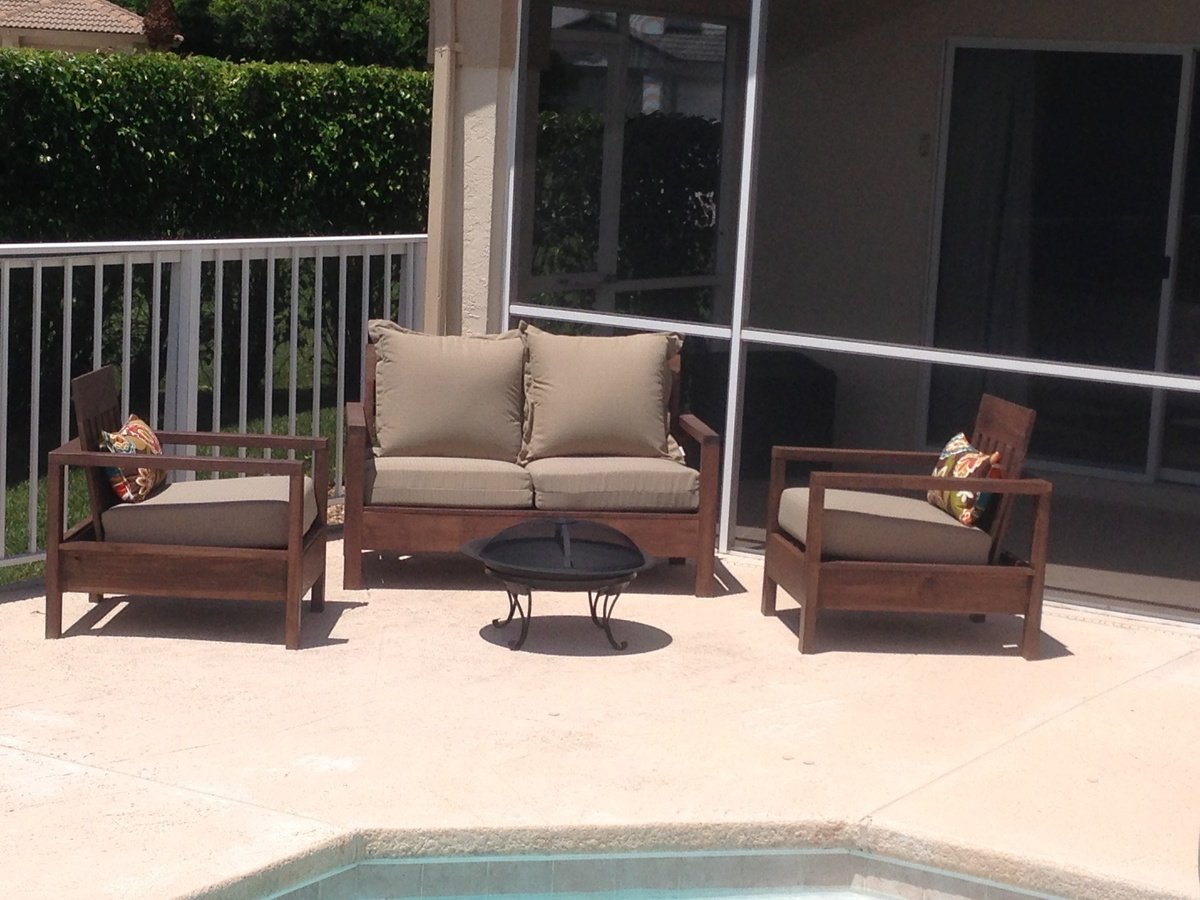
This project seemed to take forever, but it was so worth it! We finally have a great cozy outdoor space to gather around the fire pit comfortably. Thanks so much for the plans Ana!
I should mention I used 2x3's instead of 2x2's for all legs because pressure treated 2x2's here are only 1 1/4"??
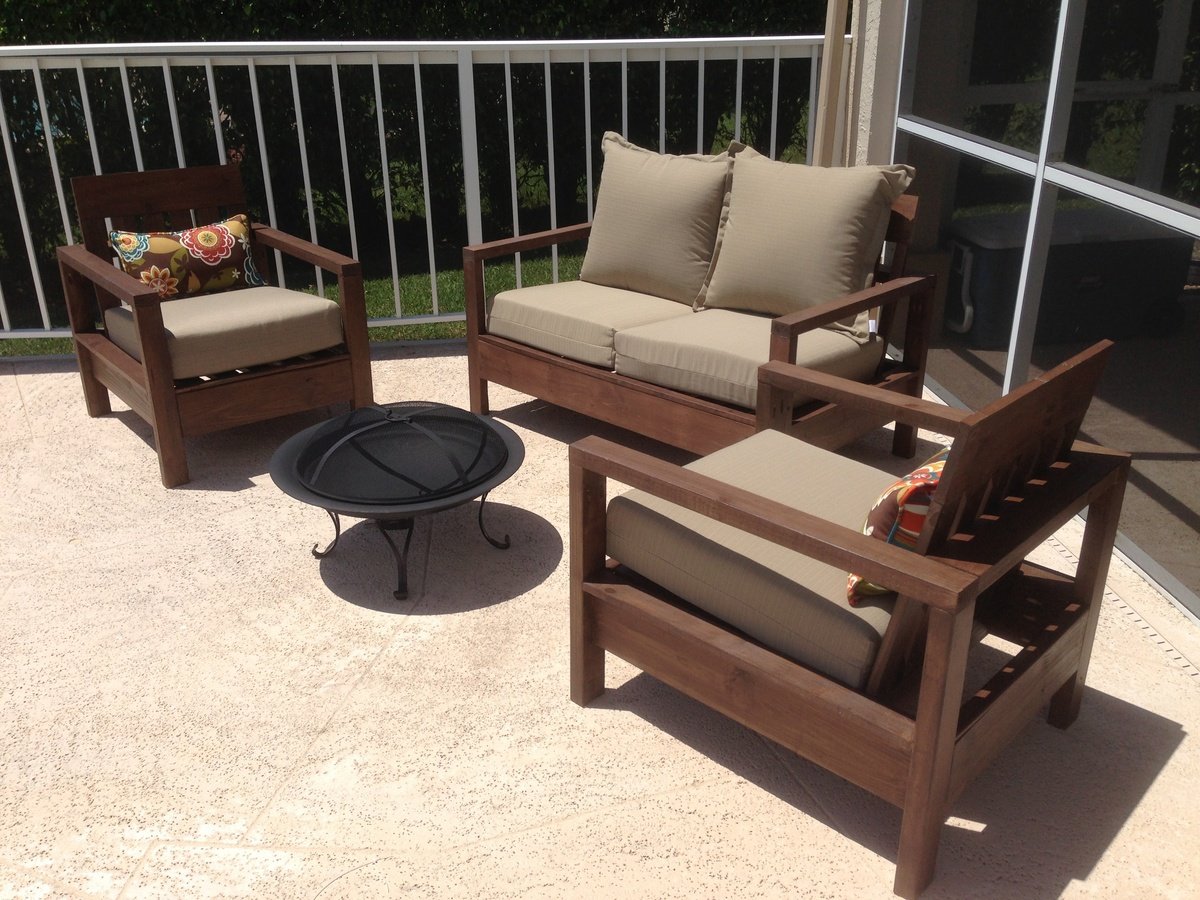
Built from Plan(s)
Estimated Cost
$175 lumber & $225 cushions
Estimated Time Investment
Week Long Project (20 Hours or More)
Finish Used
Behr premium weatherproofing stain in Padre Brown
Recommended Skill Level
Intermediate
Comments

Reclaimed beauty
All wood used was reclaimed. Some tabletop pieces were warped, but added character to the table. Took about four 6-hour days with interruptions in between. I bought the stain from the Habitat store for $1.50 and the poly was left at the house we recently moved into. The stain was brushed on then rubbed in with a rag. I originally used about six coats of oil-based poly and when that didn't seem to work, I applied 2 coats of Polycrylic.
Built from Plan(s)
Estimated Cost
$20
Estimated Time Investment
Weekend Project (10-20 Hours)
Finish Used
Colonial maple stain with water-based satin poly.
Recommended Skill Level
Beginner
Grandy sliding console
Finally took the time to use a lot if my scrap pile. This one is a bit of a beast to manhandle around the shop, but well worth the finished project!
Built from Plan(s)
Estimated Cost
150
Estimated Time Investment
Weekend Project (10-20 Hours)
Finish Used
Valspar dark walnut stain. Under Behr Flat white paint. Distressed then cleared with valspar poly.
Recommended Skill Level
Intermediate
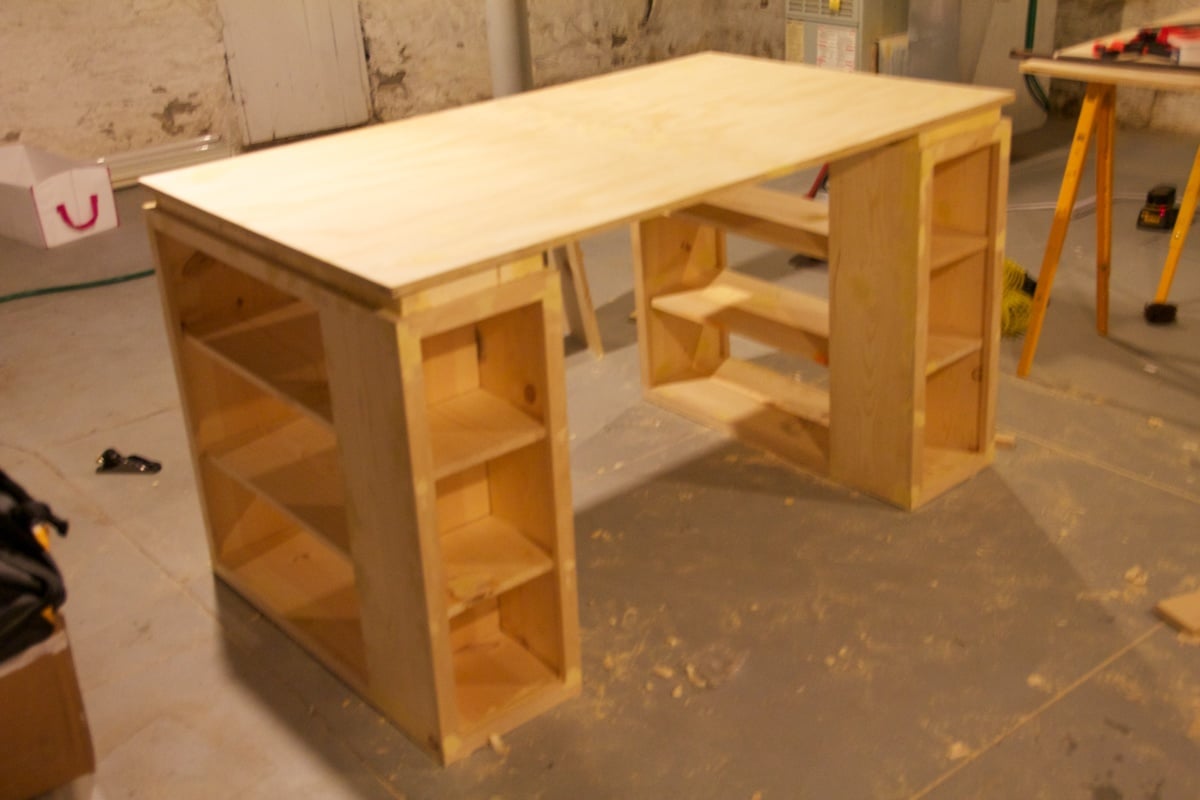
My wife's new Craft table
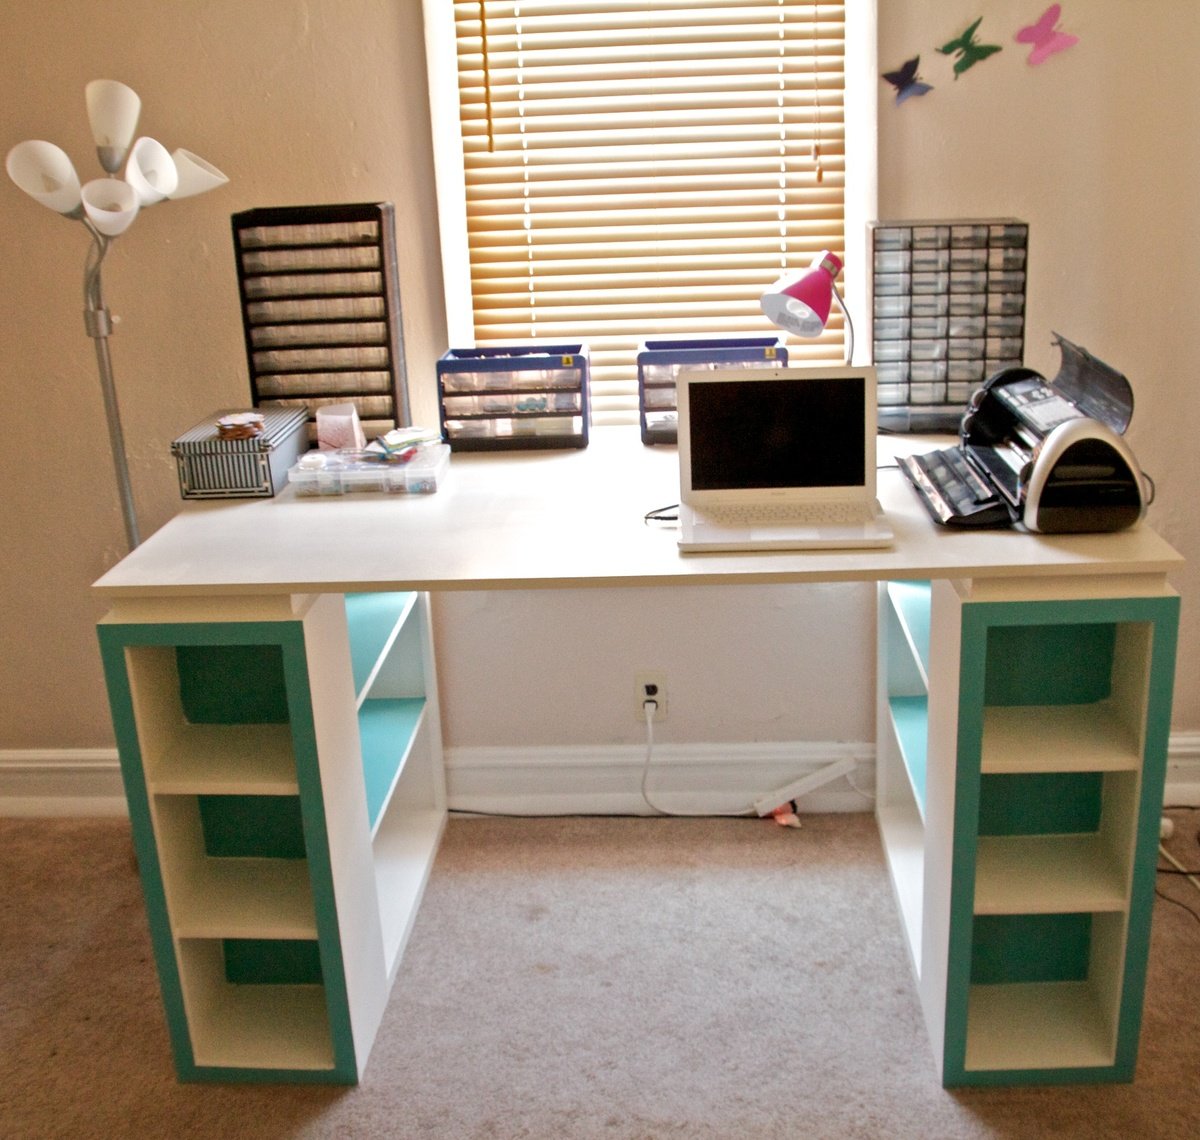
This is actually my third project from your site Ana.
I acctually decided to make this table ten inch wider since my wife has a loooooooot of crafts :)
This project took a little longer then I thought.
It was my own fault!!! I thought I would safe some time and get some of the wood cut buy the clerk at Home Depot. That turned out to be a really bad idea. Most of my cuts were uneven and even after I gave the clerk the exact measurements, a few of the boards were up to 2 inches too long. At the end I had to buy two more boards because I had to cut peaces away to have straight edges.
Lesson learned!!!
I love building wood furniture. And I already got my next plan from your site that I'm going to build.
Built from Plan(s)
Estimated Cost
$160
Estimated Time Investment
Weekend Project (10-20 Hours)
Finish Used
Valspar-Dove tail white(Eggshell)
Behr- Surfer(eggshell)
2 coats of clear Polyurethane Semi-Gloss
Behr- Surfer(eggshell)
2 coats of clear Polyurethane Semi-Gloss
Recommended Skill Level
Beginner
Comments

Wed, 09/07/2011 - 04:18
this is what i need.
awesome job! im in the middle of making one of these at the moment. but just to be a tad different i have put a small cutout hole on the top, theres a little bin that sits on the shelf under it, so all i have to do when ive finished with all my paper cuts is swipe it down the hole! hehe how nifty. oh and where did your wife get the black cricut machine?? lol
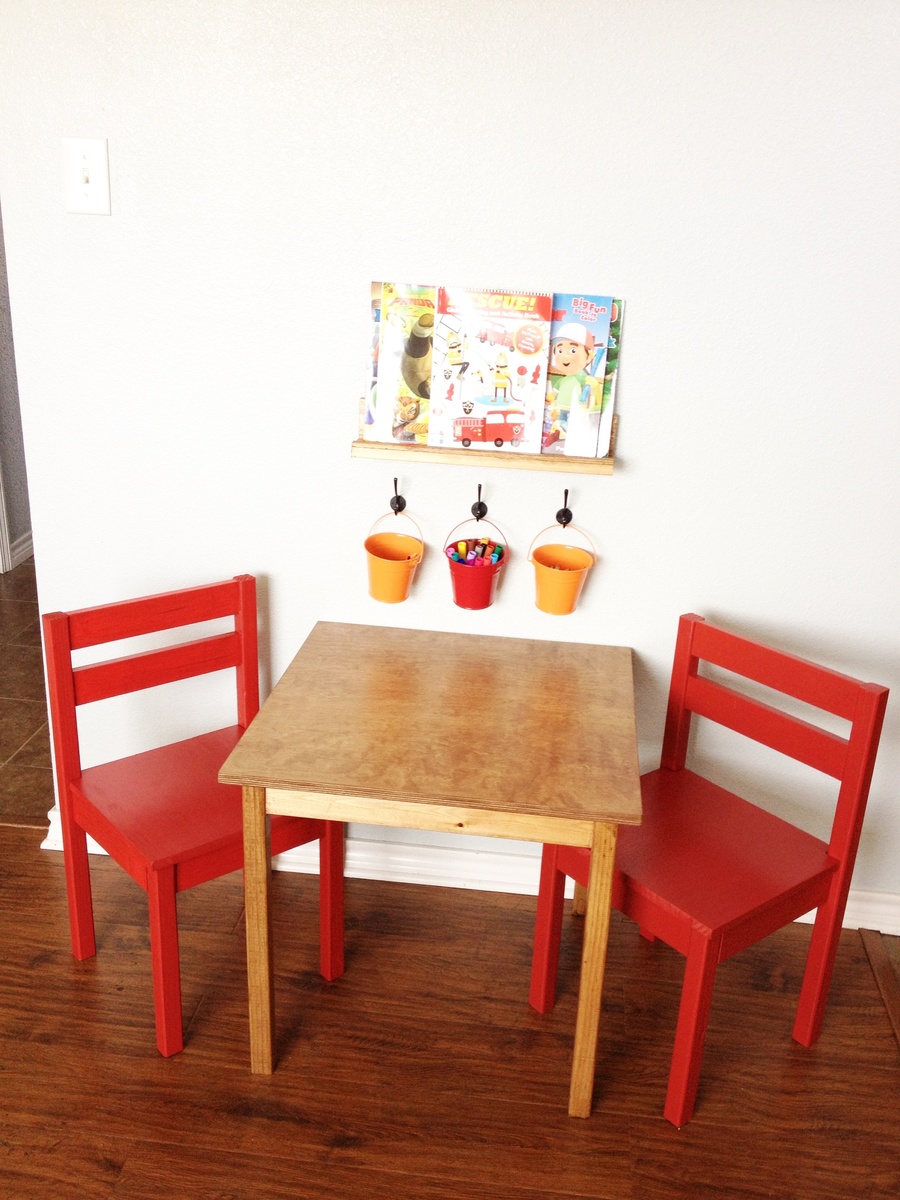
Kids table and chairs
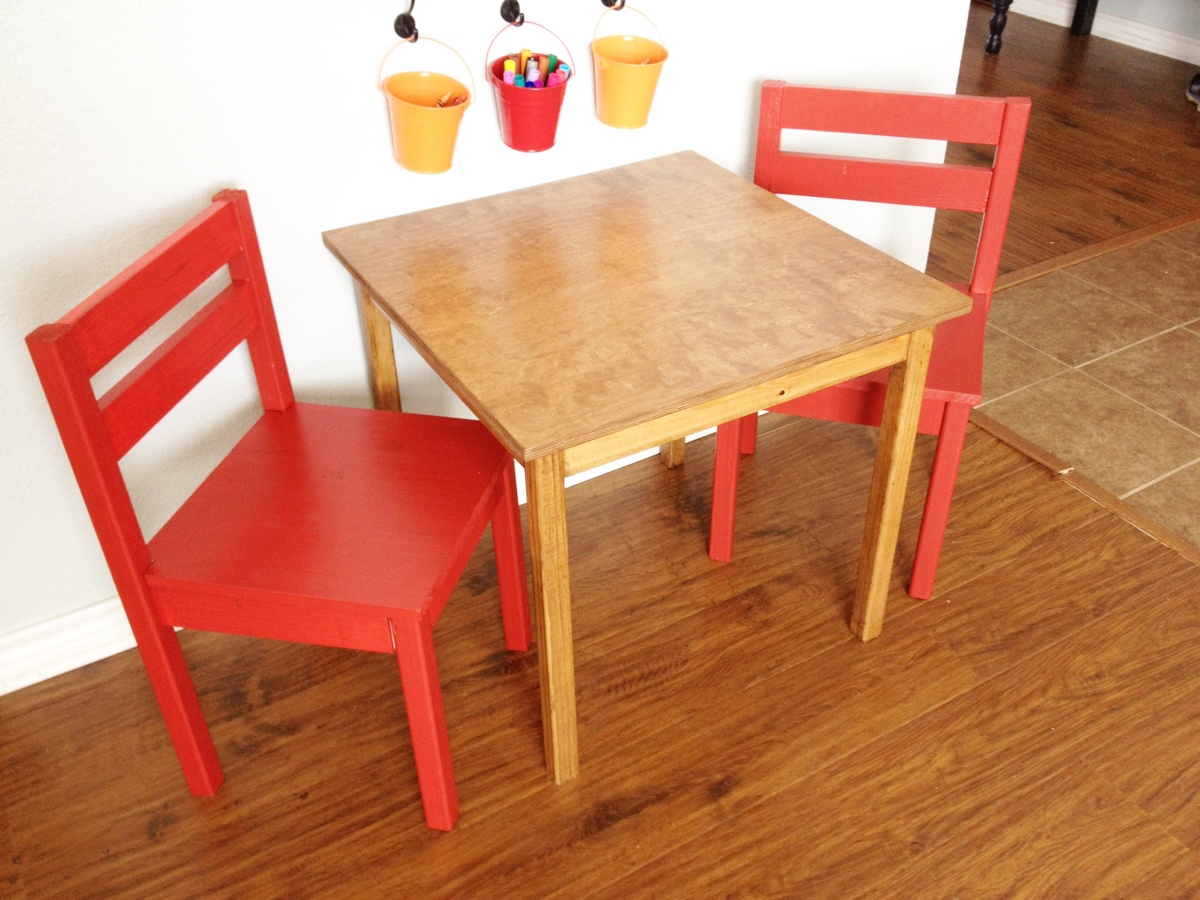
This is a table and chair set I made for my 3 year old son and he loves it! I changed a couple of things. One of the things was with the table top, instead of making it rectangular I did mine square. The second thing was instead of doing the three pieces of wood I used a single 3/4" 2'x2' piece of birch plywood I found at Lowes. With the chairs I also did solid piece seats instead of the slats and I decided to do the legs with 2"x2" wood instead of 1"x2" and I found those modified plans here http://thatsmyletter.blogspot.com/2011/12/t-is-for-table.html?m=1
Built from Plan(s)
Estimated Cost
$50
Estimated Time Investment
Afternoon Project (3-6 Hours)
Finish Used
For the table I used Minwax stain in Early American then sealed it with Minwax Polycrylic in a semi gloss finish. Then for the chairs I just used red paint.
Recommended Skill Level
Beginner
Comments

Tue, 09/03/2013 - 08:44
I really like the
I really like the modifications you made. These look like the chairs I remember from my kindergarten days. I have the table and chairs in my "to do" list. Now I know what to do to make them look more like the kid-sized chairs I like the most.
clubhouse loft
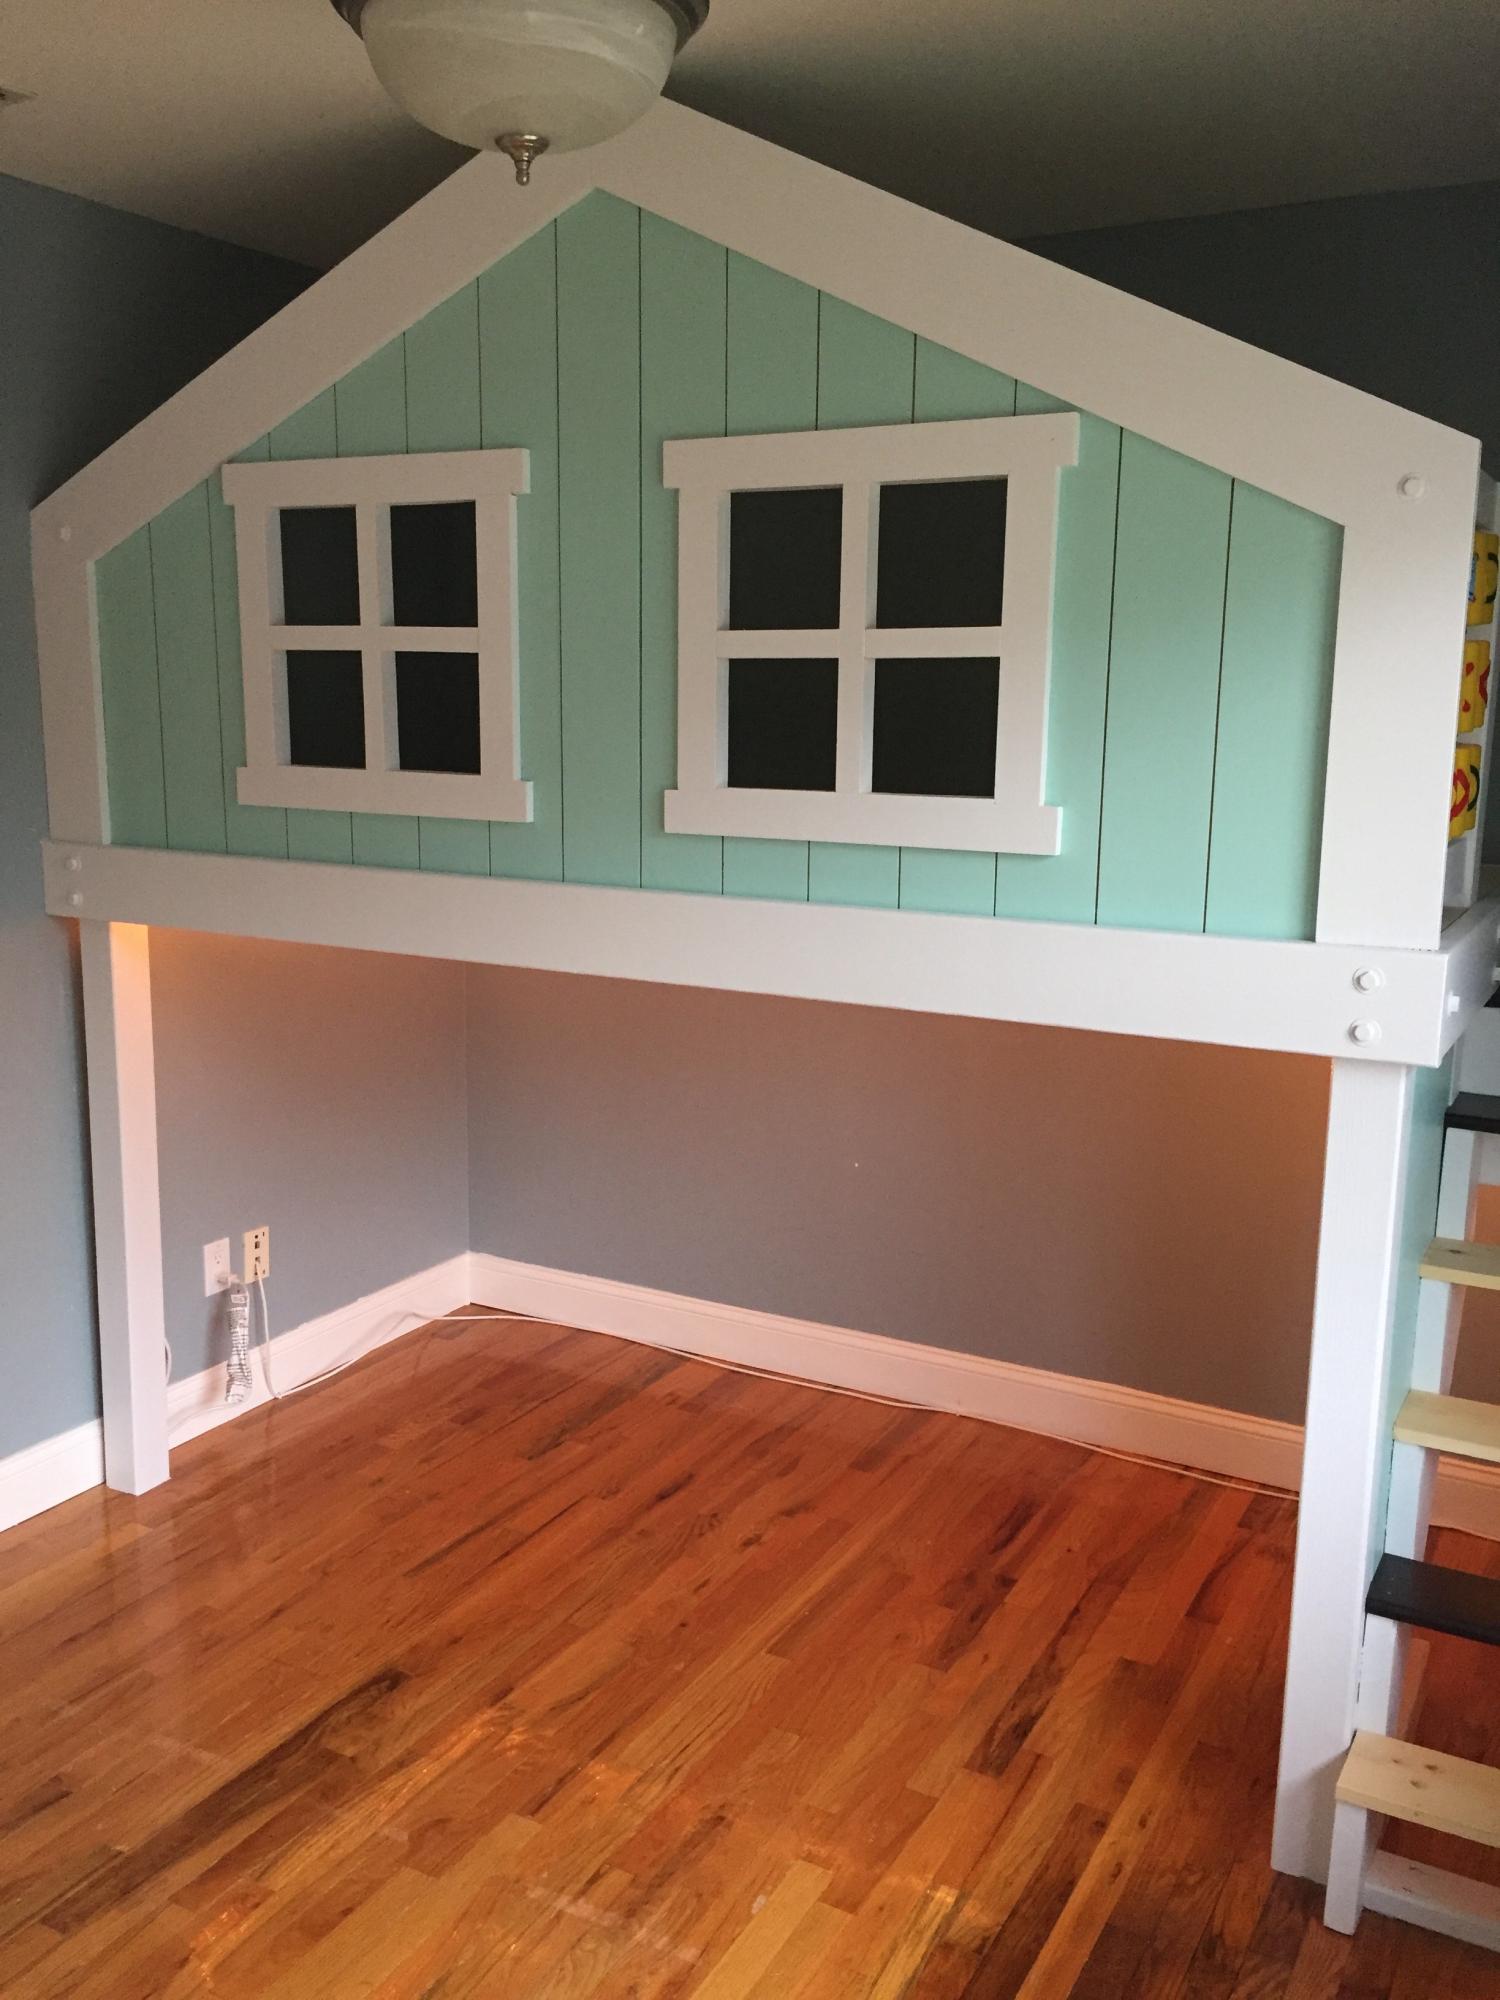
This is just a loft I made for my kids. I didn't want to spend over $1500 at PBK for a twin bed size bunk bed. the size is 4x8 enough for them to have fun.
Built from Plan(s)
Estimated Cost
350
Estimated Time Investment
Week Long Project (20 Hours or More)
Recommended Skill Level
Intermediate
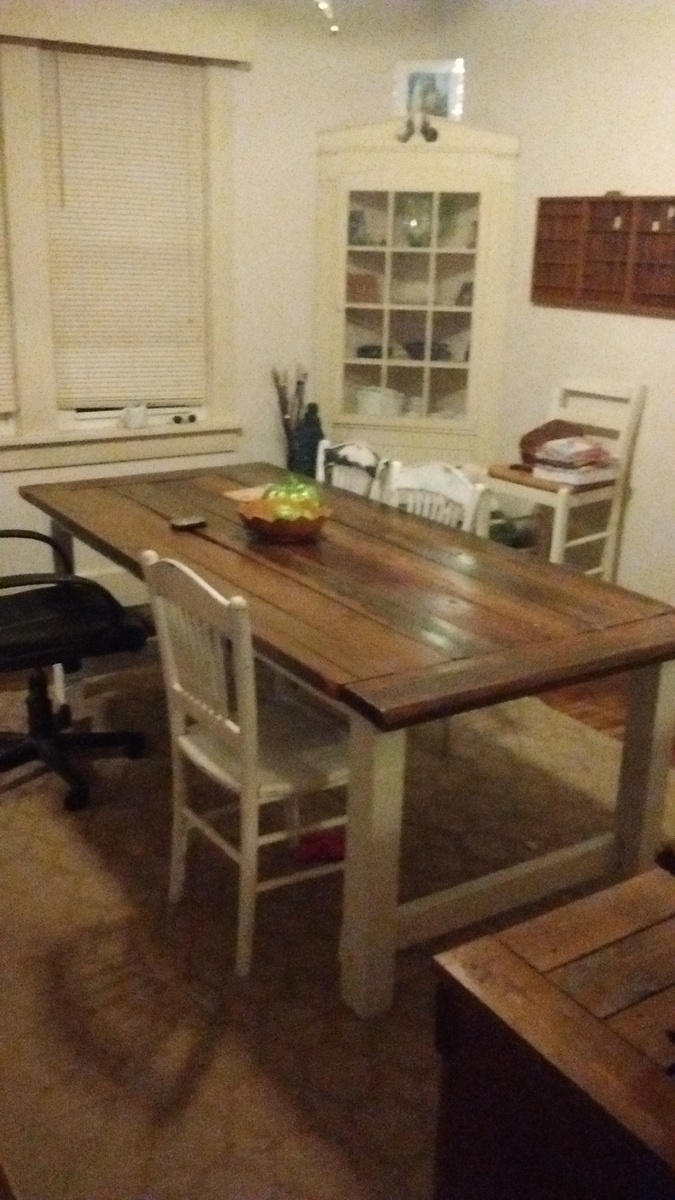
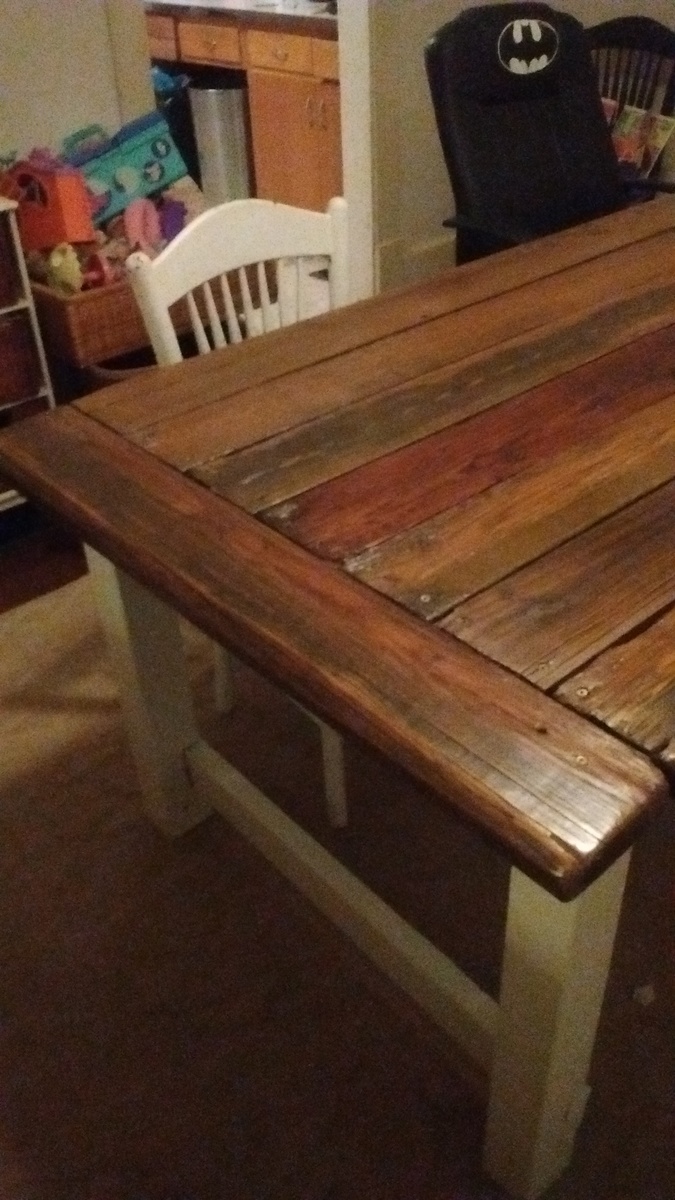
Farmhouse table with pocket holes
I followed the plans with the exception of cutting off ~19" in length to get the table down to 5.5' in order to better fit my space.
Unfortunately several of the 2 1/2" pocket screws did pierce the top - nothing too terrible or noticeable, but disappointing. My wife says it just adds to the rustic feel, so that works.
One thing I did that I notice other people not doing: I ripped off ~1/4" from the edge of all boards for the table top. This gets rid of the "crumb catcher" spaces between the planks which come rounded. By ripping off the rounded edge, the boards will fit more flush and you won't have such an issue with crumbs getting in between the boards.
Built from Plan(s)
Estimated Time Investment
Weekend Project (10-20 Hours)
Finish Used
Minwax Classic Gray Stain (set for 15 minutes), applied with sponge brush AFTER using Minwax Wood Conditioner, and Minwax Wipe-on Clear Satin Poly (2 coats), applied with clean cloth
Recommended Skill Level
Beginner
My bag dispenser, made from scrap pieces of maple and pine
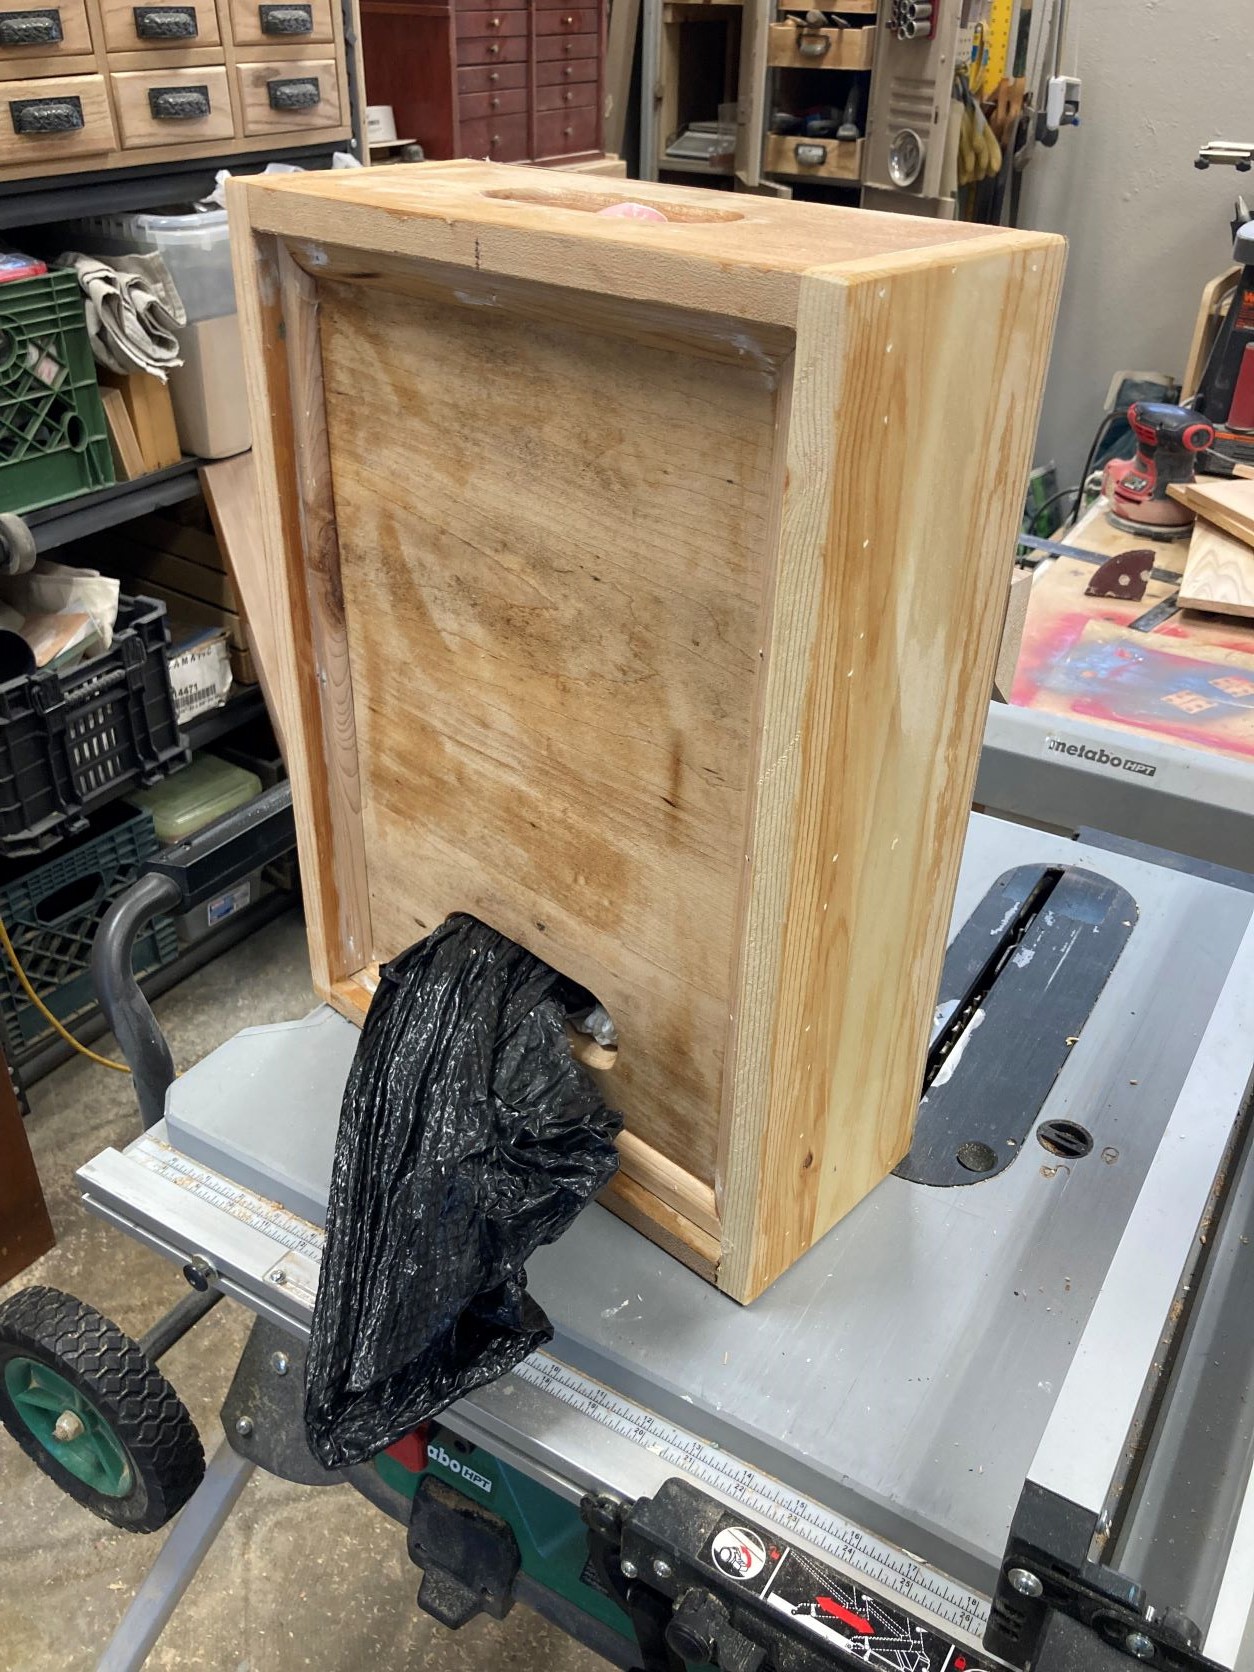
I went looking at plans for a bag dispenser, and I found Ana White's. Nice, simple design! The top, front, and bottom are made from a recycled maple table top. The sides are made from 1 x 3 boards that I glued up. Works exactly as I hoped!
Built from Plan(s)
Comments
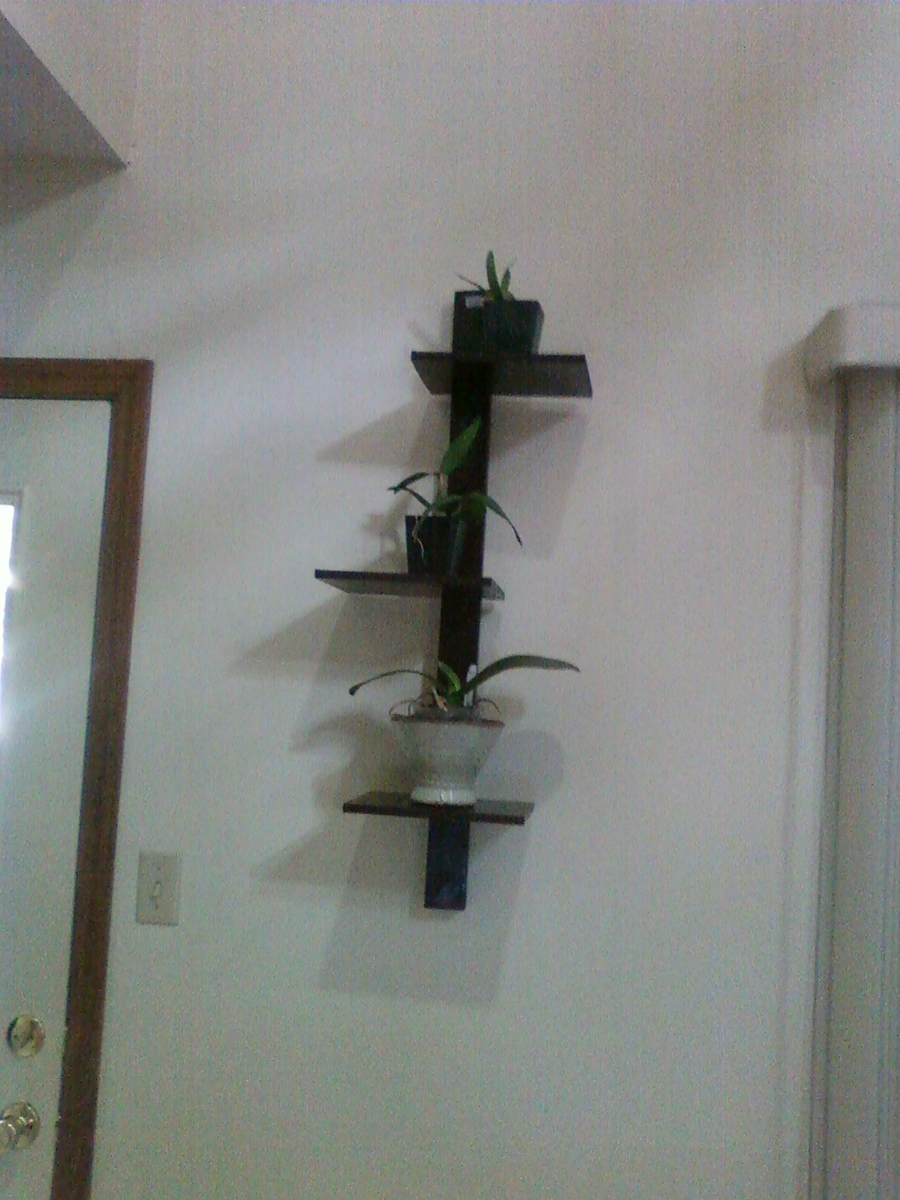
A Home for Some Orchids
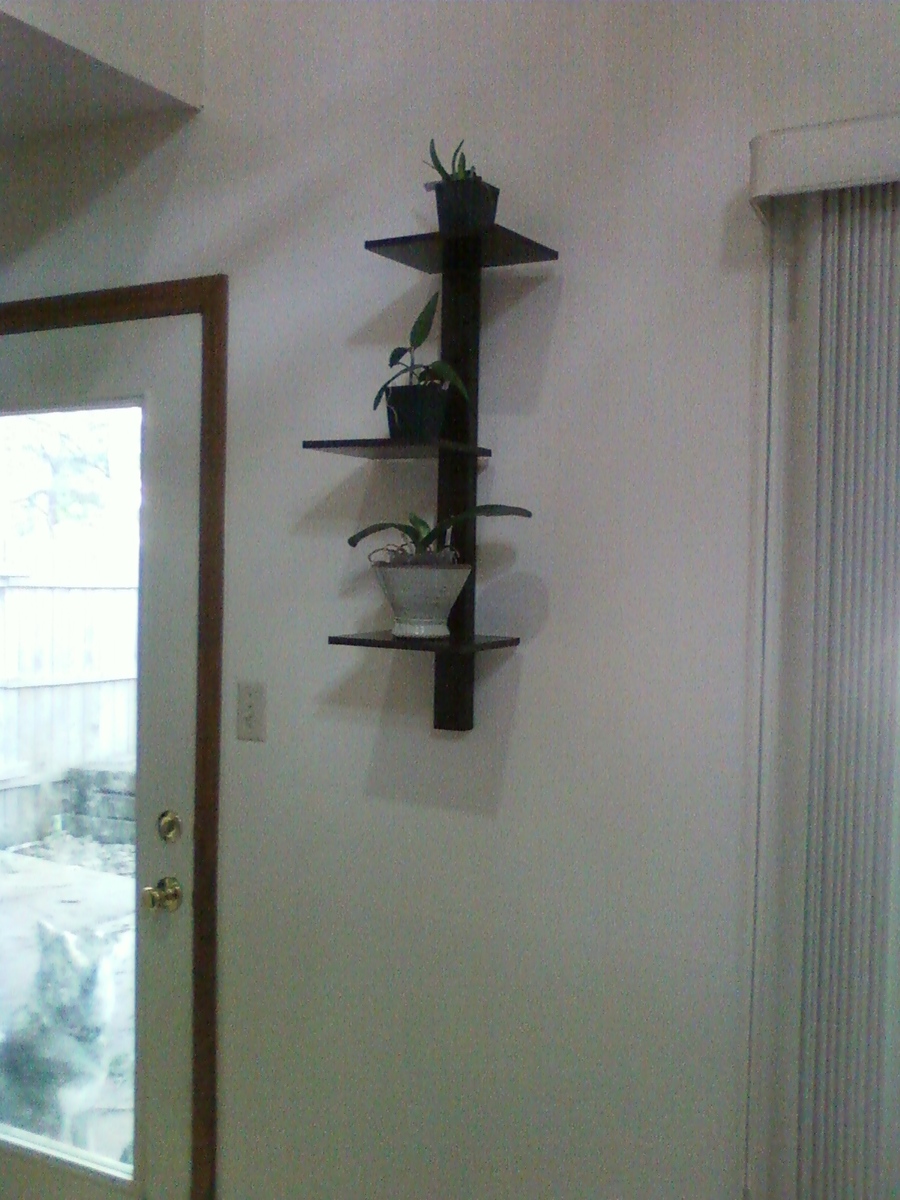
I built this with some scrap mdf, and 1x3's. I offset the shelves, and voila! A modern shelf to go with our eclectic, yet very modern decor. It also gives me a nice display for some of my orchids. I love this shelf!
Built from Plan(s)
Estimated Time Investment
Afternoon Project (3-6 Hours)
Finish Used
Kona Brown
Recommended Skill Level
Starter Project
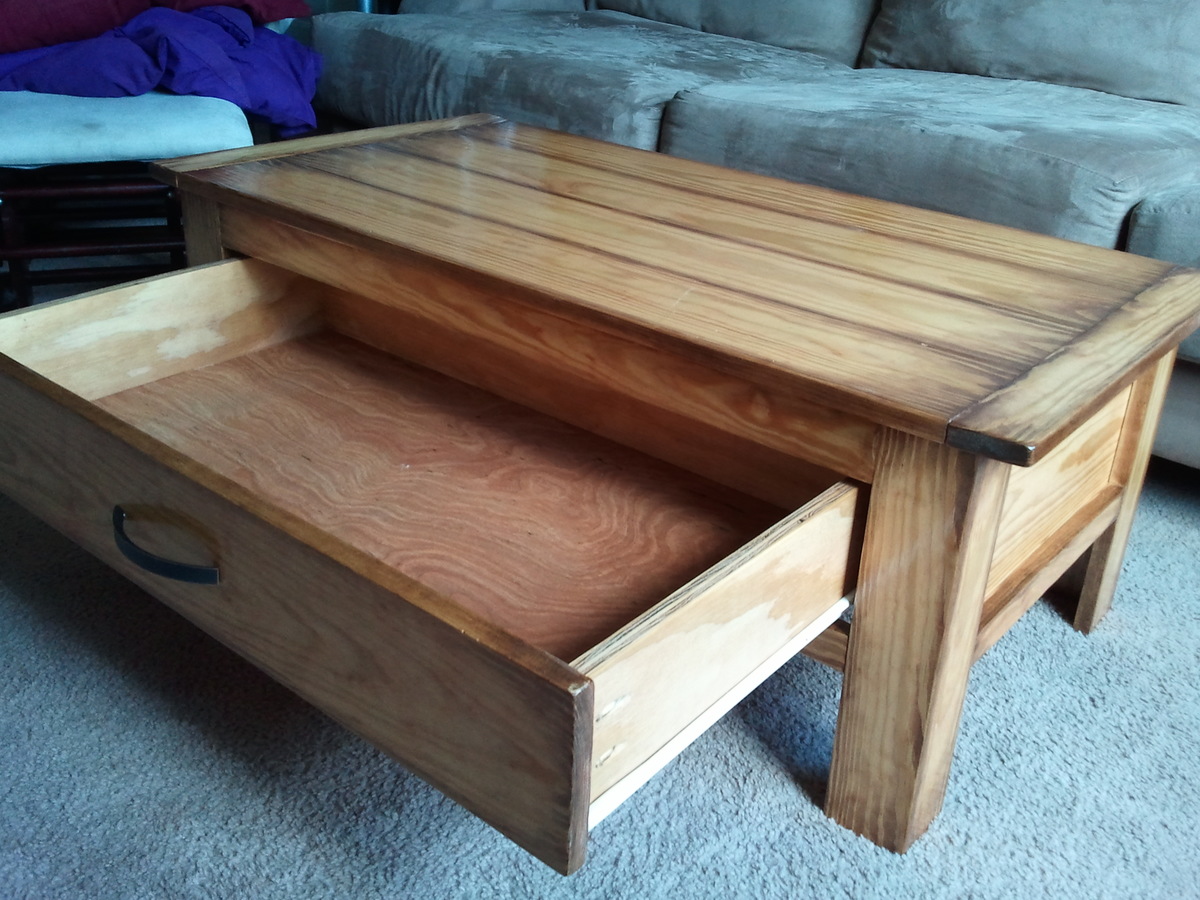
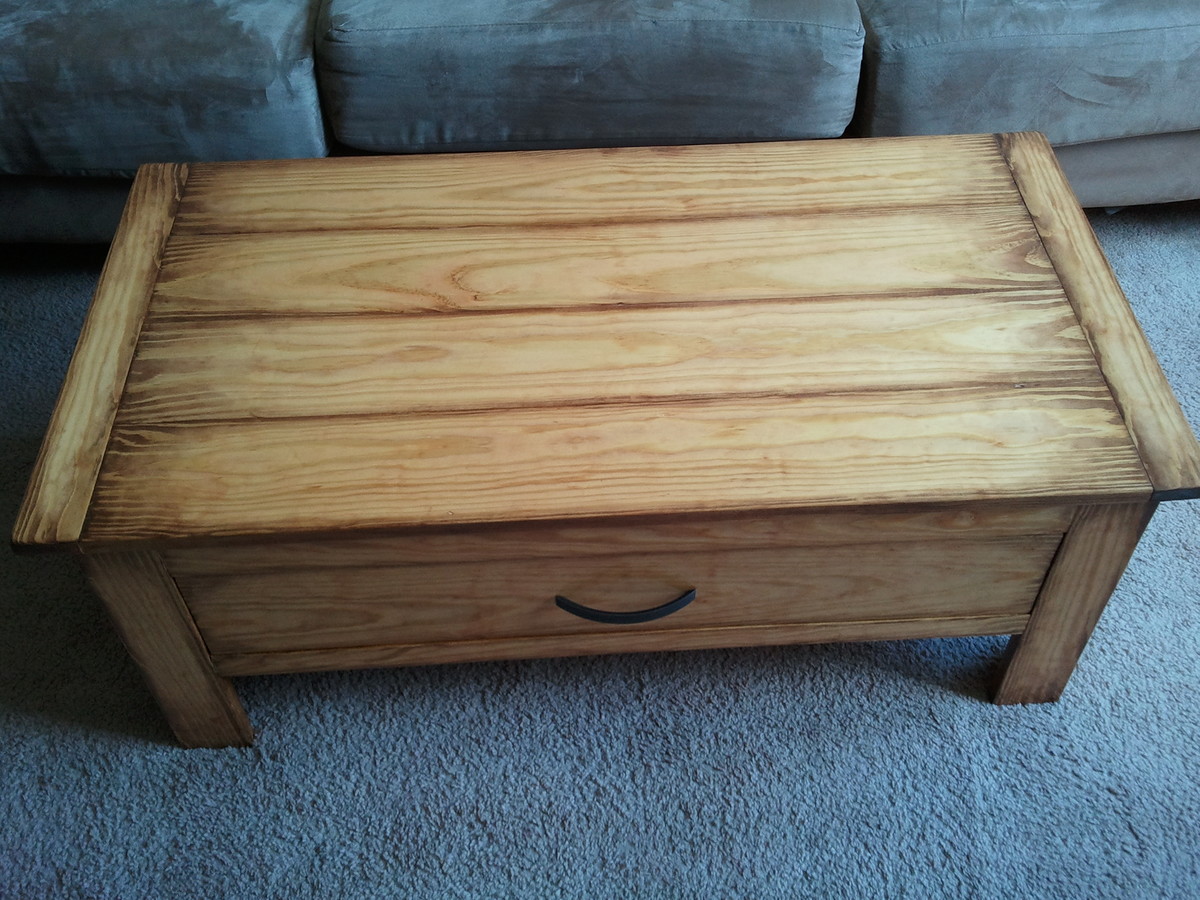
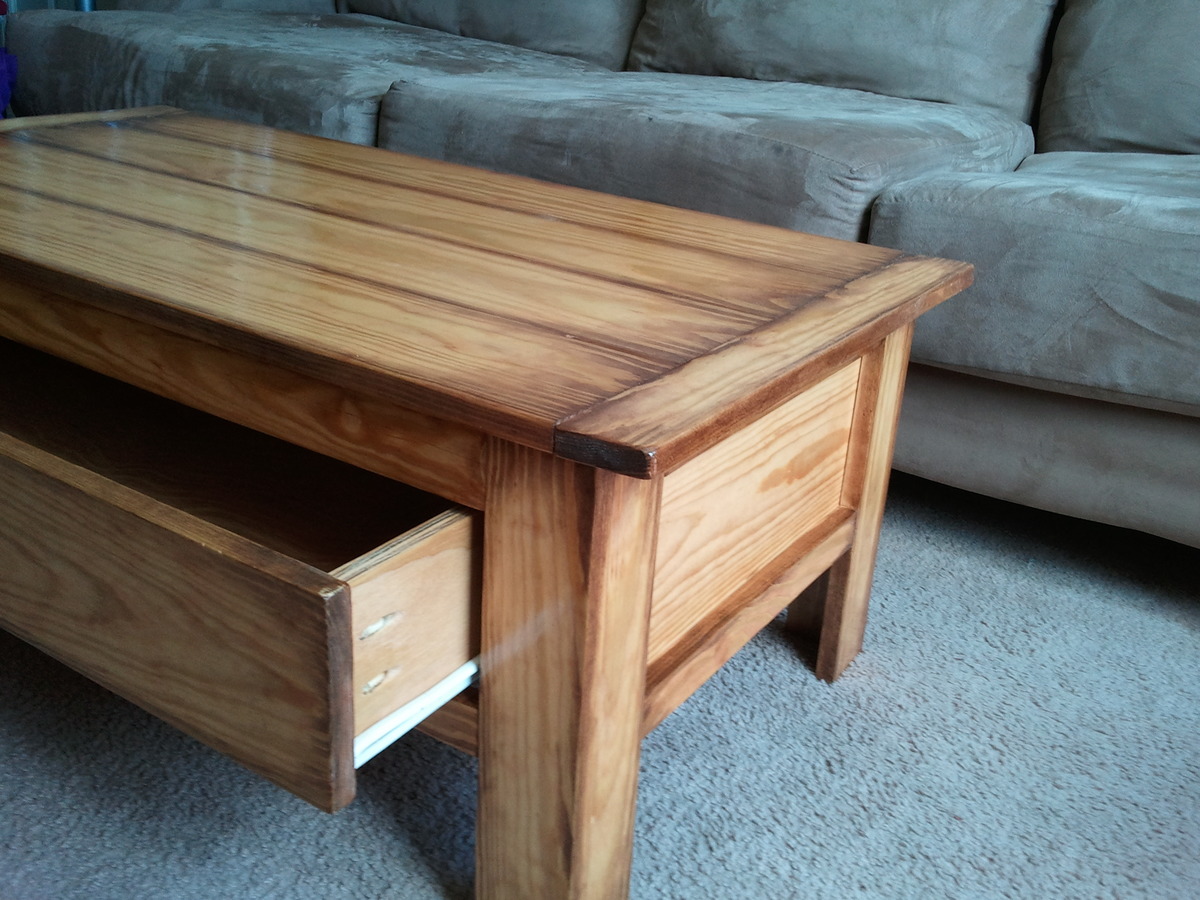
Coffee table with a massive drawer!!
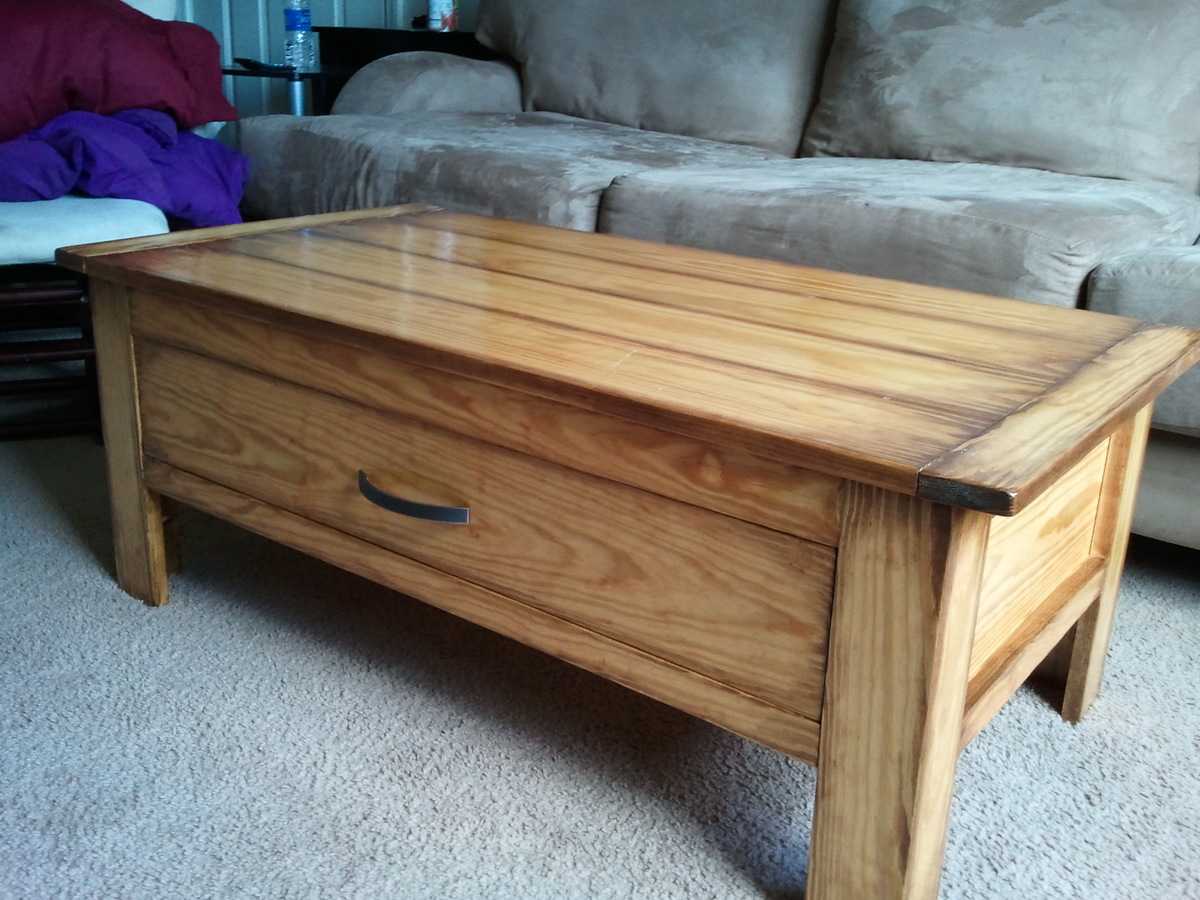
This was my second coffee table. Anticipating that the hardest part would of course be the drawer, I actually started with the drawer and built the rest of the table around that! Made a big difference too. It was much easier.
I took my time with this project with things that I had rushed through before, sanding parts before assembly, dry fitting with lots of clamps at each step, and I took extra care on cutting pieces square.
Since I was able to get the drawer done so much easier this time, the hardest part was the top. I hate how the ends turn up slightly... does anyone know how to stop that from happening?
I spent about a week and a half on this table, working on it for a few hours a day while my son was in school.
I am SO SO SO happy with how it turned out. The drawer was really tight in the shop (no air conditioning) but when I got it home, it has loosened up a bit, and its still just a little sticky, but not bad at all. I just love this finish. It's by far my favorite finish of any that I have tried.
I am trying to sell this coffee table, and my next project is going to be a console that coordinates, but will have the base part painted and the panel top stained. I really need a good job in the near future so I don't have to keep selling these things that I build and fall in love with!!
** On a side note, this coffee table got me a marriage proposal from a near stranger. Who would have thought that making sawdust would be so attractive to guys? LOL.
Built from Plan(s)
Estimated Cost
$125
Estimated Time Investment
Week Long Project (20 Hours or More)
Finish Used
First stain with Minwax Golden Pecan, then rub edges and massage into a gradient with Minwax Red Oak. Two coats of semi-gloss poly. Last coat on top is applied VERY HEAVY. Sanding with 600 grit by hand in between coats.
Recommended Skill Level
Intermediate
Comments

Wed, 09/04/2013 - 20:47
Sticking
You can get silicone in a spray can and it will keep the drawer sliding slick and not catch. I had to use it on my apothecary console table. I believe beeswax or candle wax can also help if you'd like a more natural solution. Great table!
Thu, 09/05/2013 - 20:44
thanks
actually since I have it home and it's so much cooler, it doesn't stick at all anymore. It is completely perfect. It took a couple days for the wood to adjust, but I'm so happy because there are NO "obviously handmade" flaws. You know what I mean?