Community Brag Posts

2-tier wire baskets

Submitted by alekosbiki on Wed, 03/28/2012 - 14:26

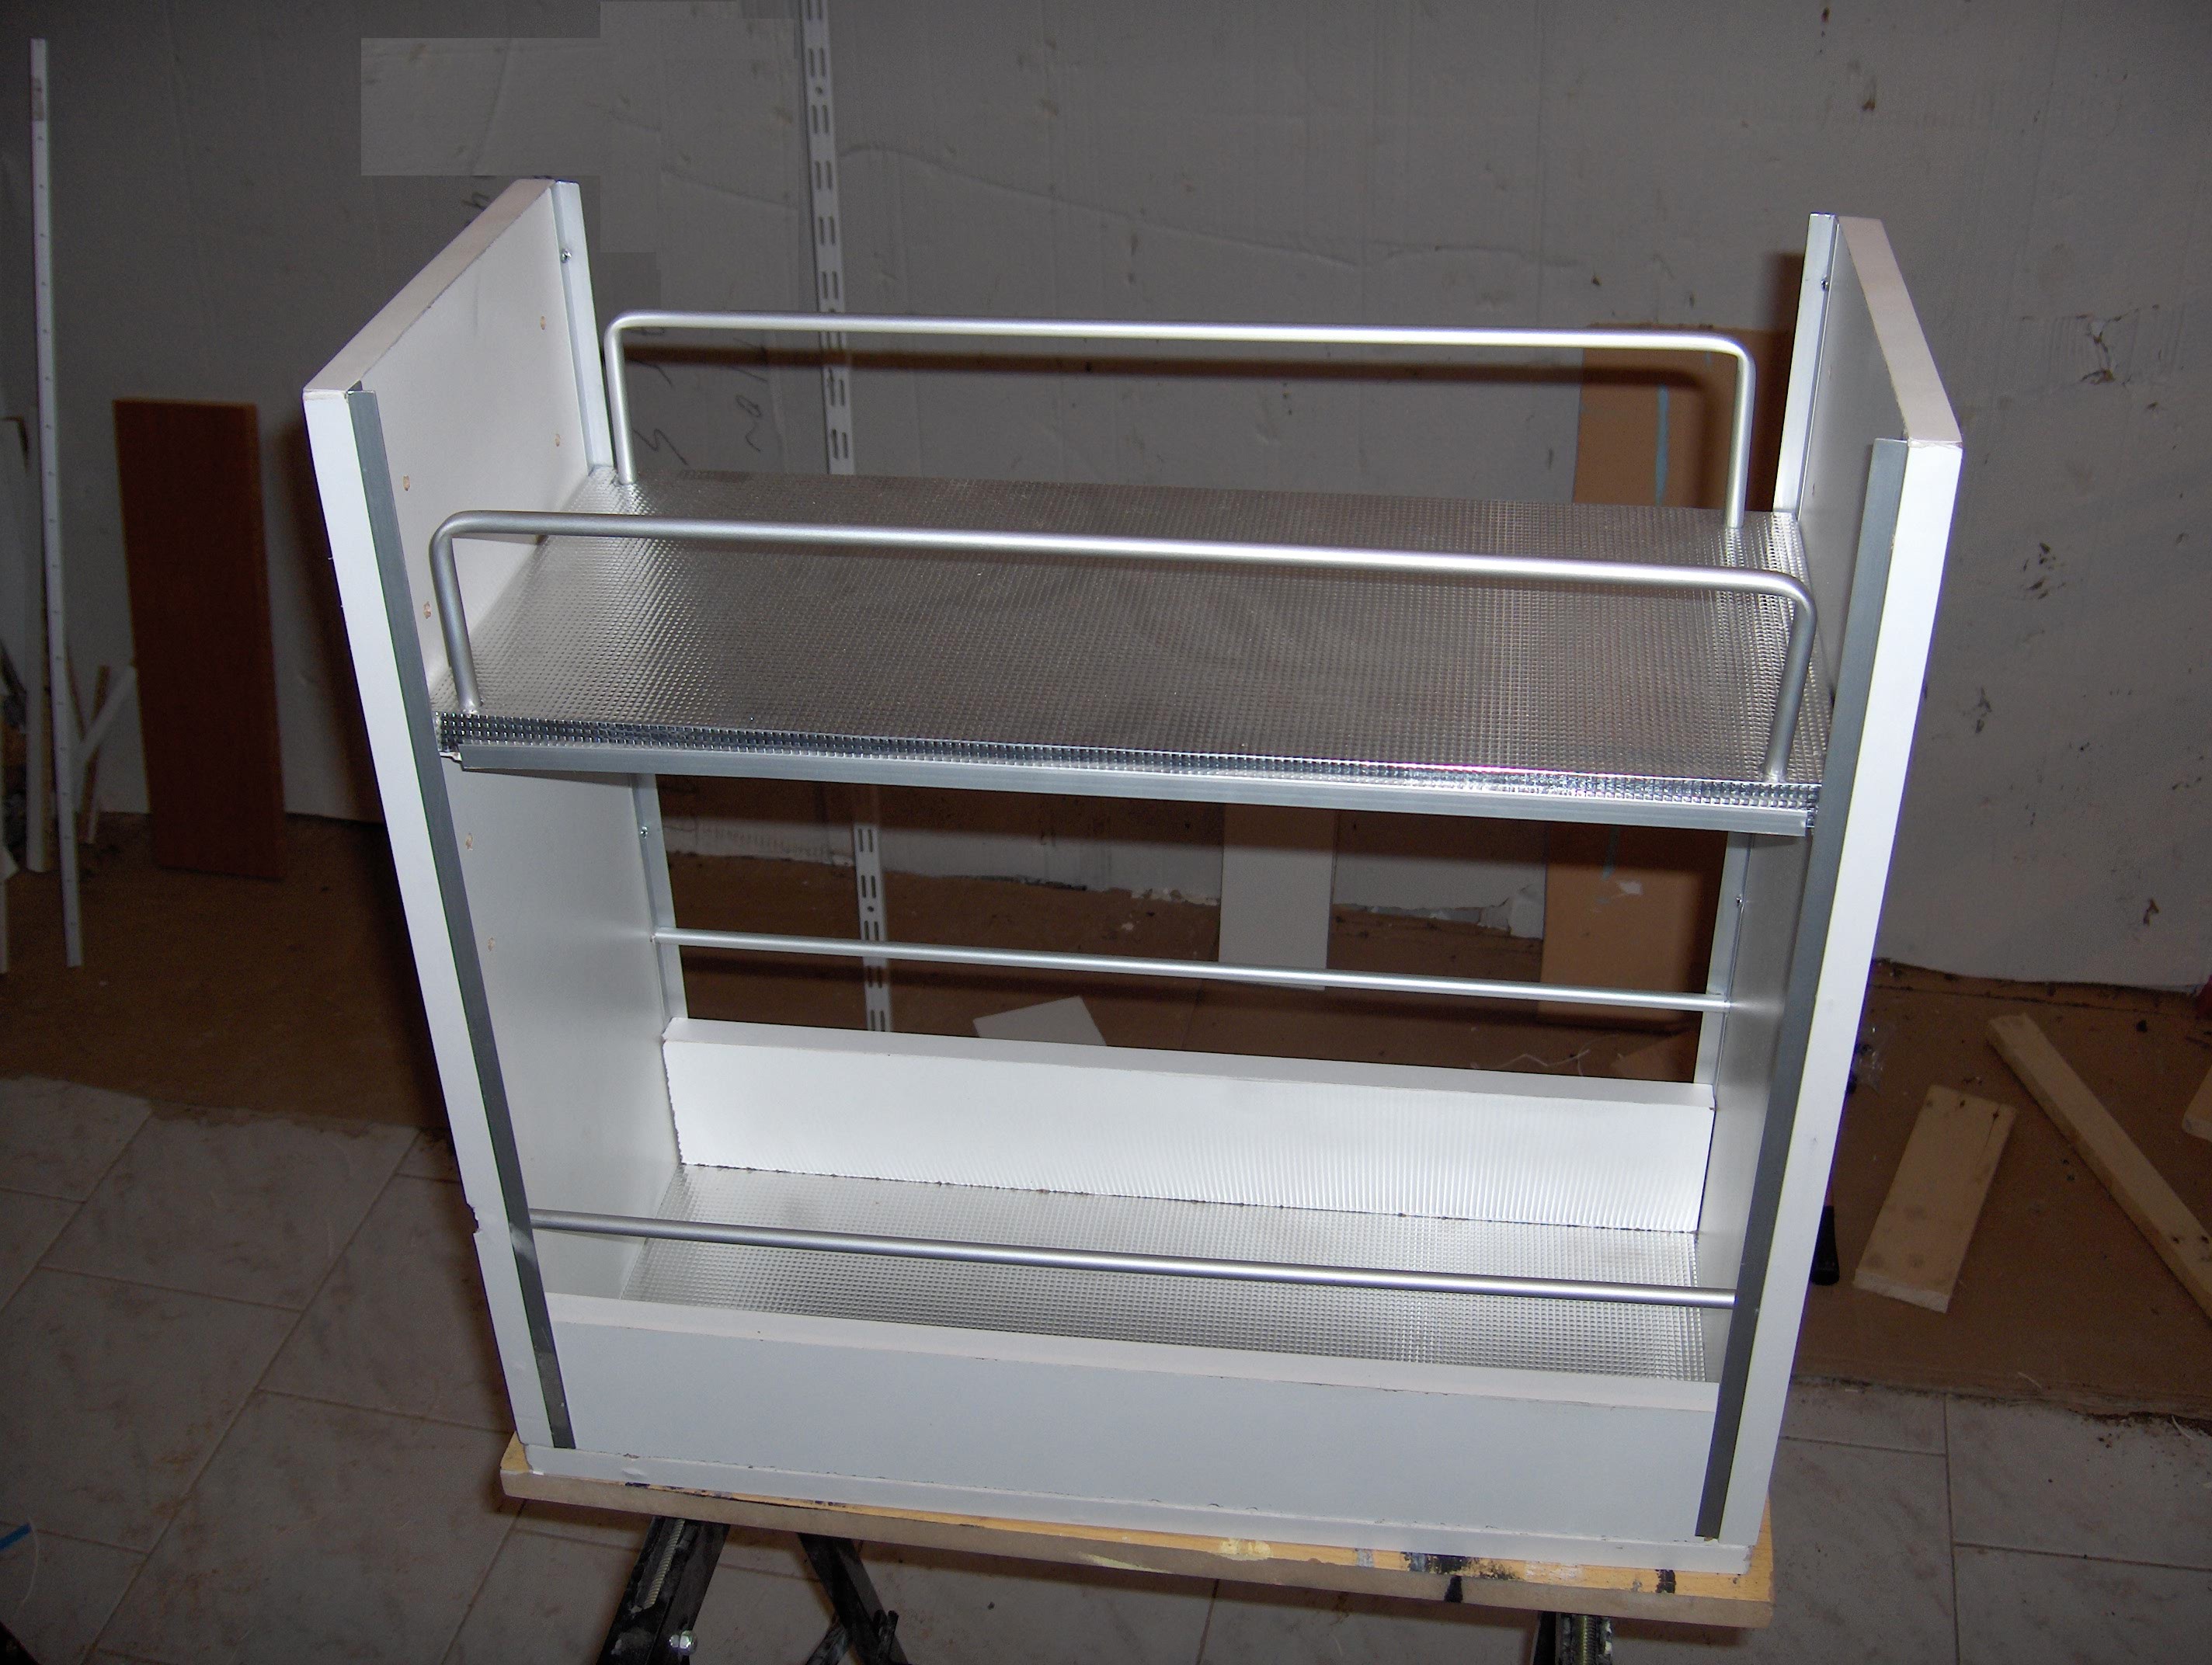
One of the kitchen accessories is
a bottle rack. 
There are many kinds of bottle
rack depending on the type of bottle (oil or whiskey) and the use of it
(sliding, stable under the sink, in a single cabinet roundtrips etc).

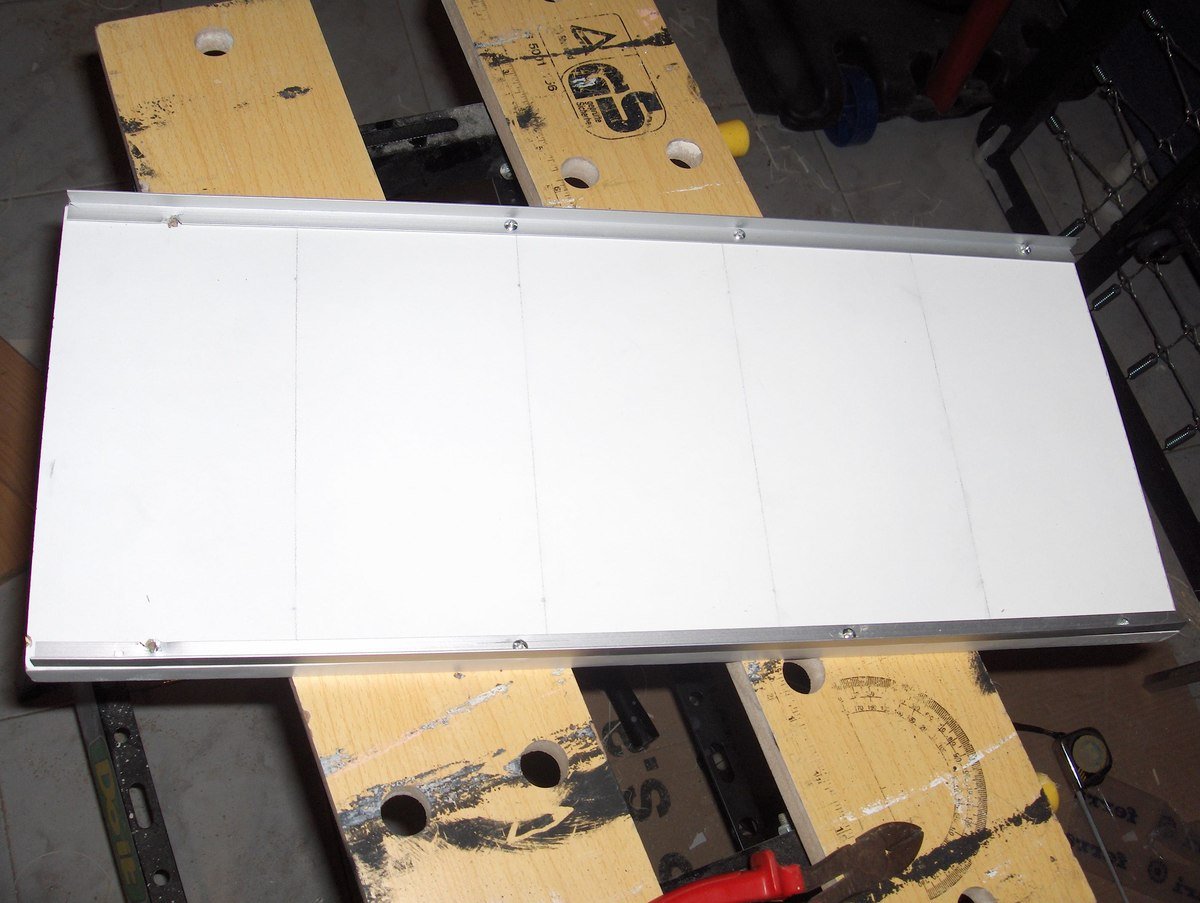
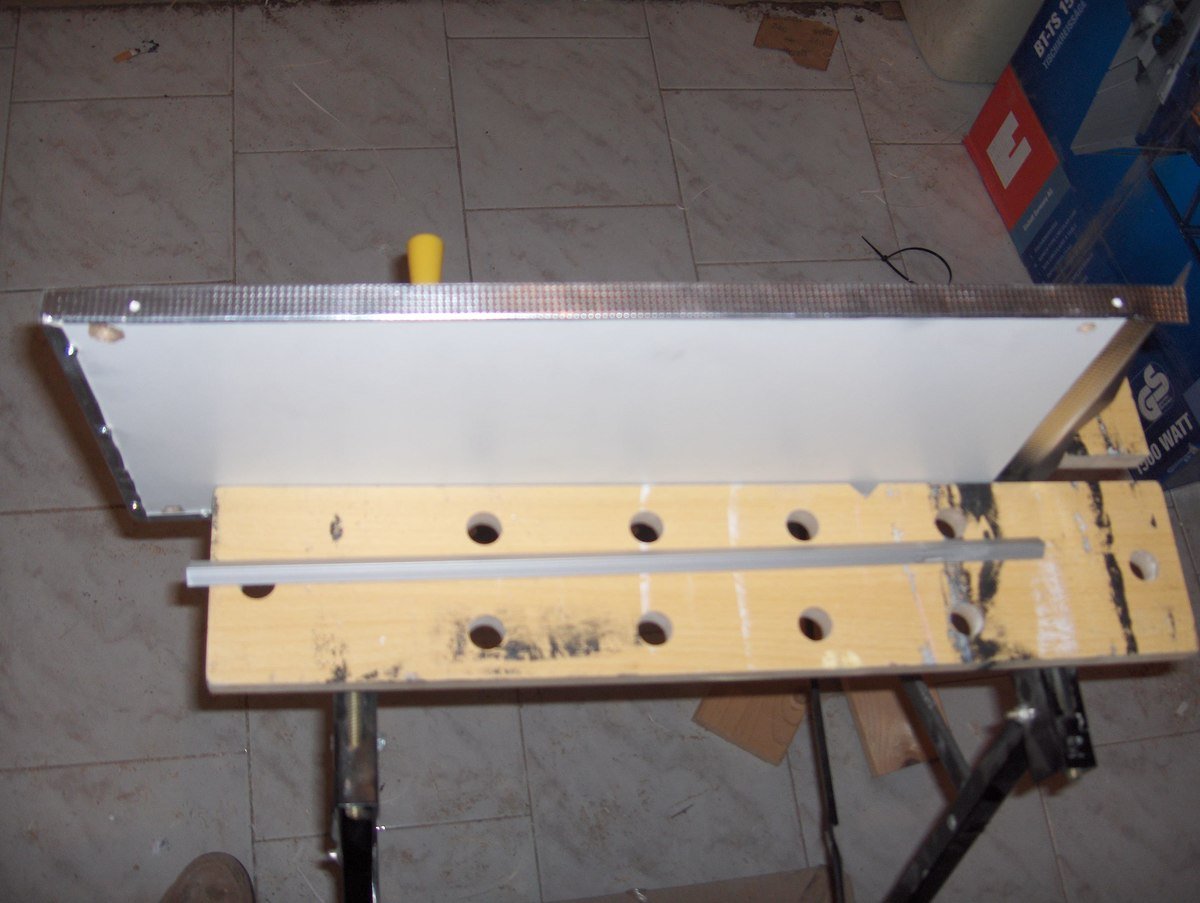
The demands of my own
construction is on bottle rack wagon (ie kitchen pulled out of context), will
find below and next to the sink that will use the entire height of the cabinet
and will have bottles of oil that can be dirty and will therefore be 
wash.Finally it is two storey with
the second shelf can be moved in height. 
The dimensions are length 53,2 cm width 25cm and
height 50cm. 
The materials we use are white
melamine 16mm aluminum angle, aluminum tubes and aluminum sheets to dress
racks. 


Materials of Construction

Melamine White 16mm: 4pcs x
(25cm x 50cm)
Aluminum angles (15mmx15mm):
4pcs 4pcs x 50cm x 47cm and
Aluminum tubes 10mm: 2 pcs and
2 x 52cm x 54cm pieces
Aluminum Sheets: 2pcs x 32cm x 57cm


Cost of construction

Melamine 0.5
m
x 11,5 = 5,75 
euros
 
Guide Ferrari50 cm 1pc x 9 = 9 
euros
Aluminum angles 4 feet (4 pcs of 1m) x 2.5 =
10
euros
Aluminium tube 4 feet (2 pcs of 2m) x 5,5 =
11 euros
Aluminum Sheets  8 euros
Mounting rack 1 
euros
Total: 45.75 euros

Estimated Cost
45.75 euros
Estimated Time Investment
An Hour or Two (0-2 Hours)
Recommended Skill Level
Starter Project

Mini Farmhouse Bedside Table

Submitted by TeamCraven on Wed, 01/15/2014 - 11:10

FIRST BUILD!! We've been using metal decorative plant stands as our nightstands, but they're just too wobbly on the carpet in our bedroom, and don't have any storage except the top of them, so when we saw the plans for the Mini Farmhouse Bedside Table, we knew it would be perfect. We don't have a lot of space next to the bed, so we went with the Mini plans, and built 2 of the nightstands, one for each side. We do a lot of projects, and I have refinished furniture for a few years, but we've never built anything from scratch. We have all the tools, so we decided to give it a try. This is our first build, and even though they're not perfect, I think they turned out nice, and we learned a lot that we will bring into future builds. We've already since built a Farmhouse Bench, and are getting lumber this weekend to build a dining table! Thanks to Ana's plans, there are endless possibilities!!

We used 3 pieces of 1x6 for a planked top instead of one large piece of wood, just because we had extra 1x6. Otherwise, we followed the plans pretty close to exact. We bought a Kreg Jig mini before starting on this project, and it's the BEST tool ever!! I want the more expensive kreg jig now, haha I love it!

Built from Plan(s)
Estimated Cost
approx $40 for two nightstands for lumber (we already had stain, etc)
Estimated Time Investment
Day Project (6-9 Hours)
Finish Used
1 Coat Minwax Pre-stain wood conditioner
2 coats Minwax Ebony stain
5 coats Minwax Wipe-On Poly (sanding lightly after 2nd and 4th coat)
Recommended Skill Level
Beginner

Dawson's

Submitted by Debi60 on Thu, 04/07/2016 - 19:33

This project cost me approx $160. I added a fire truck wallpaper border across the front and sides, finished the top in chalk board paint, and used torsion hinges from Rockler. Pricey but very nice for a lid. I also added plastic feet to the bottom and felt tabs where the lid touches the four legs. I like finishing details. It took me about a week to complete, mostly because of the time needed for the chalk board paint to set up. Loved the way it came out and hated to part with it! Ana's plans are always easy to follow and turn out great

Built from Plan(s)
Recommended Skill Level
Beginner

Toy makeup set

Submitted by mandee on Sun, 12/15/2019 - 15:23

I made this for my almost 2 year old niece for Christmas this year. 

Built from Plan(s)
Estimated Cost
50
Estimated Time Investment
Weekend Project (10-20 Hours)
Recommended Skill Level
Intermediate

Lazy Bench

Submitted by Anonymous (not verified) on Sat, 08/19/2023 - 10:53

Built this Lazy Bench over the course of one weekend. Had to make some modifications to the way the arm rest / cup holder moves, but overall happy with how it turned out.
When I build this again - I gave this one away as a donation to our local Catholic Radio station - I'll make a bigger point to make sure that all four of the back supports are exactly the same, and that I pre-drill the carriage bolts that secure the cup holder before I start assembling.

UTtanker

Dining Buffet

Submitted by lazyLiz on Sun, 04/01/2012 - 11:05

Modified the salsa console by taking the drawer off and stealing some from Patrickhosey's (bragpost). I built it for my dining room. Measures 57-1/2" long X 17" depth X 39" tall.

Built from Plan(s)
Estimated Time Investment
Week Long Project (20 Hours or More)
Finish Used
Minwax red oak and poly
Recommended Skill Level
Intermediate

Comments

lazyLiz

Mon, 04/02/2012 - 04:47

I don't but it's easy to make, make your door frame first, trace the inside of frame on a plywood sheet and use compass to make all sizes of circles on that sheet. If you don't have compass that's big enough, just use string or thread( like I did on this project), pivot one end, attach the pencil on one end and swing to make circles :)

4x4 Truss Beam Table and Benches

Submitted by MakinDust on Sat, 01/18/2014 - 08:36

Table and benches were made to plan, except I shortened the overall length and added another 2x10 to the top to give it some additional width. The benches were also shortened slightly so the legs of the benches slide between the legs of the table; which allows the benches to be pushed further under the table when not in use. Avoid my rookie furniture making mistake and go to a specialty lumber store that sells wood that is already aged (dry). Most everything you find at the big box stores will still be wet and shrink/warp on you if not completely dry first.

Built from Plan(s)
Estimated Time Investment
Week Long Project (20 Hours or More)
Finish Used
MinWax English Chestnut Stain and 3 coats of MinWax Satin Poly
Recommended Skill Level
Beginner

Comments

MakinDust

Tue, 05/20/2014 - 16:23

Appreciate the compliments. Sorry for the delayed response, but the final dimensions turned out 72" x 46". Let me know if you have any other questions.

Gopher Hole Puzzle

Submitted by mtairymd on Fri, 12/20/2019 - 09:09

This is a fun little puzzle that goes by the name of Golf, Nine Hole and, my favorite, Gopher Hole Puzzle. The goal is to fit all six pieces into the box. The possible combinations make it pretty challenging.

Estimated Cost
$5
Estimated Time Investment
Afternoon Project (3-6 Hours)
Finish Used
Oil & Paint
Recommended Skill Level
Beginner

DIY Double Queen Size Lounge

Submitted by Anonymous (not verified) on Sat, 08/26/2023 - 12:13

A friend asked me to build her a durable queen sized lounger for beside her pool. I used this platform style and added the multi-adjustable tilt. The lounger looks amazing and will double as a spare queen size bed for guests.

Mary Wikene

2 projects combined

Submitted by cmsklein on Wed, 04/04/2012 - 17:09

This replaced a huge formica countertop in our laundry room. The counter collected unfolded clothes on the top, and piles of shoes underneath. Also, we had a 4 hook shelf from Target holding all 3 of our kids bags and backpacks. My husband was against this, because "where would we put all the laundry?" Well, this is the solution and we both love it!

I measured this out and drew diagrams and then finally decided this was too big of a project to do for the first time. I did hire someone, but he said the measurements were right on.....he had never built something like this before. The outside of the door is painted with magnetic primer and holds magnets. So much more functional that the counter.

I know I didn't build this myself. I think I could have done it, if I could have a week to do this without interruption, but that was impossible and I needed this YESTERDAY (the 4 hook wall shelf fell out of the wall). But I wanted to share in case anyone else is having a space dilemma! We LOVE it!!!!

Estimated Cost
$1100 hired/ $200 self
Estimated Time Investment
Week Long Project (20 Hours or More)
Finish Used
paint sherwin williams
Recommended Skill Level
Intermediate

Comments

Guest (not verified)

Thu, 04/05/2012 - 12:10

What a great idea! Very well planned out! I would love to build something like this in our mudroom.

Guest (not verified)

Tue, 04/10/2012 - 16:33

Just what we need! Thank you! And I love the door covering the baskets and the magnetic paint - I hadn't thought of those! Thanks so much for sharing! It gives met the confidence to try it myself!

Grey wash bookshelf

Submitted by DutchDIY on Mon, 01/20/2014 - 06:09

Thanks Ana for your wonderfull website! even in The Netherlands your designs are shown.

Built from Plan(s)
Estimated Time Investment
Afternoon Project (3-6 Hours)
Finish Used
grey-wash paint
Recommended Skill Level
Beginner

Comments

Modified from Farmhouse Table

Submitted by Anonymous (not verified) on Tue, 04/12/2016 - 19:15

Modified the plans from the farmhouse table to add leaves in order to extend it another 15" total. Turned out well with the locking latches.

Estimated Cost
200-300
Estimated Time Investment
Weekend Project (10-20 Hours)
Recommended Skill Level
Beginner

Comments

Horse Tack Storage Shed

Submitted by Anonymous (not verified) on Wed, 08/30/2023 - 09:09

We have been in need of a place to store our horse tack for several years, and finally got around to it. We modified the small cedar shed with a little extra support and added saddle racks and bridle hooks. Super pleased with how it turned out!

Gabi Johnson

Built from Plan(s)

Comments

Seasonal And Holiday

Pet feeder

Submitted by Milhouse on Sat, 04/07/2012 - 23:07

I love my cat, and felt she needed a pretty feeding dish. I stole some old spindles from my sister's garage, cut them down and threw this plan together. It was actually harder than I expected because getting into tight little spaces with my drill to drill in the pocket holes was almost imposible. The wood split, nothing is square and the holes for the dishes are messy...but it doesn't really matter, it looks good from a distance and my cat doesn't judge. Not that I know of, anyway.

Estimated Cost
Free - made from scraps
Estimated Time Investment
An Hour or Two (0-2 Hours)
Finish Used
Flat white paint
Recommended Skill Level
Intermediate

Comments

Breakfast nook benches with table

We wanted to create more seating space and a cosier breakfast experience with this nook. We made the benches with hinges for storage. The table was customized to fit our space and we chose to change the legs rather than buying the $20 each legs. We love how it turned out!

Estimated Cost
$100
Estimated Time Investment
Weekend Project (10-20 Hours)
Finish Used
Early American on the tabletop and semi gloss white paint.
Recommended Skill Level
Beginner

Comments

Corner Cupboard, Corner Cabinet

Submitted by Anonymous (not verified) on Fri, 04/15/2016 - 21:33

I saw the plans on Ana White website and and used them to put this together. I changed it slightly to fit my needs. I made this for my in-laws and it was a lot of fun to do. Hardest part was using blue tape on stain and paint.

Built from Plan(s)
Estimated Cost
125$ includes four cans of Rustoleum White Satin primer and paint from Home Depot, hardware, and lumber. Measure twice Cut once and all will be well.
Estimated Time Investment
Week Long Project (20 Hours or More)
Finish Used
Min wax Red Oak
Min wax satin poly
Rust oleum White Satin Paint and Primer
Recommended Skill Level
Intermediate

Chalkboard frame

Submitted by Kate_14 on Sun, 12/29/2019 - 08:39

I built these in different sizes. I added hooks on one to hang keys. I nailed hardboard with chalkboard spraypaint on the back.

Built from Plan(s)
Recommended Skill Level
Beginner

Indoor Punee/ Daybed

Submitted by hawaiitara on Mon, 04/09/2012 - 20:18

In our living room/sun room we needed a place to lounge as well as a place for guests to sleep. We used the chunky leg bed frame plans with the full size modifications to build 2 of them to make a giant Hawaii style Punee. We were able to build both of these easily in 1 day. We modified the legs and used 4x4's to make them taller and more rustic looking.

Estimated Cost
$200 for both
Estimated Time Investment
Day Project (6-9 Hours)
Finish Used
After priming, I spray painted them with Rustoleum 2x coverage in Satin Moss Green.
Recommended Skill Level
Beginner

Comments

theHammerGirl (not verified)

Sat, 05/19/2012 - 14:47

Nice beds! They are very tropical looking - really blends in the outdoor with the indoors.

Junior Size Classic Bunk Bed

We built this in our living room start to finish - we live in an NYC apartment. Because of the small room size we chose to modify the plans to a small mattress - hoping that it will last our boys until they are about 5 and 7 (currently 2 and almost here). This blog post outlines our buy and cut list for the modified size: http://wp.me/p3DCu3-Kd

Built from Plan(s)
Estimated Cost
$215 (plus $200 for mattresses and bedding)
Estimated Time Investment
Weekend Project (10-20 Hours)
Finish Used
None
Recommended Skill Level
Beginner

How to make a 2 year old happy (the long way)

Submitted by Anonymous (not verified) on Mon, 04/18/2016 - 13:23

I started this in my garage this winter so that it was ready for spring. Nothing in this is too complicated but it requires some patience. It was all worth it to see how excited my daughter was to finally play with her friends.

Estimated Cost
$500
Estimated Time Investment
Week Long Project (20 Hours or More)
Finish Used
Exterior paint from SW
Recommended Skill Level
Intermediate

Comments

Back