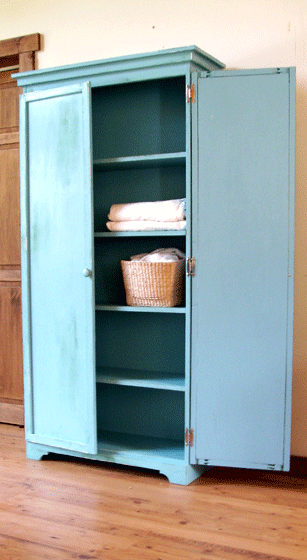


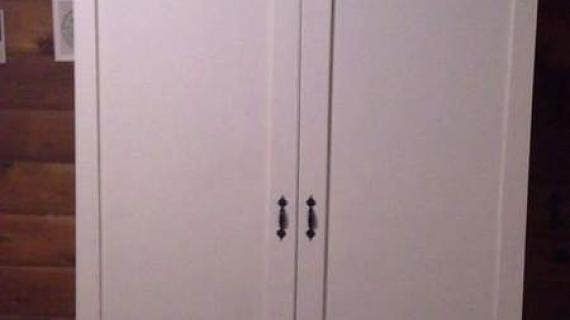
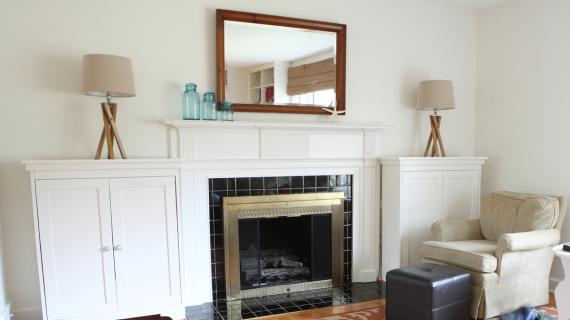
Sometimes you need a cluttered bookshelf. Hide the contents with beautiful doors. This armoire is simply a bookshelf with doors. A great spot to put linens, clothes, books, or even dishes. Special thanks to our readers for sharing their photos.
Preparation
2 – 1×12, 10′ Length
1 – 1×10, 12′ Length
1 – 1×4, 8′ Length
2 – 1×2, 8′ Length
1 – Sheet of 1/4″ Plywood or MDF (for the backs)
1 – Sheet of 1/2″ Plywood or MDF (for the doors)
5/8″ Brad Nails
Edge Banding if you are staining
3 Sets of Hinges for inset doors, frameless cabinets
2 Knobs
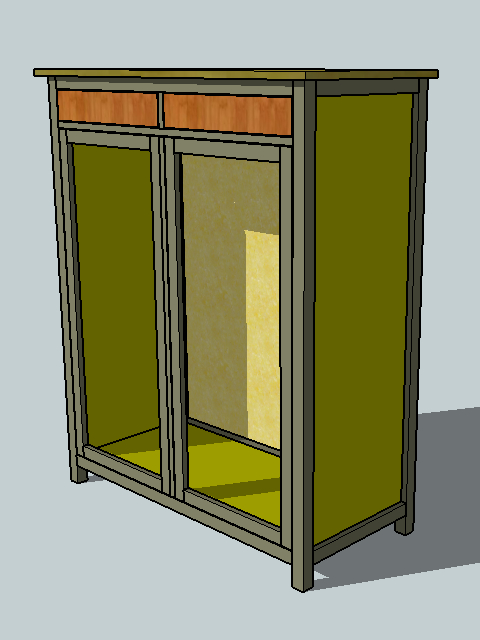
Cut List for the Bookcase
2 – 1×12 @ 71 1/4″ (Sides)
1 – 1×12 @ 34 1/2″ (Bottom Shelf)
1 – 1×12 @ 36″ (Top Shelf)
4 – 1×10 @ 34 1/2″ (Shelves)
2 – 1×4 @ 34 1/2″ (Header and Footer)
4 – 1×2 @ 11 1/2″ (Side Crown)
1 – 1×2 @ 37 1/2″ (Bottom Front Crown)
1 – 1×2 @ 39″ (Top Front Crown)
1 – 1/4″ Plywood or MDF @ 36″ x 72″ (Back)
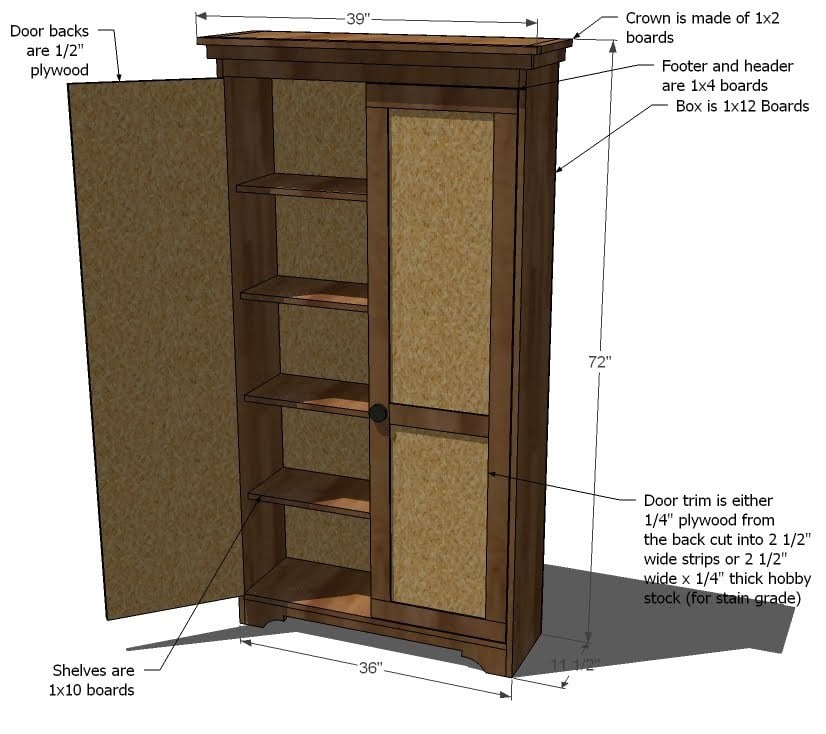
Cut List for TWO Doors
2 – 1/2″ Plywood or MDF @ 63 1/4″ x 17″ (Back of Doors)
4 – 1/4″ Plywood cut into 2 1/2″ wide strips @ 17″ (Top and Bottom Trim for Doors)
4 – 1/4″ Plywood cut into 2 1/2″ wide strips @ 58 1/4″ (Side Trim for Doors)
2 – 1/4″ Plywood cut into 2 1/2″ wide strips @ 12″ (Center Trim for Doors)


Cut larger boards first. Work on a clean level surface. Adhere to proper safety guidelines. Take a square of your project after each step. Keep outside edges flush. Use 2″ nails and glue unless otherwise directed.
Instructions
Step 1
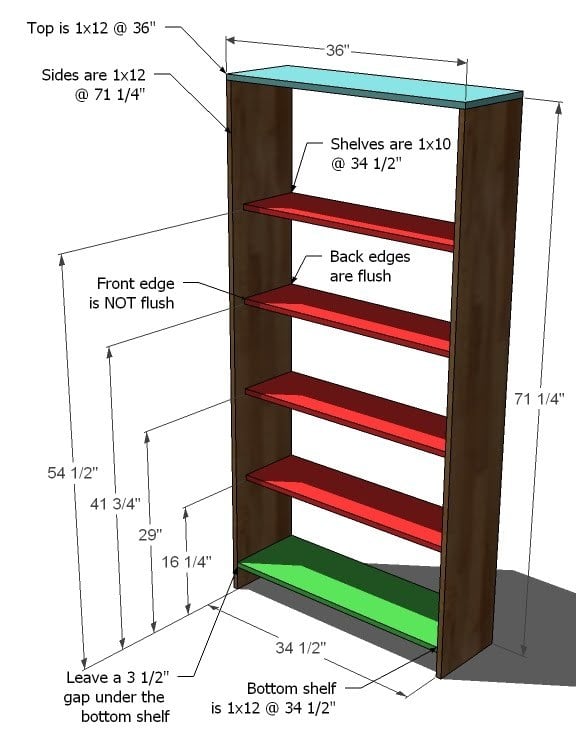
Build the Box. As shown above, build the box using 2″ nails and glue. Keep back edges flush. You can place the shelves anywhere you like, the shelf placement above is for 12″ clearance on each of the lower shelves. Remember to leave a 3 1/2″ gap under the bottom shelf, and that the top sit on top of the sides.
Step 2
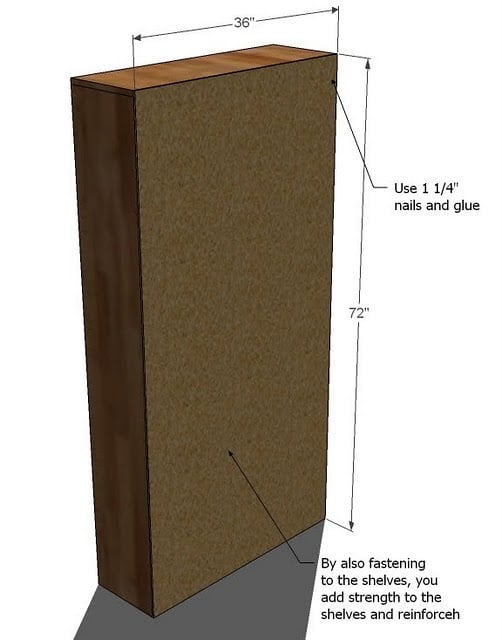
Back. Use 1 1/4″ nails and glue to fasten the back to the bookcase. Fasten all joining edges.
Step 3

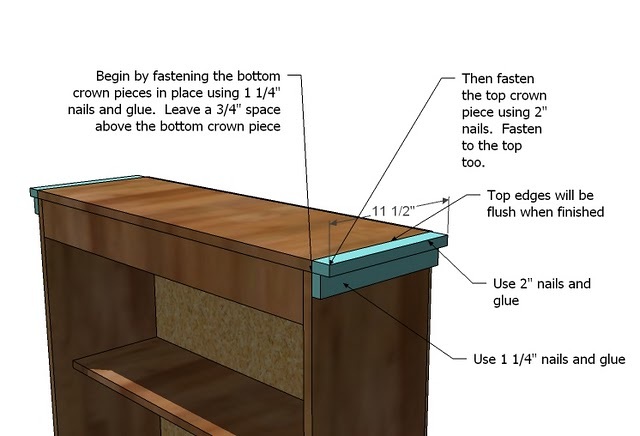
Header and Footer. Fasten the header and footer to the bookshelf, as shown above. Use 2″ nails and glue.
Step 4
Footer Cutout. Measure and mark out the footer as shown above. Use a jigsaw to cut out the shape above on both ends.
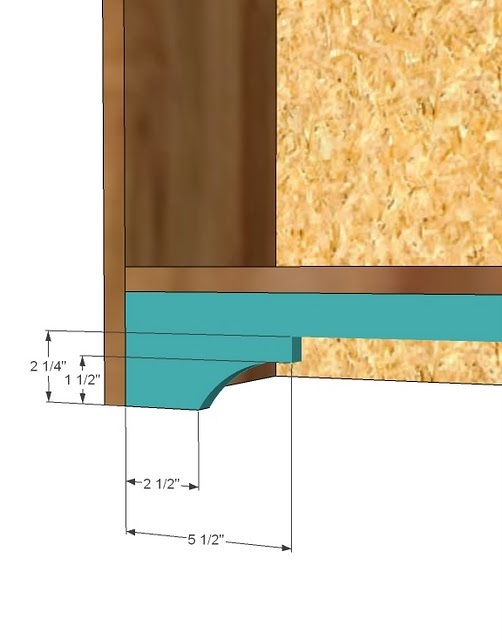
Step 5
Step 6
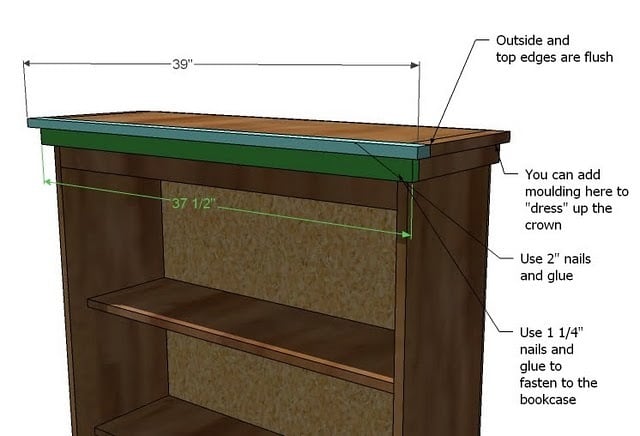
Front Crown. Add the front crown as you did the side crown. If you would like to “dress” up the crown more, you can purchase and use cove moulding 3/4″ x 3/4″ in between the top and bottom crowns, or under the bottom edge. You will need to miter the outside corners.
Step 7
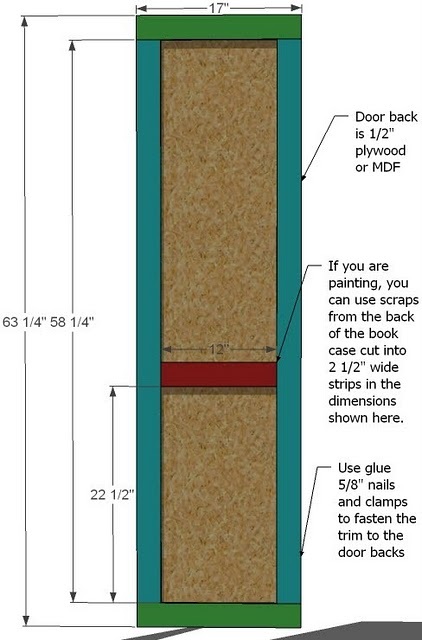
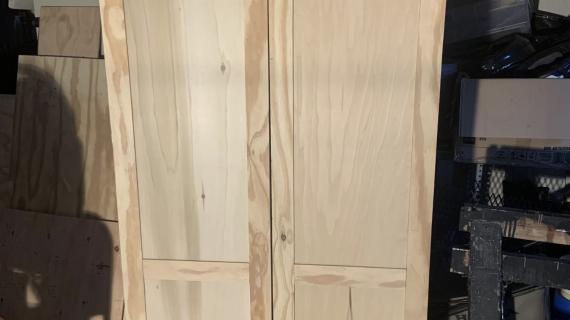
Door Construction. Cut your 1/2″ plywood for the backs. From leftovers from the back of the cabinet, cut 2 1/2″ strips with your tablesaw or circular saw. Then cut your trim boards from these 2 1/2″ strips to the measurements given above and in the cut list. Begin creating the doors by fastening the green trim above with 5/8″ nails and glue. Clamp and let dry. Do not clamp so hard that you loose all of your glue. Then add the blue trim, clamp and let dry. Finally, add the red trim. Dry on a flat level surface, the doors stacked, with a heavy object on top.
Step 8
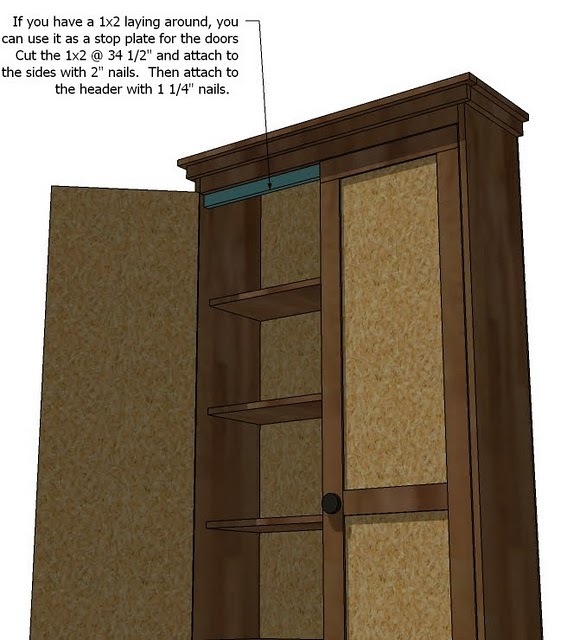
Optional: If you have a scrap 1×2 and want a little extra support for the tops of the doors, I often will add a 1×2 to the header as shown above. This also makes a nice finished look when the bookcase is opened.
Step 9
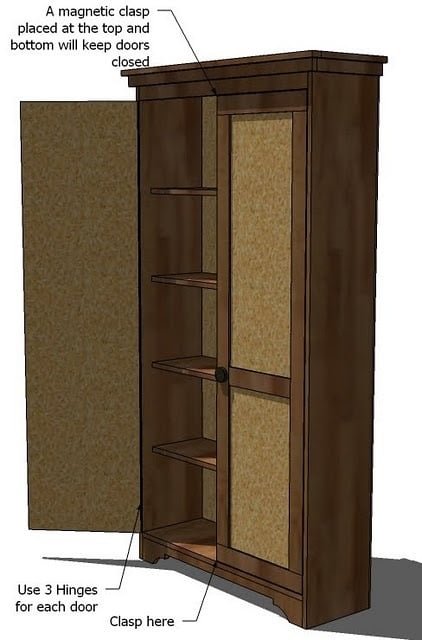
Door Construction. Use 3 Hinges per door and attach the doors to the bookcase. I like to add magnetic clasps to keep the doors from opening. Add knobs or pulls.


Comments
Carrie S (not verified)
Thu, 03/25/2010 - 00:21
Ana,This is so cute. Thank
Ana,
This is so cute. Thank you for your plans. This is definetly going on my growing to do list.
Lulu (not verified)
Thu, 03/25/2010 - 01:11
The Primitive Yellow Armoire
The Primitive Yellow Armoire is from Ikea! It's the Hemnes Linen Cupboard.
Tracy D (not verified)
Thu, 03/25/2010 - 01:44
It's gonna take me a year to
It's gonna take me a year to get through my list of things to build!! I'm so glad you added the doors to the bookcase, its PERFECT!! Thank you! :)
Kate (not verified)
Thu, 03/25/2010 - 03:34
OMG, I love that yellow
OMG, I love that yellow cabinet. I wonder how hard that would be to adapt from all the info you've given us before on other projects.
M - Pacha Mama (not verified)
Thu, 03/25/2010 - 04:07
Yup, the yellow cabinet is
Yup, the yellow cabinet is the Ikea Hemnes. It's mostly pine, but it does look really nice IRL as well.
http://www.ikea.com/us/en/catalog/products/30141857
JessA (not verified)
Thu, 03/25/2010 - 04:09
Oh I want to make this
Oh I want to make this without the doors! Ana, I propose we stop saying Far from perfect (FFP for short) and start saying Just Perfect Enough!!(JPE) :)
Jessica (not verified)
Thu, 03/25/2010 - 04:35
Thank you! I love it!
Thank you! I love it!
Serena (not verified)
Thu, 03/25/2010 - 05:13
Love this! I think this will
Love this! I think this will be a great solution for our need for dressers in our master bedroom. Thanks Ana!
Marjorie (not verified)
Thu, 03/25/2010 - 05:31
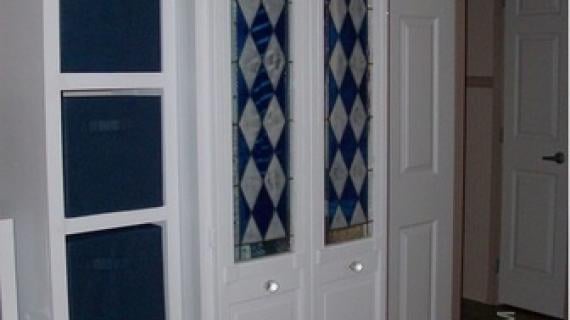
Hi Ana, I'd like to make
Hi Ana, I'd like to make this with glass inserts instead. Do you know what modifications I would need to make? Thanks!
Mom, Wife, and… (not verified)
Thu, 03/25/2010 - 05:52
Oh!! This just got bumped
Oh!! This just got bumped into 1st on my to-do list from here! I need a computer armoire, and this will be my supply armoire!
Deb W (not verified)
Thu, 03/25/2010 - 05:53
Hi Ana,Whether you're looking
Hi Ana,
Whether you're looking for finishing stuff like steel wool, tung oil, or milk paint; hardware like latches, knobs or hinges; tools like drivers, chisels or router bits; in fact anything for all kinds of woodworking; I have a great source...
Lee Valley Tools has all of these and more! Top quality tools (some are their own "Veritas" line with some of these made from customer's design suggestions).
They give incredible customer service, if you ever need it, not to mention their gardening toys/tools, bird feeders, books...
If I sound totally "over the top" - well, I have been dealing with this company for over 25 years and have no complaints.
I still look forward to receiving their catalogues in the mail, even though they have an excellent website. They are online at wwwleevalleytools.com
Enjoy, Deb
Deb W (not verified)
Thu, 03/25/2010 - 05:56
Sorry, forgot a dot in the
Sorry, forgot a dot in the address... www.leevalleytools.com
lanisanford (not verified)
Thu, 03/25/2010 - 06:40
yaaay! been waiting for this
yaaay! been waiting for this plan to be redone! Thanks Ana!
Roxanna (not verified)
Thu, 03/25/2010 - 07:10
Ana I would also love to do
Ana I would also love to do it with glass :) I have been wanting a cabinet to show off a collection of Depression Glass this might be perfect!
Melissa (not verified)
Thu, 03/25/2010 - 08:03
added to my to build list...
added to my to build list... that makes about 10ish things so far. I really need to get started but it is going to be another week. First thing is to build our daughter a bed but after that this might be next. It would work perfect in our master bedroom or even in the office. We have an antique armorie that belongs to my inlaws but I want something painted and i'm not about to paint their antique cabinet. haha! So many things to build so... I can't wait to see it all come together and to know that we built it, how exciting.
KRISTINA CIPOL… (not verified)
Thu, 03/25/2010 - 09:41
I REALLY like this project!
I REALLY like this project! it would be perfect in our bedroom. Thank you so much for all the great ideas and taking the time out to post! Very inspiring! :)
Mary (not verified)
Thu, 03/25/2010 - 09:55
Perfect timing! My husband
Perfect timing! My husband and I want to make one for the kitchen.
Lin W. (not verified)
Thu, 03/25/2010 - 16:49
Thank you so much for posting
Thank you so much for posting this plan. I've been trying to learn Sketchup. It's taken me 4 days to modify one of your plans to fit into my mudroom. I don't know how you do it all. You deserve a "Superwoman" award.
mcwilli2 (not verified)
Fri, 03/26/2010 - 00:29
I LOVE your site!!This is
I LOVE your site!!
This is going to be my first project!!!
-Crystal
Dianne (not verified)
Fri, 03/26/2010 - 08:35
I'd love a version of this
I'd love a version of this that had deeper shelves. Maybe somewhere in the 16-18 inch range. How would that work?
Kathleen (not verified)
Fri, 03/26/2010 - 10:59
Would LOVE it if you could
Would LOVE it if you could post the plans for the Primitive Yellow cupboard from Ikea (Hemnes Linen Cupboard) - as soon as i saw it I hoped you would show us how to make it! It could be so many things - linen cupboard, sewing storage, pie cupboard for baking supplies, etc, etc, etc!
Stephanie @ ki… (not verified)
Fri, 04/23/2010 - 17:02
Yep! That primitive cabinet
Yep! That primitive cabinet is the Ikea Hemnes cabinet in yellow. I have it and love it!
I did change the pattern on the back when I got it last year. Here's my post: http://kitschicagoan.blogspot.com/2009/03/mellow-yellows-mini-makeover-…
The Bottjer Family (not verified)
Thu, 06/10/2010 - 12:08
I have been following your
I have been following your site for quite some time and am hoping you could answer a question about this cabinet w/doors. I am looking to build a few of these to put side by side in a popout in my home to use as additional pantry space (hence why I need the doors- because I want to hide all of the cans, boxes, etc). However, I was wondering what the load capacity is on the shelves- I don't want to have them snap under the pressure of my pantry items.
Thanks sooo much!!!
jen5273 (not verified)
Sat, 06/26/2010 - 18:14
I agree with the previous
I agree with the previous posters - would LOVE to see plans for that yellow armoire. Would be perfect in my bathroom. Thanks!
A (not verified)
Mon, 07/19/2010 - 19:24
As mentioned by the previous
As mentioned by the previous posters, I would love to see the plans for the primitive yellow armoire. Thanks!!
Patty (not verified)
Fri, 07/23/2010 - 12:46
I love this project. Its on
I love this project. Its on my list of projects to do. But I'm wondering if it's possible to make it taller. Make the sides 81 1/4 instead of 71 1/4?
Keri Miller (not verified)
Mon, 08/30/2010 - 19:09
Ana, Have been following
Ana,
Have been following your plans for a while, but just as an observer. (I guess I have been building up the motivation? Confidence? I really like the yellow cabinent in this post, that you list as unknown. At this point in my "amateurism" I am not brave enough to go out on a limb and try something with direction. Yep, chicken! Any way possible you could draw up some plans for a cabinent like that??? You really are an inspiration, thank you for your dedication and hard work!
Keri
ana (not verified)
Mon, 08/30/2010 - 21:36
Hi Keri, this cabinet is
Hi Keri, this cabinet is actually from IKEA (thanks readers for pointing this out to me!) and I do plan on getting these plan together very soon!
alyssa_panas (not verified)
Mon, 09/06/2010 - 12:54
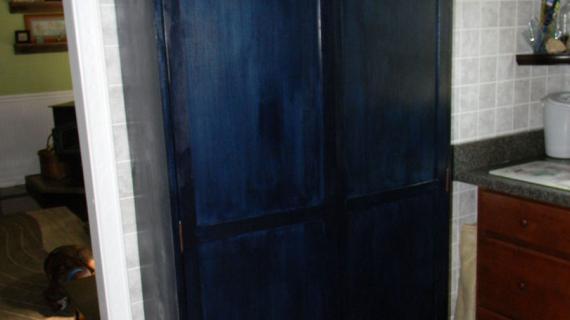
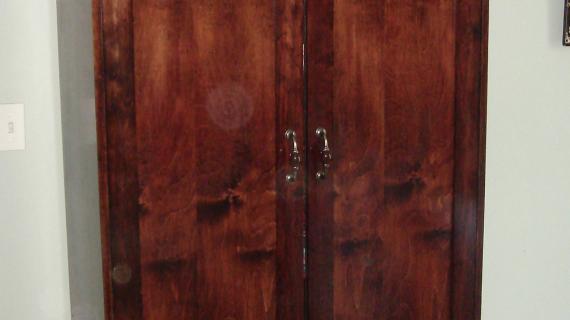
There are way too many
There are way too many comments to see if this has been asked, but how is that armoir in the very first picture finished? As in, how do you do a finish like that??
Ana White (not verified)
Mon, 09/06/2010 - 13:05
Alyssa, this armoire was
Alyssa, this armoire was built by one of our amazing readers as (I believe) a first project. To me, it looks like multiple layers of paint were painted on, and sanded to unveil layers beneath. Check out our finishing tutorial links to see how this is done.
Jasmine (not verified)
Thu, 09/30/2010 - 08:49
Ana, Thanks so much for
Ana,
Thanks so much for the inspiration!
I have a question... I'd like to build this as a full size closet - basically a deeper box with a hanging rod inside. I am worried that by taking out the shelving it will not take the weight. How do I know if it will be strong enough? How do I build it stronger?
Thanks!
p.s. Your post "Becoming Somebody" will always be my favourite : )
Dan K (not verified)
Mon, 11/08/2010 - 16:48
Since you are going to make
Since you are going to make the armoire deeper I would suggest using 3/4" plywood for the sides. This will be stronger and easier than gluing up 1x pieces. BC grade plywood will have a nice smooth face for the outside and a fairly good face for the inside. You can then overlay the outsides with more wood to give it a paneled look. (Similar process to constructing the doors).

Another way to strengthen the unit would be to use screws instead of nails. 2" screws will have much more holding power than nails. Predrill and countersink your holes to prevent splitting.
Dan K (not verified)
Mon, 11/08/2010 - 17:13
oops lost the second
oops lost the second picture:

Another option:
The light green pieces are a simple 2x4 box that goes at the very top and bottom to solidify things even further. The long pieces are 33" and the short ones are 20 1/2. (this makes a 36" wide x 24" deep armoire) I'd be happy to do a full cut-list if necessary.
I think that if you make use of my ideas you'll end up with a very sturdy armoire.
JulieP (not verified)
Tue, 11/16/2010 - 16:25
Dan, I would love to see a
Dan,
I would love to see a cut list for the dimensions you have listed. I was thinking about doing this armoire 24" deep.
Dan K (not verified)
Thu, 11/18/2010 - 18:37
I created some assembly
I created some assembly instructions here:
http://www.flickr.com/photos/8984712@N02/sets/72157625296999001/
Shopping List:
2 --2x4 8' Length
Sheet 3/4" BC Grade Plywood
2 Sheets 1/2" Plywood
4 -- 1x2 8' Length
5 -- 1x3 8' Length
5 -- 1x4 8' Length
6 Hinges
2 Knobs or Handles
Cut list:
2x4
4 @ 33
4 @ 20
3/4 BC Plywood (or MDF)
1 @ 22 3/4 x 34 1/2 (Bottom Shelf)
2 @ 23 15/16 by 72 (Sides)
Cut the bottom shelf first Then cut the other piece to 72" and rip it in half.
1/2 Plywood
1 @36 x 72 (For the back)
2 @ 16 15/16 x 66 (Doors)
1 @ 24 x 37 1/2 (Top)
1x2
2 @ 72 (Front trim)
4 @ 24 (Crown Sides)
1 @ 39 (Crown Front)
1 @ 40 1/2 (Crown Front)
1x3
4 @ 66 (Door Trim Verticals)
6 @ 12 (Door Trim Horizontals)
1x4
4 @ 72 (Side trim verticals)
6 @ 16 (Side trim horizontals)
1 @ 34 1/2 (Front Top)
MegShannon (not verified)
Tue, 12/13/2011 - 10:18
Thanks Dan!
This is exactly what I was looking for :) I having been eying an ikea amoire (I even pinned it! http://pinterest.com/pin/219972763019022369/ ) but I wanted something that I knew would be sturdy and stand up to the abuse of 3 kids.
Thanks for taking the time to plan this out!
Dan K (not verified)
Thu, 11/18/2010 - 19:04
Coming Soon?? Hemnes Linen
Coming Soon??
Hemnes Linen cabinet:
ashley (not verified)
Thu, 11/25/2010 - 17:56
that yellow cabinet is from
that yellow cabinet is from IKEA...its a HEMNES linen cabinet. I've had my eye on it for a while...any plans for that?
tracy (not verified)
Mon, 12/27/2010 - 19:00
I believe the little yellow
I believe the little yellow cabinet is Ikea.
Amanda (not verified)
Thu, 01/13/2011 - 10:52
We have a blank wall in the
We have a blank wall in the finished part of our basement and I'd love to add two or three of these, side-by-side, and add base moulding to the bottom as if they're built-ins, to create a wall of storage. If I get to it I'll post pictures!
aSprinkling (not verified)
Sun, 01/30/2011 - 10:01
How do you come up with your
How do you come up with your prices? When I price the boards for this (using plywood), I come up with just over $100 without taxes. And that doesn't include any of the additional hardware, nails, etc.
Melissa (not verified)
Wed, 02/16/2011 - 16:25
Dan, you may have just saved
Dan, you may have just saved me from having to hire someone to put in a closet in an office. We plan on turning it in a bedroom and this will be much cheaper!
Knightlight
Fri, 04/01/2011 - 16:59
I can't wait to make this!
I want to make one of these, but does anyone have a clue on how to make it into one of these? I really like the cabinet, but I would like to use it as a DVD cabiniet? I am not very plan savvy, so I was wondering if someone could help me out (or send me in the direction of a plan that is already made).
Thanks!
mommyofthree336
Mon, 04/11/2011 - 07:59
(No subject)
Guest (not verified)
Sat, 05/28/2011 - 12:12
Cost???
I love this plan and want to make a pantry for our kitchen. I'm working on my husband to make this. Is there an approximate cost to this project? We have all the tools, just wondering for the supplies. Sorry if I missed this in the plans.
Guest (not verified)
Mon, 06/06/2011 - 10:21
kreg jig
There were several jigs to choose from. Is the mini kreg jig enough to handle these project and easy to use?
Guest (not verified)
Fri, 06/17/2011 - 12:27
first build - panty
We're about to move into a house in a couple of months with no pantry so I've been hoping that this can be my first build. I saw one builder modified these plans to make the red one and I was wondering (Ana or Dan?) if you could help me with modified pantry plans? I need something a little deeper (like the plans Dan shared) but also wider. I am SO new to all of this so I'm looking for a buy and cut list. Otherwise I may try this one and hope it works! I hope to start next week! THANK YOU so much for this website! I have a list I can't wait to get started on soon!!
Guest (not verified)
Fri, 06/17/2011 - 12:52
Glad it's a PANTRY you're
Glad it's a PANTRY you're building, had me curious for a minute!!! haha Good luck!!
Nicole S (not verified)
Wed, 06/29/2011 - 11:04
I too am moving into a home
I too am moving into a home with no pantry and was wondering the same as others...about how much does it cost to build?
Guest (not verified)
Mon, 02/27/2012 - 09:31
Glass Door Inserts
How would one go about replacing the plywood in the doors with glass? What would be the dimensional changes?