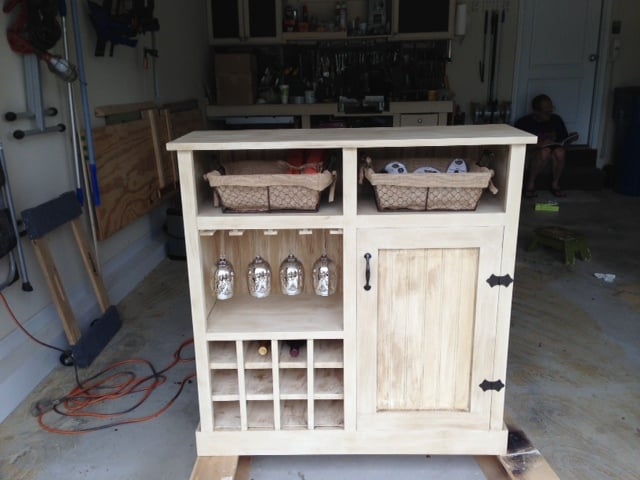
Happy Tuesday everyone! Today I am going to share a project with you that I built with the help of some plans from Ana-White.com.In a weekend we carved out a custom wine cabinet we will be donating to a local children’s charity here in St Peter’s, MO. This lovely cabinet was created from the SHANTY OPEN SHELF CONSOLE, which was designed for the Shanty sisters at Shanty-2-Chic blog site. We altered the plan to make it a wine cabinet which came out spectacular! Ana, thank's again for providing your free plans. I will be happy to upload the altered plans in a couple days so you can all enjoy them! Happy wood working!
Built from Plan(s)
Estimated Cost
$175.00
Estimated Time Investment
Weekend Project (10-20 Hours)
Finish Used
Anne Sloan Old Ocher chalk pain and wax set clear/brown
Recommended Skill Level
Intermediate
Comments
JLDunlap
Wed, 08/07/2013 - 14:43
Great Gift Idea
Thinking this would make a great Christmas Gift idea for quite a few of my friends! Can't wait for the altered plans!
lscrandall
Thu, 08/08/2013 - 17:55
Altered Plans!
The plans are in process - Hope to have them posted this weekend to your Ana's site!
Cody9691
Sun, 08/18/2013 - 08:46
Altered plans
Looks great! Any idea when the altered plans will be available? Itching to get this built for my SO.
Joeboxer1013
Tue, 08/27/2013 - 13:51
Looks Great!
I'm adding this to the top of my build list as soon as the modified plans are uploaded! Thanks for taking the time to add them.
lscrandall
Wed, 08/28/2013 - 17:10
Plans for Wine Console
Wine Console Altered Plans
Sorry it took me so long, our blog over at Hello...I Live Here has kept us busy with all our new visitors. But as promised here are the altered plans to help you make the wine bottle holder and stemware holder.
MAKING THE WINE BOTTLE HOLDER:
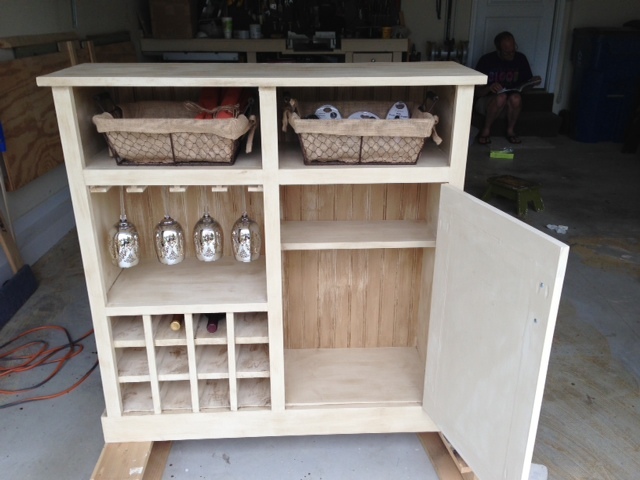
Start your project with Ana White's plans. Finish the whole thing, but only make one door. Leave the other side open and alter as follows to get your wine holders:
1. First cut 3 additional shelves 17 5/8" wide. Make sure you Kreg 3/4" holes on the right and left side of the shelves, connect to the sides with 1 1/4" PH (pocket hole screws - Kreg).
2. We spaced each of our shelves 3 1/2" apart, allowing 12 bottles to be stored in the wine case.
3. Cut in half length wise a 1x2 board. This will give you a horizontal stringer about .75" wide.
4. We customized the top shelf board to fit the distance - we did not want the board to hang down interfering with the wine storage. We trimmed this board to 3/4" to match the shelf thickness. Then glued and nailed into place.
5. Once the top board is in place, measure the distance from the bottom shelf to the top shelf to just under the top shelf board from step 4. With a pencil mark the stringer and cut to size, and install with glue and nails. This step needs to be completed 3 times 3 1/2" apart from each other. You should now have 12 square boxes making your wine storage.
6. On each shelf behind the three stringers, we placed a divider to keep the bottles from hitting one another. Each divider is 1/2" square, and 11 1/4 long, to match the shelf depth.
MAKING THE WINE STEM HOLDERS:
Now that you are done building the box for the wine holder, we can move on to the stemware holder.
1. We purchased .25 x 1.5" x 36" poplar flat wood. This will make the bottom of the T's and L's stem ware holders.
2. Then we used 1/2" square pieces of poplar to make the L and T mounts. Mount the flat poplar to the 1/2" squares making 2 L shaped pieces for the Right and Left side of the unit, then make 3 T's for the centers. You will use glue, and clamp them down tight, then nail together.
3. Hang each L shape on the Left and Right Side of the unit with finish nails. The next part is kind of trick and depends on the size of the stem bottom you will be hanging not all base bottoms are the same. Once your L's are hung, take the stem wear you will be hanging and rest it into the L shape holding the glass (do not let go of the glass it will break if dropped). Then position the T shaped molding to accommodate your stemware. Move the glass in and out of the L and T until you get your desired width for your stemware. Mark the T you are holding with a pencil , carefully sit down the stemware and mount the T shaped holder. Continue until all 3 of the T's are hung ( we used glue and nails to complete this process).
We used a bead-board backer instead of plywood to give it that French country feel.
We hope these plans help you build a piece you love! This piece of furniture brought the charity we donated it to $500 extra dollars to help their children. We at Hello...I Live Here were very proud of the job we did and that we got to help some wonderful children!
Visit us at www.helloilivehere.com or stop by our Facebook page and give us a big like once you complete your project!
Happy building ;-)
- LC
Joeboxer1013
Thu, 08/29/2013 - 13:01
Thanks so much for posting
Thanks so much for posting the plans! My sister has been asking me to make this for her since she saw the pics a couple of weeks ago.
Side note: I'm from St. Louis, MO, so seeing you were from St. Charles caught my eye!
In reply to Thanks so much for posting by Joeboxer1013
lscrandall
Thu, 08/29/2013 - 16:06
Happy to help
No problem - we are actually in Ballwin MO - stop past our page and see the other things we do - helloilivehere.com
LC
jairoaparra
Sun, 04/17/2016 - 11:15
Thank you.
I made this last weekend and it turned out beautiful.
jairoaparra
Sun, 04/17/2016 - 11:15
Thank you.
I made this last weekend and it turned out beautiful.